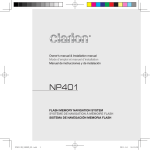
1
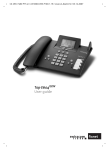
Gigaset 4170/4175isdn, A31008-G4170-B100-2-7619
407x_cover_vorne.fm
21.2.02
s
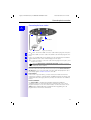
Be inspired
Operating instructions
and Safety Precautions
!
Gigaset 4170/4175isdn, Domestic, A31008-G4170-
407x_cover_vorne.
21.2.02
Gigaset 4170/4175isdn, A31008-G4170-B100-2-7619
Sicherheitshinweise_U2.fm
21.2.02
Safety precautions
Safety precautions
½
Use only the USB cable supplied to connect your Gigaset 4170/4175isdn to a
PC. Do not insert the USB cable until prompted to do so by the PC program’s
talk&surf Assistant. Do not insert or remove the USB cable during a storm. You
run the risk of receiving an electric shock. Do not extend the USB cable. This
may increase EMC radiation.
$
Only the plug-in power supply unit provided should be used (see underside
of base station).
Sensitive electronic equipment may be affected. Please comply with local
technical requirements (e.g. in a doctor's surgery).
The equipment may cause an unpleasant hum in hearing aids.
Do not install in bathrooms or shower rooms.
Do not use the base station in environments where there is a risk of explosion
(e.g. paint shops).
Please dispose of old equipment in accordance with relevant environmental
legislation.
Only commercially available terminals may be connected to the TAE sockets.
Install only in covered areas with a temperature range of +5° Cto +45°C.
ƒ
This Gigaset device should only be passed on to third parties complete with
the operating instructions.
1
Uebersicht_U3.fm
Gigaset 4170/4175isdn, A31008-G4170-B100-2-7619
21.2.02
Brief overview of the handset
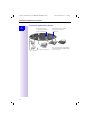
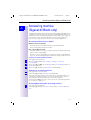
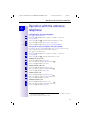
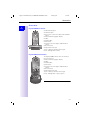
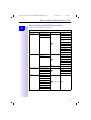
Brief overview of the handset
Status LED (light-emitting
lights up during a call;
Flashes for:
– incoming call
– new messages
– alarm calls,
reminders,
anniversaries
Display
Battery level
= flat (flashes)
U full
Reception strength
Control key
Talk key
– Accept call
– Dial call number
– Switch from handsfree to handset
mode
Ñ
Current functions
and softkeys
e
The softkeys give you
access to the current
functions.
Annabella
19.07.01
z
13:13
©
End call and on/off key
– Ending the call
– Abort function
– Press briefly: Back
one menu level;
long press: return to
main menu
– Handset on/off
(long press)
hands-free
talking button
Open PhoneBook
1 key
Long press: call up
answering machine
1
2ABC
3 DEF
4 GHI
5JKL
6 MNO
7 PQRS
8TUV
9 WXYZ
Message key
Access to the
message lists.
0
Star key
Long press to
switch ringer on
and off
Provider key
– Open provider list:
press briefly
– R key function
(flash):
long press
Keylock
On/off
long press
Microphone
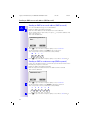
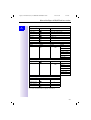
Relationship between control key and softkeys
Softkeys
Control key
2
The softkeys can be used to
perform functions, some of
which can also be controlled
with the control key.
The control key page which
you must select is shown with
the following symbols in the
operating manual:
F/ G (left/right)
E/ D (up/down)
Uebersicht_U3.fm 21.2.02
Gigaset 4170/4175isdn, A31008-G4170-B100-2-7619
Brief overview of the handset
Functions of the control key
The control key has different functions in different situations.
Contr
ol key
On standby
E
In lists and menus
In an input field
Up
Cursor one
line up
D
Open PhoneBook
Down
Cursor one
line down
G
Activate menu
Select entry (OK)
Cursor right
Dialling internal
subscribers
One menu level
back (cancel)
Cursor left
F
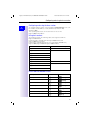
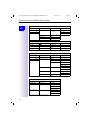
Display symbols
Depending on the situation you will see the following symbols above the
softkeys:
Symbol Meaning
©
Menu key: On standby, opens the general menu. During a call,
opens a context-sensitive menu.
[
Confirm and select menu function, end input and store.
X
z
I
Delete key (backspace): Deletes entries from right to left.
Last number redial: Opens a list of the last five numbers called.
Shown only in the connection status for dialling an internal user.
J
Shown only in the connection status for new messages to answering machines, the T-net box, in the caller list and the SMS list.
Î
One menu level back, cancel (locally and in the connection status)
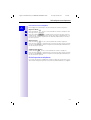
Navigating the menus to set the hands-free volume
1.
2.
3.
4.
5.
6.
©
D
G or ¿
G or ¿
F or G
¿
G or press right softkey ¿.
Scroll down to Sound Settings.
Select Sound Settings.
Select Handset Volume.
Set the volume you prefer.
Save the volume.
3
Gigaset 4170/4175isdn, A31008-G4170-B100-2-7619
Herkules1IVZ.fm 21.2.02
Table of contents
Table of contents
Safety precautions . . . . . . . . . . . . . . . . . . . . . . . . . . . . . . . . . . . . . . . . . . . . . . 1
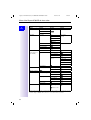
Brief overview of the handset . . . . . . . . . . . . . . . . . . . . . . . . . . . . . . . . . 2
Relationship between control key and softkeys. . . . . . . . . . . . . . . . . . . .
Functions of the control key. . . . . . . . . . . . . . . . . . . . . . . . . . . . . . . . . . .
Display symbols . . . . . . . . . . . . . . . . . . . . . . . . . . . . . . . . . . . . . . . . . . . .
Navigating the menus to set the hands-free volume . . . . . . . . . . . . . . . .
2
3
3
3
Table of contents . . . . . . . . . . . . . . . . . . . . . . . . . . . . . . . . . . . . . . . . . . . . . . . 4
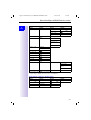
Installation . . . . . . . . . . . . . . . . . . . . . . . . . . . . . . . . . . . . . . . . . . . . . . . . . . . . 11
Contents of packaging . . . . . . . . . . . . . . . . . . . . . . . . . . . . . . . . . . . . . . . . .
Installation notes. . . . . . . . . . . . . . . . . . . . . . . . . . . . . . . . . . . . . . . . . . . . . .
Use as a desktop unit . . . . . . . . . . . . . . . . . . . . . . . . . . . . . . . . . . . . . . . . . .
Fitting the base station as a wall-mounted unit . . . . . . . . . . . . . . . . . . . . . .
Connecting the base station . . . . . . . . . . . . . . . . . . . . . . . . . . . . . . . . . . . . .
Connecting supplementary devices . . . . . . . . . . . . . . . . . . . . . . . . . . . . . . .
Configuring and using the base station . . . . . . . . . . . . . . . . . . . . . . . . . . . .
Using the handsets. . . . . . . . . . . . . . . . . . . . . . . . . . . . . . . . . . . . . . . . . . . .
Comparison between the features of the
Comfort 4000 and 3000/2000 handsets. . . . . . . . . . . . . . . . . . . . . . . . .
Registering handsets . . . . . . . . . . . . . . . . . . . . . . . . . . . . . . . . . . . . . . . . . .
Registering the Gigaset 4000 Comfort/Micro handset. . . . . . . . . . . . . .
Registering the Gigaset 4000 Classic handset. . . . . . . . . . . . . . . . . . . .
Registering the Gigaset 3000 Comfort/Micro handset. . . . . . . . . . . . . .
Registering the Gigaset 3000 Classic handset. . . . . . . . . . . . . . . . . . . .
Registering the Gigaset 2000 C handset . . . . . . . . . . . . . . . . . . . . . . . .
Registering the Gigaset 2000 S handset . . . . . . . . . . . . . . . . . . . . . . . .
Registering the Gigaset 1000 C/S handset . . . . . . . . . . . . . . . . . . . . . .
To register the Gigase trepeater . . . . . . . . . . . . . . . . . . . . . . . . . . . . . .
Registering GAP handsets made by other manufacturers. . . . . . . . . . .
De-registering a device . . . . . . . . . . . . . . . . . . . . . . . . . . . . . . . . . . . . . . . . .
11
11
12
12
13
14
15
15
15
16
16
16
17
17
17
18
18
18
18
18
Getting into the ISDN world is easy . . . . . . . . . . . . . . . . . . . . . . . . . . . . . . 19
What is an MSN? . . . . . . . . . . . . . . . . . . . . . . . . . . . . . . . . . . . . . . . . . . . . . 19
Configuring Gigaset 4170/4175isdn and MSNs . . . . . . . . . . . . . . . . . . . . . . 19
Ring delay per incoming MSN . . . . . . . . . . . . . . . . . . . . . . . . . . . . . . . . . . . 20
4
Gigaset 4170/4175isdn, A31008-G4170-B100-2-7619
Herkules1IVZ.fm
21.2.02
Table of contents
The Installation Assistant . . . . . . . . . . . . . . . . . . . . . . . . . . . . . . . . . . . . 21
Starting the Installation Assistant . . . . . . . . . . . . . . . . . . . . . . . . . . . . . . . . . 21
Entering the date and time. . . . . . . . . . . . . . . . . . . . . . . . . . . . . . . . . . . 21
Hiding answering machines . . . . . . . . . . . . . . . . . . . . . . . . . . . . . . . . . . 21
Finding your own numbers (MSNs) . . . . . . . . . . . . . . . . . . . . . . . . . . . . 21
Enter own numbers (MSNs) and name for the MSNs. . . . . . . . . . . . . . 22
Setting the device type . . . . . . . . . . . . . . . . . . . . . . . . . . . . . . . . . . . . . 22
Setting incoming MSNs . . . . . . . . . . . . . . . . . . . . . . . . . . . . . . . . . . . . . 22
Setting outgoing MSNs . . . . . . . . . . . . . . . . . . . . . . . . . . . . . . . . . . . . . 23
Operation using a telephone system . . . . . . . . . . . . . . . . . . . . . . . . . . . 23
Configuring ISDN call numbers (MSNs) . . . . . . . . . . . . . . . . . . . . . . . . 24
Set up numbers (MSNs). . . . . . . . . . . . . . . . . . . . . . . . . . . . . . . . . . . . .
Assigning call numbers (MSNs) . . . . . . . . . . . . . . . . . . . . . . . . . . . . . . .
Assigning an incoming MSN . . . . . . . . . . . . . . . . . . . . . . . . . . . . . . . . .
Assigning an outgoing MSN. . . . . . . . . . . . . . . . . . . . . . . . . . . . . . . . . .
24
24
24
25
System settings. . . . . . . . . . . . . . . . . . . . . . . . . . . . . . . . . . . . . . . . . . . . . . . . 26
Changing the names for internal subscribers . . . . . . . . . . . . . . . . . . . . . . . .
Call waiting - activating/deactivating CW . . . . . . . . . . . . . . . . . . . . . . . . . . .
Rejecting calls for entire MSN group . . . . . . . . . . . . . . . . . . . . . . . . . . . . . .
Configuring "reject" for the entire MSN group . . . . . . . . . . . . . . . . . . . .
Busy signal when MSN is engaged (Busy on Busy) . . . . . . . . . . . . . . . . . . .
Setting external/internal enquiry calls. . . . . . . . . . . . . . . . . . . . . . . . . . . . . .
Call beats data . . . . . . . . . . . . . . . . . . . . . . . . . . . . . . . . . . . . . . . . . . . . . . .
Configuring music-on-hold . . . . . . . . . . . . . . . . . . . . . . . . . . . . . . . . . . . . . .
Answering machine - activating/deactivating automatic call pickup . . . . . . .
Audio settings. . . . . . . . . . . . . . . . . . . . . . . . . . . . . . . . . . . . . . . . . . . . . . . .
Assigning a ringer melody to an MSN . . . . . . . . . . . . . . . . . . . . . . . . . .
Changing long-distance codes . . . . . . . . . . . . . . . . . . . . . . . . . . . . . . . . . . .
Restoring the factory setting . . . . . . . . . . . . . . . . . . . . . . . . . . . . . . . . . . . .
Querying the status . . . . . . . . . . . . . . . . . . . . . . . . . . . . . . . . . . . . . . . . . . .
26
26
27
27
27
27
28
28
29
29
29
29
30
30
Making calls using comfort features . . . . . . . . . . . . . . . . . . . . . . . . . . . . . 31
Making internal calls free of charge . . . . . . . . . . . . . . . . . . . . . . . . . . . . . . .
Collective call/Group call . . . . . . . . . . . . . . . . . . . . . . . . . . . . . . . . . . . . . . . .
Configuring internal collective call groups . . . . . . . . . . . . . . . . . . . . . . .
Starting a collective call to all internal subscribers . . . . . . . . . . . . . . . . .
Ring delay . . . . . . . . . . . . . . . . . . . . . . . . . . . . . . . . . . . . . . . . . . . . . . . . . . .
Setting ring delay . . . . . . . . . . . . . . . . . . . . . . . . . . . . . . . . . . . . . . . . . .
Picking up calls during ring delay . . . . . . . . . . . . . . . . . . . . . . . . . . . . . .
Conducting calls with more than one subscriber . . . . . . . . . . . . . . . . . . . . .
Internal enquiry call . . . . . . . . . . . . . . . . . . . . . . . . . . . . . . . . . . . . . . . .
Toggle . . . . . . . . . . . . . . . . . . . . . . . . . . . . . . . . . . . . . . . . . . . . . . . . . .
Conference circuit . . . . . . . . . . . . . . . . . . . . . . . . . . . . . . . . . . . . . . . . .
Setting up an external enquiry call . . . . . . . . . . . . . . . . . . . . . . . . . . . . .
Ending an external enquiry call. . . . . . . . . . . . . . . . . . . . . . . . . . . . . . . .
Transferring calls on/before answer – ECT (Explicit Call Transfer) . . . . .
Entering numbers in the telephone directory . . . . . . . . . . . . . . . . . . . . . . . .
31
31
31
31
32
32
32
32
32
33
33
33
33
33
34
5
Gigaset 4170/4175isdn, A31008-G4170-B100-2-7619
Herkules1IVZ.fm 21.2.02
Table of contents
Picking up a call while the answering machine is operating. . . . . . . . . . . . . 34
Automatic call pickup activated (default) . . . . . . . . . . . . . . . . . . . . . . . . 34
Automatic call pickup deactivated . . . . . . . . . . . . . . . . . . . . . . . . . . . . . 34
Rejecting calls. . . . . . . . . . . . . . . . . . . . . . . . . . . . . . . . . . . . . . . . . . . . . . . . 34
Rejecting calls . . . . . . . . . . . . . . . . . . . . . . . . . . . . . . . . . . . . . . . . . . . . 34
Missed calls list . . . . . . . . . . . . . . . . . . . . . . . . . . . . . . . . . . . . . . . . . . . . . . 35
Dialling from the Calls List using the Message key . . . . . . . . . . . . . . . . 35
Dialling from the Calls List list via the menus . . . . . . . . . . . . . . . . . . . . 35
Copying numbers from th eCalls List list to the directory . . . . . . . . . . . 36
Checking and deleting numbers in a calls list,
deleting a list or changing a number. . . . . . . . . . . . . . . . . . . . . . . . . . . 36
Internal call forwarding . . . . . . . . . . . . . . . . . . . . . . . . . . . . . . . . . . . . . . . . . 37
Configuring a forwarding destination . . . . . . . . . . . . . . . . . . . . . . . . . . . 37
Activating/deactivating internal call forwarding . . . . . . . . . . . . . . . . . . . 37
Defining the number of ring cycles . . . . . . . . . . . . . . . . . . . . . . . . . . . . 37
External call forwarding - CF . . . . . . . . . . . . . . . . . . . . . . . . . . . . . . . . . . . . . 37
Configuring a new call forwarding destination . . . . . . . . . . . . . . . . . . . . 37
Activating/deactivating external call forwarding . . . . . . . . . . . . . . . . . . . 37
Edit entry . . . . . . . . . . . . . . . . . . . . . . . . . . . . . . . . . . . . . . . . . . . . . . . . 38
Deleting external call forwarding . . . . . . . . . . . . . . . . . . . . . . . . . . . . . . 38
Switching internal/external call forwarding. . . . . . . . . . . . . . . . . . . . . . . . . . 38
Transferring incoming calls - CD (Call Deflection) . . . . . . . . . . . . . . . . . . . . . 38
Transferring incoming external calls manually . . . . . . . . . . . . . . . . . . . . 38
Predefining the forwarding destination . . . . . . . . . . . . . . . . . . . . . . . . . 38
Automatic external callback . . . . . . . . . . . . . . . . . . . . . . . . . . . . . . . . . . . . . 39
Activating callback . . . . . . . . . . . . . . . . . . . . . . . . . . . . . . . . . . . . . . . . . 39
Accepting a callback . . . . . . . . . . . . . . . . . . . . . . . . . . . . . . . . . . . . . . . . 39
Deleting a callback . . . . . . . . . . . . . . . . . . . . . . . . . . . . . . . . . . . . . . . . . 39
Checking or deleting the callback number . . . . . . . . . . . . . . . . . . . . . . . 39
Call waiting - CW . . . . . . . . . . . . . . . . . . . . . . . . . . . . . . . . . . . . . . . . . . . . . 40
Accepting/rejecting external call waiting . . . . . . . . . . . . . . . . . . . . . . . . 40
Holding calls (Call Hold) . . . . . . . . . . . . . . . . . . . . . . . . . . . . . . . . . . . . . . . . 40
Putting external subscribers on hold . . . . . . . . . . . . . . . . . . . . . . . . . . . 40
Putting internal subscribers on hold. . . . . . . . . . . . . . . . . . . . . . . . . . . . 40
Calling line identification restriction (CLIR) . . . . . . . . . . . . . . . . . . . . . . . . . . 41
Temporary calling line identification restriction . . . . . . . . . . . . . . . . . . . 41
Permanent calling line identification restriction . . . . . . . . . . . . . . . . . . . 41
Reserving a line . . . . . . . . . . . . . . . . . . . . . . . . . . . . . . . . . . . . . . . . . . . . . . 41
Reserving a line . . . . . . . . . . . . . . . . . . . . . . . . . . . . . . . . . . . . . . . . . . . 41
Accepting a free line . . . . . . . . . . . . . . . . . . . . . . . . . . . . . . . . . . . . . . . 41
Deleting a line reservation . . . . . . . . . . . . . . . . . . . . . . . . . . . . . . . . . . . 41
Set MSN for next call . . . . . . . . . . . . . . . . . . . . . . . . . . . . . . . . . . . . . . . . . . 42
Seize specific MSNs . . . . . . . . . . . . . . . . . . . . . . . . . . . . . . . . . . . . . . . . . . . 42
Automatic call forwarding due to inaccessible handset . . . . . . . . . . . . . . . . 42
Enter a number and activating/deactivating automatic call forwarding . 42
Tracing switch . . . . . . . . . . . . . . . . . . . . . . . . . . . . . . . . . . . . . . . . . . . . . . . 43
During or immediately after the call . . . . . . . . . . . . . . . . . . . . . . . . . . . . 43
Parking/continuing calls ("unpark"). . . . . . . . . . . . . . . . . . . . . . . . . . . . . . . . . 43
Unparking a call before answering . . . . . . . . . . . . . . . . . . . . . . . . . . . . . 43
"Cancel CallPark" after answering a call . . . . . . . . . . . . . . . . . . . . . . . . . 43
6
Gigaset 4170/4175isdn, A31008-G4170-B100-2-7619
Herkules1IVZ.fm
21.2.02
Table of contents
Special functions . . . . . . . . . . . . . . . . . . . . . . . . . . . . . . . . . . . . . . . . . . . . . . 44
Copying telephone directory entries. . . . . . . . . . . . . . . . . . . . . . . . . . . . . . .
Configuring an external destination call number for the room monitor . . . .
Gigaset 4000 Comfort/Micro . . . . . . . . . . . . . . . . . . . . . . . . . . . . . . . . .
Gigaset 3000/2000 Comfort/Micro. . . . . . . . . . . . . . . . . . . . . . . . . . . . .
Night service. . . . . . . . . . . . . . . . . . . . . . . . . . . . . . . . . . . . . . . . . . . . . . . . .
Setting an internal/external Night Service forwarding destination . . . . .
Entering an automatic start/end time for night service . . . . . . . . . . . . .
Activating/deactivating all-day night service for Saturday/Sunday . . . . .
Activating/deactivating night service . . . . . . . . . . . . . . . . . . . . . . . . . . .
Displaying costs and call duration. . . . . . . . . . . . . . . . . . . . . . . . . . . . . . . . .
Call charge display . . . . . . . . . . . . . . . . . . . . . . . . . . . . . . . . . . . . . . . . .
Configuring determination of costs . . . . . . . . . . . . . . . . . . . . . . . . . . . .
Displaying a cost overview. . . . . . . . . . . . . . . . . . . . . . . . . . . . . . . . . . .
Display last call costs . . . . . . . . . . . . . . . . . . . . . . . . . . . . . . . . . . . . . . .
44
44
44
44
44
45
45
45
45
46
46
46
47
47
Short messages (SMS) . . . . . . . . . . . . . . . . . . . . . . . . . . . . . . . . . . . . . . 48
Requirements. . . . . . . . . . . . . . . . . . . . . . . . . . . . . . . . . . . . . . . . . . . . .
Administering SMS service centres . . . . . . . . . . . . . . . . . . . . . . . . . . . . . . .
Entering, changing or deleting SMS centre numbers. . . . . . . . . . . . . . . . . .
Activating/de-activating an outgoing SMS centre . . . . . . . . . . . . . . . . . . . . .
Registering/deregistering with the SMS call centre . . . . . . . . . . . . . . . . . . .
Writing, saving and sending SMS messages . . . . . . . . . . . . . . . . . . . . . . . .
Writing an SMS . . . . . . . . . . . . . . . . . . . . . . . . . . . . . . . . . . . . . . . . . . .
Save SMS (without sending it) . . . . . . . . . . . . . . . . . . . . . . . . . . . . . . . .
Send SMS (without saving it) . . . . . . . . . . . . . . . . . . . . . . . . . . . . . . . . .
Sending an SMS to an e-mail address (SMS to e-mail) . . . . . . . . . . . . . . . .
Sending an SMS as a voice message (SMS to speech) . . . . . . . . . . . . . . . .
Querying remaining memory . . . . . . . . . . . . . . . . . . . . . . . . . . . . . . . . . . . .
List of incoming messages . . . . . . . . . . . . . . . . . . . . . . . . . . . . . . . . . . . . .
Reading or deleting messages received . . . . . . . . . . . . . . . . . . . . . . . .
Displaying, dialling or saving in the directory the call number
from the SMS message . . . . . . . . . . . . . . . . . . . . . . . . . . . . . . . . . . . .
Options for reading SMS messages . . . . . . . . . . . . . . . . . . . . . . . . . . .
List of outgoing messages . . . . . . . . . . . . . . . . . . . . . . . . . . . . . . . . . . . . .
Reading or deleting saved SMS messages . . . . . . . . . . . . . . . . . . . . . .
Displaying, dialling or saving in the directory the call number from the
SMS message . . . . . . . . . . . . . . . . . . . . . . . . . . . . . . . . . . . . . . . . . . . .
Options for reading a saved SMS message . . . . . . . . . . . . . . . . . . . . . .
Further SMS features . . . . . . . . . . . . . . . . . . . . . . . . . . . . . . . . . . . . . . . . . .
SMS service behind ISDN telephone systems. . . . . . . . . . . . . . . . . . . . . . .
Fault during transmission of an SMS message . . . . . . . . . . . . . . . . . . . . . .
48
48
49
49
50
50
50
50
50
52
52
53
53
53
54
54
55
55
55
55
56
56
56
Answering machine (Gigaset 4175isdn only). . . . . . . . . . . . . . . . . . . . . . . 57
Answering machine-access options . . . . . . . . . . . . . . . . . . . . . . . . . . . . . . .
Assigning an incoming MSN to the AM . . . . . . . . . . . . . . . . . . . . . . . . .
Selecting an answering machine . . . . . . . . . . . . . . . . . . . . . . . . . . . . . . . . .
Activating/deactivating the answering machine . . . . . . . . . . . . . . . . . . . . . .
Hiding/showing answering machines. . . . . . . . . . . . . . . . . . . . . . . . . . . . . .
Activating an announcement . . . . . . . . . . . . . . . . . . . . . . . . . . . . . . . . . . . .
57
57
57
57
58
58
7
Gigaset 4170/4175isdn, A31008-G4170-B100-2-7619
Herkules1IVZ.fm 21.2.02
Table of contents
Recording/modifying announcements . . . . . . . . . . . . . . . . . . . . . . . . . . . . .
Playing back/deleting announcements . . . . . . . . . . . . . . . . . . . . . . . . . . . . .
Checking/deleting announcements . . . . . . . . . . . . . . . . . . . . . . . . . . . .
Recording memos . . . . . . . . . . . . . . . . . . . . . . . . . . . . . . . . . . . . . . . . . . . .
Recording a call . . . . . . . . . . . . . . . . . . . . . . . . . . . . . . . . . . . . . . . . . . . . . .
Listening to messages . . . . . . . . . . . . . . . . . . . . . . . . . . . . . . . . . . . . . . . . .
Listening to memos . . . . . . . . . . . . . . . . . . . . . . . . . . . . . . . . . . . . . . . . . . .
Deleting messages and memos . . . . . . . . . . . . . . . . . . . . . . . . . . . . . . . . . .
Deleting individual messages or memos . . . . . . . . . . . . . . . . . . . . . . . .
Delete all old messages . . . . . . . . . . . . . . . . . . . . . . . . . . . . . . . . . . . . .
Callback during playback . . . . . . . . . . . . . . . . . . . . . . . . . . . . . . . . . . . .
Set old message to "New" . . . . . . . . . . . . . . . . . . . . . . . . . . . . . . . . . . . . . .
Set playback speed. . . . . . . . . . . . . . . . . . . . . . . . . . . . . . . . . . . . . . . . . . . .
Add number to telephone book . . . . . . . . . . . . . . . . . . . . . . . . . . . . . . . . . .
Modifying settings . . . . . . . . . . . . . . . . . . . . . . . . . . . . . . . . . . . . . . . . . . . .
Defining the number of rings . . . . . . . . . . . . . . . . . . . . . . . . . . . . . . . . .
Activating/deactivating voice output of the date and time . . . . . . . . . . .
Defining recording length . . . . . . . . . . . . . . . . . . . . . . . . . . . . . . . . . . . .
Setting recording quality . . . . . . . . . . . . . . . . . . . . . . . . . . . . . . . . . . . .
Activating automatic pause . . . . . . . . . . . . . . . . . . . . . . . . . . . . . . . . . .
Locking the answering machine . . . . . . . . . . . . . . . . . . . . . . . . . . . . . . . . . .
Activating/deactivating the answering machine . . . . . . . . . . . . . . . . . . .
Setting a timer . . . . . . . . . . . . . . . . . . . . . . . . . . . . . . . . . . . . . . . . . . . . . . .
Activating/deactivating the timer . . . . . . . . . . . . . . . . . . . . . . . . . . . . . .
Setting the start time (Monday - Friday). . . . . . . . . . . . . . . . . . . . . . . . .
Setting "Saturday - Sunday" mode . . . . . . . . . . . . . . . . . . . . . . . . . . . . .
Automatic listening in on the handset . . . . . . . . . . . . . . . . . . . . . . . . . . . . .
Assigning a handset . . . . . . . . . . . . . . . . . . . . . . . . . . . . . . . . . . . . . . . .
Activating/deactivating listening-in . . . . . . . . . . . . . . . . . . . . . . . . . . . . .
Picking up a call from an answering machine. . . . . . . . . . . . . . . . . . . . . . . .
Activating/deactivating automatic AM pickup . . . . . . . . . . . . . . . . . . . .
Picking up a call . . . . . . . . . . . . . . . . . . . . . . . . . . . . . . . . . . . . . . . . . . .
Querying the answering machine status . . . . . . . . . . . . . . . . . . . . . . . . . . .
Automatic notification via SMS. . . . . . . . . . . . . . . . . . . . . . . . . . . . . . . . . . .
Entering, changing destination number . . . . . . . . . . . . . . . . . . . . . . . . .
Deleting destination number . . . . . . . . . . . . . . . . . . . . . . . . . . . . . . . . .
Activate/deactivate SMS notification . . . . . . . . . . . . . . . . . . . . . . . . . . .
Remote control of the answering machine . . . . . . . . . . . . . . . . . . . . . . . . .
Modifying the answering machine PIN . . . . . . . . . . . . . . . . . . . . . . . . .
Setting remote functionality. . . . . . . . . . . . . . . . . . . . . . . . . . . . . . . . . .
Operating the answering machine on the move . . . . . . . . . . . . . . . . . .
Controlling the answering machine from the handset (internal) . . . . . .
Key sequences for remote control . . . . . . . . . . . . . . . . . . . . . . . . . . . . .
58
59
59
59
59
60
60
60
60
60
61
61
61
61
62
62
62
62
62
62
63
63
63
63
63
63
63
63
63
64
64
64
64
65
65
65
65
65
65
66
66
66
67
Security settings . . . . . . . . . . . . . . . . . . . . . . . . . . . . . . . . . . . . . . . . . . . . 69
To change the system PIN . . . . . . . . . . . . . . . . . . . . . . . . . . . . . . . . . . . . . .
Defining authorizations . . . . . . . . . . . . . . . . . . . . . . . . . . . . . . . . . . . . . . . .
Emergency Nos. . . . . . . . . . . . . . . . . . . . . . . . . . . . . . . . . . . . . . . . . . . . . . .
Configuring new emergency numbers. . . . . . . . . . . . . . . . . . . . . . . . . .
Dialling the emergency number . . . . . . . . . . . . . . . . . . . . . . . . . . . . . . .
8
69
69
70
70
70
Gigaset 4170/4175isdn, A31008-G4170-B100-2-7619
Herkules1IVZ.fm
21.2.02
Table of contents
Operation using a telephone system. . . . . . . . . . . . . . . . . . . . . . . . . . . 71
Prefixes (access codes) . . . . . . . . . . . . . . . . . . . . . . . . . . . . . . . . . . . . . . . .
Transferring a call – automatic call transfer . . . . . . . . . . . . . . . . . . . . . . . . .
Dialling options . . . . . . . . . . . . . . . . . . . . . . . . . . . . . . . . . . . . . . . . . . . . . . .
Setting options . . . . . . . . . . . . . . . . . . . . . . . . . . . . . . . . . . . . . . . . . . . .
Activating standard dialling (ISDN) . . . . . . . . . . . . . . . . . . . . . . . . . . . . .
Activating automatic keypad switching . . . . . . . . . . . . . . . . . . . . . . . . .
Activating * and # dialling. . . . . . . . . . . . . . . . . . . . . . . . . . . . . . . . . . . .
Activating/De-activating the keypad during a call . . . . . . . . . . . . . . . . . .
Activate the keypad for the next call only. . . . . . . . . . . . . . . . . . . . . . . .
71
71
72
72
73
73
73
73
73
Operation using other devices . . . . . . . . . . . . . . . . . . . . . . . . . . . . . . . . 74
Connecting wired analog devices. . . . . . . . . . . . . . . . . . . . . . . . . . . . . . . . . 74
Setting the device type . . . . . . . . . . . . . . . . . . . . . . . . . . . . . . . . . . . . . 74
Telephone connections . . . . . . . . . . . . . . . . . . . . . . . . . . . . . . . . . . . . . 74
Connecting a fax machine . . . . . . . . . . . . . . . . . . . . . . . . . . . . . . . . . . . 75
Connecting a modem . . . . . . . . . . . . . . . . . . . . . . . . . . . . . . . . . . . . . . . 75
Connecting an answering machine . . . . . . . . . . . . . . . . . . . . . . . . . . . . 75
No device connected . . . . . . . . . . . . . . . . . . . . . . . . . . . . . . . . . . . . . . . 76
Specifying the device type . . . . . . . . . . . . . . . . . . . . . . . . . . . . . . . . . . . . . . 76
Gigaset M101 Data and M105 Data modules . . . . . . . . . . . . . . . . . . . . . . . 76
Gigaset Repeater . . . . . . . . . . . . . . . . . . . . . . . . . . . . . . . . . . . . . . . . . . . . . 76
Activating and deactivating the repeater capability . . . . . . . . . . . . . . . . 76
Registering a repeater . . . . . . . . . . . . . . . . . . . . . . . . . . . . . . . . . . . . . . 76
Registering cordless Gigaset 1000TAE . . . . . . . . . . . . . . . . . . . . . . . . . . . . 77
Setting the device type for cordless TAE . . . . . . . . . . . . . . . . . . . . . . . . 77
Making calls with devices with TAE connection. . . . . . . . . . . . . . . . . . . . . . 77
Activating/deactivating automatic line seizure . . . . . . . . . . . . . . . . . . . . 77
Making external calls . . . . . . . . . . . . . . . . . . . . . . . . . . . . . . . . . . . . . . . 77
Making internal calls. . . . . . . . . . . . . . . . . . . . . . . . . . . . . . . . . . . . . . . . 77
Making internal calls with GAP handsets . . . . . . . . . . . . . . . . . . . . . . . . 77
Collective calls to all internal subscribers . . . . . . . . . . . . . . . . . . . . . . . . 78
Call waiting . . . . . . . . . . . . . . . . . . . . . . . . . . . . . . . . . . . . . . . . . . . . . . . 78
Switching to waiting subscribers - toggle . . . . . . . . . . . . . . . . . . . . . . . 78
Conducting external enquiry calls. . . . . . . . . . . . . . . . . . . . . . . . . . . . . . 78
Making internal enquiry calls . . . . . . . . . . . . . . . . . . . . . . . . . . . . . . . . . 78
Call transfer on/before answer. . . . . . . . . . . . . . . . . . . . . . . . . . . . . . . . 78
Picking up a call while the answering machine is operating . . . . . . . . . 78
Operation with the entrance telephone . . . . . . . . . . . . . . . . . . . . . . . . 79
Configuring the entrance telephone . . . . . . . . . . . . . . . . . . . . . . . . . . . . . . .
Setting codes for entrance telephone "Door type 2 (DTMF)" . . . . . . . . .
Assigning internal users to the entrance telephone call group . . . . . . .
Forwarding the entrance telephone externally. . . . . . . . . . . . . . . . . . . .
Call from the entrance telephone. . . . . . . . . . . . . . . . . . . . . . . . . . . . . .
Activating entrance telephones . . . . . . . . . . . . . . . . . . . . . . . . . . . . . . . . . .
79
79
80
80
81
81
9
Gigaset 4170/4175isdn, A31008-G4170-B100-2-7619
Herkules1IVZ.fm 21.2.02
Table of contents
Annex . . . . . . . . . . . . . . . . . . . . . . . . . . . . . . . . . . . . . . . . . . . . . . . . . . . . . . . . 82
Guarantee . . . . . . . . . . . . . . . . . . . . . . . . . . . . . . . . . . . . . . . . . . . . . . . . . . .
Scope . . . . . . . . . . . . . . . . . . . . . . . . . . . . . . . . . . . . . . . . . . . . . . . . . . .
Guarantee period . . . . . . . . . . . . . . . . . . . . . . . . . . . . . . . . . . . . . . . . . .
Service . . . . . . . . . . . . . . . . . . . . . . . . . . . . . . . . . . . . . . . . . . . . . . . . . . . . .
Excerpt from the original declaration) . . . . . . . . . . . . . . . . . . . . . . . . . . . . . .
Technical data. . . . . . . . . . . . . . . . . . . . . . . . . . . . . . . . . . . . . . . . . . . . . . . .
Accessories . . . . . . . . . . . . . . . . . . . . . . . . . . . . . . . . . . . . . . . . . . . . . . . . .
Gigaset 4000 Micro handset . . . . . . . . . . . . . . . . . . . . . . . . . . . . . . . . .
Gigaset 4000 Comfort handset . . . . . . . . . . . . . . . . . . . . . . . . . . . . . . .
Gigaset 4000 Classic handset . . . . . . . . . . . . . . . . . . . . . . . . . . . . . . . .
Gigaset repeater. . . . . . . . . . . . . . . . . . . . . . . . . . . . . . . . . . . . . . . . . . .
Mobile hands-free set with PTT key . . . . . . . . . . . . . . . . . . . . . . . . . . .
MP3 player USB. . . . . . . . . . . . . . . . . . . . . . . . . . . . . . . . . . . . . . . . . . .
82
82
83
84
85
86
87
87
87
88
88
88
89
Menu Displays . . . . . . . . . . . . . . . . . . . . . . . . . . . . . . . . . . . . . . . . . . . . . . . . 90
Gigaset 4000 Comfort menu . . . . . . . . . . . . . . . . . . . . . . . . . . . . . . . . . . . .
Menu of the Gigas et4170/4175isdn base station . . . . . . . . . . . . . . . . . . . .
Base Settings > Status. . . . . . . . . . . . . . . . . . . . . . . . . . . . . . . . . . . . . .
Base Settings > Missed calls . . . . . . . . . . . . . . . . . . . . . . . . . . . . . . . . .
Base Settings > Accepted calls . . . . . . . . . . . . . . . . . . . . . . . . . . . . . . .
Base Settings > Call preparat. . . . . . . . . . . . . . . . . . . . . . . . . . . . . . . . .
Base Settings > Forward. netw. . . . . . . . . . . . . . . . . . . . . . . . . . . . . . .
Base Settings > Forward. base . . . . . . . . . . . . . . . . . . . . . . . . . . . . . . .
Base Settings > Night service . . . . . . . . . . . . . . . . . . . . . . . . . . . . . . . .
Base Settings > Settings > Security . . . . . . . . . . . . . . . . . . . . . . . . . . .
Base Settings > Settings > Setup user . . . . . . . . . . . . . . . . . . . . . . . . .
Base Settings > Settings > System settings . . . . . . . . . . . . . . . . . . . . .
Base Settings > Settings > Service centres . . . . . . . . . . . . . . . . . . . . .
Base Settings > Settings > ISDN settings . . . . . . . . . . . . . . . . . . . . . . .
90
91
93
93
93
93
94
94
94
94
95
96
97
97
ISDN Glossary. . . . . . . . . . . . . . . . . . . . . . . . . . . . . . . . . . . . . . . . . . . . . . . . . 98
Index . . . . . . . . . . . . . . . . . . . . . . . . . . . . . . . . . . . . . . . . . . . . . . . . . . . . . . . . 105
Dear Customer,
We value your opinion.
Please take a few moments to complete the questionnaire at the following
Internet address:
http://www.siemens.com/customersurvey
All participants will be entered in a draw for 5000 Euros’ worth of Siemens
cordless and mobile telephones.
The closing date for the draw is 31 August 2002.
Thank you for your co-operation!
10
Gigaset 4170/4175isdn, A31008-G4170-B100-2-7619
inbetriebnahme.fm 21.2.02
Installation
Step
by
Step
Installation
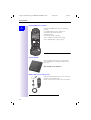
Contents of packaging
●
●
●
●
●
●
●
●
●
1 base station
1 mains connection cable with a plug-in power supply unit
1 ISDN connection cable
1 USB cable
1 wall mounting
1 operating instructions
1 CD-ROM "talk&surf 5.1"
Gigaset 4170/4175isdn Comfort also includes:
1 Gigaset 4000 Comfort telephone
1 Gigaset 4000 L telephone charger
Installation notes
●
●
●
●
●
●
●
●
A 220/230Vac mains socket and an ISDN telephone socket must be available
at the installation site.
For optimum reception, it should be installed in the most central location
possible.
The installation site should not be located in the immediate vicinity of other
devices such as stereo systems, televisions, office equipment or microwaves, as this could result in interference. Minimum distance (including distance from power supply for the base station ): 1.5 metres
In the event of image and sound interference in the case of satellite receivers, please contact your specialist outlet in order to have your satellite receiver checked for screening defects.
Avoid direct contact with direct heat sources (e.g. radiators).
Do not expose the base station to direct sunlight.
With the wall mounting supplied, the base station is suitable for wall mounting.
The maximum outdoor range between the base station and the handset is
300 m. A range of up to 50 m can be achieved indoors.
If wall mounting is not required, simply stand the base station on a level,
non-slip surface. The device feet do not normally leave marks on the
installation surface. However, due to the variety of varnishes and polishes in
use, marks could be left at the points of contact.
11
Gigaset 4170/4175isdn, A31008-G4170-B100-2-7619
inbetriebnahme.fm
21.2.02
Use as a desktop unit
Use as a desktop unit
Step
by
Your Gigaset 4170/4175isdn can be used as a desktop unit with a small footprint. Before connecting the base station, please comply with the installation
instructions (see page 11).
Step
Fitting the base station as a wall-mounted unit
Before mounting the base station, please comply with the installation instructions (see page 11).
1.
2.
3.
4.
5.
12
Drill two holes (∅ 5 mm) 80 mm apart in the
wall.
Use suitable dowels.
Screw in two round-head screws (∅ 4mm).
Before installing the wall mounting and tightening the screws, starting from the end, thread
the mains connection cable through the mounting. Ensure that the mains connection cable is
left free in the recess to the back of mounting.
Now insert the mains connection cable into the
base station (see Connecting the base station).
From above, gently press the base station vertically downwards onto the wall mounting tab.
Gigaset 4170/4175isdn, A31008-G4170-B100-2-7619
inbetriebnahme.fm 21.2.02
Connecting the base station
Connecting the base station
Step
by
Step
5.
1.
4.
Device front
3.
2.
1.
2.
3.
4.
Figure schematically
V S0 socket: insert in the ISDN connection cable until the plug locks into place.
Insert in the ISDN connection cable in the ISDN socket until the plug locks into
place.
In the case of NTBA with self-assembly, insert the cable between the NTBA
and the Mini-Western socket until both plugs lock into place.
$ socket: Insert mains connection cable until the plug locks into place, and
insert in the socket.
Only the plug-in power supply unit provided should be used (see
underside of base station).
5.
Info
For PC connection only:
Insert the USB connection cable into the base station, but do not connect to
the PC yet. Do not connect the USB connection cable until prompted to do so
by the PC program’s talk&surf Assistant on the PC.
Power failure:
In the event of a power failure, your base station, the handsets which are
registered at it and any corded terminals are not operational. All settings and
saved information (messages, directory entries) are retained for an unlimited
period.
Profiset talk&surf:
It is not possible to install Profiset talk&surf and Gigaset talk&surf
simultaneously on the same PC. Otherwise, problems will occur as both
programs attempt to access the same interface. You must therefore choose
either Gigaset talk&surf or Profiset talk&surf. When upgrading, the old
program version must first be uninstalled.
13
inbetriebnahme.fm
Gigaset 4170/4175isdn, A31008-G4170-B100-2-7619
21.2.02
Connecting supplementary devices
Step
Connecting supplementary devices
by
Step
Connection for the
corded terminal with
internal number 22
Figure schematically
14
Connection for the corded
terminal with internal
number 21
The connections are intended for
normal terminals with Mini-Western connectors.
inbetriebnahme.fm 21.2.02
Gigaset 4170/4175isdn, A31008-G4170-B100-2-7619
Configuring and using the base station
Step
by
Step
Configuring and using the base station
To configure the base station, you need a Gigaset 4000/3000/2000 series comfort handset (Comfort/Micro) or a PC (Windows 98, Windows ME,
Windows 2000).
This operating manual sets out the instructions for use for the
Gigaset 4000 Comfort/Micro.
Using the handsets
The handsets listed in the following table can be registered with the
Gigaset 4170/4175isdn.
Full functionality is available with the Gigaset 4000 Comfort and
Gigaset 4000 Micro handsets.
Functionality is partially limited in the case of the Gigas et40 00Classic,
Gigaset 3000, Gigaset 2000 and Gigaset 1000 handsets.
Handset
Operated in the same way as:
Gigaset 4000 Comfort
Gigaset 4000 Comfort
Gigaset 3000 MOBILE
Gigaset 3000 Comfort
Gigaset 3000 Comfort
Gigaset 3000 Micro
Gigaset 2000 pocket
Gigaset 2000 C/T
Gigaset 3000 Classic
Gigaset 3000 Classic
Gigaset 4000 Classic
GAP devices
Gigaset 2000 S
Gigaset 1000 C/S/TAE
Comparison between the features of the
Comfort 4000 and 3000/2000 handsets
Description
4000
3000/2000
Face up
E
Y (Softkey)
Face down
D
Z (Softkey)
Up one menu level
F
{ (Softkey)
Select entry
G
[ (Softkey)
Open telephone book
D
K (Key)
Select internal call party
F
I (Softkey)
Open menu
G
. (Key)
15
Gigaset 4170/4175isdn, A31008-G4170-B100-2-7619
inbetriebnahme.fm
21.2.02
Registering handsets
Registering handsets
Step
by
Info
Step
If you wish to use the Gigase t400 0Classic, Gigase t2000S, Gigase t1000 series handsets or handsets made by other manufacturers please register them
first.
You can register a maximum of 8 wireless devices (handsets, data boxes, wireless TAEs and SimPADs).
The illuminated registration key is
pressed
Registering the Gigaset 4000 Comfort/Micro handset
or
1.
2.
2.
3.
4.
5.
Switch on handset; to do this press and hold down the akey.
Accept the new handset Register? by selecting [OK] on the handset;
Existing handset: G is pressed → Settings → Register H/Set → Base 1 - Base
4 select a base station and confirm by selecting [OK].
Enter the base station’s system PIN (factory default: 0000) and select [OK] to
confirm.
Press the illuminated registration key on the base station, the key flashes. The
base station only remains in registration mode while the key is flashing.
Select any available internal number (11-18) by pressing [Á] and select [OK] to
confirm.
The display confirms that registration was successful.
Registering the Gigaset 4000 Classic handset
Info
1.
2.
3.
4.
16
You can register a maximum of four Gigaset 4000 Classic handsets.
Register these first.
Press the illuminated registration key on the base station, the key flashes.
The base station only remains in registration mode while the key is flashing.
Switch on the handset; to do this press and hold down the a key.
Register? is pressed [YES] to confirm the entry.
Enter the base station’s system PIN (factory default: 0000) and select [OK] to
confirm.
The handset is registered.
With registration, the next available internal number is automatically assigned
to the handset.
Gigaset 4170/4175isdn, A31008-G4170-B100-2-7619
inbetriebnahme.fm 21.2.02
Registering handsets
Registering the Gigaset 3000 Comfort/Micro handset
Step
by
Step
or
1.
2.
2.
3.
4.
5.
Switch on handset; to do this press and hold down the − key
Accept the new handset Register? by selecting [OK] on the handset;
Existing handset: . is pressed→ Base settings → Base 1 - 4 select a base
station, [W] press and → Register is selected and [OK] is pressed to confirm.
Enter the base station’s system PIN (factory default: 0000) and select [OK] to
confirm.
Press the illuminated registration key on the base station, the key flashes. The
base station only remains in registration mode while the key is flashing.
Select any available internal number (11-18) by pressing [Á] and select [OK] to
confirm.
The display confirms that registration was successful.
Registering the Gigaset 3000 Classic handset
1.
2.
3.
4.
5.
6.
Switch on handset; to do this press and hold down the − key
¦ ¨ « are pressed in sequence.
Enter the base station number - generally 1 - and select [OK] to confirm. The
symbol flashes and then remains permanently on when the connection with
the base station has been set up.
Enter the base station’s PIN (factory default: 0000) and select [OK] to confirm.
Press the illuminated registration key on the base station, the key flashes regularly.
Enter available internal number (11-18) ; the handset is then successfully registered (the ready signal stops flashing).
C
Registering the Gigaset 2000 C handset
1.
2.
3.
4.
5.
Switch on handset h .
. is pressed → H/Set Settings → Register → Base 1 - 6 select a base station,
[W] is pressed and → Register is selected and confirmed by pressing [OK].
Enter the base station’s system PIN (factory default: 0000) and select [OK] to
confirm.
Press the illuminated registration key on the base station, the key flashes. The
base station only remains in registration mode while the key is flashing.
Select any available internal number (11-18) by pressing [Á] and select [OK] to
confirm.
The display confirms that registration was successful.
17
Gigaset 4170/4175isdn, A31008-G4170-B100-2-7619
inbetriebnahme.fm
21.2.02
De-registering a device
Step
Info
by
Step
For the registration process described below, the following applies:
You may only register a maximum of four other handsets (e.g.
Gigaset 2000S, GAP handsets) or wireless devices (e.g.
Gigaset 1000 TAE, STA). Register these devices first.
Registering the Gigaset 2000 S handset
1.
2.
3.
4.
Handset h (off) is pressed.
Press [the number of the base station] and h (on) simultaneously.
Enter the system code #.
Press the illuminated registration key on the base station.
The lowest available internal number is allocated. An available internal number
cannot be selected.
Registering the Gigaset 1000 C/S handset
For the registration process, please refer to the relevant operating manuals.
To register the Gigaset repeater
An available registration location is not required for a Gigaset repeater designed
to increase the handset range. You can register up to 6 Gigaset repeaters with
one base station (for a description see Page 76).
Registering GAP handsets made by other manufacturers.
1.
2.
Info
Press the green illuminated key on the base station.
Prepare the GAP handset for registration (see operating manual for the handset). A connection is set up between the base station and the GAP handset.
The lowest available internal number is allocated to the GAP handset. An available internal number cannot be selected by the GAP handset.
The display information depends on the GAP handset in question because the
base station does not transmit display data to the GAP handset.
De-registering a device
1.
2.
3.
4.
18
A wireless device can be de-registered with any Comfort 4000/3000/2000
handset. Any devices still registered retain their former internal numbers.
. or G is pressed to see the menus.
Press [Á] and [OK] to select: Service Set Up or Base Settings → Settings →
Setup user → De-register.
List of internal numbers is displayed.
Press [Á] to select: (internal number required).
[OK] is pressed; the device is de-registered along with the internal number.
isdn.fm
Gigaset 4170/4175isdn, A31008-G4170-B100-2-7619
21.2.02
Getting into the ISDN world is easy
Step
by
Step
Getting into the ISDN world is easy*
What is an MSN?
MSN stands for multiple subscriber number. You can apply for a maximum of
ten different telephone numbers for the ISDN multiple device connection. An
MSN is one of the telephone numbers assigned to you without the area code.
Configuring Gigaset 4170/4175isdn and MSNs
Your telephone system in the Gigaset 4170/4175isdn uses the MSN specifically
according to your requirements. In this regard, the following distinctions are
made:
– Incoming MSN. This is the number that can also be answered by one of the
three answering machines in the case of incoming calls to specific internal
numbers or in the case of Gigase t4175isdn.
– Outgoing MSN. This is the number an internal subscriber places before the
number he is dialling when making outgoing calls; it is then also used by the
network provider to calculate charges.
– In addition to the above options you can also set the required MSN for the
next outgoing call on the Comfort handset.
Possible internal subscribers are:
11-18
Handsets
21, 22
Corded analog devices
40
41- 48
PC via USB connection*
Cordless PC via Gigaset M101 Data or Gigaset M105 Data*
91- 93
Integrated answering machine (AM) 91 = AM 1, 92 = AM 2, 93 =
AM 3 (Gigaset 4175isdn only)
* The numbers 40 - 48 are assigned automatically
An example: five MSNs were applied for; two for business use, a fax number
and two for personal use.
Use
business
Fax
*
Incoming
MSN
Where
does it
ring?
Answering Outgoing Set MSN for
machine
MSN
next call
11111
11, 12, 91
1
11111
22222
22222
11, 12, 91
1
11111
22222
33333
21
-
33333
---
The ISDN functions described in the user guide are dependent on the country and
network provider.
19
isdn.fm
Gigaset 4170/4175isdn, A31008-G4170-B100-2-7619
21.2.02
Ring delay per incoming MSN
Step
by
Use
Step
Personal
Incoming
MSN
44444
Where
does it
ring?
Answering Outgoing Set MSN for
machine
MSN
next call
13, 92
2
44444
---
55555
14, 92
2
55555
--You can use the MSN next call feature by allocating two MSNs to the handsets
11 and 12 and switch to the MSN 22222 for this dialling procedure in the
process. This is not possible for handsets 13 and 14 as an alternative MSN was
not set up.
Answering machine (AM) 1 was allocated to business use and AM 2 to
personal use.
Ring delay per incoming MSN
Using the ring delay feature you can configure a handset for each individual
incoming MSN to delay response to the call signal. However, during this ring
delay time the Comfort handset can accept the call using the "call pickup"
function without a call signal queuing. When this feature is being configured,
the time allowed by the answering machine for recording a message (default:
Automatic 2/4) must be taken into account. When the ring delay that has been
set is higher than the setting on the active AM, there is no call signal as the
answering machine accepts the call beforehand. Setting ring delay see
page 32.
20
Gigaset 4170/4175isdn, A31008-G4170-B100-2-7619
Installations_assi.f 21.2.02
The Installation Assistant
The Installation Assistant
Step
by
Step
The Installation Assistant can be called up any time to help you set the most
important functions. The following settings can be completed in sequence:
● Date and time.
● Show/hide answering machine 1…3 (can only be queried with the
Gigaset 4175isdn).
● Determining/entering MSNs
– To determine MSNs (can only be queried if an MSN has not yet been entered).
– Enter own number (MSNs = your telephone numbers) without a prefix.
● Device type (e.g. telephone, fax).
● Set incoming MSN = call allocation of subscribers to a telephone number.
● Set outgoing MSN = own telephone number given externally - can be set
individually for each terminal.
● Exchange code (when used with a telephone system).
● Exchange code (with installation behind a PABX)
Starting the Installation Assistant
1.
2.
3.
Press G for selection menus.
Select using [Á] and [OK]: Base Settings → Installation.
Confirm the prompt for starting the Installation Assistant with [YES].
Entering the date and time
1.
2.
3.
Confirm the prompt for entering the time with [YES].
Enter the date in the format " - - . - - . - - " (day, month, year) and the time in the
format " - - : - - " (hour, minute) and confirm with [ W].
Select using [Á] and [OK]: Save entry.
Hiding answering machines
1.
2.
If you want to operate only one answering machine on your line (e.g. AM1), you
can use this procedure to hide the other AMs in all displays and menus. If there
are still old or new messages on an AM which you want to hide, you will be
informed of this during the procedure.
Confirm that you want to hide the current AM with [YES].
If appropriate, hide the next AM.
Finding your own numbers (MSNs)
1.
The network provider will have notified you of your MSNs when they sent you
the order confirmation for your ISDN line. Provided the connection permits it,
these numbers can be requested from the central office und entered and displayed by Gigaset 4170/4175isdn.
Confirm the prompt Find own numbers (MSN)? by selecting [YES].
If the display shows a positive answer (e.g. "3 numbers (MSNs) found") and you
do not want to enter any names for the MSNs, you can skip the following procedure with [NO].
21
Gigaset 4170/4175isdn, A31008-G4170-B100-2-7619
Installations_assi.f
21.2.02
Starting the Installation Assistant
If this function is not supported by the service provider, the MSNs must be entered manually; see next chapter.
Step
by
Step
Enter own numbers (MSNs) and name for the MSNs.
1.
2.
3.
4.
You can store up to 10 numbers. For easier identification, you can enter a name
for each number.
Confirm the prompt for entering the call number with [YES].
Confirm the prompt for entering the first MSN with [YES].
Enter the name and with Z move to Change call number, if required enter or
change call number and confirm with [W].
Select using [Á] and [OK]: Save entry.
You are prompted for the next MSN.
Setting the device type
1.
2.
3.
4.
The factory default for the TAE connections isTelephone. This means that even
without the handset, the base station is already in its standby state with a telephone (with tone dialling/DTMF) connected to Intern 21 or Intern 22. If you
wish to connect to another analog device (e.g. fax machine), the device type
must be changed ((see page 74)).
Select [YES] to confirm the prompt for setting the device type.
Select [YES] to confirm the prompt for the internal party.
Press [Á] and [OK] to select: (device type).
To confirm, press ».
To end the procedure select Î.
Allocations for further internal parties are offered.
Setting incoming MSNs
or
1.
2.
2.
3.
4.
22
The number is used to call your handset/terminal.You can assign several
MSNs.
To confirm the incoming MSN prompt, select [YES].
To confirm the allocation prompt select [YES].
To move to the next internal number, select [NO].
Press [Á] and [OK] to select: (one or more MSNs).
To confirm, press ».
To end the procedure select Î.
Allocations for further internal parties are offered.
Installations_assi.f 21.2.02
Gigaset 4170/4175isdn, A31008-G4170-B100-2-7619
Starting the Installation Assistant
Setting outgoing MSNs
Step
by
Step
or
1.
2.
2.
3.
4.
This number can be used to make an outgoing call. This number is transmitted
to the called party and the service provider charges the call costs to this MSN.
You can only assign one outgoing MSN to each handset/terminal.
To confirm the outgoing MSN prompt, select [YES].
To confirm the allocation prompt select [YES].
To move to the next internal number, select [NO].
Press [Á] and [OK] to select: (one MSN).
To confirm, press ».
To end the procedure select Î.
Allocations for further internal parties are offered.
Operation using a telephone system
1.
2.
3.
4.
If you are connecting your base station to a telephone system:
Select [YES] in response to the telephone system prompt.
Select [YES] to confirm the prefix prompt (exchange code).
Enter prefix and select [W] to confirm.
Press [Á] and [OK] to select: Save entry.
Installation is completed with the help of the installation assistant.
23
Gigaset 4170/4175isdn, A31008-G4170-B100-2-7619
MSN.fm
21.2.02
Configuring ISDN call numbers (MSNs)
Configuring ISDN call numbers
(MSNs)
Step
by
Step
Your ISDN connection provides you with two telephone lines that you can use
simultaneously. You can configure up to 10 own call numbers (MSNs) at your
base station. You can also use some call numbers for additional devices on the
ISDN connection (S0 bus). If you did not use the Installation Assistant (see
page 21) to store all the call numbers, you can do this now. All these call numbers stored subsequently are automatically assigned to all the registered
handsets.
Set up numbers (MSNs)
1.
2.
3.
4.
5.
6.
Each newly assigned MSN is automatically assigned its own ringer melody.
This setting enables you to change the type of melody.
Press G for selection menus.
Select using [Á] and [OK]: Base Settings → Settings → ISDN settings → Set up
MSN.
Select using [Á] and [W]: (required MSN).
Select using [Á] and [OK]: Edit entry.
In this menu, you also have the option of setting another ringer melody and of
deleting or displaying the entry.
Enter new or modified MSN and/or names and confirm with [W].
Select using [Á] and [OK]: Save entry.
Assigning call numbers (MSNs)
Specific own call numbers (MSNs) can be assigned to registered devices. In
this way you can define
● the call number under which a registered terminal will ring (incoming MSN)
and
● the call number from which an internal subscriber should dial (outgoing
MSN). You can set one outgoing MSN for each internal subscriber. This MSN
is displayed to the called party and any call charges incurred are assigned to
the appropriate subscriber.
Assigning an incoming MSN
1.
2.
3.
4.
Info
24
A newly registered handset will ring under all configured call numbers. If you
want to assign a specific incoming MSN to the handset:
Press G for selection menus.
Select using [Á] and [OK]: Base Settings → Settings → Setup user → Setup device.
Select using [Á] and [W]: (required internal subscriber).
Select using [Á] and [OK]: Receive MSN→ (relevant MSN).
With regard to assigning an incoming MSN for an answering machine see
page 57.
Gigaset 4170/4175isdn, A31008-G4170-B100-2-7619
MSN.fm
21.2.02
Configuring ISDN call numbers (MSNs)
Assigning an outgoing MSN
Step
by
Step
1.
2.
3.
4.
Press G for selection menus.
Select using [Á] and [OK]: Base Settings → Settings → Setup user → Setup device.
Select using [Á] and [W]: (required internal subscriber).
Select using [Á] and [OK]: Send MSN → (required MSN).
25
Gigaset 4170/4175isdn, A31008-G4170-B100-2-7619
System.fm
21.2.02
System settings
System settings
Step
by
Step
The abbreviations in brackets after the titles stand for the corresponding ISDN
feature. Some features can only be used if enabled by the provider (additional
charge).
Changing the names for internal subscribers
1.
2.
3.
4.
Info
With the factory default, the names Int.11, Int.12 etc. are allocated to all the internal numbers in accordance with their numbering. These entries may be
changed to suit your requirements.
G is pressed for menus.
Press [Á] and [OK] to select: Base Settings → Settings → Setup user → Setup
device → (required internal no.) → [W] → Name.
Change the name and select [W] to confirm.
Press [Á] and [OK] to select: Save entry.
The name is now displayed in the internal list and also when an internal call is
made from this internal no.
Since the names are stored in the base station, another name may be assigned
to a handset when registering with another base station. In this way it is possible to identify the base station to which the handset is currently connected.
Call waiting - activating/deactivating CW
1.
2.
26
This feature can be set up separately for each subscriber. When call waiting is
activated, the caller hears the on-hook signal if you are already conducting a
call.
If call waiting is deactivated, the caller hears the ring tone if you are
already conducting a call and additional devices are assigned to this MSN.
If call waiting is deactivated, the caller hears the busy signal if you are aCall
waitinglready conducting a call, and are either the only user assigned this MSN,
or if the feature Busy signal when MSN is engaged (Busy on Busy) see page 27
has been activated.
Press G for selection menus.
Select using [Á] and [OK]: Base Settings → Settings → Setup user → Setup device→ (required internal subscriber) → [W] → Call waiting
Gigaset 4170/4175isdn, A31008-G4170-B100-2-7619
System.fm
21.2.02
Rejecting calls for entire MSN group
Rejecting calls for entire MSN group
Step
by
You have the option of rejecting an external call, not only to your handset, but
also for all the members of an MSN group. By pressing [REJECT] the caller will
receive a busy signal instead of the ringing tone. The entire group will no longer
be called. During a call, a "call waiting" may also be rejected. The call is picked
up in the caller list.
Step
Configuring "reject" for the entire MSN group
1.
2.
3.
Press G for selection menus.
Select using [Á] and [OK]: Base Settings → Settings → ISDN settings
→ Reject all.
Select using [Á] and [OK].
The selection is confirmed with ».
Busy signal when MSN is engaged (Busy on Busy)
1.
2.
3.
With this setting, callers immediately hear the busy signal if a call is currently
being conducted through this MSN, regardless of the setting Call waiting.
Example:
You are currently conducting a call to number 4711. Any caller who dials this
number will hear a busy signal.
Press G for selection menus.
Select using [Á] and [OK]: Base Settings → Settings → ISDN settings → Busy
on busy.
Select using [Á] and [OK].
The selection is confirmed with ».
Setting external/internal enquiry calls
Info
1.
2.
or
2.
3.
You can set your telephone so that:
● when conducting an enquiry with an external subscriber arising from an
external call, the original caller is held in the central office so that your
second ISDN line remains free
● when conducting an enquiry with an external subscriber arising from an
external call, the original caller is held in the base station which means that
both ISDN lines are busy (see also "Configuring music-on-hold" on page 28)
If Int. enq. call is set and the second B channel is in use, calls are automatically
placed on hold in the central office.
The default setting is Ext. enq. call.
Press G for selection menus.
Select using [Á] and [OK]: Base Settings → Settings → ISDN settings → Int.
enq. call → (9 in front of menu item = ON / no = OFF).
Select using [Á] and [OK]: Base Settings Æ Settings Æ ISDN settings Æ Ext.
enq. call Æ (9 in front of menu item = ON / no = OFF).
Confirm with [OK].
27
Gigaset 4170/4175isdn, A31008-G4170-B100-2-7619
System.fm
21.2.02
Call beats data
Call beats data
Step
by
Step
Info
1.
2.
If an incoming call is made when the Call beats data function is activated and
if both B-channels are seized owing to channel bundling, for example, then a Bchannel is split. The incoming call can be picked up and the Internet connection
is maintained with one channel.
If you have activated the Call beats data function while at the same time surfing
the Internet with two separate RDT connections (e.g. with two PCs), one of the
two connections is immediately disconnected in the event of an incoming call.
Factory default: Call beats data is not activated.
G is pressed for menus.
Press [Á] and [OK] to select: Base Settings → Settings → ISDN settings
→ Call beats data → (9 before menu item = ON / none = OFF).
Configuring music-on-hold
The caller hears music-on-hold when put on hold by the base station rather
than the exchange (e.g. in the case of internal transfer). You should also note
the section on "Setting external/internal enquiry calls" on page 25. The following
settings can be selected:
Internal
External
Off
1.
2.
3.
28
The party on hold hears the base station’s music on hold .
In this case, the music on hold is played by an external device.
An analog connection must also be configured as external music
on hold. If an analog connection has not been configured, the External setting (through the analog connection) is not offered.
Please contact your specialist outlet to find out about adapters
for playing music on hold.
If the music on hold is not activated, no settings can be made.
Press G for selection menus.
Select using [Á] and [OK]: Base Settings → Settings → System settings
→ Music on hold.
Select using [Á] and [OK]: required type.
Gigaset 4170/4175isdn, A31008-G4170-B100-2-7619
System.fm
21.2.02
Answering machine - activating/deactivating automatic call pickup
Answering machine - activating/deactivating automatic call
pickup
Step
by
Step
Info
1.
2.
3.
By default, automatic AM call pickup is activated.
Calls can only be picked up automatically if automatic monitoring has not been
activated for any other handset.
If automatic call pickup is activated, you can pick up a call from an answering
machine (during announcement or message recording) directly by pressing the
talk key (mobile station) or by lifting the handset (corded phone).
However, it is possible to initiate a new call while the answering machine is active
without deactivating the recording process (provided the second line is free).
Press G for selection menus.
Select using [Á] and [OK]: Base Settings → Settings → System settings
→ AM auto. pickup → (9 before menu item = ON / no = OFF).
Confirm with [OK].
Audio settings
Info
With this setting you can define a ringer melody for each MSN, valid for all
called handsets.
The ringer melody cannot be set on the handset itself. Depending on the MSN
Mcalled, the base station assigns a ringer melody to a handset.
Assigning a ringer melody to an MSN
1.
2.
3.
4.
5.
Each newly assigned MSN is automatically assigned its own ringer melody.
This setting enables you to change the type of melody.
Press G for selection menus.
Select using [Á] and [OK]: Base Settings → Settings → ISDN settings
→ Set up MSN.
Select using [Á] and [W]: (required MSN).
Select using [Á] and [OK]: Ringer melody.
Select a melody from 1 to 10 using [<] or [>] and confirm with [OK].
Changing long-distance codes
1.
2.
3.
4.
5.
6.
The long-distance codes are the first digits in the prefix for dialling another city
(national) or country (international).
Default settings:
0
for connections to other local networks (national)
00
for connections to other countries (international)
If the long-distance codes are different in your country you need to change the
settings. Otherwise you will not be able to use the callback function for all calls
in the missed calls list.
Press G for selection menus.
Select using [Á] and [OK]: Base Settings → Settings → ISDN settings
→ Lg.-dist. code.
Select using [Á] and [W]: (national or international).
Select using [Á] and [OK]: Change number.
Enter the new or changed code and confirm with [W].
Select using [Á] and [OK]: Save entry.
29
Gigaset 4170/4175isdn, A31008-G4170-B100-2-7619
System.fm
21.2.02
Restoring the factory setting
Restoring the factory setting
Step
by
Step
Info
1.
2.
3.
4.
5.
or
5.
6.
You can choose the settings that are to be restored:
● Operational – All MSNs and prefixes (exchange codes) are deleted and the
AM PIN (for Gigaset 4175isdn only) is set to 0000.
● Reset all – All functions are reset to the default settings. The system PIN is
reset to "0000". All entries (missed calls list, costs) are deleted.
For both functions: Before resetting, you must deactivate all active call forwarding settings. Remote control of the answering machine is disabled. The
handsets remain registered.
Press G for selection menus.
Select using [Á] and [OK]: Base Settings → Settings → System settings →
Spec. function → Factory setting.
Confirm with [OK].
Enter the system PIN and confirm with [OK].
Operational is displayed. Confirm with [OK].
Acknowledge the message
Settings
reset
and wait for the confirmation tone.
Select using [Á] Reset all and confirm with [OK].
Answer [YES] to the question
Reset
factory
defaults?
Confirm the message Reset all and wait for the confirmation tone.
Querying the status
1.
2.
3.
30
You can query the status of the following settings:
● Callback
● Withhold no.
● Call forwarding
● Ext.occupations
● AB1, AB2, AB3
Press G for selection menus.
Select using [Á] and [OK]: Base Settings → Status
Press [OK] to open the status list
(9 before an item = system function active).
Komfortabel.fm
Gigaset 4170/4175isdn, A31008-G4170-B100-2-7619
21.2.02
Making calls using comfort features
Making calls using comfort
features
Step
by
Step
The availability of some of the functions described here depends on the service
provider.
Making internal calls free of charge
1.
2.
If you have several handsets or supplementary devices, you can make internal
calls free of charge.
Press F.
Your internal call number is displayed.
Enter the number of the internal subscriber required.
Possible subscribers include:
11-18
21, 22
91-93
or
2.
3.
Handsets
Corded devices
Integrated answering machine (Gigaset 4175isdn only)
Press [LIST].
Select using [Á] and [OK]: (required internal subscriber).
The internal subscriber is called.
Collective call/Group call
You can make a collective call from any handset to all registered internal
subscribers.
Configuring internal collective call groups
1.
2.
3.
4.
In the basic configuration, all registered subscribers of the "Telephone" or
"Neutral" device type are configured in the collective call group.
Press G for selection menus.
Select using [Á] and [OK]: Base Settings → Settings → Setup user
→ Setup device.
Select using [Á] and [W]: (required internal subscriber).
Select using [Á] and [OK]: Hunt group (9 in front of menu item = ON / no =
OFF).
Starting a collective call to all internal subscribers
or
1.
2.
F → [LIST].
Select using [Á] and [OK]: Collective call.
1.
2.
F.
Press :.
All available internal subscribers are called. You are connected to the first
internal subscriber who answers the call.
31
Gigaset 4170/4175isdn, A31008-G4170-B100-2-7619
Komfortabel.fm
21.2.02
Ring delay
Ring delay
Step
by
Using the ring delay feature you can configure a handset for each individual
incoming MSN to delay response to the call signal. However, during this ring
delay time the handset can accept the call using the Accept? function without
a call signal queuing. When this feature is being configured, the time allowed
by the answering machine for recording a message (default: Automatic 2/4)
must be taken into account. When the ring delay that has been set is higher
than the setting on the active answering machine, there is no call signal as the
answering machine accepts the call beforehand.
Step
Setting ring delay
1.
2.
3.
4.
5.
6.
Press G for selection menus.
Select using [Á] and [OK]: Base Settings → Settings → Setup user
→ Setup device.
Select using [Á] and [W]: (required internal subscriber).
Select using [Á] and [OK]: Ring delay.
Select using [Á] and [W]: (required MSN).
Set No. of rings using [] -¬], ¢ = off.
Picking up calls during ring delay
or
1.
2.
3.
3.
A call is coming through to the assigned MSN.
Press the c key, the following appears in the display: Accept?
Press [YES] . You can then answer the call.
Press [NO] . You can set up your own external or internal call.
Conducting calls with more than one subscriber
Internal enquiry call
1.
or
1.
2.
3.
or
or
32
3.
3.
You would like to call an internal subscriber during an external call.
Press F and enter the call number for the second subscriber.
A connection is established with the internal subscriber.
F → [LIST].
Select using [Á] and [OK]: (required internal subscriber).
A connection is established with the internal subscriber.
If the internal subscriber dialled is busy:
Press [BACK]: You are reconnected with the external caller.
The internal subscriber answers the call:
Toggling: you can switch between call parties with [À] and [Á].
Three-way calling: press [CONF.]. This establishes the conference circuit.
Gigaset 4170/4175isdn, A31008-G4170-B100-2-7619
Komfortabel.fm
21.2.02
Conducting calls with more than one subscriber
Toggle
Step
by
Step
1.
1.
2.
By toggling, you switch from the active (1st call) to the inactive (2nd call)
connection. The first call remains connected.
To switch between called parties, select E and D or [À] and [Á].
Ending an enquiry call/toggle
Press G for the menu.
Select using [Á] and [OK]: End.
You are reconnected with the subscriber on hold.
Conference circuit
A conference circuit enables you to talk to two parties at the same time. These
can either comprise two external subscribers, or one external and one internal
subscriber.
1.
1.
Setting up three way calling
You are conducting an enquiry call. The first subscriber is put on hold.
Press [CONF.]: This establishes the conference circuit.
Ending three-way calling
You are conducting three-way calling.
Press [INDIV.]: The conference call is terminated. The connection which was
active immediately before three-way calling was set up is reestablished as the
active connection. The other subscriber is put on hold once more.
Setting up an external enquiry call
1.
2.
3.
You would like to call an internal subscriber during an external call; To set, see:
Press G for the menu.
Select using [Á] and [OK]: Enquiry call.
Enter the call number for the second subscriber.
Ending an external enquiry call
1.
2.
You are conducting an enquiry call which you would like to end:
Press G for the menu.
Select using [Á] and [OK]: End.
Transferring calls on/before answer – ECT (Explicit Call Transfer)
or
1.
2.
3.
4.
4.
5.
ECT is currently only supported behind PABXs. To activate/deactivate call
transfer, see Page 24 .
You are conducting an external call which you would like to transfer to another
external subscriber.
Press G for the menu.
Select using [Á] and [OK]: Enquiry call.
Enter the call number to which the call is to be transferred.
Replace the handset: press −.
Conduct the enquiry call.
Replace the handset: press −.
33
Gigaset 4170/4175isdn, A31008-G4170-B100-2-7619
Komfortabel.fm
21.2.02
Entering numbers in the telephone directory
Entering numbers in the telephone directory
Step
by
Step
1.
2.
3.
4.
During a call, you can enter the number of the other party in the telephone
directory, or add his/her name and then call them from the telephone directory.
Press G for the menu.
Select using [Á] and [OK]: Copy to dir.
Enter name.
Select [W] and [OK] to store:
Picking up a call while the answering machine is operating
Calls can be picked up even if an answering machine has switched itself on
(AM symbol ¸ flashes), is playing your announcement or recording a
message. Once you pick up, the recording process is stopped.
Direct call pickup can be deactivated (see page 29) so that you can make
outgoing calls even while the answering machine is switched on.
Automatic call pickup activated (default)
1.
Press c or u, and answer the call.
Automatic call pickup deactivated
1.
2.
3.
Info
Press c or u .
Press [OP.LIST].
Press [ACCEPT] and answer the call.
In order to pick up a call, the same incoming MSN must have been allocated to
the answering machine and the internal user picking up the call, and another
user must not be monitoring calls automatically on another handset.
Rejecting calls
You receive a call or you are conducting a call and receive a second call. The call
is signalled acoustically and displayed for all members of this MSN group.
Depending on the setting, either your own handset* or that of the entire MSN
group will be rejected.
Setting up see pag e25.
Rejecting calls
1.
You are conducting a call and receive a second call at the same MSN.
Press the softkey: [REJECT] .
*
34
The call is only disconnected for this user, the other users in the call group remain connected.
Komfortabel.fm
Gigaset 4170/4175isdn, A31008-G4170-B100-2-7619
21.2.02
Missed calls list
Missed calls list
Step
by
Call numbers (max. 32 digits) of calls which you do not answer ("Missed calls"
list with number of call attempts) or which you answer ("Answered calls" list),
are saved together with the date and time. If the numbers are included in the
telephone directory of the handset, the caller's name is displayed. Calls made
with the calling line identification restriction set are indicated as "unknown" in
the "Missed calls" list and are not shown in the "Answered calls" list. New
entries in the calls list are indicated by flashing of the status LED and by a text
message in the display (note: this also applies to new messages on the
answering machines). In the connected state the J sign also appears.
Each of the two lists can contain up to 20 entries. When the list is full, the
oldest entry is deleted and the most recent entry is added at the beginning of
the list. If you return the call, or or if the calling party manages to reach you later
on, the entry for this caller is removed from the list.
Step
Display
0123456789(02)
Caller ID
Number of call attempts
Dialling from the Calls List using the Message key
1.
or
2.
3.
3.
On the Gigaset 4000 Comfort, new calls in the missed calls list are indicated
by a message on the display and a flashing status LED. Pressing the message
button ? gives you direct access to new calls.
Press ? .
If there are no new messages in the answering machines, the entries in the
calls list are displayed immediately. If there are new messages on an answering
machine and entries in the calls list, the menu item Missed calls must also be
confirmed with [OK].
Select using [Á] and [W]: (required call).
Select using [Á] and [OK]: Dial number.
Press c (do not confirm the W key first)
The call number is dialled.
Dialling from the Calls List list via the menus
or
1.
2.
2.
3.
4.
Press G for selection menus.
Select using [Á] and [OK]: Base Settings → Missed calls.
Select using [Á] and [OK]: Base Settings → Accepted calls.
Select using [Á] and [W]: (required call).
Select using [Á] and [OK]: Dial number.
The call number is dialled. If a call is established in this way the entry is
automatically deleted from the relevant Calls List.
It is possible to dial from the Calls List list before or after the c key is
pressed (the menu item Base Settings is no longer used).
35
Gigaset 4170/4175isdn, A31008-G4170-B100-2-7619
Komfortabel.fm
21.2.02
Missed calls list
Copying numbers from the Calls List list to the directory
Step
by
Step
or
1.
2.
2.
3.
4.
Press G for selection menus.
Select using [Á] and [OK]: Base Settings → Missed calls.
Select using [Á] and [OK]: Base Settings → Accepted calls.
Select using [Á] and [W]: (required call).
Select using [Á] and [OK]: Copy to dir.
Checking and deleting numbers in a calls list,
deleting a list or changing a number.
1.
Press G for selection menus.
2.
Displaying an entry:
Select using [Á] and [OK]: Base Settings → Missed calls (or → Accepted calls)
→ (desired number) [W] → Display entry and confirm with [OK]. Together with
the telephone number, the date and time of the call are also displayed.
or
2.
Deleting an entry:
Select using [Á] and [OK]: Base Settings → Missed calls (or → Accepted calls)
→ (desired number) [W] → Delete entry and confirm with [OK].
or
2.
Deleting a list:
Select using [Á] and [OK]: Base Settings → Missed calls (or → Accepted calls)
→ (call number) [W] → Delete list and confirm with [OK].
or
2.
3.
4.
36
Changing a number:
Select using [Á] and [OK]: Base Settings → Missed calls (or → Accepted calls)
→ (desired number) [W] → Change number and confirm with [OK].
Change the number by using the softkeys X < > and by entering digits
directly.
Press [W] → Save entry and confirm with [OK].
Gigaset 4170/4175isdn, A31008-G4170-B100-2-7619
Komfortabel.fm
21.2.02
Internal call forwarding
Internal call forwarding
Step
by
Step
Configuring a forwarding destination
1.
2.
Press G for selection menus.
Select using [Á] and [OK]: Base Settings → Int. call forw. → Forward. dest.
→ (required internal subscriber).
Only one forwarding destination can be selected for internal call forwarding.
Activating/deactivating internal call forwarding
1.
2.
Internal call forwarding can only be activated if a forwarding destination
extension has been configured.
Press G for selection menus.
Select using [Á] and [OK]: Base Settings → Int. call forw.→ Activate?
or Deactivate?
Defining the number of ring cycles
1.
2.
3.
Ring delay is used to define the number of ring cycles to be completed before
a call is forwarded. Between 0 to 9 ring cycles can be configured.
Press G for selection menus.
Select using [Á] and [OK]: Base Settings → Int. call forw. → No. of rings.
Enter the number of ring cycles and confirm with [OK].
External call forwarding - CF
If call forwarding is configured, it is activated at the provider exchange. Both
telephone lines assigned to your ISDN connection are free during call
forwarding. You must pay the connection costs together with a surcharge. You
can define the following conditions for call forwarding:
Immediately — On busy — On no reply
Configuring a new call forwarding destination
1.
2.
3.
or
4.
5.
6.
6.
Press G for selection menus.
Select using [Á] and [OK]: Base Settings → Ext. call forw.
Press [W] to select: New entry → (MSN for which
call forwarding should apply) → Immediately, On busy or On no reply.
Enter the required destination call number and confirm with [ W].
Select using [Á] and [OK]: Save entry.
Confirm the prompt with [YES]: Call forwarding is activated.
Confirm the prompt with [NO]: Call forwarding is not activated.
Activating/deactivating external call forwarding
1.
2.
3.
4.
Press G for selection menus.
Select using [Á] and [OK]: Base Settings → Ext. call forw.
Select using [Á] and [W]: (required call forwarding).
Select using [Á] and [OK]: Activate? or Deactivate?
37
Gigaset 4170/4175isdn, A31008-G4170-B100-2-7619
Komfortabel.fm
21.2.02
Switching internal/external call forwarding
Edit entry
Step
by
Step
or
1.
2.
3.
4.
5.
6.
7.
7.
Press G for selection menus.
Select using [Á] and [OK]: Base Settings → Ext. call forw.
Select using [Á] and [W]: (required call forwarding).
Select using [Á] and [OK]: Edit entry.
Enter the required destination call number and confirm with [ W].
Select using [Á] and [OK]: Save entry.
Confirm the prompt with [YES]: Call forwarding is activated.
Confirm the prompt with [NO]: Call forwarding is not activated.
Deleting external call forwarding
1.
2.
3.
4.
Press G for selection menus.
Select using [Á] and [OK]: Base Settings → Ext. call forw.
Select using [Á] and [W]: (required call forwarding).
Select using [Á] and [OK]: Delete entry.
Switching internal/external call forwarding
1.
2.
Calls can be forwarded by the base station (internal) or by the provider
(external). In the case of internal call forwarding, the second B- channel is used.
Press G for selection menus.
Select using [Á] and [OK]: Base Settings → Settings → ISDN settings → Int.
call forw. or Ext. call forw.
Transferring incoming calls - CD (Call Deflection)
With CD you can transfer an incoming call to another call number while it is
ringing. You do not need to answer the call, see also pa ge42.
Transferring incoming external calls manually
1.
2.
You receive an external call.
Press G for the menu.
Select using [Á] and [OK]: Forward → (predefined forwarding destination).
As well as using a predefined forwarding destination, you can also select a call
number from the directory or enter a new number.
Predefining the forwarding destination
1.
2.
3.
4.
38
You can define a forwarding destination for incoming calls. This
destination call number is offered as a preset in the case of manual
transfer.
Press G for selection menus.
Select using [Á] and [OK]: Base Settings → Settings → ISDN settings →
Forward. dest.
Enter the call number for the call forwarding destination and confirm with [W].
Select using [Á] and [OK]: Save entry.
Komfortabel.fm
Gigaset 4170/4175isdn, A31008-G4170-B100-2-7619
21.2.02
Automatic external callback
Automatic external callback
Step
by
on busy – CCBS
Step
If the called party is currently in a call you can initiate automatic callback. This
will save you having to dial again and again.
On no reply – CCNR
If the called party does not answer you can initiate automatic callback. As soon
as the other party is free again you will receive the callback. This feature must
be supported by the central office. The callback order will be automatically
cancelled after about two hours (depending on the central office).
Activating callback
1.
2.
To activate callback confirm the softkey [CALLBCK].
Wait for confirmation from central office.
Accepting a callback
1.
The handset rings with a specific ring tone and the callback number is shown
on the display.
Press c: the connection is established.
Deleting a callback
1.
The handset rings and the callback number is shown on the display.
Confirm [DELETE]. The callback is deleted.
Checking or deleting the callback number
1.
2.
or
3.
3.
Press G for selection menus.
Select using [Á] and [OK]: Base Settings → Status → Callback.
The current callback number is shown on the display.
Confirm [BACK]. The callback remains active.
Confirm [DELETE]. The callback is deleted.
39
Gigaset 4170/4175isdn, A31008-G4170-B100-2-7619
Komfortabel.fm
21.2.02
Call waiting - CW
Call waiting - CW
Step
by
Call waiting - activating/deactivating CW see page 24.
Step
Accepting/rejecting external call waiting
1.
You hear the call waiting tone during your call (internal or external).
Confirm [ACCEPT]. You accept the waiting call and the first call is put on hold.
Both parties are shown on the display, the current party is highlighted.
Confirm [REJECT]. Reject the waiting call.
1.
2.
Ending an active call
Press G for the menu.
Confirm with [OK]: End.
1.
or
1.
2.
Info
Forwarding waiting calls internally
You can forward waiting calls internally without taking the call.
Press G for the menu.
Select using [Á], Forward and [OK]: (internal subscriber).
Continue the active call.
Calls can only be forwarded to internal subscribers who have not been called
already.
Holding calls (Call Hold)
Putting external subscribers on hold
1.
2.
or
2.
You are engaged in an external call.
Press [INT]: The external subscriber is put on hold.
The waiting external subscriber hears music-on-hold. You can conduct an
internal enquiry call.
As soon as the internal subscriber ends the enquiry call, [BACK] appears on the
display for 10 seconds. Pressing [BACK] reconnects you to the external caller.
If this option is not used, the ring tone sounds again after 10 seconds.
To end the internal call, press G for the menu and select [End] followed by
[OK]. You are then returned to the external call and the internal subscriber hears
the busy tone.
Putting internal subscribers on hold
1.
2.
or
40
2.
You are conducting an internal call.
Press [CONSULT]: The internal subscriber is put on hold.
You can set up an external enquiry call.
To end the external call, press G for the menu and select [End] followed by
[OK]. You are then returned to the internal call and the external connection is
closed.
Three-way calling: press [CONF.]. This establishes the conference circuit.
Gigaset 4170/4175isdn, A31008-G4170-B100-2-7619
Komfortabel.fm
21.2.02
Calling line identification restriction (CLIR)
Calling line identification restriction (CLIR)
Step
by
If you withhold your number from other parties, you can activate the calling line
identification restriction. You can set up CLIR for just the next call or
permanently. If set up permanently your call number will be suppressed both
for outgoing calls (CLIR) and for incoming calls (COLR). This feature must be
supported by your provider.
Step
Temporary calling line identification restriction
1.
2.
3.
4.
Info
Press G for selection menus.
Select using [Á] and [OK]: Base Settings → Call preparat. → Temp.withhold. (9
in front of Temp.withhold = ON / no = OFF).
Confirm with [OK].
a is pressed.
After the call, this restriction is lifted. Your number will not be withheld from the
next party called. This applies even if you select a number from the redial list.
Permanent calling line identification restriction
1.
2.
3.
Press G for selection menus.
Select using [Á] and [OK]: Base Settings → Settings → ISDN settings →
Withhold no.(9 in front of Withhold no. = ON / no = OFF)
Confirm with [OK].
Reserving a line
You cannot make external calls when both external lines are being used by
other internal subscribers. In this case you can "reserve a line". When an
external channel becomes available, the system calls you automatically and you
can make external calls again.
Reserving a line
1.
You attempt to set up an external connection but all external lines are busy.
Press [CALLBCK].
Accepting a free line
1.
2.
An external line becomes available. A recall is implemented.
Lift the handset: Press c.
A connection is set up to the provider.
Set up the external connection as normal.
Deleting a line reservation
1.
An external line becomes available. A recall is implemented.
Press [DELETE].
The external line reservation is deleted.
41
Gigaset 4170/4175isdn, A31008-G4170-B100-2-7619
Komfortabel.fm
21.2.02
Set MSN for next call
Set MSN for next call
Step
by
Even if you have defined individual outgoing MSNs for outgoing calls on
handsets you can select a different outgoing MSN for the next call (for example
for separate billing)
Step
1.
2.
3.
Info
Press G for selection menus.
Select using [Á] and [OK]: Base Settings → Call preparat. → MSN next call.
Select using [Á] and [OK] (desired MSN) and confirm.
Menu item MSN next call is marked. The next call is made with the selected
MSN (see page 19).
Seize specific MSNs
1.
2.
3.
4.
5.
If this setting is activated, a list of available MSNs is displayed before each call
is made when the talk key c or speaker key u is activated. Even if you have
specified an individual outgoing MSN for the handset, before every call you can
use it to select specifically an MSN as the outgoing MSN, e.g. for separate
recording of costs.
However, further MSNs are only displayed for selection if these have been
allocated to the handset as incoming MSNs (see pag e24).
With SMSs you should ensure that the outgoing/incoming MSN corresponds
to the number registered with your MSN centre.
G is pressed for menus.
Press [Á] and [OK] to select: Base Settings → Settings → Setup user Æ Setup
device.
List of internal numbers entered is displayed.
Press [Á] and [OK] to select (required internal no.).
Press [W] key, → MSN next call and [OK]
(9 before menu item = ON / none = OFF)
Press a.
Automatic call forwarding due to inaccessible handset
This service can only be used if the CD feature has been activated for your
connection. Further information can be obtained from your network provider.
For instance, if your handset is outside the base station range, the battery has
run out or the handset is switched off, this feature reroutes all calls to a defined
external number.
Prerequisite: You have assigned an exclusive MSN to your handset, (see
page 24). This MSN must not be assigned to any other device, even on the
ISDN bus.
Enter a number and activating/deactivating automatic call forwarding
1.
2.
3.
4.
5.
42
Press G for selection menus.
Select using [Á] and [OK]: Base Settings → Settings → ISDN settings →
Auto.forwarding.
Press [OK]: a list of all MSNs entered is displayed.
Select using [Á] and [OK] (desired MSN) and enter an external destination
number.
Press [W] and select Save entry followed by [OK]. Automatic call forwarding is
now activated. (9 in front of MSN = Auto.forwarding ON, no 9 =
Auto.forwarding OFF).
Gigaset 4170/4175isdn, A31008-G4170-B100-2-7619
Komfortabel.fm
21.2.02
Tracing switch
Tracing switch
Step
by
The tracing switch is used to identify nuisance or malicious callers. This feature
can be requested from your provider only in justified cases.
Step
During or immediately after the call
1.
2.
You have received a malicious call from an anonymous caller.You can activate
this function:
During the call or as soon as the caller has terminated the call.
Do not hang up.
Press G for selection menus.
Select using [Á]: Identify caller and press [OK].
The caller and his/her number are identified in the central office and recorded
together with the date and time at which the call was made. A printout can be
supplied by the network provider at a later point in time.
Parking/continuing calls ("unpark")
1.
2.
3.
4.
You are conducting an external call which you would like to transfer to another
telephone at your ISDN connection, for example.
Press G for the menu.
Select using [Á] and [OK]: Call park.
Enter a parking number (one or two digits) and confirm with [OK].
Press a.
Unparking a call before answering
1.
2.
3.
Press G for selection menus.
Select using [Á] and [OK]: Base Settings → Call preparat. → Canc. call park.
Enter the parking number assigned previously and confirm with [OK].
"Cancel CallPark" after answering a call
1.
2.
3.
4.
Press c.
Press G for the menu.
Select using [Á] and [OK]: Canc. call park.
Enter the parking number assigned previously and confirm with [OK].
43
Gigaset 4170/4175isdn, A31008-G4170-B100-2-7619
Anlage.fm
21.2.02
Special functions
Special functions
Step
by
Step
Copying telephone directory entries
If you have registered two or more Gigaset 4000/3000/2000 Comfort devices
you can copy all or part of the telephone directory from one handset to another.
Please read the relevant operating instructions.
Configuring an external destination call number for the room
monitor
Using the room monitor function, the Gigaset 4000 and 3000/2000 Comfort
handsets can automatically activate a call when a particular noise level is exceeded.
Gigaset 4000 Comfort/Micro
With Gigaset 4000 Comfort handsets, the room monitor number can be input
in the handset directly. Both an internal (INT) and an external number can be
entered.
For details, please refer to the operating manual for your handset.
Gigaset 3000/2000 Comfort/Micro
1.
2.
3.
4.
With Gigaset G3000/2000 Comfort handsets, the room monitor number can
only be entered as an internal (INT) number. In order to activate it externally as
well:
– must be entered as the internal number on the handset INT 99. For details,
please refer to the operating manual for your handset.
– an external destination number called can be entered in the base station as
described below.
Press G for selection menus.
Select using [Á] and [OK]: Base Settings → Settings → System settings
→ Ext.room monit. → Dest.call no. → [W] → Change number.
Enter the number and press [W].
Select using [Á] and [OK]: Save entry.
Press { to return to the starting menu. Alternatively, the
a button can be pressed. The option Ext.room monit. in the menu
System settings is now highlighted.
Night service
With the night service feature you can configure timed call forwarding, e.g. to
divert calls to a private telephone outside office hours. In the same way as external call forwarding, only MSNs that the relevant handset has configured as
an incoming MSN can be forwarded externally. If the night service is already
activated, it must be deactivated again in order to alter the forwarding destination.
44
Gigaset 4170/4175isdn, A31008-G4170-B100-2-7619
Anlage.fm
21.2.02
Night service
Setting an internal/external Night Service forwarding destination
Step
by
1.
2.
Step
or
Press G for selection menus.
Select using [Á] and [OK]: Base Settings → Night service → (required MSN) →
Forward. dest.→ External, Internal or one of the maximum of 3 answering machines.
The option "Answ. Machine" is only offered with Gigaset 4175isdn. If you select
this option all calls are forwarded to one of the three answering machines.
3.
4.
Entering an external destination call number:
Enter the external destination call number for night service and press [ W].
Select with [OK]: Save entry.
3.
Entering an internal destination call number:
Select using [Á] and [OK]: (required internal subscriber).
Entering an automatic start/end time for night service
1.
2.
3.
4.
Press G for selection menus.
Select using [Á] and [OK]: Base Settings → Night service → (required MSN) →
Start time or End time.
Enter start time or end time and confirm with [W].
Select using [Á] and [OK]: Save entry.
Activating/deactivating all-day night service for Saturday/Sunday
1.
2.
3.
Press G for selection menus.
Select using [Á] and [OK]: Base Settings → Night service → (required MSN) →
Sat/Sun all day.
Press [OK] key, night service is activated. (9 before Sat/Sun all day = ON, none
9 = OFF).
Activating/deactivating night service
1.
2.
Press G for selection menus.
Select using [Á] and [OK]: Base Settings → Night service → (required MSN) →
Select Activate? or Deactivate?
45
Gigaset 4170/4175isdn, A31008-G4170-B100-2-7619
Anlage.fm
21.2.02
Displaying costs and call duration
Displaying costs and call duration
Step
by
Step
Call charge display
You can use call charge display if you have registered for this with your provider.
The units/total charges accumulated and the cost of the last call completed can
(depending on programming) be checked using your Comfort handset. The total cost includes the charges incurred by the handset. If you do not receive tariff
information from your provider the duration of the call will be displayed.
Configuring determination of costs
Check with your provider as to whether the call costs will be transmitted as tariff units or as amounts. You can then set the accounting method accordingly
as either units centr.off. or costs centr.off..
If you have selectedcosts centr.off. but only units have been transmitted by the
service provider, the device automatically switches to units centr.off. when the
call is completed.
1.
2.
3.
4.
4
Info
1.
2.
3.
4.
46
Setting up costs centr.off.
Press G for the selection menus.
Select using [Á] and [OK]: Costs.
Select using [Á] and [OK]: Type of calcul.
Select using [Á] and [OK]: costs centr.off.
If the item is marked with 9 the call costs transmitted by the provider will be
displayed. No further settings are needed.
If you have also entered a rate (see Secti on, "Entering the price per unit") the
call costs will be multiplied by this rate. You can also use a rate if you want to
bill for higher call costs, otherwise disable the rate (the cost display is to be increased by factor 2, for example).
Setting up units centr.off.
Press G for the selection menus.
Select using [Á] and [OK]: Costs.
Select using [Á] and [OK]: Type of calcul.
Select using [Á] and [OK]: units centr.off.
If the item is marked, the units transmitted by the provider will be displayed or
used to calculate the costs. If the default setting No rate is used, the units will
be displayed.
Gigaset 4170/4175isdn, A31008-G4170-B100-2-7619
Anlage.fm
21.2.02
Displaying costs and call duration
Step
by
Step
1.
2.
3.
4.
5.
6.
7.
8.
9.
Entering the price per unit
Before the charges for each call can be calculated, the currency and price per
unit must be defined (the default setting is No rate). For determining the costs,
units centr.off. must be set (default).
Press G for the selection menus.
Select using [Á] and [OK]: Costs.
Select using [Á] and [OK]: Type of calcul.
Select using [Á] and [OK]: Rate --.-- (with decimal point) or
Rate ---- (without decimal point).
Enter the basic price and confirm with [W].
Select using [Á] and [OK]: Save entry.
If you would like to set an additional currency:
Enter the currency and confirm [W].
Select using [Á] and [OK]: Save entry.
If No rate was already set a prompt is displayed.
Confirm the prompt for accounting method with [YES].
All accounts are reset and the option is highlighted.
Displaying a cost overview
1.
2.
3.
Depending on the setting, call or charge units are displayed for each internal
subscriber, for each configured MSN, and for the system as a whole.
Press G for the selection menus.
Select using [Á] and [OK]: Costs.
Select using [Á] and [OK]: Cost overview.
The accounts for each internal subscriber and for each configured MSN are displayed. The total amount is shown at the start of the list.
1.
2.
Info
Deleting the cost overview total
You are in the cost overview display:
Select using [Á] and [W]: (required cost overview).
Select using [Á] and [OK]: Delete amount.
Totalled and individual costs must be deleted separately. This means that if you
delete an MSN total for example, the individual charges incurred remain stored
in the handset and must be deleted individually.
Display last call costs
1.
2.
3.
The total costs and the costs for the last call made on this handset can be displayed when the "talk" key is pressed.
G is pressed for the menu.
Press [Á] and [OK] to select: Costs → Last charge
(9before menu item = ON / none = OFF)
Pressa.
47
Gigaset 4170/4175isdn, A31008-G4170-B100-2-7619
sms.fm
21.2.02
Short messages (SMS)
Step
by
Short messages (SMS)*
Step
With Gigaset 4000 Comfort/Micro handsets you can send and receive short
messages (SMS – Short Message Service). For this function, you need an SMS
provider.
With the SMS service, you can send an SMS to any connection in the fixed network and, depending on the SMS provider, in mobile networks too. Your SMS
can be received as a short message on devices with SMS capability (mobile
phone, PC, other telephone). If the party receiving your SMS does not have a
telephone with SMS capability, the SMS is sent as voice output.
Incoming SMS messages are stored in the base station. Thus you can read,
write or forward your SMS messages on any mobile handset which has the
same MSN. If several handsets are in use, only one handset can access SMS
messages at any one time.
Requirements
Enquire
● which SMS providers are available.
Use the Internet for your search: Enter the terms "SMS" and "fixed network"
in a search engine.
● what charges are levied for sending and, where applicable, receiving an
SMS,
● to which mobile phone operators you can send an SMS and from which mobile phone operators you can receive an SMS,
● which functions are offered by your SMS service.
Administering SMS service centres
SMS messages are exchanged through SMS centres. In order to be able to
send and receive SMS messages, you need the call number of the SMS centre
of your service provider.
You can enter up to 10 SMS centres in your Gigaset 4170/4175isdn.
The meaning of the entries for sending and receiving SMS messages is explained below.
Sending SMS messages
The call number of the SMS centre you want to use for sending SMS messages
must be entered and activated in your Gigaset 4175isdn (see section below).
This number will be used automatically for sending all SMS messages. In other
words, you can only send SMS messages via this SMS centre.
Receiving SMS messages
In order to be able to receive SMS messages via an SMS centre, you must be
registered with this SMS centre. You can register to receive SMS messages
with up to 10 SMS centres of different service providers. As soon as you have
registered with an SMS centre you will be able to receive SMS messages via
this SMS centre. Please find out from the service provider concerned what information you need to send in order to become registered with their SMS centre.
*
48
Not available in each country.
Gigaset 4170/4175isdn, A31008-G4170-B100-2-7619
sms.fm
21.2.02
Entering, changing or deleting SMS centre numbers.
Before you can send an SMS message to register and deregister with any other
SMS centre, you must first enter and activate the call number of this SMS centre (see next section).
After registering or deregistering do not forget to reactivate the call number of
the SMS centre you want to use for sending SMS messages (see pa ge49).
Step
by
Step
Entering, changing or deleting SMS centre numbers.
1.
2.
or
3.
4.
5.
6.
4.
Info
You can enter up to 10 SMS centres.
Before making or changing an entry, make sure you are fully informed about
special conditions and services offered by the SMS service provider.
Press G for selection menus.
Select using [Á] and [OK]: Base Settings → Settings → Service centres (the list
of call numbers appears).
Select using [Á] and [W]: <empty> or existing call number.
Select using [Á] and [OK]: Edit entry.
Enter call number and confirm with [W] .
Select using [Á] and [OK]: Save entry.
Press [Á] and [OK] to select: Delete entry SMS centre is deleted.
If you are running your Gigaset 4170/4175isdn on a telephone system, you may
have to enter a prefix (exchange code*) before the number, depending on the
configuration of your telephone system.
In this case, you should contact the vendor to find out whether your telephone
system places the prefix before the number when transmitting the number
(CLIP) to the Gigaset 4170/4175isdn. If you cannot obtain any information, you
can find out whether or not you need to add a prefix by trial and error, (sending
an SMS see page 50).
Activating/de-activating an outgoing SMS centre
1.
2.
3.
4.
or
4.
Info
The required SMS centre must be activated in order to send SMS messages. In
this way, you specify the SMS centre through which the SMS messages are to be
sent. SMS messages may be received through all the SMS centres registered provided you have identified yourself as a connection with SMS capability beforehand
by following the appropriate registration procedure (see next chapter).
Press G for selection menus.
Select using [Á] and [OK]: Base Settings → Settings → Service centres (the list
of call numbers appears).
Select using [Á] and [W]: desired call number.
Select using [Á] and [OK]: Serv.centre on? The display changes to Send off?
The SMS centre is activated. The call number of the sending centre is marked
with 9.
Select using [Á] and [OK]: Send off? SMS centre is deactivated.
If you have not activated an outgoing SMS centre, you cannot send any SMS
messages, but you can receive SMS messages from all the registered SMS
centres.
*
The number you use to seize a trunk line, generally "0".
49
Gigaset 4170/4175isdn, A31008-G4170-B100-2-7619
sms.fm
21.2.02
Registering/deregistering with the SMS call centre
Registering/deregistering with the SMS call centre
Step
by
In order to receive SMS messages with your Gigaset 4170/4175isdn, you must
first register your number with the SMS service provider. To find out what information you need to send for registration/de-registration with the SMS centre, please refer to the information supplied by the relevant service provider.
Step
Info
When registering, please ensure that you register the number (MSN) allocated
to the handset as the outgoing MSN with which you will send the SMS. If you
also wish to send and receive SMS messages with other outgoing MSNs
through other handsets, you must also register these numbers.
Writing, saving and sending SMS messages
An SMS message may not contain more than 160 characters. SMS messages
are only automatically saved if transmission is interrupted. If you have written
an important SMS message which you want to save, you must save it first, before sending it.
Writing an SMS
1.
2.
3.
4.
Press G for selection menus.
Select using [Á] and [OK]: Text Message.
Select using [Á] and [OK]: Write Message.
Entering a short message.
Hi Peter, can’t come to
sports today because I have
an appointment with the dentist.
W
Info
¨
Input functions
H
Controlling the cursor in the text field.
Characters may later be inserted to the right of the cursor.
W Deleting characters to the left of the cursor.
]
«
5.
1x inserting a space.
1x Switching upper case/lower case after a space.
Press [©] to open the menu.
Save SMS (without sending it)
1.
2.
Write an SMS as described on page 50.
Press D and [OK] to select: Save Text
The SMS is saved in the outgoing messages list and can be sent at a later
stage.
Send SMS (without saving it)
1.
50
Write an SMS as described on page 50.
Gigaset 4170/4175isdn, A31008-G4170-B100-2-7619
sms.fm
21.2.02
Writing, saving and sending SMS messages
Step
by
Step
or
2.
3.
Press [OK] to select: Send Text
Enter recipient’s number (destination number). Even for the local network, the
number must always include the area code (prefix). In the case of numbers
with an international prefix, "00" must be entered. Entering "+" is not permitted.
3.
Press [©] to open the menu and then press [Á] and [OK] to select: No.from
dir..
Select the required entry and press [OK] to confirm. The number is accepted.
If you have stored this number with a prefix in your telephone book, it must be
deleted to send an SMS.
Press [©] to open the menu.
Press [OK] to select: Press Send and a.
SMS is transmitted, the SMS centre automatically inserts your connection
number as the source address.
4.
5.
Info
● If you receive a phone call or an SMS message while you are writing or send-
ing an SMS message, your message will be saved in the outgoing messages
list. You can pick up the call and write or send your SMS message later on.
● SMS messages which cannot be sent after several attempts are marked
with an error code and saved in the list of incoming messages (see your network provider's error code list).
● You can find out from the SMS service of your network provider whether an
SMS message has been delivered or not.
● If there is a power cut, all settings and saved SMS messages are preserved.
51
sms.fm
Gigaset 4170/4175isdn, A31008-G4170-B100-2-7619
21.2.02
Sending an SMS to an e-mail address (SMS to e-mail)
Sending an SMS to an e-mail address (SMS to e-mail)
Step
by
Step
1.
2.
You can send SMS messages to an e-mail address.
Prepare an SMS as described on page 50.
Enter the e-mail address in the text field in front of the SMS text.
The at character ("@") is replaced by a "*" (press « 2x) and the address ends
with ":" (press Þ 8x).
Then enter the SMS text.
p.mustermann*name.de: Hi
Peter …
W
3.
4.
5.
¨
Press [©] to open the menu and press [OK] to select: Send Text.
As the destination number, enter 6245 for the e-mail service.
This corresponds to the key combination (vanity number):
M
A
I
6
2
4
L
5
MNO
ABC
GHI
JKL
Press [©] to open the menu and press [OK] to select: Press Send and a.
Sending an SMS as a voice message (SMS to speech)
1.
2.
In this case, the SMS message is converted to speech and can then be transmitted by any telephone connection.
Prepare an SMS as described on page 50.
Enter the recipient’s number in front of the SMS text in the text field.
Then enter the SMS text.
089123456: Hi Peter …
W
3.
4.
5.
52
¨
Press [©] to open the menu and press [OK] to select: Send Text.
As the destination number, enter 773324 for language conversion.
This corresponds to the key combination (vanity number):
S
P
E
E
C
7
7
3
3
2
4
PQRS
PQRS
DEF
DEF
ABC
GHI
H
Press [©] to open the menu and press [OK] to select: Press Send and a.
Gigaset 4170/4175isdn, A31008-G4170-B100-2-7619
sms.fm
21.2.02
Querying remaining memory
Querying remaining memory
Step
by
Step
1.
2.
3.
You can query the remaining SMS memory (in %).
Press G for selection menus.
Select using [Á] and [OK]: Text Message
Select using [Á] and [OK]: Available memory. Free memory will be shown in
percent.
List of incoming messages
The incoming messages list contains all SMS messages received and all messages which could not be delivered, together with an error code.
Reading or deleting messages received
When a new SMS message arrives, the status LED starts flashing on all mobile
handsets with the same incoming MSN, and they all show »You have a new
message« in the display.
The date and time (as transmitted by the SMS centre) is indicated for each SMS
message received. SMS messages are sorted after being received. New messages are placed before old messages.
2.
If there are no answering machine messages or missed calls (missed calls
list)
Press ? for New messages.
The messages received list is opened and the last SMS received is displayed.
Press [Á] and [W] to select: (required SMS).
1.
2.
If there are new messages on the answering machine or entries in the
missed calls list
Press ? for New messages.
Press [Á] and [OK] to select: Textmessage(SMS).
1.
3.
or
3.
or
3.
Info
Reading an SMS message
Select using [Á] and [OK]: Read textmessage. Press D to see the continuation of the message in the display.
After a new message has been read, its status changes to "Old SMS".
Deleting an SMS message
Select using [Á] and [OK]: Delete textmess. After a message has been deleted,
the next message (if there is one) or the previous message is shown.
Delete all SMS messages received
Select using [Á] and [OK]: Delete list.
● You can also open the list of incoming messages with G, Text Message
[OK] and [Á] Inbox [OK].
● If the messages received memory is full, you will receive the message: Text
list full! Please delete entries. One by one, remove the SMS messages no
longer required from the messages received/sent list. In total, you can store
a minimum of 25 and a maximum of 99 SMS messages in the two lists.
53
Gigaset 4170/4175isdn, A31008-G4170-B100-2-7619
sms.fm
21.2.02
List of incoming messages
Displaying, dialling or saving in the directory the call number
from the SMS message
Step
by
Step
1.
2.
3.
4.
Press G for selection menus.
Select using [OK]: Text Message.
Select using [Á] and [OK]: Inbox .
Select using [Á] and [W]: (desired message).
5.
Display incoming MSNs (for whom is the SMS intended)
Press [Á] and [OK] to select: Display entry.
The incoming MSN is displayed.
6.
Display the SMS sender’s number (from whom did the SMS come)
Select using [Á] and [OK]: Display entry. The call number will be displayed.
or
6.
Dialling the call number of the SMS message
Select using [Á] and [OK]: Dial number.
or
6.
Saving the call number of the SMS message in the telephone directory
Select using [Á] and [OK]: Copy to dir.
Options for reading SMS messages
1.
2.
3.
4.
5.
6.
54
When you read an SMS message, you can use the following functions via the
menu.
Press G for selection menus.
Select using [OK]: Text Message.
Select using [Á] and [OK]: Inbox 1/2 (e.g. 1 new, 2 old entries).
Select using [Á] and [W]: (desired message).
Select using [Á] and [OK]: Read textmessage
Select [W] to open menu.
7.
Writing a new message as answer
Select using D: Write Message. The input field is opened.You can write a
message and then send or save it (see page 50).
or
7.
Answer "Yes" or "No"
Select using D: Answer: Yes or Answer: No. "Yes" or "No" will be attached to
the received message. After this you can send the message or save it in the
outgoing messages list (see page 50).
or
7.
Modifying and answering SMS messages after reading them
Select using D: Use Text. You can modify or extend a received message and
then send it or save it in the outgoing messages list (see pag e50).
or
7.
Forwarding SMS messages
Select using D: Forward Text. The call number field will be opened. Enter the
call number with area code to which the message is to be forwarded.
or
7.
Saving call number of the message in the telephone directory
Select using D: Copy to Directory.
Gigaset 4170/4175isdn, A31008-G4170-B100-2-7619
sms.fm
21.2.02
List of outgoing messages
List of outgoing messages
Step
by
Step
Info
The outgoing messages list shows all messages which:
● you have saved (see pag e50),
● which the system automatically saved because you were interrupted while
writing the SMS (e.g. by an incoming call).
These messages are kept in the memory until you delete them.
● Messages which are sent without being saved are deleted.
● In total, you can store a minimum of 25 and a maximum of 99 SMS in the
messages received/sent list.
Reading or deleting saved SMS messages
1.
2.
3.
4.
Press G for selection menus.
Select using [OK]: Text Message.
Select using [Á] and [OK]: Outbox 3 (e.g. 3 entries).
Select using [Á] and [W]: (desired message).
5.
Reading saved SMS messages
Select using [Á] and [OK]: Read textmessage. Press [Á] to see the continuation
of the message in the display.
or
5.
Deleting saved SMS message
Select using [Á] and [OK]: Delete textmess. After a message has been deleted,
the next message (if there is one) or the previous message is shown.
or
5.
Deleting all saved SMS messages
Select using [Á] and [OK]: Delete list.
Displaying, dialling or saving in the directory the call number from the
SMS message
or
or
1.
2.
3.
4.
Press G for selection menus.
Select using [OK]: Text Message.
Select using [Á] and [OK]: Outbox 3 (e.g. 3 entries).
Select using [Á] and [W]: to select: (desired message).
5.
Displaying the call number of saved SMS message
Select using [Á] and [OK]: Display entry. The call number will be displayed.
5.
Dialling the call number of the saved SMS message
Select using [Á] and [OK]: Dial number.
5.
Saving the call number of the saved SMS message in the telephone
directory
Select using [Á] and [OK]: Copy to dir.
Options for reading a saved SMS message
1.
2.
3.
When you read a saved SMS message, you can use the following functions via
the menu.
Press G for selection menus.
Select using [OK]: Text Message.
Select using [Á] and [OK]: Outbox 3 (e.g. 3 entries).
55
Gigaset 4170/4175isdn, A31008-G4170-B100-2-7619
sms.fm
21.2.02
Further SMS features
Step
by
Step
or
4.
5.
6.
Select using [Á] and [W]: (desired message).
Select using [Á] and [OK]: Read textmessage.
Select [W] to open menu.
7.
Writing a new message as answer
Select D: Write Message. The input field is opened. You can write a message
and then send or save it (see page 50).
7.
Sending saved SMS messages
Select D: Use Text. You can modify or extend a saved message and then send
it (see page 50).
Further SMS features
Find out which of the following SMS features are offered by your network provider and which call numbers and codes you should use.
For the current range of SMS services available, please contact your service
provider.
SMS service behind ISDN telephone systems
If your Gigaset 4170/4175isdn is connected to an ISDN telephone system,
please refer to the instructions regarding SMS functions for your telephone system.
Fault during transmission of an SMS message
Interrupted transmissions will be charged for.
The following error codes may be displayed:
Error code
E0
FE
FD
C3
Description
Permanent suppression of activated number (CLIR).
Error during transmission of the SMS
Error in making connection with the service centre
Wrong SMS number
E0: SMS messages cannot be sent if your station number transmission has
not been released.
FD: If the SMS centre number was missing or if it was stored incorrectly, SMS
messages cannot be sent or received. The wrong SMS centre number also
appears in you caller list; please delete this number there. Check the SMS
centre number to ensure that it has been correctly stored (see p age49).
Info
56
SMS messages with special features such as graphics or sound are not supported by your Gigaset 4170/4175isdn.
Gigaset 4170/4175isdn, A31008-G4170-B100-2-7619
Anrufbeantwort-
21.2.02
Answering machine (Gigaset 4175isdn only)
Answering machine
(Gigaset 4175isdn only)
Step
by
Step
The Gigaset 4175isdn has three answering machines (AMs). Any MSN can be
assigned to any answering machine. However, an individual MSN cannot be assigned to more than one answering machine at a time. Only one message can
be recorded at a time. Answering machines which you have hidden (see
page 21) or (see page 58) are not shown in the corresponding menus.
Answering machine-access options
MSN not set (factory default):
– Every AM can be set and monitored from any handset/terminal.
– Once activated, AM1 will answer all calls.
One or more MSN allocated:
– The AM in question can only be set and monitored from handsets/terminals
with the same incoming MSN.
– Exception: If an incoming MSN is exclusively allocated to an AM and therefore to no other handset/terminal, this AM can be used by all internal users.
Assigning an incoming MSN to the AM
1.
2.
3.
4.
Press G for selection menus.
Select using [Á] and [OK]: Base Settings → Settings → Setup user
→ Setup device.
Select using [Á] and [W]: (Int: 91 AM 91 for AM 1, Int: 92 AM 92 for AM 2, Int:
93 AM 93 for AM 3).
Select using [Á] and [OK]: Receive MSN → (relevant MSN).
Selecting an answering machine
1.
2.
Press G for the selection menus.
Select using [Á] and [OK]: Voice mail → (required AM).
The list of answering machines only contains those answering machines assigned for this Comfort handset. If only one answering machine can be accessed from this Comfort handset, the selection list is ignored.
On the Gigaset 4000 Comfort you can access the list of answering machines
by a long press on digit key 1.
Activating/deactivating the answering machine
1.
2.
Press G for selection menus.
Select using [Á] and [OK]: Voice mail→ (desired AM) → Activate? or Deactivate?
57
Gigaset 4170/4175isdn, A31008-G4170-B100-2-7619
Anrufbeantwort-
21.2.02
Hiding/showing answering machines
Hiding/showing answering machines
Step
by
Step
1.
2.
or
3.
4.
4.
If you want to operate only one answering machine for your line (e.g AM91),
you can hide the other AMs in all displays and menus with this procedure. The
procedure deactivates any active AM. The AM returns to its previous condition
when it is shown again.
If there are still any messages on an AM which you want to hide, you will be
informed of this during the procedure.
Press G for selection menus.
Select using [Á] and [OK]: Base Settings → Settings → Setup user → Setup device. The list of internal numbers will be displayed.
Select internal no. of the desired AM (e.g. AM93) using [Á] and [W].
Select and confirm using [Á] and [OK]: Hide AM?.
Select and confirm using [Á] and [OK]: Show AM?.
Activating an announcement
1.
2.
3.
You can activate announcement 1 or 2, or the information announcement. If
available, the concluding announcement is automatically activated in connection with announcement 1 or 2.
If you have not recorded an announcement, the factory default announcement
is used.
Select using G and [OK]: Voice mail → (desired AM) → Announcements.
Select using [Á] and [W]: (required announcement).
Select using [Á] and [OK]: Select.
Recording/modifying announcements
1.
2.
3.
4.
5.
6.
58
A total of 4 announcements can be recorded:
● Announcement 1
● Announcement 2
● Announcem. only
● Concl.announcem
Select using G and [OK]: Voice mail → (desired AM) → Announcements.
Select using [Á] and [W]: (required announcement).
Select using [Á] and [OK]: Record.
Press [START]: start recording.
Record announcement.
Press [STOP]: end recording.
The announcement is played back so that you can check it.
Recording is automatically aborted if:
● you pause for more than 8 seconds while recording the announcement
● the memory is full
Gigaset 4170/4175isdn, A31008-G4170-B100-2-7619
Anrufbeantwort-
21.2.02
Playing back/deleting announcements
Playing back/deleting announcements
Step
by
Step
Checking/deleting announcements
or
1.
2.
3.
3.
4.
Select using G and [OK]: Voice mail → (desired AM) → Announcements.
Select using [Á] and [W]: (required announcement).
Select using [Á] and [OK]: Playback.
Select using [Á] and [OK]: Delete.
When deleting an announcement: Confirm prompt with [YES].
Recording memos
1.
2.
3.
4.
Memos are "spoken messages" which are left for family members, for example.
A memo can be played back like a message, saved and deleted.
Select using G and [OK]: Voice mail → (desired AM)
→ Announcements → Memos → Record memo.
Press [START]: start recording.
Record memo text.
Press [STOP]: end recording.
If the memory is full or if you pause for more than 8 seconds while recording
the announcement, recording is automatically aborted.
Recording a call
1.
2.
3.
Info
You can record a call and then listen to and delete the recording like any other
message.
During a call:
Press G for the menu.
Select using [Á] and [OK]: Record → (required AM).
Recording starts immediately.
Press [STOP]: Recording ends.
Recording also stops when the call ends or if the memory is full.You should
always let the other person know you that you intend recording the call.
59
Gigaset 4170/4175isdn, A31008-G4170-B100-2-7619
Anrufbeantwort-
21.2.02
Listening to messages
Listening to messages
Step
by
You can access new messages directly using the letter symbol [J] on the Gigaset 3000/2000 Comfort handset.
New messages are indicated on the Gigaset 4000 Comfort by a flashing status
LED. Pressing the message button ? gives you direct access to new messages.
You can start playback by holding down the ] button (if more than one answering machine contains messages you first need to select the answering
machine).
You can call up all saved messages as follows:
Select using G and [OK]: Voice mail → (desired AM) → Messages
→ New messages or All messages. Select using G and [OK]: Playback begins.
Press [Á] or [À] to go to the next or previous message.
Press Å to repeat the last 5seconds of the current message. If fewer than
5 seconds have elapsed, the message is played from the start again. During
the pause you can start the next message by pressing Æ.
Step
Listening to memos
Select using G and [OK]: Voice mail → (desired AM) → Memos
→ New memos or All memos. Select using [Á] and [OK]: Playback begins.
Press [Á] or [À] to go to the next or previous memo.
Deleting messages and memos
You can delete messages or memos either individually or together. Messages
and memos can only be deleted if they have been played back for at least three
seconds. These recordings are then classified as old.
Deleting individual messages or memos
1.
2.
3.
Select using G and [OK]: Voice mail → (desired AM) → Messages
→ All messages or → Memos → All memos.
Select using [Á] or [À] and [W]: (required message or memo).
Select using [Á] and [OK]: Delete message or Delete curr.memo.
The current message or memo is deleted.
Delete all old messages
1.
2.
3.
4.
60
Select using G and [OK]: Voice mail → (desired AM) → Messages
→ All messages or → Memos → All memos.
Press [W]: branch to the supplementary menu.
Select using [Á] and [OK]: Del.old messages or Delete old memos.
Confirm prompt with [YES].
Gigaset 4170/4175isdn, A31008-G4170-B100-2-7619
Anrufbeantwort-
21.2.02
Set old message to "New"
Callback during playback
Step
by
Step
1.
2.
1.
2.
. 3.
While you are playing a message you can call the caller back immediately, provided the caller's number was sent with the message.
Press [W] during playback.
Select using [Á] and [OK]: Call back.
The subscriber is called.
If you have stored one or more providers on the handset you can make the callback with a provider call number.
Press [W] during playback.
Select using [Á] and [OK]: No.from provider/NET list.
Select using [Á] and [OK]: (Provider)
The subscriber is called.
Set old message to "New"
1.
2.
Messages which have already been monitored can be set to "New", so that this
message is shown as a new entry by a flashing status LED or by text in the
display.
By pressing the messages key ? you will again have direct access to the
message.
During playback, press [W].
Press [Á] and [OK] to select: Status to 'new'.
Only the current recording is again "new".
Playback continues if further messages have been recorded.
Set playback speed
1.
2.
3.
The playback speed for a message can be set in four steps.
During playback, press [W].
Press [Á] and [OK] to select: Speed.
Select required speed, e. g. Fast and press [OK] to accept (9 before menu item
= ON / none = OFF).
Playback continues at the new speed. The speed selected is stored.
Add number to telephone book
1.
2.
While a message is being played back, you can have the caller’s number displayed and stored in the telephone book.
Requirement: The caller’s number was transmitted to you.
During playback, press [W].
Press [Á] and [OK] to select: Save number → (enter a name) → [W] → Save
Entry.
61
Gigaset 4170/4175isdn, A31008-G4170-B100-2-7619
Anrufbeantwort-
21.2.02
Modifying settings
Step
Modifying settings
by
Step
Defining the number of rings
Factory setting: Automatic 2/4. In this case the answering machine operates as
follows: if there are no new messages, the announcement is activated after 4
ring cycles; if new messages have already been left, the announcement is activated after 2 cycles. When you check your messages remotely, this enables
you to tell after 3 ring tones that there are no new messages. If you hang up
immediately, no call charges are incurred.
Select using G and [OK]: Voice mail → (desired AM) → Settings
→ No. of rings → (1-9) or (Automatic 2/4).
Activating/deactivating voice output of the date and time
If the time stamp is activated, all messages include the day, date and time of
recording.
Select using G and [OK]: Voice mail → (desired AM) → Settings
→ Message/Memo → Time stamp.
Defining recording length
The message can either be 1minute, 2minutes or 3minutes long, or of maximum length.
Select using G and [OK]: Voice mail → (desired AM) → Settings
→ Message/Memo → Message length → (required recording length).
Setting recording quality
If you set the recording quality to high, this reduces the available recording
time. At standard recording quality (which is normally sufficient), the memory
can support 35 minutes, at high quality 12 minutes.
Select using G and [OK]: Voice mail → (desired AM) → Settings
→ AM quality → High quality or Long recording.
Activating automatic pause
When automatic pause is activated, the answering machine switches automatically to pause status after a message or memo has been played back.
Select using [G] and [OK]: Voice mail → (desired AM) → Settings
→ Automatic pause.
62
Anrufbeantwort-
Gigaset 4170/4175isdn, A31008-G4170-B100-2-7619
21.2.02
Locking the answering machine
Locking the answering machine
Step
by
Your answering machine can be protected against third-party intervention with
an individual PIN (Personal Identification Number). The answering machine PIN
is also your access code for remote control of the answering machine.
Step
Activating/deactivating the answering machine
Select using G and [OK]: Voice mail → (desired AM) → Settings
→ AM lock (9 before the menu command = ON / no = OFF).
Setting a timer
You can control your answering machines with a timer function. A start time
can be defined for each announcement. For workdays (Monday to Friday) you
can set a separate start time for each announcement and switch off the answering machine at a particular time. At weekends (Saturday and Sunday) you
can either use the timer controls for weekdays, select one of the announcements for use all day or switch off the answering machine all day.
For example: A company has an emergency service outside of regular business
hours. However the announcement at weekends must differ from the announcement during the week. The following setting would be appropriate in
this case: Mon - Fri from 07:00 pm to 07:00 am: an announcement specifying
the emergency number. Sat + Sun from 00:00 am to 07:00 am: the second announcement.
Activating/deactivating the timer
Select using G and [OK]: Voice mail → (desired AM) → Settings
→ Time control → Activate? or Deactivate?
Setting the start time (Monday - Friday)
1.
2.
Info
3.
Select using G and [OK]: Voice mail → (desired AM) → Settings
→ Time control → Mon - Fri → (required announcement).
Enter the start time and press [W].
Entering a second start time generates the end of the previous one.
Select using [Á] and [OK]: Save entry.
Setting "Saturday - Sunday" mode
Select using G and [OK]: Voice mail → (desired AM) → Settings
→ Time control → Sat - Sun → (required function).
Automatic listening in on the handset
A Gigaset 4000 Comfort is assigned to an answering machine. You can set
whether the handset is switched automatically to open listening when a message is recorded.
Assigning a handset
Select using G and [OK]: Voice mail → (desired AM) → Settings
→ Aut. listen in → Select HS → required handset.
Activating/deactivating listening-in
Select using G and [OK]: Voice mail → (desired AM) → Settings
→ Aut. listen in → Activate? (or Deactivate?).
63
Gigaset 4170/4175isdn, A31008-G4170-B100-2-7619
Anrufbeantwort-
21.2.02
Picking up a call from an answering machine
Picking up a call from an answering machine
Step
by
To pick up a call from an answering machine, you need at least the "Incoming
only" access (Defining authorizations see page 69). A further requirement is
that the same incoming MSN must have been allocated to the answering machine and the internal user picking up the call, and that no other user is automatically monitoring calls on another handset.
Step
Activating/deactivating automatic AM pickup
1.
2.
Press G for selection menus.
Select using [Á] and [OK]: Base Settings → Settings → System settings
→ AM auto. pickup.
Picking up a call
A call is recorded.You answer the call using the
1.
or
1.
2.
3.
c
button.
Direct (setting AM Auto. Pickup is active)
Press c.
Indirect (setting AM Auto. Pickup is not active)
Press c.
Listen in on the call: press [OP.LIST], this allows you to listen in without the caller noticing.
Pick up the call: press [ACCEPT].
Querying the answering machine status
You can check the number of new and old messages (memos) and the answering machine settings.
Select using G and [OK]: Voice mail → (desired AM) → Status
→ Messages (or memos).
The number of new and old messages (memos) is displayed.
or
Instead of messages (memos), you can also check the following settings:
– Announcement (type of announcement)
– Recording (length/quality)
– Time control (on/off, announcement start times)
– Start options (number of rings)
– Playback (type, automatic pause)
– Remote options (remote control: on/off, remote delete: on/off)
– General (language, remaining memory)
64
Anrufbeantwort-
Gigaset 4170/4175isdn, A31008-G4170-B100-2-7619
21.2.02
Automatic notification via SMS
Automatic notification via SMS
Step
by
Your Gigaset 4175isdn can automatically send you an SMS message to an external call number when a new message is recorded on the answering machine. This SMS message will say, for example:
Step
"New message: 01712205625 for office 78581312 at 18:27 hours on THUR,
19.07. You have a total of 2 new AM messages".
Entering, changing destination number
1.
2.
3.
4.
5.
Select using G and [OK]: Voice mail → (desired AM) → Settings
→ SMS notificat.
Press display button [W]: Go into additional menu.
Select using [Á] and [OK]: Change number.
Press display buttons:X < > and enter digits to change number.
Press display button [W] → Save entry and [OK].
Deleting destination number
1.
2.
3.
Select using G and [OK]: Voice mail → (desired AM) → Settings
→ SMS notificat.
Press display button [W]: Go into additional menu.
Select using [Á] and [OK]: Delete number.
Activate/deactivate SMS notification
1.
or
2.
3.
3.
Select using G and [OK]: Voice mail → (desired AM) → Settings
→ SMS notificat.
Press display button [W]: Go into additional menu.
Select using [Á] and [OK]: Activate?
Select using [Á] and [OK]: Deactivate?
Remote control of the answering machine
You can control your answering machine from any registered handset or externally, e.g. listening to and deleting messages. The same procedures apply for
both remote control functions, the only difference is the way in which remote
control is activated. For remote operation you need to modify the answering
machine PIN (factory setting: 0000) to ensure maximum security. To ensure
full functionality for this type of operation, remote control and remote delete
must be enabled.
Modifying the answering machine PIN
1.
2.
3.
Info
Your Gigaset 4175isdn is delivered with the answering machine PIN 0000.
Select using G and [OK]: Voice mail → (desired AM) → Settings
→ Change AM-PIN.
Enter the new AM PIN (ma x . 8digits) and confirm with [OK].
Repeat the new AM PIN and confirm with [OK].
If you make a mistake when entering the PIN, you can delete the entry
using the X key and enter the correct PIN.
65
Gigaset 4170/4175isdn, A31008-G4170-B100-2-7619
Anrufbeantwort-
21.2.02
Remote control of the answering machine
Setting remote functionality
Step
Select using G and [OK]: Voice mail → (desired AM) → Settings
→ Remote options → Remote control and/or Remote delete.
by
Step
Operating the answering machine on the move
1.
2.
Remote control requires access to a telephone with DTMF (tone dialling). It is
important that the AM PIN has to be entered immediately while the announcement text is being played. In addition, Remote control and Remote delete must
be activated.
Dial your own call number.
Once the announcement has commenced, you can enter the AM PIN immediately.
Controlling the answering machine from the handset (internal)
Voice-controlled help is activated with the two-key functions; these are as follows:
0;
:;
6;
9;
1.
2.
3.
1.
2.
3.
Info
1.
2.
3.
66
for
for
for
for
delete help
new messages help
recording help
setup help
Comfort and standard handset
Press [INT].
Enter the internal call number for the answering machine: 91 or 92 or 93.
If the answering machine lock is active:
Enter the answering machine PIN.
Third-party handset (GAP mode)
Lift the handset. An additional key may have to be pressed in order to set up
an internal call.
Enter the internal call number for the answering machine: 91 or 92 or 93.
If the answering machine lock is active:
Enter the answering machine PIN.
Cordless telephone adapter and a normal telephone
Automatic line seizure (see page 77) must be deactivated. It is activated by default.
Lift the handset.
Enter the internal call number for the answering machine: 91 or 92 or 93.
If the answering machine lock is active:
Enter the answering machine PIN.
Anrufbeantwort-
Gigaset 4170/4175isdn, A31008-G4170-B100-2-7619
21.2.02
Remote control of the answering machine
Step
by
Step
Key sequences for remote control
Once you have commenced remote control for the answering machine, each
key has the same function, regardless of the telephone model.
1
2
3
Pause/stop
Record
4
5
6
Announcemen
t
On/off
Mode
7
8
9
New
Delete
Status/Help
:
0
;
Playing back messages and memos
All messages
New messages only
Pause/stop
Continue Playback
End Playback
2
:2
5
2
55
Skipping messages and memos
To start of message
Previous message
Next message
1
11
3
Deleting messages and memos
Individual message during Playback
All messages after Playback
02
02
Recording an announcement
Announcement 1
Announcement 2
Announcem. only
Concluding announcement
671
672
673
674
Playing back an announcement
Announcement 1
Announcement 2
71
72
67
Gigaset 4170/4175isdn, A31008-G4170-B100-2-7619
Anrufbeantwort-
Remote control of the answering machine
Step
by
Step
Playing back an announcement
Announcem. only
Concluding announcement
73
74
Selecting an announcement
Announcement 1
Announcement 2
Announcem. only
Concluding announcement
91
92
93
94
Recording internal memos
Begin recording
End recording
62
5
Activating/deactivating the answering machine
Activate/deactivate
8
Help
Query settings
Query single-key functions
68
;
;;
Query two-key functions
(see p. 66)
End query
5
21.2.02
Gigaset 4170/4175isdn, A31008-G4170-B100-2-7619
Sicherheit.fm
21.2.02
Security settings
Security settings
Step
by
Step
To change the system PIN
1.
2.
3.
4.
5.
6.
With the system PIN (Personal Identification Number) you can enter the following settings in the base station to prevent unauthorised access:
G → Costs
G → Base Settings → Ext. call forw.
G → Base Settings → Int. call forw.
G → Base Settings → Night service
G → Base Settings → Settings
G → Base Settings → Installation
The system PIN only takes effect if it is ≠ 0.
PIN number 0000 is assigned to your Gigaset 4170/4175isdn on delivery.
Press G for selection menus.
Select using [Á] and [OK]: Base Settings → Settings → Security.
Only for system PIN ≠ 0000: Enter system PIN and confirm with [OK].
Select using [Á] and [OK]: Change PIN.
Repeat the new base PIN (max. 8 digits) and confirm with [OK].
Repeat the new base PIN and confirm with [OK].
Note the new base PIN carefully. If you forget your PIN, the device will
need to be opened. In this case, contact the Siemens Hotline.
Defining authorizations
It is possible to set different authorizations for all registered devices:
1.
Unrestricted
(Default setting)
All devices can accept incoming calls and make outgoing external/internal
calls.
2. Incoming only
The devices can only accept incoming calls. External calls cannot be made.
Internal calls may be made.
Emergency numbers may be dialled.
3. Internal only
The devices can only accept and handle internal calls.
Calls to the emergency services can be made.
1.
2.
3.
4.
Press G for selection menus.
Select using [Á] and [OK]: Base Settings → Settings → Security.
Only for system PIN ≠ 0000: Enter the system PIN and confirm with [OK].
Select using [Á] and [OK]: Authorisation → (desired internal subscriber) → [W]
→ (desired authorization, 9 before menu command = ON / no = OFF).
69
Gigaset 4170/4175isdn, A31008-G4170-B100-2-7619
Sicherheit.fm
21.2.02
Emergency Nos.
Emergency Nos.
Step
by
Two or three emergency numbers (country-specific) are entered at the base
station. Five additional emergency numbers can be added to the following positions.
Step
Configuring new emergency numbers
1.
2.
3.
4.
5.
6.
7.
Info
Press G for selection menus.
Select using [Á] and [OK]: Base Settings → Settings → Security.
Select using [Á] and [OK]: Emergency nos. → <no entry>.
Confirm [W].
Select using [Á] and [OK]: Change number.
You can also delete or display an emergency number in this supplementary
menu.
Enter the new emergency number (max. 32 digits) and confirm [W].
Select using [Á] and [OK]: Save entry.
You can also add a number from the directory to this supplementary menu as
an emergency number, or use a provider number (if supported).
If your Gigaset 4170/4175isdn is connected to a telephone system, you must
enter the correct prefix, e.g. "0" in front of the emergency number. This also applies to fixed numbers already entered "110" and "112", which you may have to
re-enter as "0110" and "0112."
Dialling the emergency number
Info
1.
2.
3.
70
The emergency number may also be dialled on handsets with restricted access
(e.g. Internal only).
Press any key or c.
Confirm [EMERG.].
Enter the emergency number.
Gigaset 4170/4175isdn, A31008-G4170-B100-2-7619
Wahloptionen.fm
21.2.02
Operation using a telephone system
Operation using a telephone
system
Step
by
Step
Prefixes (access codes)
If your telephone is connected to a PABX, you may initially have to enter a prefix
(access code) for external calls. Please refer to the operating instructions for
your PABX. The prefix can consist of one to four digits.
In the case of incoming calls, the prefix is automatically added to the caller’s
number in the display, in the missed calls list and thus also in the telephone
directory (if copied there from the missed calls list). The number stored can be
dialled directly from the missed calls list (see page 35).
1.
2.
3.
4.
3.
Info
Entering a prefix (access code)
Press G for selection menus.
Select using [Á] and [OK]: Base Settings → Settings → System settings
→ Access code.
Confirm with [W] and enter the desired code.
Press [< > X] to select: delete, change or insert.
Confirm with [W] and select Save entry followed by [OK].
When dialling manually or entering telephone directory, emergency or DSS
numbers, the prefix must be specified explicitly.
Transferring a call – automatic call transfer
1.
2.
Info
With some ISDN systems, the original caller and the party called for enquiry
purposes cannot be connected simply by hanging up.
In this case, you must activating this function.
Please refer also to the operating instructions for your PABX.
Press G for selection menus.
Select using [Á] and [OK]: Base Settings → Settings → ISDN settings
→ Transfer(ECT) (9 before menu item = ON / no = OFF).
Use [OK] to toggle between ON and OFF.
If you activate this function, Ext. enq. call is automatically set (= in the central
office) (see pag e27).
71
Gigaset 4170/4175isdn, A31008-G4170-B100-2-7619
Wahloptionen.fm
21.2.02
Dialling options
Step
by
Step
Dialling options
With the KEYPAD function, you can control certain service elements by entering sequences of characters and numbers.
The KEYPAD function should be set when connecting your Gigaset 4170/
4175isdn to an ISDN telephone system or a switching centre (e.g. Centrex)
which is controlled by the KEYPAD protocol. In this case, the numbers/characters 0-9, *, # are sent as keypad information elements. For the information and
codes you can send, please contact your service provider.
If your Gigaset 4170/4175isdn is linked to a Centrex system, you can use the
following features.
Calling Name
Identification
(CNI)
In the case of incoming calls from other CENTREX subscribers, the number and name of the caller is shown on
the display.
Message Wait- On comfort handsets, the display key J is offered if there
ing Indication are new callers in the caller list.
(MWI)
Calling up the caller list results in deletion of the display key
J.
CENTREX call
The CENTREX call is signalled acoustically as an internal
call.
Setting options
You have the option of switching between Standard dial (factory default) Auto
keypad und Dial * and # settings.
Standard dial
Having switched on,Standard dial * and # are not transmitted when dialling and
when * and # are entered, the unit does not switch to keypad.
Auto keypad
When * or #are input, this setting automatically switches signalling to keypad
when dialling. This automatic switching is required for commands to the
switching centre or telephone system.
Dial * and #
When Dial * and # are activated, the characters * and # are sent as commands
to the switching centre or telephone system when dialling.
Regardless of the above setting options, the system is automatically switched
to tone dialling (DTMF) when dialling is complete, e.g. for telecontrol of an answering machine.
72
Gigaset 4170/4175isdn, A31008-G4170-B100-2-7619
Wahloptionen.fm
21.2.02
Dialling options
Activating standard dialling (ISDN)
Step
by
1.
2.
Step
G is pressed for menus.
Press [Á] and [OK] to select: Base Settings → Settings → System settings →
Spec. function → Dial properties → Standard dial (9 before menu item = ON /
none = OFF).
Activating automatic keypad switching
1.
2.
G is pressed for menus.
Press [Á] and [OK] to select: Base Settings → Settings → System settings →
Spec. function → Dial properties → Auto keypad (9 before menu item = ON /
none = OFF).
Activating * and # dialling
1.
2.
G is pressed for menus.
Press [Á] and [OK] to select: Base Settings → Settings → System settings →
Spec. function → Dial properties → Dial * and # (9 before menu item = ON /
none = OFF).
Activating/De-activating the keypad during a call
or
1.
2.
3.
2.
In addition to the long-term settings described above, you also have the option
of switching temporarily to keypad.
The setting only applies to an ongoing external call and is automatically de-activated when the call is finished.
Requirement: You are currently making a call.
G is pressed for menus.
Press [Á] and [OK] to select: Keypad on?.
Enter keypad character sequence (code).
Press [Á] and [OK] to select: Keypad off?.
Activate the keypad for the next call only.
1.
2.
All dialling characters (0-9, *, #) are sent as a keypad character sequence when
the next connection is made (dialling and call). When connected, the keypad
is retained and the unit does not automatically switch to tone dialling (DTMF).
G is pressed for menus.
Press [Á] and [OK] to select: Base Settings → Call preparat. → Temp. keypad
(9 before menu item = ON / none = OFF).
73
Gigaset 4170/4175isdn, A31008-G4170-B100-2-7619
Geraete.fm
21.2.02
Operation using other devices
Operation using other devices
Step
by
Step
Connecting wired analog devices
The internal numbers Int.21/Int.22are permanently allocated to the TAE connections.
Devices connected to them must not be
● registered with the base station and
● must be set for tone dialling (DTMF) (DP not supported).
Furthermore, the appropriate device type must be set and additional deviceZdependent settings must be made.
Costs are not displayed on connected devices. However, costs accruing are jrecorded in the base station and can be retrieved from a Comfort handset or the
PC.
Setting the device type
The following settings can be made (Specifying the device type see page 76).
see page 74, Telephone connections.
● Telephone
see page 75, Connecting a fax machine.
● Fax
see page 75, Connecting a modem.
● Modem
● Answering mach. see page 75, Connecting an answering machine.
see page 75, Connecting a fax machine.
● Neutral
see page 79, Configuring the entrance telephone.
● Door type1
● Doortype2(DTMF) see page 79, Configuring the entrance telephone.
see page 28, Configuring music-on-hold.
● Ext. music/hold
see page 76, No device connected.
● No function
Info
Please note the following explanations regarding device types and the additional device-dependent settings for them.
Telephone connections
With the factory default, the two TAE connections are set toTelephone.
This means that even without the handset, the base station is already in its
standby state with a telephone (with tone dialling/DTMF) connected to Int.21
or Int.22.
For details on how to make calls with wired telephones, see the chapter on
"Making calls with devices with TAE connection." , Page 77 .
If you also wish to make internal calls with this telephone, automatic line seizure for the corresponding TAE connection must be switched off (see page 77).
For external connections, the number must be prefixed by a zero.
74
Gigaset 4170/4175isdn, A31008-G4170-B100-2-7619
Geraete.fm
21.2.02
Connecting wired analog devices
Step
by
Step
Connecting a fax machine
To operate a fax machine or multifunction device (e.g. fax cum telephone) the
device type setting must be changed to Fax or Neutral.
For smooth fax operation independent of the settings for the remote station,
device type setting Neutral is recommended (with the Fax setting, a successful
fax connection depends on the settings for the remote station).
If you only set up external connections, automatic line seizure for the relevant
TAE connection must remain switched on. In this case, the fax machine or multifunction device should be set to "main station operation".
On the other hand, if you also wish to set up internal connections, automatic
line seizure must be switched off for the corresponding TAE connection (see
page 77). For external connections, the number must be prefixed by a zero, or
the fax machine or multifunction device must be switched to "telephone system operation" (see operating manual for the fax machine, multifunction device).
Use the option of assigning the fax its own number (MSN). Assign an exclusive
incoming MSN to the relevant TAE connection (see page 24).
With device type setting Fax, Call waiting and Hunt group are not supported.
With device type setting Neutral, Call waiting is not supported. When a "Dedicated" fax machine is connected, Hunt group must be switched off (see
page 31).
Connecting a modem
To use a modem, the device type setting must be changed to Modem.
If you only set up external connections, automatic line seizure for the relevant
TAE connection must remain switched on. In this case, the modem should be
set to "main station operation".
On the other hand, if you also wish to set up internal connections, automatic
line seizure must be switched off for the corresponding TAE connection (see
page 77). For external connections, the number must be prefixed by a zero or
the modem must be switched to "telephone system operation" (see operating
manual for the modem).
Connecting an answering machine
If you wish to use an answering machine (or telephone with an integrated answering machine) using the TAE connection, device type setting
Answering mach. is recommended. With this setting, a call can be picked up
by the answering machine (see page 78).
If a telephone is connected to an integrated answering machine and you also
wish to make internal calls with the telephone, automatic line seizure for the
corresponding TAE connection must be switched off (see page 77). For external calls, the number must then be prefixed by a zero.
With device type setting Answering mach., Call waiting and Hunt group are not
supported.
75
Gigaset 4170/4175isdn, A31008-G4170-B100-2-7619
Geraete.fm
21.2.02
Specifying the device type
No device connected
Step
by
For every TAE connection for which no device is connected, device typeNo
function must be set in order to prevent malfunctions with ISDN functions Reject all (see page 27) and Busy on busy (see page 27).
Step
Specifying the device type
1.
2.
3.
G is pressed for menus.
Press [Á] and [OK] to select: Base Settings → Settings → Setup user → Setup
device → Int.21 or Int.22 → Set.
Press [OK] to set (9 e.g. before Fax)
Gigaset M101 Data and M105 Data modules
Gigaset M101 Data with its V24 interface and Gigaset M105 Data with its USB
interface enable cordless PC connection to the base station, e.g. for Internet
access.
For setting up see the chapter entitled "Operating Gigaset talk&surf with a
cordless data module" in the installation instructions.
Gigaset Repeater
The Gigaset repeater allows you to increase the range of your handset.Your
Gigaset 4170/4175isdn is set up to use a Gigaset repeater (as an accessory).
Activating and deactivating the repeater capability
1.
2.
3.
4.
This function allows you to activate and deactivate the repeater capability.
Press G for selection menus.
Select using [Á] and [OK]: Base Settings → Settings → System settings →
Spec. function → Repeater.
Set using [OK]: 9 before the menu command = ON/no = OFF
To activate, press [NEXT]. The handset is then temporarily disabled.
Registering a repeater
1.
2.
Info
3.
4.
Gigaset repeater is switched off (power plug has been removed).
Press the illuminated registration key on the base station, the key flashes. The
base station only remains in registration mode while the key is flashing.
When carrying out this procedure, please ensure that no other base station is
in registration mode in the vicinity of the Gigaset repeater.
Plug in the Gigaset repeater.
The Gigaset repeater LED flashes intermittently. The LED soon remains on permanently to indicate that registration was successful and that it is in its standby
state.
For further information, please refer to the operating manual for the
Gigaset repeater.
76
Geraete.fm
Gigaset 4170/4175isdn, A31008-G4170-B100-2-7619
21.2.02
Registering cordless Gigaset 1000TAE
Registering cordless Gigaset 1000TAE
Step
by
The cordless Gigaset 1000TAE allows analog terminals e.g. telephones, fax
machines or answering machines to be operated cordlessly from your base station.
Step
1.
2.
The base station system PIN must be set to "0000" before the device is put into
operation, see To change the system PIN see page 69.
Press the green illuminated key on the base station.
Prepare the 1000TAE for registration (see the Gigaset 1000TAE operating instructions).
A connection is setup between the base station and the TAE. The 1000TAE is
assigned the lowest available internal number. An available internal number
cannot be selected via the 1000TAE.
Setting the device type for cordless TAE
When operating a cordless TAE on Gigaset 4170/4175isdn, you must define the
type of the connected device.
Making calls with devices with TAE connection.
Telephones with tone dialling (DTMF = dual-tone multi-frequency signalling)
can be used with TAE connections. Telephones with DP (dialling pulse) are not
supported. Setting the device type see page 74.
Activating/deactivating automatic line seizure
1.
2.
3.
4.
With automatic line seizure, the trunk line is seized immediately when the
handset is lifted. Normal internal dialling is thus no longer possible. By pressing
the [R] key, however, an internal call can be made by means of an internal enquiry.
Press G for selection menus.
Select using [Á] and [OK]: Base Settings → Settings → Setup user
→ Setup device.
Select using [Á] and [W]: (cordless subscriber, analogue subscriber or Gigaset
1000TAE subscriber or GAP handset subscriber).
Select using [Á] and [OK]: Auto. seizure.
Making external calls
Autom. line seizure deactivated
Autom. line seizure activated
‘0£
‘£
Making internal calls
Autom. line seizure deactivated
‘£
Making internal calls with GAP handsets
Autom. line seizure deactivated
‘ £ or I £
77
Geraete.fm
Gigaset 4170/4175isdn, A31008-G4170-B100-2-7619
21.2.02
Making calls with devices with TAE connection.
Collective calls to all internal subscribers
Step
by
Autom. line seizure deactivated
‘ :/ with GAP poss. I :
Step
Call waiting
You hear the call waiting tone during your external call.
“ Call
or
disconnected, wait for call signal ‘ ’
1 is put on hold
R ’ subscriber
Switching to waiting subscribers - toggle
R ’ subscriber
1 is put on hold,
R ’ subscriber
2 is put on hold, etc.
Conducting external enquiry calls
R 0£ (again R
switch between the call parties)
Making internal enquiry calls
R £ (repeated R
switch between the call parties)
Call transfer on/before answer.
.
R £ (internal) “
R £ (internal) ’ “
Picking up a call while the answering machine is operating
Calls can be picked up even while the answering machine connected to the
second analog connection is switched on, playing your announcement or recording a message. Once you pick up, the recording process is stopped.
Automatic call pickup can be deactivated (see pag e64) so that you can make
outgoing calls even while the answering machine is switched on.
Automatic line seizure must be switched off.
Info
78
Automatic call pickup active (factory
default)
Automatic call pickup not active
‘’
‘9R’
For call pickup, the answering machine and the internal subscriber called must
be assigned the same incoming MSN and the internal number of the answering machine must be assigned the device type Answering mach..
Gigaset 4170/4175isdn, A31008-G4170-B100-2-7619
Tuersprechstelle.fm
21.2.02
Operation with the entrance telephone
Operation with the entrance
telephone
Step
by
Step
Configuring the entrance telephone
3.
4.
Press G for selection menus.
Select using [Á] and [OK]: Base Settings → Settings → Setup user
→ Setup device.
Select using [Á] and [W]: (desired internal subscriber 21 or 22).
Select using [Á] and [OK]: Device type → Door type1*.
4.
Select using [Á] and [OK]: Device type → Doortype2(DTMF)**.
1.
2.
or
Setting codes for entrance telephone "Door type 2 (DTMF)"
3.
For entrance phones controlled by DTMF codes you can set various codes.
Please read the instructions for this entrance phone!
Press G for selection menus.
Select using [Á] and [OK]: Base Settings → Settings → Setup user
→ Setup device.
Select using [Á] and [W]: (desired internal user 21 or 22).
4.
5.
6.
Setting door opener code
Select using [Á] and [OK]: Door code.
Enter code (factory setting = #9) and confirm [W].
Select using [Á] and [OK]: Save entry.
4.
5.
6.
Setting collective call code
Select using [Á] and [OK]: Hunt group code.
Enter code (factory setting = 8) and confirm [W].
Select using [Á] and [OK]: Save entry.
4.
5.
6.
Setting connect code
Select using [Á] and [OK]: Connection code.
Enter code (factory setting = 9) and confirm [W].
Select using [Á] and [OK]: Save entry.
4.
5.
6.
Setting disconnect code
Select using [Á] and [OK]: Release code.
Enter code (factory setting = #0) and confirm [W].
Select using [Á] and [OK]: Save entry.
1.
2.
*
This configuration is only applicable for entrance telephones in accordance with FTZ
(door opener via ring current).
** E.g. Deutsche Telekom DoorLine products
79
Gigaset 4170/4175isdn, A31008-G4170-B100-2-7619
Tuersprechstelle.fm
21.2.02
Configuring the entrance telephone
Assigning internal users to the entrance telephone call group
Step
by
Step
1.
2.
3.
4.
Press G for selection menus.
Select using [Á] and [OK]: Base Settings → Settings → Setup user
→ Setup device.
Select using [Á] and [W]: (required internal subscriber).
Select using [Á] and [OK]: Door call grp.
Forwarding the entrance telephone externally
All entrance telephone calls can be forwarded to an external number although
internal users will also be called.
1.
2.
3.
4.
5.
6.
7.
8.
1.
2.
3.
4.
5.
6.
1.
2.
3.
4.
5.
6.
80
Entering/modifying a destination call number for external call forwarding
Press G for selection menus.
Select using [Á] and [OK]: Base Settings → Settings → Setup user
→ Setup device.
Select using [Á] and [W]: (configured entrance telephone Int 21 or Int 22).
Select using [Á] and [OK]: Forw. door call.
Select using [W]: (destination call number).
If a destination call number has not yet been stored, the entry <blank> is displayed.
Select using [Á] and [OK]: Change number.
Enter the new or modified destination call number and confirm with [ W].
Select using [Á] and [OK]: Save entry.
Deleting a destination call number for external call forwarding
Press G for selection menus.
Select using [Á] and [OK]: Base Settings → Settings → Setup user
→ Setup device.
Select using [Á] and [W]: (configured entrance telephone Int 21 or Int 22).
Select using [Á] and [OK]: Forw. door call.
Select using [W]: (delete number).
Select using [Á] and [OK]: Delete number.
Activating/deactivating call forwarding
Press G for selection menus.
Select using [Á] and [OK]: Base Settings → Settings → Setup user → Setup device.
Select using [Á] and [W]: (required internal subscriber).
Select using [Á] and [OK]: Forw. door call
Select using [W]: (destination call number).
Select using [Á] and [OK]: Activate? or Deactivate?
Tuersprechstelle.fm
Gigaset 4170/4175isdn, A31008-G4170-B100-2-7619
21.2.02
Activating entrance telephones
Call from the entrance telephone
Step
by
Five ringing tones (externally to 12) are made by the entrance telephone.
Step
2.
Gigaset Comfort
Press the talk key c . You are connected with the entrance telephone. The
message "Door" is displayed.
Press the softkey OP DOOR to activate the door opener. The door opener is
activated. The confirmation message "Intern. Door Op." is displayed. The connection to the entrance telephone is automatically terminated once the door
has been opened.
1.
2.
Gigaset Classic
Press the talk key c. You are connected with the entrance telephone.
Press the keys º 1 to activate the door opener. The door opener is activated. The connection to the entrance telephone is automatically terminated once
the door has been opened.
1.
2.
Supplementary devices
Lift the handset c . You are connected with the entrance telephone.
Press the keys º 1 to activate the door opener. The door opener is activated. The connection to the entrance telephone is automatically terminated once
the door has been opened.
1.
Activating entrance telephones
If you have any queries regarding the entrance telephones shown here or any
other entrance telephone, please contact the relevant manufacturer or supplier.
81
Gigaset 4170/4175isdn, A31008-G4170-B100-2-7619
Anhang.fm
21.2.02
Annex
Step
by
Annex
Step
Care
Clean the base station with an antistatic wipe. Never use a dry cloth as this
could cause a build-up of static electricity.
Guarantee
Scope
●
●
●
●
●
●
●
●
●
82
This equipment guarantee applies to end users ("customers"). This
guarantee does not in any way affect the customer's statutory rights.
The guarantee applies to the supplied devices and all their components but
not to their installation or configuration or to the services provided by the
dealer. Manuals and any software supplied on a separate data medium are
excluded from the guarantee. This guarantee does not apply to decorative
covers or any other personalised parts or software not included in the scope
of supply. The guarantee also does not apply to decorative top or bottom
shells for special editions.
The guarantee provides for devices or components that, despite proper care
and use, have demonstrably developed defects due to faulty workmanship
and/or faulty materials to be replaced or repaired at our discretion free of
charge. The guarantee does not cover normal wear and tear. Alternatively,
we reserve the right to replace the defective device with a successor model
or reimburse the original purchase price on return of the defective device.
Our decision is final. Any legal claims are excluded.
Claims under the guarantee cannot be made if
– the defect or damage was caused by improper care or use.
Improper care or use includes the following:
– Opening the device (this is classed as third-party intervention)
– Manipulating components on the printed circuit board
– Manipulating the software
– Defects or damage caused by dropping, breaking, lightning or ingress of
moisture. This also applies if defects or damage was caused by
mechanical, chemical, radio interference or thermal factors (e.g.
microwave, sauna, etc.).
– Repairs or other work done by persons not authorised by us.
– Devices fitted with accessories not authorised by Siemens.
Any further claims due to damage are excluded, such as damage arising
outside the device, provided this was not due to gross negligence and/or
intent on our part.
Claims under the guarantee must be made as soon as the defect is noticed.
A till receipt showing the date of purchase must be presented as proof. Each
claim under the guarantee is accepted with the express reservation that
subsequent investigations confirm the validity of the claim.
Any devices or components that are replaced become our property.
The costs of materials and labour will be borne by us, but not the costs of
transport, postage or freight.
Gigaset 4170/4175isdn, A31008-G4170-B100-2-7619
Anhang.fm
21.2.02
Guarantee
●
Step
by
Step
●
●
●
We are entitled, at our discretion, to make technical changes (such as
firmware updates) beyond repair or replacement in order to upgrade the
device to the latest state of the art. There is no additional charge to the
customer for this work. Our decision is final. Any legal claims are excluded.
The guarantee is valid in the country of purchase. It applies only if the device
is operated in the relevant geographical area in accordance with the
information on the packaging and in the operating instructions.
Any further claims are excluded. Siemens is not liable in any circumstances
for downtime, loss of profits, loss of data or loss of any other information.
The customer alone is responsible for safeguarding such data and
information.
Changes to this guarantee require prior approval by Siemens in writing.
Guarantee period
●
●
●
●
●
The guarantee applies in countries in the EU from 1 January 2002 for a
period of 24 months.
In all other countries the guarantee period shall be the relevant minimum
statutory guarantee period, but no longer than 24 months.
The guarantee period starts on the day of purchase by the customer.
A successful claim under the guarantee does not extend the guarantee
period.
Work under the guarantee is handled by our Customer Care Centers.
The guarantor is Siemens Aktiengesellschaft Deutschland, Schlavenhorst 88,
D-46395 Bocholt.
Info
To redeem the guarantee please contact your local Customer Care Center (see
page 84).
83
Gigaset 4170/4175isdn, A31008-G4170-B100-2-7619
Anhang.fm
21.2.02
Service
Step
by
Step
Service
You can get assistance easily when you have technical questions or questions
about how to use your device by using our online support service on the
Internet at:
www.my-siemens.com/customercare
If the device needs to be repaired, please contact one of our service centers:
Abu Dhabi..........................0 26 42 38 00
Australia........................... 18 00 62 24 14
Argentina ...................... 0 80 08 88 98 78
Austria ............................. 05 17 07 50 04
Bahrain ...................................... 40 42 34
Bangladesh........................ 0 17 52 74 47
Belgium ............................. 0 78 15 22 21
Brunei .................................. 02 43 08 01
Bulgaria................................. 02 73 94 88
Cambodia ............................. 12 80 05 00
Canada.......................... 1 88 87 77 02 11
China ............................ 0 21 50 31 81 49
Croatia ............................... 0 16 10 53 81
Czech Republic ............... 02 33 03 27 27
Denmark............................... 35 25 86 00
Dubai ................................. 0 43 55 99 88
Egypt ................................. 0 13 31 31 44
Estonia.................................... 6 30 47 35
Finland............................. 09 22 94 37 00
France ............................. 01 56 38 42 00
Germany....................... 0 18 05 33 32 22
Greece............................... 0 16 86 43 89
Hong Kong............................ 22 58 36 36
Hungary ........................... 06 14 71 24 44
Iceland .................................... 5 11 30 00
India................................. 01 16 92 39 88
Indonesia ......................... 02 14 61 50 81
Ireland.............................. 18 50 77 72 77
Italy.................................. 02 66 76 44 00
Ivory Coast ........................... 80 00 03 33
Jordan ............................... 0 79 55 96 63
Kuwait .................................... 4 81 87 49
Latvia ...................................... 7 50 11 14
Lebanon................................ 01 44 30 43
Libya ................................ 02 13 35 02 31
Lithuania ................................. 2 39 77 79
Luxembourg ....................... 43 84 33 99
Malaysia .......................... 03 79 52 51 84
Malta ..................... 00 35 32 14 94 06 32
Mauritius..... ................................2 11 62 13
Morocco ..... ..............................22 66 92 32
Netherlands ......................0 90 03 33 31 02
Norway ....... ..............................22 70 84 00
Oman.......... ...................................79 10 12
Pakistan ...... .........................02 15 67 35 65
Philippines .. ..............................28 14 98 88
Poland......... .........................08 01 30 00 30
Portugal ...... ...........................8 00 85 32 04
Qatar........... ....................00 97 44 69 67 00
Russia ......... .........................09 57 37 29 51
Saudi Arabia ...........................0 26 51 50 94
Sharjah ........ ...........................0 65 33 66 42
Singapore.... ................................8 45 48 18
Slovak Republic
07 59 68 22 66
Slovenia ...... ...........................0 14 74 63 36
South Africa .........................08 60 10 11 57
Spain .......... ...........................9 02 11 50 61
Sweden ...... ...........................0 87 50 99 11
Switzerland . ...........................0 12 12 00 90
Taiwan ........ .........................02 25 18 65 04
Thailand ...... ...........................0 27 15 51 00
Tunisia ........ ..............................01 86 19 02
Turkey......... ......................0 21 65 71 89 89
United Kingdom ................0 87 05 33 44 11
USA ............ ........................1 800 777 0211
Vietnam ...... ..............................45 63 22 44
Zimbabwe... ..............................04 36 94 24
Your Gigaset is intended for operation in your country, as depicted on the
underside of the base station. Country-specific features have been taken into
account.
The conformity of the device with the essential requirements of the R&TTE
directive is confirmed by the CE symbol.
84
Gigaset 4170/4175isdn, A31008-G4170-B100-2-7619
Anhang.fm
21.2.02
Excerpt from the original declaration)
Step
by
Step
Excerpt from the original declaration)
"We, Siemens AG, declare, that the above mentioned product is manufactured
according to our Full Quality Assurance System certified by CETECOM ICT
Services GmbH with the registration number "Q810820M" in compliance with
ANNEX V of the R&TTE-Directive 99/05/EC. The presumption of conformity
with the essential requirements regarding Council Directive 99/05/EC is
ensured."
Senior Approvals Manager
The Declaration of Conformity (DoC) has been signed. For an original copy of
the signed Declaration of Conformity (DoC) please contact the Siemens
hotline.
85
Gigaset 4170/4175isdn, A31008-G4170-B100-2-7619
Anhang.fm
21.2.02
Technical data
Step
Technical data
by
Step
DECT standard
is supported
GAP standard
is supported
Number of channels
120 Duplex channels
Broadcast band
1880 MHz to 1900 MHz
Duplex procedure
Time multiplex, 10 ms frame length
Channel spacing
1728 kHz
Bit rate
1152 kbit/s
Modulation
GFSK
Language encoding
32 kbit/s (ADPCM)
Output power
10 mW, average power per channel
Range
up to 300 m outdoors
up to 50 m in buildings
Power supply
220/230 V ~/50 Hz (plug-in power supply unit
SNG 8-a)
Power consumption
In the standby state, approx. 4.6 W
When busy:
with handset approx. 4.8 W
with telephone (TAE) approx. 5.2 W
Environmental conditions
for operation
+5 °C to +45 °C
ISDN port
Euro-ISDN multi-device connection IAE
TAE connection
(INT 21/22)
Socket: TAE 6, F/N coding
20 % to 75 % relative humidity
Dialling method: DTMF (tone dialling)
Data transmission rate: max. 28.8 kbit/s
Dimensions of the base
station
approx. 152 x 213 x 61 mm (h x w x d)
Weight of the base station 0.350 kg
Length of power cable
Power cable approx. 3 m
ISDN connection cable approx. 3 m
USB connection cable approx. 3 m
86
Gigaset 4170/4175isdn, A31008-G4170-B100-2-7619
Anhang.fm
21.2.02
Accessories
Step
Accessories
by
Step
Gigaset 4000 Micro handset
Illuminated keypad
Vibration alarm
● Connection socket for headset, PC and MP3
player,
● 5-line illuminated graphic display
● SMS,
● Walkie-talkie,
● Hands-free
● Telephone book for approx. 200 numbers/
names,
● Room monitor
● Appointment function
Scope of delivery: Handset with charger
Colour: midnight blue metallic
●
●
INT
1
4 GHI
7PQRS
2 ABC
3 DEF
5 JKL
6 MNO
8 TUV
9WXYZ
0
Gigaset 4000 Comfort handset
INT
1
2ABC
3 DEF
4 GHI
5JKL
6 MNO
7 PQRS
8TUV
9 WXYZ
The Gigaset 4000 Comfort offers an extended
range of functions:
● 5-line illuminated graphic display
● SMS,
● Walkie-talkie,
● Hands-free
● Telephone book for approx. 200 numbers/
names,
● Room monitor
● Appointment function
Scope of delivery: Handset with charger
Colour: midnight blue or glacier green*.
0
*
Country-specific
87
Gigaset 4170/4175isdn, A31008-G4170-B100-2-7619
Anhang.fm
21.2.02
Accessories
Step
Gigaset 4000 Classic* handset
by
The Gigaset 4000 Classic offers the following
features:
● 12-digit display for time, numbers etc.
● Telephone book with 20 entries,
● Alarm function,
● Redial the last five numbers.
Scope of delivery: Handset with charger
Colour: midnight blue or glacier green*.
Step
1
2ABC
3 DEF
4 GHI
5JKL
6 MNO
7 PQRS 8TUV 9 WXYZ
0
R
*
Country-specific
Gigaset repeater
With the Gigaset repeater you can expand the
receive range from your Gigaset handset to the
Base unit.
(Not available in all countries!)
Mobile hands-free set with PTT key
With the mobile hands-free set you can leave your
hands free when making calls.
Others can also listen in on the call on the handset.
*
88
Not available in all countries.
Gigaset 4170/4175isdn, A31008-G4170-B100-2-7619
Anhang.fm
21.2.02
Accessories
Step
by
Step
MP3 player USB
The integrated read/write device faci itates fast,
easy downloading ofMP3 files from your PC. A
replaceable multi-media card is included in the
scope of delivery.
The stereo headset guarantees first-class sound
quality and in conjunction with the iintegrated
microphone, it is also has the dual function of a
hands-free unit.
All devices, accessories and batteries can be purchased through specialist
outlets or the Internet through the Siemens Service Shop:
http://communication-market.siemens.de/serviceshop/default.asp
89
Gigaset 4170/4175isdn, A31008-G4170-B100-2-7619
Menue.fm
21.2.02
Menu Displays
Step
by
Menu Displays
Step
Gigaset 4000 Comfort menu
Please also refer to the local operating instructions for the Gigaset 4000
Comfort.
Press G with the telephone in its standby state.
Step 1
Text Message
Add. Features
Calendar/Clock
Sound Settings
Costs
H/Set Settings
Base Settings
Voice mail
90
Step 2
Step 3
Write Message
Enter
Inbox
Select
Outbox
Select
Available memory Info
Room Monitor.
Enter
Walk and Talk
Enter
Set Appoints.
Enter
Alarm Clock
Enter
Missed Dates
Enter
Date/Time
Enter
Handset Volume Enter
Ringer Settings
Enter
Advisory Tones
Enter
Cost overview
Select
Type of calcul.
Select
Last charge
Select
Auto Answer
Language
List
Register H/Set
List
Select Base
List
Reset Handset
Calls up the main menu for the base
station.
This menu item is available only if the
handset is operated on the
Gigaset 4175isdn base station. The
answering machine menu for the
base station is called up.
Menue.fm
Gigaset 4170/4175isdn, A31008-G4170-B100-2-7619
21.2.02
Menu of the Gigase t4170/4175isdn base station
Step
by
Step
Menu of the Gigaset 4170/4175isdn base station
Display on Gigaset 4000 Comfort handset.
Voice mail > Select AM, e.g. AM1: AM 91
Step 1
Messages
Step 2
New messages
All messages
Step 3
Step 4
Continue
Delete message
Call back
NET list/No.from
provider
Repeat
Del.old messages
Display
Status to 'new'
Save number
Speed
Exit
Continue
Delete curr.memo
Repeat
Delete old memos
Status to 'new'
Speed
Exit
START
[
Memos
New memos
All memos
[
Announcements
Status
Record memo
Announcement 1
Announcement 2
Announcem. only
Concl.announcem
Messages
Memos
Announcement
Recording
Time control
Start options
Playback
Remote options
General
[
Select *
Record
Play back
Delete
[
[ Status
report
BACK
91
Menue.fm
Gigaset 4170/4175isdn, A31008-G4170-B100-2-7619
21.2.02
Menu of the Gigase t4170/4175isdn base station
Step
by
Step
Voice mail > Select AM, e.g. AM1: AM 91
Step 1
Settings
Step 2
Message/Memo
Step 3
Message length
Time stamp
Activate?
Mon
- Fri
✱✱:✱✱ = HH: MM
Time control
Step 4
1 minute
2 minutes
3 minutes
Maximum
[
[
✱✱:✱✱
Announcement 1
✱✱:✱✱
Announcement 2
✱✱:✱✱ Ann. Only
Saturday
Sunday
No. of rings
Automatic pause
Remote options
Change AM-PIN
AM lock
AM quality
Aut. listen in
SMS notificat.
Deactivate?
*
92
[
not for concluding announcement
Automatic 2/4
1 ring tone
2 ring tones
(2 to 9)
✱✱:✱✱ AM off
As for Mon-Fri
Ann. 1 24h
Ann. 2 24h
Ann. only 24h
AM off
As for Mon-Fri
Ann. 1 24h
Ann. 2 24h
Ann. only 24h
AM off
[
Z[
Z[
[
Remote control
Remote delete
New PIN
[
[
Repeat PIN
[
High quality
Long recording
Activate?
Select HS
Dest.call no.
Activate?
[
[
[
Z[
W
Menue.fm
Gigaset 4170/4175isdn, A31008-G4170-B100-2-7619
21.2.02
Menu of the Gigase t4170/4175isdn base station
Step
by
Step
Base Settings > Status
Step 1
Callback
Step 2
[
Step 3
Display of the numbers with callback
Withhold no.
Call forwarding
Ext.occupations
AM1 on
AM2 on
AM3 on
[
»
[
»
[
[
[
[
if set up permanently
MSN with call forwarding
No. of seized B-channels, if any
» if AM 1 on
» if AM 2 on
» if AM 3 on
Base Settings > Missed calls
Step 1
» Missed calls
Step 2
[
Step 3
Number W
Step 4
Dial number
NET list
Copy to dir.
Change number
Delete entry
Display entry
Delete list
Step 3
Number W
Step 4
Dial number
NET list
Copy to dir.
Change number
Delete entry
Display entry
Delete list
Base Settings > Accepted calls
Step 1
» Missed calls
Step 2
[
Base Settings > Call preparat.
Step 1
Temp.withhold
Step 2
Step 3
»
*
MSN next call
[
» MSN
Temp. keypad
Canc. call park
»
*
[
**
Park-Nr.
This feature is only available if supported by the net provider.
** At least one MSN must be assigned to the handset.
93
Menue.fm
Gigaset 4170/4175isdn, A31008-G4170-B100-2-7619
21.2.02
Menu of the Gigase t4170/4175isdn base station
Step
by
Step
Base Settings > Forward. netw.
Step 1
MSN1 Call... W
Step 2
New entry
Step 3
MSN W
etc.
Step 4
Immediately
On busy
On no reply
Activate?
Edit entry
Delete entry
[
[
Base Settings > Forward. base
Step 1
Activate?
Forward. dest.
No. of rings
*
Step 2
[
INT11:Internal11*
0-9
Step 3
Deactivate?
Step 4
[»
[
Display of all available internal numbers.
Base Settings > Night service
Step 1
MSN1 xy... W
etc.
Step 2
Activate?
Forward. dest.
Start time:
End time:
Sat/Sun all day
*
Step 3
[
External
Internal
INT11:Internal11*
Answering mach. AM1: ... 91
AM2: ... 92
AM3: ... 93
HH:MM
Save entry
Cancel
HH:MM
Save entry
Cancel
[»
Display of all availabale internal numbers
Base Settings > Settings > Security
Step 1
Change PIN
Authorisation
Emergency nos.
*
94
Step 2
New PIN
Step 3
New PIN
INT11:Unrestrict * Unrestricted
Incom.only
Int. only
Change number
Delete number
Display number
Display of all available internal numbers.
Step 4
Deactivate?
Dest.call no.
Menue.fm
Gigaset 4170/4175isdn, A31008-G4170-B100-2-7619
21.2.02
Menu of the Gigase t4170/4175isdn base station
Step
by
Step
Base Settings > Settings > Setup user
Step 1
Setup device
Step 2
Step 3
INT11: Internal 11* Name
Send MSN
Receive MSN
MSN next call
Call waiting
Ring delay
Step 4
W
Z[
Z[
[»
[»
Z [ MSN
yx
No. of rings
Hunt group
Auto. seizure
Door call grp.
De-register
*
INT12: Internal 12*
[»
[»
[»
Z[
Display of all available internal numbers of cordless devices.
95
Menue.fm
Gigaset 4170/4175isdn, A31008-G4170-B100-2-7619
21.2.02
Menu of the Gigase t4170/4175isdn base station
Step
by
Step
Base Settings > Settings > System settings
Step 1
Music on hold
Step 2
Internal
Step 3
Z[
Date/time
External *
OFF
Set time
Step 4
Day:
Save entry
> Month:
Cancel
> Year:
> Hour:
> Minute:
Costs **
(Interrogation of
system PIN)
Access code
AM auto. pickup
Spec. function
24 hours
12 hours
Date DD.MM
Date MM.DD
Cost overview
Type of calcul.
Last charge
Access code:
[»
[»
[»
Total amount
units centr.off.
costs centr.off.
No rate
Rate --.-Rate ----
W Delete
amount
[»
[»
[»
Save entry
Insert euro
£ Insert pound
$ Insert dollar
Cancel
[
Save entry
Cancel
[
Operational
Reset all
Standard dial
Auto keypad
Dial * and #
Ann. Only
[
[
[»
Factory setting
Dial properties
Ext.room monit.
[»
Repeater
SW version
Dest.call no.
[
[»
[»
[»
NEXT
[
W
Change num-
W <Number>
ber
W
Delete num-
ber
*
Only if "Ext. music/hold" is selected when the device type is set to connection 21 or 22
** On the Gigaset 4000 Comfort, "Costs" is accessed from the local menu
96
Menue.fm
Gigaset 4170/4175isdn, A31008-G4170-B100-2-7619
21.2.02
Menu of the Gigase t4170/4175isdn base station
Step
by
Step
Base Settings > Settings > ISDN settings
Step 1
Set up MSN
Withhold no.
Forward. dest.
Step 2
MSN x
Step 4
<Name> W
Ringer melody: x
[
Name *
[»
<Number>
Lg.-dist. code
National:
International:
Int. enq. call
Ext. enq. call
Transfer(ECT)
Forward. base
Forward. netw.
Reject all
Busy on busy
Auto.forwarding
[»
MSN x
Call beats data
[»
*
Step 3
Edit entry
Ringer melody
Delete entry
Display entry
Save entry
No.from dir.
No.from provider**
Cancel
[»
[»
[»
[»
[»
[»
<Number>
Save entry
No.from dir.
No.from provider**
Cancel
Call number and melody are also displayed
** On the Gigaset 4000 Comfort this menu is called NET list
Base Settings > Settings > Service centres
Step 1
<empty> W
Step 2
Edit entry
Serv.centre on?
Step 3
<Number> W
Send off?
Delete entry
[
Step 4
Save entry
[
[
97
Gigaset 4170/4175isdn, A31008-G4170-B100-2-7619
Glossar.fm
21.2.02
ISDN Glossary
ISDN Glossary
A
Access classes
Permitted connections (e.g. internal only, incoming or unrestricted call
access) are defined on the terminals of a telephone system.
Access levels
Different levels of access can be assigned to different users on your base
station telephone. For example, user A may only be allowed to take
incoming calls, whereas user B may also make outgoing calls without any
restrictions.
Advance dialling, see also en-bloc dialling
On some display telephones you can enter a call number, check it is correct
and then dial.
AOC-D
Advice of Charge: During the Call. Charge information is transferred during
the call.
AOC-E
Advice of Charge: at the End of the Call. Charge information is not
transferred until the end of the call.
Automatic callback
See Callback on busy.
Automatic redial
If the number is busy, further call attempts are made automatically.B
B
Bar/lock
Protects the line against unauthorised use.
Barring certain numbers, outgoing/call restrictions
With this enhanced feature you can suppress dialing of certain numbers
from an ISDN telephone (or from an analogue telephone connected to an
ISDN system with the appropriate feature), such as premium rate numbers.
98
Gigaset 4170/4175isdn, A31008-G4170-B100-2-7619
Glossar.fm
21.2.02
ISDN Glossary
C
Call deflection
CD. This must be explicitly enabled by the provider for each ISDN line. With
CD you can transfer an incoming call to another call number while it is
ringing. You do not need to answer the call. Since the caller has no influence
on where the call will be forwarded (to a mobile phone for example), you pay
the appropriate charges. The caller will be billed only for the normal
telephone charges to the number dialled.
Call forwarding
CF (Call Forwarding) You wish to permanently forward calls to a different line.
Call forwarding can be set up externally via the exchange or internally on the
terminal.
Call forwarding can be set up separately for each of your call numbers
(MSNs) - to your mobile phone when you are on holiday, to the office, to a
neighbour, etc.
This is set up in the provider's local exchange. The call therefore never
reaches the line originally called.
There are three types of call forwarding: immediate (CFU, Call Forwarding
Unconditional), on busy (CFB, Call Forwarding Busy) and on no reply (CFNR,
Call Forwarding No Reply).
Call forwarding (via the second B-channel)/internal call forwarding
Whereas external call forwarding takes place in the provider's local
exchange, internal call forwarding takes place at your telephone. Your
telephone forwards the call via the second telephone line of your ISDN line.
This means that both telephone lines are busy for the duration of the
call. You pay the charges for the connection to the forwarded number.
However, you save on the fees charged by the provider for this function.
Call waiting
CW Network provider feature. If someone calls you while you are already in
a call you will hear a signal tone. ISDN telephones also signal this with a
display message. You can then decide whether to accept or reject the
second call.
Callback on busy.
The call must have callback activated on his terminal. A connection is
automatically set up as soon as the busy status is cancelled on the
destination line. When the line becomes free the caller will hear the
appropriate signal tone. As soon as he lifts his handset the connection is
automatically set up.
Callback on no reply.
If a subscriber does not answer, a caller can activate automatic callback. As
soon as the destination subscriber has set up a call and is free again the
appropriate signal tone will be sent to the caller. This feature must be
supported by the central office. The callback order will be automatically
cancelled after about two hours (depending on the provider).
Caller identification
The call number, name or type of connection (e.g. exchange/internal) of the
call is shown on the telephone display.
Caller list
Depending on the settings, the list contains the callers whose calls you
missed or the callers to whom you have spoken. The last 20 calls made and
received are stored along with telephone numbers, dates and times. You can
call back directly from this list.
99
Gigaset 4170/4175isdn, A31008-G4170-B100-2-7619
Glossar.fm
21.2.02
ISDN Glossary
Calling Line Identification Restriction (CLIR)
Transfer of your own call number is disabled.
CCBS (Completion of calls to busy subscriber)
See Callback on busy.
CCNR (Completion of calls no reply)
See Callback on no reply.
CD (Call Deflection)
See Call deflection
CF (Call Forwarding)
See Call forwarding
Channel
An ISDN line, like an analogue telephone line, has two cables running into
your house but a distinction is made in ISDN between the two logical user
channels, known as the B-channels (which have nothing to do with the
physical cables) and the control channel, known as the D-channel.
Charge display
See AOC-D and AOC-E.
CLIP (Calling Line Identification Presentation)
Subscriber A calls subscriber B. The call number of A appears on B's
telephone display.
CLIR (Calling Line Identification Restriction)
The number of the calling line is not displayed.
COLP (Connected line identification presentation)
Subscriber A calls subscriber B. The call number of B is displayed on A's
telephone. If B has programmed call forwarding or deflection to C, then the
number dialed and the number transferred will not be the same; the call
number of C will be displayed, provided C has not suppressed his number.
COLR (Connected line identification restriction)
The call number of C is not displayed on A's telephone if C has set up COLR.
Conference call
See Three-party conference.
Consultation call
You are engaged in a call. You can use the "Consultation" function to interrupt
the call briefly to set up a second external call or internal call to another
subscriber. If you speak to the other person and then end the call, this was
a consultation call. If you switch back and forth between the first and second
parties, this is called toggling.
CW (Call Waiting)
See Call waiting
100
Gigaset 4170/4175isdn, A31008-G4170-B100-2-7619
Glossar.fm
21.2.02
ISDN Glossary
D
Digital exchange
Computer-controlled memory time switches are used to set up calls quickly
and activate enhanced features such as => consultation calls, => call
waiting, => three-party conference, => call deflection, etc.
D-channel
Control channel for an ISDN line. See Channel.
E
ECT (Explicit call transfer)
See Switching.
Electronic code lock
Personal identification number (=> PIN) that you can use, for example, to
prevent people using your phone without your consent – calls to the
emergency services can still be made however. Incoming calls can still be
taken.
En-bloc dialling
Also known as advance dialling. You can key in the number you wish to call
and make any necessary corrections. Then you can lift the handset or press
the speaker key.
Enhanced line
ISDN line that offers three features more than the standard line: call
deflection, advice of charge at the end of the call and T-Netbox.
Explicit call transfer (on ISDN telephone systems)
ECT. Subscriber A calls subscriber B, places the call on hold and calls
subscriber C. Instead of now all talking in a three-party conference, A now
transfers B to C and replaces the handset.
Exchange
A nodal point in the public telephone network. A distinction is made
between local exchanges and long-distance exchanges.
H
Hands-free talking
The hands-free system on a telephone enables you hear the caller via the
loudspeaker and talk to the caller via a built-in microphone without lifting the
handset. Other people in the room can therefore also take part in the call.
Holding calls
(Hold). Interrupting and restoring an existing call. In particular, this is useful
for consultation calls and toggling.
Hot key
This disables the telephone for all call numbers apart from one specific userdefined number. When the handset is lifted and any key is pressed a call is
automatically made to the stored number. This is ideal for children who
cannot be relied on to dial correctly. Calls to the emergency services can still
be made. This function is available on Gigaset 3000/2000 Comfort handsets.
101
Gigaset 4170/4175isdn, A31008-G4170-B100-2-7619
Glossar.fm
21.2.02
ISDN Glossary
I
Internal calls
These are connections free of charge between the base station telephone
and handsets.
Internal ringer
Special signal tone on telephone systems to discriminate between internal
and external calls.
ISDN
Abbreviation for Integrated Services Digital Network. Integration can cover
telephone, fax and data transfer for example.
ISDN abbreviations
CW
Call waiting
CF
Call forwarding
3PTY
Three-party conference
CCBS Callback on busy
CD
Call deflection
K
Keypad
The keypad supports special function keys such as the star key (*) and the
hash key (#). These can be used with the appropriate codes to access
various functions offered by your provider (such as #4711*).
L
Lock function/PIN
A code protects your telephone against unauthorised use. By entering
single-digit or multi-digit lock numbers you can prevent certain numbers or
groups of numbers from being dialled.
M
MCID (Malicious call identification)
See Trace.
MSN
Multiple Subscriber Number. The call numbers of an ISDN multiple device
connection. They are used to address specific terminals; the fax machine,
for example, may have a separate number. Three MSNs are included in the
basic price of the standard line and the enhanced line. Up to ten MSNs can
be assigned to an ISDN line.
Multiple subscriber number
See MSN.
Multiple device connection
ISDN line which, in contrast to a system connection, provides up to ten
MSNs instead of one extension number block. This is the most usual type
of ISDN line for private customers.
Music on Hold
Music on hold. Music is played to the waiting caller during a consultation call
or call transfer.
Mute
Enhanced feature on telephones; deactivates the built-in microphone (in the
handset or hands-free system).
102
Gigaset 4170/4175isdn, A31008-G4170-B100-2-7619
Glossar.fm
21.2.02
ISDN Glossary
N
Notebook function
During a call you can enter a call number in the telephone's memory so you
can dial it later.
NT/NTBA
NT = Network Terminator, NTBA = Network Terminator Basic Access. The
public T-ISDN ends at the NT. The NT provides the link to the existing
telephone socket. Only the NT can and should be connected to the
telephone socket. Analogue terminals must not be connected to the
telephone socket. ISDN terminals and other ISDN sockets are connected to
the NT.
O
On-hook dialling
Enhanced telephone function: The handset is not lifted until the called party
answers.
Open listening
At the push of a button everyone in the room can listen to the telephone call
via the built-in loudspeaker. See also Hands-free talking
Outgoing MSN freely selectable
This is a feature which enables you to determine which MSN is to be used
for the subsequent call. This is important not only for call number display on
the called party's phone but also for calculating call charges. Call costs,
which can be coded by MSN free of charge on the provider's bill, are
assigned to the MSN that was used to make the appropriate call.
P
Parking calls
You park a call when you unplug the telephone during a call or replace the
handset so you can pick up the call on another handset connected to the
same line. The call remains connected during this time.
Phonebook
Enhanced feature of a telephone; stores the names and call numbers of
other subscribers. The numbers can be quickly found and dialled.
PIN
Abbreviation for Personal Identification Number. This is used to protect
against unauthorised use, examples include the system-PIN, answering
machine PIN and handset PIN.
103
Gigaset 4170/4175isdn, A31008-G4170-B100-2-7619
Glossar.fm
21.2.02
ISDN Glossary
R
Recording the calls
This is a feature of the answering machine; enables a call to be recorded.
Reject call waiting
Deactivates the call waiting signal.
Remote replay
Answering machine function. This involves dialling in to the answering
machine to listen to messages; in most cases you can also delete messages
and change announcements.
Remote power-on
This enables the answering machine to be switched on and off under PIN
control during a telephone call.
Repeater
With a repeater you can increase the range of the handsets linked to a base
station telephone. The unit receives the radio signal from the base station
telephone and transmits it on.
Repertory keys/function keys
Enhanced feature on a telephone; a limited set of call numbers can be
assigned to specific keys. These programmed numbers can then be dialled
at the push of a button.
Ring delay
For each internal user you can define how many ringing signals are received
before ringing is activated. This setting can be made for each MSN.
If you are operating your handset on the private call number, ringing should
start after, say, three ring tones in addition to the base station telephone (the
base station telephone will start ringing immediately), whereas your
handset should ring immediately if you receive a call on the business
number.
Room monitoring
A feature on the answering machine or telephone, for example. Enables you
to listen in on a room via the telephone network. PIN-protected.
104
Gigaset 4170/4175isdn, A31008-G4170-B100-2-7619
Herkules1SIX.fm
21.2.02
Index
Index
A
Access code .....................................71
Access levels ....................................69
Activating automatic call transfer......71
All memos.........................................60
All messages ....................................60
Announcem. only..............................58
Announcements ...............................59
Answering machine ..........................57
access options ............................57
activate/deactivate automatic call
pickup..........................................29
activating an announcement .......58
automatic pause..........................62
listening to memos .....................60
listening to messages .................60
locking .........................................63
number of ringers........................62
picking up a call .....................34, 78
recording announcements ..........58
recording length ..........................62
recording memos ........................59
recording quality..........................62
remote control.............................65
selecting......................................57
start time.....................................63
status ..........................................64
time control .................................63
time stamp ..................................62
Approval............................................85
Audio settings...................................29
Automatic call forwarding due to
inaccessible handset.........................42
Automatic pause ...............................62
B
Busy on Busy....................................27
C
Call allocation ................................... 22
Call charge display ........................... 46
Call forwarding ........................... 37, 38
Call Forwarding (CF)......................... 99
Call Hold........................................... 40
Call number withhold ....................... 41
Call preparation ................................ 41
Callback............................................ 39
Calling line identification restriction
(CLIR) ............................................... 41
Care.................................................. 82
CCNR ............................................... 39
CD (Call Deflection).......................... 38
CF (Call Forwarding)......................... 37
CNI (Calling Name Identification) ..... 72
Codes for entrance telephone ......... 79
Collective call ................................... 31
collective call code ........................... 79
Conference circuit............................ 33
connect code ................................... 79
Connection
base station................................ 13
ISDN ........................................... 13
supplementary devices .............. 14
Corded ............................................. 78
Cordless TAE connecting................. 77
Customer Care (Service) .................. 84
CW (Call Waiting) ....................... 26, 40
D
Date and time .................................. 21
Default setting ................................. 30
De-registering
a data module............................. 18
a handset/data module ............... 18
handset ...................................... 16
Device type ...................................... 22
Dialling method ................................ 72
disconnect code............................... 79
Door call grp..................................... 80
door opener code............................. 79
Door type 2 ...................................... 79
Doorbell call ..................................... 81
DTMF ............................................... 79
105
Gigaset 4170/4175isdn, A31008-G4170-B100-2-7619
Herkules1SIX.fm
21.2.02
Index
E
Emergency numbers ........................70
Emergency operation........................13
Enquiry call........................................32
Entering numbers .............................34
Entrance telephone...........................79
External call forwarding ....................37
External/internal enquiry set .............27
Missed call lists
changing a number..................... 36
deleting a number ...................... 36
Missed calls list................................ 35
changing a number..................... 36
deleting a number ...................... 36
MSN (Multiple Subscriber Number)
configuring ................................. 24
Music-on-hold .................................. 28
F
Factory setting ..................................30
Forw.entr.tel. ....................................80
Forward. Dest. ..................................38
G
GAP handset.....................................18
Gigaset 1000TAE ..............................77
Group call..........................................22
N
New memos .................................... 60
New messages ................................ 60
Night service.................................... 44
Number memo................................. 34
Number of rings............................... 62
P
Handset
not accessible .............................42
telephone directory copying........44
Hearing aids ........................................1
Holding calls......................................40
Parking calls ..................................... 43
PIN ................................................... 69
Plug-in power supply unit................... 1
Power failure.................................... 13
Prefix (access code) ......................... 71
Program MSNs (Multiple Subscriber
Number) ..................................... 22
I
R
Installation Assistant.........................21
Installation site..................................11
Internal call from door.......................81
Range............................................... 11
Record.............................................. 59
Recording length.............................. 62
Recording quality ............................. 62
Registering devices.......................... 18
Rejecting calls ............................ 27, 34
Remote control ................................ 62
Repeater capability activating/
deactivating...................................... 76
Reserving a line................................ 41
Ring cycles....................................... 37
Ringer Melody.................................. 29
Room monitor .................................. 44
H
L
Listening in .......................................63
M
M101 Data ........................................76
M105 Data ........................................76
Medical equipment .............................1
Memos .............................................59
Menu
Gigaset 4170/4175isdn ...............91
Menu Displays ..................................90
Message Waiting Indication (MWI) ..72
Messages .........................................60
106
Gigaset 4170/4175isdn, A31008-G4170-B100-2-7619
Herkules1SIX.fm
21.2.02
Index
S
Safety precautions ..............................1
Service ..............................................84
Short message..................................48
SMS ..................................................48
display .........................................54
display call numbers....................55
List of incoming messages .........53
List of outgoing messages..........55
read .............................................53
send ............................................50
write ............................................50
SMS centre.......................................50
SMS centres .....................................48
SMS options .....................................54
Softkeys..............................................2
Status query......................................30
System PIN.......................................69
T
Technical data ...................................86
Telephone directory entries copying.44
Time control......................................63
Toggling ............................................33
Tracing switch...................................43
Type of connection ...........................23
V
Voice output......................................62
107
Gigaset 4170/4175isdn, A31008-G4170-B100-2-7619
Published by
Information and Communication mobile
Haidenauplatz 1
D-81667 Munich
© Siemens AG 2002
All rights reserved. Subject to availability.
Right of modification reserved.
Printed in Germany (2/2002).
Siemens Aktiengesellschaft
http://www.my-siemens.com
Order. no.: A31008-G4170-B100-2-7619
407x_cover_hinten.fm
21.2.02
*1PA31008-G4170-B100-2-7619*
A31008-G4170-B100-2-7619