1
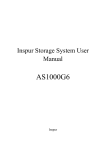
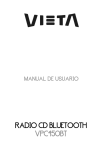
Esta radio está equipada con la "PANTALLA TÁCTIL" más avanzada para que sea fácil y cómoda de utilizar
mientras conduce.
SUGERENCIAS
• Le proporcionamos algunas sugerencias para demostrarle lo fácil que resulta utilizar esta
pantalla táctil:
■
Un toque muy ligero en la pantalla de radio activará esa función. No le hará falta
"PRESIONAR" fuerte en la pantalla para que esta radio cambie de función.
■
Algunos de los botones que tienen funciones dobles tendrán que "PULSARSE" de 2 a 3
segundos para activar la función de segundo nivel
■
La mejor área para "PULSAR" la pantalla con el fin de activarla es el área iluminada o clara. Por
ejemplo, basta con pulsar los botones
iluminados para reproducir la siguiente pista
o volver a la pista anterior.
E-1
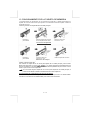
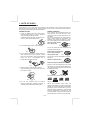
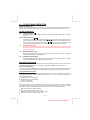
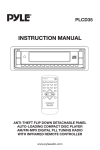
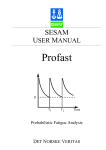
1. DISCOS
CONDENSACIÓN DE LA HUMEDAD
En días lluviosos o en zonas muy húmedas, la humedad se puede condensar sobre las lentes
en el interior de la unidad. Si esto ocurriese, el equipo dejaría de funcionar correctamente. En
estos casos, extraiga el disco y espere aproximadamente una hora hasta que la humedad se
haya evaporado.
NOTAS SOBRE LOS DISCOS
Si utiliza los discos detallados a
NOTAS SOBRE LOS CDs
continuación, los residuos pegajosos
1. Un CD sucio o defectuoso puede causar
pueden hacer que el CD deje de girar y
pérdidas de sonido durante la reproducción.
pueden causar un mal funcionamiento o
estropear sus discos. No utilice CD de
Para disfrutar de un sonido óptimo, manipule
segunda mano o de alquiler que tengan
el CD como se indica a continuación.
residuos pegajosos en la superficie (por
Coja los discos por los bordes.
ejemplo, de etiquetas arrancadas o tinta, o
del pegamento de las etiquetas).
Para no ensuciarlo, no
toque la superficie (P.1).
Hay residuos de cola.
P. 1
La tinta está pegajosa
(P.5).
P. 5
2. No pegue ningún papel o cinta sobre el disco (P.2).
No utilice CD de alquiler con etiquetas
antiguas que empiecen a despegarse.
P. 2
3. No exponga los CD a la luz directa del sol ni a
fuentes de calor como conductos de aire
caliente, ni los deje en el interior de vehículos
aparcados bajo la luz directa del sol ya que la
temperatura puede aumentar considerablemente en el
interior del
vehículo (P.3).
P. 3
4. Antes de la reproducción, limpie los discos
con un trapo de limpieza. Pase el trapo
sobre cada disco desde el centro hacia fuera
(P.4).
Adhesivos que empiezan a
despegarse, dejando un
residuo pegajoso (P.6). P. 6
No utilice sus CDs con etiquetas o adhesivos
adjuntos.
Etiquetas adjuntas (P.7).
P. 7
No utilice CD de formas especiales
Asegúrese de utilizar únicamente CDs
redondos para esta unidad; no utilice CDs
de ninguna otra forma especial. El uso de
CDs de formas especiales puede provocar un
mal funcionamiento de la unidad (P.8).
P. 8
Asegúrese de utilizar CDs con marca de disco
P. 4
5.
No utilice disolventes como gasolina,
diluyentes, productos de limpieza disponibles
en el mercado o sprays antiestáticos para
discos analógicos.
E-2
Sólo para esta unidad.
No se pueden reproducir los CD-R y
CDRW
no
finalizados.
(Para
más
información
sobre
el
proceso
de
finalización, consulte el manual de su
software de escritura de CDR/CD-RW o
grabador de CD-R/CD-RW). Además,
según el estado de grabación, podría
resultar imposible reproducir algunas
grabaciones de CD en CD-R o CD-RW.
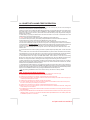
2. INSTALACIÓN
● Antes de instalar la unidad de forma definitiva, conecte los cables provisionalmente y asegúrese de que todo está
conectado correctamente y de que la unidad y el sistema funcionan con normalidad.
● Para garantizar una correcta instalación, utilice únicamente las piezas incluidas con la unidad. El uso de piezas
no autorizadas puede provocar fallos de funcionamiento.
● Consulte con su distribuidor más cercano en caso de que la instalación requiera el taladrado de agujero u
otras modificaciones en el vehículo.
● Instale la unidad en un lugar donde no moleste al conductor y no pueda lastimar a los pasajeros en caso de
producirse una parada repentina, como puede ser un frenazo de emergencia.
● Si el ángulo de montaje supera los 30º desde la horizontal, puede que el rendimiento de la unidad no sea el
óptimo.
● Evite instalar la unidad donde pueda estar expuesta a altas temperaturas, como la luz directa del sol,
aire caliente, calefactores, o donde exista polvo, suciedad o vibraciones excesivas.
● Asegúrese de retirar el panel frontal antes de instalar la unidad.
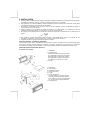
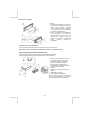
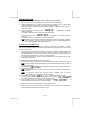
MONTAJE FRONTAL / POSTERIOR SEGÚN DIN
Esta unidad se puede instalar correctamente desde la parte "Frontal" (montaje frontal convencional según DIN)
o "Posterior" (montaje posterior según DIN, utilizando los orificios roscados que se encuentran en los laterales
del chasis de la unidad). Para más detalles, consulte los siguientes métodos de instalación ilustrados A y B.
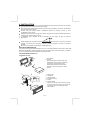
MONTAJE FRONTAL SEGÚN DIN (Método A)
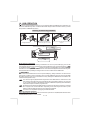
Instalación de la unidad
1. Salpicadero
2. Asa de sujeción
Después de introducir la media carcasa
en el salpicadero, seleccione la pestaña
adecuada según el grosor del material
del salpicadero y dóblela hacia adentro
para asegurar el soporte en su lugar.
3. Tornillo
1.
2.
3.
4.
5.
6.
Salpicadero
Tuerca (5 mm)
Arandela de presión
Tornillo (4x12mm)
Tornillo
Correa de sujeción
No olvide utilizar la correa de soporte
para fijar firmemente la parte posterior
de la unidad. La correa se puede doblar
con la mano hasta el ángulo deseado.
7. Arandela plana
E-3
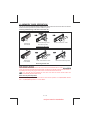
Extracción de la unidad
a. Marco
b. Introduzca los dedos en la ranura de
la parte frontal del marco y tire hacia
usted para extraerlo. (Cuando
vuelva a instalar el marco, colóquelo
con el lado de la ranura apuntando
hacia abajo y sujételo bien.)
c. Inserte las palancas suministradas
con la unidad en las ranuras de
ambos lados de la misma, como se
muestra en la figura, hasta que
hagan clic. Si tira de las palancas
podrá
extraer la unidad del
salpicadero.
Instalación de la placa decorativa:
Empuje la placa decorativa contra el chasis hasta que quede encajada.
Debe hacerlo antes de instalar la carátula; de lo contrario, no podrá colocarla.
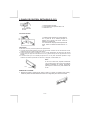
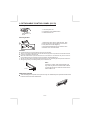
MONTAJE POSTERIOR SEGÚN DIN (MÉTODO B)
Instalación utilizando los orificios roscados de los laterales de la unidad.
Fijar la unidad al soporte de montaje para radio que viene de fábrica.
1. Seleccione una posición en la que
los orificios para los tornillos del
soporte de montaje y los orificios
para los tornillos de la unidad
principal queden alineados (se
correspondan) y apriete los tornillos
en 2 puntos de cada lado.
2. Tornillo
3. Soporte de montaje para radio de
fábrica.
4. Salpicadero o consola
5. Gancho (extraer esta pieza)
Nota: la caja de montaje, el anillo de la
placa y la media carcasa no se utilizan
en la instalación según el método B.
E-4
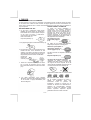
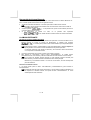
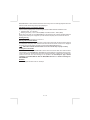
3. PANEL DE CONTROL EXTRAÍBLE (P.C.E.)
Extracción del panel de control extraíble (P.C.E.).
BOTÓN DE EXTRACCIÓN
DEL PANEL
1. Desconecte la corriente
2. Pulse el botón de expulsión del P.C.E.
3. Retire el P.C.E.
Colocación del PCE
1. Instale el panel primero por el lado derecho,
con el punto B de la unidad principal en
contacto con el punto A del P.C.E. (como se
muestra en el diagrama).
2. A continuación, empuje el lado izquierdo del
P.C.E. contra la unidad principal hasta oír un
“clic”.
PRECAUCIÓN
● NO inserte el P.C.E. por el lado izquierdo. Esto podría dañarlo.
● Los golpes pueden dañar fácilmente el P.C.E. Una vez extraído, colóquelo en una caja protectora y tenga
cuidado para que no se caiga ni sufra golpes fuertes.
● Cuando se pulsa el botón de extracción y el P.C.E. queda desbloqueado, las vibraciones del vehículo
pueden hacer que caiga. Para evitar daños en el P.C.E., guárdelo siempre en una caja protectora una vez
extraído.
● El conector trasero que une la unidad principal al P.C.E. es una pieza sumamente importante. Tenga
cuidado de no dañarlo al presionarlo con las uñas, un bolígrafo, un destornillador, etc.
Nota:
Toma
Si el P.C.E. está sucio, límpielo únicamente
con un trapo suave y seco. Use una varilla de
algodón empapada en alcohol isopropílico
para limpiar la base de la parte trasera del
P.C.E.
REINICIO DE LA UNIDAD:
● Después de soltar el panel frontal, utilice un lápiz o un objeto no metálico para pulsar y
mantener pulsado el botón REINICIO durante cinco segundos para reiniciar la unidad.
E-5
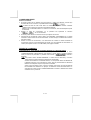
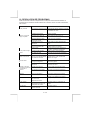
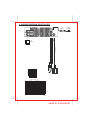
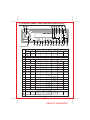
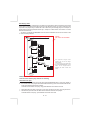
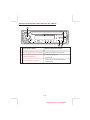
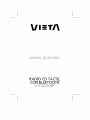
4. DIAGRAMA DE CABLEADO (CONECTOR ISO INCORPORADO)
CONECTOR
DE ANTENA
CONECTOR
ISO
(no suministrado)
CABLE RCA A RCA
(no suministrado)
CONECTOR A
CONECTOR B
FUNCIÓN / ETIQUETA
A4
AMARILLO
BATERÍA (+)
A5
AZUL
ALIMENTACIÓN DE ANTENA
A7
ROJO
IGNICIÓN (ACC)
A8
NEGRO
TOMA DE TIERRA
B1
VIOLETA
ALTAVOZ TRASERO DERECHO (+)
B2
VIOLETA / NEGRO
ALTAVOZ TRASERO DERECHO (-)
B3
GRIS
ALTAVOZ DELANTERO DERECHO (+)
B4
GRIS / NEGRO
ALTAVOZ DELANTERO DERECHO (-)
B5
BLANCO
ALTAVOZ DELANTERO IZQUIERDO (+)
B6
BLANCO / NEGRO
ALTAVOZ DELANTERO IZQUIERDO (-)
B7
VERDE
ALTAVOZ TRASERO IZQUIERDO (+)
B8
VERDE / NEGRO
ALTAVOZ TRASERO IZQUIERDO (-)
E-6
SUB
WOOFER
COLOR DEL CABLE
SALIDA SUBWOOFER
AMP
ESQUEMA DE CABLEADO DEL CONECTOR ISO
PIN
SALIDA DE LÍNEA TRASERA
CANAL IZQUIERDO
SALIDA DE LÍNEA
TRASERA CANAL DCHO
Figura 2
CABLE DE
EXTENSIÓN
DE ANTENA
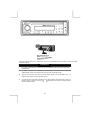
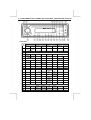
5. FUNCIONES DEL PANEL DE CONTROL (RDS+BLUETOOTH)
FUNCIONES:
SISTEMA
BOTÓN Pulsación Pulsación
corta
1
2
Menú de
audio
larga
SINTONIZADOR
Pulsación
corta
5
6
Bluetooth
Pulsación Pulsación
corta
larga
Botón de extracción del panel
Silencio Encendido
Enter
Modo
Codificador de
volumen
ESC
8
ix-Bass
Rechazar Finalizar llamada
TA
Guardado
automático
9
Sub-W
Info RDS
Info ID3
11
Teléfono
12
M1
Pausa /
Memoria 1 Reproducción
13
M2
Memoria 2
14
M3
Memoria 3
15
M4
Memoria 4
16
M5
Memoria 5
17
M6
Memoria 6
18
Banda
19
Intro
carpetas
Repetición
Repetición de carpetas
Orden aleatoAleatorio rio en carpeta
Carpeta
Carpeta
+
Buscador
de carpetas
Intro
Tapa / Conexión hembra USB
20
Buscar +
21
Buscar -
22
Pulsación
larga
Expulsar
7
10
CD/MP3/WMA
Pulsación
corta
Menú del
sistema
3
4
Pulsación
larga
Pista/
Sintonizar + Archivo +
Pista/
Sintonizar - Archivo
-
Avance
rápido
Retroceso
rápido
CONEXIÓN AUXILIAR DE ENTRADA EN PANEL FRONTAL
E-7
Transferencia
6. FUNCIONES BÁSICAS
3)
BOTÓN DE EXTRACCIÓN DEL PANEL (REL)
Pulse este botón para extraer el panel de control.
4)
BOTÓN DE ENCENDIDO/APAGADO (POWER/MUTE)
Mantenga pulsado el botón POWER/MUTE o cualquier otro botón de la parte delantera de la radio
(excepto Abrir/Expulsar) para encender la unidad. Mantenga pulsado de nuevo el botón
POWER/MUTE para desconectar la unidad.
4)
BOTÓN DE SILENCIO (POWER/MUTE)
Pulse el botón POWER/MUTE momentáneamente para silenciar el volumen de la radio; aparecerá
el mensaje "MUTE" parpadeando en la pantalla. Pulse de nuevo el botón POWER/MUTE para
poner de nuevo el volumen en su ajuste anterior.
10)
SUBWOOFER (SUBW/INFO)
Mantenga pulsado el botón SUBW/INFO para activar la función de Subwoofer; el icono “SUB-W”
aparecerá en la pantalla LCD. Pulse de nuevo el botón SUBW/INFO para desactivar la función de
Subwoofer.
8)
BOTÓN iX-BASS (XBS)
Pulse el botón XBS para activar la función iX-Bass; el icono “X-BAS” aparecerá en la pantalla LCD.
Pulse de nuevo el botón XBS para desactivar la función iX-Bass.
5)
BOTÓN DE MODO (MODE)
Pulse el botón MODE para seleccionar un modo de funcionamiento diferente, tal y como se indica
en el panel de la pantalla.
Entre los modos disponibles se encuentran TUNER, DISC, USB, SD CARD, BT AUDIO y Aux.
22)
CONEXIÓN DE ENTRADA AUXILIAR EN EL PANEL FRONTAL
Conecte la señal exterior al conector de entrada AUX situado en la
parte frontal del panel y, a continuación, pulse el botón MODE para
seleccionar el modo AUX. Pulse de nuevo el botón MODE para
cancelar el modo AUX y volver al modo anterior.
ENTRADA
AUX
CARCASA FRONTAL
PISTA IZQ
PISTA DCHA
TOMA DE
TIERRA
ENTRADA AUX
6)
BOTÓN DE VOLUMEN DE CODIFICADOR
Para subir el volumen, gire el Control de volumen en sentido de las agujas del reloj. Para bajar el
volumen, gire el Control de volumen en sentido contrario a las agujas del reloj. Cuando el volumen
esté ajustado, el nivel de volumen se mostrará en el panel de la pantalla como un número
comprendido entre 0 (nivel mínimo) y 46 (nivel máximo).
2)
BOTÓN EXPULSAR
Pulse este botón para expulsar el CD de la unidad. El receptor cambiará automáticamente al modo
de radio.
7)
BOTÓN DE RETORNO
Pulse este botón para volver rápidamente al menú o modo anterior.
E-8
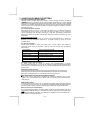
7. AJUSTES DEL MENÚ DE SISTEMA
1 ) LISTA DE FUNCIONES DEL MENÚ (MENU)
Mantenga pulsado el botón MENU para acceder al modo de ajuste del Menú del sistema.
aparecerá en la pantalla de forma momentánea. Desplácese por el menú pulsando
brevemente el botón MENU para avanzar hasta la siguiente opción. Cuando la opción deseada
aparezca en la pantalla, ajústela girando el Control de volumen (pulse el botón de subir/bajar
volumen) dentro de los 5 segundos siguientes. Se pueden ajustar las siguientes opciones a
través de este menú.
Reconexión (RE-CON / DIS-CON)
Esta función permite reconectar o desconectar el teléfono móvil o dispositivo Bluetooth
sincronizado de forma manual. En el modo “RE-CON” del MENU, gire el Control de
volumen para elegir entre “RE-CON” (reconexión) y “DIS-CON” (desconexión). Después de
seleccionar el modo de conexión, pulse el botón AUDIO para iniciar la activación del modo
de conexión.
Bluetooth On/Off (BT On/Off)
El usuario puede girar el Control de volumen para activar/desactivar la función de
Bluetooth. El icono “Bluetooth” aparecerá en la pantalla cuando se active la función
correspondiente.
PTY (Tipo de programa)
Cuando haya accedido al modo PTY podrá pulsar el botón AUDIO para obtener la
información sobre el tipo de programa, y girar el Control de volumen para la categoría
seleccionada.
Tipo de música
Tipo de comunicación hablada
POP, ROCK
NOTICIAS, NEGOCIOS, INFORMACIÓN
EASY, LIGERA
DEPORTES, EDUCACIÓN, TEATRO
CLÁSICA, OTRAS
CULTURA, CIENCIA, VARIOS
JAZZ, COUNTRY
TIEMPO, FINANZAS, INFANCIA
NACIONAL, ANTIGUA
SOCIAL, RELIGIÓN, LLAMADAS TELEFÓNICAS
FOLK, A-TEXT, ALARMA
VIAJES, OCIO, DOCUMENTALES
AF ON/OFF (Frecuencias alternativas)
El usuario puede girar el Control de volumen para activar/desactivar la función
AF (Frecuencias alternativas). Con el modo AF activado, la unidad buscará automáticamente
otra emisora con una señal más potente, pero con la misma identificación de programa que la
emisora actual.
REG ON/OFF (Radio regional)
El usuario puede girar el Control de volumen para activar/desactivar la función Regional.
[REG ON]: Sólo se pueden sintonizar automáticamente las emisoras de la región actual.
[REG OFF]: Se pueden sintonizar automáticamente todas las emisoras.
AREA (ESPACIADO DE FRECUENCIA DE SINTONIZACIÓN)
Esta opción permite seleccionar el espaciado de frecuencia apropiado para su área.
"AREA U.S.A." es la configuración por defecto. Gire el control de volumen para seleccionar
EUR (Europa).
BEEP ON/OFF (Pitido)
La función Pitido permite seleccionar una señal acústica (pitido) que se escuchará cada vez
que se pulse un botón en la radio. La visualización por defecto es "BEEP ON (pitido activado)".
Gire el control de volumen para seleccionar la opción "BEEP OFF” (pitido desactivado).
BTRF (Frecuencia de radio Bluetooth)
En el modo Bluetooth activado, el usuario puede acceder al menú del sistema para ver la
intensidad de la señal Bluetooth, que varía desde 00 (nivel más débil) hasta 50 (nivel más fuerte).
NOTA
Si la señal Bluetooth es débil, esto afectará a la calidad de sonido de la llamada de
teléfono o de Audio Streaming.
E-9
INFO SYS (Información del sistema)
En el modo de Información del sistema, pulse el botón AUDIO para ver la información
detallada del software del sistema de esta unidad.
E - 10
8. AJUSTES DE AUDIO
Pulse el botón MENU para acceder al menú de audio. Cuando el elemento del menú deseado
aparezca en la pantalla, ajústelo girando el control de volumen. Los siguientes elementos de
menú se pueden ajustar tal y como se ha descrito anteriormente.
BAS (Nivel de bajos)
•
El usuario dispone de 5 segundos para usar el control de volumen y ajustar el nivel de bajos
en un rango de -10 a +10.
TRE (Nivel de agudos)
•
El usuario dispone de 5 segundos para usar el control de volumen y ajustar el nivel de agudos
en un rango de -10 a +10.
BAL (Balance)
• El usuario dispone de 5 segundos para usar el control de volumen y ajustar el balance entre
los altavoces derecho e izquierdo en un rango que abarca desde 10R (solamente derecho)
hasta 10L (solamente izquierdo). “C00” representa el equilibrio entre el altavoz derecho y
el izquierdo.
FAD (Atenuador)
• El usuario dispone de 5 segundos para usar el control de volumen y ajustar el atenuador
entre los altavoces delantero y trasero en un rango que abarca desde 10R (solamente
trasero) hasta 10F (solamente delantero). “C00” representa el equilibrio entre el altavoz
delantero y el trasero.
E - 11
9. FUNCIONAMIENTO DEL SINTONIZADOR
18)
BOTÓN BAND (BÚSQUEDA/BANDA)
Pulse el botón BROWSE/BAND para cambiar entre las frecuencias de FM y las
frecuencias de AM (MW).
20-21) BOTÓN DE SINTONIZAR + / SINTONIZAR Sintonización manual
Mantenga pulsado el botón Sint. + o Sint. - para mover el número de frecuencia de radio
arriba o abajo en un paso.
Sintonización automática
Pulse el botón Sint. + o Sint. - para pasar automáticamente a la siguiente emisora.
12-17) BOTONES DE PROGRAMACIÓN DE EMISORAS
Existen seis botones de programación numerados que permiten guardar y recuperar
emisoras de cada banda.
Guardar una emisora
Seleccione una banda (si es necesario) y, a continuación, seleccione una emisora.
Mantenga pulsado un botón de programación durante 3 segundos. El número
programado aparecerá en la pantalla.
Recuperar una emisora
Seleccione una banda (si es necesario). Pulse un botón de programación para seleccionar
la emisora guardada correspondiente.
9)
ALMACENAMIENTO AUTOMÁTICO / ESCANEADO PROGRAMADO (AS)
Almacenamiento automático
Selecciona automáticamente 6 emisoras con señal fuerte y las guarda en la banda en
uso. Seleccione una banda (si es necesario). Pulse el botón AS durante más de tres
segundos. Las nuevas emisoras sustituirán a las emisoras ya almacenadas en esa banda.
Escaneo programado
Escanea emisoras guardadas en la banda en uso. Seleccione una banda (si es
necesario). Pulse el botón AS durante menos de 3 segundos. La unidad se detendrá
durante diez segundos en cada emisora programada. Pulse de nuevo el botón AS para
detener la el escaneado al llegar a la emisora deseada.
ESTÉREO
La unidad captará automáticamente una señal estéreo cuando ésta esté disponible. En
el modo Estéreo, el icono ST aparecerá en la pantalla. Si no hay ninguna señal estéreo
disponible, la unidad volverá automáticamente al funcionamiento Mono y no se
mostrará ningún icono.
E - 12
10. FUNCIONAMIENTO DEL RDS
Funciones del RDS
La unidad está equipada con las siguientes funciones RDS:
- AF Alternative Frequencies (Frecuencias alternativas; búsqueda automática del emisor de
señal más fuerte)
- CT Clock Time (Fecha y hora)
- PI Program identifications (identificación de la red de emisoras)
- PS Program service name (Nombre de la red de emisoras)
- PTY Program Type (Tipo de programa)
- TA Traffic Announcement (Identificación de información sobre el tráfico)
- TP Traffic program (Identificación de red con programas de radio)
1. Función AF
Mantenga pulsado el botón AF para activar el modo de standby AF. Se mostrará el icono
"AF" en la pantalla. En el modo AF “On”, si la señal de la emisora sintonizada se vuelve
débil, la unidad cambiará automáticamente a una frecuencia diferente de la misma red con
una señal más fuerte. Nota: El ajuste de fábrica es “AF ON”
2. Función TA
Mantenga pulsado el botón XBS/TA para activar el modo de standby TA. Se mostrará el
icono “TA” en la pantalla. En el modo de standby, cuando comienza la emisión de
información sobre el tráfico, ésta se recibirá con la máxima prioridad independientemente del
modo de funcionamiento. Cuando la información sobre el tráfico comience a emitirse, se
mostrará “TRAFFIC INFO” en la pantalla LCD. Pulse el botón TA para cancelar la recepción
de la radiodifusión mientras se está recibiendo la información sobre el tráfico. La unidad
volverá al modo anterior, y la función TA volverá de nuevo al modo standby. Si el icono TP
no se enciende durante 60 segundos, se escucha un pitido de alarma y en la pantalla LCD
aparece “Lost TP, TA” (TA, TP perdido).La búsqueda TA se activará automáticamente y
buscará otra emisora TA.
3. Función PTY
Mantenga pulsado el botón PTY para activar el modo de standby PTY. Se mostrará el icono
"PTY" en la pantalla. Una vez seleccionado el elemento PTY, el usuario dispondrá de 5
segundos para pulsar los botones “SELECT (Seleccionar)" o “TUNE UP (Sintonizar +) o
TUNE DOWN (Sintonizar -)” durante menos de 3 segundos para buscar el elemento PTY
seleccionado. En la pantalla LCD aparecerá la indicación “PTY SEEK (búsqueda de PTY)".
Si no se recibe ninguna emisora con la retransmisión de PTY seleccionada, la pantalla LCD
mostrará “No Match PTY (No hay PTY coincidente)” y parpadeará durante 5 segundos antes
de volver al modo anterior.
Los tipos de programas son los siguientes:
Tipo de música
Tipo de comunicación hablada
POP, ROCK
NOTICIAS, NEGOCIOS, INFORMACIÓN
EASY, LIGERA
DEPORTES, EDUCACIÓN, TEATRO
CLÁSICA, OTRAS
CULTURA, CIENCIA, VARIOS
JAZZ, COUNTRY
TIEMPO, FINANZAS, INFANCIA
NACIONAL, ANTIGUA
SOCIAL, RELIGIÓN, LLAMADAS TELEFÓNICAS
FOLK, A-TEXT, ALARMA
VIAJES, OCIO, DOCUMENTALES
E - 13
11. FUNCIONAMIENTO DEL CD/MP3/WMA
INSERCIÓN Y EXPULSIÓN DEL CD
Inserte un CD con el lado de la etiqueta hacia arriba y la unidad encendida. El disco comenzará a
reproducirse. Pulse el botón Expulsar para detener la reproducción del CD y expulsarlo. La unidad
no necesita estar encendida para poder expulsar el CD.
FUNCIONAMIENTO DE CD-DA
12) BOTÓN DE PAUSA
Pulse el botón PAUSA para suspender la reproducción del disco. Vuelva a pulsar el botón
PAUSA para reanudar la reproducción del disco.
20-21)
SELECCIÓN DE PISTA
durante más de 1 segundo para avanzar a la
Pulse el botón Sint. + o Sint. siguiente pista del CD. El número de pista seleccionado aparecerá en la pantalla. Mantenga
durante más de 1 segundo para avanzar o
pulsado el botón Sint. + o Sint. retroceder rápidamente por el disco. La reproducción del CD se iniciará al soltar el botón.
13)
BOTÓN INTRO (INT)
Durante la reproducción del disco, pulse el botón INT (introducción) para reproducir los
primeros 10 segundos del disco. Cuando se alcance la pista deseada, pulse de nuevo el
botón INT (introducción) para finalizar el escaneado y reproducir la pista seleccionada.
14)
BOTÓN DE REPETICIÓN (RPT)
Pulse el botón RPT (Repetición) durante la reproducción del disco para que se repita de forma
continua la reproducción de la pista. Pulse el botón RPT (Repetición) para detener la
repetición.
15)
BOTÓN DE REPRODUCCIÓN ALEATORIA (RDM)
Pulse el botón RDM (Reproducción aleatoria) durante la reproducción del disco para que todas
las pistas de un CD se reproduzcan en un orden aleatorio. Pulse de nuevo el botón RDM
(Reproducción aleatoria) para detener la reproducción aleatoria.
FUNCIONAMIENTO DE MP3/WMA
Los archivos de música en MP3 y WMA (Windows Media Audio) son formatos de comprensión de
audio. Esta unidad puede reproducir MP3/WMA directamente desde los archivos contenidos en el
CD-R/RW, la memoria USB o una tarjeta SD.
Notas sobre la reproducción de MP3/WMA
Esta unidad puede reproducir MP3 (MPEG1, 2, 2.5 Audio Layer 3). Sin embargo, los medios de
grabación de MP3 y formatos aceptados son limitados. Cuando escriba archivos MP3/WMA, preste
atención a las siguientes restricciones.
Formatos de medios aceptados
Los siguientes formatos están disponibles para los medios utilizados en esta unidad. El número
máximo de caracteres utilizados para el nombre de archivo, incluyendo el delimitador (“,”) y la
extensión de 3 caracteres, se indica entre paréntesis.
●
●
●
●
ISO 9660 Nivel 1 (11 caracteres)
ISO 9660 Nivel 2 (31 caracteres)
Joliet (31 caracteres)
Romeo (31 caracteres)
En el formato de nombre largo de archivo se pueden visualizar hasta 200 caracteres. Para obtener
una lista de los caracteres disponibles, consulte el manual de instrucciones del software de escritura
y la sección "Introducción de nombres de archivos y carpetas" más adelante. Los medios
reproducibles en esta unidad tienen las siguientes limitaciones:
●
●
●
●
Número máximo de carpetas anidadas: 8
Número máximo de ficheros por disco: 2000
Número máximo de ficheros por dispositivo de medios: 2000
Número máximo de carpetas por disco: 255
E - 14
Los archivos MP3/WMA escritos en formatos diferentes a los anteriormente mencionados
pueden no ser reproducidos con éxito y sus nombres de archivo o nombres de carpeta pueden
no visualizarse adecuadamente.
Codificador MP3/WMA y configuración del grabador de CDs
Utilice la siguiente configuración a la hora de comprimir datos de audio en MP3 con un
codificador de MP3.
● Tasa de transferencia de bits: 32 - 320 kbps
● Frecuencia de muestreo: 32, 44.1, 48 kHz (WMA) 16, 22.05, 24, 32, 44.1, 48 kHz (MP3)
Cuando utilice un grabador de CDs para grabar MP3/WMA hasta la capacidad máxima del
disco, deshabilite la escritura adicional. Para grabar sobre un disco vacío hasta la capacidad
máxima de una sola vez, marque "disc at once".
Introducción de etiqueta ID3
Esta unidad admite etiquetas ID3 de las versiones 1.0 y 1.1.
Introducción de nombres de archivo y carpeta
Los nombres que utilicen los caracteres de la lista de códigos son los únicos nombres de
archivo y de carpeta que se pueden introducir y visualizar. El uso de cualquier otro carácter
provocará que los nombres de archivo y de carpeta se muestren de forma incorrecta. La unidad
sólo reconoce y reproduce archivos con la extensión MP3/WMA.
NOTA
Un nombre de archivo introducido con caracteres no presentes en la lista de
códigos puede no ser reproducido de forma correcta.
Escritura de archivos en un medio
Cuando un medio que contiene datos MP3/WMA se carga, la unidad comprueba todos los
datos. Si el medio contiene muchas carpetas o archivos no MP3/WMA, la reproducción de los
archivos MP3/WMA se retrasará. La unidad puede tardar algún tiempo en pasar al siguiente
archivo, y las búsquedas pueden presentar problemas. La carga de dichos medios puede
producir ruidos y causar daños en los altavoces. No intente reproducir medios que
contengan un archivo que no sea MP3/WMA con la extensión MP3/WMA ni medios que
contengan archivos que no sean MP3/WMA.
Tasas de transferencia de bits
La unidad admite tasas de transferencia de bits entre 32 y 320 kbps.
E - 15
Orden de reproducción de los archivos
Cuando se selecciona la reproducción, búsqueda de carpetas, búsqueda de archivos o
selección de carpetas, el acceso a los archivos y carpetas se lleva a cabo en el orden en el que
fueron escritos por el Grabador de PC. A causa de esto, el orden en el que se espera que se
reproduzcan puede no coincidir con el orden en el que realmente se reproducen. Por ejemplo,
un medio con la siguiente jerarquía de carpetas/archivos está sujeto a la Búsqueda de
carpetas, Búsqueda de archivos o Selección de carpetas tal como se muestra abajo.
●
A continuación se muestra el perfil de un medio con archivos MP3/WMA. Las subcarpetas
aparecen como carpetas en la carpeta seleccionada.
RAÍZ
NIVEL 1
NIVEL 2
NIVEL 3
NIVEL 4
“NO SE VISUALIZA”
“NO SE VISUALIZA”
“NO SE VISUALIZA”
El equipo asigna números de carpeta.
El usuario no puede asignar números
de carpeta.
No es posible examinar carpetas que
no incluyan archivos MP3/WMA.
(Dichas carpetas se pasarán sin
mostrar el número ni el nombre de la
carpeta)
“NO SE VISUALIZA”
REPRODUCCIÓN DE ARCHIVOS/CARPETAS
Existen tres métodos de reproducción diferentes, como se indica a continuación:
Reproducción de la introducción de un archivo/carpeta:
●
Mantenga pulsado el botón M2 más de 3 segundos durante la reproducción del disco en
MP3/WMA para reproducir la introducción de todos los archivos de la carpeta actual. La
reproducción de la introducción de los archivos se reanudará con la primera canción de la
carpeta actual, después de que se haya reproducido la introducción de todos los archivos
de los archivos actuales.
Para deshabilitar la "reproducción de la introducción" de la carpeta actual, mantenga
pulsado el botón M2 durante más de 3 segundos.
●
Pulse el botón M2 durante menos de 3 segundos y se efectuará una "reproducción de la
introducción" de todos los archivos del disco. La reproducción de la introducción debe
reiniciarse en el primer archivo del disco después de que se haya reproducido la
introducción de todos los ficheros del disco.
Para deshabilitar la "reproducción de la introducción", pulse el botón M2 durante menos de
3 segundos.
E-16
Reproducción repetida de un archivo/carpeta:
● Pulse el botón M3 durante más de 3 segundos durante la reproducción del disco en
MP3/WMA para activar la "reproducción repetida" de todos los archivos de la carpeta
actual. La carpeta actual seguirá reproduciéndose de forma repetida hasta que se
deshabilite la función “reproducción repetida”.
Para deshabilitar la "reproducción repetida" de la carpeta actual, mantenga pulsado el botón
M3 más de 3 segundos
● Pulse el botón M3 durante menos de 3 segundos para realizar la “reproducción repetida” del
archivo actual.
El archivo actual seguirá reproduciéndose de forma repetida hasta que se deshabilite la
función “reproducción repetida”.
Pulse el botón M3 durante menos de 3 segundos para deshabilitar la “reproducción
repetida” del archivo actual.
Reproducción aleatoria de un archivo/carpeta:
● Mantenga pulsado el botón M4 más de 3 segundos durante la reproducción de un archivo
MP3/WMA para "reproducir de forma aleatoria" todos los archivos de la carpeta actual.
Para deshabilitar la "reproducción aleatoria" de la carpeta actual, mantenga pulsado el botón
M4 más de 3 segundos.
● Pulse el botón M4 durante menos de 3 segundos y se efectuará una "reproducirán aleatoria"
de todos los archivos del disco.
Para deshabilitar la función "reproducción aleatoria" de todos los archivos, pulse el botón M3
durante menos de 3 segundos.
Reproducción Carpeta +/● Pulse el botón M5 durante menos de 3 segundos para bajar una carpeta.
● Pulse el botón M6 durante menos de 3 segundos para subir una carpeta.
Búsqueda de carpetas o archivos MP3/WMA
Búsqueda directa del número de archivo
Pulse el botón BROWSE/BAND. La pantalla LCD mostrará
y
parpadeará. Gire el control del volumen para seleccionar el número de pista deseada y, a
continuación, pulse el botón ENTER para confirmar y reproducir el archivo seleccionado.
Búsqueda-navegación por archivos / carpetas
Pulse el botón BROWSE/BAND dos veces. La pantalla LCD mostrará
y
parpadeará. Gire el mando para desplazarse por todas las carpetas y subcarpetas del
disco. Los nombres de carpeta se visualizarán en la pantalla LCD. Pulse el botón de selección
durante más de 3 segundos para reproducir el primer archivo de la carpeta. Pulse el botón de
selección durante menos de tres segundos para acceder a los archivos o subcarpetas. Gire el
control del volumen para desplazarse y, a continuación, pulse el botón de selección para
confirmar e iniciar la reproducción del archivo seleccionado. Durante la búsqueda-navegación,
pulse PS o gire el control de volumen en el sentido contrario a las agujas del reloj para volver
atrás al último nivel superior de una carpeta.
VISUALIZACIÓN DE LA INFORMACIÓN ID3
En caso de que algún archivo MP3/WMA haya sido grabado con información de etiqueta ID3.
La información ID3 como el título del álbum, título de pista, título de artista se visualizará y se
desplazará automáticamente por la pantalla LCD mientras se reproduce el archivo. El usuario
también puede pulsar el botón INFO repetidamente para ver la información de etiqueta ID3 de
forma manual.
E - 17
12. FUNCIONAMIENTO DEL USB
La unidad soporta la función USB Host. Puede reproducir formatos de audio MP3 y WMA
guardados en una memoria USB o en un reproductor de música con interfaz USB. Lea las
instrucciones que aparecen a continuación antes de empezar a utilizar la función USB HOST.
Insertar y extraer el dispositivo USB
Inserción de la memoria USB
Advertencia:
Nunca separe el panel mientras la
memoria USB esté conectada.
Retire siempre la memoria USB antes de
separar el panel.
Extracción del dispositivo USB
Paso
Sujete el panel con la mano izquierda
Paso
Retire con cuidado el
dispositivo USB
Cambio a modo USB HOST
Si se encuentra en cualquier otro modo cuando inserte un dispositivo USB en el conector USB
del panel frontal, la unidad cambiará automáticamente del modo de reproducción en uso al
modo USB Host. La unidad mostrará
durante un momento y, a continuación, iniciará
de los archivos contenidos en la memoria USB. Cuando la unidad haya leído
satisfactoriamente el dispositivo USB, el primer archivo de música del dispositivo USB
comenzará a reproducirse automáticamente. Pulse el botón Mode repetidamente para cambiar
a otros modos o para volver al USB HOST.
ADVERTENCIA:
Antes de extraer la memoria USB del conector del panel frontal, recuerde siempre apagar la
unidad o cambiar a otro modo para extraer la memoria USB. Nunca intente extraer el
dispositivo USB mientras se está reproduciendo un archivo de música en él. Esto puede dañar
la memoria USB, e incluso hacer que el sistema de la unidad se bloquee.
NOTA
La unidad permite la reproducción desde reproductores de música con interfaz USB.
Sin embargo, debido a los rápidos cambios en la tecnología de los decodificadores y a
los diferentes tipos de interfaz de hardware, esta unidad puede ser o no compatible con
todos los reproductores de música y memorias USB, especialmente aquéllos que
requieran la instalación de controladores.
NOTA
En cuanto a los reproductores Flash de música con interfaz UB, la unidad suele necesitar
más tiempo para leer este tipo de reproductores que para leer una memoria USB
normal. Especialmente en el caso de reproductores Flash con batería
incorporada,
puede llegar a necesitar 20-30 segundos para iniciar la reproducción.
NOTA
La unidad no es compatible con la reproducción de discos duros portátiles.
Funcionamiento de la reproducción de archivos de música
La función de reproducción de USB es similar a la reproducción de CD/MP3/WMA. Consulte
"Funcionamiento de CD/MP3/WMA" para obtener más información.
E - 18
13. FUNCIONAMIENTO DE LA TARJETA DE MEMORIA
La unidad permite la reproducción de los formatos de audio MP3 y WMA almacenados en
tarjetas SD. Lea las instrucciones que aparecen a continuación antes de empezar a utilizar la
tarjeta de memoria.
Insertar y extraer una tarjeta SD de la unidad principal
Extraiga el
panel frontal
Inserte la tarjeta de memoria
con la etiqueta hacia arriba
Presione hasta que
escuche un “clic”
Inserción de la tarjeta SD
Extraiga el
panel frontal
Presione hasta que
escuche un “clic”
Extracción de la tarjeta
Retire la tarjeta de memoria
Cambio a modo Tarjeta SD
Tras insertar una tarjeta SD en la ranura para tarjetas de la unidad principal, pulse el botón
. La unidad reproducirá automáticamente los
Mode para seleccionar el modo
archivos contenidos en la tarjeta SD. Pulse el botón Mode repetidamente para cambiar a otros
modos o para volver al modo Tarjeta SD.
NOTA
Si no se inserta ninguna tarjeta SD en la ranura para tarjetas de la unidad principal, al
pulsar el botón Mode se saldrá automáticamente del modo Tarjeta SD.
Funcionamiento de la reproducción de archivos de música
La función de reproducción de tarjetas SD es similar a la reproducción de CD/MP3/WMA.
Consulte "Funcionamiento de CD/MP3/WMA" para obtener más información.
E - 19
14. FUNCIONAMIENTO DEL BLUETOOTH MANOS LIBRES
Guía de usuario para el funcionamiento del Bluetooth
1. Cuando el usuario utilice nuestra UNIDAD PRINCIPAL Bluetooth, deberá asegurarse de que el teléfono
móvil utilizado tenga las funciones Bluetooth o sea compatible con ellas (perfil de auriculares, manos libres o
ambos).
2. Antes de que comience a utilizar nuestra UNIDAD PRINCIPAL Bluetooth, asegúrese de que ésta se
conecta de forma adecuada a su teléfono móvil. Consulte el manual de usuario, sección “SINCRONIZACIÓN”
para unas instrucciones más detalladas. Para asegurar la mejor recepción para sincronización o reconexión,
asegúrese de que la batería del teléfono esté totalmente cargada.
3. Le recomendamos que intente siempre sincronizar el teléfono móvil con la unidad principal pasados unos
pocos minutos después de encender el móvil, con el fin de garantizar los mejores resultados de
sincronización.
4. “BT89” es el número de modelo de esta unidad que se muestra en el teléfono móvil.
5. Para conseguir el mejor rendimiento, mantenga siempre el teléfono móvil a menos de 3 metros de la unidad
principal.
6. Mantenga siempre libre el espacio entre el teléfono móvil y la unidad principal.
7. No coloque nunca objetos metálicos o cualquier otro obstáculo entre el teléfono móvil y la unidad principal.
8. Algunas marcas de teléfono móvil, como Sony Ericsson, pueden tener activada la característica “Modo de
ahorro de energía” cuando el modo Bluetooth está encendido. NO active el "Modo de ahorro de energía"
cuando utilice esta unidad principal, ya que puede provocar una mala comunicación de la misma.
9. Antes de realizar una llamada o de recibir una llamada entrante, asegúrese de que la "función Bluetooth"
del teléfono está activada.
10. Para conseguir la mejor calidad de conversación, hable siempre a menos de 1 metro de la unidad
principal.
11. Si el usuario desea desconectar la unidad principal del teléfono móvil, desconecte la conectividad
Bluetooth en el teléfono móvil o bien vaya al menú de sistema y pulse "desconectar" para desconectar
manualmente la conectividad Bluetooth. (Consulte en el manual de usuario la sección "Desconexión del
sistema Bluetooth" para obtener más detalles.) )
12. Algunos teléfonos móviles, como Nokia, pueden ser compatibles con “IN BAND RING TONE (Tono de
llamada In band)”. En ese caso, el tono de llamada entrante será el mismo que el tono de llamada original del
teléfono móvil. Sin embargo, algunos teléfonos móviles, como los Sony Ericsson, no admiten esta
característica. El tono de llamada utilizado será el tono de llamada estándar de la unidad principal.
13. Cuando esté hablando en el modo Teléfono, se recomienda encarecidamente que ponga el volumen por
debajo de "30" para conseguir la mejor calidad de sonido. Si el volumen es demasiado alto, se puede crear
un eco no deseado dentro del coche que puede acoplarse al micrófono.
14. Si no funciona el Bluetooth y no se pueden conectar dos dispositivos ni hacer llamadas, usted puede
tratar de hacer un SOFT-RESET (REINICIO SUAVE) del módulo Bluetooth extrayendo / separando el panel
de la unidad principal y esperando aproximadamente 1 minuto. Después vuelva a insertar el panel en la
unidad e intente utilizar el Bluetooth de nuevo. También puede REINICIAR la unidad entera pulsando el botón
REINICIO que se encuentra detrás del panel.
NOTA
Al pulsar el botón REINICIO toda la memoria almacenada volverá al estado predeterminado de fábrica
Preguntas frecuentes
P: Durante una conversación telefónica, la salida de voz de los altavoces del coche no es lo suficientemente
alta.
R: Intente subir el volumen de la unidad principal hasta alcanzar el nivel de sonido adecuado.
P: Durante una conversación telefónica, el "receptor" no puede escuchar mi voz a un volumen lo
suficientemente alto.
R: Intente primero que el "receptor" suba el volumen de su teléfono móvil. Si sigue sin estar suficientemente
alto, intente subir el volumen de su teléfono móvil.
P: Durante una conversación telefónica, el “receptor" puede escuchar eco acoplado.
R: El volumen de los altavoces de su unidad está demasiado alto, provocando que la voz se acople al
micrófono integrado. Esto se puede solucionar disminuyendo el nivel de volumen.
P: Durante una conversación telefónica, el “receptor" se queja de que hay demasiado ruido de fondo.
R: Quizás se encuentra en un entorno muy ruidoso. Intente cerrar la ventanilla del coche para amortiguar el
ruido del entorno mientras dure la conversación telefónica.
P: Si el teléfono móvil ya está sincronizado con la unidad principal, pero, después de varias llamadas, las
llamadas entrantes no pasan a través de la unidad principal.
R: Es posible que se haya perdido la conexión Bluetooth entre el teléfono móvil sincronizado y la unidad
principal. En ese caso, vaya a "MENU" y seleccione "reconectar" para volver a conectar la unidad principal al
teléfono móvil sincronizado. Para obtener más detalles, consulte la operación "Reconexión" del MENÚ.
E - 20
Matriz de teclas de función del panel manos libres por Bluetooth
Botón de función del panel
Función del Bluetooth manos libres
1
Control de volumen (pulsación corta)
Confirmar para responder a una llamada
entrante
2
Llamada / Esc. (pulsación corta)
3
Teléfono / Desvío (pulsación larga)
1.
Rechazar una llamada entrante
2.
Finalizar una llamada
Desviar la llamada telefónica de nuevo
al teléfono móvil
E - 21
SINCRONIZACIÓN
Sincronización del sistema Bluetooth entre el teléfono móvil y la unidad
●
Abra su teléfono móvil, active el Bluetooth y busque el dispositivo Bluetooth.
●
“BT89” debe aparecer en la lista de sincronización del teléfono móvil. El usuario debe
seleccionar “BT89” y, a continuación, introducir la contraseña “1234”.
Si la sincronización se realiza con éxito, la pantalla mostrará el nombre del teléfono móvil o el
número de modelo.
●
Si la sincronización se realiza con éxito, “
durante 3 segundos.
Y la unidad cambiará al modo anterior de manera automática.
●
Si la sincronización falla, “
” parpadeará en la pantalla durante 3
segundos.
Y la unidad cambiará al modo anterior de manera automática.
NOTA
Durante la sincronización, sólo están operativos los botones Encendido, Teléfono /
Desvío, Volumen y Silencio; el resto de las teclas de función estarán deshabilitadas y
no operativas durante el modo de sincronización.
” parpadeará en la pantalla
Reconexión del sistema Bluetooth
La unidad cuenta con una función de reconexión incorporada. No obstante, en ciertas
condiciones el usuario tendrá que reconectarse manualmente. Por ejemplo, en los casos que se
indican a continuación.
● Si el teléfono móvil está fuera de cobertura (a más de 2 metros de la unidad principal). En
caso de pérdida de conexión cuando el usuario vuelve a la unidad. Al mismo tiempo, hay
una llamada entrante o el usuario está teniendo una conversación por el teléfono móvil a más
de 2 metros de la unidad principal y vuelve a la unidad principal.
● Si el usuario desea volver a desviar el audio del teléfono móvil a la unidad principal, debe
reconectarlo manualmente.
La unidad puede reconectarse de las siguientes formas:
●
Acceda al modo Menú del sistema – modo RE-CON para activar la reconexión manual.
NOTA
Consulte el Ajuste del Menú del sistema para más información sobre cómo acceder al
modo Menú del sistema.
en la pantalla LCD, pulse el botón AUDIO para activar el
● Cuando aparezca
modo Reconexión manual.
NOTA
1. Mantenga el teléfono móvil al menos a 2 metros de la unidad cuando realice la
conexión.
2. La reconexión manual sólo funciona cuando el teléfono móvil ya ha sido
sincronizado con la unidad principal anteriormente.
La pantalla LCD mostrará “
” durante el período de conexión.
Si la reconexión se realiza con éxito, en la pantalla LCD aparecerá
.
Y la unidad cambiará al modo anterior de manera automática.
Si la reconexión falla, en la pantalla LCD aparecerá "
". La
unidad cambiará al modo anterior de manera automática.
NOTA
●
●
●
La unidad se reconectará automáticamente en los siguientes casos.
●
Cada vez que gire la llave del contacto de la posición "off" a la posición "on", la unidad se
reconectará automáticamente con el teléfono móvil.
E - 22
Desconexión del sistema Bluetooth
La unidad tiene una función opcional para que el usuario desconecte el sistema Bluetooth de
ésta. La unidad puede desconectarse de las siguientes formas:
●
Acceda al modo Menú del sistema – DIS-CON para activar la desconexión manual.
NOTA
●
●
Consulte el Ajuste del Menú del sistema para más información sobre cómo acceder al
modo Menú del sistema.
Cuando aparezca “
” en la pantalla LCD, pulse el botón AUDIO para activar
el modo de Desconexión manual.
Si la desconexión se realiza con éxito, en la pantalla LCD aparecerá
" ".
. Y la unidad cambiará al modo anterior de manera automática.
LLAMADA ENTRANTE
CONTESTAR A UNA LLAMADA ENTRANTE
●
Cuando haya una llamada entrante, en la pantalla LCD aparecerá el número de teléfono. Si la
llamada entrante no incluye el número de identificación, la pantalla LCD mostrará
. El usuario podrá pulsar el botón Teléfono/Desvío para responder/aceptar
la llamada.
NOTA
Pulse siempre el botón "Teléfono/Desvío" para responder/aceptar la llamada después de
que la pantalla LCD muestre el número de teléfono de la persona que llama.
La salida de audio del modo actual se silenciará y se escuchará el timbre de llamada si
no se responde a la llamada entrante.
●
●
El usuario puede utilizar el control de volumen para ajustar el volumen.
Para terminar la conversación, pulse el botón “Llamada/Retorno”. La unidad volverá
automáticamente al modo anterior y liberará el silenciado del modo anterior al mismo tiempo.
NOTA
Si se recibe una llamada entrante durante el modo Standby (ignición activada pero
desconectado), el sistema activará automáticamente la unidad principal.
Mientras hay una llamada entrante o en modo de conversación, la tecla Abrir/Expulsar
panel se desactiva.
Rechazar una llamada entrante
● El usuario puede pulsar el botón ”CALL/RETURN” ("Llamada/Retorno”) para rechazar la
llamada entrante.
NOTA
La salida de audio del modo actual se silenciará y se escuchará el timbre de llamada si no
se responde a la llamada entrante. Tras pulsar el botón “Llamada/Retorno”, el modo
actual dejará de estar silenciado.
E - 23
LLAMADA SALIENTE
Realizar una llamada
● El usuario puede usar su teléfono móvil para marcar y realizar una llamada. Cuando haya
terminado de marcar el número, la pantalla deberá mostrar "
NOTA
La salida de audio de este modo SÓLO se silenciará tras pulsar el botón “PHONE”
(Teléfono) para confirmar la marcación de la llamada saliente.
Mientras hay una llamada saliente o en modo de conversación, la tecla Abrir/Expulsar panel
se desactiva.
● Durante
“
el
modo
de conversación, en
” de la conversación.
la
pantalla
LCD
aparecerá
la
duración
● El usuario puede utilizar el control de volumen para ajustar el volumen.
● Para terminar la conversación, pulse el botón “CALL/RETURN” (Llamada/Retorno). La unidad
cambiará al modo anterior de manera automática. Al mismo tiempo, se desactivará el silencio
del modo anterior.
● Durante el modo de conversación, si se desconecta el contacto la unidad mantendrá la
conversación aunque se haya desactivado la ignición. Una vez finalizada la conversación, el
usuario podrá pulsar el botón “CALL/RETURN” para apagar la unidad.
DESVÍO DE LLAMADAS
PARA DESVIAR EL AUDIO DESDE LA UNIDAD PRINCIPAL AL TELÉFONO MÓVIL
● Durante el modo de conversación, el usuario puede mantener pulsado el botón
“PHONE/TRANSFER” (Teléfono/Desvío) para desviar el audio desde la unidad al teléfono
” durante 3
móvil por motivos de privacidad. La pantalla LCD mostrará “
segundos.
NOTA
Tras pulsar el botón “PHONE/TRANSFER”, el modo actual se silenciará y el usuario
podrá presionar el botón MUTE para desconectar el silenciado.
Cuando esté realizando una llamada saliente, no será posible realizar el DESVÍO DE
LLAMADA hasta que no se responda a la misma. Sólo se puede transferir la llamada al
teléfono móvil después de que se responda a la llamada.
Según el tipo de teléfono móvil, el tiempo necesario para activar el modo de DESVÍO
DE LLAMADA será diferente. Por ejemplo, los teléfonos móviles de Nokia tardan 3-5
segundos tras pulsar el botón "PHONE/TRANSFER” en desviar la llamada de la unidad
al teléfono móvil y viceversa.
E - 24
Escucha de audio Bluetooth A2DP (perfil avanzado de distribución de
audio)
El usuario puede escuchar archivos de música de un dispositivo de audio en esta unidad si el
dispositivo de audio admite A2DP (perfil avanzado de distribución de audio) de tecnología
Bluetooth. Lea las instrucciones que figuran a continuación antes de utilizar la función Bluetooth
Audio Streaming de esta unidad.
Conectar un dispositivo de audio Bluetooth a esta unidad
Antes de utilizar un dispositivo de audio para reproducir música en esta unidad, el dispositivo
debe sincronizarse primero con la unidad.
NOTA
NOTA
a. Para más información sobre la función de sincronización de esta unidad, consulte
la función de SINCRONIZACIÓN.
b. Consulte el manual de instrucciones del dispositivo Bluetooth acerca de cómo
utilizar el dispositivo de audio Bluetooth para sincronizarlo con esta unidad.
Suge- Si el dispositivo de audio tiene tanto HFP (perfil manos libres) como A2DP (perfil
rencias avanzado de distribución de audio), esta unidad sincronizará automáticamente esos
dos perfiles al mismo tiempo. Por ejemplo, si un teléfono móvil tiene tanto el perfil
HFP como el A2DP y ese teléfono móvil ya ha sincronizado el perfil HFP, no será
necesario realizar la sincronización A2DP del dispositivo de audio. Dicho teléfono
móvil sincronizado será añadido automáticamente a la lista de DISPOSITIVOS
SINCRONIZADOS - AUDIO de esta unidad. Para más información acerca de las
funciones de los dispositivos sincronizados consulte el MENU del Bluetooth.
Escuchar música en esta unidad desde un dispositivo de audio
(1)
Conecte esta unidad al dispositivo de audio.
NOTA
Para más información sobre la función de conexión con esta unidad, consulte la
función de CONEXIÓN.
(2) Pulse el botón Mode varias veces hasta que “BT AUDIO” (audio Bluetooth) aparezca en la
pantalla.
IMPORTANTE: Para escuchar audio vía Bluetooth desde el dispositivo de audio, el
usuario DEBE cambiar primero el modo a "AUDIO BT". Cualquier otro modo de esta
unidad no será capaz de activar la función de escucha de audio a través de Bluetooth
NOTA
Si el dispositivo de audio está conectado o no hay ningún dispositivo de audio que se
esté conectando con esta unidad, después de cambiar al modo AUDIO BT se
. Si, tras 20 segundos sigue sin encontrar ningún
mostrará
dispositivo
de
audio
a
conectar,
la
unidad
mostrará
durante 3 segundos. A continuación, pasará al modo de
Sintonizador.
(3) Una vez activado el modo “AUDIO BT”, el usuario puede utilizar el dispositivo de audio
para iniciar la reproducción de una canción a través del Bluetooth inalámbrico de esta
unidad.
NOTA
Cuando el usuario active el modo AUDIO BT, ciertos dispositivos de audio pueden
comenzar a reproducir música automáticamente sin necesidad de activar la función
de reproducción de música. Otros dispositivos, como los teléfonos móviles, pueden
necesitar cambiar primero al modo “Media Player”, de lo contrario, la canción no
podrá ser reproducida directamente mediante Bluetooth inalámbrico. Si el dispositivo
de audio no admite la reproducción automática, consulte el manual de instrucciones
del dispositivo de audio para saber cómo utilizar la reproducción de música a través
de la tecnología inalámbrica Bluetooth.
E - 25
Uso de un dispositivo de audio con el AVRCP (perfil de control remoto
de audio vídeo) de esta unidad
Esta unidad puede realizar las operaciones siguientes con un dispositivo de audio conectado
que admita AVRCP (perfil de control remoto de audio vídeo) únicamente si el dispositivo de
audio soporta AVRCP.
(1) Iniciar reproducción – Cada vez que el usuario cambie al modo “AUDIO BT”, esta unidad
enviará automáticamente el comando “PLAY” (reproducir), a través del AVRCP, al
dispositivo de audio para ordenar la reproducción automática de la pista que se encuentra
en el dispositivo de audio.
NOTA
El comando PLAY puede variar en función del dispositivo de audio. Si el dispositivo
de audio no puede iniciar la reproducción automática después de activar el modo “BT
AUDIO”, el usuario tendrá que activar el modo PLAY del dispositivo de audio para
iniciar la reproducción de la pista.
(2)
(3)
(4)
(5)
(6)
Pista arriba/abajo: pulsando los botones de Pista arriba/abajo de la unidad.
Pausa / Reproducción: pulsando el botón Pausa / Reproducción de la unidad.
Volumen (+ / -): girando el control de volumen de esta unidad.
Silencio: pulsando el botón Mute (Silencio) de la unidad.
Detener reproducción: cambiando de modo en la unidad.
NOTA
La función AVRCP puede variar en función del dispositivo de audio, las funciones
queno aparecen en la lista anterior deben realizarse en el dispositivo de audio.
Llamadas con manos libres mientras se utiliza el streaming de audio
Bluetooth
Si el dispositivo de audio conectado es un teléfono móvil, las funciones manos libres seguirán
estando disponibles durante el audio streaming por Bluetooth, como la respuesta a llamadas
entrantes, realización de llamadas, etc.
Desconexión de un dispositivo de audio de esta unidad
El usuario puede cerrar la conexión de audio Bluetooth al desconectar el dispositivo de audio.
NOTA
Para más información sobre la función de desconexión de esta unidad, consulte la
función DESCONEXIÓN.
E - 26
15. ESPECIFICACIONES
REPRODUCTOR DE CD
Sistema
Discos utilizables
Frecuencia de muestreo
Nº de bits de cuantificación
Frecuencia
Número de canales
Relación S/N
SECCIÓN DE MEDIOS
Puerto USB
Tarjeta de memoria
Tarjetas de memoria compatibles
Sistema de audio del disco compacto
Disco compacto
44,1 kHz
1 bit
5-20.000 Hz
2 estéreo
70 dB
Host 1.1 compatible 2.0
SD
SECCIÓN DE RADIO
FM
Rango de frecuencia
87,5-108 MHz
Frecuencia intermedia
Sensibilidad útil
Separación estéreo
Relación S/N
10,7 MHz
Superior a 15 dB a S/N 30 dB
25 dB a 1 kHz
50 dB
AM/MW
Rango de frecuencia
522-1620 kHz
Frecuencia intermedia
Sensibilidad útil
Relación S/N
450 kHz
Superior a 45 dB
40 dB
BLUETOOTH
Consumo de energía
Potencia de salida
Banda de frecuencia
Alcance
Estándar
GENERAL
Suministro eléctrico
Polaridad
Impedancia del altavoz
Potencia
200 mA máx.
0 dBm (Clase II)
2,4 GHz ~ 2,4835 GHz Banda ISM
3 metros (espacio libre)
Especificación Bluetooth 2.0
CC 11 -14 V
Puesta a tierra negativa
4 ohmios
4 x 50 W
COMENTARIO:
Especificaciones sujetas a cambios sin previo aviso.
E - 27
16. RESOLUCIÓN DE PROBLEMAS
Antes de examinar la lista de comprobaciones, verifique las conexiones del cableado. Si
cualquiera de los problemas persiste después de comprobar la lista, consulte al distribuidor
más cercano.
Síntoma
No hay corriente
Causa
Solución
El contacto del vehículo no está Si el suministro eléctrico está bien conectado
encendido.
al terminal del vehículo, coloque el interruptor
de encendido en “ACC”
El fusible está quemado.
Sustituya el fusible.
Presencia de un disco CD
dentro del reproductor.
Retire el disco del reproductor y a
continuación inserte uno nuevo.
Se está insertando el disco
en dirección inversa.
Inserte el CD con la etiqueta
hacia arriba.
El CD está muy sucio o
defectuoso.
Limpie el disco o intente reproducir uno
nuevo.
La temperatura dentro del
coche es demasiado alta.
Refrigérelo hasta que la temperatura
ambiente vuelva a ser normal.
Condensación
Desconecte el reproductor durante una
hora aprox. e inténtelo a continuación.
No se produce ningún
sonido
El volumen está al mínimo.
Ajuste el volumen al nivel deseado.
Los cables no están
bien conectados.
Compruebe las conexiones del cableado.
Los botones de
función no funcionan
El microordenador integrado no Pulse el botón RESET.
funciona correctamente debido El panel frontal no está correctamente
a la existencia de ruidos.
insertado en su lugar
El sonido salta.
El ángulo de instalación
es mayor de 30 grados.
Ajuste el ángulo de instalación a
menos de 30 grados.
El CD está muy sucio o
defectuoso.
Limpie el disco compacto o intente
reproducir uno nuevo.
El disco no se puede
cargar o expulsar
La radio no funciona.
El cable de la antena no
La selección automática está conectado.
de emisoras no
funciona.
Las señales son demasiado
débiles.
Inserte el cable de antena firmemente.
ERROR 1
Error en el mecanismo.
Error de lectura
La unidad no puede reproducir
los archivos del
dispositivo de medios.
Pulse el botón "Reinicio" para corregir el
problema. Si el código de error no desaparece,
consulte con su distribuidor más cercano.
Sustituya el dispositivo de medios
No hay archivo
No hay archivos con formato
reproducible en el disco o en
el dispositivo de medios.
Error de disco
Puede que el disco esté sucio / Reemplace el disco.
rayado / del revés.
E - 28
Seleccione una emisora manualmente.
Reemplace el disco o el dispositivo de
medios.
4 X 50W
AUX
INPUT
AUDIO MENU
MEN
vtc2500BT
SYS
This radio is equipped with the most advanced "TOUCH SENSE PANEL", so that it is easy and
convenient to use while driving.
TIPS
Here are some tips to show you how easy it is to use this touch sense panel:
Using a very light touch on the radio panel will activate that feature. You will not need to
"PRESS" hard on the panel to make this radio change features.
Some of the buttons that have dual functions, will need to be "TOUCHED" from 2 to 3 seconds
to activate the second level function.
The best area to "TOUCH" on the panel to make it activate is the illuminated or lighted area. For
example, just touch the illuminated
to play the next track or return to the previous
track.
E-1
1. NOTE OF DISCS
MOISTURE CONDENSATION
On a rainy day or in a very damp area, moisture may condense on the lenses inside the unit.
Should this occur, the unit will not operate properly. In such a case, remove the disc and wait for
about an hour until the moisture has evaporated.
NOTES ON CDs
NOTES ON DISCS
1. A dirty or defective disc may cause sound
dropouts while playing. To enjoy optimum
sound, handle the disc as follows.
Handle the disc by its edge. To keep the disc
clean, do not touch the surface (P.1).
If you use the discs explained below, the
sticky residue can cause the CD to stop
spinning and may cause malfunction or ruin
your discs.
Do not use second-hand or rental CDs that
have a sticky residue on the surface (for
example, from peeled-off stickers or from
ink, or glue leaking from under the stickers).
There are paste residue.
Ink is sticky (P.5).
P. 1
2. Do not stick paper or tape on the disc (P.2).
****
*******
P. 5
*******
******* *******
Do not use rental CDs with old labels that
are beginning to peel off.
P. 2
3. Do not expose the discs to direct sunlight or
heat sources such as hot air-ducts, or leave
them in a car parked in direct sunlight where
there can be a considerable rise in
temperature inside the car (P.3).
Stickers that are beginning
to peel away, leaving a
sticky residue (P.6).
P. 6
**************
*******
*******
*******
Do not use your CDs with labels or stickers
attached.
Labels are attached (P.7).
*******
*******
*******
*******
*******
P. 7
Do Not Use Special Shape CDs
P. 3
4. Before playing, clean the discs with an
optional cleaning cloth. Wipe each disc from
the centre out (P.4).
Be sure to use round shape CDs only for this
unit and do not use any special shape CDs.
Use of special shape CDs may cause the unit
to malfunction.(P.8).
P. 8
Be sure to use CDs with disc mark
P. 4
RECORDABLE
5. Do not use solvents such as benzine,
thinner,commercially available cleaners, or
antistatic spray intended for analog discs.
REWRITABLE
TEXT
Only for this unit.
CD-Rs and CD-RWs which have not
undergone finalization processing cannot be
played. (For more information on finalization
processing, refer to the manual for your CDR/CD-RW writing software or CD-R/CD-RW
recorder.) Additionally, depending on the
recording status, it may prove impossible to
play certain CDs record on CD-R or CD-RW.
CDE VERSION
E-2
2. INSTALLATION
Before finally installing the unit, connect the wiring temporarily and make sure it is all connected
up properly and the unit and system work properly.
Use only the parts included with the unit to ensure proper installation. The use of unauthorized
parts can cause malfunctions.
Consult with your nearest dealer if installation requires the drilling of holes or other
modifications of the vehicle.
Install the unit where it does not get in the driver's way and cannot injure the passenger if there is
a sudden stop, like an emergency stop.
If installation angle exceeds 30° from horizontal, the unit might not give its optimum
performance.
Avoid installing the unit where it would be subject to high temperature, such as from direct
sunlight, or from hot air, from heater, or where it would be subject to dust dirt or excessive
vibration.
Be sure to remove the front panel before installing the unit.
DIN FRONT/REAR-MOUNT
This unit can be property installed either from “Front” (conventional DIN Front-mount) or “Rear”(DIN
Rear-mount installation, utilizing threaded screw holes at the sides of the unit chassis). For details,
refer to the following illustrated installation methods A and B.
DIN FRONT-MOUNT (Method A)
Installation the unit
1
2
182
53
3
1
6
1.
2.
3.
4.
5.
6.
7
4
2
5
3
1. Dashboard
2. Holder
After inserting the half sleeve into the
dashboard, select the appropriate tab
according to the thickness of the
dashboard material and bend them
inwards to secure the holder in place.
3. Screw
Dashboard
Nut (5mm)
Spring washer
Screw (4x12mm)
Screw
Support Strap
Be sure to use the support strap to secure
the back of the unit in place. The strap can
be bent by hand to the desired angle.
7. Plain washer
E-3
Removing the unit
a
a. Frame
b. Insert fingers into the groove in the
front of frame and pull out to remove
the frame. (When re-attaching the
frame, point the side with a groove
down wards and attach it.)
c. Insert the levers supplied with the unit
into the grooves at both sides of the
unit as shown in figure until they click.
Pulling the levers makes it possible to
remove the unit from the dashboard.
b
c
Trim Plate Installation:
Push the trim plate against the chassis until it is fitted.
You must do this before you install the front panel, otherwise it can't be attached.
DIN REAR-MOUNT (METHOD B)
Installation using the screw holes on the sides of the unit.
Fastening the unit to the factory radio mounting bracket.
1. Select a position where the screw
holes of the bracket and the screw
holes of the main unit become
aligned (are fitted) and tighten the
screws at 2 places on each side.
2. Screw
3. Factory radio mounting bracket.
4. Dashboard or Console
5. Hook (Remove this part)
2
4
5
3
2
Note: the mounting box, outer trim ring,
and half-sleeve are not used for method B
installation.
5
E-4
3. DETACHABLE CONTROL PANEL (D.C.P.)
Removing The Detachable Control Panel (D.C.P.).
PANEL RELEASE
BUTTON
1. Turn the power off
2. Press the D.C.P. release button
3. Remove the D.C.P.
Attaching the DCP
2
A
B
1. Attach the panel at the right side first, with
point B on the main unit touching point A on the
D.C.P. (As shown on the diagram).
2. Then press the left side of D.C.P. onto the main
unit until a “click” sound is heard.
CAUTION
DO NOT insert the D.C.P from the left side. Doing so may damage it.
The D.C.P can easily be damaged by shocks. After removing it, place it in a protective case and be careful not
to drop it or subject it to strong shocks.
When the release button is pressed and the D.C.P is unlocked, the car's vibrations may cause it to fall. To
prevent damage to the D.C.P, always store it in a protective case after detaching it.
The rear connector that connects the main unit and the D.C.P is an extremely important part. Be careful not to
damage it by pressing on it with fingernails, pens, screwdrivers, etc.
Note:
Socket
If the D.C.P is dirty, wipe off the dirt with soft,
dry cloth only. And use a cotton swab soaked
in isopropyl alcohol to clean the socket on the
back of the D.C.P.
RESETTING THE UNIT:
After releasing the front panel, use a pencil or any non-metalic object to press & hold the reset
button for five seconds to reset the unit.
T
SE
RE
E-5
4. WIRING DIAGRAM (BUILT-IN ISO)
ANTENNA
JACK
ANTENNA
EXTENDER
CABLE
L
FUSE
R
REAR
SUB-W OUT
ISO
CONNECTOR
(Not Supplied)
RCA-TO-RCA CABLE
(Not Supplied)
6
3
4
3
4
1
2
1
2
CONNECTOR A
CONNECTOR B
8
5
SUB
WOOFER
7
6
SUB-W OUT
AMP
8
REAR LINE OUT L-CH
REAR LINE OUT R-CH
7
5
Figure 2
ISO CONNECTOR WIRING CHART
PIN
WIRE COLOR
FUNCTION/LABEL
A4
YELLOW
BATTERY(+)
A5
BLUE
POWER ANTENNA
A7
RED
IGNITION(ACC)
A8
BLACK
GROUND
B1
VIOLET
RIGHT REAR SPEAKER (+)
B2
VIOLET/BLACK
RIGHT REAR SPEAKER (-)
B3
GREY
RIGHT FRONT SPEAKER (+)
B4
GREY/BLACK
RIGHT FRONT SPEAKER (-)
B5
WHITE
LEFT FRONT SPEAKER (+)
B6
WHITE/BLACK
LEFT FRONT SPEAKER (-)
B7
GREEN
LEFT REAR SPEAKER (+)
B8
GREEN/BLACK
LEFT REAR SPEAKER (-)
E-6
need to translation
5. CONTROL PANEL FUNCTION(RDS+BLUETOOTH)
3
6
10
8
5
9
2
22
4 X 50W
AUX
INPUT
AUDIO MENU
MEN
vtc2500BT
SYS
4
1
21
20
12
13
14
15
16
17
11
7
18
19
OPERATIONS:
SYSTEM
KEY
Short
Press
Long
Press
1
Audio
Menu
Sys tem
Menu
2
Eject
TUNER
Short
Press
CD/MP3/WMA
Long
Press
3
Mute
5
Mode
ESC
8
ix-B ass
Reject
End call
TA
Auto
Store
Sub-W
RDS Info
ID3 Info
11
Phone
12
M1
Me mor y 1
Pause
/Play
13
M2
Mem or y 2
Intro
14
M3
Memo ry 3
Repeat
15
M4
Me mo ry 4
Ra nd om
M5
Me mo ry 5
17
M6
Memory 6
18
Band
19
Tran sfe r
Folder
Intro
Folder
Repeat
Folder
Random
Fo lde r
Do wn
Fo lde r
Up
File
Browser
USB Cover / Socket
20
Seek Up
Tun e Up
21
Seek
Down
Tun e
Down
22
Long
Press
En ter
Power
9
16
Short
Press
Encoder Volum e
7
10
Long
Press
Panel Releas e button
4
6
Short
Press
Bluetooth
Track/ Fil e
Up
Track/ Fil e
Dow n
Fas t
Fo rwa rd
Fast
Backward
AUX IN JACK ON FRONT PANEL
E-7
need to translation
6. BASIC OPERATIONS
3) PANEL RELEASE BUTTON (REL)
Press this button to remove the control panel.
4) POWER ON/OFF BUTTON ( POWER/MUTE )
Hold & press POWER/MUTE button or any other button on the front of the radio (except
Open/Eject) to turn the unit on. And hold & press POWER /MUTE button again to turn the unit
off.
4) MUTE BUTTON (POWER/MUTE)
Short press the POWER/MUTE button momentarily to mute the audio volume, and "MUTE" will
flash in the display. Press the POWER/MUTE button again to restore volume to the previous
setting.
10) SUBWOOFER (SUBW/INFO)
Hold & press the SUBW/INFO button to activate the Subwoofer function On, and “SUB-W”
icon will appear on the LCD display. Press the SUBW/INFO button again to turn off the
Subwoofer function.
8) iX-BASS BUTTON (XBS)
Press the XBS button to turn on the iX-Bass function, and the “X-BAS” icon will appear on the
LCD display. Press the XBS button again to turn off the iX-Bass function.
5) MODE BUTTON (MODE)
Press MODE button to select a different mode of operation as indicated on the display panel.
Available modes include TUNER, DISC, USB, SD CARD ,BT AUDIO and Aux In .
22) AUX IN JACK ON FRONT PANEL
Connect the external signal to AUX in jack
located at the front of the panel , then press
Mode button to select Aux mode. Press Mode
Button again to cancel Aux Mode and return to
previous mode.
AUX IN
FRONT CABINET
LEFT TRACK
RIGHT TRACK
GROUND
AUX IN
6) ENCODER VOLUME BUTTON
To increase the volume, rotate the Encoder Volume Knob clockwise. To decrease the volume,
rotate the Encoder Volume Knob counter clockwise.When volume is adjusted, the volume
level will be shown on the display panel as a number ranging from 0 (lowest) to 46 (highest).
2) EJECT BUTTON (
)
Press this button to eject the CD from the unit. The receiver will switches to radio mode
automatically.
7) RETURN BUTTON (
)
Press this button to quick return previous menu or mode.
E -8
red part need to translation
7. SYSTEM MENU SETTING
1) MENU FUNCTION LIST (MENU)
Hold & press MENU button to access into the System Menu setting mode.
Will appear
in the display momentarily. Navigate the menu by pressing MENU momentarily to move to the
next option. Once the desired option appears in the display, adjust that option by rotating the
Encoder Volume Knob(press the volume up / down button ) within 5 seconds. The following
options are adjusted through this menu feature.
Re-connection (RE-CON / DIS-CON )
This feature allows to Re-connect or Dis-connect to the paired mobile phone or Bluetooth
device by manually. Under the Menu- “RE-CON”mode, Rotate the Encoder Volume Knob to
navigate thru “RE-CON” (re-connection) and “DIS-CON”(Dis-connection). After selected the
mode for connection then press Audio button to start activating the connection mode.
Bluetooth On/Off ( BT On/Off )
User can rotate the Encoder Volume Knob to turn On / Off the Bluetooth function, then the “
Bluetooth” icon will be appear in the display, once bluetooth function is turned on.
PTY (Program Type)
Once into the PTY mode, you can be press Audio button to get into program type item, and
rotate Encoder Volume Konb to selected category.
Music Group
Speech Group
POP M, ROCK M
EASY M, LIGHT M
NEWS, AFFAIRS, INFO
SPORT, EDUCATE, DRAMA
CLASSICS, OTHER M
JAZZ M, COUNTRY
NATION M, OLDIES M
WEATHER,FINANCE, CHILDREN
SOCIAL, RELIGION, PHONE IN
FOLK M, A-TEXT, ALARM
TRAVEL, LEISURE, DOCUMENT
CULTURE, SCIENCE, VARIED
AF ON/OFF (Alternate Frequencies)
User can rotate the Encoder Volume Knob to turn On / Off the AF ( Alternate Frequencies )
function. When AF in On mode, the unit will be searches for another station with stronger signal
but with the same program identification as the current station automatically.
REG ON/OFF (Regional Radio)
User can rotate the Encoder Volume Knob to turn On / Off the Regional function.
[ REG ON ]: Only stations in the current region can be tuned to automatically.
[REG OFF]: All stations can be tuned to automatically.
AREA (TUNER FREQUENCY SPACING)
This option allows the selection of the frequency spacing appropriate for your area. "AREA
U.S.A." is the default setting. Rotate the Encoder Volume Knob to select the EUR(Europe) .
BEEP ON/OFF ( Beep Tone )
The beep tone feature allows the selection of an audible beep tone to be heard each time a
button is pressed on the face of the radio. "BEEP ON" is the default display. Rotate the Encoder
Volume Knob to select the "BEEP OFF” option.
BTRF (Bluetooth Radio Frequency)
Under the Bluetooth On mode, user can get into the System Menu to view the Bluetooth signal
intensity, the signal ranging from 00 (weakest) to 50(strongest).
If the Bluetooth signal is weak, this will affect the Telephone call or Audio Streaming
sound quality.
E-9
need to translation
INFO SYS ( System Information )
Once into the System Information mode, press the Audio button to view the details system
software informations of this unit.
E - 10
need to translation
8. ADJUST AUDIO SETTING
Press MENU button to access the Audio Menu. Once the desired menu item appears on the
display, adjust that option by rotate the Encoder Volume Knob. The following menu items can be
adjusted as described above.
BAS (Bass Level)
User has 5 seconds to use the Encoder Volume Knob to adjust the desired Bass level range
from -10 to +10.
TRE (Treble Level)
User has 5 seconds to use the Encoder Volume Knob to adjust the desired Treble level range
from -10 to +10.
BAL (Balance)
User has 5 seconds to use the Encoder Volume Knob to adjust the Balance between the right
and left speakers from 10R (full right) to 10L (full left). “C00” represents an equal balance
between the right and left speakers.
FAD (Fader)
User has 5 seconds to use the Encoder Volume Knob to adjust the Fader between the front
and rear speakers from 10R (full rear) to 10F (full front). “C00” represents an equal balance
between the front and rear speakers.
E - 11
need to translation
9. TUNER OPERATION
18)
BAND BUTTON (BROWSE/BAND)
Press BROWSE/BAND button to change between FM bands and AM(MW) bands.
20-21) TUNING UP/DOWN BUTTON (
)
Manual Tuning
Hold & press the Up Tuning or Down Tuning button to move the radio frequency number up
or down one step.
Auto Seek Tuning
Press the Up Tuning or Down Tuning button to move to next station automatically.
12-17) PRESET STATIONS BUTTONS
Six numbered preset buttons store and recall stations for each band.
Store a Station
Select a band (if needed), then select a station. Hold a preset button for 3 seconds. The
preset number will appear in the display.
Recall a Station
Select a band (if needed). Press a preset button to select the corresponding stored station.
9)
AUTOMATICALLY STORE / PRESET SCAN (AS)
Automatically Store
Automatically select 6 strong stations and store them in the current band. Select a band (if
needed). Press AS button for more than three seconds. The new stations replace stations
already stored in that band.
Preset Scan
Scan stations stored in the current band. Select a band (if needed). Press AS button for less
than 3 seconds. The unit will pause for ten seconds at each preset station. Press AS button
again to stop scanning when the desired station is reached.
STEREO
The unit will automatically pick up a stereo signal, when available. When in stereo mode,
the ST icon appears in the display. When no stereo signal is available, the unit will
automatically revert to mono operation, and no icon will be displayed.
E - 12
red part need to translation
10. RDS OPERATION
RDS functions
The unit is equipped with the following RDS function:
-
AF Alternative Frequencies
CT Clock Time
PI Program identifications
PS Program service name
PTY Program Type
TA Traffic Announcement
TP Traffic program
1. AF Function
Hold & press the AF button to turn On the AF standby mode, the “AF” icon will be appear in the
display. Under AF “On” mode, if the tuned in station signal is getting weak, the unit will
automatically switches to a different frequency on the same network with stronger signal.
Note: Factory Default setting is “AF ON”
2. TA Function
Hold & press the XBS/TA button to turn On the TA standby mode, the “TA” icon will be appear in
the display. In the stand by mode, when a traffic announcement broadcast starts, the traffic
announcement broadcast will be received as top priority regardless of the function mode. When
a traffic announcement starts, “TRAFFIC INFO” will show on the LCD, press the TA button can
cancelled the broadcast reception while a traffic announcement broadcast is being received.
The unit will go back to the previous mode and TA goes into stand by mode again. When the TP
icon is not light up for 60 seconds. A beep Alarm tone is heard and the LCD will show “Lost TP,
TA”. TA seek will automatic activate and searches to another TA station.
3. PTY Function
Hold & press the PTY button to turn On the PTY standby mode, the “PTY” icon will be appear in
the display. Once selected the PTY item, user have 5 seconds to press “SELECT” or “TUNE UP
or TUNE DOWN” buttons < 3 seconds to seek for the selected PTY item. The LCD will display
“PTY SEEK”. If no station with the selected PTY broadcast can be received, the LCD will display
“No Match PTY” and blinks for 5 seconds then returns to the previous mode.
The program type item as below:
Music Group
Speech Group
POP M, ROCK M
EASY M, LIGHT M
NEWS, AFFAIRS, INFO
SPORT, EDUCATE, DRAMA
CLASSICS, OTHER M
JAZZ M, COUNTRY
NATION M, OLDIES M
WEATHER,FINANCE, CHILDREN
SOCIAL, RELIGION, PHONE IN
FOLK M, A-TEXT, ALARM
TRAVEL, LEISURE, DOCUMENT
CULTURE, SCIENCE, VARIED
E - 13
red part need to translation
11. CD /MP3/WMA OPERATION
INSERT AND EJECT CD
Insert a CD label-side up with the unit turned on, and the disc will begin to play. Press the Eject button to stop CD play and eject the CD. The unit does not have to be turned on to eject the CD.
CD-DA OPERATION
12)
PAUSE BUTTON (
)
Press the PAUSE button to suspend disc play. Press the PAUSE button again to resume
disc Play.
20-21) TRACK SELECT (
)
Press the Up Tuning or Down Tuning button (
) for less than one second to advance
to the next track on the CD, The selected track number will appear on the display. Press and
hold the Up Tuning or Down Tuning button (
) for more than one second to fast
forward or fast reverse through the disc. CD play starts when the button is released.
13)
INTRO BUTTON (INT)
During disc play, press INT (Intro) button to play the first 10 seconds to each track on the
disc. When the desired track is reached, press INT (Intro) button again to end the scan and
play the selected track.
14)
REPEAT BUTTON (RPT)
Press RPT (Repeat) button during disc play to continuously repeat the track. Press RPT
(Repeat) button again to stop Repeating.
15)
RANDOM BUTTON (RDM)
Press RDM (Random) button during disc play to play all tracks on a CD in random, shuffled
order. Press RDM (Random) again to stop random play.
MP3/WMA OPERATION
MP3 and WMA (Windows Media Audio) music files are audio compression format. This unit can
play MP3/WMA directly from files contained on a CD-R/RW, USB Memory Stick, SD Card.
Notes on MP3/WMA Play
This unit can play MP3 (MPEG1, 2, 2.5 Audio Layer 3). However, the MP3 recording media and
accepted formats are limited. When writing MP3/WMA, pay attention to the following restrictions.
Acceptable Medium Formats
The following formats are available for the media used in this unit. The maximum number of
characters used for file name including the delimiter (".") and three-character extension are
indicated in parentheses.
ISO 9660 Level 1 (11 characters)
ISO 9660 Level 2 (31 characters)
Joliet (31 characters)
Romeo (31 characters)
Up to 200 characters can be displayed in the long file name format. For a list of available
characters, see the instruction manual of the writing software and the section “Entering File and
Folder Names” below. The media reproducible on this unit has the following limitations:
Maximum number of nested folders: 8
Maximum number of files per disc: 2000
Maximum number of files per media device: 2000
Maximum number of folders per disc: 255
E - 14
red part need to translation
MP3/WMA written in the formats other than the above may not be successfully played and their file
names or folder names may not be properly displayed.
MP3/WMA Encoder and CD Writer Settings
Use the following settings when compressing audio data in MP3 data with the MP3 encoder.
Transfer bit rate : 32- 320 kbps
Sampling frequency : 32,44.1,48 kHz(WMA) 16,22.05,24,32,44.1, 48kHz (MP3)
When using a CD writer to record MP3/WMA up to the maximum disc capacity, disable additional
writing. For recording on an empty disc up to the maximum capacity at once, check disc at once.
Entering ID3 Tag
This unit supports ID3 tag versions 1.0 and 1.1.
Entering File and Folder Names
Names using the code list characters are the only file names and folder names that can be entered
and displayed. Using any other character will cause the file and folder names to be displayed
incorrectly. The unit recognizes and plays only files with the MP3/WMA extension.
A file name entered with characters not on the code list may not play correctly.
Writing Files into a Media
When a media containing MP3/WMA data is loaded, the unit checks all data. If the media contains
many folders or non-MP3/WMA files, MP3/WMA play will be delayed, it may take time for the unit to
move to the next file, and searches may not be performed smoothly. Loading such a media may
produce loud noise and cause damage to the speakers. Do not attempt to play a media
containing a non-MP3/WMA file with the MP3/WMA extension or a media containing non
MP3/WMA files.
Bit Rates
The unit supports bit rates from 32 - 320 kbps.
E - 15
Files Playing Order
When selected for play, Folder Search, File Search or Folder Select, files and folders are accessed
in the order in which they were written by the PC writer. Because of this, the order in which they are
expected to be played may not match the order in which they are actually played. For example, a
media with the following folder/file hierarchy is subject to Folder Search, File Search or Folder
Select as shown below.
An outline of a Media with MP3/WMA is shown below. Subfolders are shown as folders in the
folder currently selected.
ROOT
1 LEVEL
2 LEVEL
3 LEVEL
noted!
not same as the 2000
4 LEVEL
01
001.MP3
002.MP3
003.MP3
004.MP3
02
005.MP3
“NOT DISPLAY”
006.MP3
X
007.MP3
03
008.WMA
009.WMA
010.WMA
04
011.MP3
012.MP3
05
06
013.MP3
07
014.MP3
016.MP3
017.MP3
The equipment assigns folder
numbers. The user can not assign
folder numbers.
“NOT DISPLAY”
X
“NOT DISPLAY”
X
08
015.MP3
018.WMA
019.WMA
09
020.WMA
It is not possible to check folders that
do not include MP3/WMA files. (These
folders will be skipped without
displaying the folder number and
name)
021.MP3
022.MP3
023.MP3
“NOT DISPLAY”
X
FILE/FOLDER PLAY
There are three different play methods as following:
File/Folder Intro play:
Press M2 button more than 3 seconds during playing MP3/WMA disc for “intro play” all files of
the current folder. Intro play should restart from the first song of the current folder, after all files
in the current files have been intro-played.
To disable current folder “intro play”, long press M2 button more than 3 seconds
Press M2 button less than 3 seconds is “intro play” all files on the disc. Intro play should restart at the very first file of the disc after all files in the disc has been intro played.
To disable all files “intro play”, press M2 button less than 3 seconds
E - 16
File/Folder Repeat play :
Press M3 button more than 3 seconds during playing MP3/WMA disc for “repeat play” all
files of the current folder. And keep on repeat playing the current folder until “repeat play” is
disabled.
To disable current folder “repeat play”, long press M3 button more than 3 seconds
Press M3 button less than 3 seconds to “repeat play” the current file. And keep on repeat
Playing the current file until the “repeat play” is disabled.
To disable current file “repeat play”, press M3 button less than 3 seconds
File/Folder Random play:
Press M4 button more than 3 seconds during playing MP3/WMA disc to “random play” all files
of the current folder.
To disable current folder “random play”, long press M4 button more than 3 seconds
Press M4 button less than 3 seconds is “random play” all files on the disc.
To disable all file “ random play”, press M4 button less than 3 seconds.
Folder Up / Down Play
Press M5 button less than 3 seconds to One Folder Down
Press M6 button less than 3 seconds to One Folder Up
MP3/WMA File or Folder Search
Direct File Number Searching
Press BROWSE/BAND button. The LCD will display
, and the
will blink.
Rotate the Encoder Volume Knob to select the desired track number, then press enter to confirm
and play the selected file.
Folder / Files Navigate Searching
Press BROWSE/BAND button twice. The LCD will display
, and the
will
blink. Rotate the Encoder Volume Knob to navigate through all folders and sub-folders on the disc.
The folder names will be displayed on the LCD. Press the select knob for more than three seconds
to play the first file in the folder. Press the select knob for less than three seconds to access the subfolders or files. Rotate the Encoder Volume Knob to navigate, then press the select knob to confirm
and begin file play. During navigation search, press PS or rotate the Encoder Volume Knob
counterclockwise to move back to the last upper level of a folder.
ID3 INFORMATION DISPLAY
If any MP3/WMA file recording with ID3 Tag information. The ID3 information such like Album title,
Track title, Artist Title will be displayed and automatic scrolling through the LCD while the file is
playing. User also allows pressing the INFO button repeatedly to view the ID3 tag information
manually.
E - 17
red part need to translation
12. USB OPERATION
The unit can support USB Host Function. It can playback MP3 and WMA Audio format which are
stored into USB Memory Stick or USB interface Music Player. Please read below before you start
the operation of USB HOST Function.
Inserting and Removing USB Drive
1
Inserting the USB stick
Warning:
Never Detach the Panel when a
USB stick was plug on the socket
2
Always remove the USB stick before detach
the panel
Removing USB Drive
Step
1
Secure panel with left hand
Step
2
Carefully remove USB drive
Mode change to USB HOST
Under any other mode while inserting a USB Stick into the front panel USB plug, the unit will
automatically switches from present playing mode to USB Host mode. The unit will display
for a while then starts
the files contained on the USB Stick. Once the unit read the
USB Stick successfully, the first audio music file on the USB stick Playback will Automatically start.
Press Mode button repeatedly to change to other modes or switch back to USB HOST.
WARNING:
Before remove the USB stick from the Front panel USB plug. Always remember to switch off the
unit's power or switch to other mode then remove out the USB Stick. Never try removing the USB
Stick while playing music file on the USB stick. It may damage the USB Stick and sometimes will
caused the unit system lock up.
The unit can support playback Music Player which have USB Interface. However due to the
fast changing decoder technology and different kind of hardware interface. This unit may
or may not be compatible to all the Music Player and USB Stick especially those USB Stick /
Player which require to install a program driver.
About Music Flash Player with USB Interface, Usually, the unit takes longer time to read this
kind of player than normal USB Stick. Especially, if the Flash Player with built-in power
battery sometimes takes 20-30 seconds to start up the playback
The unit is not compatible to playing any Portable Hard disk.
Music File Playback Operation
All the USB playback operation function is same as the operation on CD/MP3/WMA. Please refer to
'CD/MP3/WMA Operation' for more details.
E - 18
13. MEMORY CARD OPERATION
The unit can support playback MP3 and WMA Audio format which are stored into SD Card. Please
read below before you start the operation of Memory Card.
Inserting and Removing a SD card on the main unit
2
1
3
Face
Up
Click
Detach the
Front Panel
Insert the Memory Card
with Label up side
Push in till heard a “click”
Inserting the SD card
2
1
3
Click
Detach the
Front Panel
Push in till heard a “click”
Remove the Memory Card
Removing the SD card
Mode change to SD Card
After a SD card was inserted into the main unit card slot. Press Mode button to select
mode, the unit will automatically playback files contained from the SD Card. Press Mode button
repeatedly is allowing changing to other modes or switch back to SD Card mode.
If no any SD Card is inserted into the main unit card slot. Press mode button will
automatically skip SD CARD mode.
Music File Playback Operation
All the SD Card playback operation function is same as the operation on CD/MP3/WMA. Please
refer 'CD/MP3/WMA Operation' for more details.
E-19
red part need to translation
14. BLUETOOTH HAND FREE OPERATION
User Guide For Bluetooth Operation
1. When user use our Bluetooth HEAD UNIT, please make sure the mobile phone you use must /does support
Bluetooth functions (Headset or Handsfree profiles or both)
2. Before you start to use our Bluetooth HEAD UNIT, please make sure complete pairing with your mobile phone
first. Please refer to the user manual, section “PAIRING” for detail “PAIRING” instruction. To ensure the best
reception for Pairing or Re-connection, please make sure the Phone Battery is fully charged when making the
Pairing or Re-connection.
3. Please always try pairing the Mobile Phone with Head unit after a few minutes of the Mobile Phone was
Switched On to ensure the best pairing result.
4. “BT89” is this unit device model number which is displayed on the mobile phone.
5. To achieve the best performance, please always keep the Mobile Phone within 3 meters of the Head unit.
6. Please always keep a clear path between the Mobile Phone & the Head unit.
7. Never put any metal object or any obstacle between the path of the Mobile Phone & the Head unit.
8. Some brand of Mobile Phone like Sony Ericsson may have "Power Saving Mode" selection when Bluetooth
mode is switched on. PLEASE DO NOT Switches ON Power saving Mode when operating with this Head Unit, as
some abnormal communication behavior will happen occasionally if Power Saving Mode is switched on.
9. Before user make Outgoing call or Incoming call, make sure the mobile phone's “Bluetooth function” was
switched “ON”.
10. To ensure the best conversation quality / performance, please always keep talking within 1 meter of the Head
Unit.
11. If user want to Dis-connect the Head unit with the Mobile Phone, please switch "OFF" Bluetooth connectivity
on the Mobile Phone,or go to the system menu, "dis-connect" to disconnect the bluetooth connectivity manually.
( please refer to the user manual, section "dis-connection of the bluetooth system for details instruction. )
12. Some Mobile Phones can support “IN BAND RING TONE”, such as Nokia. In such case, the Incoming
Ringing Tone will be same as the original Ring-tone of the Mobile Phone. But some Mobile Phones like Sony
Ericsson do not support this feature. The Ring-tone will be using the standard Ring-tone of the Head unit.
13. When in telephone mode, during talking, it is highly recommended to set the volume to below “30” in order to
achieve the best sound quality. As if the volume is too high, it may create unwanted echo inside the car, and this
unwanted echo may feedback into the microphone.
14. If the Bluetooth related operation is not performing normally, like cannot make pairing, cannot making an
outgoing call, User can try to make a SOFT-RESET of the Bluetooth module by removing / detaching the panel
from the main unit and waiting for about 1 min. Then re-attach the panel to the unit & retry the Bluetooth operation
again. Or user can RESET the whole unit by pressing the RESET button behind the panel.
By pressing the RESET button all the stored memory will resume to factory default
FAQ (Frequency Asking Questions)
Q: Under phone conversation, if the voice output from the car's speakers is not loud enough.
A: Try increase the volume level of the head unit to a suitable sound level
Q: Under phone conversation, the “Listener” cannot hearing my voice loud enough
A: First, try asking the 'Listener” increase the volume level on his/her mobile phone, if still not loud enough, try to
increase your mobile phone's volume.
Q: Under Phone conversation, the “Listener' can hear echo feedback.
A: Your unit's speaker volume level is too loud which cause the voice feedback into the built-in microphone,
this can be corrected by decreasing the volume level.
Q: Under Phone conversation, the “Listener' complain the background is too noisy
A: May be you are in a noisy environment. Try close the car's window to shield the environment / background
noise under phone conversation.
Q: If the Mobile Phone already paired with the headunit, but after several calls, the incoming calls cannot access
thru the headunit.
A: May be the paired Mobile Phone lost the Bluetooth connection with the headunit. in this case, please go to the
"MENU" & select "re-connect" to reconnect the headunit with the paired Mobile Phone. For details, please refer
to the MENU operation "re-connection”.
E - 20
red part need to translation
Bluetooth Hand Free Panel Function Key Matrix
1
4 X 50W
AUX
INPUT
AUDIO MENU
MEN
vtc2500BT
SYS
3
2
Panel Function Button
Bluetooth Hand Free Function
1
Encoder Volume Knob ( Short Press )
Confirm to answer an incoming call
2
Call/Esc ( Short Press )
3
Phone/Transfer ( Long Press )
1. Reject Incoming call
2. End a call
Transfer Phone Conversation back to
Mobile Phone
E - 21
red part need to translation
PAIRING
Pairing The Bluetooth System Between Mobile Phone & The Unit
Open your Mobile Phone and switch Bluetooth to on, and search Bluetooth device.
“BT89” should appear in the pairing list on the Mobile Phone. User need to select “BT89” and
then input the password “1234”.
If the pairing is successful, the display will show Mobile Phone Name or Model Number.
If the pairing successful, “
” will be flashing on the Display for 3 seconds.
And the unit will switch back to the previous mode automatically.
If the pairing failed, “
” will be flashing on the Display for 3 seconds.
And the unit will switch back to the previous mode automatically.
During the Pairing, only Power, Phone/Transfer ,Encoder Volume Knob & Mute are
functional, other function keys are disabled & non-operational during the pairing mode.
Re-Connection Of The Bluetooth System
The unit is with built -in Auto-Reconnection function. In some conditions, user need to reconnect
manually. For example like the following.
If the Mobile Phone is out of range.( 2 meters away from the Head unit) Under the condition of
lost connection when the user come back to the unit. At the same time, there is an incoming
call or user is under conversation on the Mobile Phone 2 meters away from the Head Unit and
come back to Head unit.
If user wants Audio Transfer back from Mobile Phone to Head unit. It needs to re-connect
manually.
The unit can be re-connected by the following methods.
Access into System Menu - RE-CON mode to activate the manual RE-Connection.
Please refer System Menu Setting for more details of how to access into System Menu
mode.
Once the
is display on the LCD , press the AUDIO button to activate the
manual Re-Connect mode.
1. Please keep the Mobile Phone within 2 Meter from the unit when making the
connection.
2. The manual re-connect is only function with the Mobile Phone has already been
paired with the unit before.
The LCD Display will displayed “
” during the connecting period.
If the re-connection is successful, the LCD Display will display “
”. And
the unit will switch back to the previous mode automatically.
If the re-connection failed, the LCD Display will display “
” . And the
unit will switch back to the previous mode automatically.
The unit will be Auto Re-Connection by following operation .
Every time turn the ignition key from off to on, the unit will Auto re-connect with the Mobile
Phone.
E - 22
red part need to translation
Dis-Connection of the Bluetooth System
The unit have a option function for user to disconnect the Bluetooth system with the unit. The unit
can be Dis-connected by the following methods.
Access into System Menu - DIS-CONN mode to activate the manual Dis-Connection.
Please refer System Menu Setting for more details of how to access into System Menu
mode.
Once the “
” is display on the LCD, press the AUDIO button to activate the
manual Dis-Connect mode.
If the Dis-Connection is successful, the LCD Display will display “
”. And the unit will switch back to the previous mode automatically.
INCOMING CALL
ANSWERING AN INCOMING CALL
When there is an incoming call, the display will display the Phone Number. If the incoming call
has no caller number, the LCD will display
user can short press the
PHONE/TRANSFER button answer / accept the call.
Always press the PHONE/TRANSFER button answer / accept the call after the LCD
display the “ Incoming caller telephone number ”.
The audio output of the present mode will be muted and the ringing tones will be heard,
if an incoming call is not being answered.
User can use the Encoder Volume Knob to adjust the volume level.
To end the conversation, press the “CALL/RETURN” button. The unit will switch back to the
previous mode automatically and release the mute of the previous mode at the same time.
An Incoming call under stand by mode (Ignition on & Power Off), the system will
automatically switch on the head unit.
While there is an Incoming call or under talking mode, the Panel Open/Eject key is disactivated.
Rejecting An Incoming Call
User can press “CALL/RETURN” button to reject the incoming call.
The audio output of the present mode will be muted and the ringing tones will be heard if
an incoming call is not being answered. After pressing the “CALL/RETURN” button, the
mute of the present mode will be released.
E - 23
red part need to translation
OUTGOING CALL
Making An Outgoing Call
User can use his / her Mobile Phone to dial and make an outgoing call. Once the user has
completed the dialling, the display should show “
”.
The audio output of the present mode will ONLY be muted after pressing the “PHONE”
button as a confirmation to dial the outgoing call.
While there is an outgoing call or under talking mode, the Panel Open/Eject key is disactivated.
During the talking mode, the LCD Display will display the duration “
”of
the conversation.
User can use the Encoder Volume Knob to adjust the volume level.
To end the conversation, press the “CALL/RETURN” button. The unit will switch back to the
previous mode automatically. The mute of the previous mode will be released at the same
time.
During the talking mode, if the Ignition is being turned off, the unit will keep the conversation
even if the Ignition is Switched off. After finished the conversation, User can press
“CALL/RETURN” button to switch off the unit.
CALL TRANSFER
TO AUDIO TRANSFER FROM HEAD UNIT BACK TO THE MOBILE PHONE
During the talking mode, user can long press the “PHONE/TRANSFER” button to transfer the
audio from the unit back to the Mobile Phone for privacy reason. The LCD Display will display “
” on the LCD for 3 seconds.
After the “PHONE/TRANSFEER ” button is pressed, the present mode will be muted at
the same time, user can press the Mute button to release the Mute.
When making an outgoing call, it's not possible to CALL TRANSFER if the call is not
being answered yet.. It's only possible to Transfer the call to Mobile Phone after the call is
being answered.
Depending on different type of Mobile Phone, the time need for activating the CALL
TRANSFER mode is different. Like Nokia Mobile Phone usually takes 3-5 seconds after
pressed the "PHONE/TRANSFER” button for audio transfer back or forth through Unit to
Mobile Phone.
E - 24
red part need to translation
Bluetooth Audio Streaming A2DP (Advanced Audio Distribution Profile)
User can listen to music files on an audio device on this unit if the audio device supports A2DP
(Advanced Audio Distribution Profile) of Bluetooth Technology. Please read the below
instruction before operating the Bluetooth Audio streaming function on this unit.
Connecting A Bluetooth Audio Device With This Unit
Before using audio device to play music on this unit, the audio device must be paired
with this unit first.
a. For the details operation of Pairing with this unit, Please refer to the PAIRING
operation for more details.
b. How to use the Bluetooth audio device to pair with this unit, please refer to the
instruction manual of the Bluetooth device.
Tips If the audio device has both HFP (Hands Free Profile) and A2DP (Advance Audio
Distribution Profile), this unit will automatically pairing these two profiles at the same
time. For ex, if a mobile phone has both HFP & A2DP profile and this mobile phone is
already HFP paired with this unit, in this case A2DP audio device pairing is not
necessary. And this paired mobile phone will be added automatically to the list of
PAIRED DEVICE – AUDIO of this unit. Please refer to MENU of BT for details of
PAIRED DEVICE operation.
Listening To Music From An Audio Device In This Unit
(1) Connect this unit with the audio device.
For the details operation of connecting with this unit, Please refer to the
CONNECTING operation for more details.
(2) Press MODE button repeatedly until “BT AUDIO” appears on the display.
IMPORTANT: To listen Bluetooth audio streaming from the audio device, user MUST
change the mode to “BT AUDIO” first. Any other mode of this unit is not able to activate
the Bluetooth audio streaming ( A2DP ) function.
If the audio device is the connectivity or no audio device is connecting with this
unit,
after mode changed to BT AUDIO mode, the display will show
, and if after a 20 seconds time out still cannot find any audio
device for connecting, the unit will display
for 3 seconds
then turn to the Tunner Mode.
(3) Once in the “BT AUDIO” mode, user can use the audio device to start playback the song
via Bluetooth wireless with this unit.
When mode change to BT AUDIO mode, some of the audio device may auto
playback the music without operate the music playback operation and some of the
device like mobile phone may need to first change into the 'Media Player' mode on
the mobile phone otherwise the song cannot be direct playback via Bluetooth
wireless. If the auto playback not support on the audio device then please refer to
the instruction manual of the audio device on how to operate music playback via
Bluetooth wireless technology.
E - 25
need to translation
Operating an audio device with this unit AVRCP ( Audio Video Remote
Control Profile )
This unit can perform the following operations with the connecting Audio device whichsupports
AVRCP (Audio Video Remote Control Profile) & only if the Audio device does support AVRCP.
(1) Start playing - Every time when user change mode into “BT AUDIO” mode, this unit
will automatically send a “PLAY” command via AVRCP to the audio device to
command the auto start playing song in the audio device.
The PLAY command may differs depending on the Audio device. If the
Audio device is not able auto start playing song after changed mode into “BT
AUDIO” mode, user may need to operate the PLAY mode on the audio device to start
the song playback.
(2) Track up / down - by pressing the Track up / down buttons on this unit.
(3) Pause / Play – by pressing the Pause / Play button on this unit.
(4) Volume up / down – by rotating the Encoder Volume Knob on this unit.
(5) Audio Mute – by pressing the Mute button on this unit.
(6) Stop playback – by mode changing mode into any other mode of this unit.
The AVRCP operation may differ depending on the audio device, all the other
operation other than those listed above should be performed on the audio device.
Hands-free Phoning While Bluetooth Audio Streaming
If the connecting playback audio device is a mobile phone, all the hands free function is still
available under the Bluetooth audio streaming, like the answering incoming call, making an
outgoing call, etc.
Disconnecting An Audio Device With This Unit
User can close the Bluetooth Audio connection by disconnecting with the audio device.
The details operation of disconnecting with this unit, please refer to the
DISCONNECTION operation for more details.
E - 26
need to translation
15. SPECIFICATIONS
CD PLAYER
System
Usable disc
Sampling frequency
No of quantization bits
Frequency
Number of channels
S/N Ratio
Compact disc audio system
Compact disc
44.1KHz
1bit
5-20,000Hz
2 stereo
70dB
MEDIA SECTION
USB Host
Host 1.1 compatibles 2.0
Memory Card
Support Type of Memory Card
SD
RADIO SECTION
FM
Frequency Range
87.5-108 Mhz
Intermediate Frequency
UsableSensitivity
StereoSeparation
S/NRatio
10.7 MHz
Better than 15dB at S/N 30 dB
25 dB at 1KHz
50 dB
AM/MW
Frequency Range
522-1620 KHz
Intermediate Frequency
UsableSensitivity
S/NRatio
450KHz
Better than 45dB
40 dB
BLUETOOTH
Power Consumption
Output Power
Frequency Band
Range
Standard
200mA Max.
0 dBm (Class II)
2.4GHz ~ 2.4835GHz ISM Band
3 meters (free space)
Bluetooth 2.0 specification
GENERAL
PowerSupply
Polarity
Speaker impedance
Power Output
DC 11 -14V
Negative Ground
4 ohms
4 x 50W
REMARK :
Specifications subject to change without notice.
E - 27
16. TROUBLE SHOOTING
Before going through the check list, check wiring connection. If any of the problems persist after
check list has been made, consult your nearest service dealer.
Symptom
Cause
Solution
No power
The car ignition is not on.
The fuse is blown.
Replace the fuse.
Disc cannot be
loaded or ejected
Presence of CD disc inside
the player.
Remove the disc in the player, then
put a new one.
Inserting the disc in reverse
direction.
Insert the compact disc with the
label facing upward.
Compact disc is extremely
dirty or defective disc.
Clean the disc or try to play a new one.
Temperature inside the car is
too high.
Cool off or until the ambient temperature
returns to normal.
Condensation.
Leave the player to off for an hour or so,
then try again.
If the power supply is properly connected to
the car accessory terminal, switch the ignition
key to “ACC”
Volume is in minimum.
Adjust volume to a desired level.
Wiring is not properly
connected.
Check wiring connection.
The operation keys
do not work
The built-in microcomputer is
not operating properly due to
noise.
Press the RESET button.
Front panel is not properly fixed into
its place
Sound skips.
The installation angle is
more than 30 degrees.
Adjust the installation angle to less
than 30 degrees.
No sound
The disc is extremely dirty or a Clean the compact disc or try to play a
defective disc.
new one.
The radio does not
work.
The radio station
automatic selection
does not work.
The antenna cable is not
connected.
Insert the antenna cable firmly.
The signals are too weak.
Select a station manually.
ERROR 1
Mechanism Error
Press the reset button to correct the problem.
If the error code does not disappear, consult
your nearest service dealer.
Read Error
The Media Device not able to
play file by the unit
Replace the Media Device or
No File
No file Format supports for
Playback on the disc or
Media Device
Disc Error
Maybe disc dirty / disc scratched
/disc upside down.
E - 28
Replace the disc or Media Device..
Replace the disc.