1
UNIVERSITY OF NEW SOUTH WALES
School of Computer Science & Engineering
Hardware control systems using Java
November 2002
Oliver Mather
Student Number 3015072
Bachelor of Engineering (Software)
The University of Newcastle
Supervisor: Assoc. Prof. Michael Ashley
Assessor: Steve Matheson
Abstract
The purpose of this thesis is to apply Java technology to facilitate the creation of more reliable,
portable, flexible and logical hardware control systems. This has been achieved by integrating
Java tools and libraries throughout the development processes of several software projects.
In particular, the development of enhancements to the Automated Patrol Telescope control
software was conducted. The Java language has been used to develop both sophisticated user
interface and hardware control components utilising protocols such as the Simple Network
Management Protocol. These enhancements have been seamlessly integrated into the Java
Automation System to provide distributed control of the Automated Patrol Telescope.
The Spectrum Scanner application has also been developed in Java to provide software control
of a radio receiver through the RS232 Serial protocol, capable of data visualisation using the
VisAD toolkit.
This thesis documents these achievements and presents the possibility of integrating these
advancements with other systems in the future.
3
Acknowledgements
Special thanks must be extended to my supervisor, Michael Ashley, and to Keith Bannister for
their consistent patience and assistance throughout the year. Thankyou, also, to my SEARFE
colleagues, Michelle Storey and George Warr.
Most of all, thanks to all my family and friends for their help with just about everything. Everyone
who has helped out is included in the puzzle below (names can be found up, down, right, left,
and diagonally).
L
K
R
I
S
T
I
N
B
E
E
R
Y
A
S
N
O
R
C
N
A
R
F
P
H
H
C
Y
R
R
U
C
B
A
S
S
B
C
T
A
P
O
M
I
D
E
N
R
I
D
H
R
E
G
D
R
O
C
E
E
A
D
O
A
S
A
A
C
L
E
L
K
U
V
V
R
R
W
R
B
M
D
M
O
A
C
I
E
Y
A
A
C
T
I
B
E
A
K
B
I
J
E
B
N
N
D
J
D
X
N
O
L
R
E
L
F
Y
A
B
R
N
O
O
M
E
E
C
A
I
I
I
D
L
N
N
J
R
A
M
R
E
L
A
M
5
T
T
D
L
E
I
S
I
C
A
E
I
B
L
R
L
A
H
O
E
L
T
M
P
H
H
L
M
S
E
H
B
N
A
R
A
L
O
A
E
R
A
A
O
U
H
A
N
D
A
A
H
T
I
H
T
I
R
N
D
C
C
N
R
R
R
L
C
E
V
E
T
S
A
A
E
A
I
R
D
E
O
U
I
Y
T
T
O
C
S
E
A
E
M
E
C
I
N
B
M
U
M
V
T
E
L
L
I
C
U
L
B
Contents
1
2
3
4
5
6
7
Introduction
11
1.1
Overview
1.2
Automated Patrol Telescope
1.3
Additional projects
APT hardware
13
2.1
Introduction
2.2
APT building
2.3
Mistral
2.4
Telescope
2.5
CCD
2.6
Telescope movement
2.7
Masterswitch
2.8
Web cameras
2.9
Controller Area Network (CAN)
2.10
Roof
2.11
ROTSE
APT software
25
3.1
Introduction
3.2
Portable Telescope Control System (PTCS)
3.3
Command line tools
3.4
Java Automation System (JAS)
3.5
APT server
APT Masterswitch implementation
31
4.1
Introduction
4.2
Controlling the masterswitch
4.3
Code
4.4
JAS integration
4.5
Screenshots
4.6
Conclusion
APT user interface implementation
39
5.1
Introduction
5.2
Architecture
5.3
Process manager
5.4
Roof
5.5
Chat system
5.6
Look and Feel
5.7
Conclusion
APT software deployment
49
6.1
Introduction
6.2
Version control
6.3
JNLP & Java Web Start
6.4
Compilation
6.5
Version synchronisation
6.6
Uploading
6.7
Conclusion
APT suggestions and enhancements
59
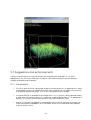
7.1
Introduction
7.2
Hardware
7.3
Software
7.4
Conclusion
7
11
11
11
13
13
14
14
16
16
19
21
21
22
23
25
25
26
27
28
31
31
32
34
37
38
39
40
40
41
42
45
47
49
49
49
52
55
56
57
59
59
59
61
8
SkinnedTextField 63
8.1
Introduction
8.2
Requirements
8.3
Design
8.4
TextSkin
8.5
SkinnedTextFieldDemo
8.6
Suggestions and enhancements
9
CSIRO SEARFE project
69
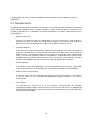
9.1
Background
9.2
Introduction
9.3
Requirements
9.4
Hardware
9.5
Architecture
9.6
User interface
9.7
Suggestions and enhancements
9.8
Conclusion
10
Conclusion
83
10.1
Introduction
10.2
Java as a hardware control system language
10.3
Failure and fault analysis
10.4
Logging analysis
Bibliography 87
A.
Glossary
89
B. JAS programming techniques 91
B.1.
Introduction
B.2.
JAS message sender
B.3.
BoundComponent framework
B.4.
Creating JAS commands
B.5.
JAS channel monitoring
C.
Software tools 95
C.1.
CVS - Windows
D.
SNMP overview
97
D.1.
Architecture
E. Astronomy primer 99
E.1.
Celestial coordinate systems
E.2.
Astronomical times
E.3.
Gamma ray bursts
E.4.
Astronomical filters
E.5.
Flat fielding
E.6.
Cosmic rays
F. Selected code listings
105
F.1.
Masterswitch module
F.2.
APT deployment system
F.3.
CSIRO / SEARFE
F.4.
TextSkin
G.
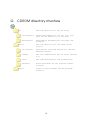
CDROM directory structure 147
8
63
63
63
64
65
67
69
69
70
71
71
72
80
81
83
83
83
84
91
91
91
91
93
95
97
99
101
102
102
103
103
105
132
144
145
List of Figures
Figure 2-1 APT building
Figure 2-2 Telescope
Figure 2-3 Focus motor interface
Figure 2-4 Right ascension motor
Figure 2-5 Declination motor
Figure 2-6 Incremental encoder
Figure 2-7 Anti backlash motor
Figure 2-8 Inner RA limit switches
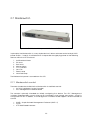
Figure 2-9 APC Masterswitch power distribution unit AP9212
Figure 2-10 Sky camera image
Figure 2-11 Telescope Image
Figure 2-12 Infrared camera image
Figure 2-13 Nearby ROTSE Enclosure
Figure 2-14 APT architectural diagram
Figure 3-1 Mistral APT Command Line Tools
Figure 3-2 JAS Communication Diagram
Figure 4-1 Masterswitch interface
Figure 4-2 Masterswitch interface
Figure 4-3 Masterswitch OIDs
Figure 4-4 Masterswitch commands
Figure 4-5 Masterswitch privileged commands
Figure 4-6 Initialising the Masterswitch channel
Figure 4-7 Masterswitch channel monitoring
Figure 4-8 Masterswitch message broadcasting
Figure 4-9 Masterswitch user interface
Figure 5-1 Existing user interface
Figure 5-2 Client GUI architecture
Figure 5-3 Process manager
Figure 5-4 Roof Status Indicator Truth Table
Figure 5-5 Roof properties frame
Figure 5-6 Client sending JASChatMessages
Figure 5-7 JASChatManager usage
Figure 5-8 APT chat system
Figure 5-9 Skin Look and Feel usage
Figure 5-10 Main GUI with default skin Look and Feel and Atari textSkin
Figure 5-11 Aqua Look and Feel with Blue Digits textSkin
Figure 6-1 JNLP VersionID parsing grammar
Figure 6-2 Web Start warning dialog
Figure 6-3 Suggested resource loading
Figure 6-4 APT software deployment system
Figure 7-1 Proposed apt_masterswitch command line usage
Figure 8-1 SkinnedTextField API
Figure 8-2 TextSkin API
Figure 8-3 SkinnedTextFieldDemo
Figure 8-4 SkinnedTextField menu
Figure 9-1 AOR – AR3000A Radio Receiver
Figure 9-2 Spectrum scanner software architecture
Figure 9-3 Main control window
Figure 9-4 Scan conditions panel
Figure 9-5 Receiver parameters
9
13
15
16
17
17
17
18
19
20
21
21
21
23
24
26
27
32
32
33
35
35
36
36
37
37
39
40
41
42
42
43
43
44
45
46
47
50
51
52
53
61
64
64
65
66
71
72
73
74
75
Figure 9-6 Scan status panel
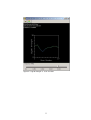
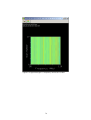
Figure 9-7 Signal strength vs. scan number
Figure 9-8 Signal strength vs. frequency and scan number
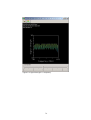
Figure 9-9 Signal strength vs. frequency
Figure 9-10 3D plot
Figure B-1 JASCommand object
Figure B-2 APT command sets
Figure B-3 Implementing a ChannelMonitor
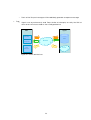
Figure D-1 SNMP message
Figure D-2 SNMP architecture
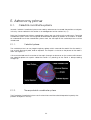
Figure E-1 Celestial sphere, sourced from [ 4 ].
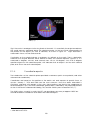
Figure E-2 Equatorial coordinates, sourced from [ 4 ].
10
76
77
78
79
80
92
92
93
97
98
99
100
1 Introduction
1.1 Overview
This thesis documents the application of the Java language across several projects, the majority
of which, are dedicated toward the Automated Patrol Telescope. However, much of the
technology developed as part of these projects can be applied to other similar hardware
control systems.
1.2 Automated Patrol Telescope
These Chapters document efforts made to improve various software systems resulting in a more
reliable control system for the Automated Patrol Telescope. The APT is an optical telescope
managed by Michael Ashley and the UNSW school of physics.
•
Chapters 2 and 3 provide a very in depth coverage of the existing hardware and
software currently used to provide the automation capabilities of the telescope. A
significant effort has been made to clearly document these systems to allow students in
the future to more easily understand and assist in its further development. Appendices A
through E are also very useful resources in understanding the APT system.
•
Chapter 4 thoroughly documents the design and implementation of the
apt.masterswitch software enabling complete control of the APC Masterswitch
device.
•
Chapter 5 covers the features and implementation details of an improved client user
interface to the APT utilising the JAS.
•
Chapter 6 documents design decisions and implementation level details of an
automated software deployment system for the APT, integrating version control and
1.3 Additional projects
•
Chapter 8 covers the design and implementation of the reusable SkinnedTextField GUI
component, designed to display telemetry information in high quality user interfaces. This
component is used in both the APT client application and the Spectrum Scanner software
•
Chapter 9 introduces the Spectrum Scanner software, designed to control a radio
receiver and provide data acquisition, visualisation and analysis tools. This software was
developed for the SEARFE (Students Exploring Australia’s Radio-Frequency Environment)
project run by the CSIRO.
11
2 APT hardware
2.1 Introduction
The APT is a term often used not simply to refer the Telescope itself, but rather to a complex
system of integrated components. As a system, these components interact to provide
comprehensive software remote control of the telescope and its environment.
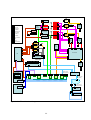
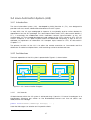
This Chapter provides an overview of the devices and how they interact to provide automated
control. The APT architectural diagram, shown in Figure 2-14, is a useful aid in understanding the
content of this Chapter.
2.2 APT building
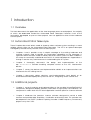
Figure 2-1 APT building
The APT is situated at Siding Springs observatory, Coonabarabran and housed in a small building.
More precisely, the APT is at 31º16’30” S, 149º03’40” E and an altitude of 1140 meters above sea
level.
13
Control of the sliding roof, discussed in more detail in 2.10, gives the telescope rapid access to
any part of the sky. The building also contains a control room, adjacent to the telescope, where
much of the computer equipment is located.
2.3 Mistral
Mistrali is an Intel desktop computer running the GNU Linux operating system which runs the
majority of the software used to control the telescope and other devices inside the building.
Currently mistral is a 450MHz Intel Pentium III, 384MB Ram, with approximately 100GB of hard
drive space. It is also equipped with a SCSI CD/RW burner, and an IDE DVD Burnerii, primarily for
distributing and archiving image data.
Mistral is part of a local 10Mbit subnet shared by all of the Ethernet devices at the site. 2 x 64
Kbit/s ISDN lines provide a gateway to the Internet.
2.3.1 Serial modem
A standard 56K modem is installed to provide a Phone Alert System, proposed and partially
implemented in [ 55 ]. This phone alert system is ultimately designed to place a voice call to a
qualified technician in an emergency situation and provide them with specific information.
2.3.2 USB sound card
Mistral is also interfaced to a Telex Pro USB sound card. Designed to provide voice messages to
warn people nearby of activity at the site. The remote operation capabilities of the APT, and the
fact that the control room is likely to be unattended, presents several safety issues. Unexpected
roof operation, for example, could cause serious injury to unaware bystanders.
Software is currently in place to produce these audio messages, however, additional hardware is
required to provide sufficient volume for the system to actually be effective.
2.3.3 Watchdog
A PCI PC Watchdog, from [ 3 ], board is installed in mistral to monitor the PC’s temperature and
software to provide maximum availability. The watchdog device driver also routinely attempts to
poll the card, in order to prevent the card from assuming the operating system has failed and
subsequently reboot the computer.
2.4 Telescope
The telescope, shown in Figure 2-2, is a wide-field, 0.5miii Schmidtiv optical telescope fitted with
a CCD camera for imaging.
mistral.anu.edu.au: by convention, all hostnames within the Research School of Astronomy and
Astrophysics at ANU begin with the letter m
ii currently only utilised as a CDR-RW driver due to device driver limitations
iii 50cm aperture
iv Schmidt is a standard telescope design
i
14
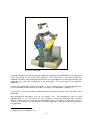
Figure 2-2 Telescope
Originally a Baker-Nunn satellite tracking camera, the telescope was donated to The University of
New South Wales by the Smithsonian Institute in 1986. Since then, it has been significantly
modified. The optics were redesigned to allow the use of standard 5-mm astronomical filters (see
Appendix E.4), and also to produce a flat focal plane. This is discussed in more detail in
Appendix E.5.
Currently the telescope is fitted with a green ‘V’ filter. Changing filters is a complicated process
and it is desirable to automate this function in the future, as suggested in Chapter 7.2.1.
There is also a 110V mirror heater installed to prevent the build-up of dew within the optics of the
telescope.
Most professional telescopes, such as the nearby 2.3mi, are designed to view an area
approximately 0.1º x 0.1º of the sky. The APT, however, is a wide-view telescope with a viewing
area of 5º, although, due to the current limited size of the CCD installed, images are only 3ºx 2ºii.
In the future, a newer CCD camera will be installed capable of utilising the full viewing area of
the telescope.
i
ii
2.3m diameter primary mirror
3 degrees (E-W) x 2 degrees (N-S)
15
2.5 CCD
The CCD, or Charge Coupled Device, is a digital camera, similar to those commonly found in the
marketplace today. The telescope is equipped with a Wright Instruments CCD camera with a
resolution of 1152 x 770 pixels (digitised at 16 bits/pixel). The CCD is controlled using a Linux
character device driver developed by Michael Ashley.
2.5.1 Focus control
Focus is achieved by adjusting the distance of the CCD
from the primary mirror inside the telescope. This is
achieved by using a stepper motor, controlled via the
focus motor interface, shown in Figure 2-3. Software
manipulates this interface through the /dev/focus device
special file.
Two limit switches (upper and lower) are also installed to
prevent damage to the focus mechanism.
Figure 2-3 Focus motor interface
2.6 Telescope movement
Astronomers use the equatorial coordinate system to describe the position of an object in the sky
according to its right ascension and declination. This is discussed in more detail in Appendix E.1.
In order to simplify the calculation of these equatorial coordinates, the mount itself has been
aligned with the earth’s North – South axes. A viewer standing in the control room looking toward
the telescope is facing directly South.
The mount itself can be rotated on two axes:
•
•
Right ascension (RA) aligned with the North – South axis
Declination (Dec) aligned with the East – West axis
There are two pancake servo motors, one for each axis. The RA motor, shown below in Figure
2-4, uses a harmonic gearbox and a friction drive to provide rotation, resulting in a very accurate
control of the axis.
Unlike the RA axis, the declination motor (Figure 2-5) rotates its axis via a worm gear. The anti
backlash motor, discussed in 2.6.1, is required to eliminate backlash..
16
Figure 2-5 Declination motor
Figure 2-4 Right ascension motor
Each servo motor is powered by its own DC servo amplifier which receives an analogue voltage
from the Macrostation (see 2.6.4).
In October 2002, the motors were upgraded to improve the average telescope slew time from
approximately 120 seconds to 30 seconds for a 100 degree slew.
Connected to each motor, is an Incremental
Encoder (Figure 2-6), which is used to accurately
measure the shaft rotation.
Once calibrated, the information from these
encoders is used to calculate the coordinates of
the telescope.
Also in October 2002, newer encoders were
installed providing a higher resolution of 10000
pulses per revolution, four times higher than the
old encoders.
Figure 2-6 Incremental encoder
2.6.1 Anti backlash motor
The Anti backlash motor is required on the declination axis in order to compensate for the
backlash caused by the use of a worm gear, rather than a friction drive system, as used in the
right ascension axis.
The declination motor, is mounted perpendicular to its axis (as shown in Figure 2-5).
Consequently, a worm gear is used to correctly transfer the motion of the motor to the main
gear.
The slack space between the teeth of these gears results in a backlash. This is particularly
noticeable when the motor changes direction, a small amount of motion on the motor will result
in no movement of the telescope. Also, the telescope mount can be moved freely by physically
17
pushing the mount in the opposite direction to which it is travelling. Note that this motion will not
be recorded by the software, which only monitors the encoders attached to the motor shafts.
In order to compensate for this slack space, the anti-backlash motor, show in Figure 2-7, provides
a constant tension in one direction, forcing the worm gear to remain in contact with one side of
the main gear, eliminating any free movement of the telescope mount.
Figure 2-7 Anti backlash motor
For this reason, during normal operation of the telescope, the anti backlash motor should always
be powered on.
2.6.2 Limit switches
Limit switches are used in order to prevent the telescope from damaging either itself or any other
equipment in the enclosure by travelling too far.
Four switches are used for each axis:
• 2 inner limits
These provide digital inputs to the Macrostation. When triggered, the software is notified
via the PMAC (see 2.6.4) device driver should take measures to stop the telescope
moving further.
•
2 outer limits
Triggering the outer limits will cause the corresponding servo amplifier to cut power to the
servos, preventing the telescope from moving.
The Inner (software) limits restrict the range of the declination axis from -75º to 29º55’, and the
right ascension axis to approximately 4.5 hours either side of the meridian.
18
Figure 2-8 Inner RA limit switches
2.6.3 Tilt sensor
The tilt sensor is used for calibration of the telescope. This is necessary to correctly interpret the
data from the encoders, the encoders can only count the amount of movement or each axis.
This information is meaningless unless used in conjunction with a known reference point.
The tilt sensor has two digital outputs indicating if the telescope is east or north of the zenith. As
shown in Figure 2-14, these outputs are connected to the Macrostation and controlled via the
PMAC device driver.
2.6.4 Macrostation
The MACRO (Motion And Control Ring Optical) – Station is a microprocessor based controller,
manufactured by [ 1 ], used to process the information from the encoders, tilt sensor, limit
switches, and allow software to control the RA and Dec axes.
The PMAC (Programmable Multi Axis Controller, also from [ 1 ]) interface board, installed in
Mistral, is controlled via a Linux device driveri, developed by Michael Ashley. The Macrostation is
connected to the PMACii via a high speed fibre optic network.
The PTCS software system, discussed in Chapter 3.2, in conjunction with the PMAC software is
used to abstract this hardware implementation and provide telescope control.
i
ii
/dev/pmac
A PCI card in Mistral
19
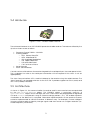
2.7 Masterswitch
Figure 2-9 APC Masterswitch power distribution unit AP9212
In principle, the Masterswitch is a very simple device. It allows software control of eight 240V
power outlets. Currently, the Masterswitch is responsible for supplying power to the following
devices within the APT enclosure.
1.
2.
3.
4.
5.
6.
7.
8.
Anti-Backlash Motor
RA Servo
Dec Servo
Macro Station
CCD Camera
Lens Fan
Room Lamp
Infra-Red Lamp
The Masterswitch power is sourced from the UPS.
2.7.1 Masterswitch control
There are two devices build into the Masterswitch to facilitate control:
• An RS232 serial port (Control Console)
• APC Management Interface Board
The console is primarily intended for initially configuring the device. The APC Management
Interface Board provides a much richer set of functionality via a network connection. Once it is
configured with an IP address, the Management Interface Board supports several methods of
control:
•
•
•
SNMP – Simple Network Management Protocol (SNMP v1)
TELNET
HTTP Web Based Interface
20
The Management Interface Board also supports up to 16 user accounts, although this
functionality is not required as the JAS provides user authentication.
The Masterswitch control for the APT was originally done using TELNET. This has been rewritten as
part of this thesis to use the SNMP protocol, covered in detail in Chapter 4.
2.8 Web cameras
There are currently three web cameras installed at the site, detailed information on each
camera is shown below. The video output from each camera is connected to an AXIS 240 Web
camera Server which provides control and image retrieval facilities via an HTTP interface.
Java code, developed by Michael Ashley provides an interface to the web camera server. This
code has been integrated into the Client GUI application, covered in Chapter 5.
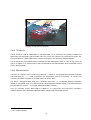
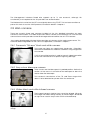
2.8.1 Panasonic “fish eye” black and white camera.
This image was taken on a particularly cloudy day. Potentially,
software could determine weather conditions using images from
this camera.
A 2GHz transmitter/receiver is used to transmit video information
to the web camera server to prevent lightning damage.
Figure 2-10 Sky camera image
2.8.2 Sony colour telescope camera
Here we can see the telescope in its parked position. Notice the
section of the roof cut out behind the telescope to allow the
roof to clear the telescope.
This camera is mounted on a Pan, Tilt, and Zoom stage which
allows it to be directed anywhere within the enclosure.
Figure 2-11 Telescope Image
2.8.3 Watec black and white infrared camera.
The infrared camera’s field of view cannot be altered. Although
this image was taken during the day, a similar image is obtained
at night when used in conjunction with the Infrared lamp.
Figure 2-12 Infrared camera
image
21
2.9 Controller Area Network (CAN)
Controller Area Network (CAN) is a serial bus system especially suited to interconnect smart
devices to build smart systems or sub-systems [ 2 ]. A CAN is a collection of nodes, where each
node can support digital I/O and analogue lines.
Originally designed for the automotive industry, CANs are used in a broad range of industries
such as factory automation, machine control, building automation, maritime, medical and
railway applications.
The CAN protocol boasts a sophisticated error detection mechanism which makes it ideal for the
APT environment where reliability is a primary concern. Although all CAN nodes can transmit
instructions, a feature to facilitate redundancy. The CAN at the APT is controlled by a single PCI
CAN adaptori.
Currently CAN nodes are installed to control the roof circuitry, the observatory lights, and a
switchboard of 240V outlets. (as shown in Figure 2-14).Much of the work done to install the APT
CAN system has been documented in [ 52 ].
2.10 Roof
The sliding Roof, clearly visible in Figure 2-1 and Figure 5-5, is one of the more crucial systems.
Failure to close the roof in foul weather (or in bright sunlight) could result in significant damage to
the telescope and other equipment within the enclosure. Every effort must be made to ensure
this veritable catastrophe must never occur.
The roof circuitry, discussed in [ 52 ], ensures that several safety conditions must be met before
the software will attempt to drive the roof motors.
•
•
•
•
•
i
Telescope must be in the correct position
Roof Emergency Stop button, located on the roof control box, must be depressed
The Crane system must be stowed
Crane power off
Correct roof position information ( Roof Closed, Roof Open Sensors )
JANZ VMOD-ICAN3 PCI CAN Adaptor, interfaced using /dev/can
22
2.11 ROTSE
Figure 2-13 Nearby ROTSE Enclosure
The ROTSE (Robotic Optical Transient Search Experiment) enclosure is situated just a few metres
from the APT building. The ROTSE Telescope, like the APT has a wide field of view (1.8 x 1.8
degrees) and is equipped with a very fast slewing mounting. This makes it ideal for tracking
Gamma Ray Bursts, as discussed in Appendix E.3. When it is fully operational , ROTSE will share
much of the hardware and infrastructure of the APT system.
Currently installed in the ROTSE enclosure is a PCi used to provide weather information, the
telescope itself was expected to arrive in early October 2002. However, at the time of writing
ROTSE is still being prepared for shipment at Los Alames National Laboratory, New Mexico.
i
moody.anu.edu.au, 486 50MHz, 32MB, 512MB HDD, running Redhat 7.2 Linux
23
Anti
Backlash
Motor
Lens Fan
Outer Limit
6
S
Inner Limit
Dec
Motor
Up per Limit
Focus
Motor
Interface
Video
240V AC
Analog I/O
Anti
Backlash
Power
Encoder
Inner Limit
N
Low er Limit
Outer Limit
1
Digital I/O
IR Lamp
Serial RS 232
Outer Limit
CCD Camera
Fibre Optic
10 base T
Focus Motor
8
W
Inner Limit
APT Lamp
5
7
RA
Motor
CAN Bus
E
Mirror Heater
Fibre Channel
Encoder
Inner Limit
Outer Limit
DC
Coax
Parallel Cable
RA
Servo
Amplifier
Dec
Servo
Amplifier
2
3
Sky Cam
2GHz
IR Cam
Tilt
Sensor
IR Cam
Stage
Macrostation
UPS
AXIS 240
Webcamera Server
150.203.153.10
malt.anu.edu.au
2 240V
3 Outlets
4 5 6
1
7
8
DC
Power
Supply
Masterswitch
150.203.153.9
maiden.anu.edu.au
4
Switchboad
CAN Bus
150.203.153.2
mistral.anu.edu.au
Power Outlets
Power Outlets
Power Outlets
RS232
PCI
Parralel
PCI
Ethernet Hub
USB
ISA
ISA
PCI
150.203.153.1
gateway
Lights
Switchboard
Node
Device Drivers
/dev/can
Watchdog
/dev/focus
/dev/ccd
/dev/pmac
/dev/eth0
Internet
Roof Control
150.203.92.3
maia.anu.edu.au
Roof Node
2.3 m Weather
ROTSE Weather
150.203.153.6
moody.anu.edu.au
Figure 2-14 APT architectural diagram
24
3 APT software
3.1 Introduction
As stated in 2.3, the GNU Linux operating system is an integral part of the APT system. It provides a
centralised platform for the APT control software. Fundamental services such as the file system,
networking and device drivers provide the basis for control software to be built.
3.2 Portable Telescope Control System (PTCS)
PTCS is a generic telescope control system designed to support multiple telescopes in multiple
operating environments. It was written by Jeremy Bailey for the AAO i in an attempt to promote
reuse of a collection of well known and trusted algorithms for pointing and tracking a telescope.
PTCS is implemented in the DRAMA software environment and consists of a set of DRAMA tasks.
PTCS is currently used at two telescopes, the APT and the 15m James Clerk Maxwell submillimeter
Telescope (JCMT) on Mauna Kea, Hawaii.
Currently the JAS server interfaces to PTCS via a Java interface to DRAMA.
3.2.1 DRAMA
The DRAMA system is a portable environment designed for writing distributed instrumentation
software [ 14 ]. Developed by the AAO, it is essentially a platform independent system of
interprocess communication. Messages are sent and received between DRAMA Tasks.
3.2.2 THI
The Telescope Hardware Interface, like PTCS is also a DRAMA task. It serves to abstract the
specific architecture of the telescope control hardware. The THI provides access to universal
time (UT) information, sending of demand positions to the servos, and reading the encoder
values for each axis.
The APT implementation of the THI interfaces to the PMAC device driver, which in turn provides
access to servo drives and encoders. UT information is calculated from values obtained from the
PC system clockii.
i
ii
Anglo-Australian Observatory
Accuracy of the system clock is maintained by ntpd, the network time protocol daemon
25
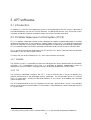
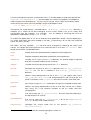
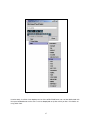
3.3 Command line tools
System
All
Imaging
Enclosure
Telescope
aptStart
aptStop
Device Drivers
aptSetProperties
aptGetProperties
apt_exposure_display
apt_image
apt_image_abort
Linux Platform
aptEmergency
apt_imsave
apt_stm
apt_img_preview
APTServer
SP
Interface
aptSafety
apt_get_control
apt_relinquish_control
apt_login
apt_lst
apt_observe
apt_marilena
apt_stop_observing
apt_im
apt_autocal
apt_autopoint
apt_stm
apt_twieven
apt_twimorn
aptRoofOpen
aptRoofClose
apt_lights
apt_roof
apt_slew
apt_slew_abort
apt_move
apt_park
apt_zenith
apt_position
apt_track
apt_calibrate
apt_focus
apt_standard
BASH
PERL
IRAF
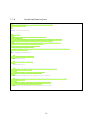
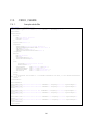
Figure 3-1 Mistral APT Command Line Tools
3.3.1 Scripts
The diagram above shows all the APT command line tools according to their language and the
layer in which they interface to the system. This diagram should only be used as a guide, in some
cases, is it not entirely correct. For example, the aptSetProperties/aptGetProperties commands
interface to many subsystems. These commands are configured for the apt user on mistral.
3.3.2 IRAF
The Image Reduction and Analysis Facility is a general purpose software system for the reduction
and analysis of astronomical data. The IRAF distribution, which is freely available, can be
obtained from [ 11 ]. One of the more powerful features of the package is the Command
Language (CL) scripting facility, a programming environment for scientific applications.
Many of the APT commands are implemented as IRAF CL scripts. See Figure 3-1. These scripts
can make decisions based on the results of image analysis.
26
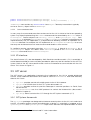
3.4 Java Automation System (JAS)
3.4.1 Introduction
The Java Automation System (JAS), developed by Keith Bannister in [ 52 ], was designed to
provide multi-user, secure, distributed automation of the APT system.
In early 2002, the JAS was redesigned to improve its functionality and to further abstract its
dependence on the JSDT package. The Java Shared Data Toolkit (JSDT), discussed in detail in [
52 ], is essentially the middleware which facilitates network communication of the JAS.
Unfortunately Suni has ceased development and support of the JSDT in favour of JXTA. JXTA, or
Project Juxtapose, is Sun’s peer to peer solution for distributed computing. In light of this, it is
desirable to implement an alternative JAS transport layer, based on JXTA, as discussed in
Chapter 7.3.7.
The primary function of the JAS is to allow the remote execution of Commands and the
distribution of data to multiple clients, whilst restricting control to authorised users.
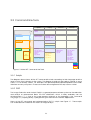
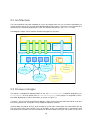
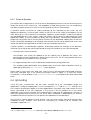
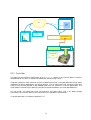
3.4.2 Architecture
The basic operation of the JAS system is presented in Figure 3-2, shown below.
JASServer
Process Space
JASClient
Telemetry
Data
ClientProcessSpace
Command
Executio n
Process
Data
Send
Commands
APT_CONTROL
Command
Channels
PTCS_STATUS_3
Message Channels
Figure 3-2 JAS Communication Diagram
3.4.2.1
JASChannels
All data transfer within the JAS system is achieved using Channels. A Channel is analogous to a
blackboard. Messages are written to the Blackboard/Channel such that all clients can
read/receive this message.
public void sendToAll(JASMessage message){ ... }
Note that Messages can also be sent to specific clients:
i
Sun Microsystems
27
public void sendToOthers(JASMessage message) { ... }
public void sendToClient(JASMessage message, String clientName) { ... }
JASMessages can contain any serializable Java Object. Telemetry information is typically
sent as a Java Map object within a JASMessage.
3.4.2.2
Command execution
In many ways the command execution environment of the JAS is similar to that of an operating
system. Any object implementing the Command interface can be executed by a Process within a
ProcessSpace. Process objects can execute(), abort(), and signal(Object arg). Each
ProcessSpace is assigned a ProcessManager. The ProcessManager interface is designed to be
implemented by the JAS Application, it is responsible for deciding whether an operation on a
Command is allowed. For example, the APT implements a PriorityExclusiveManager to ensure
that only one authorised user can execute commands and thus have control.
To facilitate remote command execution, a ProcessSpace is bound to a Channel, by a
ServerTransport object. This allows other JASClients joined to this Channel to send the
JASServer commands via a ClientProcessSpace.
3.4.3 SP interface
The Serial Protocol (SP), also developed by Keith Bannister and discussed in [ 52 ] is essentially a
socket based method of communication provided to allow any tool to interface to the APT-JAS
System. Most of the APT command line tools use the SP interface to communicate with the JAS
server. This is shown in Figure 3-1.
3.5 APT server
The APT Server is an application interfacing the hardware to the JAS to enable distributed
control. These hardware abstractions are used to construct APTCommands and send telemetry
data to JAS Clients.
•
•
•
•
•
apt.roof provides control of the sliding roof via the JCAN interface.
apt.ptcs is a DRAMA client to the PTCS system discussed in 3.2.
apt.park provides routines to park the telescope in common positions. i.e Zenith, Roof
Movement etc
apt.masterswitch uses the SNMP protocol to control the Masterswitch (discussed in
detail in Chapter 4).
apt.image Allows control of the CCD through the APT System framework (3.5.1)
3.5.1 APTSystem framework
The apt.system package was designed to interface several systems to the JAS, not under Java
controli, to enable remote control and distribution of data. It is essentially a wrapper of the
aptGetProperties and aptSetProperties scripts which abstract the implementation of these
i
Such as 2.3m weather, UPS, Network and PC status information.
28
subsystems as a set of key-value properties. The Masterswitch, discussed in detail in Chapter 4, is
controlled in this way.
29
4 APT Masterswitch implementation
4.1 Introduction
Currently the Masterswitch is controlled via an “Expect” script which runs a telnet session to
interface to the device. Expect is a scripting language designed to respond to text on the
screen.
The JAS interfaces to the Masterswitch using the APTSystem framework.
Each time a
Masterswitch outlet property is set, the APTSystem calls the aptSetProperties script which inturn invokes the expect script. Eventually resulting in the outlet changing state. I.e. Switch on or
off.
There are several issues with the current implementation:
•
•
•
There is no state change notification
The Masterswitch device must be queried at regular intervals in order to discover when
an outlets state has changed, possibly due to another user controlling the device.
Unreliable, occasionally the TELNET session created within the expect script fails for
unknown reasons.
Poor Error handling. If the script fails, very little error information can be obtained.
The SNMP (Simple Network Management Protocol) interface provides a much more powerful
way to control the hardware. When the SNMP interface is enabled, the Masterswitch generates
SNMP Traps which can be used to notify the system of any state changes within the system.
Capturing this information at runtime allows notification of state changes within the system rather
than using a polling technique.
It is desirable for the APT System to be able to access the Masterswitch as a Java Object. This will
allow more powerful JASCommands to be written, which will, in turn provide a framework for a
more reliable and flexible software module.
4.2 Controlling the masterswitch
Due to the simple functionality of the Masterswitch, the requirements for controlling it are fairly
straightforward. These are:
•
get and set outlet state
•
Real-time notification of outlet state changes
It is vital that the system always reflects the current state of the Masterswitch. Although
the outlets are unlikely to be switched often, correctly knowing the state of each outlet at
all times would be valuable information, particularly if a fault had occurred elsewhere in
the system.
•
Error Notification
Internal errors and warning conditions within the Masterswitch should be able to be
monitored
•
Support for adding multiple Masterswitch devices in the future.
31
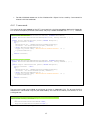
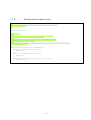
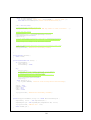
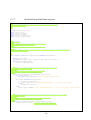
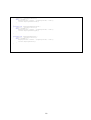
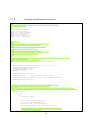
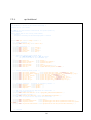
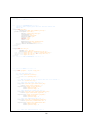
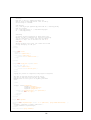
These requirements were translated into the Java interfaces shown below:
// Java interface to the APC AP9212 Masterswitch
public interface Masterswitch {
// Outlet States
public static final
public static final
public static final
public static final
public static final
public static final
public static final
String
String
String
String
String
String
String
OUTLET_ON
OUTLET_OFF
OUTLET_REBOOT
OUTLET_UNKNOWN
OUTLET_ON_WITH_DELAY
OUTLET_OFF_WITH_DELAY
OUTLET_REBOOT_WITH_DELAY
=
=
=
=
=
=
=
"On";
"Off";
"Reboot";
"Unknown";
"On with delay";
"Off with delay";
"Reboot with delay";
public String setOutletState(int outlet,String outletState)
throws MasterswitchException;
public String getOutletState(int outlet)
throws MasterswitchException;
...
// Event Notification
public void addMasterswitchListener( MasterswitchListener listener);
public void removeMasterswitchListener( MasterswitchListener listener );
}
Figure 4-1 Masterswitch interface
// Event Notification
public interface MasterswitchListener {
public void outletStateChanged(int outlet, String newState);
public void outletNameChanged (int outlet, String newName );
// Something has changed, but we are not sure what
public void stateChanged();
}
Figure 4-2 Masterswitch interface
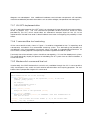
4.3 Code
4.3.1 SNMP libraries
In an effort to reduce development time and increase reliability, the decision was made to use a
3rd party SNMP package. Several Java SNMP implementations exist:
Open Source
• JSNMPi
• Westhawk SNMP Stack [ 20 ]
• AgentAPI [ 22 ]
• JawaOpenEyes (Network Monitoring Tool) [ 23 ]
Commercial
• Advent Net [ 24 ]
i
A sub-project of OpenNMS [ 21 ]
32
The AdventNet package is clearly of the highest quality. Feature rich, and backed by
comprehensive documentation. However, the Masterswitch SNMP implementation will only
require a basic set of SNMP operations, all supported by the open source packages.
Of the open source alternatives, the JSNMP package was chosen primarily for its superior
documentation, support and activity within the SNMP community. Also, the AgentAPI is used to
parse the APC PowerNet MIB, [ 28 ].
A brief overview of the SNMP protocol is given in Appendix D.
4.3.2 Configuration
•
Enable SNMP on the Masterswitch
This is achieved though the HTTP interface to the APT Management Interface board.
Mistral (150.203.153.2) is given read/write access and added to the list of hosts to send
SNMP traps.
•
Mistral’s firewall settings must be configured to allow access to UDP ports 161,162. This is
achieved using the ipchains Linux firewalling utility.
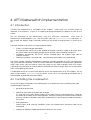
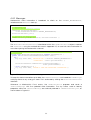
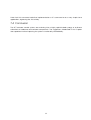
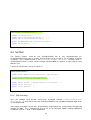
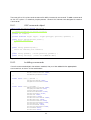
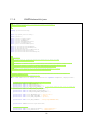
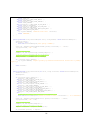
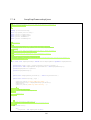
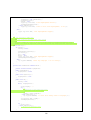
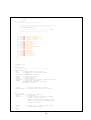
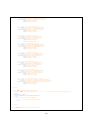
4.3.3 SNMP messages
Control of the Masterswitch outlets is achieved by GETs and SETs of the two OID’si shown below:
•
sPDUOutletName
String label for the Outlet (Max 20 characters)
•
sPDUOutletCtl
outletOn
(1)
outletOff
(2)
outletReboot
(3)
outletUnknown
(4)
outletOnWithDelay
(5)
outletOffWithDelay
(6)
outletRebootWithDelay (7)
Detailed documentation on the outlet behaviour for each of these values is documented in
[ 27 ] and [ 28 ], and available through the apt.masterswitch API JavaDocs.
Figure 4-3 Masterswitch OIDs
On initialisation, the POWERNET.MIB [ 28 ] is parsed and loaded into memory using the AgentAPI.
The OIDs shown in Figure 4-3 must be converted to a String of ‘.’ delimited integers denoting their
location in the MIB tree before they can be inserted into a PDUii. This value is obtained by calling
mibModule.getNode(“sPDUOutletName”).getOID().toJavaValue().
For example, the OID sPDUOutletName is equivalent to:
“.iso.org.dod.internet.private.enterprises.apc.products.hardware.masterswitch.
sPDUOutletConfig.sPDUOutletConfigTable.sPDUOutletConfigEntry.sPDUOutletName”
i
ii
Object Identifiers, see Appendix D, SNMP overview
Protocol Data Unit, see Appendix D, SNMP overview
33
which is represented internally as “.1.3.6.1.4.1.318.1.1.4.5.2.1.3”.This string is then
appended with “.<outlet-number>” to specify the outlet. The OID, and some data, if the
operation is a SET, are packaged into a PDU which is then sent to the Masterswitch using the
JSNMP SnmpSession object.
The SNMP agent on the Masterswitch interface board then performs the appropriate action,
resulting in an SNMP response being returned. The response packet is processed, resulting in the
executing thread returning to the caller.
4.3.4 Synchronisation
The SNMPMasterswitch is a multithreaded object. Calls to Masterswitch methods are blocked
and queued implicitly by Java synchronization. The blocked threads are then woken by either
a timeout or an SNMP response message from the device.
4.3.5 Event notification
There are two alternative methods used to notify MasterswitchListeners of any state
changes:
•
Responding to SNMP Traps
The Masterswitch generates SNMP traps for numerous events. These traps can be
decoded to discover events that have occurred on the Masterswitch. A complete
specification of Masterswitch traps is provided in [ 27 ] and [ 28 ]. Root permissions are
required by the SNMPTrapDaemon to bind itself to UDP port 162. This method is more
efficient and also provides more accurate error information.
•
Polling
A TimerTask periodically queries the state of the Masterswitch and compares the new
information with cached values. A Masterswitch event is triggered if a change is
detected.
Upon initialisation, the SNMPMasterswitch will attempt to listen to SNMP traps by starting the trap
daemon. If this fails, a polling technique will be used, querying the Masterswitch every three
seconds.
4.4 JAS integration
To allow portability, all code integrating the Masterswitch to the JAS is handled in the
JASMasterswitch and Command Objects. Leaving the apt.masterswitch package an
independent software module.
The JASMasterswitch object has several responsibilities:
•
•
Initialise the SNMP implementation of the Masterswitch
Send status information as JASStatusMessages to clients
34
•
Provide initialised references to the Masterswitch Object to be used by Commands to
interact with the hardware
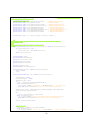
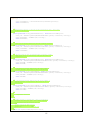
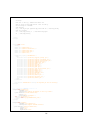
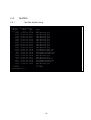
4.4.1 Commands
Two commands were added to the APT Command set using the procedure defined in Appendix
B.4. Given the simplicity of these commands, they only need to override the execute() method.
// Switch Outlet Command
public class MasterswitchSwitchOutletCommand() extends APTCommand{
public MasterswitchSwitchOutletCommand(int outlet, String newState ) {...}
...
public Object execute(Process parent) throws Exception {
String returnVal = null;
try {
Masterswitch ms = JASMasterswitch.getMasterswitch();
returnVal = ms.setOutletState(outlet, newState );
} catch (MasterswitchException e) {
logger.log( Level.INFO, "Masterswitch Command Failed" + e );
e.printStackTrace();
}
return returnVal;
}
}
// Rename Outlet Command
public class MasterswitchRenameOutletCommand() extends APTCommand {
public MasterswitchRenameOutletCommand(int outlet, String newName ) {...}
...
public Object execute(Process parent) throws Exception {
String returnVal = null;
try {
Masterswitch ms = JASMasterswitch.getMasterswitch();
returnVal = ms.setOutletName(outlet, newName );
} catch (MasterswitchException e) {
logger.log( Level.INFO, "Masterswitch Command Failed" + e );
e.printStackTrace();
}
return returnVal;
}
}
Figure 4-4 Masterswitch commands
The new commands are installed as privileged, as shown in Appendix B.4.2. This ensures that the
Masterswitch commands may only be executed by the user who currently has control, i.e. the
privileged user.
// APTServer.java
// Include the Masterswitch commands as privileged Commands
static final Class[] privCmds = {
...
MasterswitchSwitchOutletCommand.class,
MasterswitchRenameOutletCommand.class };
Figure 4-5 Masterswitch privileged commands
35
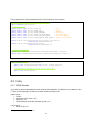
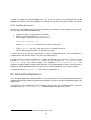
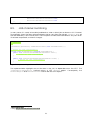
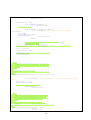
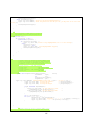
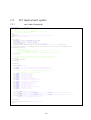
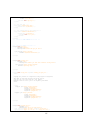
4.4.2 Messages
Masterswitch status information is broadcast to clients on the CHANNEL_MASTERSWITCH,
initialised at the APTServer start-up .
...
// APTServer.java
// Create the Masterswitch Channel
JASChannel masterswitchChannel =
client.makeChannel(Channels.CHANNEL_MASTERSWITCH);
masterswitchChannel.join();
// Initalise the Masterswitch
JASMasterswitch.getJASMasterswitch( masterswitchChannel );
...
Figure 4-6 Initialising the Masterswitch channel
The MasteswitchChannelWatcher, instantiated within the JASMasterswitch object, monitors
the JASChannel, using the method discussed in Appendix B.5, to send full status information to
new clients joining the Masterswitch channel.
// Monitor the Masterswitch Channel and send any new subscribers all status
// information
private class MasterswitchChannelWatcher extends ChannelAdaptor {
public void channelConsumerAdded(ChannelEvent event) {
try {
log.log( Level.INFO, "Detected new "+ Channels.CHANNEL_MASTERSWITCH +
" subscriber: "+event.getClientName() );
masterswitchChannel.sendToClient( prepareCompleteMsg(),
event.getClientName() );
} catch (JSDTException e) {
log.log( Level.INFO, "Couldn't send new subscriber information");
}
}
}
Figure 4-7 Masterswitch channel monitoring
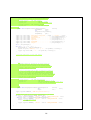
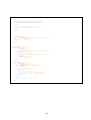
To keep the status information up to date, the JASMasterswitch must broadcast JASMessages
notifying clients of any change in state. This is achieved by utilising the MasterswitchListener
interface.
Whenever a Masterswitch Event occurs, the JASMasterswitch prepares and sends a
JASStatusMessage with the updated state information. The key values used to identify
properties within the JASStatusMessage are statically defined in JASMasterswitch.java, as
shown below in Figure 4-8.
36
public static final String KEY_OUTLET_1_STATE = "Outlet 1";
...
public static final String KEY_OUTLET_8_STATE = "Outlet 8";
...
// MasterswitchListener methods
public void outletStateChanged(int outlet, String newState) {
...
// Send a JASStatusMessage containing the new information to all clients
// on the masterswitch channel
JASStatusMessage msg = new JASStatusMessage();
Map map = msg.getValueMap();
map.clear();
map.put( keyForOutletState(outlet) , newState);
try {
masterswitchChannel.sendToAll( msg );
} catch (JSDTException e) {
log.log(Level.WARNING, "Failed to notify clients of Masterswitch state change",e);
}
}
Figure 4-8 Masterswitch message broadcasting
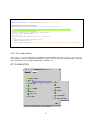
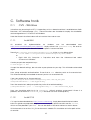
4.4.3 SP modifications
The APTSPClient will need to be modified to automatically join the CHANNEL_MASTERSWITCH
and enable SP clients to retrieve Masterswitch status. This is not currently implemented. A revised
apt_masterswitch command is proposed in Chapter 7.3.9.
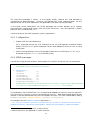
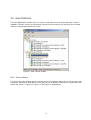
4.5 Screenshots
Figure 4-9 Masterswitch user interface
37
4.6 Conclusion
The design proposed and developed is being successfully used in the live system, providing a
more reliable fine grained control of the hardware. SNMP Trap messages are also logged which
may provide very useful information in the event of a serious hardware failure or devices in the
enclosure.
38
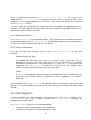
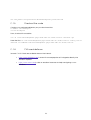
5 APT user interface implementation
5.1 Introduction
The existing user interface (shown below), was originally developed by Keith Bannister to provide
an interface to the APT demonstrating the use of the JAS system. Since it was produced, the JAS
System has matured and many features have been added. A higher quality user interface
needs to be developed to fully utilise the remote operation capabilities of the APT. This new
interface aims to be more intuitive, responsive and functional than its predecessor.
Figure 5-1 Existing user interface
39
5.2 Architecture
The user interface has been isolated as much as possible from the JAS to ease its portability to
future versions of the JAS, or even other distributed control systems. Although many components
reference JAS interfaces and objects, most JAS routines are found in the JASComms class.
The diagram below shows the flow of data throughout the system.
APTServer
Telemetry
Channels
Command
Channels
JASComms
Bound Component Managers
Command Sender
Cmd
Status Gui
Components
Control Gui
Components
Status Gui
Components
Status Gui
Components
Control Gui
Components
Figure 5-2 Client GUI architecture
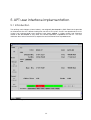
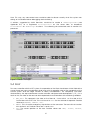
5.3 Process manager
This panel is a graphical representation of the JAS ProcessListener interface, displaying JAS
ProcessEvents as they arrive from a ClientProcessSpace. Each process is assigned a row in
the table displaying its status information, as shown in Figure 5-3.
Currently, only the privileged process space is used. System and general commands may also
be running within the JAS system in their respective process spaces.
Unfortunately this panel will only ever be able to show status information for commands sent by
the user whilst they have control. This is a limitation of the JAS architecture. It would be more
convenient to be able to show information on all commands running in the system at any one
40
time. This way, any connected users would be able to discern exactly what the system was
doing, an invaluable tool for debugging and monitoring.
A solution, suggested by Keith Bannister, would be to create a JASMessageSender (see
Appendix B.2) as a registered ProcessListener on the server side, to broadcast
ProcessEvents as JASMessages to clients. Thus allowing all connected users to monitor JAS
processes.
Figure 5-3 Process manager
5.4 Roof
For users unfamiliar with the APT System, the operation of the Roof should seem trivial. Behind the
scenes there are many complications and issues with its operation due to the complexity of the
control system and the large number of safety considerations. This complexity has been
abstracted by the apt.modules.roof control software, designed and developed in [ 52 ]. As a
result of this, the state of the roof can be interpreted as a combination of the following variables:
•
•
•
MAN_AUTO: This represents the state of the Manual / Auto switch on the side of the
Control box at the APT Site. This must be set to AUTO for the software to operate. Possible
values are UNKNOWN, MANUAL, AUTO
EMERG: This is the roof emergency stop button on the same box. The roof will not function
if this button is set. Possible values are OK and EMERG
POS: The current position of the roof. Possible values are OPEN, CLOSED, MIDDLE,
UNKNOWN
41
•
•
POWER: The status of the roofs power supply. It is either ON, or OFF
MOVING:Possible values are OPENING, CLOSING, STOPPED, UNKNOWN
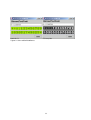
These values are obtained by listening on the ROOF Channel, their values can be seen using the Roof
Properties Frame, shown in Figure 5-5. The MOVING and POS are interpreted using the table in Figure 5-4
to create the roof status icon on the main status bar.
MovingState
OPENING
CLOSING
STOPPED
UNKNOWN
OPEN
RoofPosition
CLOSED
MIDDLE
UNKNOWN
Figure 5-4 Roof Status Indicator Truth Table
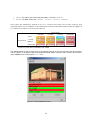
The sole purpose of the unknown icon is to prompt the user to consult the Roof Properties frame,
shown Figure 5-5, to obtain more accurate information about the roof state. Portions of this frame
were adapted from the original PtcsUi GUI.
Figure 5-5 Roof properties frame
42
5.5 Chat system
Given the distributed nature and complexity of the APT control system it is desirable to be able to
communicate with other users currently logged in. For example, a higher priority user would be
able to ask the current user what they were working on before overriding their control.
This level of communication would also be very useful in a classroom environment. Students
would be communicate remotely with other users controlling the telescope. For example,
although the GUI can display a variety of status information, the intentions of the user in control
could be somewhat difficult to discover. The chat system could be used to simply tell the
connected users why the telescope is slewing to particular coordinates.
The APT chat system is most certainly this simplest of all the APT services, implemented as a
JASChannel designed to send and receive JASChatMessagesi.
JASChatMessages are sent from a ChatPanel by simply utilising the sendToAll() method
provided by the JAS, as shown below.
...
JASComms.getJASComms().getChatChannel().sendToAll(
new JASChatMessage( System.getProperty("user.name")+": "+msg + "\n" )
);
...
Figure 5-6 Client sending JASChatMessages
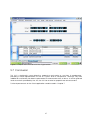
When a JASChatComponentManager receives a JASChatMessage it conveys this information
to any registered JASChatComponents, in accordance with the BoundComponent Framework
discussed in Appendix B.3. Since the ChatPanel is a registered JASChatComponent, it receives
this message and subsequently prints it to the screen, as shown in Figure 5-8.
The sole responsibility of the server is to initialise the CHANNEL_CHAT and create the
JASChatManager.
...
// APTServer.java
// Initialise JASChatManager
JASChannel chatChannel = client.makeChannel( Channels.CHANNEL_CHAT );
chatChannel.join();
new JASChatManager( chatChannel );
...
Figure 5-7 JASChatManager usage
The JASChatManager simply creates a ChannelMonitor, as shown in Appendix B.5, which
broadcasts notification messages when users join and leave the chat. Joining and leaving the
chat is analogous to joining the leaving the chat channel.
i
Currently implemented as a String
43
Figure 5-8 APT chat system
44
5.6 Look and Feel
The Java Language comes with a rich user interface toolkit, the Java Foundation Classes, also
known as JFC-Swing. Swing provides a rich set of widgets iand class libraries to build a
professional user interface. One of its key features is the pluggable look and feel framework. This
allows the programmer to dynamically switch between any look and feel. A Look and Feel is a
collection of widget styles, colours, fonts, and input device semantics.
Altering the look and feel servers two purposes. Firstly, for purely aesthetic reasons. Users of the
software can choose a particular colour scheme or theme to suit their mood. Secondly, users
familiar with the behaviour of a particular platform, such as MacOS or Windows, can configure
the look and feel to emulate their environment. This level of customisation makes users more
comfortable with the software.
APT Client GUI Application has been equipped with a Look and Feel menu which allows the user
to switch the look and feel at any time.
5.6.1 Skinned Look and Feel
In addition to the Look and Feel’s supplied with the JDK, many other vendors have implemented
customised Look and Feels. Many of these can be found at the Javootoo website [ 34], which is
designed as a primary reference for Look and Feel developers.
One of the more prominent customised Look and Feel’s available is the Skin Look and Feel from
L2FProd.com. A freely available Look and Feel supporting Skins. Skins use images and other
techniques to drastically enhance the appearance of the GUI components.
Using the code idiom shown in Figure 5-9, the Skin Look and Feel was easily integrated into the
APT Client Application.
/* Skin Look and Feel Usage */
import com.l2fprod.gui.plaf.skin.SkinLookAndFeel;
...
SkinLookAndFeel.setSkin(
SkinLookAndFeel.loadThemePack(
new URL("SkinPackFile.zip”)
)
);
SkinLookAndFeel.enable();
updateComponents();
...
private void updateComponents() {
SwingUtilities.updateComponentTreeUI( rootJFrame);
}
Figure 5-9 Skin Look and Feel usage
i
A user-interface control such as a checkbox or drop-down list
45
5.6.2 Problems
•
SwingUtilities.updateComponentTreeUI() in certain circumstances does not
function as desired. For example, components that are not visible when this method is
called will not be refreshed correctly and will retain the previous Look and Feel settings.
This can be overcome by
updateComponents().
a
more explicit and
rigorous implementation
5.6.3 Screenshots
Figure 5-10 Main GUI with default skin Look and Feel and Atari textSkin
46
of
Figure 5-11 Aqua Look and Feel with Blue Digits textSkin
5.7 Conclusion
This GUI is significantly more attractive, responsive and easier to use than its predecessor,
providing a clear representation of the APT system and its components. Although very little
additional functionality has been implemented, the framework exists to do so. As a finer grained
level of control is provided by the JAS, the GUI can evolve to support these enhancements.
Further improvements to the Client application are discussed in Chapter 7.
47
6 APT software deployment
6.1 Introduction
The APT software is a very complex system of integrated software components and is constantly
under development. The Java APT source code alone is approximately 8000 lines across 300
source files. The system also depends on several external packages such as the JAS and JSDT.
Unfortunately, there is no test platformi and consequently the system spends the majority of its
time running a test version of the software. Although thorough testing is important, it is crucial to
preserve the ability to run an older (release) version of the software known to run properly.
Such a large and unique system requires code management tools to allow for more efficient
development. To summarise, the APT software deployment system must satisfy the following
requirements:
•
•
•
•
•
•
Allow multiple developers to work on the code simultaneously.
Compile and deploy multiple versions of the software in an efficient manner.
Roll back to previous trusted versions when more reliable operation is required. i.e.
Observing.
Distribute client code to potentially large and diverse user bases. Eg, Classroom
environment, professional astronomers.
Guarantee that all clients are running the correct, compatible version of the code.
Adapt to future changes to the structure of the application. For example, the
introduction of additional libraries.
6.2 Version control
Since the development of the JAS and the APTServer, the entire code base has been managed
within a CVSii repository. CVS is the de facto industry standard version control system, rivalling
commercial products such as Microsoft Visual SourceSafe and Rational Clearcase. CVS
fundamentally allows multiple users access to the source tree, as well as maintaining a history of
all changes made to each file. CVS also supports binary files, such as libraries, allowing the entire
programming workspace to be stored in the repository.
Installation instructions for using CVS with the APT source code are included in Appendix C.
6.3 JNLP & Java Web Start
Java Web Start is Sun’s reference implementation of JNLPiii. The Java Network Launch Protocol
[ 47 ] is a specification published by Sun designed to streamline the deployment of Java
applications over the Internet. It is used to manage and distribute the APT Client applications to
all users.
The JAS test harness developed by Keith Bannister has not been updated to use JAS2
Concurrent Versions System
iii Java Network Launch Protocol
i
ii
49
Web Start is designed to address several of the problems traditionally associated with the
deployment of standalone applications:
• Installation Issues
• Upgrading to the latest version
• Different versions of the JVM
Once Web Start (or any JNLP client) is configured on the users machine, any Web Start
application can be downloaded, installed, and executed from a single click on a web page.
A JNLP enabled application is specified by an xml configuration file labelled <app-name>.jnlp.
This file contains all the information required to setup and run the application such as jar file
resources, properties, and main class information. The APT jnlp configuration files can be found in
Appendix F.2.1 and F.2.2.
JAR files (Java ARchive) are similar to tar, or zip files. They are a collection of all the files required
by the application, including class files, images, and other resources. Adding a jar file to the
CLASSPATH variable is equivalent to adding the root directory of the extracted jar.
There are several third party implementations of JNLP such as NetX (part of the Object
Component Desktop projecti) and OpenJNLP (openjnlp.nanode.org) both striving to provide a
richer implementation of JNLP than Web Start. However, both these implementations are still very
much in a beta stage only partially implementing the JNLP specification.
6.3.1 Versioning
JNLP supports versioning of resource jar files in two ways. Either a versions.xml file to be used in
conjunction with the JnlpDownloadServlet or simply naming the jar files according to the
parsing grammar shown below in Figure 6-1.
file
::= name __ options . ext
options ::= option ( __ options ) *
option ::= V version-id |
O os |
A arch |
L locale
Figure 6-1 JNLP VersionID parsing grammar
Jar file versions are specified using the file naming convention for several reasons. Firstly, the
version of the jar files can be identified simply using a dir or ls command, a particularly useful
feature in a UNIX environment where command line control is required. Also, the versions.xml
file is yet another configuration file that must be maintained for the system to operate correctly.
This added complexity is also the reason the JnlpDownloadServlet was not used in the first
implementation of the APT deployment system. It is, however the obvious choice for improving
the system to achieve faster and more efficient client download times.
Note that JNLP features such as JARDiff, designed to allow Web Start clients to only download
the changes from one version of a jar to another, as opposed to downloading the entire new
version, are only provided by the JnlpDownloadServlet.
i
http://ocd.sourceforge.net
50
6.3.2 Security
By default, all Web Start applications are run in a restricted sandbox with the following limitations
(sourced from [ 49 ] ):
• No access to local disk.
• All jars must be downloaded from the same host. Note, however, that you can download
extensions and JREs from any host as long as they are signed and trusted.
• Network connections are allowed only to host from which your jars were downloaded.
("Phone home restriction.")
• No security manager can be installed.
• No native libraries (not even in extensions).
• Limited access to system properties. (The application has read/write access to all system
properties defined in the .jnlp file, as well as read-only access to the same set of
properties as applets
The APT Client application, like many other standalone Java applications, requires unrestricted
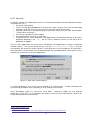
network access. This can be achieved by using the <all-permissions/> tag in the jnlp
configuration file. When this security option is used, all jar files must be signed with a certificate. If
the certificate is not trusted the user will be prompted with the dialog below warning them of the
possible risks involved in running the application.
Figure 6-2 Web Start warning dialog
A trusted certificate is one which can be verified as a trusted source. Trusted certificates are
commercially available from companies such as Verisigni and Thawteii.
Many developers within the community have been requesting support for fine grained
permissions in jnlp filesiii. This would allow the above warning to be more specific, rather than
simply requesting unrestricted access.
http://www.verisign.com
http://www.thawte.com
iii http://developer.java.sun.com/developer/bugParade/bugs/4398087.html
i
ii
51
6.3.3 Resource loading
Resources such as images, sounds, and any other additional application files cannot simply be
referenced in the same way a normal application would. There are two major restrictions:
• All resources must be packaged in jar files. Primarily to support versioning and
download management for JNLP clients.
• File paths cannot be used to reference the contents of these jar files. The JNLP
specification does not stipulate where or in what form the applications are handled on
the client side. Java Web Start, for example, renames downloaded jar files for caching
purposes.
Consequently, the Web Start Developers Guide [ 45 ], provides the following construct to load
resources. Note that the getResource() method returns a Java URL Object.
// Get current classloader
ClassLoader cl = this.getClass().getClassLoader();
// Create icons
Icon saveIcon = new ImageIcon(cl.getResource("images/save.gif"));
Icon cutIcon
= new ImageIcon(cl.getResource("images/cut.gif"));
...
Figure 6-3 Suggested resource loading
Although this may seem a trivial modification to existing applications, complications can arise.
For example, the SkinnedTextField, discussed in Chapter 8, requires a ZipFile object in the
constructor of a TextSkin. The creation of a ZipFile from a URL is not a trivial operation. For this
reason TextSkin packages must be downloaded and installed manually.
The free package Racheli , designed to simplify resource loading, is used in the APT Client
application to load Skin Packages for the Skinned Look and Feel, discussed in 5.6.1.
6.4 Compilation
The Java based build tool ant is used to control compilation and deployment. Each CVS module
is accompanied by a build.xml configuration file. This file specifies various targets, tasks, and
dependency information required to compile and deploy the application.
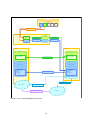
The software deployment system can be seen in Figure 6-4. This diagram shows the usages of the
different ant targets. Similar information is obtained using the “ant usage” target.
i
http://rachel.sourceforge.net
52
CVS Repository
apt
lib
jas
jcan
jsdt
cvs checkout
workspace
unsigned
jars
ant sign-jars
ant upload
src
ant prepare
ant upload
mistral
mcba5
/lib
/lib
jas__V1.0.jar
jas__V2.0.jar
...
jas__V1.0.jar
jas__V2.0.jar
...
ant upload-mistral
/apt__V1.0
/apt__V1.0
/apt__V2.0
/apt__V2.0
/apt__V3.0
/apt__V3.0
apt-client.jnlp
runServer
apt.jar
config.jar
...
apt-client.jnlp
runServer
apt.jar
config.jar
...
ant upload-mistral
apt-client.jnlp
Web Start
APTServer
sh runServer
APTClient
JAS Runtime Check
Figure 6-4 APT software deployment system
53
Once the workspace has been checked out from CVS the developer should manually edit the
build.xml (see Appendix F.2.3) file and modify the version-key property. This property is
used throughout the build process. This key must be unique, which is best achieved by simple
incrementing the version count or perhaps using the developers name.
<property name="version-key" value="test-0.96"/>
Throughout the build process, covered below, a dist/apt__V<version-key> directory is
created. This is where all the files belonging to the current version such as run scripts and
configuration files are created. Any changes, such as adding or removing files must be
reflected in modifications to the build.xml file.
To enable the application to run as an ordinary Java application locally, without deploying it,
run scripts and batch files are included in the apt__V<version-key> dir so that the versioned
clients can be run locally.
Like Makei , ant only compiles .java files that have changed by analysing file system time
stamps. Ant targets are executed from the command line in the form ant <target>. Each
target and its action is specified below:
clean
Deletes all the files and directories created by the build process.
init
Prepares temporary directories required for the build process.
compile-sp
Compile the SP Client to the build directory, this special target is required
due to the complex coding of the SP classes.
compile
Compile the entire apt source tree to the build directory.
apt-jar
Package the contents of the build directory into the apt__V<versionkey>.jar file. This file is created in the dist/apt__V<version-key>
directory.
config-jar
Performs String replacements to files in the config dir, copies them to the
apt__V<version-key>/config dir and packages this dir into a jar file. The
jar file is necessary so the .properties files can be used in Java Web Start.
sign-jars
Sign the jars using the aptdev certificate. Jar Signing is required for Web Start.
prepare
Performs the String replacements of files so that they contain the <versionkey> string. This is the dynamic creation of the run scripts and JNLP
configurations.
upload
Uses scp to copy the apt__V<version-key> dir to the Web Start directory in
the apt account on mcba5
upload-mistral
Uses scp to copy the apt__V<version-key> dir to the APTAutomationMultiVer dir on mistral. Ready to be run.
source-tar.gz
Packages the source code into
key>/source-tar.gz
i
to
the archive apt__V<version-
Unix Make build tool. Traditionally for compiling programs written in C
54
doc-tar.gz
Packages the JavaDocs and content of the doc directory code into the
archive apt__V<version-key>/apt-docs__V<version-key>.tar.gz
6.5 Version synchronisation
The APT System is a very dynamic software application, software changes on the server are likely
to create incompatibilities with the client code. In addition to the flexibility of running multiple
versions of the server, it is also necessary to synchronise the client code, so we can guarantee
that the correct, corresponding version is run.
A significant portion of this problem is solved using JNLP and Java Web Start. A JNLP
configuration allows an indefinite number of clients, distributed anywhere on the Internet, to
automatically download and install the APT client application.
By omitting the <offline-allowed/> tag in the JNLP configuration file, the Web Start client is
forced to reload the up to date JNLP information from the web server. If this operation fails, Web
Start will not run the application.
Consequently the problem is simplified to that of ensuring that the JNLP configuration file is up to
date and matches the version of the server that is running. This is achieved very simply by
copying the apt-client.jnlp file to the Web Start web server whenever the server is started,
overwriting the previous jnlp configuration.
The runServer script, used to start the server on mistral, copies the corresponding aptclient__V<version>.jnlp file to apt@mcba5/~apt/public_html/software/webstart/aptclient.jnlp. Thus guaranteeing that any new clients started will be using the correct version. Note
that the apt-client__V<version>.jnlp is created at build time using the ant prepare target.
Every version or build has its own copies of all configuration files required to run the server.
The apt-client.jnlp file is generated at build time tagged with the version-key property
specified in the ant build.xml.
However, this elegantly simple solution is not completely correct. If the server is started after the
client software has loaded, there is no guarantee that the jnlp file used to start the client
corresponds to that of the server. This is unlikely to ever be a problem since restarting the server
while the client is logged in will cause the client software to fail, and attempting to login to an
incompatible version of the server is also likely to fail. Both of these scenarios will prompt the user
to restart the client, forcing JNLP configuration to be reloaded, and subsequently eliminating the
problem.
In the unlikely event of the client successfully logging in to a different version of the server a
runtime check can be performed. This is currently not implemented.
55
6.5.1 External libraries
The solution discussed previously must be further developed to account for the versioning of the
library files that the APT system uses. The upgrading of third party jar files must not compromise
the ability of older versions or the APT to use the original versions of these libraries.
A possible solution could be to simply package all the required jar files within the APT
deployment directory, such that each version of the APT has its own copy of the libraries. This will
work, although it is very inefficient. For example, suppose a trivial change is made to the apt.jar
file and deployed as a new version. Web Start clients will be forced to download the entire
application again, since it considers the library files to be different, consequently defeating the
purpose of using Web Start in the first place. Likewise, for the developer, deployment of the new
version will require uploading of all the library files to both the web server and mistral. Given that
the jar files alone have reached up to 2MB in size this could take some time.
A better solution is to store libraries together, and simple monitor the changes to this directory.
Historical uses of the jar files can be preserved as long as the following two rules are obeyed.
•
No library filei is ever overwritten.
New libraries must simply be added to the lib module with a different file name. Thus
preserving the existing references in other versions of the APT. The APT configuration files must
be modified to now reference the new library.
•
All usages or library files must be specifically referenced in configuration files.
Thus enabling alternate libraries to be referenced in the future under a different name. As
opposed to setting the java.ext.dirsii system property.
When used in conjunction with Web Start, clients will only be required to download resources
that have changed. Also, if the naming convention shown in Figure 6-1 is used, the JARDiff
functionality ( only available in the JnlpDownloadServlet) will enable even faster download
times.
6.6 Uploading
Once the apt__V<version-key> dir has been created using the ant-prepare target the
application is ready for deployment. It must be copied to mcba5 and to mistral. Mcba5 is the
host used to subsequently deploy the Client applications using Web Start, and mistral is the live
server connected to the APT hardware. In the future it will be possible to run the server
application using a command line JNLP implementation, reducing this upload time. However, a
more fine grained level of control on the server side is preferred. A dependency on mistral’s
unreliable Internet connection must not prevent the operation of the telescope.
SecureCopy is used to perform the file transfer. Scp is an open source, secure file transfer utility
available on both windows, UNIX and Linux. Instructions on installing scp on windows are
included in Appendix C.1.1.
i
ii
Any file in the /lib module
All jar files in the java.ext.dirs directory are implicitly added to the CLASSPATH
56
The ant upload targets discussed previously are simply calls to the scp command line tool. The
deploy directory is uploaded to mcba5, and then to mistral to optimize network bandwidth for
developers operating on slow connectionsi. The entire application can be compiled and
deployed from a 56K modem connection in approximately 8 minutes.
6.7 Conclusion
This system allows any authorised user to checkout any version of the software to any
development environment, then compile and deploy both the server and the clients using two
simple commands. All this is done without compromising the working versions of the software. It is
also compatible with minor changes to the build system itself, provided the core principle of the
apt__V<version-key> directory are preserved. This directory must completely encapsulate a
version of the software.
Since this deployment framework was introduced, several versions have been successfully
deployed on mistral using this system allowing the APT operator to rapidly switch between
different versions of the software.
It is assumed that the connection from mcba5 to mistral is faster than the developers workspace
to mistral.
i
57
7 APT suggestions and enhancements
7.1 Introduction
This Chapter contains a collection of improvements designed to increase the reliability and
functionality of the APT system. These improvements range from hardware and software
upgrades to the development process itself.
7.2 Hardware
7.2.1 Automated changing of astronomical filters
Currently, the switching of astronomical filters (see Appendix E.4) on the APT is a very tedious
process. Automation if this procedure would expand the remote observing capabilities of the
APT. Software control of this system will most likely be implemented as a CAN node.
7.3 Software
7.3.1 Configuration management
Configuration management deals with tracking the evolution of a software project. By
formalising the development processes, its efficiency and reliability can be improved.
The software deployment system, developed as part of this thesis (see Chapter 6) is a significant
part of the configuration management of the APT system, providing a multi-user, distributed
method of development.
However, the APT system is lacking a Change Management strategy. Change management is
essentially an ordered way to track information such as changes through the system. For
example, what specific changes, either improvements or bug fixes, were implemented in a
given release of the software ?
This information is very useful for several reasons:
•
•
If a bug is detected in the current version of the software, configuration management
information will help to determine how this bug was introduced, providing an answer to the
question: “What has changed … ?”, which often results in the first clue as to what the
problem may be, where is was introduced, and by who.
Hardware may be updated or reconfigured such that previous versions of the code are now
incorrect and may function unpredictably. For example, the Roof was recently rewired and
subsequently recoded. All previous versions of the roof software are now incompatible with
the hardware. This information must also be considered when choosing a trusted version of
the software to roll back to in the event of a new bug being discovered.
Currently the version.properties file is used to track changes with each release.
59
7.3.2 Maintenance
The APT system relies heavily on several external software libraries and tools. Such as PTCS,
DRAMA, JAS, JSDT, JSNMP, Ant, CVS, the Linux operating System, and many more. Maintaining
these libraries and tools to the latest release version will reap may benefits such as improved
features, reliability and performance.
7.3.3 Client SP server
For security reasons, the SP server only accepts connections from the localhost. Currently there is
only an SP server run on mistral. Development is in progress, with the help of Keith Bannister, to
incorporate an SP Server into the APT Client application. This would allow the execution of APT SP
commands remotely. Once a sufficient set of commands are SP enabled, observers will no
longer need user-level access to mistral.
The SP command set could be deployed using JNLP, and automatically versioned using the
framework in Chapter 6.
7.3.4 Client error control
In many cases user actions will appear to have no effect due to some exception being thrown.
In the current implementation, these exceptions are caught and logged. No further action is
taken. The only way to determine the fate of a failed command is to examine the Client Log or
the Server Log panels.
Although there are limited types of exceptions that can be thrown, the context in which they do
so can narrow down the specific problem. This information should be extracted and conveyed
to the user via a dialog message or some other stimulus such as an discoloured icon.
7.3.5 Improved process information
The Process Manager user interface component introduced in Chapter 5.3, needs to be
accessible to all connected users, not just the user in control. It could also be extended to show
which ProcessSpace a particular process is executing in.
7.3.6 Interactive diagnostics diagram
The APT Hardware Architecture diagram, shown in Figure 2-14, is a very useful resource for
understanding the relationships and dependencies among the hardware and devices that
comprise the APT systems. Knowledge that is vital for diagnosing faults in the system.
An interesting project would be to implement this diagram in software as an interactive user
interface, such that components could be interrogated to obtain status information, and
stimulate the user when events occur. Sounds and animations could be used to depict the
operation of devices, such as a turning motor, or a pulsing cable to indicate data transfer.
Ultimately the user should be able to identify the status of the system at a glance.
This is not a trivial project. The implementation would need to be flexible to cope with the
constant changing of the system, such as the addition of new hardware, or the reconfiguration
of existing components. Many corrections and adjustments were frequently made while this
60
diagram was developed. Also, additional hardware and software components will inevitably
need to be added to provide information such as cable voltages, temperature monitoring etc.
7.3.7 JAS JXTA implementation
The JAS is primarily based on the JSDTi which has subsequently been discontinued, presumably in
favour of project JXTA. The JXTA architecture provides several constructs similar to those
provided by the JSDT which would allow an alternative transport layer for the JAS to be
implemented. Richard Dixon and Chaker Khabbaz have been investigating this possibility in their
theses.
7.3.8 Command line tool versioning
All the command line tools, shown in Figure 3-1 should be integrated to the CVS repository and
subsequently included in the automated versioning system. Thus eliminating the possibility of
accidentally using incompatible commands which may lead to unpredictable behaviour. All
commands, including aptStart and aptStop should be migrated toward this system.
Eventually the entire software system should be managed by CVS and the deployment system.
This would drastically simplify the process of rebuilding the APT system from a clean installation, if
mistral was to fail.
7.3.9 Masterswitch command line tool
Unfortunately the SNMP Masterswitch control is only available through the GUI. A command line
utility would prove very useful for both remote administration and scripting purposes. The text
below shows a proposed usage of this command.
Usage: apt_masterswitch command [ command_options ]
Where command can be one of the following:
status [outlet]
Print the current state of the specified [outlet] in the form
[number].[name]=[state]
For example:
$ apt_masterswitch status 1
1.Anti Backlash = On
switch [outlet] [state]
Change the state of the specified [outlet]
rename [outlet] newName
Rename the specified [outlet] to "newName". Note that newName must be
less than 20 chars.
[outlet]
[state]
Can be either the outlet number {1..8} or the outlets name.
On, Off, or Reboot
Figure 7-1 Proposed apt_masterswitch command line usage
i
Java Shared Data Toolkit
61
Note that this command could be implemented as a SP command or as a very simple Java
application, bypassing the JAS entirely.
7.4 Conclusion
The APT software control systems are maturing into a highly sophisticated synergy of a diverse
collection of hardware and software components. The suggestions introduced in this Chapter
are capable of further improving the systems functionality and reliability.
62
8 SkinnedTextField
8.1 Introduction
Given the complex architecture of the APT System, the development of a rich user interface in
Java will require a high level of programming skills and proficiency with the Java Swing
framework.
In order to gain Insight into the internal architecture of Swing itself, I decided to develop a
customised, reusable Swing component, the SkinnedTextField, which uses images, as opposed to
fonts, to render each letter within a text label. This concept is based on the creative images from
Digit Mania[ 36]. It is ideal for displaying the APT telemetry information and is also used in the
Spectrum Scanner application discussed in Chapter 9.
This component can be seamlessly integrated into other Java applications. Particularly
engineering and hardware interfacing systems due to its clear digital readout. The Skins can also
be configured to simulate the real readouts on the hardware itself, enabling unfamiliar users to
quickly identify the semantics of the data.
8.2 Requirements
•
•
•
•
Dynamic switching of skins
Synchronization without performance degradation
Skin images may be of any size
Not all images within a given skin have to be the same size
8.3 Design
There are four classes used to implement the SkinnedTextField:
•
SkinnedTextField
This is the component. Created directly by the user. It behaves in much the same way as
a JLabel. More information on its API is included in Figure 8-1
•
SkinnedTextFieldDemo
Sample code to test and demonstrate SkinnedTextFields
•
SkinnedTextFieldManager
Currently there is no need for the user to access this class. It keeps track of all the
SkinnedTextField instances and controls the popup menu.
•
TextSkin
This abstracts the mapping of images to individual characters.
63
/* Abbreviated SkinnedTextField API */
public class SkinnedTextField {
...
public SkinnedTextField() { ... }
public void setSkin(TextSkin newSkin) { ... }
public void setSkinMode(boolean mode) { ... }
public synchronized void setText(String newText) { ... }
public void getText() { ... }
...
}
Figure 8-1 SkinnedTextField API
8.4 TextSkin
The TextSkin Object, used by the SkinnedTextField has a very straightforward API.
SkinnedTextFiled simply asks its current TextSkin object for an image to use to display a certain
character. This is implemented in the getImageIcon(char character) function which is
guaranteed to return a value. Default images are provided by TextSkin, as discussed in more
detail in 8.4.2.
The API for the TextSkin is shown in Figure 8-2.
/* TextSkin API */
public class TextSkin {
...
public static final TextSkin defaultSkin = new TextSkin();
/* return the image to display character */
public ImageIcon getImageIcon(char character) {...}
public static TextSkin loadSkinFromZip(File skinZipFile) {...}
public String toString() {...}
public String getName() {...}
...
}
Figure 8-2 TextSkin API
8.4.1 Skin loading
Skins are loaded using private constructors accessed through loadSkinFromZip(File
skinZipFile). In most cases Skins are statically loaded by the SkinnedTextFieldManager when
it is first referenced.
The majority of images for the skins, obtained from Digit Mania[ 36], unfortunately only provide
images for digits. This is inadequate for the APT as RA and Dec displays require additional
characters such as ‘:’ and ‘+’ to be supported.
64
In order to support skins downloaded from [ 36], as well as those I have extended to include
additional characters, Skins are loaded by matching only those that are discovered in the zip file.
8.4.2 TextSkin zip format
TextSkins can be loaded from any zip file containing a collection of gif images complying with
the naming conventions detailed below:
•
•
•
All files must be in the root path of the zip file.
Zip files must be named using <SkinName>.zip
Each image in the zip file must be of the form
<IdentStr><SkinName>.gif
where icon<IdentStr> is variable name within TextSkin.java
•
These <IdentStr> are NOT case sensitive, this is a weakness due to
Java'
s ZipFile implementation not distinguishing case.
As each file within the zip file is processed, it'
s name is identified and it is then matched to a
variable within the TextSkin object using the Java Reflection API.
This allows TextSkin zip files to support any number of characters. As a minimum, a TextSkin should
provide a
default<SkinName>.gif which will be returned by
getImageIcon(char
character) when the correct image is not supplied. If default<SkinName>.gif is not
supplied, a global default image will be returned. As the global default image is likely to be of a
different size and appearance to the current skin, it is likely to produce a non uniform output.
A sample listing of a <SkinName>.zip file is shown in Appendix F.4.1.
8.5 SkinnedTextFieldDemo
This is a simple application designed both to test the features of the SkinnedTextField framework
and provide example code to guide other developers wishing to include SkinnedTextField in their
applications.
It contains two SkinnedTextFields, the first displays the text from the JTextField above it, while the
second shows the currentTimeMillis() i updated approximately every 100ms.
i
This is the number of miliseconds since 12am, Jan 1 1970
65
BackLitLCD
Figure 8-3 SkinnedTextFieldDemo
57ChevySkin
66
Figure 8-4 SkinnedTextField menu
Unfortunately, the Web Start deployment of SkinnedTextFieldDemo can not be distributed with
Skins pre-loaded because the Skins must be deployed as zip files within jar files. A limitation of
using Web Start.
67
8.6 Suggestions and enhancements
•
Support for Classes of SkinnedTextFields.
This would allow users display to have different areas of their application using different
skins at the same time. Currently only one skin is supported across all instances of
SkinnedTextField.
This could be implemented by allowing multiple instances of
SkinnedTextFieldManager.
•
Dynamic creation of blank images.
When incomplete skins are used and the global default image is required, the
component can appear odd. The default icon could be dynamically created at load
time based on the appearance of existing icons discovered in the TextSkin zip file.
68
9 CSIRO SEARFE project
9.1 Background
The SEARFE (Students Exploring Australia’s Radio-Frequency Environment) project is designed to
act as an educational resource for high school physics students as well as contributing to a
national study of radio interference throughout Australia, geared towards Australia’s bid for the
SKA telescope.
The SKA is an international project to design, and ultimately build a radio astronomical telescope
with an effective collecting area of one square kilometre [ 37 ]. Unlike traditional radiotelescopes, the SKA will consist of many small antennae distributed across a large area. Together,
these antennas will yield a collection area of one square kilometre, significantly greater than any
radio telescope in existence. Currently Australia is a potential host country for the construction of
the SKA.
The SKA Outreach Project is an effort by the CSIRO to study Australia’s suitability and to increase
the likelihood of being selected as the host country. The SEARFE project, a subset of the SKA
Outreach project, is designed to involve students and to provide statistical data on the levels of
radio noise throughout Australia, particularly in remote areas. SEARFE is sponsored by IBM
Australia, BAE Systems Australia, Perth Observatory and Australian Geographic. This Chapter will
provide an overview of my involvement in the SEARFE project as the developer of the Spectrum
Scanner software.
9.2 Introduction
The Spectrum Scanner software is designed to be used by high school students to record radio
interference levels in their local area. The software uses a serial protocol to interface to the AORAR3000A radio receiver and record the signal strength at various frequencies.
Although initial versions of the software were deployed on IBM laptopsi running the Windows
operating system, a larger user base (of unknown platforms) is anticipated in the future. The Java
language’s platform independence will allow for seamless portability to these other platforms.
A prototype of the software was initially developed by George Warr. Although the concept was
proven to work, there were several fundamental problems with this initial implementation:
•
•
•
•
•
i
Unreliable
o Crashed when switching modes
o Couldn’t scan twice, needed to restart the program
No logging
Visualisation errors
o Inconsistent data between plots
o Colour scale not correct
Limited user interface
Could not save plots
800x600 resolution, 2GB HDD, P133, 128MB Ram
69
This prototype was used as a basis for preparing the requirements of the Spectrum Scanner
application.
9.3 Requirements
The primary purpose of the software is to interface to the radio receiver and allow recording of
signal strength readings across a given frequency range whilst providing a mechanism for
visualising the data as it is acquired. This broad requirement has been further refined to the
following points:
•
Spectrum scanning
Users must be able to enter scan parameters such as start frequency, stop frequency,
increment or step size, dwell time, and other conditions, then instruct the receiver to
perform the scan at a specified time. Users must be able to cancel this scan.
•
Persistent data files
Every scan must be accompanied by a data file storing all the information for archiving
purposes. This data file must store enough information to enable the user to recreate an
identical scan. Circumstantial data, such as date, time, and any other experimental
notes, must also be stored for scientific completeness. These data files must be human
readable and accessible to other software systems for analysis. These data files must also
be able to be loaded back into the Spectrum Scanner application for analysis.
•
Data visualisation
The majority of scans are expected to run for considerable amounts of time. There needs
to be a mechanism for visualising data as it is acquired to provide the user feedback.
•
Robust, intuitive user interface
The primary user base for the software are inquisitive high school students. For this reason,
it must be easy to use and provide appropriate dialog messages if an error is
encountered.
•
Fault Tolerant
The software must continue to run if the receiver is disconnected. For example,
unplugging the serial cable whilst the receiver is scanning should result in an appropriate
warning to be displayed. The software should also automatically resume scanning when
the connection is restored.
70
9.4 Hardware
Figure 9-1 AOR – AR3000A Radio Receiver
The software interfaces to a AOR-AR3000A professional radio receiver. The features utilised by the
Spectrum Scanner are as follows:
•
•
•
•
Frequency Range 100KHz – 2036MHz
Listening Modes
o NFM Narrow Band FM
o WFM Wide Band FM
o AM Amplitude Modulation
o USB Upper Side Band
o LSB Lower Side Band
o CW Continuous Wave
Signal Strength
RS232 Serial Interface
Control can be switched from the receiver keypad to the serial port input via a rear panel switch.
This is important to note as the serial port connection will not respond if this switch is not set
appropriately.
The Java Communications API is used to interface to the receiver using the serial interface. The
Java CommAPI is a standard extension to the J2SE SDK. It provides support for RS232 (Serial) and
IEEE11284 (Parallel) interfaces.
9.5 Architecture
As shown in Figure 9-2, the communication to receiver and its command set are encapsulated
by the rfsv.recevier.AR3000A object. This AR3000A object is exclusively used by a
SpectrumScanner object which manages the scan. Scan events are propagated to registered
GUI and ScanData components using an Observer design pattern [ 43 ]. This enables dynamic
visualisation of the data as it is acquired. Alternative implementations of the SpectrumScanner
could be implemented to utilise the receiver in different ways. For example, a more intelligent
Scanner would be able to identify stronger signals and then rescan at a higher resolution (i.e.
smaller frequency increments).
71
ScanData
Data
Scan
Scan
Data
GUI
Visad
Visad
Visad
Plots
Data
Data
Data
File
File
File
Status
Status
Status
Widgets
Widgets
Widgets
Spectrum Scanner
AR3000A
Acquire Scan
RS232
Command
Set
Figure 9-2 Spectrum scanner software architecture
9.5.1 Data files
The data files are written incrementally by the ScanData object to ensure that data is correctly
recorded even if there is a software or hardware failure during a scan.
Originally, data files were stored as a comma delimited text file, to enable data files to be easily
imported into other applications for further analysis, such as Microsoft Excel. However, these files
had to be manually parsed to be loaded back into the Spectrum Scanner application. The
overhead of maintaining this parsing mechanism posed a problem to further development.
For this reason, the data files were converted to XML documents. XML is an ideal storage
mechanism for scientific data of this nature due to its portability and flexibility.
A sample data file is included in Appendix F.3.1.
72
9.6 User interface
The main application window shown in Figure 9-3 provides access to all the data files currently
loaded in memory, access to the receiver console, and can launch the Spectrum Scan Wizard,
used to configure the receiver for a scan.
Figure 9-3 Main control window
9.6.1 Scan wizard
The Spectrum Scan Wizard consists of three consecutive panels allowing the user to input scan
conditions, parameters and specify which plots to use to display the data as it is obtained. These
panels are shown in Figure 9-4, Figure 9-5 and Figure 9-6 respectively.
73
Figure 9-4 Scan conditions panel
74
Figure 9-5 Receiver parameters
75
Figure 9-6 Scan status panel
9.6.2 Data visualisation
VisAD was chosen as a graphical package primarily because of its ability to plot image graphs,
as shown in Figure 9-8. The VisAD library is a freely available “Java component library for
interactive and collaborative visualisation and analysis of numerical data” [ 41 ]. Four kinds of
plots were defined for use in the Spectrum Scanner application. These are shown in Figure 9-7
through Figure 9-10.
76
Figure 9-7 Signal strength vs. scan number
77
Figure 9-8 Signal strength vs. frequency and scan number
78
Figure 9-9 Signal strength vs. frequency
79
Figure 9-10 3D plot
9.7 Suggestions and enhancements
Version 2.0 of the Spectrum Scanner satisfies all the requirements outlined in 9.3. Since its
deployment, very few issues and bugs have arisen. Most feature requests are for improved
usability and data analysis facilities.
9.7.1 Visualisations
•
The VisAD plots are only configured to plot the entire data set, as opposed to a more
manageable subset of this data. Users often want to perform a very large scan and zoom
in to analyse a particular range. This is a very high priority feature to add.
•
The signal strength is recorded as an integer from 1 to 16, and this value is plotted linearly
in each plot. For scientific analysis, it is necessary to plot exponentially (2n ) as opposed to
linearly (n). Dynamic switching of the axes is not a trivial exercise in VisAD.
•
Axes on the 3D plot can appear inverted and cause confusion. Rotation of the plot can
make these labels unreadable. This is a limitation of the VisAD toolkit and there appears
to be no solution to this.
80
•
The XML data files also utilise XML style sheets to automatically format the data into
comma delimited text. These style sheets could be improved to allow the data to be
displayed in a presentable form on the web. Easing collaborative analysis.
•
Each visualisation window is always placed on the top left corner of the users desktop,
often covering other plots, causing confusion. A tiling or cascading window placement
strategy could be implemented to overcome this.
9.7.2 Data files
•
Currently the user interface can appear to hang when very large files are loaded. This is
because the file loading process is executed by the Swing event thread. This can be
trivially overcome by creating a new Thread object.
•
A DTD (Document Type Definition) should be developed as a specification for the data
files. This would enable data files to be validated as well as other software developers to
write analysis software.
9.7.3 Web Start
Initial versions of the software were simply deployed as zip files. Web Start deployment was not
implemented for several reasons. Firstly, the donated laptops were not equipped with a network
interface or modems. This, and the fact that they were to be sent to very remote areas of
Australia, means that they are unlikely to ever have Internet access. Thus negating most of the
benefits Web Start provides. Also, the CommAPI relies on native libraries which must be manually
installed into the users Java installation. At the time, overcoming these complications to enable
Web Start deployment was considered a low priority.
However, given the success of the Spectrum Scanner software, and the interest in its use at other
potential SKA sites, the user base may rapidly increase. Managing deployment and software
upgrades to such a large and divers set of users can be made trivial through the use of JNLP and
Web Start.
9.7.4 Receiver portability
Although there is no direct need for the software to interface with radio receivers other than the
AR3000A, the requirement of adding this feature in the future must be anticipated. This current
architecture is moderately flexible and capable of achieving this. However, a more defined
process should be integrated to enable other developers to add support for different receivers.
9.8 Conclusion
The Spectrum Scanner software has been used successfully by several schools throughout
Australia with very few bugs surfacing. Most of the problems encountered have been overcome
by simple workarounds. Development will continue as the SEARFE project expands. The project
has attracted international interest from European organisations and the SETIi Institute in the
United States.
i
Search for Extra Terrestrial Intelligence
81
82
10 Conclusion
10.1 Introduction
Despite the fact that Java’s platform independence and design principles are focussed on
abstracting and isolating the programmer as much as possible from the architecture of its host
system, it has been used to successfully implement hardware control components for both the
APT and the Spectrum Scanner application. This Chapter details reasons for this success and
documents the common characteristics of hardware control systems that may be exploited to
achieve similar results in other systems.
10.2 Java as a hardware control system language
A Hardware control system is a software application designed to manage a set of distinct, yet
interconnected components to enable them to work together effectively in order to achieve a
higher purpose. The APT system, for example, consists of a plethora of hardware devices and
components that enable its remote operation.
A distinction must be made between the concepts of hardware interfacing and hardware
control. Hardware interfacing refers to the lower level implementations of functions on the
device itself whereas hardware control is focussed on the logical operation of devices made
possible by the hardware interfacing. Devices and functions can be abstracted by utilising these
hardware interfaces.
Once this hardware abstraction layer is created, the complex logic of the system can be built.
The role of Java is to provide this control layer. The advantages of using Java for this are as
follows:
•
•
•
•
•
•
•
•
Portability
Maturity
Quality documentation
Easy to debug
Trusted libraries
Memory management and garbage collection
Multithreaded environment
Object oriented design
The Java language supports several techniques for interfacing to the hardware:
•
•
•
•
•
JNI – Java Native Interface. This is used in the JCAN module developed by Keith
Bannister to interface to the CAN controller device driver
File system. Many system properties can be obtained by parsing a particular file which is
updated by another source.
Java Communications API. The RS232 serial protocol is used by the Spectrum Scanner
software to interface to the radio receiver.
Java can invoke external processes using Runtime.getRuntime().exec()
Strong network protocols support. For example the Masterswitch is controlled via its
Ethernet interface.
83
10.3 Failure and fault analysis
As the complexity of any system grows, so does the likelihood of a individual components failure.
The consequences of this failure are unique to every system. This highlights the need to analyse
the system and identify faults that can occur and how these faults will propagate through the
system, on both a hardware and a software level. The following questions should be considered
when designing a control system:
•
•
•
•
•
What potential faults can occur and how serious are they?
How can software accurately become aware of these faults ?
What action can be taken to recover ?
How will this fault propagate to other devices in the System ?
Can additional hardware be added to the system to more effectively diagnose these
faults ?
This information would encourage the development of a more reliable software system capable
of detecting and recovering from failures.
10.4 Logging analysis
10.4.1
Overview
In virtually every complex software system, various log files are used for monitoring and
debugging the software. This characteristic is shared by both the APT and the Spectrum Scanner
software through the use of the java.util.logging framework. Operating Systems are also an
example of this. Unix/Linux based operating systems log system messages to
/var/adm/messagesi whereas WindowsNT messages can viewed with the Event Viewer.
In any software failure, analysis of these log files is generally the standard procedure for
identifying the cause of the problem. Particularly when the system is controlled remotely. This
analysis can often be very time consuming due to the verbosity and sheer size of log information.
Command line tools such as grep, tail, more, and less are often used in this kind of
analysis. These are inadequate, particularly for Java based systems, for several reasons:
•
•
•
•
Log messages can be on more than one line (eg Java stack traces).
Some log messages are longer than 80 characters.
Log messages cannot be filtered according to their severity.
Searches are limited to plain text as opposed to log record types and attributes.
Given these shortcomings of the current log analysis tools, a specification for an ideal tool can
be defined.
10.4.2
Analysis tool specification
The aim is to provide a graphical based tool to analyse log file data using searching, filtering and
masking techniques. The power of this tool is drawn from the fact that LogRecord data types
can be searched, rather than just plain text.
i
The path of the messages log file varies between differnts distrubutions
84
An implementation based on the java.util.logging framework is capable of achieving this.
Searches could be performed on LogRecord objects using sophisticated implementations of the
Filter interface.
Although the Chainsaw (http://logui.sourceforge.net/) project adopts similar concepts using the
log4ji framework, there is a potentially significant market for such a tool.
i
http://jakarta.apache.org/log4j/
85
Bibliography
[ 1 ] Delta Tau Website. http://www.deltatau.com/
[ 2 ] CAN in Automation workgroup. http://www.can-cia.de
[ 3 ] PCI Watchdog Website. http://www.pciwatchdog.com
[ 4 ] Celestial Coordinate Systems. http://library.thinkquest.org/29033/begin/coordinate.htm
[ 5 ] Times. http://library.thinkquest.org/29033/begin/time.htm.
[ 6 ] Markus Kuhn, Paul Eggert. What are all those different kinds of time?
http://www.faqs.org/faqs/astronomy/faq/part3/section-4.html
[ 7 ] Rick Fisher. Earth Rotation and Equatorial Coordinates.
http://www.gb.nrao.edu/~rfisher/Ephemerides/earth_rot.html
[ 8 ] New Scientist. Explosion Spotter. http://www.newscientist.com/news/news.jsp?id=ns999952. 6
October 2000.
[ 9 ] Scientific American. Mega Burst. http://www.sciam.com/article.cfm?articleID=00004DE34EDA-1C75-9B81809EC588EF21. 5 April, 1999.
[ 10 ] Gamma Ray Coordinate Network Website. http://gcn.gsfc.nasa.gov
[ 11 ] IRAF Project Homepage. http://iraf.noao.edu/iraf-homepage.html
[ 12 ] Jeremy Bailey, Richard Prestage. The portable telescope control system project.
[ 13 ] Jeremy Bailey. Portable Telescope Control System – Telescope Hardware Interface
Specification. 18 July 1997.
[ 14 ] DRAMA Homepage. http://www.aao.gov.au/drama/html/dramaintro.html
[ 15 ] M. Tan, A. Bridger, G. Wright, A. Adamson, M. Currie, F. Economou. Graphical User Interface
for and Observing Control System for the UK Ifrared Telescope.
http://www.adass.org/adass/proceedings/adass99/P1-24/
[ 16 ] Eduardo Augusto Bezerra. Selecting a Hardware Description Language for the Design of an
On-Board Scientific Instrument Processing Module. 2002.
[ 17 ] Troy Ames, Lisa Koons, Ken Sall, Craig Warsaw. Using XML and Java for Astronomical
Instrument Control. June 19, 2000.
[ 18 ] RFC1157 SNMP Standard
[ 19 ] SNMPLink.org Website. http://www.snmplink.org
[ 20 ] Westhawk SNMP Stack. http://www.westhawk.co.uk/resources/snmp/index.html
[ 21 ] OpenNMS. http://www.opennms.org
[ 22 ] Network Management AgentAPI. http://nms.estig.ipb.pt/
[ 23 ] Jawa Open Eyes. http://jopeneyes.sourceforge.net/
[ 24 ] AdventNet SNMP Java API. http://www.adventnet.com/products/snmp/index.html
[ 25 ] APC Masterswitch Power Distribution Unit User Guide.
[ 26 ] APC Masterswitch Installation and Quick Start Manual.
[ 27 ] APC PowerNet SNMP Management Information Base (MIB) Guide v3.1.0
[ 28 ] APC PowerNet MIB
[ 29 ] Per Cederqvist et al. Version Management with CVS.
http://www.cvshome.org/docs/manual.
[ 30 ] Ant documentation. http://jakarta.apache.org/ant.
[ 31 ] Project JXTA Website. http://www.jxta.org
[ 32 ] ROTSE Project Website. http://www.rotse.net
[ 33 ] Merlin Hughes. Deep Space Hubble Does Applets.
http://java.sun.com/features/1997/july/hubble.html. July 1997.
[ 34 ] Java Look and Feel Resource. http://www.javootoo.com
[ 35 ] Skin Look and Feel. http://www.l2fprod.com
[ 36 ] Digit Mania Website. http://www.digitmania.holowww.com/
[ 37 ] CSIRO ATNF SKA Website. http://www.atnf.csiro.au/projects/ska/
[ 38 ] SEARFE Project Website. http://www.searfe.atnf.csiro.au
87
[ 39 ] AOR. AR – 3000A Professional Monitor Receiver Instruction Manual.
[ 40 ] Java Communications API Website. http://java.sun.com/products/javacomm/
[ 41 ] VisAD Website. http://www.ssec.wisc.edu/~billh/visad.html
[ 42 ] A Guide to Australia – Australian Towns/Cities Latitude and Longitude
http://life.csu.edu.au/geo/findlatlong.html
[ 43 ] Erich Gamma, Richard Helm, Ralph Johnson, John Vlissides. Design Patterns.
[ 44 ] John Zukowski. Deploying Software with JNLP and Java Web Start – Going Beyond the Java
Plug-in. http://developer.java.sun.com. August 2002.
[ 45 ] Sun Microsystems. Java Web Start Developers Guide – Version 1.0.1. http://java.sun.com.
[ 46 ] Sun Microsystems. Java Web Start. http://java.sun.com/products/javawebstart
[ 47 ] Rene W. Schmidt, Sun Microsystems. Java Network Launch Protocol & API Specification
(JSR-56) – Version 1.0.1.
[ 48 ] Raghavan N. Srinivas. Java Web Start to the Rescue.
http://www.javaworld.com/javaworld/jw-07-2001/jw-0706-webstart_p.html
[ 49 ] Vamp HQ, JNLP Tag Reference. http://www.vamphq.com/jnlpref.html
[ 50 ] Steven Kim. Developing and distributing Java applications for the client side.
http://www.ibm.com/developerworks. September 2001
[ 51 ] Joshua Bloch. Effective Java Programming Language Guide. Addison-Wesley, 2001
[ 52 ] Keith Bannister. Multi-User, Interactive Control of the Automated Patrol Telescope Over the
Internet. October 2001
[ 53 ] Keith Bannister. APT Software Website. http://mcba5.phys.unsw.edu.au/~keith.
[ 54 ] Keith Bannister. JAS API Documentation.
[ 55 ] Kathy Law. Thesis. 2001.
88
A. Glossary
AAO
APT
CAN
CCD
CVS
Dec
DRAMA
GCN
GRB
J2SE
JAS
JDK
JNLP
JSDT
JXTA
LDAP
LST
MACRO
MIB
MIB
MJD
NMS
NTPD
OID
PDU
PMAC
PTCS
RA
RMI
ROTSE
SDK
SEARFE
SKA
SNMP
SOAP
TAI
THI
UDP
UPS
UTC
Vignetted
Anglo Australian Observatory
Automated Patrol Telescope
Controller Area Network
Charge Coupled Device - Camera
Concurrent Versions System
-Declination "Latitude +=90"
Inter-process Communication mechanism developed by the AAO
Gamma-Ray Co-ordinate Network
Gamma Ray Burst
Java 2 Standard Edition Platform
Java Automation System
Java Development Kit
Java Network Launch Protocol
Java Shared Data Toolkit
Project Juxtapose – Sun Microsystems Peer to Peer Architecture
Lightweight Directory Access Protocol
Local Sidereal Time
Motion And Control Ring Optical - Delta Tau
Management Interface Board (APC Masterswitch)
Management Information Base (SNMP)
Modified Julian Date
Network Management Station
Network Time Protocol
Object Identifier
Protocol Data Unit
Programmable Multi-Axis Controller
Portable Telescope Control System - Jeremy Bailey AAO
Right Ascension = Longitude - measured in hours,minutes,seconds.000
Remote Method Invocation
Robotic Optical Transient Search Experiment
Software Development Kit
Students Exploring Australia’s Radio-Frequency Environment
Square Kilometre Array
Simple Network Management Protocol
Simple Object Access Protocol
International Atomic Time
Telescope Hardware Interface
User Datagram Packet
Uninterruptible Power Supply
Coordinated Universal Time
The viewing are is obscured in some way by an object in the foreground.
89
B. JAS programming techniques
B.1.
Introduction
This appendix is intended to be a simple programming guide for interacting with the APT using
the JAS. It is intended to be used as a reference for code patterns and techniques when adding
or modifying the APT-JAS application.
B.2.
JAS message sender
Many of the subsystems at the APT are responsible for sending telemetry information to clients.
The JASChannel object supports two methods for sending JASMessages:
•
•
JASChannel.sendToAll( JASMessage msg )
JASChannel.sendToClient( JASMessage msg, String client )
A JASMessage object can be extended to allow any Java objecti to be distributed to JASClients.
In the case of the APT, JASMessages used for telemetry information are a collection of
<key>/<value> paired data, stored in a Java Map object, sent to clients as a JASStatusMessage.
The PTCS_CHANNEL_3SEC JASChannel sends a PTCSStatusMessage, which is actually a
subclass of JASStatusMessage, every three seconds. Note that a JASStatusMessage alone is
sufficient for this purpose. The PTCSStatusMessage is intended to provide more efficient
customised serialisation.
B.3.
BoundComponent framework
JASClients receiving JASMessages are typically designed to display this information in a GUI of
some sort. The BoundComponent framework developed by Keith Bannister in [ 52 ], was
designed to simplify this process.
BoundComponents were designed to be used with JASStatusMessages. When a
JASStatusMessage arrives on a channel, the JASStatusMessageManager updates the values of
all the GUI components registered to it. Each GUI component is Bound to a specific key within
the Map of data stored by the JASStatutsMessage.
The BoundComponent framework has been extended to support a richer set of GUI components.
JASChatMessageManager and JASLogMessageManagers have been introduced to handle
JASChatMessages and JASLogMessages and function in a similar fashion to the
JASStatusMessageManager.
B.4.
i
Creating JAS commands
All objectcs contained by in JASMessage must be serializable
91
The core of the JAS system revolves around its ability to execute commands. To add a command
to the APT system is a relatively simple process. Several JASChannels are designed to receive
Commands.
B.4.1.
JASCommand object
public class MyCommand extends APTCommand {
// Command parameters as private variables
private int someData;
private transient Logger logger = Logger.getLogger( getClass().getName() );
public Object execute(Process parent) {
// Execute something...
...
}
public String getDescription() {
return "Do Something with someData";
}
...
public String getName() { return getClass().getName(); }
public String toString() { return "DO SOMETHING CMD";}
}
Figure B-1 JASCommand object
B.4.2.
Installing commands
Once the command objects have been created, they must be added to the appropriate
command set, as shown in the code below.
static final Class[] sysCmds = {
RoofStatusBroadcaster.class,
SendAPTPropsCommand.class
};
static final Class[] genCmds = {
ImageListCommand.class,
ImageRetrieveCommand.class
};
static final Class[] privCmds = {
APTSetPropertyCommand.class,
ImageExposeCommand.class,
LightsCommand.class,
ParkForRoofMovement.class,
ParkTwilightFlat.class,
ParkZenith.class,
ParkZeroHour.class,
PtcsMoveOffsetCommand.class,
PtcsMovePOffset.class,
PtcsSetBaseCommand.class,
PtcsSetOffsetCommand.class,
PtcsSetPOffset.class,
PtcsSlewCommand.class,
PtcsSetSystemCommand.class,
RoofCommand.class,
RoofRefresh.class,
92
LogCommand.class,
MasterswitchSwitchOutletCommand.class,
MasterswitchRenameOutletCommand.class
};
Figure B-2 APT command sets
B.5.
JAS channel monitoring
In many cases, it is useful to be able to determine, when a client joins or leaves a JAS Channel.
For example, when the Roof softwarei detects that a new client has joined Channels.ROOF all
the roof telemetry is sent to that client. From this point onward, roof information is only sent when
it has been requestedii, or when it changes.
/* Procedure for discovering when new clients have been added to a
* JASChannel
*/
...
jasChannnel.getChannel().addChannelListener( new ChannelWatcher() );
...
// Extend the JSDT ChannelAdaptor
private class ChannelMonitor extends ChannelAdaptor {
public void channelConsumerAdded(ChannelEvent event) {
// Extend the JSDT ChannelAdaptor
}
public void channelConsumerRemoved(ChannelEvent event) {
// Extend the JSDT ChannelAdaptor
}
}
Figure B-3 Implementing a ChannelMonitor
This implementation highlights one of the flaws in the JAS, its dependence on the JSDT. The
jasChannnel.getChannel() method returns a JSDT Channel object. Consequently, the
ChannelAdaptor and ChannelListener classes are also JSDT objects.
i
ii
apt.modules.roof
Using apt.jas.BroadcastRoofCommand
93
C. Software tools
C.1.
CVS - Windows
Instructions for accessing the APT CVS repository on Linux based machines is available from Keith
Bannister’s APT Software page [ 53 ]. These instructions are included to simplify the installation
and configuration of CVS and SSH on Windows.
Note that these instructions below will not work for the cvsanon user.
C.1.1.
Install SSH
An
excellent
ssh
implementation
for
windows
can
be
downloaded
from
http://www.networksimplicity.com/openssh/. Simply extract the openssh34-3.zip file and run
setup.exe. Accepting the default installation options is recommended.
Place the C:\Program Files\NetworkSimplicity\ssh in the PATH by doing either:
• C:\set PATH= C:\Program Files\NetworkSimplicity\ssh;%PATH%
or
• Right click My Computer -> Properties and from the Advanced tab select
Environment Variables.
Create your private and public keys:
C:\ssh-keygen –t dsa
Accept the default settings, do not enter a pass phrase for your key. This will hinder automated
logins.
Now, setup automatic authentication. Ensure that a .ssh directory exists on the remote host.
This will automatically be created whenever you first ssh to another host.
Copy your public key to the remote host:
scp "C:\Program Files\NetworkSimplicity\ssh\.ssh\id_dsa.pub"
user@remotemachine:/~/.ssh/mypublickey
From the remote host, add your public key to the list of authorized keys:
[user@remotehost:~]cat ~/.ssh/mypublickey >> ~/.ssh/authorized_keys2
Now, you should be able to ssh to remotehost without entering a password. If there is a
problem, ensure that the authorized_keys2 file does not have a corrupt entry.
C.1.2.
Install CVS
CVS can be downloaded from http://www.cvshome.org. Simply download the latest stable
build. This guide was prepared using cvs-1-11-2.zip. This zip file contains one file, cvs.exe,
which must be placed in you PATH. This can be done in the same fashion as shown above.
All that remains is to set the CVS_RSH environment variable. This should be set to the path of the
ssh.exe file.
95
set CVS_RSH=C:\Program Files\NetworkSimplicity\ssh\ssh.exe
C.1.3.
Checkout the code
Create a cvs-workspace directory on your local machine.
C:\mkdir cvs-workspace
cd cvs-workspace
Now, checkout the modules.
cvs –d :ext:[email protected]:/home/cvsroot checkout apt
Note that the –d :ext:[email protected]:/home/cvsroot string can be
omitted if CVSROOT=:ext:[email protected]:/home/cvsroot.
C.1.4.
CVS user interfaces
Several CVS GUI tools are available free on the Internet.
•
http://www.tortoisecvs.org is one of the more popular as it integrates directly into
Windows explorer.
•
http://www.wincvs.org is also an excellent resource for help configuring cvs on
Windows.
96
D. SNMP overview
D.1.
Architecture
The Simple Network Management Protocol (SNMP), is a standard designed to allow the remote
management of devices across a network. This standard, defined in [ 18 ], facilitates
communication between an SNMP Agent (managed device), and a Network Management
Station (NMS).
Device management is achieved by a simple system of getting and setting of attributes on the
remote device. Attributes, or Object Identifiers are defined in the agent’s Management
Information Base (MIB), a repository containing definitions of all the OID’s within an agent.
Objects within an agent belong to a particular SNMP Communityi . The community name, known
only to the system administrator, is used to authenticate messages.
Communication is achieved via SNMP Messages, as shown in Figure D-2. Sent as UDP packets,
they contain three pieces of information:
1. SNMP version number. Included to guarantee the correct dissection of packets in an
environment where multiple SNMP agents, supporting different versions, exist.
2. Community name.
3. One or more Protocol Data Units (PDU’s). A PDU typically contains a list of OID’s and their
corresponding values.
SNMP Version
Community
PDU
PDU
PDU’s
Figure D-1 SNMP
message
There are three kinds of SNMP messages:
•
•
i
Request
o GET, Read information from the SNMP Agent corresponding to an attribute of the
managed device.
o
GET NEXT, Do a get on the next attribute in the tree. This is used to traverse each
OID within the SNMP agent, otherwise known as an SNMP-walk.
o
SET, Set the value of an attribute of a managed device.
Response
Typically, all objects within an agent will belong to the same community,
97
o
•
Trap
o
Each of the Request messages will immediately generate a response message.
Agents can asynchronously send Traps (similar to interrupts) to notify the NMS of
some event which occurred on the managed device.
NMS
Send
Requests
Receive
Response
Agent
Request
Request
Response
Response
MIB
Network
T ra p
T ra p
Trap
Daemon
Events
Figure D-2 SNMP architecture
98
E. Astronomy primer
E.1.
Celestial coordinate systems
Several Celestial Coordinate Systems are used by astronomers to record the positions of objects
in the sky. Some material in this section is an abridgement of the content in [ 4 ].
Both the Equatorial and Horizon coordinate systems are very similar to the well known Terrestrial
coordinate system which uses longitude and latitude to specify a position on the earth. In order
to understand how these coordinate systems work, the concept of the celestial sphere must be
introduced.
E.1.1.
Celestial sphere
The celestial sphere is a very large imaginary sphere which surrounds the earth. Like the earth, is
has a north and south pole, and an equator. The Ecliptic is a circle on the plane of the earth’s
orbit. See Figure E-1.
A line constructed from the centre of the earth, through an observer on the surface will intersect
the celestial sphere at a point called the Zenith. I.e. pointing at the Zenith is always looking
straight up.
Figure E-1 Celestial sphere, sourced from [ 4 ].
E.1.2.
The equatorial coordinate system
The Equatorial Coordinate System uses the hour lines and the celestial equator to specify the
position of objects in the sky.
99
Figure E-2 Equatorial coordinates, sourced
from [ 4 ].
Right Ascension is analogous to the longitude of the earth. It is essentially the angle formed from
the vernal equinox, eastwards along the celestial equator, to the hour circle corresponding to
the position of the object you wish to describe, as shown in Figure E-2. Right ascension is
measured in hours, minutes and secondsi.
Declination on the celestial sphere is analogous to latitude on the earth. That is, declination
measures the angular distance either above or below the celestial equator (Figure E-2). It is
measured in degrees, minutes, and seconds from +90 to -90 degrees. Such that 0 degrees
specifies objects on the celestial equator, +90º indicates that an object is on the north celestial
pole, and -90º on the south celestial pole
E.1.3.
Coordinate epochs
The introduction of the celestial sphere provided a reference point for equatorial (and other
astronomical coordinates).
Coordinates are based on the position of the earths axis and equator at specific times, or
epochs. January 1, 1950 and 2000ii are the most common. Since the earths orientation is
constantly changing with respect to the stars, these positions are tied to the coordinates of
observed objects. Thus, the B1950 coordinate grid location is defined by the published positions
of stars in the fourth Fundamental-Katalog, FK4, and the J2000 system is based on FK5 [ 7 ].
The J2000 system, currently in use by the APT, can provide an accuracy of approx 0.0005 arc
seconds based on a reference set of about 400 celestial objects.
i
ii
From 0 to 24 hours.
Julian date 2451545.0
100
E.2.
E.2.1.
Astronomical times
Universal time
Universal time (UT) is the precise measurement of time used as the basis for civil time keeping [ 5
]. By definition, it is the solar time at the Greenwich meridian, also know as Greenwich Mean Time
(GMT)i. Such that the sun passes directly over the Greenwich meridian at noon, UT.
Universal time is calculated in several ways:
•
•
•
•
E.2.2.
UT0 is the universal time calculated from astronomical observations.
UT1 is UT0 adjusted to compensate for long term, uniform errors in the earths rotation
(known as the Chandler Wobble).
UT2 is UT1 adjusted to compensate for annual and semi-annual changes in the earths
rotation rate.
UTC, Coordinated Universal Time is calculated from TAI. UTC is identical to TAI except for
the addition of leap seconds which are added to keep UTC accurate to within 0.9
seconds of UT1. Astronomers will typically quote UTC when recording observation data.
Atomic time
International Atomic Time (Temps Atomique International – TAI) is a time scale based on the SI
unit for a second, defined as the duration of 9,192,631,770 cycles of radiation corresponding to
the transition between two hyperfine levels of the ground state of caesium 133. TAI is a fixed
scale and consequently does not compensate for irregularities in the earths rotation. It is
maintained by approximately 200 atomic clocks worldwide.
E.2.3.
Sidereal time
Sidereal time is used with the equatorial coordinate system. If a certain hour circle is on the
celestial meridian, one sidereal hour later the next hour circle will be on the celestial meridian.
The celestial sphere completes one rotation in relation to the earth every sidereal day [ 5 ]. Thus,
Local Sidereal Time (LST) is defined as the Right Ascension of the local meridian, or hour circle, as
shown in Figure E-1.
E.2.4.
Ephemeris time
Ephemeris Time (ET) was introduced in 1960 by astronomers to account for errors caused by
variations in the earths rotationi. ET is currently one minute ahead of UT and gradually diverging.
i
Now obseleted by UTC
101
E.2.5.
Dynamical time
Dynamical Time, introduced in 1984 as a replacement for ephemeris time, more accurately
defines a uniform astronomical time scale.
Terrestrial Dynamical Time (TDT) is a time scale tied to the earth, whereas Barycentric Dynamical
Time (TDB) is used as a time reference for the barycentreii of the solar system. When the
difference of these two values (less than a few milliseconds) is considered negligible, TDT is simply
referred to as TT. In most cases, TDT is considered to be equal to TAI plus 32.184 seconds.
E.2.6.
Julian dates
The Julian Day Number (JDN) is a count of days elapsed since Greenwich mean noon on 1
January 4713 B.C., Julian proleptic calendar. The Julian Date (JD) is the Julian day number
followed by the fraction of the day elapsed since the preceding noon.
The Modified Julian Date (MJD) is calculated as MJD = JD - 2400000.5. The 0.5 is included so that
midnight, rather than noon, defines the change over point from one day to the next. MJD 0
started at 0000h GMT on Wednesday 17 Nov 1858 AD.
E.3.
Gamma ray bursts
Gamma Ray Bursts (GRB’s) are spectacular explosions of energy originating from distant galaxies.
Lasting from 10 milliseconds to more than 15 minutes, these explosions release as much energy in
10 seconds, as a billion of our Suns. Despite the fact that GRB’s occur quite frequently,
approximately daily, very little is known of their nature or origin.
They were first discovered accidentally in the late 1960’s by a team of American scientistsiii
commissioned by the military to monitor Soviet nuclear activity. Since then scientists have had
difficulty studying them due to their short life span. The Gamma Ray Coordinate Network (GCN)
was established to process incoming GRB data from satellites and coordinate observing.
The GCN is connected to a large network of satellites and spacecraft capable of detecting
GRB’s. When a GRB is detected, its RA and Dec is calculated and then broadcast to GCN
subscribers within seconds, allowing remote observatories to obtain data while the GRB is still
active.
The APT is ideal for observing the GRB’s due to its wide field of view and fully automated
operation.
E.4.
Astronomical filters
Astronomical filters are special types of tinted lenses placed in front of the CCD to enhance the
images acquired. Each filter only allows light from a limited range of wavelengths to pass
through it. Astronomers exploit this behaviour to mask out specific parts of the spectrum, thus
enhancing the image.
These errors were first discovered in the 1930’s
Centre of mass, similar to centre of gravity
iii led by Ray Klebesadel
i
ii
102
The APT has the following filters available:
•
•
•
•
•
•
E.5.
Ultraviolet (R)
Blue (B)
Visible (V)
Visible Red (VR)
Infrared (I)
Clear
Flat fielding
Flat Fielding refers to the process of calibrating the CCD to account for irregularities in the optics
and errors within the CCD itself. A reference image is taken when the CCD is expected to return
an image of constant intensity, such as the twilight sky. Any flaws in this reference image can be
used to correct images obtained in the future.
This is not to be confused with the focal plane within the Telescope, which has been flattened
using a field-flattening lens. Originally, images were obtained from the APT using photographic
film which was placed in a spherical shaped collection area within the telescope. Because the
CCD cannot be placed on a curved surface, the optics were modified with the addition of a
lens to make the telescope focal plane flat out to a diameter of 5 degrees.
E.6.
Cosmic rays
Cosmic Rays or Cosmic Radiation, in simple terms, refers to energised particles travelling in all
directions throughout the universe. Very little is known of there origin. Optical astronomers are
concerned with cosmic rays as they can affect images obtained with the CCD. If a cosmic ray
strikes the CCD, the resulting image will falsely appear to show a bright star
To counteract this phenomenon, astronomers will typically take three images in succession, and
compare the results to identify any spurious data caused by cosmic rays.
103
F. Selected code listings
F.1.
F.1.1.
Masterswitch module
Masterswitch.java
/**
* $Id: Masterswitch.java,v 1.4 2002/10/22 08:23:11 oliverm Exp $
* Author: Oliver Mather
*
*/
package apt.masterswitch;
import java.util.Date;
/**
* Description:
*
* <p>
* This is an interface to the APC AP9212 Masterswitch
* <a href="http://www.apc.com">www.apc.com</a>
* <p>
* It is a device that supplies 8 x 240V Power Outlets. These outlets can be
* powered on and off remotely. Controlling these outlets is the main purpose
* of the Masterswitch.java interface
*
* <p>
*
* @author $Author: oliverm $ <a href="mailto:[email protected]">Oliver Mather</a>
* @version $Revision: 1.4 $
* @see apt.masterswitch.MasterswitchListener
*
*/
public interface Masterswitch {
/**
* <p>
* Getting this state from an outlet means that the outlet is currenly On
* Setting an outlet to this state will switch the outlet On.
*/
public static final String OUTLET_ON = "On";
/**
* <p>
* Getting this state from an outlet means that the outlet is currenly Off
* Setting an outlet to this state will switch the outlet Off.
*/
public static final String OUTLET_OFF = "Off";
/**
* <p>
* Setting an outlet this state will Reboot the outlet.
*/
public static final String OUTLET_REBOOT = "Reboot";
/**
* This state can only be retrieved. It cannot be set.
* <p>
* An outlet will return this state when the apt.masterswitch.masterswitch cannot determine
its state.
* <p>
* If this state is returned by any outlet, all devices powered by the Masterswitch
* should be shut down. The Masterswitch's power should then be cycled
* to clear this condition.
*/
public static final String OUTLET_UNKNOWN = "Unknown";
/**
* <p>
* Setting an outlet to this state will turn the outlet on
* after the sPDUOutletPowerOnTime OID has elapsed. This option is not
105
* valid for MasterSwitch firmware version 1.X.
*/
public static final String OUTLET_ON_WITH_DELAY = "On with delay";
/**
* <p>
* Setting an outlet to this state will turn the outlet off
* after the sPDUOutletPowerOffTime OID has elapsed. This option is not
* valid for MasterSwitch firmware version 1.X.
*/
public static final String OUTLET_OFF_WITH_DELAY = "Off with delay";
/**
* <p>
* Setting an outlet to this state will turn the outlet off
* after the sPDUOutletPowerOffTime OID has elapsed, wait the
* sPDUOutletRebootDuration OID time, then turn the outlet back on.
* This option is not valid for MasterSwitch firmware version 1.X.
*/
public static final String OUTLET_REBOOT_WITH_DELAY = "Reboot with delay";
/**
* <p>
* An array of all the OUTLET_xxxx states. This can be used by GUI's to
* populate menus.
*/
public static final String[] ALL_STATES = {
OUTLET_ON,
OUTLET_OFF,
OUTLET_REBOOT,
OUTLET_UNKNOWN,
OUTLET_ON_WITH_DELAY,
OUTLET_OFF_WITH_DELAY,
OUTLET_REBOOT_WITH_DELAY
};
/**
* The number of outlets.
* <p>
* Note that outlets are referenced from 1 to NUM_OUTLETS
*/
public final int NUM_OUTLETS = 8;
/**
* This call will Block until either it returns successfully, or an error occurs
* <p>
* @throws apt.masterswitch.MasterswitchException
* @param outlet The Masterswitch outlet. This is a number between 1 and 8
* @return The String label corresponding to the outlet. Up to 20 Chars
*/
public String getOutletName(int outlet) throws MasterswitchException;
/**
* This call will Block until either it returns successfully, or an error occurs
* <p>
* @throws apt.masterswitch.MasterswitchException
* @param outlet The Masterswitch outlet. This is a number between 1 and 8
* @return The String value corresponding to the outlets state. These values are defined in Masterswitch
* @exception MasterswitchException
*/
public String getOutletState(int outlet) throws MasterswitchException;
/**
* Set the outlets name
* <p>
* This call will Block until either it returns successfully, or an error occurs
* <p>
* @throws apt.masterswitch.MasterswitchException
* @param outlet The Masterswitch outlet. This is a number between 1 and 8
* @param newName The new name for the specified outlet. Maximum of 20 chars
* @return The String label corresponding to the outlet.
* @exception MasterswitchException
*/
public String setOutletName(int outlet, String newName)
throws MasterswitchException;
/**
* This call will Block until either it returns successfully, or an error occurs
* <p>
* @throws apt.masterswitch.MasterswitchException
106
* @param outlet The Masterswitch outlet. This is a number between 1 and 8
* @return The String value corresponding to the outlets state. These values are defined in Masterswitch
* @exception MasterswitchException
*/
public String setOutletState(int outlet, String outletState) throws MasterswitchException;
/**
* The hardware revision of the PDU (Power Distribution Unit). This value
* is set at the factory.
* <p>
* @throws apt.masterswitch.MasterswitchException
*/
public String getHardwareRevision() throws MasterswitchException;
/**
* An 8 byte ID string identifying the PDU firmware revision.
* <p>
* @throws apt.masterswitch.MasterswitchException
*/
public String getFirmwareRevision() throws MasterswitchException;
/**
* The date when the PDU was manufactured in mm/dd/yy format.
* This value is set at the factory. The year 2000 will be
* represented by 00.
* <p>
* @throws apt.masterswitch.MasterswitchException
*/
public String getDateOfManufacture() throws MasterswitchException;
/**
* A 10-character string identifying the model number of
* the PDU internal. This value is set at the factory.
* <p>
* @throws apt.masterswitch.MasterswitchException
*/
public String getModelNumber() throws MasterswitchException;
/**
* A 12-character string identifying the serial number of
* the PDU internal microprocessor. This value is set at
* the factory.
* <p>
* @throws apt.masterswitch.MasterswitchException
*/
public String getSerialNumber() throws MasterswitchException;
/**
* Register the {@link apt.masterswitch.MasterswitchListener} object so
* that it receives events.
* <p>
* @param listener
The object to receive events
* @see apt.masterswitch.MasterswitchListener
*/
public void addMasterswitchListener( MasterswitchListener listener);
/**
* Remove the {@link apt.masterswitch.MasterswitchListener} so that it no longer receives
* events
* <p>
* @param listener
The object to no longer receive events
* @see apt.masterswitch.MasterswitchListener
*/
public void removeMasterswitchListener( MasterswitchListener listener );
}
F.1.2.
AbstractMasterswitch.java
107
/**
* $Id: AbstractMasterswitch.java,v 1.2 2002/10/22 08:23:11 oliverm Exp $
* Author: Oliver Mather
*
*/
package apt.masterswitch;
import
import
import
import
import
import
java.util.ArrayList;
java.util.List;
java.util.Iterator;
java.util.Collections;
java.util.logging.Logger;
java.util.logging.Level;
/**
* Description:
* <p>
* This implements some of the common tasks required by
* full Masterswitch implementations. Such as MasterswitchListener
* event management code
* <p>
*
* @see apt.masterswitch.MasterswitchListener
* @author $Author: oliverm $ <a href="mailto:[email protected]">Oliver Mather</a>
* @version $Revision: 1.2 $
*
*
*/
public abstract class AbstractMasterswitch implements Masterswitch {
private List listeners;
private final Logger logger = Logger.getLogger( getClass().getName() );
public AbstractMasterswitch() {
logger.log(Level.INFO,"Initialising Masterswitch");
listeners = Collections.synchronizedList( new ArrayList(5) );
}
protected void checkOutlet(int outlet) throws IllegalArgumentException {
if( outlet < 1 || outlet > NUM_OUTLETS ) {
throw new IllegalArgumentException("Invalid outlet number: "+outlet);
}
}
protected void fireOutletStateChanged(int outlet, String newState) {
Iterator i = listeners.iterator();
while (i.hasNext()) {
MasterswitchListener listener = (MasterswitchListener) i.next();
listener.outletStateChanged(outlet,newState);
}
}
protected void fireOutletNameChanged(int outlet, String newName) {
Iterator i = listeners.iterator();
while (i.hasNext()) {
MasterswitchListener listener = (MasterswitchListener) i.next();
listener.outletStateChanged(outlet,newName);
}
}
protected void fireStateChanged() {
Iterator i = listeners.iterator();
while (i.hasNext()) {
MasterswitchListener listener = (MasterswitchListener) i.next();
listener.stateChanged();
}
}
public void addMasterswitchListener( MasterswitchListener listener) {
if( listener == null ) {
throw new NullPointerException("Cannot addMasterswitchListener(null)");
}
108
if( listener instanceof MasterswitchListener ) {
if( listeners.contains(listener) ) {
logger.log(Level.INFO, "Cannot add MasterswitchListener, it has already been added" );
} else {
listeners.add( listener );
}
} else {
logger.log(Level.WARNING, "Cannot add MasterswitchListener, it is not of the correct instance
type");
}
}
public void removeMasterswitchListener( MasterswitchListener listener ) {
listeners.remove(listener);
}
}
109
F.1.3.
MasterswitchListener.java
/**
* $Id: MasterswitchListener.java,v 1.2 2002/10/22 08:23:11 oliverm Exp $
* Author: Oliver Mather
*
*/
package apt.masterswitch;
/**
* Description:
* <p>
* The listener interface for receiving Masterswitch Events.
* <p>
* @author $Author: oliverm $ <a href="mailto:[email protected]">Oliver Mather</a>
* @version $Revision: 1.2 $
* @see apt.masterswitch.Masterswitch
*
*/
public interface MasterswitchListener {
/**
* The outlet has changed to newState
* <p>
* @param outlet
The outlet number from 1 to {@link apt.masterswitch.Masterswitch#NUM_OUTLETS
NUM_OUTLETS}
* @param newState
The new state of the specified outlet. This must be found in {@link
apt.masterswitch.Masterswitch#ALL_STATES ALL_STATES}
*/
public void outletStateChanged(int outlet, String newState);
/**
* The outlet has been renamed to newName
* <p>
* @param outlet
The outlet number from 1 to {@link apt.masterswitch.Masterswitch#NUM_OUTLETS
NUM_OUTLETS}
* @param newName
The new String label for the specified outlet
*/
public void outletNameChanged(int outlet, String newName);
/**
* Something has changed on the masterswitch, but we are not sure
* what. This event should typically be used to refresh the masterswitch
* status.
* <p>
*/
public void stateChanged();
}
110
F.1.4.
MasterswitchException.java
/**
* $Id: MasterswitchException.java,v 1.2 2002/10/22 08:23:11 oliverm Exp $
* Author: Oliver Mather
*
*/
package apt.masterswitch;
/**
* Description:
* <p>
* The exception object used to encapsulate any errors that can be
* encountered by the operation of the masterswitch.
* <p>
* Specific details of the error condition are contained in the message
* string and/or by a Throwable object.
* <p>
* @author $Author: oliverm $ <a href="mailto:[email protected]">Oliver Mather</a>
* @version $Revision: 1.2 $
*
*/
public class MasterswitchException extends Exception {
public MasterswitchException(String message) {
super(message);
}
public MasterswitchException(Throwable cause) {
super(cause);
}
public MasterswitchException(String message, Throwable cause) {
super(message, cause);
}
}
111
F.1.5.
SNMPMasterswitch.java
/**
* $Id: SNMPMasterswitch.java,v 1.6 2002/10/22 08:23:11 oliverm Exp $
* Author: Oliver Mather
*
*/
package apt.masterswitch.snmp;
import org.opennms.protocols.snmp.*;
import
import
import
import
import
import
import
java.util.*;
java.util.logging.Logger;
java.util.logging.Level;
java.net.InetAddress;
java.net.UnknownHostException;
java.net.SocketException;
java.io.FileNotFoundException;
import
import
import
import
import
import
pt.ipb.agentapi.mibs.MibModule;
pt.ipb.agentapi.mibs.MibException;
pt.ipb.agentapi.OID;
apt.masterswitch.AbstractMasterswitch;
apt.masterswitch.Masterswitch;
apt.masterswitch.MasterswitchException;
/**
* Description:
* <p>
* An implementation of {@link apt.masterswitch.Masterswitch} using the SNMP
* interface to the APC Masterswitch.
* <p>
* SNMP Transport is handled using the <a href="http://www.opennms.org">opennms joesnmp stack</a>
* <p>
* Control of the device is achived by sending SNMP Messages as Datagram Packets to the
* <i>Management Interface Board</i> built into the Masterswitch Device
* <p>
* Changes to status information on the masterswitch are detected by listening
* to events from a {@link apt.masterswitch.snmp.SnmpTrapDaemon}
*
*
* @author $Author: oliverm $ <a href="mailto:[email protected]">Oliver Mather</a>
* @version $Revision: 1.6 $
* @see apt.masterswitch.snmp.SnmpTrapListener
*/
public class SNMPMasterswitch extends AbstractMasterswitch implements SnmpHandler, SnmpTrapListener {
// These are the values needed to populate the snmp packets
private static final int SNMP_OUTLET_ON = 1;
private static final int SNMP_OUTLET_OFF = 2;
private static final int SNMP_OUTLET_REBOOT = 3;
private static final int SNMP_OUTLET_UNKNOWN = 4; // this value cannot be set. If it is read, the
apt.masterswitch.masterswitch must be power cycled.
private static final int SNMP_OUTLET_ON_WITH_DELAY = 5;
private static final int SNMP_OUTLET_OFF_WITH_DELAY = 6;
private static final int SNMP_OUTLET_REBOOT_WITH_DELAY = 7;
private static final String MASTERSWITCH_IP = "150.203.153.9";
private static final String SNMP_COMM_READ = "public";
private static final String SNMP_COMM_WRITE = "private";
private static final String MIB_FILENAME = "./config/snmp/POWERNET.MIB";
private static SNMPMasterswitch singletonInstance;
//sPDUOutletControlTable
private static final String sPDUOutletPending = "sPDUOutletPending";
private static final String sPDUOutletCtl
= "sPDUOutletCtl";
112
private static final String sPDUOutletCtlName = "sPDUOutletCtlName"; // This is similar to sPDUOutletName,
except only sPDUOutletName can be SET
// sPDUOutletConfig Table
private static final String
private static final String
private static final String
private static final String
sPDUOutletPowerOnTime
sPDUOutletName
sPDUOutletPowerOffTime
sPDUOutletRebootDuration
private
private
private
private
private
sPDUIdentHardwareRev
sPDUIdentFirmwareRev
sPDUIdentDateOfManufacture
sPDUIdentModelNumber
sPDUIdentSerialNumber
static
static
static
static
static
final
final
final
final
final
String
String
String
String
String
=
=
=
=
"sPDUOutletPowerOnTime";
"sPDUOutletName";
"sPDUOutletPowerOffTime";
"sPDUOutletRebootDuration";
=
=
=
=
=
"sPDUIdentHardwareRev";
"sPDUIdentFirmwareRev";
"sPDUIdentDateOfManufacture";
"sPDUIdentModelNumber";
"sPDUIdentSerialNumber";
private final Logger log = Logger.getLogger( getClass().getName() );
/**
* There is only one Masterswitch object allowed to be created in memory at
* any one time.
*
* @return The singleton instance of this device
*/
public synchronized static Masterswitch getInstance() throws MasterswitchException {
if( singletonInstance == null ) {
singletonInstance = new SNMPMasterswitch();
}
return singletonInstance;
}
private boolean loaded;
private boolean watcherRunning;
private java.util.Timer timer;
private SnmpSession session;
private MibModule mibModule;
private SnmpSyntax value;
private boolean waitingForResponse;
private SNMPMasterswitch() throws MasterswitchException {
loaded = false;
load();
}
private synchronized void load() throws MasterswitchException {
watcherRunning = false;
waitingForResponse = false;
InetAddress addr = null;
try {
addr = InetAddress.getByName(MASTERSWITCH_IP);
} catch (UnknownHostException e) {
log.log(Level.SEVERE, "The address \""+MASTERSWITCH_IP+"\" is unknown",e);
throw new MasterswitchException("Cannot initialise Masterswitch",e);
}
SnmpParameters params = new SnmpParameters(SNMP_COMM_READ, SNMP_COMM_WRITE);
params.setVersion(SnmpSMI.SNMPV1 );
try {
session = new SnmpSession( addr,params);
} catch (SocketException e) {
log.log(Level.SEVERE, "Cannot create SNMP session with Masterswitch",e);
throw new MasterswitchException("Cannot initialise Masterswitch",e);
}
session.setDefaultHandler(this);
// Load MIB file
try {
mibModule = MibModule.load( MIB_FILENAME );
} catch (MibException e) {
log.log(Level.WARNING, "Cannot load \""+MIB_FILENAME+"\", unexpected MibException ",e);
113
throw new MasterswitchException("Cannot initialise Masterswitch",e);
} catch (FileNotFoundException e) {
log.log(Level.WARNING, "Cannot load \""+MIB_FILENAME+"\", File not found ",e);
throw new MasterswitchException("Cannot initialise Masterswitch",e);
}
timer = new Timer(true);
// Initialise Trap Listener on port 162
log.log(Level.INFO, "Attempting to start SNMP Trap Daemon for event notification...");
// Java Snmp Trap Daemon
// SnmpTrapDaemon trapd = SnmpTrapDaemonImpl.getInstance();
SnmpTrapDaemon trapd = LinuxSnmpTrapDaemonImpl.instance;
trapd.addSnmpTrapListener(this);
trapd.start();
// If the trapd cannot be started it will fire a snmpTrapDaemonStopped()
// event. This SNMPMasterswitch will then use a polling technique for
// monitoring state changes on the masterswitch device.
// The apt.masterswitch.masterswitch object has successfully been loaded
loaded = true;
log.log(Level.INFO, "Masterswitch successfully loaded");
}
private boolean isLoaded() {
return loaded;
}
private synchronized void unload()
{
if( watcherRunning ) {
timer.cancel();
watcherRunning = false;
}
try {
session.close();
// Shutdown the Trap Listener on port 162, if its running
SnmpTrapDaemon trapd = SnmpTrapDaemonImpl.getInstance();
// remove listener before stopping because
// trapDStopped event will cause the SNMPMasterswitch to
// start polling the masterswitch..
trapd.removeSnmpTrapListener(this);
trapd.stop();
} catch (Exception e1) {
log.log(Level.WARNING, "Could not close the snmp session while unloading");
}
session = null;
mibModule = null;
value = null;
timer = null;
loaded = false;
log.log(Level.INFO, "Masterswitch successfully unloaded");
}
private SnmpSyntax doSNMPGet( String oid ) throws MasterswitchException {
SnmpVarBind[] vblist = { new SnmpVarBind(oid) };
SnmpPduRequest pdu = new SnmpPduRequest(SnmpPduPacket.GET, vblist);
log.log(Level.FINE, "SNMP Get OID = "+oid);
return doSNMP( pdu );
}
114
private SnmpSyntax doSNMPSet( String oid, SnmpSyntax data ) throws MasterswitchException
{
SnmpVarBind[] vblist = { new SnmpVarBind(oid,data) };
SnmpPduRequest pdu = new SnmpPduRequest(SnmpPduPacket.SET, vblist);
log.log(Level.FINE, "SNMP Set OID = "+oid+": " + data);
return doSNMP( pdu );
}
private SnmpSyntax doSNMP( SnmpPduRequest pdu )
throws MasterswitchException
{
pdu.setRequestId(SnmpPduPacket.nextSequence());
// get a lock on the session object,
// this ensures that another pdu cannot be sent until
// the previous one has been received.
synchronized(session) {
try {
waitingForResponse = true;
session.send(pdu);
while( waitingForResponse ) {
session.wait();
}
// This should be woken up by an SnmpHandlerMethod which has
// setup the "value" variable which contains the result of
// the SNMP request, Also the thread which received the response
// must waitingForResponse = false
} catch (Exception e ) {
e.printStackTrace();
}
}
if( value == null ) {
// There was an error
log.log(Level.INFO, "SNMP returned a Null value");
throw new MasterswitchException("An SNMP error prevented communication with the Masterswitch");
}
return value;
}
public synchronized String getOutletName(int outlet)
checkOutlet(outlet);
throws MasterswitchException {
String oid = mibModule.getNode(sPDUOutletName).getOID().toJavaValue() + "."+outlet;
String outletName = doSNMPGet(oid).toString();
return outletName;
}
public synchronized String getOutletState(int outlet) throws MasterswitchException {
checkOutlet(outlet);
String oid = mibModule.getNode(sPDUOutletCtl).getOID().toJavaValue() + "."+outlet;
SnmpInt32 outletState = (SnmpInt32)doSNMPGet(oid);
int outletSnmpState = outletState.getValue();
String outletStateStr = outletIntToOutletStr( outletSnmpState );
return outletStateStr;
}
/**
* This converts an outlet state as an integer constant defined in
* {@link apt.masterswitch.snmp.SNMPMasterswitch } to an equivalent
* String constant as defined
* in {@link apt.masterswitch.Masterswitch }
* <p>
* Note: String constants are used to make error messages more readable.
*/
private String outletIntToOutletStr(int outletInt ) {
if( outletInt == SNMP_OUTLET_ON ) {
return OUTLET_ON;
115
} else if(outletInt == SNMP_OUTLET_OFF ) {
return OUTLET_OFF;
} else if(outletInt == SNMP_OUTLET_REBOOT ) {
return OUTLET_REBOOT;
} else if(outletInt == SNMP_OUTLET_UNKNOWN ) {
return OUTLET_UNKNOWN;
} else if(outletInt == SNMP_OUTLET_ON_WITH_DELAY ) {
return OUTLET_ON_WITH_DELAY;
} else if(outletInt == SNMP_OUTLET_OFF_WITH_DELAY ) {
return OUTLET_OFF_WITH_DELAY;
} else if(outletInt == SNMP_OUTLET_REBOOT_WITH_DELAY ) {
return OUTLET_REBOOT_WITH_DELAY;
} else {
log.log(Level.WARNING, "Undefined outlet state: "+outletInt);
return "UNDEFINED";
}
}
public synchronized String setOutletName(int outlet, String newName)
checkOutlet(outlet);
if( newName == null ) {
throw new NullPointerException("Must specify a newName");
}
throws MasterswitchException {
String oid = mibModule.getNode(sPDUOutletName).getOID().toJavaValue() + "."+outlet;
log.log(Level.FINE, "OID = "+oid);
// Try to set the value
doSNMPSet(oid, new SnmpOctetString( newName.getBytes() ) );
// Get the value to check that the set was successful
// --> it will fail if another user is logged in
String returnVal = (doSNMPGet(oid )).toString();
if( ! returnVal.equals( newName) ) {
log.log(Level.WARNING, "Request ignored by apt.masterswitch.masterswitch. Another user is probably
logged in");
}
return returnVal;
}
public synchronized String setOutletState(int outlet, String outletState) throws MasterswitchException {
checkOutlet(outlet);
int snmpState;
if( outletState.equals( OUTLET_ON ) ) {
snmpState = SNMP_OUTLET_ON;
} else if( outletState.equals( OUTLET_OFF ) ){
snmpState = SNMP_OUTLET_OFF;
} else if( outletState.equals( OUTLET_REBOOT ) ){
snmpState = SNMP_OUTLET_REBOOT;
} else if( outletState.equals( OUTLET_UNKNOWN ) ) {
snmpState = SNMP_OUTLET_UNKNOWN;
} else if( outletState.equals( OUTLET_ON_WITH_DELAY ) ) {
snmpState = SNMP_OUTLET_ON_WITH_DELAY;
} else if( outletState.equals( OUTLET_OFF_WITH_DELAY ) ) {
snmpState = SNMP_OUTLET_OFF_WITH_DELAY;
} else if( outletState.equals( OUTLET_REBOOT_WITH_DELAY ) ) {
snmpState = SNMP_OUTLET_REBOOT_WITH_DELAY;
} else {
// The user has tried to set the outlet to an undefined state
throw new MasterswitchException("Cannot set outlet to state \""+outletState+"\", it is undefined");
}
String oid = mibModule.getNode(sPDUOutletCtl).getOID().toJavaValue() + "."+outlet;
log.log(Level.FINE, "OID = "+oid);
// Try to set the value
doSNMPSet(oid, new SnmpInt32(snmpState ));
// Get the value to check that it was set
SnmpInt32 returnedVal = (SnmpInt32)doSNMPGet(oid);
if( returnedVal.getValue() != snmpState ) {
116
log.log(Level.WARNING, "Request ignored by apt.masterswitch.masterswitch. Another user is probably
logged in");
}
String returnedState = outletIntToOutletStr(returnedVal.getValue());
return returnedState;
}
/**
* The hardware revision of the PDU (Power Distribution Unit). This value
* is set at the factory.
*/
public synchronized String getHardwareRevision() throws MasterswitchException{
String oid = mibModule.getNode(sPDUIdentHardwareRev).getOID().toJavaValue().toString();
String hardwareRev = doSNMPGet(oid).toString();
return hardwareRev;
}
/**
* An 8 byte ID string identifying the PDU firmware revision.
*/
public synchronized String getFirmwareRevision() throws MasterswitchException {
String oid = mibModule.getNode(sPDUIdentFirmwareRev).getOID().toJavaValue().toString();
String firmwareRev = doSNMPGet(oid).toString();
return firmwareRev;
}
/**
* The date when the PDU was manufactured in mm/dd/yy format.
* This value is set at the factory. The year 2000 will be
* represented by 00.
*/
public synchronized String getDateOfManufacture() throws MasterswitchException {
String oid = mibModule.getNode(sPDUIdentDateOfManufacture).getOID().toJavaValue().toString();
String dateOfMF = doSNMPGet(oid).toString();
return dateOfMF;
}
/**
* A 10-character string identifying the model number of
* the PDU internal. This value is set at the factory.
*/
public synchronized String getModelNumber() throws MasterswitchException {
String oid = mibModule.getNode(sPDUIdentModelNumber).getOID().toJavaValue().toString();
String modelNum = doSNMPGet(oid).toString();
return modelNum;
}
/**
* A 12-character string identifying the serial number of
* the PDU internal microprocessor. This value is set at
* the factory.
*/
public synchronized String getSerialNumber() throws MasterswitchException{
String oid = mibModule.getNode(sPDUIdentSerialNumber).getOID().toJavaValue().toString();
String serialNum = doSNMPGet(oid).toString();
return serialNum;
}
/**
*
*
*
*/
SnmpHandler interface
/**
* <P>This method is invoked when a pdu is successfully
* returned from the peer agent. The command argument
* is recovered from the received pdu.</P>
* <p>
* @param session The SNMP session
* @param command The PDU command
* @param pdu
The SNMP pdu
*
*/
public void snmpReceivedPdu(SnmpSession session,
117
int command,
SnmpPduPacket pdu) {
SnmpPduRequest req = null;
if(pdu instanceof SnmpPduRequest) {
req = (SnmpPduRequest)pdu;
//req.getErrorStatus()
}
if(pdu.getCommand() != SnmpPduPacket.RESPONSE) {
log.log( Level.WARNING, "Error: Received non-response command " +
pdu.getCommand());
value = null;
waitingForResponse = false;
synchronized(session) {
session.notifyAll();
}
return;
}
// Passed the checks so lets get the first varbind and
// print out it's value
SnmpVarBind vb = pdu.getVarBindAt(0);
//log.log(Level.FINE, mibModule.getNode( vb.getName().toString() )+":"+vb.getValue() );
log.log(Level.FINE, "Received "+":"+vb.getValue() );
value = vb.getValue();
waitingForResponse = false;
// Wake up the calling thread so it can return a value
synchronized(session) {
session.notifyAll();
}
}
/**
* <p>
* This method is invoked when an agent fails to respond
* in the required time. This method will only be invoked
* if the total retries exceed the number defined by the
* session.
* <p>
*
* @param session The SNMP Session
* @param pdu
The PDU object that timed out
*
*/
public void snmpTimeoutError(SnmpSession session, SnmpSyntax pdu) {
log.log(Level.WARNING, "The session timed out trying to communicate with the remote
host");
value = null;
waitingForResponse = false;
// Wake up the blocking request thread
synchronized(session) {
session.notifyAll();
}
}
/**
* <p>
* This method is invoked when an internal error occurs
* for the session. To determine the exact error the
* err parameter should be compared with all the error
* conditions defined in the SnmpSession class.
* </p>
*
* @param session The SNMP session in question
* @param err
The error that occured
* @param pdu
The PDU object that caused the error
*
*/
public void snmpInternalError(SnmpSession session,
int err,
SnmpSyntax pdu) {
118
log.log(Level.WARNING, "An unexpected error occured with the SNMP Session");
log.log(Level.WARNING, "The error code is " + err);
value = null;
waitingForResponse = false;
// Wake up the blocking thread
synchronized(session) {
session.notifyAll();
}
}
public void snmpTrapDaemonStarted() {
log.log(Level.INFO, "Listening to SNMP traps...");
if( watcherRunning ) {
timer.cancel();
watcherRunning = false;
}
}
public void snmpTrapDaemonStopped() {
log.log(Level.INFO, "Not listening to SNMP traps");
log.log(Level.INFO, "Periodically polling Masterswitch for event notification");
timer.scheduleAtFixedRate( new MasterswitchWatcher(), 3000,3000 );
watcherRunning = true;
}
public void snmpTrapReceived() {
/**
* This simple implementation just says 'something'
* changed whenever we receive a trap.
*
* It could be improved by analysing the trap to see
* exactly what happened and generate a more specific event
*/
fireStateChanged();
}
/**
*
* The run method of this class will be periodically
* called to notify masterswitchListeners if anything has changed.
*
*/
private class MasterswitchWatcher extends TimerTask {
private String[] outletNames;
private String[] outletStates;
public MasterswitchWatcher() {
outletNames = new String[8];
outletStates = new String[8];
// Populate the cached values
try {
for (int i = 0; i < outletNames.length; i++) {
outletNames[i] = getOutletName(i+1);
}
for (int i = 0; i < outletStates.length; i++) {
outletStates[i] = getOutletState(i+1);
}
} catch (MasterswitchException e) {
log.log(Level.WARNING, "Problem while checking if the Masterswitch has changed state",e);
}
}
public void run() {
log.log( Level.INFO, "Checking Masterswitch for changes...");
try {
for (int i = 0; i < outletNames.length; i++) {
String currName = getOutletName(i+1);
if( !outletNames[i].equals( currName ) ) {
outletNames[i] = currName;
119
System.out.println("fireOutletNameChanged("+((int)(i+1))+", "+currName+");");
fireOutletNameChanged(i+1, currName);
}
}
for (int i = 0; i < outletStates.length; i++) {
String currState = getOutletState(i+1);
if( !outletStates[i].equals( currState) ) {
outletStates[i] = currState;
System.out.println("fireOutletStateChanged("+((int)(i+1))+", "+currState+");");
fireOutletStateChanged(i+1, currState);
}
}
} catch (MasterswitchException e) {
log.log(Level.WARNING, "Problem while checking if the Masterswitch has changed state",e);
}
}
}
}
120
F.1.6.
SnmpTrapDaemon.java
/**
* $Id: SnmpTrapDaemon.java,v 1.3 2002/10/22 08:23:11 oliverm Exp $
* Author: Oliver Mather
*
*/
package apt.masterswitch.snmp;
/**
* Description:
* <p>
* This interface specifies the methods required for an
* SNMP TrapDaemon.
* <p> An SNMP Trap Daemon will listen on UDP port 162 for SNMP traps, generating
* an event to notify SnmpTrapListeners that an event has occurred.
* <p>
* This interfaces it used by {@link apt.masterswitch.snmp.SNMPMasterswitch } to
* detect state changes on the masterswitch device.
*
* @see apt.masterswitch.snmp.SnmpTrapListener
* @see apt.masterswitch.Masterswitch
* @author $Author: oliverm $ <a href="mailto:[email protected]">Oliver Mather</a>
* @version $Revision: 1.3 $
*
*/
public interface SnmpTrapDaemon {
/**
* Start listening to SNMP traps
*/
public void start();
/**
* Stop listening to SNMP Traps
*/
public void stop();
/**
* Register the {@link apt.masterswitch.snmp.SnmpTrapListener} object
* so that it receives events.
* <p>
* @param listener
The object to receive events
* @see apt.masterswitch.snmp.SnmpTrapListener
*/
public void addSnmpTrapListener(SnmpTrapListener listener);
/**
* Removes the {@link apt.masterswitch.snmp.SnmpTrapListener} object so it no longer
* receives events.
* <p>
* @param listener
The object to no longer receive events
* @see apt.masterswitch.snmp.SnmpTrapListener
*/
public void removeSnmpTrapListener(SnmpTrapListener listener);
}
121
F.1.7.
AbstractSnmpTrapDaemon.java
/**
* $Id: AbstractSnmpTrapDaemon.java,v 1.3 2002/10/22 08:23:11 oliverm Exp $
* Author: Oliver Mather
*
*/
package apt.masterswitch.snmp;
import
import
import
import
import
java.util.List;
java.util.ArrayList;
java.util.Iterator;
java.util.logging.Level;
java.util.logging.Logger;
/**
* Description:
* <p>
* This implements some of the common tasks required by
* full SnmpTrapDaemon implementations.
* <p>
* Specifically SnmpTrapListener event management code
* <p>
* @author $Author: oliverm $ <a href="mailto:[email protected]">Oliver Mather</a>
* @version $Revision: 1.3 $
*
*/
public abstract class AbstractSnmpTrapDaemon implements SnmpTrapDaemon {
private List listeners;
protected final Logger logger = Logger.getLogger( getClass().getName() );
public AbstractSnmpTrapDaemon() {
listeners = new ArrayList(5);
}
/**
* Register the {@link apt.masterswitch.snmp.SnmpTrapListener} object
* so that it receives events.
* <p>
* @param listener
The object to receive events
* @see apt.masterswitch.snmp.SnmpTrapListener
*/
public void addSnmpTrapListener(SnmpTrapListener listener) {
if( listener == null ) {
throw new NullPointerException("Cannot addSnmpTrapListener(null)");
}
if( listener instanceof SnmpTrapListener ) {
if( listeners.contains(listener) ) {
logger.log(Level.INFO, "Cannot add SnmpTrapListener, it has already been added" );
} else {
listeners.add( listener );
}
} else {
logger.log(Level.WARNING, "Cannot add SnmpTrapListener, it is not of the correct instance type");
}
}
/**
* Removes the {@link apt.masterswitch.snmp.SnmpTrapListener} object so it no longer
* receives events.
* <p>
* @param listener
The object to no longer receive events
* @see apt.masterswitch.snmp.SnmpTrapListener
*/
public void removeSnmpTrapListener(SnmpTrapListener listener) {
listeners.remove(listener); // if "listener" is not in the list
// the List collection will handle it
}
122
protected void fireSnmpTrapDaemonStarted() {
Iterator i = listeners.iterator();
while (i.hasNext()) {
SnmpTrapListener listener = (SnmpTrapListener) i.next();
listener.snmpTrapDaemonStarted();
}
}
protected void fireSnmpTrapDaemonStopped() {
Iterator i = listeners.iterator();
while (i.hasNext()) {
SnmpTrapListener listener = (SnmpTrapListener) i.next();
listener.snmpTrapDaemonStopped();
}
}
protected void fireSnmpTrapReceived() {
Iterator i = listeners.iterator();
while (i.hasNext()) {
SnmpTrapListener listener = (SnmpTrapListener) i.next();
listener.snmpTrapReceived();
}
}
}
123
F.1.8.
SnmpTrapDaemonImpl.java
/**
* $Id: SnmpTrapDaemonImpl.java,v 1.4 2002/10/22 08:23:11 oliverm Exp $
* Author: Oliver Mather
*
*/
package apt.masterswitch.snmp;
import org.opennms.protocols.snmp.*;
import
import
import
import
java.util.logging.Level;
java.util.logging.Logger;
java.net.InetAddress;
java.net.SocketException;
/**
* Description:
*
* <p>
* This is an implementation of the SnmpTrapListener interface
* primarily based on the org.opennms.protocols.snmp.SnmpTrapHandler
* interface
* <p>
* Using the tools from org.opennms.protocols.snmp, a thead is bound to
* UDP port 162 to listen for snmp traps.
* <p>
* Root permissions are required for this TrapDaemon to start()
* <p>
* @see apt.masterswitch.snmp.SnmpTrapListener
* @author $Author: oliverm $ <a href="mailto:[email protected]">Oliver Mather</a>
* @version $Revision: 1.4 $
*
*/
public final class SnmpTrapDaemonImpl extends AbstractSnmpTrapDaemon implements SnmpTrapHandler{
private final Logger logger = Logger.getLogger( getClass().getName() );
private static final SnmpTrapDaemon singletonInstance = new SnmpTrapDaemonImpl();
private SnmpTrapSession trapSession;
private SnmpTrapDaemonImpl() {
}
public static SnmpTrapDaemon getInstance() { return singletonInstance; }
public static void main(String[] args) {
System.out.println("Starting SNMP Trap Daemon...");
SnmpTrapDaemon trapd = SnmpTrapDaemonImpl.getInstance();
trapd.start();
System.out.println("SNMP Trap Daemon Running...");
/*
try {
Thread.sleep(5000);
} catch (InterruptedException e) {
}
trapd.stop();
*/
}
/**
* Start listening to SNMP Traps by
* creating a org.opennms.protocols.snmp.SnmpTrapSession
* <p>
*/
public void start(){
try {
trapSession = new SnmpTrapSession(this);
124
logger.log( Level.INFO, "Java SnmpTrapDaemon Started");
fireSnmpTrapDaemonStarted();
} catch (SocketException e) {
logger.log( Level.WARNING, "Could not initialise SnmpTrapSession");
logger.log( Level.WARNING, "Check the permissions for UDP port 162, you may have to run this code
as root",e);
fireSnmpTrapDaemonStopped();
}
}
/**
* Stop listening to SNMP Traps by closing the
* org.opennms.protocols.snmp.SnmpTrapSession
*/
public void stop() {
if( trapSession != null ) {
synchronized(trapSession) {
if( trapSession.isClosed() ) {
logger.log( Level.INFO,"Tried to stop SnmpTrapDaemon, but it is not running");
} else {
trapSession.close();
trapSession = null;
logger.log( Level.INFO, "Java SnmpTrapDaemon Stopped");
fireSnmpTrapDaemonStopped();
}
}
}
}
/**
* <P>This method is defined to handle SNMPv2 traps
* that are received by the session. The parameters
* allow teh handler to determine the host, port, and
* community string of the received PDU</P>
*
* @param session
The SNMP session
* @param agent
The remote sender
* @param port
The remote senders port
* @param community
The community string
* @param pdu
The SNMP pdu
*
*/
public void snmpReceivedTrap(SnmpTrapSession
session,
InetAddress
agent,
int
port,
SnmpOctetString community,
SnmpPduPacket
pdu) {
logger.log( Level.WARNING, "Received SNMP
logger.log( Level.FINE, "V2
logger.log( Level.FINE, "V2
logger.log( Level.FINE, "V2
V2 Trap from "+ agent + " on
Trap PDU command
" +
Trap PDU ID
" +
Trap PDU Length
" +
if(pdu instanceof SnmpPduRequest)
{
logger.log( Level.FINE, "V2 Trap PDU Error Status
((SnmpPduRequest)pdu).getErrorStatus());
logger.log( Level.FINE, "V2 Trap PDU Error Index
((SnmpPduRequest)pdu).getErrorIndex());
}
port "+ port );
pdu.getCommand());
pdu.getRequestId());
pdu.getLength());
" +
" +
int k = pdu.getLength();
for (int i = 0; i < k ; i++ ) {
SnmpVarBind vb = pdu.getVarBindAt(i);
logger.log( Level.FINE, "Varbind[" + i + "] := " + vb.getName().toString());
logger.log( Level.FINE, " --> " + vb.getValue().toString());
}
}
/**
* <P>This method is define to handle SNMPv1 traps
* that are received by the session. The parameters
125
* allow the handler to determine the host, port,
* and community string of the received PDU.</P>
*
* @param session
The SNMP session
* @param agent
The Trap sender
* @param port
The port of the sender
* @param community
The community string
* @param pdu
The SNMP trap pdu
*
*/
public void snmpReceivedTrap(SnmpTrapSession
session,
InetAddress
agent,
int
port,
SnmpOctetString community,
SnmpPduTrap
pdu) {
logger.log(
logger.log(
logger.log(
logger.log(
logger.log(
logger.log(
logger.log(
Level.INFO,
Level.FINE,
Level.FINE,
Level.FINE,
Level.FINE,
Level.FINE,
Level.FINE,
"Received V1 Trap from " + agent
"Ip Address................. " +
"Enterprise Id.............. " +
"Generic ................... " +
"Specific .................. " +
"TimeStamp ................. " +
"Length..................... " +
+ " on port " + port);
pdu.getAgentAddress() );
pdu.getEnterprise() );
pdu.getGeneric() );
pdu.getSpecific() );
pdu.getTimeStamp() );
pdu.getLength() );
int k = pdu.getLength();
for (int i = 0; i < k ; i++ ) {
SnmpVarBind vb = pdu.getVarBindAt(i);
System.out.print("Varbind[" + i + "] := " + vb.getName().toString());
logger.log( Level.FINE," --> " + vb.getValue().toString());
}
// Do some stuff here to fire some events.
}
/**
* <P>This method is invoked if an error occurs in
* the trap session. The error code that represents
* the failure will be passed in the second parameter,
* 'error'. The error codes can be found in the class
* SnmpTrapSession class.</P>
*
* <P>If a particular PDU is part of the error condition
* it will be passed in the third parameter, 'pdu'. The
* pdu will be of the type SnmpPduRequest or SnmpPduTrap
* object. The handler should use the "instanceof" operator
* to determine which type the object is. Also, the object
* may be null if the error condition is not associated
* with a particular PDU.</P>
*
* @param session
The SNMP Trap Session
* @param error
The error condition value.
* @param ref
The PDU reference, or potentially null.
*
It may also be an exception.
*
*
*/
public void snmpTrapSessionError(SnmpTrapSession
session,
int
error,
Object
ref) {
logger.log(Level.WARNING, "SNMP Trap Session Error");
// This error code is not actaully implemented at the moment
if( error == SnmpTrapSession.ERROR_INVALID_PDU ) {
logger.log(Level.WARNING, "\tError: "+error+" ERROR_INVALID_PDU: "+ref);
} else if( error == SnmpTrapSession.ERROR_EXCEPTION) {
logger.log(Level.WARNING, "\tError: "+error+" ERROR_EXCEPTION: "+ref);
stop(); // close the session
} else {
logger.log(Level.WARNING, "\tError: "+error+" ERROR_UNDEFINED: "+ref);
}
}
}
126
F.1.9.
LinuxSnmpTrapDaemonImpl.java
/**
* $Id: LinuxSnmpTrapDaemonImpl.java,v 1.2 2002/10/22 08:23:11 oliverm Exp $
* Author: Oliver Mather
*
*/
package apt.masterswitch.snmp;
import
import
import
import
import
import
java.io.InputStream;
java.io.InputStreamReader;
java.io.BufferedReader;
java.io.IOException;
java.util.logging.Logger;
java.util.logging.Level;
/**
* Description:
* <p>
* This is an implementation of the SnmpTrapDaemon using the
* linux command line tool /usr/sbin/snmptrapd
* <p>
* snmptrapd must be run with root permissions. This is
* achieved by using the "sudo" linux tool.
* <p>
* The stderr of snmptrapd is captured and used to
* fireSnmpTrapReceived() events when a new trap is received.
* <p>
* For more information see "man snmptrapd"
* <p>
*
* @author $Author: oliverm $ <a href="mailto:[email protected]">Oliver Mather</a>
* @version $Revision: 1.2 $
* @see apt.masterswitch.snmp.SnmpTrapListener
*/
public class LinuxSnmpTrapDaemonImpl extends AbstractSnmpTrapDaemon {
private static String snmptrapdCommand = "sudo /usr/sbin/snmptrapd -P";
private
private
private
private
volatile boolean stopRequested;
volatile boolean running;
BufferedReader buffer;
Process proc;
private StdErrReader readerThread;
private final Logger log = Logger.getLogger( getClass().getName() );
public static LinuxSnmpTrapDaemonImpl instance = new LinuxSnmpTrapDaemonImpl();
private LinuxSnmpTrapDaemonImpl() {}
/**
* Start the <code>/usr/sbin/snmptrapd</code> daemon and begin listening
* to its stderr so that we can find out trap information.
* <p>
* This will trigger the {@link apt.masterswitch.snmp.SnmpTrapListener#snmpTrapDaemonStarted() }
* method to be called on registered {@link apt.masterswitch.snmp.SnmpTrapListener SnmpTrapListeners}
*/
public void start() {
if( !running ) {
try {
stopRequested = false;
Runtime runtime = Runtime.getRuntime();
proc = runtime.exec(snmptrapdCommand);
InputStream stderr = proc.getErrorStream();
InputStreamReader reader = new InputStreamReader(stderr);
// Make the buffer size=1 so that readLine() returns as soon as a
// line is written to the buffer
127
buffer = new BufferedReader(reader,1);
readerThread = new StdErrReader();
readerThread.start();
running = true;
logger.log( Level.INFO, "Linux SnmpTrapDaemon Started");
fireSnmpTrapDaemonStarted();
} catch (IOException e) {
logger.log( Level.INFO, "Could not start Linuz SnmpTrapDaemon, IO err",e);
}
} else {
logger.log( Level.INFO, "Linux SnmpTrapDaemon Stopped");
}
}
/**
* Stop listening to SNMP traps
* <p>
* Kill the <code>/usr/sbin/snmptrapd</code> process
* <p>
* This will trigger the {@link apt.masterswitch.snmp.SnmpTrapListener#snmpTrapDaemonStopped() }
* method to be called on registered {@link apt.masterswitch.snmp.SnmpTrapListener SnmpTrapListeners}
*/
public void stop() {
if( running ) {
running = false;
readerThread.requestStop();
proc.destroy();
proc = null;
buffer = null;
logger.log( Level.INFO, "Linux SnmpTrapDaemon Stopped");
fireSnmpTrapDaemonStopped();
} else {
log.log(Level.WARNING, "Cannot Stop snmptrapd, it is not running");
}
}
private class StdErrReader extends Thread {
private volatile boolean stopRequested;
public StdErrReader() {
stopRequested = false;
}
public void requestStop() {
stopRequested = true;
}
public void run() {
running = true;
while( !stopRequested ) {
String trapMsg = "";
try {
/**
* Execution of this thread will block
* here until a new line is read
*/
trapMsg = buffer.readLine();
} catch (IOException e) {
log.log(Level.WARNING, "I/O Error while reading stdout of snmptrapd",e );
}
log.log(Level.INFO, trapMsg );
fireSnmpTrapReceived();
}
try {
buffer.close();
} catch (IOException e) {
// The proc was probably killed
}
}
128
}
}
/**
*
output of "man snmptrapd"
* *************************************************************
SNMPTRAPD(8)
SNMPTRAPD(8)
NAME
snmptrapd - Receive and log snmp trap messages.
SYNOPSIS
snmptrapd [common options] [-P] [-o file] [-s] [-f] [-p
port] [-e] [-l [d0-7]] [-a] [-C] [-c confFile] [-F FORMAT]
DESCRIPTION
Snmptrapd is an SNMP application that receives and logs
snmp trap messages sent to the SNMP-TRAP port (162) on the
local machine.
The log messages are of the form:
Sep 17 22:39:52 suffern snmptrapd: 128.2.13.41: Cold Start
Trap (0) Uptime: 8 days, 0:35:46
Snmptrapd must be run as root so that UDP port 162 can be
opened.
COMMAND LINE ARGUMENTS
In addition to the command arguments described under snm
pcmd(1) the following arguments are understood:
-P
Print the logged messages to stderr.
-o file
Logs messages to a given file.
-p port
Specifies the port to run on, if the default 162 is
not desired.
-s
Log the messages to syslog(8). These syslog mes
sages are sent with the level of LOG_WARNING, and
to the LOG_LOCAL0 facility (by default). The demon
will also fork away from its caller when the syslog
facilities are used.
This is the default unless
the '-P' flag or '-o' flag is used.
-n
Don't do reverse translation from IP address to
host name.
-l [d0-7]
Specifies the syslog facility to use, demon or
local[0-7].
-a
makes snmptrapd ignore AuthenticationFailure traps
-d
Causes the application to dump input and output
packets.
-D
Turn debugging output on.
-f
Don't fork away from the caller when using sys
log().
-C
Don't read the default set of configuration files.
-c confFile
Force the reading of confFile as a configuration
file.
-F FORMAT
When logging to standard output, use the format in
the string FORMAT.
FORMAT is a printf-like string. Snmptrapd interprets the
following formatting sequences:
%%
a literal %
%t
decimal number of seconds since the operating sys
tem's epoch
%y
current year
%m
current (numeric) month
%l
current day of month
%h
current hour
%j
current minute
%k
current second
%T
up-time in seconds (in decimal)
%Y
the year field from the up-time
%M
the numeric month field from the up-time
%L
the day of month field from the up-time
%H
the hour field from the up-time
%J
the minute field from the up-time
%K
the seconds field from the up-time
%A
agent's hostname if available, otherwise IP address
%a
agent's IP address
%B
PDU's hostname if available, otherwise IP address
%b
PDU's IP address
%N
Enterprise string
%w
Trap type (numeric, in decimal)
129
%W
%q
%P
Trap description
Trap sub-type (numeric, in decimal)
Security information from the PDU (community name
for v1/v2c, user and context for v3)
%v
list of trap's variables
In addition to these values, you may also specify an
optional field width and precision, just as in printf, and
a flag value. The following flags are legal:
left justify
0
use leading zeros
#
use alternate form
The "use alternate form" flag changes the behavior of some
format flags. Normally, the fields that display time
information base it on the local time, but this flag tells
them to use GMT instead. Also, the variable list is nor
mally a tab-separated list, but this flag changes it to a
comma-separated one. The alternate form for the uptime is
similar to "3 days, 0:14:34.65"
Examples:
To get a message like "14:03 TRAP3.1 from humpty.ucd.edu"
you could use something like this:
snmptrapd -P -F "%02.2h:%02.2j TRAP%w.%q from %A\n"
If you want the same thing but in GMT rather than local
time, use
snmptrapd -P -F "%#02.2h:%#02.2j TRAP%w.%q from
%A\n"
EXTENSIBILITY AND CONFIGURATION
See the snmptrapd.conf(5) manual page.
SEE ALSO
snmpcmd(1), syslog(8), variables(5)
07 Aug 2001
SNMPTRAPD(8)
(END)
*/
130
F.1.10.
SnmpTrapListener.java
/**
* $Id: SnmpTrapListener.java,v 1.3 2002/10/22 08:23:11 oliverm Exp $
* Author: Oliver Mather
*
*/
package apt.masterswitch.snmp;
/**
* Description:
* <p>
* The listener interface for receiving SnmpTrapDaemon Events.
* <p>
* @author $Author: oliverm $ <a href="mailto:[email protected]">Oliver Mather</a>
* @version $Revision: 1.3 $
* @see apt.masterswitch.snmp.SnmpTrapDaemon
*
*/
public interface SnmpTrapListener {
/**
* This method is invoked by the SnmpTrapDaemon when
* it is now listening for SNMP traps
*/
public void snmpTrapDaemonStarted();
/**
* This method is invoked by the SnmpTrapDaemon when
* it no longer listening for SNMP traps
*/
public void snmpTrapDaemonStopped();
/**
* This method is called whenever a SNMP trap is
* received by the SnmpTrapDaemon to which this listener
* is registered.
*/
public void snmpTrapReceived();
/*
These methods should be implemented to provide decoding
of the traps to identify their specific meaning:
public void snmpV1TrapReceived(SnmpV1Trap trap);
public void snmpV2TrapReceived(SnmpV2Trap trap);
public void snmpTrapError();
*/
}
131
F.2.
APT deployment system
F.2.1.
apt-client-base.jnlp
<?xml version="1.0" encoding="utf-8"?>
<!-- JNLP base file for the apt client gui
$Id$
At build time, the string #version-key#, is replaced
by the specific build key -->
<jnlp
spec="1.0+"
codebase="http://mcba5.phys.unsw.edu.au/~apt/software/webstart/"
href="./apt-client.jnlp">
<information>
<title>APT Client ver:#version-key#</title>
<icon href="./images/webstart-icon.gif"/>
<vendor>UNSW School of Physics</vendor>
<homepage href="http://mcba5.phys.unsw.edu.au/~apt"/>
<description>APT Remote Client User Interface version:"#version-key#" </description>
<description kind="short">Enhanced Client User Interface for controlling the Automated Patrol
Telescope</description>
<!-- <offline-allowed/>
This tag is omitted, because we want users to be forced to run
the latest version by reloading
http://mcba5.phys.unsw.edu.au/~apt/software/webstart/apt-client.jnlp
</information>
-->
<!-- We must specify all-permissions because we need network access.
Currently webstart does not support finer grained access control -->
<security>
<all-permissions/>
</security>
<resources>
<j2se version="1.4"/>
<jar href="./apt__V#version-key#/apt__V#version-key#.jar"/>
<jar href="./apt__V#version-key#/config__V#version-key#.jar"/>
<!-- All these libraries must be signed by the user aptDev ( this
is automated by the lib build.xml file -->
<jar href="./lib/skinlf.jar"/>
<jar href="./lib/lf-skins.jar"/>
<jar href="./lib/rachel.jar"/>
<jar href="./lib/ol__V1.jar"/>
<jar href="./lib/jas__V2.2.jar"/>
<jar href="./lib/cryptix-jce-api.jar"/>
<jar href="./lib/cryptix-jce-compat.jar"/>
<jar href="./lib/cryptix-jce-provider.jar"/>
<jar href="./lib/cryptix-sasl.jar"/>
<jar href="./lib/drama.jar"/>
<jar href="./lib/javax-sasl.jar"/>
<jar href="./lib/jcan.jar"/>
<jar href="./lib/jsdt-client-socket.jar"/>
<jar href="./lib/jsdt.jar"/>
<jar href="./lib/log4j.jar"/>
<property name="log4j.configuration"
value="jar:file:./apt__V#version-key#/config__V#version-key#.jar!log.properties" />
<property name="java.util.logging.config.URL"
value="jar:file:./apt__V#version-key#/config__V#version-key#.jar!/javalog.properties" />
<property name="java.util.logging.config.class"
value="apt.util.LogConfigUrlLoader" />
</resources>
<application-desc main-class="apt.client.Main"/>
</jnlp>
132
F.2.2.
apt-client-keith.jnlp
<?xml version="1.0" encoding="utf-8"?>
<!-- JNLP base file for the apt client gui
$Id: apt-client-keith-base.jnlp,v 1.4 2002/10/24 01:32:11 oliverm Exp $
At build time, the string #version-key#, is replaced
by the specific build key -->
<jnlp
spec="1.0+"
codebase="http://mcba5.phys.unsw.edu.au/~apt/software/webstart/"
href="./apt-client-keith.jnlp">
<information>
<title>Keiths APT Client ver:#version-key#</title>
<!-- <icon href="./images/webstart-icon.gif"/> -->
<vendor>UNSW School of Physics</vendor>
<homepage href="http://mcba5.phys.unsw.edu.au/~apt"/>
<description>APT Remote Client User Interface version:"#version-key#" </description>
<description kind="short">Enhanced Client User Interface for controlling the Automated Patrol
Telescope</description>
<!-- <offline-allowed/>
This tag is omitted, because we want users to be forced to run
the latest version by reloading
http://mcba5.phys.unsw.edu.au/~apt/software/webstart/apt-client-keith.jnlp
-->
</information>
<!-- We must specify all-permissions because we need network access.
Currently webstart does not support finer grained access control -->
<security>
<all-permissions/>
</security>
<resources>
<j2se version="1.4"/>
<jar href="./apt__V#version-key#/apt__V#version-key#.jar"/>
<jar href="./apt__V#version-key#/config__V#version-key#.jar"/>
<!-- All these libraries must be signed by the user aptDev ( this
is automated by the lib build.xml file
-->
<jar href="./lib/jas__V2.2.jar"/>
<jar href="./lib/cryptix-jce-api.jar"/>
<jar href="./lib/cryptix-jce-compat.jar"/>
<jar href="./lib/cryptix-jce-provider.jar"/>
<jar href="./lib/cryptix-sasl.jar"/>
<jar href="./lib/drama.jar"/>
<jar href="./lib/javax-sasl.jar"/>
<jar href="./lib/jcan.jar"/>
<jar href="./lib/jsdt-client-socket.jar"/>
<jar href="./lib/jsdt.jar"/>
<jar href="./lib/log4j.jar"/>
<property name="log4j.configuration"
value="jar:file:./apt__V#version-key#/config__V#version-key#.jar!log.properties" />
<property name="java.util.logging.config.URL"
value="jar:file:./apt__V#version-key#/config__V#version-key#.jar!/javalog.properties" />
<property name="java.util.logging.config.class"
value="apt.util.LogConfigUrlLoader" />
</resources>
<application-desc main-class="apt.client.gui.ptcs.ui.PtcsUi"/>
</jnlp>
133
F.2.3.
apt build.xml
<?xml version="1.0"?>
<!-$Id: build.xml,v 1.24 2002/10/24 01:35:35 oliverm Exp $
Buildfile for apt java classes.
Use "ant" to use this buildfile. Download ant from jakarta.apache.org
By Keith Bannister
Drastic changes made to this file by Oliver Mather,
- simplify it
- incorporate versioning and automated deployment to webstart
-->
<project name="apt" default="usage" basedir=".">
<!-- global properties -->
<property name="version-key" value="test-0.96"/>
<!-- source directories -->
<property name="src-dir"
<property name="lib-dir"
<property name="doc-dir"
<property name="config-dir"
<property name="bin-dir"
value="source"/>
value="../lib"/>
value="doc"/>
value="config"/>
value="bin"/>
<!-- directories created locally during build
Note: the "dist-dir-name" prefix of "apt__V" matches
the prefix hardcoded in apt-client-base.jnlp
-->
<property
<property
<property
<property
<property
<property
name="build-dir"
name="build-classes-dir"
name="build-doc-dir"
name="dist-base-dir"
name="dist-dir-name"
name="dist-dir"
value="build"/>
value="${build-dir}/classes"/>
value="${build-dir}/doc"/>
value="dist"/>
value="apt__V${version-key}" />
value="${dist-base-dir}/${dist-dir-name}" />
<!-- filenames created by build process -->
<property name="apt.client.jnlpfile"
value="${dist-dir}/apt-client__V${version-key}.jnlp"/>
<property name="apt.client-keith.jnlpfile" value="${dist-dir}/apt-client-keith__V${version-key}.jnlp"/>
<property name="apt.jarfile"
value="${dist-dir}/apt__V${version-key}.jar"/>
<property name="apt.config.jarfile" value="${dist-dir}/config__V${version-key}.jar"/>
<property name="apt.src.tar"
value="${dist-dir}/apt-source__V${version-key}.tar"/>
<property name="apt.src.tar.gz"
value="${dist-dir}/apt-source__V${version-key}.tar.gz"/>
<property name="apt.doc.tar"
value="${dist-dir}/apt-docs__V${version-key}.tar"/>
<property name="apt.doc.tar.gz"
value="${dist-dir}/apt-docs__V${version-key}.tar.gz"/>
<!-- jarsigning parameters. jarsigning is required by webstart -->
<property name="keystore"
value=".keystore"/>
<property name="keypass"
value="aptdev"
/>
<property name="keystorepass" value="aptdev"
/>
<property name="keyalias"
value="aptdev"
/>
<!-- NOTE these two properties are duplicated in lib/build.xml -->
<!-- directories used on mcba5 -->
<property name="mcba5-dist-base-dir" value="~apt/public_html/software/webstart" />
<!-- directories used on mistral -->
<property name="mistral-dist-base-dir" value="~apt/APTAutomation-MultiVer" />
<!-- NOTE these two properties are duplicated in lib/build.xml -->
<property
<property
<property
dir-name}"/>
<property
name="scp.command"
name="scp.mcba5.destination"
name="scp.mcba5.source"
value="scp"/>
value="[email protected]:${mcba5-dist-base-dir}"/>
value="[email protected]:${mcba5-dist-base-dir}/${dist-
name="scp.mistral.destination" value="[email protected]:${mistral-dist-base-dir}/" />
<!-- Classpath
134
Note: if you install an additional library here,
please add it to the check below at the
init target
-->
<path id="classpath">
<fileset id="all-lib-jars" dir="${lib-dir}">
<!-- we cannot just include all jars because multiple versions
of the same lib will be installed in ${lib-dir}.
<include name="**/*.jar"/>
Note that each lib relese must have a different name.
libXXX.jar files must never be overwritten.
-->
<include
<include
<include
<include
<include
<include
<include
<include
<include
<include
<include
<include
<include
<include
<include
<include
<include
<include
name="cryptix-jce-api.jar"/>
name="cryptix-jce-compat.jar"/>
name="cryptix-jce-provider.jar"/>
name="cryptix-sasl.jar"/>
name="javax-sasl.jar"/>
name="log4j.jar"/>
name="jas__V2.2.jar"/>
name="jcan.jar"/>
name="jsdt.jar"/>
name="jsdt-client-socket.jar"/>
name="junit.jar"/>
name="drama.jar"/>
name="jsnmp.jar"/>
name="agentapi.jar"/>
name="ol.jar"/>
name="skinlf.jar" />
name="lf-skins.jar" />
name="rachel.jar" />
</fileset>
</path>
<target name="usage" >
<echo>
APT Build File
-----------------------------------------------------Primary targets are:
init
--> prepares build dir structure
clean
--> removes all files and dirs created
by ant
compile-sp --> Compiles SP interface
compile
--> Compile apt package
apt-jar
--> create apt.jar
config-jar --> create config.jar
sign-jars --> sign these jars (required for webstart deployment)
prepare
--> prepare the ${dist-dir}.
.i.e dynamically create the jnlp,deploy
and runServer scripts.
upload
--> upload the ${dist-dir} to mcba5
upload-mistral --> copy ${dist-dir} from mcba5 to mistral
Optional targets:
source-tar.gz --> creates ${apt.src.tar.gz}
api-doc
--> runs javadoc
doc-tar.gz
--> creates ${apt.doc.tar.gz} which contains
${doc-dir} and the javadocs
These files are created in the ${dist-dir}
and will consequently be uploaded by using
the 'upload' target
test-all
test-ui
--> Run JUnit test... usage of these targets
--> has not been documented
Notes
-----
135
SCP Setup
Note that to use scp, authenticed remote ssh
must be setup on mcba5 AND mistral. This is done by
the following two commands:
Your machine:
scp ~/.ssh/id_dsa.pub [email protected]:~/.ssh/temp-pub-key
User apt on mcba5:
cat ~/.ssh/temp-pub-key >> ~/.ssh/authorized_keys2
rm ~/.ssh/temp-pub-key
</echo>
</target>
<target name="init">
<tstamp/>
<mkdir
<mkdir
<mkdir
<mkdir
<mkdir
dir="${build-dir}"/>
dir="${build-classes-dir}"/>
dir="${build-doc-dir}"/>
dir="${dist-base-dir}"/>
dir="${dist-dir}"/>
<condition property="haveAllJars" >
<and>
<available file="${lib-dir}/cryptix-jce-api.jar"/>
<available file="${lib-dir}/cryptix-jce-compat.jar"/>
<available file="${lib-dir}/cryptix-jce-provider.jar"/>
<available file="${lib-dir}/cryptix-sasl.jar"/>
<available file="${lib-dir}/javax-sasl.jar"/>
<available file="${lib-dir}/log4j.jar"/>
<available file="${lib-dir}/jas.jar"/>
<available file="${lib-dir}/jcan.jar"/>
<available file="${lib-dir}/jsdt.jar"/>
<available file="${lib-dir}/jsdt-client-socket.jar"/>
<available file="${lib-dir}/junit.jar"/>
<available file="${lib-dir}/drama.jar"/>
<available file="${lib-dir}/jsnmp.jar"/>
<available file="${lib-dir}/agentapi.jar"/>
<available file="${lib-dir}/ol.jar"/>
<available file="${lib-dir}/skinlf.jar" />
<available file="${lib-dir}/lf-skins.jar" />
<available file="${lib-dir}/rachel.jar" />
</and>
</condition>
<fail unless="haveAllJars" message="A required jar file is missing"/>
</target>
<!-- ********** COMPILE ********** -->
<target name="compile-sp"
depends="init"
description="Compile SP because it won't by itself">
<javac destdir="${build-classes-dir}"
source="1.4"
classpathref="classpath" >
<src path="${src-dir}"/>
<include name="apt/sp/APTSPClient.java"/>
</javac>
</target>
<target name="compile"
depends="init,compile-sp"
description="Compile the APT classes">
<javac destdir="${build-classes-dir}"
source="1.4"
debug="yes"
deprecation="true"
136
classpathref="classpath"
srcdir="${src-dir}" >
<exclude name="apt/sp/**"/>
</javac>
<!-- copy the docs -->
<copy todir="${build-doc-dir}">
<fileset dir="${doc-dir}" />
</copy>
<!-- copy images used by the client gui -->
<copy todir="${build-classes-dir}">
<fileset dir="${src-dir}">
<include name="**/*.gif"/>
</fileset>
</copy>
</target>
<!-- ********** END COMPILE ********** -->
<!-- ********** DIST ********** -->
<target name="apt-jar"
depends="compile"
description="Create the apt jar file">
<jar jarfile="${apt.jarfile}"
basedir="${build-classes-dir}"/>
</target>
<target name="config-jar"
depends="init"
description="Create jar file that contains config files">
<jar jarfile="${apt.config.jarfile}"
basedir="${config-dir}" />
</target>
<target name="sign-jars" depends="config-jar,apt-jar" >
<echo>
Signing the jarfiles as ${keyalias} using keystore ${keystore}
This must be the same keystore and alias used to
sign all the jar files from the 'lib' module.
Webstart does not allow jars to be signed by different
users.
</echo>
<signjar jar="${apt.config.jarfile}"
alias="${keyalias}"
keypass="${keypass}"
storepass="${keystorepass}"
keystore="${keystore}" />
<signjar jar="${apt.jarfile}"
alias="${keyalias}"
keypass="${keypass}"
storepass="${keystorepass}"
keystore="${keystore}" />
</target>
<target name="source-tar.gz"
depends="init"
description="tar.gz up the source">
<tar tarfile="${apt.src.tar}" basedir="${src-dir}"/>
<gzip zipfile="${apt.src.tar.gz}" src="${apt.src.tar}"/>
137
<delete file="${apt.src.tar}"/>
</target>
<!-- ********** END DIST ********** -->
<!--
********** DOCUMENTATION **********
optional, these targets pepare the docs and stick them in the
deploy dir.
-->
<target name="api-doc"
description="Make the standard java api">
<javadoc sourcepath="${src-dir}"
destdir="${build-doc-dir}/api"
packagenames="apt.*"
classpathref="classpath"
defaultexcludes="yes"
package="true"
version="true"
author="true"
WindowTitle="APT API Documentation"
additionalparam="-source 1.4">
<doctitle>APT API Documentation</doctitle>
</javadoc>
</target>
<target name="doc-tar.gz"
depends="init, api-doc"
description="Generate documentation tar.gz">
<tar tarfile="${apt.doc.tar}" basedir="${build-doc-dir}"/>
<gzip zipfile="${apt.doc.tar.gz}" src="${apt.doc.tar}"/>
<delete file="${apt.doc.tar}"/>
</target>
<!-- ********** END DOCUMENTATION ********** -->
<!-- ********** DEPLOY ********** -->
<target name="prepare"
depends="sign-jars" >
<!-- copy the config dir -->
<copy todir="${dist-dir}/config">
<fileset dir="${config-dir}" />
</copy>
<!-- when the server is run, it expects this dir to be created -->
<mkdir dir="${dist-dir}/log"/>
<!-- create the apt-client jnlp file -->
<copy file="${bin-dir}/apt-client-base.jnlp"
tofile="${apt.client.jnlpfile}" />
<replace file="${apt.client.jnlpfile}"
token="#version-key#"
value="${version-key}" />
<!-- create Keiths apt-client jnlp file -->
<copy file="${bin-dir}/apt-client-keith-base.jnlp"
tofile="${apt.client-keith.jnlpfile}" />
<replace file="${apt.client-keith.jnlpfile}"
token="#version-key#"
value="${version-key}" />
<!-- create the runKeithsGui.bat file -->
<copy file="${bin-dir}/runKeithsGui-base.bat"
tofile="${dist-dir}/runKeithsGui.bat" />
<replace file="${dist-dir}/runKeithsGui.bat"
token="#version-key#"
value="${version-key}" />
<!-- create the runOliversGui.bat file -->
138
<copy file="${bin-dir}/runOliversGui-base.bat"
tofile="${dist-dir}/runOliversGui.bat" />
<replace file="${dist-dir}/runOliversGui.bat"
token="#version-key#"
value="${version-key}" />
<!-- create the runOliversGui file -->
<copy file="${bin-dir}/runOliversGui-base"
tofile="${dist-dir}/runOliversGui" />
<replace file="${dist-dir}/runOliversGui"
token="#version-key#"
value="${version-key}" />
<!-- create the runServer file -->
<copy file="${bin-dir}/runServer-base"
tofile="${dist-dir}/runServer" />
<replace file="${dist-dir}/runServer"
token="#version-key#"
value="${version-key}" />
<!-- create the upadteWebstart file -->
<copy file="${bin-dir}/updateWebstart-base"
tofile="${dist-dir}/updateWebstart" />
<replace file="${dist-dir}/updateWebstart"
token="#version-key#"
value="${version-key}" />
<!-- create the runSPServer file -->
<copy file="${bin-dir}/runSPServer-base"
tofile="${dist-dir}/runSPServer" />
<replace file="${dist-dir}/runSPServer"
token="#version-key#"
value="${version-key}" />
<!-- create the runUserman file -->
<copy file="${bin-dir}/runUserman-base"
tofile="${dist-dir}/runUserman" />
<replace file="${dist-dir}/runUserman"
token="#version-key#"
value="${version-key}" />
<!-- create the setClasspath file -->
<copy file="${bin-dir}/setClasspath-base"
tofile="${dist-dir}/setClasspath" />
<replace file="${dist-dir}/setClasspath"
token="#version-key#"
value="${version-key}" />
<!-- create the versionPropeties file -->
<copy file="${config-dir}/version.properties-base"
tofile="${dist-dir}/config/version.properties" />
<replace file="${dist-dir}/config/version.properties"
token="#version-key#"
value="${version-key}" />
</target>
<target name="upload" depends="prepare" >
<property name="scp-upload-mcba5-args" value=" -C -r ${dist-dir} ${scp.mcba5.destination}" />
<echo>
Uploading to mcba5...
% ${scp.command} ${scp-upload-mcba5-args}
</echo>
<exec executable="${scp.command}">
<arg line="${scp-upload-mcba5-args}" />
</exec>
</target>
<target name="upload-mistral" depends="upload" >
139
<property name="scp-upload-mistral-args" value=" -C -r
${scp.mcba5.source}
/>
<echo>
Copying ${dist-dir-name} from mcba5 to mistral
% ${scp.command} ${scp-upload-mistral-args}
</echo>
<exec executable="${scp.command}">
<arg line="${scp-upload-mistral-args}"
</exec>
/>
</target>
<target name="clean"
description="Clean up dist and build directories">
<delete dir="${dist-base-dir}"/>
<delete dir="${build-dir}"
/>
</target>
<!-- ********** TEST ********** -->
<target name="test-all"
depends="compile"
description="Run JUnit on all available tests">
<junit printsummary="on">
<classpath>
<path refid="classpath"/>
<pathelement location="${build-classes-dir}"/>
</classpath>
<test name="apt.AllTests"/>
<formatter type="plain"/>
</junit>
</target>
<target name="test-ui"
depends="compile"
description="Run JUnit Gui">
<java classname="junit.swingui.TestRunner"
fork="yes">
<arg value="apt.AllTests"/>
<jvmarg value="-ea"/>
<classpath>
<path refid="classpath"/>
<pathelement location="./lib/junit.jar"/>
<pathelement location="${build-classes-dir}"/>
</classpath>
</java>
</target>
<!-- ********** END TEST ********** -->
</project>
140
${scp.mistral.destination}"
F.2.4.
lib build.xml
<?xml version="1.0"?>
<!-$Id: build.xml,v 1.4 2002/10/03 08:32:20 oliverm Exp $
Ant build file for the apt library files
This is a utility ant buildfile used to:
* sign all the jars (required by webstart)
* deploy the libs (jars & .so) to mcba5 and mistral
-->
<project name="lib" default="usage" basedir=".">
<!-- directories used by build -->
<property name="lib-dir" value="." />
<!-- directories created during build -->
<property name="dist-dir-name" value="signed-jars" />
<property name="dist-dir"
value="${dist-dir-name}" />
<!-- filenames created -->
<!-- jarsigning parameters. jarsigning is required by webstart
Note that the apt module must be checked out to give us
access to the keystore
-->
<property name="keystore"
value="../apt/.keystore"/>
<property name="keypass"
value="aptdev"
/>
<property name="keystorepass" value="aptdev"
/>
<property name="keyalias"
value="aptdev"
/>
<!-- NOTE these two properties are duplicated in apt/build.xml -->
<!-- directories used on mcba5 -->
<property name="mcba5-dist-base-dir" value="~apt/public_html/software/webstart" />
<!-- directories used on mistral -->
<property name="mistral-dist-base-dir" value="~apt/APTAutomation-MultiVer" />
<!-- NOTE these two properties are duplicated in apt/build.xml -->
<property
<property
<property
dir-name}"/>
<property
name="scp.command"
value="scp"/>
name="scp.mcba5.destination" value="[email protected]:${mcba5-dist-base-dir}" />
name="scp.mcba5.source"
value="[email protected]:${mcba5-dist-base-dir}/${distname="scp.mistral.destination" value="[email protected]:${mistral-dist-base-dir}/" />
<fileset id="all-lib-jars" dir="${lib-dir}">
<include name="*.jar"/>
</fileset>
<fileset id="linux-so-libs" dir="${lib-dir}">
<include name="*.so"/>
</fileset>
<target name="usage" >
<echo>
APT Library files
-----------------------------------------------------Available targets are:
init
--> creates ${dist-dir} and copies .so files to it
clean
--> removes the directory ${dist-dir}
sign-jars
--> copies the jars to ${dist-dir}
and then signs them as ${keyalias}
upload
--> Copies everything in ${dist-dir} to mcba5
upload-mistral --> Copies ${dist-dir} from mcba5 to mistral
Notes
-----
141
SCP Setup
Note that to use scp, authenticed remote ssh
must be setup on mcba5 AND mistral. This is done by
the following two commands:
Your machine:
scp ~/.ssh/id_dsa.pub [email protected]:~/.ssh/temp-pub-key
User apt on mcba5:
cat ~/.ssh/temp-pub-key >> ~/.ssh/authorized_keys2
rm ~/.ssh/temp-pub-key
Versioning
To preseve the multi-versioning of these build files,
ANY new lib that is added must not overwrite an existing
lib. All other build + config files must be updated
manually to 'swap' over to the newer lib file of a
diff name.
The ant build.xml file in the 'lib' module can be used
to sign and deploy all the jars.
</echo>
</target>
<target name="init">
<tstamp/>
<mkdir dir="${dist-dir}"/>
<copy todir="${dist-dir}">
<fileset refid="linux-so-libs" />
</copy>
</target>
<target name="sign-jars" depends="init">
<!-- copy the jars -->
<copy todir="${dist-dir}">
<fileset refid="all-lib-jars" />
</copy>
<echo>
Signing the jarfiles as ${keyalias} using keystore ${keystore}
This must be the same keystore and alias used to
sign apt.jar and config.jar from the 'apt' module.
Webstart does not allow jars to be signed by different
users.
</echo>
<signjar
alias="${keyalias}"
keypass="${keypass}"
storepass="${keystorepass}"
keystore="${keystore}" >
<fileset id="copied-lib-jars" dir="${dist-dir}">
<include name="**/*.jar"/>
</fileset>
</signjar>
</target>
<target name="upload">
<property name="scp-mcba5-args" value=" -C -r ${dist-dir}
<echo>
Uploading ${dist-dir} to mcba5, please wait...
% ${scp.command} ${scp-mcba5-args}
</echo>
<exec executable="${scp.command}">
142
${scp.mcba5.destination}"
/>
<arg line="${scp-mcba5-args}" />
</exec>
</target>
<target name="upload-mistral" depends="upload" >
<property name="scp-mistral-args" value=" -C -r
${scp.mcba5.source}
<echo>
Copying ${dist-dir-name} from mcba5 to mistral
% ${scp.command} ${scp-mistral-args}
</echo>
<exec executable="${scp.command}">
<arg line="${scp-mistral-args}"
</exec>
/>
</target>
<target name="clean"
description="Clean up dist and build directories">
<delete dir="${dist-dir}"/>
</target>
</project>
143
${scp.mistral.destination}" />
F.3.
CSIRO / SEARFE
F.3.1.
Sample data file
<?xml version="1.0" encoding="UTF-8"?>
<?xml:stylesheet type="text/xsl" href="Style.xsl" version="1.0" encoding="UTF-8" ?>
<SpectrumScan>
<ScanParameters>
<Location
Name="USyd Physics (A29) Roof"
Longitude="151.18565"
Latitude="-33.88961"
/>
<Operator Name="Hansel" />
<SignalPath>
<Antenna Name="Discone 50-1300 MHz Antenna" />
<AntennaToLNATransmissionLine Name="10m RJ50 Cable" />
<LNA Name="None" />
<LNAAttenuator Value="None" />
<LNAToReceiverTransmissionLine Name="None" />
</SignalPath>
<Receiver
Name="AOR AR-3000A"
Mode="WFM"
InternalRFAttenuator="Off"
InternalShortwavePreamp="On"
/>
<Scan
StartTime="2002-08-28 19:38:07.254 EST"
NumberOfScans="10" >
<StartFrequency
<StopFrequency
<FrequencyIncrement
<DwellPerIncrement
<DwellPerScan
</Scan>
Value="0090.0000" Unit="MHz" />
Value="0110.0000" Unit="MHz" />
Value="0.1" Unit="MHz" />
Value="100" Unit="ms/increment" />
Value="0.0" Unit="hours/scan" />
<Notes>
~30 m extension lead attached to ~10 m Antenna Transmission Line Cable, so total Antenna Transmission
Line cable ~40 m.
</Notes>
</ScanParameters>
<SpectrumScanData>
<SpectrumData Time="2002-08-28
Errors="S=0,C=3" />
<SpectrumData Time="2002-08-28
Errors="S=0,C=0" />
...
<SpectrumData Time="2002-08-28
Errors="S=0,C=0" />
<SpectrumData Time="2002-08-28
Errors="S=0,C=0" />
19:38:13.974 EST" ScanNumber="1" Frequency="0090.0000" SignalStrength="5"
19:38:14.184 EST" ScanNumber="1" Frequency="0090.1000" SignalStrength="8"
19:39:29.72 EST" ScanNumber="2" Frequency="0105.8000" SignalStrength="10"
19:39:29.282 EST" ScanNumber="2" Frequency="0105.9000" SignalStrength="9"
...
<SpectrumData Time="2002-08-28 19:45:10.623 EST" ScanNumber="10" Frequency="0109.9000" SignalStrength="8"
Errors="S=0,C=0" />
<SpectrumData Time="2002-08-28 19:45:10.833 EST" ScanNumber="10" Frequency="0110.0000" SignalStrength="6"
Errors="S=0,C=0" />
</SpectrumScanData>
</SpectrumScan>
144
F.4.
F.4.1.
TextSkin
TextSkin zipfile listing
[oliverm@mcba5:~] unzip -l BacklitLCD.zip
Archive: BacklitLCD.zip
Length
Date
Time
Name
----------------1086 07-08-02 12:08
MBacklitLCD.gif
1063 05-01-02 20:17
1BacklitLCD.gif
1086 05-01-02 20:17
2BacklitLCD.gif
1091 05-01-02 20:17
3BacklitLCD.gif
1068 05-01-02 20:18
4BacklitLCD.gif
1083 05-01-02 20:18
5BacklitLCD.gif
1093 05-01-02 20:18
6BacklitLCD.gif
1068 05-01-02 20:19
7BacklitLCD.gif
1106 05-01-02 20:19
8BacklitLCD.gif
1097 05-01-02 20:19
9BacklitLCD.gif
1041 08-23-02 15:08
bSlashBacklitLCD.gif
1031 08-23-02 15:03
colonBacklitLCD.gif
580 05-01-02 20:21
defaultBacklitLCD.gif
1037 08-23-02 15:08
fSlashBacklitLCD.gif
1068 07-08-02 12:09
HBacklitLCD.gif
1104 05-01-02 20:17
0BacklitLCD.gif
607 08-23-02 15:06
minusBacklitLCD.gif
1017 05-01-02 20:20
periodBacklitLCD.gif
1047 08-23-02 15:05
plusBacklitLCD.gif
1056 07-08-02 12:14
zBacklitLCD.gif
-------------20429
20 files
[oliverm@mcba5:~]
145
G. CDROM directory structure
apt
The base directory for the apt files
cvs-workspace
Build environments for the apt, jas, jcan,
jsdt and lib modules as of 4-11-2002
masterswitch
Masterswitch documentation and jsnmp code
workspace
searfe
The base directory for the CSIRO searfe
project
aor-software
Miscelaneous files and manuals for the AORAR3000A receiver
commapi
The Java Communication API for win32 (version
2.0)
visad
The VisAD distribution and documentation
workspace
Build enviroment for the Spectrum Scanner
software
thesis
Copies of this document and the diagrams
within it
147