1
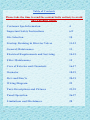
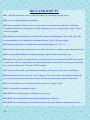
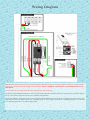
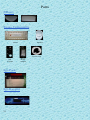
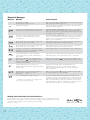
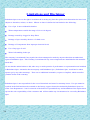
Owner’s
Guidebook
to the
Best Spa Experience
on Earth
raindancehottubs.com
2212 Buffalo Road
Johnson City, Tennessee 37604
(423) 477-7796
Raindance
Spas
2
Owner’s Manual
This Owner’s Manual will acquaint you with the operation and
general maintenance of your new Raindance Spa. Please keep this
manual available for reference.
If you have any questions about any aspect of your spa’s set up
procedures, operation or maintenance, contact Raindance Spa’s
Technical Support at Raindance Spa 866-996-2623.
IMPORTANT: Raindance Spa reserves the right to change
specifications or designs, without notification and without incurring
any obligation.
Serial number information will be located inside electrical access
panel. The tag is black and always located on the right hand side of
the pump. For your convenience, we recommend copying the
number on the next page.
3
SPA INFORMATION
Date purchased:
.
Date installed:
.
Dealer name:
.
Dealer address:
.
Dealer telephone:
.
Spa model and serial number:
.
4
Table of Contents
Please take the time to read the content in its entirety to avoid
any warranty issues.
5
Customer Spa Information
4
Important Safety Instructions
6-9
Site Selection
10
Startup, Draining & Diverter Valves
11-12
General Maintenance
13
Electrical Requirements and Servicing
14-15
Filter Maintenance
15
Care of Exterior and Chemicals
16-17
Ozonator
18-19
Do’s and Don’ts
20-21
Wiring Diagram
22
Parts Descriptions and Pictures
23-25
Panel Operation
26-27
Limitations and Disclaimers
28
IMPORTANT SAFETY INSTRUCTIONS
READ AND FOLLOW ALL INSTRUCTIONS!!!!
SAVE THESE INSTRUCTIONS!!
When installing and using this electrical equipment, basic safety
precautions should always be followed including the following:
1. Danger: To reduce the risk of injury, do not ever permit children to
use the spa without adult supervision.
2. Warning: Risk of Child Drowning: Exercise extreme caution to
prevent unauthorized access by children. To avoid accidents, ensure
that children cannot use the spa unless supervised at all times.
3. Warning: To reduce the risk of electrical shock, replace damaged
or defective wiring immediately.
4. Danger: To reduce the risk of injury to persons, DO NOT
REMOVE Suction Fittings.
5. A pressure wire connector is provided on the side of the control
box to permit connection of a minimum No. 8 AWG (8.4mm) solid
copper bonding conductor between this point and any metal
equipment, metal enclosures of electrical equipment, metal water pipe
or conduit within 5 ft (1.5m) of the unit, as need to comply with local
requirements and/or electrical code. Install the spa at least 5 ft (1.52m)
from all metal surfaces. A spa may be installed within 5 ft of metal
surfaces if metal surfaces are permanently connected by a minimum
No. 6 AWG solid copper bonding conductor attached to the wire
conductor on the terminal box that is provided for this purpose.
(National Electrical Code ANSI/NFPA 70)
6. A Ground-Fault Circuit Interrupter must be installed near the spa
6
pack. Before each use, with the plug connected to the power supply
and with the unit operating, push the Test Button. The unit should
now operate normally. If the interrupter fails to operate in this
manner, there is a ground current flowing indicating the possibility
of an electric shock.
7. Danger-Risk of Electric Shock. Install at least 5 feet (1.5M) from
all metal surfaces.
8. Danger-Risk of Electric Shock. Do not permit any external
electric appliance, such as a light, telephone, radio, or television,
within 5 feet (1.5m) of a spa or hot tub.
9.
To reduce the risk of injury:
A. The water in a spa or hot tub should never exceed 40
degrees C (104 degrees F). Water temperatures between 38 degrees
C and 100 degrees F are considered safe for a healthy adult. Lower
water temperatures are recommended for extended use (exceeding 10
-15 minutes) and for young children.
B. Since excessive water temperatures have a high potential
for causing fetal damage during the early months of pregnancy,
pregnant or possibly pregnant women should limit spa or hot tub
water temperatures to 30 degrees C (100 degrees F).
C. Before entering a spa or hot tub, the user should measure
the water temperature with an accurate thermometer since the
tolerance of water temperature-regulation devices may vary as much
as plus or minus 3 degrees C (5 degrees F).
D. The use of alcohol, drugs, or medication before or during
spa or hot tub use may lead to unconsciousness with the possibility
of drowning.
E. Persons suffering from obesity or a medical history of heart
disease, low or high blood pressure, circulatory system problems, or
7
diabetes should consult a physician before using a spa or hot tub.
F. Persons using medication should consult a physician before
using a spa or hot tub since some medication may induce drowsiness
while other medication may affect heart rate, blood pressure, and
circulation.
10. The electrical supply for this product must include a suitably
rated switch or circuit breaker to open all ungrounded supply
conductors to comply with Section 422-20 of the National Electrical
Code, ANSI/NFPA 70-1987. The disconnecting means must be
readily accessible to the tub occupant but installed at least 5 feet
(1.5M) from the tub water. Hyperthermia occurs when the internal
temperature of the body reaches a level several degrees above the
normal body temperature of 98.6 F. The symptoms of hyperthermia
include dizziness, fainting, drowsiness, lethargy, and an increase in
the internal temperature of the body. The effects of hyperthermia
include (1) Unaware of impending hazard, (2) Failure to perceive
heat, (3) Failure to recognize the need to exit spa, (4) Inability to exit
spa, (5) Fetal damage to pregnant women, and (6) Unconsciousness
resulting in a danger of drowning.
WARNING: The use of alcohol, drugs, or medication can greatly
increase the risk of fatal hyperthermia in hot tubs and spas.
11. Audio/Video Equipped Units: The instruction manual for spas
equipped with audio/video components shall be provided with the
following or equivalent:
CAUTION-Risk of Electric Shock. Do not leave compartment
door open.
CAUTION-Risk of Electric Shock. Replace components only
with identical components.
DO NOT operate the audio/video controls while inside the spa
WARNING-Prevent Electrocution. Do not connect any auxiliary
8
components (for example, cable, additional speakers, headphones,
additional audio/video components, etc.) to the system.
These units are not provided with an outdoor antenna; when
provided, it should be installed on accordance with Article 810 of
the National Electrical Code, ANSI/NFPA 70.
DO NOT service this product yourself as opening or removing
covers may expose you to dangerous voltage or other risk of
injury. REFER ALL SERVICING TO QUALIFIED SERVICE
PERSONNEL.
When the power supply connections or power supply cord(s) are
damaged; if water is entering the audio/video compartment or any
electrical equipment compartment area; if the protective shields or
barriers are showing signs of deterioration; or if there are signs of
other potential damage to the unit, turn off the unit and refer
servicing to a qualified service personnel.
The unit should be subjected to routine maintenance (for example,
once every 3 months) to make sure the unit is operating properly.
9
Site Selection
IMPORTANT: Site selection and preparation are your responsibility. Carefully read these
instructions and consult your authorized Raindance Spa dealer if you have any questions.
Manufacturer recommends a poured, reinforced concrete slab with a minimum thickness of
5 inches. Wood decking is also acceptable provided it is constructed so that it meets the
requirements outlined below. The spa must be installed in such a manner as to provide
drainage away from the spa. Placing the spa in a depression without provisions for proper
drainage could allow rain, overflow and other casual water to flood the equipment and
create a wet deck. Install so as to permit access to the equipment, either from above or
below, for servicing. Make certain that there are not any obstructions which would prevent
removal of the cabinet side panels and access to the jet’s components, especially on the side
with the equipment bay doors. If the allocated site appears to be unstable or unsafe, have it
checked by a building contractor.
Site
Select a level surface so that the water is level and weight distribution is maintained
equally. Any deck, patio or floor with adequate support should be suitable to carry the
weight of the spa filled with water and people. To determine if your spa site can
withstand the weight of the tub, water, and bathers, multiply the number of gallons
required to fill your spa times 8(water weight approximately 8 lbs per gallon) then add
the weight of the Spa and the bathers to determine the total weight.
You probably have a spot picked out for you new spa, whether it’s indoors or outdoors, on a
patio or on a deck. Just make sure you check the following:
Always put your spa on a structurally sound, level surface. A filled spa can weigh a
great deal. Make certain that the location you choose can support the weight of your
filled spa.
Don’t forget to level your spa before filling it.
Locate your equipment compartment, which houses all of the electrical components,
in a place where water will drain away from it. Allowing water into the equipment
compartment can damage the electronics, or may result in tripping your houses
circuit breaker.
Leave yourself easy access to the circuit breakers in the subpanel (230 volt models).
Never let water get into the subpanel (230 volt models), or into the electrical outlet
10
that your spa is plugged into. Your 230 volt spa’s subpanel is rain tight when
installed correctly with the door closed.
Leave access to the equipment compartment for periodic spa care and maintenance.
The spa should be placed a minimum of 3 feet from all structures to allow
access to all sides for servicing and repair. If the spa cannot be serviced
and repaired due to un-accessibility of sides, it is the customer’s obligation
to have tub drained, moved, and placed in an accessible site.
Start –Up Instructions
Always refill spa through one filter housing to purge any trapped air from pump intakes.
Failure to do so may cause air to be trapped in wither pump #1 or the circulation pumps
intake creating an (air lock), preventing either pump from circulating water. Insure both
shutoff valves are fully open. Re-install filter cartridge, filter housing assembly and lid.
Make sure filter cartridge is clean before installing.
Filter Housing Assembly
Remove filter lid and rotate top filter housing counterclockwise and remove assembly.
Remove filter cartridge upward, and inspect element for cleanliness. The proper way to fill
your spa using a common garden hose is with cartridge element removed. Once spa is filled
with water 1” below pillows, re-install filter cartridge and housing assembly locking it back
in place replacing filter lid.
Fiberoptic Lighting
All replacement lighting must be provided by Raindance Spas or J & J Electronics.
Warranty will be void with any other replacement.
Draining and Refilling Spa
Draining:
Turn the power off to the system by turning off the GFCI breaker. Remove the drain cap
from the drain valve and attach a garden hose to the drain bib. Turn the drain bib
counterclockwise to open and allow water to drain. Close drain bib by gently turning
clockwise (carefully and do not over-tighten) and install drain bib cap.
11
Filling:
Water level is centered in area of weir door or 1 inch above extended skimmer opening.
Never fill past the recommended level. Check to see if all slice valves are open. The slice
valves should have the handles pulled out as far as possible when open. The drain bib
should be closed and drain cap installed. Fill your spa with water by removing you filter lid
(all models may not have a lid) and place the garden hose into the filter housing. This will
help prevent air from being trapped in the plumbing lines commonly known as an air lock.
Jets, Valves and Air Controls
Jets
The jet inserts in the spa that have a textured feel are adjustable allowing you to increase or
decrease the water flow by turning the jet face clockwise or counterclockwise. This makes
it easier to get the right pressure needed in the right areas. Jets with a smooth face are not
adjustable. Please try adjusting the jets to acquire the proper technique.
Slice Valves
These valves allow removal of equipment without having to drain the spa. The T-handles
should always be in the open position, allowing water flow before operating the spa. The
slice valves are located on the intake and discharge sides of the pump(s) they will be placed
down in closed position.
Air Control Valves
Turning the valve counterclockwise increases the airflow and the pressure of the jets.
Turning the valve clockwise will control the air supply for less pressure. All Air Control
Valves are located on the top of the spa and used to control the amount of air that mixes
with the water flow of the jets.
Waterfall Valve
By turning the handle counterclockwise the water flow will decrease. By turning the
handle clockwise, the water flow will increase. The Waterfall Valve is located at the top of
the spa and is similar to the air control valve.
Diverter Valve
This valve allows you to increase or decrease pressure ( by turning handle from side
to side) in certain areas of the spa. The diverter valve can balance jet pressure throughout
the spa. The Diverter Valve is located on the top of the spa and is large in size to left corner
of keypad. Diverter Valve can only be moved when the pump(s) are turned off. Otherwise,
damage will occur to the diverter valve.
12
General Maintenance
Every two to five months, depending on frequency of use, drain your spa, clean with spa
multi-purpose cleaner (found in your chemical maintenance kit) and polish with a silicone
sealant polish.
To temporarily remove foam, apply anti-foaming agent to foamy areas. To correct the
condition, be sure the water is balanced.
Be sure to add a metal build up inhibitor each time you are refilling your spa. Shock treat
the water with a non-chlorine shock each week.
It is important to use scale and stain inhibitor weekly to prevent calcium deposits from
damaging your spa and equipment. If this happens, it could void the warranty. Refer to your
chemical handbook for further information on water chemistry and troubleshooting.
DRAINING THE WATER
Locate drain hose near or around the equipment. Remove cap and attach garden hose. Open
the back valve on hose bib to drain spa.
FILTER MAINTENANCE
At least once a week, check and clean the skimmer basket and weir to insure proper filter
flow. Remove leaves, foreign matter and debris when present. It is very important to keep
your spa filter cartridge clean and free of particles that can obstruct water flow. A clean
filter will permit the hydrotherapy system to function properly and also allows more
efficient filtering. Depending on how frequently your spa is used, we recommend cleaning
the spa filter cartridge every four to six weeks. If this is not done, the filter may clog and
restrict water flow, which causes inadequate filtration and poor jet performance.
13
Electrical Requirements and Servicing
The Spa shall be hooked up by a licensed electrician and observing all municipal
codes. Codes may vary from state to state. Check with a local electrician to find out wiring
requirements for your area.
Minimum specifications: A # 6/3 wire ( this is a 4 wire system as the ground wire is
not referred to) making up a #6 Black (hot), a #6 Red (hot), a #6 White (neutral), and a #6
Green (ground). A 60 amp 240 volt breaker for 3 pump hot tubs and 50 amp 240 volt
breaker for all other 240 volt applications. A corresponding GFCI either 60/50 amp
depending on electrical needs.
We recommend using a “square D” GFCI as wired in diagram.
IMPORTANT NOTICE: The electrical wiring if this spa must meet the requirements
of the National Electrical Code (NEC) and any applicable state or local codes. The electrical
circuit must be installed by a qualified electrician and approved by a local building/
electrical inspection authority.
1. This spa must be permanently connected (hard-wired) to the power supply. No plugin connections or extension cords are to be used in conjunction with the operation of this
spa. Supplying power to the spa which is not in accordance with these instructions will code
both of the independent testing agency listings and the manufacturer’s warranty.
2. The power supplied to this spa must be a dedicated circuit with no other appliances
or lights sharing the power provided by the circuit.
3. To determine the current, voltage, and wire size required, refer to section “Power
Requirements” Wire size must be appropriate per NEC and/or local codes.
4. We recommend type THHN wire.
5. All wiring must be copper to ensure proper connections. When using wire larger
than #6 (10mm2), add a junction box near the spa and reduce to short lengths of #6
(10mm2) wire to connect to spa.
6. The electrical supply for this product must include a suitably rated circuit breaker to
open all ungrounded supply conductors to comply with Section 422-20 of the National
Electrical Code. ANSI/NFPA 70. The disconnecting means must be readily accessible to
the spa’s occupant but installed at least 5 feet (1.5m) from spa water.
7. The electrical circuit supplied for the spa must include a suitable ground fault circuit
interrupter (GFCI) as required by NEC Article 680-42.
14
8. To gain access to the spa’s power terminal block, remove the screws and cabinet
panel setting it aside, then remove the securing screws from the panel on the control
equipment pack system.
9. Select the power supply inlet you want to use and remove the cabinet panel from the
front of the spa to allow you to feed the cable through to the control box. Install the cable
with connectors through the conduit.
10. Connect wires, color to color, on terminal blocks and TIGHTEN SECURELY! All
wires must be hooked up securely or damage could result.
11.
Install control box door panel with screws and re-install the cabinet side panels.
Filter Maintenance
The filter(s) in your spa should be cleansed at least every 5-6 weeks, depending on spa
usage. This will ensure that the water is being filtered properly, and there is no restriction in
the filer due to dirt and grease build-up.
Cleansing the filter can be done easily using a Filter Degreaser solution and following the
directions on the bottle. Soak filter in a degreaser and power wash with a garden hose. It is
recommended to have a second filter, which can be cleaned between filter changes. This
will enable you to quickly exchange the dirty filter with a clean filter and immediately start
your spa up again.
Filter Removal: The filter system is the top-load type. This style is round, approximately
8” in length located in the corner of the spa below the water level when the spa is full). To
remove basket turn counterclockwise ¼ turn removing the basket and lid, to re-install turn
lid clockwise and lock into place.
Cleaning Filter (s): There are a few ways to clean your filter. A very effective way is to use
a garden hose and nozzle with good water pressure. Start at the top of the filter spraying a
side-to-side pattern downward, turning filter as necessary. It is recommended to clean filter
(s) every month depending upon activity in the spa. Speak to your dealer about other
methods of cleaning spa filters. Replace your filter (s) about every 6 months depending on
activity. If your spa stops heating, please check to make sure the filter (s) are clean and free
of debris before contacting the dealer.
15
Care of the Exterior
Spa Shell
Your spa shell is made of acrylic. Stains and dirt generally will not adhere to the surface.
Using a soft rag or a nylon scrubber should easily remove most dirt. Most household
chemicals are harmful to your spa’s shell. See your dealer for the best product to use. The
only products which have passed the manufacture’s test are Soft Scrub and Windex.
Sodium bicarbonate (baking soda) can also be used for minor surface cleaning. Always
thoroughly rinse off any spa shell cleaning agent with fresh water.
NOTES: Iron and copper in the water can stain the spa shell if allowed to go unchecked.
Ask your Raindance Spa’s technician about a stain and scale inhibitor to use if your spa
water has a high concentration of dissolved minerals.
The use of alcohol or any household cleaners other than those listed to clean the spa shell
surface is NOT recommended. DO NOT use any cleaning products containing abrasives or
solvents since they may damage the shell surface. NEVER USE HARSH CHEMICALS!
Damage to the shell by the use of harsh chemicals is not covered under the warranty.
IMPORTANT: Some surface cleaners contain eye and skin irritants. Keep all cleaners out
of the reach of children and use care when applying.
Maintenance Free Cabinet
Raindance Spa’s consists of a rigid polymer that combines the durability of plastic with the
beauty of redwood or gray looking cabinet. Cabinet will not crack, peel, blister, or
delaminate. Cleaning consists of simply spraying the cabinet with a mild soap and water
solution to remove any stains and residue.
16
Chemicals
Chemicals are used to sanitize the water and to balance the pH level. This is done to
maintain clear and sanitary water at all times. When the water chemistry is out of balance, a
number of things can happen: many types of bacteria form inside the warm waters of your
spa and inside the plumbing and fittings. For this reason, the sanitized level must be
constantly monitored and adjusted. The pH level affects how well the sanitizer works and
the acidity level of the water. The closer to 7.2 the Ph, the more effective the sanitizing
agent will work, and last.
Bromine is the most common form of sanitizer. Bromine has been found to be very
compatible with warmer waters in the spa environment. Bromine is the most widely used
chemical as a sanitizer in spas. A pH level of 7.2-7.8 is considered a satisfactory level with
7.4 being the ideal level. At this level, your sanitizer works more effectively and the water
is close to a neutral pH level. As the pH level rises a little, more chemicals are needed to
effectively eliminate the bacteria. However, as the pH lowers to 7.0, the water becomes
more acidic to the equipment and lends itself to the rapid growth of bacteria. The opposite is
also true that high Ph levels have caustic reactions. Chemicals affect pH levels and improper
levels can even give a false Ph reading.
Therefore, it is important to keep your chemical balance in check as much as possible.
Your warranty does not cover pH damage to your equipment such as cracking or peeling of
jet housing. Continuous high Ph levels will cause sealing and will stop heater from working
and very low Ph levels will cause trace metals in water and cause malfunctions.
Remember:
You cannot keep the chemicals perfectly balanced in a spa constantly. Don’t try to
keep everything in perfect order everyday. Check the chemical balance every two or three
days. Maintain, as nearly as you can, an ideal level of sanitizer. Keep the pH level in the
upper level of ideal range, somewhere around 7.4-7.8. If it drifts above this level, do not try
to bring the level down rapidly.
A non-chlorine shock should be used a minimum of once per week to maintain accurate
levels. Defoamer is available to reduce the foaming caused by high chemical levels. Be
aware that too much Defoamer will cause cloudiness of the water. 1-inch Bromine tablet
should be used in an adjustable floater for proper dispersal. When water chemistry is
unstable or water turbidity (cloudy water) is present, drain and re-fill Spa.
17
Ozonator
First discovered in the 1840’s, ozone has been used to treat drinking water for more than 90
years. Then in 1937, the Mohawk Cruiser Swim & Tennis Club in Bryam, NJ became the
first commercial swimming pool in the United States to utilize an ozone-only oxidation and
disinfecting system. Despite its long history of use as a drinking water oxidizer and
sanitizer, ozone has only seen significant use in pools and spas in the U.S. in the last 15 to
20 years.
Ozone has found a niche in the spa industry as a very popular sanitizer. It is a very
fast acting and powerful sanitizer that destroys almost all types of bacteria that it comes in
contact with. However, it is only effective for a few minutes, so the supply must constantly
be replenished. This is done by the use of an ozone generator. Although ozone is a very
powerful sanitizer, it has no residual properties, which means that you must still use
chemicals. However, the amount necessary will be greatly reduced. The low speed mode on
pump 1 is the only mode in which the ozonator will operate.
Ozone is an unstable form of oxygen and will react with oxidized bacteria much
more rapidly than the chemicals we use. Ozone creates no residuals or by-products when
they oxidize or eliminate bacteria. The ozone generator produces ozone that is immediately
introduced into the spa water by an injector system. Therefore, you will spend less time
cleaning and adding chemicals and will use far fewer chemicals. This system provides a
means of the interior of the spa with a soft cloth and warm water. This should adequately
clean the acrylic surface. If necessary, apply a small amount of multi-purpose non-abrasive
cleaner to the cloth to clean the badly soiled areas. Rapid disbursement throughout the
water. Ozone is the pH neutral, so it does not affect the pH of the water. Therefore, the pH
level will be more stable.
What Is Ozone?
Ozone is “active oxygen” (Each ozone molecule consists of three oxygen atoms.)
Ozone is a natural purifier.
Ozone is the most powerful oxidizer safely used.
Ozone is the alternative water purifier to traditional chemicals such as chlorine and
bromine.
18
What Does Ozone Do?
Ozone destroys bacteria, viruses, mold and mildew.
Ozone eliminates spores, cysts, yeast, and fungus.
Ozone eliminates oils and other contaminants in water.
Ozone keeps water clean and sparkling clear.
Ozone keeps water fresh.
CARE OF THE SPA PILLOWS
The spa pillows will provide years of comfort if treated with care. They have been
positioned above the water level to minimize the bleaching effects of chlorinated water and
other spa water chemicals. To extend their life, whenever the spa shell is being cleaned, the
spa pillows should be removed and cleaned separately . Body oils can be removed with a
mild soap and water solution. ALWAYS rinse pillows thoroughly to remove any soap
residue. If the spa is not going to be used for a long period of time ( during a vacation or if
the spa is winterized) , or if when water is being super-chlorinated,. The spa pillows should
be removed until the next use of the spa.
To remove and replace the spa pillows:
1. Carefully lift one end of the pillow away from the spa shell.
2. Continue lifting one end until all pillow retainers are released from the spa shell.
IMPORTANT: Just pulling the pillow straight up and out of the shell recesses will
eventually damage the pillow. This abuse is not covered under warranty.
3. To re-install the spa pillow, carefully bend the pillow slightly to allow one of the
pillow retainers to slip into recess in the back of the shell.
4. Keeping the pillow slightly bent, slide the other pillow retainer into the recess in the
back of the sheet.
5. After all the pillow retainers are in place, press the pillow down into the recess in the
spa shell.
19
DO’S AND DON’TS
DO Add all chemicals slowly with the hydro jets operating in high speed.
DO Use care when handling chemicals.
DO Store granulated chlorine in a cool, dry place to maintain the chlorine’s freshness.
Granulated chlorine will degrade if stored improperly or for a long period of time. Do not
store in sunlight.
DO Maintain total alkalinity level within the recommended range of 80 to 120 ppm. The
calcium hardness level should be maintained in the 120 to 250 ppm range.
DO Maintain the pH level within the recommended range of 7.4 to 7.6.
DO Maintain proper chemical balance to reduce the risk of catching or spreading infections.
DO Use granulated chlorine/ bromine produced specifically for portable spas.
DO Make sure the spa is connected to a Ground Fault Circuit Interrupter (GRCI) protected
circuit. This GFCI is required by the National Electrical Code (NEC) and must be installed
by a licensed electrician. Test the GFCI monthly.
DO Test the water with your hand before entering the spa to be sure it is comfortable.
DO Remember that wet surfaces can be slippery. Take care when entering and exiting the
spa. Only enter by way of the steps in the spa. Do not step on spa edges or filter lids.
DO Use the thermal cover when the spa is not in use, empty or full.
DO Clean the filter cartridge weekly.
DO NOT Use swimming pool chemicals in your spa.
DO NOT Use household bleach (liquid sodium hypo chlorine).
DO NOT Use swimming pool (muriatic) acid to lower pH. Many swimming pool water
20
care products can cause damage to spa and equipment.
DO NOT Allow anyone to be in the spa while chemicals are being added or are dissolving.
DO NOT Use incorrect products such as Trichlor, which has a very low pH (2.6), dissolves
very slowly, is highly concentrated, and was designed for concrete or plaster swimming
pools. It will cause damage to your spa!
DO NOT Use the spa for long periods of time at temperatures over 104°F(40 C).
DO NOT Operate the spa without water. Turn the circuit breaker off before emptying the
spa and while it is empty.
DO NOT Store chemicals in the spa’s equipment box compartment!
DO NOT Open the electrical box. There are no user serviceable parts inside.
DO NOT Operate the pump(s) on hi-speed for extended periods of time with the cover on.
Extended hi-speed pump operation will cause a slow build-up due to water friction, which
could trip the spa’s hi-limit thermostat.
21
Wiring Diagram
Remove Power from the spa/hot tub and circuit breaker panel BEFORE working on electrical equipment! Failure to comply with this
requirement, can lead to electrical shock and/or electrocution! This is a GENERAL GUIDE ONLY! USE this information at your
OWN RISK!
Consult with or hire a licensed electrician before beginning any work of this type.
Any hot tub or spa installation must have a remote cut off switch, that must be mounted at least five feet away from, and within sight of
the spa. Be sure that your remote cut off is NOT installed closer than this.
SPA PACK WIRING: The Spa pack comes with components already attached to the proper plug. If components are taken off they will
hook back up from left to right as follows: J23 is Red plug (pump 1). J50 TV plug is not used. J17 is Pink plug (pump 2). J47 is not used.
J29 is White plug (Prozone). J20 is White plug (Light).
22
Parts
Pillows
Stereo Components
Stereo
JBL
Topside
Spa Pack
Spa Keypad
23
Speaker
Stereo
Power
Adapter
Power Cord
Parts Cont.
Ozonator
Filters
Spa Pumps
Pump & Motor
Bleed Valve Bleed Valve
Drop In Filter
Plumbing Components
Flex Pipe
Diverter Assembly Waterfall Assembly
Diverter
Gate Valve
6 port manifold
10 port manifold
Filter Basket
Waterfall Knob
Air Diverter
Master Jet
Master Jet
Housing
24
Mini-Master Jet
Standard Jet
Housing
Drain Bib
Standard Jet
Suction Valve
Mini Jet
Standard Jet
Housing
Filter Basket
Parts Cont.
Cabinet Pieces
Slatted Synthetic
Cabinet
Synthetic
Cabinet
Light Components
Light Assembly
Subzero Insulation
25
Light
Round
Corner
Slatted
Cabinet
26
Diagnostic Messages
Message
Meaning
Action Required
No message on display.
Power has been cut off to the spa.
The control panel will be disabled until power returns. Spa settings
will be preserved until next power up.
Temperature unknown.
After the pump has been running for 2 minutes, the current water
temperature will be displayed.
“Overheat” - The spa has shut down.* One of the
sensors has detected 118°F/47.8°C at the heater.
DO NOT ENTER THE WATER. Remove the spa cover and allow
water to cool. Once the heater has cooled, reset by pushing any
button. If spa does not reset, shut off the power to the spa and call
your dealer or service organization.
“Overheat” - The spa has shut down.* One of
the sensors has detected that the spa water is
110°F/43.5°C.
DO NOT ENTER THE WATER. Remove the spa cover and allow
water to cool. At 107°F/41.7°C, the spa should automatically reset.
If spa does not reset, shut off the power to the spa and call your
dealer or service organization.
Spa is shut down.* The sensor that is plugged into
the Sensor “A” jack is not working.
If the problem persists, contact your dealer or service organization.
(May appear temporarily in an overheat condition.)
Spa is shut down.* The sensor that is plugged into
the Sensor “B” jack is not working.
If the problem persists, contact your dealer or service organization.
(May appear temporarily in an overheat condition.)
Sensors are out of balance. If alternating with spa
temperature, it may just be a temporary condition.
If flashing by itself, spa is shut down.*
If the problem persists, contact your dealer or service organization.
A significant difference between temperature
sensors has been detected. This could indicate a
flow problem.
If the water level is normal, make sure all pumps have been primed.
If problem persists, contact your dealer or service organization.
Persistent low flow problems. (Displays on the
message within 24 hours.)
fifth occurrence of
Heater is shut down, but other spa functions
continue to run normally.
message. Heating capability of the
Follow action required for
spa will not reset automatically; you may press any button to reset.
Possible inadequate water, poor flow, or air
bubbles in detected in the heater. Spa is shut down
for 15 minutes.
If water level is normal, make sure all pumps have been
primed. Press any button to reset. This message will reset
within 15 minutes. If problem persists, contact your dealer or
service organization.
Inadequate water detected in heater. (Displays on
third occurrence of
message.) Spa is
shut down.*
Follow action required for
message. Spa will not automatically
reset. Press any button to reset manually.
“Ice” - Potential freeze condition detected.
No action required. All equipment will automatically activate
regardless of spa status. The equipment stays on 4 minutes after the
sensors detect that the spa temperature has risen to 45°F/7.2°C or
higher. An optional freeze sensor may be added to protect against
extraordinary freeze conditions. Auxiliary freeze sensor protection is
advisable is colder climates. See your dealer for details.
* - Even when spa is shut down, some equipment will
turn on if freeze protection is needed.
Warning! Shock Hazard! No User Serviceable Parts.
Do not attempt service of this control system. Contact your dealer or service organization for assistance.
Follow all owner’s manual power connection instructions. Installation must be performed by a licensed
electrician and all grounding connections must be properly installed.
P/N 40790_C 12/19/2007
27
Limitations and Disclaimer
Raindance Spas reserves the right to terminate the warranty any time the spa has been determined to have been
subject to alteration, misuse, or abuse. Misuse or abuse is defined as but limited to the following:
Use of spa in non-residential situation
Water temperatures outside the range of 32 to 110 degrees
Damage caused by clogged or dirty filters
Damage of spa caused by absence of a hard cover
Damage of Components from improper chemical levels
Use of any type of acid
Water left standing in the spa.
The warranty is terminated if any repairs have been attempted or made by anyone other than an authorized
agent of Raindance Spas. This warranty is terminated if any extra components are installed after the manufactured date.
No one has the authorization to add, take away or make promise of performance or representation not included
in Raindance Spas’ warranties that accompany each Raindance Spa. ( Raindance Spas’ would not be taken
upon to go by any other warranty). There are no additional warranties, express or implied, which extend beyond the terms of the warranty.
Raindance Spas is not responsible for the cost of chemicals and water for warranty issues. If a spa cannot be
repaired in the field and must be returned to the factory, approval must be obtained by Raindance Spas Customer Care Department. Cost for removal of the defective spa and delivery and installation of the replacement
spa are the sole responsibility of the consumer and will not under any circumstances be covered by Raindance
Spas.
All warranty issues must be pre-approved by Raindance Spas Customer Care
28