1
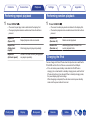
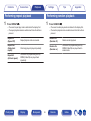
Contents
Connections
Playback
Settings
Tips
Appendix
.
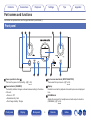
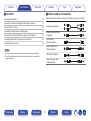
D/A CONVERTER
HD-DAC1
You can print more than one page of a PDF onto a single sheet of paper.
Front panel
Display
Rear panel
1
Remote
Owner’s Manual
Index
Contents
Connections
Playback
Display
Rear panel
Tips
Appendix
Connections
4
5
5
5
6
6
6
8
8
10
11
12
Accessories
About the remote control
Inserting the batteries
Operating range of the remote control unit
Main features
High quality sound
High performance
Part names and functions
Front panel
Display
Rear panel
Remote control unit
Front panel
Settings
Connecting an amplifier
Connecting to a device with digital audio output connectors
Connecting a PC or Mac
Connecting a smartphone or portable player
Connecting an iPod or USB memory device to the USB port
REMOTE CONTROL jack
Connection
Setting
Connecting the power cord
2
Remote
Index
16
17
18
19
20
22
22
22
23
Contents
Connections
Playback
Settings
Playback
Appendix
Settings
Basic operation
Turning the power on
Selecting the input source
Adjusting the volume
Turning off the sound temporarily (Muting)
Switching the display’s brightness
Using as a D/A converter
Connecting and playing back from a computer (USB-DAC)
Connect and playback from a digital device (COAX/OPT1/OPT2)
Playing back an iPod
Playing an iPod
Setting operation mode (Remote iPod mode)
Performing repeat playback
Performing random playback
Charging the iPod
Playing a USB memory device
Playing files stored on USB memory devices
Performing repeat playback
Performing random playback
Playing audio from devices connected to the AUX connector
Front panel
Tips
Display
Rear panel
25
25
26
26
26
27
28
29
37
38
39
40
41
41
41
42
43
45
45
46
47
48
49
49
49
50
Menu map
Menu operation
AMP Gain
Dimmer
iPodMode
AutoStby
Tips
51
52
53
Contents
Tips
Troubleshooting
Appendix
Playing back a USB memory devices
Playback order of files
About folders and files
How to handle media
D/A converter
Explanation of terms
Trademark information
Specifications
Index
3
Remote
Index
59
60
61
61
62
63
65
66
69
Contents
Connections
Playback
Settings
Tips
Appendix
Thank you for purchasing this Marantz product.
To ensure proper operation, please read this owner’s manual carefully before using the product.
After reading this manual, be sure to keep it for future reference.
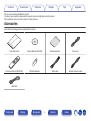
Accessories
.
.
.
.
Check that the following parts are supplied with the product.
Owner’s Manual (CD-ROM)
Remote control unit (RC001HD)
R03/AAA batteries
Safety Instructions
Power cord
.
.
.
.
Quick Start Guide
Remote connector cable
.
Audio cable
USB cable
Front panel
Display
Rear panel
4
Remote
Index
Connections
Contents
Playback
Settings
Tips
Appendix
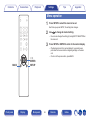
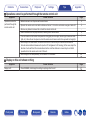
About the remote control
Inserting the batteries
NOTE
0 To prevent damage or leakage of battery fluid:
A Remove the rear lid in the direction of the arrow and remove it.
0 Do not use a new battery together with an old one.
0 Do not use two different types of batteries.
0 If the battery fluid should leak, carefully wipe the fluid off the inside of the battery
compartment and insert new batteries.
Operating range of the remote control
unit
.
Point the remote control unit at the remote sensor when operating it.
B Insert two batteries correctly into the battery compartment as indicated.
R03/AAA batteries
Approx. 7 m
.
30°
Front panel
.
C Put the rear cover back on.
Display
Rear panel
5
Remote
Index
30°
Contents
Connections
Playback
Settings
Tips
Appendix
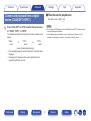
Main features
High quality sound
High performance
0 Large-capacitance block capacitor
0 Equipped with a USB-DAC function to support playback of high-
resolution sound sources
This unit supports the playback of high resolution audio formats such as
DSD (2.8/5.6 MHz) and PCM files up to 192 kHz/24 bits. It provides high
quality playback of high resolution files.
A large capacitance 3,300 μF capacitor carefully selected for its
acoustic characteristics is incorporated into the power supply circuit.
0 Audiophile-grade film capacitors and electrolytic capacitors
The unit’s features the same audiophile-grade film capacitors and
electrolytic capacitors specifically used in top-range models.
0 DIGITAL AUDIO IN connectors (COAXIAL/OPTICAL)
You can play back PCM signals up to 192 kHz/24 bits by inputting digital
audio signals from an external device into this unit.
0 Low noise amp due differential input HDAM, and equipped with a
low distortion filter circuit due to high speed HDAM®SA2 delivery
amp
0 Plays USB memory devices (MP3/WMA/AAC/WAV) and iPod®/
iPhone®
You can play back audio files stored on a USB memory device or iPod/
iPhone by connecting the USB memory device or iPod/iPhone to the
USB port.
0 Double-layered chassis
0 High-grade machined analog audio output connectors
0 High grade headphone circuit
This unit has a two-amplifier structure based on the design concept of
luxury models, comprising a current feedback voltage amplifier using
the HDAM®SA2 and a feedbackless Darlington power buffer. This
allows higher speeds without creating dynamic strain in response to
impedance changes in the headphones.
Front panel
Display
Rear panel
6
Remote
Index
Contents
Connections
Playback
Settings
Tips
0 Peripheral circuitry off function minimizes audio output signal
interference
In order to minimize noise from peripheral circuitry which could interfere
with the analog audio signal, this unit is equipped with a peripheral
circuitry off function which turns off the display.
0 Equipped with variable audio output connectors
In addition to the normal fixed audio output connectors, this unit is
equipped with variable audio output connectors that cooperate with the
volume of this unit. These can be connected to the Power Amplifier to
adjust the volume.
0 iPod® auto detect charges your device even after the unit
switches to standby mode (v p. 20)
0 Equipped with auto standby mode function that reduces power
consumption
Front panel
Display
Rear panel
7
Remote
Index
Appendix
Contents
Connections
Playback
Settings
Tips
Appendix
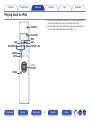
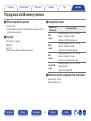
Part names and functions
For buttons not explained here, see the page indicated in parentheses ( ).
Front panel
q
w
e
r
.
y
u
i
o
t
Q0
A Power operation button (X)
This turns the power on/off (standby). (v p. 25)
C Input source select knob (INPUT SELECTOR)
These select the input source. (v p. 26)
B Power indicator (STANDBY)
The standby indicator changes as shown below according to the status
of the unit.
0 Power on : Off
0 Normal standby : Red
0 iPod charge standby : Orange
D Display
Information such as the playback status and input source is displayed
here.
Front panel
Display
Rear panel
E VOLUME knob
Adjusts the volume of the headphones and audio output connectors
(VARIABLE). (v p. 26)
8
Remote
Index
Contents
Connections
.
y u
i
o
Playback
Settings
Tips
Q0
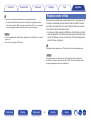
F SETUP button
Used to set up this unit.
G Remote control sensor
This receives signals from the remote control unit.
H DISPLAY OFF indicator
This indicator lights up when the display is off. (v p. 27)
I USB port
Used to connect iPod or USB memory devices. (v p. 20)
J Headphones jack (PHONES)
Used to connect headphones.
NOTE
To prevent hearing loss, do not raise the volume level excessively when using
headphones.
Front panel
Display
Rear panel
9
Remote
Index
Appendix
Contents
Connections
Playback
Settings
Tips
Appendix
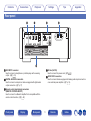
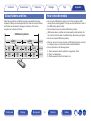
Display
The input source name, sampling frequency, setting values and other information are displayed here.
o iPod/USB playback indicator
o D/A converter display
w
e
.
.
q
A Input source indicator
This indicator displays the selected input source (USB-DAC/COAX/
OPT1/OPT2).
r
t
C Information display
This indicator displays the track information, etc.
D Playback mode indicators
1: Displayed during playback.
3: Displayed during pause.
B Sampling frequency display
This indicator displays the sampling frequency of the input audio signal.
E Time indicator
This indicator displays the elapsed time of the current track.
Front panel
Display
Rear panel
10
Remote
Index
Contents
Connections
Playback
Settings
Tips
Appendix
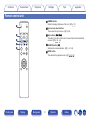
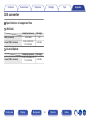
Rear panel
q
w
AUDIO IN
e
DIGITAL AUDIO IN
1
r
AC IN
REMOTE CONTROL
2
IN
INTERNAL
EXTERNAL
OUT
AUX
COAXIAL
OPTICAL
USB-DAC
AUDIO OUT
R
L
R
FIXED
L
VARIABLE
.
t
A AUX INPUT connector
Used to connect a smartphone or portable player with an analog
output. (v p. 16)
D AC inlet (AC IN)
Used to connect the power cord. (v p. 23)
E AUDIO OUT connectors
Used to connect devices equipped with analog audio inputs connectors
or an external power amplifier. (v p. 16)
B DIGITAL AUDIO IN connectors
Used to connect a computer or devices equipped with digital audio
output connectors. (v p. 17)
C Remote control input/output connectors
(REMOTE CONTROL IN/OUT)
Used to connect to a Marantz amplifier that is compatible with the
remote control function. (v p. 22)
Front panel
Display
Rear panel
11
Remote
Index
Contents
Connections
Playback
Settings
Tips
Appendix
Remote control unit
q
w
A DIMMER button
Adjust the display brightness of this unit. (v p. 27)
POWER
DIMMER
B Input source select buttons
These select the input source. (v p. 26)
USB-DAC
AUX
iPod/USB
OPT 1
OPT 2
COAX
e
r
RANDOM
t
MODE
C Skip buttons (8, 9)
This skips to the start of the track. Press and hold to fast-forward/fast
reverse. (v p. 39, 44)
REPEAT
D RANDOM button (P)
Switches the random playback. (v p. 41, 45)
MUTE
E MODE button
This switches the playback mode. (v p. 40, 43)
VOLUME
INFO
SETUP
.
BACK
Front panel
Display
Rear panel
12
Remote
Index
Contents
Connections
Playback
Settings
o
USB-DAC
AUX
iPod/USB
OPT 1
OPT 2
COAX
RANDOM
G Cursor buttons (uio p)
These select items. (v p. 39, 48)
H BACK button
Returns to the previous item. (v p. 48)
Q0
REPEAT
I POWER button (X)
This turns the power on/off (standby). (v p. 25)
MODE
MUTE
y
J Play/pause button (1/3)
Plays back or pauses a track. (v p. 39, 44)
VOLUME
INFO
u
BACK
SETUP
.
i
Front panel
Display
Appendix
F Information button (INFO)
This switches display items such as the album name and title name in
the playback screen. (v p. 39, 44)
POWER
DIMMER
Tips
Rear panel
13
Remote
Index
Contents
Connections
Playback
Settings
Appendix
K REPEAT button (L)
Switches the repeat playback. (v p. 41, 45)
POWER
DIMMER
Tips
L Stop button (2)
Stops playback. (v p. 39, 44)
USB-DAC
AUX
iPod/USB
OPT 1
OPT 2
COAX
RANDOM
REPEAT
MODE
MUTE
VOLUME
M VOLUME buttons (df)
Adjusts the volume of the headphones and the amplifier connected to
the audio output connectors (VARIABLE). (v p. 26)
Q1
Q2
N MUTE button (:)
This mutes the output audio. (v p. 26)
Q3
O ENTER button
This determines the selection. (v p. 39, 48)
INFO
Q4
Q5
SETUP
Q6
.
BACK
P SETUP button
The setting menu is displayed on the display. (v p. 48)
Front panel
Display
Rear panel
14
Remote
Index
Connections
Playback
Settings
o Contents
Appendix
o Cables used for connections
18
Connecting a smartphone or portable player
19
Connecting an iPod or USB memory device to the USB port
20
Connecting devices with remote control connectors
22
Connecting the power cord
23
Audio cable (supplied)
Remote connector cable
(supplied)
Optical cable
(Sold separately)
Coaxial digital cable
(Sold separately)
NOTE
0 Do not plug in the power cord until all connections have been completed.
0 Do not bundle power cords with connection cables. Doing so can result in
humming or noise.
Display
Rear panel
L
L
R
R
.
17
Connecting a PC or Mac
.
Connecting to a device with digital audio output connectors
Provide necessary cables according to the devices you want to connect.
.
16
.
Connecting an amplifier
Front panel
Tips
.
USB cable (supplied)
Stereo mini plug cable
(sold separately)
15
Remote
.
Contents
Index
Contents
Connections
Playback
Settings
Tips
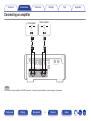
Connecting an amplifier
Power amplifier
Pre Amplifier
AUDIO
AUDIO
AUDIO
IN
R
L
AUDIO
IN
R
L
R
L
R
L
R
L
R
L
AUDIO IN
DIGITAL AUDIO IN
1
AC IN
REMOTE CONTROL
2
IN
INTERNAL
EXTERNAL
OUT
AUX
COAXIAL
OPTICAL
USB-DAC
AUDIO OUT
R
L
R
L
VARIABLE
.
FIXED
NOTE
Do not connect a power amplifier to the FIXED connectors. Connecting a power amplifier may cause damage to the speakers.
Front panel
Display
Rear panel
16
Remote
Index
Appendix
Contents
Connections
Playback
Settings
Tips
Appendix
Connecting to a device with digital audio output connectors
Use this connection to input digital audio signals to this unit, and convert the signals for playback using the D/A converter of this unit. (v p. 37)
CD Transport /
digital device
COAXIAL
OUT
OPTICAL
OUT
AUDIO IN
DIGITAL AUDIO IN
1
AC IN
REMOTE CONTROL
2
IN
INTERNAL
EXTERNAL
OUT
AUX
COAXIAL
OPTICAL
USB-DAC
AUDIO OUT
R
L
R
VARIABLE
.
FIXED
L
NOTE
0 Linear PCM signals with a sampling frequency of 32 kHz, 44.1 kHz, 48 kHz, 64 kHz, 88.2 kHz, 96 kHz, 176.4 kHz, or 192 kHz can be input into this device.
0 Do not input non-PCM signals, such as DTS and AAC. This causes noise and could damage the speakers.
Front panel
Display
Rear panel
17
Remote
Index
Contents
Connections
Playback
Settings
Tips
Appendix
Connecting a PC or Mac
By connecting a computer to the USB port (USB-DAC) on the rear panel of this unit using a commercially available USB cable (supplied), this unit can be
used as a D/A converter. (v p. 29)
Type A
USB 2.0 cable
(supplied)
Type B
AUDIO IN
DIGITAL AUDIO IN
1
Computer on which the driver software and audio
player software are installed
AC IN
REMOTE CONTROL
2
IN
INTERNAL
EXTERNAL
OUT
AUX
COAXIAL
OPTICAL
USB-DAC
AUDIO OUT
R
L
R
L
VARIABLE
.
FIXED
0 Install the dedicated driver software on the computer to enable communication between the computer and this unit in order to playback high-resolution sound source (DSD
signal or 192 kHz/24 bit PCM signal) audio available on the internet. (v p. 29)
0 Download the driver software from the HD-DAC1 page of the Marantz website.
NOTE
Use a cable that is 3 m or less to connect to the computer.
Front panel
Display
Rear panel
18
Remote
Index
Contents
Connections
Playback
Settings
Tips
Connecting a smartphone or portable player
Use this connection to input analog audio signals to this unit and play them back through the amplifier of this unit.
Smartphone/
portable player
ANALOG
OUT
AUDIO IN
DIGITAL AUDIO IN
1
AC IN
REMOTE CONTROL
2
IN
INTERNAL
EXTERNAL
OUT
AUX
COAXIAL
OPTICAL
USB-DAC
AUDIO OUT
R
L
R
VARIABLE
.
FIXED
L
Front panel
Display
Rear panel
19
Remote
Index
Appendix
Contents
Connections
Playback
Settings
Tips
Appendix
Connecting an iPod or USB memory device to the USB port
You can enjoy music stored on an iPod/iPhone or USB memory device.
0 To connect an iPod/iPhone to this unit, use the USB adapter cable that was supplied with the iPod/iPhone.
0 For operating instructions see “Playing an iPod” (v p. 39) or “Playing files stored on USB memory devices” (v p. 43).
iPod
USB memory
device
.
or
Marantz does not guarantee that all USB memory devices will operate or receive power. When using a portable USB hard disk drive (HDD) which came with an AC adapter, use
that device’s supplied AC adapter.
NOTE
0 USB memory devices will not work via a USB hub.
0 Playback is not possible when connected via the front panel’s USB port. Connection to a computer is possible via the digital input USB-DAC port (Type B) on the rear panel.
0 Do not use an extension cable when connecting a USB memory device. This may cause radio interference with other devices.
Front panel
Display
Rear panel
20
Remote
Index
Contents
Connections
Playback
Settings
Tips
o Supported iPod/iPhone models
• iPod classic
• iPod nano
• iPod touch
.
• iPhone
Front panel
Display
Rear panel
21
Remote
Index
Appendix
Contents
Connections
Playback
Settings
Tips
Appendix
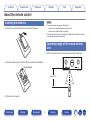
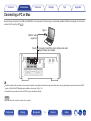
REMOTE CONTROL jack
When you use this unit connected to a Marantz amplifier, this unit receives operation signals sent from the amplifier and operates accordingly. Next,
configure the “Connections” and “Settings”.
This unit
Connection
AUDIO IN
DIGITAL AUDIO IN
1
REMOTE CONTROL
AC IN
Use the supplied remote connector cable to connect the REMOTE
CONTROL IN connector of this unit to REMOTE CONTROL OUT
connector of the amplifier.
2
IN
INTERNAL
EXTERNAL
OUT
AUX
COAXIAL
OPTICAL
USB-DAC
AUDIO OUT
R
L
FIXED
INTERNAL
EXTERNAL
Set to
“EXTERNAL”.
R
L
VARIABLE
Remote
connector
cable
(supplied)
Setting
Turn the EXTERNAL/INTERNAL switch on the unit to “EXTERNAL”.
0 This setting will disable remote sensor reception of this unit.
0 To operate the unit, point the remote control at the remote sensor of the
amplifier.
Signal flow
Amplifier
.
To use this unit by itself without connecting an amplifier, turn the switch to
“INTERNAL”.
Front panel
Display
Rear panel
22
Remote
Index
Contents
Connections
Playback
Settings
Tips
Connecting the power cord
Wait until all connections have been completed before connecting the power cord.
AC IN
REMOTE CONTROL
IN
INTERNAL
EXTERNAL
OUT
L
VARIABLE
To household power outlet
(AC230V, 50/60Hz)
.
Power cord (supplied)
Front panel
Display
Rear panel
23
Remote
Index
Appendix
Contents
Connections
Playback
Settings
Tips
Appendix
o Contents
25
Using as a D/A converter (USB-DAC)
28
Selecting the input source
26
Playing an iPod
38
Adjusting the volume
26
Playing a USB memory device
42
Turning off the sound temporarily (Muting)
26
Playing audio from devices connected to the AUX connector
46
Switching the display’s brightness
27
Turning the power on
Front panel
Display
Rear panel
24
Remote
Index
Contents
Connections
Playback
Settings
Tips
Appendix
Basic operation
DIMMER
Input
source
select
buttons
Turning the power on
POWER
POWER X
DIMMER
USB-DAC
AUX
iPod/USB
OPT 1
OPT 2
COAX
1
Press POWER X to turn on power to the unit.
The power indicator turns off.
You can also switch the power to standby by pressing X on the main unit.
RANDOM
REPEAT
o Switching the power to standby
MODE
MUTE
VOLUME
1
VOLUME
INFO
MUTE
Press POWER X.
The unit switches to standby mode.
NOTE
SETUP
.
BACK
Power continues to be supplied to some of the circuitry even when the power is in the
standby mode. When leaving home for long periods of time or when going on
vacation, unplug the power cord from the power outlet.
Front panel
Display
Rear panel
25
Remote
Index
Contents
Connections
Playback
Settings
Selecting the input source
1
Tips
Appendix
Adjusting the volume
1
Press the input source select button to be played back.
Press VOLUME df to adjust the volume.
USB-DAC:
Plays back audio files on the computer.
COAX:
Plays back the device connected to the
COAXIAL connector.
OPT1:
Plays back the device connected to the
OPTICAL 1 connector.
OPT2:
Plays back the device connected to the
OPTICAL 2 connector.
iPod/USB:
Plays back an iPod or USB memory device.
Mutes audio output from the headphones and audio output connectors
(VARIABLE).
AUX:
Plays back analog audio signals input to the
AUX connector.
1
You can also adjust the master volume by turning VOLUME on the main unit.
Turning off the sound temporarily
(Muting)
You can also select the input source by turning INPUT SELECTOR on the main unit.
Front panel
Display
Rear panel
Press MUTE :.
“MUTE ON” appears in the display.
To cancel mute, press MUTE : again.
26
Remote
Index
Contents
Connections
Playback
Settings
Tips
Switching the display’s brightness
The display brightness can be adjusted between four levels. Switching the
display off reduces a source of noise that affects sound quality, enabling
higher sound quality playback.
1
Press DIMMER.
0 When the display is turned off, the DISPLAY OFF indicator lights.
0 The brightness of the display can also be switched in the setting menu on the
display of the main unit.
Front panel
Display
Rear panel
27
Remote
Index
Appendix
Contents
Connections
Playback
Settings
Tips
Appendix
Using as a D/A converter
DIMMER
Digital audio signals input from an external device or computer into this
unit can be converted and output as analog signals using this unit’s D/A
converter. (D/A converter function)
POWER
POWER X
0 DSD is a registered trademark.
USB-DAC
OPT1
USB-DAC
AUX
iPod/USB
OPT 1
OPT 2
COAX
RANDOM
0 Microsoft, Windows Vista, Windows 7 and Windows 8 are either
registered trademarks or trademarks of Microsoft Corporation
in the United States and/or other countries.
0 Apple, Macintosh and Mac OS are trademarks of Apple Inc.,
registered in the U.S. and other countries.
COAX
OPT2
REPEAT
MODE
MUTE
VOLUME
INFO
SETUP
.
BACK
Front panel
Display
Rear panel
28
Remote
Index
Contents
Connections
Playback
Settings
Connecting and playing back from a
computer (USB-DAC)
You can enjoy high-quality audio playback from the D/A converter built in
to this unit by inputting PCM signal or DSD signal music files into this unit
from a computer via USB connection.
0 Before USB connecting this unit to your computer, install the driver
software in your computer.
0 Drivers do not need to be installed for Mac OS.
0 Also, you can use whichever commercially available or downloadable
player software you like to playback files on your computer.
Windows OS
Installing the dedicated driver (v p. 29)
Mac OS
Audio Device Settings (v p. 35)
n Installing the driver software
1
connected to the unit by a USB cable.
0 If the unit and your computer are connected by a USB cable and
the computer is switched on before installation, disconnect the
USB and restart the computer.
2
3
Rear panel
Disconnect the USB cable between your PC and the
unit.
0 The driver software cannot be installed correctly if your PC is
OS
0 Windows® Vista, Windows 7 or Windows 8/8.1
0 Mac OS X 10.6.3 or later
USB
0 USB 2.0: USB High speed/USB Audio Class Ver.2.0
Display
Appendix
o Installing the dedicated driver
(Windows OS only)
o Computer (recommended system)
Front panel
Tips
29
Download the dedicated driver from the “Download”
section of the HD-DAC1 page of the Marantz website
onto your PC.
Unzip the downloaded file, select the 32-bit or 64-bit
exe file that matches your Windows operating system,
and double-click the file.
Remote
Index
Contents
Playback
Settings
Install the driver.
Tips
Appendix
C The wizard menu is displayed. Click “Next”.
A Select the language to use for the installation.
B Click “OK”.
q
w
.
e
.
4
Connections
Front panel
Display
Rear panel
30
Remote
Index
Contents
Connections
Playback
Settings
D Read the Software Licensing Agreement, and click “I accept the
terms in the license agreement”.
E Click “Next”.
Tips
Appendix
F Click “Install” on the installation start dialog.
0 The installation starts. Do not perform any operation on the PC
until the installation is completed.
SOFTWARE LICENSING AGREEMENT
Marantz
y
t
.
.
r
Front panel
Display
Rear panel
31
Remote
Index
Contents
Connections
Playback
Settings
G In the Windows security dialog, select “Always trust software
from “DandM Holdings Inc.””.
H Click “Install”.
Tips
Appendix
I When the installation is completed, click “Finish”.
i
u
.
.
o
5
With the unit power off, connect the unit and PC using
a USB cable (supplied).
0 For the connection procedure, refer to the “Connecting a PC or
Mac” (v p. 18) section.
Front panel
Display
Rear panel
32
Remote
Index
Contents
6
Connections
Playback
Settings
9
Press POWER X.
0 When the unit power is turned on, the PC automatically finds and
connects to the unit.
8
Appendix
Checking audio output.
Outputs a TEST signal from the PC and checks the audio output
from the USB-DAC function.
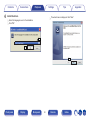
A Select “Digital Audio Interface” and click “Properties”.
0 The Digital Audio Interface Properties window is displayed.
Press the input source select button (USB-DAC) to
switch the input source to “USB-DAC”.
Sound
Checking the installed driver.
Playback Recording
A Click the “Start” button and click “Control Panel” on the PC.
0 The control panel setting list is displayed.
B Click the “Sound” icon.
0 The sound menu window is displayed.
C Check that there is a checkmark next to “Default Device” under in
“Digital Audio Interface” of the “Playback” tab.
0 When there is a checkmark for a different device, click
“Marantz USB Audio” and “Set Default”.
Sounds
Communications
Select a playback device below to modify its settings:
Digital
Audio
Dig
Audi
udio
o Inte
IInterface
nterface
Default Device
Speakers
Ready
q
Configure
Set Default
OK
.
7
Tips
Front panel
Display
Rear panel
33
Remote
Index
Cancel
Properties
Apply
Contents
Connections
Playback
Settings
Tips
NOTE
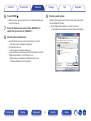
B Click the “Advanced” tab.
C Select the sampling rate and bit rate to be applied to the D/A
converter.
0 It is recommended that “2 channel, 24 bit, 192000 Hz (Studio
Quality)” is selected.
D Click “Apply”.
E Click “Test”.
0 Check that audio from this unit is output from the PC.
0 The dedicated driver must be installed in the PC before this unit is connected to a
PC. Operation will not occur correctly if connected to the PC before the dedicated
driver has been installed. Moreover, if the PC is running Windows XP as its OS,
the PC’s speed will decrease significantly, and a PC restart may be required.
0 Operation may fail in some PC hardware and software configurations.
Digital Audio Interface Properties
General
Supported Formats
Levels
Advanced
w
Default Format
t
Select the sample rate and bit depth to be used when running
in shared mode.
2 channel, 24 bit, 192000 Hz (Studio Quality)
Test
2 channel, 24 bit, 44100 Hz (Studio Quality)
2 channel, 24 bit, 48000 Hz (Studio Quality)
2 channel, 24 bit, 96000 Hz (Studio Quality)
2 channel, 24 bit, 192000 Hz (Studio Quality)
Allow applications to take exclusive control of this device
e
Give exclusive mode applications priority
r
Restore Defaults
Cancel
Apply
.
OK
Front panel
Display
Rear panel
Appendix
34
Remote
Index
Contents
Connections
Playback
Settings
Tips
D Select the “HD-DAC1” format.
0 It is normally recommended to set the format to “192000.0 Hz” and
“2ch-24 bit Interger”.
o Audio Device Settings (Mac OS X only)
.
A Move the cursor to “Go” on the computer screen, and then click
“Utilities”.
0 The utility list is displayed.
B Double-click “Audio MIDI Setup”.
0 The “Audio Devices” window is displayed.
C Check that “Use this device for sound output” is checked in “HDDAC1”.
0 If a different device is checked, select and “Secondary click” on “HDDAC1”, and then select “Use this device for sound output”.
.
E Click “Quit Audio MIDI Setup”.
Front panel
Display
Rear panel
Appendix
35
Remote
Index
Contents
Connections
Playback
Settings
o Playback
NOTE
Press USB-DAC to switch the input source to “USBDAC”.
Start playback on the computer’s player software.
The digital audio signal that is being input is shown as follows in the
display.
“USB-DAC:
or
xxxxk”
“USB-DAC:
DSD xxxM”
(xxxx is the sampling frequency.)
0 If the sampling frequency cannot be detected, “Unlocked” will be
displayed.
0 “Unsupported” is displayed when audio signals that are not
supported by this unit are input.
o Files that can be played back
See “D/A converter” (v p. 62).
Front panel
Appendix
0 Perform operations such as playback and pause on the computer. At this time, you
cannot perform operations with buttons on this unit or the remote control.
0 You can also control the volume and equalizer on the computer. Enjoy playing
music at the desired volume.
0 When this unit is functioning as a D/A converter, sound is not output from the
computer’s speakers.
0 If the computer is disconnected from this unit while the computer music playback
software is running, the playback software may freeze. Always exit the playback
software before disconnecting the computer.
0 When an error occurs on the computer, disconnect the USB cable and restart the
computer.
0 The sampling frequency of the music playback software and sampling frequency
displayed on this unit may differ.
0 Use a cable that is 3 m or less to connect to the computer.
Install the desired player software on your computer beforehand.
Use the rear panel USB-DAC port to connect this unit to a computer.
(v p. 18)
1
Tips
Display
Rear panel
36
Remote
Index
Contents
Connections
Playback
Settings
See “D/A converter” (v p. 62).
NOTE
Press COAX, OPT1 or OPT2 to switch the input source
to “COAX”, “OPT1” or “OPT2”.
0 Do not input non-PCM signals, such as Dolby Digital, and DTS. This causes noise
and could damage the speakers.
0 If the sampling frequency switches, such as from A mode to B mode in a CS
broadcast, muting may operate for 1 – 2 seconds, cutting the sound.
The digital audio signal that is being input is shown as follows in the
display.
“COAX
xxxxk”
or
“OPT1
xxxxk”
or
“OPT2
xxxxk”
(xxxx is the sampling frequency.)
0 If the sampling frequency cannot be detected, “Unlocked” will be
displayed.
0 “Unsupported” is displayed when audio signals that are not
supported by this unit are input.
Front panel
Display
Rear panel
Appendix
o Files that can be played back
Connect and playback from a digital
device (COAX/OPT1/OPT2)
1
Tips
37
Remote
Index
Contents
Connections
Playback
Settings
Tips
Appendix
Playing back an iPod
0 You can use the USB cable provided with the iPod to connect the iPod
DIMMER
with the unit’s USB port and enjoy music stored on the iPod.
POWER
0 For information on the iPod models that can be played back with this
POWER X
8
RANDOM
2
MODE
INFO
USB-DAC
AUX
iPod/USB
OPT 1
OPT 2
COAX
RANDOM
REPEAT
unit, see “Supported iPod/iPhone models” (v p. 21).
iPod/USB
1/3
9
REPEAT
MODE
MUTE
VOLUME
INFO
uio p
ENTER
BACK
SETUP
.
BACK
Front panel
Display
Rear panel
38
Remote
Index
Contents
Connections
Playback
Settings
2
3
Appendix
o iPod operation
Playing an iPod
1
Tips
Operation buttons
Press iPod/USB to switch the input source to “iPod/
USB”.
Function
MODE
Setting iPod operation mode
0 Switching between “Direct iPod” or “Remote
iPod” mode.
“Direct iPod” is displayed on the display of this unit.
INFO
Operate iPod itself directly while seeing the iPod
screen to play back music.
Text information display
0 Text information recorded on the media is
displayed.
uio p
Select the item
Connect the iPod to the USB port. (v p. 20)
The iPod display modes include “Direct iPod” and “Remote iPod”. By default, “Direct
iPod”, where you directly operate the iPod itself while looking at the iPod screen, is
set.
NOTE
0 Marantz will accept no responsibility whatsoever for any loss of iPod data.
0 Depending on the type of iPod and the software version, some functions may not
operate.
Front panel
Display
Rear panel
39
8, 9
Skip search (cue)
8, 9
(Press and hold)
Manual search (fast-reverse/fast-forward)
1/3
Playback / Pause
2
Stop
REPEAT L
Repeat playback (v p. 41)
0 Switching between All-track repeat and
Single-track repeat.
RANDOM P
Shuffle playback (v p. 41)
Remote
Index
Contents
Connections
Playback
Settings
During playback, press INFO.
0 This switches between the title name, artist name, album name and
track number.
In this mode, various lists and screens during playback on the iPod are
displayed on this unit.
This section describes the steps up to playing back tracks on the iPod in
“Remote iPod”.
2
Press MODE.
“Remote iPod” is displayed on the display of this unit.
Use ui to select the file to be played, then press
ENTER.
Playback starts.
Operation mode
Playable files
Direct iPod Remote iPod
Music file
P
Video file
z
Remote control unit
Active buttons (This unit)
iPod
P
P
P
P
z Only the sound is played.
Front panel
Display
Rear panel
Appendix
o Switching the display
Setting operation mode (Remote iPod
mode)
1
Tips
40
Remote
Index
Contents
Connections
Playback
Settings
Performing repeat playback
1
Tips
Appendix
Performing random playback
1
Press REPEAT L.
0 The current repeat play mode is indicated in the display first.
0 The repeat playback mode is switched each time the button is
Repeat playback mode is canceled.
Repeat One
(Single-track
repeat):
A file being played is played repeatedly.
Repeat All
(All-track repeat):
All files in the folder currently being played
are played repeatedly.
0 The current random play mode is indicated in the display first.
0 The random playback mode is switched each time the button is
pressed.
Repeat Off
(Repeat Off):
Press RANDOM P.
pressed.
Random Off
(Random off):
Disable random playback.
Random On
(Random on):
Randomly play back all tracks in the
current playback folder.
Charging the iPod
You can charge an iPod or iPhone when the input source is switched to
“iPod/USB” and the iPod or iPhone is connected to the USB port.
0 If the unit enters power standby mode while the iPod/iPhone is
charging, the unit will switch to standby charging mode, and the iPod/
iPhone will continue to be charged. When in standby charging mode,
the power display light turns orange.
When charging is completed, the unit enters normal power standby
mode and the power indicator turns red.
Front panel
Display
Rear panel
41
Remote
Index
Contents
Connections
Playback
Settings
Tips
Appendix
Playing a USB memory device
0 Playing back music stored on a USB memory device.
DIMMER
0 Only USB memory devices conforming to mass storage class standards
POWER
can be played on this unit.
POWER X
8
RANDOM
USB-DAC
AUX
iPod/USB
OPT 1
OPT 2
COAX
RANDOM
REPEAT
0 This unit can play back the following files.
0 WMA
1/3
0 MP3
9
0 WAV
0 AAC
MODE
MUTE
INFO
“FAT32” format.
iPod/USB
REPEAT
2
MODE
0 This unit is compatible with USB memory devices in “FAT16” or
VOLUME
INFO
uio p
ENTER
BACK
SETUP
.
BACK
Front panel
Display
Rear panel
42
Remote
Index
Contents
Connections
Playback
Settings
2
3
This unit stores the point at which playback of a file was stopped.
0 Resume playback works even if the USB memory device is
disconnected and then reconnected. However, if a different USB
memory device is connected, the resume information for the
previous USB memory device is deleted.
0 The resume information may be deleted when the USB memory
device is removed and files are added or deleted.
0 Press 2 while playback is stopped to delete the resume information.
“Resume Off” is displayed.
Press iPod/USB to switch the input source to “iPod/
USB”.
Connect the USB memory device to the USB port.
(v p. 20)
Press “MODE” to select “Folder” or “All”.
n About the display
NOTE
0 Do not remove the USB memory device from the unit when the USB memory
communication indicator is flashing. Doing so may damage the USB memory
device, or may corrupt the files recorded on the USB memory device.
0 Note that Marantz will accept no responsibility whatsoever for any problems
arising with the data on a USB memory device when using this unit in conjunction
with the USB memory device.
0 When “Folder” is selected
All the files in the selected folder are played.
0 When “All” is selected
After the selected folder and files are played, all the files in all
the folders are played.
4
5
Use ui to select the file or folder, then press ENTER.
Use ui to select the file, then press ENTER.
Playback starts.
Front panel
Display
Appendix
o Resume function
Playing files stored on USB memory
devices
1
Tips
Rear panel
43
Remote
Index
Contents
Connections
Playback
Settings
o USB operation
Appendix
o Files that can be played back
Operation buttons
Function
MODE
Switch to Folder playback mode
0 Switching between “Folder” or “All” mode.
INFO
Text information display
0 Text information recorded on the media is
displayed.
uio p
Select the item
8, 9
Skip search (cue)
8, 9
(Press and hold)
Manual search (fast-reverse/fast-forward)
1/3
Playback / Pause
2
Stop
REPEAT L
Repeat playback (v p. 45)
0 Switching between All-track repeat and
Single-track repeat.
RANDOM P
Random playback (v p. 45)
Front panel
Tips
Display
Rear panel
See “Playing back a USB memory devices” (v p. 59).
o Switching the display
During playback, press INFO.
0 This switches between the file name, title name, artist name, album
name and file number.
0 While a WAV file is being played back, only the file name is
displayed.
0 The player can display the following characters:
ABCDEFGHIJKLMNOPQRSTUVWXYZ
abcdefghijklmnopqrstuvwxyz
0123456789
! ” # $ % & : ; < ? @ \ [ _ ` l { ~ ^ ’( * + , - . / = (space)
44
Remote
Index
Contents
Connections
Playback
Settings
Performing repeat playback
1
Tips
Appendix
Performing random playback
1
Press REPEAT L.
0 The current repeat play mode is indicated in the display first.
0 The repeat playback mode is switched each time the button is
Press RANDOM P.
0 The current random play mode is indicated in the display first.
0 The random playback mode is switched each time the button is
pressed.
pressed.
Repeat Off
(Repeat Off):
Repeat playback mode is canceled.
Random Off
(Random off):
Disable random playback.
Repeat One
(Single-track
repeat):
A file being played is played repeatedly.
Random On
(Random on):
All tracks in the playback range set by
MODE (Folder/All) are played back in
random order.
Repeat All
(All-track repeat):
All tracks in the playback range set by
MODE (Folder/All) are played back
repeatedly.
Front panel
Display
Rear panel
45
Remote
Index
Contents
Connections
Playback
Settings
Tips
Appendix
Playing audio from devices connected to the AUX connector
AUX
You can connect a smartphone or portable player to the AUX connector of
this unit and play back audio.
POWER
DIMMER
USB-DAC
AUX
iPod/USB
OPT 1
OPT 2
COAX
RANDOM
1
2
3
REPEAT
Press AUX to switch the input source to “AUX”.
Connect a smartphone or portable player to the AUX
connector of this unit. (v p. 19)
Play the component connected to this unit.
MODE
MUTE
VOLUME
INFO
SETUP
.
BACK
Front panel
Display
Rear panel
46
Remote
Index
Contents
Connections
Playback
Settings
Tips
Appendix
Menu map
By default, this unit has recommended settings defined. You can customize this unit based on your existing system and your preferences.
Setting items
Description
Page
AMP Gain
Set the gain of the headphone amplifier.
49
Dimmerz
This switches the brightness of the display.
49
iPodModez
Set whether to operate the iPod from this unit or on the iPod.
49
AutoStby
Sets whether to automatically switch the unit to the standby mode when the unit remains in the stop
mode for more than 30 minutes.
50
z Displayed when SETUP is pressed on this unit.
Front panel
Display
Rear panel
47
Remote
Index
Contents
Connections
Playback
Settings
1
USB-DAC
AUX
iPod/USB
OPT 1
OPT 2
COAX
RANDOM
2
REPEAT
3
VOLUME
INFO
SETUP
0 You can also change the setting by turning INPUT SELECTOR on
Press SETUP or ENTER to return to the normal display.
0 The display returns to the normal display if no operations are
ENTER
SETUP
.
BACK
Use o p to change to desired setting.
performed for 5 seconds after configuring settings on the main
unit.
0 To return to the previous item, press BACK.
o p
BACK
Press SETUP to select the menu to be set.
Each time you press SETUP, the setting item changes.
the main unit.
MODE
MUTE
Front panel
Display
Appendix
Menu operation
POWER
DIMMER
Tips
Rear panel
48
Remote
Index
Contents
Connections
Playback
Settings
Tips
AMP Gain
Dimmer
Set the gain of the headphone amplifier. Set this according to the
impedance of the connected headphones. It is recommended that this is
set on the “Low” side if the headphones have low impedance and on the
“High” side if they have high impedance.
This switches the brightness of the display.
Low
(Default):
Set the gain of the headphone amplifier to
“Low”.
Mid:
Set the gain of the headphone amplifier to
“Mid”.
High:
Set the gain of the headphone amplifier to
“High”.
Appendix
Off:
Turns the display off.
Dark:
Very low display brightness.
Dim:
Reduced display brightness.
Bright
(Default):
Normal display brightness.
You can also adjust the display by pressing DIMMER on the remote control unit.
iPodMode
NOTE
The headphone volume varies depending on the “AMP Gain” setting. Decrease the
volume or mute the audio first if changing this setting while listening to audio.
Set whether to operate the iPod from this unit or on the iPod.
Direct
(Default):
Operate the iPod on the iPod itself.
Remote:
Operate the iPod from this unit and the remote
control unit.
Operation mode can also be switched by pressing MODE on the remote control unit.
Front panel
Display
Rear panel
49
Remote
Index
Contents
Connections
Playback
Settings
Tips
AutoStby
When this unit is in the stop state and there is no input signal and
operation for 30 minutes, it automatically enters the standby mode.
On
(Default):
Enable Auto Standby mode.
Off:
Disable Auto Standby mode.
When iPod is being charged, this unit enters the power standby mode after charging.
Front panel
Display
Rear panel
50
Remote
Index
Appendix
Contents
Connections
Playback
Settings
Tips
Appendix
Contents
o Tips
o Troubleshooting
I want to enjoy analog output audio at higher quality
52
Power does not turn on / Power is turned off
53
I want to playback just the specified folder
52
Operations cannot be performed through the remote control unit
54
Display on this unit shows nothing
51
No sound comes out
51
Sound is interrupted or noise occurs
51
PC or Mac files cannot be played back
56
Audio from digital devices cannot be played back (Coaxial/Optical)
56
I want to delete the resume information for playback of a USB memory
device
52
I want to display the title, etc. of the file currently playing back on the
iPod on this unit’s display
51
I want to playback WAV files
52
I want to adjust the volume with the volume controls of this unit when
the Power Amplifier is connected
52
Front panel
Display
Rear panel
51
iPod cannot be played back
56
USB memory devices cannot be played back
57
File names on the iPod/USB memory device are not displayed
properly
58
Remote
Index
Contents
Connections
Playback
Settings
Tips
Tips
I want to enjoy analog output audio at higher quality
0 Press the DIMMER button to turn the display off. (v p. 27)
I want to playback just the specified folder
0 Press the MODE button to set the playback mode to “Folder”. (v p. 43)
I want to delete the resume information for playback of a USB memory device
0 In the stop mode, press the 2 button.
I want to display the title, etc. of the file currently playing back on the iPod on this unit’s display
0 Press the MODE button to set Remote iPod mode. (v p. 40)
I want to playback WAV files
0 This unit can playback WAV files that are stored on a USB memory device. (v p. 42)
I want to adjust the volume with the volume controls of this unit when the Power Amplifier is connected
0 Connect the Power Amplifier to the audio output connectors (VARIABLE). (v p. 16)
Front panel
Display
Rear panel
52
Remote
Index
Appendix
Contents
Connections
Playback
Settings
Tips
Appendix
Troubleshooting
1. Are the connections correct?
2. Is the set being operated as described in the owner’s manual?
3. Are the other devices operating properly?
If this unit does not operate properly, check the items listed in the table below.
Should the problem persist, there may be a malfunction. In this case, disconnect the power immediately and contact your store of purchase.
o Power does not turn on / Power is turned off
Symptom
Power is not turned on.
Power automatically turns
off.
Front panel
Cause / Solution
Page
0 Check whether the power plug is correctly inserted into the power outlet.
23
0 This unit is in standby mode. Press X on the unit or POWER X on the remote control.
25
0 The Auto Standby mode is on. The Auto Standby mode switches the unit to standby mode when the unit
50
is not operated for approximately 30 minutes. To disable Auto Standby mode, set “AutoStby” on the menu
to “Off”.
Display
Rear panel
53
Remote
Index
Contents
Connections
Playback
Settings
Tips
Appendix
o Operations cannot be performed through the remote control unit
Symptom
Operations cannot be
performed through the
remote control unit.
Cause / Solution
Page
0 Batteries are worn out. Replace with new batteries.
5
0 Operate the remote control unit within a distance of about 7 m from this unit and at an angle of within 30°.
5
0 Remove any obstacle between this unit and the remote control unit.
-
0 Insert the batteries in the proper direction, checking the q and w marks.
5
0 The set’s remote control sensor is exposed to strong light (direct sunlight, inverter type fluorescent bulb
-
0 When using a 3D video device, the remote control unit of this unit may not function due to effects of
-
0 When using this unit independently, set the switch to “INTERNAL”.
22
light, etc.). Move the set to a place in which the remote control sensor will not be exposed to strong light.
infrared communications between units (such as TV and glasses for 3D viewing). In this case, adjust the
direction of units with the 3D communications function and their distance to ensure they do not affect
operations from the remote control unit of this unit.
o Display on this unit shows nothing
Symptom
Display is off.
Front panel
Cause / Solution
Page
0 Press DIMMER, and change the setting to anything other than off.
Display
Rear panel
54
Remote
27
Index
Contents
Connections
Playback
Settings
Tips
Appendix
o No sound comes out
Symptom
No sound is produced. Or
sound is distorted.
When the volume is
increased, sound from the
audio output connectors
(VARIABLE) is distorted.
Cause / Solution
Page
0 Check the connections for all devices.
15
0 Insert connection cables all the way in.
-
0 Check that input connectors and output connectors are not reversely connected.
-
0 Check cables for damage.
-
0 Check the amplifier’s functions and controls and adjust as necessary.
-
0 Check that a proper input source is selected.
26
0 The volume is set to the minimum level. Adjust the volume to a suitable level.
26
0 Cancel the mute mode.
26
0 Switch “AMP Gain” to “Mid” or “High” if using headphones with high impedance or low sensitivity.
-
0 If the “AMP Gain” setting is “High” or “Mid”, switch it to “Low”.
49
o Sound is interrupted or noise occurs
Symptom
Cause / Solution
Page
Sound is interrupted during 0 Do not start applications other than the player software while playing music on your computer.
playback of tracks saved
on a computer.
Front panel
Display
Rear panel
55
Remote
Index
-
Contents
Connections
Playback
Settings
Tips
Appendix
o PC or Mac files cannot be played back
Symptom
Cause / Solution
Page
“Unlocked” is displayed.
0 When digital audio signals cannot be detected properly, “Unlocked” is displayed.
36
“Unsupported” is
displayed.
0 “Unsupported” is displayed when audio signals that are not supported by this unit are input. Check the
36
0 If the computer you use is “Mac OS”, please check if the “HD-DAC1” format is set below “192000.0 Hz”
-
settings on your computer or player software.
using the “Audio MIDI Setup”.
o Audio from digital devices cannot be played back (Coaxial/Optical)
Symptom
Cause / Solution
Page
“Unlocked” is displayed.
0 When digital audio signals cannot be detected properly, “Unlocked” is displayed.
37
“Unsupported” is
displayed.
0 “Unsupported” is displayed when audio signals that are not supported by this unit are input. Check the
audio output signal format from your digital device.
37
o iPod cannot be played back
Symptom
iPod cannot be connected
or “Error 5” is displayed.
Cause / Solution
Page
0 When using iPod by connecting it to the USB port, some iPod variations are not supported.
21
0 When iPod is connected by using a USB cable other than the genuine cable, iPod may not be
-
recognized. Use a genuine USB cable.
Front panel
Display
Rear panel
56
Remote
Index
Contents
Connections
Playback
Settings
Tips
Appendix
o USB memory devices cannot be played back
Symptom
“No USB Device”, “Error 1”
or “Error 2” is displayed.
Cause / Solution
Page
0 This unit may not recognize the USB memory device due to poor connection, etc. Make sure that the
20
0 Mass storage class compatible USB memory devices are supported.
-
0 This unit does not support a connection through a USB hub. Connect the USB memory device directly to
-
connection is made properly by taking actions such as disconnecting and reconnecting the USB memory
device.
the USB port.
0 The USB memory device must be formatted to FAT16 or FAT32.
-
0 Not all USB memory devices are guaranteed to work. Some USB memory devices are not recognized.
-
Files on the USB memory
0 Files of a type not supported by this unit are not displayed.
device are not displayed or 0 This unit can display a file structure with up to 8 levels, up to 700 folders and up to 65,535 files in total.
“Error 3” is displayed.
Modify the folder structure of the USB memory device.
42
0 When multiple partitions exist on the USB memory device, only files on the first partition are displayed.
-
0 Files are created in a format that is not supported by this unit. Check the formats supported by this unit.
42
When using a type of portable hard disc drive compatible with the USB connection that requires power
from an AC adapter, use the AC adapter that came with the drive.
Files on a USB memory
device cannot be played.
Front panel
-
0 Files that are copyright protected cannot be played on this unit.
-
0 If a file is unplayable, “Error 5” is displayed and the next file is played.
-
Display
Rear panel
57
Remote
Index
Contents
Connections
Playback
Settings
Tips
Appendix
o File names on the iPod/USB memory device are not displayed properly
Symptom
The file names are not
displayed properly (“…”,
etc.).
Cause / Solution
Page
0 Characters that cannot be displayed have been used. On this unit, characters that cannot be displayed
are replaced with a “.” (period).
-
o Sound is distorted when AUX is used
Symptom
Sound is distorted when
AUX is used.
Front panel
Cause / Solution
Page
0 Turn down the volume of the playback device connected to the AUX connector.
Display
Rear panel
58
Remote
-
Index
Contents
Connections
Playback
Settings
Tips
Appendix
Playing back a USB memory devices
o USB-compatible file systems
o Compatible formats
FAT16 or FAT32
0 If the USB memory device is divided into multiple partitions, only the
top drive can be selected.
Playable files
(Extension)
o Tag data
ID3-TAG (Ver.1.x and 2.x)
WMA-TAG
AAC-TAG
(The title, artist, and album tag data are supported)
File specification
0 Sampling frequency : 32 / 44.1 / 48 kHz
MP3
(.mp3)
0 Bit rate : 32 kbps to 320 kbps
WMA
(.wma)
0 Bit rate : 48 kbps to 320 kbps
AAC
(.m4a/)
Linear PCM
(.wav)
0 File format : MPEG1 Audio Layer 3
0 Sampling frequency : 32 / 44.1 / 48 kHz
0 File format : Windows Media Audio
0 Sampling frequency : 32 / 44.1 / 48 kHz
0 Bit rate : 64 kbps to 192 kbps
0 File format : Advanced Audio Codec
0 Sampling frequency : 32 / 44.1 / 48 kHz
0 Bit length: 16 bit
0 File format : Linear PCM
o Maximum number of playable files and folders
Number of files : 65,535
Number of folders : 700
Front panel
Display
Rear panel
59
Remote
Index
Contents
Connections
Playback
Settings
Tips
Appendix
Playback order of files
0 This unit can only play music files that are not copyright protected.
When there are multiple folders containing music files, the playback order
of folders is automatically set when this unit reads the media. The files in
each folder are played back in the order in which the files were recorded
on the media, from the oldest date and time.
0 For playback of files recorded on USB, files in the first folder on the first
layer are played first, next folders on the second layer in the folder, then
next on the third layer, and so on in this order. Then accordingly files on
another first layer are played.
0 Content downloaded from pay sites on the Internet are copyright protected.
Also, files encoded in WMA format when ripped from a CD, etc., on a computer
may be copyright protected, depending on the computer’s settings.
NOTE
0 It is not compatible with an MP3 player, digital camera, a USB device for a mobile
phone, etc.
0 The unit cannot charge a USB device.
The playback order displayed on a PC may differ from the actual playback order.
NOTE
The playback order may differ from the order in which the folders or files were
recorded if you delete or add a folder or file on USB. This occurs because of data
recording specifications and is not a malfunction.
Front panel
Display
Rear panel
60
Remote
Index
Contents
Connections
Playback
Settings
About folders and files
0 Do not eject a USB memory device or turn off the unit while a USB
0
0
USB memory device
0
File 1
File 5
1st level
0
0
File 3
Folder 3
2nd level
File 6
File 7
3rd level
memory device is being played. This may result in malfunction or loss of
the USB memory device’s data.
Do not attempt to open or modify a USB memory device.
USB memory device and files can be damaged by static electricity. Do
not touch the metal contacts of a USB memory device with your fingers.
Do not use warped USB memory device.
After use, be sure to remove any disc or USB memory device, and store
it in its proper case, to avoid dust, scratches and deformation.
Do not store discs in the following places:
1. Places exposed to direct sunlight for long periods of time
2. Dusty or humid places
3. Places exposed to heat from heaters, etc.
.
File 4
Folder 2
File 2
Front panel
Display
Appendix
How to handle media
Music files recorded on a USB memory device are divided into large
segments (folders) and small segments (files). Files are stored in folders,
and folders can be placed for storage in a hierarchy. The unit can
recognize up to 8 levels of folders.
Folder 1
Tips
Rear panel
61
Remote
Index
Contents
Connections
Playback
Settings
Tips
D/A converter
o Specifications of supported files
n USB-DAC
DSD (2-channel)
Linear PCM (2-channel)
Sampling frequency
Bit length
2.8/5.6 MHz
1 bit
32/44.1/48/88.2/96/
176.4/192 kHz
16/24 bits
Sampling frequency
Bit length
32/44.1/48/64/88.2/96/
176.4/192 kHz
16/24 bits
n Coaxial/Optical
Linear PCM (2-channel)
Front panel
Display
Rear panel
62
Remote
Index
Appendix
Contents
Connections
Playback
Settings
Tips
Appendix
Explanation of terms
DSD (Direct-Stream Digital)
WMA (Windows Media Audio)
One of the audio data recording methods, it is the signal aspect used to
store audio signals on a super audio CD, and is Δ-Σ modulated digital
audio. It is configured of an array of single bit values at a 2.8224MHz
sampling rate.
This is the audio compression technology developed by Microsoft
Corporation.
WMA data can be encoded using Windows Media® Player.
To encode WMA files, only use applications authorized by Microsoft
Corporation. If you use an unauthorized application, the file may not work
properly.
MP3 (MPEG Audio Layer-3)
This is an internationally standardized audio data compression scheme,
using the “MPEG-1” video compression standard. It compresses the data
volume to about one eleventh its original size while maintaining sound
quality equivalent to a music CD.
Sampling frequency
Sampling involves taking a reading of a sound wave (analog signal) at
regular intervals and expressing the height of the wave at each reading in
digitized format (producing a digital signal).
The number of readings taken in one second is called the “sampling
frequency”. The larger the value, the closer the reproduced sound is to the
original.
MPEG (Moving Picture Experts Group), MPEG-2, MPEG-4
These are the names for digital compression format standards used for
the encoding of video and audio. Video standards include “MPEG-1
Video”, “MPEG-2 Video”, “MPEG-4 Visual”, “MPEG-4 AVC”. Audio
standards include “MPEG-1 Audio”, “MPEG-2 Audio”, “MPEG-4 AAC”.
Front panel
Display
Rear panel
63
Remote
Index
Contents
Connections
Playback
Settings
Tips
Dynamic range
The difference between the maximum undistorted sound level and the
minimum discernible level above the noise emitted by the device.
Bit rate
This expresses the read amount per 1 second of video/audio data
recorded in a disc. A larger number means higher sound quality, but also
means a larger file size.
Linear PCM
This is an uncompressed PCM (Pulse Code Modulation) signal. This is the
same system used for CD audio but uses 192 kHz, 96 kHz, and 48 kHz
sampling frequencies on Blu-ray Disc or DVD and provides higher
resolution than CD.
Front panel
Display
Rear panel
64
Remote
Index
Appendix
Contents
Connections
Playback
Settings
Tips
Appendix
.
Trademark information
“Made for iPod” and “Made for iPhone” mean that an electronic accessory
has been designed to connect specifically to iPod, or iPhone,
respectively, and has been certified by the developer to meet Apple
performance standards.
Apple is not responsible for the operation of this device or its compliance
with safety and regulatory standards. Please note that the use of this
accessory with iPod, or iPhone, may affect wireless performance. iPad,
iPhone, iPod, iPod classic, iPod nano, iPod shuffle and iPod touch are
trademarks of Apple Inc., registered in the U.S. and other countries.
0 Individual users are permitted to use iPhone, iPod, iPod classic, iPod
nano, iPod shuffle, and iPod touch for private copy and playback of
non-copyrighted contents and contents whose copy and playback is
permitted by law. Copyright infringement is prohibited by law.
Front panel
Display
Rear panel
.
Adobe, the Adobe logo and Reader are either registered trademarks or
trademarks of Adobe Systems Incorporated in the United States and/or
other countries.
65
Remote
Index
Contents
Connections
Playback
Settings
Tips
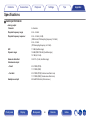
Specifications
o Audio performance
0 Analog output
Channels:
2-channels
Playable frequency range:
2 Hz – 96 kHz
Playable frequency response:
2 Hz – 50 kHz (–3 dB)
(DSD mode, PCM sampling frequency: 192 kHz)
2 Hz – 20 kHz
(PCM sampling frequency: 44.1 kHz)
S/N:
110 dB (Audible range)
Dynamic range:
106 dB (DSD/192 kHz) (Audible range)
101 dB (44.1 kHz)
Harmonic distortion:
0.0012 % (1 kHz, Audible range)
Unbalanced output
0 Fixed:
2.3 V RMS (PCM)
1.7 V RMS (DSD)
0 Variable:
2.3 V RMS (PCM) (Volume max./Gain: Low)
1.7 V RMS (DSD) (Volume max./Gain: Low)
Headphone output:
800 mW/32 Ω/ohms (Volume max.)
Front panel
Display
Rear panel
66
Remote
Index
Appendix
Contents
Connections
Playback
Settings
Tips
0 Analog input
Input sensitivity/impedance:
200 mVrms/22 kΩ/kohms
0 Digital input
Coaxial:
0.5 Vp-p / 75 Ω/ohms
Optical :
–27 dBm or lator
USB (Front):
USB Type A (USB 2.0 Full speed)
USB (Rear):
USB Type B (USB 2.0 High speed)
o General
Power supply voltage/frequency:
AC230 V, 50/60 Hz
Power consumption (EN60065) :
35 W
Power consumption in standby mode:
0.3 W
For the purpose of improvement, the specifications and design are subject to change without notice.
Front panel
Display
Rear panel
67
Remote
Index
Appendix
Contents
Connections
Playback
Settings
Tips
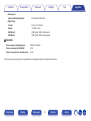
o Dimensions
159
12
40
250
270
51
8
Unit : mm
80
34
10
182
.
34
90
250
o Weight : 5 kg
Front panel
Display
Rear panel
68
Remote
Index
Appendix
Contents
Connections
Index
Playback
Settings
vD
vA
Accessories ..................................................... 4
Audio cable .............................................. 15, 16
Audio Device Settings (Mac OS X only) ......... 35
vB
Bit rate ...................................................... 59, 64
vC
Charging the iPod .......................................... 41
Coaxial digital cable ................................. 15, 17
Connecting a computer .................................. 18
Connecting an amplifier ................................. 16
Connecting an iPod ........................................ 20
Connecting a USB memory device ................ 20
Connecting a power cord ............................... 23
Tips
Appendix
vP
D/A converter function .............................. 28, 62
Playing back an iPod ...................................... 38
Display’s brightness ....................................... 27
Playing a USB memory device ....................... 42
DSD ......................................................... 62, 63
vF
vR
Random playback .................................... 41, 45
Front panel ....................................................... 8
Rear panel ...................................................... 11
Remote connector cable .......................... 15, 22
vI
Inserting the batteries ....................................... 5
Installing the dedicated driver (Windows OS
only) ............................................................... 29
Remote control connection ............................ 22
Remote control unit ........................................ 12
Repeat playback ...................................... 41, 45
vS
vM
Menu map ...................................................... 47
MP3 .................................................... 42, 59, 63
Sampling frequency ............................ 59, 62, 63
Selecting the input source .............................. 26
Stereo mini plug cable .................................... 19
Supported iPod/iPhone models ...................... 21
vO
Optical cable ............................................ 15, 17
vT
Turning the power on ..................................... 25
vU
USB cable .......................................... 15, 18, 20
USB-DAC ........................................... 18, 28, 62
Front panel
Display
Rear panel
69
Remote
Index
Contents
Connections
Playback
Settings
Tips
vW
WAV ......................................................... 42, 59
WMA .................................................. 42, 59, 63
Front panel
Display
Rear panel
70
Remote
Index
Appendix
.
D&M Holdings Inc.
3520 10359 00AM
71