1
98648-002-63
Sartorius Basic
Electronic Analytical and precision Balances
Installation and Operating Instructions
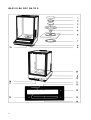
BA 210 S, BA 160 P, BA 110 S
2
BA 310 S, BA 310 P
3
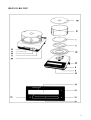
BA 110
4
BA 210
5
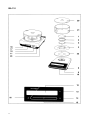
BA 4100 S, BA 3100 P, BA 2100 S, BA 610; BA 6100, BA 4100, BA 2100
6
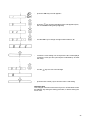
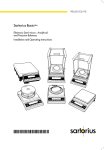
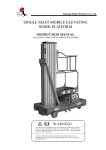
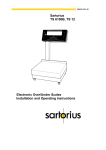
1 Weighing pan
12 Weight display
2 Compensating ring (depends on type of model)
13 CAL key
3 Pan support (depends on type of model)
14 Print key (for data output)
4 Protective ring (depends on type of model)
15 Tare control
5 Protective bushing (depends on type of model)
16 ON/OFF key
6 Weighing chamber base plate
(depends on type of model)
17 Data interface
7 Locking ring (depends on type of model)
18 AC jack
8 Leveling foot (depends on type of model)
19 Manufacturer’s label (on bottom of balance)
9 Menu access switch (depends on type of model)
20 Draft shield lid (depends on type of model)
10 Level indicator (depends on type of model)
21 Glass cylinder of the round draft shield
(depends on type of model)
11 Lug for attaching an antitheft locking device
22 Draft shield base plate
(depends on type of model)
7
Contents
Page
Warranty
Storage and Shipping Conditions
Equipment Supplied
Installation Instructions
Ambient Conditions
Startup
Mounting the Analytical Draft
Shield Chamber
Connecting the Balance to AC Power
Voltage Selection
Safety Precautions
Connecting Electronic Devices
(Peripherals)
Information on Weighing
Electro statically Charged Samples
Leveling the Balance
Using the Level Indicator
How to Operate the Balance
9
9
Page
—————————————————————
Special Functions/Operating
Parameters:
10
11
12
13
15
15
15
16
16
17
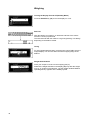
Weighing
Turning the Display On and Off
Self-test
Taring
Weight Determination
18
18
18
18
Calibration
19
Data Interface
20
Below-Balance Weighing
21
Balance Operating Menu
22
Weighing Mode:
Adaption to Ambient Conditions
Stability Range
Tare Parameters
Auto Zero Function
Weight Units
Calibration Function
Final Readout Mode »--«
22
22
22
22
23
23
23
Additional Functions:
Beep Tone (Acoustic Signal)
Universal Switch
Power-On Mode
Automatic Shutoff
24
24
24
24
Utilities for Printouts or Data Transfer
Data Output Parameter
Data Output in Defined Intervals
Data ID Codes
25
25
25
Changing Settings in the
Balance Operating Menu
26
How to Undo All Menu Code
Changes: Reset Function
28
————————————————————
How to Fasten an
Antitheft Locking Device
8
21
Troubleshooting Guide
29
Care and Maintenance
Cleaning
Safety Inspection
Safety Certificate
30
30
30
31
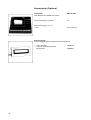
Accessories (Options)
32
Specifications
35
Dimensions (Scale Drawings)
39
With this Sartorius Balance, you have acquired a high-quality electronic weighing instrument that will ease your daily work load.
Please read these installation and operating instructions carefully before operating your new balance.
Warranty
Do not miss out on the benefits of our full warranty.
Please complete the warranty registration card, indicating the date of
installation, and return the card to your Sartorius dealer.
Storage and Shipping Conditions
Allowable storage temperature:
-40 °C ...+70 °C
-40°F ...+158°F
The packaging has been designed to ensure that the balance will not
be damaged even if it is dropped from a height of 80 cm maximum
(about 32 inches).
Carefully unpack the balance and check the equipment immediately
for any visible damage as a result of rough handling during shipment.
If this is the case, proceed as directed in the section entitled "Safety
Inspection."
Save all parts of the packaging and the box because you may
need to ship your balance. Before packing your balance to ship
it, unplug all connected cables to prevent damage.
Do not expose the balance unnecessarily to extreme temperatures,
moisture, shocks, blows or vibrations.
9
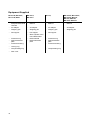
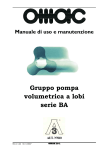
Equipment Supplied
BA 210 S, BA 160 P,
BA 110 S, BA 61
BA 310 S,
BA 310 P
BA 110,
BA 4100 S, BA 3100 P,
BA 2100 S, BA 610,
BA 210, BA 6100,
BA 4100, BA 2100
— Balance
— Balance
— Balance
— AC adapter
— AC adapter
— AC adapter
— Weighing pan
— Weighing pan
— Weighing pan
— Weighing pan
— Pan support
— Pan support
— Glass cylinder of the
round draft shield
— Draft shield lid
— Draft shield base
plate
— Pan support
— Balance with
analytical draft shield
chamber
— AC adapter
— Protective ring
— Draft shield base
plate
— Protective bushing
— Protective ring
— Draft shield base
plate
— Protective bushing
— Locking ring
— Compensating ring
— Dust cover
10
— Compensating ring
Installation Instructions
Ambient Conditions
The Sartorius Basic Balance is designed to provide reliable weighing
results under normal conditions in the laboratory and in industry.
When choosing the area to Setup your balance, avoid exposing it to
the ambient conditions listed in the following so that you will be able to
work with added speed and accuracy:
- extreme heat radiation
- drafts
- inclined position
- extreme vibrations
- aggressive chemical atmospheres
The balance may not be used in a hazardous location/area where
there is danger of explosion.
Do not expose the balance to extreme moisture over long periods.
Moisture in the air can condense on the surfaces of the balance
whenever a cold balance is brought to a substantially warmer place. lf
you need to transfer the balance to a warmer area, make sure to condition it for about two hours at room temperature (with the AC adapter
disconnected).
Afterwards, if you keep the balance connected to power supply, the
continuous positive difference in temperature between the inside of
the balance and the outside will practically rule out the effects of moisture condensation.
11
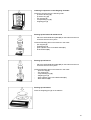
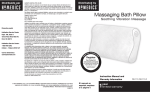
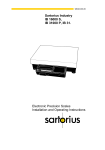
Startup
Mounting the Analytical Draft Shield Chamber
on the BA 210 S, BA 160 P, BA 110 S and BA 61
-
Remove plastic, adhesive Strips and foam packaging
-
When you handle the draft shield chamber, make sure it is always
in an upright position
Mounting the Draft Shield
-
Place the draft shield on the balance
Take the base plate out of the weighing chamber
Align the draft shield
Position the locking ring (7) in the weighing chamber and turn it
clockwise until it locks in place
Installing the Weighing Chamber Base Plate (6)
12
-
Position the base plate
The rear edge of the base plate has a sealing strip
-
Align the base plate with the sealing strip against the rear panel of
the draft shield and then lower the front part of the base plate and
press it down into place.
Installing Components in the Weighing Chamber
Install the components in the following order:
- protective bushing (5)
- protective ring (4)
- pan support (3)
- compensating ring (2)
- weighing pan (1)
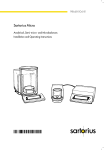
Starting Up the BA 310 S and BA 310 P
-
Place the draft shield base plate (22) on the balance and turn it
clockwise until it locks in place
Install the following parts on the balance in this order:
- pan support (3)
- weighing pan (1)
- glass cylinder of the round draft shield (21)
- draft shield lid (20)
Starting Up the BA 110
-
Place the draft shield base plate (22) on the balance and turn it
clockwise until it locks in place
Install the following parts on the balance in this order:
- - protective ring (4)
- - pan support (3)
- - compensating ring (2)
- - weighing pan (1)
- - glass cylinder of the round draft shield (21)
- - draft shield lid (20)
Starting Up the BA 210
Place the weighing pan (1) on the balance
13
Starting Up the BA 4100 S, BA 3100 P, BA 2100 S, BA 610,
BA 6100, BA 4100 and BA 2100
Place the weighing pan (1) on the balance
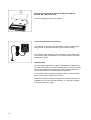
Connecting the Balance to AC Power
Your balance is energized by an AC adapter. Make sure the voltage
rating printed on this unit is identical to your local line voltage.
lf the voltage rating specified on the AC adapter or plug design does
not match the rating or Standard you use, please contact your Sartorius dealer or Office.
Important Note
Only use original Sartorius AC adapters identified by the Sartorius label. Use of AC adapters from other manufacturers, even if these units
have a registered approval rating from a national testing laboratory,
requires the consent of a certified Sartorius technician.
For information about operating the balance with an external battery
pack, see the section entitled "Accessories."
Detailed information on additional options for powering the balance is
available in our Service Information Bulletin, no. 15/88 (for example,
using local extra-low voltage).
14
Plug the cord of the AC adapter into the jack on the balance. Now
plug the AC adapter into a wall outlet.
Voltage Selection
You can select the voltage only if you use our portable power supply
(69 71172) that has a European-type plug (rounded prongs).
Safety Precautions
The power supply or AC adapter rated to Class 2 can be plugged into
a wall outlet without taking any additional safety precautions.
The pole of the output voltage is connected to the balance housing
which can be grounded for Operation.
The interface is also electrically connected to the balance housing
(ground).
Connecting Electronic Devices (Peripherals)
Make sure to unplug the AC adapter from the wall outlet before you
connect or disconnect additional devices (printer or PC) to or from the
balance interface port.
15
Information on Weighing Electro statically Charged Samples
lf you are using a balance with a 0.1 mg readability and electro statically charged glass or plastic Containers with a diameter larger than
the weighing pan, you should utilize our antistatic pan
(Ø 130 mm - see "Accessories") instead of the Standard weighing
pan.
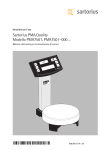
Leveling the Balance Using the Level Indicator (depends on type
of model)
At the point of use, level the balance using the leveling feet (8) so that
the air bubble is centered within the circle of the level indicator (10).
To raise the balance, lower the leveling feet (turn clockwise).
To lower the balance, raise the feet (turn counter-clockwise).
16
How to Operate the Balance
After you have initially plugged your balance into a wall outlet (or
after a relatively long power outage), allow for at least 30 minutes' warmup
The weight display shows the following messages for your information:
{ (OFF)
The balance was disconnected from AC power (power failure or outage for longer than approx 3 seconds, reconnection to AC power after
the balance was unplugged).
(Standby
The display has been turned off with the ON/OFF key (16) and the
balance is now in the ready-to-operate mode so that it does not require warmup.
(Busy)
After the balance is turned on, the symbol is displayed until you
press a key for the first time. During Operation: The processor is still
busy processing a function and will not accept any other command to
perform functions at this time.
17
Weighing
Turning the Display On and Off (Standby Mode)
Press the ON/OFF key (16) to turn the display on or off.
Self-Test
After the balance is turned on, an automatic self-test of the scale's
electronic circuitry is performed.
This self-test ends with the readout "0.0 g/0.00 g/0.000 g or 0.0000 g"
depending on the balance model.
Taring
For exact weight determination, press the tare control (15) to zero the
weight display. You can tare within the entire weighing range of the
balance.
Weight Determination
Place your sample or obJect on the weighing pan (1).
Read off the weight indicated in the display (12) only after the weight
unit ("g" or another unit if selected - see the chapter entitied "Balance
Operating Menü") appears as the stability symbol.
18
Calibration
During calibration, the balance is adapted to changes in ambient conditions.
Calibrate your new balance at the point of use – after warmup and before the first measurement.
Recalibrate your balance each time you move it to a different location
and whenever ambient conditions (especially the temperature)
change considerably.
Unload the weighing pan and tare.
When you obtain a zero readout, press the CAL key (13). The calibration routine is started and the calibration weight in grams is displayed.
lf external influences are affecting the calibration, "Err 02" may appear briefly. In this case, tare the balance and press the CAL key
again once you obtain a zero readout.
Center the calibration weight on the weighing pan.
The balance calibrates itself automatically – an acoustic signal indicates completion of the calibration procedure.
The balance can also be calibrated using other weights. See
"Specifications" for a list of other calibration weights that are
approved for use with your balance.
Only use calibration weights with tolerances that are equal to or better
than the readability of your particular balance (see "Accessories" for
information on calibration weights).
Another weight is accepted for calibration if its exact weight briefly appears in the display.
An acoustic Signal indicates completion of the calibration procedure.
19
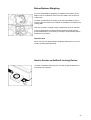
Data Interface
lf you wish to document your weighing data with the Sartorius
Data Printer, connect the printer's interface connector to the interface port (17) on the balance. You do not need to change any
settings!
To do this, remove the protective cap from the data interface port.
-
Plug the interface connector into the interface port
Secure the interface connector by tightening the screws
Important Note
Make sure to unplug the AC adapter from the wall outlet before you
connect or disconnect additional devices (printer or PC) to or from the
balance interface port.
Press the
key (14) for data output.
See page 24 for information on data output parameters and data ID
codes. For more information about the data interface (e.g. data output
and input formats, pin assignment, etc.), see the enclosed "Interface
Description."
20
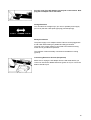
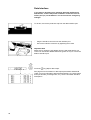
Below-Balance Weighing
A port for below-balance weighing is available on the bottom of the
balance (not on models BA 160 P, BA110 S, BA61, BA110, BA 210
or BA 2100).
To fasten an attachment or hanger, open the below-balance port by
removing the two screws on the bottom of the balance and detach the
closing plate.
Now you can attach a sample using a Suspension wire, for example.
Common applications for below-balance weighing include specific
gravity determination or immersing a sample in a special atmosphere
(medium for a reaction).
Important Note
When you use such below-balance weighing attachments, you must
install a shield to eliminate drafts.
How to Fasten an Antitheft Locking Device
To fasten an antitheft locking device, use the lug (11) located on the
rear panel of the balance.
21
Balance Operating Menu
The balance operating menu enables you to adapt the balance to your requirements.
At the factory, we have set the codes for the balance operating program so that you normally will not need to
make any changes. lf you have special operating conditions, change the codes in the balance operating
program to meet your individual requirements.
The factory settings in the balance operating program are marked with "*". Functions not marked by "*" can
be set by entering the corresponding code (see page 26).
lf you need to change the factory settings, make sure to record the date.
Weighing Mode:
Adaptation to Ambient Conditions
The balance is adapted to ambient conditions by changing the time allowed for weighings (see the Product
Data Sheet).
Very stable environment (shortest measuring time)
Stable environment (short measuring time)
Unstable environment (long measuring time)
Very unstable environment (longest measuring time)
Code
1 1 1
1 1 2
1 1 3
1 2 4
Changes
*
*
Stability Range
The stability symbol remains displayed for a weight
deviation ±
0,25 digit
0,5 digit
1
digit
2
digits
4
digits
8
digits
Code
1
1
1
1
1
1
3
3
3
3
3
3
1
2
3
4
5
6
Changes
*
*
Tare Parameters
The tare function is performed:
Without stability control
At stability
Code
1 5 1
1 5 2
Changes
*
Auto Zero Function
When this function is activated, any zero point is eliminated so that a true zero indication is maintained.
Auto-Zero on
Auto-Zero off
*
22
Code
1 6 1
1 6 2
= factory setting, depends on balance model in some cases
Changes
*
Weight Units
You can select any of the following weight units:
Grams
Kilograms
Symbol
g
kg
Code
1 7 2
1 7 3
Carats
Pounds
Ounces
Troy ounces
Hong Kong taels
Singapore taels
Taiwanese taels
Grains
Pennyweights
Milligrams
Parts per pound
Chinese taels
Mommes
Austrian carats
Tola
Baht
Mesghal
ct
lb
oz
ozt
tl
tl
tl
GN
dwt
mg
o
tl
m
k
t
b
m
1
1
1
1
1
1
1
1
1
1
1
1
1
1
1
1
1
Changes
*
7 4
7 5
7 6
7 7
7 8
7 9
7 10
7 11
7 12
7 13
7 14
7 15
7 16
7 17
7 18
7 19
7 20
Some unit symbols printed on hard copy or output on a computer screen will differ from the way they are
shown on the balance display:
this applies to code numbers ending with
8=
9=
10=
14=
15=
16=
17=
18=
19=
20=
tlh
tls
tlt
/lb
tlc
mom
K
tol
bat
MS
Calibration Function
Calibration with standard calibration weight only
Calibration with standard or other
calibration weights approved for use
Calibration function – access denied
Code
1 9 1
1 9 2
1 9 5
Changes
*
Final Readout Mode »--«
If you are only interested in the final readout, you can select this mode with code 2 5 1. A special symbol
“ - -“ is displayed until the final stable readout appears in digits. For the standard readout mode, set code
2 5 2 (all readouts in digits).
Read out »--«
Special symbol»--« for unstable readouts when load
changes
Standard digital readout mode
*
Code
Changes
2 5 1
2 5 2
*
= factory setting, depends on balance model in some cases
23
Additional functions:
Beep Tone (Acoustic Signal)
If you desire, you can turn off the beep tone – also called an acoustic signal.
Acoustic signal
ON
OFF
Code
8 2 1
8 2 2
Changes
*
Universal Switch
An external switch can be connected via the interface port – you can change the setting in the menu code to
alter the function of this switch
Funktionen
Print
Tare
Code
8 4 1
8 4 2
Changes
*
Power-On Mode
Depending on the your operating requirements, you can change the power-on mode of your balance.
lf you define the code for "toggle between on and off," the balance power will remain turned off after a power
failure has occurred or after you have temporarily disconnected your balance from AC current. After the balance is turned off, power is not available for the "standby" mode. Use the ON/OFF key (16) to turn the balance on or off.
In the setting "toggle between on and standby", the balance power is turned on automatically after a power
failure has occurred or after you have disconnected your balance temporarily from AC power.
In the setting "automatic power-on," the balance will automatically turn on again after a power failure has
occurred, the balance has been disconnected from AC power, or after you have pressed the ON/OFF key
(16). In this setting, the balance can no longer be turned off by the ON/OFF key.
Power-on mode
(Power) off Æ on ÅÆ standby
on ÅÆ (Power) off
on ÅÆ standby
Automatic power-on
Code
8 6 1
8 6 2
8 6 3
8 6 4
Changes
*
Automatic Shutoff (functions only if the menu code 8 6 2 is selected or if the balance is powered by the
rechargeable battery pack)
lf you operate the balance with a battery pack, set the menu code for the "Automatic Shutoff" function in order to save energy and thereby increase the service life of the battery. lf the weight shown in the display
". After another 2 minutes, the balance turns itself
does not change for 2 minutes, the display will show "
off automatically.
Automatic Shutoff
ON
OFF
*
24
Code
8 7 1
8 7 2
= factory setting, depends on balance model in some cases
Changes
*
Utilities for Printouts or Data Transfer:
Sartorius Balances come Standard with an interface.
You can plug a Sartorius Printer or a Computer into this interface port to print data on hard copy or transfer
them to your Computer. Moreover, you can choose to Output data from your balance to this on-line device
either automatically or by pressing the print key on the balance.
The balance operating menu lets you define the various parameters for data Output.
For information on the data formats and for interfacing a Computer or a different peripheral device, see "Interface Description."
Data Output Parameter
This parameter is coupled with or without the stability parameter = stable readout or no motion is detected
Print on request = data is Output only when the print key is pressed or a Software command is received
Auto print = continuous, automatic data output
Print on request regardless of stability
Print on request after stability with storage of the
function
Print on request after stability without storage of the
function
Auto print regardless of stability
Auto print at stability
Code
6 1 1
6 1 2
Changes
*
6 1 3
6 1 4
6 1 5
Data Output in Defined Intervals
You can reduce the volume of data in the "auto print" mode by defining the interval at which data will be Output automatically. This auto print interval is based on the number of times the display is updated.
Auto print interval
1 display update
2 display updates
Code
6 3 1
6 3 2
Changes
*
Data ID Codes
An "N" printed or displayed before a weight identifies it as a net weight.
This ID code increases the data output format for each value from 16 to 22 characters.
ID code for data output
Without
With
*
Code
7 2 1
7 2 2
Changes
*
= factory setting, depends on balance model in some cases
25
Changing Settings in the Balance
Operating Menu
Select the appropriate code to change settings for
certain functions.
There are three Steps to changing a code:
-
access the menu
set the code
confirm and store this code
The following keys have special functions when setting a code:
CAL (13)
= in crease displayed digit (once you have run
through all numbers, the series will start again
from "0")
T (15)
= confirm settings, store them and exit the menu
(14)
= move to the right and left
Now please try it for yourself - turn off the beeper tone (acoustic Signal) - code: 8 2 2.
How to Access the Menu
26
-
Turn off the balance
-
Hold down the tare key (15) and briefly press the ON/OFF key
(16)
-
Release the tare key once " | " appears in the display
-
When the display shows "—" in front of the left number, remove
the protective cap located on the front right of the balance and
move the menu access switch (9) in the direction of the arrow
-
press the CAL key until "8" appears
-
key until the third digit of the code appears (here,
press the
the current code setting always appears)
-
use the CAL key to change the right-hand number to "2"
-
confirm the code setting You must press the tare control (15) to
confirm the code you have just set (this is indicated by "o" after
the code).
-
use the
-
press the tare control (15) to store the menu code setting
key to move to the left digit
Important Note
The changed code will not be stored if you turn off the balance with
the ON/OFF key during the setting procedure, or before storing the
menu code.
27
In the balance operating program, each code setting is indicated by
"o" behind the last number. When you access the menu of the balance operating program and move to the right-hand number, the current code setting is displayed. This makes it easy to check the codes
you have set.
How to Undo All Menu Code Changes:
Reset Function
The reset function lets you undo all menu code changes, which
means you obtain the menu codes originally set at the factory
(marked by “*”) so your balance will operate according to them.
o
To use this function, set code 9 - - 1 . Confirm and store this entry as
described on page 27.
28
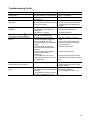
Troubleshooting Guide
Problem ...
No segments appear in the weight
display (12)?
The weight display shows "H"?
Weight display shows "L" or
"Err 54"?
Weight display briefly displays
"Err 02"?
The special message "
" does
not go out in the weight display
The weight readout changes constantly
The display shows "Lo Accu" or a
weight flashes in the display?
The weight readout is obviously
wrong
Causes ...
- No AC power available
- The AC adapter is not plugged in
- Sample exceeds the capacity of
the balance
- The weighing pan (1) , pan support (3) and/or compensating ring
(2) are not in place
- The CAL key (13) was not
pressed when the display indicated zero
- The balance is loaded
- No key has been pressed since
the balance was turned on
- Unstable ambient conditions
- Too much Vibration or the balance is exposed to a draft
- The draft shield is not completely
closed
- A foreign object is caught between the pan and the balance
housing
- The port for the below-balance
weighing attachment is
uncovered
- The sample does not have a
stable weight (absorbs moisture
or evaporates)
Remedy
- Check AC power supply
- Plug in AC adapter
- Unload the balance
- Install weighing pan, pan support
(depends on type of model) and
compensating ring (depends on
model)
- Press the tare control
and re-press the CAL key
- Unload the balance
- Press any key
- Set up the balance in another
area
- Access the menu to adapt the
balance to the particular weighing environment
- Close the draft shield
- Remove foreign object
- Fasten the closing plate to dose
the port for below-balance weighing
- The battery voltage is too low
- Connect balance or external
battery pack to line power using
the AC adapter
- The balance is not calibrated
- Calibrate (see p. 19)
- The balance was not tared before - Tare before weighing
weighing
- Level the balance (see p. 16 )
- The air bubble in the level indicator (10) is not within the circle
29
Care and Maintenance
Cleaning
Before cleaning the balance, unplug the AC adapter from the wall outlet.
Please do no use any aggressive cleaning agents (solvents or similar
agents). Instead, use a piece of cloth wet with a mild detergent.
Make sure that no liquid enters the balance housing.
After cleaning, wipe down the balance with a soft, dry piece of cloth.
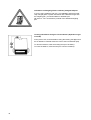
Safety Inspection
lf there is any indication that safe Operation of the balance with the
AC adapter is no longer warranted, turn off the power and unplug the
balance from AC power. Lock the balance and AC adapter in a secure
place to ensure that they cannot be used for the time being.
Safe Operation of the balance with the AC adapter is no longer ensured when
- there is visible damage to the AC adapter
- the AC adapter no longer functions properly
- the AC adapter has been stored for relatively long periods under unfavorable conditions
In this case, notify your nearest Sartorius Service Center or the International Service Support Department in Goettingen, Germany. Only
service technicians who have access to the required maintenance
manuals are allowed to perform maintenance and repair work on the
equipment.
We recommend the balance along with the AC adapter be inspected
according to the following checklist by a qualified Sartorius service
technician:
- Leakage current < 0.05 mA measured by a properly calibrated
multimeter
- Insulation resistance > 7 megohms measured with a constant
voltage of at least 500V at a 500 kohm load
30
The duration and number of measurements should be determined by
a qualified Sartorius service technician according to the particular ambient and operational conditions for the AC adapter. However, such
inspections should be done at least once a year,
Pursuant to the German Directive for the Implementation of
Regulations for Prevention of Accidents "Elektrische Anlagen und Betriebsmittel (VBG 4)" [Electrical Installations and
Equipment] of April 1986, in conjunction with Article 10 of
the Low Voltage Directive 73/23/EEC issued on February
19, 1973, by the European Community, it is hereby certified
that the equipment delivered, "Electronic Analytical or Precision Balance of the Basic Series" is manufactured and
tested in compliance with the following DIN/VDE regulations
DlN IEC 348/VDE 0411
Safety requirements for electronic measuring apparatus
DIN IEC 380/VDE 0806
Safety of electrically energized office machines
DIN IEC 601 /VDE 0750
Safety of medical electrical equipment
When you use electrical equipment in installations and
under ambient conditions requiring higher safety Standards, you must comply with the provisions as specified in
the applicable regulations for installation in your country.
The electrical and electronic components used in the balance are
rated at least Class KSF according to DlN 40040.
31
Accessories (Options)
Data printer
with date/time and statistics functions
YDP 02-0DV1
Print speed approx. lines/sec.
1,5
Printer housing (B x T x H)
in mm
150 x 138 x 43
Remote display
(can be plugged into the interface port of the balance)
— LCD, reflective
— LCD, for overhead projectors,
transmissive
32
737101 A
737102 A
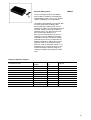
External Battery Pack,
YRB02Z
can be recharged using the AC adapter
(time it takes to Charge a completely discharged battery pack: 15 hrs); see "Specifications" regarding hours of Operation.
The balance automatically "recognizes" that
it is being powered by a battery pack.
When utilizing the battery pack, use the
ON/OFF key (16) to turn the balance on and
off (if the code 8 6 4 is set in the balance
operating menu, you cannot turn the balance off using the ON/OFF key).
After you turn off the balance, there is no
supply of power for "Standby" Operation.
The balance can also tell when it is being
powered by line current, provided the AC
adapter is plugged in and the line current
supply is intact. If you utilize the battery
pack, the code for automatic shutoff - 8 7 1
should be set to increase the time you can
operate the balance before having to recharge the batteries (see page 24 in addition).
External calibration weights:
for balance model
BA 61
BA 110 S, BA 160 P, BA 110
BA 210
BA 210 S
BA 310 P, BA 310 S
BA 610
BA 3100 P
BA 2100
BA 2100 S, BA 4100 S, BA 4100
BA 6100
Accuracy class
(OIML)
E2
E2
F2
E2
F1
F2
F1
F2
F1
F1
Weight
in g
1 x 50
1 x 100
1 x 100
1 x 200
1 x 200
1 x 500
1 x 1000
1 x 1000
1 x 2000
1 x 5000
Order No.
YCW 4528
YCW 5128
YCW 5148
YCW 5228
YCW 5238
YCW 5548
YCW 6138
YCW 6148
YCW 6238
YCW 6538
33
“Balance Reader” applications kit including Software
for collecting data that are transmitted by your Sartorius Balance/Scale to a
commercially available personal Computer. These data are read into spreadsheets and stored. The stored spreadsheets can be further processed using
Standard Software available on the market (Excel, Lotus 1 -2-3, etc.).
This applications kit includes the following Software and equipment:
— 3 ½" and 5¼" program diskettes
— program description
— interface cable
— adapter (25-position to 9-position)
YAK 10 PC-0002
Specific gravity determination set for BA 210 S, BA 160 P and BA 110 S
YDK 01
Antistatic weighing pan for balances with 0.1 mg readability
YWP 01 BA
Analytical draft shield chamber for the BA 310 P and BA 310 S
YDS 03
Universal remote control switches
with menu code definable print or tare functions:
Foot switch
Foot switch with T-Connector
Hand switch
7223
YPE 01 Z
7226
T-Connector
7258
Dust cover
— for balance with round weighing pan
— for balance with rectangular weighing pan
YDC 01 BA
YDC 02 BA
Carrying case
— for balances with an analytical draft shield
— for balances without an analytical draft shield
34
YDB 01 BA
YDB 02 BA
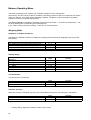
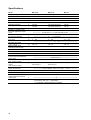
Specifications
Model
BA 210 S
Weighing range structure
BA 160 P
BA 110 S
BA 61
SuperRange
PolyRange
SuperRange
g
mg
210
0,0001
110
0,0001
61
0,0001
Tare range (by subtraction)
Reproducibility
(standard deviation)
Linearity
g
g
-210
≤±0,0001
-110
≤±0,0001
-61
≤±0,0001
g
≤±0,0002
≤±0,0002
≤±0,0002
Response time (typical)
Adaption to ambient conditions and application requirements
Display update (depends on
the filter level selected
Allowable ambient temperature range
g
≤ 2,5
30/60/110/160
0,0001/0,0002/
0,0005/0,001
-160
≤±0,0001/0,0002/
0,0005/0,001
≤±0,0002/0,0002/
0,0005/0,001
≤2
≤2
≤2
Weighing range/capacity
Readability
← by selection of 1 of 4 optimized filter levels →
s
← 0,1 – 0,4 (selectable) →
o
C
Operating temperature range
Sensitivity drift within
o
+10 ... +30 C
Moisture-proof rating
according to DIN 40 040
Pan size
o
C
← +5 .. +40 →
← +10 ... +30 →
Wägeraumhöhe
mm
Net weight, approx.
kg
o
/C
≤±2 ∙ 10
-6
≤±3 ∙ 10
-6
≤±2 ∙ 10
-6
≤±2 ∙ 10
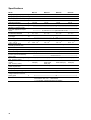
-6
← Class F, non-condensing→
mm
← Ø 80 →
← 200 →
← 5,5 →
Selectable weight units
Automatic zero tracking
function (can be turned off by
menu code)
Standard calibration weight
(min. accuracy class)
Other permissible calibration
weight
(min. accuracy class)
AC power source/
power requirements
Frequency
g, kg, ct, lb, oz, ozt, tlh, tls, tlt, GN, dwt, mg, /lb, tlc, mom, K, tol, bat, MS
V~
←via AC adapter, 230 or 115, -20% ... +15% →
Hz
Power consumption, (typical)
VA
← 48 – 60 →
← maximal 16; typical 8 →
← standard feature →
g
200 (E2)
100 (E2)
100 (E2)
50 (E2)
g
100,
100+50 (E2)
50,
100+50 (E2)
50 (E2)
---
Hours of operation with a fullycharged YRB 02 Z external
battery pack
h
Built-in interface
← 48 →
RS 232 C-S/V24-V28; 7-bit; -even, -odd;
transmission rates 150 … 19200 Baud,
1 or 2 stopbits, software/Hardware handshake
35
Specifications
Model
BA 310 S
Weighing range structure
BA 310 P
BA 110
SuperRange
PolyRange
Weighing range/capacity
g
310
60/120/310
110
Readability
mg
0,001
0,001/0,002/0,005
0,0001
Tare range (by subtraction)
Reproducibility
(standard deviation)
Linearity
g
-310
-310
-110
g
g
≤±0,001
≤±0,002
≤±0,001/0,001/0,003
≤±0,002/0,002/0,005
≤±0,001
≤±0,001
Response time (typical)
Adaption to ambient conditions and application requirements
Display update (depends on
the filter level selected
Allowable ambient temperature range
Operating temperature range
Sensitivity drift within
o
+10 ... +30 C
Moisture-proof rating
according to DIN 40 040
Pan size
g
≤ 1,5
≤ 1,5
≤2
mm
Ø 130
Ø 130
Ø 80
Net weight, approx.
kg
4,5
4,5
3,5
← by selection of 1 of 4 optimized filter levels →
← 0,1 – 0,4 (selectable) →
s
o
o
C
C
o
/C
0 ... +40
0 ... +40
+5 ... +40
← +10 ... +30 →
≤±2 ∙ 10
-6
≤±5 ∙ 10
-6
≤±2 ∙ 10
-6
← Class F, non-condensing→
Selectable weight units
Automatic zero tracking
function (can be turned off by
menu code)
Standard calibration weight
(min. accuracy class)
Other permissible calibration
weight
(min. accuracy class)
AC power source/
power requirements
Frequency
g, kg, ct, lb, oz, ozt, tlh, tls, tlt, GN, dwt, mg, /lb, tlc, mom, K, tol, bat, MS
V~
←via AC adapter, 230 or 115, -20% ... +15% →
Hz
Power consumption, (typical)
VA
← 48 – 60 →
← maximal 16; typical 8 →
← standard feature →
g
200 (F1)
200 (F1)
100 (F1)
g
100+50, 200+50,
200+100 (F1)
100, 100+50, 200+50,
200+100 (F1)
50 (F1)
Hours of operation with a fullycharged YRB 02 Z external
battery pack
h
Built-in interface
36
← 48 →
RS 232 C-S/V24-V28; 7-bit; -even, -odd;
transmission rates 150 … 19200 Baud,
1 or 2 stopbits, software/Hardware handshake
Specifications
Model
BA 4100 S
Weighing range structure
BA 3100 P
BA 2100 S
BA 610
SuperRange
PolyRange
SuperRange
Weighing range/capacity
g
4100
600/1200/3100
2100
610
Readability
mg
0,01
0,01/0,02/0,05
0,01
0,01
Tare range (by subtraction)
Reproducibility
(standard deviation)
Linearity
g
-4100
-3100
-2100
-610
g
g
≤±0,01
≤±0,02
≤±0,01/0,01/0,03
≤±0,02/0,02/0,05
≤±0,01
≤±0,02
≤±0,005
≤±0,01
Response time (typical)
Adaption to ambient conditions and application requirements
Display update (depends on
the filter level selected
Allowable ambient temperature range
g
≤ 1,5
≤ 1,5
≤ 1,5
≤1
o
C
Operating temperature range
Sensitivity drift within
o
+10 ... +30 C
Moisture-proof rating
according to DIN 40 040
Pan size
o
C
Net weight, approx.
kg
← by selection of 1 of 4 optimized filter levels →
0,1 – 0,4
s
o
/C
0,1 – 0,4
0,1 – 0,4
0,1 – 0,6
← 0 .. +40 →
← 0 ... +40 →
≤±2 ∙ 10
-6
≤±5 ∙ 10
-6
≤±2 ∙ 10
-6
≤±5 ∙ 10
-6
← Class F, non-condensing→
mm
← 175 x 175 →
3,9
3
3
3
Selectable weight units
Automatic zero tracking
function (can be turned off by
menu code)
Standard calibration weight
(min. accuracy class)
Other permissible calibration
weight
(min. accuracy class)
AC power source/
power requirements
Frequency
g, kg, ct, lb, oz, ozt, tlh, tls, tlt, GN, dwt, mg, /lb, tlc, mom, K, tol, bat, MS
V~
←via AC adapter, 230 or 115, -20% ... +15% →
Hz
Power consumption, (typical)
VA
← 48 – 60 →
← maximal 16; typical 8 →
← standard feature →
g
2000 (F1)
1000 (F1)
2000 (F1)
500 (F2)
g
2000+100
2000,
1000,
2000+2000 (F1)
2000+1000 (F1)
1000+500 (F1)
200+100,
200+200,
500+100 (F2)
Hours of operation with a fullycharged YRB 02 Z external
battery pack
h
Built-in interface
← 48 →
RS 232 C-S/V24-V28; 7-bit; -even, -odd;
transmission rates 150 … 19200 Baud,
1 or 2 stopbits, software/Hardware handshake
37
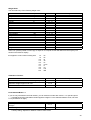
Specifications
Model
BA 210
Weighing range/capacity
g
210
BA 6100
6100
BA 4100
BA 2100
4100
2100
Weighing range/capacity
mg
0,01
0,1
0,1
0,1
Tare range (by subtraction)
Reproducibility
(standard deviation)
Linearity
g
-210
-6100
-4100
-2100
g
g
≤±0,005
≤±0,01
≤±0,05
≤±0,1
≤±0,05
≤±0,1
≤±0,05
≤±0,1
← ≤ 1 →
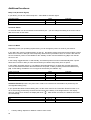
Response time (typical)
Adaption to ambient conditions and application requirements
Display update (depends on
the filter level selected
Allowable ambient temperature range
g
o
C
Operating temperature range
Sensitivity drift within
o
+10 ... +30 C
Moisture-proof rating
according to DIN 40 040
Pan size
o
C
mm
116
175 x 175
175 x 175
175 x 175
Net weight, approx.
kg
1,6
3
3
1,6
← by selection of 1 of 4 optimized filter levels →
s
0,1 – 0,6
o
/C
0,1 – 0,4
0,1 – 0,4
0,1 – 0,4
← 0 .. +40 →
← 0 ... +40 →
≤±10 ∙ 10
-6
≤±5 ∙ 10
-6
≤±5 ∙ 10
-6
≤±10 ∙ 10
-6
← Class F, non-condensing→
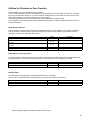
Selectable weight units
Automatic zero tracking
function (can be turned off by
menu code)
Standard calibration weight
(min. accuracy class)
Other permissible calibration
weight
(min. accuracy class)
AC power source/
power requirements
Frequency
g, kg, ct, lb, oz, ozt, tlh, tls, tlt, GN, dwt, mg, /lb, tlc, mom, K, tol, bat, MS
V~
←via AC adapter, 230 or 115, -20% ... +15% →
Hz
Power consumption, (typical)
VA
← 48 – 60 →
← maximal 16; typical 8 →
← standard feature →
g
100 (M1)
5000 (F2)
2000 (F2)
1000 (M1)
g
100+50,
200 (M1)
2000+1000,
2000+2000,
2000 (F2)
2000+1000,
2000+2000 (F2)
1000+500;
2000 (M1)
Hours of operation with a fullycharged YRB 02 Z external
battery pack
h
Built-in interface
38
← 48 →
RS 232 C-S/V24-V28; 7-bit; -even, -odd;
transmission rates 150 … 19200 Baud,
1 or 2 stopbits, software/Hardware handshake
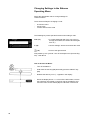
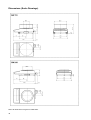
Dimensions (Scale Drawings)
Note: All dimensions are given in millimeters.
39
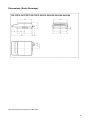
Dimensions (Scale Drawings)
Note: All dimensions are given in millimeters.
40
Dimensions (Scale Drawings)
Note: All dimensions are given in millimeters.
41
Sartorius AG
B
P
T
37070 Göttingen
Weender Landstraße 94–108, 37075 Göttingen
(0551) 308-0, F (0551) 308-3289
Internet: http://www.sartorius.com
Copyright by Sartorius AG, Göttingen, Deutschland.
All rights reserved. No part of this publication may be
printed or translated in any form or by any means without
the prior written permission of Sartorius AG.
Sartorius AG reserves the right to make change to the
technology, features, specification and design of the equipment
without notice.