1
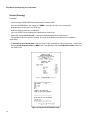
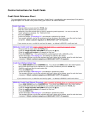
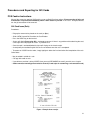
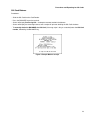
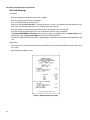
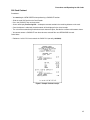
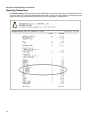
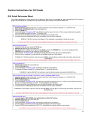
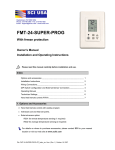
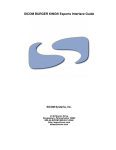
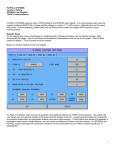
SL-Series™ Integrated Credit and Gift Card User’s Guide
SICOM Systems, Inc.
4140 Skyron Drive
Doylestown, Pennsylvania 18902
800-54-SICOM (800-547-4266) or 215-489-2500
http://www.sicom.com
[email protected]
SL-Series™ Integrated Credit and Gift Card User’s Guide
by SICOM Systems, Inc.
4140 Skyron Drive
Doylestown, Pennsylvania 18902
800-54-SICOM (800-547-4266) or 215-489-2500
http://www.sicom.com
[email protected]
Copyright © 2008 SICOM Systems, Inc.
PROPRIETARY RIGHTS NOTICE
All rights reserved. No part of this material may be reproduced or transmitted in any form or by any means,
electronic, mechanical, or otherwise, including photocopying and recording or in connection with any
information storage or retrieval system, without the written permission in writing from SICOM Systems, Inc.
SICOM Systems, Inc. has taken reasonable preventive measures to ensure the accuracy of the information
contained in this manual. However, SICOM Systems, Inc. makes no warranties or representations with respect
to the information contained herein and SICOM shall not be liable for damages resulting from any errors
or omissions herein or from the use of the information contained in this manual.
Document Revision: 1.05, 03/17/2008
LINUX® is a registered trademark of Linus Torvalds.
SICOM and the "S" logo are trademarks of SICOM Systems Incorporated.
"DataTran" and "IPTran" are trademarks of Datacap Systems Incorporated.
Table of Contents
I. Credit Cards ..................................................................................................................................................... 1
Installation of Credit Cards ....................................................................................................................... 1
Credit Card Configuration.................................................................................................................... 1
Connect the Hardware (if required)............................................................................................. 1
Software Configuration ............................................................................................................... 5
Revenue Configuration Files....................................................................................................... 7
ICR Report Configuration ........................................................................................................... 7
Touch Screen Panels Edit ........................................................................................................... 7
Contact SICOM Support at 800-54-SICOM (800-547-4266) or 215-489-2500 to Complete the
Installation .......................................................................................................................... 7
Perform Test Transactions and CONFIRM Deposit Into Bank Accounts..................................... 7
Procedures and Reporting for Credit Cards............................................................................................ 9
POS Cashier Instructions .................................................................................................................... 9
Credit Card Sale ......................................................................................................................... 9
Refund (Overring) ..................................................................................................................... 10
Reporting Transactions and Closing Batches.................................................................................... 11
Revenue Report ........................................................................................................................ 11
Credit Card Processing Menu Option and Closing a Batch ...................................................... 11
Cashier Instructions for Credit Cards .................................................................................................... 15
Credit Quick Reference Sheet ........................................................................................................... 15
II. Gift Cards....................................................................................................................................................... 17
Installation of Gift Cards.......................................................................................................................... 17
Gift Card Configuration...................................................................................................................... 17
Software Configuration ............................................................................................................. 17
Revenue Configuration File....................................................................................................... 18
ICR Report Configuration File................................................................................................... 18
Touch Screen Panels Edit ......................................................................................................... 18
Test the Cards!.......................................................................................................................... 19
IPTran Configuration and Setup......................................................................................................... 19
Procedures and Reporting for Gift Cards .............................................................................................. 21
POS Cashier Instructions .................................................................................................................. 21
Gift Card Issue (Sale) ............................................................................................................... 21
Gift Card Redemption ............................................................................................................... 22
Gift Card Balance...................................................................................................................... 22
Gift Card Recharge ................................................................................................................... 23
Gift Card Cashout ..................................................................................................................... 24
Reporting Transactions...................................................................................................................... 25
Cashier Instructions for Gift Cards ........................................................................................................ 27
Gift Quick Reference Sheet ............................................................................................................... 27
iii
iv
Installation of Credit Cards
Credit Card Configuration
The SICOM SL-Series provides direct software integration without the use of an external credit authorization
device. The system can also interface to a DataTran model ML162 from Datacap Systems. The "DataTran"
hardware device is essentially a specialized modem used to efficiently communicate with the major card networks (VisaNet, Vital, Nabanco, NDC, CardNet and many others) when the SICOM SL Series system does not
natively support your Merchant Services/Payment Processor provider network. Our software (or DataTran) is programmed with specific information for each restaurant. DataTran units (and software configurations) CANNOT
be moved from location to location without being reprogrammed.
Our Integrated Credit Card Authoriztion Interface (Soft Credit) is available with MGRNG releases v1.81 and greater.
The "DataTran" hardware interface is available with MGRNG releases v1.17 and greater and POS releases 1.027 and
greater.
Compliance with Payment Card Industry (PCI) guidelines requires at least MGRNG v1.42 or higher.
There are 8 steps necessary to install the SICOM Integrated Credit Card Software at the restaurant:
•
Connect the hardware. (if required)
•
Add new Function PLU’s.
•
Setup Credit Card PLU mapping.
•
Configure the revenue reports.
•
Configure the ICR report.
•
Setup 2 new buttons on the panels.
•
Contact SICOM Support at 800-54-SICOM (800-547-4266) or 215-489-2500 to configure the software and
options.
•
Perform test transactions and CONFIRM deposit into bank accounts.
Connect the Hardware (if required)
Depending on which options you have chosen and which Merchant Services/Payment Processor provider network that you use, you may have 1 or 2 hardware devices that need to be installed. These devices, called the
DataTran and IPTran, are used by the SL-Series to interface with your Merchant Services/Payment Processor
provider network.
1
Installation of Credit Cards
Figure 1. The front-view of the DataTran. There is one light, red, that indicates if the power is on.
Figure 2. The rear-view of the DataTran. Connect the serial cable from the port labelled "PC/ECR" to a
COM port cable on the SICOM end.
Figure 3. A photo of the SICOM end cable as it is connected to a SL18 terminal. It’s often called the
"Octopus" cable. The SL19 terminal does not require use of an Octopus cable.
The DataTran is usually connected to COM2 on a SL-Series Manager Terminal. The SL18 model uses a specially
designed serial cable, called the "Octopus" cable, that has 3 9-pin connectors on one end and a 25 pin connector
2
Installation of Credit Cards
on the other. COM1 (blue) connects to the analog modem (the modem needs an additional, standard 9-25 pin
modem cable). COM2 (red) connects to the DataTran serial cable. COM3 (yellow) is normally not used.
Figure 4. A closer look at the Octopus cable, with the DataTran serial cable connected to the COM2 end.
An SL19 model terminal does not require use of an "Octopus" cable. The serial cable from the DataTran connects
DIRECTLY into the COM2 port under the terminal.
Figure 5. The layout of connector ports under the SL19 model terminal.
IPTran Configuration and Setup
Generally, there is no additional SICOM configuration needed for the IPTran after it is connected to the DataTran.
You will need to ensure that the internal IP address of the restaurant’s router is set to 192.168.1.254. If the
restaurant router’s IP address is not set properly, the IPTran will not be able to connect to the Internet to authorize
credit card transactions.
Connect the IPTran using the provided serial cable from the COM1 port on the IPTran to the AUX RS232 port on
the DataTran. (You may need to remove the "AUX RS232" protective sticker first.) Connect an ethernet cable to
the Ethernet port on the IPTran to an available port on the network switch or restaurant router. Finally, connect
the power to the back of the IPTran and the wall.
3
Installation of Credit Cards
Figure 6. IPTran connected to the DataTran top view (IPTran on right, DataTran on left)
Figure 7. IPTran connected to the DataTran bottom view (IPTran on left, DataTran on right)
4
Installation of Credit Cards
If an IPTran device is being added to a pre-existing DataTran system that has been installed previously, the DataTran
may need to be reprogrammed for the new IPTran device. Please contact your System Administrator, or SICOM Support
for more information.
Beginning with MGRNG version v1.40, the IPTran can be added to the DHCP Edit, so that it can have a fixed IP
address assigned.
Whenever there is a credit card transaction sent to the DataTran, the DataTran will first attempt to authorize
the credit card and amount over the Internet using the IPTran. If it fails, then it will attempt to dial out using the
DataTran.
Software Configuration
Add New Function PLUs
Go to MAINTENANCE -> PRODUCT/DISCOUNT/FUNCTION -> FUNCTION/MEDIA.
Set up a Tender Key with a PLU type of 16. Reference 1 should be the same as the PLU# of the credit card key
you are defining. If the customer is to be able to receive cash back from an over-tender then make Reference 1
the cash PLU (usually 30000000). See Table 1 for additional details.
If you don’t want the cash drawer to open when the credit card is used, place a 1 in the Route2 field. Since
newer SICOM cash drawers have a media slot to place the signature slip in, there is no reason for the drawer to
open.
VAT 1 should be 48. (Specifying that the device is connected to terminal 0.)
Class Code should be set to 15. (Credit.)
There are a few other PLUs that need to be set up for Credit Card PLU Mapping. POS2 can automatically ADD
the credit amount to a particular credit card bucket (Amex, MasterCard, Discover, etc.) in addition to the general
one. Simply set up the additional PLUs as directed below but DO NOT put a key in the touch screen edit for it.
Credit Card PLU Mapping is not available in POS1, so there is no need to configure extra PLUs for this feature if
POS1 is installed.
5
Installation of Credit Cards
Table 1. Sample PLU configuration details.
Field
Main
Visa
M/C
Discover
AMEX
30004000
30004001
30004002
30004003
30004004
Type
16
5
5
5
5
Price
0.00
0.00
0.00
0.00
0.00
Name
Credit
Visa
M/C
Disc
AMEX
Tax
N
N
N
N
N
Category
90
90
90
90
90
Visa
MasterCard
Discover
PLU Number
Recipe
Code
Reference 1
30004000*
Reference 2
Route 1
Route 2
1**
Limit 1
Limit 2
VAT 1
48
VAT 2
Call a Pop-Up?
Poll ID
Class Code
Long Description
15
Credit Card
American
Express
Poll ID-2
You can also use the PLU for Cash (30000000) instead of the Main CC PLU number if the
customer can get cash back from a transaction. (Also called an Over-Tender.)
** Enter in a 0 in this field if you wish the cash drawer to OPEN whenever a credit card is
used.
*
Setup Credit Card PLU Mapping
Credit Card PLU Mapping is not available in POS1, so there is no need to configure extra PLUs for this feature if
POS1 is installed.
Go to SYSTEM MAINTENANCE TOOLS -> CREDIT CARD/PLU MAPPING. Enter the description of the cards
accepted by the customer (VISA, AMEX, DISC, M/C) and select the PLU to map it with. Example, select "Visa"
from the top menu, and then select PLU 30004001 (from our above example) from the bottom dropdown menu.
Match MasterCard to the PLU for MasterCard, Discover to the PLU for Discover, etc.
When the credit card is rung up, the amount will automatically be placed in both the general credit PLU and the
specific one as recognized by the system.
6
Installation of Credit Cards
Beginning with MGRNG release v1.29, the Credit Card Descriptions (VISA, AMEX, DISC, M/C) are in a dropdown
menu.
Revenue Configuration Files
Go to SYSTEM MAINTENANCE TOOLS -> REVENUE REPORT EDIT.
Make sure that a TYPECHG.16 is added to the top of ALL REVRTXT*.MAS files, saved and converted. If not,
credit card sales will not be listed.
•
REVRTXTH.MAS is used for the HISTORICAL Revenue Report.
•
REVRTXTI.MAS is used for the INSERT Revenue Report.
•
REVRTXTS.MAS is used for the SHIFT Revenue Report.
•
REVRTXTD.MAS is used for the DAILY Revenue Report.
•
REVRTXTW.MAS is used for the WEEKLY Revenue Report.
•
REVRTXTM.MAS is used for the MONTHLY Revenue Report.
ICR Report Configuration
You can add the "Main" PLU number to the PLUDEF for CHARGE if it is already setup. You can also add more
PLUDEF’s for each additional PLU that you created (for Visa, M/C, Disc, AMEX) and list them on the 3rd page
of the report, so that the customer can see how much of each credit type was used.
Touch Screen Panels Edit
Add a SICOM CREDIT key (type 5 value lookup and referencing the master or "main" credit card PLU) and
set up an "@" key (Key type 41). Place these new buttons on the TENDER panel (usually Panel 99.)
The @ key is used to manually enter a card. If the mag stripe is damaged on the card, it can still manually
entered by keying the expiration (ie:0405 for April 2005), the "@" key and then keying the entire card number
before pressing the CREDIT key. Payment in this manner MUST be the entire order. Partial payment is not
accepted using a manual credit card entry.
Contact SICOM Support at 800-54-SICOM (800-547-4266) or 215-489-2500 to Complete
the Installation
Ensure that you are at the restaurant when calling to complete the installation. SICOM Representatives will
require your assistance if any issues arise.
A SICOM Support Representative will connect into your restaurant, verify the connections to the hardware,
configure and activate the background software necessary to process credit cards via the SL-Series.
This process can take an hour or more to complete. Once finished, you will be notified by SICOM Support, and
may continue to the next step.
Perform Test Transactions and CONFIRM Deposit Into Bank Accounts
After the installation and configuration are complete, perform several test transactions using one of each type of
card that you will be accepting on the POS.
Perform a Terminal Update on one terminal to load the changes. Ring up an small order over .10, and pay the
order using a credit card and the new Credit tender button. The order should complete after a few seconds, and
TWO credit receipts should print out. Repeat this process for each credit type that you intend to accept.
7
Installation of Credit Cards
Repeat the process again for any gift and/or loyalty card that you intend to accept. Redeem, Issue, Recharge,
Cash Out and check balances using the new Gift tender buttons. Each operation should complete after a few
seconds, and a receipt for each should print out.
Once completed, go back to the Manager’s terminal and check SALES -> DAILY -> CREDIT CARD PROCESSING -> REPORT - ALL TRANSACTIONS to ensure all of the transactions show in the correct amount that was
rung up. If so, perform a Batch Close (which sends the credit card sales data to your Merchant Services/Payment
Processor for payment), and verify that the batch does indeed close and clear. (A summary report will show on
the screen indicating the batch was closed.)
DO NOT to use the SICOM Credit system until the restaurant can verify that the correct batch dollar
amount is deposited into the bank account(s). This process can take several days to complete! Once the
deposit is confirmed, you can begin to accept electronic payments normally.
Be sure to Close Batches on a regular basis!
The system can hold a maximum of 999 electronic payment tranactions in the system at one time. The recommendation
is to hold no more than 250 transactions in a single batch at any time - especially if the batch close is transmitted over
a dial-up (modem) connection! It is imperative that the restaurant performs a Batch Close on a regular basis, so that
this maximum is not reached! SICOM recommends that you close a Batch on a daily basis right before the Daily Close
is performed.
8
Procedures and Reporting for Credit Cards
POS Cashier Instructions
Credit Card Sale
Procedure:
•
Ring up order as usual, press the TOTAL key.
•
Slide the Credit Card thru the Card Reader.
•
Enter in the amount to use from the Credit Card (as $$¢¢) and press the CREDIT key. You can also simply
press the CREDIT key to complete the sale with a single Credit Card.
•
Screen will display Processing CC... & attempt to connect to authorize the credit charge.
•
Two receipts will print out (one for customer, one to put in the drawer) once the sale is completed.
Other Notes:
•
To manually charge a Credit Card (if the mag stripe is dirty or scratched) enter the 4-digit Expiration Date
(as MMYY) press the @ button, enter the Credit Card number, then press the CREDIT key.
•
To remove an partial-tender charge from an order, simply highlight & delete the line item before final completion
of the sale.
Figure 1. Sample Credit Sale receipt.
9
Procedures and Reporting for Credit Cards
Refund (Overring)
Procedure:
•
You must begin a NEW ORDER when performing a refund function.
•
Press the OVERRING key. You should see "ORNG" in the top line of the virtual receipt area.
•
Ring up order as usual, press the TOTAL key.
•
Slide the Credit Card thru the Card Reader.
•
Press the CREDIT key to complete the refund with the Credit Card.
•
Screen will display Processing CC... & attempt to connect to perform the credit refund.
•
Two receipts will print out (one for customer, one to put in the drawer) once the refund is completed.
Other Notes:
•
To manually refund a Credit Card (if the mag stripe is dirty, scratched, or if the physical card is not present)
enter the 4-digit Expiration Date (as MMYY) press the @ button, enter the Credit Card number, then press
the CREDIT key.
Figure 2. Sample Credit Refund receipt.
10
Procedures and Reporting for Credit Cards
Reporting Transactions and Closing Batches
Credit card sales information can be obtained two ways: Through the Revenue Report or through the Credit
Card Processing menu option located in the Sales menu. You use the Credit Card Processing menu option to
close batches daily.
Revenue Report
The Revenue report will display each type of credit card received and the associated sales totals as well. Below
is an example for your reference. Note that you can obtain this report on an insert, daily, weekly, or monthly basis.
11
Procedures and Reporting for Credit Cards
Credit Card Processing Menu Option and Closing a Batch
Current Batch Number: Displays the current batch number.
Current Batch Opened: Displays the date and time of the start of the current batch. All data reported on this
page will be from this start date and time.
Current Captured Transactions:: Displays the count and amount of all approved (captured) transactions.
Close Current Batch: Press this button to begin the Batch Close process for the batch number displayed to the
right of the button. The credit card device will dial out and connect to your vendor to upload and finalize all of the
transactions for the day. Typically, the Batch Close procedure is performed only once each day at the same time
you perform your Daily Close.
Report For: Select the batch number to display a report. The default is the current batch. You can obtain a report
for the last 60 batches. This report will include all types of transactions, including approved, declined, and any
other transactions that encountered an error, like invalid card swipes or no dial tone messages. A summary will
also be printed at the bottom of the report.
Report Format: Select from PDF, HTML, TXT, or CSV type file formats.
Report - All Transactions: Pressing this button will display the report based on your selected options above.
If upgrading from an earlier version of the Credit software, previously closed batches will NOT be listed here. They
can reported upon from the Sales -> Historical menu, using the "Credit Batch Report" option.
Summary Report: This button will display a report summarizing the captured (approved), pending, declined,
voided, and uncollectible transactions based on your selected options above. This report will also provide the
total amounts for each credit card type that you accept.
12
Procedures and Reporting for Credit Cards
Be sure to close Batches on a regular basis!
The system can hold a maximum of 999 electronic payment tranactions in the system at one time. The recommendation
is to hold no more than 250 transactions in a single batch at any time - especially if the batch close is transmitted over
a dial-up (modem) connection! It is imperative that the restaurant performs a Batch Close on a regular basis, so that
this maximum is not reached! SICOM recommends that you close a Batch on a daily basis right before the Daily Close
is performed.
Clear Batch
To clear a batch, first enter the batch number in the text box to the right and then click Clear Batch. Pressing
this button will CLEAR all of the transactions and data from the system, and your credit card device. The cannot
be undone! You will NOT receive payment from the bank for these transactions if cleared.
This option is only available to your System Administrator and should ONLY be used if directed by your your
System Administrator, your Merchant Services/Payment Processor, or SICOM Support.
13
Procedures and Reporting for Credit Cards
14
Cashier Instructions for Credit Cards
Credit Quick Reference Sheet
This page detailing the steps necessary to process Credit Cards is provided for your convenience! Print out this
page and place in a location easily accessed by your cashiers for future reference!
15
Cashier Instructions for Credit Cards
16
Installation of Gift Cards
Gift Card Configuration
The SICOM SL-Series can perform Gift Card transactions for the Burger King Pay It Your Way® Gift Card
Program via the Valuelink Network and the FDMS Gift Card Program via the First Data Merchant Services
(FDMS) Network. The customer must pre-arrange access to those networks before installation.
Gift Card features are available with POS release 2.45b or later.
Adding Gift Cards to a pre-existing DataTran system that was installed on a previous date requires new program
parameters and/or a software reload to work. The DataTran unit itself does not need to be returned to us. It will,
however (if shipped prior to June 2005) need to call home to be reprogrammed. IPTran devices shipped prior to June
2005 will need to be exchanged as they are not field upgradeable. Please contact your System Administrator or SICOM
Technical Support for more information.
There are 6 steps necessary to install the Gift Card Software at the restaurant:
•
The DataTran device needs to support Gift Cards (if one is installed).
•
Add 4 new Function PLU’s.
•
Configure the revenue reports.
•
Configure the ICR report.
•
Setup 5 new buttons on the panels.
•
Test the Cards!
Software Configuration
Add New Function PLUs
There are 4 new Function PLU’s and 5 buttons that are required to process Gift Cards. There are also 5 new
key types to use for these new Function PLU’s. These are:
•
Key Type 74, Gift Card Issue. This is used to initially sell/purchase a NEW, COMPLETELY UNUSED Gift
Card from the restaurant.
•
Key Type 75, Gift Card Redeem. This is used to redeem, or use, some or all of the amount that has been
loaded onto the card.
•
Key Type 76, Gift Card Balance. This is used to print the remaining balance of the card. No purchase
necessary. No amount is loaded or removed from the card.
•
Key Type 77, Gift Card Recharge. This is used to load (or add) more money to a card that is already in use,
increasing it’s available balance.
•
Key Type 78, Gift Card Cashout. This is used to cash out all of the amount that has been loaded onto the
card. This action reduces the available balance from the card to 0 and renders it inactive until it is recharged.
The 4 new Function PLU’s that you will be adding will be similar to the following list:
17
Installation of Gift Cards
Table 1. Sample Function PLU configuration details.
Field
Cashout
Issue
Redeem
Recharge
PLU Number
40001000
40001001
40001002
40001003
Type
5
5
5
5
Price
0.00
0.00
0.00
0.00
Name
GCard Cashout
GCard Issue
GCard Redeem
GCard Recharge
Tax
N
N
N
N
Category
90
90
90
90
Recipe
Code
Reference 1
30000000*
30000000*
Reference 2
Route 1
Route 2
Limit 1
Limit 2
VAT 1
VAT 2
Call a Pop-Up?
Poll ID
Class Code
4 (Declared Gift)
10 (Gift Cert Sold)
4 (Declared Gift)
10 (Gift Cert Sold)
Long Description
Poll ID-2
* POS 2.47a will alert the user if these fields are not properly configured.
Revenue Configuration File
All 4 of the above Function PLU’s should automatically be displayed on the Revenue Report once they are
configured and used on the POS.
ICR Report Configuration File
You can add all 4 of the Function PLU’s listed as their own PLUDEF and add each PLUDEF to the 3rd page of
the ICR report so that the totals can be viewed on the ICR.
Touch Screen Panels Edit
As mentioned earlier, there are 5 new buttons that need to be added to the panels, preferably to Panel 99 (The
tender panel.)
18
Installation of Gift Cards
Table 2. Sample Panel configuration details.
Name
Action Panel
Key Type
PLU Number
Gift Card Cashout
-1 (No Action)
78
40001000
Gift Card Issue
-1 (No Action)
74
40001001
Gift Card Redeem
-1 (No Action)
75
40001002
Gift Card Recharge
-1 (No Action)
77
40001003
Gift Card Balance
-1 (No Action)
76
Test the Cards!
After the configuration of the Gift Cards has been completed, have the customer perform several test transactions.
Perform a Terminal Update on one terminal to load the changes. Have them ISSUE a new card for $1.00. Slide
a NEW card into the slot, press 100 then the ISSUE button. A message will only appear if the transaction was
NOT successful. Take gift card from slot and tender the order with cash or credit card. Make sure a receipt prints
with the card information on it.
Next have them REDEEM part of the card. Ring up an item LESS than $1.00. Slide the gift card into the slot and
press the REDEEM button to finalize and tender the order. Remove gift card from slot. Make sure a receipt prints
with the card information on it.
Check the BALANCE of the gift card. Slide the gift card into the slot, and press the BALANCE button. A message
on screen, and a receipt should print out detailing the remaining balance on the gift card. Remove gift card from
slot.
RECHARGE the card for any additional amount. Slide the gift card into the slot, enter the amount to recharge
and press the RECHARGE button. Take gift card from slot and tender the order with cash or credit card. Make
sure a receipt prints with the card information on it.
Finally, CASHOUT the card. Slide the gift card into the slot and press the CASHOUT button. The remaining
balance of the card should be displayed in the virtual receipt. The CASHOUT amount of cash is returned to the
customer from the drawer.
IPTran Configuration and Setup
Adding Gift Cards to a pre-existing IPTran system that has been installed on a previous date requires new
program parameters and/or a software reload to work. IPTrans shipped prior to June 2005 will need to be
exchanged as they are not field upgradeable. Please contact your System Administrator or SICOM Support for
more information.
19
Installation of Gift Cards
20
Procedures and Reporting for Gift Cards
POS Cashier Instructions
Many of the same rules apply to Gift Cards the same as Credit Card transactions. Please note that all gift card
transactions are processed immediately when a GIFT button is pressed. If the sale is changed, deleted,
etc. the gift transaction will be reversed.
Gift Card Issue (Sale)
Procedures:
•
Ring up the amount to be placed on the card (as $$¢¢).
•
Slide a NEW, Unused Gift Card thru the Card Reader.
•
Press the ISSUE key on the terminal.
•
Screen will display Processing Gift... & attempt to connect. If there is any problem with authorizing the card,
a message will be displayed on-screen. Try another card.
•
Once the card is activated/loaded, the item will display on the virtual receipt.
•
A receipt will print out detailing the Gift Card’s new balance once the sale is completed.
•
To remove an ISSUE from the order, simply highlight & delete the line item before final completion of the sale.
Other Notes:
•
May be added in middle of a sale.
•
Can pay with credit or cash.
•
If you delete a card that is being ISSUED, then you must RECHARGE the card if you wish to use it again.
•
Cards cannot be manually processed to be issued. (If card stripe is not working, card cannot be used.)
Figure 1. Sample Issue receipt.
21
Procedures and Reporting for Gift Cards
Gift Card Redemption
Procedures:
•
Ring up order as usual, press the TOTAL key.
•
Slide the Gift Card thru the Card Reader.
•
Enter in the amount to use from the Gift Card (as $$¢¢) and press the REDEEM key. You can also simply
press the REDEEM key to complete the sale with a single Gift Card.
•
Screen will display Processing Gift... & attempt to connect to deduct the sale from the Card’s balance.
•
When the sale is completed, a receipt will print out detailing the Gift Card’s remaining balance.
•
To manually REDEEM a Gift Card (if the mag stripe is dirty or scratched) enter the amount ($$¢¢) press the
@ button, enter the Gift Card number, then press the REDEEM key.
•
To remove an REDEMPTION from the order, simply highlight & delete the line item before final completion of
the sale.
Other Notes:
•
May continue with other gift card or credit card in the same fashion (partial payment) and finish with cash.
•
Up to 30 different Gift Cards can be used in any single sale.
Figure 2. Sample Redeem receipt.
22
Procedures and Reporting for Gift Cards
Gift Card Balance
Procedures:
•
Slide the Gift Card thru the Card Reader.
•
Press the BALANCE key on the terminal.
•
Screen will display Processing Gift... & attempt to connect to obtain the balance.
•
Screen will display the remaining balance, and a receipt will print out detailing the Gift Card’s balance.
•
To manually obtain the BALANCE of a Gift Card (if the mag stripe is dirty or scratched) enter the Gift Card
number, followed by the BALANCE key.
Figure 3. Sample Balance receipt.
23
Procedures and Reporting for Gift Cards
Gift Card Recharge
Procedures:
•
Ring up the amount to be placed on the card (as $$¢¢).
•
Slide the used Gift Card thru the Card Reader.
•
Press the RECHARGE key on the terminal.
•
Screen will display Processing Gift... & attempt to connect. If there is any problem with recharging the card,
a message will be displayed on-screen. Try recharging the card manually.
•
Once the amount has been loaded to the card, the item will display on the virtual receipt.
•
A receipt will print out detailing the Gift Card’s new balance once the sale is completed.
•
To manually RECHARGE a Gift Card (if the mag stripe is dirty or scratched) enter the amount ($$¢¢) press
the @ button, enter the Gift Card number, then press the RECHARGE key.
•
To remove an RECHARGE from the order, simply highlight & delete the line item before final completion of the
sale.
Other Notes:
•
If you’ve previously deleted a card that was being ISSUED, then you must RECHARGE the card if you wish to
use it again.
•
May be added in middle of a sale.
Figure 4. Sample Recharge receipt.
24
Procedures and Reporting for Gift Cards
Gift Card Cashout
Procedures:
•
You must begin a NEW ORDER when performing a CASHOUT function.
•
Slide the used Gift Card thru the Card Reader.
•
Press the CASHOUT key on the terminal.
•
Screen will display Processing Gift... & attempt to connect to obtain the remaining balance on the card.
•
Once the balance is obtained, the total amount will be displayed in the virtual receipt.
•
The sale will be automatically finalized and cash drawer will open; Provide the customer with amount shown.
•
You cannot remove a CASHOUT from the order once entered! You must RECHARGE the card.
Other Notes:
•
Reference 1 of this PLU must contain the CASH PLU (normally 30000000)
Figure 5. Sample Cashout receipt.
25
Procedures and Reporting for Gift Cards
Reporting Transactions
The Revenue report will display the transactions performed on the system along with the amount totals for each.
These line items will usually be displayed towards the bottom section of the report. Below is an example for your
reference. Note that you can obtain this report on an insert, daily, weekly, or monthly basis.
26
Cashier Instructions for Gift Cards
Gift Quick Reference Sheet
This page detailing the steps necessary to process Gift Cards is provided for your convenience! Print out this
page, cut, and place in a location easily accessed by your cashiers for future reference!
27
Cashier Instructions for Gift Cards
28