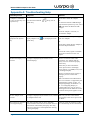
1
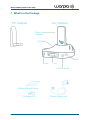
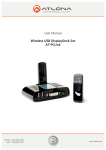
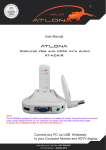
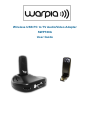
Wireless USB PC to TV Audio/Video Adapter SWP100A User Guide Wireless USB A/V Adapter Set User Guide © 2011 Source R&D. All rights reserved. All rights, title and interest, copyrights, patents, know-how, trade secrets and other intellectual property relating to this publication and to Source R&D products are proprietary products of Source R&D. The information presented in this publication does not form part of any quotation or contract, is believed to be accurate and reliable, and may change. No part of this publication may be reproduced in any form whatsoever without prior written approval by Source R&D The Wireless USB A/V Adapter set is protected by patents and pending patent applications. Any and all other trademarks, product names and other intellectual property rights are the sole property of their respective owners. Source R&D Proprietary Information Customer Support: Please send all technical support questions to the following email address. For faster service, be sure to include your system specifications including: PC/Laptop Model Operating System and Service Pack # CPU, RAM & Video Card (if applicable) Television/projector Make and Model Warpia Driver build Warpia PC adapter & Device Adapter version Warpia HDMI Firmware version Send to: [email protected] Doc. version UG10055 R1.8 Page 2 Wireless USB A/V Adapter Set User Guide Table of Contents 1 What's in the Package ..................................................................................... 4 2 Positioning ....................................................................................................... 5 2.1 2.2 3 Positioning the A/V Adapter ..................................................................................... 5 Positioning the PC Adapter ...................................................................................... 6 Software Installation and First Connection ................................................... 7 3.1 3.2 Connect the PC Adapter to the PC ........................................................................ 11 Connect the A/V Adapter ....................................................................................... 11 3.2.1 Connecting Audio ............................................................................................................. 11 4 Wireless USB Manager User Interface ......................................................... 12 4.1 4.2 4.3 4.4 4.5 5 Wireless USB Manager System Tray Icon ............................................................. 12 Accessing the Wireless USB Manager ................................................................... 12 Blocking or Disassociating a Device ...................................................................... 15 Changing Device Names in the Wireless USB Manager ........................................ 16 Advanced Settings ................................................................................................. 16 Using and Configuring the A/V Adapter ...................................................... 18 5.1 Using the A/V Adapter ........................................................................................... 18 5.1.1 5.1.2 5.1.3 5.1.4 5.2 Using Mirror Mode ........................................................................................................... 18 Using Extend Mode .......................................................................................................... 19 Laptop Operation with the Lid Closed .............................................................................. 19 External Display Only....................................................................................................... 20 Configuring Display in Windows 7 .......................................................................... 20 5.2.1 Setting Mirror or Extend Mode in Windows 7 .................................................................. 20 5.2.2 Configure Screen Options in Windows 7 ......................................................................... 20 5.3 Configuring Display in Windows XP/Vista .............................................................. 21 5.3.1 Configuring the Display via the Display Icon Context Menu in Windows XP/Vista ......... 21 5.3.2 Configuring the Display via Windows Display Properties in Windows XP/Vista .............. 24 5.4 Optimizing Wireless Video Display......................................................................... 26 5.4.1 5.4.2 5.4.3 5.4.4 5.4.5 5.4.6 5.5 6 Use Extend Mode ............................................................................................................ 26 Optimizing Internet Video Viewing ................................................................................... 26 Using Optimize for Video Mode ....................................................................................... 27 Setting Aero Desktop Theme in Vista .............................................................................. 27 Recommended Media Player Applications ...................................................................... 28 Recommended Minimum System Requirements ............................................................ 28 Setting Audio Output Device .................................................................................. 29 LED Indications .............................................................................................. 31 Appendix A: Troubleshooting Help ....................................................................... 32 Appendix B: Pairing Procedure ............................................................................. 36 Page 3 Wireless USB A/V Adapter Set User Guide 1 What's in the Package A/V Adapter PC Adapter Device Adapter A/V Base Power HDMI VGA 3.5mm Audio Getting Started Guide Software CD Page 4 Power Supply Unit Wireless USB A/V Adapter Set User Guide 2 Positioning 2.1 Positioning the A/V Adapter The Wireless USB A/V Adapter is designed for two possible mounting options: Simple table placement – the Audio/Video Base (A/V Base) is placed on a flat horizontal surface, and the Device Adapter is connected at 90 degrees to the base so that it is vertical. Vertical mounting – the A/V Base is fastened to a wall, a projector, or behind a display screen, and the Device Adapter is connected so that it is flat with the mounting surface, with the Device Adapter pointing upwards. Note: For best performance, it is recommended to always position the Device Adapter vertically so that it is pointing upwards. Page 5 Wireless USB A/V Adapter Set User Guide 2.2 Positioning the PC Adapter To achieve best performance it is recommended to position the PC Adapter in the upright position. Figure 1: PC in working mode - PC Adapter in upright position When the laptop is not in use, the PC Adapter can be rotated 90 degrees for storage, as seen in the following illustration: Figure 2: Laptop inactive - PC adapter in horizontal position for storage. Page 6 Wireless USB A/V Adapter Set User Guide 3 Software Installation and First Connection Note: If your PC contains a previous Wireless USB Suite driver installation, please perform a proper uninstall procedure using the Windows Control Panel. 1. Ensure that the PC Adapter is unplugged from the PC. 2. Insert the installation CD in the PC CDROM drive. 3. The installation CD Autoplay menu is displayed. 4. Select .Install Wireless USB Software. The installer offers two options: Option 1: Install Directly from CD - initiates Option 2: Download latest software from the WEB - provides the installation process from the CD. a link to a web address where you can download software updates. If you choose this option, follow the instructions provided on the software download page. Page 7 Wireless USB A/V Adapter Set User Guide 5. If you select Option 1: Install Directly from CD, the install wizard begins installing the Wireless USB software. The installation process may include more than one stage to accommodate different drivers that are installed. Following the Wireless USB drivers, the Display drivers and application are installed. 6. Choose your geographic region to comply with your local radio regulations. This setting can be changed if needed once the software is installed. 7. Follow the onscreen instructions, and proceed by clicking Next> when prompted, or by approving authorization requests to continue the installation. Page 8 Wireless USB A/V Adapter Set User Guide 8. When the Wireless USB Driver installation has completed, the Display driver installation begins. Click I Accept to approve the end-user license agreement and continue installation. 9. When the installation procedure has successfully finished, you are automatically returned to the opening screen of the Autoplay menu. You may be requested to reboot. Page 9 Wireless USB A/V Adapter Set User Guide Page 10 Wireless USB A/V Adapter Set User Guide 3.1 Connect the PC Adapter to the PC 1. Connect the Wireless USB PC Adapter to a high speed PC USB port. The system will automatically detect and install the drivers for the connected PC Adapter 2. System Tray icon turns red to indicate that the PC Adapter (Host) is ready to connect to any paired device in range 3.2 Connect the A/V Adapter 1. Attach the A/V Adapter to the remote display device (TV/Projector/Monitor), and ensure the PC (with PC Adapter attached) is within 3 meter distance from the A/V Adapter for the initial connection. Ensure the two adapters have clear line-of-sight. Connect the provided power supply to the A/V Base power receptacle. Note: The PC Adapter and Device Adapter in this set are already paired and do not require performing a pairing procedure. If you should need to perform pairing manually for any reason (e.g. connecting to a new host PC Adapter, or adding a Device Adapter that was not purchased in a set), please refer to Appendix B: Pairing Procedure 2. Wait for the System Tray icon to turn green , indicating that a wireless connection with the A/V Adapter has been established. The Display icon is also displayed as soon as a connection is established and the Display drivers are active. Note: If you do not see the icon changing to green, or do not see the Display icon, please see Appendix A: Troubleshooting Help for suggestions. 3.2.1 Connecting Audio The following options can be used to connect an Audio Output Device to the A/V Adapter: Using the HDMI connector. Connect the HDMI cable to the A/V Base. Both video and audio are delivered on the same HDMI cable. Connect the other end of the cable to the appropriate HDMI port on the TV/Projector/Monitor. Using the dedicated 3.5mm port. Connect an audio cable with a 3.5mm (mini-stereo) plug to the audio jack on the A/V Base. Connect the other end of the cable to the appropriate audio input jack on the audio device. Note: The audio output is activated automatically. If you need to set the audio output device manually, see Setting Audio Output Device. Page 11 Wireless USB A/V Adapter Set User Guide 4 Wireless USB Manager User Interface The Wireless USB Manager allows you to monitor and control the available Wireless USB devices and connections that are within range of the PC. 4.1 Wireless USB Manager System Tray Icon The Wireless USB Manager icon is automatically displayed in the Windows System Tray whenever Windows starts. The color and shape of the icon indicates the current activity state, as described in the following table: Icon Color Status Connected (green icon) A wireless connection is established with a Wireless USB Device Adapter. Host Hardware Enabled (red icon) Wireless USB PC Adapter is connected to the PC (PC Adapter is enabled), but no wireless connection is detected. Host Hardware Disconnected (gray icon) Wireless USB PC Adapter is not connected. Host Hardware Disabled (gray icon with X) Wireless USB PC Adapter is disabled. Note: Under the Japan regional setting, this icon is displayed whenever the AC power source is disconnected from the PC. Wireless USB Channel is Busy (green icon with exclamation) Low channel quality detected, but at least one Wireless USB device is still connected. To improve connection quality, see Appendix A: Troubleshooting Help for suggestions. Wireless USB Channel is not available (red icon with exclamation) No available channel detected. To improve connection quality, see Appendix A: Troubleshooting Help for suggestions. 4.2 Accessing the Wireless USB Manager To access the Wireless USB Manager: Right click the Wireless USB Manager System Tray icon Connections to display the Wireless USB Manager screen. and select Wireless USB Figure 3: System Tray Icon - Context menu Page 12 Wireless USB A/V Adapter Set User Guide Table 1: Context menu options Menu Option Description Wireless USB Manager Displays the main user interface, which displays a list of Wireless USB devices that are available, and their connection status (Connected, Not Connected, Blocked) Help Opens the help/troubleshooting file (HTML format) in a browser About Displays the About screen, containing version information for the drivers and software. Exit Closes the Wireless USB Manager application Figure 4: Wireless USB Manager – remote device connected Page 13 Wireless USB A/V Adapter Set User Guide Table 2: Wireless USB Manager Options Menu Option Description Host ID Displays the currently connected PC Adapter ID number Connection Quality: The following are the different states of the connection status icon which indicates the connection quality: Blocked Not connected Connected Medium Good Very Good Excellent Advanced Settings Displays the Advanced Settings screen, allows configuration of the PC Adapter RF settings. Close Closes the Wireless USB Manager screen, does NOT close the Wireless USB Manager application. About Displays the About screen containing basic information regarding the software version and vendor details (Help) Page 14 Opens the help/troubleshooting file (HTML format) in a browser Wireless USB A/V Adapter Set User Guide 4.3 Blocking or Disassociating a Device The Wireless USB Manager screen allows you to remove devices or to temporarily disable them from connecting to the Host. To Block a device temporarily, and prevent it from connecting to the Host: Right click the device name in the Connection list and select Block Device. Figure 5: Wireless USB Manager Context Menu To remove a device from the list of available devices completely: Right click the device name in the Connection list and select Disassociate Device Figure 6: Wireless USB Manager– remote device blocked Note: The Disassociate Device option is only available for Device Adapters that are purchased separately and not in a set. For information about pairing an Adapter set, see Appendix B: Pairing Procedure. Table 3: Context Menu Options Menu Option Description Block/UnBlock Device Allows you to temporarily disable a device from connecting with the Host. Disassociate Device Removes the device from the list. To return the device to the list, Pairing must be performed again. Rename Allows you to change device name as it appears on the Wireless USB Manager. Properties Displays the properties screen for this device. Page 15 Wireless USB A/V Adapter Set User Guide 4.4 Changing Device Names in the Wireless USB Manager The Wireless USB Manager screen allows you to modify the name of the device that appears in the connections list. To modify the device name: 1. Double-click the device name 2. Enter the text that you want. 3. Click anywhere outside of the device name area to finalize. Figure 7: Editing Device Name in Wireless USB Manager 4.5 Advanced Settings The Advanced Settings screen of the Wireless USB Manager allows configuration of the Channel and Region selection in the Host. To access the Advanced Settings screen: In the Wireless USB Manager screen, click Advanced Settings Figure 8: Advanced Settings Screen Page 16 Wireless USB A/V Adapter Set User Guide Option Description Region: Allows selecting the regulatory region: USA, Europe, Japan, Korea, China Current Channel (read only) Displays the current PHY Channel Channel Quality (read only) Displays Channel quality: Excellent, Very Good, Good, Low, Not Connected Select Channel Allows selecting PHY Channels: 13*, 14, 15# Select Rate (Mbps) This option is not active. OK Applies configuration changes that were made Close Closes the Advanced Settings screen Notes: * This is the default value for USA region. # This is the only available option for Europe, Japan, Korea and China regions. Page 17 Wireless USB A/V Adapter Set User Guide 5 Using and Configuring the A/V Adapter The following are suggested work modes for connecting a display screen to the A/V Adapter: Mirror Mode Extend Mode Laptop with Lid Closed External Display Only Note: On Windows XP/Vista, the display properties for the A/V Adapter can be configured in two ways: as described in Sec. 5.3.1 Configuring the Display via the Display Icon Context Menu in Windows XP/Vista, or as described in Sec. 5.3.2 Configuring the Display via Windows Display Properties in Windows XP/Vista. On Windows 7, refer to Sec. 5.2 Configuring Display in Windows 7. When changing settings, or during first connection between the PC Adapter and A/V Adapter, the PC display may flicker or turn on and off as the screen resolution is automatically adjusted. 5.1 Using the A/V Adapter Upon first time operation, the A/V Adapter is in Extend mode, this section describes the different modes that can be set. In Sec. 5.2 and 5.3.2 you will find the procedures for configuring these modes. 5.1.1 Using Mirror Mode Mirror mode is used to display the identical content on the additional screen as is shown on the main PC/Laptop screen. Mirror mode is generally used to display the PC contents on a larger or higher definition display. See Figure 9: Mirror Mode - displaying PC desktop on a larger display screen. Figure 9: Mirror Mode - displaying PC desktop on a larger display screen Page 18 Wireless USB A/V Adapter Set User Guide Note: Mirror mode is not recommended for playing HD video. 5.1.2 Using Extend Mode Use the Extend mode to display different content on each display screen. In Extend mode, the display attached to the A/V Adapter becomes an extended part of the Windows desktop. The extra desktop area is a great productivity aid, allowing you to view or work with more applications or documents at the same time. You can also use this mode to extend your desktop to fill multiple screens that are positioned next to each other for a larger continuous work space. PC screen External (extended) screen Figure 10: Illustration of extend mode Note: Extend mode is recommended for playing HD video. Figure 11: Extend Mode - using second display for an additional application or a movie 5.1.3 Laptop Operation with the Lid Closed You can work conveniently with a laptop by setting its default action upon closing the lid to "Do nothing" (to prevent the laptop from entering "sleep" or "hibernation" mode, Control Panel > Power Options, "When I close the lid:" - "Do nothing"), and then set the A/V Adapter screen as the primary display while disabling the main. The laptop lid can then be closed, and the laptop can be used with the A/V Adapter screen and an external keyboard and mouse attached to the laptop. This configuration can be used together with either Mirror mode or Extend mode. Page 19 Wireless USB A/V Adapter Set User Guide 5.1.4 External Display Only When you want to use the external display only, you can close your main monitor and view movies on the external display attached to the A/V Adapter. 5.2 Configuring Display in Windows 7 5.2.1 Setting Mirror or Extend Mode in Windows 7 In Windows 7, there is a built in support for external monitor. To use it press the windows key together with the P key ( +P), and then the following menu will appear: Figure 12 - Switching projection mode under Windows 7 For mirror mode, choose Duplicate For Extend mode, choose Extend 5.2.2 Configure Screen Options in Windows 7 When a link is established with the Wireless USB A/V Adapter, the Display drivers are activated and the Display icon appears in the Windows system tray. The right-click context menu of the Display icon contains configuration options that correspond to the display mode. Figure 13 - DisplayLink Context Menu Page 20 Wireless USB A/V Adapter Set User Guide To configure screen resolution, or any other display option, choose Advanced. The following window will appear: Figure 14 - Windows 7 Display Settings To change any of the external display settings: 1. Select the appropriate display name in the Display scroll down options. You should select the name of the TV/Monitor/Projector connected to your A/V Adapter. 2. Select the desired value in any of the available settings: a. Resolution: your external display resolution. b. Orientation: select either Landscape or Portrait. c. Multiple displays: select either Mirror or Extend mode. d. Make this my main display: mark this option to make the external display the primary display on which the desktop is displayed. 5.3 Configuring Display in Windows XP/Vista 5.3.1 Configuring the Display via the Display Icon Context Menu in Windows XP/Vista When a link is established with the Wireless USB A/V Adapter, the Display drivers are activated and the Display icon appears in the Windows system tray. The right-click context menu of the Display icon contains configuration options that correspond to the display mode. Note: When changing settings, the PC display may flicker or turn on and off as the screen resolution is automatically adjusted. Page 21 Wireless USB A/V Adapter Set User Guide Configuration Option Options available Remarks Screen Resolution Extend mode only Color Quality Extend mode only Screen Rotation Mirror and Extend modes Extend To Extend mode only Extend Sets the Extend mode Mirror Sets the Mirror mode Off Disables the remote display Advanced Opens the Windows Display Settings screen Select Mirror or Extend mode to enable the display 5.3.1.1 Setting Mirror Mode in Windows XP/Vista To set the display to Mirror mode: Right click the DisplayLink System Tray icon menu Page 22 and select Mirror from the context Wireless USB A/V Adapter Set User Guide The resolution, color depth and refresh rate of the primary screen are duplicated on the display connected to the A/V Adapter. If the display connected to the A/V Adapter supports a lower resolution than the primary display, the primary graphics device will have its resolution changed automatically to ensure the whole picture fits on the additional display screen. If the display screen connected to the A/V Adapter is larger than the primary screen, the image will be adjusted to a letter-box frame to preserve the correct aspect ratio. Note: When changing from Extend to Mirror mode, it is recommended to first set the Display to Off, and then set to Mirror. 5.3.1.2 Setting Extend Mode in Windows XP/Vista To set the display to Extend mode: Right click the DisplayLink System Tray icon and select Extend from the context menu. You can also select the Extend To option to specify which side of the extended space is occupied by the extended display. Note: When changing from Mirror to Extend mode, it is recommended to first set the Display to Off, and then set to Extend. To place an application window in the extended space, use the following tips: Reduce the application window size to about half the normal size, and then drag the application window (dragging by the Title Bar at the top of the screen) past the edge of your main display and into the extended display space. Resize the window in the extended space as needed for comfortable viewing. Page 23 Wireless USB A/V Adapter Set User Guide When dragging a running process window such as a movie or other application from the main screen to the extended screen, it is recommended to pause or stop the running application first, and restart it in the extended screen. 5.3.2 Configuring the Display via Windows Display Properties in Windows XP/Vista Display settings can also be configured from the Windows Display Properties dialog box. (In Windows Vista: right click on the desktop, select Personalize > Display Settings. In Windows XP: right click on the desktop, select Properties>Settings tab). Drag area for selecting and positioning display Figure 14: Windows Display Settings 5.3.2.1 Selecting the Correct Display Monitor In the monitor drop down box, find the entry for the A/V Adapter display monitor "...on DisplayLink Graphics". You can arrange this display's position with respect to the other monitors on the extended desktop by using the drag area at the top of the Windows Display Settings dialog. If you are not sure which number represents which display, click Identify Monitors and a large identifying number will appear on each display. 5.3.2.2 Setting the Display to Extend or Mirror Mode To set the display in Extend mode, check the option Extend the desktop onto this monitor To set the display into Mirror mode, uncheck the box marked Extend the desktop onto this monitor (see circle #1 in Figure 14). Page 24 Wireless USB A/V Adapter Set User Guide 5.3.2.3 Adjusting Screen Resolution Use the Resolution slider to adjust the desired resolution of the display (see circle #2 in Figure 14). 5.3.2.4 Adjusting Color Level Use the Colors drop-down box to select a color complexity level (see circle #2 in Figure 14). 5.3.2.5 Setting the A/V Adapter as the Primary Display To make the A/V Adapter display the primary display: 1. Select the screen that is connected to the A/V Adapter - for example "Default Monitor on DisplayLink Graphics Adapter" as shown in the screen above. 2. Check the option Extend the desktop onto this monitor. (In Windows XP - Extend my Windows desktop onto this monitor). 3. Check the option This is my main monitor. (in Windows XP - Use this device as the primary monitor). 4. Click OK to save the new settings. Note: On some PCs it is necessary to disable the main display (uncheck the box marked ‘Extend the desktop onto this monitor’ for the main display) as part of the same settings change. The A/V Adapter remains the primary one if the PC enters Hibernate or Suspend mode or is rebooted. If the A/V Adapter is detached, the main display becomes the primary display again. Page 25 Wireless USB A/V Adapter Set User Guide 5.4 Optimizing Wireless Video Display The following are suggested operating modes for best results in displaying video with the Wireless USB A/V Adapter. Additional suggestions can be found in Appendix A: Troubleshooting Help. 5.4.1 Use Extend Mode For optimum performance it is recommended to use Extend mode. When playing HD movies it is recommended to limit the extended screen to 720p resolution (i.e. 1280x720) or any closer resolution. 5.4.2 Optimizing Internet Video Viewing Many video content websites use an embedded Adobe Flash player to show video content. In some cases to achieve best performance with the Flash player, (for example, when viewing online video content in full screen mode) adjust the Flash Player settings as follows. To optimize the Flash player for the A/V Adapter: 1. Right click the video content on the website and select Settings from the Adobe Flash Player context menu. 2. In the Adobe Flash Player Settings screen, uncheck the Enable hardware acceleration option and click Close to close the settings screen. 3. Resume viewing the video content. Page 26 Wireless USB A/V Adapter Set User Guide 5.4.3 Using Optimize for Video Mode For best performance when using the Wireless A/V Adapter, use the Optimize for Video mode (if available). 5.4.4 Setting Aero Desktop Theme in Vista For best performance when using the Wireless A/V Adapter with Windows Vista operating platform, it is recommended to use the Aero desktop theme. To set the Vista desktop to the Aero theme: 1. Right click the desktop and select Personalize. 2. In the Control Panel > Personalization screen, select Windows Color and Appearance Page 27 Wireless USB A/V Adapter Set User Guide 3. Select Windows Aero from the Color scheme list, click OK to save the new setting. 5.4.5 Recommended Media Player Applications On Vista WDDM Aero and Windows XP (in Extend mode), the A/V Adapter can display media files and DVDs using the following media players: Windows Media Player 11 (http://www.microsoft.com/windows/windowsmedia/default.mspx) WinDVD 8 (www.intervideo.com) PowerDVD 7 (www.cyberlink.com) RealPlayer 11 (www.real.com) Note: To get a better idea of what you can do with the A/V Adapter and multiple display screens, please see the web page "How it Works" at this address: http://www.displaylink.com/how_it_works.html 5.4.6 Recommended Minimum System Requirements For best performance, the following are the recommended minimum system requirements: Personal computer with USB 2.0 port available Microsoft Windows® XP SP3, or Microsoft Windows Vista SP2 (32 or 64 bit) TV/display/projector with VGA or HDMI port When using Windows XP: Page 28 Wireless USB A/V Adapter Set User Guide For office use, productivity, web browsing etc.: At least 1.6GHz Atom or Celeron processor and 512MB memory For full screen video, 720p playback etc.: At least 1.8GHz Core2 Duo processor and 1GB memory When using Windows Vista: For office use, productivity, web browsing etc.: At least 1.6GHz Core Solo processor and 1GB memory For full screen video, 720p playback etc.: At least 1.8GHz Core2 Duo processor and 1GB memory 5.5 Setting Audio Output Device The PC audio output device should set itself automatically to the connected A/V Adapter CMedia audio device. If it doesn’t, you can select the correct Audio Playback device from the drop down dialog as follows: In Windows XP: 1. Right click the Volume icon in the System Tray and select Adjust Volume Properties. 2. In the Sounds and Audio Devices Properties screen, select the Audio tab. 3. In the Sound Playback > Default Device drop-down box, select the USB PnP Sound Device. 4. Click OK to save the new setting. In Windows Vista: 1. Right click the Volume icon in the System Tray and select Open Volume Mixer. 2. In the Volume Mixer screen, click Device and select the USB PnP Sound Device from the drop down list. 3. Close the Volume Mixer screen to save the new setting. Page 29 Wireless USB A/V Adapter Set User Guide In Windows 7: 1. Right click the Volume icon in the System Tray and select Open Volume Mixer. 2. In the Volume Mixer screen, under Device, click Speakers and select the USB PnP Sound Device from the drop down list. 3. Close the Volume Mixer screen to save the new setting. Page 30 Wireless USB A/V Adapter Set User Guide 6 LED Indications The following LED indications allow you to see the operational status of the Wireless USB adapters. Power: - OFF when no power is applied or adapter is not connected - Momentary green when initially connected to USB port. Traffic — Rapid flashing when data is received. Power/Traffic LED Figure 15: Wireless USB Adapter LED Page 31 Wireless USB A/V Adapter Set User Guide Appendix A: Troubleshooting Help Problem/Question Symptoms PC Adapter is attached to PC, but I see the Gray icon Host show Disconnected in System Tray. System Tray Solutions (Gray) icon in Detach and re-attach PC Adapter OR Exit from the Wireless USB Manager (right-click the System Tray icon, select Exit) and restart the Wireless USB Manager. OR Detach PC Adapter, restart PC, reattach the PC Adapter Display Adapter icon is not displayed in the System Display Adapter icon Tray System Tray. is not displayed in the Detach and re-attach the power supply of the A/V Adapter OR Detach and re-attach the PC Adapter to restart the adapter hardware. OR Reset the PC and try again to establish the wireless connection to the A/V Adapter. The External Display is not No image is displayed by the remote screen activated (external display). Check to see that the video cable between the A/V Adapter and the display screen is connected properly and securely. Ensure that you have selected the correct input source in the display screen controls (e.g. HDMI, VGA, Line In, and Digital Input). Check to see that the power supply to the display screen is connected properly. Make sure that the Screen Resolution that is set on the PC is supported by the external display. Please see Sec. 5.2 Configuring Display in Windows 7 or Sec. 5.3 Configuring Display in Windows XP/Vista. You can also try switching between the different screens resolutions until picture appears on the TV. The A/V Adapter is not activated No image is displayed by the remote screen, and the Make sure you have connected the A/V Adapter LED is off. power supply to the correct port on the A/V Base. Movie playing is disrupted Some laptop models offer an active hard-disk Disable or lower the sensitivity of the by moving the laptop protection feature that locks the hard-disk when too active hard-disk protection mechanism. much motion is detected by the laptop. This may cause movie playing to be disrupted when moving or jarring the laptop. Page 32 Wireless USB A/V Adapter Set User Guide Problem/Question Symptoms Movie playing performance is poor Movie playing is jumpy or uneven or may get stuck Open the Wireless USB Manager and due to weak wireless connection. check the Connection Quality indication - adjust the distance and/or the line of sight between the PC and the A/V Adapter to improve the wireless connection quality. Online movies freeze in full screen mode Movie freeze when going to full screen mode on websites which use an embedded Adobe Flash player. Video does not play properly on Apple’s QuickTime player When using QuickTime player, the video looks green/pink or does not play on the remote display. TV by default is setup to a specific resolution, and is not scanning the HDMI for supported resolutions When connecting a TV in HDMI mode the picture on the TV is too big (only part of my laptop screen is showing), OR When connecting a TV in HDMI mode the picture on the TV is too small (Black bars are seen around the picture). Solutions In the Adobe Flash Player Settings screen, uncheck the Enable hardware acceleration option. Please see Sec. 5.4 Optimizing Wireless Video Display. Open QuickTime: Click Start > Program Files > QuickTime. On the QuickTime application click Edit > Preferences > QuickTime Preferences, and then switch to Safe Mode under the Video setting. In the TV setup screen look for a method for either: Enabling the HDMI scan Switch to PC mode Disable Over Scan If neither of these modes is available, please try to select different screen resolutions in the TV until you find one that fits the resolution you have selected on your laptop screen settings. For more Display Adapter Please refer to the Support Knowledgebase tips and information: section of the DisplayLink website for more specific information and answers to questions: www.displaylink.com/support/knowledg ebase.php For basic definitions, see the Frequently Asked Questions: www.displaylink.com/setup_faqs.html. Audio is not synchronized When you play a video, the audio part of the with the video playback may not be synchronized with the video playback. Change the active power plan to ‘Always On’ or to ‘Balanced’ or to ‘High Performance’. XP: Click Start, select Control Panel. Click Power Options. Under Power Schemes select Always On. Vista: Click Start, type power in the Start Search box, and then click Power Options in the Programs list. Under Select a power plan, click Balanced or click High performance. Page 33 Wireless USB A/V Adapter Set User Guide Problem/Question Symptoms Solutions No Audio on the remote speakers connected to the A/V Adapter When you play a video and the audio part of the playback is heard from the PC speakers and not from the remote speakers. Make sure you have connected the remote speakers to the 3.5mm audio port. On the media player press Stop and then Play to restart the video. Please see Sec. 5.5 Setting Audio Output Device for further details. Problems in establishing connection with Device Tray To check if a device is connected, right click the System Tray icon and select Wireless USB Manager to view the list of available devices and to see the green Connected icon next to the (red) icon in System device name of the newly established connection Power not connected to Device: ensure that the correct power supply is connected to the device side. Device Adapter requires restart: detach and re-attach the Device Adapter from the Table Adapter to restart the hardware. Wireless Device is out of range: if you experience frequent Wireless link disconnection, the Wireless Device may be out of range –the solution is to bring the Wireless Device closer to the Wireless USB Host. - Green System Tray icon does not light up Device Adapter requires pairing: to indicate that a connection has been established, if you are adding a Device Adapter that was not part of a set, or if you are OR connecting to a new unrecognized Host, - The Device is not listed in the Wireless USB you may need to perform the Pairing Manager screen procedure see Appendix B: Pairing Procedure. Channel busy message displays when I try to change the channel External radio interference may exist close to the PC/device Channel selection SW may have failed Note: manual channel selection may be restricted by local communication regulation laws. Problems with Pairing see also - Appendix B: Pairing Procedure Another wireless system may be in use in proximity to the PC or device environment, and may cause temporary interference to the wireless USB system. Try to select a different channel (where applicable - local regulatory restrictions may apply). Close the message box, detach the PC Adapter from your PC and re-attach it. If the message displays again, try to change the channel again. The Pairing procedure does not result in the Detach and re-attach Device Adapter confirmation screen "WIRELESS USB device has OR been paired", or results in an error message. Re-attach PC Adapter, then attach Device Adapter OR Detach all Adapters, restart PC and try Pairing again. Page 34 Wireless USB A/V Adapter Set User Guide Problem/Question Symptoms Solutions Pairing with multiple Hosts present – each pairing must correspond to a specific PC Adapter (Host) If more than a single PC Adapter (Host) has been attached to the PC at any time, the pairing process requires that at least one PC Adapter be connected while the Device Adapter is being paired Ensure that a single PC Adapter is attached to the PC, and then re-attach the Device Adapter to perform Pairing. see also - Appendix B: Pairing Procedure Page 35 Wireless USB A/V Adapter Set User Guide Appendix B: Pairing Procedure The PC Adapter and Device Adapter in this set are already paired and do not require performing a pairing procedure. If you should need to perform pairing manually for any reason (e.g. connecting to a new host PC Adapter, or adding a Device Adapter that was not purchased in a set), please follow these steps: To perform Pairing: 1. Ensure that a Wireless USB Host or PC Adapter is connected to the PC. 2. Remove the Device Adapter from the A/V Base and connect it directly to the host PC USB port, do not use the A/V Base or any other accessory to connect to the PC. 3. Upon first time connection of a Device Adapter to the PC, the Pairing driver is installed automatically. 4. Once the Pairing driver is installed, pairing is automatically performed between the host PC and the Device Adapter, and a confirmation message is displayed. 5. Click OK to confirm and close the Cable Pairing screen. 6. Remove the Device Adapter from the PC and reconnect it to the A/V Base. Page 36 Wireless USB A/V Adapter Set User Guide Page 37