1
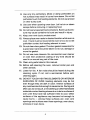
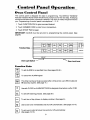
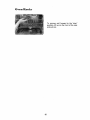
ORDER
MAYFAG
Use and Care Manual
Self-Cleaning
Ra_lJant
and
Convection
Model CWE 1000
Oven
# 203867C
About
Your
Your Maytag self-cleaning
ing methods,
convection
roasting.
Maytag
Oven
oven combines
the best of two cookand radiant
(conventional)
baking
or
The benefits of convection
cooking, used by major restaurants
chefs all over the world are at your fingertips.
The Maytag
convection
oven
is actually
a conventional
and
oven that
circulates
heated air within the oven. As both bake and broil heating
elements cycle on and off with the thermostat,
a fan keeps the heated
air circulating
around the food.
The constantly
recirculating
heated air in the convection
oven
strips away the layer of cooler air that surrounds
food. Consequently,
many foods cook more quickly. Distributed
heat makes multiple rack
cooking
possible.
Convection
roasted
meats retain their natural
flavor and juiciness
with less shrinkage
than radiant bake roasting.
In addition to the many exclusive benefits of a convection
also a fine full-featured "bake and broil" oven.
oven, it is
You can cook your "old favorite"
recipes as you have in the past.
The radiant bake oven also gives you the flexibility
of preparing
various foods when convection
cooking
may not be as beneficial, as
when cooking
foods in covered casseroles
or clay pots.
The broil element
of foods.
is convenient
for top browning
The BAKE TIME and STOP TIME features
the convection
or radiant bake oven.
and oven broiling
can be used with either
The electronic
controls
provide additional
features not possible
with other control
panels, plus easy to set operation.
The smooth
control
panel provides
ease of maintenance.
Temperatures
for
BROIL and CLEAN modes are pre-set. Extra features such as the
ALARM and recall of program are possible because of the electronic
memory bank.
Since this manual explains how you can obtain the best use of your
oven, it is essential that you follow the instructions
carefully.
Th is will
enable you to fully enjoy and properly
maintain
your Maytag oven
and achieve fine cooking
results with the foods you prepare..,
year
after year.
Should
appliance,
appliance.
you have any questions
about
using
your
write to us. Be sure to provide the model number
Consumer Education Department
Maytag Company
Newton, Iowa 50208
2
Maytag
of your
Index
Baking .......................
General
Recommendations
Convection
Baking
Baking
Rack Cooking
Broiling
................................................................
Cleaning
.....................
Self-Cleaning
......
Display
Clock
........................
Process
Probe Temp
Tips
Window
Setting
.......................
31-32
...............................
8
.................................
9
Oven Operation,
Baking or Roasting
Minute Timer .................................
...........
Time-Controlled
Baking or Roasting
Alarm .....................................
........
Use ...................
....................................................
.....................
Radiant
Roasting
.........................................................
Service Tips
"......................................................
....................
.............................
Roasting
3
35
15
Recommendations
Safety Precautions
......
12-13
33-34
22-25
General
..................................................................
10
11
31
.............................................................
Convection
Warranty
28-30
............................................................
Rack Positions
Roasting
18
.....................
Low Oven Temperature
Light Bulb Replacement
16
26-27
Other Cleaning
Panel Operation
14
15-18
Chart .................................
Multiple
Control
....................
........................
.......................
19
19
20-21
4-5
36-37
39
SAFETY PRECAUTIONS
Read before operating your oven
All appliances
-- regardless
of the manufacturer
-- have the
potential
through
improper
or careless use to create safety
problems.
Therefore the following
safety precautions
should
be observed:
1. Be sure your appliance
by a qualified
2. Never
room.
installed
and grounded
technician.
use your
3. Children
is properly
should
appliance
for warming
not be left alone
or heating
or unattended
the
in area
where appliance
is in use. They should never be allowed
to sit or stand on any part of the appliance.
4. Wear proper
should
apparel.
Loose-fitting
never be worn while
5. Do not repair or replace
specifically
ing should
Technician.
6. Flammable
or hanging
garments
using the appliance.
any part of the appliance
unless
recommended
in this manual. All other servicbe referred to an authorized
Maytag Service
materials
should
not be stored
7. Do not use water on grease fires. Smother
use dry chemical
or foam-type
extinguisher.
in an oven.
fire or flame or
8. Use only dry potholders. Moist or damp potholders on
hot surfaces may result in burns from steam. Do not let
potholder touch hot heating elements. Do not use a towel
or other bulky cloth.
9. Use care when opening oven door. Let hot air or steam
escape before removing or replacing food.
10. Do not heat unopened food containers. Build-up of pressure may cause container to burst and result in injury.
11. Keep oven vent ducts unobstructed.
12. Always place oven racks in desired location while oven is
cool. If rack must be moved while oven is hot, do not let
potholder contact hot heating element in oven.
13. Do not clean door gasket. The door gasket is essential for
a good seal. Care should be taken not to rub, damage or
move the gasket.
14. Do not use oven cleaners. No commercial oven cleaner
or oven liner protective coating of any kind should be
used in or around any part of the oven.
15. Clean only parts listed in this manual.
16. Before self-cleaning
other utensils.
the oven, remove broiler
pan and
17. Listen for fan. A fan noise should be heard during the
cleaning cycle. If not, call a serviceman before selfcleaning again.
18. DO NOT TOUCH HEATING ELEMENTS OR INTERIOR
SURFACES OF OVEN. Heating elements may be hot
even though they are dark in color. Interior surfaces of
any oven become hot enough to cause burns. During and
after use, do not touch, or let clothing or other flammable
materials contact heating elements or interior surfaces of
oven until they have had sufficient time to cool. Other
surfaces of the appliance may become hot enough to
cause burns D among these surfaces are: oven vent
openings and surfaces near these openings, oven doors,
windows of oven doors.
Control
Oven
Panel
Coutrol
Operation
Panel
The control
panel is designed for ease in programming.
The DISPLAY WINDOW
features Indicator Words which will blink and prompt you for the next step. A beeping
sound occurs each time a command is entered. If an error is made, the panel informs
you. Programming
of control panel is as simple as 1 - 2 - 3 :
1. Touch
FUNCTION
2. Touch
NUMBER
3. Touch
START
IMPORTANT:
page 9.)
Function
PAD to give command
desired.
PADS to enter time or temperature.
PAD to begin.
CLOCK
must
be set prior
to programming
the control
I°'H'-H N H
Pads
SET
TIllER
SELF
BAKE
.. mpe_
onfoff
CLEAN
TIME
BROIL
panel.
(See
BAKE
CONVlE
I_-I-t - !-t
I-I,,o,l-l--I-l.-t--------H " H°'_H TI"H _"H_"I -_
OVEN
Oven Light Switch _
Function
@
LIGHT
r--1
O
Door Lock Lever
Pads:
To set ALARM
for a specified
To cancel the ALARM
time. (See pages 33-34.)
signal.
Thisseconds,
timer can
be set (See
to givepage
a signal
99
expires.
11.) after a time period,
Q
D
B
Use with CLOCK
To set self-cleaning
or ALARM SET PADS to designate
process.
To set time of day (shown
up to 99 minutes
and
time before or after 12:00.
(See page 29.)
in display window).
Use to start oven immediately
COMPUTER
(See page 9.)
and shut off automatically.
(See pages 12-13.)
To set oven to start at future time and shut off automatically.
(See pages 12-13.)
6
1
Display Window
Number Pads
4 CONTROL
_
Use for top browning
%
%
MAYrAG
or oven broiling
of foods.
Use with probe to cook foods to desired
(See pages 22-25.)
Use for convection
Use for radiant
baking
(conventional)
Cancels
programmed
ALARM orany
MINUTE
TIMER.
Pads:
internal
temperature.
or roasting.
Use to start the programmed
N.mber
(See pages 26-27.)
Use to program
baking
function
cooking
or roasting.
after all commands
function
or stops
are entered.
beeping
signal
of
times or temperatures.
DisplayWindow:
Shows time of day as set with CLOCK PAD or displays
has been set with oven controls or MINUTE TIMER. (See page 8.)
what
_,en
Lflght
S_vi_b:
The oven light automatically
comes on whenever the oven
door is opened. When door is closed, push in switch to turn oven light on or off. Light
cannot be turned on during the self-cleaning
process.
D®@_
°_
_,_G_
Use to lock oven for self-cleaning
7
process.
Display
Windo
,ENTER CONVCT BAKE AM PROBE TEMP
_lC;EcAK
N
0
Indicalor Words _%
XBROll
DISPLAY
Display
WINDOW
0
RAD
serves multiple
O
_
O
Display
Numerals
STOP PM ALARM TIME
purposes.
Numerals:
• Show time of day.
• Count down time remaining
• Show temperature
• Show internal
as set with MINUTE
TIMER
of oven as it rises to reach programmed
temperature
• Recall program
Indicator
has been made when
entered
temperature.
of food as it rises when PROBE TEMP is used.
• Serve as a reminder to lock oven door for self-cleaning
word, door, is displayed.
o Show a mistake
displayed.
PAD.
information
when commanded,
operation
when information
word, EEEE meaning
such as set temperature
error,
is
or time.
Words:
• Blink to prompt
next step and allow entry of program.
Show on-going
programmed
status of program.
o Show function
programmed
function
illuminated
when recalled.
8
in words
to indicate
the present
C_oek
Setth_g
ENTER CONVCTBAKE AM PRODE TEMP
,' oT
8 8:8
BROIL
IMPORTANT:
RAD
8
STOP PM ALARM TIME
First, set the clock.
When oven is first supplied electrical power or power is interrupted, the entire display
will blink. Whenever this occurs, clock MUST be set before entering operating instructions to control panel.
To set
the
1. Touch
clock
for
CLOCK
time
of day:
PAD.
Indicator Words ENTER, TIME, AM or PM and colon will blink for 8 seconds to
allow setting numbers and AM/PM for time of day. (If more than 8 seconds elapse
between touching
CLOCK PAD and first numeral, the CLOCK
PAD must be
touched again to repeat the sequence.)
ENTER
0 0:0 0 o,.,,.,
PM
2. Touch
NUMBER
For example:
PADS for time of day desired;
touch
5
3
0
TIME
enter in order.
for5:30.
ENTER
5:3 0 °,,,,,,
PM
3. Touch
Touch
AM/PM
TIME
PAD.
pad until desired
AM or PM setting
appears
in display
window.
ENTER
5:30
Display
PM
4. Touch START
PAD.
IMPORTANT:
This step is necessary
to complete
setting the clock or any
instructions
given to control panel. Clock is now set; colon will continue to blink.
5:3 0 o,s.,..
PM
To change
tJ_
of da T set
on _loek:
Repeat above sequence.
NOTE: Clock time cannot be changed when control panel has program entered.
Cancel program with appropriate pad before reprogramming
clock.
To re_alt
t_e
of day _irhen
_oth_r
fu_tou
is showing:
Touch
CLOCK PAD. Time of day will be displayed
return to on-going
program.
9
briefly,
then display
will automatically
Oven
To
set
Operation,
oven
on
radiant
or Ro tlng
or
1. I:_aa_eoven racks on proper
2. Touch
BAKE RADIANT
convection
bake:
rack positions.
(See page 15.)
or BAKE CONVECT
Indicator Words ENTER, CONVCT
be displayed.
PAD.
or RAD, BAKE and TEMP will blink. All O's will
ENTER CONVCTBAKE
3. Touch
order.
NUMBER
For example:
(Allowable
PADS for oven temperature
touch
3
2
5
desired
by touching
numbers,
in
for325°F.
range of temperature
that may be set is 100 ° to 525°F.)
ENTER CONVCTBAKE
4. Touch
START
PAD.
Display will show a rise in increments
of 5 ° until programmed
temperature
is
reached. When Indicator Word TEMP stops blinking, the oven will be preheated
and programmed
oven temperature
will be displayed. To time length of cooking
period, use MINUTE TIMER. (See page 11.)
IMPORTANT:
WheneverTEMP
is blinking,
blink, oven was already hot from previous
the oven is heating. IfTEMP
use and is preheated.
does not
To recall
temperature
set:
Touch appropriate
BAKE PAD. Temperature
be briefly displayed, then will automatically
return to on-going
program.
To change
Step 3.
5. Touch
Display
temperature
CANCEL-OFF
set"
Repeat Steps 2-4, entering
new temperature
PAD to turn oven off at end of baking.
will return to time of day.
NOTE: A cooling fan may be heard during oven use. This occurs anytime
cooling of the electronic control panel is required. Fan may come on any time
during use of the oven and may continue for a short time after the oven has
been turned off.
10
will
in
Minute
Thner
IMPORTANT:
This timer does not control the oven; it only operates a beeper. It can be
used to remind you when a period, up to 99 minutes and 99 seconds, expires. It can be
used independently of any other oven activity and can be set anytime.
3'0 set mt.u_
1. Touch
timer:
MINUTE
TIMER
PAD.
Indicator Words ENTER and TIME will blink and all O's will be displayed for 8
seconds to allow setting numbers. (If more than 8 seconds elapse between touching MINUTE TIMER PAD and first numeral, the MINUTE TIMER PAD must be
touched again to set the numbers.)
ENTER
O0
0
Display
TIME
.
Touch
NUMBER
For example:
seconds.
PADS for time desired.
touch
3
0
0
0
for
30 minutes
or
touch
3
0
for
IMPORTANT:
This is the only function where time entered is in minutes
seconds. Minutes are to left of colon and seconds to right of colon.
ENTER
ENTER
30:00
or
TIME
3. Touch
START
0
30
and
Display
TIME
PAD.
This starts the countdown
that will be displayed.
Countdown
will have display
precedence
over anything else programmed,
such as oven temperature
or probe
temperature.
At end of time set, signal will beep five times.
After timer
on control
runs out, display
panel.
will return
to time of day or whatever
2 9:59
is programmed
°,..,-
4. To cancel MINUTE
TIMER, touch MINUTE TIMER PAD to stop beeping or to
cancel timer at any time. CANCEL-OFF
PAD can also be used to stop the
beeping; however, this will also cancel any other cooking function.
11
Time-Controlled
To set
oven
1. Touch
to start
or Roasting
hnmediately
BAKE RADIANT
and
shut
or BAKE CONVECT
Indicator Words ENTER, CONVCT
be displayed.
off
automatically:
PAD.
or RAD, BAKE and TEMP will blink. All O's will
ENTER CONVCT
2. Touch
NUMBER
For example:
(Allowable
PADS for desired
touch
3
5
0
oven temperature,
in order.
for350°F.
range of temperature
that may be set is 100 ° to 525° F.)
ENTER CONVCTBAKE
35
3. Touch
TEMP
OF
Display
BAKE TIME PAD.
Indicator Words ENTER, BAKE and TIME will blink. All O's will be displayed.
Touch number pads for amount of time food is to cook.
Hours are to left of colon
and minutes
For example:
3
touch
2
0
for2
to right of colon.
hours and 30 minutes.
ENTER
BAKE
2:30
Display
TIME
IMPORTANT:
Oven will preheat for approximately
5 to 9 minutes.
At end of
programmed
BAKE TIME, oven will shut off automatically;
retained heat will
continue to cook food. This function
is not recommended
for baked items
that require a preheated oven, such as cakes, cookies, pies, breads. For these
foods, place food in preheated oven, then set MINUTE
TIMER to signal the
end of baking time.
,
Touch
START
PAD.
Display will show a rise in increments
of 5°F until programmed
temperature
is
reached. When Indicator
Word TEMP stops blinking, the oven is preheated and
programmed
oven temperature
will be displayed.
CONVCTBAKE
TEMP
10 0 F
Display
To recall
functions
programmed:
Touch appropriate pad BAKE RADIANT
or BAKE CONVECT
or BAKE TIME. Recall will be displayed briefly, then display
will automatically
return to on-going program. BAKE TIME recall will display
time remaining.
5. Touch CANCEL-OFF
Display
will return
PAD to cancel before programmed
to time of day.
12
automatic
time expires.
_® _
_n
_
_
a_ f_re
tlme
and
shut
off
automatically:
1. Follow preceding Steps 1-3.
4. Touch STOP TIME PAD.
Indicator Words ENTER, STOP and TIME will blink.
Enter desired time food is to be finished.
For example:
5. Touch
Touch
AM/PM
touch
6
0
0
All O's will be displayed.
for6:00.
PAD.
pad until desired
AM or PM setting
appears
in display
window.
ENTER
6:0 0 °,..,°.
PM
6. Touch
START
TIME
PAD.
Start time will be automatically
calculated
and will be briefly
displayed.
For example:
If 2 hours, 30 minutes was touched
in Step 3 and 6:00 PM was
touched in Step 4 above, the display will show 3:30 PM briefly. Then display will
change back to time of day with programmed
commands
showing by means of
Indicator Words.
BAKE
3:30
Display
RAD STOP PM
If STOP TIME (Step 4 above) and start time calculates less than BAKE TIME (Step
3) programmed,
all E's appear when START PAD is touched. Enter a later STOP
TIME and repeat above sequence.
To recall
function
programmed:
If after touching START pad, you would
like to recall any command or function given the control panel, touch that specific
command pad. It will appear briefly in the display window, then will automatically
return to on-going
program.
NOTE: Since food continues
to cook if-left in the oven, it is suggested
that the
clock controls be used primarily
to start the oven when no one is in the kitchen.
Provisions should be made to have the food removed as soon as the signal has
sounded.
13
Baking
General
Baking
Recommendations
• When cooking foods for the first time in your new oven, use recipe cooking
times and temperatures
as a guide.
• Use tested
recipes from reliable
sources.
• Preheat the oven only when necessary.
For baked foods that rise and
for richer browning, a preheated oven is better. Casseroles can be started
in a cold oven. Preheating takes from 5 to 9 minutes; place food in oven
after TEMP Indicator Word stops blinking.
• Arrange oven racks before turning on oven. Follow suggested
tions on page 15 and in the various baking charts.
• Allow about 1 to 11,_inches of space
pans to allow proper air circulation.
between
the oven
rack posi-
side walls
and
• When baking foods in more than one pan, place them on opposite corners
of the rack. Stagger pans when baking on two racks so that one pan
does not shield another. (See above photo.)
• To conserve energy, avoid frequent
end of cooking, touch CANCEL-OFF
ing food.
or prolonged
door openings.
At the
PAD to turn oven off before remov-
• Always test for doneness
(fingertip,
toothpick,
sides pulling
pan). Do not rely on time or brownness as only indicators.
• Use good quality
baking
pans and the size recommended
• Dull, dark, enameled or glass pans will generally produce
crust. Shiny metal pans produce a light, golden crust.
away from
in the recipe.
a brown,
• Frozen pies in shiny aluminum
pans should be baked on a cookie
on rack 2 or be removed to a dull or glass pan.
14
crisp
sheet
Convection
Bah Jug Recommendations
As a general rule, when using recipes or prepared mixes developed for a radiant
bake oven, set the oven temperature
25°F lower than the recipe recommended
temperature.
Times will be similar to or a few minutes less than recipe recommended times. The chart on page 16 compares
times and temperatures
of
many baked foods. Use this as a reference.
®
• For better browning,
large pans such as cookie sheets or rectangular
baking
pans should be placed lengthwise,
front to back, on the rack. This centers
the food in front of the convection
fan for better air circulation
which gives
better overall browning.
® Cookie sheets should be without sides and made of shiny aluminum.
The
best size to use for cookie sheets is 14 x 10-inches
(overall size, includes
handles).
Rack
Positions
The rack positions noted are generally recommended
for the best browning
results
and most efficient
cooking
times. For many food items, excellent
results can be
achieved
when using one of several different rack positions.
Refer to baking and
roasting sections for recommendations
for specific foods.
Different
Racks:
Two flat racks and one offset rack were packaged with your oven. Best single rack
baking results are achieved in position #3 with offset rack. When using two racks
for baking, place the offset rack in position #2. In general use the offset rack for
broiling in position #4.
(flat)
(offset)
1 (flat)
Use
Hack
Position
#1:
Large cuts of meat and large poultry,
pie, dessert souffle.
Use
Rack
Position
#2:
Roasting small cuts of meat,
pie shell, large casseroles.
Use
Igaek
Positlon
angel food cake, loaves of bread, custard
cakes
(tube,
bundt,
_ek
Position
Most broiling.
_lultipte
Hack
Two rack,
and 4.
frozen
fruit
pie,
#3"
Most baked goods on cookie sheets, frozen
pie, cream pie, layer cakes, main dish souffle.
Use
or layer),
convenience
foods,
fresh
fruit
#4:
(Use offset
rack for most broiling.)
Cook_g:
use #2 (offset
rack)
and #4. Three
15
rack,
use #1, 3 (offset
rack)
Baking
* The times given are approximate.
** The CONVECT
temperature
Chart
Actual times will depend
on recipes
is 25°F lower than recommended
16
and mixes prepared.
on package
mix or recipe.
Bang
Conve ence
• Preheating
of
Foods
the oven is not necessary.
® Follow package recommendations
for oven temperature, foil covering and use
of cookie sheets. Baking times will be similar. See chart below for some exceptions
and examples.
® Center foods in the oven. If more than one food item is being baked or if
foods are being baked on multiple racks, stagger foods for proper air circulation.
® Most foods are baked on rack position
3 with the offset rack.
® For multiple rack baking, use racks 1, 3 (offset rack) and 4. However, pizzas
should be placed on cookie sheets and baked on rack positions 2 (offset rack),
3 and 4.
_iiiiiiiiiiiiiiiiiiiiiiiiii!
17
€o vectlon
MuJtiple
Coo g
For best results, bake foods on one rack at a time as described in this manual. However,
very good results can be obtained when baking quantities of foods on multiple racks.
Quantity cooking provides both time and energy savings.
The convection oven is suggested for most multiple rack cooking, especially three
rack cooking, because the circulating heated air results in more even browning than
radiant. For two rack cooking, the radiant bake oven provides very good baking results
especially when pans can be staggered, such as with layer cakes.
Many foods can be prepared on three racks at the same time. These are just a few
examples: cookies, cupcakes, rolls, biscuits, muffins, pies, frozen convenience foods,
pizzas, appetizers, and snack foods.
To obtain the best results in multiple rack cooking,
• Use temperature
•
follow
these suggestions:
and times in this manual as a guide for best results.
For two rack baking, rack positions 2 (offset rack) and 4 are best for most
baked products but flat racks on position 2 and 4 also provide acceptable
results.
For three rack baking use positions
is pizza (see page 17).
Since foods on positions I
3, additional cooking time
rack. An additional minute
such as biscuits, rolls, or
and pizzas, which should
more minutes.
• Stagger
1, 3 (offset
rack) and 4. One exception
and 4 will usually be done before foods on position
will be needed for browning foods on the middle
is needed for thin foods such as cookies. For foods
muffins, allow 1 to 2 more minutes. Frozen pies
be baked on a cookie sheet, need about 2 to 4
small pans, such as layer cake pans, in the oven.
• Frozen pies in shiny aluminum
pans should be placed
baked on rack positions 1, 3 (offset rack) and 4.
• Cookie sheets should be placed
for more even browning.
lengthwise,
front to back,
• Oven meals are recommended
for energy conservation.
1 and 3 (offset rack) or 2 (offset rack) and 4.
18
on cookie
sheets
and
in front of the fan
Use rack positions
Roasting
General
Roasting
Recommendations
•
Preheating
o
For open pan roasting, place
two-piece
pan included
with
open pan roasting for tender
to be cooked by moist heat in
O
For best results, a meat thermometer
or probe is the most accurate guide
to degree of doneness. See pages 22-25 for directions
on use of the PROBE
TEMP feature as well as suggestions
for placing a thermometer
probe in
meat and poultry.
•
Place roast, fat side up, to allow self basting
•
Since meats continue
to cook after being removed from the oven, remove
roast from oven when it reaches an internal temperature about 5 degrees
below the temperature desired.
•
For less loss of juices and easier carving,
time" after removing meat from oven.
•
For best results in roasting poultry, thaw completely.
of poultry, partially thawed poultry will cook unevenly.
Radiant
•
is not necessary.
Bake
meat or poultry on the slotted portion of the
the oven. Do not add water to the pan. Use
cuts of meat. Less tender cuts of meat need
a covered pan.
Roasting
of meat during
allow
about
roasting.
15 minutes "standing
Due to the structure
Recommendations
If preferred,
tender cuts of meat can be roasted in the radiant bake oven
by following
the general recommendations
given above. However,
meats
will roast more quickly in the convection
oven.
•
Radiant bake is best for less tender cuts of meat that require a longer, moist
heat method of cooking.
Follow your recipe for times and temperatures
for covered meats.
•
Meats cooked in cooking
bags, dutch
best cooked in the radiant bake oven.
•
Use meat roasting charts in standard cookbooks
for recommended
and temperatures
for roasting in a radiant bake oven.
19
ovens,
or covered
roasting
pans are
times
_
• Tendercutsof meat
in the convection
and poultry can be quickly roasted to a rich golden brown
oven. Follow general recommendations
for roasting.
• Refer to convection
meat roasting chart for recommended
cooking temperature and time. The chart can serve as a guide to help plan meal serving time.
• Minutes per pound will vary according
to the size, shape, quality, and initial
temperature
of meat as well as the electrical voltage in your area. Times are
based on refrigerator
cold meat.
• A large cut of meat will usually require fewer minutes
smaller cut of meat.
o Do not use a roasting
per pound to roast than a
pan with high sides; use pan provided
e Do not cover meat. Allow the circulating
the juices.
hot air to surround
with oven.
the meat and seal in
• Since the breast meat on a large turkey cooks more quickly than the thigh area,
place a "foil cap" over the breast area after desired brownness
is reached to
prevent overbrowning.
(See above photo.)
o A stuffed turkey will require an extra 30 to 60 minutes
Stuffing should reach an internal temperature
of 165°F.
Convection
Roasting:
Frozen
depending
on size.
to Fiulsh
Meats (except poultry) may be roasted frozen to finish. Follow these guidelines
most satisfactory
results.
for the
o Use temperatures
for roasting fresh meats as recommended
by most cookbooks. Generally, most meats are roasted at 325°F. For best results do not use
temperatures
below 300°F.
• Use times for roasting fresh meats given in your favorite cookbooks as approximate guides for roasting frozen meats. Roasting times will vary due to factors
such as coldness of meat, size, quality, or cut. In general, roasting times for
frozen to finish in the convection
oven will be approximately
the same as fresh
to finish in a radiant bake oven.
• The guidelines given for roasting
to roasting frozen meats.
fresh meats in the convection
oven also apply
e If oven probe thermometer
will be used, insert probe midway during cooking
process; reset cooking program and set PROBE TEMP. (See page 22.)
2O
C®_ctlon
Roast_mg
(Thawed
21
Meats
Only)
Probe
Temp
The PROBE TEMP feature enables you to cook meats and other foods without the
chore of watching
a thermometer.
It can be used with either radiant or convection
oven and can also be used with time-controlled
baking or roasting. Upon reaching
selected internal temperature,
a signal will sound to tell you the food is done and is
ready to be removed from oven.
To Use
PROBE
TEMP
Feature
1. Insert the skewer-like
probe into the
food item. For meats, the probe tip
should be located in the center of the
thickest part of the meat and not in fat or
touching
a bone.
2. Place the food in the oven using the rack
position suggested
on page 15.
3. Insert the probe plug into the receptacle
located behind the metal cover plate on
the right inside oven wall. Be certain to
insert plug into the receptacle
all the
way.
4. Touch
PROBE
TEMP
PAD.
Indicator
Words ENTER, PROBE and TEMP will blink and the lowest probe
reading 70 ° F, or temperature
of food if higher than 70 ° F, will be displayed.
ENTER
PROBETEMP
7
.
Touch
NUMBER
For example:
(Allowable
PADS, in order,
touch
1
4
0
for desired
degree of doneness.
for140°F.
range of temperature
that may be set is 90 ° to 199 ° F.)
ENTER
PROBETEMP
lq
6. Touch
BAKE RADIANT
or BAKE CONVECT
Indicator Words ENTER, CONVCT
will be displayed.
0
Display
PAD.
or RAD, BAKE and TEMP will blink. All O's
ENTER
BAKE
TEMP
0 0 00
RAD
22
,
Touch NUMBER
For example:
(Allowable
PADS for oven temperature
touch
3
2
5
by touching
numbers,
in order.
for 325 °F.)
range of temperature
that may be set is 100 ° to 525°F.)
ENTER
BAKE
TEMP
32
5F
Display
RAD
.
Touch
START
PAD.
Display will show minimum of 70 ° F then will continue to rise in 1° F increments
until programmed
probe temperature
is reached.
If E's are displayed
and
PROBE Indicator Word blinks, check to see if probe is properly connected.
PROBETEMP
7
Display
9. When selected internal temperature
of meat has been reached, the oven will
shut off and the PROBE TEMP signal will continue to beep until CANCEL-OFF
PAD is touched.
10. Once selected internal temperature
prevent overcooking.
First, unplug
food. Hold plug with potholder.
is reached, remove food immediately
to
the probe from the oven before removing
IMPORTANT:
PROBE TEMP probe must be unplugged
and removed
from oven when it is not being used. If probe is left plugged in oven
and PROBE TEMP is not programmed,
the oven will not start and all
E's will be displayed
until probe is removed. Be sure metal cover is
over receptacle when PROBE TEMP feature is not being used.
To use
shut
PROBE
off
TEMP
feature
to start
at future
time
and
automatically:
1. Follow
preceding
8. Touch
BAKE TIME
Indicator
Words
Steps 1-7.
PAD.
ENTER,
BAKE and TIME
will blink. All O's will be displayed.
ENTER
BAKE
00"00
Display
TIME
9. Touch
cook.
NUMBER
For example:
PADS
touch
2
for approximate
3
0
for 2 hours
amount
of time food
will
probably
and 30 minutes.
ENTER
BAKE
:3O
Display
TIME
NOTE: Probe set temperature
will control the actual bake time. Regardless of
whether it takes more or less time for food to reach set temperature
PROBE
TEMP will turn oven off when food is done.
23
10. Touch STOPTIME PAD.
IndicatorWords ENTER,STOPand TIME will blink.
All O'swill be displayed.
ENTER
0 0:0 0 o,s.,°.
STOP
11. Touch NUMBER
be done cooking.
For example:
PADS indicating
approximate
Start time will automatically
touch
8
0
0
TIME
time of day you desire food to
be calculated
for you.
for8:00.
ENTER
8:0 0 O""'aY
STOP PM
TIME
NOTE: The calculated
start time is obtained by programming
the length of
cooking
time, BAKE TIME, and a STOP TIME. Probe set temperature
will
control the completion
time.
12. Touch AM/PM
Touch
PAD.
pad until desired
AM or PM setting
appears
in display
window.
ENTER
8" 0 0 °""'aY
STOP PM
13. Touch
START
TIME
PAD.
The calculated
start time will be briefly
oven will start heating.
displayed
to inform
you of the time
For example:
If 2 hours, 30 minutes was touched in Step 9, page 23 and 8:00
PM was touched in Step 11, above, the display will briefly show 5:30 PM. Then
display will change back to time of day and programmed
commands
will be
shown by Indicator Words.
'_'o _
f_€._ou
pro_4_mc._li:
To recall any command or function given
after touching
START pad, touch that specific
command
pad. The programmed command will appear briefly in the display window, then will automatically
return to on-going
program.
NOTE: The PROBE TEMP feature can be used in other ways. To use
PROBE TEMP as a thermometer
to check temperature
of food
between 90 ° to 199 ° F, plug probe into oven receptacle
and insert
probe in food. Touch PROBE TEMP PAD and temperature
will appear
in the display.
24
Hh ts on Successful
Use
the Probe
Temp Feature
of
The probe should be located in the center of the thickest part of a roast. Plan
the placement
of the probe tip by laying it on the outside of the meat,
marking with finger where edge of meat comes on the probe. Insert probe
into thickest part of muscle up to the marking held by finger.
0
Tip of probe should
not touch
fat, bone or gristle.
0
For turkeys and large poultry products,
insert probe into the thickest part of
the inner thigh. Because of variables in cooking
poultry, such as size and
shape, use the thermometer
as a guide to the degree of doneness but also
use conventional
methods,
squeezing
or wiggling
drumstick,
to test for
doneness.
0
Because of the excellent insulation of the oven, the retained heat continues
to cook the meat after the signal has sounded and the oven has cycled off.
For this reason, it is important to remove the meat from the oven as soon as
the signal sounds.
$
Meats continue to cook after being removed from the oven. As a suggestion,
set the internal temperature
5 degrees
below the desired final degree of
doneness. Allow the "standing
time" before carving (15 to 20 minutes) to
finish cooking the food.
0
Use the roasting chart on page 21 as a guide to the length of cooking time to
help plan meal serving time for meats roasted in the convection
oven.
Use the handle of the probe for inserting
or removing.
cable. Use a potholder to remove since probe becomes
For frozen roasts, insert probe after 1_,_to 2 hours.
PROBE TEMP (See page 22).
Do not pull on the
hot.
Set controls
for use with
PROBE TEMP feature can be used to register internal temperature
of other
foods, such as meat loaf and reheated casseroles.
It can also be used to
check the temperature
of other foods such as 105 ° to 115°F water to
dissolve yeast. (See NOTE, page 24.)
To clean cooled
in water.
probe, wipe with a soapy dishcloth.
25
Do not submerge
probe
Broiling
To Broil
1. Place oven rack on the rack position
suggested in the chart. Distance from
broiling element depends on foods being prepared. Rack position 4 with offset
rack is usually recommended
unless otherwise
stated.
2. Touch
BROIL
PAD.
Indicator Word BROIL
oven will automatically
not be accepted.
will blink and time of day will appear in display. Since
heat to broil temperature
(550°F), numerical
entry will
6:0
BROIL
3. Touch
START
0 °".",
PM
PAD.
Place food on roasting
pan provided
with oven. Broil element will preheat
in 2 to 3 minutes. After broil element is red, place food in oven. Oven door
MUST be left open at broil stop position.
4. Touch
Display
CANCEL-OFF
will return
Broiling
PAD to turn off oven when food
is cooked.
to time of day.
Tips
e Tender cuts of meat or marinated meats are best for broiling. This includes
rib and loin cuts of steak, ground
beef, ham steaks, lamb chops, poultry
pieces or fish. For best results, steaks should be at least 1" thick. Thinner
steaks should be pan-broiled.
e Do not cover broiler grid with foil since this prevents fat drippings
into bottom of pan.
from draining
• Before broiling,
remove excess fat from meat and score edges
not cut into meat) to prevent meat from curling. Salt after cooking.
• To prevent
dry surface
on fish or lean meats, brush melted butter on top.
• Foods that require turning should be turned only once during
meat with tongs to avoid piercing and loss of juices.
• Cooking
of fat (do
times given in the chart are to be used only as a guide.
26
broiling.
Turn
*Use offset rack in position #4.
NOTE: This chart is a suggested guide. The times may vary with food being cooked.
NOTE: A cooling fan may be heard during oven use. This occurs anytime cooling of
the electronic control panel is required. Fan may come on any time during use of
the oven and may continue for a short time after the oven has been turned off.
27
Oven
How
the
Cleaning
Self-Cleaning
Process
Works
When the oven controls are set to CLEAN, the oven heats to temperatures
that are
higher than those used for cooking. The high temperatures
cause food soil to burn
off and substantially
disappear. While this occurs, a device in the oven vent helps to
consume smoke. The oven is vented through an opening on top of the control panel.
How to Prepare
the Self-Cleaning
Oven Before
Process
• Be sure metal cover plate is covering
• Remove
the broiling
Operating
the probe receptacle.
pan, oven racks and any other utensils from the oven.
The oven racks will discolor,
lose shininess, and become difficult to slide in
and out if left in the oven during the cleaning process. Be sure to read special
tips on page 30 if oven racks are cleaned during the self-cleaning
process.
Clean spatters and spills from those areas
which will not be cleaned during the selfcleaning process:
mcenter front of oven and door near opening in door gasket.
--porcelain
oven door liner (area outside
the door gasket).
--stainless
stgel oven front frame.
NOTE: DO NOT CLEAN serial plate located
on the oven front.
To clean, use hot water and detergent,
nonabrasive
cleansers or soap filled steel
wool pads (rub with the brushed grain on
the oven front frame to prevent scratching).
Rinse thoroughly,
being careful
not to use an excessive amount of water that would dampen the door gasket.
Soil left in these areas will be more difficult
to remove after the self-cleaning
process since the high heat will bake on any soil that is present. DO NOT USE
COMMERCIAL
OVEN CLEANERS TO CLEAN THESE AREAS.
DO NOT ATTEMPT
TO CLEAN, RUB, OR APPLY WATER TO GASKET ON
OVEN DOOR. The gasket is essential
for a good door seal. Rubbing
or
cleaning will damage the gasket and may affect the seal.
Wipe up excess grease and food spillovers which have not baked on the
bottom of the oven. Large accumulations
of soil can cause heavy smoke or
fire in the oven during the cleaning process. For ease of cleaning, the heating
element can be lifted slightly.
Although smoke or fire in the oven is a normal occurrence
and there
safety problem, there will be venting of excessive smoke and odor.
28
is no
Steps
to Follow
for
To set oven to start cleaning
1. Touch
SELF CLEAN
Self-Cleaning
Process
immediately:
PAD.
An automatic
program of three hours is pre-set into control panel for an average
soiled oven. If oven is heavily soiled, touch 4 and program will be extended to four
hours. If lightly soiled, touch 2 and the program will be reduced to two hours. The program time takes into consideration
the preheat time before cleaning and the cool down
time after cleaning when oven may be unlocked.
2. Close and lock oven door.
3. Touch
START
Move DOOR
LOCK
CLEAN
."
Display
LEVER to full right position.
PAD.
Indicator Word CLEAN and time of day will
appear in display. Indicator Word LOCK will
appearwhen
oven temperature reaches550 ° F
and door cannot be opened until temperature
drops below 550 ° F.
NOTE: If the word door appears
you have omitted Step 2.
AM
CLEAN
LOCK
8:4 5 °".'°,
cl o o r
in display,
Display
4. Oven beeps once and stops automatically
after programmed
cleaning
time
elapses. Oven door will not unlock until oven cools to a safe temperature.
When
this occurs, the Indicator Word LOCK goes out. During the cleaning process, the
time remaining
before having access to the oven can be recalled by touching
the
SELF CLEAN PAD.
To set oven to start cleaning
1. Repeat preceding
3. Touch
at a later time:
Steps I and 2.
STOP TIME
PAD.
Touch number pads for desired time cleaning process is to be completed. Time
set has to be at least two to four hours ahead of time displayed on clock depending
upon time to clean, set in Step 1 above. If less time has been programmed, all E's
appear.
4. Touch AM/PM
PAD.
ENTER
Touch pad until desired
appears in display.
5. Touch
START
AM or PM setting
2:30
STOP PM
Display
TIME
PAD.
Display will briefly show the time of day oven will automatically
turn on. At that
time the oven will beep once to indicate oven has turned on. Display will show time
of day, CLEAN and STOP.
6. Oven
stops
unlock
LOCK
beeps once to signal start of delayed function
and beeps once when oven
automatically
after programmed
cleaning time elapses. Oven door will not
until oven cools to a safe temperature.
When this occurs, the Indicator Word
goes out.
To stop cleaning
1o Touch
process:
CANCEL-OFF
PAD.
If Indicator Word LOCK is not displayed,
door can be opened; if LOCK is displayed, oven will have to cool before door can be opened.
DO NOT TRY TO UNLOCK
THE DOOR WHILE LOCK INDICATOR
WORD IS
DISPLAYED.
29
More
Information
SelfoCleaning
on
the
Process
A slight odor may be detected, and if an oven is heavily soiled, some smoke
may be visible. Some smoke and odor during the cleaning process is a normal
occurrence.
Since the oven is vented in the front, vapors, moisture, etc. may
be seen coming from this area.
During the cleaning process, do not be alarmed if an occasional flame is visible
through the oven window. This is caused by excessive food soil that was not
removed before the oven was set to clean.
SINCE THE DOOR AND WINDOW
THE SELF-CLEANING
PROCESS,
OF THE OVEN WILL GET WARM
AVOID CONTACT.
DURING
Some types of soil may disintegrate but leave a light film or heavier deposit
of ash. The amount of ash depends on the amount of soil which was in the
oven. After oven has cooled, this ash may be removed with a damp sponge.
If other dark deposits remain after wiping with a sponge, the length of cleaning
time was not enough. Increase the cleaning time for future cleanings. The normal
cleaning program is 3 hours. More than 3 hours may be selected if necessary.
See page 29, step 1.
If racks have been left in oven during the cleaning process, they should be
treated as follows. After the cleaning process is completed and the oven has
cooled, buff the underside of rack edges with Scotch-Brite scour-pad or rub
the underside of rack edges with a light coating of vegetable oil. Use a light
application of oil so it does not soil the oven. As a suggestion, use fingertips
to apply oil. This will make the cleaned racks slide more easily.
To remove occasional spillovers between cleanings,
pad or mild cleanser; rinse well.
use a soap-filled
scouring
•
It is better to clean the oven regularly rather than waiting until there is a heavy
build-up of soil in the oven.
•
During the cleaning process, the kitchen should
eliminate normal odors associated with cleaning.
• Any attempt to force the self-clean DOOR
in damage to the door locking mechanism.
•
DO NOT USE COMMERCIAL
CLEANING
OVEN AREA.
•
DO NOT USE ALUMINUM
LOCK
OVEN CLEANERS
FOIL OR OTHER
30
be well ventilated
LEVER
to unlock
IN OR AROUND
LINERS
to help
may result
THE SELF-
IN THE OVEN.
Other
Caring
Cleaning
Other
Hints
on
for Your
Surfaces
Oven
of Your
Oven
Door
and control
panel
trim:
The metal trim around the door and the control
panel can be cleaned with any non-abrasive
cleansers such as Bon Ami or soapy
water; rinse well. Be careful not to use an excessive amount of water.
Glass
on the control
panel
suitable glass cleaner or soapy
front
water.
and oven
door
front:
To clean, use any
Spray glass cleaner then wipe the panel.
NOTE: When wiping
of the oven control.
the panel there is a possibility
Oven
Bulb
Light
of entering
or changing
settings
Before replacing bulb, disconnect
power to oven at the main fuse or circuit breaker
panel
Be sure that the entire oven cavity including
the light bulb is cool before
attempting
to remove.
To replace
light
bulb:
1. Carefully
remove the glass light lens and lens
retainer by removing the two screws in the light
lens retainer using a phillips screwdriver. Note: The
light lens is separate from the light lens retainer.
The two pieces will drop down into your hands at
the same time. Do NOT remove the remaining two
screws.
2. To obtain firm grasp on bulb, wear protective
rubber gloves. Remove by turning bulb to the left.
Do not touch a hot oven light bulb with a damp
cloth as bulb will break. Note: If the bulb does
break and you wish to remove it, be certain power
supply is disconnected and wear protective gloves.
You may contact your authorized Maytag Service
Technician for service.
.
Replace bulb with a 40 watt oven-rated appliance
bulb. Bulb with brass base is recommended
to
prevent fusing
=
of bulb into socket.
Place light lens inside of light lens retainer. Holding the light lens and lens retainer in place, insert
the two screws into the light lens retainer and
tighten.
31
_en
R,_e_
To remove, pull forward
to the "stop"
position,
lift up on the front of the rack
and pull out.
32
Other Uses of Your Oven's
Electronic
Controls
_aPIli
The ALARM can be set to signal one-time
or to repeat at the same time daily. The
signal beeps for 10 seconds,
pauses 50 seconds,
than repeats 10 times unless
ALARM OFF PAD is touched.
To set alarm for a one-time
1. Touch
ALARM
Indicator
signal:
SET PAD once.
Words
ENTER, ALARM
and TIME
will blink.
(If more than 8 seconds
elapse between
touching ALARM SET PAD and first numeral, the ALARM SET PAD must be touched
again to repeat sequence.)
2. Touch
NUMBER
For example:
ENTER
0
PADS for time of day desired;
touch
3
0
0
All O's will be displayed.
for3:00.
enter
0"
0
0
Display
ALARM
TIME
in order.
ENTER
3:00
Display
PM ALARMTIME
3. Touch AM/PM
PAD until desired
AM or PM setting
appears
in display
window.
ENTER
3:0 0 o,..,°.
4. Touch
START
PAD.
PMALARM
TIME
Alarm is now set to beep at set time for a one-time
alarm is set by Indicator Word ALARM.
only signal. Display
will indicate
3:00
Display
PM ALARM
5. Touch ALARM OFF PAD once to cancel
To set alarm for a repeated daily signal:
1. Touch
ALARM
Indicator
programmed
function.
SET PAD twice.
Words
ENTER, ALARM
and TIME
will blink.
All O's will be displayed.
ENTER
0 O: 0 0 o,..,..
ALARMTIME
.
Touch
NUMBER
For example:
PADS for time of day desired;
touch
5 3 0 for 5:30.
enter
ENTER
in order.
5:3 0 °,..,°.
PM ALARMTIME
.
Touch
AMiPM
PAD until desired
AM or PM setting
appears
in display
window.
ENTER
5 :30
PM ALARMTIME
33
Display
4. Touch STARTPAD.
Alarm is nowsetto beepat sametime eachday. Displayindicatesalarmissetby
Indicator Word ALARM. Display returnsto time of day.
5. Touch ALARMOFFPADonce to cancel beeping signal.
Touch ALARM OFF PAD twice to cancel programmed
command.
To recall alarm time set:Touch
ALARM SET PAD once.
Display
will briefly
show programmed
34
time, then return
to time of day.
Low
Oven
Temperature
Use
Dehydration:
The low temperature
setting combined
with the moving air
in the convection
oven creates suitable drying conditions.
Covers for oven racks
can be made inexpensively
and easily.
To make
cover
for oven
rack:
1. Cut a piece of nylon net the width of a
rack less 2 inches and twice the depth.
Sew Velcro I or snap tape to shorter ends .....
2. Slip net through
back support.
Wrap
around
rack. Fasten snugly.
Clean
in
washing
machine.
Store
rolled
up in
drawer.
CAUTION:
It is recommended
mum oven temperature
140°F.
To
set
oven
1. Arrange
2. Touch
3. Touch
4. Touch
Tips
on
to dry
BAKE CONV
0
0
START
drying
not exceed
food:
food on drying
1
that maxi-
should
racks; put racks
in oven.
PAD.
PADS.
PAD.
foods:
• Drying
times vary due to numerous
factors
such as juiciness
or ripeness
of food, thickness
of slices, volume in oven, humidity when drying food.
•
Prop oven
to escape.
•
Quality
of dried food
• Spread
food in single
Recommended
door
open
Deanna.
(use small
is determined
measuring
greatly
by quality
cup)
to allow
of food being
moisture
used.
layer, not overlapping.
references:
Beyerl Bee. Food Drying
Inc., 1976.
DeLong,
slightly
How
at Home
the Natural
To Dry Foods.
Hobson,
Phyllis. Garden
Way Publishing,
1980.
Way's
Guide
Tucson,
Way. Los Angeles,
AZ.: H.P. Books,
To Food
35
Drying.
CA.: J.P. Tarcher,
1979.
Charlotte,
VT.: Garden
Before
You Call
for Service
Check the following
list to be sure a service call is really necessary. A quick reference
of this manual as well as reviewing
additional
information
on items to check, may
prevent an unneeded service call.
If nothing
on
the
oven
operates:
• check
for a blown
• check
if oven is properly
• check
if clock
If clock
and/or
circuit
connected
operate
If the
oven
light
• the light
does
circuit
breaker.
in house.
(See page 9.)
oven
does
not
or START
heat:
PAD not touched.
start.
not
work:
bulb is loose or defective.
• oven light does not work
If oven
but
PADS may be set incorrectly
• may be set for delayed
main circuit
to electric
has been set; reset clock
lights
• NUMBER
fuse or a tripped
_I11
not
• controls
go
during
through
self-cleaning
process.
self-cleaning
may be improperly
process:
set, or START
PAD not touched.
• door may not be locked.
If oven
did
not
clean
properly:
• oven may need longer cleaning
• excessive
If oven
spills
door
_411 not
If foods
do
current
not
• check
to safe temperature
into house
setting
• probe
process.
properly:
START
PAD not touched.
may be low.
in display
window
of control
panel
plug not in place when
this
has
using
when using
• invalid
temperature
such as 550 ° F.
• invalid
time on clock
food
indicates
been
PROBE
• time set not logical
• food
after self-cleaning
into the oven may be off.
pads may not be set properly,
appears
incorrect
If baked
process.
rack position.
• voltage
If EEEE
coming
broil
• the function
prior to self-cleaning
unlock:
• oven may not have cooled
• electric
time.
were not removed
BAKE TIME
may be positioned
or
too
brown
incorrectly
on
in oven.
36
tnco_p1_
such
ass
TEMP command.
and STOP TIME.
such as 14:00.
is burned
given
an
top:
®_
If foods
bake
unevenly:
• the oven may be installed
• check
improperly.
the oven rack with a level.
• stagger
pans; do not allow
• check
instructions
If cooking
results
pans to touch
for suggested
are
less
each other
placement
than
or oven wall.
of pans on oven rack.
expected:
• the pans being used may not be of the size or material
results.
• there may not be sufficient
circulation
in the oven.
• check
instructions
If PROBE
TEMP
• check
does
not
TEMP numbers
results
differ
sides
rack position
of the pans
for
for best
proper
air
and oven temperature.
work:
plug is properly
• probe may not be positioned
If baking
around
for preheating,
to be sure probe
• PROBE
room
recommended
inserted
into oven receptacle.
in food properly.
may be set incorrectly.
from
previous
oven:
• oven thermostat
calibration
may differ between old and new ovens. Follow
recipe and use and care directions
before calling for service since the calibration on the previous oven may have drifted to a too high or too low setting.
If, after
properly:
checking
the
• call your Maytag
recommended.
If the dealer
• write to:
or
above,
dealer's
service
the
service
company
appliance
still
doesn't
operate
department
or the
service
department
cannot
resolve
the
problem:
Maycor Parts and Service Company
Division of Maytag Corporation
P.O. Box 2370
Cleveland, Tennessee 37311
615-472-3333
• Service manuals
nominal charge.
Should
you
still
and parts catalogs
have
are available
from this department
at a
a problem:
• write to:
Major Appliance Consumer Action Panel
20 North Wacker Drive
Chicago, Illinois 60606
MACAP is an industry-sponsored
but independent
group of consumer
experts who receive and act on complaints from appliance owners.
Note:
When writing about
ing information:
problem,
please
(a) Your name, address, and telephone
number;
(b) Model number, series number, and serial number
frame) of your appliance;
(found
(c) Name and address
(d) A clear description
an unsolved
service
of your dealer and date the appliance
of the problem you are having.
37
include
the follow-
on the oven front
was bought;
|MPORTANT
MODEL
NUMBER
SERIAL
NUMBER
(Numbers
appear
OP TION
on the serial
plate located
on oven front frame.)
Date Purchased
MAYTAG
DEALER
FROM WHOM
PURCHASED
ADDRESS
CITY
PHONE
AUTHORIZED
MAYTAG
SERVICE
TECHNICIAN
ADDRESS
CITY,
PHONE
IMPORTANT:
Retain proof of purchase
38
documents
for warranty
service.
WaPPauty
Full
One Year
Warranty
For one (1) year from
date of original
retail purchase,
any part, which fails in normal
home use, will be repaired or replaced free of charge when the appliance is located in
the United
States.
Limited
Parts
Warranty
After the first year from the date of original purchase, through the time periods listed
below, the designated
parts which fail in normal home use will be repaired
or
replaced free of charge for the part itself, with the owner paying all other costs
including
labor.
Second
Third
Year
Through
on electronic
Limited
- All Parts
touch
Parts
Fifth
control
Year
- Touch
pad and printed
circuit
board
wall oven.
Warranty
Outside
the
United
States
For two (2) years from the date of original
retail purchase, any part, which fails in
normal home use, will be repaired or replaced free of charge for the part itself, with
the owner paying all other costs, including
shipping charges and labor, when the
appliance is located outside the United States.
How
and Where
to Receive
Warranty
Service
• Call or write the authorized
Maytag dealer from whom appliance was purchased or authorized service firm designated by it.
• If the owner moves from selling dealer's servicing area after purchase, call or
write any authorized Maytag dealer or authorized service firm in or near the
new location.
• Should the owner not receive satisfactory warranty service from one of the
above, call or write: Maycor Parts and Service Company, a Division of Maytag
Corporation,
P. O. Box 2370, Cleveland, Tennessee 37311,615-472-3333,
and
arrangements for warranty service will be made.
This warranty
gives you specific
which vary from state to state.
legal rights,
39
and you
may also
have other
rights
COMP IY
Newton, lowa 50208
(515) 792-7000
Printed in U.S.A.
Part No. 203867C
Form No. 356FE-0689
6/89