1
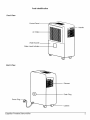
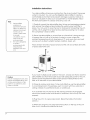
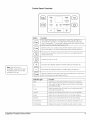
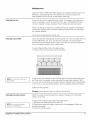
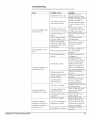
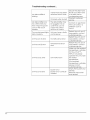
EDGESTAR
_
Dehumidifier
Model: DEP501EW
Owner's Manual
For more information on other great EdgeStar products on the web, go to http://www.edgestar.com
Important
Safety Information
Improper handling can cause serious damage
to the EdgeStar dehumidifier
and/or to the user. This
dehumidifier
is designed for domestic indoor use only. Do not use the unit for industrial or commercial
use. Any
other use may invalidate the warranty. Please review the ratings label located on the rear panel of the unit for
electrical and other technical data related to this unit. The unit must be used in a properly grounded wall
outlet. Please read and follow the safety information listed below.
/_Electrical
Safety
_
This dehumidifier
is designed
for indoor use
only Do not use the unit near bath tubs,
swimming
pools or other bodies of water
•
Do not wet the housing or control panel
•
Do not exceed
the power outlet ratings
•
Do not pull the unit by the cord
•
Always turn the unit off and unplug it from
the outlet when cleaning
•
Unplug the unit if it is not going to be used
for an extended
time period
•
Do not operate
the unit with a power plug
missing the ground plug, a damaged
cord
or a loose socket
•
•
•
•
•
•
•
•
_.
Be sure the dehumidifier
is properly
grounded
Never plug or unplug the unit with wet
hands
/_General
Safety
_'_
This unit is not intended
children
to be used by
Children
should be supervised
to ensure that
they do not play with this product
Do not allow children to play with the controls
or drop any objects into the air outlets or
vents
•
Care should be taken when using the unit in a
room with infants, elderly persons, and
children
•
Do not
objects
Do not
Do not
Do not
•
•
•
place flower vases,
on top of the unit
allow anyone to sit
climb on or use the
cover the air intake
with towels,
air flow
clothes
containers,
or any
on the unit
unit as a step
or exhaust vents
or materials
that
prevent
Do not bypass, cut or remove the grounding
plug
Do not use extension cords or power strips
with this unit You may need to contact
your
electrician
if it is necessary to use a longer
cord or do not have a grounded
outlet
Do
not modify the power cord's length or share
the outlet with other appliances
It is
recommended
the unit be connected
on its
own circuit
•
When using in closets or confined
sure to keep doors open to allow
ventilation
•
Do not use this appliance
near flammable
gas
or combustibles,
such as gasoline, benzene,
thinner, etc
Do not use in areas where chemicals
are
handled
Do not start or stop the unit by switching
the
circuit's power on and off
If the power cord is damaged,
it must be
replaced
by the manufacturer
or a
qualified
technician
Never open the unit while it is plugged
in
Immediately
unplug the unit if it makes
strange sounds, emits smells or smoke
comes out of it, and contact
customer
•
service
•
•
•
•
•
spaces,
proper
be
Do not place the unit near a heat source as
doing so may cause the plastic parts to melt
Only use in an upright position on a flat, level
surface and provide at least 10 inches of
clearance
from any walls or objects
Route the power cord carefully to avoid
creating
a tripping hazard
When using in closets or confined
spaces, be
sure to keep doors open to allow proper
ventilation
Clean
the filters every
two weeks
or as
j
is not potable or suitable for drinking.
Do not drink or use condensate
or wafer
The waferfrom
produced
dehumidifier
drained
the unit by
as the
if contains
contaminates
and could
make you sick
21
\._:_/
Electrical products should not be disposed of
with household waste Please contact
your
local recycling center for more information
on
how to recycle electronic waste
Table of Contents
IMPORTANT SAFETY INFORMATION .................................................................
INTRODUCTION
...................................................................................................
PARTS IDENTIFICATION .....................................................................................
BACK VIEW ..........................................................................................................
FRONT VIEW .........................................................................................................
INSTALLATION
INSTRUCTIONS
2
2
CONTROL PANEL OVERVIEW ............................................................................
4
OPERATING THE CONTROL PANEL .................................................................
5
CONTINUOUS
MODE
.............................................................................................
5
5
5
5
FAN SPEEDS..........................................................................................................
5
SETTING THE HUMIDITY LEVEL ...................................................................................
5
LCD DISPLAY .......................................................................................................
Error Codes ..................................................................................................
6
6
WATER FULL LIGHT .................................................................................................
6
ADDITIONAL
6
NOTES ABOUT THE DEHUMIDIFIER'S BEHAVIOR: .........................................
DRAINING THE UNIT ............................................................................................
MANUAL
DRAIN ....................................................................................................
CONTINUOUS
DRAIN .............................................................................................
MAINTENANCE
....................................................................................................
7
7
7
8
CLEANING
THE UNIT ...............................................................................................
8
CLEANING
THE PRE-FILTER.......................................................................................
8
CLEANING
THE WATER BUCKET ................................................................................
8
PREPARATION FOR STORAGE ..................................................................................
9
ENERGY SAVING GUIDE .....................................................................................
9
TROUBLESHOOTING
9
SPECIFICATIONS
Dehumidifier
2
3
A uto-Restart: ................................................................................................
Auto-Shut Off: ..............................................................................................
Portable
1
........................................................................
POWER ................................................................................................................
EdgeStar
I
..........................................................................................
...............................................................................................
12
ii
Introduction
Thank you for purchasing this EdgeStar portable dehumidifier.
We are glad
you chose us. We believe fhaf your purchase of this product opens a
relationship between you and EdgeSfar. We will provide the customer
support needed fo nurture fhaf relationship.
This manual contains important information regarding the proper
installation, use and maintenance
of your portable dehumidifier.
Following
this manual will ensure that your product will work at its peak performance
and efficiency.
Your dehumidifier
is designed to remove moisture in the air by
condensation
removal and collecting the wafer in a removable
bucket,
or draining into a drain hose fhaf can be routed fo a drain hole on the
floor or condensate
pump.
Please save the original product packaging
transport your portable dehumidifier.
in case you need to safely
For Your Records:
Please write down the model number and serial number
below for future reference. Both numbers are located
on the ratings label on the back of your unit and are
needed fo obtain warranty service. You may also want
fo staple your receipt fo this manual as if is the proof of
your purchase, and is also needed for service under
your warranty.
Model
Number:
Serial Number:
Date of Purchase:
To better serve you, please do the following
service:
before
contacting
immediately
customer
•
If you received a damaged
product,
dealer that sold you the product.
•
Read and follow this instruction
use and maintain your portable
•
Read the troubleshooting
section of this manual
diagnose and solve common issues.
•
Register your product at http://www.edgestar.com
and download
product guides, owner's manuals, and access additional
troubleshooting
resources.
•
If you need warranty service, our friendly customer service
representatives
are available via email af [email protected]
or by telephone af 1 (866) 319-5473.
manual carefully
dehumidifier.
contact
the
to help you install,
as it will help you
Parts Identification
Front View
Control
Panel
Handle
Air Intake
Water Bucket
Water Level Indicator
Back View
Exhaust
Drain Plug
Power Plug
Casters
EdgeStar
Portable
Dehumidifier
2
Installation
Instructions
Your dehumidifier
will remove
moisture from the air and collect
the excess
wafer in a bucket. You can use the EdgeSfar dehumidifier
fo create a
comfortable
environment
and prevent damage caused by moisture fo
books or valuables in areas such as basements or home libraries. Follow
f
the instructions
Note:
Dehumidifiers
working in a
basement will have
little or no effect on
adjacent enclosed
rooms such as
closets, unless there
is enough
circulation of air in
and out of the
enclosed area.
The unit is designed
to work in
environments with
temperatures
between 41°F and
below fo unpack
and set up your unit.
1) Carefully unpack the dehumidifier
from its box and packaging
material,
and remove the adhesive tape holding the wafer bucket and filter in
place. You may want fo save the box for storing and transporting the unit.
Let the unit sit upright for af least 24 hours before powering if on fo allow
the compressor's fluids fo settle.
2) Place the dehumidifier
on a level floor or surface that is strong enough
fo support the unit with a full bucket of wafer in a room where the
ambient temperature
will not drop below 41°F, and away from any heat
sources such as direct sunlight, heaters, radiators, dryers, etc.
Allow at least 10 inches of space
of space above the unit.
all around
the unit and at least 20 inches
9qOF
20
10_
f
Caution:
The unit is designed to be used
indoors and freestanding, and
not be used outdoors, or be
built-in fo a cabinet or used
under a counter.
If you have multiple power outlets in the room, choose one that is near the
dehumidifier
and fhaf will be able fo provide adequate
power fo the unit.
See the power requirements
listed on the product label printed on the
side, or on the back of your dehumidifier.
3) Close all windows and doors. To be most effective, use the dehumidifier
in a contained
room. For example, use if in a room with four walls and a
ceiling, instead of a partitioned
studio, or warehouse.
4) To activate the unit and ensure the warning switches are engaged,
remove the water bucket and reinstall it; otherwise, the unit may not work
properly.
5) Plug the unit in to a grounded
section.)
outlet.
(Read the Safety Information
6) When first using the unit, press the Power button on the top of the unit
and run if in continuous mode for 24 hours.
Control Panel Overview
Filter
o
Turbo
o
Ful
cD
Normal
cY_
Cont.
c]
On
c_
Off
c_
Autodeffost
o
Timer
Button
Function
The check
filter feature
is a reminder
fo clean
the air filter for a
more efficient operation.
The Filter light will illuminate after 250
hours of operation.
To reset after cleaning the filter, press the Filter
button and the indicator light will shut off.
(_
ets not
the be
unitable
fo run
continuously
until the wafer humidify
bucket isbuttons.
full. You
will
fo use
the increase/decrease
Sets the fan speed
moisture removal.
from normal
fo turbo for your desired
level of
Powers the unit on or off.
(_
Increases
the desired
relative
humidify
setting for damper
air.
Note: The unit is not a
humidifier; using the increase
humidify button will not add
moisture fo the air.
Decreases
the desired
relative
humidify
setting for drier air.
Pressthe
to initiate
autodecrease
start and buttons.
auto stop feature
with
increasetheand
Indicator
EdgeStar
Portable
Dehumidifier
Light
in conjunction
Function
Filter
Lights up to indicate
Full
The water full light will light up red if the unit has filled
the water bucket.
the filter needs to be cleaned.
Cont.
Lights up when the unit is set to run continuously
the water bucket is full.
On/Off
Lights up to indicate
if the unit is in on or off position.
Turbo
Lights up to indicate
the fan is on the high setting.
Normal
Lights up to indicate
the fan is on the low setting.
Auto-Defrost
Lights up to indicate
the auto defrost
LCD Display
Displays the level of humidity
operation
until
is on
as well as error codes.
4
Operating
the Control
Panel
Use the "Power" button to turn the portable dehumidifier
on and off. By
default when you first use the power button, the unit will begin fo operate
in normal fan speed mode.
Power
Note: If the unit was powered
if back on.
off, waif af least 3 minutes before
powering
Auto-Restart: If power fo the unit is interrupted, the dehumidifier will restart
itself in with the last used mode/settings
once the power is restored. The
compressor will restart after 3 minutes.
Auto-Shut Off: The unit will shut off when the set humidify has been
reached, or when the wafer bucket is full, has been removed, or is not in
its proper
Continuous
position.
Continuous
continuous
Mode
mode dehumidifies
mode for maximum
use the set humidify
the air until the wafer bucket is full. Use the
dehumidification.
You will not be able fo
buttons.
To operate the unit in continuous mode:
1) Make sure the power cord is plugged into a power outlet.
2) Press the "Power" button.
3) Press the "Conf." button. The LED indicator next fo "Conf."
4) Select the fan speed by using the Normal or High button.
The dehumidifier
has two fan speeds. Use the turbo fan speed for
maximum moisture removal. Use the normal fan speed for quieter
operation.
Fan Speeds
Select the fan speed
illuminated
Setting
the Humidity
will light up.
Level
by pressing the "Fan"
button
until desired mode
is
The desired humidify level can be set within a range of 35% Relative
Humidify (RH) fo 80% RH in 5% increments.
f
Note: Relative Humidity (RH) is
the ratio of the actual wafer
content of the air at a given
temperature to the potential
water content af fhaf same
temperature.
]) Make sure the power cord is plugged into a power outlet.
2) Press the Power button. Make sure the "Conf." light is fumed off.
3) Press the "Increase" and "Decrease"
buttons fo set the desired humidify
To set After
the desired
humidify the
levelLCD
percentage:
level.
a few seconds,
display will revert fo the acfuat room
humidify
level with +5% accuracy.
For drier air use the "Decrease"
button.
Operating
the Control Panel continued
The LCD Display will show the room's relative humidity percentage
by
default. Pressing the Increase and Decrease buttons will show the set
humidity for a few seconds, and then revert to the room's relative
humidity.
LCD Display
Error Codes
In addition to showing the humidify,
error codes:
the display may show the following
AS - Humidity sensor error
Power the unit off, and then unplug the unit for 15 minutes. Plug in and
power on. If the issue persists, please contact customer service.
ES - Temperature sensor error
Power the unit off, and then unplug the unit for 15 minutes. Plug in and
power on. If the issue persists, please contact customer service.
EC - Unit malfunction
Please make sure whether the ambient temperature
is suitable for the
stated temperature
in the manual or not. If not, please operate the unit
under the stated temperature.
If the environment
temperature
is suitable
for the stated temperature,
please contact customer service.
P2- Bucket is full
Empty the water bucket
and reinstall it.
The Water Full Light will illuminate when the bucket is ready to be emptied.
The light also turns on when the bucket is not installed or installed
incorrectly. Once the wafer is drained, and the bucket is properly
installed, the unit will operate normally.
Water Full Light
Additional notes about the dehumidifier's
•
•
•
EdgeStar
Portable
Dehumidifier
behavior:
Once the unit reaches the desired set humidify, the power button will
remain lit while the compressor and fan shuts off. You will not be able
fo change the fan speed.
If the power fo the unit was interrupted while the compressor was
running, the unit may take a few minutes to start the fan and
compressor.
If the room's relative humidity is lower than the set humidity, the unit
will not start the fan and compressor unless you set the unit to run in
Continuous mode.
6
Draining
Manual
Drain
the Unit
The dehumidifier
can be drained manually
the bucket is full, the unit will automatically
light will turn on.
Follow the steps fo remove
the bucket
1) Slowly and carefully pull the
bucket out by the handles until
you see the bucket handle.
using the water bucket. When
stop running, and the wafer full
and dump
the wafer.
2) Pull the bucket
handle
up by its
@
Warning: The wafer produced
the dehumidifier
is not potable
suitable for drinking.
Do not drink the wafer drained
from the unit as if contains
contaminates
and could make
you sick.
Continuous Drain
by
or
3) Pour the water out. Do not place
uneven and will fall down.
4) Reinstall the bucket.
The dehumidifier
]) Remove
connector.
can be drained
the bucket
continuously
on the floor as its bottom
is
fo a floor drain.
the water bucket from the unit, and you will find a hose
You can use a ]2 mm hose fo attach fo the connector.
Connector
Drain
/
hose
2) Remove the rubber plug from the back of the unit's drain hose outlet,
and push the drain hose through.
3) Securely attach the drain hose fo the connector.
Lead the other end of
the hose fo a floor drain or other suitable drainage port.
4) You must reinstall the wafer bucket.
Maintenance
Clean the dehumidifier
and filters regularly to maintain performance
efficiency, and prolong the unit's life. Be sure to always unplug the
dehumidifier
from the power outlet before cleaning.
Cleaning the unit
and
Use a soft dry cloth to wipe the body clean. If necessary, use lukewarm
water to dampen a cloth to clean the unit. Use a soft bristle brush and
vacuum cleaner to clean between the air intake and exhaust vents.
Never use abrasive chemicals, volatile substances, gasoline, detergents,
chemically
treated cloths, or other cleaning solvents that may damage
the cabinet exterior.
Never spray water directly
Cleaning the pre-filter
on the unit.
Clean the pre-filter periodically
to prolong the unit's life, and keep the unit
running efficiently. Lint, dust, and dirt can clog the unit and reduce its
performance
and effectiveness.
If the unit is used in a dusty environment
you may need to clean it on a weekly basis.
To clean the pre-filter, follow the steps below:
1) Power off the unit and remove the pre-filter.
-ZT
[
NOTE: Do not put the filter in a
dishwasher.
................................................
ZZ
"Z'ZI-ZZZi
dirt, then rinse thoroughly under lukewarm running water (below 104°F).
2) Use a vacuum cleaner or tap the filter lightly to remove loose dust and
You may use a mild soap and water solution if needed. Allow the pre-filter
to air dry in a cool and shaded place. Dry thoroughly before reinstalling.
3) Reinsert the pre-filter.
Warning: Never operate
Cleaning the water bucket
Wash the water bucket
mildew and mold.
the unit without
frequently
the air filter.
to prevent
the growth of bacteria,
To clean the water bucket, follow the steps below:
1) Remove the wafer bucket from the unit.
bucket
in a
NOTE: Do
notdishwasher.
put the wafer
EdgeStar
Portable
Dehumidifier
2) Wash thoroughly.
the bucket with clean wafer and a mild detergent.
bucket
3) Install the wafer bucket.
Rinse the
8
Maintenance
Preparation for Storage
continued
If you are not going to be using fhe unif for an exfended
follow fhe insfrucfions below before sforing your unif:
])
2)
3)
4)
5)
6)
period of time,
Turn off fhe unif and waif 24 hours before empfying fhe wafer lank.
Drain all fhe wafer from fhe wafer lank.
Clean fhe air filler, wafer lank and unif.
Unplug and carefully wind fhe power cord.
Cover fhe unif wifh a plastic bag.
Sfore fhe unif in an uprighf position in a dry, well-venfilafed
place.
Energy Saving
Guide
Read and follow fhe guide below fo gel fhe besf performance
and
efficiency from your porfable dehumidifier:
•
Do nor cover fhe air ouflef (exhausf) while in use.
•
Do nor place fhe unif in fronf of curfains or drapes- fo ensure fhey do
nor obsfrucf fhe air infake.
•
•
•
•
•
•
•
Keep curfains, blinds or drapes closed during fhe sunniesf parr of fhe
day.
Close all windows and doors.
Indoor relative humidify should ideally be kepf befween 35 and 60
percenf depending
on fhe ambienf femperafure.
Make sure fhe unif is on a level surface.
To prolong fhe compressor's life, please waif af leasf 3 minufes before
fuming fhe unif back on affer shuffing if off.
Inspecf and keep fhe pre-filfers clean by cleaning regularly.
Perform roufine mainfenance.
Troubleshooting
Follow the troubleshooting
chart fo resolve common
Possible Cause
Issue
Insufficient
time fo dry
Air intake or Exhaust
vents are blocked
My dehumidifier
not dry the air
does
Humidify control may
not be set low enough
Opened
doors
windows
or
Room temperature
is
too low (below 41°F)
There is a kerosene
heater or something
giving off wafer vapor
in the room
Frost appears
coils
on the
This is normal
behavior
Unit is not receiving
power
Insufficient
power
My dehumidifier
is not
functioning at all
Water bucket
is full
Water bucket is not in
proper position
Control panel is
disconnected
The unit is not level
My dehumidifier
is
making a loud noise
A foreign object has
jammed the fan
The floor below
is uneven
the unit
Air filter is clogged
My dehumidifier
is
making a continuous
metallic knocking or
pinging sound
EdgeStar
Portable
Dehumidifier
Unit may have been
shipped on its side
Damaged
compressor
issues.
Solution
Run the unit for a
longer period of time.
Make sure there are no
towels, curtains, or
furniture blocking the
front and back of the
unit.
Lower the humidify
control. Run the unit in
continuous mode.
Close all windows and
doors.
Increase the room
temperature.
Remove any device
producing wafer
vapor.
The dehumidifier
has
an auto-defrost
feature.
Make sure the unit is
plugged in.
Move the unit fo
another outlet. Check
your circuit breaker.
(Refer fo the rating
label on the back of
the unit fo determine
the Amperage
draw).
Drain the unit and
restart.
Remove bucket and
reinserf.
If no indicator lights
turn on, contact
customer service.
Make sure the unit is on
a level surface.
Shut off the unit, and
remove the object
from the fan.
Move the unit fo a
level surface.
Clean the air filter.
Shut off the unit. Let
the unit sit on a level
surface for af least 24
hours and restart.
Contact customer
service.
10
Troubleshooting
continued...
Secure the drain hose.
My dehumidifier
leaking
is
A drain hose has been
attached
and is loose
Cracked
My dehumidifier
runs
for a little while and
then it trips the power
cord or the circuit
breaker
water
bucket
The dehumidifier
may
be plugged into an
outlet that can not
supply the correct
amount of current
The control panel lights
blink randomly
Unit may have a faulty
control panel
Unit has an AS error
Humidify sensor error
Unit has an ESerror
Temperature
error
Unit has a EC error
sensor
Unit malfunction
Route your drain hose
to a drain hole or
condensate
pump.
Contact custom.er
service.
Contact an electrician
if the unit works in a
different room or
circuit.
Restart the unit, and if
issue persists, contact
customer service.
Restart the unit, and if
issue persists, contact
customer service.
Restart the unit, and if
issue persists, contact
customer service.
Make sure the ambient
temperature
is suitable
for the unit (41°F 95°F). If not please
operate the unit under
the stated
temperature.
If the ambient
temperature
is suitable,
please contact
customer service.
Unit has a P2 error
11
Bucket is full
Bucket is not correctly
installed
Empty the bucket and
reinstall.
Remove the bucket
and reinstall.
Specifications
Description
Portable
of product
Model
DEPS01EW
Voltage/Frequency
AC 115V-60Hz
Power Consumption
520W
Operating
4.7A
Current
7.5 Liters / 1.98 Gallons
Water Bucket Capacity
Dehumidifying
RH60%
EdgeStar
Portable
Dehumidifier
Dehumidifier
Capacity
@ 80F
50 Pints/Day
Refrigerant
R410A
Dimensions
WxDxH
15 3/8" x 10 9/16" x 23 1/8"
Weight
36 Ibs.
12
EdgeStar
Limited Warranty
One (1) Year Parts & Ninety (90) Days Labor
This product is warranted by EdgeStar to be free from defective workmanship
set forth as follows:
and materials, subject to any conditions
WHAT IS COVERED:
LABOR: For a period of NINETY (90) DAYS from the date of original purchase, labor will be performed free of charge at
an authorized EdgeStar repair facility. At its option, EdgeStar will repair the product with new or remanufactured parts,
or exchange the defective product with a new, refurbished, or remanufactured product. If a product is replaced, it will
carry the remaining warranty of the original product. After the ninety (90) day period, EdgeStar will no longer be
responsible for labor charges incurred. All defective products and parts covered by this warranty will be repaired or
replaced on a mail-in basis to an EdgeStar authorized repair facility.
PARTS: For a period of ONE (1) YEAR from the date of original purchase, EdgeStar will supply new, rebuilt, or
refurbished parts free of charge. EdgeStar may request a defective part be returned in exchange for the replacement
part. All replacement parts or products will be new, remanufactured, or refurbished. All products and parts replaced by
EdgeStar under warranty service become the property of EdgeStar.
This warranty applies to the original purchaser only, and only covers defects in workmanship experienced during
operation of the product under normal service, maintenance, and usage conditions. This warranty applies to the
purchase and use of this product in residential settings within the United States of America.
WHAT IS NOT COVERED:
The following limitations apply to the coverage of this warranty. This warranty does not cover:
,,
Labor charges for installation, setup or training to use the product.
,,
Shipping damage, and any damage caused by improper packaging for shipment to an authorized service center, and any
damaged caused by improper voltage or any other misuse, including abnormal service, handling, or usage.
,,
Cosmetic damage such as scratches and dents.
,,
Normal wear and tear on parts or replacement of parts designed to be replaced, e.g. filters, cartridges, batteries.
,,
Service trips to deliver, pick-up, or repair, install the product, or to instruct in proper usage of the product.
,,
Damages or operating problems resulting from misuse, abuse, operation outside environmental specifications, uses
contrary to instructions provided in the owner's manual, accidents, acts of God, vermin, fire, flood, improper installation,
unauthorized service, maintenance negligence, unauthorized installation or modification, or commercial use.
,,
Labor charges incurred 91 days or more after the date d original purchase.
,,
The use of EdgeStar products in commercial settings.
,,
Optional accessories, attachments, and appearance items.
,,
Products that have been modified to perform outside of specifications without the prior written permission of EdgeStar.
•
Products lost in shipment, or theft.
,,
Products sold AS IS or from an unauthorized reseller.
,,
Products that have had their serial numbers removed or defaced. Products with serial numbers that have been invalidated.
OBTAINING WARRANTY SERVICE:
If you believe your product is defective, contact EdgeStar Customer Support for troubleshooting assistance and
warranty service at 1-866-319-5473. Please have your serial number and proof of purchase available. Once an
EdgeStar authorized representative has confirmed that your product is defective and eligible for warranty service, the
product must be returned to an EdgeStar repair facility. The purchaser is solely responsible for prepaying all shipping
related costs to and from the repair facility. EdgeStar is not responsible for damage resulting from shipper mishandling
or improper packaging. Do not return a defective product to the place of purchase. Products received without a return
authorization number will be refused.
THIS WARRANTY IS IN LIEU OF ANY OTHER WARRANTY, EXPRESS OR IMPLIED, INCLUDING WITHOUT LIMITATION, ANY
WARRANTY OF MERCHANTABILITY OR FITNESS FOR A PARTICULAR PURPOSE. TO THE EXTENT ANY IMPLIED
WARRANTY IS REQUIRED BY LAW, IT IS LIMITED IN DURATION TO THE EXPRESS WARRANTY PERIOD ABOVE. NEITHER
THE MANUFACTURER NOR ITS DISTRIBUTORS SHALL BE LIABLE FOR ANY INCIDENTAL, CONSEQUENTIAL,
INDIRECT,
SPECIAL, OR PUNITIVE DAMAGES OF ANY NATURE, INCLUDING WITHOUT LIMITATION, LOST REVENUES OR PROFITS,
OR ANY OTHER DAMAGE WHETHER BASED IN CONTRACT, TORT, OR OTHERWISE. SOME STATES DO NOT ALLOW THE
EXCLUSION OF INCIDENTAL OR CONSEQUENTIAL DAMAGES, SO THE ABOVE EXCLUSION MAY NOT APPLY TO YOU.
THIS WARRANTY GIVES YOU SPECIFIC LEGAL RIGHTS. YOU MAY HAVE OTHER RIGHTS THAT VARY FROM STATE TO
STATE.
EdgeStar
Beverage
Cooler
EdgeStar Products
500 N. Capital of TX Hwy, Bldg 5
Austin, TX 78746
Toll Free: 1-866-319-5473
Web: http://www.edgestar.com
E-mail: [email protected]
Register your product, download owner's manuals, access additional
troubleshooting resources, and obtain more information on other great
EdgeStar & Koldfront products on the web at: http://www.edgestar.com
Product
contents
Copyright
and specifications
may change
without
notice.
© 2012 Living Direct, Inc. All rights reserved.