1
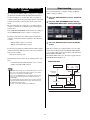
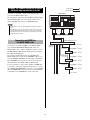
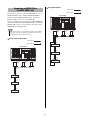
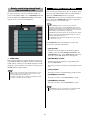
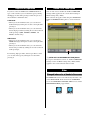
M7CL V3.5 Supplementary Manual This supplementary manual explains the functionality that was added or changed in M7CL firmware V3.5. Please read it together with the M7CL V3 operating manual. Added a File Load option (M7CL-48ES) Main changes Support for AuviTran Network ASIO Streamer (M7CL-48ES) • When loading an M7CL settings file (*.M7C), you can now select whether the AUTO CONFIGURE settings will be applied to the console (p.7). • By connecting the M7CL-48ES’s [3rd] port to a computer via a LAN cable, you can now perform direct recording or conduct a sound check using the playback from your DAW software (p.2). Support for using the HA encoders to control attenuation values • An external head amp connected via the M7CL-48ES’s slot 1 can now be operated remotely (p.4). • HA KNOB FUNCTION has been added to the PREFERENCE page of the USER SETUP popup window. This lets you choose whether rotating the HA encoder of the SELECTED CHANNEL area will control the head amp gain or the digital attenuation. This setting will also be applied to the OVERVIEW screen. ALTERNATE function added Other • By holding down a user-defined key to which the ALTERNATE function is assigned and operating an encoder in the SELECTED CHANNEL area, you can now perform operations such as switching a parameter on/off (p.6). • The PRE/POST status is now indicated by the index color of the SEND LEVEL knobs (p.7). Support for remote operation of an external head amp connected to a slot (M7CL-48ES) • You can now access the CH LINK MODE popup window by pressing two [SEL] keys of the input channels simultaneously. • ATT has been added to the CH LINK parameters. Improved EQ operability • Even if another user locked the console, it can now be unlocked by an administrator password. • The EQ [Q] encoder now allows you to switch between peaking and shelving types (p.7). • The PEQ “Q” parameter value goes up to 16. 1 EN Support for AuviTran Network ASIO Streamer Direct recording To record directly into a computer, change the M7CL48ES’s settings as follows. By connecting the M7CL-48ES’s [3rd] port to a computer (in which the AuviTran Network ASIO Streamer Driver has been installed) via a LAN cable, direct recording or conduct a sound check using the playback from your DAW software (hereinafter called “sound check” in this document). By performing direct recording first, you will be able to conduct a sound check or simulate a rehearsal using that sound source. Choose FROM STAGE BOX mode for direct recording, or choose FROM DAW mode to conduct a sound check. 1 Press the SETUP button to access the SETUP screen. 2 Press the ASIO STREAMER button and the FROM STAGE BOX button, making them light. In order to send and receive audio signals to and from a computer, the firmware must be updated to the following versions. • M7CL-48ES console: V3.5 or later 3 Press the SETUP button to close the SETUP • EtherSound module: 0C18 or later screen. With these settings, the computer will receive the audio signals that are being input to the M7CL-48ES’s ES IN 1–48 and the audio signals that are being output from the M7CL-48ES’s ES OUT 1–16. The M7CL-48ES will receive the audio signals from the STAGE BOX into ES IN 1–48. For the latest information on EtherSound modules and the AuviTran Network ASIO Streamer, refer to the AuviTran Corporation’s website. http://www.auvitran.com/ The following software must also be installed in the computer. FROM STAGE BOX • AuviTran Network ASIO Streamer: V1.2.5 or later Computer (DAW) • ASIO-compatible DAW software STAGE BOX IN 1–48 IN 49–64 OUT 1–48 NOTE • For details about settings on your computer and how to use the software, refer to the AuviTran Network ASIO Streamer user’s manual and to the user’s manual of your DAW software. EtherSound connector [3rd] port FROM STAGE BOX • If you choose FROM DAW mode, the time display area in the function access area will alternate between showing the time and [FROM DAW]. FROM DAW • The patching within the EtherSound module is changed automatically by the AuviTran Network ASIO Streamer, but the patching of the M7CL-48ES will not change. ES IN 1–48 ES OUT 1–16 • ES OUT 1–24 are always transmitted to STAGE BOX. INPUT PATCH OUTPUT PATCH M7CL-48ES 2 Sound check To conduct a sound check using audio that was previously recorded on a computer, change the M7CL-48ES’s settings as follows. NOTE • Some audio signal delay will occur in FROM DAW mode, since the audio signals pass through the computer. When you’ve finished the sound check, switch to FROM STAGE BOX mode, or press the ASIO STREAMER button to turn it off (unlit). 1 Press the SETUP button to access the SETUP screen. 2 Press the ASIO STREAMER button and the FROM DAW button, making them light. 3 Press the SETUP button to close the SETUP screen. With these settings, the computer will receive the audio signals that are being input to the M7CL-48ES’s ES IN 1–48 and the audio signals that are being output from the M7CL-48ES’s ES OUT 1–16. The M7CL-48ES will receive the audio signals from the computer into ES IN 1–48. FROM DAW Computer (DAW) STAGE BOX IN 1–48 IN 49–64 EtherSound connector OUT 1–48 [3rd] port FROM STAGE BOX FROM DAW ES IN 1–48 INPUT PATCH ES OUT 1–16 OUTPUT PATCH M7CL-48ES NOTE • If the console is restarted in FROM DAW mode, it will switch to FROM STAGE BOX mode and then start up. 3 Support for remote control of an external head amp connected to a slot Audio signals Remote signals M7CL-48ES Now you can remotely control an external head amp connected to the M7CL-48ES’s slot 1. By using this in conjunction with the EtherSound port built into the M7CL-48ES, you can remotely control up to twelve AD8HR units or up to six SB168-ES units. NOTE • If controlling via a slot, use AVS-ESMonitor to make EtherSound settings. Slot 1 • If you want to use the console’s EtherSound port as well, set it up as a separate EtherSound network. If you set it up as the same EtherSound network, the word clock will not be synchronized, and remote control will not be possible. Connecting an AD8HR via the M7CL-48ES’s slot MY16ES64 MY16EX MY16EX EtherSound [IN] connector NAI48-ES HA REMOTE connector AES/EBU connectors To remotely control the AD8HR via the M7CL-48ES’s slot, install the MY16-ES64 EtherSound card in the M7CL-48ES’s slot 1, and use an Ethernet cable to connect the MY16-ES64’s EtherSound [OUT] port to the NAI48ES’s EtherSound [IN] port. To send the signals being input to the AD8HR to the M7CL-48ES, use a D-sub 25-pin AES/EBU cable to connect the AD8HR’s DIGITAL OUT A (or B) to the NAI48ES’s AES/EBU port. Signals are sent and received from the NAI48-ES to the M7CL-48ES via EtherSound. It is also possible to “daisy-chain” multiple AD8HR units to remotely control them simultaneously. To do so, connect the AD8HR’s HA REMOTE 2 port to the second AD8HR unit’s HA REMOTE 1 port. If you’re using an NAI48-ES, a maximum of six AD8HR units can be connected. DIGITAL OUT A connector HA REMOTE 1 connector AD8HR 1 HA REMOTE 2 connector DIGITAL OUT A connector HA REMOTE 1 connector AD8HR 2 HA REMOTE 2 connector DIGITAL OUT A connector HA REMOTE 1 connector AD8HR 3 HA REMOTE 2 connector Up to six units 4 Ring connections Connecting an SB168-ES via the M7CL-48ES’s slot Audio signals Remote signals If you want to remotely control an SB168-ES via one of the M7CL-48ES’s slots, install an MY16-ES64 EtherSound card into the M7CL-48ES’s slot 1, and use an Ethernet cable to connect it to the SB168-ES. By daisy-chaining or ring-connecting multiple SB168-ES units, and installing two MY16-EX expansion cards in the M7CL-48ES’s slots, you can remotely control up to three SB168-ES units simultaneously. M7CL-48ES NOTE Slot 1 • If you’re also using the console’s EtherSound port, do not simultaneously ring-connect the two EtherSound networks. Word clock synchronization will not be possible if you do so. MY16ES64 OUT Daisy-chain connections Audio signals IN Remote signals SB168-ES M7CL-48ES OUT IN SB168-ES OUT IN Slot 1 SB168-ES MY16ES64 MY16EX MY16EX OUT IN SB168-ES OUT IN SB168-ES OUT IN SB168-ES 5 MY16EX MY16EX ALTERNATE function added Remote control of an external head amp connected to a slot You can now perform operations such as on/off by operating an encoder while holding down a user-defined key to which the ALTERNATE function is assigned. ALTERNATE mode is the state in which the user-defined key to which the ALTERNATE function is assigned has been pressed (i.e., is in the On state). In order to remotely control an external head amp connected via the M7CL-48ES’s slot, an EXTERNAL HA tab has been added to the VIRTUAL RACK window which appears when you press the RACK button. q NOTE • The ALTERNATE function lets you choose either LATCH or UNLATCH. If UNLATCH is selected, ALTERNATE mode will be on only while you hold down the user-defined key. If LATCH is selected, ALTERNATE mode will toggle on/off, allowing you to use the function without having to hold down the user-defined key. • ALTERNATE mode will turn off when you switch between the OVERVIEW screen and the SELECTED CHANNEL VIEW screen, when a popup window appears, and so on. • In ALTERNATE mode, “ALT” will be displayed as the user name in the function access area. In ALTERNATE mode, the following encoders will change their operation as described. • [HA] encoder Turn the encoder to adjust the attenuation value. If [ATT] is selected for HA KNOB FUNCTION in the PREFERENCE page of the USER SETUP popup window, the encoder will adjust the head amp gain. q COMM PORT This specifies whether the external head amp connected via the M7CL-48ES’s slot will be remotely controlled. To enable remote control, press the [SLOT 1] button to make it light. If you do not wish to use remote control, press the [NONE] button to make it light. • [MIX/MATRIX] encoder Turn the encoder to switch the corresponding send between PRE /POST. Press the encoder to switch the corresponding send on/ off. • [HPF] encoder NOTE Press the encoder to switch the high-pass filter on/off. • Remote control is not possible if the port that transmits or receives MIDI messages is specified as SLOT 1. To allow remote control, assign the MIDI port to other than SLOT 1. • [DYNAMICS 1] encoder • For details on operation, refer to “Remotely controlling an external head amp” in the M7CL V3 owner’s manual. Press the encoder to switch DYNAMICS 1 on/off. • [DYNAMICS 2] encoder Press the encoder to switch DYNAMICS 2 on/off. NOTE • In ALTERNATE mode, encoder functions in the SELECTED CHANNEL section other than those listed above are disabled. 6 Improved EQ operation Added a File Load option You can now choose whether the AUTO CONFIGURE settings will be applied to the console when loading an M7CL settings file (*.M7C). This selection also applies when using the STAGE BOX DATA CONVERSION dialog box to convert and load a file. If you have selected a LOW band or HIGH band whose type can be switched, you can switch the type by turning the EQ[Q] encoder while pressing it when the Q is set to the maximum or minimum value. LOW band: • When Q is at the minimum value, you can switch to LOW shelving by turning the encoder to the right while pressing it. • When Q is at the maximum value, you can switch the band to high-pass filter by turning the encoder to the left while pressing it (MIX, MATRIX, STEREO, and MONO channels only). HIGH band: • When Q is at the minimum value, you can switch to HIGH shelving by turning the encoder to the right while pressing it. • When Q is at the maximum value, you can switch the band to low-pass filter by turning the encoder to the left while pressing it. For shelving, high-pass filter, and low-pass filter as well, you can switch the type by turning the encoder while pressing it. q q [WITH AUTO CONFIGURE SETTING] button If you press this button to turn it on, AUTO CONFIGURE settings saved in an M7CL settings file (*.M7C) will be applied to the console when the file is loaded. Other Changed index color of knobs in the screen The PRE/POST status is now indicated by the index color of the SEND LEVEL knobs shown in the OVERVIEW screen, the SELECTED CHANNEL VIEW screen, and the MIX/MATRIX SEND popup window. PRE (white) 7 POST (black) Yamaha Pro Audio global web site: http://www.yamahaproaudio.com/ Yamaha Manual Library http://www.yamaha.co.jp/manual/ U.R.G., Pro Audio Division ©2010 Yamaha Corporation 012POTO-A0 Printed in Japan WY16630