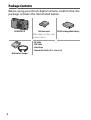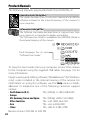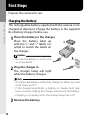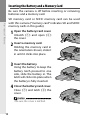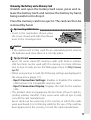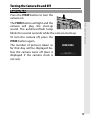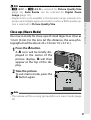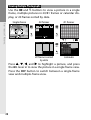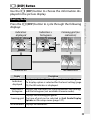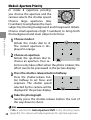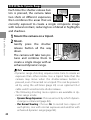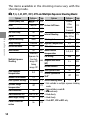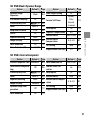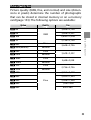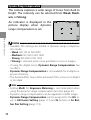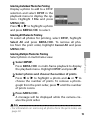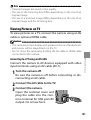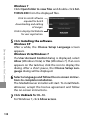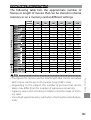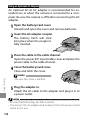
1
Camera User Guide The product serial number may be found on the bottom of the camera. Before You Begin Before using your camera, take a few moments to familiarize yourself with camera controls and displays. Refer to this section as you read through the rest of the manual (page 1). Basic Photography and Playback Read this section before using the camera for the first time (page 9). It covers the steps involved in readying the camera for use, taking photographs, and playing them back. Reference Read this section for information on topics not covered in “Basic Photography and Playback” (page 35). It covers advanced shooting and playback options and describes how to print photographs, customize camera settings, and copy pictures to a computer. The rechargeable battery needs to be charged before use. The battery is not charged at the time of purchase. Package Contents Before using your Ricoh digital camera, confirm that the package contains the items listed below. GR DIGITAL IV Hot shoe cover DB-65 rechargeable battery (Mounted on the camera hot shoe.) • AV cable • USB cable • Hand strap • Camera User Guide (this manual) BJ-6 battery charger ii Notices • Safety precautions: Read all safety precautions thoroughly to ensure safe use. • Test shots: Take test shots to ensure that the camera is working properly before taking photos on important occasions. • Copyright: Reproduction or alteration of copyrighted documents, magazines, and other materials, other than for personal, home, or other similarly limited purposes, without the consent of the copyright holder, is prohibited. • Exemption from liability: Ricoh Co., Ltd. assumes no liability for failure to record or display images as a result of product malfunction. • Warranty: This product is manufactured to local specifications and the warranty is valid within the country of purchase. The manufacturer assumes no responsibility for servicing the product in other countries or bearing any expense thereby incurred. • Radio interference: Operating this product in the vicinity of other electronic equipment may adversely affect both the camera and the other device. Interference is particularly likely if the camera is used in close proximity to a radio or television. This can be resolved by moving the camera as far as possible from the other device, reorienting the radio or television antenna, or plugging the radio or television into a different outlet. © 2011 RICOH CO., LTD. All rights reserved. This publication may not be reproduced in whole or in part without Ricoh’s express written permission. Ricoh reserves the right to change the contents of this document at any time without prior notice. Every effort has been made to ensure the accuracy of the information in this document. Should you nevertheless notice any errors or omissions, we would be grateful if you would notify us at the address listed on the back cover of this booklet. Microsoft, Windows, Windows Vista, Windows 7, and Internet Explorer are registered trademarks of Microsoft Corporation in the United States of America and other countries. Macintosh and Mac OS are registered trademarks of Apple Inc. in the United States of America and other countries. Adobe, the Adobe logo, and Adobe Reader are trademarks of Adobe Systems Incorporated. HDMI, the HDMI logo and High-Definition Multimedia Interface are trademarks or registered trademarks of HDMI Licensing LLC. Eye-Fi, the Eye-Fi logo and Eye-Fi connected are trademarks of Eye-Fi, Inc. All other trade names mentioned in this document are the property of their respective owners. iii Safety Precautions Warning Symbols Various symbols are used throughout this instruction manual and on the product to prevent physical harm to you or other people and damage to property. The symbols and their meanings are explained below. Danger Warning Caution This symbol indicates matters that may lead to imminent risk of death or serious injury if ignored or incorrectly handled. This symbol indicates matters that may lead to death or serious injury if ignored or incorrectly handled. This symbol indicates matters that may lead to injury or physical damage if ignored or incorrectly handled. Sample Warnings The symbol alerts you to actions that must be performed. The symbol alerts you to prohibited actions. The symbol may be combined with other symbols to indicate that a specific action is prohibited. ●Examples Do not touch Do not disassemble Observe the following precautions to ensure safe use of this equipment. Danger ●Do not attempt to disassemble, repair or alter the equipment yourself. The high-voltage circuitry in the equipment poses significant electrical hazard. ●Do not attempt to disassemble, alter or directly solder the battery. ●Do not put the battery in a fire, attempt to heat it, use it in a high temperature environment such as next to a fire or inside a car, or abandon it. Do not put it into water or the sea or allow it to get wet. ●Do not attempt to pierce, hit, compress, drop, or subject the bat- tery to any other severe impact or force. iv ●Do not use a battery that is significantly damaged or deformed. Warning ●Turn off the power immediately in the event of abnormalities such as smoke or unusual odors being emitted. Remove the battery as soon as possible, being careful to avoid electric shocks or burns. If you are drawing power from a household electrical outlet, be sure to unplug the power cord from the outlet to avoid fire or electrical hazards. Discontinue use of the equipment immediately if it is malfunctioning. Contact the nearest service center at your earliest convenience. ●Turn off the power immediately if any metallic object, water, liquid or other foreign object gets into the camera. Remove the battery and memory card as soon as possible, being careful to avoid electric shocks or burns. If you are drawing power from a household electrical outlet, be sure to unplug the power cord from the outlet to avoid fire or electrical hazards. Discontinue use of the equipment immediately if it is malfunctioning. Contact the nearest service center at your earliest convenience. ●Avoid any contact with the liquid crystal inside the picture display, should the monitor be damaged. Follow the appropriate emergency measures below. •SKIN: If any of the liquid crystal gets on your skin, wipe it off and rinse the affected area thoroughly with water, then wash well with soap. •EYES: If it gets in your eyes, wash your eyes with clean water for at least 15 minutes and seek medical advice immediately. •INGESTION: If any of the liquid crystal is ingested, rinse the mouth out thoroughly with water. Have the person drink a large amount of water and induce vomiting. Seek medical assistance immediately. v ●Follow these precautions to prevent the battery from leaking, overheating, igniting or exploding. •Do not use a battery other than those specifically recommended for the equipment. •Do not carry or store together with metal objects such as ballpoint pens, necklaces, coins, hairpins, etc. •Do not put the battery into a microwave or high pressure container. •If leakage of battery fluid or a strange odor, color change, etc. is noticed during use or during charging, remove the battery from the camera or battery charger immediately and keep it away from fire. ●Please observe the following in order to prevent fire, electrical shock or cracking of the battery while charging. •Use only the indicated power supply voltage. Also avoid the use of multi-socket adapters and extension cords. •Do not damage, bundle or alter power cords. Also, do not place heavy objects on, stretch or bend power cords. •Do not connect or disconnect the power plug with wet hands. Always grip the plug section when disconnecting a power cord. •Do not cover equipment while charging. ●Keep the battery and SD memory card used in this equipment out of the reach of children to prevent accidental ingestion. Consumption is harmful to human beings. If swallowed, seek medical assistance immediately. ●Keep the equipment out of the reach of children. ●Do not touch the internal components of the equipment if they become exposed as a result of being dropped or damaged. The high-voltage circuitry in the equipment could lead to an electric shock. Remove the battery as soon as possible, being careful to avoid electric shocks or burns. Take the equipment to your nearest dealer or service center if it is damaged. ●Do not use the equipment in wet areas as this could result in fire or electric shock. ●Do vi not use the equipment near flammable gases, gasoline, benzene, thinner or similar substances to avoid the risk of explosion, fire or burns. ●Do not use the equipment in locations where usage is restricted or prohibited as this may lead to disasters or accidents. ●Wipe off any dust that accumulates on the electrical plug as this may lead to fire. ●Use only the specified AC adapter in household electrical outlets. Other adapters pose the risk of fire, electric shock or injury. ●To avoid the risk of fire, electric shock or injury, do not use the battery charger or AC adapter with commercially available electronic transformers when traveling abroad. Observe the following precautions to ensure safe use of this unit. Caution ●Contact with fluid leaking from a battery can lead to burns. If part of your body comes in contact with a damaged battery, rinse the area with water immediately. (Do not use soap.) If a battery starts to leak, remove it immediately from the equipment and wipe the battery chamber thoroughly before replacing it with a new battery. ●Plug the power cords securely into the electrical outlets. Loose cords pose a fire hazard. ●Do not allow the camera to get wet. In addition, do not operate it with wet hands. Both pose the risk of electric shock. ●Do not fire the flash at drivers of vehicles, as this may cause the driver to lose control and result in a traffic accident. Safety Precautions When using optional products, carefully read the infor Accessories structions before using that product. vii Product Manuals The following manuals are provided with the GR DIGITAL IV: Camera User Guide (this booklet) This guide describes how to use your camera and install the software included in the internal memory of the camera to your computer. Software User Guide (pdf file) The Software User Guide describes how to copy pictures from your camera to a computer for display and editing. The “Software User Guide” is available in the [MANUAL] folder in the internal memory of the camera. Each language has its own “Software User Guide”. To copy the User Guide onto your computer, connect the camera to the computer using the supplied USB cable. See page 139 for more information. Image viewing and editing software, “MediaBrowser” (for Windows only), is also included in the internal memory of the camera. For information on using this software, see the Help menu in MediaBrowser or telephone one of the following customer support centers: • North America (U.S.) TEL: (Toll Free) +1-800-458-4029 • Europe UK, Germany, France and Spain: TEL: (Toll Free) +800-1532-4865 Other Countries: TEL: +44-1489-564-764 • Asia TEL: +63-2-438-0090 • China TEL: +86-21-5385-3786 Business hours: 9:00 AM to 5:00 PM viii Table of Contents Package Contents....................................................................................................... ii Notices.............................................................................................................................. iii Safety Precautions.....................................................................................................iv Product Manuals.......................................................................................................viii Before You Begin 1 Read this section before using your camera for the first time. Introduction..................................................................................... 2 Parts of the Camera...................................................................................................2 Basic Photography and Playback 9 Read this section before using your camera for the first time. First Steps........................................................................................10 Charging the Battery.............................................................................................. 10 Inserting the Battery and a Memory Card................................................ 12 Turning the Camera On and Off..................................................................... 15 Basic Setup................................................................................................................... 17 Taking Photographs......................................................................18 Taking a Photograph.............................................................................................. 18 Digital Zoom............................................................................................................... 20 Close-ups (Macro Mode)..................................................................................... 21 Flash................................................................................................................................. 22 Self-Timer...................................................................................................................... 24 Tilt Indicator................................................................................................................. 25 Viewing and Deleting Photographs...........................................27 Viewing Photographs............................................................................................ 27 Deleting Photographs........................................................................................... 30 O (DISP.) Button.................................................................................................... 33 ix Reference35 Read this section for more information on camera functions. More on Photography..................................................................36 Mode P: Program Shift.......................................................................................... 36 Mode A: Aperture Priority................................................................................... 38 Mode S: Shutter Priority....................................................................................... 39 Mode M: Manual Exposure................................................................................ 40 4 Mode: Matching Settings to the Scene.................................... 42 “MY” Modes: Using Custom Settings........................................................... 48 The Shooting Menu................................................................................................ 49 Movies.............................................................................................86 3 Recording Movies............................................................................................ 86 3 Viewing Movies................................................................................................. 88 More on Playback..........................................................................89 The Playback Menu................................................................................................. 89 Viewing Pictures on TV...................................................................................... 101 Printing Photographs.................................................................104 Connecting the Camera................................................................................... 104 Printing........................................................................................................................ 106 The Setup Menu...........................................................................109 Key Custom Options........................................................................................... 112 Setup Menu Options.......................................................................................... 123 Downloading Images to Your Computer................................135 For Windows............................................................................................................ 135 For Macintosh.......................................................................................................... 142 Technical Notes............................................................................144 Troubleshooting.................................................................................................... 144 Specifications........................................................................................................... 150 Optional Accessories.......................................................................................... 154 Using the Camera Abroad............................................................................... 161 Precautions for Use.............................................................................................. 161 Camera Care and Storage................................................................................ 163 Warranty and Servicing..................................................................................... 164 NOTICES...................................................................................................................... 165 Index..............................................................................................166 x Before You Begin Read this section before using your camera for the first time. First-time user? Read this. Introduction........................................................2 1 Introduction Parts of the Camera First-time user? Read this. 1 2 3 4 5 6 7 14 8 9 10 11 12 13 Refer to the page to the right of each item. 1Up-down dial.................................5 2Mode dial lock release button........4 3Mode dial.......................................4 4Shutter-release button.........................18 5POWER button.............................15 6Hot shoe.....................................159 7Flash cover...................................22 2 8Strap eyelet 9External AF sensor 10 AF auxiliary light..................24, 124 11 F OPEN switch............................22 12 Ring cap.....................................156 13Lens 14Flash.............................................22 15 20 19 16 17 18 First-time user? Read this. 21 22 23 24 25 26 27 28 29 30 31 32 33 34 35 15 Autofocus/flash lamp............15, 19, 23 16 Picture display................................6 17 Common terminal for USB port/ AV output.......... 101, 105, 137, 140, 142 18 Connector for HDMI cable...........102 19 6 (playback) button............27, 89 20 ADJ. lever...............................5, 117 21 8 (enlarged view) button ................................. 20, 28, 29, 121 22 9 (thumbnail display) button ................................. 20, 28, 29, 121 23 $/F (flash) button.....................22 24 C/D button ....................................... 49, 89, 109 25 #/Fn1 (function 1) button........119 26 t (self-timer)/Fn2 (function 2)/ D (delete) button........... 24, 30, 119 27 "/N (macro) button.................21 28 O (DISP.) button...............25, 33 29 Connector cover.......... 101, 102, 105 30 DC power cable cover.................158 31Speaker 32 Release lever................................12 33 Battery/card cover........................12 34 Tripod screw hole 35Microphone 3 Mode Dial Press the mode dial lock release (1) and rotate the mode dial to choose a shooting mode (2). First-time user? Read this. P (program shift): You choose from combinations of shutter speed and aperture that produce the same exposure (page 36). A (aperture priority): You choose an aperture and let the camera adjust the shutter speed for optimal exposure (page 38). 5 (auto): The camera sets shutter speed and aperture for optimal exposure (page 18). MY1/MY2/MY3 (“my settings”): Recall settings saved using Reg. My Settings (pages 48, 112). 4 S (shutter priority): You choose a shutter speed and let the camera adjust aperture for optimal exposure (page 39). M (manual exposure): You choose shutter speed and aperture (page 40). 4 (scene): Shootings in the Dynamic Range/Interval Composite/Skew Correct/ Movies mode are available (page 42). Up-down dial First-time user? Read this. Up-down Dial and ADJ. Lever When viewing pictures or navigating the menus, you can use the up-down dial in place of the ! and " buttons and the ADJ. lever in place of the # and $ buttons. The ADJ. lever and up-down dial can also be used to select shutter speed and aperture in P, A, S, and M modes. ADJ. lever Note • You can assign frequently-used shooting menu items to the ADJ. lever for easy access (page 117). • Functions assigned to the up-down dial and ADJ. lever can be changed in M Mode Dial Options and Playback Mode Dial Options in the setup menu (page 121). 5 Picture Display Shooting (still photography) 1 11 12 2 3 4 10 M 2 Interval 17 First-time user? Read this. 13 14 18 29 30 NR DR DATE 31 1Flash mode............. 22 2Flash compensation ............................... 70 Manual flash level ............................... 71 3Scene mode............ 42 Continuous...............64 4Shooting mode ............................4, 36 Plus normal shooting ............................... 84 5Number of exposures remaining *........... 153 6Destination............. 14 7Snap focus distance.................. 60 8Picture size............. 53 9Aspect ratio............ 53 10 Picture quality........ 53 35 36 4:3 N 16 15 Shooting (movie mode) 5 6 7 8 9 10 37 VGA 640 19 20 21 22 23 24 25 26 27 28 32 33 34 11Self-timer............... 24 12 Macro mode........... 21 13Zoom...................... 20 14 Depth of field......... 56 Optional AF distance display.................... 56 15 Focus bar................ 56 16 Interval shooting.... 75 Multiple exposure shooting................. 68 17Autoexposure lock...................... 119 18 Tilt indicator........... 25 19 Focus mode............ 55 20 White balance mode ............................... 78 21Metering................ 61 22 Image setting......... 62 23Bracketing.............. 67 24Histogram.............. 34 25 Noise reduction...... 73 26 Dynamic range compensation........ 72 27 Date imprint........... 76 28 Blur warning.......... 20 29Aperture ....................36, 38, 40 30 Shutter speed ....................36, 39, 40 31Exposure compensation........ 77 32ISO.......................... 82 33 Eye-Fi connection.......8 34 Battery level............. 8 35 Movie length 36 Time available * 37 Frame rate.............. 87 * Approximation only; actual capacity varies with shooting conditions and make of memory card. Display shows “9999” when memory remains for over 9,999 images. 6 Playback (photographs) 1 23 4 5 Playback (photographs) 6 7 8 9 10 11 10 M 4:3 N VGA 2011/01/01 00:20 12 13 14 :Start 2011/01/01 00:20 15 16 17 18 1File number.......... 132 2Current frame 3Total frames 4Eye-Fi transferred images..................... 8 5Playback mode indicator 6Protected image..... 90 7DPOF print indicator................. 92 8Source.................... 14 9Picture size............. 53 First-time user? Read this. 19 20 640 10 Aspect ratio............ 53 11 Picture quality........ 53 12 Date of recording ............................... 17 13Aperture ....................36, 38, 40 14ISO.......................... 82 15Exposure compensation........ 77 16 Shutter speed ....................36, 39, 40 21 22 17 Eye-Fi connection ................................. 8 18 Battery level............. 8 19 Length/elapsed time ............................... 88 20 Progress indicator ............................... 88 21 White balance........ 78 22 White balance compensation........ 81 7 Battery Level Indicator Icon (green) First-time user? Read this. (green) (orange) Status Battery fully charged. Battery partially discharged. Low battery. Charge or replace the battery. Note • If using NiMH batteries, the battery level may not be displayed correctly depending on the type of the batteries or conditions. Eye-Fi Connection When using an Eye-Fi card (page 13), the connection status is displayed in the shooting and playback modes. Icon Status Not connected Connecting Waiting for data transfer Transferring Connection terminated Transferred images Eye-Fi card information acquisition error • Turn the camera off and on. If the issues still persist, there may be something wrong with the card. 8 Basic Photography and Playback First-time user? Read this. Read this section before using your camera for the first time. First Steps..........................................................10 Taking Photographs........................................18 Viewing and Deleting Photographs...............27 9 First Steps Prepare the camera for use. Charging the Battery First-time user? Read this. The rechargeable battery supplied with the camera is not charged at shipment. Charge the battery in the supplied BJ-6 battery charger before use. the battery in the charger. 1Place Place the battery label up with the “+” and “–” labels oriented to match the labels on the charger. Caution • Be sure the battery is in the correct orientation. the charger in. 2Plug The charger lamp will light while the battery charges. Note • An exhausted battery will be fully charged in about two and a half hours at 25 °C. • If the charger lamp blinks, a battery or charger fault may have occurred. Unplug the charger and remove the battery. • Charging is complete when the charger lamp turns off. 3Remove the battery. 10 Tip: Compatible Batteries • The camera can be used with a DB-65 rechargeable Li-ion battery (supplied), DB-60 rechargeable batteries or with a pair of AAA alkaline or rechargeable nickel-metal hydride (NiMH) batteries. First-time user? Read this. Tip: Battery Capacity • Under normal conditions, about 390 shots can be taken with a fully-charged DB-65 battery. About 30 shots can be taken with a pair of fresh AAA alkaline batteries. These figures are based on tests conducted according to CIPA standards under the following conditions: temperature 23 °C (73 °F); picture display on; 10 shots taken with 30 seconds between shots and the flash fired with every other shot; and the cycle repeated after the camera has been turned off and then on again. Caution • Rechargeable Li-ion batteries: Use only genuine DB-65 or DB-60 batteries. • Alkaline batteries: Battery life varies with make and storage conditions. Capacity drops at low temperatures. • NiMH batteries: Note that performance may be impaired immediately after purchase or following an extended period of disuse, and that the batteries may need to be used and recharged two or three times before they will hold a charge. • Manganese and Ni-Cd batteries cannot be used. • Batteries may be hot immediately after use. Before removing batteries, turn the camera off and wait for them to cool down. 11 Inserting the Battery and a Memory Card Be sure the camera is off before inserting or removing batteries and a memory card. First-time user? Read this. SD memory card or SDHC memory card can be used with this camera (“memory card” indicates SD and SDHC memory cards in this guide). the battery/card cover. 1Open Unlatch (1) and open (2) the cover. 2 Insert a memory card. Holding the memory card in the orientation shown, slide it in until it clicks into place. 1 2 the battery. 3Insert Using the battery to keep the battery latch pressed to one side, slide the battery in. The latch will click into place when the battery is fully inserted. the battery/card cover. 4Close Close (1) and latch (2) the cover. Caution • Be sure the cover is latched. 12 1 2 Removing the Battery and a Memory Card Unlatch and open the battery/card cover, press and release the battery latch and remove the battery by hand, being careful not to drop it. Tip: Inserting AAA Batteries • Insert in the orientation shown, press the cover closed, and slide the release lever to the closed position. First-time user? Read this. Press the memory card in to eject it. The card can then be removed by hand. Caution • If the camera will not be used for an extended period, remove the batteries and store them in a cool dry place. Tip: Eye-Fi Cards • Eye-Fi X2 series cards (SD memory cards with built-in wireless LAN function) can be used with this camera. For more information on Eye-Fi cards, access the Web page of Eye-Fi (http://www. eye.fi/). • When using an Eye-Fi card, the following settings are displayed in the setup menu (page 111). • Eye-Fi Connection Settings: Enables or disables the wireless LAN function of a compatible memory card. • Eye-Fi Connection Display: Displays the SSID for the wireless LAN. • This product does not guarantee the functions of Eye-Fi card (including wireless transfer). If any issues arise with an Eye-Fi card, consult the card manufacturer. Eye-Fi cards can be used only in the country in which the cards were purchased. For confirming whether the use of the card has been approved in the country, consult the card manufacturer. 13 Destination to Record Pictures taken with this camera can be recorded to the internal memory or a memory card. When a memory card is not set in the camera, data is recorded in the internal memory. First-time user? Read this. 14 The data in the internal memory can be copied to a memory card (page 94). Caution • Pictures will not be recorded to the internal memory when a memory card is inserted, even if the memory card is full. Note • Format memory cards before first use or after they have been used in a computer or other device (page 123). • See page 153 for information on memory card capacity. Turning the Camera On and Off Shooting Mode Press the POWER button to turn the camera on. To turn the camera off, press the POWER button again. The number of pictures taken so far that day will be displayed before the camera turns off (zero is displayed if the camera clock is not set). First-time user? Read this. The POWER button will light and the camera will play the start-up sound. The autofocus/flash lamp blinks for several seconds while the camera starts up. 15 Playback Mode Press the 6 button for about a second to turn the camera on in playback mode. First-time user? Read this. 16 Press the 6 button again to turn the camera off. Note • The camera will turn off automatically to save power if no operations are performed for the time selected in the Auto Power Off menu (page 125). • If Sleep Mode is set in the setup menu, the camera dims the display automatically to save power after a set period of time (page 126). • If On is selected for LCD Auto Dim in the setup menu, the camera dims the display automatically to save power when no operations are performed for five seconds (page 126). • The power indicator lamp can be set to On or Off in Power Button Lamp in the key custom settings (page 121). Basic Setup A language-selection dialog is displayed the first time the camera is turned on. Follow the steps below to choose a language and set the time and date. light a language and press C/D to select. To exit before setup is complete, press the DISP. button. the clock. 2Set Press # or $ First-time user? Read this. a language. 1Select Press !, ", #, or $ to high- to highlight the year, month, day, hour, minute, or date format and press ! or " to change. Press C/D. A confirmation dialog will be displayed. 3Press C/D. Note • If you leave the battery in the camera for at least two hours, the battery can be removed for about a week without resetting the clock or language selection. • The language, time, and date can be changed in the setup menu (page 111). 17 Taking Photographs After setting up the camera as described in “First Steps” (page 10), you are ready to take your first photos. First-time user? Read this. Taking a Photograph 1Rotate the mode dial to 5. 2Focus. Frame your subject in the cen- AUTO 9999 10 M 4:3 N ter of the picture display and press the shutter-release button halfway to set focus and exposure. The focus frames (up to nine) that contain objects that are in focus are shown in green. the picture. 3Take Gently press the shutter-release button the rest of the way down to take the picture. The photograph you have just taken will be displayed in the picture display. 18 Tip: Focus • The autofocus/flash lamp and the focus frame show whether the subject is in focus. Autofocus/flash lamp Focus status Focus frame Autofocus/flash lamp Camera has not yet focused. White Off Subject in focus. Green On (green) Red (blinks) Blinks (green) Camera unable to focus. First-time user? Read this. Focus frame • The camera may be unable to focus or a subject may not be in focus even if focus frames are displayed in green in the following cases. • Objects that lack contrast, such as the sky, a wall that is only one color, or the hood of a car • Flat objects containing only horizontal lines • Fast-moving objects • Objects that are poorly lit • Objects with bright reflections or backlighting • Flickering objects, such as fluorescent lights • Point light sources, such as light bulbs, spotlights, or LEDs If the camera is unable to focus, lock focus on another object at the same distance from the camera as your subject, then recompose the photograph and take the picture. 19 First-time user? Read this. Tip: Avoiding Blurred Pictures • In situations in which photographs are especially prone to blurring caused by camera shake, attempt one of the following remedies: • Selecting On for Camera Shake Correction in the shooting menu (page 74) • Turning the flash on or using auto flash ( page 22) • Choosing a higher ISO (page 82) • Using the self-timer (page 24) Note • You can choose how long a picture is displayed after shooting in LCD Confirmation Time in the setup menu (page 125). If selecting Hold, a picture is displayed until the shutter-release button is pressed halfway next time. Digital Zoom When Digital Zoom is selected for Zoom Button in the key custom settings, the 8 button can be used to zoom in to a maximum of 4.0 ×. Use the 9 button to zoom out. digital zoom to the 8 and 9 buttons. 1Assign Select Digital Zoom for the Zoom Button option in the key custom settings (page 121). the picture using the 8 and 9 buttons. 2Frame The zoom ratio is shown in the picture display. 3Take the picture. 20 Close-ups (Macro Mode) Use macro mode for close-ups of small objects as close as 1.0 cm (0.4 in.) to the lens (at this distance, the area photographed will be about 26 × 19 mm/1.0 × 0.7 in.). First-time user? Read this. Note • j 4:3 F or j 4:3 N is selected for Picture Quality/Size (page 53), Auto Resize can be selected for Digital Zoom Image (page 131). • Digital zoom is not available in the dynamic range, interval composite, and multiple exposure modes or when a RAW-quality option is selected for Picture Quality/Size. the N button. 1Press A N icon will be briefly dis- played in the center of the picture display. N will then appear at the top of the display. the picture. 2Take To exit macro mode, press the AUTO 9999 10 M 4:3 N N button again. Note • The camera will focus using spot autofocus in macro mode (page 55). 21 Flash The following flash modes are available. Mode Description Flash On The flash fires with every shot. First-time user? Read this. Auto The flash fires automatically when required (default). Red-Eye Flash Reduces “red-eye” in portraits taken with the flash. Combines the flash with slow shutter speeds. Use when Flash taking portraits that include details of the background Synchro. indoors or at night. Use of a tripod is recommended to prevent blur. Manual Flash The flash fires with every shot; flash output is fixed at the level selected for Manual Flash Amount in the shooting menu (page 71). Flash Off The flash will not fire. Using the Built-in Flash the flash. 1Raise Slide the F OPEN shown. 22 switch as a flash mode. 2Select Press the F button and press Note • To close the flash when it is not in use, gently press the center of the flash cover down until it latches. • The flash has a range of approximately 20 cm to 3.0 m (8 in.–10 ft.), measured from the front of the lens (auto ISO; see page 82). • If the camera is powered by AAA batteries, the picture display will turn off until charging is complete. • A pre-flash is fired before the main flash to achieve optimal exposure. • Flash amount can be adjusted in Flash Exposure Compensation in the shooting menu (page 70). First-time user? Read this. # or $ to select a flash mode. The flash mode icon is briefly displayed in the center of the picture display and then appears in the top left corner of the display. The autofocus/flash lamp blinks while the flash charges. Photos can be taken when the lamp stops blinking. Caution • The flash turns off automatically in dynamic range, internal composite, movie, continuous, and bracketing modes. • Do not use the built-in flash with conversion lenses or lens hoods. 23 Self-Timer First-time user? Read this. The self-timer can be set to two seconds or a custom setting. Two-second timer is useful for preventing blur caused by the camera movement when the shutter-release button is pressed. The number of pictures and the shooting interval can be set for a custom setting in Custom Self-Timer in the shooting menu (page 74). a self-timer mode. 1Choose Press the t button once to AUTO 9999 10 M 4:3 N 2 select the two-second timer and again to select the custom setting. The current selection is displayed in the picture display. Pressing the button a third time turns the timer off. the timer. 2Start Press the shutter-release button to lock focus and start the timer. Note • The selected self-timer mode remains in effect until a new mode is chosen or the camera is turned off. • When two-second timer is selected, the AF auxiliary light does not light. • By default, the self-timer is assigned to the t (Fn2) button, but it can also be assigned to the Fn1 button. The self-timer can only be used when assigned to a button (page 119). • Custom setting is not available for the interval composite shooting and skew correct mode in scene mode, and multiple exposure shooting. 24 Tilt Indicator Use the tilt indicator to level the camera and correct the perspective when photographing buildings or landscapes. button until level setting options are displayed. an option. 2Highlight Press ! or " to highlight an option: Option Off First-time user? Read this. level setting options. 1Display Press and hold the O (DISP.) Description Tilt indicator is not displayed. Level + Displays the tilt and level indicator at the bottom of the Tilt picture display (default). Level Displays the tilt indicator at the bottom of the picture display. Displays the tilt indicator at the bottom of the picture Level + display, and a beep sounds at a regular interval when the Sound camera is level. Sound A beep sounds at a regular interval when the camera is level. The tilt indicator is not displayed in the picture display. the highlighted option. 3Select Press C/D to select the highlighted option. 25 Understanding the Tilt Indicator AUTO 9999 10 M 4:3 N AUTO 9999 First-time user? Read this. Green 4:3 N Orange Camera level AUTO 10 M 9999 Tilt camera left to level 10 M 4:3 N Orange Tilt camera backward to level AUTO 9999 10 M 4:3 N Red Unable to measure tilt; camera rotated too far forward or backward Note • Tilt indicator can also be set in Level Setting in the setup menu (page 126). • The standard perspective can be registered in Level (Tilt) Calibration in the setup menu (page 126). • When Volume Settings is set to Off, a beep does not sound even if the level sound function is set. Caution • The tilt indicator is not displayed when the camera is upside down, movies are being recorded, or in the interval shooting. • The tilt indicator is intended as a guide only and should not be used as a spirit level or in other applications in which a high degree of precision is required. Accuracy drops when the camera is in motion or you are shooting on a vehicle or other moving platform. 26 Viewing and Deleting Photographs Pictures can be viewed in the picture display. Viewing Photographs play a picture in the playback mode. First-time user? Read this. to the playback mode. 1Switch Press the 6 button to dis- a picture. 2Display Press $ to view subsequent pictures, # to view in reverse order. Press " to skip ahead ten frames, ! to go back ten frames. Press the 6 button again to exit to shooting mode. Note • The display order can be selected from File Numbers or Sht. Date/Time in Playback Order Options in the setup menu (page 130). Tip: Auto Rotate • If On is selected for Auto Rotate in the setup menu, pictures will be automatically displayed in the correct orientation in the picture display (page 129). 27 Viewing Multiple Photographs Use the 9 and 8 buttons to view a picture in a single frame, multiple pictures in 20/81 frames or calendar display, or 20 frames sorted by date. First-time user? Read this. Single frame 4:3 N 2011/01/01 00:20 20 frames Last File 81 frames 4:3 N 2011/01/01 00:20 2011/01/01 ŔŢŵŶųťŢź 37/37 Pics Calendar Playback 2011.01.01 Saturday 1/37 Pics 20 frames sorted by date Calendar Press !, ", #, and $ to highlight a picture, and press the ADJ. lever in to view the picture in a single frame view. Press the DISP. button to switch between a single-frame view and multiple-frame view. 28 Playback Zoom Press the 8 button or rotate the up-down dial to zoom in on the photo currently displayed full frame. To zoom in to the magnification selected in One Press Zoom Ratio (page 128), press the ADJ. lever in. Use Description 8/9 Zoom in and out. Press !, ", # or $ to move the display area. Up-down Rotate right to zoom in, left to zoom out. dial C/D Zoom in to the magnification selected in One Press Zoom Ratio (page 128). ADJ. lever Press left or right to view a preceding or next image at the same zoom ratio. The playback zoom is canceled automatically if a movie or a picture taken in the S-Cont or M-Cont mode is displayed. First-time user? Read this. The following operations are available: Note • Maximum magnification varies with image size: Image size (pixels) Maximum magnification a 6.7 × j/i/g/h/e/c z/o* 16 × 3.4 × * Only when RAW only is selected for RAW/JPEG Setting in the setup menu (page 130). • The functions assigned to the up-down dial and the ADJ. lever can be changed in Playback Mode Dial Options in the key custom settings (page 121). 29 Deleting Photographs Deleting Individual Photographs a photograph you want to delete. 1Display Display a photograph you want to delete in singleFirst-time user? Read this. frame playback (page 27). 2Press the D button. Delete One. 3Highlight Press ! or " to highlight Delete One. 4Press C/D. Deleting All Files To delete all files, press the D button to display delete options and select Delete All. A confirmation dialog will be displayed; press # or $ to highlight Yes and press C/D. 30 Deleting Multiple Files the D button. 1Press In multi-frame playback, proceed to Step 2. Sel. Indiv. or Sel. Range. 2Select To select images one at a time, highlight Sel. Indiv., press C/D, and proceed to Step 3. To select a range, highlight Sel. Range, press C/D, and proceed to Step 3.1. To exit without deleting files, press the DISP. button. photographs. 3Select Press !, ", #, or $ to high- photos and press C/D to select. Selected pictures are marked with D icon. To deselect a photo, highlight it and press C/D again. Last File Delete 10 M First-time user? Read this. In single-frame playback, delete options will be displayed. Highlight Delete Multi and press C/D. 4:3 N light OK Sel/Cancel Delete 31 Tip: Selecting Ranges First-time user? Read this. 3.1Press !, ", #, or $ to highlight the first image and press C/D to select. The selected image is marked with D icon. If you selected a wrong image, press the DISP. button and try again. 3.2Press !, ", #, or $ to highlight the last image and press C/D to select. The selected image and images in the range will be marked with D icon. 27/99 Delete OK End End DISP. 4:3 N 10 M 4:3 N Cancel 30/99 Delete OK DISP. 10 M Cancel • Repeat Steps 3.1 and 3.2 to select additional ranges. • To select or deselect individual photos, press the ADJ. lever in to switch to Sel. Indiv. mode. D. 4Press A confirmation dialog will be displayed. Yes. 5Select Press # or $ to highlight Yes and press C/D. 32 O (DISP.) Button Use the O (DISP.) button to choose the information displayed in the picture display. Indicators displayed Indicators + histogram 10 M 4:3 N 10 M Framing grid (no indicators) 4:3 N Monitor off First-time user? Read this. Shooting Mode Press the O (DISP.) button to cycle through the following displays: No indicators Display Description Indicators displayed Displays indicators for shooting modes and settings. If a display option is selected for the level setting (page 25), the tilt indicator is displayed. Indicators+ Displays the indicators for shooting modes and settings, histogram and the histogram (not available in movie mode). Displays the framing grid guide. Framing grid The type of grid can be selected in Grid Guide Display Options in the setup menu (page 127). No indicators Displays no indicators. 33 Display Description First-time user? Read this. Turns the monitor off. Select this mode to save power or for using an optional external viewfinder. The monitor will turn on in the following cases. Monitor off • When the ADJ. lever, C/D, DISP., 6, 8, or 9 is pressed. • When ! or " is pressed in the manual focus mode. Note • REC icon blinks and the recording time and remaining time are displayed in the picture display while shooting a movie regardless of the display mode. Playback Mode Press the O (DISP.) button to cycle through the following displays: Indicators displayed 10 M Details + histogram 4:3 N 10 M 4:3 N 10 M 4:3 N F 1.9 1/48 ISO 125 EV 0.0 A:0, G:0 C: 5 S: 5 2011/01/01 00:20 2011/01/01 00:20 White Saturation Display 2011/01/01 00:20 No indicators 34 Highlights Note • If On is selected for White Saturation Display in the setup menu (page 129), the white saturation areas of the image flash in black in the Highlights display. • Details for shooting settings are displayed in the details+histogram display, and the pages can be switched using ! and " buttons. Reference Read this section for more information on camera functions. More on Photography.....................................36 Movies...............................................................86 More on Playback.............................................89 Printing Photographs....................................104 The Setup Menu.............................................109 Downloading Images to Your Computer.....135 Technical Notes..............................................144 35 More on Photography This section provides information on P, A, S, M, 4, and “MY” modes and on using shooting menu options. Mode P: Program Shift More on Photography In mode P (program shift), use the up-down dial to choose from several combinations of shutter speed and aperture, all of which produced the same exposure. mode P. 1Choose Rotate the mode dial to P. The AUTO 9999 10 M 4:3 N AUTO 9999 10 M 4:3 N shooting mode is shown by an icon in the display. exposure. 2Measure Press the shutter-release but- ton halfway to measure exposure. The current shutter speed and aperture appear in the display. F 3.2 1/80 shutter speed and aperture. 3Choose Remove your finger from the shutter-release button and rotate the up-down dial to select a combination of shutter speed and aperture. 36 Note • Shutter speed and aperture can be adjusted for ten seconds after you remove your finger from the shutter-release button. the photograph. 4Take Gently press the shutter-release button all the way down to take the photograph. Ev6 Ev7 Ev8 Ev9 More on Photography Note: The Exposure Program • The exposure program (ISO 100, flash off ) is shown below. The shaded area gives the combinations of shutter speed and aperture available at each exposure value (EV). Ev10 Ev11 Ev12 Ev13 Ev14 Ev15 Ev16 Ev17 Ev18 Ev19 Ev5 F16 Ev4 F11 Ev3 F9.0 Ev2 F8.0 F5.6 F4.0 Ev0 F2.8 Ev-1 F1.9 Ev-2 Aperture Ev1 F2.0 F1.4 F1.0 8 4 2 1 1/2 1/4 1/8 1/15 1/30 1/60 1/125 1/250 1/500 1/1000 1/2000 1/4000 Shutter speed (seconds) 37 Mode A: Aperture Priority In mode A (aperture priority), you choose the aperture and the camera selects the shutter speed. Choose large apertures (low f-numbers) to emphasize the main subject by blurring background and foreground details. Choose small apertures (high f-numbers) to bring both the background and main subject into focus. More on Photography mode A. 1Choose Rotate the mode dial to A. AUTO 9999 10 M 4:3 N The current aperture is displayed in orange. an aperture. 2Choose Rotate the up-down dial to F 1.9 choose an aperture. Your selection only takes effect when the photo is taken; the effect cannot be previewed in the picture display. AUTO 3 Press the shutter-release button halfway. Press the shutter-release button halfway to set focus and exposure. The shutter speed selected by the camera will be F 1.9 1/32 displayed in the picture display. 9999 10 M 4:3 N the photograph. 4Take Gently press the shutter-release button the rest of the way down to shoot. Note • If On is selected for Auto Aperture Shift in the shooting menu 38 (page 83), the camera will adjust aperture for optimal exposure. Mode S: Shutter Priority In mode S (shutter priority), you choose the shutter speed and the camera selects the aperture. Choose fast shutter speeds to “freeze” motion, slow shutter speeds to suggest motion by blurring moving objects. AUTO 9999 10 M 4:3 N 9999 10 M 4:3 N More on Photography mode S. 1Choose Rotate the mode dial to S. The current shutter speed is displayed in orange. shutter speed. 2Choose Rotate the up-down dial to 1/32 choose a shutter speed. AUTO 3 Press the shutter-release button halfway. Press the shutter-release button halfway to set focus and exposure. The aperture selected by the camera will be F 1.9 1/32 displayed in the picture display. ISO 100 the photograph. 4Take Gently press the shutter-release button the rest of the way down to shoot. Note • Maximum aperture (the lowest possible f-number) may not be selected at slow shutter speeds, even when the subject is poorly lit. 39 • If On is selected for Shutter Speed Auto Shift in the shooting menu (page 83), the shutter speeds are adjusted automatically to achieve optimal exposure when overexposed or underexposed. • The monitor is off while shooting in a slow shutter speed. Caution • Noise reduction is applied to an image if the shutter speed is set to more than 10 seconds. It may take a while to save the image. Mode M: Manual Exposure More on Photography In mode M (manual exposure), use the up-down dial to choose aperture and the ADJ. lever to select a shutter speed. mode M. 1Choose Rotate the mode dial to M. The AUTO 9999 10 M 4:3 N shooting mode, exposure indicator, and current aperture and shutter speed appear in the display. an aperture and shutter speed. 2Choose Rotate the up-down dial to 40 choose an aperture and press the ADJ. lever left or right to –2 EV +2 EV select a shutter speed (if desired, the roles of the two controls can be reversed; see page 121). The effects can be previewed in the picture display and are reflected in the exposure indicator (if the image would be under- or over-exposed by more than 2 EV, the effects cannot be previewed and the indicator will turn orange). the shutter-release button halfway. 3Press Press the shutter-release button halfway to focus. the photograph. 4Take Gently press the shutter-release button the rest of the way down to shoot. More on Photography Note • If Auto or Auto-Hi is selected for ISO Setting (page 82), ISO will be set to a value between 100 and 400 while the camera is in manual exposure mode. • Functions assigned to 8 and 9 buttons, up-down dial, and ADJ. lever which are used in mode M can be changed in M Mode Dial Options and One Press M Mode in the key custom settings (pages 121 and 122). • B (Bulb) or T (Time) can be selected for the shutter speed in mode M. In the B setting, the shutter is opened to expose while the shutter-release button is pressed. In the T setting, press the shutter-release button to open and close the shutter. The shooting ends automatically after 180 seconds elapsed. You can use an optional CA-2 cable switch wired remote shutter release. In the B and T settings, the following functions are not available. • Self-timer • Interval shooting • Bracketing • One Press M Mode • If setting Continuous Mode in the shooting menu when B or T is selected, the shutter speed will be automatically set to 180 seconds. B or T setting cannot be selected if Continuous Mode has been selected. Caution • Noise reduction is applied to an image if the shutter speed is set to more than 10 seconds. It may take a while to save the image. 41 4 Mode: Matching Settings to the Scene Select 4 mode to shoot movies or to choose from one of the following subject types. Camera settings are automatically optimized for the selected subject type. Option Description More on Photography Dynamic Range Choose for natural contrast when photographing subjects that are partly in the shade on a sunny day and other high-contrast scenes (page 44). Interval Composite Synthesizes the bright parts of images which are taken in the interval shooting. This mode is useful for capturing the trail of stars and the moon etc (page 45). Reduce the effects of perspective when photographSkew Correct ing rectangular objects, such as message boards or Mode business cards (page 47). Movie Shoot movies with sound (page 86). To select a scene mode option: the mode dial to 4. 1Rotate The option currently selected for 4 mode is displayed in the picture display. 42 AUTO 9999 10 M 4:3 N C/D. 2Press A menu of scene mode options will be displayed. an option. 3Select Press ! or " to highlight an option and press 4Shoot. • Dynamic range mode: See page 44. • Interval composite mode: See page 45. • Skew correct mode: See page 47. • Movie mode: See page 86. More on Photography C/D to exit to the selected shooting mode. 43 4 Mode: Dynamic Range Each time the shutter-release button is pressed, the camera takes two shots at different exposures, then combines the areas that are correctly exposed to create a single composite image with natural contrast, reducing loss of detail in highlights and shadows. More on Photography 1Mount the camera on a tripod. 2Shoot. Gently press the shutterrelease button all the way down. The camera will take two pictures and combine them to create a single image with an enhanced dynamic range. Note • Dynamic range shooting requires more time to create an exposure than other modes. Use a tripod. Note that the camera may move when the shutter-release button is pressed, even if mounted on a tripod. This can be prevented by using the self-timer (page 24) or an optional CA-2 cable switch wired remote shutter release. • The following shooting menu options are available in dynamic range mode: • Dynamic Range Expansion: Choose amount by which dynamic range is enhanced (page 84). • Plus Normal Shooting: Choose On to record two copies of each photo, one with normal exposure and another with enhanced dynamic range (page 84). 44 • Dynamic range shooting is also available by selecting Dynamic Range Compensation in the shooting menu (page 72). 4 Mode: Interval Composite The bright parts of the pictures taken in the interval shooting are synthesized to create a single composite image. This mode is useful for capturing the trail of stars and the moon etc. More on Photography Caution • The flash turns off, digital zoom cannot be used, and RAWquality options cannot be selected for Picture Quality/Size (page 53). • The desired effect may not be achieved if the scene is too bright or too dark. • Moving subjects may be blurred. • Flicker from fluorescent lights may affect colors and brightness. Set Interval Composite Time and Save Interval Composite Img. in the shooting menu beforehand (pages 84 and 85). 1Mount the camera on a tripod. a test shot in mode M. 2Take Set up a composition and adjust the exposure, shut- ter speed, ISO sensitivity, white balance, and focus settings. 3Select Interval Composite in scene mode. 45 shooting. 4Start Press the shutter-release button. Photographs will be taken automatically at the selected interval. To confirm the image in process, press the shutterrelease button halfway. Pressing the shutter-release button all the way down saves the image, and start another interval composite shooting. shooting. 5End Press C/D to end shooting when all the deMore on Photography 46 sired photographs have been taken. Caution • The following functions are not available in interval composite mode. • Flash • Digital zoom • If C/D is pressed while image synthesis is in process, the image will not be synthesized. Note • The values for the first shot are applied to the following settings of the succeeding shots. • Auto or Auto-Hi setting of ISO Setting • Auto setting of White Balance • Autofocus and self-timer are available for the fist shot only. • Setting ∞ for focus mode, and 1 second for Interval Composite Time are recommended for capturing the trail of stars. • ISO settings over ISO 800 are not available. • Shutter speeds longer than 60 seconds are not available. • If ISO 800 is selected, or ISO 400 is selected when the shutter speed is set to 60 seconds, MAX setting is automatically applied to Noise Reduction. • Confirm that a star is displayed in a dot in a test shot. The dots will create a star trail when images are synthesized. • Use an optional external viewfinder (GV-1/GV-2) when shooting under low light condition. 4 Mode: Skew Correct Mode To take pictures in skew correct mode, frame the subject so that it occupies as much of the frame as possible. a photograph. 1Take Press the shutter-release button to take a photo- a correction area. 2Select Press $. Press ! to record the photograph without correcting perspective. Press C/D. 3 Skew Correct Mode More on Photography graph. If the camera detects an object that can be used to correct perspective, a message will be displayed with the object shown by an orange frame. The camera can detect up to five objects. Ļ 2nd Corr Cancel OK Execute Caution • The camera records two images each time the shutter is released: the unmodified photograph and a copy that has been processed to correct perspective. No photograph will be taken if memory is insufficient to record two images. • The camera may not be able to correct perspective if: • The subject is out of focus. • The four edges of the subject are not clearly visible. • There is little contrast between the subject and the background. • The background contains many fine details. • AE/AF target selection is not available in skew correct mode. 47 Note • The Skew Correction option in the playback menu can be used to correct perspective in existing photographs (page 95). • a 4:3 F and z 4:3 F are the available options for Picture Quality/Size in skew correct mode. “MY” Modes: Using Custom Settings More on Photography To take photos using settings saved with the Reg. My Settings in key custom settings (page 112), rotate the mode dial to MY1/ MY2/MY3. the mode dial to MY1, MY2, or MY3. 1Rotate The shooting mode saved usAUTO 9999 10 M 4:3 N ing Reg. My Settings will be displayed in the picture display. 2Take the photograph. Note • Settings can be adjusted in “MY” modes. The settings saved with Reg. My Settings are restored when another mode is selected or the camera is turned off. Tip: Choosing a Shooting Mode • To choose a shooting mode in “MY” mode without changing other settings, use the Switch Shooting Mode option in the shooting menu (page 84). Switch Shooting Mode is not available in “MY” modes for which a scene mode is selected. 48 The Shooting Menu Use the !, ", #, $, and C/D buttons to navigate the menus. the shooting menu. 1Display In modes other than 4, pressing the C/D button in shooting mode displays the shooting menu. Scroll bar shows position in menu More on Photography Tip: 4 Mode • In scene mode, pressing C/D displays the mode menu; press # to highlight the mode tab, " to display the shooting menu, and $ to place the cursor in the menu. a menu item. 2Select Press ! or " to highlight a menu item and press $ to display options for the highlighted item. an option. 3Select Press ! or " to highlight an option. Press C/D to select and exit to shooting mode, or press # to select and return to the shooting menu. 49 The items available in the shooting menu vary with the shooting mode. 5, P, A, S, M, MY1, MY2, MY3 and Multiple Exposure Shooting Modes Option Picture Quality/Size Focus Snap Focus Distance Multi AF Auto Full Press Snap On Pre-AF Off More on Photography Exposure Metering Image Settings Continuous Mode 1 Auto Bracket 1 Multiple Exposure Shooting Flash Exposure Compensation Manual Flash Amount Flash Synchro Settings Dynamic Range Compensation 1 Noise Reduction Noise Reduction ISO Move Target Setting Camera Shake Correction 50 Default Page j 4:3 N 53 Multi Standard Off Off Option 55 Custom Self-Timer 1 60 60 61 Interval Shooting 61 Date Imprint 62 Exposure Compensation 2 64 White Balance 67 White Balance Compensation Automatic Exposure: On ISO Setting Save Each 68 Magnification Ratio Image: Off (MF) Saving Restore Defaults 3 image: Off Auto Aperture Shift 4 0.0 70 Shutter Speed Auto 5 1/2 71 Shift Default Page Pictures: 2 Pics Interval: 5 seconds 74 OO Hour OO 75 Min. OO Sec. Off 76 0.0 77 Multi-P AUTO 78 A: 0; G: 0 81 Auto 82 2 × 83 — 83 Off 83 Off 83 6 — 84 71 Switch Shooting Mode 1 Not available in multiple exposure shooting Off 72 mode. 2 Not available in mode M. Off 73 3 5 mode only. Over ISO 401 73 4Mode A only. AF 74 5Mode S only. 6Mode MY1, MY2 or MY3 only. On 74 1st Curtain 4 Mode: Dynamic Range Option Dynamic Range Expansion Plus Normal Shooting Picture Quality/Size Focus Snap Focus Distance Pre-AF Weak 84 Off 84 j 4:3N 53 Multi AF 55 2.5 m 60 Off 61 Multi 61 Image Settings Standard Noise Reduction Off Noise Reduction ISO Page Default Page Move Target Setting Option AF 74 Custom Self-Timer Pictures: 2 Pics Interval: 5 seconds 74 Date Imprint Off 76 Exposure Compensation 0.0 77 White Balance White Balance 62 Compensation 73 ISO Setting Over ISO 401 73 Magnification Ratio (MF) Multi-P AUTO 78 A: 0; G: 0 81 Auto 82 2 × 83 Default Page 4: Interval Composite Option Default Page Option Interval Composite Time 0h00m00s 84 Noise Reduction ISO Save Interval Composite Img. 85 Picture Quality/Size Focus Exposure Metering Image Settings Off Camera Shake Correction j 4:3N 53 Date Imprint Multi AF Multi Standard Off 72 Noise Reduction Off 73 On 74 Off 76 78 A: 0; G: 0 81 ISO Setting Auto 82 Magnification Ratio (MF) 2 × 83 61 White Balance Compen62 sation Dynamic Range Compensation Over ISO 401 73 Auto 55 White Balance More on Photography Exposure Metering Default 51 4 Mode: Skew Correct Mode Option Picture Quality/Size Focus Default Snap Focus Distance 2.5 m Full Press Snap On Pre-AF Off Exposure Metering Multi Image Settings Option Standard 60 Flash Synchro Settings 60 Date Imprint Default Page 0.0 70 1st Curtain 71 Off 76 0.0 77 61 Exposure Compensation Multi-P AUTO 78 61 White Balance More on Photography 62 ISO Setting Magnification Ratio (MF) Auto 82 2 × 83 Default Page 4 Mode: Movie Option Movie Size Frame Rate Focus Snap Focus Distance Pre-AF 52 Page a 4:3N 53 Flash Exposure Multi AF 55 Compensation Default z 640 Page Option 87 White Balance 30 Frame/Sec 87 White Balance Multi AF 55 Compensation 2.5 m Off 60 Magnification Ratio (MF) 61 Multi-P Auto 78 A: 0, G: 0 81 2 × 83 Picture Quality/Size Picture quality (RAW, fine, and normal) and size (dimensions in pixels) determine the number of photographs that can be stored in internal memory or on a memory card (page 153). The following options are available: o 4:3 Option o 3:2 Quality j 4:3 F Fine o 1:1 2,736 × 2,736 j 4:3 N (default) Normal i 3:2 N Normal g 16:9 F Fine Fine g 16:9 N Normal g 1:1 N Normal g 1:1 F h 4:3 F Fine a 4:3 F z 4:3 F 3,648 × 2,736 3,648 × 2,432 3,648×2,048 2,736 × 2,736 3,264 × 2,448 e 4:3 F c 4:3 F 3,648 × 2,432 3,648 × 2,048 More on Photography o 16:9 RAW i 3:2 F Size 3,648 × 2,736 2,592 × 1,944 Fine 2,048 × 1,536 1,280 × 960 640 × 480 53 Tip: Picture Quality • The camera supports the following picture qualities: • Normal: JPEG compression is used to reduce file size. • Fine: Compression is reduced for improved quality. File size increases, reducing number of photos that can be recorded. • RAW: Raw image data are saved in DNG format; JPEG copies are also created. The camera displays only the JPEG copy; DNG files can be viewed and edited on a computer using the supplied MediaBrowser (Windows only) or commercially-available applications that support the DNG format. More on Photography Note • Images with the aspect ratio of 3:2/1:1/16:9 are displayed surrounded by a black border in the picture display. • Picture Quality/Size can be assigned to the ADJ. lever in ADJ Lever Setting (page 117). • The Fn buttons can be used to switch file formats if JPEG>RAW is selected for Fn Button Pair Setting (page 119). Tip: RAW Images • Some settings cannot be used, as detailed in the section for the affected setting. • Image Settings and Date Imprint options apply only to JPEG copies and have no effect on the DNG images. • The number of RAW photographs that can be taken in a single burst in continuous mode varies with the option selected for Noise Reduction (page 73). Up to five photographs can be taken when noise reduction is disabled; when noise reduction is enabled, this number drops to four. • The size and quality of the JPEG copies recorded with DNG images can be selected using the RAW/JPEG Setting option in the setup menu (page 130). • The camera displays a JPEG copy only. If RAW only is selected for RAW/JPEG Setting (page 130), a JPEG file saved in a DNG file is displayed in the picture display. 54 Focus Choose how the camera focuses. Option Description Multi AF The camera selects the focus area with the closest subject, preventing out-of-focus shots by keeping the camera from focusing on the background (default). Spot AF Focus on the subject in the center of the frame. More on Photography The camera tracks and focuses on the selected subject. Frame the subject to set as the tracking target in the center of the picture display, and press the shutterrelease button halfway to set the target. The target Subj. Tracking subject is framed with a green box. If missing the target subject while tracking, the green box turns red and blinks. Tracking is canceled when the target subject is out of the picture frame, the shutter-release button is released, or after finishing the shooting. MF Focus manually (page 58). (manual focus) Snap Focus is fixed at distance selected with Snap Focus Distance (page 60) for quick shutter response. ∞ (infinity) Fix the focus distance at infinity when photographing distant scenes. 55 The camera measures the distance to a subject using the external AF sensor (except for Subj. Tracking focus). If On is selected for Optional AF Distance Display in the setup menu (page 126), the distance to the subject is displayed in the picture display. AUTO 9999 10 M 4:3 N AF distance display More on Photography At setting of MF, the focus bar is displayed. At settings of MF, Snap, and ∞ in mode A and M, the focus bar and the depth of field are displayed. If On is selected for Optional AF Distance Display when Auto is selected for Snap Focus Distance, AF distance is displayed. AUTO Depth of field Focus bar 9999 10 M 4:3 N Hold: Distances and the depth of field in the focus bar are approximate. 56 More on Photography Note • Focus can be assigned to the ADJ. lever in ADJ Lever Setting (page 117) or Fn buttons in Fn Button Pair Setting (page 119). The Fn buttons can be used to switch back and forth between autofocus and manual focus/snap focus/subject tracking focus. • The following functions are not available for Subj. Tracking focus mode. • Custom setting of the self-timer • Interval shooting • Bracketing • AE/AF target selection • Macro target • If selecting On for Pre-AF in the shooting menu (page 61), the camera automatically focuses on a subject in Multi AF or Spot AF mode even if the shutter-release button is not pressed halfway. This mode increases the drain on the battery. • The external AF sensor is turned off and AF distance is not displayed when using the camera with AAA batteries or with an optional wide conversion lens on. • If On is selected for Optional AF Distance Display (page 126), select Off for Sleep Mode and LCD Auto Dim in the setup menu. • When focus distance metering by the external AF sensor is not available, 2.5m (8.2 ft) is set for the Auto setting of Snap Focus Distance. 57 Focus: MF (Manual Focus) Manual focus can be used to lock focus over a series of photographs or to focus when the camera is unable to focus using autofocus. MF (manual focus). 1Select Select MF in the Focus menu. AUTO 9999 10 M 4:3 N The focus mode and focus bar are displayed in the picture display. More on Photography Hold: the focus distance. 2Choose Press ! to increase the focus distance, " to decrease. To zoom in on the subject in the center of the picture display and check focus, press and hold the C/D button. Press and hold the button again to return to the normal shooting display. 3Take the picture. AUTO 9999 10 M 4:3 N Hold: Note • The camera can focus on the subject at a close distance in the macro mode using the manual focus. • The zoom ratio for the zoom by pressing and holding C/D button can be selected from 2 × and 4 × in Magnification Ratio (MF) in the shooting menu (page 83). 58 Choosing the Focus and Metering Target Target selection can be used to set focus and exposure for off-center subjects without moving the camera, making it easier to use a tripod. Select a type of target in Move Target Setting in the shooting menu beforehand (page 74). target selection. 1Activate Press the ADJ. lever in and then press the lever left or the target. 2Position Using the !, ", #, and $ but- tons, position the cross hairs over your subject and press C/D (to return to the target selection menu, press the DISP. button). 3Take the picture. AF DISP. Cancel OK More on Photography right to highlight P and press C/D. Ok Target Note • Target selection is not available in subject tracking and manual focus modes (page 55). • AF target selection remains in effect until a new target is selected. • Target selection is canceled if changing to the manual focus mode. • The Fn buttons can be used for focus target selection in macro mode if Macro Target is selected for Fn Button Pair Setting (page 119). Press N or " to cancel the target selection function. • AE/AF target selection cannot be used with the macro target function. To use the macro target function, press the DISP. button to cancel the target selection in AE/AF target selection mode. 59 • For using the functions assigned to the ADJ. lever 1 to 5, press the DISP. button to cancel the target selection. Snap Focus Distance Select the distance at which the camera focuses when Snap is selected for Focus (page 55) or Full Press Snap is on (page 60). Choose from Auto, 1 m (3.3 ft.), 1.5 m (4.9 ft.), 2.5 m (8.2 ft.), 5 m (16.4 ft.), and ∞ (infinity). More on Photography Full Press Snap Take photographs without pausing to focus when Multi AF, Spot AF, or Subj. Tracking is selected for Focus (page 55). Option Description Off The camera focuses normally. On If the shutter-release button is pressed all the way down in one motion, the camera will take a picture at the focus distance selected for Snap Focus Distance (page 60). Choose when quick shutter response is required. Auto-Hi ISO As for On, except that ISO sensitivity is automatically set to Auto-Hi (page 82). Caution • Full press snap is not available in macro mode or when MF, Snap, or ∞ is selected for Focus. • Care is required to avoid blur caused by camera movement. Note • The camera will focus normally if you pause with the shutterrelease button pressed halfway. • If Auto is selected for Snap Focus Distance, the camera focuses according to the focus distance measured by the external AF sensor. When focus distance metering by the external AF sensor is not available, 2.5 m (8.2 ft.) is set for Snap Focus Distance. 60 Pre-AF If On is selected when Multi AF or Spot AF is selected for Focus (page 55), the camera will continue to focus even when the shutter-release button is not pressed halfway (the focus range, however, is narrower than for normal focus). This may decrease the time needed to focus when a picture is taken, potentially improving shutter response. Exposure Metering Choose how the camera measures exposure. Option Description The camera meters exposure in 256 areas of the frame (deMulti fault). More on Photography Caution • Using pre-AF increases the drain on the battery. The camera meters the entire frame but assigns the greatCenter est weight to the center. Use when the subject in the center of the frame is brighter or darker than the background. Spot The camera meters only the subject in the center of the frame, ensuring that it is correctly exposed even when it is markedly brighter or darker than the background. Settings of Center and Spot are shown by an icon in the picture display. AUTO 9999 10 M 4:3 N Note • Exposure Metering can be assigned to the ADJ. lever in ADJ Lever Setting (page 117) or Fn buttons in Fn Button Pair Setting (page 119). 61 Image Settings Adjust contrast, sharpness, and vividness (color depth) or take monochrome photographs. Option More on Photography 62 Description Vivid Take strong, vivid photos with heightened contrast and sharpness and maximum vividness. Standard Normal contrast, sharpness, and vividness (default). Setting 1 Make individual adjustments to vividness, contrast, sharpness, and colors to create custom settings that can be recalled as desired. Setting 2 Black & White Take photos in black and white. Contrast and sharpness can be adjusted manually. B&W (TE) (toning effect) Create monochrome photos with a sepia, red, green, blue, or purple tint. Hue, vividness, contrast, and sharpness can be adjusted manually. Hi-Contrast B&W Emphasizes the contrast to the effect of the Black & White setting creating images of like a supersensitive film or images developed with sensitizing. Contrast, sharpness, and vignetting can be adjusted manually. Cross Process Take photos by adding a hue different from the actual hue. Hue, contrast, and vignetting can be adjusted manually. Positive Film Take photos in high vividness creating images like positive film. Vividness, contrast, sharpness, and vignetting can be adjusted manually. Bleach Bypass Take photos by reducing vividness and increasing contrast. Hue, contrast, sharpness, and vignetting can be adjusted manually. To make individual adjustments to the settings, highlight the desired option and press $. More on Photography Note • Image setting is not applied to a RAW image. If RAW only is selected for RAW/JPEG Setting (page 130), image setting has no effect. • If a RAW-quality option is selected for Picture Quality/Size in the shooting menu, Hi-Contrast B&W, Cross Process, Positive Film, and Bleach Bypass have no effect. • Hi-Contrast B&W has no effect in continuous shooting mode. • If Hi-Contrast B&W, Cross Process, Positive Film, or Bleach Bypass is selected, Subj. Tracking in the focus mode has no effect. • If Black & White, B&W (TE), or Hi-Contrast B&W is selected, WB-BKT has no effect. • Noise Reduction in the shooting settings has no effect when Hi-Contrast B&W is selected. settings. 1Adjust Press ! and " to highlight an option and press # and $ to change. Setting 1/Setting 2 Black & White Bleach Bypass C/D. 2Press Press C/D to return to the Image Settings menu when settings are complete. 63 to shooting mode. 3Exit Press C/D. The option currently selected for Image Settings will be displayed in the picture display. AUTO 9999 10 M 4:3 N More on Photography Note • Image Settings can be assigned to the ADJ. lever in ADJ Lever Setting (page 117) or Fn buttons in Fn Button Pair Setting (page 119). Fn buttons can be used to switch image settings if Color>B&W, Color>TE, Color>High B&W, Color>Cross, Color>Pos. Film, Color>B Bypass is selected for Fn Button Pair Setting. Continuous Mode Shoot photographs in continuous sequence. The following options are available: • Continuous: The camera records photographs one after the other while the shutter-release button is pressed. AF AF-Cont: The camera shoots by trailing a target subject using the external AF sensor while the shutter-release button is pressed. • S-Cont (stream continuous): While the shutter-release button is pressed, the camera shoots up to 16 frames at about 7.5 frames per second and joins them to form a single image (j in size). About 2 s are required to shoot the entire sequence. 64 • • M-Cont (memory-reversal continuous): The camera shoots while the shutter-release button is pressed, but only the last 16 frames (about the last two seconds of shooting) are recorded, creating a single image (j in size). At settings other than Off, the current selection is shown by an icon in the picture display. AUTO 9999 10 M 4:3 N More on Photography When you remove your finger from the shutter release button… …the camera records the last 16 frames taken (frames 1 to f). To cancel the continuous shooting mode, select Off for Continuous Mode. Note • In the S-Cont and M-Cont modes, Normal setting is applied automatically for Digital Zoom Image even if Auto Resize is selected (page 131). • In the AF-Cont mode, Multi AF setting is applied automatically to Focus. • At settings other than Off, the flash turns off automatically, focus and exposure are fixed with the first shot in each series, and Auto white balance is used in place of Multi-P AUTO (page 78). • In the S-Cont and M-Cont modes, ISO AUTO setting is applied automatically for ISO Setting even if a setting from ISO 80 to ISO 250 is selected. 65 More on Photography 66 • If releasing the shutter-release button within two seconds in MCont mode, the number of recorded photographs will be less than 16 images. • The number of photographs that can be taken in succession depends on the picture size. • The maximum number of photographs that can be taken in succession is 999. Even if the number of exposures remaining is more than 1000, 999 is displayed in the picture display. • When On is selected for Card Sequence No. in the setup menu (page 132), if the last four digits of a file number exceeds 9999 while shooting in the continuous mode, a new folder is created automatically in a memory card and the shooting is continued. • Continuous Mode can be assigned to the ADJ. lever in ADJ Lever Setting (page 117) or Fn buttons in Fn Button Pair Setting (page 119). Tip: Viewing S-Cont and M-Cont Images with Playback Zoom • Zoom can be used to view the individual frames of S-Cont and M-Cont images during playback. Pressing the 8 button while an image taken with either of these options is displayed in single-frame playback displays the first frame in the sequence; use the # and $ buttons to display other frames. Your current position in the sequence is shown by strip at the bottom of the display (the DISP. button can be used to hide the strip; see page 33). Press C/D to exit. Auto Bracket Vary exposure, white balance, or color to record two or three images “bracketing” current settings. Option Description Each time the shutter-release button is pressed, the camera takes three photos: one underexposed by 0.3 EV, a second AE-BKT at current exposure settings, and a third overexposed by 0.3 EV. Choose when you find it difficult to judge the correct 1/3EV exposure. More on Photography As above, except that the camera varies exposure by 0.5 EV AE-BKT with each shot instead of 0.3 EV. 1/2EV The camera records three copies of each photo: one with a “warm,” reddish cast, a second at the white balance currently selected in the shooting menu (page 78), and a third WB-BKT with a “cool,” blueish cast. Choose when you find it difficult to select the correct white balance. The camera takes three photos in three different picture qualities. The picture quality for the second and third picture can Img. Set. be selected. BKT The camera takes three photos in three different dynamic range compensation settings: one without the dynamic range compensation, a second with Weak setting, and a third DR-BKT with Strong setting. CONTRASTBKT The camera takes photos in different contrasts. Note • Bracketing is not available when an option other than Off is selected for Continuous. • WB-BKT is not available when shooting monochrome photographs. • AE-BKT 1/3EV and AE-BKT 1/2EV are the available options when a RAW-quality option is selected for Picture Quality/Size (page 53). • The flash turns off automatically when bracketing is in effect. 67 To make adjustments to the settings for AE-BKT 1/3EV or AE-BKT 1/2EV, highlight the desired option and press $. the exposure settings. 1Set Press # and $ to highlight an option and press ! and " to set the exposure value. More on Photography 2Press C/D. Caution • Auto white balance setting is applied even when Multi-P AUTO is selected for White Balance in the shooting menu (page 78). Note • Auto Bracket can be assigned to the ADJ. lever in ADJ Lever Setting (page 117) or Fn buttons in Fn Button Pair Setting (page 119). Multiple Exposure Shooting Shoot a picture by synthesizing up to five images. On or Off for options. 1Select Press ! or " to select an option, and select On or Off. 68 Option Description Automatic Exposure Select On to shoot pictures by automatically adjusting the amount of exposure according to the number of pictures to synthesize. Save Each Image Select On to save original pictures separately from a composite image. Selecting Off does not save original pictures but a composite image only. Saving image Select On to save images at each synthesis. Selecting Off saves a composite image only. the DISP. button. pictures. 3Take Press the shutter-release but- ton to take the first picture. Select Next shot and press C/D to take the next picture. Repeat the procedures to take all the pictures (select Retake shot to cancel and retake an image), and select Complete to finish. A composite image is saved. Next shot > Retake shot Complete OK More on Photography C/D. 2Press To exit the multiple exposure shooting mode, press Ļ Execute Caution • After taking five pictures, a composite image is saved automatically. • Multiple exposure shooting is not available in scene mode. • The following functions are not available in the multiple exposure shooting mode. • Continuous shooting • Digital zoom • Bracketing • Interval shooting • Image settings cannot be adjusted while shooting. 69 Note • If assigning Multiple Exposure Shooting to Fn buttons, pressing Fn1 or Fn2 button takes pictures in the multiple exposure shooting mode. More on Photography Flash Exposure Compensation Adjust flash level by –2.0 to +2.0 in steps of 1/3 EV. Selecting Flash Exposure Compensation in the shooting menu displays the slider; press ! or " to choose a flash exposure compensation value and press C/D. Flash exposure compensation is displayed in the picture display except when the flash is off. 9999 10 M 4:3 N Caution • Flash exposure compensation may have no effect outside the range of the flash (page 23). Note • Flash Exposure Compensation can be assigned to the ADJ. lever in ADJ Lever Setting (page 117) or Fn buttons in Fn Button Pair Setting (page 119). 70 Manual Flash Amount Choose amount of light produced by the flash in manual flash mode (page 22). Flash output is expressed as a fraction of full power (all values are approximate): FULL 1/1.4 1/2 1/2.8 1/4 1/5.6 1/8 Flash level is displayed in the picture display in manual flash mode. 1/11 1/16 1/22 1/32 9999 1/64 10 M 4:3 N More on Photography Note • Flash Exposure Compensation has no effect in manual flash mode, and Manual Flash Amount setting is applied instead. • The actual flash amount may differ from the setting in Manual Flash Amount. • Manual Flash Amount can be assigned to the ADJ. lever in ADJ Lever Setting (page 117) or Fn buttons in Fn Button Pair Setting (page 119). Flash Synchro Settings Choose how the flash synchronizes with the shutter. • 1st Curtain: The flash fires at the beginning of the exposure (default). • 2nd Curtain: The flash fires at the end of the exposure. This option produces trails of light behind moving light sources. 71 Dynamic Range Compensation The camera captures a wide range of tones from dark to bright. The intensity can be selected from Weak, Medium, or Strong. An indicator is displayed in the picture display when dynamic range compensation is set. AUTO 9999 10 M 4:3 N More on Photography Caution • Available ISO settings are limited in dynamic range compensation mode. • Weak: ISO 125 to ISO 2500 • Medium: ISO 160 to ISO 1600 • Strong: ISO 200 to ISO 1250 • If Strong is selected, more noise are likely to occur in images. • If using the digital zoom, Dynamic Range Compensation has no effect. • Dynamic Range Compensation is not available for multiple exposure shooting. • The desired effect may not be achieved if the scene is too bright or too dark. Note • Setting Multi for Exposure Metering is recommended when using the dynamic range compensation function (page 61). • Dynamic range compensation can be applied to a RAW image. • Dynamic Range Compensation can be assigned to the ADJ. lever in ADJ Lever Setting (page 117) and Fn buttons in Fn Button Pair Setting (page 119). 72 Noise Reduction Choose Weak, Strong, or MAX to reduce “noise” (random variations in brightness and color) in photographs taken at high ISO sensitivities. AUTO 9999 4:3 N The minimum ISO sensitivity at which noise reduction applies can be selected using Noise Reduction ISO (see below). 10 M Note • When a RAW-quality option is selected for Picture Quality/Size, noise reduction applies only to the JPEG copy, not to the DNG file. • The time needed to record photographs varies with the option selected for Noise Reduction. More on Photography An indicator is displayed when noise reduction is on. Noise Reduction ISO Select the minimum ISO sensitivity at which noise reduction applies when Weak, Strong, or MAX is selected for Noise Reduction. Choose from All (noise reduction applies at all ISO sensitivities), Over ISO 201, Over ISO 401, Over ISO 801, and Over ISO 1601. 73 Move Target Setting Select a type of target for the target selection function (page 59). More on Photography Option Description AE/AF Spot metering and spot autofocus; choose the focus and exposure target. AF Spot autofocus (default); choose the focus target. Exposure is metered using the option selected for Exposure Metering (page 61). AE Spot metering; choose the metering target. Focus is set using the option selected for Focus (page 55). Camera Shake Correction Choose On to prevent blur caused by camera shake. Caution • The camera shake correction function is not available when the shutter speed is set to B, T, or more than 1 second in mode M, the self-timer is set, or using an optional cable switch. • The camera shake correction function cannot prevent the blur caused by the movement of the subject. • Effects of the camera shake correction function differ depending on the shooting conditions. Custom Self-Timer Set the number of pictures and the shooting interval for the self-timer shooting. • Pictures: Set the number of pictures to be taken from 1 to 10 pictures (default: 2). • Interval: Set the interval between 5 to 10 seconds (default: 5). 74 Note • If the number of pictures is set to more than two, the focus is fixed to the position set in the first picture. Interval Shooting To take photos automatically at intervals of from five seconds to one hour, select Interval Shooting in the shooting menu and follow the steps below: hours, minutes, or seconds and press ! and " to change. Press C/D to exit to shooting mode. Interval will be displayed in the picture display. More on Photography an interval. 1Choose Press # and $ to highlight shooting. 2Start Press the shutter-release button. Photographs will be taken automatically at the selected interval. shooting. 3End Press C/D to end shooting when all the desired photographs have been taken. Caution • Interval shooting is not available in scene mode. • If the time needed to record photographs is longer than the selected interval, the next photograph will not be taken until recording is complete. 75 Note • The interval resets to zero when the camera is turned off. • Use a fully-charged battery or optional AC adapter and be sure that sufficient space remains in internal memory or on the memory card. Interval shooting ends automatically when the number of exposures remaining reaches zero. • Photographs can be taken at any time by pressing the shutterrelease button. • Continuous Mode is set to Off automatically in the interval shooting. More on Photography 9999 4:3 N Date Imprint Imprint the date (YY/MM/DD) or date and time (YY/MM/ DD hh:mm) on photographs as they are taken. AUTO 10 M An indicator is displayed in the picture display when date imprint is on. Note • Date imprint is not available when the clock is not set. Set the clock (page 17) before using date imprint. • The date cannot be imprinted on movies. • When a RAW-quality option is selected for Picture Quality/Size, the date is imprinted only on the JPEG copy, not the DNG file. • The date is permanently imprinted on the image and cannot be removed. 76 Exposure Compensation The camera automatically adjusts exposure for the subject in the center of the frame, producing optimal exposure. the exposure compensation slider. 1Display Selecting Exposure Compensation in the shooting menu displays the slider. AUTO 9999 10 M 4:3 N posure compensation value. Press the shutter-release button to take a picture or press C/D to exit to shooting mode. More on Photography exposure compensation. 2Adjust Press ! or " to choose an ex- Caution • Exposure compensation is not available in mode M, interval composite shooting and movie mode. Note • Exposure Compensation can be assigned to the ADJ. lever in ADJ Lever Setting (page 117), Fn buttons in Fn Button Pair Setting (page 119), or 8 and 9 buttons in Zoom Button (page 121). 77 White Balance The camera automatically adjusts white balance so that a white subject will appear white regardless of the color of the light source. Select an option to match white balance to the light source under mixed lighting or when photographing a subject that is a solid color. Option Description More on Photography Auto The camera adjusts white balance automatically. Multi-P AUTO The camera adjusts white balance to account for differences in lighting in separate areas of the frame (default). Outdoors Use when shooting in daylight under clear skies. Cloudy Use when shooting in daylight under cloudy skies. Incandescent 1 Use with incandescent lighting. Pictures taken in the Incandescent 2 setting are tinged with reddish cast comparing to the IncanIncandescent 2 descent 1. Fluorescent Lamp Use with fluorescent lighting. Manual Settings Measure white balance manually (page 80). Detail Make fine adjustments to white balance (page 80). white balance options. 1Display Select White Balance in the shooting menu. a white balance option. 2Select Press ! or " to select an option. Press the shutter78 release button to take a picture or press C/D to exit to shooting mode. The current selection is shown by an icon in the picture display. AUTO 9999 10 M 4:3 N Note • White Balance can be assigned to the ADJ. lever in ADJ Lever Setting (page 117), Fn buttons in Fn Button Pair Setting (page 119), or 9 and 8 buttons in Zoom Button (page 121). More on Photography Caution • Auto white balance may not produce the desired results with scenes lacking white objects. This can be corrected by adding a white object to the scene before shooting. • Options other than Auto may not produce the desired results when the flash is used. Select Auto when using the flash. • Auto setting is applied automatically in the following cases even if Multi-P AUTO is selected. • In the interval composite shooting (scene mode) • In the continuous shooting • If AE-BKT 1/3EV or AE-BKT 1/2EV is selected for Auto Bracket 79 Manual: Measuring White Balance To measure a value for white balance: Manual Settings. 1Select Highlight Manual Settings in the white balance menu. white balance. 2Measure Frame a blank piece of paper or other white object so that it fills the frame and press the DISP. button. More on Photography 3Press C/D. Note • The area to measure the white balance in can be selected in Area measured for manual WB in the setup menu (page 131). • When the flash setting is on, the white balance for when the flash fires can be measured by pressing the DISP. button. Detail: Making Fine Adjustments to White Balance To make fine adjustments to white balance: Detail. 1Select Highlight Detail in the white balance menu and press the DISP. button. a setting. 2Choose Press ! or " to choose a white balance. Press C/D when settings are complete. 3Press C/D. 80 White Balance Compensation Compensate for color casts by modifying white balance on the green-magenta or blue-amber axis. The modifications apply to the option currently selected for white balance and to all options selected while the modifications are in effect. white balance compensation controls. 1Display Selecting White Balance color casts. 2Compensate Choose white balance com- pensation using the !, ", #, or $ button. Press the DISP. button to reset white balance compensation Blue to a neutral value. Amount Green More on Photography Compensation in the shooting menu (page 49) displays the controls. Amber Magenta C/D. 3Press Press the DISP. button twice to cancel. Note • White Balance Compensation can be assigned to the ADJ. lever in ADJ Lever Setting (page 117) or Fn buttons in Fn Button Pair Setting (page 119). • When the mode dial is rotated to 4, white balance compensation is only available in dynamic range, interval composite and movie modes. • The White Balance Compensation option in the playback menu (page 99) does not use the same values as the shooting menu option. 81 More on Photography ISO Setting Adjust the camera’s sensitivity to light. • Auto: The camera automatically adjusts sensitivity according to brightness, the distance to the subject, and the options selected for macro mode and picture quality and size. • Auto-Hi (high sensitivity auto): As above, except that the camera selects higher sensitivities when the subject is poorly lit. The maximum sensitivity and the shutter speed to shift the value of ISO sensitivity can be selected in the setup menu (page 124). • ISO 80–ISO 3200: Sensitivity is set to the selected value. Note • Step value for ISO sensitivity can be selected from 1EV or 1/3EV in ISO Step Setting in the setup menu (page 124). • “Noise” (random variations in brightness and color) may appear in photographs taken at high sensitivities. • The sensitivity displayed in the picture display in Auto and AutoHi modes may differ from the actual value. If the flash is used, a sensitivity of Auto is equivalent to ISO 154, regardless of the value displayed in the picture display. The range of sensitivities available in Auto mode when the flash is off is shown below: Picture size z a c Over e ISO sensitivity Default Min. Max. 283 100 80 238 176 154 • Available ISO settings are limited in dynamic range compensation shooting (page 72). 82 • If On is selected for ADJ. Direct ISO Control in the key custom settings, ISO sensitivity can be changed by pressing the ADJ. lever left or right in the shooting mode. In mode P and A, ISO sensitivity can be also changed by pressing the shutter-release button halfway. • ISO Setting can be assigned to the ADJ. lever in ADJ Lever Setting (page 117) or Fn buttons in Fn Button Pair Setting (page 119). Restore Defaults To restore default shooting menu settings (pages 50–52), rotate the mode dial to 5 and select Restore Defaults in the shooting menu. A confirmation dialog will be displayed; highlight Yes and press C/D to restore default values and exit to shooting mode. More on Photography Magnification Ratio (MF) The zoom ratio for the zoom by pressing and holding C/D button can be selected from 2 × and 4 ×. Auto Aperture Shift If On is selected, the camera will automatically adjust aperture to prevent overexposure in mode A. Note • Auto aperture shift is available only in mode A. Shutter Speed Auto Shift If On is selected, the shutter speeds are adjusted automatically to achieve optimal exposure when overexposed or underexposed. 83 Switch Shooting Mode When the mode dial is rotated to a “MY” mode (page 48), you can use this option to switch between 5, P, A, S, and M modes without rotating the mode dial to a new setting. This option is only available in “MY” modes and is not displayed if the shooting mode currently selected for Reg. My Settings is a scene mode. More on Photography Dynamic Range Expansion Choose the dynamic range expansion from Weak, Medium, or Strong. The range of brightness to be processed extends by selecting the stronger effect. Plus Normal Shooting Choose On to record two copies in the dynamic range shooting, one with normal exposure and another with enhanced dynamic range. Interval Composite Time Set the shooting interval between 1 second and 1 hour for the interval composite shooting. Note • Set the interval longer than the shutter speed. 84 Save Interval Composite Img. Select an option for saving images in the interval composite shooting. • Off: Saves a composite image only. • Save Each Image: Saves original pictures separately from a composite image. • Saving image: Saves images at each synthesis. More on Photography 85 Movies This section describes how to record and view movies. 3 Recording Movies Shoot movies with sound. Movies are stored as AVI files. 1Rotate the mode dial to 4. C/D. 2Press A menu of scene mode options will be displayed. Movies 3. 3Select Press ! or " to highlight 3 (movie) and press C/D. 4Shoot. Press the shutter-release but- VGA 640 ton to begin recording; press again to end. REC icon blinks and the recording time and remaining time are displayed in the picture display while shooting a movie. Recording ends automatically when memory is full. Note • Sounds made by the camera may be recorded with the movie. • Movies may be up to 29 minutes in length or 4 GB in size. Depending on the type of memory card used, shooting may end before this length is reached. The maximum total length of all movie files that can be stored in internal memory or on a memory card varies with the options selected for Movie Size and Frame Rate (page 87). • 86 The flash cannot be used. • The camera focuses when the shutter-release button is pressed to begin recording. • The amount of time remaining is calculated based on the amount of memory available and may not diminish at an even rate. • Charge the battery before shooting or use an optional AC adapter. For long recordings, choose memory cards with high write speeds and check the amount of memory available before shooting. • AE/AF target selection is not available for movies. Choosing the Frame Size and Frame Rate Movies consist of a series of images (frames) that are played at high speed to create the illusion of motion. Choose a frame size (the size of each frame in pixels) and frame rate (the rate at which the frames are recorded). Movies the shooting menu. 1Display Press C/D to display the scene menu. Press # to highlight the mode tab, press " to highlight the shooting menu tab, and press $ to place the cursor in the shooting menu. Movie Size or Frame Rate. 2Select Highlight Movie Size or Frame Rate and press $ to display options for the selected item. an option. 3Select • Movie Size: Choose z 640 (640 × 480 pixels) or y 320 (320 × 240 pixels). • Frame Rate: Choose 30 Frames/ Sec (30 fps) or 15 Frames/Sec (15 fps). C/D. 4Press The selected option will be displayed in the picture display. 87 3 Viewing Movies 6. 1Press Press the 6 button to display pictures in the picture display. the movie. 2Display Use the !, ", #, and $ but- tons to scroll through pictures (page 27) until the first frame of the movie is displayed. Movies are indicated by a 3 icon. Movies To Press 640 VGA 640 :Start 2011/01/01 00:20 playback. 3Start Press the ADJ. lever in to start playback. Progress is shown in the playback display. The following operations can be performed: VGA :Stop 2011/01/01 00:20 Description Hold 8 to fast forward, 9 to rewind. Press 9 or 8 when the playback is paused to Advance/ 8/9 advance or rewind a movie frame by frame. rewind Hold 9 or 8 when the playback is paused for slow advance or rewind. Pause/ resume Adjust volume 88 ADJ. Press the ADJ. lever in to pause; press again to resume. !/" Press ! to increase volume, " to decrease. More on Playback This section details the options in the playback menu and describes how to view pictures on a TV. The Playback Menu the playback menu. 1Display Press the 6 button and press the C/D button. to display options for the highlighted item. The playback menu contains the following options: Option Page Option Page Slide Show 90 Skew Correction 95 Protect 90 Level Compensation 96 DPOF 92 White Balance Compensation 99 Resize 94 Trim 100 Copy to Card from Internal Memory 94 More on Playback a menu item. 2Select Press ! or " to scroll through the menu and press $ 89 Slide Show Selecting this option starts an automated slide show. Pictures are displayed at three second intervals. When a movie is displayed, movie playback begins automatically; the slide show resumes when playback is complete. The slide show repeats until stopped; press any button to end the slide show. Protect Protect pictures from accidental deletion. Caution • Formatting erases all files, including protected files. More on Playback Protecting Individual Pictures To protect or remove protection from individual files, play the picture back and select Protect in the playback menu to display the options. Highlight 1 File and press C/D. Protected files are indicated by an icon. 10 M 4:3 N Protecting or Removing Protection from All Files To protect all files, select Protect, highlight Select All and 2011/01/01 00:20 press C/D. To remove protection from all files, highlight Cancel All and press C/D. 90 Changing the Protect Status of Multiple Files Protect in the playback menu. 1Select In multi-frame playback, proceed to Step 2. In single-frame playback, the options will be displayed. Highlight Sel Mult and press C/D. Sel. Indiv. or Sel. Range. 2Select Select Protect in the playback menu to display the options. To select images one at a time, highlight Sel. Indiv., press C/D, and proceed to Step 3. To select ranges, highlight Sel. Range, press C/D, and proceed to Step 3.1. photographs. 3Select Press !, ", #, or $ to high- Protect OK Sel/Cancel 32/38 10 M DISP. Cancel 4:3 N More on Playback light a photo and press C/D to select. Protected pictures are marked with an icon. To remove protection from a photo, highlight it and press C/D again. 91 Tip: Selecting Ranges 3.1Press !, ", #, or $ to highlight the first image and press C/D to select. The selected image is marked with an icon. Protect OK 3.2Press !, ", #, or $ to highlight the last image and press C/D to select. The selected image and images in the range will be marked with icons. End Protect OK 32/38 End DISP. 4:3 N 10 M 4:3 N Cancel 37/38 DISP. 10 M Cancel More on Playback • Repeat Steps 3.1 and 3.2 to select additional ranges. • To select or deselect individual photos, press the ADJ. lever in to switch to Sel. Indiv. mode. the Fn2 button. 4Press A message will be displayed while the camera protects the selected files. The camera will then return to playback mode. DPOF: Selecting Pictures for Printing Use this option to create a digital “print order” listing the photos you wish to print and the number of prints, and then take the memory card to a digital print service center that supports the DPOF (Digital Print Order Format) standard. 92 Caution • If a photograph created using a RAW picture-quality option is selected for printing, only the JPEG copy will be printed. • DPOF is not available for photos saved in internal memory of the camera. Selecting Individual Photos for Printing Display a photo to add to a DPOF selection and select DPOF in the playback menu to display the options. Highlight 1 File and press C/D. Press # or $ to highlight a photo and press C/D to select. Selecting All Photos for Printing To select all photos for printing, select DPOF, highlight Select All and press C/D. To remove all photos from the print order, highlight Cancel All and press C/D. DPOF. 1Select Press C/D in multi-frame playback to display the playback menu. Highlight DPOF and press $. photos and choose the number of prints. 2Select Press # or $ to highlight a photo and ! or " to More on Playback Selecting Multiple Photos for Printing Select photos in multi-frame view. choose the number of prints. To remove a photograph from the print order, press " until the number of prints is zero. C/D. 3Press A message will be displayed while the camera cre- ates the print order. Note • For information on removing all photos from the print order, see page 92. 93 Resize: Creating Small Copies of Photographs To create a small copy of the current photograph, select Resize in the playback menu and choose a size from a 4:3 F or z 4:3 F. Note • All copies have an aspect ratio of 4 : 3. Copies created from photos with an aspect ratio of 3 : 2, 1 : 1, or 16:9 have a black border. • Movies and RAW-quality photos cannot be resized. Copy to Card from Internal Memory To copy all files from internal memory to a memory card, insert the memory card in the camera and select Copy to Card from Internal Memory in the playback menu. More on Playback 94 Caution • If the space available on the memory card is insufficient to copy all the files in internal memory, a message will be displayed. To copy only those files that will fit in the space available, highlight Yes and press C/D; to exit without copying any files, select No. • Files cannot be copied to internal memory from a memory card. Skew Correction Create copies that have been processed to reduce the effects of perspective on rectangular objects, such as message boards or business cards. the photo. 1Display Display the photo to be processed in playback mode. Skew Correction. 2Select Press C/D to display the playback menu, C/D. 3Press A message will be displayed while the camera copies the photo. More on Playback highlight Skew Correction, and press $. If the camera detects an object to correct perspective, the object is shown with an orange frame. The camera can detect up to five objects; to select a different object, press $, or press ! to exit without correcting perspective. If the camera cannot detect an object, an error message is displayed. Caution • Skew correction is available only with still images taken with this camera. It is not available for movies or photos taken using SCont or M-Cont. • When used with photos taken with a RAW-quality option selected for picture quality (page 53), skew correction applies only to the JPEG copy. 95 Note • The copy is the same size as the original. • To reduce the time required, create a small copy of the original using the Resize function (page 94) and perform skew correction on the copy. • Skew correction can also be performed during shooting (pages 42 and 47). Level Compensation Create copies that have been processed to adjust brightness and contrast. Auto: Automatic Level Correction the photo. 1Display Display the photo to be processed in playback mode. More on Playback Level Compensation. 2Select Press C/D to display the playback menu, highlight Level Compensation, and press $. Auto. 3Select Highlight Auto and press $. If the camera is able to create a copy, a preview will be displayed with the original image displayed at upper left, the corrected copy at right. If the camera cannot create a copy, an error message will be displayed and the camera will exit to the playback menu. C/D. 4Press Press C/D to copy the image (to exit without 96 creating a copy, press the DISP. button). A message will be displayed while the camera copies the photo. Manual: Manual Level Correction Manual. 1Select Display the photo to be processed and select Level Compensation > Manual in the playback menu. the black point, white point, or mid-point. 2Select The preview contains a his- C/D. 3Press Press C/D to copy the image (to exit without More on Playback togram showing how pixels of different brightnesses are distributed in the image, with dark pixels (shadows) on the left and bright pixels (highFrom left to right: lights) on the right. Press the black point, midADJ. lever in to cycle through point, white point the black point, mid-point, and white point and press # or $ to position the selected point for enhanced brightness and contrast. For help, press the Fn2 button; press the button again to return to the preview display. creating a copy, press the DISP. button). A message will be displayed while the camera copies the photo. 97 Tip: Choosing the Black Point, White Point, and Mid-Point • Adjusting brightness: To make the image brighter, move the mid-point to the left. Moving the mid-point to the right makes the image darker. More on Playback • Correcting exposure: If the image is overexposed, move the black point to the right until it lines up with the darkest pixel in the histogram. If the image is underexposed, move the white point to the left until it lines up with the brightest pixel. You can then move the mid-point left or right to adjust brightness. • Increasing contrast: To increase contrast, align the black point and white point with the darkest and brightest pixels. You can then move the mid-point left or right to adjust brightness. Correcting overexposure Caution • Level correction is available only with still images taken with this camera. It is not available for movies or pictures taken using SCont or M-Cont. • The desired results may not be achieved with monochrome images. • Although level correction can be applied multiple times, the compression applied every time a copy is saved will result in a drop in image quality. 98 White Balance Compensation Create copies with modified white balance. the photo. 1Display Display the photo to be copied in playback mode. White Balance Compensation. 2Select Press C/D to display the playback menu, highlight White Balance Compensation, and press $. white balance. 3Adjust Use the !, ", #, or $ to ad- C/D. 4Press Press C/D to copy the image (to exit without More on Playback just white balance. Press the DISP. button to reset white balance compensation to a neutral value (to view or hide help, press the Fn2 button). creating a copy, press the DISP. button twice). A message will be displayed while the camera copies the photo. Caution • White balance compensation is available only with still images taken with this camera. It is not available for movies or pictures taken using S-Cont or M-Cont. • The desired results may not be achieved with monochrome images. • Although white balance compensation can be applied multiple times, the compression applied every time a copy is saved will result in a drop in image quality. 99 Trim Create a copy of a trimmed image. the photo. 1Display Display the photo to be processed in playback mode. Trim. 2Select Press C/D to display the playback menu, highlight Trim, and press $. the photo. 3Trim Press !, ", #, or $ to move More on Playback the trimming box, and 9 or 8 to change the trimming size, and press the ADJ. lever in to change the aspect ratio of the trimming box (4:3/1:1). For help, press Fn2, and press the button again to return to the previous display. C/D. 4Press Press C/D to save the copy. A message will be displayed while the camera copies the photo. Caution • Trimming is available only with still images taken with this camera. • Pictures taken in the RAW mode cannot be trimmed. • Although trimming can be applied multiple times, a copy will result in a drop in image quality. 100 Note • Trimmed images are saved in fine quality. • The size of the trimming box differs depending on the size of an original image. • The size of a trimmed image differs depending on the size of an original image and the trimming box. Viewing Pictures on TV To view pictures on a TV, connect the camera using an AV cable or optional HDMI cable. Caution • The camera‘s picture display and speaker will turn off and photos and movies will be played back on the TV. • Do not move the camera by holding the AV cable or HDMI cable connected to the camera. the camera off. 1Turn Be sure the camera is off before connecting or dis- More on Playback Connecting to a TV using an AV Cable Connect the camera to AV devices equipped with video input terminals using an AV cable (AV-1). connecting an AV cable. 2Connect the AV cable to the TV. the camera. 3Connect Open the terminal cover and plug the cable into the common terminal for USB port/AV output. Do not use force. 101 the television to the video channel. 4Tune Select video input. See the television manual for details. 5Turn the camera on. Note • The camera supports the following video standards: NTSC (used in North America, the Caribbean, parts of Latin America, and some East Asian countries) and PAL (used in the United Kingdom and much of Europe, Australia, New Zealand, and parts of Asia and Africa). SECAM is not supported. Where possible, the camera is set to the standard used in your country or region before shipment; before connecting the camera to a device that uses a different video standard, choose the appropriate video mode (page 133). More on Playback Connecting to a TV using an HDMI Cable Connect the camera to AV devices equipped with HDMI terminals using an optional HDMI cable (HC-1). the camera off. 1Turn Be sure the camera is off before connecting or disconnecting an HDMI cable. 2Connect the HDMI cable to the TV. the camera. 3Connect Open the terminal cover and plug the cable into the HDMI connector. Do not use force. the television to the vid 4Tune eo channel. Select video input. See the television manual for details. 102 5Turn the camera on. Note • If connecting or disconnecting the HDMI cable, the display switches to single-frame view. • AUTO is selected for the resolution of image output using an HDMI cable. If the resolution of image displayed on TV is low with the AUTO setting, select 1080i, 720P, or 480P in HDMI Output in the setup menu (page 134). More on Playback 103 Printing Photographs The camera can be connected to a printer via the supplied USB cable and photographs printed directly from the camera without using a computer. Caution • Movies cannot be printed. • If a photograph created using a RAW picture-quality option is selected for printing, only the JPEG copy will be printed. Printing Photographs Note • The camera conforms to PictBridge, a standard widely used for direct printing, and direct printing is consequently only available with PictBridge-compliant printers. See the documentation provided with your printer for information on whether it supports PictBridge. • Selecting PTP for USB Connection Type in the setup menu is required depending on the type of printers. Connecting the Camera Connect the camera to the printer using the supplied USB cable. the camera off. 1Turn Be sure the camera is off before connecting or disconnecting the USB cable. the USB cable to the printer. 2Connect Connect the USB cable to the printer and turn the printer on. 104 the camera. 3Connect Open the terminal cover and plug the cable into the common terminal for USB port/AV output. Press the ADJ. lever in. The camera will turn on and the message will be displayed; press the ADJ. lever in again immediately. Printing Photographs Note • If you do not press the ADJ. lever in while the above message is displayed, it may in some cases be replaced after two seconds by a message stating that the camera is connecting to a computer. Turn the camera off and press the ADJ. lever in again. The message will be replaced by the PictBridge playback display. If the PictBridge playback display does not appear, the camera is still establishing a connection to the printer. Caution • Do not use force when connecting the USB cable or when handling the camera with the cable connected. 105 Printing Caution • Do not disconnect the USB cable while printing is in progress. • If an error is displayed during printing, check the printer and take the appropriate action. Printing a Photograph or All Photographs a photo. 1Select To select a photo, press # or $ until the desired Printing Photographs photo is shown in the PictBridge playback display and press the ADJ. lever in. Highlight 1 File and press C/D. To print one copy of all photos, press the ADJ. lever in. Highlight All Files and press C/D. printer settings. 2Adjust Highlight an item and press $ to view the options avail- able, or choose Printer Select to use the default setting for the current printer (the options available vary with the type of printer; items not supported by the connected printer cannot be selected). Press ! or " to highlight an option and press C/D. Item 106 Description Paper Size Choose the paper size. Paper Type Choose the paper type. Layout Choose the number of pictures per page. Item Description Date Print Include the time and date of recording. See page 17 for information on selecting the order in which the time and date are displayed. If the picture was taken using Date Imprint (page 76), only the imprinted date will be printed. File Name Print Include the file name. Optimize Image Choose whether the printer optimizes photo data. Print Size Choose the print size. Print Quality Choose the print quality. Report Print * Print a report. Toner Saving * Use less toner during printing. 1-Side/2-Sides * Print on one or both sides of the paper. * Ricoh printers only. Visit http://www.ricoh.com/ for details. printing. 3Start Press C/D when the menu in Step 2 is dis- Printing Photographs Printing Quantity Choose the number of copies. played. A message is displayed during printing; to exit before printing is complete, press the DISP. button. The PictBridge playback display will appear when printing is complete. 107 Printing Multiple Photographs the 9 button in the PictBridge playback dis 1Press play. Photographs will be displayed in multi-frame playback. a picture. 2Select Highlight a picture and press C/D. the number of prints. 3Choose Press ! or " to choose the Printing Photographs number of prints. Selected pictures are marked with a icon; to deselect a photograph, press " until the number of prints is zero. Prnt Fil OK Last File 10 M 4:3 N Forward Press # or $ to highlight an additional photograph and press ! or " to choose the number of prints. printer settings. 4Adjust Press C/D to display the direct print menu. Adjust settings as described on page 106. printing. 5Start Press C/D when the print menu is displayed. A message is displayed during printing; to exit before printing is complete, press the DISP. button. The PictBridge playback display will appear when printing is complete. 108 The Setup Menu The setup menu can be accessed from the shooting and playback menus (pages 49 and 89). Key Custom Options tab and Setup tab are available for the setup menu. the menus. 1Display Press C/D to display the menu for the current mode (in scene mode, a MODE tab will be displayed). a menu tab. 2Select Press # to highlight the tab 1 Key custom options tab 2 Setup tab The Setup Menu for the current menu and 1 press ! or " to highlight the 2 key custom options tab or the setup tab. Press $ to place the cursor in the selected tab. a menu item. 3Select Press ! or " to highlight a menu item and press $ to display options for the highlighted item. an option. 4Select Press ! or " to highlight an option and press C/D to select (the procedure may differ for some items). 109 The key custom options tab contains the following options: Option Default Reg. My Settings — Recall My Settings — Edit My Settings — My Settings for Fn Settings Off My Settings WB Comp. ADJ Lever Setting 1 ADJ Lever Setting 2 ADJ Lever Setting 3 ADJ Lever Setting 4 ADJ Lever Setting 5 The Setup Menu ADJ Shutter Confirmation Fn Button Pair Setting Page Option 112 Fn Button Pair 114 Switching Page Fn Pair Setting1 120 Exposure Comp. 121 115 Zoom Button Power Button Lamp On 121 117 Playback Mode Dial Setting1 121 117 Options Off White Balance 117 M Mode Dial Options ISO 117 One Press M Mode 117 ADJ. Direct ISO Control Image 117 Delete My Settings Expo. Metering 117 Restore Defaults Off 118 Quality Auto Bracket Default Setting1 121 Aprtr Priority 122 Off 122 — 122 — — 119 Note • The settings except Reg. My Settings in the key custom settings can be reset to the default settings with Restore Defaults. 110 The setup tab contains the following options: Option Default Page Option Default Page Format [Card] — 123 One Press Zoom Ratio 9.8 × 128 Format [Internal Memory] — 123 Auto Rotate On 129 LCD Brightness Auto 123 White Saturation Display Off 129 ISO Step Setting 1EV 124 ISO Auto-High Settings AF Auxiliary Light Operation Sounds Volume Settings Auto Power Off Sleep Mode LCD Auto Dim Optional AF Distance Display Level Setting Level (Tilt) Calibration Playback Order Options Maximum ISO: AUTO RAW/JPEG Setting Fine 130 400 Color Space Setting sRGB 130 Change 124 Area measured for manual Shutter Spot 131 WB Speed: Digital Zoom Image Normal 131 Auto Off 131 On 124 Store Menu Cursor Position 125 Card Sequence No. Date Settings 125 (medium) Language/N 0.5 seconds 125 Video Out Mode All 5 Min. 125 Off 126 USB Connection Type 126 HDMI Output Confirm Firmware Version Off 126 Eye-Fi Connection SetLevel+Tilt 126 tings 2 — 126 Eye-Fi Connection Display 2 On On 132 — 133 (Varies 1) 133 (Varies 1) 133 Mass 133 Storage AUTO 134 — 134 On 134 — 134 Shooting Info. Display Frame Off 127 1 Varies with country or region of purchase. 2 Displayed only when using an Eye-Fi card. 127 Information Display Mode Off 128 Grid Guide Display Options The Setup Menu LCD Confirmation Time Sht. Date/ 130 Time 111 Key Custom Options Reg. My Settings You can register up to 18 frequently-used shooting settings (twelve for the internal memory and six for a memory card) and easily recall the settings by assigning the settings to MY1, MY2 or MY3 of the mode dial (page 48). settings. 1Adjust Set the camera to the desired settings. The following The Setup Menu settings can be registered: • Camera settings: Shooting mode (5, P, A, S, M, or 4), aperture (modes A and M), shutter speed (modes S and M), focus position for manual focus, macro, flash, self-timer and display modes. • Shooting menu options: All options except Multiple Exposure Shooting, Interval Shooting, Magnification Ratio (MF), Restore Defaults, Auto Aperture Shift, Shutter Speed Auto Shift, and Switch Shooting Mode. White balance compensation will be stored if My Settings WB Comp. is on (page 117). • Key custom options: Fn Button Pair Setting (only when On is selected for My Settings for Fn Settings) • Setup options: ISO Step Setting, ISO Auto-High Settings, Optional AF Distance Display, Level Setting, Grid Guide Display Options, Shooting Info. Display Frame, and Digital Zoom Image. Reg. My Settings. 2Select Highlight Reg. My Settings in the key custom options tab and press $. 112 settings. 3Save To assign the settings to MY1, MY2, or MY3 on the mode dial, highlight MY 1, MY 2, or MY 3 and press C/D (to exit without saving settings, press the DISP. button). To save the settings to a “box” or “card” to be recalled and assigned to the mode dial at a later date (page 114), select My Settings Box or Card and press $. Highlight the desired number and press C/D. The Setup Menu Unnamed boxes will be named using the current date and time. If the box has already been assigned a name, the dialog will be displayed. Select Yes to use the current name, No to use a name based on the current date and time. Note • Settings assigned to “card” will be cleared if the memory card is formatted. Settings assigned to “box” will not be cleared even if the internal memory is formatted. 113 Recall My Settings Assign settings in a “box” or “card” to MY1, MY2, or MY3. Recall My Settings. 1Select Highlight Recall My Settings in the key custom options tab and press $. the source. 2Select Highlight My Settings Box or Card, and press $. a destination. 3Select Highlight the destination to assign the setting to (MY 1, MY 2, or MY 3) and press $. The Setup Menu a setting. 4Select Highlight a setting to assign to the selected position on the mode dial and press C/D. To exit without assigning settings to the mode dial, press the DISP. button. Note • My settings configured with other cameras cannot be recalled with this camera. 114 Edit My Settings Edit and rename settings saved with Reg. My Settings. Edit My Settings. 1Select Highlight Edit My Settings in the key custom options tab and press $. settings. 2Select To edit the settings assigned to MY1, MY2, or MY3 on the mode dial, highlight MY 1, MY 2, or MY 3 and press $. To edit settings saved in “box” or “card”, select My Settings Box or Card and press $. Highlight the desired number and press $. to highlight items and press $ to edit. After editing each item, press # to return to the settings list, where you can edit additional settings. The Setup Menu settings. 3Edit Press ! or " changes. 4Save Press C/D to save changes and exit (to exit without saving changes, press the DISP. button). 115 Tip: Naming My Settings • Select Name in Step 3 to rename the Name area current setting. The current name is highlighted in the name area; to edit the current name, press # or $ to position the cursor in the name area and press " to place the cursor in the keyboard area (to delete the current name, press " while the name is highKeyboard area lighted). Highlight characters using !, ", #, or $ and press C/D to enter the highlighted character at the current cursor position (to delete the character at the current cursor position, select [Delete]). Press Fn2 to switch between upper and lower case. Names can be up to 32 characters long. Press the ADJ. lever in to use the new name, or press the DISP. button to exit without renaming the settings. The Setup Menu Note • When the settings registered in Reg. My Settings are assigned to MY1, MY2, or MY3, if editing the settings in Edit My Settings, the changes are reflected to the settings assigned to MY1, MY2, or MY3. If editing the assigned settings directly in the MY1, MY2, or MY3 mode, the changes are not reflected to the settings registered in Reg. My Settings. After changing the settings directly in the MY1, MY2, or MY3 mode, the settings edited in Edit My Settings will not be reflected to the settings assigned to MY1, MY2, or MY3. 9999 4:3 N • Names assigned to “My” settings are 2011/01/01/00:20 Set displayed immediately after the mode dial is rotated to MY1, MY2, or MY3 or when ! is pressed. • My Settings can be deleted in Delete My Settings in key custom settings (page 122). AUTO 116 10 M My Settings for Fn Settings Select On to include the options assigned to the Fn buttons (page 119) in the settings saved with Reg. My Settings. My Settings WB Comp. Select On to include white balance compensation (page 81) in the settings saved with Reg. My Settings. The Setup Menu ADJ Lever Setting Assign up to five frequently-used options to the ADJ. lever for quick access in 5, P, A, S, and M modes. At shipment, the ADJ. lever can be used for white balance (page 78), ISO setting (page 82), picture quality (page 53), image setting (page 62), and exposure metering (page 61), but it can also be used for white balance compensation (page 81), focus (page 55), continuous (page 64), bracketing (page 67), flash compensation (page 70), manual flash amount (page 71), exposure compensation (page 77), and dynamic range compensation (page 72). 117 Assigning a Function to the ADJ. Lever a setting from ADJ Lever Setting 1 to ADJ Le 1Select ver Setting 5 in the key custom settings and press $. a function to assign to the setting and press 2Select C/D. Using the ADJ. Lever To select an option currently assigned to the ADJ. lever: options. 1Display With the camera in shooting The Setup Menu mode, press the ADJ. lever in and press the lever left or right or press # or $ to view the options assigned to the lever (AE/AF target selection (fixed) and the options assigned to ADJ. lever 1 to 5 are switched). an option. 2Select Press ! or " to highlight an option and press the ADJ. lever in or press C/D to select. Note • AE/AF target selection (page 74) displayed at the upper right corner of the picture display cannot be replaced with another function. ADJ Shutter Confirmation Select On to use the shutter-release button to select the highlighted option in ADJ. lever mode. 118 Fn Button Pair Setting Assign functions to the Fn (function) buttons: # (Fn1) and t (Fn2). The following settings can be assigned. Option Description AF/Snap Switch between multi or spot AF and snap focus (page 55). AF/Subj. Trckng Switch between multi or spot AF and target tracking focus (page 55). AE Lock Lock exposure. JPEG>RAW If a fine- or normal-quality option is selected for Picture Quality/Size, pressing the Fn button selects a RAW-quality option with the same aspect ratio (page 53). Color>B&W Select Black & White for Image Settings (page 62). Color>TE Select B&W (TE) for Image Settings (page 62). Color>High B&W Select Hi-Contrast B&W for Image Settings (page 62). Color>Cross Select Cross Process for Image Settings (page 62). The Setup Menu AF/MF Switch between multi or spot AF and manual focus (page 55). Color>Pos. Film Select Positive Film for Image Settings (page 62). Color>B Bypass Select Bleach Bypass for Image Settings (page 62). Exposure Comp. Display the exposure compensation slider (page 77). White Balance Display white balance options (page 78). WB Correction Display white balance compensation controls (page 81). ISO Display ISO sensitivity options (page 82). Quality Display options for picture quality/size (page 53) or movie size (page 87). Focus Display focus options (page 55). Expo. Metering Display exposure metering options (page 61). Image Display image setting options (page 62). 119 Option Description Cont. Mode Display continuous shooting options (page 64). Auto Bracket Display bracketing options (page 67). Flash Comp. Display the flash compensation slider (page 70). Flash Amount Adjust manual flash output (page 71). Dyn Range Comp Display the dynamic range compensation options (page 72). Multi Exposure Enters the Multiple Exposure shooting mode (page 68). Macro Target Position the focus target in macro mode (page 21). Self-timer Set the self-timer (page 24). Up to 4 settings can be registered. Fn Button Pair Setting. 1Select Highlight Fn Button Pair Setting in the key custom options tab and then press $. The Setup Menu a number to assign a function to. 2Select Press ! or " to select Fn Pair Setting 1 to 4 and press $. a function to assign. 3Select Press ! or " to highlight a function to assign and press C/D. Repeat steps 2 and 3 to assign additional functions. 4Press the DISP. button. Fn Button Pair Switching Select a setting to apply to Fn buttons from Fn Pair Setting1 to 4 which are set in Fn Button Pair Setting. 120 Note 9999 4:3 N • The functions currently assigned to Fn buttons are displayed when the camera is turned on, the mode dial is rotated, or ! is pressed. When the assigned functions are displayed in AF/MF the picture display, rotating the upSelf-timer down dial while pressing ! switches assigned functions (Fn Pair Setting 1 to 4) (this function is not available in the manual focus mode). AUTO 10 M Zoom Button Choose the role played by the 8 and 9 buttons. Choose from none (off ), digital zoom (page 20), exposure compensation (default) (page 77), and white balance (page 78). Playback Mode Dial Options/M Mode Dial Options Choose the roles played by the ADJ. lever and up-down dial during playback zoom and in mode M. Playback Mode Dial Options Setting1 ADJ. lever Updown dial Setting2 M Mode Dial Options Setting1 Setting2 Next/previous Scroll left/right Shutter speed frame Aperture Scroll up/ down Shutter speed Zoom in/out The Setup Menu Power Button Lamp If On is selected, the power button LED will light when the camera is turned on. Aperture 121 One Press M Mode When exposure compensation is assigned to the 8 and 9 buttons (page 121) or AE lock is assigned to an Fn button (page 119), pressing the button in manual exposure mode sets shutter speed and/or aperture to values close to those needed for optimal exposure. • Aprtr Priority: Aperture remains at the selected value; shutter speed is adjusted for optimal exposure. • Shttr Priority: Shutter speed remains at the selected value; aperture is adjusted for optimal exposure. • Program: Both aperture and shutter speed are adjusted for optimal exposure. The Setup Menu 122 ADJ. Direct ISO Control Select On to enable to change ISO sensitivity by pressing the ADJ. lever left or right in the shooting mode. Delete My Settings Highlight MY 1, MY 2, or MY 3, or highlight My Settings Box or Card, press $, and highlight a setting to be deleted. Press C/D to delete the selected setting. A confirmation dialog will be displayed; press # or $ to highlight Yes and press C/D. Setup Menu Options Format [Card]/Format [Internal Memory] Select Format [Card] to format a memory card. Select Format [Internal Memory] if a message is displayed prompting you to format internal memory. Caution • Formatting deletes all data on the card or in internal memory. Before formatting, copy the data you wish to keep to a computer (page 135). LCD Brightness Select the brightness for the picture display. LCD Brightness. 1Select Highlight LCD Brightness in the setup tab and then an option. 2Select Press ! or " to select Auto or Manual and press $. If selecting Auto, the display returns to the setup menu. If selecting Manual, the control is displayed. The Setup Menu press $. the brightness of the 3Adjust picture display. Press ! to increase the brightness and " to decrease. 4Press C/D. 123 ISO Step Setting Step value for ISO sensitivity can be selected from 1EV and 1/3EV. The available ISO settings differ depending on the selected step value. Option Available ISO Sensitivity 1EV Auto/Auto-Hi/ISO 80/ISO 100/ISO 200/ISO 400/ISO 800/ ISO 1600/ISO 3200 1/3EV Auto/Auto-Hi/ISO 80/ISO 100/ISO 125/ISO 160/ISO 200/ ISO 250/ISO 320/ISO 400/ISO 500/ISO 640/ISO 800/ISO 1000/ISO 1250/ISO 1600/ISO 2000 /ISO 2500/ISO 3200 The Setup Menu ISO Auto-High Settings Choose the maximum sensitivity (Maximum ISO) selected by the camera and the shutter speed to shift the value of ISO sensitivity (Change Shutter Speed) when Auto-Hi is selected for ISO Setting in the shooting menu (page 82). Choose the maximum sensitivity from settings of ISO 200 (AUTO 200), 400 (AUTO 400) (default), 800 (AUTO 800), 1600 (AUTO 1600) or 3200 (AUTO 3200). Choose the shutter speed from Auto, 1/2, 1/4, 1/8, 1/15, 1/30, 1/60, 1/125, or 1/250. AF Auxiliary Light If On is selected, the AF auxiliary light will light to assist the focus operation when the subject is poorly lit. 124 Operation Sounds Choose when the camera plays a sound. Option Description All Sounds are played at startup, when the shutter is released, when the camera focuses, and when an error occurs. If Sound or Level + Sound is selected for the level setting (page 25), the camera will also beep at regular intervals when the camera is level. Level Sound If Sound or Level + Sound is selected for Level Setting, the camera will beep at regular intervals when the camera is level. Sounds are played when the shutter is released or an error ocShutter curs. If Sound or Level + Sound is selected for Level Setting, the Sounds camera will beep at regular intervals when the camera is level. LCD Confirmation Time Choose how long a picture is displayed in the picture display after shooting. Select from 0.5, 1, 2, and 3 seconds, Hold (photograph is displayed until shutter-release button is pressed halfway next time and can be viewed with playback zoom or deleted), and Off (photographs are not displayed in the picture display after shooting). The Setup Menu Volume Settings Select the volume for the operation sounds. Choose from Off, (low), (medium), and (high). Auto Power Off Choose the delay before the camera turns off automatically to save power when no operations are performed. Select from Off (the camera does not turn off automatically), 1 minute, 5 minutes, and 30 minutes. 125 Note • The auto power off function is not available for the following cases. • When connected to a computer or printer. • In the interval shooting or interval composite shooting (scene mode) • When transferring images using an Eye-Fi card Sleep Mode Choose the delay before the picture display enters sleep mode. Choose from Off (the function does not work), 10 Seconds, 1 Minute, and 3 Minutes. The Setup Menu Note • The sleep function is not available for the following cases. • When connected to an AV device using an AV cable or HDMI cable • In the interval composite shooting (scene mode) LCD Auto Dim Select On to dim the picture display to save power if no operations are performed for five seconds. Optional AF Distance Display Selecting On to display the indicator for the distance to the subject in shooting mode. Level Setting Choose tilt indicator settings to level the camera and correct the perspective for photographing buildings or landscapes (page 25). Level (Tilt) Calibration Register the current perspective as the standard. 126 Grid Guide Display Options Choose the type of framing grid available in shooting mode (page 33). Item Description A three-by-three grid for “rule of thirds” composition (default). A four-by-four grid with diagonal lines running from corner to corner makes it easy to find the center of the subject. Use for architectural photography or photographing products for display. The Setup Menu A two-by-two grid with the center of the frame left clear to make it easier to view the subject. Use if your subject is in motion. Shooting Info. Display Frame Select On to display shooting icons in a frame surrounding the view through the lens (page 6), making it easier to frame photographs in the picture display. The frame is not displayed in movie mode. 127 Information Display Mode Select On to display shooting information in the picture display even when the picture display is off (page 33), allowing you to adjust camera settings while using an optional external viewfinder (page 154) to frame photographs. Shooting information can be displayed by: • Pressing the Fn1, t, or N button • Rotating the mode dial to a new position • Using the up-down dial • Pressing the ADJ. lever left or right • Pressing the flash OPEN switch (F OPEN) to raise the flash The Setup Menu 128 The information display turns off if the shutter-release button is pressed halfway or no operations are performed for a few seconds. One Press Zoom Ratio Select the magnification at which pictures are displayed when zoomed in using the C/D button or ADJ. lever (page 29). Choose from 5.7 ×, 9.8 ×, and 16 ×. Auto Rotate Select On to automatically display pictures in the correct orientation. White Saturation Display Select On to display the white saturation areas of the image flashed in black in the Highlights display. If selecting Off, the Highlights display is not available in the playback mode (page 34). The Setup Menu Caution • The orientation of the pictures taken in the Continuous, AFCont, or auto bracket mode will be the orientation of the first shot. • The auto rotate function is not available for the following cases. • Movies • Pictures taken in the S-Cont or M-Cont mode • When viewing pictures in the multi-frame view • Pictures with too much perspective (taken with the camera tilted too far forward or backward) • Pictures taken with the camera upside-down • If the orientation of the camera changed while viewing a picture in the enlarge view • While the skew correction is in process (when an orange frame is displayed) • In the slide show or viewing images on a TV 129 Playback Order Options Select the order for the pictures to be displayed in the playback mode. • File Numbers: Pictures are displayed in the order of file numbers. • Sht. Date/Time: Pictures are displayed in the order of shooting date and time. RAW/JPEG Setting Choose the quality and size of JPEG copies recorded when a RAW-quality option is selected for Picture Quality/Size (page 53). Select Fine or Normal to record a fine- or normal-quality copy of the same dimensions as the RAW image, VGA to record a copy of z 4:3 F in size. If selecting RAW only, a JPEG copy is not recorded. The Setup Menu Color Space Setting Choose the color space used to record photographs. sRGB is widely used to reproduce digital images but offers a smaller gamut of colors than AdobeRGB. Caution • The Adobe RGB color space was developed by Adobe Systems, Inc., and is compatible with the default color space used in Adobe Photoshop and other image editing software. Note, however, that colors will only be reproduced correctly in software that supports the Adobe RGB color space. Note too that specialized equipment is required to print the full range of colors in the Adobe RGB gamut; when printed using consumer household printers or digital photo print services, colors will generally be less vivid than in photographs that use the sRGB color space. 130 Area measured for manual WB Select the area to measure the white balance in from Entire frame or Spot. AUTO 5M The Setup Menu Digital Zoom Image Choose how the image taken using the digital zoom will be saved. • Normal: It crops a portion of an image and enlarges the portion back to the size selected in Picture Quality/ Size, resulting in lower image quality. • Auto Resize: It crops a portion of an image and save the image in the cropped size. It keeps from decreasing the image quality, however, the image size becomes smaller. Auto Resize zoom is available only when j 4:3 F or j 4:3 N is selected for Picture Quality/Size (page 53). 9999 4:3 F The current picture size is displayed in the picture display when the camera is zoomed in (the sizes of cropped image differ depending on the zoom ratio). Caution • Auto Resize has no effect when S-Cont or M-Cont is selected for Continuous, or in multiple exposure shooting or scene mode. Store Menu Cursor Position If On is selected, the most-recently accessed item will be highlighted when menus are displayed. 131 Card Sequence No. Choose how the camera names image files when saving photographs to a memory card. • On: File names consist of “R” followed by a seven-digit number (e.g., “R0010001.jpg”), assigned in ascending order from 0010001 to 9999999. When a new memory card is inserted, file numbering continues from the last number used. • Off: File names consist of “RIMG” followed by a four-digit number (e.g., “RIMG0001.jpg”), assigned in ascending order from 0001 to 9999. When a new memory card is inserted, file numbering is reset to 0001. The Setup Menu Note • This option applies only to memory cards. The names of photos in internal memory consist of “RIMG” and a four-digit number. • Photos copied to a computer using DL-10 (page 135) are given new names consisting of “RIMG” and a four-digit number. • Photos taken with AdobeRGB selected for Color Space Setting (page 130) are indicated by file names beginning with an underscore (e.g., “_R010001.jpg” or “_RIMG001.jpg”). Caution • When On is selected, no further photographs can be stored if the memory card contains a folder numbered 999 and a file name ending in 9999; when Off is selected, no further photographs can be stored if the memory card contains a file numbered 9999. To take additional photos, format the card after copying its contents to a computer. 132 Date Settings Set the camera clock (page 17). Language/N Choose the language in which camera messages and menus are displayed. Option Description Option Description 日本語 English Japanese Danske Danish English Svenska Swedish Deutsch German Русский Russian Français French 简体中文 Simplified Chinese Italiano Italian 繁体中文 Traditional Chinese Español Spanish Korean Nederlands Dutch 한국어 ไทย Thai The Setup Menu Video Out Mode When connecting the camera to a TV or VCR (page 101), choose a video out mode that matches the standard used in the device. The camera supports NTSC and PAL; SECAM is not supported. USB Connection Type Select the type of USB connection from Mass Storage or PTP. 133 HDMI Output Choose the resolution of image output using an HDMI cable. Choose the setting from AUTO, 1080i, 720P, or 480P. Note • Normally, select AUTO. If the resolution of image displayed on TV is low with the AUTO setting, select 1080i, 720P, or 480P. The image may be improved. Confirm Firmware Version Confirm the version of the firmware and update the firmware if necessary. For information about firmware, visit the Ricoh website (http://www.ricoh.com/r_dc/support/). The Setup Menu Eye-Fi Connection Settings When using the SD memory card with wireless LAN function, selecting On enables the wireless LAN function. Selecting Off turns the wireless LAN function off, and the card can be used as a standard SD memory card. Eye-Fi Connection Display When an Eye-Fi card is used, selecting this option displays the destination SSID. 134 Downloading Images to Your Computer The screen images shown here may differ from the images displayed on your computer depending on your computer OS. For Windows You can copy pictures to your computer using the software included in the internal memory of the camera. Software DL-10 Description Copies pictures to your computer. Caution • Administrator privileges are required for installation. • DL‑10 is not network-compatible. Use as a stand-alone application. Note • For details on MediaBrowser, see the Help in MediaBrowser or visit the website: http://www.mediabrowser.jp/en/index.html Downloading Images to Your Computer MediaBrowser View, manage, and edit images. 135 System Requirements for Using the Software Before installing the software included in the camera, check that your computer meets the following environment requirements. Windows XP Home Edition Service Pack 3/ProfesOperating Systems sional Service Pack 3 Supported Windows Vista Service Pack 2 Windows 7 (32- and 64-bit) CPU Memory Downloading Images to Your Computer 136 Pentium® IV: 1.6 GHz or faster Pentium® M: 1.4 GHz or faster Core™ 2 Duo: 1.5 GHz or faster Windows XP: 512 MB or more Windows Vista/Windows 7: 1 GB or more Hard drive space re- 300 MB or more quired for installation Display Resolution 1024 × 768 pixels or greater Display Colors USB Port 65,000 colors or greater A USB port compatible with the above-mentioned computer Caution • Windows XP 64-bit and Windows Vista 64-bit are not supported. • If your computer has an upgraded OS, the USB function may not work normally, so it will not be supported. • The software may not operate properly if changes are made to the operating system, such as with patches and service package releases. • The camera does not support connection to a USB port added by using an extension function (PCI bus or other). • If used in conjunction with a hub or other USB devices, the software may not work properly. • When dealing with movies and other large files, a larger memory environment is recommended. Installing Software Install the supplied software to your computer. Caution • Before proceeding, confirm that Mass Storage is selected for USB Connection Type in the setup menu (page 133). the camera power off, and pull the SD memo 1Turn ry card out of the camera. With SD memory card in the camera, the software cannot be installed. port/AV output of the camera. The camera turns on automatically when a connection is established. RICOHDCI(E:) screen is displayed (E indicates the drive name). Start the digital camera 4Click software installer, and then click the OK button. Digital camera software installer screen appears. Downloading Images to Your Computer 2Connect the supplied USB cable to the computer. the USB cable to the 3Connect common terminal for USB 137 Windows 7 Click Open folder to view files and double-click AUTORUN.EXE from the displayed files. Click to install software required for batch downloading and editing of images. Click to display the Website for user registration. Installing the software. 5Click Windows XP Downloading Images to Your Computer After a while, the Choose Setup Language screen appears. Windows Vista/Windows 7 If a User Account Control dialog is displayed, select Allow (Windows Vista) or Yes (Windows 7). If an icon appears on the task bar, click the icon to display the dialog. After a short pause, the Choose Setup Language dialog will be displayed. a language and follow the on-screen instruc 6Select tions to complete installation. The MediaBrowser installer will start. To install MediaBrowser, accept the license agreement and follow the on-screen instructions. Unblock for DL‑10. 7Click For Windows 7, click Allow access. 138 a message appears prompting you to restart 8When your computer, select Yes, I want to restart my computer now. and then click Finish. Your computer will restart automatically. After your computer restarts, a Windows security warning message appears. Viewing Software Manual In the internal memory of the camera, “Software User Guide” (PDF file) is available. This guide explains how to download images from the camera to your computer. To view the guide, copy the guide onto your computer. My computer with the camera connected to 1Open the computer. Downloading Images to Your Computer Caution • When using the USB cable, do not move the camera with the USB cable. • Do not disconnect the USB cable with the camera power on. • Do not connect a cable other than the supplied USB cable. • If you install the DC Software 2 in the computer in which the DC software is already installed, DL-10 for the DC Software 2 is added to the Start-up folder. • If you uninstall the DC Software 2 with the DC Software and the DC Software 2 have been already installed, DL-10 added to the Start-up folder may be deleted. The internal memory of the camera appears as the drive. MANUAL folder. 2Open Each language has its own “Software User Guide” (PDF file). 139 the PDF file for your language directly to the 3Copy hard disk of your computer. Note • Adobe Reader or Acrobat Reader is required to view the operation manual (PDF file). Install the application from the Adobe website if either of the applications is not installed in your computer. When the DL-10 Software has already been installed from the camera, select Start > DC Software 2 > Adobe Reader Download to display the website for downloading. • For details about Adobe Reader, see the Help for Adobe Reader. Downloading Images to Your Computer Copying Pictures to Your Computer Follow the steps below to copy pictures to your computer. Caution • Before proceeding, confirm that Mass Storage is selected for USB Connection Type in the setup menu (page 133). • To copy pictures stored in the SD memory card, insert the card in the camera first and then connect the camera to the computer. • Turn the camera off before connecting the USB cable. 1Connect the supplied USB cable to the computer. the USB cable to the 2Connect common terminal for USB port/AV output of the camera. The camera turns on automatically when a connection is established. 140 photos to the computer. 3Copy If DL-10 is installed: Example of the display in Windows XP the camera off and disconnect the USB cable 4Turn when transfer is complete. Caution • Do not turn off the camera or disconnect the USB cable during image transfer. Downloading Images to Your Computer DL-10 starts and transfers images automatically. Pictures are copied to the Digital Camera folder in My Documents, where they are sorted into separate folders by date of recording. See the “Software User Guide” (PDF file) for more information. If DL‑10 is not installed: Copy files from the camera to the desired location. When Digital camera software installer screen appears, click ×. 141 For Macintosh This camera supports the following Macintosh operating systems. • Mac OS X 10.4 to 10.6.7 Note • In the internal memory of the camera, “Software User Guide” (PDF file) is available. To view the guide, copy the guide onto your computer (page 139). Copying Pictures to Your Computer Follow the steps below to copy pictures to your computer. Downloading Images to Your Computer 142 Caution • Before proceeding, confirm that Mass Storage is selected for USB Connection Type in the setup menu (page 133). • To copy pictures stored in the SD memory card, insert the card first and then connect the camera to the computer. • Turn the camera off before connecting the USB cable. 1Connect the supplied USB cable to the computer. the USB cable to the 2Connect common terminal for USB port/AV output of the camera. The camera turns on automatically when a connection is established. photos to the computer. 3Copy Copy files from the camera to the desired location. the USB cable when transfer is com 4Disconnect plete. Drag the camera volume into the Trash and then disconnect the USB cable. Downloading Images to Your Computer Caution • Do not turn off the camera or disconnect the USB cable during image transfer. • If the USB cable is disconnected without disabling the connection, the Unsafe Removal of Device screen may be displayed. Be sure to stop the connection before removing the USB cable. • When you connect your camera to a Macintosh computer, a file called “FINDER.DAT” or “.DS_Store” may be created in your SD memory card, which will appear as Unmatched File on your camera. You can delete this file from the SD memory card if you wish. 143 Technical Notes Troubleshooting Error Messages If an error message is displayed, take the steps listed below. Message Insert card Set date. The file number limit has been exceeded. Technical Notes 144 Solution No memory card inserted. Insert card. Camera clock not set. Set camera clock. Page 12 17, 133 Camera is out of file numbers. Insert another card. 12, 132 Camera cannot display the file. Use computer to check file Unmatched File contents and delete file. Insufficient memory. Space on memory card is insufficient to copy all files. Insert Continue? another card. Protected File is protected and cannot be deleted. Card Is Write-Protected. Card is write protected (locked). Unlock card. Print settings cannot be File is a movie or other file that cannot be selected for printapplied to this file. ing. Insufficient memory to store additional files. Delete existing Insufficient Memory/ files or insert another card. Capacity short Maximum number of images selected for printing. Set number of prints for other images to zero. Format internal Internal memory is not correctly formatted. Format internal memory. memory. Format card. Card is not correctly formatted. Format card in camera. Format card. If message persists, card is faulty, discontinue Card Error use. Writing Data Camera is saving data. Wait until save is complete. No File No files available for playback. Memory is full. Use another card or remove card and use Cannot Record internal memory. — 12 90 — — 12, 30 108 123 123 123 — — 12 Camera-Related Problems Power Supply Problem Cause Technical Notes Solution Page Check that battery is correctly Battery is exhausted or not inserted. Charge battery (re- 10, inserted. chargeable battery only), insert 12, 158 fresh battery, or use AC adapter. The camera does Use supplied battery or compatBattery is incompatible. 11 not turn on. ible AAA batteries. AC adapter is not connected. Check connection. 158 Battery is not in correct orienta- Insert battery in correct orien12 tion. tation. Camera has turned off autoTurn camera on. 15 matically to save power. Charge battery (rechargeable The camera turns 10, Battery is exhausted. battery only), insert fresh batoff during use. 12, 158 tery, or use AC adapter. Use supplied battery or compat11 Battery is incompatible. ible AAA batteries. Remove and reinsert battery or The camera does Camera malfunction. disconnect and reconnect AC 12, 158 not turn off. adapter. Low battery indicator displayed Use supplied battery or compat11 or camera turns off Battery is incompatible. ible AAA batteries. when battery has charge remaining. Battery cannot be Battery has reached end of Replace with a new battery. — charged. charging life. Ambient temperature is very — — Battery is quickly high or very low. exhausted. Poor lighting requires extensive — — use of flash. 145 Shooting Problem No picture taken when shutterrelease button is pressed. Cannot view photos after shooting. Cause Solution Page Charge battery (rechargeable 10, Battery is exhausted. battery only), insert fresh bat12, 158 tery, or use AC adapter. Press POWER button to turn Camera is off or not in shooting camera on or press 6 to select 15, 27 mode. shooting mode. Memory card is not formatted. Format card. 123 Memory card is full. Insert new card or delete files. 12, 30 Memory card has reached end Insert new card. 12 of working life. Wait until flash lamp stops Flash is charging. — blinking. Memory card is locked. Unlock card. — Memory card contacts are dirty. Clean with soft, dry cloth. — Display time is too short. Picture display is dark. Picture display is blank. Technical Notes 146 Picture display is off. Choose longer display time. Adjust picture display brightness. Press DISP. to turn picture display on. AV cable or HDMI cable is conDisconnect the cable. nected. Lens is dirty. Clean with soft, dry cloth. Subject is not at center of Use focus lock. Camera unable to frame. focus in autofocus Subject not suitable for autoUse focus lock or manual focus. mode. focus. Use macro mode or move away Subject is too close. from subject. Camera moved during shoot- Use tripod or press elbows ing. against torso. Pictures are blurred. Lighting is poor and shutter Use the flash or choose higher speeds are slow. ISO setting. 125 123 33 — — — 19, 58 21 — 22, 82 Problem Cause Flash is not raised. Flash cover is not fully open. Solution Slide F OPEN switch down to raise flash. Do not obstruct flash cover. Bracketing enabled or camera in continuous, dynamic range, Change camera settings. Flash does not fire interval composite, or movie or will not charge. mode. Flash is off. Battery is exhausted. Page 22 — 44, 45, 64, 67, 86 Raise flash and choose another 22 flash mode. Charge battery (rechargeable 10, battery only), insert fresh bat12, 158 tery, or use AC adapter. — 70 70 — 70 123 22 123 78 Technical Notes Subject is more than Move closer to subject. 3.0 m/9.8 ft. from camera. Flash does not Subject is dark. Increase flash output. illuminate subject. Flash output is too low. Increase flash output. Flash cover is not fully open. Do not obstruct flash cover. Reduce flash output, move Flash output is too high. away from subject, or use difPhotos are too ferent light source. bright. Adjust picture display brightPicture display is too bright. ness. Flash is off and subject is poorly Raise flash and choose another lit. flash mode. Photos are too dark. Adjust picture display brightPicture display is too dark. ness. Camera unable to adjust white Include white object in photo or Colors are unbalance for shooting conditions choose another white balance natural. using auto white balance. option. Picture display Ambient lighting is poor or This is normal and does not inbrightness changes differs from that used for audicate a malfunction. during focusing. tofocus. Vertical streaks This is normal and does not in(“smear”) appear Subject is bright. dicate a malfunction. in photos. — — 147 Problem Cause Solution Off or Sound selected for Level Choose Level + Tilt, Level, or Setting. Level + Sound. Tilt indicator is not Indicators are hidden. Press DISP. to display indicators. displayed. Hold the camera in the correct The camera is upside down. orientation. Camera was moving when Do not take pictures from movPhoto is not level, although tilt photo was taken. ing objects. indicator showed that camera was Subject is not level. Straighten subject. level. Page 25 33 — — — Playback/Deletion Technical Notes 148 Problem Cause Solution Page Photo information Indicators are hidden. Press DISP. to display indicators. 33 not displayed. AV cable/HDMI cable incorrectly Reconnect the cable. 101 Cannot play connected. pictures back. Video mode does not match TV. Choose another video mode. 133 Card was not formatted in Insert card that has been forcamera. matted in camera and contains 12, 123 Pictures were created with pictures recorded with camera. Cannot view pic- other device. tures on memory Memory card contacts are dirty. Clean with soft, dry cloth. — card. Insert another card. If you can view pictures on second card, 12 Card malfunction. first card has probably malfunctioned, discontinue use. Charge battery (rechargeable 10, Battery is exhausted. battery only), insert fresh bat12, 158 Picture display has tery, or use AC adapter. turned off. Camera has turned off autoTurn camera on. 15 matically to save power. File is protected. Remove protection. 90 Cannot delete file. Memory card is locked. Unlock memory card. — Cannot format Card is locked. card. Miscellaneous Problem Cannot insert memory card. Camera controls have no effect. Date is incorrect. Date has been reset. Pictures are not displayed on TV. Cause Solution Page Card is not in correct orientaInsert in correct orientation. 12 tion. Charge battery (rechargeable 10, Battery is exhausted. battery only), insert fresh bat12, 158 tery, or use AC adapter. Turn camera off and then on 15 again. Camera malfunction. Remove and reinsert battery or disconnect and reconnect AC 12, 158 adapter. Set clock to correct date and Clock is not set correctly. 17 time. Battery has not been inserted Set clock to correct date and 17 for about a week. time. Video mode does not match TV. Choose another video mode. 133 AV cable/HDMI cable not conConnect the cable. 101 nected. AV device is not tuned to VIDEO Tune the AV device to VIDEO IN — IN channel. channel. Technical Notes 149 Specifications Effective pixels Image sensor Focal length Aperture (f-number) Lens Focus range (from lens) Construction Zoom Focus mode Blur Reduction Shutter Photographs speed Movies Metering Exposure Mode control Exposure compensation Technical Notes Exposure link range (in auto shooting mode, light metering mode [center]) ISO sensitivity (Standard Output Sensitivity) White balance 150 Approximately 10 million 1/1.7˝ CCD (approximately 10.4 million total pixels) 6.0 mm (35-mm format equivalent: 28 mm) f/1.9 – f/9 (ND filter used for apertures of f/8.0 – f/11 in auto shooting mode) Approx. 30 cm – ∞, approx. 1.0 cm – ∞ in macro mode 8 elements in 6 groups (2 aspherical lens elements with 2 surfaces) 4.0 × digital zoom, approx. 5.7 × auto resize zoom (VGA) CCD-based multi and spot AF, Subj. Tracking, MF, Snap, ∞, focus lock, and AF-assist Image Sensor Shift Image Stabilizer B (Bulb), T (Time) 180, 120, 60, 30, 15, 13, 10, 8, 6, 5, 4, 3.2, 2.5, 2, 1.6, 1.3, and 1 – 1/2000 s (upper and lower limits vary according to shooting and flash mode) 1/30 – 1/2000 s TTL-CCD metering in multi (256-segment), center-weighted, and spot modes with autoexposure lock Program AE, Aperture priority AE, Shutter priority AE, Manual exposure Manual (+2.0 to –2.0 EV in increments of 1/3 EV), Auto bracketing (–0.5 EV, ±0 EV, +0.5 EV and –0.3 EV, ±0 EV, +0.3 EV) 1.8 EV to 17.7 EV (link range for automatic ISO converted based on the EV for ISO100) *For 5.3 EV or lower, the camera will shift the setting 0.125 EV toward the low brightness side (up to -1.0 EV maximum) for every 1.0 EV that the exposure link range decreases. Auto/Auto-Hi/ISO 80/ISO 100/ISO 125/ISO 160/ISO 200/ISO 250/ISO 320/ISO 400/ISO 500/ISO 640/ISO 800/ISO 1000/ISO 1250/ISO 1600/ ISO 2000/ISO 2500/ISO 3200 Auto, Multi-P AUTO, Outdoors, Cloudy, Incandescent 1, Incandescent 2, Fluorescent Lamp, Manual Settings, Detail, White balance bracket Mode Flash Guide number Range (builtin flash) Flash compensation Charging Time Picture display Shooting mode Picture quality 1 Image Photographs size (pixels) Movies Storage 5.4 (ISO 100 equivalent) Approx. 20 cm – 3.0 m (ISO Auto) ±2.0 EV in increments of 1/3 EV Approx. 5 seconds when using a rechargeable battery Approx. 8 seconds when using AAA alkaline batteries 3.0˝ transparent LCD, approx. 1,230,000 pixels (640 × 4 × 480 = 1,228,800) Auto, Program shift, Aperture priority, Shutter speed priority, Manual exposure, Scene (Dynamic range, Interval composite, Skew correct, Movie), “My Settings” Fine, Normal, RAW (DNG) 2 3648 × 2736, 3648 × 2432, 2736 × 2736, 3648 × 2048, 3264 × 2448, 2592 × 1944, 2048 × 1536, 1280 × 960, 640 × 480 640 × 480, 320 × 240 SD/SDHC and MultiMedia memory cards, Eye-Fi card (X2 series), internal memory (approx. 40 MB) 2,193 KB/frame (N), 3,728 KB/frame (F), 14.6 MB/frame (RAW) 1,954 KB/frame (N), 3,319 KB/frame (F), 13.0 MB/frame (RAW) 1,654 KB/frame (N), 2,803 KB/frame (F), 11.0 MB/frame (RAW) 1,657 KB/frame (N), 2,808 KB/frame (F), 11.0 MB/frame (RAW) 3,014 KB/frame (F) 2,311 KB/frame (F) 1,498 KB/frame (F) 836 KB/frame (F) 221 KB/frame (F) JPEG (Exif Ver. 2.21) 3, RAW (DNG) AVI (OpenDML Motion JPEG compliant) JPEG baseline compliant (photographs and movies) Technical Notes 3648 × 2736 3648 × 2432 3648 × 2048 2736 × 2736 File size 3264 × 2448 (approx.) 2592 × 1944 2048 × 1536 1280 × 960 640 × 480 Photographs File Movies format Compression Auto (flash fires when lighting is poor or subject is backlit), Red-eye, On, Slow sync, Manual, Off 151 Technical Notes 152 Continuous shooting (Continuous, AF-Cont, S-Cont, M-Cont), Self-timer (shutter release delay of approx. 2 s or Custom), Interval shooting (intervals of 5 s to 1 h in increments of 5 s) 4, White balance bracket, Image setting bracket, Dynamic range bracket, Contrast bracket, Other shooting options Color space setting, AE/AF target selection, Camera shake correction, Dynamic range compensation, Multiple exposure shooting, Noise reduction, Histogram display, Framing grid, Depth-of-field indicator, Tilt indicator, Hot shoe Auto image rotation, Multi-frame playback, Playback zoom (up to Other playback options 16 ×), Slide show, Resize, Skew Correction, Level Compensation, White Balance Compensation, Trim, DPOF USB 2.0 (High-Speed), Mass Storage 5, audio output 1.0 Vp-p (75 Ω), Interface HDMI cable connector (Type D) Video signal format NTSC, PAL One DB-65 rechargeable battery (3.7 V) Power source Two AAA alkaline or NiMH batteries Optional AC-4c AC adapter (3.8 V) Battery life (based on • DB-65: approx. 390 shots • AAA alkaline batteries: approx. 30 shots 7 CIPA standard) 6 Dimensions (W × H × D) 108.6 mm × 59.8 mm × 25.2 mm (excluding projections) • Camera (excluding battery, memory card, and strap): 190 g Weight (approx.) • Battery and strap: 30 g Tripod screw hole 1/4-20UNC Date storage time Approx. 1 week Operating temperature 0 °C to 40 °C Operating humidity 90% or less Storage temperature –20 °C to 60 °C 1The options available vary with image size. 2A JPEG file is also recorded (the JPEG file may be a fine- or normal-quality file with the dimensions as the RAW file or VGA file). RAW files are in the standard DNG format promoted by Adobe Systems, Inc. 3Compatible with the Design rule for Camera File system (DCF, a JEITA standard) and DPOF. Full compatibility with other devices is not guaranteed. 4Flash off. 5Mass Storage is supported under 64-bit version of Windows XP, Windows Vista, Windows 7, and Mac OS X 10.1.2–10.6.7. 6Measured according to CIPA standard. For reference only, actual number of shots varies greatly according to how camera is used. 7Measured with Panasonic alkaline batteries. Internal Memory/Memory Card Capacity The following table lists the approximate number of frames or length of movies that can be stored in internal memory or on a memory card at different settings. Photographs Movies o 4:3 j 4:3 F j 4:3 N o 3:2 i 3:2 F i 3:2 N o 16:9 g 16:9 F g 16:9 N o 1:1 g 1:1 F g 1:1 N h 4:3 F e 4:3 F c 4:3 F a 4:3 F z 4:3 F z 640, 30fps z 640, 15fps y 320, 30fps y 320, 15fps Internal memory 2 10 17 2 11 19 2 13 23 2 13 23 12 15 24 43 158 22 s 43 s 54 s 1 min. 38 s 1 GB 50 240 411 57 271 461 67 321 544 67 319 544 297 370 570 1041 3776 8 min. 54 s 17 min. 4 s 21 min. 26 s 38 min. 45 s 2 GB 4 GB 8 GB 103 203 415 487 957 1957 830 1631 3333 116 228 467 548 1077 2202 931 1828 3737 137 270 553 653 1284 2624 1097 2155 4405 137 270 551 647 1270 2596 1097 2155 4405 602 1183 2418 749 1471 3008 1159 2277 4654 2118 4160 8505 7681 15082 30828 17 min. 58 s 35 min. 17 s 72 min. 8 s 34 min. 9 s 67 min. 3 s 137 min. 3 s 42 min. 41 s 83 min. 49 s 171 min. 19 s 78 min. 48 s 154 min. 44 s 316 min. 16 s 16 GB 831 3922 6678 935 4412 7487 1108 5257 8824 1105 5202 8824 4845 6026 9324 17039 61759 144 min. 30 s 274 min. 33 s 343 min. 11 s 633 min. 35 s 32 GB 1668 7867 13396 1877 8851 15020 2222 10546 17702 2217 10435 17702 9718 12089 18704 34181 123888 289 min. 52 s 550 min. 45 s 688 min. 26 s 1270 min. 57 s Technical Notes Note • The figures for movies are the total length that can be recorded. Each movie can be up to 29 minutes long (4 GB in size). • Depending on the subject, the number of pictures that can be taken may differ from the number of exposures remaining. • Capacity varies with shooting conditions and the make of memory card. • Use a high-speed memory card when shooting for extended periods. 153 Optional Accessories The GR DIGITAL IV can be used with the following optional accessories. AC-4c AC adapter DB-65 rechargeable battery The adaptor cannot be used depending on country or region. GH-2 hood and adapter A hood to prevent sunlight from entering the lens and an adapter for general-purpose filters with a diameter of 43 mm. Technical Notes 154 BJ-6 battery charger GW-2 wide conversion lens CA-2 cable switch A conversion lens with a A wired remote shutter focal length multiplier of release. 0.75 × for wide-angle shots, giving a combined focal length of 21 mm (35-mm format equivalent). Requires GH-2. Case included. GF-1 external flash GV-1 external viewfinder An external flash with An optical viewfinder TTL autoflash system that attaches to the (page 159). camera hot shoe. Frames offer coverage for 21 mm and 28 mm lenses (35-mm format equivalent). Case included. GV-2 mini external viewfinder A compact optical viewfinder that attaches to the camera hot shoe. Frames offer coverage for 28 mm lenses (35mm format equivalent) with marks for 1 : 1 aspect ratio. Case included. GL-1 Metal Lens Cap A metal lens cap with power switch lock for preventing the camera from being turned on accidentally (the camera does not fit in the softcase with the metal lens cap on). AV-1 AV cable HC-1 HDMI cable An AV cable for con- An HDMI cable for connecting the camera to necting the camera to the video input termi- a compatible TV, etc. nal of a TV etc. GC-3 soft case GC-4 soft case (can be used with GV-2) GS-1 or ST-2 neck strap GS-2 hand strap Technical Notes Note • Before using optional accessories, read the manual provided with the product. • The built-in flash cannot be used with conversion lenses or lens hoods. • GH-1, GW-1, and GT-1 accessories for GR DIGITAL and GR DIGITAL II cameras cannot be used. • For the latest information on optional accessories, visit the Ricoh website (http://www.ricohpmmc.com/). 155 Tip: Ring Cap • Remove the ring cap before attaching a conversion lens, the lens hood and adapter, or a metal lens cap. • To remove the ring cap: Turn the camera off and rotate the ring cap counterclockwise until it can be removed. • To reattach the ring cap: Turn the camera off and place the cap on the camera, keeping the marks on the camera body (1) and ring cap (2) aligned. Rotate the cap clockwise until it clicks into place. Technical Notes 156 Camera System and Accessories GV-1/GV-2 external viewfinder GF-1 flash unit Attach to hot shoe. GC-3/GC-4 soft case GL-1 Metal Lens Cap GS-1/ST-2/GS-2 strap Remove ring cap before attaching. GH-2 lens hood and adapter ø 43 mm ø 43 mm Attach to the HDMI cable connector. HC-1 HDMI cable Filters GW-2 wide conversion lens AV-1 AV cable Attach to the common terminal for USB port/AV output. Optional accessory BJ-6 battery charger AC-4c AC adapter Technical Notes USB cable/CA-2 cable switch DB-65/DB-60 rechargeable battery Available from thirdparty supplier 157 Using an Optional AC Adapter An optional AC-4c AC adapter is recommended for extended use or when the camera is connected to a computer. Be sure the camera is off before connecting the AC adapter. the battery/card cover. 1Open Unlatch and open the cover and remove batteries. the AC adapter coupler. 2Insert The battery latch will click into place when the coupler is fully inserted. the cable in the cable channel. 3Place Open the power (DC input) cable cover and place the power cable in the cable channel. the battery/card cover. 4Close Close and latch the cover. Technical Notes Caution • Be sure the cover is latched. 1 2 the adapter in. 5Plug Attach the AC cable to the adapter and plug it in to a power outlet. Caution • Be sure that both plugs are fully inserted. • Disconnect the AC adapter and unplug it from the power outlet when not in use. 158 • Data may become corrupted if the AC adapter is disconnected or power is interrupted while the camera is on. ) may be displayed while the AC • The battery indicator ( adapter is in use. This is normal, and you can continue using the camera. • Do not pick up the camera by the cable when the AC adapter is attached. • The adaptor cannot be used depending on country or region. Flash Unit An optional GF-1 flash unit (TTL autoflash system) can be connected to the camera hot shoe. 1Close the flash cover. the hot shoe cover from the hot shoe of 2Remove the camera. the flash. 3Attach Turn the camera and the GF-1 Hot shoe off and attach the GF-1 to the hot shoe. Note • If the optional flash unit icon is not displayed, turn the GF-1 and camera off and then remove and reattach the flash. • Switch the flash modes by pressing the F button. If using the manual flash, set the flash mode to the manual flash setting in both of the camera and GF-1. The flash amount can be selected in Manual Flash Amount in the shooting menu (page 71). • Optional flash unit cannot be used in interval shooting, dynamic range shooting, and interval composite shooting. Technical Notes 4Turn the flash and camera on. 159 Other Flash Units Use only flash units with one signal terminal, which must be an X-contact with a positive voltage of no more than 20 V. Use a flash that covers the angle of view of the lens. 1Close the flash cover. the flash. 2Attach Turn the camera and the optional flash unit off and attach the flash to the camera hot shoe. aperture manually. 3Set Turn the camera on, select mode A or M, and choose an aperture (pages 38 and 40). a manual ISO sensitivity setting. 4Choose Select an option other than Auto or Auto-Hi for ISO sensitivity (page 82). the flash on. 5Turn Turn the flash on and set it to auto mode. Set aperture and ISO sensitivity to the values selected with the camera. Take a test shot and adjust flash aperture and ISO settings as necessary. Technical Notes 160 Caution • Turn the optional flash unit off before removing it from the camera. • Do not raise the built-in flash when an optional flash unit is attached to the camera. • If the external flash is on, it will fire with every shot regardless to the flash mode selected with the camera. Turn the flash unit off to shoot without the flash. • Optional flash units are in principle for use at ranges that exceed the range of the built-in flash. Using an optional flash unit at shorter ranges may result in overexposure. Using the Camera Abroad Using the AC-4c AC Adapter and BJ-6 Battery Charger These products are for use with currents of 100–240 V and 50 or 60 Hz. Before travelling, purchase a travel adapter for connection to the type of outlets used at your destination. Do not use these products with electrical transformers, as this could damage the camera. Warranty This product was manufactured for use in the country of purchase, and the warranty is not valid in other countries. Should the product fail or malfunction while out of the country, the manufacturer assumes no responsibility for servicing the product locally or bearing any expenditure incurred thereby. Precautions for Use • This product was manufactured for use in the country of purchase, the warranty is not valid in other countries. Should the product fail or malfunction while out of the country, the manufacturer assumes no responsibility for servicing the product locally or bearing any expenditure incurred thereby. • Do not drop the camera or subject it to physical shocks. When carrying the camera, be careful that it does not strike other objects. Particular care is required to protect the lens and picture display. Technical Notes Television Playback An AV cable can be used to connect the camera to televisions and monitors equipped with a video input terminal. The camera supports the NTSC and PAL video formats. Before connecting the camera to a video device, select the appropriate video output mode. 161 Technical Notes • The flash may overheat if fired many times in succession. Do not use the flash more than necessary. Do not use the flash in close contact with your body or other objects. Failure to observe these precautions could result in burns or fire. • Using the flash unit in close proximity to your subject’s eyes could cause temporary visual impairment. Particular care should be observed when photographing infants. Do not direct the flash at the operator of a motor vehicle. • Batteries may become hot with extended use. Wait for batteries to cool before removing them from the camera. • The picture display may be difficult to read in direct sunlight. • You may notice that picture display varies in brightness or contains pixels that do not light or that are always lit. This is common to all LCD monitors and does not indicate a malfunction. • Do not apply force to the picture display. • Abrupt changes in temperature may cause condensation, resulting in visible condensation inside the lens or camera malfunction. This can be avoided by placing the camera in a plastic bag to slow the temperature change, and removing it only after the air in the bag has reached the same temperature its surroundings. • To prevent damage to the product, do not insert objects into the holes in the microphone and speaker coverings. • Keep the camera dry and avoid handling it with wet hands. Failure to observe these precautions could result in product malfunction or electric shock. • Take a test shot to ensure that the camera is functioning properly before using it on important occasions such as travel or weddings. We recommend that you keep this manual and spare batteries at hand. Tip: Avoiding Condensation • Condensation is particularly likely to occur if you move to an area with a sharply different temperature, if humidity is high, in a cold room after the heater has come on, or where the camera is exposed to cold air from an air conditioner or other device. 162 Camera Care and Storage Caring for the Camera • Photographs can be affected by fingerprints and other foreign matter on the lens. Avoid touching the lens with your fingers. Remove dust or lint with a blower from a camera supply store, or gently clean the lens with a soft, dry cloth. Clean the picture display by wiping it with a soft cloth dampened with a small amount of any monitor cleaner that does not contain organic solvents. • Clean the camera thoroughly after using it at the beach or handling cosmetics. Do not expose the camera to volatile substances such as thinner, benzene, or pesticides. Failure to observe this precaution could result in damage to the camera or its finish. • In the unlikely event of malfunction, visit a Ricoh Repair Center. • The camera contains high-voltage circuits. Do not disassemble. • The picture display is easily scratched, avoid touching it with hard objects. Storage Technical Notes • Do not store the camera where it will be exposed to: extreme heat or humidity, large changes in temperature or humidity, dust, dirt, or sand, severe vibration, prolonged contact with chemicals, including mothballs and other insect repellent, or with vinyl or rubber products, strong magnetic fields (for example, in the vicinity of a monitor, transformer, or magnet). • Remove the batteries if the product will be left unused for a long period of time. Before Cleaning Turn the camera off and remove the battery or disconnect the AC adapter. 163 Warranty and Servicing Technical Notes 164 1. This product is backed by a limited warranty. During the warranty period mentioned in the Warranty supplied with your camera, any defective parts will be repaired free of charge. In the event of a camera malfunction, contact the dealer from which you purchased the camera or your nearest Ricoh Repair Center. Please note that you will not be reimbursed for the cost of bringing the camera to the Ricoh Repair Center. 2. This warranty does not cover any damage resulting from: 1 failure to follow the instructions in the instruction manual; 2 repair, modification or overhaul not conducted by an authorized service center listed in the instruction manual; 3 fire, natural disaster, act of God, lightning, abnormal voltage, etc.; 4 improper storage (noted in the “Camera User Guide”), leaking of battery and other fluids, mold, or otherwise insufficient care of the camera. 5 submergence in water (flooding), exposure to alcohol or other beverages, infiltration of sand or mud, physical shock, dropping of the camera, or pressure on the camera, and other unnatural causes. 3. After the warranty period has passed, you will be liable for all repair fees, including those incurred at an authorized service center. 4. You will be liable for all repair fees, even within the warranty period, if the warranty card is not attached or if the distributor’s name or the purchase date have been changed or are not indicated on the card. 5. Expenses for overhaul and thorough inspection by special request of the customer will be charged to the customer, whether or not they are incurred during the warranty period. 6. This warranty only applies to the camera and not to the accessories, such as the case and strap, nor does it apply to the battery and other consumables provided. 7. Any consequential damages arising from failure of the camera, such as expenses incurred in taking pictures or loss of expected profit, will not be reimbursed whether they occur during the warranty period or not. 8. The warranty is only valid in the country in which the camera was purchased. * The above provisions refer to repairs offered free of charge, and do not limit your legal rights. * The intention of the above provisions is also described in the warranty card provided with this camera. 9. Parts essential to the servicing of the camera (that is, components required to maintain the functions and quality of the camera) will be available for a period of five years after the camera is discontinued. 10.Please note that if the camera is seriously damaged by flooding, submergence, infiltration of sand or mud, violent shocks or dropping, it may not be repairable, and restoration to its original condition may be impossible. Note • Before sending the camera in for repair, check the battery and read the instruction manual again to ensure proper operation. • Some repairs require a significant amount of time to complete. • When sending the camera to a service center, please include a note which describes the defective part and the problem as precisely as possible. • Remove all accessories not related to the problem before sending the camera to the service center. • This warranty does not apply to data stored on memory cards or in internal memory. NOTICES INFORMATION TO THE USER USA FCC Part 15 Class B This equipment has been tested and found to comply with the limits for a Class B digital device, pursuant to part 15 of the FCC Rules. These limits are designed to provide reasonable protection against harmful interference in a residential installation. This equipment generates, uses and can radiate radio frequency energy and if not installed and used in accordance with the instructions, may cause harmful interference to radio communications. However, there is no guarantee that interference will not occur in a particular installation. If this equipment does cause harmful interference to radio or television reception, which can be determined by turning the equipment off and on, the user is encouraged to try to correct the interference by one or more of the following measures: • Reorient or relocate the receiving antenna. • Increase the separation between the equipment and receiver. • Connect the equipment into an outlet on a circuit different from that to which the receiver is connected. • Consult the dealer or an experienced radio/TV technician for help. (FCC 15.105B) Changes or modifications not expressly approved by the party responsible for compliance could void the user’s authority to operate the equipment. (FCC 15.21) Properly shielded and grounded cables and connectors must be used for connections to host computer in order to comply with FCC emission limits. (FCC 15.27) An AC adapter with a ferrite core must be used for RF interference suppression. (2)This device must accept any interference received, including interference that may cause undesired operation. RICOH AMERICAS CORPORATION 5 Dedrick Place, West Caldwell NJ, 07006 Tel.: 1-800-225-1899 Technical Notes COMPLIANCE INFORMATION STATEMENT Product Name: DIGITAL CAMERA Model Number: GR DIGITAL IV This device complies with Part 15 of the FCC Rules. Operation is subject to the following two conditions: (1)This device may not cause harmful interference, and Note to Users in Canada Note: This Class B digital apparatus complies with Canadian ICES-003 Remarque Concernant les Utilisateurs au Canada Avertissement : Cet appareil numerique de la classe B est conforme a la norme NMB003 du Canada IMPORTANT SAFETY INSTRUCTIONS–SAVE THESE INSTRUCTIONS DANGER–TO REDUCE THE RISK OF FIRE OR ELECTRIC SHOCK, CAREFULLY FOLLOW THESE INSTRUCTIONS. 165 Index A A (aperture priority) mode...................38 AV cable.................................................. 101 AAA alkaline.............................................11 AC adapter............................................. 158 ADJ. Direct ISO Control.................... 122 ADJ. mode............................................. 118 ADJ Lever Setting............................... 117 ADJ Shutter Confirmation.............. 118 ADJ. lever....................................................... 5 Adobe Reader....................................... 140 AF auxiliary light..............................2, 124 AF sensor, external................................... 2 Alkaline......................................................11 Aperture..................................................6, 7 Area measured for manual WB..... 131 Auto Aperture Shift..............................83 Auto Bracket............................................67 Auto (5) mode......................................18 Auto Power Off.................................... 125 Auto Rotate........................................... 129 Autofocus/flash lamp.....................19, 23 AVI................................................................86 B B (bulb).......................................................41 Battery.................................................10, 12 Battery charger.............................. 10, 154 Battery level................................................ 8 Battery/card cover..................................12 Black-and-white......................................62 Bleach Bypass.........................................62 Blur..............................................................20 Bracketing.................................................67 C 166 Cable switch.......................................... 154 Capacity........................................... 11, 153 Card Sequence No............................. 132 Case, soft................................................ 155 Close-up.....................................................21 Color Space Setting........................... 130 Camera Shake Correction..................74 Computer............................................... 135 Confirm Firmware Version..................134 Connector cover...........................101, 105 Continuous Mode.................................64 Contrast.....................................................96 Conversion lens, wide........................ 154 Copy to Card from Internal Memory...................................................94 Copying to computer................140, 142 Cross Process...........................................62 Custom Self-Timer................................74 D Date and time................................ 17, 133 Date Imprint............................................76 DC power cable cover....................3, 158 Defaults............................50–52, 110, 111 Delete My Settings............................ 122 Deleting photographs..........................30 Depth of field...........................................56 Digital zoom.............................................20 Digital Zoom Image.......................... 131 DISP. button................................................33 DL-10...............................................135, 141 DNG.............................................................54 DPOF...........................................................92 Dynamic range.................................42, 44 Dynamic Range Compensation......72 Dynamic Range Expansion...............84 E Edit My Settings.................................. 115 Error message....................................... 144 Exposure Compensation....................77 Exposure lock (AE Lock).......................59 Exposure Metering...............................61 Exposure program.................................37 Eye-Fi.............................................8, 13, 134 F Fine picture quality................................54 Flash cover................................................23 Flash Exposure Compensation........70 Flash level..................................................71 Flash mode...............................................22 Flash OPEN switch (F OPEN)............ 2, 22 Flash Synchro Settings.......................71 Flash, built-in............................................22 Flash, manual...........................................71 Flash, optional...................................... 159 Fn Button Pair Setting...................... 119 Fn Button Pair Switching................ 120 Focus....................................................19, 55 Focus bar...................................................56 Focus lock..................................................58 Focus target..............................................59 Formatting............................................. 123 Frame Rate...............................................87 Full Press Snap........................................60 G Grid.................................................... 33, 127 H HDMI...............................................102, 134 Hi-Contrast B&W....................................62 Highlights..................................................34 Histogram...................................33, 34, 97 Hood and adapter............................... 154 Hot shoe................................................. 159 I Image setting bracketing....................67 Image Settings.......................................62 Information Display Mode............. 128 Installation............................................. 137 Interval Composite........................42, 45 Interval Composite Time....................84 Interval Shooting..................................75 ISO Auto-High Settings................... 124 ISO Setting...............................................82 ISO Step Setting.................................. 124 J JPEG................................................... 54, 130 L Language/N............................ 17, 133 LCD Auto Dim...................................... 126 LCD Brightness.................................... 123 LCD Confirmation Time................... 125 Level Compensation............................96 Level Setting........................................ 126 Level (Tilt) Calibration...................... 126 Lock release................................................ 4 M M (manual exposure) mode................40 M Mode Dial Options........................ 121 Macintosh.............................................. 142 Macro mode.............................................21 Macro Target................................. 59, 120 Magnification Ratio (MF)...................83 Manual Flash Amount.........................71 Manual focus.....................................55, 58 MediaBrowser....................................... 135 Memory card............................................12 Memory, internal................... 14, 94, 153 C/D button.............. 49, 89, 109 Microphone................................................ 3 Mode dial.................................................... 4 Monochrome...........................................62 Move Target Setting.............................74 Movie mode...............................42, 52, 86 Movie playback.......................................88 Movie Size................................................87 Multi-frame playback............................28 Multiple Exposure Shooting............68 MY modes...................................................48 My Settings for Fn Settings............ 117 My Settings WB Comp...................... 117 N Neck strap.............................................. 155 Nickel-metal hydride (NiMH)..............11 Noise Reduction....................................73 Noise Reduction ISO............................73 Normal picture quality.........................54 NTSC................................................102, 133 K Key custom options...................110, 112 167 O One Press M Mode............................. 122 One Press Zoom Ratio...................... 128 Operation Sounds.............................. 125 Optional accessories.................154, 157 Optional AF Distance Display....... 126 P P (program shift) mode........................36 PAL...................................................102, 133 PictBridge............................................... 104 Picture Display.................................... 6, 33 Picture Quality/Size..............................53 Playback menu........................................89 Playback Mode Dial Options ........ 121 Playback Order Options.................. 130 Playback zoom........................................29 Playback, movies....................................88 Playback, photographs........................27 Playback, TV........................................... 101 Plus Normal Shooting.........................84 Positive Film............................................62 POWER button............................................15 Power Button Lamp.......................... 121 Pre-AF.........................................................61 Printing.................................................... 104 Protect.......................................................90 PTP...................................................104, 133 R RAW.............................................................54 RAW/JPEG Setting.............................. 130 Recall My Settings.............................. 114 Rechargeable battery....................10, 12 Red-eye reduction.................................22 Reg. My Settings................................. 112 Remote shutter release..................... 154 Resize.........................................................94 Restore Defaults.......................... 83, 110 Ring cap.................................................. 156 S 168 S (shutter priority) mode......................39 Save Interval Composite Img. .........85 Scene mode..............................................42 SD memory card.....................................12 SDHC memory card...............................12 Self-timer...................................................24 Setup menu........................................... 111 Shooting Info. Display Frame........ 127 Shooting menu.......................................49 Shutter speed....................................... 150 Shutter Speed Auto Shift...................83 Size...............................................................53 Skew correction...............................47, 95 Sleep Mode........................................... 126 Slide Show................................................90 Snap Focus Distance............................60 Software.................................................. 135 Speaker........................................................ 3 Specifications........................................ 150 Store Menu Cursor Position........... 131 Strap eyelet................................................. 2 Subj. Tracking.........................................55 Switch Shooting Mode.......................84 System requirements......................... 136 T T (time).......................................................41 Target selection (AF/AE)................59, 74 Tilt indicator.............................................25 Time and date................................ 17, 133 Trim.......................................................... 100 TV.............................................................. 101 U Up-down dial............................................. 5 USB cable..............................104, 137, 142 USB Connection Type....................... 133 V Video Out Mode.................................. 133 Viewfinder, external............................ 154 Viewing photographs.....................27, 101 Volume............................................. 88, 125 W Warranty........................................161, 164 White Balance.........................................78 White Balance Compensation .............................................................81, 99 White Saturation Display................ 129 Wireless LAN................................... 13, 134 Windows................................................. 135 Z Zoom....................................................20, 29 Zoom Button........................................ 121 169 Telephone Support Numbers in Europe UK Deutschland France Italia España Belgium (from within the UK) (from outside the UK) (innerhalb Deutschlands) (außerhalb Deutschlands) (à partir de la France) (en dehors de la France) (dall’Italia) (dall’estero) (desde España) (desde fuera de España) (from outside the Belgium) (from outside the Belgium) http://www.ricoh.com/r_dc/ 0203 0262290 +44 203 0262290 06331 268 438 +49 6331 268 438 0800 88 18 70 +33 1 60 60 19 94 02 40326427 +39 02 40326427 911 230396 +34 911 230396 +32 2 8088300 (French) +32 505 51082 (Flemish) From environmental friendliness to environmental conservation and to environmental management Ricoh is aggressively promoting environment-friendly activities and also environment conservation activities to solve the great subject of management as one of the citizens on our precious earth. To reduce the environmental loads of digital cameras, Ricoh is also trying to solve the great subjects of “Saving energy by reducing power consumption” and “Reducing environment-affecting chemical substances contained in products”. If You Encounter a Problem with This Product See “Troubleshooting” (page 144) in this manual. If the problem persists, contact a Ricoh office. Ricoh Offices 3-2-3, Shin-Yokohama Kouhoku-ku, Yokohama City, Kanagawa 222-8530, JAPAN RICOH COMPANY, LTD. http://www.ricoh.com/r_dc/ 5 Dedrick Place, West Caldwell, New Jersey 07006, U.S.A. RICOH AMERICAS CORPORATION 1-800-22RICOH http://www.ricoh-usa.com/ Oberrather Straße 6, D-40472 Düsseldorf, GERMANY RICOH INTERNATIONAL B.V. (innerhalb Deutschlands) 06331 268 438 (EPMMC) (außerhalb Deutschlands) +49 6331 268 438 http://www.ricoh.com/r_dc/ RICOH ASIA PACIFIC OPERATIONS 21/F, One Kowloon, 1 Wang Yuen Street, Kowloon Bay, Hong Kong LIMITED About MediaBrowser North America (U.S.) (Toll Free) +1-800-458-4029 UK, Germany, France and Spain: (Toll Free) +800-1532-4865 Europe Other Countries: +44-1489-564-764 Asia +63-2-438-0090 China +86-21-5385-3786 Business hours: 9:00 AM to 5:00 PM Ricoh Company, Ltd. Ricoh Building, 8-13-1, Ginza, Chuo-ku, Tokyo 104-8222, Japan 2011 August EN EN USA GB Printed in China GB AE AE *L764 0872A*