1
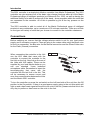
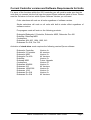
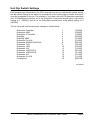
Martin 2501 Controller
user’s guide
Software version 5.0
Table of Contents
Introduction . . . . . . . . . . . . . . . . . . . . . . . . . . . . . . . . . . . . . . . . . . . . . . . . . . . . .
3
Connections . . . . . . . . . . . . . . . . . . . . . . . . . . . . . . . . . . . . . . . . . . . . . . . . . . . . .
3
Sections of the 2501 Controller . . . . . . . . . . . . . . . . . . . . . . . . . . . . . . . . . . . . . . .
3
Accessing Stand-Alone and Pre-Programmed sequences . . . . . . . . . . . . . . . . . . . .
5
Stand-Alone Sequences . . . . . . . . . . . . . . . . . . . . . . . . . . . . . . . . . . . . . . . . . . . .
5
Pre-Programmed Sequences . . . . . . . . . . . . . . . . . . . . . . . . . . . . . . . . . . . . . . . . .
6
Current Controller version and Software Requirements for Units . . . . . . . . . . . . . . .
7
Unit Dip Switch Settings . . . . . . . . . . . . . . . . . . . . . . . . . . . . . . . . . . . . . . . . . . . .
8
Martin Professional 2501 Controller Users Guide
Page 2
Introduction
The 2501 controller is a simple but effective controller from Martin Professional. The 2501
controller can give access to all of the basic color change functions within all of the Martin
Professional range of Intelligent products (not Roboscan Pro 1220), as well as having the
additional facility to be able to access all of the stand - alone programs within the units that
are connected to the controller. All of this is possible by just a few key presses on the
controller.
The 2501 controller is able to control all of the Martin Professional range of intelligent
products in any combination, up to a maximum of 32 units per controller. There are no limits
on the type and variety of units that you choose to connect to the controller whatsoever.
Connections
Before switching on, ensure that the voltage selector switch is set for your local power
supply and if necessary connect a Three pin plug to the mains cable using the Brown wire
for the Live connection, the Blue wire for the Neutral connection and the Green/Yellow wire
for the Earth (Ground) connection.
When connecting the controller to the Unit
use the XLR cable that came with the
controller to connect the controller to the
first Unit on the link. Now link up the rest of
the Units with XLR cables. These can be
supplied by your local Martin dealer or you
can use standard 3-core balanced
microphone cable. Remember to insert the
terminating-plug that came with the
controller into the last Unit in the link. This
will be necessary to ensure correct and
error-free communication between the Units
and the Martin 2501 controller.
To turn the controller on press the red switch on the left hand side of the unit from the Off
position to the On position. If there is a good power supply going to the unit this switch will
light up and a hard reset signal will be sent to all units in the link, please note that this is the
only way to perform a hard reset on the units in the link.
Martin Professional 2501 Controller Users Guide
Page 3
Sections of the 2501 Controller
The 2501 controller has separate control sections within the unit. There is one section that
controls all of the color change functions, including the strobe facility, and there is another
section that controls the access of the Stand - Alone and Pre - Programmed sequences.
Changing colors
To change colors of the units in the link with the 2501 controller you should just use the
seven buttons on the left of the controller and follow the labels printed above the switches,
these are marked as follows;
[White], [Red], [Green], [Blue], [Yellow], [Strobe] and [Black].
Quite simply to change the color of all of the units in the link you should press the relevant
color button, if you want all units to Black-out you should press the [Black] button.
Strobe Facility
Please note that this function will only work with units that have a strobe facility
built into them. However if you send a Strobe command to a unit that cannot
strobe the command will simply be ignored.
To access the strobe facility simply press the button marked [Strobe] and all units will begin
strobing. There are Three different strobe rates programmed into the 2501 controller and by
pressing the [Strobe] again you will be able to access these different rates. The button
works in a cycle mode so that every time you reach the third strobe rate the next press of
the button will automatically return you to the first strobe rate, e.g. First press-Rate 1,
Second press-Rate 2, Third press-Rate 3, Fourth press-Rate 1 etc.
*** IMPORTANT ***
Special Note for RoboZap and RoboZap MSR 1200
Please note that when you change color for either the RoboZap or the RoboZap MSR 1200
some movement will occur on the mirror drum, this feature has been programmed into the
controller. These movements are different for each color change that you select and last for
different periods of time. Once a specific color has been selected you can still access the
movement by pressing the same color button on the 2501 controller again. The signal for
the mirror drum to move is then sent out to the unit again.
Martin Professional 2501 Controller Users Guide
Page 4
Accessing Stand-Alone and Pre-Programmed sequences
Understanding the Difference between Stand-Alone and Pre-Programmed
Sequences
It is important that you understand the way that these Two features work, and more
importantly, you understand the differences between them.
All Stand-Alone functions and sequences are contained within the Eprom inside the lighting
unit, these sequences are not programmed and are extremely random, the 2501 controller,
therefore, is just starting these sequences to run and nothing more.
The Pre-Programmed sequences are greatly different. These sequences have actually been
programmed and then stored inside the 2501 Controller, therefore in this situation the 2501
controller is accessing and controlling these sequences all from within itself.
There are Two modes for the Stand-Alone sequence available, one with Auto-Trig and the
other with Music-Trig.
There are also Four totally different Pre-Programmed sequences that have been
programmed into the 2501 controller, all of which are easily accessible.
The buttons used to access the stand-alone and pre-programmed sequences within the
2501 controller work in a slightly different way to those used to change colors.
Firstly you should locate the Two right hand buttons on the controller marked Stand Alone
and Program.
Next you should follow the markings that run beneath the buttons on the controller. You will
see that the Four left hand buttons are marked [Color], [Zap], [Center] and [Scan], and that
the button marked [Black] is also marked [All]. These buttons correspond to the relevant
group of products and the button marked [All] will control all units connected in the link.
Stand-Alone Sequences
If you wish to access the Stand-Alone sequence within the unit you should press the button
marked Stand-Alone and, while keeping it pressed down, you should then press the button
for the product group that you wish to run.
That product group will then automatically start running its Stand-Alone sequence in MusicTrig mode, e.g. each beat of music heard by the units in-built microphone will trigger a
change in the units output; color change, movement change etc..
By then keeping the Stand-Alone button pressed down again and pressing the same product
group button again, the units will change to run the sequence in Auto-Trig mode e.g. no
sound input is required. Further presses of the same combination of buttons will toggle the
Trigger status between Music and Auto.
Martin Professional 2501 Controller Users Guide
Page 5
Pre-Programmed Sequences
Unlike the Stand-Alone function, all sequences within the Pre-Programmed section of the
controller will run on Auto-Trig automatically.
If you wish to access the Pre-Programmed sequences within the unit you should press the
button marked Program, and while keeping it pressed down, you should then press the
button for the product group that you wish to run.
The product group that you have selected will then begin to run the first Pre-Programmed
sequence from the controller. There are Four Pre-Programmed sequences and you can now
access the other sequences by again pressing and holding the Program button and again
pressing the same product group. The controller will then begin to run sequence Two, if you
follow the same procedure again the controller will run sequence Three etc.. When you are
running sequence Four and you press the buttons again the controller will then revert back
to running sequence One, further presses of the buttons will continue this cycle.
Please note that the First and Second Pre-Programmed sequences contain only color and
gobo information for Roboscans, movement of the mirror is only available in sequences
Three and Four.
The products that each button controls are detailed below :
[Color]
[Zap]
[Center]
[Scan]
[All]
Robocolor/Robocolor II Controller, Robocolor MSD 200, Robocolor Pro 400
RoboZap, RoboZap MSR 1200
Centrepiece
Roboscan 804/805, Roboscan 1004/1005, Roboscan 1016,
Roboscan Pro 218, Roboscan 1020, Roboscan 812, Roboscan Pro 518
All Units connected in the link
Please note that you are able to run one product type at a time in this mode, or all products
together. You ARE NOT able to run a combination of different units together e.g. Robocolors
and RoboZaps. The controller does not work in this way.
Also, please note that at any time you can change between the different function sections
of the 2501 controller. For example, if you have some RoboZaps connected to the link and
they are running a Stand - Alone sequence, by pressing the button marked [Red] all of the
units will stop running stand - alone and will change color to Red.
Martin Professional 2501 Controller Users Guide
Page 6
Current Controller version and Software Requirements for Units
For some of the functions within the 2501 controller you will need to make sure that the
units that you connect into the link have the correct Eprom software inside of them. Please
read the list below to find out which Eprom Software Version you will need.
Color selections will work on all units regardless of software version.
Strobe selections will work on all units with built-in strobe effect regardless of
software version.
Pre-program mode will work on the following products:
Robocolor/Robocolor II Controller, Robocolor MSD, Robocolor Pro 400
RoboZap, RoboZap MSR
Centrepiece
Roboscan 804, 805, 1004, 1005, 812
Roboscan Pro 218, Pro 518.
Activation of stand-alone mode requires the following version Eprom software:
Robocolor Controller
Robocolor II Controller
Robocolor MSD
Robocolor Pro 400
RoboZap
Robozap MSR
Centrepiece
Roboscan 804/805
Roboscan 812
Roboscan 1004/1005
Roboscan 1016
Roboscan Pro 218
Roboscan Pro 518
Version 4+
All versions
Version 3+
All Versions
Version 3+
Future Upgrade
Version 3+
Version 2+
All Versions
Version 8+
Version 2+
Version 2+
All Versions
Martin Professional 2501 Controller Users Guide
Page 7
Unit Dip Switch Settings
Each product type connected to the 2501 controller has its own relevant dip switch setting,
this dip switch setting is the same for all products of the same type no matter how many
units are connected to the link. For example, if you have a link with 10 Robocolor controllers
and 10 RoboZaps connected, all of the Robocolor Controllers should have a dip switch
setting of 1 (100000), and all of the RoboZaps should have a dip switch setting of 4
(001000).
The full list of all product dip switch settings is shown below :
Robocolor Controller
Robocolor MSD
Robocolor II Controller
RoboZap
RoboZap MSR
Robocolor Pro 400
Roboscan 804/805/1004/1005
Roboscan 1016
Roboscan 1208
Roboscan 218
Roboscan 1020/1220 A
Roboscan 1020/1220 B
Roboscan 812
Roboscan Pro 518
Centrepiece
1
2
3
4
5
6
8
9
10
11
12
13
14
15
16
[100000]
[010000]
[110000]
[001000]
[101000]
[011000]
[000100]
[100100]
[010100]
[110100]
[001100]
[101100]
[011100]
[111100]
[000010]
PS-950818
Martin Professional 2501 Controller Users Guide
Page 8