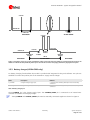
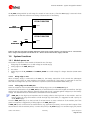
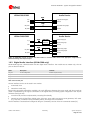
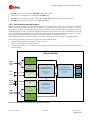
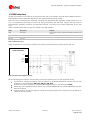
1
locate, communicate, accelerate LEON-G100/G200 Quad Band GSM/GPRS Voice and Data Modules System Integration Manual Abstract This document describes the features and integration of the LEON-G100/G200 Quad Band GSM/GPRS data and voice modules. The LEON-G100/G200 are complete and cost efficient solutions, bringing full feature Quad Band GSM/GPRS data and voice transmission technology in a compact form factor. 29.5 x 18.9 x 2.84 mm www.u-blox.com LEON-G100/G200 - System Integration Manual Document Information Title LEON-G100/G200 Subtitle Quad Band GSM/GPRS Voice and Data Modules Document type System Integration Manual Document number GSM.G1-HW-09002-C Document status Preliminary This document contains preliminary data, revised and supplementary data may be published later. This document applies to the following products: Name Type number Firmware version PCN reference LEON-G100 LEON-G200 LEON-G100-00S-01 LEON-G200-00S-00 07.30 07.30 n.a. n.a. This document and the use of any information contained therein, is subject to the acceptance of the u-blox terms and conditions. They can be downloaded from www.u-blox.com. u-blox makes no warranties based on the accuracy or completeness of the contents of this document and reserves the right to make changes to specifications and product descriptions at any time without notice. u-blox reserves all rights to this document and the information contained herein. Reproduction, use or disclosure to third parties without express permission is strictly prohibited. Copyright © 2009, u-blox AG. u-blox® is a registered trademark of u-blox Holding AG in the EU and other countries. GSM.G1-HW-09002-C Page 2 LEON-G100/G200 - System Integration Manual Preface u-blox Technical Documentation As part of our commitment to customer support, u-blox maintains an extensive volume of technical documentation for our products. In addition to our product-specific technical data sheets, the following manuals are available to assist u-blox customers in product design and development. AT Commands Manual: This document provides the description of the supported AT commands by the LEON GSM/GPRS Voice and Data Modules to verify all implemented functionalities. System Integration Manual: This Manual provides hardware design instructions and information on how to set up production and final product tests. Application Note: document provides general design instructions and information that applies to all u-blox Wireless modules. See Section Related documents for a list of Application Notes related to your Wireless Module. How to use this Manual The LEON-G100/G200 System Integration Manual provides the necessary information to successfully design in and configure these u-blox wireless modules. For navigating this document please note the following: This manual has a modular structure. It is not necessary to read it from the beginning to the end. To help in finding needed information, a brief section overview is provided below: 1. System description: This chapter introduces the basics of function and architecture of the wireless modules. This manual has a modular structure. It is not necessary to read it from the beginning to the end. The following symbols are used to highlight important information within the manual: An index finger points out key information pertaining to module integration and performance. A warning symbol indicates actions that could negatively impact or damage the module. Questions If you have any questions about u-blox Wireless Integration, please: Read this manual carefully. Contact our information service on the homepage http://www.u-blox.com Read the questions and answers on our FAQ database on the homepage http://www.u-blox.com Technical Support Worldwide Web Our website (www.u-blox.com) is a rich pool of information. Product information, technical documents and helpful FAQ can be accessed 24h a day. By E-mail If you have technical problems or cannot find the required information in the provided documents, contact the nearest of the Technical Support offices by email. Use our service pool email addresses rather than any personal email address of our staff. This makes sure that your request is processed as soon as possible. You will find the contact details at the end of the document. Helpful Information when Contacting Technical Support When contacting Technical Support please have the following information ready: Module type (e.g. LEON-G100) and firmware version Module configuration GSM.G1-HW-09002-C Preliminary Preface Page 3 of 75 LEON-G100/G200 - System Integration Manual Clear description of your question or the problem A short description of the application Your complete contact details GSM.G1-HW-09002-C Preliminary Preface Page 4 of 75 LEON-G100/G200 - System Integration Manual Contents Preface ................................................................................................................................ 3 Contents.............................................................................................................................. 5 1 System description ....................................................................................................... 8 1.1 1.2 Overview .............................................................................................................................................. 8 Architecture .......................................................................................................................................... 9 1.2.1 Functional blocks ......................................................................................................................... 10 1.2.2 Hardware differences between LEON-G100 and LEON-G200 ...................................................... 10 1.3 Pin-out ............................................................................................................................................... 12 1.4 Operating Modes................................................................................................................................ 14 1.5 Power management ........................................................................................................................... 16 1.5.1 Power supply circuit overview ...................................................................................................... 16 1.5.2 Voltage supply (VCC) .................................................................................................................. 17 1.5.3 1.5.4 Battery charger (LEON-G200 only) ............................................................................................... 21 Voltage Backup Power (V_BCKP) ................................................................................................. 25 1.6 System functions ................................................................................................................................ 26 1.6.1 1.6.2 Module power on ....................................................................................................................... 26 Module power off ....................................................................................................................... 28 1.6.3 Module reset ............................................................................................................................... 29 1.7 1.8 RF connection ..................................................................................................................................... 31 Antenna supervisor ............................................................................................................................. 31 1.9 Audio ................................................................................................................................................. 31 1.9.1 1.9.2 Analog Audio interface ............................................................................................................... 32 Digital Audio interface (LEON-G200 only) .................................................................................... 37 1.9.3 Voiceband processing system ...................................................................................................... 39 1.10 SIM interface................................................................................................................................... 41 1.10.1 SIM functionality ......................................................................................................................... 42 1.11 Serial Communication ..................................................................................................................... 42 1.11.1 1.11.2 1.12 ADC input (LEON-G100 only) .......................................................................................................... 48 1.13 1.14 General Purpose Input/Output (GPIO) ............................................................................................. 49 Approvals........................................................................................................................................ 50 1.14.1 2 Asynchronous serial interface (UART)........................................................................................... 42 2 DDC (I C) interface ...................................................................................................................... 47 Compliance with FCC and IC Rules and Regulations .................................................................... 50 Design-In ..................................................................................................................... 51 2.1 Schematic design-in checklist .............................................................................................................. 51 2.2 Design Guidelines for Layout .............................................................................................................. 52 2.2.1 2.2.2 Layout guidelines per pin function ............................................................................................... 52 Footprint and paste mask ............................................................................................................ 58 2.2.3 Placement ................................................................................................................................... 60 GSM.G1-HW-09002-C Preliminary Contents Page 5 of 75 LEON-G100/G200 - System Integration Manual 2.3 2.4 3 2.4.1 Antenna termination ................................................................................................................... 61 2.4.2 2.4.3 Antenna radiation ....................................................................................................................... 62 Antenna detection functionality .................................................................................................. 64 Handling and soldering ............................................................................................. 65 3.1 3.2 4 Module thermal resistance .................................................................................................................. 60 Antenna guidelines ............................................................................................................................. 60 Packaging, shipping, storage and moisture preconditioning ............................................................... 65 Processing .......................................................................................................................................... 65 3.2.1 Soldering paste............................................................................................................................ 65 3.2.2 3.2.3 Reflow soldering ......................................................................................................................... 65 Optical inspection ........................................................................................................................ 66 3.2.4 Cleaning...................................................................................................................................... 66 3.2.5 3.2.6 Repeated reflow soldering ........................................................................................................... 67 Wave soldering............................................................................................................................ 67 3.2.7 Hand soldering ............................................................................................................................ 67 3.2.8 3.2.9 Rework........................................................................................................................................ 67 Conformal coating ...................................................................................................................... 67 3.2.10 Casting........................................................................................................................................ 67 3.2.11 3.2.12 Grounding metal covers .............................................................................................................. 67 Use of ultrasonic processes .......................................................................................................... 67 Product Testing........................................................................................................... 68 4.1 u-blox in-series production test ........................................................................................................... 68 Appendix .......................................................................................................................... 69 A Extra Features ............................................................................................................. 69 A.1 Firmware (upgrade) Over AT (FOAT) ................................................................................................... 69 A.1.1 Overview ..................................................................................................................................... 69 A.1.2 FOAT procedure .......................................................................................................................... 69 A.2 Firewall ............................................................................................................................................... 69 A.3 TCP/IP ................................................................................................................................................. 69 A.3.1 Multiple IP addresses and sockets ................................................................................................ 69 A.4 FTP ..................................................................................................................................................... 69 B A.5 HTTP ................................................................................................................................................... 70 A.6 A.7 SMTP .................................................................................................................................................. 70 FOTA (LEON-G200 only) ..................................................................................................................... 70 A.8 GPS .................................................................................................................................................... 70 Glossary ...................................................................................................................... 71 Related documents........................................................................................................... 73 Revision history ................................................................................................................ 74 GSM.G1-HW-09002-C Preliminary Contents Page 6 of 75 LEON-G100/G200 - System Integration Manual Contact .............................................................................................................................. 75 GSM.G1-HW-09002-C Preliminary Contents Page 7 of 75 LEON-G100/G200 - System Integration Manual 1 System description 1.1 Overview LEON-G100/G200 GSM/GPRS modules integrate a full-featured Release 99 GSM-GPRS protocol stack, with the following main characteristics. Quad band support: GSM 850 MHz, EGSM 900 MHz, DCS 1800 MHz and PCS 1900 MHz Power class 4 (33 dBm nominal maximum output power) for GSM/EGSM bands Power class 1 (30 dBm nominal maximum output power) for DCS/PCS bands GPRS multislot class 10 All GPRS coding schemes from CS1 to CS4 are supported GPRS bit rate: 85.6 kbps (max.), 53.6 kbps (typ.) in down-link; 42.8 kbps (max.), 26.8 kbps (typ.) in up-link CS (Circuit Switched) Data calls are supported in transparent/non transparent mode up to 9.6 kbps Encryption algorithms A5/1 for GSM and GPRS support Bearer service fax Group 3 Class 2.0 support LEON-G100/G200 modules are Class B Mobile Stations (i.e. the data module can be attached to both GPRS and GSM services, using one service at a time). Network operation modes I to III are supported. Paging messages for GSM calls can optionally be monitored during GPRS data transfer in not-coordinating network operation mode NOM II-III. PBCCH/PCCCH logical channels supported, CBCH reception when PBCCH supported. LEON-G100/G200 modules implement GPRS multi-slot class 10 for data transfer. GPRS class determines the maximum number of timeslots available for upload and download and thus the speed at which data can be transmitted and received: higher classes typically allow faster data transfer rates. GPRS multi-slot class 10 uses a maximum of 4 slots in download (reception) and 2 slots in upload (transmission) with 5 slots in total. The network automatically configures the number of timeslots used for reception or transmission (voice calls take precedence over GPRS traffic). The network also automatically configures channel encoding (CS1 to CS4). The maximum GPRS bit rate of the mobile station depends on the coding scheme and number of time slots. GSM.G1-HW-09002-C Preliminary System description Page 8 of 75 LEON-G100/G200 - System Integration Manual 1.2 Architecture 32.768 kHz 26 MHz Power-On PA ANT External Reset RF Transceiver SAW Filter Switch GPIO DDC (for GPS) SIM Card Memory UART Baseband 2 Analog Audio Vcc (Supply) Power Management Headset Detection V_BCKP ADC Figure 1: LEON-G100 Block Diagram 32.768 kHz 26 MHz Power-On PA ANT SAW Filter Switch RF Transceiver External Reset GPIO DDC (for GPS) SIM Card Memory Baseband Charger Vcc (Battery) UART 2 Analog Audio Power Management Headset Detection V_BCKP Digital Audio Figure 2: LEON-G200 Block Diagram GSM.G1-HW-09002-C Preliminary System description Page 9 of 75 LEON-G100/G200 - System Integration Manual 1.2.1 Functional blocks The LEON-G100/G200 modules consist of the following functional blocks: RF Baseband Power Management 1.2.1.1 RF The RF block is composed of the following main elements: RF transceiver (integrated in the GSM/GPRS single chip) performing modulation, up-conversion of the baseband I/Q signals, down-conversion and demodulation of the RF received signals. The RF transceiver includes: Constant gain direct conversion receiver with integrated LNAs; Highly linear RF quadrature demodulator; Digital Sigma-Delta transmitter modulator; Fractional-N Sigma-Delta RF synthesizer; 3.8 GHz VCO; Digital controlled crystal oscillator. Transmit module, which amplifies the signals modulated by the RF transceiver and connects the single antenna input/output pin of the module to the suitable RX/TX path, via its integrated parts: Power amplifier; Antenna switch; RX diplexer SAW (band pass) filters; 26 MHz crystal, connected to the digital controlled crystal oscillator to perform the clock reference in active or connected mode. 1.2.1.2 Baseband The Baseband block is composed of the following main elements: Baseband integrated in the GSM/GPRS single chip, including: Microprocessor; DSP (for GSM/GPRS Layer 1 and audio processing); Peripheral blocks (for parallel control of the digital interfaces); Audio analog front-end; Memory system in a multi-chip package integrating two devices: NOR flash non-volatile memory; PSRAM volatile memory; 32.768 kHz crystal, connected to the oscillator of the RTC to perform the clock reference in idle or poweroff mode. 1.2.1.3 Power Management The Power Management block is composed of the following main elements: Voltage regulators integrated in the GSM/GPRS single chip for direct connection to battery; Charging control circuitry. 1.2.2 Hardware differences between LEON-G100 and LEON-G200 Hardware differences between the LEON-G100 and the LEON-G200 modules: Charging control circuitry is available on the LEON-G200 module only GSM.G1-HW-09002-C Preliminary System description Page 10 of 75 LEON-G100/G200 - System Integration Manual ADC input is provided on the LEON-G100 module only GSM.G1-HW-09002-C Preliminary System description Page 11 of 75 LEON-G100/G200 - System Integration Manual 1.3 Pin-out Table 1 describes the pin-out of LEON-G100/G200 modules, with pins grouped by function. Function Pin No I/O Description Remarks Power VCC 50 I Module Supply GND 1, 3, 6, 7, 8, 17, 25, 36, 45, 46, 48, 49 N/A Ground Clean and stable supply is required: low ripple and low voltage drop must be guaranteed. Voltage provided has to be always above the minimum limit of the operating range. Consider that there are large current spike in connected mode, when a GSM call is enabled. See section 1.5.2 GND pins are internally connected but good (low impedance) external ground can improve RF performances. V_BCKP 2 I/O Real Time Clock supply V_BCKP = 2.0 V (typical) generated by the module to supply Real Time Clock when VCC supply voltage is within valid operating range. See section 1.5.4 VSIM 35 O SIM supply V_CHARGE (LEON-G200) 4 I Charger voltage supply input CHARGE_SENSE (LEON-G200) 5 I Charger voltage measurement input SIM supply automatically generated by the module. See section 1.10 V_CHARGE and CHARGE_SENSE must be externally connected. The external supply used as charging source must be voltage and current limited. See section 1.5.3 V_CHARGE and CHARGE_SENSE must be externally connected. The external supply used as charging source must be voltage and current limited. See section 1.5.3 RF ANT 47 I/O RF antenna Audio HS_DET 18 I Headset detection input I2S_WA (LEON-G200) 26 O I2S word alignment I2S_TXD (LEON-G200) 27 O I2S transmit data I2S_CLK (LEON-G200) 28 O I2S clock I2S_RXD (LEON-G200) 29 I I2S receive data HS_P 37 O SPK_P 38 O SPK_N 39 O Low power single-ended analog audio output High power differential analog audio output High power differential analog audio output Audio output used in handset or in headset mode. Audio pin: see section 1.9.1 Audio output used in ring tones or in hands free mode. Audio pin: see section 1.9.1 Used in ring tones or in hands free mode. Audio pin: see section 1.9.1 MIC_BIAS2 41 I Second microphone analog bias Single ended supply output and signal input for the second microphone. Used in headset mode. GSM.G1-HW-09002-C Preliminary 50 nominal impedance. See section 1.8 See section 1.9.1.3 I2S Interface: see section 1.9.2. Check device specifications to ensure compatibility of supported modes to LEON-G100/G200 module. Add a test point to provide access to the pin for debugging. I2S Interface: see section 1.9.2. Check device specifications to ensure compatibility of supported modes to LEON/G200 module. Add a test point to provide access to the pin for debugging. I2S Interface: see section 1.9.2. Check device specifications to ensure compatibility of supported modes to LEON/G200 module. Add a test point to provide access to the pin for debugging. I2S Interface: see section 1.9.2. Check device specifications to ensure compatibility of supported modes to LEON/G200 module. Add a test point to provide access to the pin for debugging. System description Page 12 of 75 LEON-G100/G200 - System Integration Manual Function Pin No I/O Description Remarks Audio pin: see section 1.9.1 MIC_GND2 42 I MIC_GND1 43 I MIC_BIAS1 44 SIM_CLK Second microphone analog reference First microphone analog reference Local ground of second microphone. Audio pin: see section 1.9.1 Local ground of the first microphone. Audio pin: see section 1.9.1 I First microphone analog bias Single ended supply output and signal input for first microphone. Used in handset or in hands free mode. Audio pin: see section 1.9.1 32 O SIM clock SIM_IO 33 I/O SIM data SIM_RST 34 O SIM reset SIM interface: see section 1.10. Must meet SIM specifications SIM interface: see section 1.10. Must meet SIM specifications SIM interface: see section 1.10. Must meet SIM specifications DSR RI 9 10 O O UART data set ready UART ring indicator See section 1.11.1. Control convention of the pins See section 1.11.1. Control convention of the pins DCD DTR 11 12 O I UART data carrier detect UART data terminal ready See section 1.11.1. Control convention of the pins See section 1.11.1. Control convention of the pins RTS CTS 13 14 I O UART ready to send UART clear to send See section 1.11.1. Control convention of the pins See section 1.11.1. Control convention of the pins TxD RxD 15 16 I O UART transmitted data UART received data See section 1.11.1. Control convention of the pins See section 1.11.1. Control convention of the pins SCL 30 O I2C bus clock line Fixed open drain. External pull-up required. See section 1.11.2 SDA 31 I/O I2C bus data line ADC ADC1 (LEON-G100) 5 I ADC input GPIO GPIO1 20 I/O GPIO GPIO2 21 I/O GPIO Fixed open drain. External pull-up required. See section 1.11.2 Resolution: 12 bits. See section 1.12; consider that the impedance of this input changes depending on the operative mode See section 1.13. Add a test point to provide access to the pin for debugging. See section 1.13 PWR_ON 19 I Power-on input RESET_N 22 I External reset input Reserved 23 Do not connect Reserved Reserved 24 40 Do not connect Do not connect Reserved (LEON-G100) Reserved (LEON-G100) Reserved (LEON-G100) 4 Do not connect 26 Do not connect. Add a test point to provide access to the pin for debugging. Do not connect. Add a test point to provide access to the pin for debugging. Reserved (LEON-G100) Reserved (LEON-G100) 28 SIM UART DDC System Reserved 27 PWR_ON pin has high input impedance. Do not keep floating in noisy environment: external pull-up required. See section 1.6.1 See section 1.6.3 Do not connect. Add a test point to provide access to the pin for debugging. Do not connect. Add a test point to provide access to the pin for debugging. 29 Table 1: LEON-G100/G200 pinout GSM.G1-HW-09002-C Preliminary System description Page 13 of 75 LEON-G100/G200 - System Integration Manual 1.4 Operating Modes LEON-G100/G200 modules include several operating modes, each have different active features and interfaces. Table 2 summarizes the various operating modes and provides general guidelines for operation. General Status Operating Mode Description Features / Remarks Power-down Not-Powered Mode VCC supply not present or below normal operating range. Microprocessor not operating. RTC only operates if supplied through V_BCKP pin. Power-Off Mode VCC supply within normal operating range. Microprocessor not operating. Only RTC runs. Idle-Mode Microprocessor runs with 32 kHz as reference oscillator. Module does not accept data signals from an external device. Module is switched off. Module cannot be switched on by a falling edge provided on the PWR_ON input, neither by a preset RTC alarm, or a rising edge to a valid voltage for charger detection provided on the V_CHARGE and CHARGE_SENSE inputs. Application interfaces not accessible. Internal RTC timer operates only if a valid voltage is applied to V_BCKP pin. Any external signal connected to UART I/F, I2S I/F, HS_DET, or a GPIO must be set low or tri-stated to avoid an increase of module power-off consumption. Module is switched off: normal shutdown after sending the AT+CPWROFF command (refer to u-blox AT Commands Manual [2]). Module can be switched on by a falling edge provided on the PWR_ON input, by a preset RTC alarm, or by a rising edge to a valid voltage for charger detection provided on the V_CHARGE and CHARGE_SENSE inputs. Application interfaces are not accessible. Only the internal RTC timer in operation. Any external signal connected to the UART I/F, I2S I/F, HS_DET pin, or a GPIO must be set low or tri-stated to avoid an increase of the module power-off consumption. Module is switched on and is in idle mode (i.e. power saving / sleep mode). Application interfaces disabled. Module by default automatically enters idle mode whenever possible, unless this mode is disabled by appropriate AT command (refer to u-blox AT Commands Manual [2]). If module is registered with the network, it automatically enters idle mode and periodically wakes up to active mode to monitor the paging channel for the paging block reception according to network indication. If module is not registered with the network, it automatically goes in idle mode and periodically wakes up to monitor external activity. Module wakes up from default idle mode to active mode if an RTC alarm occurs. Module wakes up from default idle mode to active mode when data received on UART interface with HW flow control enabled. Module wakes up from default idle mode to active mode if a voice or data call incoming. Module wakes up from default idle mode to active mode when the RTS input line is set to the ON state by the DTE if the AT+UPSV=2 command is sent to the module (feature not enabled by default). The hardware flow control output (CTS line) indicates when the module is in idle (power saving mode): the line is driven in the OFF state when the module is not prepared to accept data signals. Module is switched on and is fully active: power saving is not enabled. The application interfaces are enabled. Normal operation Active-Mode GSM.G1-HW-09002-C Microprocessor runs with 26 MHz as reference oscillator. The module is prepared to accept data signals from an external device. Preliminary System description Page 14 of 75 LEON-G100/G200 - System Integration Manual General Status Charging (LEON-G200 only) Operating Mode Description Connected-Mode Voice or data call enabled. Microprocessor runs with 26 MHz as reference oscillator. Module is prepared to accept data signals from an external device. Pre-charge mode Battery connected to VCC. Battery voltage level is below the VCC normal operating range. Charger connected to V_CHARGE and CHARGE_SENSE inputs with proper voltage and current characteristics. Charging of the deeply discharged battery is enabled while the module is switched off. Battery connected to VCC. Battery voltage level is within the VCC normal operating range. Charger connected to V_CHARGE and CHARGE_SENSE inputs with proper voltage and current characteristics. Charging process enabled while the module is switched on and normal operations are enabled. Charge-mode Features / Remarks The module is switched on and a voice call or a data call (GSM/GPRS) is in progress. Module is fully active. Application interfaces are enabled. When call terminates, module returns to the last operating state (Idle or Active). Module is switched off and cannot be switched on (not powered mode). The Pre-Charge phase of the charging process is enabled: charging of the deeply discharged battery is forced by HW at slow current while the module is switched off Module is switched on and normal operations are enabled (Idle mode, Active mode or Connected mode). The charging process is enabled: charging of battery is controlled by the microprocessor while the module is switched on Table 2: Module operating modes summary GSM.G1-HW-09002-C Preliminary System description Page 15 of 75 LEON-G100/G200 - System Integration Manual 1.5 Power management 1.5.1 Power supply circuit overview LEON-G100/G200 4-Bands GSM FEM Antenna Switch PA GSM/GPRS Chipset Charging Control VCC LDOs RF LDOs BB 50 47 µF MCP Memory EBU LDO NOR Flash PSRAM LDO LDO V_BCKP RTC 2 1 µF VSIM 35 1 µF Figure 3: Power supply concept LEON G100 / LEON-G200 modules are supplied via the VCC pin. There is only one main power supply pin. The VCC pin connects the RF Power Amplifier and the integrated power management unit within the module: all supply voltages needed by the module are generated from the VCC supply by integrated voltage regulators. When the VCC voltage is within the valid operating range, the module supplies the Real Time Clock. If the VCC voltage is under the minimum operating limit, the Real Time Clock can be externally supplied via the V_BCKP pin. When a 1.8 V or a 3 V SIM card type is connected, LEON G100 / LEON-G200 automatically supply the SIM card via the VSIM pin. Activation and deactivation of the SIM interface with automatic voltage switch from 1.8 to 3 V is implemented, in accordance to the ISO-IEC 78-16-e specifications. The integrated power management unit also provides the control state machine for system start up, including start up with discharged batteries, pre-charging and system reset control. LEON-G100 / LEON-G200 feature a power management concept optimized for most efficient use of battery power. This is achieved by hardware design utilizing power efficient circuit topology, and by power management software controlling the power saving mode of the module. Battery management runs in the context of the operation and maintenance process: Battery charging control, in order to maintain the full capacity of the battery GSM.G1-HW-09002-C Preliminary System description Page 16 of 75 LEON-G100/G200 - System Integration Manual Collecting and processing of measurements of battery voltage 1.5.2 Voltage supply (VCC) LEON G100 / LEON-G200 modules must be supplied through the VCC pin by a DC power supply. Voltages must be stable, due to the surging consumption profile of the GSM system (described in the section 1.5.2.1). The DC power supply can be selected from: A switching regulator with appropriate power capabilities, low output ripple, and with a switching frequency greater or equal to 1 MHz An LDO linear regulator with appropriate power capabilities and with proper power dissipation A rechargeable Li-Ion battery with a capacity from 500 mAh up to 1100 mAh (recommended) A primary (not rechargeable) battery with appropriate power capabilities The voltage provided to the VCC pin must be within the normal operating range limits specified in the LEON-G100/G200 Data Sheet [1]. Complete functionality of the module is only guaranteed within the specified minimum and maximum VCC voltage range. Ensure that the input voltage at the VCC is above the normal operating range minimum limit to enable the switch-on of the module. Note that the module cannot be switched on if the VCC voltage value is below the minimum specified limit. See LEON-G100/G200 Data Sheet [1]. When the LEON G100 / LEON-G200 modules are in operation, the voltage provided to the VCC pin can exceed the normal operating range limits but must be within the extended operating range limits specified in the LEON-G100/G200 Data Sheet [1]. Module reliability is only guaranteed within the specified operational extended voltage range. Ensure that the input voltage at the VCC pin never drops below the extended operating range minimum limit when the module is switched on, not even during a GSM transmit burst, where the current consumption can rise up to maximum peaks of 2.5 A in case of a mismatched antenna load. Note that the module switches off when the VCC voltage value drops below the minimum limit. Operation above the extended operating range maximum limit is not recommended and extended exposure beyond it may affect device reliability. Stress beyond the VCC absolute maximum ratings may cause permanent damage to the module: if necessary, voltage spikes beyond VCC absolute maximum ratings must be limited to values within the specified boundaries by using appropriate protection. When designing the power supply for the application, pay specific attention to power losses and transients: do not exceed 200 mV voltage drops during transmit bursts avoid undershoot and overshoot on voltage drops at the start and at the end of a transmission minimize voltage ripple on the supply GSM.G1-HW-09002-C Preliminary System description Page 17 of 75 LEON-G100/G200 - System Integration Manual Voltage overshoot ripple 3.8 V (typ) drop ripple RX slot unused unused slot slot TX slot undershoot unused unused slot slot MON slot unused slot RX slot unused unused slot slot GSM frame 4.615 ms (1 frame = 8 slots) Figure 4: Description of the VCC voltage profile versus time during a GSM call TX slot unused unused slot slot MON slot unused slot Time GSM frame 4.615 ms (1 frame = 8 slots) To reduce voltage drops, use a low impedance power source. The resistance of the power supply lines (connected to VCC and GND pins of the module) on the application board and battery pack should also be considered and minimized: cabling and routing must be as short as possible in order to minimize power losses. To avoid undershoot and overshoot on voltage drops at the start and at the end of a transmit burst during a GSM call (when current consumption on the VCC supply can rise up to 2.5 A in the worst case), place a 330 µF low ESR capacitor (e.g. KEMET T520D337M006ATE045) located near the VCC pin of LEON-G100/G200 board. To reduce voltage ripple and noise, place near the VCC pin of the LEON-G100/G200 board the following: 100 nF capacitor (e.g Murata GRM155R61A104K) and a 10 nF capacitor (e.g. Murata GRM155R71C103K) to filter digital logic noises from clocks and data sources 10 pF capacitor (e.g. Murata GRM1555C1E100J) to filter transmission EMI in the DCS/PCS bands, 39 pF capacitor (e.g. Murata GRM1555C1E390J) to filter transmission EMI in the GSM/EGSM bands. Any degradation in the power supply performance, due to losses, noise or transients, will directly affect the RF performance of the module since the single external DC power source indirectly supplies all the digital and analog interfaces, and also directly supplies the RF power amplifier (PA). If the module is supplied by a battery, do not connect any other power supply at the VCC supply pin in parallel to the battery. If the module is not supplied by a battery, Figure 5 and the components listed in Table 3 show an example of a power supply circuit. This example is implemented on the Evaluation Board EVK-G25P. VCC supply is provided by a step-down switching regulator with a 1 MHz switching frequency. LEON-G100/G200 50 VCC Figure 5: Suggested schematic design for the VCC voltage supply application circuit using a step-down regulator GSM.G1-HW-09002-C Preliminary System description Page 18 of 75 LEON-G100/G200 - System Integration Manual Reference Description Part Number - Manufacturer C37 330 µF Capacitor Tantalum D_SIZE 6.3 V 45 mΩ T520D337M006ATE045 - KEMET C41 C43 47 µF Capacitor Aluminum 0810 50 V 10 µF Capacitor Ceramic X7R 5750 15% 50 V MAL215371479E3 - Vishay C5750X7R1H106MB - TDK C44 10 nF Capacitor Ceramic X7R 0402 10% 16 V GRM155R71C103KA01 - Murata C46 C47 680 pF Capacitor Ceramic X7R 0402 10% 16 V 10 nF Capacitor Ceramic X7R 0402 10% 16 V GRM155R71H681KA01 - Murata GRM155R71C103KA01 - Murata C49 C51 470 nF Capacitor Ceramic X7R 0603 10% 25 V 22 µF Capacitor Ceramic X5R 1210 10% 25 V GRM188R71E474KA12 - Murata GRM32ER61E226KE15 - Murata C61 D7 22 pF Capacitor Ceramic COG 0402 5% 25 V Schottky Diode 40V 3 A GRM1555C1H220JZ01 - Murata MBRA340T3G - ON Semiconductor L5 L6 10 µH Inductor 744066100 30% 3.6 A 1 µH Inductor 7445601 20% 8.6 A 744066100 - Wurth Electronics 7445601 - Wurth Electronics R56 470 kΩ Resistor 0402 5% 0.1 W 2322-705-87474-L - Yageo R58 R60 15 kΩ Resistor 0402 5% 0.1 W 33 kΩ Resistor 0402 5% 0.1 W 2322-705-87153-L - Yageo 2322-705-87333-L - Yageo R65 R66 390 kΩ Resistor 0402 1% 0.063 W 100 kΩ Resistor 0402 5% 0.1 W RC0402FR-07390KL - Yageo 2322-705-70104-L - Yageo U12 Step Down Regulator MSOP10 3.5 A 2.4 MHz LT3972IMSE#PBF - Linear Technology Table 3: Suggested components for the VCC voltage supply application circuit using a step-down regulator If another step-down switching regulator is used, the switching frequency must be set to 1 MHz or upper values to avoid a degradation of the RF modulation spectrum performance. An LDO linear voltage regulator can be used to supply the module. Ensure proper power dissipation on the regulator in order to avoid reaching LDO thermal limits during the high current peak generated by the module during a GSM transmit burst. 1.5.2.1 Current consumption profiles During operation, the current drawn by the LEON-G100/G200 through the VCC pin can vary by some orders of magnitude. This ranges from the high peak of current consumption during the GSM transmitting bursts at maximum power level in connected mode, to the low current consumption during power saving in idle mode. 1.5.2.1.1 Connected-mode When a GSM call is established, the battery is discharged at a rate determined by the current consumption profile typical of the GSM transmitting and receiving bursts. The peak of current consumption during a transmission slot is strictly dependent on the transmitted power, which is regulated by the network. If the module is transmitting in GSM talk mode in the GSM 850 or in the EGSM 900 band at the maximum RF power control level 5 (that is approximately 2 W or 33 dBm), the battery discharge current is modulated at up to 2500 mA (worst case value) with pulses of 576.9 µs (width of 1 slot/burst) that occur every 4.615 ms (width of 1 frame = 8 slots) according to GSM TDMA. During a GSM call, current consumption is about 100 mA in receiving or in monitor bursts and is about 30-50 mA in the inactive unused bursts (low current period). The more relevant contribution to determine the average current consumption is set by the transmitted power in the transmit slot. An example of current consumption profile of the data module in GSM talk mode is shown in Figure 6. GSM.G1-HW-09002-C Preliminary System description Page 19 of 75 LEON-G100/G200 - System Integration Manual Current 2500 mA Depends on TX power 200 mA RX slot unused unused slot slot TX slot ~170 mA unused unused slot slot MON slot ~170 mA unused slot RX slot ~40 mA unused unused slot slot GSM frame 4.615 ms (1 frame = 8 slots) TX slot unused unused slot slot GSM frame 4.615 ms (1 frame = 8 slots) MON slot unused slot Time Figure 6: Description of the VCC current consumption profile versus time during a GSM call When a GPRS connection is established, the battery is discharged at a rate determined by the current consumption profile typical of the GPRS transmitting and receiving bursts. In contrast to a GSM call, during a GPRS connection more than one slot can be used to transmit and/or more than one slot can be used to receive. The transmitted power depends on network conditions and sets the peak of current consumption, but following the GPRS specifications the maximum transmitted power can be reduced if more than one slot is used to transmit, so the maximum peak of current consumption is not as high as can be the case in a GSM call. 1.5.2.1.2 Idle-mode By default the module automatically enters idle-mode (power-saving mode) whenever possible, unless idle mode is disabled using the appropriate AT command (refer to u-blox AT Commands Manual [2]). When the data module is registered or attached to a network and a voice or data call is not enabled, the module must periodically monitor the paging channel of the current base station (paging block reception), in accordance to GSM system requirements. When the module monitors the paging channel, it wakes up to active mode, to enable the paging block reception. In between, the module switches to idle-mode (power-saving mode). This is known as GSM discontinuous reception (DRX). The module processor core is activated during the paging block reception, and automatically switches its reference clock frequency from the 32 kHz to the 26 MHz used in active-mode. The time period between two paging block receptions is defined by the network. The time interval between two paging block receptions can be from 470.76 ms (width of 2 GSM multiframes = 2 x 51 GSM frames = 2 x 51 x 4.615 ms) up to 2118.42 ms (width of 9 GSM multiframes = 9 x 51 frames = 9 x 51 x 4.615 ms): this is the paging period parameter broadcast and fixed by the base station. An example of current consumption profile of the data module is shown in Figure 7: the module is registered with the network, automatically goes into idle mode and periodically wakes up to active mode to monitor the paging channel for paging block reception GSM.G1-HW-09002-C Preliminary System description Page 20 of 75 LEON-G100/G200 - System Integration Manual ~150 mA 500-700 uA 0.44-2.09 s ~30 ms IDLE MODE ACTIVE MODE ~150 mA 20-22 mA 8-10 mA 500-700 uA Active Mode Enabled RX+DSP Enabled PLL Enabled IDLE MODE Idle Mode Enabled ~30 ms ACTIVE MODE IDLE MODE Figure 7: Description of the VCC current consumption profile versus time when the module is registered with the network: the module is in idle mode and periodically wakes up to active mode to monitor the paging channel for paging block reception 1.5.3 Battery charger (LEON-G200 only) For battery charging functionalities the module is provided with integrated circuitry and software. Two pins are available to connect the positive pole of the external DC supply used as charger. Name Description Remarks V_CHARGE Charger Voltage Supply Input CHARGE_SENSE Charger Voltage Measurement Input V_CHARGE and CHARGE_SENSE pins must be externally connected. V_CHARGE and CHARGE_SENSE pins must be externally connected. Table 4: Battery charger pins The V_CHARGE pin is the charger supply input. The CHARGE_SENSE pin is connected to an internal ADC converter to measure the charging voltage. The V_CHARGE and CHARGE_SENSE pins must be externally connected together as shown in Figure 8. GSM.G1-HW-09002-C Preliminary System description Page 21 of 75 LEON-G100/G200 - System Integration Manual LEON-G200 5 CHARGE_SENSE 4 V_CHARGE Charger voltage and current limited GND 50 VCC Li-Ion Battery 500 mAh … 1100 mAh GND Figure 9: Connection of an external DC supply used as charger and a Li-Ion battery to the LEON-G200 module Figure 8: Connection of an external DC supply used as charger and a Li-Ion battery to the LEON-G200 module When charger detection is implemented: a valid charger is recognized if the voltage provided to V_CHARGE and CHARGE_SENSE pins is within the operating range limits (5.6 V minimum, 15 V maximum). If the module is switched off, the charger circuitry generates the power on in charging mode after charger detection. To prevent damage to the module and the battery, use only chargers that comply with the characteristics given in section 1.5.3.1. The algorithm that controls battery charging, implements a classic Li-Ion battery charging process, divided into 4 phases: 1. Pre-Charge, at slow current for deeply discharged batteries 2. Fast Charge, at the maximum current provided by the external DC supply used as charger (must be current limited) 3. Top Charge, to complete the over-charging of the batteries, after the maximum voltage (4.2 V for Li-Ion battery) is reached 4. Trickle Charge, to maintain the battery at higher level of charge, if the external DC supply used as charger remains connected If the batteries are deeply discharged (VCC voltage within 0 V and 3.1 V) and the device is in not-powered mode, the charger circuit starts pre-charging when a valid voltage is provided to the V_CHARGE and CHARGE_SENSE pins of the module. In the pre-charging phase, the charge transistor switch mounted inside the module is pulsed with 100 Hz and a duty cycle of 12.5%. This means the average charge current is reduced to avoid overheating of charger parts and to gently charge the deeply discharged batteries. Pre-charging is hardware controlled and continues as long as the VCC voltage reaches the 3.1 V typical limit, so the module is able to start the following charging phase. During fast charging (following the pre-charging phase) the charge transistor switch mounted inside the module can be driven by software according to the charge algorithm. The duty cycle of the charge current never reaches 100%: the charge switch is not closed for 100% of the time but still pulsed with a 100 Hz clock with an on-time GSM.G1-HW-09002-C Preliminary System description Page 22 of 75 LEON-G100/G200 - System Integration Manual of >99% of a period. The remaining off time is used to check if the AC-DC wall adapter is still connected since detection is critical when charging switch is closed. The integrated charging circuit doesn’t have any voltage or current limitation, therefore the charger must be chosen very carefully: during the fast charging phase, the battery is charged with the maximum DC current provided by the external DC supply used as charger, which must be current limited as described in the charger specification section. When the battery voltage reaches the nominal maximum voltage (4.2 V for Li-Ion battery), charging enters the constant voltage phase (top charge algorithm): in this phase the average charging current decreases until the battery is completely charged. After the constant voltage phase, the battery is maintained at a higher level of charge with the trickle charge algorithm until an external charger is connected to the module. The charging process is enabled only within the temperature range: from 0°C to 50°C with a 5°C hysteresis to prevent rapid switching on and off as the temperature drifts around the set point: it is disabled when the temperature falls below 0°C and then enabled when it rises above 5°C; it is disabled when the temperature rises above 50°C and then enabled when falls below 45°C. Battery over-voltage detection is implemented to switch-off charging if e.g. the battery is removed during charging. The over-voltage threshold level is set to the nominal value of 4.47 V (evaluated with 2% of tolerance). 1.5.3.1 Charger specification To avoid damage to the module, the external supply used as charging source must be voltage and current limited. The value of the charger voltage limit must be lower or equal to 15 V. Since the module is not provided with an internal overvoltage protection circuit on the V_CHARGE and CHARGE_SENSE pins, the charging voltage must be lower or equal to the maximum acceptable charging voltage value of 15 V at any time: voltage spikes that may occur during connection or disconnection of the charger must be limited within this value. The value of the charger current limit must be lower or equal to the value of the battery capacity plus 100 mA: the maximum acceptable value for the charger current limit depends on the capacity of the Li-Ion battery used. For example using a 500 mAh battery, the charger current limit must be lower or equal to 600 mA. Since the module is not provided with an internal over-current protection circuit on the V_CHARGE and CHARGE_SENSE pins, the charging current must be lower or equal to the maximum acceptable charging current value at any time: current spikes that may occur during charger connection or disconnection must be limited within this value. There may not be any capacitor on the charge path: a straight connection must be provided between the output of the external supply used as charging source and the V_CHARGE and CHARGE_SENSE pins of the module. The charger must be able to provide a minimum open circuit output voltage greater or equal to 5.6 V for the valid charger detection. A minimum current for the charger is not specified: this value has to be large enough to perform the whole battery charging process within the time interval specified by the application. For example using a 500 mAh battery, the minimum current available by the charger can be 400 mA to reach the complete charge of the battery within a useful period. DC supplies with fold-back current protection cannot be used as charger for the module. Use a charger with the following electrical characteristics: 6 V DC voltage Current limit equal to the capacity of the used battery (i.e. 500 mA current limit if a 500 mAh battery is used) The V-I output characteristics of the external supply used as charger must be within the valid area delineated by: the maximum acceptable charging voltage (equal to 15 V in any case) the minimum voltage valid for charger detection (equal to 5.6 V in any case) GSM.G1-HW-09002-C Preliminary System description Page 23 of 75 LEON-G100/G200 - System Integration Manual the maximum acceptable charging current (equal to the capacity value of the used battery plus 100 mA) the minimum charging current (specified by the application, e.g. 400 mA) For example, Figure 10 and Figure 11 show the valid area for the charger V-I output characteristics using a 500 mAh Li-Ion battery (Figure 10) and a 1100 mAh Li-Ion battery (Figure 11). V Charger specification using a 500 mAh Li-Ion Battery 16 15.0 14 13 12 11 10 9 8 7 5.6 6 5 4 3 2 1 0 0 100 200 300 500 400 700 800 900 1000 1100 1200 1300 mA 600 Figure 10: Valid area for the charger V-I output characteristics using a 500 mAh Li-Ion Battery GSM.G1-HW-09002-C Preliminary System description Page 24 of 75 LEON-G100/G200 - System Integration Manual V Charger specification using a 1100 mAh Li-Ion Battery 16 15.0 14 13 12 11 10 9 8 7 5.6 6 5 4 3 2 1 0 0 100 200 300 500 600 700 800 900 1000 1100 400 1300 mA 1200 Figure 11: Valid area for the charger V-I output characteristics using a 1100 mAh Li-Ion Battery 1.5.4 Voltage Backup Power (V_BCKP) The V_BCKP pin connects the Real Time Clock (RTC) supply, which is internally generated by a linear regulator integrated in the module chipset. The output of this linear regulator is enabled when the main voltage supply providing the module through VCC is within the valid operating range or if the module is switched-off. The RTC provides the time reference (date and time) of the module, also in power-off mode, since the RTC runs when the V_BCKP voltage is within its valid range (specified in LEON-G100/G200 Data Sheet [1]). The RTC block is able to provide programmable alarm functions by means of the internal 32.768 kHz clock. The RTC block has very low power consumption, but this is highly temperature dependent. For example at 25°C and a V_BCKP voltage of 2.0 V the power consumption is approximately 2 µA, whereas at 85°C and an equal voltage the power consumption increases to 5 µA. The RTC can be supplied from an external back battery through the V_BCKP, when the main voltage supply is not provided to the module through VCC. This lets the time reference (date and time) run even when the main supply is not provided to the module. The module cannot switch on if a valid voltage is not present on VCC even when RTC is supplied through V_BCKP (meaning that VCC is mandatory to switch-on the module). If V_BCKP is left unconnected and the main voltage supply of the module is removed from VCC, the RTC be supplied from the 1 µF buffer capacitor mounted inside the module. However, this capacitor is not able to provide a long buffering time: within 0.5 seconds the voltage on V_BCKP will go below the valid range (1 V min). V_BCKP can be left unconnected if RTC is not required when VCC supply is removed. If RTC is required to run for a time interval of T [seconds] at 25°C when VCC supply is removed, place a capacitor with a nominal capacitance of C [µF] at the V_BCKP pin. Chose the capacitor with the following formula: C [µF] = ( Current_Consumption [µA] x T [seconds] ) / Voltage_Drop [V] = 2 x T [seconds] The current consumption of the RTC is around 2 µA at 25°C, and the voltage drop is equal to 1 V (from the V_BCKP typical value of 2.0 V to the valid range minimum limit of 1.0 V). For example, a 100 µF capacitor (such as the Murata GRM43SR60J107M) can be placed at the V_BCKP to provide a long buffering time. This capacitor will hold V_BCKP voltage within its valid range for around 50 seconds at 25°C, after the VCC supply is removed. If a very long buffering time is required, a 70 mF supercapacitor (e.g. Seiko Instruments XH414H-IV01E) can be placed at V_BCKP, with a 4.7 k series resistor to hold GSM.G1-HW-09002-C Preliminary System description Page 25 of 75 LEON-G100/G200 - System Integration Manual the V_BCKP voltage within its valid range for around 10 hours at 25°C, after the VCC supply is removed. These capacitors will let the time reference run during a disconnection of the battery. LEON-G100/G200 100 µF GRM43SR60J107M 2 + V_BCKP LEON-G100/G200 4.7 k 70 mF XH414H-IV01E + 2 V_BCKP Figure 12: Real time clock supply (V_BCKP) application circuits using a 100 µF capacitor to let the RTC run for ~50 seconds at 25°C or using a 70 mF capacitor to let the RTC run for ~10 hours at 25°C when the VCC supply is removed 1.6 System functions 1.6.1 Module power on The power-on sequence of the module is initiated in one of 4 ways: Rising edge on the VCC pin to a valid voltage as module supply Falling edge on the PWR_ON signal RTC alarm Rising edge on the V_CHARGE and CHARGE_SENSE to a valid voltage for charger detection (LEON-G200 only) 1.6.1.1 Rising edge on VCC When a battery supply is connected to the VCC pin, the battery supervision circuit controls the subsequent activation of the power up state machines: the module is switched-on if the battery is connected for the first time and the voltage rises up to the valid limit of operation (See LEON-G100/G200 Data Sheet [1]). 1.6.1.2 Falling edge on the PWR_ON Power-on sequence of the module starts when a falling edge occurs on the PWR_ON signal. The electrical characteristics of the PWR_ON input pin are different from the other digital I/O interfaces: the high and the low logic levels have different operating ranges and the pin is tolerant against voltages up to the battery voltage. The detailed electrical characteristics are described in the datasheet. PWR_ON pin has high input impedance and is weakly pulled to the high level on the module. Avoid to keep it floating in noisy environment: to hold the high logic level stable, it is suggested to add a pull-up to the V_BCKP supply. Force the PWR_ON input pin to the low level for at least 50 ms to cause a switch-on of the module, also if the power-on sequence is triggered by a falling edge on the PWR_ON signal. If PWR_ON input is connected to an external device (e.g. application processor), use an open drain output of the external device with an external pull-up. Connect the pull-up to V_BCKP supply or to another supply rail present GSM.G1-HW-09002-C Preliminary System description Page 26 of 75 LEON-G100/G200 - System Integration Manual on the application board, in range from 1.8 V to 3.3 V. It should also be available when the module is in poweroff mode. Other possibility is to use a push-pull output of the external device, but take care to fix the proper level in all the possible scenarios to avoid an inappropriate switch-on of the module. LEON-G100/G200 Power-on push button 2 V_BCKP 19 PWR_ON 10 k LEON-G100/G200 Application Processor 10k 19 PWR_ON Figure 13: Power on (PWR_ON) application circuits using a push button or using an application processor 1.6.1.3 RTC alarm The module can be switched-on by the RTC alarm if a valid voltage is applied to the VCC pin, when Real Time Clock system reaches a pre-defined scheduled time. The RTC system will then initiate the boot sequence by indicating to the power management unit to turn on power. Also included in this setup is an interrupt signal from the RTC block to indicate to the baseband processor, that a RTC event has occurred. 1.6.1.4 Rising edge on V_CHARGE and CHARGE_SENSE (LEON-G200 only) The module can be switched-on by a charger: if the power management unit detects that a charger is connected to the module through the V_CHARGE and CHARGE_SENSE pins, it turns on power and the module is switched on in charge mode. 1.6.1.5 Additional considerations If a valid battery voltage is connected to VCC before the detection of a start-up event, most input-output pads of the baseband chipset are locked in tri-state. The power down tri-state function isolates the outputs of the module from its environment, when no proper operation of the outputs can be guaranteed. To avoid an increase of the module current consumption in power down mode, any external signal of the digital interfaces connected to the module must be set low or tri-stated when the module is in not-powered mode or in the power-off mode. After the detection of a start-up event, during the power-on sequence, the baseband core is held in reset state before enabling the input-output pads. Any signal of the module digital interfaces is held to the reset state until the application starts. See Figure 14. The reset state of all the module input-output pins is reported in the pin description table of the LEON-G100/G200 Data Sheet [1]. GSM.G1-HW-09002-C Preliminary System description Page 27 of 75 LEON-G100/G200 - System Integration Manual The power-on sequence is described in Figure 14. Valid VCC Start-up event VCC V_BCKP PWR_ON don't care don't care LDOs RESET_N System State BB Pads State OFF Tristate ON Reset Operational Figure 14: Power on sequence description 1.6.2 Module power off LEON-G100/G200 can be switched-off by one of the following switch-off events: Via AT command AT+CPWROFF (more details in u-blox AT Commands Manual [2]). This is the only way to switch off the module. An under-voltage shutdown will be done if VCC falls below the valid operating limit. After a switch-off event has been triggered, the digital pins are locked in tri-state by the module. All internal voltage regulators except the RTC supply are turned off in a defined power-off sequence. To avoid an increase of module current consumption in power-down mode, any external signal connected to the module digital pins (UART interface, Digital audio interface, HS_DET, GPIOs) must be set low or tristated when the module is in the not-powered or power-off modes. If the external signals connected to the module digital pins cannot be set low or tri-stated, insert a switch (e.g. Texas Instruments SN74CB3Q16244, or Texas Instruments TS5A3159, or Texas Instruments TS5A63157) between the twocircuit connections. Set the switch to high impedance when the module is in power-down mode (to avoid an increase of the module power consumption). The power-off sequence is described in Figure 15. GSM.G1-HW-09002-C Preliminary System description Page 28 of 75 LEON-G100/G200 - System Integration Manual Turn-off triggered VCC V_BCKP LDOs RESET_N System State ON OFF BB Pads State Operational Tristate Figure 15: Power off sequence description 1.6.3 Module reset Reset the module using RESET_N: this performs an external or hardware reset. When RESET_N pin is driven to low, the device is initialized into a defined reset state. An asynchronous reset of the entire module - except for the RTC - is triggered. The electrical characteristics of RESET_N are different from the other digital I/O interfaces. The high and the low logic levels have different operating ranges and the pin is tolerant to voltages up to the battery voltage (a series protection diode is mounted inside the module to protect the pin). The detailed electrical characteristics are described in the LEON-G100/G200 Data Sheet [1]. RESET_N is pulled high by an integrated pull-up resistor, therefore an external pull-up is not required on the application board. An internal circuit pulls the level to 1.88 V (see Figure 16). Force the RESET_N input pin to the low level for at least 50 ms to cause an external reset of the module. When the RESET_N is released from the low level, the module automatically starts its power-on reset sequence. If RESET_N is connected to an external device (e.g. an application processor on an application board) an open drain output can be directly connected without any external pull-up. Otherwise, a push-pull output should be used. Make sure to fix the proper level on RESET_N in all possible scenarios, to avoid unwanted reset of the module. The reset state of all input-output pins is reported in the pin description table in the LEON-G100/G200 Data Sheet [1]. GSM.G1-HW-09002-C Preliminary System description Page 29 of 75 LEON-G100/G200 - System Integration Manual LEON-G100/G200 Reset push button RESET_N 12.6 k 1.88 V 22 Application Processor LEON-G100/G200 12.6 k RESET_N 22 1.88 V Figure 16: Application circuits to reset the module using a push button or using an application processor When the module is in power-off mode or in reset state, RESET_N is pulled low (e.g. during boot sequence, a watchdog timer, or software reset). RESET_N can indicate to an external application that the module is powered up and is not in the reset state, when: RESET_N connected through a biased inverting transistor to a LED RESET_N connected through a biased inverting and level shifting transistor to an input pin of an application processor that will sense a low logic level when the module is powered up and is not in the reset state; RESET_N connected through a pull-down resistor to an input pin of the application processor that senses a high logic level (1.8 V) when the module is powered up and is not in the reset state. Examples of application circuits are shown in the Figure 17. LEON-G100/G200 220 220 k Application Processor 22 RESET_N LEON-G100/G200 22 k INPUT 220 k 22 Application Processor RESET_N LEON-G100/G200 22 INPUT RESET_N 680 k Figure 17: Application circuits to sense if the module is in the reset state GSM.G1-HW-09002-C Preliminary System description Page 30 of 75 LEON-G100/G200 - System Integration Manual 1.7 RF connection The core of the RF part of the LEON-G100/G200 modules is the transceiver integrated in the GSM/GPRS single chip. The integrated receiver covers the four GSM bands GSM850 MHz, EGSM900 MHz, DCS1800 MHz and PCS1900 MHz, using two LNAs integrated in the RF Transceiver and providing quad-band operation. In the first duplexer the two low bands (RX path 850 MHz and 900 MHz) are separated, filtered, and routed to a single output and then connected to the LNA of the first low band receiver. In the same way the two high bands (RX paths 1800 MHz and 1900 MHz) are connected to the second duplexer to LNA of the second high band receiver. Two different RF TX outputs are provided, one for 850/900 MHz bands and one for 1800/1900 MHz bands. The quad-band front end module amplifies these signals maintaining two separate paths. By default the RF I/O signal is routed through a 50 Ω antenna interface. The temperature dependent performance of the oscillator and RF high power circuits are controlled by the baseband with the aid of the NTC sensor. 1.8 Antenna supervisor Antenna detection is internally performed by the module via ANT: the RF port is DC coupled to the ADC unit in the baseband chip. The module measures the DC voltage at ANT, in the range of 0..2 V. Additionally, the module can inject a known DC current (~ 100 µA) on ANT and measures the resulting DC voltage. DC Blocking ANT RF Transceriver RF Choke A-to-D Converter Current Source LEON-G100 LEON-G200 Figure 18: Antenna Supervisor internal circuit If the DC voltage is present on ANT, or a DC connection to a known resistor at the radiating element is implemented, the module will be able to check the connection to the Antenna element. Refer to the u-blox AT Commands Manual [2] for more details on how to access this feature. 1.9 Audio LEON-G100/G200 modules provide four analog and one digital audio interfaces: Two microphone inputs: First microphone input: direct connection of an electret condenser microphone, used in the handset mode or in the hands free mode GSM.G1-HW-09002-C Preliminary System description Page 31 of 75 LEON-G100/G200 - System Integration Manual Second microphone input: direct connection of an electret condenser microphone, used in the headset mode Two speaker outputs: First speaker output: a single ended low power audio output, can be used to directly connect a receiver (earpiece) used in handset mode or in headset mode Second speaker output: a differential high power audio output, can be used to directly connect a speaker or a loud speaker used in ring-tones or in hands-free mode Headset detection input I2S digital audio interface 1.9.1 Analog Audio interface 1.9.1.1 Uplink path (microphone inputs) The TX (uplink) path of the analog audio front-end on the module consists of two identical microphone circuits. Two electret condenser microphones can be directly connected to the two available microphone inputs. The main electrical specification requirements for the electret condenser microphone are 2.2 k output impedance at 1 kHz and 2 V maximum standard operating voltage. as maximum The following board-to-board pins are related to the uplink path (microphones inputs): MIC_BIAS1: single ended supply to the first microphone and represents the microphone signal input used in handset or hands free mode; MIC_GND1: local ground for the first microphone; MIC_BIAS2: single ended supply to the second microphone and represents microphone signal input used in headset mode; MIC_GND2: local ground for the second microphone. For a description of the internal function blocks see Figure 24. 1.9.1.2 Downlink path (speaker outputs) The RX (downlink) path of the analog audio front-end of the module consists of two speaker outputs available on the following pins: HS_P: low power single ended audio output available for handset or headset mode. This pin is internally connected to the output of the single ended audio amplifier of the chipset; SPK_N/SPK_P: high power differential audio output, available for hands free or ringer mode. These two pins are internally connected to the output of the high power differential audio amplifier of the chipset. For a description of the internal function blocks see Figure 24. Warning: excessive sound pressure from headphones can cause hearing loss. Detailed electrical characteristics of the low power single-ended audio receive path and the high power differential audio receive path can be found in the LEON-G100/G200 Data Sheet [1]. Table 5 lists the signals related to analog audio functions. GSM.G1-HW-09002-C Preliminary System description Page 32 of 75 LEON-G100/G200 - System Integration Manual Name Description Remarks HS_P Low power single-ended analog audio output Used in handset or in headset mode SPK_P SPK_N High power differential analog audio output High power differential analog audio output Used in ring tones or in hands free mode Used in ring tones or in hands free mode MIC_BIAS2 Second microphone analog bias MIC_GND2 Second microphone analog reference Single ended supply output and signal input for the second microphone. Used in headset mode Local ground of second microphone MIC_GND1 MIC_BIAS1 First microphone analog reference First microphone analog bias Local ground of the first microphone Single ended supply output and signal input for first microphone. Used in handset or in hands free mode Table 5: Analog Audio Signal Pins All audio lines on an Application Board must be routed in pairs, be embedded in GND (have the ground lines as close as possible to the audio lines), and maintain distance from noisy lines such as VCC and from components as switching regulators. 1.9.1.3 Handset mode Handset mode is the default audio operating mode of LEON-G100/G200 modules: Handset microphone must be connected to inputs MIC_BIAS1/MIC_GND1 Handset receiver must be connected to output HS_P. Figure 19 shows an example of an application circuit connecting a handset (with a 2.2 kΩ electret microphone and a 32 Ω receiver) to the LEON-G100/G200 modules. Perform the following steps on the application circuit: Mount a series capacitor on the HS_P line to decouple the bias. Mount A 10 µF ceramic capacitor (e.g. Murata GRM188R60J106M) if connecting a 32 Ω receiver, or a load with greater impedance (such as a single ended analog input of a codec). Otherwise if a 16 Ω receiver is connected to the line, a ceramic capacitor with greater nominal capacitance must be used: a 22 µF series capacitor (e.g. Murata GRM21BR60J226M) is required. Mount a 33nH series inductor (e.g. Murata LQP15M33NG02) on each microphone line and a 27 pF bypass capacitor (e.g. Murata GRM1555C1H270J) on all audio lines to minimize RF coupling and TDMA noise. Figure 19: Handset connector application circuit GSM.G1-HW-09002-C Preliminary System description Page 33 of 75 LEON-G100/G200 - System Integration Manual Audio Device LEON-G100/G200 10 µF HS_P 37 Single-ended Analog Input Reference GND 10 µF MIC_BIAS1 44 Single-ended Analog Output MIC_GND1 43 Reference Audio Device LEON-G100/G200 10 µF HS_P 37 Single-ended to Differential 10 µF MIC_GND1 Negative Analog Input Reference GND MIC_BIAS1 Positive Analog Input 44 Differential to Single-ended 43 Positive Analog Output Negative Analog Output Reference Figure 20: Application circuits to connect the LEON module to external audio devices with proper single-ended or differential analog audio inputs/outputs 1.9.1.4 Headset mode The audio path is automatically switched from handset mode to headset mode when a rising edge is detected by the module on HS_DET. The audio path returns to the handset mode when the line returns to low level. The audio path used in headset mode: Headset microphone must be connected to MIC_BIAS2/MIC_GND2 Headset receiver must be connected to HS_P Figure 21 shows an application circuit connecting a headset (with a 2.2 kΩ electret microphone and a 32 Ω receiver) to the LEON-G100/G200 modules. Pin 1 & 2 are shorted in the headset connector, causing HS_DET to be pulled low. When the headset plug is inserted HS_DET is pulled internally by the module, causing a rising edge for detection. Perform the following steps on the application board (see Figure 21): Mount a series capacitor on the HS_P line to decouple the bias. 10 µF ceramic capacitor (e.g. Murata GRM188R60J106M) is required if a 32 Ω receiver or a load with greater impedance (as a single ended analog input of a codec) is connected to the line. When a 16 Ω receiver is connected to the line, a ceramic capacitor with greater nominal capacitance must be used: a 22 µF series capacitor (e.g. Murata GRM21BR60J226M) is required GSM.G1-HW-09002-C Preliminary System description Page 34 of 75 LEON-G100/G200 - System Integration Manual Mount a 33 nH series inductor (e.g. Murata LQP15M33NG02) on each microphone line, and a 27 pF bypass capacitor (e.g. Murata GRM1555C1H270J) on all audio lines to minimize RF coupling and the TDMA noise LEON-G100/G200 MIC_GND2 42 MIC_BIAS2 41 HS_P 37 HS_DET 18 Figure 21: Headset connector application circuit 1.9.1.5 Hands-free mode Hands-free functionality is implemented using appropriate DSP algorithms for voice band handling (echo cancellation and automatic gain control), managed via software. The viva voice operation provides the possibility to realize a phone call with a loudspeaker and a microphone. The audio path used in hands-free mode: Microphone is connected to the input pins MIC_BIAS1/MIC_GND1 High power loudspeaker is connected to the output pins SPK_P/SPK_N. When hands-free mode is enabled, the audio output signal on HS_P is disabled. The physical width of the high power audio outputs lines on the application board must be wide enough to minimize series resistance. Figure 22 shows an application circuit for hands-free mode. In this example the LEON-G100/G200 module is connected to an 8 Ω speaker and a 2.2 kΩ electret microphone. Insert a 33 nH series inductor (e.g. Murata LQP15M33NG02) on each microphone line and a 27 pF bypass capacitor (e.g. Murata GRM1555C1H270J) on all audio lines to minimize RF coupling and the TDMA noise. GSM.G1-HW-09002-C Preliminary System description Page 35 of 75 LEON-G100/G200 - System Integration Manual LEON-G100/G200 SPK_P 38 SPK_N 39 MIC_BIAS1 44 MIC_GND1 43 Figure 22: Hands free mode application circuit 1.9.1.6 Connection to an external analog audio device When the LEON-G100/G200 module analog audio output is connected to an external audio device, HS_P analog audio output can be used. A 10 µF series capacitor (e.g. Murata GRM188R60J106M) must be inserted between the HS_P output and the single ended analog input of the external audio device (to decouple the bias). An additional single-ended to differential circuit is required for audio devices with a differential analog input. The signal levels can be adapted by setting gain using AT commands, but additional circuitry must be inserted if the HS_P output level of the module is too high for the input of the audio device. If LEON-G100/G200 module analog audio input is connected to an external audio device, MIC_BIAS1/MIC_GND1 can be used (default analog audio input of the module). Insert a 10 µF series capacitor (e.g. Murata GRM188R60J106M) between the single ended analog output of the external audio device and MIC_BIAS1. Connect the reference of the single ended analog output of the external audio device to MIC_GND1. If the external audio device is provided with a differential analog output, insert an additional differential to single ended circuit. The signal levels can be adapted by setting gain using AT commands, but additional circuitry must be inserted if the output level of the audio device is too high for MIC_BIAS1. Examples of connecting the LEON-G100/G200 modules to external audio applications are shown in Figure 23. GSM.G1-HW-09002-C Preliminary System description Page 36 of 75 LEON-G100/G200 - System Integration Manual Audio Device LEON-G100/G200 10 µF HS_P 37 Single-ended Analog Input Reference GND 10 µF MIC_BIAS1 44 Single-ended Analog Output MIC_GND1 43 Reference Audio Device LEON-G100/G200 10 µF HS_P 37 Positive Analog Input Single-ended to Differential Negative Analog Input Reference GND 10 µF MIC_BIAS1 MIC_GND1 44 Positive Analog Output Differential to Single-ended Negative Analog Output 43 Reference Figure 23: Application circuits to connect the LEON module to external audio devices with appropriate single-ended or differential analog audio inputs/outputs 1.9.2 Digital Audio interface (LEON-G200 only) LEON-G200 supports a bidirectional 4-wire I2S digital audio interface. The module acts as master only. The I2S pins are listed in Table 6: Name Description Remarks I2S_WA I2S word alignment Module output (master) I2S_TXD I2S_CLK I2S transmit data I2S clock Module output Module output (master) I2S_RXD I2S receive data Module input Table 6: I2S interface pins The I2S interface can be can be used in two modes: PCM mode: I2Sx Normal I2S mode: I2Sy Beyond the supported transmission modality, the main difference between the PCM mode and the normal I2S mode is represented by the logical connection to the digital audio processing system integrated in the chipset firmware (see Figure 24): In PCM mode provides complete audio processing functionality Normal I2S mode: digital filters, digital gains, side tone, some audio resources as tone generator, info tones (e.g. free tone, connection tone, low battery alarm), and ringer are not available The I2S interface is activated and configured using AT commands, see the u-blox AT commands manual [2]. GSM.G1-HW-09002-C Preliminary System description Page 37 of 75 LEON-G100/G200 - System Integration Manual If the I2S interface is used in PCM mode, digital path parameters can be configured and saved as the normal analog paths, using appropriate path index as described in the u-blox AT commands manual [2]. Analog gain parameters of microphone and speakers are unused when digital path is selected. Any external signal connected to the digital audio interface must be set low or tri-stated when the module is in power down mode to avoid an increase of module power consumption. If the external signals connected to the digital audio interface cannot be set low or tri-stated, insert a multi channel digital switch (e.g. Texas Instruments SN74CB3Q16244, TS5A3159, or TS5A63157) between the two-circuit connections and set to high impedance when the module is in power down mode. For debug purposes, include a test point at each I2S pin also if the digital audio interface is not used. 1.9.2.1 PCM mode In PCM mode I2S_TX and I2S_RX are respectively parallel to the analog front end I2S_RX and I2S_TX as internal connections to the voice processing system (see Figure 24), so resources available for analog path can be shared: Digital filters and digital gains are available in both uplink and downlink direction. Configure using AT commands Ringer tone and service tone are mixed on the TX path when active (downlink) The HF algorithm acts on I2S path Main features of the I2S interface in PCM mode: I2S runs in PCM - short alignment mode (configurable with AT commands) Module functions as I2S master (I2S_CLK and I2S_WA signals generated by the module) I2S_WA signal always runs at 8 kHz I2S_WA toggles high for 1 or 2 CLK cycles of synchronism (configurable), then toggles low for 16 CLK cycles of sample width. Frame length can be 1 + 16 = 17 bits or 2 + 16 = 18 bits I2S_CLK frequency depends on frame length. Can be 17 x 8 kHz = 136 kHz or 18 x 8 kHz = 144 kHz I2S_TX, I2S_RX data are 16 bit words with 8 kHz sampling rate, mono. Data are in 2’s complement notation. MSB is transmitted first When I2S_WA toggles high, first synchronism bit is always low. Second synchronism bit (present only in case of 2 bit long I2S_WA configuration) is MSB of the transmitted word (MSB is transmitted twice in this case) I2S_TX changes on I2S_CLK rising edge, I2S_RX changes on I2S_CLK falling edge 1.9.2.2 Normal I2S mode Normal I2S supports: 16 bits word mono interface 8 kHz frequency Main features of I2S interface in Normal I2S mode: I2S_WA signal always runs at 8 KHz and the channel can be either high or low; I2S_TX data 16 bit words with 32 bit frame and 2, dual mono (the word can be written on 2 channels). Data are in 2’s complement notation. MSB is transmitted first. The MSB is first transmitted; the bits change on I2S_CLK rising or falling edge (configurable); I2S_RX data are read on the I2S_CLK edge opposite to I2S_TX writing edge; I2S_CLK frequency depends by the number of bits and number of channels so is 16 x 2 x 8 KHz = 256 KHz. The modes are configurable through a specific AT command (refer to u-blox AT commands manual [2]) and the following parameters can be set: GSM.G1-HW-09002-C Preliminary System description Page 38 of 75 LEON-G100/G200 - System Integration Manual I2S_TX word can be written while I2S_WA is high, low or both; MSB can be 1 bit delayed or non-delayed on I2S_WA edge; I2S_TX data can change on rising or falling edge of I2S_CLK signal (Rising edge in this example); I2S_RX data read on the opposite front of I2S_CLK signal. 1.9.3 Voiceband processing system Digital voiceband processing on the LEON-G100/G200 is implemented in the DSP core inside the baseband chipset. The analog audio front-end of the chipset is connected to the digital system through 16 bit ADC converters in the uplink path, and through 16 bit DAC converters in the downlink path. The digitized TX and RX voiceband signals are both processed by digital gain stages and decimation filter in TX, interpolation filters in RX path. The processed digital signals of TX and RX are connected to the TEAKLite DSP for various tasks (i.e. speech codec, digital mixing and sidetone, audio filtering) implemented in the firmware modules. External digital audio devices can be interfaced to the DSP voiceband processing system via the I2S interface. The voiceband processing system can be split up into three different parts: Sample-based Voiceband Processing (at 8 kHz / 125 µs) Frame-based Voiceband Processing (20 ms) Circular Mixing Buffer, to mix different sound signals (Sound Ringer, MIDI synthesizer) with the downlink signal at 48 kHz LEON-G100/G200 Digital Audio Input Mic-1 Mic-2 Receiver Loud Speaker Digital Audio Output I2Sy RX (Normal I2S mode) I2Sx RX (PCM mode) Analog Front End TX Analog Front End RX I2Sx TX (PCM mode) Sample-based Voiceband Processing DTMF Tones (UL & DL) Filtering (IIR & FIR) Sidetone Frame-based Voiceband Processing Voice Memo Hands Free TX MODEM RX Circular Mixing Buffer Sample Rate Conversion MIDI Synthesizer I2Sy TX (Normal I2S mode) Figure 24: LEON-G100/G200 voiceband processing system block diagram GSM.G1-HW-09002-C Preliminary System description Page 39 of 75 LEON-G100/G200 - System Integration Manual The sample-based voiceband processing is done on an interrupt level and its main task is to transfer the voiceband samples from either analog audio front-end TX path or I2Sx RX path to the Voiceband Sample Buffer and from the Voiceband Sample Buffer to the analog audio front-end RX path and/or I2Sx TX path. First the TX path (uplink) is processed: the input sample is scaled, filtered and before it is copied into the voiceband input buffer for the speech frame based processing and it is used to generate the sidetone for the RX path processing. Furthermore the signal is mixed with the output of the circular buffer. The frame-based voiceband processing consists of these operating parts: voice memo; echo cancellation and auto gain control for hands free mode. The uplink path starts with output samples from voiceband buffer and stops with speech encoding. The downlink path starts with output samples from speech decoder and stops with output samples to voiceband buffer. The circular buffer is a 3000 word buffer to store and mix the voiceband samples from external sources (synthesizer data). The buffer has a circular structure, so that when the write pointer reaches the end of the buffer, it is wrapped to the begin address of the buffer. Two different sample-based sample rate converters are used: an interpolator, required to convert the samplebased voiceband processing sampling rate of 8 kHz to the analog audio front-end output rate of 47.6 kHz; a decimator, required to convert the circular buffer sampling rate of 47.6 kHz to the I2Sx TX or the uplink path sample rate of 8 kHz. 1.9.3.1 Audio codecs The following speech codecs are supported by firmware on the DSP: GSM Half Rate (TCH/HS) GSM Full Rate (TCH/FS) GSM Enhanced Full Rate (TCH/EFR) 3GPP Adaptive Multi Rate (AMR) (TCH/AFS+TCH/AHS) 1.9.3.2 Echo cancelation and noise reduction LEON-G100/G200 support algorithms for echo cancellation, noise suppression and automatic gain control. Algorithms are configurable with AT commands (refer to the u-blox AT Commands Manual [2]). 1.9.3.3 Digital filters and gains Audio parameters such as digital filters, digital gain, Side-tone gain (feedback from uplink to downlink path) and analog gain are available for uplink and downlink audio paths. These parameters can be modified by dedicated AT commands and be saved in 2 customer profiles in the non-volatile memory of the module (refer to the u-blox AT Commands Manual [2]). 1.9.3.4 Ringer mode LEON-G100/G200 modules support polyphonic ring tones. The ringer tones are generated by a built-in generator on the chipset and then amplified by the internal amplifier. The synthesizer output is only mono and cannot be mixed with TCH voice path (the two are mutually exclusive). To perform in-band alerting during TCH with voice path open, only Tone Generator can be used. Polyphonic standard format supported. GSM.G1-HW-09002-C Preliminary System description Page 40 of 75 LEON-G100/G200 - System Integration Manual 1.10 SIM interface An SIM card interface is provided on the board-to-board pins of the module: the high-speed SIM/ME interface is implemented as well as automatic detection of the required SIM supporting voltage. Both 1.8 V and 3 V SIM types are supported: activation and deactivation with automatic voltage switch from 1.8 to 3 V is implemented, according to ISO-IEC 78-16-e specifications. The SIM driver supports the PPS (Protocol and Parameter Selection) procedure for baud-rate selection, according to the values determined by the SIM Card. Table 7 describes the board to board pins related to the SIM interface: Name Description Remarks VSIM SIM supply SIM_CLK SIM_IO SIM clock SIM data 1.80 V typical or 2.85 V typical automatically generated by the module 3.25 MHz clock frequency SIM_RST SIM reset Table 7: SIM Interface pins Figure 25 shows the circuit with the minimal connections between the LEON module and the SIM card. LEON-G100/G200 VSIM 35 SIM_IO 33 SIM_CLK 32 SIM_RST 34 Figure 25: SIM interface application circuit When connecting the module to SIM connector perform the following steps on the application board: To prevent RF coupling: ground via a 47 pF capacitor (e.g. Murata GRM1555C1H470J) near the SIM connector on each SIM signal (SIM_CLK, SIM_IO, SIM_RST) Ground via a 100 nF capacitor (e.g. Murata GRM155R71C104K) on the SIM supply (VSIM). Mount very low capacitance ESD protection (e.g. Infineon ESD8V0L2B-03L or AVX USB0002RP) near the SIM card connector Limit capacitance on each SIM signal to match the SIM specifications: the connections should always be routed as short as possible GSM.G1-HW-09002-C Preliminary System description Page 41 of 75 LEON-G100/G200 - System Integration Manual 1.10.1 SIM functionality The following SIM services are supported: Abbreviated Dialing Numbers (ADN) Fixed Dialing Numbers (FDN) Last Dialed Numbers (LDN) Service Dialing Numbers (SDN) SIM Toolkit R99 is supported. 1.11 Serial Communication 1.11.1 Asynchronous serial interface (UART) The UART interface is an 8-wire unbalanced asynchronous serial interface provided for all communications with LEON-G100/G200 modules: AT commands interface, GPRS data and CSD data, software upgrades. The UART interface provides RS-232 functionality conforming to the ITU-T V.24 Recommendation (more details available in [3]), with CMOS compatible signal levels: 0 V for low data bit or ON state, and 2.85 V for high data bit or OFF state. An external voltage translator (Maxim MAX3237) is required to provide RS-232 compatible signal levels. For the detailed electrical characteristics refer to the LEON-G100/G200 Data Sheet [1]. LEON-G100/G200 modules are designed to operate as a GSM/GPRS modem, which represents the data circuit-terminating equipment (DCE) as described by the ITU-T V.24 Recommendation. A customer application processor connected to the module through the UART interface represents the data terminal equipment (DTE). The signal names of the LEON-G100/G200 UART interface conform to ITU-T V.24 Recommendation. The UART interface includes data lines, hardware flow control lines, modem status and control lines: RxD: module data output, provides the functionality of the ITU-T V.24 Circuit 104 (Received data) TxD: module data input, provides the functionality of the ITU-T V.24 Circuit 103 (Transmitted data) CTS: module hardware flow control output, provides the functionality of the ITU-T V.24 Circuit 106 (Ready for sending) RTS: module hardware flow control input, provides the functionality of the ITU-T V.24 Circuit 105 (Request to send) DTR: module input, provides the functionality of the ITU-T V.24 Circuit 108/2 (Data terminal ready) DSR: module output, provides the functionality of the ITU-T V.24 Circuit 107 (Data set ready) DCD: module output, provides the functionality of the ITU-T V.24 Circuit 109 (Data channel received line signal detector) RI: module output, provides the functionality of the ITU-T V.24 Circuit 125 (Calling indicator) 1.11.1.1 UART features The AT commands that are supported on the module through the UART interface are: AT commands according to [7]. AT commands according to [8]. AT commands according to [9]. u-blox AT commands. GSM.G1-HW-09002-C Preliminary System description Page 42 of 75 LEON-G100/G200 - System Integration Manual All flow control handshakes are supported by the UART interface and can be set by appropriate AT commands (see u-blox AT Commands Manual [2]): hardware flow control (RTS/CTS), software flow control(XON/XOFF), or none flow control. Autobauding is supported and can be enabled or disabled by an AT command (see u-blox AT Commands Manual [2]). Autobauding is enabled by default. Hardware flow control is default. For the complete list of supported AT commands and their syntax refer to the u-blox AT Commands Manual [2]. Autobauding result can be unpredictable with spurious data if idle-mode (power-saving) is entered and the hardware flow control is disabled. The following baud rates can be configured using AT commands: 4800 bps, 9600 bps, 19200 bps, 38400 bps, 57600 bps, 115200 bps. Default when autobauding disabled. The following baud-rates are available with autobauding only: 1200 bps, 230400 bps. Automatic frame recognition is supported: this feature is enabled in conjunction with autobauding only, which is enabled by default. The frame format can be: 8N1 (8 data bits, No parity, 1 stop bit), 8E1 (8 data bits, even parity, 1 stop bit), 8O1 (8 data bits, odd parity, 1 stop bit), 8N2 (8 data bits, No parity, 2 stop bits). The default frame configuration with fixed baud rate is 8N1, described in the Figure 26. Normal Transfer, 8N1 Start of 1-Byte transfer D0 D1 Possible Start of next transfer D2 D3 D4 D5 D6 D7 Start Bit (Always 0) Stop Bit (Always 1) tbit = 1/(Baudrate) Figure 26: UART default frame format (8N1) description GSM.G1-HW-09002-C Preliminary System description Page 43 of 75 LEON-G100/G200 - System Integration Manual 1.11.1.2 UART signal behavior See Table 2 for a description of operating modes and states referred to in this section. By default the RxD and the TxD lines are set to the OFF state at UART initialization, following the boot sequence when the module is switched on. The module holds RxD and TxD in the OFF state until data is either transmitted or received by the module: an active pull-up is enabled inside the module on the TxD input. The hardware flow control output (CTS line) indicates when the module is in active mode and the UART interface is enabled: the module drives the CTS line to the ON state or to the OFF state when it is either prepared or not prepared to accept data from the external device (DTE). After the boot sequence the CTS line is set to the ON state at UART initialization, when the module is in activemode and ready to operate. By default the module automatically enters idle-mode (power saving) unless this mode has been disabled using an AT command (see u-blox AT Commands Manual [2]).Thus data delivered by the DTE can be lost if no hardware flow-control is enabled. The module periodically wakes up from idle-mode to the active-mode to be synchronized with network activity. Idle-mode time is fixed by network parameters and can be up to ~2.1 s. When the module wakes up to active-mode, the UART interface is enabled: the CTS line is switched to the ON state and is held in this state for a minimum of ~11 ms. The behavior of hardware flow-control output (CTS line) during the module normal operations (idle mode and active mode) is illustrated in Figure 27. The time delay for the module to go from active-mode to idle-mode is variable and depends (in addition to dependency on network parameters) on the timeout from the last data received at the serial port. This timeout is configurable by the AT+UPSV command, between 40 GSM frames (~184 ms) and 65000 GSM frames (~300 s) Default value is 2000 GSM frames (~9.2 s). Data input CTS OFF CTS ON time [s] max ~2.1 s UART disabled min ~11 ms UART enabled ~9.2 s (default) UART enabled Figure 27: CTS behavior during normal module operation: the CTS line indicates when the module is able (CTS = ON) or not able (CTS = OFF) to accept data from the DTE and communicate through the UART interface The hardware flow control input (RTS line) is set by default to OFF state at UART initialization at the end of the boot sequence, after the module switch on. RTS line is then held by the module in the OFF state if hardware flow- control is not enabled by the DTE: an active pull-up is enabled inside the module on the RTS input. The module drives the DSR line to indicate whether it is ready to operate or not. After the module switches on, the DSR line switches from ON state to OFF state as shown in Figure 28. During the Boot process of the module, DSR is forced to OFF, until the module is not ready to operate. It is switched to ON state when the module is ready to operate. The time Tswitch depends on the duration of the boot process, and is in the range of ~1 s. DSR OFF DSR ON 0 0.024 Tswitch time [s] Power-on Figure 28: DSR behavior at power-on GSM.G1-HW-09002-C Preliminary System description Page 44 of 75 LEON-G100/G200 - System Integration Manual The DTR line is set by default to the OFF state at the UART initialization, at the end of the boot sequence after the module switch on. The DTR line is then held by the module in the OFF state if the line is not activated by the DTE: an active pull-up is enabled inside the module on the DTR input. By default the RI and the DCD lines are set to the OFF state at UART initialization, at the end of the boot sequence. The RI line is then held by the module in the OFF state until an incoming call or SMS is received. The DCD line is held in the OFF state until a data call is accepted. During an incoming call the RI line is switched from the OFF state to the ON state with a 4:1 duty cycle and a 5 second period (ON for 1 second, OFF for 4 second, see Figure 29), until the DTE attached to the module sends the ATA string and the module accepts the incoming data call. The RING string sent by the module (DCE) to the serial port at constant time intervals is not correlated with the switch of the RI line to the ON state. When the data call is accepted, the module is set to ON state and the serial line DCD sends the CONNECT<communication baudrate> to the DTE. DTE sends data through the DCE and the GSM network to the remote DCE-DTE system and data communication can be performed as for outgoing data calls. 1s RI OFF RI ON 0 5 10 15 time [s] Call incomes Figure 29: RI behavior at incoming call The RI line is used to notify an SMS arrival. When the SMS arrives the RI line switches from OFF to ON for 1 second (see Figure 30). 1s RI OFF RI ON 0 time [s] SMS arrives Figure 30: RI behavior at SMS arrival 1.11.1.3 UART application circuits Full RS-232 Functionality For complete RS-232 functionality conforming to [3] in DTE/DCE serial communication, the complete UART interface of the module (DCE) must be connected to the DTE as described in Figure 31. GSM.G1-HW-09002-C Preliminary System description Page 45 of 75 LEON-G100/G200 - System Integration Manual Application Processor (DTE) LEON-G100/G200 (DCE) TxD 15 TxD RxD 16 RxD RTS 13 RTS CTS 14 CTS DTR 12 DTR DSR 9 DSR RI 10 RI DCD 11 DCD V Fig. 30: UART interface application circuit with complete V.24 link in the DTE/DCE serial communication Using TxD, RxD, RTS and CTS lines (not using the complete V.24 link) Follow the application circuit described in Figure 31. In this case the HW flow-control is used. The module wakes up from default idle-mode to active-mode when data is received at the UART interface, since the HW flow control is enabled by default in the module. In the application circuit a loop from the module DSR output line to the module DTR input line must be implemented because the module needs DTR active (low electrical level) and DSR is active (low electrical level) once the module is switched on and the UART interface is enabled. The DCD and RI lines of the module can be left unconnected and floating. Application Processor (DTE) LEON-G100/G200 (DCE) TxD 15 TxD RxD 16 RxD RTS 13 RTS CTS 14 CTS DTR 12 DTR DSR 9 DSR RI 10 RI DCD 11 DCD Figure 31: UART interface application circuit with partial V.24 link (4-wire) in the DTE/DCE serial communication Using only TxD and RxD lines (not complete V24 link) Follow the application circuit described in the Figure 32. In this case the HW flow control is not used. The module doesn’t wake up from the default idle-mode to active-mode when data is received at the UART interface. Since the HW flow control is by default enabled in the module, data delivered by the DTE can be lost. In the application circuit a loop from the module CTS output line to the module RTS input line is provided GSM.G1-HW-09002-C Preliminary System description Page 46 of 75 LEON-G100/G200 - System Integration Manual because the module needs RTS active (low electrical level) and CTS is active (low electrical level) when the module is in active mode and the UART interface is enabled. In the application circuit a loop from the module DSR output line to the module DTR input line is provided because the module needs DTR active (low electrical level) and DSR is active (low electrical level) once the module is switched on and the UART interface is enabled. The DCD and RI lines of the module can be left unconnected and floating. Also in this configuration the UART interface can be used as AT commands interface, for GPRS data and CSD data communication and for software upgrades, but without the HW flow control, data delivered by the DTE can be lost. Application Processor (DTE) LEON-G100/G200 (DCE) TxD 15 TxD RxD 16 RxD RTS 13 RTS CTS 14 CTS DTR 12 DTR DSR 9 DSR RI 10 RI DCD 11 DCD Figure 32: UART interface application circuit with partial V.24 link (2-wire) in the DTE/DCE serial communication To avoid an increase in module power consumption, any external signal connected to the UART must be set low or tri-stated when the module is in power-down mode. If the external signals in the application circuit connected to the UART cannot be set low or tri-stated, a multi channel digital switch (e.g. Texas Instruments SN74CB3Q16244) or a single channel analog switch (e.g.Texas Instruments TS5A3159 or Texas Instruments TS5A63157) must be inserted between the two-circuit connections and set to high impedance when the module is in power-down mode. 1.11.1.4 MUX Protocol (3GPP 27.010) The module has a software layer with MUX functionality complaint with [9]. It is a data link protocol (layer 2 of OSI model) which uses HDLC-like framing and operates between the module (DCE) and the application processor (DTE). The protocol allows simultaneous sessions over the physical link, the UART. Each session consists of a stream of bytes transferring various kinds of data like SMS, CBS, GPRS, AT commands in general. This permits, for example, SMS to be transferred to the DTE when a data connection is in progress. The following virtual channels are defined: Channel 0: MUX control Channel 1: reserve for GPS data Channel 2-5: free usage 2 1.11.2 DDC (I C) interface 1.11.2.1 Overview 2 An I C compatible Display Data Channel (DDC) interface is available with LEON-G100/G200 modules for serial communication. This interface is exclusively to access u-blox GPS receivers. GSM.G1-HW-09002-C Preliminary System description Page 47 of 75 LEON-G100/G200 - System Integration Manual 2 To be complaint with the I C bus specifications, the module pads of the bus interface are open drain output and pull up resistors must be used. Since the pull-up resistors are not mounted on the module, they must be 2 mounted externally. Resistor values must conform to the I C bus specifications [10]. If LEON-G100/G200 modules are connected through the DDC bus to a single u-blox GPS receiver only (only one device is connected on the DDC bus), use a pull-up resistor of 4.7 k . Pull-ups must be connected to a supply voltage of 2.85 V (typical), since this is the voltage domain of the DDC pins (for detailed electrical characteristics see the LEON-G100/G200 Data Sheet [1]). DDC Slave-mode operation is not supported, the module can act as master only. Two lines, serial data (SDA) and serial clock (SCL), carry information on the bus. SCL is used to synchronize data transfers, and SDA is the data line. Since both lines are open drain outputs, the DDC devices can only drive them low or leave them open. The pull-up resistor pulls the line up to the supply rail if no DDC device is pulling it down to GND. If the pull-ups are missing, SCL and SDA lines are undefined and the DDC bus will not work. The signal shape is defined by the values of the pull-up resistors and the bus capacitance. Long wires on the bus will increase the capacitance. If the bus capacitance is increased, use pull-up resistors with lower nominal 2 resistance value than 4.7 k , to match the I C bus specifications regarding rise and fall times of the signals [10]. 2 Capacitance must be limited on the bus to match the I C specifications: connections should be routed as short as possible. If the pins are not used as DDC bus interface, they can be left unconnected. 1.11.2.2 Minimal connections The minimal connections are illustrated in the Figure 33. u-blox GPS receiver LEON-G100/G200 2.85 V 4.7 k SDA 31 SDA 30 SCL 2.85 V 4.7 k SCL Figure 33: DDC interface application circuit (connection with a GPS module) 1.12 ADC input (LEON-G100 only) One Analog to Digital Converter input is available (ADC1) and is configurable using u-blox AT commands (see u-blox AT Commands Manual [2]). The resolution of this converter is 12-bit with a single ended input range. The electrical behavior of the measurement circuit in voltage mode can be modeled by a circuit equivalent to that shown in Figure 34. This includes a resistor (Req), voltage source (Ueq), analog preamplifier (with typical gain G=0.5), and a digital amplifier (with typical gain gADC=2048 LSB/V). GSM.G1-HW-09002-C Preliminary System description Page 48 of 75 LEON-G100/G200 - System Integration Manual LEON-G100 Rsig ADC1 5 G gADC Req Usig Uadc Ueq Figure 34: Equivalent network for ADC single-ended measurement The LEON-G100 ADC software driver takes care of the parameters shown in Figure 34 (Req, Ueq, G, gADC). The voltage measured by the ADC is Uadc. If the voltage source (Usig) has a significant internal resistance (Rsig) compared to the input resistance in measurement mode (Req) of the ADC, this should be taken into account and corrected. If an external voltage divider is implemented to increase the voltage range, check the input resistance in measurement mode (Req) of the ADC input and all the electrical characteristics. The detailed electrical specification of the Analog to Digital Converter input are reported in the LEON-G100/G200 Data Sheet [1]. 1.13 General Purpose Input/Output (GPIO) LEON-G100/G200 modules provide two General Purpose Input/Output pins (GPIO1, GPIO2) which can be configured via u-blox AT commands (more details available in u-blox AT Commands Manual [2]). GPIO2 is dedicated for connection to a u-blox GPS receiver: AT commands are used to drive the GPIO as output to wake up the u-blox GPS module. If LEON-G100/G200 module is not connected to a u-blox GPS module, GPIO2 can be used for general purposes. Unused and unconnected GPIOs should be programmed to a fixed logic level to minimize module idle power consumption. Therefore set unused pins in GPIO output mode driving ground level. To avoid an increase of module power consumption any external signal connected to a GPIO must be set low or tri-stated when the module is in power-down mode. If the external signals in the application circuit connected to a GPIO cannot be set low or tri-stated, mount a multi channel digital switch (e.g. Texas Instruments SN74CB3Q16244) or a single channel analog switch (e.g. Texas Instruments TS5A3159 or TS5A63157) between the two-circuit connections and set to high impedance. For debug purposes, add a test point on the GPIO1 pin even if this GPIO is not used. GSM.G1-HW-09002-C Preliminary System description Page 49 of 75 LEON-G100/G200 - System Integration Manual 1.14 Approvals 1.14.1 Compliance with FCC and IC Rules and Regulations FCC Identifier for LEON-G100: XPYLEONG100 FCC Identifier for LEON-G100: XPYLEONG100 Industry Canada Certification Number LEON-G100 : 8595A-LEONG100 Industry Canada Certification Number LEON-G200 : 8595A-LEONG200 Manufacturers of mobile or fixed devices incorporating LEON-G100 / LEON-G200 modules are authorized to use the FCC Grants and Industry Canada Certificates of the LEON-G100 / LEON-G200 modules for their own final products according to the conditions referenced in the certificates. The FCC Label shall in the above case be visible from the outside, or the host device shall bear a second label stating: "Contains FCC ID: XPYLEONG100" resp. "Contains FCC ID XPYLEONG200". IMPORTANT: Manufacturers of portable applications incorporating LEON-G100 / LEON-G200 modules are required to have their final product certified and apply for their own FCC Grant and Industry Canada Certificate related to the specific portable device. This is mandatory to meet the SAR requirements for portable devices. Changes or modifications not expressly approved by the party responsible for compliance could void the user's authority to operate the equipment. GSM.G1-HW-09002-C Preliminary System description Page 50 of 75 LEON-G100/G200 - System Integration Manual 2 Design-In This section provides a design-in checklist. 2.1 Schematic design-in checklist The following are the most important points for a simple design-in check: VCC supply should be capable of delivering 2.5 A current bursts with low voltage drop. For debug purposes, add a test point on each I2S pin and on GPIO1 also if they are not used. VCC supply should be clean, with very low ripple and noise. Do no connect DC/DC regulator output and Battery Pack on VCC, they are mutually exclusive. V_CHARGE and CHARGE_SENSE must be externally shorted (LEON-G200 only). The DC supply used as charger must be current limited as specified (LEON-G200 only). Do no leave POWER_ON floating: add a pull-up resistor. Insert a series inductor on each microphone lines and a 27 pF bypass capacitor on each audio line. Capacitance must be limited on each SIM signal to match the SIM specifications. Check that voltage level of connected digital pins does not exceed operating range. Check UART signals direction, since the signal names follow the ITU-T V.24 Recommendation. Add a proper pull-up resistor on each line of the DDC interface. Capacitance must be limited on each line of the DDC interface. Check the matching of the digital audio interface specifications to connect a proper device (LEON-G200 only). To avoid an increase of module current consumption in power down mode, any external signals connected to the module digital pins (UART interface, Digital Audio Interface, HS_DET, GPIOs) must be set low or tri-stated when the module is in power down mode. Layout: Check 50 Ω impedance of ANT line. Ensure no coupling occurs with other noisy or sensitive signals. VCC line should be wide and short. Route VCC supply line away from sensitive analog signals. Avoid coupling of any noisy signals to microphone inputs lines. Ensure proper grounding. Consider “No-routing” areas for the Data Module footprint. Optimize placement for minimum length of RF line and closer path from DC source for VCC. Antenna: Antenna should have 50 Ω impedance, V.S.W.R less then 3:1, recommended 2:1 on operating bands in deployment geographical area. Antenna should have built in DC resistor to ground to get proper Antenna detection functionality. GSM.G1-HW-09002-C Preliminary Design-In Page 51 of 75 LEON-G100/G200 - System Integration Manual 2.2 Design Guidelines for Layout The following design guidelines must be met for optimal integration of LEON-G100/G200 modules on the final application board. 2.2.1 Layout guidelines per pin function This section groups the LEON-G100/G200 pins by signal function and provides a ranking of importance in layout design. VCC GND GND ANT GND GND MIC_BIAS1 MIC_GND1 MIC_GND2 MIC_BIAS2 Reserved SPK_N SPK_P HS_P GND VSIM SIM_RST SIM_IO SIM_CLK SDA SCL I2S_RXD I2S_CLK I2S_TXD I2S_WA GND V_BCKP GND V_CHARGE CHARGE_SENSE/ADC1 GND GND GND DSR RI DCD DTR RTS CTS TXD RXD GND HS_DET PWR_ON GPIO1 GPIO2 RESET_N Reserved Reserved GND Legend: Very Important Careful Layout Common Practice Pinout_Layout_R1.1(ppt) Figure 35: Module pin-out with highlighted functions GSM.G1-HW-09002-C Preliminary Design-In Page 52 of 75 LEON-G100/G200 - System Integration Manual Rank Function 1st RF Antenna In/out 2nd DC Supply 3rd Analog Audio Pin(s) Layout Remarks ANT Very Important Design for 50 characteristic impedance. See section 2.2.1.1 VCC line should be wide and short. Route away from sensitive analog signals. See section 2.2.1.2 Avoid coupling with noisy signals See section 2.2.1.3 VCC Very Important Careful Layout Audio Outputs MIC_BIAS1, MIC_GND1, MIC_BIAS2, MIC_GND2 SPK_P, SPK_N, HS_P 4th Ground GND Careful Layout 5th Charger V_CHARGE, CHARGE_SENSE Careful Layout 6th Sensitive Pin : Backup Voltage Audio Inputs A to D Converter (If implemented) Power On 7th Digital pins : SIM Card Interface Digital Audio DDC UART External Reset General Purpose I/O Careful Layout V_BCKP Provide proper grounding. See section 2.2.1.4 Check Charger line width. See section 2.2.1.5 Avoid coupling with noisy signals. See section 2.2.1.6 ADC1 PWR_ON VSIM, SIM_CLK, SIM_IO, SIM_RST Common Practice Follow common practice rules for digital pin routing See section 2.2.1.7 I2S_CLK, I2S_RXD, I2S_TXD, I2S_WA SCL, SDA TXD, RXD, CTS, RTS, DSR, RI, DCD, DTR RESET_N GPIO1, GPIO2 Table 8: Pin list in order of decreasing importance for layout design 2.2.1.1 RF Antenna connection The RF antenna connection pin ANT is very critical in layout design. The PCB line must be designed to provide 50 Ω characteristic impedance and minimum loss up to radiating element. Provide proper transition between the ANT pad to application board PCB Increase GND keep-out for ANT pin to at least 250 µm up to adjacent pads metal definition and up to 500 µm on the area below the Data Module Add GND keep-out on buried metal layers below antenna pad if top-layer to buried layer dielectric thickness is below 200 µm The transmission line up to antenna connector or pad may be a micro strip or a stripline. In any case must be designed to achieve 50 Ω characteristic impedance; Microstrip lines are usually easier to implement and the reduced number of layer transitions up to antenna connector simplifies the design and diminishes reflection losses. However, the electromagnetic field extends to the free air interface above the stripline and may interact with other circuitry Buried stripline exhibits better shielding to incoming and generated interferences. Therefore are preferred for sensitive application. In case a stripline is implemented, carefully check that the via pad-stack does not couple with other signals on the crossed and adjacent layers Minimize the transmission line length; the insertion loss should be minimized as much as possible, in the order of a few tenths of a dB The transmission line should not have abrupt change to thickness and spacing to GND, but must be uniform and routed as smoothly as possible GSM.G1-HW-09002-C Preliminary Design-In Page 53 of 75 LEON-G100/G200 - System Integration Manual The transmission line must be routed in a section of the PCB where minimal interference from noise sources can be expected Route ANT line far from other sensitive circuits as it is a source of electromagnetic interference Avoid coupling with VCC routing and analog Audio lines Ensure solid metal connection of the adjacent metal layer on the PCB stack-up to main ground layer Add GND vias around transmission line Ensure no other signals are routed parallel to transmission line, or that other signals cross on adjacent metal layer If the distance between the transmission line and the adjacent GND area (on the same layer) does not exceed 5 times the track width of the micro strip, use the “Coplanar Waveguide” model for 50 Ω characteristic impedance calculation Don’t route microstrip line below discrete component or other mechanics placed on top layer When terminating transmission line on antenna connector (or antenna pad) it is very important to strictly follow the connector manufacturer’s recommended layout GND layer under RF connectors and close to buried vias should be cut out in order to remove stray capacitance and thus keep the RF line 50 Ω. In most cases the large active pad of the integrated antenna or antenna connector needs to have a GND keep-out at least on first inner layer to reduce parasitic capacitance to ground. Note that the layout recommendation is not always available from connector manufacturer: e.g. the classical SMA Pin-Through-Hole needs to have GND cleared on all the layers around the central pin up to annular pads of the four GND posts. Check 50 Ω impedance of ANT line Ensure no coupling occurs with other noisy or sensitive signals 2.2.1.2 Main DC supply connection The DC supply of LEON-G100/G200 modules is very important for the overall performance and functionality of the integrated product. For detailed description check the design guidelines in section 1.5.2. Some main characteristics are: VCC connection may carry a maximum burst current in the order of 2.5 A. Therefore, it is typically implemented as a wide PCB line with short routing from DC supply (DC-DC regulator, battery pack, etc) The module automatically initiates an emergency shutdown if supply voltage drops below hardware threshold. In addition, reduced supply voltage can set a worst case operation point for RF circuitry that may behave incorrectly. It follows that each voltage drop in the DC supply track will restrict the operating margin at the main DC source output. Therefore, the PCB connection has to exhibit a minimum or zero voltage drop. Avoid any series component with Equivalent Series Resistance (ESR) greater than a few mΩs Given the large burst current, VCC line is a source of disturbance for other signals. Therefore route VCC through a PCB area separated from sensitive analog signals. Typically it is good practice to interpose at least one layer of PCB ground between VCC track and other signal routing The VCC supply current supply flows back to main DC source through GND as ground current: provide adequate return path with suitable uninterrupted ground plane to main DC source; A tank capacitor with low ESR is often used to smooth current spikes. This is most effective when placed as close as possible to VCC. From main DC source, first connect the capacitor and then VCC. If the main DC source is a switching DC-DC converter, place the large capacitor close to the DC-DC output and minimize the VCC track length. Otherwise consider using separate capacitors for DC-DC converter and LEONG100/G200 tank capacitor. Note that the capacitor voltage rating may be adequate to withstand the charger over-voltage if battery-pack is used VCC is directly connected to the RF power amplifier. Add capacitor in the pF range from VCC to GND along the supply path Since VCC is directly connected to RF Power Amplifier, voltage ripple at high frequency may result in unwanted spurious modulation of transmitter RF signal. This is especially seen with switching DC-DC converters, in which case it is better to select the highest operating frequency for the switcher and add a large L-C filter before connecting to LEON-G100/G200 in the worst case GSM.G1-HW-09002-C Preliminary Design-In Page 54 of 75 LEON-G100/G200 - System Integration Manual The large current generates a magnetic field that is not well isolated by PCB ground layers and which may interact with other analog modules (e.g. VCO) even if placed on opposite side of PCB. In this case route VCC away from other sensitive functional units The typical GSM burst has a periodic nature of approx. 217 Hz, which lies in the audible audio range. Avoid coupling between VCC and audio lines (especially microphone inputs) If VCC is protected by transient voltage suppressor / reverse polarity protection diode to ensure that the voltage maximum ratings are not exceeded, place the protecting device along the path from the DC source toward LEON-G100/G200, preferably closer to the DC source (otherwise functionality may be compromised) VCC pad is longer than other pads, and requires a “No-Routing” area for any other signals on the top layer of the application board PCB, below the LEON-G100/G200 VCC line should be wide and short Route away from sensitive analog signals 2.2.1.3 Analog Audio Accurate analog audio design is very important to obtain clear and high quality audio. The GSM signal burst has a repetition rate of 271 Hz that lies in the audible range. A careful layout is required to reduce the risk of noise pickup from audio lines due to both VCC burst noise coupling and RF detection. Analog audio is separated in the two paths, 1. Audio Input (Uplink path): MIC_BIASx, MIC_GNDx 2. Audio Outputs (Downlink path): SPK_P / SPK_N, HS_P The most sensitive is the Uplink path, since the analog input signals are in the µV range. The two microphone inputs have the same electrical characteristics, and it is recommended to implement their layout with the same routing rules. Avoid coupling of any noisy signals to microphone inputs lines It is strongly recommended to route MIC signals away from battery and RF antenna lines. Try to skip fast switching digital lines as well Keep ground separation from other noisy signals. Use an intermediate GND layer or vias wall for coplanar signals MIC_BIAS and MIC_GND carry also the bias for external electret active microphone. Verify that microphone is connected with right polarity, i.e. MIC_BIAS to the pin marked “+” and MIC_GND (zero Volt) to the chassis of the device; Despite different DC level, MIC_BIAS and MIC_GND are sensed differentially within the module. Therefore they should be routed as a differential pair of MIC_BIAS up to the active microphone Route MIC_GND with dedicated line together with MIC_BIAS up to active microphone. Note that MIC_GND is grounded internally within module and does not need external connection to GND Cross other signals lines on adjacent layers with 90° crossing Place bypass capacitor for RF very close to active microphone. The preferred microphone should be designed for GSM applications which typically have internal built-in bypass capacitor for RF very close to active device. If the integrated FET detects the RF burst, the resulting DC level will be in the pass-band of the audio circuitry and cannot be filtered by any other device If DC decoupling is required, consider that the input impedance of microphone lines is in the kΩ range. Therefore, series capacitors with sufficiently large value to reduce the high-pass cut-off frequency of the equivalent high-pass RC filter Output Audio lines have two separated configurations. GSM.G1-HW-09002-C Preliminary Design-In Page 55 of 75 LEON-G100/G200 - System Integration Manual SPK_P / SPK_N are high level balanced output. They are DC coupled and must be used with a speaker connected in bridge configuration. Route SPK_P / SPK_N as differential pair, to reduce differential noise pick-up. The balanced configuration will help reject the common mode noise If audio output is directly connected to speaker transducer, given the low load impedance of its load, then consider enlarging PCB lines to reduce series resistive losses HS_P is single ended analog audio referenced to GND. Reduce coupling with noisy lines as this Audio output line does not benefit from common mode noise rejection of SPK_P / SPK_N Use twisted pair cable for balanced audio usage, shielded cable for unbalanced connection to speaker If DC decoupling is required, a large capacitor needs to be used, typically in the µF range, depending on the load impedance, in order not to increase the lower cut-off frequency due to its High-Pass RC filter response 2.2.1.4 Module grounding Good connection of the module with application board solid ground layer is required for correct RF performance. It significantly reduces EMC issues and provides a thermal heat sink for the module. Connect each GND pin with application board solid GND layer. It is strongly recommended that each GND pad surrounding VCC and ANT pins have one or more dedicated via down to application board solid ground layer. The same applies to GND pins on the opposite side close to Charger pins If Application board is a multilayer PCB, then it is required to tight together each GND area with complete via stack down to main board ground layer It is recommended to implement one layer of the application board as ground plane Good grounding of GND pads will also ensure thermal heat sink. This is critical during call connection, when the real network commands the module to transmit at maximum power: proper grounding helps prevent module overheating. 2.2.1.5 Charger Layout If battery charger is implemented, V_CHARGE must withstand the charge current (typically in the order of several hundred mA) continuous current sink. Voltage drop is not as critical as for VCC, but dimension the line width adequately to support the charge current without excessive loss that may lead to increase in PCB temperature. CHARGE_SENSE senses the charger voltage: it sinks a few µA. Therefore its line width is not critical. Since it is an analog input, it must be connected to V_CHARGE away from noisy sources. 2.2.1.6 Other Sensitive pins A few other pins on the LEON-G100/G200 require careful layout. Backup battery (V_BCKP): avoid injecting noise on this voltage domain as it may affect the stability of sleep oscillator Analog-to-Digital Converter (ADC1): it is a high impedance analog input; the conversion accuracy will be degraded if noise injected. Low-pass filter may be used to improve noise rejection; typically L-C tuned for RF rejection gives better results; Power On (PWR_ON): is the digital input for power-on of the LEON-G100/G200. It is implemented as high impedance input. Ensure that the voltage level is well defined during operation and no transient noise is coupled on this line, otherwise the module may detect a spurious power-on request GSM.G1-HW-09002-C Preliminary Design-In Page 56 of 75 LEON-G100/G200 - System Integration Manual 2.2.1.7 Digital pins External Reset (RESET_N): input for external reset, a logic low voltage will reset the module SIM Card Interface (VSIM, SIM_CLK, SIM_IO, SIM_RST): the SIM layout may be critical if the SIM card is placed far away from LEON-G100/G200 or in close vicinity of RF antenna. In the first case the long connection may radiate higher harmonic of digital data. In the second case the same harmonics may be picked up and create self-interference that can reduce the sensitivity of GSM Receiver channels whose carrier frequency is coincident with harmonic frequencies. In the later case using RF bypass capacitors on the digital line will mitigate the problem. In addition, since the SIM card typically accesses by the end use, it may be subjected to ESD discharges: add adequate ESD protection to improve the robustness of the digital pins within the module. Remember to add such ESD protection along the path between SIM holder toward the module Digital Audio (I2S_CLK, I2S_RX, I2S_TX, I2S_WA): the I2S interface requires the same consideration regarding electro-magnetic interference as the SIM card. Keep the traces short and avoid coupling with RF line or sensitive analog inputs; DDC (SCL, SDA): the DDC interface requires the same consideration regarding electro-magnetic interference as for SIM card. Keep the traces short and avoid coupling with RF line or sensitive analog inputs; UART (TXD, RXD, CTS, RTS, DSR, RI, DCD, DTR): the serial interface require the same consideration regarding electro-magnetic interference as for SIM card. Keep the traces short and avoid coupling with RF line or sensitive analog inputs. GSM.G1-HW-09002-C Preliminary Design-In Page 57 of 75 LEON-G100/G200 - System Integration Manual 2.2.2 Footprint and paste mask 1.0 mm [39. mil] 29.5 mm [1161 mil] 0.8mm [31.5 mil] Stencil: 200 m 1.1 mm [43 mil] 0.8 mm [31.5 mil] 0.6 mm [23.5 mil] 0.8 mm [31.5 mil] 17.6 mm [693 mil] 1.55 mm [61 mil] 18.9 mm [744 mil] 18.9 mm [744 mil] 22.7 mm [893.5 mil] Figure 36: LEON-G100/G200 footprint Figure 37: LEON-G100/G200 paste mask To improve the wetting of the half vias, reduce the amount of solder paste under the module and increase the volume outside of the module by defining the dimensions of the paste mask to form a T-shape (or equivalent) extending beyond the Copper mask. The solder paste should have a total thickness of 200 m. The paste mask outline needs to be considered when defining the minimal distance to the next component. The exact geometry, distances, stencil thicknesses and solder paste volumes must be adapted to the specific production processes (e.g. soldering etc.) of the customer. The bottom layer of LEON-G100/G200 shows some unprotected copper areas for GND and VCC signals, plus GND keep-out for internal RF signals routing. Consider “No-routing” areas for the LEON-G100/G200 footprint as follows: 1. Ground copper and signals keep-out below LEON-G100/G200 on Application Motherboard due to VCC area, RF ANT pin and exposed GND pad on module bottom layer (see Figure 38); 2. Signals Keep-Out below module on Application Motherboard due to GND opening on LEON-G100/G200 bottom layer for internal RF signals (see Figure 39). GSM.G1-HW-09002-C Preliminary Design-In Page 58 of 75 LEON-G100/G200 - System Integration Manual Figure 38: Ground copper and signal keep-out below data module on application motherboard due to due to VCC area, RF ANT pin and exposed GND pad on data module bottom layer Figure 39: Signals keep-out below data module on application motherboard due to GND opening on data module bottom layer for internal RF signals Routing below LEON-G100/G200 on application motherboard is generally possible but not recommended: in addition to the required keep-out defined before, consider that the insulation offered by the solder mask painting may be weakened corresponding to micro-vias on LEON-G100/G200 bottom layer, thus increasing the risk of short to GND if the application motherboard has unprotected signal routing on same coordinates. GSM.G1-HW-09002-C Preliminary Design-In Page 59 of 75 LEON-G100/G200 - System Integration Manual 2.2.3 Placement Optimize placement for minimum length of RF line and closer path from DC source for VCC. 2.3 Module thermal resistance The Case-to-Ambient thermal resistance (RC-A) of the module, with the LEON-G100/G200 mounted on a 130 x 110 x 1.6 mm FR4 PCB with a high coverage of copper (e.g. the EVK-G25H evaluation kit) in still air conditions is equal to 14°C/W. With this Case-to-Ambient thermal resistance, the increase of the module temperature is: Around 12°C when the module transmits at the maximum power level during a GSM call in the GSM/EGSM bands; Around 17°C when the module transmits at the maximum power level during a GPRS data transfer (2 Tx + 3 Rx slots) in the GSM/EGSM bands; Case-to-Ambient thermal resistance value will be different than the one provided if the module is mounted on a PCB with different size and characteristics. 2.4 Antenna guidelines Antenna characteristics are essential for good functionality of the module. The radiating performance of antennas have direct impact on the reliability of connection over the Air Interface. A bad termination of ANT can result in poor performance of the module. The following parameters should be checked: Item Recommendations Impedance Frequency Range Input Power 50 Ω Depends on the Mobile Network used. GSM900: 880..960 MHz GSM1800: 1710..1880 MHz GSM850: 824..894 MHz GSM1900: 1850..1990 MHz >2 W peak V.S.W.R Return Loss <2:1 recommended, <3:1 acceptable S11<-10 dB recommended, S11<-6 dB acceptable Gain <3 dBic Table 9: General recommendation for GSM antenna GSM antennas are typically available as: Linear monopole: typical for fixed application. The antenna extends mostly as a linear element with a dimension comparable to lambda/4 of the lowest frequency of the operating band. Magnetic base may be available. Cable or direct RF connectors are common options. The integration normally requires the fulfillment of some minimum guidelines suggested by antenna manufacturer Patch-like antenna: better suited for integration in compact designs (e.g. mobile phone). They are mostly custom designs where the exact definition of the PCB and product mechanical design is fundamental for tuning of antenna characteristics GSM.G1-HW-09002-C Preliminary Design-In Page 60 of 75 LEON-G100/G200 - System Integration Manual For integration observe these recommendations: Ensure 50 Ω antenna termination, minimize the V.S.W.R. or return loss, as this will optimize the electrical performance of the module. See section 2.4.1 Select antenna with best radiating performance. See section 2.4.2 If a cable is used to connect the antenna radiating element to application board, select a short cable with minimum insertion loss. The higher the additional insertion loss due to low quality or long cable, the lower the connectivity Follow the recommendations of the antenna manufacturer for correct installation and deployment Do not include antenna within closed metal case Do not place antenna in close vicinity to end user since the emitted radiation in human tissue is limited by S.A.R. regulatory requirements Do not use directivity antenna since the electromagnetic field radiation intensity is limited in some countries Take care of interaction between co-located RF systems since the GSM transmitted power may interact or disturb the performance of companion systems Place antenna far from sensitive analog systems or employ countermeasures to reduce electromagnetic compatibility issues that may arise 2.4.1 Antenna termination LEON-G100/G200 modules are designed to work on a 50 Ω load. However, real antennas have no perfect 50 Ω load on all the supported frequency bands. Therefore, in order to as much as possible reduce performance degradation due to antenna mismatch, the following requirements should met: Measure the antenna termination with a network analyzer: connect the antenna through a coaxial cable to the measurement device, the |S11| indicates which portion of the power is delivered to antenna and which portion is reflected by the antenna back to the modem output. A good antenna should have a |S11| below -10 dB over the entire frequency band. Due to miniaturization, mechanical constraints and other design issues, this value will not be achieved. A value of |S11| of about -6 dB (in the worst case) - is acceptable. Figure 40 shows an example of this measurement: Figure 40: |S11| sample measurement of a penta-band antenna that covers in a small form factor the 4 GSM bands (850 MHz, 900 MHz, 1800 MHz and 1900 MHz) and the UMTS Band I Fig 41 shows comparable measurements performed on a wideband antenna. The termination is better, but the size of the antenna is considerably larger. GSM.G1-HW-09002-C Preliminary Design-In Page 61 of 75 LEON-G100/G200 - System Integration Manual Figure 41: |S11| sample measurement of a wideband antenna 2.4.2 Antenna radiation An indication of the radiated power by the antenna can be approximated by measuring the |S2\| from a target antenna to the measurement antenna, measured with a network analyzer using a wideband antenna. Measurements should be done at a fixed distance and orientation. Compare the results to measurements performed on a known good antenna. Figure 42 through 45 show measurement results. A wideband log periodic-like antenna was used, and the comparison was done with a half lambda dipole tune on 900 MHz frequency. The measurements show both the |S11| and |S21| for penta-band internal antenna and for the wideband antenna. GSM.G1-HW-09002-C Preliminary Design-In Page 62 of 75 LEON-G100/G200 - System Integration Manual Figure 42 and 43: |S11| and |S21| comparison between a 900 MHz tuned half wavelength dipole and a penta-band internal antenna, if |S21| like in marker 3 area are similar the target antenna performances are good Figure 44 and 45: |S11| and |S21| comparison between a 900 MHz tuned half wavelength dipole and a wideband commercial antenna, if |S21| like in marker 1/2 area are similar 5 dB better in the dipole case, so the wideband antenna radiation is considerably less For good antenna radiation performance antenna dimensions should be comparable to a quarter of the wavelength. Different types of antenna that can be used for the module, many of them (e.g. patch antennas, monopole) are based on a resonating element that works in combination with a ground plane. The ground plane, ideally infinite, can be reduced down to a minimum size that must be similar to the quarter of the wavelength of the minimum frequency that has to be radiated (transmitted/received). Numerical sample: frequency 1 GHz wavelength 30 cm minimum ground plane (or antenna size) 7.5 cm. Below this size, the antenna efficiency is reduced. GSM.G1-HW-09002-C Preliminary Design-In Page 63 of 75 LEON-G100/G200 - System Integration Manual 2.4.3 Antenna detection functionality The internal antenna detect circuit is based on DC voltage measurement at ANT. The module may inject a known DC current on ANT pin, to do resistance measurement. To achieve good antenna detection functionality, use an RF antenna with built-in resistor from ANT signal to GND, or implement an equivalent solution with a circuit between the antenna cable connection and the radiating element as shown in Fig. 46. Radiating Element DC Blocking DC Blocking ANT RF Transceriver Zo=50 Ohm RF Choke RF Choke Resistor for Diagnostic A-to-D Converter Current Source LEON-G100 LEON-G200 Figure 46: Antenna Detection circuit LEON-G100/G200 modules will report the measured value (ohmic resistance or voltage level) seen at ANT. Values above the expected range indicate that the antenna has been disconnected. Values below the expected range indicate that RF connection is shorted to GND. GSM.G1-HW-09002-C Preliminary Design-In Page 64 of 75 LEON-G100/G200 - System Integration Manual 3 Handling and soldering 3.1 Packaging, shipping, storage and moisture preconditioning For information pertaining to reels and tapes, Moisture Sensitivity levels (MSD), shipment and storage information, as well as drying for preconditioning see the LEON-G100/G200 Data Sheet [1]. 3.2 Processing 3.2.1 Soldering paste Use of "No Clean" soldering paste is strongly recommended, as it does not require cleaning after the soldering process has taken place. The paste listed in the example below meets these criteria. Soldering Paste: LFSOLDER TLF-206-93F (Tamura Kaken (UK) Ltd.) Alloy specification: Sn 95.5/ Ag 3.9/ Cu 0.6 (95.5% Tin/ 0.6 % Silver/ 0.6% Copper) Melting Temperature: Stencil Thickness: 216 - 221°C 150 µm for base boards The final choice of the soldering paste depends on the approved manufacturing procedures. The paste-mask geometry for applying soldering paste should meet the recommendations in section 2.2.2 The quality of the solder joints on the connectors (’half vias’) should meet the appropriate IPC specification. 3.2.2 Reflow soldering A convection type-soldering oven is strongly recommended over the infrared type radiation oven. Convection heated ovens allow precise control of the temperature and all parts will be heated up evenly, regardless of material properties, thickness of components and surface color. Consider the "IPC-7530 Guidelines for temperature profiling for mass soldering (reflow and wave) processes, published 2001". Preheat phase Initial heating of component leads and balls. Residual humidity will be dried out. Please note that this preheat phase will not replace prior baking procedures. Temperature rise rate: 1 - 4°C/s If the temperature rise is too rapid in the preheat phase it may cause excessive slumping. Time: 60 – 120 seconds If the preheat is insufficient, rather large solder balls tend to be generated. Conversely, if performed excessively, fine balls and large balls will be generated in clusters. End Temperature: 150 - 200°C If the temperature is too low, non-melting tends to be caused in areas containing large heat capacity. Heating/ reflow phase The temperature rises above the liquidus temperature of 216 - 221°C. Avoid a sudden rise in temperature as the slump of the paste could become worse. Limit time above 220°C liquidus temperature: 20 - 40 s Peak reflow temperature: 230 - 250°C Cooling phase A controlled cooling avoids negative metallurgical effects (solder becomes more brittle) of the solder and possible mechanical tensions in the products. Controlled cooling helps to achieve bright solder fillets with a good shape and low contact angle. Temperature fall rate: max 3°C / s GSM.G1-HW-09002-C Preliminary Handling and soldering Page 65 of 75 LEON-G100/G200 - System Integration Manual To avoid falling off, LEON-G100/G200 modules should be placed on the topside of the motherboard during soldering. The final soldering temperature chosen at the factory depends on additional external factors like choice of soldering paste, size, thickness and properties of the base board, etc. Exceeding the maximum soldering temperature in the recommended soldering profile may permanently damage the module. Preheat Heating [°C] Cooling [°C] Peak Temp. 230 - 250 °C 250 250 Liquidus Temperature 216 - 221 200 200 max 20 - 40 s max 3 °C/s End Temp. 150 - 200 °C 150 150 Typical Leadfree Soldering Profile max 1- 4 °C/s 100 100 max 60 - 120 s 50 50 0 50 100 150 200 250 300 Elapsed Time [s] Figure 47: Recommended soldering profile When soldering lead-free (LEON-G100/G200) modules in a leaded process, check the following temperatures: PB- Technology Soaktime: 40-80 sec Time above Liquidus: 40-90 sec Peak temperature: 225-235°C LEON-G100/G200 modules must not be soldered with a damp heat process. 3.2.3 Optical inspection After soldering the LEON-G100/G200 module, inspect the modules optically to verify that he module is properly aligned and centered. 3.2.4 Cleaning Cleaning the soldered modules is not recommended. Residues underneath the modules cannot be easily removed with a washing process. Cleaning with water will lead to capillary effects where water is absorbed in the gap between the baseboard and the module. The combination of residues of soldering flux and encapsulated water leads to short circuits or resistor-like interconnections between neighboring pads. Water will also damage the sticker and the inkjet printed text. Cleaning with alcohol or other organic solvents can result in soldering flux residues flooding into the two housings, areas that are not accessible for post-wash inspections. The solvent will also damage the sticker and the ink-jet printed text. Ultrasonic cleaning will permanently damage the module, in particular the quartz oscillators. For best results use a "no clean" soldering paste and eliminate the cleaning step after the soldering. GSM.G1-HW-09002-C Preliminary Handling and soldering Page 66 of 75 LEON-G100/G200 - System Integration Manual 3.2.5 Repeated reflow soldering Only a single reflow soldering process is encouraged for boards with a LEON-G100/G200 module populated on it. The reason for this is the risk of the module falling off due to high weight in relation to the adhesive properties of the solder. 3.2.6 Wave soldering Boards with combined through-hole technology (THT) components and surface-mount technology (SMT) devices require wave soldering to solder the THT components. Only a single wave soldering process is encouraged for boards populated with LEON-G100/G200 modules. 3.2.7 Hand soldering Hand soldering is not recommended. 3.2.8 Rework The LEON-G100/G200 module can be unsoldered from the baseboard using a hot air gun. Avoid overheating the module. After the module is removed, clean the pads before placing. Never attempt a rework on the module itself, e.g. replacing individual components. Such actions immediately terminate the warranty. 3.2.9 Conformal coating ® Certain applications employ a conformal coating of the PCB using HumiSeal or other related coating products. These materials affect the HF properties of the LEON-G100/G200 modules and it is important to prevent them from flowing into the module. The RF shields do not provide 100% protection for the module from coating liquids with low viscosity, therefore care is required in applying the coating. Conformal Coating of the module will void the warranty. 3.2.10 Casting If casting is required, use viscose or another type of silicon pottant. The OEM is strongly advised to qualify such processes in combination with the LEON-G100/G200 module before implementing this in the production. Casting will void the warranty. 3.2.11 Grounding metal covers Attempts to improve grounding by soldering ground cables, wick or other forms of metal strips directly onto the EMI covers is done at the customer's own risk. The numerous ground pins should be sufficient to provide optimum immunity to interferences and noise. u-blox makes no warranty for damages to the LEON-G100/G200 module caused by soldering metal cables or any other forms of metal strips directly onto the EMI covers. 3.2.12 Use of ultrasonic processes Some components on the LEON-G100/G200 module are sensitive to Ultrasonic Waves. Use of any Ultrasonic Processes (cleaning, welding etc.) may cause damage to the module. u-blox offers no warranty against damages to the LEON-G100/G200 module caused by any Ultrasonic Processes. GSM.G1-HW-09002-C Preliminary Handling and soldering Page 67 of 75 LEON-G100/G200 - System Integration Manual 4 Product Testing 4.1 u-blox in-series production test u-blox focuses on high quality for its products. To achieve a high standard it’s our philosophy to supply fully tested units. Therefore at the end of the production process, every unit is tested. Defective units are analyzed in detail to improve the production quality. This is achieved with automatic test equipment, which delivers a detailed test report for each unit. The following measurements are done: Digital self-test (Software Download, verification of FLASH firmware, etc.); Measurement of voltages and currents; Measurement of RF characteristics (e.g. C/No). Figure 48: Automatic test equipment for module tests GSM.G1-HW-09002-C Preliminary Product Testing Page 68 of 75 LEON-G100/G200 - System Integration Manual Appendix A Extra Features A.1 Firmware (upgrade) Over AT (FOAT) Firmware upgrade is available with LEON-G100/G200 modules using AT commands. For more information see the Firmware (upgrade) Over AT (FOAT) Application Note [3]. A.1.1 Overview This feature allows upgrade the module Firmware over UART, using AT Commands. AT Command AT+UFWUPD triggers a reboot and followed by upgrade procedure at specified baud rate (refer to u-blox AT commands manual [2] for more details) The Xmodem-1k protocol is used for downloading the new Firmware image via a terminal application A special boot loader on the module performs Firmware installation, security verifications and module reboot Firmware authenticity verification is performed via a security signature during the download. Firmware is then installed, overwriting the current version. In case of power loss during this phase, the boot loader detects a fault at the next wake-up, and restarts the Firmware download from the Xmodem-1k handshake. After completing the upgrade, the module is reset again and wakes-up in normal boot A.1.2 FOAT procedure The application processor must proceed in the following way: send through the UART the AT+UFWUPD command, specifying the file type and the desired baud rate reconfigure the serial communication at the selected baud rate, without flow control with the Xmodem-1k protocol send the new FW image via Xmodem-1k. A.2 Firewall The feature allows the LEON-G100/G200 user to reject incoming connections originated from IP addresses different from the specified list A.3 TCP/IP Via the AT commands it’s possible to access the TCP/IP functionalities over the GPRS connection. For more details about AT commands see the u-blox AT Commands Manual [2] A.3.1 Multiple IP addresses and sockets Using LEON’s built-in TCP/IP or UDP/IP stack, only 1 IP instance (address) is supported. Each IP instance supports up to 16 sockets. Using an external TCP/IP stack (on the application processor), it is possible to have 2 IP instances (addresses). A.4 FTP LEON G200 supports via AT commands the File Transfer Protocol functionalities. File are read and stored in the local file system of the module. For more details about AT commands see the u-blox AT Commands Manual [2]. GSM.G1-HW-09002-C Preliminary Appendix Page 69 of 75 LEON-G100/G200 - System Integration Manual A.5 HTTP HTTP client is implemented in LEON. HEAD, GET, POST, DELETE and PUT operations are available. The file size to be uploaded / downloaded depends on the free space available in the local file system (FFS) at the moment of the operation. Up to 4 HTTP client contexts to be used simultaneously. For more details about AT commands see the u-blox AT Commands Manual [2]. A.6 SMTP LEON supports SMTP client functionalities. It is possible to specify the common parameters (e.g. server data, authentication method, etc.) can be specified, to send an email to a SMTP server. Emails can be send with or without attachment. Attachments are store in the local file system of LEON. For more details about AT commands see the u-blox AT Commands Manual [2]. A.7 FOTA (LEON-G200 only) Firmware upgrade over the air (FOTA) is available. For more information see the Firmware (upgrade) Over the Air (FOTA) Application Note [3]. A.8 GPS The LEON-G100/G200 modules allow a simple and fast connection with the u-blox GPS modules (u-blox 5 family and above). Via the DDC bus it’s possible to communicate and exchange data, while the available GPIOs can handle the GPS device power on/off. For information about implementing u-blox GPS with LEON-G100/G200 modules, including using u-blox’ AssistNow Assisted GPS (A-GPS) service see the GPS Integration Application Note [5]. GSM.G1-HW-09002-C Preliminary Appendix Page 70 of 75 LEON-G100/G200 - System Integration Manual B Glossary 3GPP AC ADC ADN AMR ASIC AT BB CBCH CBS CLK CMOS CS CTS DAC DC DCD DCE DCS DDC DL DRX DSP DSR DTE DTR EBU EEP EGSM EMC EMI ESD ESR FAQ FDN FET FFS FIR FOAT FOTA FTP FW GND GPIO GPRS GPS GSM HDLC HTTP I/O I/Q I2C I2S IIR IP ISO ITU GSM.G1-HW-09002-C 3rd Generation Partnership Project Alternating Current Analog to Digital Converter Abbreviated Dialing Numbers Adaptive Multi Rate Application Specific Integrated Circuit AT Command Interpreter Software Subsystem, or attention Baseband Cell Broadcast Channel Cell Broadcast Services Clock Complementary Metal Oxide Semiconductor Coding Scheme or Chip Select Clear To Send Digital Analog Converter Direct Current Data Carrier Detect Data Communication Equipment Digital Cellular System Display Data Channel Down Link (Reception) Discontinuous Reception Digital Signal Processing Data Set Ready Data Terminal Equipment Data Terminal Ready External Bus Interface Unit EEPROM Emulation Parameters Extended GSM Electromagnetic Compatibility ElectroMagnetic Interference Electrostatic Discharge Equivalent Series Resistance Frequently Asked Questions Fixed Dialing Numbers Field Effect Transistor Flash File System Finite Impulse Response Firmware (upgrade) Over AT Firmware Over The Air File Transfer Protocol Firmware Ground General Purpose Input Output General Packet Radio Service Global Positioning System Global System for Mobile Communications High Level Data Link Control HyperText Transfer Protocol Input / Output In phase and Quadrature Inter-Integrated Circuit Inter IC Sound Infinite Impulse Response Internet Protocol International Organization for Standardization International Telecomunication Union Preliminary Appendix Page 71 of 75 LEON-G100/G200 - System Integration Manual LDN LDO LED LNA M2M ME MIDI MSB MSD MSL MUX NOM NTC OSI PA PBCCH PCCCH PC PCB PCM PCS PICS PIXIT PMU PPS PSRAM RF RI RoHS RTC RTS RX RXD SAR SAW SCL SDA SDN SIM SMA SMS SMTP STK SW TCH TCP TDMA TS TX TXD UART UDP UL VCO VSWR WA GSM.G1-HW-09002-C Last Dialed Numbers Low-Dropout Light Emitting Diode Low Noise Amplifier Machine to Machine Mobile Equipment Musical Instrument Digital Interface Most Significant Bit Moisture Sensitive Devices Moisture Sensitivity Level Multiplexer or Multiplexed Network Operating Mode Negative Temperature Coefficient Open Systems Interconnection Power Amplifier Packet Broadcast Control Channel Packet Common Control Channel Personal Computer Printed Circuit Board Pulse Code Modulation Personal Communications Service Protocol Implementation Conformance Statement Protocol Implementation Extra Information for Testing Power Management Unit Protocol and Parameter Selection Pseudo Static Random Access Memory Radio Frequency Ring Indicator Restriction of Hazardous Substances Directive Real Time Clock Ready To Send Receiver RX Data Specific Absorption Rate Surface Acoustic Wave Serial Clock Serial Data Service Dialing Numbers Subscriber Identity Module SubMiniature version A connector Short Message Service Simple Mail Transfer Protocol SIM Toolkit Software Traffic Channel Transmission Control Protocol Time Division Multiple Access Technical Specification Transmitter TX Data Universal Asynchronous Receiver Transmitter User Datagram Protocol Up Link (Transmission) Voltage Controlled Oscillator Voltage Standing Wave Ratio Word Alignment Preliminary Appendix Page 72 of 75 LEON-G100/G200 - System Integration Manual Related documents [1] u-blox LEON-G100/G200 Data Sheet, Document No GSM.G1-HW-09001 [2] [3] u-blox AT Commands Manual, Document No GSM.G1-SW-09002 Firmware (upgrade) Over AT (FOAT) Application Note, Document No GSM.G1-CS-09005 (available after 11/09) [4] Firmware (upgrade) Over the Air (FOTA) Application Note, Document No GSM.G1-CS-09006 (available after 11/09) [5] GPS Integration Application Note, Document No GSM.G1-CS-09007 (available after 11/09) [6] ITU-T Recommendation V.24, 02-2000. List of definitions for interchange circuits between data terminal equipment (DTE) and data circuit-terminating equipment (DCE). http://www.itu.int/rec/TREC-V.24-200002-I/en [7] [8] 3GPP TS 27.007 - AT command set for User Equipment (UE) (Release 1999) 3GPP TS 27.005 - Use of Data Terminal Equipment - Data Circuit terminating; Equipment (DTE - DCE) interface for Short Message Service (SMS) and Cell Broadcast Service (CBS) (Release 1999) [9] [10] 3GPP TS 27.010 - Terminal Equipment to User Equipment (TE-UE) multiplexer protocol (Release 1999) The I2C-bus specification, Version 2.1, Jan 2000, http://www.nxp.com/acrobat_download/literature/9398/39340011_21.pdf Part of the documents mentioned above can be downloaded from u-blox web-site (http://www.u-blox.com). GSM.G1-HW-09002-C Preliminary Related documents Page 73 of 75 LEON-G100/G200 - System Integration Manual Revision history Revision Date Name Status / Comments - 30/04/2009 tgri Initial release. Objective specification A 22/06/2009 lpah New CI A1 16/07/2009 tgr Change of document status to advance information B 20/08/2009 lpah Figure 1.1 and Figure 1.2: corrected the LEON block diagram Figure 1.17: corrected the SIM Application circuit Document updated for serial port handling Table 1: renamed pins and description Chapter 1.11.1: added the figures related to DSR behavior at power-on, RI behavior at SMS Arrival, RI behavior at incoming call and CTS handling in power saving mode C 4/011/2009 tgri/lpah/sses este/fves Change of document status to Preliminary. Revision of 2.2.2 footprint and paste mask, 2.2.3 paste mask removed Section 1.5.2completely revised. Added Table 3, updated section 1.5.3.1 Section 1.5.3: added charging temperature range values with clarification Section 1.5.4: added clarification regarding V_BCKP current consumption; added formula to evaluate external capacitor capacitance requirement as function of the buffering time; updated application circuits. Updated Figure 12: Real time clock supply (V_BCKP) application circuits using a 100 µF capacitor to let the RTC run for ~50 seconds at 25°C or using a 70 mF capacitor to let the RTC run for ~10 hours at 25°C when the VCC supply is removed Section 1.6.1: added Figure 14: Power on sequence description Section 1.6.2: added clarification regarding the application circuit to avoid an increase of the module current consumption in power down mode and added the power off sequence diagram Added Figure 15: Power off sequence description Section 1.6.3: added RESET_N equivalent circuit description Updated Figure 16: Application circuits to reset the module using a push button or using an application processor Section 1.9.1.3: clarified and updated application circuit description to connect a handset; added application circuit description to connect an external audio device with analog input/outputs; clarified and updated application circuit description to connect a headset. Added Figure 20. Section1.9.1.5: clarified and updated application circuit description in hands free mode Section 1.9.2: added clarification regarding the application circuit to avoid an increase of the module current consumption in power down mode. Section 1.10: clarified and updated application circuit description for the SIM card. Section 1.11.1: corrected MAX3237 description; added clarification regarding the application circuit to avoid an increase of the module current consumption in power down mode. Section 1.12: clarified as the measured value is input impedance dependent Section 1.13: added clarification regarding the application circuit to avoid an increase of the module current consumption in power down mode. Updated section 2.1: Check UART signals direction, since the signal names follow the ITU-T V.24 Recommendation. Added section 2.3 to explain module thermal resistance. Section 1.11.1: corrected supported UART frame formatCorrected and improved description Updated and improved Figure 3: Power supply concept Added VCC extended and normal operating ranges description and clarified DC power supply requirements in section 1.5.2 Updated and improved Figure 6: Description of the VCC current consumption profile versus time during a GSM call content and caption Clarified current profile description in section 1.5.2.1.2 Updated and improved content and caption Clarified charger requirements in section 1.5.3 Grouped sections Module power on, Module power off, Module reset into the 1.6 System functions chapter Updated and improved Figure 14: Power on sequence description Updated and improved Figure 15: Power off sequence description Clarified Antenna supervisor purpose in the relative section Updated Figure 21: Headset connector application circuit content Clarified I2S PCM mode path in section 1.9.2.1 Updated section 1.11.1: clarified, added and corrected UART features, UART signal behavior, UART application circuits. Updated and improved Figure 27: CTS behavior during normal module operation: the CTS line indicates when the module is able (CTS = ON) or not able (CTS = OFF) to accept data from the DTE and communicate through the UART interface content and caption Updated Figure 26: UART default frame format (8N1) description caption Deleted the double repeated point in the Schematic design-in checklist Clarified pins arrangement in section 2.2.1 Clarified ground plane requirements in section 2.2.1.4 Renumbered sections Antenna termination, Antenna radiation, Antenna detection functionality Corrected AT Commands Manual code in Related documents section Removed “System Configuration“chapter GSM.G1-HW-09002-C Preliminary Revision history Page 74 of 75 LEON-G100/G200 - System Integration Manual Contact For complete contact information visit us at www.u-blox.com u-blox Offices North, Central and South America u-blox America, Inc. Phone: +1 (703) 483 3180 E-mail: [email protected] Regional Office West Coast: Phone: +1 (703) 483 3184 E-mail: [email protected] Headquarters Europe, Middle East, Africa u-blox AG Phone: +41 44 722 74 44 E-mail: [email protected] Support: support @u-blox.com Technical Support: Phone: E-mail: +1 (703) 483 3185 [email protected] Asia, Australia, Pacific u-blox Singapore Pte. Ltd. Phone: +65 6734 3811 E-mail: [email protected] Support: [email protected] Regional Office China: Phone: +86 10 68 133 545 E-mail: [email protected] Support: [email protected] Regional Office Japan: Phone: +81 3 5775 3850 E-mail: [email protected] Support: [email protected] Regional Office Korea: Phone: +82 2 542 0861 E-mail: [email protected] Support: [email protected] Regional Office Taiwan: Phone: +886 2 2657 1090 E-mail: [email protected] Support: [email protected] GSM.G1-HW-09002-C Preliminary Contact Page 75 of 75