1
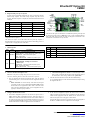
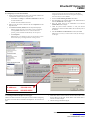
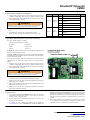
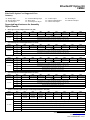
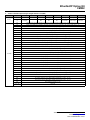
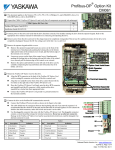
EtherNet/IP Option Kit
CM092
Applicable products: Yaskawa F7U, G7U, P7U, E7U, G5M(Spec F), and
G5M(600V). For G5U(HHP) drives, refer to IG.G5HHP.26.
1. Unpack the CM092 EtherNet/IP Option kit and verify that all
components are present and undamaged.
CM092 EtherNet/IP Option Kit Parts
Qty.
EtherNet/IP Option Card
1
Shielded RJ-45 M-F Cable
1
Ground Wire
1
4" x 1" Insulated Tubing
1
Cable Ties
2
MAC ID Label (Unique for each EtherNet/IP Option Card
1
Installation Guide (IG.AFD.26)
1
2. Connect power to the Yaskawa AC drive and verify that the drive
functions correctly.
This includes running the drive from the operator keypad. Refer to the
appropriate drive technical manual for information on connecting and
operating the drive.
3. Remove power from the drive and wait for the charge lamp to be
completely extinguished.
Wait at least five additional minutes for the drive to be completely
discharged. Measure the DC bus voltage and verify that it is at a safe level.
WARNING
Dangerous voltages in excess of 400VDC (230V drives) or 800VDC
(460V drives) are present at the DC bus terminals of the drive.
4. Remove the operator keypad and drive cover.
a. Remove the operator keypad.
b. Remove the terminal and control covers.
c. Remove the option card hold-down by carefully
compressing the top and bottom until it becomes free
of its holder. Lift it out.
5. Mount the EtherNet/IP Option Card on the drive.
a.
Connect the RJ-45 M-F cable supplied in this kit to the EtherNet/IP
Option Card.
b. Connect the ground wire supplied to ground terminal J6 on the EtherNet/
IP Option Card.
c.
Align the J2 connector on the back of the EtherNet/IP Option Card with
its mating 2CN connector on the drive control card.
d. Align the two standoffs on the front of the drive control board with the
two holes on the right side of the EtherNet/IP Option Card.
e.
Press the EtherNet/IP Option Card firmly onto the drive 2CN connector
and standoffs until the J2 connector is fully seated on 2CN and the drive
standoffs have locked into their appropriate holes.
f.
Route the RJ-45 M-F cable and the ground wire along the left-inside of
the AC drive enclosure.
g. Replace the option card hold-down.
h. Connect the ground wire from the option card terminal J6 to the terminal
assembly ground connection.
Yaskawa Electric America, Inc. – www.yaskawa.com
IG.AFD.26, Page 1 of 11
Date: 10/08/2009 Rev: 09-10
EtherNet/IP Option Kit
CM092
6. Diagnostic LED power-up test sequence
A power-up test is performed each time the AC drive is powered up after the
initial boot-up sequence. The initial boot-up sequence may take several
seconds. When this sequence is complete, the LEDs will assume their normal
conditions.
Seq
MS/RUN
NS/CON
Time
1
GREEN
OFF
250ms
2
RED
OFF
250ms
3
GREEN
OFF
250ms
4
GREEN
GREEN
250ms
5
GREEN
RED
250ms
6
GREEN
OFF
The EtherNet/IP Option Card is successfully initialized after the LEDs have
completed the above sequence.
Successful Initialization:
The EtherNet/IP Option Card hardware is installed and operating correctly with
the LEDs in the states shown in bold text in step 7 per the "LED Descriptions"
table. The LINK LED represents the status of the physical connection to the
network and is not indicative of any card state.
The EtherNet/IP Option Card LED status after the power-up sequence is
described below. Please wait for at least five seconds for the loading process to
complete before verifying the status of the LEDs.
7. LED descriptions
LED
D1
D2
Label
Description
MS/RUN
GREEN – Card Functioning Normally
GREEN BLINK – Standby/Initializing (500ms cycle)
RED BLINK – Minor Fault (500ms cycle)
RED – Major Fault
GREEN/RED BLINK – Module Test (500ms cycle)
NS/CON
GREEN – Connected
GREEN BLINK – Waiting for Connections
(500ms cycle)
RED BLINK – Connection Timeout (500ms cycle)
RED – Duplicate IP Address
GREEN/RED BLINK – Network Test (500ms cycle)
8. Connect to the EtherNet/IP Option Card.
Note: Due to the presence of high voltage in the area of the network
connection, insulating the RJ-45 M-F cable connection is required.
a.
Prior to connecting the RJ-45 M-F network cable, slide the supplied
insulated tubing (4"x1") over the female end of the supplied RJ-45 M-F
cable.
LED
Label
D3
10/100
D4
LINK
D5
Rx
D8
PWR
Description
GREEN – 100Mbs Connection Speed
GREEN – Link Established
GREEN – Message Being Received
GREEN - Appropriate Power Supplied to Card
2. Connection through hub or switch: To connect through a switch,
hub or router, connect the RJ-45 socket on the RJ-45 M-F cable to
the switch, hub or router using a standard CAT-5 patch cable.
b. After the network connection is made, slide the insulated tubing
(4"x1" Insulated Tubing) over the connection and secure it in place using
the supplied cable ties.
1. Direct connection: To connect directly to the EtherNet/IP Option
Card, plug one end of a CAT-5 EtherNet/IP crossover cable into the
RJ-45 socket on the supplied RJ-45 M-F cable. Connect the other
end to the RJ-45 EtherNet/IP socket on the configuration device,
typically a controller, laptop or other PC.
9. Configure the EtherNet/IP network.
a.
The default configuration option for the EtherNet/IP Option Card is
DHCP (Dynamic Host Configuration Protocol). Thus there must be a
DHCP Server connected to the network in order to have the IP address of
the EtherNet/IP Option Card set. For detailed information on how to set
up the Rockwell BOOTP/DHCP Server on a PC refer to the appropriate
Rockwell document or Yaskawa's Application Note AN.AFD.10.
b. If the network configuration requires that devices have a static IP
address, the EtherNet/IP Option Card's configuration can be changed to
USER and the appropriate static IP address can be entered via the
EtherNet/IP Option Card's web pages as shown below.
Note that the EtherNet/IP Option Card must first have been assigned an
IP address via DHCP before its configuration can be changed.
Yaskawa Electric America, Inc. – www.yaskawa.com
IG.AFD.26, Page 2 of 11
Date: 10/08/2009 Rev: 09-10
EtherNet/IP Option Kit
CM092
10. Configuring a PC with a static IP address
a.
Select an existing connection or create a new network connection for
communication with the EtherNet/IP Option Card.
1. Select Start ==> Settings ==> Network Connections from the task
bar in the Windows OS.
2. Select the network connection to be used.
b. Right click on the network connection and select Properties from the
drop-down menu.
c.
Select Internet Protocol (TCP/IP) from the components displayed.
Note: If a TCP/IP selection is not available, it may be installed by
selecting Install. Administrator access to the PC and the OS
operating system installation CD-ROMs may also be required.
1. Select Properties.
Note: If the PC is on a building or office network, disconnect it from
that network before proceeding. Record the existing network
IP address:
192.168.1.19
Subnet mask:
255.255.255.0
11. Accessing the EtherNet/IP Option Card web pages
The browser interface to the EtherNet/IP Option Card can be used for configuring
the card or for network and drive information and diagnostics. To access the web
pages:
settings. If the network connection already has an IP address
assigned on the EtherNet/IP Local network, ignore the following
instructions and just click on Cancel.
2. Select the Use the following IP address radio button.
3. Enter the IP address of a vacant IP address on the EtherNet/IP Local
Network (192.168.1.19 in this example).
4. Enter the subnet mask for the EtherNet/IP Local Network
(255.255.255.0 in this example).
5. Check the system network schematic or with your network
administrator to ensure that the IP address does not already exist on
the network.
6. Once the IP address and Subnet mask are entered, select OK.
Note: It may be necessary to reboot the PC in order for the changes
to take effect.
a. Obtain the IP address of the desired drive and enter that IP address in the
browser address bar. Hit Enter. The IP address of the desired drive is
192.168.1.20 in this example.
b. The main web page should be displayed.
Yaskawa Electric America, Inc. – www.yaskawa.com
IG.AFD.26, Page 3 of 11
Date: 10/08/2009 Rev: 09-10
EtherNet/IP Option Kit
CM092
12. Configuring the EtherNet/IP Option Card
a.
1. Do not use default gateway in system. Select this radio button to
disable the gateway when there is no external gateway in the system.
Select Configuration from the main web page.
2. Use default gateway in system. Select this radio button to enable
the gateway when there is an external gateway in the system. Verify
and/or update the gateway address as necessary, so that it matches
the address of the system gateway.
b. After the Configuration page has been displayed, select the method in
which the EtherNet/IP Option Card will obtain its IP address.
1. User: The EtherNet/IP Option Card will use the network address as
entered in the IP, Subnet and Gateway fields. Check with the
system schematic or network administrator to insure that the IP
address is valid and unique and that the subnet mask is correct.
The USER radio button is used in this example.
Enter the new IP address, 192.168.1.37 in this example.
2. DHCP: The EtherNet/IP Option Card will use the network address
assigned to it by the DHCP server.
3. BOOTP: The EtherNet/IP Option Card will use the network address
assigned to it by the BOOTP server.
c.
Select the Gateway Usage. Connectivity to the EtherNet/IP Option Card
may be limited or nonfunctional if the gateway usage setting and gateway
address do not match the network infrastructure in which it is installed.
3. In all cases the Gateway field must contain a valid IP address and
must not be blank.
d. When the new configuration, IP address and subnet mask have been
entered, click the Submit button.
e. Verify that the information is correct on the Submit Results page.
f.
Power cycle the drive in order to store the new information on the
EtherNet/IP Option Card.
g. Note: The IP address in the browser address bar will have to be changed
to the drive's new IP address and the web page refreshed in order to
continue to communicate with the EtherNet/IP Option Card web pages.
Configuration: USER
IP Address: 192.168.1.37
Subnet mask: 255.255.255.0
Enable Browser Interface
Gateway Usage Disabled
Yaskawa Electric America, Inc. – www.yaskawa.com
IG.AFD.26, Page 4 of 11
Date: 10/08/2009 Rev: 09-10
EtherNet/IP Option Kit
CM092
13. Finish the EtherNet/IP Option Card installation.
a.
Remove power from the AC drive and wait for the charge lamp to be
completely extinguished. Wait at least five additional minutes for the
drive to be completely discharged. Measure the AC drive DC bus voltage
and verify that it is at a safe level.
Parameter
b1-01
Function
Reference
Source
WARNING
Dangerous voltages in excess of 400VDC (230V drives) or 800VDC
(460V drives) are present at the DC bus terminals of the drive.
b. Reinstall all drive covers and the operator keypad. Apply power to the
drive.
c.
Set parameters b1-01 and b1-02 to their appropriate values.
Refer to the table to the right for available b1-01 and b1-02 values.
b1-02
Run
Source
Data
Description
0
Digital Operator
1
Terminal Strip
2
Built-in Modbus RTU RS-485
Terminals
3
Option Kit (EtherNet/IP Option)
4
Pulse Input (F7 and G7 Only)
0
Digital Operator
1
Terminal Strip
2
Built-in Modbus RTU RS-485
Terminals
3
Option Kit (EtherNet/IP Option)
Default
1
1
14. Resetting the EtherNet/IP Option Card to its default configuration
The factory default settings are as follows:
Configure Network Parameters: DHCP
IP Address:
192.168.1.20
Subnet:
255.255.255.0
Gateway:
192.168.1.1
Symptom: The Yaskawa EtherNet/IP Option Card Main web page does not
display on the PC web browser screen.
Corrective Action: Check that the PC is set up, properly connected and that
an IP address has been assigned to both the server and the node and that they
are on the same local network.
If the web page is still not visible after confirming PC set up, then reset the
configuration of the EtherNet/IP Option Card to its factory default as
follows:
a.
Remove power from the AC drive and wait for the charge lamp to be
completely extinguished. Wait at least five additional minutes for the
drive to be completely discharged. Measure the AC drive DC bus voltage
and verify that it is at a safe level.
WARNING
Dangerous voltages in excess of 400VDC (230V drives) or 800VDC
(460V drives) are present at the DC bus terminals of the drive.
b. Place an insulated wire reset jumper between test points C and /LD on
the EtherNet/IP Option Card as shown in the figure to the right.
c.
Reapply power to the AC drive and wait approximately 10 seconds for
the power-up cycle to complete.
d. Remove power from the AC drive and remove the jumper between C and
/LD on the EtherNet/IP Option Card.
e.
Reapply power to the AC drive and wait approximately 10 seconds for
the power-up sequence to complete.
15. Important notes
a.
It is strongly recommended that shielded CAT-5 patch or crossover cable
be used for all network cables. (Refer to step 8 above for the proper
selection of patch or crossover cable).
b. The maximum number of simultaneous connections is: 1 for I/O, 4 for
Explicit, 2 for Drive Wizard.
c.
To simplify the drive configuration, EDS file can be obtained at
www.yaskawa.com. Select Downloads, By Inverter Drives, By
Product, and Network Comms-Ethernet. Then select the appropriate
EDS file based on the drive series and the latest version from those listed.
EDS files for individual drive models are compressed into a single Zip
file and need to be un-zipped into a temporary directory in order to be
installed.
d. Refer to the appropriate user, programming or parameter access manual
for a complete list of drive parameters and registers available. A list of
applicable manuals is available at the end of this document.
Yaskawa Electric America, Inc. – www.yaskawa.com
IG.AFD.26, Page 5 of 11
Date: 10/08/2009 Rev: 09-10
EtherNet/IP Option Kit
CM092
16. Drive labeling and EDS files
a.
Place the supplied MAC ID label on the side of the drive either above or
below the drive nameplate.
MAC ID: 00-20-B5-24-11-13
MODEL:
CIMR-G7U20P4
INPUT:
AC3PH
OUTPUT: AC3PH
200 - 240V
0 - 240V
SPEC: 20P41A
50/60Hz
3.8A
0 – 400Hz 3.2A 1.2kVA
O/N:
S/N:
b. To simplify the drive configuration, EDS file can be obtained at
www.yaskawa.com. Select Downloads, By Inverter Drives, By
Product, and Network Comms-Ethernet. Then select the appropriate
EDS file based on the drive series and the latest version from those listed.
EDS files for individual drive models are compressed into a single Zip
file.
MASS:
1W0149999991W0001
3.0kg
PRG:
1W0149999991W0001
FILE NO: E131457
17. EtherNet/IP Option Card fault codes
The table of EtherNet/IP Option Card fault codes returned by the drive is shown
below. Refer to the appropriate drive user and/or programming manual(s) for
drive specific information on the fault returned.
EtherNet/IP Fault Code
[hex]
Description
EtherNet/IP Fault Code
[hex]
Description
0000h
None
5300h
OPE errors (01,02,03,05,06,07,08,09,10,11)
2120h
Ground Fault (GF)
6320h
EEPROM R/W Error (ERR)
2130h
Short Circuit (SC)
7110h
Dynamic Braking Transistor (RR)
2200h
Inverter Overload (OL2)
7112h
Dynamic Braking Resistor (RH)
2220h
Motor Overload (OL1)
7301h
PG Open (PGO)
2221h
Overtorque Detection 1 (OL3)
7310h
Overspeed Detection (OS)
2222h
Overtorque Detection 2 (OL4)
7310h
Speed Deviation (DEV)
2300h
Overcurrent (OC)
7500h
EtherNet/IP Communication Error (BUS)
2310h
High Slip Braking (OL7)
8110h
Feedback Loss (FBL)
3130h
Input Phase Loss (PF)
8313h
Zero Servo Fault (SVE)
3130h
Output Phase Loss (LF)
8321h
Out of Control (CF)
3210h
DC Bus Overvoltage (OV)
8321h
Undertorque Detection 1 (UL3)
3220h
DC Bus Undervoltage (UV1)
8321h
Undertorque Detection 2 (UL4)
3222h
MC Answerback (UV3)
9000h
External Fault on Terminal S3 (EF3)
4200h
Heatsink Over-temperature (OH)
9000h
External Fault on Terminal S4 (EF4)
4210h
Heatsink Maximum Temperature (OH1)
9000h
External Fault on Terminal S5 (EF5)
4300h
Motor Overheat 1 (OH3)
9000h
External Fault on Terminal S6 (EF6)
4310h
Motor Overheat 2 (OH4)
9000h
External Fault on Terminal S7 (EF7)
5110h
CTL PS Undervoltage (UV2)
9000h
External Fault on Terminal S8 (EF8)
5120h
DC Bus Fuse Open (PUF)
9000h
External Fault Through Option Card (EF0)
5300h
Operator Disconnected (OPR)
–
-
Yaskawa Electric America, Inc. – www.yaskawa.com
IG.AFD.26, Page 6 of 11
Date: 10/08/2009 Rev: 09-10
EtherNet/IP Option Kit
CM092
EtherNet/IP Option Card Supported Class
Summary
06 – Connection Manager Object
28 – Motor Object
29 – Control Supervisor Object
01 – Identity Object
02 – Message Router Object
04 – Assembly Object
F5 – TCP/IP Object
F6 – Ethernet Link Object
2A – AC Drive Object
64 – Yaskawa Command Object
65 – Yaskawa Status Object
Supported Input Instances for Assembly
Object Class 04
♦
Basic Speed Control Input Instance 20 (14h)
Input
Byte
Bit 7
Bit 6
Bit 5
Bit 4
Bit 3
Bit 2
Bit 1
Bit 0
Instance
0h
-
-
-
-
-
Fault Reset
-
Run Forward
1h
20 (14h)
♦
Reserved
2h
Speed Reference (Low Byte) [Scaled by parameter o1-03] [U1-01]
3h
Speed Reference (High Byte) [Scaled by parameter o1-03] [U1-01]
Extended Speed Control Input Instance 21 (15h)
Input
Instance
Byte
Bit 7
Bit 6
Bit 5
Bit 4
0h
-
Net Reference
Net Run/Stop
-
1h
21 (15h)
♦
Bit 1
Bit 0
-
Fault Reset
Run Reverse
Run Forward
2h
Speed Reference (Low Byte) [Scaled by parameter o1-03] [U1-01]
3h
Speed Reference (High Byte) [Scaled by parameter o1-03] [U1-01]
Basic Speed Control Input Instance 22 (16h)
Input
Byte
Bit 7
Bit 6
Bit 5
Bit 4
Bit 3
Bit 2
Bit 1
Bit 0
Instance
0h
-
-
-
-
-
Fault Reset
-
Run Forward
22 (16h)
Reserved
2h
Speed Reference (Low Byte) [Scaled by parameter o1-03] [U1-01]
3h
Speed Reference (High Byte) [Scaled by parameter o1-03] [U1-01]
4h
Torque Reference (Low Byte) [0.1%] [U1-09]
5h
Torque Reference (High Byte) [0.1%] [U1-09]
Extended Speed Control Input Instance 23 (17h)
Input
Byte
Bit 7
Bit 6
Bit 5
Bit 4
Bit 3
Bit 2
Bit 1
Bit 0
Instance
0h
-
Net Reference
Net Run/Stop
-
-
Fault Reset
Run Reverse
Run Forward
Bit 0
1h
23 (17h)
♦
Bit 2
Reserved
1h
♦
Bit 3
Reserved
2h
Speed Reference (Low Byte) [Scaled by parameter o1-03] [U1-01]
3h
Speed Reference (High Byte) [Scaled by parameter o1-03] [U1-01]
4h
Torque Reference (Low Byte) [0.1%] [U1-09]
5h
Torque Reference (High Byte) [0.1%] [U1-09]
Yaskawa Standard Speed/Torque Control Input Instance 101 (65h)
Input
Instance
101 (65h)
Byte
Bit 7
Bit 6
Bit 5
Bit 4
Bit 3
Bit 2
Bit 1
0h
Terminal S8
Terminal S7
Terminal S6
Terminal S5
Terminal S4
Terminal S3
Run Reverse
Run Forward
1h
Terminal
M5-M6
Terminal
M3-M4
Terminal
M1-M2
-
Fault Reset
External Fault
-
-
2h
Speed Reference (Low Byte) [Scaled by parameter o1-03] [U1-01]
3h
Speed Reference (High Byte) [Scaled by parameter o1-03] [U1-01]
4h
Torque Reference (Low Byte) [0.1%] [U1-09]
5h
Torque Reference (High Byte) [0.1%] [U1-09]
6h
Reserved
7h
Reserved
Yaskawa Electric America, Inc. – www.yaskawa.com
IG.AFD.26, Page 7 of 11
Date: 10/08/2009 Rev: 09-10
EtherNet/IP Option Kit
CM092
♦
Yaskawa Standard Speed/Torque Control Input Instance 115 (73h)
Input
Instance
115 (73h)
Byte
Bit 7
Bit 6
Bit 5
Bit 4
Bit 3
Bit 2
Bit 1
Bit 0
0h
Terminal S8
Terminal S7
Terminal S6
Terminal S5
Terminal S4
Terminal S3
Run Reverse
Run Forward
1h
Terminal
M5-M6
Terminal
M3-M4
Terminal
M1-M2
-
-
-
Fault Reset
External Fault
2h
Speed Reference (Low Byte) [Scaled by parameter o1-03] [U1-01]
3h
Speed Reference (High Byte) [Scaled by parameter o1-03] [U1-01]
4h
Torque Reference (Low Byte) [0.1%] [U1-09]
5h
Torque Reference (High Byte) [0.1%] [U1-09]
6h
Torque Compensation (Low Byte) [0.1%]
7h
Torque Compensation (High Byte) [0.1%]
8h ~ Bh
Reserved
Ch
Analog Output Terminal FM (Low Byte) [-726 ~ +726 (-11VDC ~ +11VDC)]
Dh
Analog Output Terminal FM (High Byte) [-726 ~ +726 (-11VDC ~ +11VDC)]
Eh
Analog Output Terminal AM (Low Byte) [-726 ~ +726 (-11VDC ~ +11VDC)]
Fh
Analog Output Terminal AM (High Byte) [-726 ~ +726 (-11VDC ~ +11VDC)]
10h
Digital Output Terminal M1-M2 (Low Byte)
11h
Digital Output Terminal M3-M4 (High Byte)
14h ~ 15h
Network Control (bit 0: Network Speed Reference, bit 1: Network Run Command)
16h ~ 27h
Reserved
Supported Output Instances for Assembly Object Class 04
♦
Basic Speed Control Output Instance 70 (46h)
Output
Byte
Bit 7
Bit 6
Bit 5
Bit 4
Bit 3
Bit 2
Bit 1
Bit 0
Instance
0h
-
-
-
-
-
Running Fwd
-
Fault
70 (46h)
♦
Reserved
2h
Output Frequency (Low Byte) [Scaled by parameter o1-03] [U1-02]
3h
Output Frequency (High Byte) [Scaled by parameter o1-03] [U1-02]
Extended Speed Control Output Instance 71 (47h)
Output
Byte
Bit 7
Bit 6
Bit 5
Bit 4
Bit 3
Bit 2
Bit 1
Bit 0
Instance
0h
Speed Agree
Net Reference
Net Run/Stop
Drive Ready
Running Rev
Running Fwd
Alarm
Fault
71 (47h)
♦
1h
1h
Reserved
2h
Output Frequency (Low Byte) [Scaled by parameter o1-03] [U1-02]
3h
Output Frequency (High Byte) [Scaled by parameter o1-03] [U1-02]
Basic Speed Control Output Instance 72 (48h)
Output
Byte
Bit 7
Bit 6
Bit 5
Bit 4
Bit 3
Bit 2
Bit 1
Bit 0
Instance
0h
-
-
-
-
-
Running Fwd
-
Fault
72 (48h)
1h
Reserved
2h
Output Frequency (Low Byte) [Scaled by parameter o1-03] [U1-02]
3h
Output Frequency (High Byte) [Scaled by parameter o1-03] [U1-02]
4h
Torque Reference (Low Byte) [0.1%] [U1-09]
5h
Torque Reference (High Byte) [0.1%] [U1-09]
Yaskawa Electric America, Inc. – www.yaskawa.com
IG.AFD.26, Page 8 of 11
Date: 10/08/2009 Rev: 09-10
EtherNet/IP Option Kit
CM092
♦
Extended Speed Control Output Instance 73 (49h)
Output
Byte
Bit 7
Bit 6
Bit 5
Bit 4
Bit 3
Bit 2
Bit 1
Bit 0
Instance
0h
Speed Agree
Net Reference
Net Run/Stop
Drive Ready
Running Rev
Running Fwd
Alarm
Fault
73 (49h)
♦
1h
Reserved
2h
Output Frequency (Low Byte) [Scaled by parameter o1-03] [U1-02]
3h
Output Frequency (High Byte) [Scaled by parameter o1-03] [U1-02]
4h
Torque Reference (Low Byte) [0.1%] [U1-09]
5h
Torque Reference (High Byte) [0.1%] [U1-09]
Yaskawa Standard Speed/Torque Output Instance 151 (97h)
Output
Byte
Bit 6
Bit 5
Bit 4
Bit 3
Bit 2
Bit 1
Bit 0
@Speed
Agree
@Reset
@Running
Rev
@Zero Speed
@Running
Fwd
Terminal
M3-M4
Terminal
M1-M2
@Local
Mode
Undervoltage
@OPE Error
0h
@Fault
@Alarm
@Drive
Ready
1h
@Zero Servo
Complete
-
Terminal
M5-M6
Instance
151 (97h)
Bit 7
2h
Output Frequency (Low Byte) [Scaled by parameter o1-03] [U1-02]
3h
Output Frequency (High Byte) [Scaled by parameter o1-03] [U1-02]
4h
Torque Reference (Low Byte) [0.1%] [U1-09]
5h
Torque Reference (High Byte) [0.1%] [U1-09]
6h
Output Current (Low Byte) [0.01A up to 11kW, 0.1A 15kW and above] [U1-03]
7h
Output Current (High Byte) [0.01A up to 11kW, 0.1A 15kW and above] [U1-03]
Yaskawa Electric America, Inc. – www.yaskawa.com
IG.AFD.26, Page 9 of 11
Date: 10/08/2009 Rev: 09-10
EtherNet/IP Option Kit
CM092
♦
Yaskawa Standard Speed/Torque Output Instance 155 (9Bh)
Output
Instance
155 (9Bh)
Byte
Bit 7
Bit 6
Bit 5
Bit 4
Bit 3
Bit 2
Bit 1
Bit 0
0h
Fault
Alarm
Drive Ready
Speed Agree
Reset Active
Running Rev
Zero Speed
Running Fwd
1h
Zero Servo
Complete
-
Terminal M5M6
Terminal M3M4
Terminal M1M2
Local Mode
Undervoltage
OPE Error
2h
Motor Speed (Low Byte) [Scaled by parameter o1-03] [U1-05] [Not available in V/F control mode (A1-02 = 0)]
3h
Motor Speed (High Byte) [Scaled by parameter o1-03] [U1-05] [Not available in V/F control mode (A1-02 = 0)]
4h
Torque Reference (Low Byte) [0.1%] [U1-09]
5h
Torque Reference (High Byte) [0.1%] [U1-09]
6h
PG Counter Channel 1 (Low Byte) [rolling counter from -32,766 ~ 32,767]
7h
PG Counter Channel 1 (High Byte) [rolling counter from -32,766 ~ 32,767]
8h
Frequency Reference (Low Byte) [Scaled by parameter o1-03] [U1-01]
9h
Frequency Reference (High Byte) [Scaled by parameter o1-03] [U1-01]
Ah
Output Frequency (Low Byte) [Scaled by parameter o1-03] [U1-02]
Bh
Output Frequency (High Byte) [Scaled by parameter o1-03] [U1-02]
Ch
Output Current (Low Byte) [0.01A up to 11kW, 0.1A 15kW and above] [U1-03]
Dh
Output Current (High Byte) [0.01A up to 11kW, 0.1A 15kW and above] [U1-03]
Eh
Terminal A2 Output (Low Byte) [0.1%] [U1-16]
Fh
Terminal A2 Output (High Byte) [0.1%] [U1-16]
10h
Main Circuit DC Voltage (Low Byte) [1VDC] [U1-07]
11h
Main Circuit DC Voltage (High Byte) [1VDC] [U1-07]
12h
Error Alarm 1 (Low Byte) [See Section 15 on Page 5 for a list of fault codes]
13h
Error Alarm 1 (High Byte) [See Section 15 on Page 5 for a list of fault codes]
14h
Error Alarm 2 (Low Byte) [See Section 15 on Page 5 for a list of fault codes]
15h
Error Alarm 2 (High Byte) [See Section 15 on Page 5 for a list of fault codes]
16h
Error Alarm 3 (Low Byte) [See Section 15 on Page 5 for a list of fault codes]
17h
Error Alarm 3 (High Byte) [See Section 15 on Page 5 for a list of fault codes]
18h
Terminal A3 Output (Low Byte) [0.1%] [U1-17]
19h
Terminal A3 Output (High Byte) [0.1%] [U1-17]
1Ah
Digital Input Terminal Bit Field (Low Byte) [Terminals S1 ~ S8] [U1-10]
1Bh
Digital Input Terminal Bit Field (High Byte) [Terminals S1 ~ S8] [U1-10]
1Ch
Terminal A1 Output (Low Byte) [0.1%] [U1-15]
1Dh
Terminal A1 Output (High Byte) [0.1%] [U1-15]
1Eh
PG Counter Channel 2 (Low Byte) [rolling counter from -32,766 ~ 32,767]
1Fh
PG Counter Channel 2 (High Byte) [rolling counter from -32,766 ~ 32,767]
20h
Drive Software Number (U1-14)
21h ~ 27h
Reserved
Yaskawa Electric America, Inc. – www.yaskawa.com
IG.AFD.26, Page 10 of 11
Date: 10/08/2009 Rev: 09-10
EtherNet/IP Option Kit
CM092
Copies of this Installation Guide along with all technical manuals in ".pdf" format and support files may be obtained from either the CD supplied with the drive or from
www.yaskawa.com. Printed copies of any Yaskawa manual may be obtained by contacting the nearest Yaskawa office. Information on EtherNet/IP may be obtained
from www.odva.org.
Reference documents:
EtherNet/IP Option Card Installation Guide - IG.AFD.26
EtherNet/IP Option Card Installation Guide for G5HHP - IG.G5HHP.26
EtherNet/IP Option Card Technical Manual - TM.AFD.26
Application Note - Using the Yaskawa AC Drive "EtherNet/IP" Option with Controllogix / Compactlogix Programmable Controllers - AN.AFD.09
Application Note - Commissioning the Yaskawa Drive EtherNet/IP Option with the Rockwell BOOTP/DHCP Server - AN.AFD.10
G5U Technical Manual - TM.4515
G5M Modbus Technical Manual - TM.4025
E7U Drive User Manual - TM.E7.01
E7U Drive Programming Manual - TM.E7.02
F7U Drive User Manual - TM.F7.01
F7U Drive Programming Manual - TM.F7.02
F7U Drive Parameter Access Technical Manual - TM.F7.11
G7U Drive Technical Manual - TM.G7.01
P7U Drive User Manual - TM.P7.01
P7U Drive Programming Manual - TM.P7.02
EtherNet/IP CONFORMANCE TESTED™ is a certification mark of the ODVA.
Modbus® is a registered trademark of Schneider Automation, Inc.
YASKAWA ELECTRIC AMERICA, INC.
Phone: 82-2-776-7844 Fax: 82-2-753-2639
Chicago-Corporate Headquarters
2121 Norman Drive South, Waukegan, IL 60085, U.S.A.
Phone: (800) YASKAWA (800-927-5292) Fax: (847) 887-7310
Internet: http://www.yaskawa.com
YASKAWA ELECTRIC (SINGAPORE) PTE. LTD.
MOTOMAN INC.
805 Liberty Lane, West Carrollton, OH 45449, U.S.A.
Phone: (937) 847-6200 Fax: (937) 847-6277
Internet: http://www.motoman.com
YASKAWA ELECTRIC CORPORATION
New Pier Takeshiba South Tower, 1-16-1, Kaigan, Minatoku, Tokyo, 105-0022, Japan
Phone: 81-3-5402-4511 Fax: 81-3-5402-4580
Internet: http://www.yaskawa.co.jp
YASKAWA ELETRICO DO BRASIL COMERCIO LTDA.
Avenida Fagundes Filho, 620 Bairro Saude Sao Paolo-SP, Brasil CEP: 04304-000
Phone: 55-11-5071-2552 Fax: 55-11-5581-8795
Internet: http://www.yaskawa.com.br
YASKAWA ELECTRIC EUROPE GmbH
Hauptstrabe 185,65760 Eschborn, Germany
Phone: 49-6196-569-300 Fax: 49-6196-569-398
MOTOMAN ROBOTICS AB
Box 504 S38525, Torsas, Sweden
Phone: 46-486-48800 Fax: 46-486-41410
MOTOMAN ROBOTEC GmbH
Kammerfeldstrabe 1, 85391 Allershausen, Germany
Phone: 49-8166-900 Fax: 49-8166-9039
YASKAWA ELECTRIC UK LTD.
1 Hunt Hill Orchardton Woods Cumbernauld, G68 9LF, Scotland, United Kingdom
Phone: 44-12-3673-5000 Fax: 44-12-3645-8182
YASKAWA ELECTRIC KOREA CORPORATION
Paik Nam Bldg. 901 188-3, 1-Ga Euljiro, Joong-Gu, Seoul, Korea
Head Office: 151 Lorong Chuan, #04-01, New Tech Park Singapore 556741, Singapore
Phone: 65-282-3003 Fax: 65-289-3003
TAIPEI OFFICE (AND YATEC ENGINEERING CORPORATION)
10F 146 Sung Chiang Road, Taipei, Taiwan
Phone: 886-2-2563-0010 Fax: 886-2-2567-4677
YASKAWA JASON (HK) COMPANY LIMITED
Rm. 2909-10, Hong Kong Plaza, 186-191 Connaught Road West, Hong Kong
Phone: 852-2803-2385 Fax: 852-2547-5773
BEIJING OFFICE
Room No. 301 Office Building of Beijing International Club,
21 Jianguomanwai Avenue, Beijing 100020, China
Phone: 86-10-6532-1850 Fax: 86-10-6532-1851
SHANGHAI OFFICE
27 Hui He Road Shanghai 200437 China
Phone: 86-21-6553-6600 Fax: 86-21-6531-4242
SHANGHAI YASKAWA-TONJI M & E CO., LTD.
27 Hui He Road Shanghai 200437 China
Phone: 86-21-6533-2828 Fax: 86-21-6553-6677
BEIJING YASKAWA BEIKE AUTOMATION ENGINEERING CO., LTD.
30 Xue Yuan Road, Haidian, Beijing 100083 China
Phone: 86-10-6232-9943 Fax: 86-10-6234-5002
SHOUGANG MOTOMAN ROBOT CO., LTD.
7, Yongchang-North Street, Beijing Economic & Technological Development Area,
Beijing 100076 China
Phone: 86-10-6788-0551 Fax: 86-10-6788-2878
YEA, TAICHUNG OFFICE IN TAIWAIN
B1, 6F, No.51, Section 2, Kung-Yi Road, Taichung City, Taiwan, R.O.C.
Phone: 886-4-2320-2227 Fax:886-4-2320-2239
Data subject to change without notice
Yaskawa Electric America, Inc. – www.yaskawa.com
IG.AFD.26, Page 11 of 11
Date: 10/08/2009 Rev: 09-10