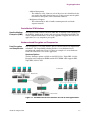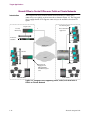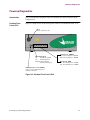
1
Vanguard Managed Solutions
Vanguard 342 Installation Manual
Notice
©2004 Vanguard Managed Solutions, LLC
575 West Street
Mansfield, Massachusetts 02048
(508) 261-4000
All rights reserved
Printed in U.S.A.
Restricted Rights Notification for U.S. Government Users
The software (including firmware) addressed in this manual is provided to the U.S.
Government under agreement which grants the government the minimum “restricted rights”
in the software, as defined in the Federal Acquisition Regulation (FAR) or the Defense
Federal Acquisition Regulation Supplement (DFARS), whichever is applicable.
If the software is procured for use by the Department of Defense, the following legend
applies:
Restricted Rights Legend
Use, duplication, or disclosure by the Government
is subject to restrictions as set forth in
subparagraph (c)(1)(ii) of the
Rights in Technical Data and Computer Software
clause at DFARS 252.227-7013.
If the software is procured for use by any U.S. Government entity other than the Department
of Defense, the following notice applies:
Notice
Notwithstanding any other lease or license agreement that may pertain to,
or accompany the delivery of, this computer software, the rights of the
Government regarding its use, reproduction, and disclosure are as set forth
in FAR 52.227-19(C).
Unpublished - rights reserved under the copyright laws of the United States.
Notice (continued)
Proprietary Material
Information and software in this document are proprietary to VanguardMS Inc. (or its
Suppliers) and without the express prior permission of an officer of VanguardMS Inc., may
not be copied, reproduced, disclosed to others, published, or used, in whole or in part, for
any purpose other than that for which it is being made available. Use of software described in
this document is subject to the terms and conditions of the VanguardMS Software License
Agreement.
This document is for information purposes only and is subject to change without notice.
Radio Frequency Interference Regulations
This equipment has been tested and found to comply with the limits for a Class B digital
device, pursuant to Part 15 of the FCC Rules, CISPR22 and EN55022. These limits are
designed to provide reasonable protection against interference when the equipment is
operated in a residential environment. This equipment generates, uses, and can radiate radio
frequency energy and, if not installed and used in accordance with the instruction manual,
may cause harmful interference to radio communications.
Changes or modifications not expressly approved by VanguardMS could void the user's
authority to operate the equipment.
This Class B digital apparatus meets all requirements of the Canadian Interference-Causing
Equipment Regulations.
This is a Class B product. Operation of this equipment in a residential environment may
cause radio interference, in which case the user may be required to take adequate measures to
correct the interference at his/her own expense.
This product was verified under test conditions that included the use of shielded DTE
cable(s). A cable equipped with a ferrite bead may also have been used. Use of different
cables will invalidate verification and increase the risk of causing interference to radio and
TV reception.
You can obtain the proper cables from Vanguard Managed Solutions.
Telecommunications Regulations
Equipment that complies with Part 68 of the FCC rules includes a label or permanent
marking on the printed circuit board that connects to the network that contains, among other
information, the FCC registration number and ringer equivalence number (REN) for this
equipment. If requested, this information must be provided to the telephone company. A plug
and jack used to connect this equipment to the premises wiring and telephone network must
comply with the applicable FCC Part 68 rules and requirements adopted by the ACTA. A
compliant telephone cord and modular plug is provided with this product. It is designed to be
connected to a compatible modular jack that is also compliant. See installation instructions
for details.
The REN is used to determine the number of devices that may be connected to a telephone
line. Excessive RENs on a telephone line may result in the devices not ringing in response to
an incoming call. In most but not all areas, the sum of RENs should not exceed five (5.0). To
be certain of the number of devices that may be connected to a line, as determined by the total
RENs, contact the local telephone company. The REN for this product is part of the product
identifier that has the format US:AAAEQ##TXXXX. The digits represented by ## are the
REN without a decimal point (e.g., 03 is a REN of 0.3).
If this equipment causes harm to the telephone network, the telephone company will notify
you in advance that temporary discontinuance of service may be required. But if advance
notice isn't practical, the telephone company will notify the customer as soon as possible.
Also, you will be advised of your right to file a complaint with the FCC if you believe it is
necessary. The telephone company may make changes in its facilities, equipment, operations
or procedures that could affect the operation of the equipment. If this happens the telephone
company will provide advance notice in order for you to make necessary modifications to
maintain uninterrupted service. If the equipment is causing harm to the telephone network,
the telephone company may request that you disconnect the equipment until the problem is
resolved. Connection to party line service is subject to state tariffs. Contact the state public
utility commission, public service commission or corporation commission for information. If
your home has specially wired alarm equipment connected to the telephone line, ensure the
installation of this equipment does not disable your alarm equipment. If you have questions
about what will disable alarm equipment, consult a trained technician.
Equipment that meets the applicable Industry Canada Terminal Equipment Technical
Specifications is conformed by the registration number. Equipment that complies with
Industry rules includes a label or permanent marking on the printed circuit board that
connects to the network. The abbreviation, IC, before the registration number signifies that
the registration was performed based on a Declaration of Conformity indicating that Industry
Canada technical specifications were met. It does not imply that Industry Canada approved
the equipment.
Part No. T0257, Revision D
Technical Writer: Paul Lukowski
Production: Denise Skinner
Illustrator: Tim Kinch
First Release: February 2003
This manual is current for Release 6.4 of Vanguard Applications Ware
To comment on this manual, please send e-mail to [email protected]
Contents
Special Notices and Translations
Customer Information
Customer Response Card
Chapter 1. About the Vanguard 342
Vanguard 342 Description ............................................................................
Features and Functionality ...........................................................................
Target Applications .......................................................................................
Virtual Private Network ...........................................................................
Cost-effective VPN Solutions...............................................................
Hardware-based Encryption and Compression.....................................
Standard-based Tunneling and Encryption for IP Traffic.....................
Multi-protocol Tunneling and Encryption ............................................
Frame Relay and X.25 Encryption .......................................................
IP and Serial Protocols over Frame Relay ...............................................
Video and Serial Protocols over Public or Private Networks ..................
Branch Office to Central Office over Public or Private Networks ...........
SOHO and Branch Office to Central Office over ISDN ..........................
DSL/Cable Modem ..................................................................................
G.SHDSL Daughtercard ...........................................................................
LAN Segmentation ...................................................................................
Virtual LAN (VLAN) ...............................................................................
Clocking Limitations Vanguard 342 .............................................................
1-2
1-3
1-5
1-6
1-7
1-7
1-8
1-8
1-9
1-10
1-11
1-12
1-14
1-16
1-17
1-18
1-19
1-20
Chapter 2. Hardware Description
Enclosure ......................................................................................................
Motherboard .................................................................................................
Vanguard Daughtercards ..............................................................................
2-2
2-4
2-7
Chapter 3. Installation and Replacement
Checking Your Shipment Contents ..............................................................
Installing The Vanguard 342 ........................................................................
Selecting and Preparing the Installation Site ...........................................
Installing Your Vanguard 342 ...................................................................
Thermal Considerations ...........................................................................
Configuring the Serial Interface ...................................................................
Setting the Interface Type ........................................................................
Setting the Interface Options ....................................................................
Cabling the Vanguard 342 ............................................................................
3-2
3-3
3-4
3-6
3-7
3-8
3-9
3-10
3-12
v
Contents (continued)
Chapter 3. Installation and Replacement
Port Characteristics and Cabling ..............................................................
Control Terminal Port (CTP) ................................................................
10/100BaseT Adapter Cable.................................................................
DB25 V.24 Pinouts ...............................................................................
DB25 V.35/V.36 Pinouts .......................................................................
DB25 X.21/V.11 Pinouts.......................................................................
Modifying Your Vanguard 342 .....................................................................
Installing Vanguard Daughtercards ..........................................................
Accessing the Motherboard ......................................................................
Adding and Removing Memory Modules ................................................
Installing/Removing the Lithium Battery ................................................
3-13
3-16
3-17
3-18
3-19
3-20
3-22
3-23
3-24
3-27
3-32
Chapter 4. Powering Up and Loading Software
Powering Up Your Vanguard 342 .................................................................
Powering Off The Vanguard 342 ..................................................................
Powerup Diagnostics ....................................................................................
Accessing the Control Terminal Port ............................................................
Alternative Methods for Accessing the CTP ........................................
Obtaining and Installing Operating Software ...............................................
4-2
4-3
4-5
4-7
4-8
4-9
Appendix A. Specifications
Appendix B. Software License and Regulatory Information
FCC Part 68 and Telephone Company Procedures and
Requirements for DSU, T1, and ISDN Interfaces ....................................
Product Declarations and Regulatory Information .......................................
Limited Warranty
Return Procedures
Index
vi
B-2
B-4
About This Manual
Overview
Introduction
This installation describes features, hardware, specifications, and applications for the
Vanguard 342.
Note
For information on operating system software and configuration, see the
Vanguard Basic Configuration Manual (Part Number T0113).
Audience
This manual is intended for people who install and operate the Vanguard 342.
How to Use This
Manual
The following table describes the contents of this manual:
This Chapter
Description
Chapter 1
Vanguard 342 hardware and software features.
Chapter 2
Description of the Vanguard 342 hardware features and
components.
Chapter 3
Installing and replacing Vanguard 342 hardware
including daughtercards and motherboard.
Chapter 4
Powerup procedures and software installation.
Appendix A
Product specifications.
Appendix B
FCC and Telephone Company procedures and
requirements.
vii
About This Manual (continued)
Related Documentation
Introduction
This section describes related documentation and where to obtain documentation.
Other
Documentation
All documentation is provided on the Vanguide CD-ROM and the VanguardMS web
site. http://www.vanguardms.com/documentation
viii
Documentation Kit
Includes:
Vanguard Applications
Ware Documentation Set
• Vanguard Applications Ware Basic Protocols
(Part Number T0106)
• IP and LAN Feature Protocols
(Part Number T0100)
• SNA Feature Protocols
(Part Number T0101)
• Serial Feature Protocols
(Part Number T0102)
• Multi-Service Feature Protocols
(Part Number T0103)
• Multimedia Feature Protocols
(Part Number T0104)
• Alarms and Reports Manual
(Part Number T0005)
• Software Installation and Coldloading Manual
(Part Number T0028)
IP and LAN Feature
Documentation Set
• IP and LAN Feature Protocols
(Part Number T0100)
SNA Feature
Documentation Set
• SNA Feature Protocols
(Part Number T0101)
Serial Feature
Documentation Set
• Serial Feature Protocols
(Part Number T0102)
Multi-Service Feature
Documentation Set
• Multi-Service Feature Protocols
(Part Number T0103)
Multimedia Feature
Documentation Set
• Multimedia Feature Protocols
(Part Number T0104)
Vanguard Applications
Ware Basic Protocols
Documentation Set
• Vanguard Basic Protocols
(Part Number T0106)
About This Manual (continued)
Vanguide CD-ROM
The Vanguide CD-ROM contains all Vanguard documentation available at the time
of release. The Vanguide CD-ROM is shipped with each Vanguard product. To order
an additional copy of the Vanguide CD-ROM, please contact a VanguardMS
Representative.
VanguardMS Web
Site
Check the VanguardMS web site for the latest documentation:
http://www.vanguardms.com/documentation/
ix
Special Notices and Translations
Special Notices
The following notices emphasize certain information in the guide. Each serves a
special purpose and is displayed in the format shown:
Nota
Note is used to emphasize any significant information.
Advertencia
Caution provides you with information that, if not followed, can result in damage to
software, hardware, or data.
Warning
Warning is the most serious notice, indicating that you can be physically hurt.
Simplified Chinese
Danish
Særlige
overskrifter
Følgende overskrifter fremhæver nogle af oplysningerne i vejledningen. De tjener
hvert et specifikt formål og vises i følgende format:
Bemærk
Bem¾rk anvendes til at fremh¾ve vigtig information.
Forsigtig
Forsigtig understreger oplysninger, som, hvis de ikke bliver fulgt, kan føre til
beskadigelse af software, hardware eller data.
Advarsel
Advarsel er den mest alvorlige overskrift, og tilkendegiver mulig personskade.
xi
Dutch
Bijzondere
vermeldingen
De volgende vermeldingen besteden extra aandacht aan bepaalde informatie in
de handleiding. Elke vermelding heeft een eigen nut en wordt in de volgende
opmaak weergegeven:
Opmerking
Een opmerking wordt gebruikt om belangrijke informatie te benadrukken.
Let op
Dit kopje geeft aan dat u de beschreven instructies moet volgen om schade aan
de software, hardware of gegevens te vermijden.
Waarschuwing
Een waarschuwing is de belangrijkste vermelding. Indien u deze niet volgt, kan
dit tot lichamelijke verwondingen leiden.
Finnish
Erityisilmoitukset
Seuraavat ilmoitukset korostavat tiettyjä oppaan tietoja. Kullakin on oma
erikoistarkoituksensa ja ne esitetään seuraavassa muodossa:
Huomaa
Huomautusta käytetään korostamaan tärkeätä tietoa.
Vaara
Vaarailmoitus antaa tietoa, jonka huomiotta jättäminen voi johtaa ohjelmiston,
laitteiston tai tietojen vahingoittumiseen.
Varoitus
Varoitus on kaikkein vakavin ilmoitus ja se kertoo mahdollisesta
loukkaantumisriskistä.
French
Messages
spéciaux
Les messages suivants mettent en valeur certaines informations dans le guide.
Chacun d’eux remplit une fonction spéciale et est affiché dans le format indiqué :
Important
Important est utilisé pour souligner des informations critiques au sujet d’une
procédure.
Mise en Garde
Une mise en garde vous fournit des informations qui, si elles ne sont pas observées,
peuvent se traduire par des dommages pour le logiciel, le matériel ou les données.
xii
Avertissement
Un avertissement constitue le message le plus sérieux, indiquant que vous pouvez
subir des blessures corporelles.
German
Besondere
Hinweise
Durch die folgenden Hinweise werden bestimmte Informationen in diesem
Handbuch hervorgehoben. Jeder Hinweis dient einem bestimmten Zweck und
wird im dargestellten Format angezeigt:
Wichtig
WICHTIG wird zur Betonung signifikanter Angaben zu Vorgehensweisen
verwendet.
Vorsicht
Ein Vorsichtshinweis macht Sie darauf aufmerksam, daß Nichtbefolgung zu
Software-, Hardware- oder Datenschäden führen kann.
Warnung
Eine Warnung weist Sie darauf hin, daß ernsthafte Körperverletzungsgefahr besteht.
Italian
Simboli speciali
I seguenti simboli, ciascuno con una speciale funzione, evidenziano determinate
informazioni all’interno del manuale. Il formato è quello riportato qui di seguito.
Nota
Questo tipo di avvertimento viene utilizzato per evidenziare tutte le informazioni
significative relative ad una procedura.
Attenzione
Questo tipo di avvertimento fornisce informazioni che, se non vengono seguite,
possono provocare danni al software, all’hardware o ai dati.
Avvertenza
Questo tipo di avvertimento indica la presenza di condizioni di rischio che
possono causare lesioni fisiche. Si tratta del simbolo più importante al quale
prestare attenzione.
xiii
Japanese
Korean
Norwegian
Spesielle
merknader
Merknadstypene nedenfor representerer en bestemt type informasjon i håndboken.
Hver merknadstype har en spesiell hensikt og vises på følgende format:
Merk
Merk brukes for å fremheve viktig informasjon.
Forsiktig
Forsiktig gir deg informasjon om situasjoner som kan føre til skade på programvare,
datamaskin eller data dersom den blir fulgt.
Advarsel
Advarsel er den mest alvorlige merknaden og indikerer at du kan bli fysisk skadet.
xiv
Portuguese/
Portugal
Avisos Especiais
Os avisos que se seguem realçam certas informações neste guia. Cada um deles serve
um objectivo especial e é visualizado no formato apresentado:
Nota
Nota é utilizado para realçar qualquer informação importante.
Atenção
Atenção faculta-lhe informações que, se não forem cumpridas, poderão provocar
danos no software, hardware ou nos dados.
Cuidado
Cuidado constitui o aviso mais grave, o qual indica que poderá ficar
fisicamente ferido.
Spanish/Spain
Notificaciones
especiales
Las siguientes notificaciones ponen énfasis sobre determinada información de la
guía. Todas tienen un propósito especial y se muestran con el formato siguiente:
Nota
Las notas se utilizan para destacar determinada información de importancia.
Advertencia
Las advertencias le proporcionan información que debe seguirse, si no desea que el
software, el hardware o los datos puedan verse dañados.
Aviso
Los avisos son las notificaciones de carácter más importante e indican la posibilidad
de daños físicos para el usuario.
Swedish
Speciella
beteckningar
Följande beteckningar betonar viss information i handboken. Var och en har ett
speciellt syfte och visas i formatet nedan:
OBS!
OBS! används för att betona viktig information.
Viktigt
Viktigt ger dig information som, om den inte följs, kan resultera i skada i
programvara, maskinvara eller data.
xv
Varning
Varning är den mest allvarliga beteckningen och den indikerar att du kan
skadas fysiskt.
xvi
Customer Information
Customer
Questions
Customers who have questions about Vanguard Managed Solutions products or
services should contact your VanguardMS representative or visit this website for
product, sales, support, documentation, or training information:
http://www.vanguardms.com/
Comments About
This Manual
Customer Information
To help us improve our product documentation, please complete the comment card
included with this manual and return it by fax to (508) 339-9592. If you prefer,
provide your name, company, and telephone number, and someone in the
documentation group will contact you to discuss your comments.
xvii
Customer Response Card
Vanguard Managed Solutions would like your help in improving its product documentation. Please
complete and return this card by fax to (508) 339-9592; Attention: Product Documentation, to provide
your feedback.
To discuss comments with a member of the documentation group, provide telephone information at the
bottom of this page. Thank you for your help.
Name _________________________________________________________________________
Company Name _________________________________________________________________
Address _______________________________________________________________________
_______________________________________________________________________
_______________________________________________________________________
Document Title: Vanguard 342 Installation Manual
Part Number: T0257 Revision D
Please rate this document for usability:
Excellent
Good
Average
Below Average
Poor
What did you like about the document? ______________________________________________
______________________________________________________________________________
______________________________________________________________________________
______________________________________________________________________________
______________________________________________________________________________
What information, if any, is missing from the document? _________________________________
______________________________________________________________________________
______________________________________________________________________________
______________________________________________________________________________
______________________________________________________________________________
Cut Here
Please identify any sections/concepts that are unclear or explained inadequately.
______________________________________________________________________________
______________________________________________________________________________
______________________________________________________________________________
______________________________________________________________________________
Additional comments/suggestions. __________________________________________________
______________________________________________________________________________
______________________________________________________________________________
______________________________________________________________________________
______________________________________________________________________________
Telephone ________________________ Ext. _________________ Best time to call __________
Chapter 1
About the Vanguard 342
Overview
Introduction
This chapter describes the hardware and software functions, and the target
applications for the Vanguard® 342 device.
These topics are discussed:
• Vanguard 342 Description
• Features and Functionality
• Target Applications
About the Vanguard 342
1-1
Vanguard 342 Description
Vanguard 342 Description
Introduction
This section describes the Vanguard 342 device.
Description
The Vanguard 342 is a member of the 340 family. The Vanguard 342 expands the
capabilities of the 340 by providing enhanced performance, increased memory and
support for new applications and services to meet the growing demands of the small
branch office. It’s high performance architecture and features enable new WAN
services such as G.SHDSL, broadband DSL and Cable access, as well as
multiservice voice, data, video integration, and VPN. The 342 comes standard with
two 10/100BaseT auto-sensing Ethernet ports - one of which can be used as a WAN
port for direct connectivity to a DSL or Cable modem, or for LAN segmentation to
separate public from private data.
The Vanguard 342 offers cost-effective integrated solutions that simultaneously
support:
•
•
•
•
•
•
Data
Fax
Voice over Frame Relay and Voice over IP
Virtual Private Network (VPN)
Broadband access
Two 10/100BT LAN Ports
Note
The second LAN port is port 8.
The Vanguard 342 is SNMP-manageable and comes with a variety of LAN, SNA,
and IP networking features. The Vanguard 342 supports two Vanguard Daughtercard
slots for voice, fax and mixed protocol data traffic such as, IP, Frame Relay, X.25,
ISDN, or NX64 T1/E1 services. The Vanguard 342 also comes with two
10/100BT LAN Ports.
For descriptions of the Vanguard 342 Daughtercard and other hardware components,
refer to the appropriate sections in Chapter 2, Hardware Description.
Limitations
Ethernet SLAC stations are not supported on the 2nd LAN port of
Vanguard® 342 .
Note
CMEM configurations from Vanguard 342 should not be loaded on a Vanguard
340. If the 342 CMEM has Port 5 with a Bridge Link Number or Router
Interface Number parameters with a value different from 1, then the Port 5
record needs to be deleted and then created again.
FLASH SIMMs for the Vanguard 340 and 6400 Series are not compatible with the
Vanguard 342. Vanguard 342 SIMMs are not compatible with the Vanguard 340 and
6400 Series. The SIMMs could be damaged.
The Vanguard 342 requires 6.2 or greater software.
1-2
About the Vanguard 342
Features and Functionality
Features and Functionality
Introduction
This section describes the features available with your Vanguard 342 device. For
descriptions of the software running on your Vanguard 342, refer to the appropriate
protocol document. These documents can be found on the VanguardMS Web site:
http://www.vanguardms/documentation/
Standard Features
The standard Vanguard 342 provides these features:
• Low Profile enclosure with rear accessible motherboard, and support for two
Vanguard Daughtercards
• Motorola MPC860P PowerPC processor
• 8 Megabytes of Non-Volatile FLASH on board
• 8 Megabytes FLASH SIMM (optional)
• 32 Megabytes of SDRAM DIMM
• Standard rear panel ports include:
- Two daughtercard ports
- One serial interface DB25 port supporting V.24, V.35, V.36, V.11/X.21
interfaces
- One Async (RJ-45 connector) Control Terminal Port (CTP) for local and
remote configuration, and management
- Two 10/100BaseT Ethernet port with auto-sensing
• Data Encryption & compression SIMM slot (optional)
• ECC DIMM slot
• External power supply
10/100BaseT
Ethernet Cable
Ports 5 and 8 are 10/100BaseT Ethernet and conform to the Fast Ethernet
specification (IEE 802.3u) known as 100BaseT. This LAN standard has raised the
Ethernet speed limit from 10 Megabits to 100 Megabits per second. This Ethernet
port has an auto-sensing feature that allows it to determine if the connection is
10BaseT or 100BaseT and adjust its speed as required.
Control Terminal
Port (CTP)
Port 4 can be used as a Control Terminal Port (CTP) for configuration, reporting, and
troubleshooting the Vanguard 342.
To access the CTP you must also configure your terminal or terminal emulation
software, to VT100, 9600 bps, 8 bit, no parity, 1 stop bit.
Dual Daughtercard The Vanguard 342 comes with two slots to support optional daughtercards. This
Slots
permits easy future expansion of the product.
About the Vanguard 342
1-3
Features and Functionality
Daughtercard
Functionality
The Vanguard 342 is available with the optional components listed below as
factory-installed or as separate add-in daughtercards:
• FXS/FXO Voice
• 4-Port FXS
• 4-Port FXO
• Voice FXS
• FT1/FE1
• Dual E&M
• ISDN BRI-U Data
• ISDN & enhanced ISDN BRI-S/T Data
• ISDN BRI Voice
• DSU
• DIMM
• ECC DIMM
• V.90
• G.SHDSL
For additional information about these cards, refer to the “Vanguard Daughtercards”
section in Chapter 2.
For detailed information about installing the Vanguard Daughtercards, refer to the
“Modifying Your Vanguard 342” section in Chapter 3.
The RemoteVU and V.34 daughtercards are obsolete.
Operating Software The Vanguard Applications Ware software is compressed in FLASH memory and
loaded into the SDRAM DIMM for operation. The Vanguard 342 supports these
Applications Ware packages:
• IP+ Applications Ware Package (includes IP, and IPX)
• SNA+ Applications Ware Package (includes IP, and SNA)
• Multi-Service Applications Ware Package
For more information on the license upgrades available for the Vanguard 342, refer
to the Software Release Notice.
Software Support
The Vanguard 342 supports all the licenses in the Vanguard Applications Ware
software suite.
For a detailed list of the software supported by the Vanguard 342:
• Contact your VanguardMS representative
• Visit the VanguardMS web site: http://www.vanguardms.com/
1-4
About the Vanguard 342
Target Applications
Target Applications
Introduction
This section describes the various target applications for the Vanguard 342.
These examples are shown:
•
•
•
•
•
•
•
•
•
About the Vanguard 342
Virtual Private Network
IP and Serial Protocols over Frame Relay
Video and Serial Protocols over Public or Private Networks
Branch Office to Central Office over Public or Private Networks
SOHO and Branch Office to Central Office over ISDN
DSL and Cable Modem
G.SHDSL
LAN Segmentation
Virtual LAN (VLAN)
1-5
Target Applications
Virtual Private Network
Introduction
This section provides a general description of features and applications within the
Vanguard Virtual Private Network (VPN).
These topics are discussed:
• Cost-effective VPN Solutions
• Hardware-based Encryption and Compression
• Standard-based Tunneling and Encryption for IP Traffic
• Multi-protocol Tunneling and Encryption
• Frame Relay and X.25 Encryption
For detailed information about a VPN, refer to your Virtual Private Network Manual
(Part Number T0103-10).
What is a VPN?
A Virtual Private Network (VPN) is a network that has the appearance and many of
the advantages of a dedicated link but occurs over a shared network. Using a
technique called “tunneling,” packets are transmitted across a public routed network,
such as the Internet or other commercially available network, in a private “tunnel”
that simulates a point-to-point connection.
This approach enables network traffic from many sources to travel through separate
tunnels across the same infrastructure. A VPN allows network protocols to traverse
incompatible infrastructures. A VPN also enables traffic from many sources to be
differentiated, so that it can be directed to specific destinations and receive specific
levels of service.
Advantages of a
VPN
A VPN provides following advantages:
Requirements of a
VPN
Below are some of the requirements of a VPN:
1-6
• Cost Effectiveness
- Infrastructure Cost - By using a VPN, a company need not invest money
on connectivity equipment like leased lines, WAN switches etcetera. The
connectivity is provided by the service provider.
- Operational Cost - Costs involved with maintaining leased lines or a
private WAN along with the money spent on people to maintain them can
be avoided.
• Manageability
- A VPN is more easily managed when compared to a fully private network.
• Connectivity
- There needs to be network connectivity among the various corporate sites.
This connectivity is typically used through the Internet.
• Security
- Data exchanged between the various corporate sites is confidential. When
data is sent over a public network it is usually encrypted. The encryption
algorithm must be robust enough to withstand any type of snooping.
About the Vanguard 342
Target Applications
• Address Management
- The Addresses of the clients on each of the private sites should not be the
ones used in the public domain, however, packets sent out onto the public
network must have public source/destination addresses.
• Multiprotocol Support
- The solution must be able to handle common protocols used in the
corporate network.
Cost-effective VPN Solutions
Small to Medium
Enterprise (SME)
The Vanguard VPN solution is ideal for SMEs that are looking to take advantage of
the flexibility, global reach, security, and cost savings of Internet-based VPNs. The
current Vanguard installed-base can be easily upgraded to support VPN site-to-site
applications at a very competitive price point.
Hardware-based Encryption and Compression
Data Encryption
and Compression
Data encryption is a very CPU intensive process and is therefore best implemented
in hardware. The VanguardMS solution provides a secure hardware-based
encryption and compression. Figure 1-1 shows an example of a secure hardwarebased VPN solution for a site-to-site application.
Hardware Options
The three hardware options available are the DES (56-bit), Triple-DES (112-bit)
Encryption and Compression SIMMs and the ECC DIMM which supports DES,
Triple-DES (168-bit) AES.
Central Site
Remote Site
Internet or
IP Network
Remote Site
Figure 1-1. Hardware-based VPN Solution for Site-to-Site Applications.
About the Vanguard 342
1-7
Target Applications
Standard-based Tunneling and Encryption for IP Traffic
IPSec
IPSec is the predominant tunneling and security standard for IP Networks. It defines
protocols required for site-to-site as well as remote access VPN implementations at
layer 3 of the OSI model. Vanguard Applications Ware release 5.5 and greater
supports these IPSec features:
• Authentication Header (AH) and Encapsulating Security Payload (ESP) for
user authentication and encryption.
• Internet Key Exchange (IKE) using preshared keys for key management.
• Message Digest (MD5) and Secure Hashing Algorithm-1 (SHA-1) for data
integrity.
• ISAKMP supports DES, Triple-DES and AES
• ESP support DES, Triple-DES and AES
Note
ISAKMP and ESP support is available with the ECC DIMM.
Multi-protocol Tunneling and Encryption
General Router
Encryption (GRE)
Whereas IPSec can only tunnel IP traffic over IP Networks, GRE tunneling is a
Layer 2 protocol that can tunnel multi-protocol traffic over IP Networks. This
enables the Vanguard to tunnel and encrypt IP, IPX, and other bridge data.
DES and Triple-DES (112-bit) are used as encryption algorithms and the fast and
efficient SAM proprietary key exchange protocol is used for key management.
Integrity Check Character (ICC) establishes data integrity when the SAM protocol is
implemented.
1-8
About the Vanguard 342
Target Applications
Frame Relay and X.25 Encryption
Frame Relay and
X.25 Networks
Another value-added feature in Vanguard Managed Solutions VPN implementation
is the ability to encrypt LAN traffic and serial legacy protocols (SNA, SDLC, SLAC,
and TBOP) and transport them over Frame Relay and X.25 networks. This is
particularly useful in the financial industry where SNA traffic going out into the
branches and ATM machines require a high level of security. This implementation
also uses DES, Triple-DES (112-bit) for encryption and VanguardMS Proprietary
SAM key exchange protocol to negotiate the keys.
Vanguard 342
with VPN
Vanguard 342
with VPN
Frame
Relay
Protected
Subnet
Protected
Subnet
Internet
Figure 1-2. Encryption over IP, Frame Relay, and X.25 Networks
Security Features
The security features in Vanguard Applications Ware release 5.5 and greater also
include Firewall functionality based on IP Packet Filtering. Access Control Lists can
be configured based on a combination of source and destination addresses. IP
Protocol, TCP/UDP source and destination port numbers/ranges, and interface
numbers. A feature called Cypher Block Chaining prevents repeated patterns in
Plaintext from appearing as repeated patterns in Cyphertext, thus making it harder
for hackers to find traffic patterns.
About the Vanguard 342
1-9
Target Applications
IP and Serial Protocols over Frame Relay
Introduction
The Vanguard 342 supports multi protocol encapsulation of IP traffic and serial
protocols over frame relay as specified by RFC 1490. As shown in Figure 1-3, a
SNA cluster controller connects to a serial port on the Vanguard 342 and the Ethernet
LAN connects to the 10/100BaseT Ethernet port. The Vanguard is fully interoperable
with third party routers via RFC 1490.
Ethernet
Third Party
Router
Ethernet
Vanguard 342
Frame
Relay
Host
Cluster Controller
Third Party
Router
FEP
Terminals
Figure 1-3. IP and Serial Protocols over Frame Relay
1-10
About the Vanguard 342
Target Applications
Video and Serial Protocols over Public or Private Networks
Introduction
As shown in Figure 1-4, the Vanguard 342 can support encapsulation of video and
serial protocols over public or private networks. This use of Vanguard 342 suits
banking applications such as Automated Bank Machines (ABMs). With Dial on
Demand software feature enabled, the Vanguard 342 initiates a connection only
when there is a data transfer, that is only for the duration of a bank transaction. The
RemoteVU Guardian can capture video and send video streams to the central bank’s
security system.
PC Running Host
Video Workstation
Application
Ethernet
ATM
Vanguard 342
IP/FR/X.25
Host
7330
FEP
RemoteVu Guardian
Automated
Teller Machine
Central Bank
Figure 1-4. Video and Serial Protocols over Public or Private Networks
About the Vanguard 342
1-11
Target Applications
Branch Office to Central Office over Public or Private Networks
Introduction
The Vanguard 342 offers an ideal solution for branch office to central office
connectivity over a public or private network as shown in Figure 1-5. The Vanguard
342 is equipped with a FT1 supports connectivity to the network at fractional T1
speeds.
PC’s Running Host
Vanguard 342
2
Security
Monitoring
Video Workstation
Application
RemoteVu
Guardian
IP/FR/X.25
7330
Ethernet
ISDN
PBX
Branch Office
Vanguard 342
Equipped with
DIM, FXS/FXO,
and ISDN Daughtercards
Ethernet
PBX
Central Office
Figure 1-5. Vanguard 342 supporting Voice, Video, and ISDN over a
Public or Private Network
1-12
About the Vanguard 342
Target Applications
Application Matrix
Application
Type
This table describes the application types shown in Figure 1-5 and lists the various
daughtercards used for connectivity over a private or public frame relay network:
Daughtercard
Used
Application Description
Branch access to
Central Office
DSU DIM, FXS/FXO The Vanguard 342 supports voice, video and data traffic
and ISDN
between the branch and central office over private or
Daughtercards
public network. The FXS/FXO Daughtercard supports
telephones, PBX, and faxes. Connect a telephone or
PABX to one FXS port on the FXS/FXO Daughtercard
and all branch telephones have access to the central office
PBX. This eliminates long distance telephone charges
between the branch and central office.
ISDN Backup
link between
Branch and
Central Office
DSU DIM, FXS/FXO To provide an alternative path in case of network failure,
and ISDN
you can configure and connect serial ports to an external
Daughtercards
analog modem or switch 56K DSU. As Figure 1-5
illustrates, you can also configure ISDN for WAN
backup.
About the Vanguard 342
1-13
Target Applications
SOHO and Branch Office to Central Office over ISDN
Introduction
The Vanguard 342 equipped with optional daughtercards provide a wide range of
network solutions for companies with small branch offices or telecommuting
employees working from a home office. A dial in or dedicated ISDN link provides
network connection for the home and branch as shown in Figure 1-6.
Vanguard 342
Equipped with
FXS/FXO and
ISDN Daughtercards
Branch Office
Central Office
Internet
Ethernet
Ethernet
7330
ISDN
PBX
PBX
Vanguard 342
Equipped with
FXS/FXO and
ISDN Daughtercards
Ethernet
Small Home Office
Figure 1-6. Small Home and Branch Office to Central Office Application
1-14
About the Vanguard 342
Target Applications
Office Type
Daughtercard Used
Description
Small Home
Office
FXS/FXO and ISDN
Daughtercard
Equipped with a Vanguard supporting the FXS/FXO and
ISDN daughtercard, a work-at-home employee can stay
fully connected to the corporate backbone and PBX via an
ISDN link. A telecommuter can easily access file servers,
email servers, voice mail and the Internet from home. The
Voice Over IP (VoIP) software feature provides voice
support.
Branch Office
FXS/FXO and ISDN
Daughtercard
Small branch offices can access the corporate backbone and
PBX in the same way as a work-at-home employee. With
Dial on Demand software feature enabled, the Vanguard 342
initiates a connection for data transfer and disconnects when
data transfer has stopped.
Note
The Vanguard 342 can support the 4-Port Voice FXS and 4-Port Voice FXO
Daughtercards.
About the Vanguard 342
1-15
Target Applications
DSL/Cable Modem
Introduction
The Vanguard 342 enables connectivity to high-speed broadband services such as
DSL and Cable by connecting the 10/100BaseT port on the Vanguard 342 to the
Ethernet port on the DSL or Cable modem.
Cable modem speeds vary in the downstream direction. Network speeds can reach
27 Mbps., but this is an aggregate amount of bandwidth that is shared by users. Few
computers will be capable of connecting at such high speeds, so a more realistic
number is 1 to 3 Mbps. In the upstream direction speeds can be up to 10 Mbps. Most
modem producers have selected a more optimum speed between 500 Kbps and 2.5
Mbps.
Remote Branches
Head Office
PBX
LAN 2
LAN 1
10/100
auto-sensing
DSL/Cable
Modem
342
VANGUARD
6435
HR and
Finance
Sales,
Marketing,
Engineering
Figure 1-7. LAN Over WAN (DSL/Cable Modem)
1-16
About the Vanguard 342
Target Applications
G.SHDSL Daughtercard
Introduction
The Vanguard 342 enables connectivity to high-speed broadband services such as
G.SHDSL by installing a Vanguard G.SHDSL daughtercard in the Vanguard 342.
Remote Branches
Head Office
PBX
LAN 2
LAN 1
Cable/DSL
10/100
auto-sensing
340
342
G.SHDSL
Daughtercard
Installed
VANGUARD
6435
Sales,
Marketing,
Engineering
Figure 1-8. LAN Over WAN (G.SHDSL Daughtercard Installed)
G.SHDSL
Daughtercard
About the Vanguard 342
The G.SHDSL Daughtercard is available for the Vanguard 342 Series with Release
6.4 and greater software. One G.SHDSL Daughtercard is supported in either of the
two daughtercard slots. For information on the G.SHDSL Daughtercard reference the
G.SHDSL Manual (Part Number T0100-14). Installation instructions are available in
the Daughtercard Installation Guide (Part Number T0020).
1-17
Target Applications
LAN Segmentation
Introduction
Traditional LAN segmentation allows grouping users and avoiding common
problem where packets are forwarded to LANs with no need for them. It allows also
isolating a secure area from a public one. When separate networks are needed or if a
network has reached its physical limitations, segmentation is used. Segmenting a
LAN can extend the network, reduce congestion, isolate network problems, and
improve security.
• Extend the Network - When the maximum physical limitations of a network
has been reached, routers may be added to create new segments to allow additional hosts onto the LAN.
• Reduce Congestion - As the number of hosts on a single network increases,
the bandwidth required also increases. Segmentation limits your segment to
traffic intended for your users.
• Isolate network problems - By dividing the network into smaller sections you
limit the amount of data and problems from other segments..
• Improve Security - By using segments a network can be isolated from outside
sources.
Figure 1-9. LAN Segmentation
1-18
About the Vanguard 342
Target Applications
Virtual LAN (VLAN)
VLAN
In this application Vanguard 342 is directly connected to a VLAN switch. Switches
are data link-layer devices that, like bridges, enable multiple physical LAN segments
to be interconnected into a single larger network. The WAN traffic consists of data
destined to remote resources. There should be virtually no traffic between local
devices.
Figure 1-10. VLAN
About the Vanguard 342
1-19
Clocking Limitations Vanguard 342
Clocking Limitations Vanguard 342
Limitation
Listed below are the clocking issues relating to Port 3 of the Vanguard 342:
Vanguard 342 DCE INT --> VG6560/VG320/VG64xx EXT at 1.5 Mbps
When a Vanguard 342 Port 3 is configured as internally clocked and is connected to
a 6560/320/64xx which is configured as EXT clocked, and the Vanguard 342 internal
clock is configured at 1.5 Mbps, the link has clock slippage and CRC errors.
Workaround:Configure the VG6560/VG320/VG64xx port "Invert TX Clock" to
YES.
Vanguard 342 DCE INT --> VG6560 SDB2 EXT
When a Vanguard 342 Port 3 is configured as internally clocked and is connected to
a SDB2 card on a Vanguard 6560 which is configured as EXT clocked, the link will
not come up. Workaround: Configure the Vanguard 6560 SDB2 port as INT clocked
and the Vanguard 342 as EXT clocked. Connect the ports with a crossover cable. The
DIM on the Vanguard 6560 SDB2 port should be in the DCE position.
Vanguard 342 DCE EXTLP --> VG6560 SDB2 or SDB INT
When a Vanguard 342 Port 3 is configured as EXTLP clocked and is connected to a
SDB2 or SDB card in a Vanguard 6560, the link will not come up.
Workaround: Configure the Vanguard 6560 SDB2 or SDB port as INT clocked and
the Vanguard 342 as EXTLP clocked. Connect the ports with crossover cable. The
DIM on the Vanguard 6560 SDB2 or SDB port should be in the DCE position.
In general, configuring a DTE device as Internally clocked or a DCE device as
externally clocked or EXTLP are not recommended configurations.
1-20
About the Vanguard 342
Chapter 2
Hardware Description
Overview
Introduction
This chapter describes the Vanguard 342:
• Enclosure
• Motherboard
• Vanguard Daughtercards
Hardware Description
2-1
Enclosure
Enclosure
Introduction
This section describes the components of the Vanguard 342 enclosure.
Vanguard 342
Enclosure
The Vanguard 342 fits into a compact, low profile enclosure case that can be:
Front Panel
The front panel of the Vanguard 342 (see Figure 2-1) includes:
• used as a desktop standalone device
• seated on a shelf in a standard 19-inch equipment rack
• bracketed to the underside of a desktop or vertical surface
The enclosure contains a motherboard and (two optional) daughtercards.
• 10 LEDs that provide node status
• Reset button
For a full description of all Front panel LEDs and reset button, refer to the
“Powering Up Your Vanguard 342” section in Chapter 4.
Reset
LEDs
Figure 2-1. Vanguard 342 Front Panels
2-2
Hardware Description
Enclosure
Rear Panel
Figure 2-2 shows a Vanguard 342 rear panel containing the following:
•
•
•
•
•
One Sync/Async Universal Serial Interface port (DB-25 connector)
One Async port (RJ-45 connector) as the CTP
Two Ethernet ports (with 10/100BaseT connector)
Power Supply connector
Two locations for Vanguard Daughtercards
Figure 2-2. Vanguard 342 Rear Panel
Note
For information about port numbering and cabling, refer to the “Port
Characteristics and Cabling” section in Chapter 3.
Caution
Do not connect Ports 4, 5 or 8 to the Public Communications Network.
Serial Number
The Hardware Serial Number indicates the version of hardware in your unit. This
serial number label is located on the rear panel of the Vanguard 342.
Refer to this serial number when contacting a Vanguard Managed Solutions Service
Representative.
Hardware Description
2-3
Motherboard
Motherboard
General
Description
The Vanguard 342 motherboard contains 8 Megabytes of Non-Volatile FLASH on
board and has 32 Megabytes of SDRAM (synchronous DRAM) on an attached
DIMM.
These components are included on the motherboard:
• Connectors for:
- FLASH expansion: 8 Megabyte SIMM on board
- AES Data Compression/Encryption SIMM (optional)
- Two Vanguard Daughtercard slots
- Fan
• A battery that provides power for the unit’s real time clock
• Two 10/100BaseT Ethernet (RJ-45connectors)
• Control Terminal Port (RJ-45connector)
• DB-25 Connector
Figure 2-3 shows the location of the motherboard components.
Figure 2-3. Vanguard V342 Motherboard
2-4
Hardware Description
Motherboard
Access the
Motherboard
To access the motherboard components you must remove the motherboard from the
enclosure.
For information about removing and installing the motherboard refer to the
“Accessing the Motherboard” section in Chapter 3.
For information about removing or installing motherboard components, refer to the
“Modifying Your Vanguard 342” section in Chapter 3.
Daughtercards
The Vanguard 342 can support two optional daughtercards. These daughtercards are
described in the “Vanguard Daughtercards” section on page 2-7.
Note
If you are only using one ISDN or enhanced ISDN BRI daughtercard, the card
must be located in the Port 1 position. If you are using Release 6.3 and greater,
the enhanced ISDN BRI ST data daughtercard must be located in port 1 and the
ISDN BRI voice card would go in port 2. For more information refer to Chapter
Five of the Daughtercard Installation Guide (Part Number T0020).
Serial Interface
The Vanguard 342 supports a serial interface that is installed on the motherboard.
The serial interface can be configured to function as a Digital Interface Module
allowing the support of these interfaces on Port 3 only:
• V.24
• V.35
• V.36
• V.11/X.21
For information on configuring the serial interface, refer to the “Cabling the
Vanguard 342” section in Chapter 3.
The serial interface supports only DCE. It can accommodate DTE with the use of a
crossover adapter cable. For information on cabling for DTE capability, refer to the
“Cabling the Vanguard 342” section in Chapter 3.
SIMMs and DIMM
The motherboard has three slots:
• SDRAM: This connector takes a standard DIMM.
• FLASH: This connector takes a FLASH SIMM to support alternate bank
FLASH options.
• Data Compression/Encryption: Set on its side, this connector takes a SIMM to
provide data compression and encryption capabilities.
Caution
To avoid damaging the equipment, be sure to place the SDRAM DIMM, and the
FLASH, and Data Compression/Encryption SIMMs in the correct slot.
For information on installing or removing these components, refer to the “Adding
and Removing Memory Modules” section in Chapter 3.
Hardware Description
2-5
Motherboard
Warning
Your Vanguard product was designed and certified for use with specific memory
option SIMMs. It is IMPORTANT that you install only the devices that are certified
for use with your Vanguard product. Installation of an incorrect FLASH SIMM
module could result in damage to the SIMM device or your Vanguard Product.
Please see the list below for the memory device that is compatible with your
hardware platform.
Vanguard 342 Compatible FLASH SIMM Devices are as follows:
8-Meg FLASH Devices
PN - "IW-388DL3-R-120"
PN - "CT8M8FJV120.M1M"
Vanguard 340 Compatible FLASH SIMM Devices are as follows:
4-Meg FLASH Devices
PN - "EDI7F292MC100BNC"
PN - "SM70848XA2JIES2"
The FLASH SIMM Device Part Number (PN) can be found in small print on the face
of the SIMM device. For further assistance, please call VanguardMS Service.
2-6
Hardware Description
Vanguard Daughtercards
Vanguard Daughtercards
Introduction
The Vanguard 342 can support these standard Vanguard Daughtercards:
• 1-Port FXS/FXO Voice
• 2-Port Voice FXS
• 4-Port Voice FXS
• 4-Port Voice FXO
• FT1/FE1
• Dual E&M
• ISDN BRI-U Data
• ISDN and Enhanced ISDN BRI-S/T Data and Enhanced ISDN BRI S/T Data
• ISDN BRI-S/T Voice
• DSU
• DIM
• V.90 Daughtercard
• G.SHDSL
This section briefly describes these cards.
For instructions for installing these cards, refer to the Vanguard Daughtercard
Installation Guide (Part Number T0020).
Daughtercard
Compatibility
Older Vanguard Daughtercards do not fit into the Vanguard 342. You can only use
the newer daughtercards which are identified by a dimple as shown in Figure 2-4. If
the dimple is not present, do not attempt to use the Daughtercard in the Vanguard
342. and V.34 Daughtercards are obsolete.
Also, when installing a Vanguard Daughtercard into a Vanguard 342, you must use
the shorter two-sided header. The taller header is used with other Vanguard units.
Dimple
DSU
Figure 2-4. New Vanguard 342 Daughtercard Example
Caution
If you attempt to force an older Vanguard Daughtercard into a Vanguard 342, the
equipment will be damaged.
If you have an older Vanguard Daughtercard and would like to use it in a Vanguard
342, contact your VanguardMS representative about having the card reworked.
Hardware Description
2-7
Vanguard Daughtercards
1-Port FXS/FXO
Voice
The Vanguard 342 supports the FXS/FXO Daughtercard. This daughtercard supports
voice channel, using either an analog FXS or FXO interface. The 1-Port Voice
FXS/FXO Daughtercard provides RJ11 connectors for FXS and FXO Ports.
However, only one port can be active at a time.
Figure 2-5 shows the FXS/FXO Voice Daughtercard connectors as they appear on
the back panel.
\
FXS
FXO
LOC
REM
Figure 2-5. 1-port FXS/FXO Voice Daughtercard Connector
2-Port Voice FXS
The Dual FXS Daughtercard provides two FXS interface ports and support one voice
channel each. The 2-Port Voice FXS Daughtercard has two RJ11 connectors for two
FXS Ports. The two ports can be used simultaneously and each port supports one
voice channel.
Figure 2-6 shows the 2 Port Voice FXS Daughtercard connectors as they appear on
the back panel.
1
2
FXS-1
FXS-2
LOC
REM
Figure 2-6. 2-port FXS Daughtercard Connector
Note
Calls between two FXS ports within the same Vanguard 342 are not supported.
4-Port Voice FXS
Daughtercard
The Vanguard Quad FXS Daughter Card is supported on the Vanguard 342. The
4-Port Voice FXS Daughtercard has four RJ11 connectors for four FXS Ports.The
new software for this card is in release 6.0 and greater.
Figure 2-7 shows the 4-Port Voice FXS Daughtercard connectors as they appear on
the back panel.
FXS-1
FXS-2
FXS-3
FXS-4
Figure 2-7. FXS Daughtercard
2-8
Hardware Description
Vanguard Daughtercards
4-Port Voice FXO
Daughtercard
The Vanguard Quad FXO Daughter Card is supported on the Vanguard 342. The
4-Port Voice FXO Daughtercard has four RJ11 connectors for four FXO Ports.The
new software for this card is in release 6.0 and greater.
Figure 2-8 shows the 4-Port Voice FXO Daughtercard connectors as they appear on
the back panel.
FXO-1
FXO-2
FXO-3
FXO-4
Figure 2-8. FXO Daughtercard
FT1/FE1
The FT1/FE1 Daughtercards allow the Vanguard 342 to transfer data over a T1 or E1
network. The daughtercards support these full and fractional T1 or E1 speeds:
• The FE1 Daughtercard provides line rates 2.048 Mbps and data rates of
n x 64 kbps (where n is 1 to 31) per channel.
• The FT1 Daughtercard provides line rates 1.544 Mbps and data rates of
n x 56 kbps (where n is 1 to 24) per channel.
Figure 2-9 shows the FT1 and the FE1 Daughtercard connectors as they appear on
the back panels. The FT1 Daughtercard has a single RJ48C connector while the FE1
Daughtercard has two BNC connectors along with one RJ48C connector.
\
T1
NTWK
ALARM
RX
E1
NTWK
TX
ALARM
Figure 2-9. FT1 and FE1 Daughtercard Connectors
Note
The FE1 Daughtercard comes with a label “!” which means that the user should
refer to the Vanguard Daughtercard Installation Guide. The purpose is to point
out that the E1 interface complies with the Australian requirements ACA
TS-016-1997 for connection to E1 SELV services. The E1 interface meets the
IEC 60950 specifications for TNV1.
Hardware Description
2-9
Vanguard Daughtercards
Dual E&M
The Dual E&M Daughtercard has two E&M interfaces. The ports use RJ11
connectors.
Figure 2-10 shows the Dual E&M Daughtercard connectors as they appear on the
back panel.
Figure 2-10. Dual E&M Daughtercard Connector
ISDN BRI-U Data
This card provides 2B+D Channel through an ISDN BRI U interface. It conforms to
ANSI T1.601 1992 (2B1Q), is LAPD:ITU Q.921 compliant, and supports the
following:
• Integral X.31
• Q.931 dial support
• NI1, 5ESS, DMS-100 switch types
• D Channel Packet Mode
• Leased Circuit Services (I Interface)
• Japan High-Speed Digital
Figure 2-11 shows the ISDN BRI-U Daughtercard connector as it appears on the
back panel.
BRI U
Figure 2-11. ISDN BRI-U Daughtercard Connector
2-10
Hardware Description
Vanguard Daughtercards
ISDN and
Enhanced ISDN
BRI-S/T Data
This card provides 2B+D Channel through a BRI S/T interface. It conforms to ITU
I.430, is LAPD:ITU Q.921 compliant, and supports:
• Integral X.31
• Q.931 dial support
• NI1, 5ESS, DMS-100, ETSI, Euro Numeric switch types
• D Channel Packet Mode
• Leased Circuit Services (I Interface)
• Permanent B for German Monopol support or Japan High-Speed Digital
Figure 2-12 shows the ISDN BRI-S/T Daughtercard connectors as they appear on
the back panel.
BRI S
HI Z
S-BUS
S-BUS
BRI-S/T DATA
TERMINAL
LINE
LINK
D-ACT
100Ω
Enhanced
Figure 2-12. ISDN and Enhanced ISDN BRI-S/T Daughtercard Connector
Note
Termination options for the Release 6.3 and greater enhanced ISDN BRI ST data
Daughtercards are set in the Configure menu, and are not controlled by switches.
For more information, refer to the Vanguard Integrated Services Digital
Network: ISDN Manual (Part Number T0103-06).
ISDN BRI Voice
This card provides 2B+D Channel through a BRI S/T interface. It conforms to ITU
I.430, is LAPD:ITU Q.921 compliant, and supports:
• Integral X.31
• ITU-T Q.931 (EURO IDSN) - ETSI switch type to connect to PBXs and
public networks.
• ECMA 143 - QSIG Basic Service to connect to PBXs over private line.
• ECMA 165 - QSIG Generic Functions for Support of PBX Supplementary
Services.
• ITU-T G.711A (A-law) and G.711U (µ-law) interface voice encoding.
• ITU-T G.723, G729, and VanguardMS proprietary CVSELP packet voice
compression.
Figure 2-13 shows the ISDN BRI Voice Daughtercard connectors as they appear on
the back panel.
BRI S
HI Z
S-BUS
S-BUS
100Ω
Figure 2-13. ISDN BRI Voice Daughtercard Connectors
Hardware Description
2-11
Vanguard Daughtercards
Note
If you are only using one ISDN or enhanced ISDN BRI daughtercard, the card
must be located in the Port 1 position. If you are using Release 6.3 and greater,
the enhanced ISDN BRI ST data daughtercard must be located in port 1 and the
ISDN BRI voice card would go in port 2. For more information refer to Chapter
Five of the Daughtercard Installation Guide (Part Number T0020).
DSU
The DSU Daughtercard provides an RJ48S connector and can support speeds of
56 kbps (synchronous). It conforms to AT&T 62310 point-to-point and multipoint,
and to ANSI T1/E1.4/91-006 56 kbps. The card supports the following capabilities:
• Internal/external clocking
• Internal/external loop back
• 4-wire line driver operation
The card also supports multidrop DSUs when either of these conditions exist:
• If a MARK Idle protocol is used (such as MX25).
• If the Telco uses an OR’ed or Data Contention is used to mix individual DRU
drops.
Figure 2-14 shows the 56K DSU Daughtercard connector as it appears on the back
panel.
DSU
Figure 2-14. DSU Daughtercard Connector
DIM
This card supports a single V.11, V.24, V.35, or V.36 DIM (Digital Interface Module)
and can be set as either a DTE or DCE.
Figure 2-15 shows the DIM Daughtercard connector as it appears on the back panel.
DIM SITE
Figure 2-15. DIM Daughtercard Connector
2-12
Hardware Description
Vanguard Daughtercards
V.90 Modem
The V.90 modem daughtercard provides dial back-up for a customers PPP Async
applications. The V.90 uses a dual RJ-11 for connection to central offices, PBXs or
telephone systems. V.90 is designed for the Vanguard 320, 340, 342, 6435, and 6455
platforms. The Vanguard V.90 daughtercard requires release 6.2 or greater software.
Figure 2-16 shows the rear panel connectors on the V.90 Modem Daughtercard. For
installation instructions, refer to the Vanguard Daughtercard Installation Guide
(Part Number T0020).
MR
.
RI OH
Line
Phone
RJ-11
RJ-11
CD
RXD
Figure 2-16. V.90 Daughtercard Connectors
G.SHDSL
The G.SHDSL Daughtercard is available with Release 6.4 and greater software. One
G.SHDSL Daughtercard is supported in either of the two daughtercard slots.
Figure 2-17 shows the rear panel connector on the G.SHDSL Daughtercard. For
information on the G.SHDSL Daughtercard reference the G.SHDSL Manual
(Part Number T0100-14). Installation instructions are available in the Daughtercard
Installation Guide (Part Number T0020).
G.SHDSL
CD
WAN
MR
LP
Figure 2-17. G.SHDSL Daughtercard Connector
Hardware Description
2-13
Chapter 3
Installation and Replacement
Overview
Introduction
This chapter describes how to install, cable, and modify your Vanguard 342 device.
This chapter provides instructions for these tasks:
•
•
•
•
•
Installation and Replacement
Checking Your Shipment Contents
Installing The Vanguard 342
Configuring the Serial Interface
Cabling the Vanguard 342
Modifying Your Vanguard 342
3-1
Checking Your Shipment Contents
Checking Your Shipment Contents
List of Contents
The Vanguard 342 is packaged in shock-absorbent packing material. Inside your
shipping carton, you should find the contents shown in Figure 3-1.
Before installing the Vanguard 342 hardware, make sure these items are included in
your shipment:
• Vanguard 342 Enclosure (four rubber feet on the bottom side)
• External Power Supply and Cable
• Serial interface adapter cable (optional)
Vanguard 342
Serial interface adapter cable (optional)
External Power Supply and Cable
Figure 3-1. Vanguard 342 Shipment Contents
3-2
Installation and Replacement
Installing The Vanguard 342
Installing The Vanguard 342
Introduction
This section explains how to install the Vanguard 342 and includes these topics:
• Selecting and Preparing the Installation Site
• Installing Your Vanguard 342
• Thermal Considerations
• Configuring the Serial Interface
• Port Characteristics and Cabling
• Daughtercard Cable Information
• Modifying Your Vanguard 342
After your Vanguard 342 is installed and cabled, go to the “Powering Up Your
Vanguard 342” section in Chapter 4 for instructions on powering-up the unit.
Installation and Replacement
3-3
Installing The Vanguard 342
Selecting and Preparing the Installation Site
How to Choose a
Site
Before installing your Vanguard 342, select a site for the device. Choose a site within
an appropriate distance of a power source. The selected site should be free of
accumulated dust and environmental extremes.
Caution
All Vanguard products should be used in environments designed for computers and
electronic equipment. In areas susceptible to lightning, take precautions to prevent
damage to electronic equipment. Contact your telephone company or an electronic
accessories vendor for information on lightning protection equipment. If you
experience problems caused by surges from lightning, install appropriately rated
surge suppressors on power and data lines connected to your Vanguard.
Mise en Garde
Tous les produits Vanguard doivent être utilisés dans des environnements conçus
pour les ordinateurs et équipements électroniques. Dans les zones sujettes à la
foudre, prenez soin de protéger l’équipement électronique contre tout dommage.
Contactez votre compagnie de téléphone ou un vendeur d’accessoires électroniques
pour de plus amples informations sur les équipements de protection contre la foudre.
Si vous avez des problèmes engendrés par des surtensions dues à la foudre, installez
des protections contre les surintensités appropriées sur les lignes d’alimentation et de
données connectées à votre produit Vanguard.
Vorsicht
Alle Vanguard-Produkte sollten in für Computer und elektronische Geräte
geeigneten Umgebungen verwendet werden. In durch Blitzschlag gefährdeten
Gebieten sollten Vorsichtsmaßnahmen zum Schutz von elektronischen Geräten
ergriffen werden. Informationen über Schutzeinrichtungen gegen Blitzschlaggefahr
erhalten Sie von Ihrer Telefongesellschaft oder vom Einzelhandel für
Elektrozubehör. Wenn Sie durch Blitzeinwirkung verursachte Spannungsstörungen
feststellen, installieren Sie einen ausreichend abgesicherten Spannungsableiter an
den Strom- und Datenleitungen, die mit dem Vanguard-Produkt verbunden sind.
Power Source
Depending on your application and the country in which the Vanguard 342 operates,
a power source must be a grounded 100 to 240 VAC outlet.
Cable Clearance/
Air Circulation
Allow at least 12 inches (30.5 cm) in back of the unit for interfacing cable clearance
and air circulation, as shown in Figure 3-2.
Caution
To avoid overheating the unit’s circuitry, you should never place anything on either
side of the unit, within 1 inch (2.5 cm) of the ventilation slots, or within 12 inches
(30.5 cm) of the back of the unit.
3-4
Installation and Replacement
Installing The Vanguard 342
Mise en Garde
Afin d’éviter toute surchauffe des circuits de l’unité, ne placez aucun objet sur
l’unité à moins de 2,5 cm (1 pouce) des conduits de ventilation du panneau avant et à
moins de 30,5 cm (12 pouces) de l’arrière de l’unité.
Vorsicht
Zur Vermeidung einer Überhitzung der Geräteschaltkreise sollten Sie keine
Gegenstände auf dem Gerät plazieren. Zu den Entlüftungsöffnungen der
Vorderabdeckung sollte ein Abstand von 2,5 cm und zur Rückseite des Gerätes von
30,5 cm eingehalten werden.
Note:
Do not remove the rubber feet from the
bottom of the unit. They allow clearance
for the front plastic lip and anti-slip
features on a table top.
Minimum 2 inches
Front and 12 inches Rear
Vanguard 342
Minimum 1 inche on either
side for ventilation.
Figure 3-2. Proper Cable and Air Clearance
Caution
Do not place items weighing more than 20 pounds (9 kg) on top of a Vanguard 342
enclosure. Do not block the top vents of the unit.
Installation and Replacement
3-5
Installing The Vanguard 342
Installing Your Vanguard 342
Installation
Complete these steps to install your Vanguard 342:
Step
3-6
Action
1
Unpack the Vanguard 342, and inspect the unit to ensure you have all the
components.
2
Install any daughtercards, or memory modules that you need to add to the
unit, as necessary.
Refer to “Modifying Your Vanguard 342” section on page 3-22.
3
Be sure that the four rubber feet are on the bottom of the enclosure.
4
Attach the power cord and cables to the rear panel.
5
Place the enclosure in the selected site, and power unit on. Do not block
the fan inlet or outlet vents.
Refer to the “Powering Up Your Vanguard 342” section in Chapter 4.
6
Ensure the fan is operational after powering the unit on by checking to see
if air blows out of the unit.
7
Ensure that the ambient temperature at the fan inlet is within the
temperature range specified in Appendix A.
Installation and Replacement
Installing The Vanguard 342
Thermal Considerations
Introduction
This section explains some of the heat and temperature factors that can affect your
Vanguard 342.
Fan
After the unit is installed, power it up and check that the fan is working properly. The
feet must be installed and air should be blowing out of the unit.
Inlet Temperature
After the unit is running, check the ambient air temperature. Make sure it does not
exceed the operating temperature limits specified in Appendix A.
Power Supply
Shutdown
If the Vanguard 342 power supply is not properly vented, the external power supply
overheats and shuts down.
Installation and Replacement
3-7
Configuring the Serial Interface
Introduction
This section describes the serial interface and explains how to configure your
Vanguard 342 for various communication interface types. These topics are
discussed:
• Setting the Interface Type
• Setting the Interface Options
The Serial Interface The Vanguard 342 supports a software-programmable serial interface that is integral
to the motherboard. Port 3 supports the serial interface and can be configured to
function as a fixed Data Interface Module, providing communication using these
interface types:
•
•
•
•
V.24
V.35
V.36
X.21/V.11
Note
The serial interface supports only DCE mode but can accommodate DTE with
the use of a crossover adapter cable. For information on DTE capability, refer to
the “Setting the Interface Options” section on page 3-10.
The Serial Interface The serial interface is supported in the Port Configuration menu and can be
Parameters
configured using the Control Terminal Port (CTP). Included in the Port
Configuration menu, are two parameters that allow you to set both the
communication and electrical interfaces. These parameters are:
Interface Type
This parameter allows you to set the communication interface type (physical layer
protocol) on Port 3. The interface types include: V.24, V.35, V.36, and X.21/V.11.
Interface Option
This parameter allows you to specify the traditional hardware strap used in V.24
Vanguard Daughtercards and electrical interface for V.35, V.36, and X.21/V.11
cabling operations.
Configuring the Serial Interface
Setting the Interface Type
Introduction
This section provides instructions for setting the Interface Type parameter.
Interface Type
Parameter
Use this procedure to set the Interface Type parameter:
Step
Installation and Replacement
Action
Result/Description
1
From the Control Terminal
Port Main menu, select
Configure -> Port.
The Port record appears.
2
In the Port Number parameter,
type 3, then press ENTER.
Port 3 is selected.
3
In the Port Type parameter,
type FRI, then press ENTER
This defines Port 3 type as FRI.
4
In the Interfaced Type, type a
?, and then press ENTER.
The Range and Default appear:
Range = V.24, V.35, V.36, X.21, NONE
Default = V.24
Specify the Electrical Interface Type:
V.24 - V.24 Electrical Interface Type
V.35 - V.35 Electrical Interface Type
V.36 - V.36 Electrical Interface Type
X.21 - V.11 Electrical Interface
Type
NONE - Electrically disabled
5
Select an Interface Type from
the menu and press ENTER.
The Interface Type is set.
3-9
Configuring the Serial Interface
Setting the Interface Options
Introduction
This section provides instruction for setting the Interface Options parameter.
V.24 Interface Type Use this procedure to set the Interface Options parameter for V.24 interface type:
Step
3-10
Action
Result/Description
1
From the Control Terminal Port The Port record appears.
Main menu, select Configure ->
Port.
2
In the Port Number parameter,
type 3, then press ENTER.
Port 3 is selected.
3
In the Port Type parameter, type
FRI, then press ENTER
This defines Port 3 type as FRI.
4
In the Interface Type parameter,
type V.24, and then press
ENTER.
The interface is set to V.24
5
In the Interface Options
parameter, type a ?, and then
press ENTER.
The Range and Default appears:
Range = RI, TM
Default = RI
Specify the Pin 22 option:
RI - V.24 uses Pin 22 for Ring
Indicator output signal
TM - V.24 uses Pin 22 for Test
Mode input signal
6
Select either RI or TM for the
Interface Option.
When RI is selected, the output signal
is Ring Indicator.
When TM is selected, the input signal
is Test Mode.
Installation and Replacement
Configuring the Serial Interface
V.35/V.36, and X.21/ Use this procedure to set the Interface Options parameter for V.35, V.36, and
V.11 Interface
X.21/V.11 interface types:
Types
Step
Action
Result/Description
Installation and Replacement
1
From the Control Terminal Port
Main menu, select Configure ->
Port.
The Port record appears.
2
In the Port Number parameter, type
3, then press ENTER.
Port 3 is selected.
3
In the Port Type parameter, type
FRI, then press ENTER
This defines Port 3 type as FRI.
4
In the Interface Type parameter, type The interface is set to the selected
one of these interfaces: V.35, V.36, type.
X.21 and then press ENTER.
5
In the Interface Options parameter,
type a ?, and then press ENTER.
The Range and Default appears:
Range = NONE, XOVER
Default = NONE
Specify the cable type:
NONE - V35/V.36/X.21 DCE
with straight through cable
XOVER - V35/V.36/X.21 DCE
with crossover adapter cable
6
Select either NONE for straight
DCE mode, or XOVER when using
the DTE crossover adapter cable.
When NONE is selected, the serial
interface is in straight DCE mode.
When XOVER is selected, the
serial interface is in DCE Mode
using the adapter cable.
3-11
Cabling the Vanguard 342
Cabling the Vanguard 342
Introduction
This section provides information to help you cable your Vanguard 342.
Caution
Before connecting cables to the motherboard or daughtercard ports, be sure that the
screws holding the motherboard in place are tight. If the screws are loose, the
motherboard could loosen under the weight of the cables and cause damage to the
equipment.
Vanguard 342 Rear Figure 3-3 illustrates the rear panel of the Vanguard 342, optional daughtercards, and
Panel
the locations of cables that must be connected.
Vanguard
Daughtercard
Slots
Power Supply
Port 1
Port 2
PORT 2
PORT 1
10/100Base T
PORT 3
CTP
POWER
100 LNK
LNK
5
Port 3
Serial Inteface
(DB25)
Hardware
Serial
Label
CTP
Port 4
100
8
Port 5
Ethernet
10/100Base T
Port 8
Ethernet
10/100Base T
Figure 3-3. Vanguard 342 Rear Panel and Cable Connections
3-12
Installation and Replacement
Cabling the Vanguard 342
Port Characteristics and Cabling
Introduction
This section describes the port characteristics and cables required to connect to the
Vanguard 342.
Port
This table lists the port characteristics, connector and cable requirements:
Characteristics and
Cable
Requirements
Port
Connector
Interface
1
DB25
DIM Site
Daughtercard
V.11, V.24, V.35,
V.36
DB25-to-DB25 Cable
V.11, V.35 and
V.36 - Max. sync
speed 2 mpbs
V.24 - Max. sync
speed 80 kpbs, Max
async speed 115.2
kbps
Selectable
RJ48S
DSU
Daughtercard
DSU Telco Cable (Part
Number) shipped with
DSU Daughtercard
DSU -56 kbps
DTE DSU
RJ11
FXS/FXO
Daughtercard
RJ11-to-RJ11 Cable
N/A
N/A
RJ45
ISDN U or S/T
Daughtercard
RJ45-to-RJ45 Cable
Either 56 or 64 kbps
for each B Channel
and 9.6 kbps for the
D Channel
N/A
RJ11
4 Port FXS /FXO RJ11-to-RJ11 Cable
Daughtercard
N/A
N/A
RJ11
Dual FXS
Daughtercard
RJ11-to-RJ11 Cable
N/A
N/A
RJ48C
FT1
Daughtercard
RJ48-to-RJ48 Twisted
Pair Cable
full or fractional T1
speeds
N/A
RJ48C
FE1
Daughtercard
RJ48-to-RJ48 Twisted
Pair Cable
full or fractional E1
speeds
N/A
BNC Pair
FE1
Daughtercard
2 BNC-to-BNC 75ohm
Coax Cable
Full or fractional E1
speeds
N/A
RJ45
Dual E&M
Daughtercard
RJ45-to-RJ45 Cable
N/A
N/A
RJ11
V.34, V.90
Daughtercard
RJ11-to-RJ11 Cable
N/A
N/A
RJ45
G.SHDSL
RJ45-to-RJ45 Cable
N/A
N/A
Installation and Replacement
Cable Required
(Application Specific)
Speed
DCE/DTE
3-13
Cabling the Vanguard 342
Port
Connector
2
DB25
DIM Site
Daughtercard
V.11, V.24, V.35,
V.36
DB25-to-DB25 Cable
RJ48S
DSU
Daughtercard
DSU Telco Cable shipped DSU -56 kbps
with DSU Daughtercard
DTE DSU
RJ11
FXS/FXO
Daughtercard
RJ11-to-RJ11 Cable
N/A
N/A
RJ11
4 Port FXS/FXO
Daughtercard
RJ11-to-RJ11 Cable
N/A
N/A
RJ11
Dual FXS
Daughtercard
RJ11-to-RJ11 Cable
N/A
N/A
RJ48C
FT1
Daughtercard
RJ48-to-RJ48 Twisted
Pair Cable
full or fractional T1
speeds
N/A
RJ48C
FE1
Daughtercard
RJ48-to-RJ48 Twisted
Pair Cable
full or fractional E1
speeds
N/A
BNC Pair
FE1
Daughtercard
2 BNC-to-BNC 75ohm
Coax Cable
full or fractional E1
speeds
N/A
RJ45
Dual E&M
Daughtercard
RJ45-to-RJ45 Cable
N/A
N/A
RJ11
V.34, V.90
Daughtercard
RJ11-to-RJ11 Cable
N/A
N/A
RJ45
G.SHDSL
RJ45-to-RJ45 Cable
N/A
N/A
3
DB25
V.11, V.24, V.35,
V.36 DIM
DB25-to-DB25 Cable
V.11, V.35 and
V.36 - Max. sync
speed 2 mpbs
V.24 - Max. sync
speed 80 kpbs, Max
async speed 115.2
kbps
Selectable
Adapter
Cable
required for
DTE
4
RJ45
CTP Port
RJ45-to-DB25 CTP
Cable shipped with
Vanguard unit
Max. async speed
115.2 kbps
DCE
3-14
Interface
Cable Required
(Application Specific)
Speed
V.11, V.35 and
V.36 - Max. sync
speed 2 mpbs
V.24 - Max. sync
speed 80 kpbs, Max
async speed 115.2
kbps
DCE/DTE
(continued)
Selectable
Installation and Replacement
Cabling the Vanguard 342
Port
Connector
Interface
Cable Required
(Application Specific)
Speed
DCE/DTE
(continued)
5
RJ45
10/100BaseT
10/100BaseT Adapter
cable
or standard UTP cable
(RJ45-to-RJ45)
10/100Mbps Auto
Sensing
Interface # 1
8
RJ45
10/100BaseT
10/100BaseT Adapter
cable
or standard UTP cable
(RJ45-to-RJ45)
10/100Mbps Auto
Sensing
Interface # 2
Port Numbering for Daughtercards installed in ports 1 and 2 must be configured correctly. For example,
Physical Ports 1
if you have installed a Dual E&M daughtercard in port 1 you must configure the port
and 2
as an E&M port. In addition, use this port numbering scheme when configuring the
Vanguard 342:
If the daughtercard is
installed in...
...and it has one port
connector, configure
port
...or it has two port
connectors,
configure port
Port 1
1
1 or 6
Port 2
2
2 or 7
Note
For more daughtercard configuration information, refer to Chapter Five of the
Daughtercard Installation Guide (Part Number T0020).
Daughtercard
Cable Information
Cables for optional daughtercards are shipped with the daughtercards. If your
Vanguard 342 is shipped with pre-installed daughtercards you will receive the
cables. For daughtercard installation and more cable information, please refer to the
Vanguard Daughtercard Installation Guide (Part Number T0020).
Installation and Replacement
3-15
Cabling the Vanguard 342
Control Terminal Port (CTP)
Port 4 Connector
Pinout
Use the supplied RJ45/DB25 cable to connect to the CTP Port and perform CTP
operations such as coldloading software images into a Vanguard 342. The Vanguard
342 defaults this port to 9.6 kbps, 8 bits, no parity, 1 stop bit.
This table identifies the connector pinout for this RJ-45 connector:
RJ45 Pin
Signal
Pin Connection
on DB25F
Adapter
1 (not connected)
Request To Send (RTS)
4
2
DTE Ready (DTR)
20
3
Received Data (RXD)
3
4 (not connected)
Data Carrier Detect (DCD)
8
5
Signal Ground
7
6
Transmitted Data (TXD)
2
7
Data Set Ready (DSR)
6
8 (not connected)
Clear To Send (CTS)
5
Note
If you plan to use a personal computer to configure the Vanguard 342, you may
need to purchase a DB25 (male) to DB9 (female) adapter for the serial port of
your personal computer. The serial ports on most personal computers require
DB9 connectors.
The connector pins are numbered as indicated in Figure 3-4.
Pin 8
Pin 1
Figure 3-4. RJ45 Pinout
3-16
Installation and Replacement
Cabling the Vanguard 342
10/100BaseT Adapter Cable
Specifications
The 10/100BaseT cable has the following specifications:
•
•
•
•
Port 5 Connector
Pinout
Cable Type: Category 5 or better
Connectors: RJ45 to RJ45
Color: Gray
Part Number: 61798-01
The 10/100BaseT Ethernet Port has a single RJ45 connector and is cabled using
CAT-5 twisted pair copper cables. This table details the pin for the 10/100Base T
RJ45 connector:Cabling Daughtercards:
Pin
Signal
Pin
Signal
1
Transmit Positive
5
Not Used
2
Transmit Negative
6
Receive Data Negative
3
Receive Data Positive
7
Not Used
4
Not Used
8
Not Used
Installation and Replacement
3-17
Cabling the Vanguard 342
DB25 V.24 Pinouts
Connector Pinouts This table shows the DB25 V.24 connector pinouts for DCE/DTE mode. To use DTE
to DTE or DCE to DCE mode, a crossover adapter cable is required. Refer to
Figure 3-5 on page 3-21 for crossover cable connections.
These pins are assigned double functions in the V.24 cable:
• Pin 15: Outputs TRANSMIT CLOCK if the port is configured for internal
clocks. Otherwise it acts as a V.54 Loop 1 signal when connected to a modem.
• Pin 22: Used as the Ring Indicator output if the port is configured to emulate a
dial modem. For this to work properly, the RI/TM port must be configured to
RI. When the RI/TM is configured to TM, this pin acts as an input, and the
TM output from the attached modem (pin 25 on the modem) comes into the
Vanguard on this pin.
For more information on configuring the V.24 interface type, refer to the “Setting the
Interface Type” section on page 3-9.
Port 3
Pin
3-18
DCE
Signal
Function/Signal
Name
Port 3
Pin
DTE Signal using
Crossover
Adapter Cable
Function/Signal
Name
1
--------------
PROTECTIVE
GROUND
1
--------------
PROTECTIVE
GROUND
2
<------------
TRANSMITTED
DATA
2
------------>
TRANSMITTED
DATA
3
------------>
RECEIVED DATA
3
<------------
RECEIVED DATA
4
<------------
REQUEST TO SEND 4
------------>
REQUEST TO SEND
5
------------>
CLEAR TO SEND
5
<------------
CLEAR TO SEND
6
------------>
DATA SET READY
6
<------------
DATA SET READY
7
--------------
SIGNAL GROUND
7
--------------
SIGNAL GROUND
8
------------>
DATA CARRIER
DETECT
8
<------------
DATA CARRIER
DETECT
14
<------------
DATA RESTRAINT
14
------------>
DATA RESTRAINT
15
------------>
TRANSMIT CLOCK
15
<------------
TRANSMIT CLOCK
16
------------>
STANDBY
INDICATOR
16
<------------
STANDBY
INDICATOR
17
------------>
RECEIVE CLOCK
17
<------------
RECEIVE CLOCK
18
<------------
EXTERNAL
RECEIVE CLOCK
18
------------>
EXTERNAL
RECEIVE CLOCK
20
<------------
DATA TERMINAL
READY
20
------------>
DATA TERMINAL
READY
21
<------------
V.54 Loop 1
21
------------>
V.54 Loop 1
22
------------>
TEST MODE
22
<------------
TEST MODE
24
<------------
EXTERNAL
TRANSMIT CLOCK
24
------------>
EXTERNAL
TRANSMIT CLOCK
25
<------------
MAKE BUSY
25
------------>
MAKE BUSY
Installation and Replacement
Cabling the Vanguard 342
DB25 V.35/V.36 Pinouts
Connector Pinout
Port 3
Pin
DCE Signal
1
-------------
2
This table shows the DB25 V.35/V.36 connector pinouts for DCE/DTE mode. To use
DTE to DTE or DCE to DCE mode, a crossover adapter cable is required. Refer to
Figure 3-5 on page 3-21 for crossover cable connections:
Function/Signal
Name
Port 3
Pin
DTE Signal
using
Crossover
Adapter Cable
Function/Signal Name
PROTECTIVE
GROUND
1
-------------
PROTECTIVE GROUND
<------------
TRANSMITTED
DATA-A
2
------------>
TRANSMITTED DATA-A
3
------------>
RECEIVED DATA-A 3
<------------
RECEIVED DATA-A
4
<------------
REQUEST TO SEND 4
------------>
REQUEST TO SEND
5
------------>
CLEAR TO SEND
5
<------------
CLEAR TO SEND
6
------------>
DATA SET READY
6
<------------
DATA SET READY
7
-------------
SIGNAL GROUND
7
--------------
SIGNAL GROUND
8
------------>
DATA CARRIER
DETECT
8
<------------
DATA CARRIER DETECT
14
<------------
TRANSMITTED
DATA-B
14
------------>
TRANSMITTED DATA-B
15
------------>
TRANSMITTED
CLOCK-A
15
(no signal)
TRANSMITTED
CLOCK-A
16
------------>
RECEIVED DATA-B
16
<------------
RECEIVED DATA-B
17
------------>
RECEIVE CLOCK-A 17
<------------
RECEIVE CLOCK-A
18
------------>
RECEIVE CLOCK-B 18
<------------
RECEIVE CLOCK-B
20
<------------
DATA TERMINAL
READY
20
------------>
DATA TERMINAL
READY
21
------------>
TRANSMITTED
CLOCK-B
21
(no signal)
TRANSMITTED
CLOCK-B
22
<------------
EXTERNAL
TRANSMIT
CLOCK-B
22
------------>
EXTERNAL TRANSMIT
CLOCK-B
24
<------------
EXTERNAL
TRANSMIT
CLOCK-A
24
------------>
EXTERNAL TRANSMIT
CLOCK-A
25
-------------
(no connection)
25
-------------
(no connection)
Note
To use DTE mode, the Interface Options parameter must be set to XOVER. For
details on setting the V.35/V.36 Interface Options, see “Setting the Interface
Options” section on page 3-10.
Installation and Replacement
3-19
Cabling the Vanguard 342
DB25 X.21/V.11 Pinouts
Connector Pinout
Port 3
Pin
This table shows the DB25 X.21/V.11 connector pinouts for DCE/DTE mode. To use
DTE to DTE or DCE to DCE mode, a crossover adapter cable is required. Refer to
Figure 3-5 on page 3-21 for crossover cable connections:
DCE Signal
Function/Signal
Name
Port 3
Pin
DTE Signal
using
Crossover
Adapter Cable
Function/Signal
Name
1
-------------
PROTECTIVE
GROUND
1
-------------
PROTECTIVE
GROUND
2
<------------
TRANSMITTED
DATA-A
2
------------>
TRANSMITTED
DATA-A
3
------------>
RECEIVED DATA-A
3
<------------
RECEIVED DATA-A
4
<------------
CONTROL-A
4
------------>
CONTROL-A
5
-------------
(no connection)
5
-------------
(no connection)
6
------------>
INDICATION-B
6
<------------
INDICATION-B
7
-------------
SIGNAL GROUND
7
-------------
SIGNAL GROUND
8
------------>
INDICATION-A
8
<------------
INDICATION-A
14
<------------
TRANSMITTED
DATA-B
14
------------>
TRANSMITTED
DATA-B
15
------------>
SIGNAL ELEMENT
TIMING-A
15
-------------
(no connection)
16
------------>
RECEIVED DATA-B
16
<------------
RECEIVED DATA-B
17
(no signal)
RECEIVE CLOCK-A
17
(no signal)
RECEIVE CLOCK-A
18
(no signal)
RECEIVE CLOCK-B
18
(no signal)
RECEIVE CLOCK-B
20
<------------
CONTROL-B
20
------------>
CONTROL-B
21
------------>
SIGNAL ELEMENT
TIMING-B
21
-------------
(no connection)
22
<------------
EXTERNAL
TRANSMIT
CLOCK B
22
------------>
EXTERNAL
TRANSMIT
CLOCK B
24
<------------
EXTERNAL
TRANSMIT
CLOCK A
24
------------>
EXTERNAL
TRANSMIT
CLOCK A
25
--------------
(no connection)
25
-------------
(no connection)
Note
To use DTE mode, the Interface Options parameter must be set to XOVER. For
details on setting the X.21/V.11 Interface Options, see “Setting the Interface
Options” section on page 3-10.
3-20
Installation and Replacement
Cabling the Vanguard 342
Crossover Cable
Connections
The diagram in Figure 3-5 shows the crossover cable connections for DCE to DCE
mode.
DCE
DCE
2
3
2
3
4
8
4
6
20
6
20
17
24
17
24
8
Figure 3-5. Crossover Cable Connections
Ordering Cables
To order cables please contact a VanguardMS representative. In addition to the
crossover adapter cables these cables can also be ordered:
• DB25 Male to M34 Female cable
• DB25 Male to M34 Male cable
Installation and Replacement
3-21
Modifying Your Vanguard 342
Modifying Your Vanguard 342
Introduction
You can modify your Vanguard 342 by adding or replacing components on the
motherboard. This section explains how to make these modifications and includes
the following topics:
• Installing Vanguard Daughtercards
• Accessing the Motherboard
• Installing/Removing the Lithium Battery
3-22
Installation and Replacement
Modifying Your Vanguard 342
Installing Vanguard Daughtercards
Vanguard
Daughtercards
You can install two Daughtercards in the Vanguard 342. The Vanguard 342 supports
these Vanguard daughtercards:
• 1-Port FXS/FXO Voice
• 2-Port Voice FXS
• 4-Port FXO Voice
• 4-Port FXS Voice
• FT1/FE1
• Dual E&M
• ISDN BRI-U Data
• ISDN and Enhanced ISDN BRI-S/T Data
• ISDN BRI-S/T Voice
• DSU
• V.90
• G.SHDSL
These daughtercards can be installed either in the factory or on-site. Refer to the
Vanguard Daughtercard Installation Guide (Part Number T0020) for complete
daughtercard installation instructions.
Caution
On-site installation of these daughtercards should be undertaken by trained service
technicians.
Mise en Garde
L’installation de ces cartes fille optionnelles doit être effectuée par des techniciens
expérimentés.
Vorsicht
Die Installation vor Ort dieser optionalen Zusatzkarten sollte von geschulten
Kundendiensttechnikern durchgeführt werden.
Installation and Replacement
3-23
Modifying Your Vanguard 342
Accessing the Motherboard
Introduction
This section explains how to access the motherboard for the Vanguard 342. It also
identifies the location of the key motherboard components.
Before replacing SIMMs, DIMM, batteries, or daughtercards you must access the
Vanguard 342 motherboard.
Accessing the
Motherboard
Figure 3-6 shows how to remove and install the Vanguard 342 motherboard.
Warning
To prevent injury and damage to the equipment, power down the unit and disconnect
the power cord and all network telecommunication cables before you remove or
install the motherboard.
Avertissement
Pour éviter toute blessure ou endommagement de l’équipement, éteignez l’unité et
déconnectez le cordon d’alimentation avant d’enlever ou d’installer la carte mère.
Warnung
Um persönliche Verletzungen und Schäden am Gerät zu verhindern, schalten Sie das
Gerät ab, und ziehen Sie den Netzstecker aus, bevor Sie die Hauptplatine entfernen
oder installieren.
Caution
Use care when handling and placing the motherboard on a surface. There are
components on the bottom of the motherboard that can be damaged.
Mise en Garde
Soyez prudents lorsque vous manipulez la carte mère ou la placez sur une surface.
Il y a des composants sur la face inférieure de la carte mère qui pourraient être
endommagés.
Vorsicht
Auf der Unterseite des Motherboard befinden sich empfindliche Teile. Verfahren Sie
entsprechend vorsichtig bei der Handhabung und beim Ablegen des Board.
Caution
Some components used in the 342 are sensitive to static electric discharges; static
electric discharges can cause damage to internal components. Use proper handling
and grounding precautions whenever handling cards and components.
Mise en Garde
Certains composants du 342 sont sensibles aux décharges électrostatiques qui
peuvent les endommager. Prenez les dispositions et précautions de mise à la terre
nécessaires lors de la manipulation de cartes et de composants.
3-24
Installation and Replacement
Modifying Your Vanguard 342
Vorsicht
Einige im 342 verwendeten Komponenten sollten keinen elektrostatischen
Entladungen ausgesetzt werden, durch die interne Bauteile beschädigt werden
können. Wenden Sie die entsprechenden Maßnahmen zur Erdung und zum Schutz
vor statischen Ladungen bei der Handhabung von Karten und Komponenten an.
Handle
Handle
Figure 3-6. Vanguard 342 Motherboard Removal and Replacement
Installation and Replacement
3-25
Modifying Your Vanguard 342
Procedure for
Removing the
Motherboard
Use the steps to remove the Vanguard 342 motherboard:
Step
Procedure for
Installing the
Motherboard
1
Remove the power cord and cables from the back of the unit.
2
Remove the two screws on either side of the chassis at the rear of
the unit.
3
Use the handle on the right side of the front panel to carefully slide
out the motherboard.
4
Place the motherboard on a clean flat surface.
Use the steps to install the Vanguard 342 motherboard:
Step
3-26
Action
Action
1
Carefully slide the motherboard into the card guides within the
opening.
2
Push the motherboard into the enclosure.
3
Tighten the screws on both sides of the chassis. Be sure the screws
are snug.
4
Reconnect the cables and power cord.
Installation and Replacement
Modifying Your Vanguard 342
Adding and Removing Memory Modules
Introduction
The appropriate memory modules (SIMMs and DIMM) are installed on the
motherboard at the factory. If they are not, you can install these components as
necessary. This section explains how to add and remove the:
• SDRAM DIMM
• FLASH SIMM
• Data Compression/Encryption SIMM
• Data Compression/Encryption SIMM (ECC DIMM)
For instructions on removing the motherboard, refer to the “Accessing the
Motherboard” section on page 3-24.
Caution
Be careful when installing a Data Compression/Encryption SIMM or a FLASH
SIMM. These SIMM slots look similar and you may accidently place a SIMM in the
wrong SIMM slot which could damage the equipment.
Mise en Garde
Soyez prudents lorsque vous installez un SIMM de compression de données/de
cryptage ou un SIMM FLASH. Les rainures SIMM ont toutes la même apparence et
vous pourriez accidentellement placer un SIMM dans une rainure SIMM erronée, ce
qui pourrait endommager l’équipement.
Vorsicht
Die Steckplätze für die Komprimierungs- und Verschlüsselungs-SIMMs und für die
Flash-SIMMs können verwechselt werden. Vergewissern Sie sich, dass Sie die
SIMMs in die richtigen Steckplätze einsetzen. Ansonsten können Sie Ihr System
beschädigen.
Caution
Some components used in the 342 are sensitive to static electric discharges; static
electric discharges can cause damage to internal components. Use proper handling
and grounding precautions whenever handling cards and components.
Mise en Garde
Certains composants du 342 sont sensibles aux décharges électrostatiques qui
peuvent les endommager. Prenez les dispositions et précautions de mise à la terre
nécessaires lors de la manipulation de cartes et de composants.
Vorsicht
Einige im 342 verwendeten Komponenten sollten keinen elektrostatischen
Entladungen ausgesetzt werden, durch die interne Bauteile beschädigt werden
können. Wenden Sie die entsprechenden Maßnahmen zur Erdung und zum Schutz
vor statischen Ladungen bei der Handhabung von Karten und Komponenten an.
Installation and Replacement
3-27
Modifying Your Vanguard 342
Note
The location of the FLASH SIMM and Data Compression (DCC/DSP)/
Encryption SIMM are indicated on the motherboard as shown in Figure 3-8.
Adding/Removing
SDRAM DIMM
Use these steps to add and remove a SDRAM DIMM:
1) Insert the DIMM into slot as shown in Figure 3-7.
2) Carefully press the DIMM into the socket.
3) Lock the DIMM into place with the locking levers.
4) To remove the DIMM, disengage the locking levers by pushing them forward,
and then lift out the DIMM.
Adding/Removing
FLASH SIMM
Use these steps to add and remove a FLASH SIMM:
1) At a slight angle, insert the SIMM into connector as shown in Figure 3-7.
2) Carefully press the SIMM down, pushing the locking tabs through the holes. The
clips click into place.
3) To remove the SIMM, use your fingers to push back the two metal retaining clips
and lift out the SIMM.
Note
FLASH SIMMs for the Vanguard 340 and 6400 Series are not compatible with
the Vanguard 342. Vanguard 342 SIMMs are not compatible with the Vanguard
340 and 6400 Series. The SIMMs could be damaged.
Adding/Removing Use these steps to add and remove a Data Compression/Encryption SIMM:
Data Compression/ 1) At a slight angle, insert the SIMM into the connector, lining up the holes with the
Encryption SIMM
tab as shown in Figure 3-7.
2) Carefully press the SIMM down, pushing the locking tabs through the holes. The
clips click into place.
3) Lock the SIMM into place with the locking levers.
4) To remove the SIMM, use your fingers to push back the two metal retaining clips
and lift out the SIMM.
3-28
Installation and Replacement
Modifying Your Vanguard 342
ECC DIMM
Figure 3-7. SIMM and DIMM Installation/Replacement
Installation and Replacement
3-29
Modifying Your Vanguard 342
Data Compression/
Encryption Slot
ECC
Encryption
Slots
SDRAM
Slots
Battery
FLASH
SIMM
Slot
Vanguard
Daughtercard
Slots
Fan
Power
DB25 (DCE)
Control Terminal
Port (CTP)
2, 10/100 BaseT
Ethernet Ports
Figure 3-8. Location of Motherboard Components
3-30
Installation and Replacement
Modifying Your Vanguard 342
SIMM and DIMM
Slots
Figure 3-8 shows the locations of the SIMM and DIMM slots:
• SDRAM DIMM
• FLASH SIMM
• Data Compression/Encryption SIMM (ECC DIMM)
Note
There are two encryption sockets in the motherboard, only one can be used at a
time. ECC DIMM is available at with Release 6.3 and greater software on the
Vanguard 342.
Installation and Replacement
3-31
Modifying Your Vanguard 342
Installing/Removing the Lithium Battery
Introduction
This section explains how to replace the real time battery. Vanguard 342 uses a
lithium battery on the motherboard to maintain the node’s real-time clock. The
battery is not used to store the configuration memory.
Warning
Only qualified service personnel should perform the procedure described in this
section. If the battery is installed incorrectly, it could explode after the Vanguard
product is powered up, damaging the unit.
Avertissement
Seules des personnes qualifiées peuvent mettre en pratique les procédures décrites
dans cette section. Si la batterie n’est pas correctement installée, elle risque
d’exploser après la mise en marche du produit Vanguard et d’endommager l’unité.
Warnung
Die in diesem Abschnitt aufgeführten Vorgänge sollten ausschließlich von
qualifiziertem Servicepersonal durchgeführt werden. Wenn die Batterie
unsachgemäß installiert wird, kann sie nach dem Einschalten des Vanguard-Produkts
explodieren und das Gerät beschädigen.
Note
After installing the battery, set the Vanguard 342’s date and time. This is done
via the CTP in the Update System Parameter menu.
Battery Type
Replace the lithium battery with lithium coin cell type CR2032 only. These can be
obtained where watch batteries are sold.
Battery Disposal
Dispose of the battery in compliance with applicable local regulations.
Routine Battery
Replacement
The lithium battery should be replaced every six years. Follow the instructions in
Figure 3-9 to replace the battery.
Before Removing/
Installing the
Battery
Before you remove or install the battery, you must access the Vanguard 342
motherboard as described in the “Accessing the Motherboard” section on page 3-24.
3-32
Once you can see the motherboard, locate the battery as shown in Figure 3-9.
Installation and Replacement
Modifying Your Vanguard 342
Removing/
Installing the
Battery
Figure 3-9 shows how to install and replace the battery.
To remove the battery
Using your fingers, push the retaining tabs aside
and pry the battery out of the holder.
To install the battery
Place the battery in the holder with the positive
(+) side up, and press down until the retaining
tabs click into place.
Note: When done, replace the motherboard as
explained in the “Accessing the Motherboard”
section on page 3-24.
Battery
Retaining Tabs
Battery Holder
Figure 3-9. Replacing the Battery
Installation and Replacement
3-33
Chapter 4
Powering Up and Loading Software
Overview
Introduction
This chapter describes:
•
•
•
•
•
Powering Up Your Vanguard 342
Powering Off The Vanguard 342
Powerup Diagnostics
Accessing the Control Terminal Port
Obtaining and Installing Operating Software
Powering Up and Loading Software
4-1
Powering Up Your Vanguard 342
Powering Up Your Vanguard 342
Introduction
This section describes the sequence of events when you power up and power down
the Vanguard 342.
Powering On the
Vanguard 342
The Vanguard 342 does not have a power switch on the unit. Use these steps to
power on the device:
1) Plug the DC output cable of the power supply into the power socket on the
Vanguard 342 back panel.
2) Connect the power cord to the power supply outlet.
Resetting the 342
The RESET button resets the node. Pressing the RESET button is the equivalent of a
power-up operation which clears all existing calls and brings down all links.
For the location of the RESET button, refer to the “Enclosure” section in Chapter 2.
4-2
Powering Up and Loading Software
Powering Off The Vanguard 342
Powering Off The Vanguard 342
Warning
When powering down the unit, always unplug the power cord from the AC power
outlet first (Figure 4-1). Never disconnect or reconnect the power connector from the
Vanguard back panel if the power supply is still connected to the AC power outlet
(Figure 4-2). Doing so can potentially damage the Vanguard unit.
Power Connector
Power Cord
Disconnect
from Power Outltet
Figure 4-1. Approved Practice for Powering Down a Vanguard Unit
Power Connector
Power Cord
Power Outlet
Figure 4-2. Unacceptable Practice for Powering Down or Powering Up a
Vanguard Unit
Powering Up and Loading Software
4-3
Powering Off The Vanguard 342
Warning
Hazardous voltage from the telecommunications network may be accessible on
un-earthed units. Disconnect all telecommunications cables before removing the
main lead from the power supply.
Des tensions dangereuses provenant des réseaux de télécommunication peuvent être
présentes sur des unités qui ne sont pas reliées à la terre. Déconnectez tous les câbles
de télécommunication avant de retirer le câble de secteur du bloc d’alimentation.
An nicht geerdeten Geräten können gefährliche Spannungen vom
Telekommunikationsnetz anliegen. Trennen Sie alle Kabelverbindungen zum
Telekommunikationsnetz, bevor Sie das Hauptnetzkabel aus der Steckdose ziehen.
4-4
Powering Up and Loading Software
Powerup Diagnostics
Powerup Diagnostics
Introduction
This section describes diagnostics that run automatically when you power up the
Vanguard 342.
Detailed Front
Panel LEDs
Figure 4-3 illustrates the detailed front panel LEDs located behind the front cover.
Reset
Resets (restarts) the unit.
STAT (Status Red)
On:
Fatal Report or WDT
Off:
Normal Operation
Flashing (Slow):Software
Download in Progress
TX (Data Out - GREEN)
On: Data Leaving Port = SPACE
Off: Data Leaving Port = MARK
RX (Data In - RED)
On: Data Entering Port = SPACE
Off: Data Entering Port = MARK
PWR (Status Power On -GREEN)
Power is on and all DC Voltages are
within specifications.
Figure 4-3. Detailed Front Panel LEDs
Powering Up and Loading Software
4-5
Power Up
Sequence
When the Vanguard 342 power cord is plugged into the power supply outlet, you will
see the following power up sequence:
Stage
Detailed FT1/FE1
LED
when...
...this indicates
1
Power (PWR) LED turns on
(GREEN)
Vanguard is receiving power.
2
PWR LED remains on and the
Status (STAT) LED blinks
(RED).
Diagnostics are starting.
3
PWR LED blinks.
Diagnostics are executed.
4
PWR LED remains on and the
STAT LED blinks.
Indicates software is being
downloaded from FLASH.
5
PWR LED blinks.
Software is initializing your system
configuration.
6
PWR LED remains on.
Your system is running.
The FT1/FE1 daughtercards have one LED located on the rear panel. Software
controls the LED and indicates the following when ON or OFF:
• ON - Alarm condition data path is disrupted, refer to the FT1/FE1 interface
statistics for more information on the problem.
• OFF - Normal operation exists.
Accessing the Control Terminal Port
Accessing the Control Terminal Port
Introduction
Once you have powered on the Vanguard 342, you can access the Control Terminal
Port from the PC or terminal attached to the CTP port.
This section does not provide all information about accessing the CTP. For more
information on accessing and using the CTP refer to the Vanguard Basic
Configuration Manual (Part Number T0113).
Procedure
Follow these steps to access the Vanguard 342 CTP Main menu:
Note
This procedure assumes that a PC or terminal is connected to the Vanguard 342
using the CTP access cable.
Step
Action
1
Set your terminal, or terminal emulation software, to VT100, 9600 bps,
8 bit, no parity, 1 stop bit.
2
Type <CR> until either an asterisk (*) or the OK prompt appears.
3
When you see OK, type atds0 <CR>. When you see the asterisk (*) type
.ctp.
The CTP banner will appear. If this banner does not appear, verify that
these steps have been followed correctly.
4
Type <CR> at the password prompt, if no password has been set.
CTP Access Using Another way to connect to the CTP, after the node is configured and operational, is to
Remote Telnet
access remotely via your established IP network by telneting into the node from an
IP network-based personal computer or workstation. You can create a telnet session
from your PC to the target node using and IP address configured in that node.
Connect to the CTP by entering atds0 <CR> after the Vanguard 342 outputs the OK
prompt on your Telnet terminal window.
CTP Access Using
Remote X.25 or
Frame Relay
Network
If the Vanguard 342 is operating in an X.25 network, or if Frame Relay Annex-G is
used to connect with other VanguardMS Network Access Product nodes, you can
access the Vanguard CTP remotely by making a Switched Virtual Circuit (SVC) call
to the node and specifying subaddress 98.
For example:
• If you are using ASYNC PAD, type 10198 at the asterisk (*) prompt, and
then press Enter.
• If you are using AT PAD, type atds010198, and then press Enter.
Powering Up and Loading Software
4-7
Accessing the Control Terminal Port
Alternative Methods for Accessing the CTP
Introduction
This section describes alternative methods for accessing the CTP over a Frame Relay
Bypass connection when:
• the terminal of the local Vanguard device does not have IP connectivity or
• cannot connect to the target device over the LAN (serial port only)
• the WAN is not using X.25 or Annex G
Using Remote
Telnet
VanguardMS Vanguard devices have a built-in Telnet feature that allows to you
access the CTP of other Vanguard devices. To use this feature, both the local and
target devices must be configured using an IP network connection. Use these steps to
access the CTP of another Vanguard device from your local node:
1) Access the local Vanguard’s CTP.
2) Select the Diagnostics Menu, and then select Telnet.
3) Type any IP address that is configured in the target Vanguard.
Using SoTCP
If the target Vanguard device has been previously configured for a particular network
connection using SoTCP and AT PAD, you can access the CTP using Frame Relay
Bypass. Use these steps to establish an SoTCP connection to the target Vanguard’s
CTP using Frame Relay Bypass:
1) From the (*) prompt, type 10198 and press Enter.
2) At the OK prompt, type atds0<target node> (example: atds010198) and press
Enter.
Startup CTP
Screen
Figure 4-4 shows an example of the Vanguard 342 Startup Screen.
OK->atds->CONNECT
Connected to the Control Port
on Node “Nodename”, at 25-NOV-2002 13:32:59
Vanguard 340 - Model 342,
Version V6.2iR00P_IP+_340
Figure 4-4. Vanguard 342 Startup CTP Screen
4-8
Powering Up and Loading Software
Obtaining and Installing Operating Software
Obtaining and Installing Operating Software
Introduction
This section briefly describes how to obtain and install the software into your
Vanguard 342 device.
Note
After the software has been loaded, refer to the appropriate user documentation
to configure and use the different software options.
Where to Get
You can obtain Vanguard Applications Ware Packages that can be tailored to your
Operating Software specific needs.
You can obtain operating software for your Vanguard 342 from:
1) the Vanguide CD-ROM, using the following path:
\VanguardMS\Sfw_imgs\V342
2) the WWW, using the following URL:
http://secure.vanguardms.com
Note
All software must be unlocked using the Software Unlocking Utility. Be sure
that you have serial numbers for each Applications Ware package before using
the unlocking utility. If you do not have serial numbers for the Applications
Ware package contact your distributor, VanguardMS sales or service.
Operating Software The operating software is compressed in FLASH and loaded into the SDRAM for
execution. There are a variety of operating software feature sets available for the
Vanguard 342.
• For feature information on the operating software available for your device,
refer to the Software Release Notice included on the CD-ROM.
• For information on installing the operating software, refer to the Vanguard
Software Installation and Coldloading Manual (Part Number T0028)
included on the CD-ROM.
Optional Software
The Vanguard 342 supports these Applications Ware packages:
• IP+ Applications Ware Package (includes IP, and IPX)
• SNA+ Applications Ware Package (includes IP, and SNA)
• Multi-Service Applications Ware Package
For more information on the license upgrades available for the Vanguard 342, refer
to the Software Release Notice.
Note
A license refers to both a legal document that allows you to use features and to
the software that contains those features.
Powering Up and Loading Software
4-9
Obtaining and Installing Operating Software
Operating Software Operating software files located on the Vanguide CD-ROM, and on the World Wide
File Formats
Web, adhere to the following file naming formats:
Filename:
XXp01.xrc
Description
where:
• XX identifies
the software release number applicable to that
image
• 01 identifies the number of the image created for any specific
software release
• xrc identifies the file as a software image
XXp01.zip is a compressed version of the file.
4-10
Powering Up and Loading Software
Appendix A
Specifications
Specifications
Introduction
This section describes the physical and environmental specifications and power
requirements for the Vanguard 342 product.
Hardware
Vanguard 342 products feature the following:
•
•
•
•
•
•
•
•
•
•
Software
Motorola MPC860P PowerPC processor
Two 10/100 Base T Ethernet ports
Async (RJ-45 connector) Control Terminal Port (CTP)
8 Megabyte of Non-Volatile FLASH on board
8 Megabyte FLASH SIMM (optional)
32 Megabyte SDRAM DIMM
Data Encryption & compression SIMM slot (optional)
ECC DIMM slot
2 optional daughtercard ports
1 configurable Universal Serial Interface port
The Vanguard 342 supports these Applications Ware packages:
• IP+ Applications Ware Package (includes IP, and IPX)
• SNA+ Applications Ware Package (includes IP, and SNA)
• Multi-Service Applications Ware Package
For more information on the license upgrades available for the Vanguard 342, refer
to the Software Release Notice.
Environmental
The following environmental conditions are required:
• Operating temperature: 32° to 104°F maximum (0° to 40°C maximum)
• Storage temperature: -40° to +158°F (-40° to +70°C)
• Relative humidity: 5% to 90% (non-condensing)
Specifications
A-1
Electromagnetic
Compatibility
Vanguard 342 products adhere to the following:
Power
Requirements
Vanguard 342 typically has the following power requirements:
Power Supply
Description
Vanguard 342 products are powered by a switch mode power supply with
50 watts maximum output power.
Safety
Vanguard 342 meets the following safety standards:
•
•
•
•
• 100 to 240 VAC nominal at 50/60Hz
• 50 watts input power (64 VA)
• maximum input current 1.1 to 0.6 amps
•
•
•
•
Physical
EN60950
IEC60960
CSA C22.2 No. 950
UL 1950
Vanguard 342 has the following measurements:
•
•
•
•
•
A-2
FCC Part 15, Class A
CISPR 22 and EN 55022, Class A
AS 3548, Class A
EN 50082-1
Height: 2.6 in. (6.6 cm)
Length: 7.7 in. (19.6 cm)
Width: 12.2 in. (31.3 cm)
Weight (not configured): 7.05 lb.
Weight (fully configured) 7.65 lb.
Specifications
Appendix B
Software License and Regulatory Information
Overview
Introduction
This appendix provides information about the following:
• FCC Part 68 and Telephone Company Procedures and Requirements
• Product Declarations and Regulatory Information
Software License and Regulatory Information
B-1
FCC Part 68 and Telephone Company Procedures and Requirements for DSU, T1, and ISDN Interfaces
FCC Part 68 and Telephone Company Procedures and
Requirements for DSU, T1, and ISDN Interfaces
Introduction
The equipment referenced in this section is compliant with FCC Part 68 rules.
Before You Begin
Before connecting a Vanguard 340 to a network, you should:
• Provide the local telephone company with the equipment’s registration
number.
• Order the proper connections.
How to Order
Connections
To order the proper connections, provide the telephone company with:
•
•
•
•
Interface type
Required USOC jack connector number
Service code
Facility interface codes
Interface Type
Troubleshooting
Your Connection
56-kbps digital interface
ISDN U Interface
ISDN S/T Interface
Fractional T1 Interface
USOC Jack
Connector
RJ48S
RJ49C
-------RJ48C
Service
Code
6.0F
6.0Y
6.0F
6.0F
V.90 Modem Interface
RJ11C
----------
Facility Interface
Code
04DU5-56
02lS5
02lS5
04DU9-BN
04DU9-2SN
----------
If any of your equipment is not operating correctly, immediately remove it from the
telephone line before damaging the network. If the telephone company is aware of
the problem, they may temporarily disconnect your service. Whenever possible, the
telephone company notifies you in advance of the disconnection.
If advance notice is not feasible, you are notified as soon as possible. Once notified,
you can correct the problem. If necessary, it is your right to file a complaint with the
FCC.
B-2
Software License and Regulatory Information
FCC Part 68 and Telephone Company Procedures and Requirements for DSU, T1, and ISDN Interfaces
Customer-Provided FCC regulations and telephone company procedures prohibit connection of
Telephone
customer-provided equipment to telephone company-provided coin service
Equipment
(central office-implemented systems). Connection to party lines is subject to state
tariffs.
Occasionally, the telephone company may make changes in their equipment,
operations, or procedures. If these changes affect your equipment or service, the
telephone company will provide written notice so you can make the necessary
changes to maintain uninterrupted service.
Contact your telephone company if you have any questions about your telephone
line.
In some circumstances, the telephone company may ask you for information about
your equipment that is connected to the telephone line. Within the United States
(at the request of the telephone company), you should provide your equipment’s
FCC registration number. This number is located on the unit’s label.
Software License and Regulatory Information
B-3
Product Declarations and Regulatory Information
Product Declarations and Regulatory Information
The following sections provide information about standards compliance, safety
statements, and ISDN Type Approvals.
Warnings And
Cautions
The following special notices apply to all equipment handling procedures in this
installation guide.
Warning
Ports capable of connecting to ports on other apparatus are defined as Safety Extra
Low Voltage (SELV). To conform with EN60950, ensure that these ports are only
connected to ports of the same type on other apparatus.
Les ports qui sont susceptibles d’être connectés à des équipements sont désignés
comme TBTS. Pour garantir la conformité à la norme EN 60950, n’interconnecte ces
ports qu’avec des ports du même type sur des autres matériels.
Anschlusse, die mit anderen Geraten verbindet werden konnen, sind als SELV
beschrieben. Um Konformitat mit EN 60950 zu versichern, sichern Sie es, daß diese
Anschlusse nur mit den des selben Type auf anderen Geraten verbindet werden.
CE Marking
The mark in the following diagram appears on each Vanguard Series product, and the
statement that follows explains its significance.
Figure B-1. CE Mark
This product is CE marked to indicate compliance with the following European
Directives:
• 1999/5/EC Radio & Telecom Terminal Equipment (R&TTE)
• 73/23/EEC Low Voltage Directive (Safety)
• 89/336/EEC EMC Directive
Copies of the full Declaration of Conformity are available at the following URL:
http://www.vanguardms.com/
B-4
Software License and Regulatory Information
Product Declarations and Regulatory Information
Declarations of
Conformity
English
Declaration of Conformity:
Hereby, VanguardMS declares that this Vanguard Router is in compliance with the requirement
and other relevant provisions of Directive 1999/5/EC.
Danish
K o n fo r m ite ts e r k læ r in g :
H e r m e d e r k læ r e r V a n g u a r d M S , a t in d e s tå e n d e V a n g u a r d R o u t e r e r i
o v e r e n s s t e m m e ls e m e d d e g r u n d læ g g e n d e k r a v o g d e r e le v a n t e p u n k t e r i
d ir e k t iv 1 9 9 9 /5 / E F .
Dutch
Verklaring van overeenstemming:
Hierbij verklaart VanguardMS dat diens Vanguard Router voldoet aan de basisvereisten en
andere relevante voorwaarden van EG-richtlijn 1999/5/EG.
Finnish
Vaatimustenmukaisuusvakuutus:
VanguardMS vakuuttaa täten, että Vanguard Router on direktiivin 1999/5/EC keskeisten
vaatimusten ja sen muiden tätä koskevien säännösten mukainen
French
Déclaration de conformité :
Par la présente, VanguardMS déclare que ce routeur Vanguard est conforme aux conditions
essentielles et à toute autre modalité pertinente de la Directive 1999/5/CE.
German
Konformitätserklärung:
Hiermit erklärt VanguardMS, dass der Vanguard Router die grundlegenden Anforderungen und
sonstige maßgebliche Bestimmungen der Richtlinie 1999/5/EG erfüllt.
Greek
ή λω σ η Σ υ µ µ όρ φ ω σ η ς:
ια τ ο υ π α ρ ό ν τ ο ς , η ε τ α ιρ ε ία V a n g u a rd M S δ η λ ώ ν ε ι ό τ ι η π α ρ ο ύ σ α σ υ σ κ ε υ ή
(δ ρ ο µ ο λ ο γ η τ ή ς ) V a n g u a rd R o u te r π λ η ρ ο ί τ ις β α σ ικ έ ς α π α ιτ ή σ ε ις κ α ι ά λ λ ε ς β α σ ικ έ ς
π ρ ο ϋ π ο θ έ σ ε ις τ η ς Ο δ η γ ία ς 1 9 9 9 /5 /Ε K .
Software License and Regulatory Information
B-5
Product Declarations and Regulatory Information
Italian
Dichiarazione di conformità:
Con la presente VanguardMS dichiara che il router Vanguard soddisfa i requisiti essenziali e le
altre disposizioni pertinenti della direttiva 1999/5/CE.
Portuguese
Declaração de Conformidade:
Através da presente, a VanguardMS declara que este encaminhador Vanguard se encontra em
conformidade com os requisitos essenciais e outras disposições relevantes da Directiva
1999/5/CE.
Spanish
Declaración de conformidad:
Por la presente declaración, VanguardMS declara que este encaminador Vanguard cumple los
requisitos esenciales y otras cláusulas importantes de la directiva 1999/5/CE.
Swedish
Överensstämmelseförklaring:
VanguardMS förklarar härmed att denna Vanguardrouter överensstämmer med de väsentliga
kraven och övriga relevanta stadganden i direktiv 1999/5/EG.
B-6
Software License and Regulatory Information
Product Declarations and Regulatory Information
Industry Canada
The following information includes the Industry Canada statement regarding ISDN
and T1 equipment use.
The Industry Canada label identifies certified equipment. This certification means
that the equipment meets certain telecommunications network protective,
operational, and safety requirements. The Department does not guarantee the
equipment will operate to the user’s satisfaction.
Before installing this equipment, users should ensure that it is permissible to be
connected to the facilities of the local telecommunications company. The equipment
must also be installed using an acceptable method of connection. In some cases, the
company’s inside wiring associated with a single line individual service might be
extended by means of a certified connector assembly (telephone extension cord).
The customer should be aware that compliance with the above conditions might not
prevent degradation of service in some situations.
Repairs to certified equipment should be made by an authorized Canadian
maintenance facility designated by the supplier. Any repairs or alterations made by
the user to this equipment, or equipment malfunctions, could give the
telecommunications company cause to request the user to disconnect the equipment.
Users should ensure for their own protection that the electrical ground connections of
the power utility, telephone lines, and internal metallic water pipe system, if present,
are connected together. This precaution can be particularly important in rural areas.
Caution
Users must not attempt to make such connection themselves, but must contact the
appropriate electric inspection authority, or electrician, as appropriate.
Les utilisateurs ne doivent pas établir de telles connexions eux-mêmes. Ils doivent
contacter une personne compétente ou un électricien.
Benutzer sollten nicht versuchen, diese Verbindung selbst herzustellen, sondern
dazu die zuständige Aufsichtsbehörde für Elektroinstallationen bzw. einen
Elektroinstallateur kontaktieren.
Notification of
Canadian
Requirements
This digital apparatus does not exceed the Class A limits for radio noise emissions
from digital apparatus as set out in the Radio Interference Regulations of the
Canadian Department of Communications.
Le présent appareil numérique n’émet pas de bruits radioélectriques dépassant les
limites applicables aux appareils numériques de classe A prescrites dans le règlement
sur le brouillage radioélectrique édicté par le Ministère des Communications du
Canada.
Software License and Regulatory Information
B-7
Limited Warranty
VanguardMS, LLC., warrants that the Product will conform to its then-current published
specifications and will be free from defects in materials and workmanship under normal use
and service for a period of (ONE) 1 YEAR from the date of purchase by the original end
user.
During the warranty period, Vanguard Managed Solutions will at its option and at no charge
either repair a defective Product (using either new or reconditioned parts) or replace it (with a
new or reconditioned Product) if you return it freight prepaid to the factory or service center
VanguardMS designates. If VanguardMS is unable within a reasonable time to repair or
replace your item, VanguardMS may instead elect to accept return of the unit and refund to
you the purchase price you paid for it. VanguardMS will pay freight costs to ship any repaired
or replacement unit to you.
VANGUARDMS MAKES NO REPRESENTATION OR OTHER WARRANTY OF
ANY OTHER KIND, EXPRESS OR IMPLIED. WITHOUT LIMITING THIS
PROVISION, VANGUARDMS SPECIFICALLY DISCLAIMS ANY IMPLIED
WARRANTIES OF MERCHANTABILITY OR FITNESS FOR A PARTICULAR
PURPOSE.
THE REMEDIES PROVIDED HEREIN ARE EXCLUSIVE. UNDER NO
CIRCUMSTANCES WILL VANGUARD MANAGED SOLUTIONS BE LIABLE FOR
LOSS OF DATA, REPROCUREMENT COSTS, LOST REVENUE OR PROFITS, OR
FOR ANY OTHER SPECIAL, INCIDENTAL OR CONSEQUENTIAL DAMAGES,
EVEN IF THEY WERE FORESEEABLE OR YOU HAVE INFORMED VANGUARD
MANAGED SOLUTIONS OF THEIR POTENTIAL.
Some states do not allow the exclusion or limitation of incidental or consequential damages
or exclusions of implied warranties or limitations on the duration of implied warranties, so
the above limitations or exclusions may not apply to you. This warranty gives you specific
legal rights and you may also have other rights which vary from state to state.
This warranty does not apply to any Product which has been subjected by you or a third party
to (a) operating or environmental conditions in excess of VanguardMS written specifications
or recommendations; (b) damage, misuse or neglect; or (c) improper installation, repair or
alteration. This warranty also excludes expendable items, such as lamps, fuses, or other parts
which fail from normal use. VanguardMS does not guarantee the integrity of data or warrant
that the equipment will operate uninterrupted or error free.
To take advantage of this warranty, you must provide proof of purchase which indicates the
date of your purchase in order to obtain warranty service.
This warranty applies only to hardware manufactured by or for VanguardMS and identified
by the VanguardMS trademark, trade name or product identification logo affixed to them. For
the warranty applicable to software, please refer to the Software License which accompanies
the software.
Limited Warranty-9
Return Procedures
Introduction
The following sections apply to U.S.A. customers only. Non-U.S.A. customers with
questions or concerns regarding return procedures should contact their VanguardMS
subsidiary or distributor.
Equipment Return
Procedures
If you have questions about equipment return procedures, on-site service or unit
exchange service call the VanguardMS Technical Support Center at (800) 544-0062
for advice and assistance.
In Case of Damage If the equipment is damaged in transit, contact the shipper.
If you have additional concerns in case of failure, about missing parts, or to return
equipment, contact your nearest VanguardMS representative.
For Locations
Contact...
Inside the United States
Vanguard Managed Solutions
575 West Street Mansfield, MA 02048-1193
Phone (800) 544-0062.
Outside the United States
the nearest VanguardMS distributor. For a
listing of our Sales and Service Offices, visit
our Web site at:
http://www.vanguardms.com/
Expiration of Lease To return equipment upon expiration of a lease agreement, contact the VanguardMS
Customer Operations Center at (800) 544-0062 for return authorization and
instructions. You will be asked to provide the following information:
•
•
•
•
Product name and description
Serial number
Customer order number
Reason for return
Return Procedures-11
Factory Repair
To return equipment for factory repair, call the VanguardMS Technical Support
Center at (800) 544-0062, for return authorization and instructions. When you call,
you will be given a Return Material Authorization (RMA) control number. Mark this
number clearly on the shipping container for ease of identification and faster service.
The RMA control number provides a convenient tracking reference for both parties.
Please have the following information available for each piece of equipment you
return:
• Product name and description
• Serial number
• Failure symptoms
Packaging
Guidelines for
Equipment Return
Return Procedures-12
Data communications equipment or parts that are to be returned to VanguardMS for
any reason must be properly packaged to prevent damage in shipment and handling.
If the original packing material and shipping container are available, reuse these
items to return equipment. If these items are not available, it is your responsibility to
package the contents in a manner that protects the equipment from damage during
normal shipping and handling. Responsibility for damage to equipment during
transit must be resolved between you and the carrier. VanguardMS can provide you
with specific packaging instructions upon request.
Index
Numerics
D
1 Port Voice FXS/FXO Daughtercard 2-8
10/100BaseT
Ethernet cable 1-3
2 Port Voice FXS Daughtercard 2-8, 2-9
4 Port Voice FXO Daughtercard 2-9
4 Port Voice FXS Daughtercard 2-8
56 K DSU/CSU Daughtercard 2-12
Data Compression SIMM 2-5
Daughtercard
2 Port Voice FXS 2-8, 2-9
4 Port Voice FXO 2-9
4 Port Voice FXS 2-8
56 K DSU/CSU 2-12
compatibility 2-7
DIM 2-12
Dual E&M 2-10
Dual Slots 1-3
FT1/FE1 2-9
G.SHDSL 2-13
ISDN BRI Voice 2-11
ISDN BRI-ST 2-11
ISDN BRI-U 2-10
V.90 Modem 2-13
Voice FXS/FXO 2-8
Daughtercards 1-3
DSU 2-12
DIM Daughtercard 2-12
Dual E&M Daughtercard 2-10
A
Accessing the Control Terminal Port (CTP) 4-7
Accessing the Motherboard 2-5
AES Encryption 1-7
air circulation 3-4
Audience vii
Avertissement xiii
B
Battery
disposal 3-32
replacement schedule 3-32
replacement type 3-32
Besondere Hinweise
Beschreibung xiii
C
Cable
10/100BaseT 1-3
cable
clearance 3-4
Cables 3-12
location 3-12
Cabling
10/100BaseT 1-3
Canadian Regulatory Requirements B-7
CD-ROM
Vanguide ix
Control Terminal Port (CTP)
accessing 4-7
CTP
access 4-7
description 1-3
E
ECC DIMM 1-7
Electromagnetic Radiation
requirements B-7
Electromagnetic specifications A-2
Encryption SIMM 2-5
Environmental specifications A-1
Equipment return 11
packaging 12
F
Factory repair 12
Fan 3-7
FCC regulations B-3
FLASH SIMM 2-5
Front Panel 2-2
FT1/FE1 Daughtercard 2-9
G
G.SHDSL Daughtercard 1-17
Index-1
H
R
Hardware specifications A-1
Heat 3-7
Rear Panel 2-3, 3-12
Regulatory Information B-4
Canadian requirements B-7
Industry Canada B-7
Remove/Replace
components 3-22
motherboard 3-24
Resetting the Device 4-2
I
Installation Instructions 3-6
Interface Type
V.24 3-10
V.35/V.36 3-11
X.21/V.11 3-11
ISDN BRI-S/T Daughtercard 2-11
ISDN BRI-U Daughtercard 2-10
L
Lease expiry 11
M
Messages spŽciaux xii
Important xii
Mise en garde xii
Motherboard 2-4
components 2-4
remove/replace 3-24
O
Operating Software 1-4
operating software
file formats 4-10
Ordering Connections
facility interface code B-2
interface type B-2
service code B-2
USOC jack connector B-2
Ordering information
CD-ROM products ix
P
Physical specifications A-2
Port 1 and Port 2, numbering and configuring 3-15
Port 5 Connector Pinout 3-17
power
source 3-4
Power requirements A-2
Powering on 4-2
Powerup
diagnostics 4-2, 4-5
power-up 4-2
Product Declarations B-4
Index-2
S
Safety specifications A-2
Serial Interface 2-5
about 3-8
interface option 3-8
interface type 3-8
parameters 3-8
setting parameters
interface options 3-10
interface type 3-9
simboli speciali
descrizione xiii
SIMM
data compression 2-5
encryption 2-5
FLASH 2-5
SDRAM 2-5
site preparation 3-4
Software
obtaining 4-9
Software Suport 1-4
Special notices
description xi
Specifications
electromagnetic A-2
environmental A-1
hardware A-1
physical A-2
power requirements A-2
safety A-2
T
Telephone Company Procedures B-2
Temperature 3-7
Thermal Considerations 3-7
Thermal Shutdown 3-7
Troubleshooting
connections B-2
V
Vanguard 342
cabling
rear panel 3-12
configuration 3-12
enclosure 2-2
features 1-3
front panel 2-2
installation 3-6
motherboard 2-4
operating software 1-4
rear panel 2-3
resetting the device 4-2
serial interface 2-5
serial number 2-3
shipment contents 3-2
software support 1-4
specifications A-1
Vanguide CD-ROM ix
Virtual Private Network
Description 1-6
Voice FXS/FXO Daughtercard 2-8
Vorsichtshinweis, Beschreibung xiii
W
Warnhinweis, Beschreibung xiii
WICHTIG-Hinweis, Beschreibung xiii
Index-3