1
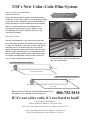
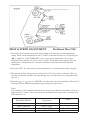
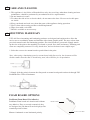
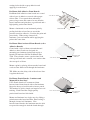
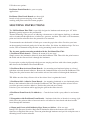
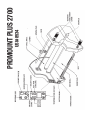
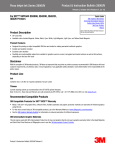
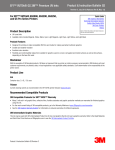
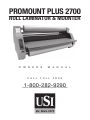
PROMOUNT PLUS 2700
ROLL LAMINATOR & MOUNTER
O W N E R S
C A L L
M A N U A L
T O L L
F R E E
1-800-282-9290
FOR USI EDUCATION OR GOVERNMENT SALES 1-800-243-4565
USI’s New Color-Code Film System
USI Color Codes all of its Roll Film
and Roll Laminators!
We are the only lamination company to offer this unique
trouble-free system. That’s right, we are making film loading
even easier. We have completely removed the possibility of
placing the adhesive side of the film down on the machine.
This is a common problem for most laminator users.
That problem will no longer be yours. When it comes
to laminating, USI is here to make the job as easy and
convenient as possible!
Here’s how it works:
Your new roll laminator is color coded on the upper and
lower film supply mandrels and machine side housings. All
1” and 2 1/4” roll films are also color coded as well. Simply
match the red core of the film roll to the red end of the
supply mandrel and machine side housing. For the bottom
mandrel, simply match the blue core of the film roll to the
blue end of the supply mandrel and machine side housing.
Now simply thread the film as shown in the manual and
you’re ready to laminate with confidence!
Roll Film Rolled Adhesive Side In
Color Code helps you easily match up the
correct side of the roll when installing film
onto your roll laminator.
Red Core
Blue Core
Adhesive Side (Dull)
Roll Film Rolled Adhesive Side Out
Blue Core
Red Core
Gloss Side
Please feel free to call our Technical Department if you
should have any questions about this process.
800-752-9131
If it’s not color code, it’s too hard to load!
USI Corporate Headquarters:
98 Fort Path Road Madison, CT 06443-2264
(203) 245-8586 • (800) 243-4565 • Fax 24 Hour (203) 245-7337
East Coast Distribution Center: Madison, Connecticut
West Coast Distribution Center: Phoenix, Arizona
OPERATING INSTRUCTIONS
ProMount Plus 2700
1 IMPORTANT SAFEGUARDS
When using electrical appliances, basic precautions should always be followed to reduce the risk
of electric shock and injury to people, including the following:
1. Read all instructions.
2. Always unplug the appliance when not in use or before cleaning.
3. Do not use outdoors.
4. Extreme caution should be taken when the appliance is used by or near children or invalids.
5. To protect against risk of electrical hazards, do not immerse cord, plugs, or appliances in water
or other liquids.
6. Do not operate the appliance with a damaged cord or plug, or after the appliance
malfunctions, has been dropped or is damaged in any manner. Return appliance to the nearest
authorized service facility for examination, repair, or adjustment.
7. Do not use accessory attachments not recommended or sold by the appliance manufacturer.
8. Do not let cord hang over edge of counter, or touch hot surfaces.
9. Do not use the appliance for other than intended use. This appliance is intended for Office
or Household use only.
10. The Socket outlet shall be installed near the equipment and shall be easily accessible.
11. Warning: Hazardous moving parts - keep fingers and other body parts away.
2 LOCATION
Please remove the laminator carefully from the transit packaging, place the machine on a flat
work surface. Locate the machine in the area where it will normally be used ensuring adequate
room for the finished laminate to feed out at the back.
3 HOW TO USE
LOADING THE FILM.
Unpack the upper and lower rods. Remove feed tray. Slide the roll of film onto the rods, leaving
equal lengths of rod out of each end. Use the guide marks to position the roll of film. Load the
rods onto the laminator.
THREAD THE FILM.
Do not mistake the re-inforcing bar for idler roller. To thread the film through the “hot” rolls
& pull rolls, please pull the handle forward to release pressure on all the rollers. Push the film
through the rollers and make sure the film is perfectly aligned top and bottom.
(Note: overlap will cause the film to deposit residue on the hot roll and pull rolls, so this
procedure is critical). Replace the feed tray.
HEAT & SPEED ADJUSTMENT
ProMount Plus 2700
1. Turn on the power switch, the digital screen display will show the previous temperature
setting. Please set the temperature to 90°C (194°F) to start the heat process. By pressing the
“ ” or “
” key of the “TEMP/SET”, users can re-set the temperature. The lowest
temperature this machine can be set is 90°C (194°F). The digital screen display will beep
showing the set temperature for 3 seconds. After that, it will show the actual machine
temperature.
2. Press the “HOT” key for heating once the temperature is set and the heater light will glow.
3. The machine will buzz/beep once it reaches 80°C (176°F) for at least 3 minutes. This is to
alert the user that the machine will start running. You can stop the beep by setting the motor
speed to 1.
4. Press the “ ” or “
” key of “MOTOR” to set the motor speed for lamination. The table °C
below gives some common temperature/speed settings for typical uses.
Notes:
If the machine is left unattended and the motor speed is not adjusted, the machine will stop in
approximately 3 minutes. This feature protects the Hot Rollers as they must constantly turn
while the heat is on.
FILM THICKNESS
Temperature
Speed
1.5 Mil (38 Micron)
3 Mil (75 Micron)
5 Mil (125 Micron)
10 Mil (250 Micron)
110°C / 230°F
110°C / 230°F
125°C / 257°F
135°C / 275°F
4
3
3
3
TENSION ADJUSTMENT
Top and bottom supply rolls should have about the same tension. By turning the top roll with one
hand, and the bottom roll with the other hand, it can be determined if one of the rolls is tighter
than the other.
To increase tension, turn the adjusting knob clockwise. To decrease tension, turn the knob
counter clockwise. If the tension is not equal top an bottom, the laminated product will curl. If it
curls up when it comes out of the machine, the top roll is probably tighter than the bottom. If it
curls down, the bottom roll is probably tighter. Even tension on the top and bottom ensures flat
lamination.
REVERSE
The machine has a “REVERSE” function. By pressing the “REVERSE” key, the user can pull
out the documents from the machine to prevent any jam or damage.
CUT-OFF KNIFE
Use the knife set (in the backside of the machine) to trim the documents.
TURN OFF LAMINATOR
When finishing the laminating job, please press the “COOL” key to turn off the heat. The motor
will stop only when the roll temperature is lower than 80°C (176°F) to protect the heated rolls.
We recommend to keep the motor running and turn off the machine only after the roll
temperature is lower than 50°C (122°F). However, incase you need to turn off the motor while
roll temperature is higher than 80°C (176°F), you can adjust the speed to “1” and press the
motor speed key for 3 seconds. If so, the speed will jump to “0” and the motor will stop.
1. This laminator is made to use a 1” core with maximum width 690mm (27”) roll film.
2. If user wants to hold the lamination just temporary without turning off the machine, this can
be done by pushing the HANDLE forward to release hot & pull rolls. This will cause the film
to stop running. Pull the HANDLE backward again to engage the hot/pull rolls and the
machine can do the lamination job again.
3. You can stop lamination by controlling the handle.
TROUBLE SHOOTING
1. The screen will appear “ER1” if the thermometer inside the machine is damaged. In this
case, the machine will turn off automatically in order to protect the machine.
2. The screen will appear “ER2” if the machine keeps heating over 12 minutes. In this case, the
machine will turn off automatically in order to protect the machine.
3. The screen will appear “ER3” if the machine temperature is higher than 200°C (392°F). In
this case, the user will hear “BUZZER” and the machine will turn off automatically in order
to protect the machine.
4. Any of these error messages: ER1/ER2/ER3 may indicate possible replacement needed of PC
board. Please contact your vendor or dealer.
4 CARE AND CLEANING
1. This appliance is for Office or Household use only. Any servicing, other than cleaning and user
maintenance, should be performed by an authorized service representative.
2. Do not immerse in water.
3. To reduce the risk of fire or electric shock, do not remove the base. No user serviceable parts
are inside.
4. Keep your hands and cord away from hot parts of the appliance during operation.
5. Never clean with scouring powders or hand implements.
6. Wipe clean with a soft cloth.
7. Shield is available as an accessory.
5 MOUNTING MADE EASY
USI’s full line of mounting and laminating products are designed and engineered to allow the
novice user to confidently mount and laminate wide format graphic prints. The user selects from
pre-sized mount boards and laminating pouches. Pre-sized means no guesswork. Simply match
up the size of the print to the matching size board or pouch. Save time and money. Trimming and
waste are completely removed. It’s easy, hassle-free, and can be done in two simple steps!
1. Select the correct-size mount board or pouch film for the print.
Note: when using a laminating pouch or mount board with film overlay, the document will be
slightly smaller than the film or board being used, this will allow for encapsulation.
2. Simply slide the print in between the film pouch or mount board pouch and run it through USI
ProMount Plus 2700 roll laminator.
FOAM BOARD OPTIONS
ProMount Foam Board (No Adhesive)
ProMount Foam boards are foam boards without
any adhesive. Easy to use and economical, they
are designed for jobs that will not be displayed for
extended periods of time
Mount a laminated or non-laminated print by
FO
smooth surface
AM
BO
AR
D
3/16” & 1/4” thick
coating its back with a spray adhesive and
applying it to the board.
ProMount Self-Adhesive Foam Boards
ProMount Self-adhesive foam boards are coated
with a layer of adhesive covered with a paper
release liner. Users prefer them when they
process larger runs and want to be sure that the
board, laminate and print have a good bond and a
high-quality professional finish.
Mount a laminated or non-laminated print by
peeling back the release liner to reveal the
pressure-sensitive adhesive. Position the print and
press firmly. When using a heated roll
laminator, you can laminate while applying the
print at the same time.
ProMount Heat-Activated Foam Boards (a.k.a.
Adhesive Boards)
Coated with a layer of heat-activated thermal
adhesive, these boards are designed for
mounting non-laminated prints and require a
heated roll laminator like the ProMount Plus
2700. These boards assure a professional look
with a good bond and a smooth, even surface that
does not peel or blister.
SE
LF
-A
3/16” & 1/4” thick
DH
ES
IVE
BO
AR
DS
adhesive
release liner
HE
AT
-A
CT
IVA
TE
D
heat-activated
adhesive
3/16” & 1/4” thick
Mount a print by placing it between the board and
a release liner then feed it through the laminator.
TIP: Make sure the shiny side of the release liner
is against the board.
ProMount Pouch Boards - Laminate and
Mount All in One Step!
USI’s Pouch boards are constructed from
heat-activated foam boards with a film laminate
hinged to the top of each board to form a pouch.
This method is quick, simple and requires no real
training. Each board has a high-quality
professional bond and rich finish.
Mount and laminate in a single step, by sliding a
print between the board and film, then feeding it
through a heated roll laminator. Like
heat-activated boards, the laminator must be able
to open wide enough to feed the board through.
PO
UC
HB
OA
RD
film
3/16” & 1/4” thick
heat-activated
adhesive
USI offers two options:
ProMount Pouch Boards for your everyday
applications.
ProMount Ultra Pouch Boards are ultra-rigid
boards to help prevent warping or bow when
working with prints and wide-format graphics.
MOUNTING INSTRUCTIONS
The USI ProMount Plus 2700 is especially designed to laminate and mount up to 1⁄4” thick.
Mounting greatly improves the presentation.
Thermal mounting is the process of adhering a document to a stiff support, backing, or substrate
such as foamboard through the use of adhesives, pressure, and heat. Over 90% of all documents,
prints and similar substrates have the potential to be mounted.
To mount make sure the handle is lifted up to create the gap in the rollers. Position your item
on the mounting board and gently feed it into the rollers. See below for additional tips. For best
results, USI recommends using the time saving mounting boards described below.
The six most popular mounting methods with the ProMount Plus 2700:
1. ProMount Pouch boards – laminate & mount all in one step!
Simply remove the lamination film rolls from the ProMount 2700. Then slide the print between
the board and the film and feed it through the laminator.
If you require an ultra-rigid board to help prevent warping and bow with wide format graphics,
then choose the ProMount Ultra Pouch Boards.
2. ProMount Heat-Activated Foam Boards – for mounting non-laminated prints on a board
with heat-activated thermal adhesive. Remove the lamination film rolls from the ProMount 2700.
Then place the print between the board and the release liner and feed it through the laminator.
TIP: Make sure the shiny silicone side of the release liner is against the board.
3. ProMount Self – Adhesive Foam Boards – for mounting laminated or non-laminated prints.
Remove the lamination film rolls from the ProMount 2700. Then peel back the release liner to
reveal the pressure-sensitive adhesive. Position the print and press firmly.
If desired, you can laminate while applying the print at the same time too.
4. ProMount Foam Boards (No Adhesive) – Coat the board with a spray adhesive and mount
print.
5. Encapsulate with ProMount Foam Boards – laminates both sides of board for a strong, rigid
finish. Place the print on either a heat activated or self-adhesive foam board and then feed the
board through the laminator.
6. Mount and Create a Self-Adhesive Sign, Poster, or Sticker...all-in one step.
Install USI’s Pressure Sensitive-Back Decal lamination film on the bottom roller and USI
OptiClear or DigiSeal film on top. Then run print through laminator and peel & stick print onto a
mounting board or other substrate.
USI Free Technical Service assistance is available to answer your questions or provide helpful
tips and advice. 1-800-282-9290 or online: www.USI-Laminate.com
FILM
USI offers the highest quality lamination film on the market today.
OPTI CLEAR® ROLL FILM
The Clearest Film In The World
Opti Clear® Roll Film produces a permanent bond to paper and additional substrates including
those with wax based ink, clay coated surfaces and heavy ink laydowns. Opti Clear® has a
melting temperature of approximately 220°-250°F. Exceptionally clear results makes this film the
optimum choice for library book jackets, poster boards, menus, educational aids and more.
PHOTO PLUS® ROLL FILM
#1 Film For Photographic Purposes
USI’s premium Photo Plus® Roll Film utilizes the highest quality and most aggressive
adhesive to insure a superior bond to photographic surfaces. Adherence capabilities are numerous
and include plastic, metal, vinyl, wax based ink, photographs and color copy bonding.
Excellent resistance to extreme temperatures ensures a hard, solid product that will not crack,
break or soften. The bonding temperature of Photo Plus® Roll Film is 235-250°°F.
DIGISEAL® ROLL FILM WITH UVI
USI’s DigiSeal®, low temperature with Ultra Violet Inhibitors (UVI), Roll Film is the ideal
choice for laminating sensitive mediums or latex based surfaces, such as wide format inkjet
output. Designed with special inhibitors that block the damaging effects of ultraviolet radiation
sunlight and fluorescent lighting. DigiSeal® has a melting temperature of approximately 185°220°F.
ULTRA VIOLET ROLL FILM
UV Roll Film was designed with UVA and UVB inhibitors that serve to block the sun’s rays.
This specially coated film eliminates the deterioration and breakdown caused by extreme
exposure.
Laminated projects can be produced well in advance and displayed indoors or outdoors without
worry. UV Film has a melting temperature of approximately 220°-250°F.
PRESSURE SENSITIVE ROLL FILM
Pressure sensitive decals can be manufactured in minutes, saving budgeting dollars. Just remove
the release liner on the back and stick to most any surface! Combine with medium weight, 5.0
mil Opti Clear Roll Film to produce the best results. Pressure Sensitive Film has a melting
temperature of approximately 235°-275°F.
ULTRA MATTE ROLL FILM
Ultra Matte Roll Film easily accepts pen, pencil and marker, while resisting smudging. The
frosted glare free finish provides exceptional indoor-outdoor application. Ultra Matte Roll Film
offers firm adherence to paper, vinyl, plastic and some metal. Ultra Matte Film has a melting
temperature of approximately 235°-250°F.
STANDARD ROLL FILM
Superb value for your dollar, USI’s Standard Roll Film is the obvious choice for anywhere cost is
the deciding factor. Standard Roll Film offers strong bonding characteristics to paper and paper
type products. This low density resin has a melting temperature of 275°-300°F and a bonding
temperature 280°F. FDA Approved.
VALUEWRAP ROLL™ FILM
USI’s most economical film yet, ValueWrap is the perfect film for our price-sensitive customers.
This film works best on prints with low ink coverage, and is a great choice when laminating
crafts, projects, and other every day items where the brilliance of our higher end films is not
necessary. Bonding temperature is 260°F.
USI provides FREE Technical Assistance for helpful tips and advice.
For advice or to order, call:
1-800-282-9290 or online: www.USI-Laminate.com
USI- Your Source for Lamination and More!
98 Fort Path Road Madison, CT 06443-2264 USA
(203) 245-8586 • (800) 243-4565 • Fax 24 Hour (203) 245-7337
USI# 8534
PROMOUNT PLUS 2700