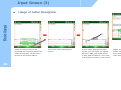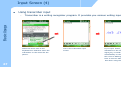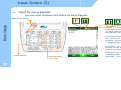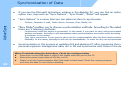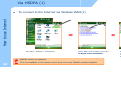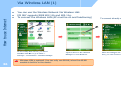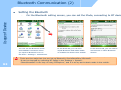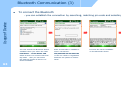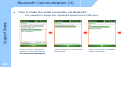
1
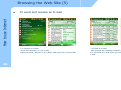
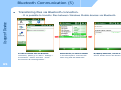
Note 2 z This manual is subject to copyright protection along g with all relevant rights. rights z No part of this document can be copied, reproduced d, changed or translated in whole or in part by any means without prior written consent of M3 Mobile Co., Ltd.. z The content of the manual is provided “as-is” and be b subject to change at any time without notice. z M3 Mobile Co., Ltd. makes no warranty of any kind with regard to this manual, including, but not limited to, the implied warranties of merchantability and fitness for a particular purpose. z Microsoft, ActiveSync, Windows, Windows logos, Windows Mobile 5.0 logos are trademarks, or registered trademarks of Microsoft Corporation in the United States S and/or other countries. Microsoft OEM products are licensed by Microsoft Licensing Inc., a entirely owne ed subsidiary of Microsoft Corporation. z All other product names in this document or producct are company names, trademarks or registered trademarks of the respective owners. Copyright and Agreement 3 z This user manual is provided “as-is”. as is . It may contain n editing error or omitting due to the difficulty of expressing technical feature. z If an application program provided by other supplie er using by M3 SKY, refer to the supplier for a program manual. z The application program providers have the responssibility of indicating their contact number for customer service on M3 SKY terminal, terminal item box, box or program. program z M3 Mobile Corporation do not warranty any program ms produced and added by the third software companies after M3 SKY products are distributed from factoriess. z M3 Mobile Corporation has the right to ask warrantyy of any programs to the program providers to meet the needs of mobile networking companies. z The contents in the user’s manual are protected under the Software Copyright Act. Copy, reproduction, distribution of the contents in the user’s manual witthout any written agreement notice of M3 Mobile Co. Ltd., is considered as criminal actions. z Windows, MS Office, Outlook, ActiveSync, Internet Explorer programs are the registered brand of Microsoft. z M3 SKY is the registered g brand of M3 Mobile Co. Ltd d. z The brands of other products and service referred in this manual belong to corresponding providers. Caution when using M3 SKY (1) z User Caution – – – – – – – z Carrying and Storage Caution – – – 4 When the unit is lost or stolen, notify to netwo ork provider immediately. Do not rent the unit to third person without au uthorized permission. Do not use the unit while driving. For technical help, contact designated service centers. Contact responding suppliers directly for questtions on applications and work programs other than hardware and basic installed applications. Use supplied adapter and accessories by M3 Mobile M Co. Ltd. Any defect on a unit while using other batterie es, chargers and accessories can not get warranty. Avoid to use the device under high temperaturre and humidity. It may cause fatality to the device. Avoid intentional dropping from high elevation. It may cause fatality to the device. Charge batteries fully before the first time use of the device. Caution when using M3 SKY (2) z Do not reconstruct – – – z Illegal copy of mobile phone is prohibited – – – 5 Do not reconstruct M3 SKY for any purpose. It may cause fire in the unit, and wound or ele ectric shock to users. Any defect caused by reconstructing units, can n not get warranty. The person who reproduces mobile phone and d uses this mobile phone is considered as criminals. The use of lost or stolen mobile phone is considered as a criminal act. Keeping the lost or stolen mobile phone after turning t power off, is considered as a criminal act. Size and Features Used frequency band WCDMA : 2100 / GSM G 850 WCDMA : 1900 / GSM G 900 WCDMA : 850 / G GSM 1800 G GSM 1900 (TX) 824 ~ 849 MHz / (RX) 869 ~ 894 MHz (TX) 880 ~ 915 MHz / (RX) 925 ~ 960 MHz (TX) 1710 ~ 1785 MHz / (RX) 1805 ~ 1880 MHz (TX) 1850 ~ 1910 MHz / (RX) 1930 ~ 1990 MHz Band width 200 KHz (GSM) / 5MHz (3G) External appearance 78.6 x 163.5 x 24.9mm (Width x length x height) Weight 320g Operational p Temperature Main body -10 ℃ ~ +50 ℃ Adapter -10 ℃ ~ +50 ℃ Relative Humidity P AC Power 6 5% ~ 80% Input : AC 100 0 ~ 250V, 50 ~ 60Hz Output : DC +5.2V, + 3.0A Supported Frequency Bands can differ depending on the su upplied antenna. C CONTENTS S Contents 7 z Note 2 LED/Battery attaching/detaching 17 z Copyright and Agreement 3 Charging 18 z Caution when using M3 4 How to connect to PC 19 z Size and Features 6 1. M3 Introduction 9 Product Composition 10 0 Name and function of each part 12 2 Input Buttons 13 3 Soft/Hard Reset 15 5 How to use stylus pen 16 6 2. Basic Usage 20 Calibration 21 Main screen 23 Input screen 24 3. ActiveSync 29 ActiveSync Introduction 30 Installing ActiveSync 31 Synchronization of data 32 Contents C CONTENTS S 4 How to use internet 4. 8 33 3 6 Usage of Device 6. 56 Via HSDPA 34 4 Camera 57 Via Wireless LAN 36 6 Bluetooth 61 Via Wireless WLAN 39 9 BTexplorer 66 Browsing the Web Site 42 2 IrDA 69 5. How to use the Phone 47 7 GPS 70 Init Screen 48 8 Scanner 72 Phone Control 49 9 RF ID RF-ID 78 Phone call and receive 50 0 Phone book 51 SMS send and receive 52 2 Phone function 54 4 Phone setting 55 5 1. Introduction Product Composition Name and Function of each part Input Buttons Soft/Hard Reset How to use Stylus pen LED Battery B tt Att Attaching/Detaching hi /D t hi Charging How to connect to PC 9 Product Composition (1) Introduction z At the first time of opening the product box, please e check if it contains all the basic components, listed as f ll i following. M3 SKY main terminal + 2 units of standard battery Ear Mic Phone + 2 units of Stylus pen 10 Cradle + USB cable Porta able Adapter The product components may differ depending on the sup pplied products. CD + ActiveSync 4.x Product Composition (2) z How to use the manual – Introduction – 11 – – This manual provides detailed information to make m using the device easier and faster. The content related to phone or communicatio on in this manual is only applicable when the device is equipped with GSM/HSDPA module for Voice and a Data communication. The features described in this manual can not be used when it is not equipped in the device (WWAN, WLAN Bluetooth, WLAN, Bluetooth IrDA IrDA, Scanner Scanner, Camera Camera, GPS S). S) The content of this manual is subject to chang ge without prior notice due to product improvement or modification of its functions, etc. Name and function of each part Introduction Charge Ramp (Left) GSM/HSDPA Status R Ramp (Center) (C ) Scanner Ramp (Right) a Camera Button Pistol Grip Connecter Battery(built in) Scanner Button b Barcode Scanner Window a b Stylus Pen Antenna Mini SD Extension Slot Ear Mic Plug c Volume Button c d Flash Camera Battery Lock e Battery SIM Card d Slot l Key Pad 12 Charge & USB/serial port Lower (Cradle) use d, e Infrared Communication Reset Switch Port (IrDA A) LCD touch Screen Input Button Volume Button Introduction Start button Alphanumeric button Phone/Call button Left, right function button End button Camera Button Scanner Button Phone/Call button Power button Left, right function button Start / End button 방향 버튼 Function button Direction Button 13 Return button Backspace button Input keys Power button Direction Button Input keys Return button Backspace button Input Button Component Power button Introduction Phone/Call function End function Input keys Left, right function button Alphanumeric Start button Backspace p button Press to toggle the device on/offf. Long press to menu (Backlight, Display, etc) Function ecute the phone press to accept the call or to exe press to hang-up/reject the call.. Press to input alphabet characte ers or numbers press to lunch an assigned application or function et and number input press to switch between alphabe Press to display the Start menu.. press to move back p Function button press to Function Key with (*, 0, 0 #) Direction button press to move left,right and up,down Return button 14 Description press to confirm the action Scanner button Press to launch the barcode datta scan application Camera button Press to launch the Pictures & Videos V Volume button Press the top key to increase vo olume, press the bottom key to decrease volume. Some key functions might not be supported, depending on the t option. Soft/Hard Reset Introduction ① ② ③ Press ①+② and ③ p power button z Soft Reset - A soft reset allows your device to get a fresh start, similar to rebooting a computer. - This restarts your device and adjusts memory allocation. - All records and entries are retained after a soft reset. - Unsaved data in open programs may in some cases be lost. z To perform a hard reset : z Hard Reset - A hard reset removes power to your device. - This erases all records and entries,, deletes all additional programs you have installed, and restores the device’s default factory settings. - Never perform a hard reset unless a soft reset does not correct your problem. tt ffor more th d tto tturn off ff th fi db ff) ÆP Press th the power b button than 12 seconds the power ((can b be confirmed by LCD off) Æ While pressing call and end button, please press the powe er button shortly. Æ When the [CLEAN BOOT WARNING] window will pop up with w message “All data will be lost! Do you want to continue?” “1. YES 0. NO, please press 1 to perform the Hard Rese et. 15 Please mind that you need to set up the standard timezone date, and time. After power off. How to use Stylus Pen z z Tap p Introduction Tap the touch screen one time using a Stylus pen to select and execute items and files. 16 z Drag g It is used when w you select the text. Please dra ag the desired part with stylus pen attached on the screen. Long Press Leave Stylus pen touching the screen for long and you can select the menu on the pop-up screen. You can also select functions available in the designated item using the popup menu. The function of the pop-up menu can be different according to the program. LED / Battery attaching/detaching g z LED Alarm Introduction – 17 Informs Charging, Scanner Status. Type LED Status LED for charging Red Green Blue Blinking WWAN Status LED Blue On Blue OFF Scanner LED z Green Battery attaching/detaching – Details Charging Charging g g complete p WWAN Standby (within range of phone/internet) WWAN in use (phone/SMS/internet in use) WWAN is off or out of range When the barcode data is successfully read – Attaching Battery As picture shown, put the battery pack to back of PDA, and lock the battery pack with locking device. Detaching Battery Press locking device to the right, then using upper notch, detach the battery from main body. Charging z Introduction z 18 z Connect plug-in from charger to charge jack of maiin b d or charge body, h jack j k off cradle, dl and d then th place l main in body onto cradle. Charging LED Type LED Status Details Direct charging to main body Red Green Charging ete Charging Comple Cradle Charging (Extra battery charging) Red Green Charging Charging Comple ete When charging, the status of the battery attached tto main body can be confirmed by the LED left of upp per corner of main body. Also the status of Sub-batteryy can be confirmed by the LED right of low corner of Cradle. z Charging in Cradle Separate Battery Main body Charging LED Separate Battery Charging LED z Charging using portable adapter Do not use any other charger except one (5.2 V / 3A) provide ed . Make sure to handle it gentle; damage with excessive force may m cause no warranty. Risk of explosion if battery is replaced by an incorrect typ pe. Dispose of used batteries according to the instructions. When attached battery is completely discharged, plug charg ger to main body, then reset the device to check if screen is back on. To use, do at least 10 miinute charging. How to connect to PC z z A cradle of M3 SKY supports charging and USB conn nection. Connecting step of cradle of M3 SKY is as following. – – Introduction – – z z Connect charger to USB cradle. (24pin connector) Connect charger to power source. (to wall) Connect USB cable of USB cradle to USB port of desktop p PC. Place M3 SKY onto docking cradle then execute Synchro onization with Desktop PC. The location of USB port can be at the back, front or o side of PC and the shape of USB port is identical on Desktop PC P and Notebook. USB host function is available by putting USB cable into USB port of C Cradle. adle USB Host/Client AC Power USB Host/Client changeover switch H Connecting to Cradle 19 C 2. Basic Usage Calibration Main screen Input Screen 20 Calibration (1) z Calibrate the touch screen as shown below, below, at first time use or when cold (hard) booted. booted ② ③ Basic Usage B e ① Tap the screen one time with a Stylus pen 21 Tap the (+) mark with the Stylus pen as it moves around. You can see the screen how to use the Stylus. If you don''t need it, click the Skip. ① Press and hold the Stylus pen on the screen then select the Cut on the pop-up menu. ② Press and hold the Stylus pen like the arrow on screen, Tap the Paste on the pop-up menu. ③ When all p processes are complete, p , click the Next. Calibration (2) Calibration continue.... continue Basic Usage B e z Set up the standard time zone date, and time. To set up a password, tap 'Next' otherwise tap 'Skip'. To set up a password set up a password type and password. 22 Choose outlook e-mail to set up p an e-mail account and then tap the 'Next'. (POP3/IMAP/Outlook/E-mail) If you choose outlook E-mail or POP3/IMAP and then tap the 'Next', you should set up it Step by step. You can see the screen above after ft th the C Calibration. lib ti Main Screen z Main screen – Button Main Screen is set below Start menu Start menu Basic Usage B e Info bar Info bar T k iinfo Task f View the power, modem, sound, input mode and connecting view. D /Ti Day/Time iinfo f Vi View th the currentt d date t and d ti time. Wireless info o Wireless info View the Wireless power and state. Messages info Today info Pocket MSN info Messages info Task info Today info Lock info Lock info Left / Right functio on info 23 Select the program you want to use. Day/Time inffo User info User info function View the personal information. View the Messages received. View the task information information. View the Today’s information. View the screen / Lock information. Pocket MSN info View the Pocket MSN information. Left/Right Function info View the Left / Right information. Input Screen (1) z To use Input - Process this program " Start > Programs > Word Mobile". To use the Keyboard Input Basic Usage B e z Tap p the arrow next to the keyboard icon and then select the keyboard on the menu screen as a picture above. 24 This is the Keyyboard Input Screen. You can input p the letter,, number and characters when you click the each icon on the keyboard Input screen. Input Screen (2) Usage of Block Recognizer input input. Basic Usage B e z Tap the arrow next to the keyboard icon and then select the Block Recognizer on the menu screen as a picture above 25 It is the screen of block recognizer input. In this input screen you can input letters in 'abc' and numbers in '123 ‘ each h in the h input box b seen on the h screen. In the input screen of block recognizer you can input special letters and characters by tapping the input box once. Input Screen (3) Usage of Letter Recognizer Basic Usage B e z Select the arrow next to the keyboard icon and then Select the 'Letter Recognizer' on the menu screen as the picture above. 26 This is the 'Letter Recognizer' screen. In the ‘Letter Recognizer' input screen, you can input the capital letters in 'ABC', the small letters in 'abc' and numbers in '123' each in the input box seen on the screen. Please choose ‘Options…’ on the input menu. Select ‘Letter Recognizer’ as input method and then click ‘Options…’. Here you can configure the input modes. Input Screen (4) z Using transcriber input Transcriber is a writing recognizer program. It provides you various writing input and input menu. Basic Usage B e – Select the arrow next to the keyboard icon and then select the Transcriber on the menu like the picture. 27 This is the Transcribe er input screen. If you input letters, numbers and characters on the screen with the stylus y p pen,, it would be written automatically on the place where the cursor is blinking. You do not have to concern about the input box when using transcriber. Input Screen (5) z Input by using Keypad – You can input numbers and letters by using Ke eypad. Basic Usage B e Alphanumeric button Convert ‘1 ,A, a’ using the input convert button on the input screen as the left picture. Then you can input capital letters, small letters, numbers and characters using keypads. For example, in the case of inputting the M3 SKY, Convert to ‘a’ > Keypad 6 > convert to ‘1’> Keypad 3 > Convert to ‘A’ > Keypad 7(4 times) > Keypad 5(twice) > Keypad 9 (3 times) By pressing ‘*’, ‘0’,’#’ while ‘Fn’ button is pressed, you can apply ‘Space’, ‘Enter’ and ‘OK’ function respectively. Function button 28 Input Key button Pressing ‘Fn’ Fn Key will change the function mode in following order : ‘Fn’ one time mode -> ‘Fn’ hold mode -> ‘Fn’ disable mode 3. ActiveSync ActiveSync Introduction I t lli ActiveSync Installing A ti S Synchronization of Data ActiveSync Introduction z Sync is an abbreviation of “Synchronization” Synchronization” and refers to the process of making data in PDA and desktop computer to be same by linking g both data. A ActiveSync c – 30 – z z Sync is an abbreviation of ‘Synchronization” an nd refers to the process of making data in PDA and desktop computer to be same by linking both data. Wh hen either PDA or PC modifies data, it updates others to the most recent data. Not all the data is synchronized at same time time. It follows the option settings of ActiveSync ActiveSync, provided by Microsoft. By linking M3 SKY and computer, you can make m data in both devices in the same status (synchronization) or install, copy, move, dele ete programs for business purpose and others. It is compulsory to install this program in ord der to install business programs, synchronize data, back up and synchronize contact numbers in n an address book, etc. Do not connect USB of Cradle to desktop PC before installing g Active Sync to desktop PC.. It may cause a desktop PC cannot recognize PDA since Active e Sync contains PDA program driver. ActiveSync install / connect z To install ActiveSync - A ActiveSync c – – z Select the ActiveSync program in the CD provid ded, and then install it to the computer. Once the installation is complete, connecting window w will start. Connect the cradle with PC using USB cable, and then dock d the device on the cradle. When the device is recognized on the PC, Conn nection will be established after assigning the port for it automatically. The definition of Partnership – It is the process of paring PC with PDA in order to exchange the data each other. Via this process, the data on the PC and on the PDA can be synchronized. h i d ※ The synchronization is available with Outlook 20 003 or above version. It is not supported on the outlook express which is provided together with Windows OS. 31 Please re-try the synchronization if connection is disturbed by strong noise or static. –To install ActiveSync on the host computer, download ve ersion 4.1 or higher from the Microsoft web site at http://www.microsoft.com. Refer to the installation n included with the ActiveSync software. –Microsoft recommends installing ActiveSync on the host computer before connecting the mobile computer. USB connection to PC Synchronization of Data z If yyou see the Microsoft ActiveSync y window in the desktop d p PC,, you y can find an option p icon. If you y click this option icon, taps such as “Sync Options”, “Sync Mod de”, “Rules” will appear. z “Sync Options” is a menu that you can select an item to synchronize. A ActiveSync c – z 32 “Sync M “S Mode” d ” enables bl you to t choose h synchronization h i ti n methods. th d According A di to t the th selected l t d synchronization h i ti mode, d there are 3 following methods: – – – z Contact, Calendar, E-mail, Tasks, Memo, Favorite, Files,, Media, etc. Continuously while the device is connected: In this mod de, if you want to carry out synchronization, connect the device to the desktop computer. ActiveSync will immediately start syn nchronization and synchronize according to the user’s input of changes in a computer or the device. Only upon connection: If you want to carry out the syncchronization after the first synchronization on a manual basis, click Sync. Manually: In this mode, mode ActiveSync will not run automattically. tically In order to carry out synchronization synchronization, click Sync Sync. Synchronization is the process of updating M3 and desktop d PC after comparing their data. Any files including personal organizer management data, etc in M3 can n synchronize with those in the desktop PC. When Troubleshooting the ActiveSync, Check the solution ns below. z Ensure the correct USB cable is used in the cradle with USB port of the PC. z Ensure the power input cable of M3 Sky or LCD. z Please re-try the Synchronization after Soft-reset or Hard-resset. Finish the running program and save the data for sure before resetting. 4. How to use Internet Via Wireless WAN Via Wi Wireless eless LAN Browsing the Web Site Via HSDPA (1) To connect to the Internet via Wireless WAN N (1) How to use Internet z Tab ‘Start > Settings > Connections’ 34 Select ‘Add a new modem connection’ of ‘My My ISP ISP’ in the ‘Connections’ Connections . WWAN service is optional. It is not available in the device which does not have WWAN module installed. Put the name you want into the ‘Enter Enter a name for the connection’ connection . Then select the ‘cellular Line(GPRS)’ in the ‘Select a modem’. Via HSDPA (2) To connect to the Internet via Wireless WAN N (2) How to use Internet z Input the Access point name suitable to the SIM Card / Operator company co pa y o of Network et o tthen e Tab ab tthe e ‘Next’. 35 Tap the ‘Finish’ after input the User name and password according to the setting. (In some cases, it is required to set IP address at the advanced menu.) Select the ‘Manage existing connections’ on the Connections. Choose the ISP which you want to connect to as picture above. * The saved settings automatically applied at connecting. You can explore the Internet using WWAN connection. Via Wireless LAN (1) z z How to use Internet z You can use the Wireless Network Via Wireless LAN. M3 SKY supports IEEE 802.11b and 802.11g. To connect the Wireless LAN (AP must be on and fun nctioning) On the Today Main screen, you select l b or go to ‘‘Start > Wireless state bar Settings > Connections>’ Wireless Manager. 36 Tap the WI-Fi WI Fi on the t ‘Wireless Wireless Manager' to turn W WLAN on. Wireless LAN is optional. You can only use WLAN, when the WLAN module is built in to the device. To connect directly on the Main Screen When the dialogue box is appeared, Select the AP you want and then, you can connect the Network with it. Via Wireless LAN (2) To connect via Wi-Fi Wi Fi menu How to use Internet z On the O th settings tti screen, you select l t Wi-Fi Icon. You can also tap Start > Settings > Connections>Wi-Fi. 37 Configure C fi the th connectt type t th then click the 'Next'. Configure f the h connect type then h click l k the h 'Next'. ' ' Input the authentification data then click the 'Next'. After f configure f Networkk authentification, h f tap the 'Finish'. You can see the wireless Networks available. Via Wireless LAN (3) z Continue from the last page Configure DHCP / Static IP How to use Internet – Tap an adapter to modify setting on the wireless LAN card and select the 'Edit'. Edit . 38 If you configure the e IP as DHCP, Click the 'Use Serve er-assigned IP address. If you configure the e IP as Static, Click the 'Use Speciific IP address. Via Wireless WLAN (1) z z To connect directly on the Main Screen How to use Internet z You can use the Wireless Network Via Wireless LAN. MM3 supports IEEE 802.11b and 802.11g. To connect the Wireless LAN (AP must be on and fun nctioning) On the Today Main screen, you select l b or go to ‘‘Start > Wireless state bar Settings > Connections>’ Wireless Manager. 39 Tap the WI-Fi WI Fi on the t ‘Wireless Wireless Manager' to turn W WLAN on. Wireless LAN is optional. You can only use WLAN, when the WLAN module is built in to the device. When the dialogue box is appeared, Select the AP you want and then, you can connect the Network with it. Via Wireless WLAN (2) To connect via Wi-Fi Wi Fi menu How to use Internet z On the settings screen, you select Wi-Fi Icon. You can also tap Start > Settings > Connections>Wi-Fi. 40 Configure the co onnect type then click the 'Next'. After configure Network authentification, tap the 'Finish'. You can see the wireless Networks available. Via Wireless WLAN (3) z Continue from the last page How to use Internet – 41 Configure DHCP / Static IP Browsing the Web Site (1) How to use Internet z Microsoft Internet Explorer - Via Wireless WAN , Wireless LAN and Activve sync connection, you can browse the web. - You can download programs and files by accessing a the Internet. To use the Internet Explorer Tap 'Start > Internet Explorer 42 Address Window Searching This is the Internet Explorer processing screen. Input the address you want on the address window in upper of the screen, then click the 'search'. It will try to connect to that web address via Wireless network that is connected. Browsing the Web Site (2) Continue from the last page. page How to use Internet z On the 'Menu > Favorites...' you can see the list of sites that you have saved and browse to it directly. The favorite page is like the picture above. 43 On the Menu > History... You can see the list of sites that you have recently visited. The history page is like the picture above. See the 'Start > Help' if you want to know more about how to o use the Internet Explorer Browsing the Web Site (3) To set up an e e-mail mail account How to use Internet z Process the 'Start Start > Messaging Messaging'.. Select the 'Menu > Tools > New Account...in the outlook E-mail box. 44 Set an E-mail p provider for 'other‘ then tap 'Next.' Input p the E-mail address on the Enter e-mail address , then tap ‘ Next '. When the Status is for completed, tap the 'Next'. Browsing the Web Site (4) Continue from last page How to use Internet z Set an E-mail provider for 'other‘ then tap 'Next'. 45 Select the Account Type and put the Name then tap 'Next'. Input the 'Incoming mail, Outgoing mail, Domain' then select 'Finish'. * For detailed setting menu, menu please click ‘Options’. After finishing the setting you can send and receive E-mail using the e-mail account. Browsing the Web Site (5) To send and receive an E-mail E mail How to use Internet z < To receive an e-mail> Select the 'Message' on the 'Today' Select the 'Send d / Receive' in the 'Menu' u and a d check the received d mail. a 46 <To send an e-mail> After process the 'Message' program , select the 'New' . You ou can a send d an a e-mail a when you select the 'Send' d after a writing g a new e-mail. 5. How to use the Phone Init Screen Ph Phone Control C t l Phone call and receive Phone book SMS send and receive Phone functions Phone setting 47 Init Screen How to use the Phone z Phone Main Screen Network Type 3G:HSDPA / G:G GSM GSM/HSDPA Operator Call Status Call Status Input Number Volume Input Number Key Pad Phone Menu It indicates the current Network Provider. It shows Call Status. It shows Inputted Numbers. Key Pad It is used to dial the number and can be used as speed-dial. Contact It shows Phone Book Dialog. Networkk Type Contacts 48 GSM/HSDPA Network Status GSM/HSDPA Operator It displays the availability of GPRS and EDGE, GSM, HSDPA connection. GSM/HSDPA Network Status It indicates the signal strength. Volume It is Volume on/off and vibrate Phone Menu Talk, End, Speed Dial, Call History, etc menu… Phone Control Phone Program On/Off How to use the Phone z Ph hone Call Send/End SEND END Select the SEND and END button like the piccture above to start and finish the Pho one program. You can turn on and off phone in Wireless l Manager 49 z Tap the Phone button on the left bottom of the h Today d Screen and d then h you can process the h Phone program. Also you can finish the program using the X button. Phone Call and Receive Phone Call z Phone Receive How to use the Phone z To make a call: 1.Input number via program keypad or device d keypad. k d 2.Make a call by pressing the ‘Talk’ button on the program, or pressing ‘SEND’ button on the device. 50 To hang up: Press the ‘END’ button on the program or on the device. When you get the Incoming Call, you can receive the phone call tapping the Answer button. If you don’t want to receive it just tap the Ignore button. Phonebook z To use Phonebook Searching Contacts How to use the Phone New Contact Searching A name or Number. New SIM Contact Contacts Menu Contacts Menu 51 Contacts Option Input the new contact Input the contact to the SIM Card. Send Contact Transmit the information of Contact by BEAM or SMS. C Copy/Delete /D l t C Copy or delete d l t the th Contact C t t Options Set the Options for Contact. View By See the Contact by Type ( Name , Company, Number … ) Filter Contacts Option You can search the contacts by writing the name and number or tapping. Filter the information you want. Call W/H/M Call by the number on the Contact Contact. Send E-mail Send an E-mail by the address on the Contact. Send SMS Add to Speed Dial Send SMS by the number on the Contact. Add the number on the Contact to Speed Dial. Send Contact Send the information of Contact by BEAM or SMS. Copy/Delete Copy and Delete the Contact. SMS send and receive (1) How to send SMS How to use the Phone z Select ‘message information’ menu on the main screen to send SMS. You can also send SMS by selecting ‘SMS send’ menu on Contacts or any other applications. 52 Change to the ‘Text Messages’ on the Message Program like the picture above and tap the ‘New’ on the bottom. Input the phone number and message. Tap the send to send SMS. You can see the pop-up screen when SMS is sent successfully. SMS sent and receive (2) How to receive SMS How to use the Phone z When connected to the GSM/HSDPA network, new message arrival will be alerted a picture above. 53 By tapping one of the received messages, the content will be dissplayed on the separate window as picture e above. Controlling received SMS can be done by using the menu on the ‘New Text Message' alert window or on the Text Messages program. Controls while on the phone How to use the Phone Functions while on the phone Change to Mode avvailable to input the Number on the screen. Mute Setting for receiver not to hear my voice while on the phone. Hold Hold for a momentt while on the phone Contact End Move to Contact End phone call he phone Featured functions while on th You can use various functions when yyou select the button on the bottom while talking on the phone. 54 Keypad You can see the list of recent calls byy selecting g ‘Call History’. y You can take a memo While talking on the phone by selecting the Note. Phone setting How to use the Phone Phone setting 55 Call Barring Block the calling to the specific number. Caller ID Turn on or off the Caller ID function. If it is enabled, your number will be shown to the receiver. Call Forwarding You can forward the incoming call to the other number. Call Waiting Voice Mail Text Messages Fixed Dialing Tap the ‘Start > Settings > Personal tap > Phone’ and in that menu you can set the Security and Sounds. Check the ‘Require PIN when phone is used used’ check box when PIN lock is required. Tap the ‘Start > Personal Tab > Phone > Network’ to set an information related to the Network.. ( Change the Network ..) Tap the ‘Start > Personal Tab > Phone > Services Tab ‘ to set an information related to the Service. ( In the Network or SIM ) You can receive another call while you are talking on the phone. Set the SMS Service Center number and Voice Mail number. Limit the available phone functions using PIN2. Description of Service Menus 6. Usage of Device Camera Bl t th Bluetooth BTExplorer IrDA GPS Scanner RF-ID To use the Camera (1) z Notice before taking pictures - The camera equipped with the M3 Sky is suppo orted 2 mega pixels. Usa age of Devvice Function Mode Still Normal, Burst, Timer Brightness Resolution Whi Balance White B l Flash AF N/A -3, -2, -1, 0, +1, +2, +3 QCIF, QVGA, CIF, VGA ,SVGA, SXGA, UXGA QCIF, QVGA Comment Setting for taking photo Setting for Brightness Setting for size A Automatic, i Sunny, S Cloudy, Cl d Fluorescent, Fl Incandescent I d Setting for White balance Flash ON, Flash OFF Setting for Flash ON/OFF Trig AF Setting for Auto Focus C Camera Program P Processing P i Screen S 57 Video Camera is optional. On the device with no built-in camera, Camera function can not be used. QCIF(176x144), QVGA(320x240), CIF(352x288), VGA(640x480), SV VGA(800x600) SXGA(1280x960), UXGA(1600x1200) To use the camera (2) z To process the camera program Ussage of Devvice - You can process the camera program when you u tap the camera button or tap the camera icon on the 'picture or video'. Select the 'Start > Programs > Pictures & Video. 58 You can process the camera program when you select the camera icon on the Picture & Video or select the camera icon in the menu. Tap the ‘Menu > Options … > Camera Tab’ and then you can set the route of the storage memory , name and quality. You can set the Video on the Video Tab. To use the camera (3) Taking a Still photo Usa age of Devvice z Execute the camera program first. Move around to focus the desired item. Finally press the camera button to take a picture. After executing the camera program , Preview mode will be changed t standby to t db mode d after ft certain t i amountt off ti time. In order to start Preview Mode again, just tap the screen or press the camera button. 59 After taking a picture, the captured image will be displayed on the screen. If you want to execute the camera program, tap the camera button at the bottom or click the camera icon on the left of window. You can see the list of pictures taken previously by tapping ‘Thumbnails’ in th C the Camera shooting h ti mode. d To use the camera (4) Taking videos Usa age of Devvice z If you want to take a video, select ‘Menu > Videos' after executing the camera program. 60 While taking a vid deo, you can either stop (by tapping stop button) or pause. (by tapping pause button) If you want to watch the video taken, Select the 'Thumbnails' first to see the list of video files available. When you select the video you want, you can play the video recorded. Bluetooth Communication (1) Bluetooth On / Off Usa age of Devvice z On the 'Today Main Screen' , select the Wireless State bar or Tap 'Start > Settings > Connections and select ‘Wireless Manager’. 61 To tu urn on/off Bluetooth, tap the Bluetooth on the Wireless Manage The status of Bluetooth can be seen on the wireless status bar on the main screen. Bluetooth is optional. Device without built-in Bluetooth can not use Bluetooth service. Bluetooth support the transmission and reception of files be etween the serial connecting service and Windows Mobile device. Bluetooth Communication (2) z Setting the Bluetooth On the Bluetooth setting screen, you can sett the Mode, connecting to BT device and COM settings Usa age of Devvice - You can set the Bluetooth mode and establish connection when you tap the 'Bluetooth' icon on the Start > Settings > Connections. 62 In the Mode tab, you can turrn on/off Bluetooth and make visible v or invisible the device from outside. o In the device tab, you can search and connect to other Bluetooth devices. There are two ways that you can set up Bluetooth; StoneStreetOne e/ Microsoft. -It can be changed by operating BT Select in the ’Settings > System m’. -’StoneStreetOne’ is the way of using ‘BTExplorer’, and it is set up as a the basic mode in the mobile. In the COM Ports tab, you can set incoming Port and outgoing Port. Bluetooth Communication (3) z To connect the Bluetooth Usa age of Devvice - you can establish the connection by searching g, matching pin code and selecting the service. You can search the Bluetooth device available when you select the 'Add new device device...' on the Device Tab. Tab Select a device to connect with and tap 'Next' . Also you can select the 'Refresh' button if there is no device available. 63 Enter a Passcode to establish a secure connection. The passcode can be fixed one or the one which is negotiated between two parties in before hand. It shows the service available on the Bluetooth device. It shows the registered devices. To add more device, please tab ‘Add Add new device’ device . Bluetooth Communication (4) z How to make the serial connection via Bluetooth It is possible to assign the registered device to o the COM port. Usa age of Devvice – Once the device is registered, please tap ‘COM Ports’ tab and then select ‘New New Outgoing Port’ Port . 64 dd Select the device you wand to ad and tap 'Next'. Select the port which is available, and then tab ‘Finish’. Once the connection is made, you can use the available service. Bluetooth Communication (5) z Transferring files via Bluetooth connection. connection Usa age of Devvice - It is possible to transfer files between Windows Mobile devices via Bluetooth. In order to transfer files via Bluetooth connection, please go to 'Start > Settings > Connections > Beam‘ and then Check the 'Receive all incoming Beams ‘. 65 Select the file you want to o transfer in the File Explorer. Presss the file name long and tab ‘Beam m File’. By tapping ‘Beam Beam File’ File , the list of available Bluetooth devices shown. Please choose the device to transfer the file to. BTExplorer(1) z Set up Bluetooth using BTExplorer Usa age of Devvice -The user can set up mode, connecting BT device e, COM setting by using BTExplorer. If you click the ‘Bluetooth’ in the ‘Start> Settings> Connections’, you can set up and connect the Bluetooth mode mode. 66 Use the Device Info tab to configure the M3 Sky’s Bluetooth connection n modes. Use the Services tab to add or delete Bluetooth services. To add a service: 1 T 1. Tap Add Add. Th The Add L Locall S Service i window i d di displays. l 2. In the list, select a service to add. 3. Tap OK. The Edit Local Service window displays for the selected service. 4. Select the appropriate information and then tap OK. See the following sections for information on the available services. BTExplorer(2) Set up Bluetooth using BTExplorer Usa age of Devvice z Security settings allows you to set global security policies for Bluetooth. Note that these settings are only active on local Services that are set to Authenticate or Authenticate/ Encryption. You can set authentication on local Services under the Services tab. 67 Use the Discovery tab to set and modify discovered devices. Virtual COM Port defines which COM ports BTExplorer attempts to use for virtual COM ports. Check the appropriate checkbox to use the port as a virtual COM port. When finished, choose Apply to enforce changes, or Revert to restore the original settings. Use the Profile tab to load or remove Bluetooth services profiles. If a profile is not used, it can be removed to save memory memory. BTExplorer(3) Connect Bluetooth using BTExplorer – The user can access Bluetooth by searching g, matching the password, and selecting the service. Usa age of Devvice z Press ‘BTExplorer’ in the ‘Start>Programs’ 68 Press ‘New Connection’ in the menu where’s at the bottom of th he screen It displays the service list you can set up. Set up your choice and press the ‘Next’. It displays the device list that you can connect. Click the device you want and press the ‘Next’. IrDA Communication Usa age of Devvice z To connect via IrDA M3 Sky can communicate with desktop, notebook,, pocket PC as well as other PDA that has OBEX protocol for the IrDA I communication. To use infrared communication Locate Infrared communication port to be in se eries with an infrared (IrDA) port with other device. Press a quick link icon > Infrared communication menu. Infrared communication program is started and d you can exchange data. If you want to have a serial communication witth the device like printer, it is possible bl by b connecting the h COM Po ort. IrDA Communication Port Connecting to IrDA Printer ※ It is advised to communicate within the shortesst distance. Shorter distance makes data transmission faste er. File transmission between PDA 69 IrDA port is optional. Device without IrDA port can not use this t feature. To use the GPS (1) z To set the GPS – Usa age of Devvice – Tap the ‘Start > Settings > System Tab > GPS’ and then you can set the information related to the GPS. You don’t have to set additional information wh hen there is a single program which uses GPS data. When there are more than one program which use GPS data, you need to set the program port and hardware port required for each program. Select the GPS on the System Tab. 70 Set the GPS Program Port which is not yet used. Set the Hardware port of the device. GPS hardware port for M3 sky is COM2 and with baud rate of 9600. GPS is optional. GPS feature is not available on the unit with h no GPS module integrated. To use the GPS (2) z To Connect the GPS Usa age of Devvice - When there is a single GPS program, please use the GPS hardware port (COM2). When there are more than one GPS program, please use the pre-deffined GPS program port. Execute the GPS program you want. 71 Set the COM Port and d Baud Rate. Sample GPS map is not provided by M3Mobile. It is available to use various application pp using g GPS like searching g the current location. To use the Scanner (1) Scanner Manual M Usa age of Devvice z 1. M3 ScanTest - It is a sample test program. program It is only for testing the t scanning feature of the device device. It can not be used for business application. 2. ScanEmul - It is a program which can be used to output the sscanned data on the application. application (like MS Word-Pad, Internet Explorer or Businesss Application) - 72 To scan the barcode barcode, there are two scanner programs installed on the device The ScanEmul program must be running if you want w to scan barcodes. To use the Scanner (2) M3 Scan Test T Usa age of Devvice z This program is located under Flash Disk -> > Scanner folder Thee Scanned Data will be displayed here You can get the information like Firmware version, DLL version and Decoder version. It is i to trigger the scan beam. Yo ou can also Use ‘S’ S’ button on the right side to o trigger it. You need to select this tab to configure Settings 73 of Device Usa age of Devvice To use the Scanner (3) Scan Emu ul When Scan Emul program operates, program icon is appeared in the tray bar. The user can access the various menus using g this icon. 74 When you click the barcode icon, you will get This menu popped up. To use the Scanner (4) Scan Emu ul Usa age of Devvice You can n set the Reading g Option p . Sync: Scan S Beam shoots until the B Barcode is scanned or it’s timed out Async: Scan Beam Shoots while trigger button is pressed or until it’s timed out. Securitty Level: number of times to check scanned data. (ex, when it is set to 2, it will scan two times and compare the data whether it is same or not. Time Out: O Scanner beam will be shoot for this time set. S Sound d: you can choose h the th sound d which hi h will ill ring i when h the th data d t is scanned. Outputt: you can select the output method. When itt is checked Enter code will be inserted after the barcode data. 75 Usa age of Devvice To use the Scanner (4) Scan Emu ul You can select the symbol (Symbology) to activate activate. 76 You can create th he prefix and suffix that will be used in the beginning and en nding of the bar code data. You can set the button that will be used as the scan button. To use the Scanner (6) Scan Testt z How to use scanner Usa age of Devvice – Usage of 1D Scanner (MC-7100S, MC-7500S) Correct way – Incorrect way Usage of 2D Scanner (MC-7700S) Correct way Incorrect way Scanner is optional. You can not use scan feature with no o scanner enabled device. 2D Barcode Scanner is optional. Only with 2D Barcode sca anner enabled device, you can do 2D barcode scan. (MC-7700S) 77 To use the RFID (1) z To Connect the RFID Usa age of Devvice – 78 Tap the ‘Start > File Explorer > Flash Disk > RFID’ and then you can run RFID. To use the RFID (2) z To Connect the RFID Usa age of Devvice – – Let the upper back of the terminal touch the tag t and then tap READ. RFID reader located in the upper-back of the terminal will recognize the tag. t You can select Read Mode in Option. In Sync mode, the terminal should reach the tag to read the information. In Async mode, the terminal auttomatically search around and read the tag. I Continuous In C i mode, d the h terminal i l continues i t read to d the h tag unless l you command d to stop. Note that Continuous mode consumes the battery faster. f 79 You can select Read Mode in Option. To use the RFID (3) Support Tag Usa age of Devvice z 80 RF-ID is optional. Device without RF-ID can not use this feature. Frequency supported only 13.56MHz