1
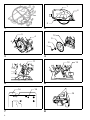
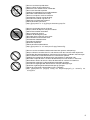
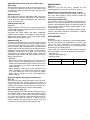
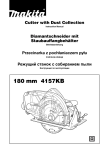
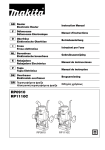
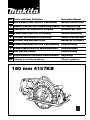
GB Cutter with Dust Collection
Instruction Manual
F
Scie diamant avec reservoir a poussières
D
Diamantschneider mit Staubauffangbehälter Betriebsanleitung
I
Troncatrice con aspirazione integrata
NL Diamantdoorslijper met stofopvang
Manuel d’instructions
Istruzioni per l’uso
Gebruiksaanwijzing
E
Cortador con sistema de aspiración
Manual de instrucciones
P
Cortador com captação de pó
Manual de instruções
DK Diamantskæremaskine med støvopsamling
Brugsanvisning
S
Diamantkapmaskin med dammuppsamlare
Bruksanvisning
N
Fres med støvsamler
Bruksanvisning
SF Pölynkeräimellä varustettu timanttileikkuri
Käyttöohje
GR Κφτης µε συλλογέα σκνης
Οδηγίες χρήσεως
180 mm 4157KB
1
2
2
1
2
3
10
4
9
5
6
8
7
3
4
11
12
13
6
5
6
14
15
16
7
2
8
21
20
17
18
19
9
10
22
23
14
24
11
12
25
26
11
27
13
14
28
29
15
3
Symbols
The followings show the symbols used for the tool. Be sure that you understand their meaning before use.
Symboles
Nous donnons ci-dessous les symboles utilisés pour l’outil. Assurez-vous que vous en avez bien compris la signification avant d’utiliser l’outil.
Symbole
Die folgenden Symbole werden für die Maschine verwendet. Machen Sie sich vor der Benutzung unbedingt mit ihrer
Bedeutung vertraut.
Simboli
Per questo utensile vengono usati i simboli seguenti. Bisogna capire il loro significato prima di usare l’utensile.
Symbolen
Voor dit gereedschap worden de volgende symbolen gebruikt. Zorg ervoor dat u de betekenis van deze symbolen
begrijpt alvorens het gereedschap te gebruiken.
Símbolos
A continuación se muestran los símbolos utilizados con esta herramienta. Asegúrese de que entiende su significado
antes de usarla.
Símbolos
O seguinte mostra os símbolos utilizados para a ferramenta. Certifique-se de que compreende o seu significado antes
da utilização.
Symboler
Nedenstående symboler er anvendt i forbindelse med denne maskine. Vær sikker på, at De har forstået symbolernes
betydning, før maskinen anvendes.
Symboler
Det följande visar de symboler som används för den här maskinen. Se noga till att du förstår deras innebörd innan
maskinen används.
Symbolene
Følgende viser de symblene som brukes for maskinen. Det er viktig å forstå betydningen av disse før maskinen tas i
bruk.
Symbolit
Alla on esitetty koneessa käytetyt symbolit. Opettele näiden merkitys, ennen kuin käytät konetta.
Σύµβολα
Τα ακλουθα δείχνουν τα σύµβολα που χρησιµοποιούνται για το µηχάνηµα. Βεβαιωθείτε τι καταλαβαίνετε
τη σηµασία τους πριν απ τη χρήση.
4
❏ Read instruction manual.
❏ Lire le mode d’emploi.
❏ Bitte Betriebsanleitung lesen.
❏ Leggete il manuale di istruzioni.
❏ Lees de gebruiksaanwijzing.
❏ Lea el manual de instrucciones.
❏ Leia o manual de instruções.
❏ Læs brugsanvisningen.
❏ Läs bruksanvisningen.
❏ Les bruksanvisingen.
❏ Katso käyttöohjeita.
❏ ∆ιαβάστε τις οδηγίες χρήσης.
❏ DOUBLE INSULATION
❏ DOUBLE ISOLATION
❏ DOPPELT SCHUTZISOLIERT
❏ DOPPIO ISOLAMENTO
❏ DUBBELE ISOLATIE
❏ DOBLE AISLAMIENTO
❏ DUPLO ISOLAMENTO
❏ DOBBELT ISOLATION
❏ DUBBEL ISOLERING
❏ DOBBEL ISOLERING
❏ KAKSINKERTAINEN ERISTYS
❏ ∆ΙΠΛΗ ΜΟΝΩΣΗ
❏ Do not use the tool upside down.
❏ Ne pas utiliser l’outil la tête en bas.
❏ Maschine nicht verkehrt herum verwenden.
❏ Non usare l’utensile capovolto.
❏ Gebruik het gereedschap niet ondersteboven.
❏ No utilice la herramienta boca abajo.
❏ Não use a máquina virada ao contrário.
❏ Anvend ikke maskine i omvendt silling.
❏ Använd inte maskinen upp och ner.
❏ Maskinen må ikke brukes oppned.
❏ Älä käytä konetta ylösalaisin.
❏ Μην χρησιµοποιείτε το µηχάνηµα αναποδογυρισµένο.
❏ Do not use the abrasive cut-off wheel.
❏ Ne pas utiliser le disque à tronçonner abrasif.
❏ Keine Trennscheibe verwenden.
❏ Non usare dischi abrasivi.
❏ Gebruik de doorslijpschijf niet.
❏ No utilice discos abrasivos para cortar.
❏ Não utilize disco abrasivo de corte.
❏ Anvend ikke slibeskæreskive.
❏ Använd inte slipskivor.
❏ Bruk ikke slipeskiven.
❏ Älä käytä katkaisuhiomalaikkaa.
❏ Μην χρησιµοποιείτε τον αποξεστικ τροχ αποκοπής.
❏ Do not use the saw blade and diamond wheel with grooves and openings.
❏ Ne pas utiliser la lame de scie ni la scie diamant avec des rainures et des ouvertures.
❏ Verwenden Sie keine Sägeblätter und Diamant-Trennschiben mit Nuten und Öffnungen.
❏ Non usare dischi e lame diamantate con scanalature e aperture.
❏ Gebruik het zaagblad en de diamantschijf met groeven en openingen niet.
❏ No utilice la hoja de sierra ni el disco de diamante para hacer ranuras ni aberturas.
❏ Não utilize a lâmina da serra e o disco de diamante em ranhuras ou aberturas.
❏ Anvend ikke savklinger og diamantklinger med alidser og huller.
❏ Använd inte sågklingor eller diamantskivor med spår eller öppningar.
❏ Bruk ikke sagblad og diamantblad med spor og åpninger.
❏ Älä käytä sahanterää ja hiomalaikkaa uriin ja aukkoihin.
❏ Μην χρησιµοποιείτε τροχούς κοπής και διαµαντοτροχούς µε αυλακιές και
ανοίγµατα.
5
ENGLISH
Explanation of general view
1
2
3
4
5
6
7
8
9
10
Dust box
Screw
Hex wrench
Shaft lock
Tighten
Loosen
Hex socket head bolt
Outer flange
Diamond wheel
Inner flange
11
12
13
14
15
16
17
18
19
20
Lever
Bevel scale plate
Knob
Base
Adjusting screw
Triangular rule
Notch
For 45° bevel cuts
For straight cuts
Switch trigger
7.
SPECIFICATIONS
Model
4157KB
Wheel diameter ...................................................180 mm
Max. cutting capacities
At 90° ................................................................. 58 mm
At 45° ................................................................. 29 mm
No load speed (min–1) ............................................ 5,800
Overall length ..................................................... 354 mm
Net weight ............................................................. 5.5 kg
• Due to our continuing program of research and development, the specifications herein are subject to change
without notice.
• Note: Specifications may differ from country to country.
Power supply
The tool should be connected only to a power supply of
the same voltage as indicated on the nameplate, and can
only be operated on single-phase AC supply. They are
double-insulated in accordance with European Standard
and can, therefore, also be used from sockets without
earth wire.
For public low-voltage distribution systems of
between 220V and 250V
Switching operations of electric apparatus cause voltage
fluctuations. The operation of this device under unfavorable mains conditions can have adverse effects to the
operation of other equipment. With a mains impedance
equal or less than 0.31 Ohms it can be presumed that
there will be no negative effects. The mains socket used
for this device must be protected with a fuse or protective
circuit breaker having slow tripping characteristics.
Safety hints
For your own safety, please refer to the enclosed safety
instructions.
ADDITIONAL SAFETY RULES
ENB051-1
1.
2.
3.
4.
5.
6.
6
Check the wheel carefully for cracks or damage
before operation. Replace cracked or damaged
wheel immediately.
Use only flanges specified for this tool.
Be careful not to damage the spindle, flanges
(especially the installing surface) or bolt. Damage to these parts could result in wheel breakage.
Hold the tool firmly.
Keep hands away from rotating parts.
Make sure the wheel is not contacting the workpiece before the switch is turned on.
8.
9.
10.
11.
12.
13.
21
22
23
24
25
26
27
28
29
Lock-off button
Rear handle
Front grip
Guide rule
Dust cap
Rubber cap
Limit mark
Brush holder cap
Screwdriver
Wait until the wheel attains full speed before cutting.
Stop operation immediately if you notice anything abnormal.
Do not attempt to lock the trigger in the “ON”
position.
Never attempt to cut with the tool held upside
down in a vise. This can lead to serious accidents, because it is extremely dangerous.
(Fig. 1)
Before setting the tool down after completing a
cut, be sure that the wheel has come to a complete stop.
Do not stop the wheel by lateral pressure on the
disc.
The tool must be used only for dry cutting. Do
not use water.
SAVE THESE INSTRUCTIONS.
OPERATING INSTRUCTIONS
Removing or installing diamond wheel
(Fig. 2, 3 & 4)
CAUTION:
Always be sure that the tool is switched off and
unplugged before removing or installing the wheel.
Use a screwdriver to loosen the two screws which secure
the dust box. Then remove the dust box from the tool.
After removing the dust box, press the shaft lock so that
the diamond wheel cannot revolve and use the hex
wrench to loosen the hex socket head bolt counterclockwise. Then remove the hex socket head bolt, outer flange
and the diamond wheel. To install the diamond wheel, follow the removal procedure in reverse.
BE SURE TO TIGHTEN THE HEX SOCKET HEAD
BOLT SECURELY.
CAUTION:
• Make sure that the arrow on the wheel should point in
the same direction as the arrow on the tool.
• Use only the Makita hex wrench to install or remove the
wheel.
Adjusting depth of cut (Fig. 5)
Loosen the lever on the depth guide and move the base
up or down. At the desired depth of cut, secure the base
by tightening the lever.
Bevel cutting (Fig. 6)
Loosen the knob on the bevel scale plate on the front of
the base. Set for the desired angle (0 – 45°) by tilting
accordingly, then tighten the knob securely.
Adjusting for accuracy of 90° cut (vertical cut)
(Fig. 7 & 8)
This adjustment has been made at the factory. But if it is
off, adjust the adjusting screw with a hex wrench while
squaring the blade with the base using a triangular rule,
try square, etc.
Sighting (Fig. 9)
For straight cuts, align the right edge of the notch in the
front of the base with your cutting line on the workpiece.
For 45° bevel cuts, align the left edge of the notch in the
front of the base with it.
Switch action (Fig. 10)
CAUTION:
Before plugging in the tool, always check to see that the
switch trigger actuates properly and returns to the “OFF”
position when released.
To prevent the switch trigger from being accidentally
pulled, a lock-off button is provided. To start the tool,
depress the lock-off button and pull the switch trigger.
Release the switch trigger to stop.
Operation (Fig. 11)
Grasp the rear handle with your right hand, the front grip
with your left. Set the base plate on the workpiece to be
cut without the wheel making any contact. Then turn the
tool on and wait until the wheel attains full speed. Now
simply move the tool forward over the workpiece surface,
keeping it flat and advancing smoothly until the cutting is
completed. To get clean cuts, keep your cutting line
straight and your speed of advance uniform. Never use
water when cutting. Water may enter the tool, causing an
electric shock hazard.
CAUTION:
• Be sure to move the tool forward in a straight line and
gently. Forcing and exerting excessive pressure or
allowing the wheel to bend, pinch or twist in the cut can
cause overheating of the motor and dangerous kickback of the tool.
• Since excessive cutting may cause overload of the
motor, the depth of cut should not be more than 20 mm
at a pass. When you wish to cut more than 20 mm
deep, make a couple of passes with progressively
deeper settings.
MAINTENANCE
CAUTION:
Always be sure that the tool is switched off and
unplugged before carrying out any work on the tool.
Replacement of carbon brushes (Fig. 14 &15)
Replace carbon brushes when they are worn down to the
limit mark. Both identical carbon brushes should be
replaced at the same time.
Dressing diamond wheel
If the cutting action of the diamond wheel begins to
diminish, use an old discarded coarse grit bench grinder
wheel or concrete block to dress the diamond wheel. To
do this, tightly secure the bench grinder wheel or concrete block and cut in it.
To maintain product safety and reliability, repairs, maintenance or adjustment should be carried out by a Makita
Authorized Service Center.
ACCESSORIES
CAUTION:
These accessories or attachments are recommended for
use with your Makita tool specified in this manual. The
use of any other accessories or attachments might
present a risk of injury to persons. Only use accessory or
attachment for its stated purpose.
If you need any assistance for more details regarding
these accessories, ask your local Makita service center.
• Hex wrench 6
• Rip fence set (Guide rule)
• Diamond wheel
Diameter
Hole diameter
Blade
180 mm
22.23 mm
Dry type
Rip fence (guide rule) (Optional accessory)
(Fig. 12)
The handy rip fence (guide rule) allows you to do extraaccurate straight cuts. Simply slide the rip fence up
snugly against the side of the workpiece and secure it in
position with the clamp screw on the front of the base. It
also makes repeated cuts of uniform width possible.
Dust extraction (Fig. 13)
This tool equipped with a dust box to collect dust and cut
chips. When the dust box is about two thirds full, empty
its contents. To do so, press the lever to unlock the dust
cap. Then open it. Cleaner cutting operations can be performed by connecting this tool to a Makita vacuum
cleaner. Remove the rubber cap from the dust cap and
connect the vacuum cleaner hose to the dust cap.
7
NEDERLANDS
Verklaring van algemene gegevens
1
2
3
4
5
6
7
8
9
10
Stofverzamelbak
Schroef
Zeskantsleutel
Asvergrendeling
Vastdraaien
Losdraaien
Zeskantbout
Buitenflens
Diamantsnijschijf
Binnenflens
11
12
13
14
15
16
17
18
19
20
Hendel
Verstekschaalplaat
Knop
Gereedschapsvoet
Regelschroef
Driehoeksliniaal
Inkeping
Voor 45° verstekzagen
Voor zagen in rechte lijn
Trekschakelaar
TECHNISCHE GEGEVENS
Model
4157KB
Diameter snijschijf .............................................. 180 mm
Max. snijcapaciteit
90° ..................................................................... 58 mm
45° ..................................................................... 29 mm
Toerental onbelast/min. (min–1) .............................. 5 800
Totale lengte ....................................................... 354 mm
Netto gewicht ......................................................... 5,5 kg
• In verband met ononderbroken research en ontwikkeling behouden wij ons het recht voor bovenstaande
technische gegevens te wijzigen zonder voorafgaande
kennisgeving.
• Opmerking: De technische gegevens kunnen van land
tot land verschillen.
1.
2.
3.
4.
5.
6.
Voor openbare laagspanningsverdeelsystemen van
tussen 220 V en 250 V
Schakelbedieningen van elektrische toestellen veroorzaken spanningsschommelingen. De bediening van dit
gereedschap onder ongunstige lichtnetomstandigheden
kan een nadelige invloed hebben op de bediening van
andere apparatuur. Het kan worden aangenomen dat er
geen negatieve effecten zullen zijn wanneer de netimpedantie gelijk is aan of minder is dan 0,31 Ohm. Het stopcontact dat voor dit gereedschap wordt gebruikt, moet
beveiligd zijn door een zekering of een stroomonderbreker met trage afschakelkarakteristieken.
9.
14
Ontgrendelknop
Achterhandgreep
Voorhandgreep
Breedtegeleider
Stofkap
Rubberdop
Limietaanduiding
Borstelhouderdop
Schroevendraaier
BIJGEVOEGDE
VEILIGHEIDSVOORSCHRIFTEN
Stroomvoorziening
De machine mag alleen worden aangesloten op een
stroombron van hetzelfde voltage als aangegeven op de
naamplaat, en kan alleen op enkel-fase wisselstroom
worden gebruikt. De machine is dubbel-geïsoleerd volgens de Europese standaard en kan derhalve ook op
een niet-geaard stopcontact worden aangesloten.
Veiligheidswenken
Voor uw veiligheid dient u de bijgevoegde Veiligheidsvoorschriften nauwkeurig op te volgen.
21
22
23
24
25
26
27
28
29
7.
8.
10.
11.
12.
13.
Controleer de ronde snijschijf zorgvuldig op barsten of beschadiging, alvorens het gereedschap
te gebruiken. Vervang onmiddellijk gebarsten of
beschadigde schijven.
Gebruik uitsluitend flenzen die voor dit gereedschap zijn gemaakt.
Wees voorzichtig en zorg dat de as, flenzen
(vooral de snijkant) en bout niet worden beschadigd. Beschadiging aan deze delen kan breuk
van de snijschijf veroorzaken.
Houd tijdens gebruik het gereedschap stevig
vast.
Houd uw handen veilig uit de buurt van de roterende delen.
Zorg ervoor dat de snijschijf bij het inschakelen
van het gereedschap niet in contact is met het
werkstuk.
Wacht totdat de snijschijf op volle toeren draait,
alvorens met snijden te beginnen.
Stop onmiddellijk de werkzaamheden wanneer u
iets abnormaals opmerkt.
Probeer nooit de trekkerschakelaar in de “ON”
positie vast te zetten.
Probeer nooit werkstukken te snijden met het
gereedschapondersteboven op een klemschroef
vastgezet. Dit is buitengewoongevaarlijk en kan
leiden tot zeer ernstige ongelukken. (Fig. 1)
Alvorens na het beëindigen van de werkzaamheden, het gereedschap neer te leggen, dient u
even te controleren of de snijschijf volledig tot
stilstand is gekomen.
Stop de snijschijf niet door er zijdelingse druk
op uit te oefenen.
Het gereedschap mag uitsluitend voor droog
snijden worden gebruikt. Gebruik geen water.
BEWAAR DEZE VOORSCHRIFTEN.
BEDIENINGSVOORSCHRIFTEN
Verwijderen of installeren van de diamantschijf
(Fig. 2, 3 en 4)
LET OP:
Zorg dat het gereedschap is uitgeschakeld en de stekker
uit het stopcontact is gehaald alvorens de schijf te verwijderen of te installeren.
Gebruik een schroevendraaier om de twee bevestigingsschroeven van de stofverzamelbak los te draaien. Verwijder daarna de stofverzamelbak van het gereedschap.
Nadat de stofverzamelbak is verwijderd, drukt u de
asvergrendeling in zodat de diamantschijf niet kan
draaien en dan gebruikt u de zeskantsleutel om de zeskantbout linksom los te draaien. Verwijder daarna de zeskantbout, de buitenflens en de diamantschijf. Voer deze
procedure in de omgekeerde volgorde uit om de diamantschijf te installeren. DRAAI DE ZESKANTBOUT
GOED VAST.
LET OP:
• Het pijltje op de schijf moet naar dezelfde richting wijzen als het pijltje op het gereedschap.
• Gebruik uitsluitend de Makita zeskantsleutel om de
schijf te verwijderen of te installeren.
Instellen van de snijdiepte (Fig. 5)
Maak de hendel op de dieptegeleider los en beweeg de
gereedschapsvoet omhoog of omlaag. Zet de gereedschapsvoet bij de gewenste snijdiepte vast door de hendel vast te draaien.
Schuine sneden (Fig. 6)
Draai de knop op de verstekschaalplaat op de voorkant
van de gereedschapsvoet los. Kantel de gereedschapsvoet om de gewenste schuine hoek (0 – 45°) te krijgen
en draai vervolgens de knop weer goed vast.
Instelling voor nauwkeurige sneden van 90°
(loodrechte sneden) (Fig. 7 en 8)
Deze instelling werd in de fabriek gemaakt. Als de instelling niet meer nauwkeurig is, draait u de regelschroef met
de zeskantsleutel terwijl u het blad rechthoekig maakt
met de gereedschapsvoet door een driehoeksliniaal, een
winkelhaak e.d. te gebruiken.
Richten (Fig. 9)
Voor rechte sneden brengt u de rechterrand van de inkeping op de voorkant van de gereedschapsvoet op één lijn
met de snijlijn op het werkstuk.Voor schuine sneden van
45° brengt u de linkerrand van de inkeping op één lijn
met de snijlijn op het werkstuk.
Werking van de trekschakelaar (Fig. 10)
LET OP:
Alvorens het netsnoer op het stopkontakt aan te sluiten,
dient u altijd te kontroleren of de trek-schakelaar behoorlijk werkt en bij loslaten onmiddelijk naar de “OFF” positie
terugkeert.
Bediening (Fig. 11)
Houd de achterhandgreep vast met uw rechter hand, en
de voorhandgreep met uw linker hand. Zet de voetplaat
op het te snijden werkstuk zonder dat de schijf met het
werkstuk in contact komt. Schakel daarna het gereedschap in en wacht totdat de schijf op volle toeren draait.
Beweeg nu het gereedschap gewoon naar voren over het
werkstukoppervlak. Houd het gereedschap vlak en
beweeg het langzaam naar voren totdat de snede voltooid is. Om schone sneden te krijgen, moet u het
gereedschap in rechte lijn en met gelijkmatige snelheid
naar voren bewegen. Gebruik nooit water tijdens het snijden. Water kan in het gereedschap binnendringen zodat
er gevaar is voor een elektrische schok.
LET OP:
• U dient het gereedschap altijd langzaam en in een
rechte lijn voort te bewegen. Door teveel kracht of druk
op het gereedschap uit te oefenen of door het gereedschap zo voort te bewegen dat de snijschijf wordt verbogen of gekneld, kan de motor oververhit raken en
een gevaarlijke terugslag veroorzaakt worden.
• Aangezien bij overmatig gebruik de motor overbelast
kan raken, mag de snijdiepte telkens niet meer dan 20
mm bedragen. Wanneer u derhalve een snede van
meer dan 20 mm diepte wenst, dient u de bewerking
zoveel keren als nodig is te herhalen en het gereedschap telkens dieper in te stellen.
Trekgeleider (breedtegeleider) (Fig. 12)
De handige trekgeleider (breedtegeleider) maakt het
mogelijk uiterst nauwkeurige rechte zaagsneden te
maken. Plaats de trekgeleider vlak tegen de zijkant van
het werkstuk en zet hem vervolgens vast met de klemschroef op de voorkant van de voetplaat. Met de trekgeleider kunt u ook herhaaldelijk stukken van gelijke
breedte afzagen.
Stofafzuiging (Fig. 13)
Dit gereedschap is voorzien van een stofverzamelbak
voor het opvangen van stof en spaanders. Ledig de stofverzamelbak wanneer deze ongeveer tweederde vol is.
Druk hiervoor eerst op de hendel om de stofkap te ontgrendelen. Open daarna de stofkap. U kunt schoner werken door een Makita stofzuiger op dit gereedschap aan
te sluiten. Verwijder de rubberdop van de stofkap en sluit
de stofzuigerslang aan op de stofkap.
ONDERHOUD
LET OP:
Zorg er altijd voor dat de machine is uitgeschakeld en de
stekker uit het stopcontact is verwijderd alvorens onderhoud aan de machine uit te voeren.
Vervangen van koolborstels (Fig. 14 en 15)
Vervang de borstels wanneer ze tot aan de aangegeven
limiet zijn afgesleten. Beide koolborstels dienen tegelijkertijd te worden vervangen.
Om te voorkomen dat de trekschakelaar per toeval wordt
ingedrukt, is het gereedschap voorzien van een ontgrendelknop. Om het gereedschap te starten, drukt u eerst de
ontgrendelknop in en dan de trekschakelaar. Laat de
trekschakelaar los om het gereedschap te stoppen.
15
Scherpen van de diamantschijf
Als de diamantschijf niet meer goed snijdt, gebruik dan
een oude, afgedankte tafelslijpmachineschijf met grove
korrel of een betonnen blok om de diamantschijf op te
zuiveren en aan te scherpen. Doe dit door de tafelslijpmachineschijf of de betonnen blok goed vast te zetten en
erin te snijden.
Opdat het gereedschap veilig en betrouwbaar blijft, dienen alle reparaties, onderhoud of afstellingen te worden
uitgevoerd bij een erkend Makita service centrum.
ACCESSOIRES
LET OP:
Deze accessoires of hulpstukken worden aanbevolen
voor gebruik met het Makita gereedschap dat in deze
gebruiksaanwijzing wordt beschreven. Het gebruik van
andere accessoires of hulpstukken kan gevaar voor persoonlijke verwonding opleveren. Gebruik de accessoires
of hulpstukken uitsluitend voor het gespecificeerde doel.
Wenst u meer informatie over deze accessoires, neem
dan contact op met het dichtstbijzijnde Makita servicecentrum.
• Inbussleutel 6
• Breedtegeleider
• Diamantsnijschijf
16
Diameter
Diameter asgat
Zaagblad
180 mm
22,23 mm
Droog type
ENH001-1
ENGLISH
PORTUGUÊS
EC-DECLARATION OF CONFORMITY
DECLARAÇÃO DE CONFORMIDADE DA CE
We declare under our sole responsibility that this product is in compliance with the following standards of standardized documents,
HD400, EN50144, EN55014, EN61000
in accordance with Council Directives, 73/23/EEC, 89/336/EEC
and 98/37/EC.
Declaramos sob inteira responsabilidade que este produto obedece às seguintes normas de documentos normalizados,
HD400, EN50144, EN55014, EN61000
de acordo com as directivas 73/23/CEE, 89/336/CEE e 98/37/CE
do Conselho.
FRANÇAISE
DANSK
DÉCLARATION DE CONFORMITÉ CE
EU-DEKLARATION OM KONFORMITET
Nous déclarons sous notre entière responsabilité que ce produit
est conforme aux normes des documents standardisés suivants,
HD400, EN50144, EN55014, EN61000
conformément aux Directives du Conseil, 73/23/CEE, 89/336/CEE
et 98/37/EG.
Vi erklærer hermed på eget ansvar, at dette produkt er i overensstemmelse med de følgende standarder i de normsættende dokumenter,
HD400, EN50144, EN55014, EN61000
i overensstemmelse med Rådets Direktiver 73/23/EEC,
89/336/EEC og 98/37/EC.
DEUTSCH
SVENSKA
CE-KONFORMITÄTSERKLÄRUNG
Hiermit erklärt wir unter unserer alleinigen Verantwortung, daß
dieses Produkt gemäß den Ratsdirektiven 73/23/EWG, 89/336/EWG
und 98/37/EG mit den folgenden Normen von Normendokumenten
übereinstimmen:
HD400, EN50144, EN55014, EN61000.
EG-DEKLARATION OM ÖVERENSSTÄMMELSE
Under eget ansvar deklarerar vi härmed att denna produkt överensstämmer med följande standardiseringar för standardiserade
dokument,
HD400, EN50144, EN55014, EN61000
i enlighet med EG-direktiven 73/23/EEC, 89/336/EEC och 98/37/EC.
ITALIANO
NORSK
DICHIARAZIONE DI CONFORMITÀ
CON LE NORME DELLA COMUNITÀ EUROPEA
EUs SAMSVARS-ERKLÆRING
Dichiariamo sotto la nostra sola responsabilità che questo prodotto
è conforme agli standard di documenti standardizzati seguenti:
HD400, EN50144, EN55014, EN61000
secondo le direttive del Consiglio 73/23/CEE, 89/336/CEE e 98/37/CE.
Vi erklærer på eget ansvar at dette produktet er i overensstemmelse med følgende standard i de standardiserte dokumenter:
HD400, EN50144, EN55014, EN61000,
i samsvar med Råds-direktivene, 73/23/EEC, 89/336/EEC og
98/37/EC.
NEDERLANDS
SUOMI
EG-VERKLARING VAN CONFORMITEIT
VAKUUTUS EC-VASTAAVUUDESTA
Wij verklaren hierbij uitsluitend op eigen verantwoordelijkheid dat
dit produkt voldoet aan de volgende normen van genormaliseerde
documenten,
HD400, EN50144, EN55014, EN61000
in overeenstemming met de richtlijnen van de Raad 73/23/EEC,
89/336/EEC en 98/37/EC.
Yksinomaisesti vastuullisina ilmoitamme, että tämä tuote on
seuraavien standardoitujen dokumenttien standardien mukainen,
HD400, EN50144, EN55014, EN61000
neuvoston direktiivien 73/23/EEC, 89/336/EEC ja 98/37/EC mukaisesti.
ESPAÑOL
ΕΛΛΗΝΙΚΑ
DECLARACIÓN DE CONFORMIDAD DE LA CE
∆ΗΛΩΣΗ ΣΥΜΜΟΡΦΩΣΗΣ ΕΚ
Declaramos bajo nuestra sola responsabilidad que este producto
cumple con las siguientes normas de documentos normalizados,
HD400, EN50144, EN55014, EN61000
de acuerdo con las directivas comunitarias, 73/23/EEC,
89/336/EEC y 98/37/CE.
∆ηλώνουµε υπ την µοναδική µας ευθύνη τι αυτ το προιν
βρίσκεται σε Συµφωνία µε τα ακλουθα πρτυπα
τυποποιηµένων εγγράφων,
HD400, EN50144, EN55014, EN61000
σύµφωνα µε τις Οδηγίες του Συµβουλίου, 73/23/EEC,
89/336/EEC και 98/37/ΚE.
Yasuhiko Kanzaki
Director
Directeur
Direktor
Amministratore
Directeur
Director
CE 2000
Director
Direktør
Direktör
Direktor
Johtaja
∆ιευθυντής
MAKITA INTERNATIONAL EUROPE LTD.
Michigan Drive, Tongwell, Milton Keynes,
Bucks MK15 8JD, ENGLAND
34
ENG006-1
ENGLISH
Noise and Vibration
The typical A-weighted noise levels are
sound pressure level: 102 dB (A)
sound power level: 115 dB (A)
– Wear ear protection. –
The typical weighted root mean square acceleration
2
value is 2.5 m/s .
FRANÇAISE
Bruit et vibrations
Les niveaux de bruit pondérés A types sont:
niveau de pression sonore: 102 dB (A)
niveau de puissance du son: 115 dB (A)
– Porter des protecteurs anti-bruit. –
L’accélération pondérée est de 2,5 m/s2.
DEUTSCH
Geräusch- und Vibrationsentwicklung
Die typischen A-bewerteten Geräuschpegel betragen:
Schalldruckpegel: 102 dB (A)
Schalleistungspegel: 115 dB (A)
– Gehörschutz tragen. –
Der gewichtete Effektivwert der Beschleunigung beträgt
2
2,5 m/s .
PORTUGUÊS
Ruído e vibração
Os níveis normais de ruído A são
nível de pressão de som: 102 dB (A)
nível do sum: 115 dB (A)
– Utilize protectores para os ouvidos –
O valor médio da aceleração é 2,5 m/s2.
DANSK
Lyd og vibration
De typiske A-vægtede lydniveauer er
lydtryksniveau: 102 dB (A)
lydeffektniveau: 115 dB (A)
– Bær høreværn. –
Den vægtede effektive accelerationsværdi er 2,5 m/s2.
SVENSKA
Buller och vibration
De typiska A-vägda bullernivåerna är
ljudtrycksnivå: 102 dB (A)
ljudeffektnivå: 115 dB (A)
– Använd hörselskydd –
Det typiskt vägda effektivvärdet för acceleration är
2,5 m/s2.
ITALIANO
NORSK
Rumore e vibrazione
I livelli del rumore pesati secondo la curva A sono:
Livello pressione sonora: 102 dB (A)
Livello potenza sonora: 115 dB (A)
– Indossare i paraorecchi. –
Il valore quadratico medio di accellerazione è di 2,5 m/s2.
Støy og vibrasjon
De vanlige A-belastede støynivå er
lydtrykksnivå: 102 dB (A)
lydstyrkenivå: 115 dB (A)
– Benytt hørselvern. –
Den vanlig belastede effektiv-verdi for akselerasjon er
2
2,5 m/s .
NEDERLANDS
SUOMI
Geluidsniveau en trilling
De typische A-gewogen geluidsniveau’s zijn
geluidsdrukniveau: 102 dB (A)
geluidsenergie-niveau: 115 dB (A)
– Draag oorbeschermers. –
De typische gewogen effectieve versnellingswaarde is
2
2,5 m/s .
ESPAÑOL
Ruido y vibración
Los niveles típicos de ruido ponderados A son
presión sonora: 102 dB (A)
nivel de potencia sonora: 115 dB (A)
– Póngase protectores en los oídos. –
El valor ponderado de la aceleración es de 2,5 m/s2.
Melutaso ja tärinä
Tyypilliset A-painotetut melutasot ovat
äänenpainetaso: 102 dB (A)
äänen tehotaso: 115 dB (A)
– Käytä kuulosuojaimia. –
Tyypillinen kiihtyvyyden painotettu tehollisarvo on
2,5 m/s2.
ΕΛΛΗΝΙΚΑ
Θρυβος και κραδασµς
Οι τυπικές A-µετρούµενες εντάσεις ήχου είναι
πίεση ήχου: 102 dB (A)
δύναµη του ήχου: 115 dB (A)
– Φοράτε ωτοασπίδες. –
Η τυπική αξία της µετρούµενης ρίζας του µέσου
τετραγώνου της επιτάχυνσης είναι 2,5 m/s2.
35
Makita Corporation
884390D994