1
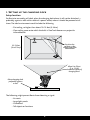
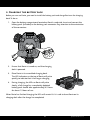
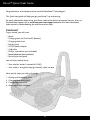
Rovio™ Quick Start Guide
Congratulations and welcome to the world of WowWee™ Technologies!
This Quick start guide will help you get your Rovio™ up and running.
For more information about using your Rovio, refer to the Rovio User manual. You can also visit
the WowWee Support site at www.wowwee.com/support/rovio for the latest downloads,
video tutorials, troubleshooting tips and Rovio online help.
Checklist
To get started, you will need:
□□ Rovio
□□ Charging dock (w/ TrueTrack™ Beacon)
□□ Charging dock mast
□□ Battery pack
□□ AC/DC power adapter
□□ USB cable
□□ Phillips screwdriver (not included)
□□ Rovio Software (downloadable)
□□ Rovio Quick start guide
You will also need to know:
□□ Your wireless router’s network ID (SSID)
□□ Your router’s encryption key (password), if you use one
Here are the steps you will go through:
1.
2.
3.
4.
Setting up the charging dock
Charging the battery pack
Configuring your Rovio
Accessing Rovio’s interface
A
1. Setting up the charging dock
Setup location
For Rovio to accurately self-dock, place the charging dock where it will not be disturbed —
preferably against a wall within reach of a power outlet, where it should be powered at all
times. The ideal environment would include the following:
• Flat ceiling, no higher than about 10-12 feet (3-3.6m)
• Clear ceiling space onto which the built-in TrueTrack Beacon can project its
infrared beams
Position the
red dots on the
ceiling away from
obstructions
10-12 feet
(3 to 3.6 m)
Allow 3 to 5 feet
(1 to 1.5 m)
clearance in front of
charging dock
Place charging dock
preferably against
a wall
The following might prevent Rovio from detecting a signal:
• Air vents
• Large light panels
• Chandeliers
• Tall objects or furniture
B
Assembling and powering the charging dock
1. Place the charging dock on the floor in the room
you want to use as the home base.
2. Attach the mast to the charging dock by slotting it
into position as illustrated.
Mast
Dock
3. Plug the power cable into the port on the back of
the charging dock and then plug the power adapter
into the power outlet.
The built-in TrueTrack Beacon will light up red. If it
is not lit, touch the metal rim on the Beacon and it
will light up.
4. Two red dots will project light onto the ceiling. For
the best signal, point the red dots at the center of
the ceiling away from unsmooth surfaces such as
lighting fixtures, fans, air vents and corners.
TrueTrack
Beacon
Back of charging dock
NOTE: The red dots are guides to help you set up the
charging dock. If the red dots turn off while you are
positioning them, touch the metal rim on the Beacon
to reactivate it. During normal operation the red dots
will not be lit; the infrared lights are still on, so avoid
looking into the beacon.
Power adapter port
TrueTrack Beacon
covers about 10-12 feet
(3 to 3.6 m) radius
C
2. Charging the battery pack
Before you can use Rovio, you need to install the battery pack and charge Rovio on the charging
dock. To do so:
1. Open the battery compartment located on Rovio’s underside. Insert and connect the
battery pack (included) to the battery pack connector. Pay attention to the orientation
of the connectors.
2. Ensure that Rovio is turned on, and the charging
dock is powered.
3. Place Rovio in its assembled charging dock.
The LED indicators on the top of Rovio will pulse
quickly to indicate that it has begun charging.
4. During charging, the LEDs on Rovio will pulse
slowly; a full charge for a completely depleted
battery pack should take approximately 4.5 hours
for about 1.5 hours of use.
When Rovio has finished charging the LEDs will remain lit. It is safe to leave Rovio on its
charging dock after the charge has completed.
D
updated for FW ver. 5.00
3. Configuring your Rovio
Before you use Rovio for the first time, you will need to configure it using the software. Refer to
the instructions for your operating system (PC or Mac).
IMPORTANT: Rovio does not support WPA2 Enterprise encryption keys (passwords).
•
•
PC users: To run the Rovio Software, you need a PC computer running Windows XP™ or
Windows Vista™.
Mac users: To run the Mac version of the Rovio Software, you need a Mac computer
running Mac OS X operating system (v.10.3 or newer) with Internet access. You also
need to be logged in with administrative privileges.
Setting up Rovio using the Rovio Software
1. Verify that your wireless router is turned on and working.
2. Verify that Rovio is fully-charged and ON. Ensure that its LED power indicator is on
before you connect it to your computer via USB.
3. From the Rovio support site (www.wowwee.com/support/rovio), locate and
download the latest version of the Rovio Software to your computer.
4. Locate the Rovio Software installer you just downloaded to your computer.
a. PC users: Double-click on the installer. Follow the onscreen instructions for the
Rovio Software installation wizard.
b. Mac users: Double-click on the Rovio Software file and then drag the Rovio Setup
icon to your Applications folder.
E
© 2008 & 2009 WowWee Group Limited. All rights reserved.
5. Once the Rovio Software is installed, run the Rovio Setup tool and follow the onscreen
instructions to configure Rovio.
[Rovio Setup for PC]
[Rovio Setup for Mac]
NOTES
• While setting up Rovio using the Rovio Setup, you might need to wait for Windows to install
the hardware driver.
• Ensure that you do not connect Rovio when its LED power indicator is not lit.
Manually setting up Rovio
You can configure Rovio without the Rovio Setup Software in Ad hoc mode by using your PC
or Mac computer (using an Ad hoc wireless connection). To learn how, refer to the Rovio User
manual for details.
4. Accessing Rovio’s interface
Once you configure Rovio, access Rovio by entering the IP address that you assigned to it in your
Internet browser (see 3. Configuring your Rovio). Note that your web-enabled device needs to be
on the same internal network as Rovio.
You can also set it up so that you can access it from anywhere in the world using an Internet
browser. Refer to the Rovio User manual for details.
For complete information on using all of Rovio’s functions, refer to the Rovio User Manual included in
the Rovio package or go to www.wowwee.com.
F
8033US02TOP