1
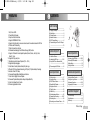
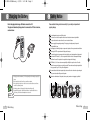
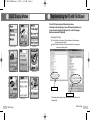
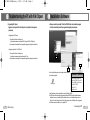
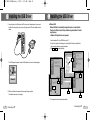
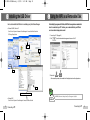
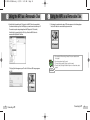
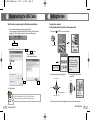
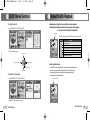
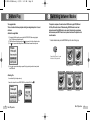
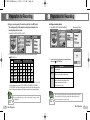
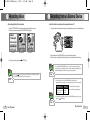
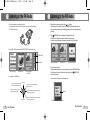
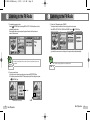
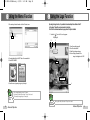
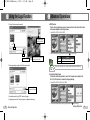
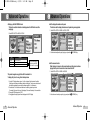
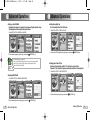
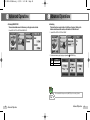
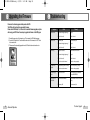
0518 SF69-00568A-eng
6/3/05
2:21 AM
Page 100
User Manual
COLOR MP3 MINI
SF-Q101 (128MB)
SF-Q102 (256MB)
SF-Q103 (512MB)
SF-Q104 (1GB)
15F DongWon Securities Bdg. 98-4 Garakbon-dong, Songpa-gu, Seoul, Korea
TEL : +82-2-3400-5200(Rep)
FAX : +82-2-3401-4142
http://www.safa.co.kr
SF69-00568A
Thank you for purchasing this product.
Please read this manual carefully before using the product.
Familiarizing yourself with the instructions and functions
explained In this manual before operating the product will
ensure proper use of the product. Please fill in and keep the
warranty included in this manual from your product distributor.
0518 SF69-00568A-eng
6/3/05
2:21 AM
Page 102
Features
Contents
Before Using
1. 65,000 color OLED.
2. Powerful Built in Speaker.
3. Easy User Emoticon Interface.
4. Supports MP3/WMA/ASF Files.
5. Supports Direct Encoding for voice records and sound from external devices into MP3 file.
6. FM radio and FM Recording.
7. Digital Clock and Alarm Function.
8. Convenient downloading by the USB Mass Storage (UMS) function.
9. Supports 3D Sound & 8 mode Graphic Equalizer (Normal, Classic, Jazz, Pop, Rock,
Bass, 3D, User).
10. Supports ID3 tags and lyrics.
11. Adjustable low and high speed Playback (70% ~ 130%).
12. Supports Multiple Languages.
13. Useful Memo Function (Address Book) & My Own Logo.
14. Effective VOR (Voice Operated Recording) & CD-Sync (CD Synchronization) Recording.
15. Automatic Power Off & Sleep.
16. Convenient Navigation/Book-Mark/Resume Functions.
17. Useful Intro & Highlight Preview Playback.
18. Convenient Playback Modes (Section Repeat & Repeat/Shuffle).
19. Useful Scroll Speed Control function.
20. Firmware Upgradeable Function.
❖ Charging the Battery.................................2
❖ Safety Notice.............................................3
❖ Package Contents.....................................4
❖ Hardware Features ...................................5
❖ OLED Display Modes ...............................6
❖ Troubleshooting the PC and VIA Chipset ..
..............................................................7-8
Connecting to PC
Basic Operation
❖ Installation Software..................................9
❖ Installing the USB Driver ...................10-12
❖ Using the MP3 as a Removable Disk
..........................................................13-15
❖ Disconnecting the USB Cable ................16
❖ Listening to the FM Radio .................30-33
❖ Recording FM Broadcasts ......................34
❖ Setting Mode...........................................35
❖ Using the Mode.......................................36
Basic Operation
Advanced Operation
❖ Setting the time.......................................17
❖ Listening to Music..............................18-19
❖ EQ/3D Stereo Function...........................20
❖ Repeat/Shuffle Playback.........................21
❖ Navigation Function ................................22
❖ Playlist Function......................................23
❖ B-Mark Play ............................................24
❖ Switching between Modes ......................25
❖ Preparation for Recording .................26-27
❖ Recording Voice......................................28
❖ Recording from an External Device........29
❖ Using the Memo Function..................37-38
❖ Using the Logo Function....................39-40
❖ Advanced Operations ........................41-49
❖ Upgrading the Firmware .........................50
Customer Support
❖ Troubleshooting ......................................51
❖ Specifications..........................................52
❖ Warranty..................................................53
Before Using
1
0518 SF69-00568A-eng
6/3/05
2:21 AM
Page 2
Safety Notice
Charging the Battery
Electric charging method using a USB cable connected to a PC.
The player will automatically charge when it is connected to a PC that is turned on,
as shown below.
Please read the following instructions carefully for your safety and prevention of
property damage.
1
2
3
4
5
6
7
8
9
10
1. Charging time takes a maximum of 3~4 hours, depending on the remaining capacity of the
battery.
2. Do not put the device into fire as this may result in an explosion.
3. Do not put the device into water or allow it to come in contact with water, as this may
result in loss of battery function.
4. Overcharging and over discharging will result in shortened battery life.
5. Incomplete charging after 6 hours indicates that there is a problem with the device.
If this occurs, please contact the manufactures service center.
11
Do not disassemble, repair or modify this product.
Do not use it in an aircraft or anywhere where the use of electronic instruments is prohibited.
Do not put the device into water or allow it to come in contact with water.
Observe copyright laws regarding recordings. The copying of recordings except for personal
use is prohibited by law.
5
Avoid dropping or submitting the body or components to impact, as this may cause device malfunction.
Puncturing the OLED may cause harmful liquid crystal to escape.
Do not place the product in an area exposed to direct sunlight or near a heating appliance for long periods.
In no event will SAFA media, Co., Ltd. be responsible or liable for indirect or consequential damages
results from the use of this product nor for reparation for damages from third party.
SAFA Media, Co., Ltd. does not assume responsibility or liability for corruption or loss of the data
saved in the memory while using or repairing the product. Please make sure to backup important data
from your product to your PC or any other storage device.
Be aware that cards that contain magnetic strips, such as credit cards or fare cards, may be damaged
if they come into contact with the product's speaker.
Irrational or unintended use of the product, such as privacy invasion or wire tapping, is prohibited.
Caution
2
Before Using
Before Using
3
0518 SF69-00568A-eng
6/3/05
2:21 AM
Page 4
Hardware Features
Package Contents
Earphone
USB Cable
CD-ROM
Users Manual
Line Cable
Mini USB
Caring Case
(Option)
Main Unit
❊ Accessories and their specifications are subject to change.
4
Before Using
OLED Display
RESET Key
Speaker
JOG Key : MODE/NAVI/VOL
Mode Selection, Navigation,
FM Frequency/Presets
Back, REW, Previous
Next, FF, Next mode
Cursor Up, Volume Up
Cursor Down, Volume Down
REPEAT/DEL/FM Key
Repeat mode, A ↔ B Repeat, File Delete,
Change to FM mode
PLAY/STOP Key
Play/Stop, Power On/Off
Earphone Jack
LINE Jack/USB Jack Combined use
REC/PAUSE/EQ
Record, Record Pause, EQ/3D Mode
HOLD Switch
Necklace/Hand Strap Latch
MIC
Before Using
5
0518 SF69-00568A-eng
6/3/05
2:21 AM
Page 6
OLED Display Modes
Troubleshooting the PC with VIA Chipset
PC's with VIA Chipsets may have USB connection problems.
Follow these trouble shooting steps, if such a USB connection problem occurs.
For more information regarding the VIA chipset, refer to the VIA homepage
[http://www.viaarena.com/?PageID=300].
1. Checking the VIA Chipset
1
2
Initial screen status
Playback mode Screen
Stop Screen
FM mode Screen
MEMO mode Screen
Mode Screen
WinXp: Select Start ➔ Control panel ➔ System ➔ Hardware ➔ Device manager ➔
Universal serial interface controller
Win98 SE: Select Start ➔ Settings ➔ Control panel ➔ System ➔ Device manager ➔
Universal serial interface controller
XP screen
Win98SE screen
RECORD mode Screen
6
Before Using
Lyrics Screen
USB Connection Screen
If the Operating System displays the windows shown above, then the PC has a VIA
Chipset installed,
Before Using
7
0518 SF69-00568A-eng
6/3/05
2:21 AM
Page 8
Installation Software
Troubleshooting the PC with VIA Chipset
2. Upgrading VIA Chipset
Upgrade is not required if the VIA chipset is not installed on the computer
(see above).
●
When you insert the provided CD into the CD-ROM drive, the installation program
will start automatically. Install the program following the process below.
◆ Upgrading the VIA Chipset
1) Download the file from the following site.
http://downloads.viaarena.com/drivers/4in1/VIA_Hyperon%204IN1_V449vp2.zip
2) Uncompress the downloaded file and complete the upgrade by clicking the execution file.
◆ Upgrade the patch file for VIA USB only
1) Download the file from the following site.
http://downloads.viaarena.com/drivers/others/usbf_110.zip
2) Uncompress the downloaded file and complete the upgrade by clicking the execution file.
Click
Click
Click
You will see the following icons on the desktop when the installation
is successfully completed.
My Manager Q
Recommended PC Environment
Pentium 133MHz or higher CPU
Windows 98SE, ME, 2000 and XP
More than 20MB free HDD space
2x or higher CD-ROM
USB port (Ver. 1.1)
VGA graphic card
Install the software using the administrator's account in Windows 2000/XP.
The MP3 driver will be automatically recognized by Windows ME/XP/2000 without additional software
installation. However, you should install the software in order to use the additional functions, such as
My Logo or the Memo writing functions. (Note: that the original version of\ Windows 98 is not supported.)
● The software cannot be installed on a not specified O/S.
●
●
8
Before Using
Connecting to PC
9
0518 SF69-00568A-eng
6/3/05
2:21 AM
Page 10
Installing the USB Driver
1. Connect the player to the USB terminal of the PC as shown in the following diagram. You can connect
the USB without turning off the player. However, if the player is set to MP3 mode, installation will not be
initiated.
Installing the USB Driver
● Windows 98SE
Windows 98SE will not automatically recognize the device as a removable disk.
Therefore, the USB driver must firstly be installed using the installation CD before
using the player.
❖ Windows 98 Original Version is not supported.
1. Insert the installation CD in to the CD-ROM drive of your PC.
2. Control Panel ➔ System ➔ Device Manager ➔ Universal Serial Bus Controller and double-click the
device name with exclamation or question mark beside it.
3. Click Next ➔ Finish to complete installation.
Click
The OLED display will change after successful USB installation, as shown in the following diagram.
Click
Click
Click
2. USB driver installation will commence with the message "Finding new device".
The installation screen may not be displayed.
Click
Click
❊ The computer will need to be rebooted after installation.
10
Connecting to PC
Connecting to PC
11
0518 SF69-00568A-eng
6/3/05
2:21 AM
Page 12
Installing the USB Driver
Using the MP3 as a Removable Disk
How to check whether the USB driver is installed properly in the Device Manager
●
Windows 2000/ME, Windows XP
Control Panel ➔ System ➔ Hardware ➔ Device Manager ➔ Universal Serial Bus Controller ➔
USB Large Storage Device
After installing the programs and USB driver, the MP3 will be recognized as a removable disk
when it is connected to your PC. Therefore, you can download files to your MP3 and
use it as an external storage device as well.
1. Connect to your PC. (See page 10.)
OK
2. Click
when the window shown below appears on the screen of the PC.
Click
Click
Click
Click
Window
3. Double-click My Computer or Explorer .
When successfully connected, the removable disk will be displayed as shown in the diagram above.
Click
If it is displayed as below, it’s OK
If the MEMO folder name is changed, memo files will not appear in the folder.
●
12
Windows 98SE
Control Panel ➔ System ➔ Device Manager ➔ Universal SerialBus Controller
Connecting to PC
Caution
Connecting to PC
13
0518 SF69-00568A-eng
6/3/05
2:25 AM
Page 14
Using the MP3 as a Removable Disk
Using the MP3 as a Removable Disk
4. Select the file(s) to download from the PC and copy it to the MUSIC folder in the removable disk.
(Use the same method to copy files to the MP3 player, as you would a normal local disk on your PC.
Files can also be copied or drag and dropped from the MP3 player to the PC's local disk.)
5. File download is completed when the player OLED window appears as in the following diagram.
Now, the USB cable can be removed and the player can be used.
Select the file(s) to copy and right-click it ➔ Click Copy ➔ Select the MUSIC folder in the
removable disk ➔ Right-click ➔ Click Paste.
The "Copying Files" window appears on your PC and the "Don't Remove USB" message appears on
the OLED.
14
Connecting to PC
1. Do not unplug the USB cable during file transfer. This may cause malfunction to the
PC and player.
2. Do not insert earphones during file transfer.
3. The transfer of large quantities of files may result in slow transfer.
4. The order of music files displayed in Windows Explorer is not the actual order of music
playback.
Caution
Connecting to PC
15
0518 SF69-00568A-eng
6/3/05
2:21 AM
Page 16
Setting the time
Disconnecting the USB Cable
When file transfer is complete, unplug the USB cable as described below.
1. Click on the green arrow displayed on the right side of the Task-bar.
(The green arrow will not be displayed in Windows 98SE. Therefore, the USB cable maybe
unplugged if the OLED window doesn't display the "Don't remove USB" message.)
This product has a calendar.
The date and time will need to be set the first time a player is used.
1. Press and hold
(PLAY/STOP) key to turn on the power.
Double Click
Press and hold
2. Select [USB Large Storage Device] and click the Stop button.
3. Click the OK button in the
"Stop Hardware Device"
window and close the window.
The player is automatically switched
to this screen only when turning
on for the first time after purchasing.
Refer to the instructions on page 47
to change the date/time during
normal usage.
Press the Rec key to
change the Time/Date
Select
2. Set the date and the time by using the jog key.
3. To check the time, switch the HOLD
switch to ON.
Increase date / Time
Click
4. Unplug the cable.
OFF
Click
Next
Previous
Finish setting and exit.
1. The player will automatically switch off if the USB cable is not removed.
2. To reconnect the player, disconnect the USB cable and plug it in again.
Caution
16
Connecting to PC
Decrease date / Time
ON
❊ Can not check the current time when it's playback, check the current time on the stop mode.
Basic Operation
17
0518 SF69-00568A-eng
6/3/05
2:21 AM
Page 18
Listening to Music
Listening to Music
1. Hold down the
(PLAY/STOP) key for 3 seconds to turn on the player.
4. Key operations during playback
Press the
(PLAY/STOP)
key For 3 seconds to turn off
the player
press once: previous music
hold down: Fast rewind
Press and hold
ress once: Stop
hold down: Power off
press once: EQ/3D mode
hold down: Designate position
of bookmark.
Volume up
press once: Next music
hold down: Fast forward
Volume down
press once: Start the search mode
hold down: Fast forward
press once: Sector repetition
hold down: repeat/shuffle playback
2. Select the file you want using the jog key.
5. Whenever (REC/PAUSE/EQ) key is pressed during playback, the mode will be changed as
described below.
Move up
EQ/3D Icon
Move to sub-folder
Move to upper folder
3. Press the
(PLAY/STOP) key to playback the selected music file.
Or, if you select a folder and press the
(PLAY/STOP) key, playback will start from the first
Music file in the selected folder.
18
Basic Operation
Operation
NORMAL
CLASSIC
JAZZ
POP
ROCK
SUPER-BASS
3D STEREO
USER
Move down
Press and hold
Icon
Remarks
Set by default.
See page 39 for how to set up.
ASF file supports only audio files.
It does not support any types of video files.
Note
Basic Operation
19
0518 SF69-00568A-eng
6/3/05
2:21 AM
Page 20
EQ/3D Stereo Function
◆ To adjust the User EQ
Repeat/Shuffle Playback
● Repeat playback: Plays back the selected folder or music repeatedly.
● Shuffle playback: Randomly selects the music and plays it back regardless
1. Select MODE ➔ SETUP ➔ AUDIO ➔ USER EQ.
of the order of music files within the selected folder.
Repeat icon
The mode is changed whenever the DEL/FM key is pressed during playback.
Icon
Operation
Deactivates the function.
Repeats the current music files only.
Repeats the folder only to which the current music files belong.
Repeats all music files.
Randomly repeats the folder to which the current music belongs.
Randomly repeats all music files.
2. Set the EQ using the jog key.
Increase Level
Increase Frequency
Decrease Frequency
Set and Exit
Decrease Level
◆ To adjust the 3D sound effect
1. Select MODE ➔ SETUP ➔ AUDIO ➔ 3D EFFECT.
● Sector repetition function
Press DEL/FM key once during playback to set the sector repetition playback function.
If the button is pressed once, the starting point will be set. If it is pressed again,
the ending point will be set and the selected sector will playback repeatedly.
Press the key again to release the function.
Repeat A-B Activated
2. Adjust the 3D stereo effect using the jog key
20
Basic Operation
Basic Operation
21
0518 SF69-00568A-eng
6/3/05
2:21 AM
Page 22
Navigation Function
Playlist Function
A saved file can be searched for during file playback. This is done by using the
navigation function.
1. In navigation mode and during playback, press the
(MODE/NAVI) key.
To be upgraded later.
This is a function which allows play back of separately designated songs (max. 50 songs).
It is used as follows:
◆ Playlist Register
1) Select files to be registered using Jog keys in the Stop or Navigation screen.
2) Press the
key to pop up the Play Select Window.
3) Registration is executed if
key is pressed after selecting Add List.
(All songs in the folder are registered by pressing the
key after selecting a folder.)
Press
2. Music files can be searched for by using the jog key.
3. Press
to playback selected music.
◆ Playlist Playback
1. Select MODE ➔ SETUP ➔ MUSIC ➔ PLAY LIST.
◆ Play Select Window
The Play Select Window appears by pressing the key in the
Item
in the stop or Navigation status.
Action
Next Play
Add List
B-Mark
Remark
Stops current music, the selected music
Selectable only during play.
After the current music file is finished,
the selected music will be played.
Selectable only during play.
Non-selectable in Playlist mode.
Select this function when
registering a Playlist.
Play commences from bookmark position.
Non-selectable in Playlist mode.
Now Play is promptly played.
2. Set the Playlist using the jog key and press the
(MODE/NAVI) key once.
3. After a music file is selected in a Playlist, the
key can be pressed to commence playback from the
selected music file.
Selectable only under playback condition.
To listen in normal mode during playback of a playlist, follow the above instructions
and select 'No'.
Note
22
Basic Operation
Basic Operation
23
0518 SF69-00568A-eng
6/3/05
2:21 AM
Page 24
B-Mark Play
To be upgraded later.
This is a function which allows playback starting from designated position. It is used
as follows:
◆ Method for using B-Mark
1) To designate the B-Mark position, press and hold the REC/PAUSE/EQ button during playback.
(Up to 10 B-Marks can be designated per file)
2) The B-Mark Browser Window appears when the
key is pressed in the Stop or Navigation status.
3) If the
key is pressed after selecting B-mark, then the bookmark browser window is opened.
Switching between Modes
This product comprises of 5 main functions: MUSIC mode to play MP3, WMA and
ASF files, FM mode to listen to FM broadcasting, RECORD mode to record and
playback recorded files, MEMO mode to view contact information of acquaintances
and view memos, and SETUP mode to set up various functions of the product and to
view information.
To select individual modes press the MODE/NAVI key at the center of the jog key.
Enter into Mode: Press for 3 seconds
Mode Select: Click right and left
4) If the
key is pressed after selecting a required file, it plays starting from the book mark position
of the selected file.
Music playback mode
FM mode
MEMO mode
SETUP mode
◆ Deleting File
You can delete file(s) in the stop mode only.
Select a file to delete ➔ Press the REPEAT/DEL/FM key ➔ Select YES ➔ Press
RECORD mode
Press
24
Basic Operation
Basic Operation
25
0518 SF69-00568A-eng
6/3/05
2:21 AM
Page 26
Preparation for Recording
◆ Setting up recording quality (This product records files in the MP3 format.)
The recording quality and the maximum recording time will depend on the
recording settings that are chosen.
Preparation for Recording
◆ Setting up recording method
1. Select MODE ➔ SETUP ➔ RECORD ➔ METHOD.
(When setting CD-Sync)
1. Select MODE ➔ SETUP ➔ RECORD ➔ QUALITY.
2. The recording quality is adjusted by pressing the jog key upward/downward and then the
(MODE/NAVI) key.
Recording Quality
Max Recording Time [Min]
Sampling Mode Format Q101
Q102
Q103
Q104
16Kbps
22KHz
Mono
MP3
1032
2090
4224
8448
32Kbps
44KHz
Mono
MP3
516
1045
2112
4224
Mode
64Kbps
44KHz
Stereo
MP3
258
523
1056
2112
128Kbps
44KHz
Stereo
MP3
129
261
528
1056
192Kbps
44KHz
Stereo
MP3
86
174
352
704
2. A mode is selected by pressing the jog key upward/downward
and then the
(MODE/NAVI) key.
Mode
Normal
VOR
CD-Sync
Specified memory capacity: SF-Q101:128MB, SF-Q102:256MB, SF-Q103:512MB, SF-Q104:1GB.
Actually available memory capacity: SF-Q101:120MB, SF-Q102:248MB, SF-Q103:504MB,
SF-Q104:992MB. Note that the recording capacity is lower than that of the actual capacity of the
device. This is because a certain amount of space is required for the devices basic operation.
The capacity available varies when service file (start.mp3, end.mpe, Logo.jpg, etc) is added
to shipped products.
Note
26
Basic Operation
Operation
Normal recording mode
The VOR (Voice On Recording) function stops recording temporarily
when the voice is too low or there is no detected sound.
The CD-Sync function automatically separates files by detecting
the mute sector between files when recording several files
continuously from an external device. The mute
sector can be set from 3 to 7 seconds.
- When recording with the CD-Sync function, the total number of files may differ from the source.
- When recording with the CD-Sync function, recording will be automatically stopped if the
mute sector lasts more than the specified 7 seconds.
Note
Basic Operation
27
0518 SF69-00568A-eng
6/3/05
2:21 AM
Page 28
Recording from an External Device
Recording Voice
◆ Recording with the built-in microphone
◆ Use this function to record audio from an external device or PC.
1. When the REC/PAUSE/EQ key is depressed in Stop status recording will commence.
2. Recording can be paused by pressing the (REC/PAUSE/EQ) key again.
Stop Mode
Recording Mode
1. Connect the player to the external device using the provided audio cable, as shown in the following diagram.
Pause Mode
2. Press and hold down the (REC/PAUSE/EQ) key for 3 seconds while in stop status.
3. Refer to the section "recording with the internal microphone" for an alternative method of recording.
3. To stop voice recording, press the
(PLAY/STOP) key.
Press and hold the (REC/PAUSE/EQ) key for 3 seconds when recording sound from an
external device. If you only briefly press the key the player will operate in Recording Using
an External Microphone mode. Therefore you may get unexpected results.
Pressing the
(Next) jog key during recording, will store the recording up to that point.
A new file name will be issued when recording recommences.
Note
Note
1. All recording files are saved in the RECORD folder. The file name will be
automatically created according to the recording signal, as shown in the following table.
Recording Signal
Voice Recording File
External Device Recording
FM Recording File
File Name
REC001-V
REC001-L
REC001-F
2. A recorded file will be allocated a file
name according to its length in minutes.
3. To playback the recorded file, select the file in the RECORD folder using the jog key, and
then press
(PLAY/STOP) key.
Note
28
Basic Operation
Basic Operation
29
0518 SF69-00568A-eng
6/3/05
2:21 AM
Page 30
Listening to the FM Radio
Listening to the FM Radio
1. Connect the earphones to the earphone terminal.
The earphone plays acts as an antenna. Therefore, if you don't connect the earphone,
the FM signal will be poor.
4. Select a station by pressing the jog key in either
direction.
Click the jog key once to seek by one step or press and hold it to operate the auto scanning,
which automatically searches for the broadcasting channel nearest to the current frequency and
stops there.
5. Press
(MODE/NAVI) key to switch between the Frequency/Preset mode.
Clicking the left or right jog key decreases or increases the frequency in the
'Frequency' mode and decreases or increases the preset channel in the 'Preset' mode.
2. Select MODE ➔ FM (or press and hold the REPEAT/DEL/FM key in the stop state.)
FM Recording
Hold on/off
music mode screen
FM mode screen
Screen is converted
with the FM
Frequency Mode screen
Preset Mode screen
No channels memorized
6. To store a station in memory
Seek the broadcasting channel to store by using the jog key and press REPEAT/DEL/FM key.
Select the channel to store by clicking the left or right jog key. Press the
(MODE /NAVI)
key to store the channel.
3. Key operations in the FM mode.
You can save up to 20 channels in the Frequency mode.
Press once: Store/Delete a broadcast
Hold down: Switch to Music mode
Volume Up
Press once: Toggle between Stereo/Mono
Hold down: Power off
Press once: Frequency/preset down
Hold down: Auto Scan down
Press once: Switched between frequency and preset
Hold down: Open the Mode
Volume Down
30
Basic Operation
Press once: Switched between frequency and preset
Hold down: Open the mode
It flashes
When the broadcasting Station is saved
Basic Operation
31
0518 SF69-00568A-eng
6/3/05
2:21 AM
Page 32
Listening to the FM Radio
7. To automatically memorize a station
Press the
(MODE/NAVI) key after selecting MODE ➔ SETUP ➔ FM ➔ Auto Memory ➔ Yes to
automatically save the station.
When automatic station saving is completed, the player will switch to the Preset mode and
channel #1 will be received.
Listening to the FM Radio
9. To listen to the FM broadcasting with a SPEAKER
The earphone should be connected at all times as it plays the role of an antenna.
Select MODE ➔ SETUP ➔ FM ➔ SPK/EAR and SPEAKER. Press the
(MODE/NAVI) key.
If you switch to the music mode or turn the player off, the earphone will be selected automatically.
A previously selected station will be overwritten by the new selected station if saved on the
same channel.
Caution
The factory setting of the player is set to earphone mode.
Note
8. To remove a saved channel
A. Select the channel to delete by using the jog key and press the REPEAT/DEL/FM key.
B. To delete the selected channel Select 'YES' when prompted by the 'Delete' dialog box and press
the
(MODE/NAVI) key.
It flashes
Channel number to be deleted
32
Basic Operation
Deleted
Basic Operation
33
0518 SF69-00568A-eng
6/3/05
2:21 AM
Page 34
Setting Mode
Recording FM Broadcasts
◆ To record the FM broadcasts
◆ How to use the mode
1. Press (REC/PAUSE/EQ) key while listening to a broadcast.
OLED display
in the FM
Press
mode
OLED display
in the FM
recording mode
It is possible that unwanted noise will be recorded if recording takes place in an area venerable to
closely adjacent frequencies.
2. Press the
1. Entering into Menu mode
1) Press the
(MODE/NAVI) key for 3 seconds.
2) Select the SETUP item by clicking the jog key left or right.
3) Press the jog key to enter into mode.
2) Press once
1) Hold down
3) Left/Right
(PLAY/STOP) key to stop recording.
3. To playback the recorded broadcast
1) Exit from the FM mode by pressing DEL/FM key for 3 seconds.
2) Search for the target file in the RECORD folder using the jog key.
3) Press the
(PLAY/STOP) key to playback the recorded broadcast.
2. In Menu mode, the jog key can be operated by pressing Up/Down/Left/Right.
◆ FM recording using a preset time. Set the FM REC TIME in advance.
Move up
1. Select MODE ➔ SETUP ➔ TIMER ➔ FM REC TIME.
Move to a
higher mode
Move down
2. Set the desired FM recording time by using the jog key, and press the
Press once to set
Hold down to enter into Setting/Lower mode
(MODE/NAVI) key.
1. The preset recording time can be set from 10-120 minutes.
2. It is possible to adjust the recording time in 10 minutes intervals.
3. When the FM preset time recording is setup, the
the icon is indicated on the FM Mode .
Note
34
Basic Operation
Basic Operation
35
0518 SF69-00568A-eng
6/3/05
2:21 AM
Page 36
Using the Memo Function
Using the Mode
◆ List of Mode Functions
Step 1
Step 2
MUSIC
FM
RECORD
MEMO
MUSIC
AUDIO
FM
RECORD
GENERAL
SETUP
TIMER
SYSTEM
Step 3
Operation
Switch to music mode.
Switch to FM mode.
Switch to RECORD mode.
Switch to MEMO mode.
INTRO
Set music introduction function.
DISPLAY
Set the information to display during playing.
PLAY SPEED
Control play speed.
PLAYLIST
Separately designated songs for playback.
USER EQ
Control user EQ.
3D
Control 3D.
AUTO MEMORY
Automatically store the broadcast.
SPK/EAR
Set whether to listen to the broadcast via the speaker or the earphone
QUALITY
Set recording quality.
METHOD
Set recording method.
SCROLL SPEED
Set the scroll speed.
RESUME
Set the current status memory.
LANGUAGE
Set Language.
BRIGHTNESS
Control brightness.
OLED LIGHT TIME Control backlight time.
AUTO POWER OFF Control auto power-off time.
SLEEP
Control sleep time.
ALARM SET
Set the alarm.
FM REC TIME
Set the FM reservation recording time.
TIME SET
Set date and time
JOG LIGHT
Control Backlight time of jog key.
MEMORY INFO
Display memory information
FORMAT
Set format.
Note
P.18
By using the memo function, it is possible to edit information of acquaintances and
contacts on the PC and download it to the player for viewing at a later date. To do this the
software described on page 9 must firstly be installed.
1. Double click the
P.30
P.28
P.37
1
2
P.41
1. New: Create new file.
2. Open: Open existing file.
3. Save: Save the modified information.
4. Find: Find the acquaintance information.
5. Delete: Delete the selected acquaintancea.
P.42
P.41
P.23
P.20
P.20
P.32
P.33
P.26
P.27
P.43
P.43
P.44
P.44
P.45
P.45
P.46
P.46
P.34
P.47
2. After inserting the name/phone number/e-mail of a contact, press the [Enter] key to save the information
in the selected number.
The e-mail item may be used for memos.
P.47
The following number of characters can be entered into each category.
. Names can contain up to 10 Characters
. Phone Number can contain up to 22 Characters
. E-mail/Memo can contain up to 38 Characters
P.48
P.49
Note
36
Basic Operation
3
icon on the PC to run the program.
My Manager Q
4 5
Advanced Operation
37
0518 SF69-00568A-eng
6/3/05
2:21 AM
Page 38
Using the Memo Function
3. After inserting all contact information, click the #3 toolbar to save.
Using the Logo Function
By using the logo function, it is possible to download .bmp files edited on the PC
to the player. These files can be viewed at a later date.
To do this the software described on page 9 must firstly be installed.
1. Double click
Click
icon in the Pc to run the program.
My Manager Q
1
2
3
1. Open: Open existing image file.
2. Save: Save the edited file.
3. Rotate: Rotate the opened image.
4. Preview: Displays a thumbnail of the
image to be displayed on the OLED
4. Downloads edited files to the ROOT folder of the removable disk.
5. Select MODE ➔ MEMO.
Click
Image Area
6. Search the memo by pressing the jog key left and right.
4
1. You can input information for up to 250 contacts.
2. Only memo files with the file extension "**.mmo" can be viewed.
3. The memo function supports up to 10 memo files.
Note
Only logo files with the file extension "**.bmp" can be viewed.
Caution
38
Advanced Operation
Advanced Operation
39
0518 SF69-00568A-eng
6/3/05
2:21 AM
Page 40
Using the Logo Function
Advanced Operations
◆ INTRO function
The Intro function playbacks a preview of saved music files for the listener. The duration
of the preview depends on the settings chosen.
2. Click the #1 toolbar to Import the image file.
1. Select MODE ➔ SETUP ➔ MUSIC ➔ INTRO.
The image that will be
displayed on the OLED
Select
2. Select the mode you want, using the jog key and press the
Click
Imported image file
Mode
Only the picture shown in the thumbnail
will be displayed on the OLED.
INTRO
HIGHLIGHT
3. When image editing is completed, click #2 toolbar to save the file.
(MODE/NAVI) key.
Operation
Playback first 10 seconds of each music.
Playback from 01 : 00 to 01 : 10 in each music.
If a music file is shorter than 1:10 sec the player will automatically default to INTRO mode.
Note
◆ Controlling Playback Speed
This function controls the playback of a music file. The speed can be adjusted from
50%~150%. This function is convenient for language learning.
1. Select MODE ➔ SETUP ➔ MUSIC ➔ PLAY SPEED.
Insert the name of the
folder to save the file and
click it.
4. Download the saved file to the "ROOT" directory of the player.
5. Unplug the player from the PC and turn the power on to display the edited image.
2. Set the desired playback speed by using the jog key, and press the
40
Advanced Operation
(MODE/NAVI) key.
Advanced Operation
41
0518 SF69-00568A-eng
6/3/05
2:21 AM
Page 42
Advanced Operations
Advanced Operations
◆ Setting up the OLED DISPLAY mode
This function sets the information to be displayed on the OLED while music files
are playing.
◆ Set the display information scroll speed.
This function sets the display information scroll speed during music playback.
1. Select MODE ➔ SETUP ➔ GENERAL ➔ SCROLL SPEED.
1. Select MODE ➔ SETUP ➔ MUSIC ➔ DISPLAY.
2. Set the desired scroll speed by using the jog key, and press the
Mode
File Name
ID3 TAG
LYRICS
Operation
Displays the file name only
Displays the ID3 Tag information
Displays the lyrics with the extension of *.lrc
This sets the information to
be displayed on the OLED
while a music files is playing
(MODE/NAVI)key.
◆ Set the resume function
When the player is turned on, the resume function sets the player to continue
playing from the point it was at when it was last switched off.
1. Select MODE ➔ SETUP ➔ GENERAL ➔ RESUME.
This product supports song lyric files with file extension*.lrc.
To display the lyrics of a song, follow the steps below.
1. Using the LRC editing software, create an *.lrc file, or download it from the internet if available.
Various types of software provide different methods of editing lyrics. Therefore, users should consult
the software manufactures to ensure that the software supports the *.lrc file extension.
2. Save the edited *.lrc file into the same folder where the matching, original song is stored.
For example, if the name of the song is 'Yesterday.mp3', then save 'Yesterday.lrc' in the same folder.
3. Change the OLED display mode to LYRIC.
4. During playback the songs lyrics will now be displayed on the OLED display.
42
Advanced Operation
2. Initiate the resume function by using the jog key, and press the
(MODE/NAVI) key.
Advanced Operation
43
0518 SF69-00568A-eng
6/3/05
2:21 AM
Page 44
Advanced Operations
Advanced Operations
◆ Setting up the LANGUAGE
By adjusting the language it is possible to view previously illegible character strings.
The language can be set using the following instructions.
◆ Setting the backlight time
To set the backlight time of the OLED screen.
1. Select MODE ➔ SETUP ➔ TIMER ➔ LCD LIGHT.
1. Select MODE ➔ SETUP ➔ GENERAL ➔ LANGUAGE.
2. Set the desired OLED backlight time by using the jog key, and press the
2. Set the desired language by using the jog key, and press the
Note
(MODE/NAVI) key.
(MODE/NAVI) key.
The following languages are supported:
Arabic, Czechoslovak, Danish, English, Finnish, French, German, Hungarian, Italian,
Japanese, Korean, Norwegian, Polish, Portuguese, Russian, Spanish, Swedish,
Chinese-Trad, Chinese-Simp, Turkish
◆ Changing Auto Power Off time
The player will automatically switch off if it is left idle for a period of time.
The period of 'idle' time before the player automatically switches off can be adjusted.
1. Select MODE ➔ SETUP ➔ TIMER ➔ POWER OFF.
◆ Adjusting BRIGHTNESS
1. Select MODE ➔ SETUP ➔ GENERAL ➔ BRIGHTNESS.
2. Set the desired time by using the jog key, and press the
2. Set the desired brightness by using the jog key, and press the
44
Advanced Operation
(MODE/NAVI) key.
(MODE/NAVI) key.
Advanced Operation
45
0518 SF69-00568A-eng
6/3/05
2:21 AM
Page 46
Advanced Operations
◆ Setting the SLEEP time
This function sets a period of time before the player automatically switches off.
This is a convenient function if the user wishes to go to sleep with the music playing.
Advanced Operations
◆ Set the date and current time (TIME SET).
1. Select MODE ➔ SETUP ➔ TIMER ➔ TIME SET.
1. Select MODE ➔ SETUP ➔ TIMER ➔ SLEEP.
2. Set the desired date and time by using the jog key, and press the
2. Set the desired time by using the jog key, and press the
(MODE/NAVI)key.
(MODE/NAVI) key.
◆ Set the ALARM TIME.
◆ Setting Jog light time
Set the OLED time of the jog key.
1. Select MODE ➔ SETUP ➔ TIMER ➔ JOG LIGHT.
1. Select MODE ➔ SETUP ➔ TIMER ➔ ALARM SET.
2. Set the desired Jog backlight time by using the jog key, and press the
(MODE/NAVI) key.
2. Set the desired alarm by using the jog key, and press the
(MODE/NAVI) key.
3. The Alarm. mp3 file must be contained in the root directory in order for the alarm function to work.
It is possible to set the alarm repeating from 1-3 times.
46
Advanced Operation
Advanced Operation
47
0518 SF69-00568A-eng
6/3/05
2:21 AM
Page 48
Advanced Operations
◆ Checking MEMORY INFO
The used and available amount of the memory on the player can be checked.
1. Select MODE ➔ SETUP ➔ SYSTEM ➔ MEMORY INFO.
Advanced Operations
◆ Formatting
The Format function is used to delete all of the files on the player. Therefore, this
function should be used with caution, as the deletion of all files will result.
1. Select MODE ➔ SETUP ➔ SYSTEM ➔ FORMAT.
2. Set the desired mode by using the jog key, and press the
Mode
NO
YES
(MODE/NAVI) key.
Operation
Exits without formatting.
Formatting is executed.
It is recommended that backups are made of all MP3 files prior to executing the format.
Note
48
Advanced Operation
Advanced Operation
49
0518 SF69-00568A-eng
6/3/05
2:21 AM
Page 50
Upgrading the Firmware
Firmware is the internal program which operates the MP3.
The MP3 has the functionality to upgrade the firmware.
Please check SAFA Media, Co., Ltd. web site for available firmware upgrades, anytime
while using your MP3. Follow these steps to upgrade the firmware of the MP3 player.
1. Download the new version of the firmware to your PC by accessing the SAFA Media homepage.
2. Connect the USB cable to the PC and download the new version of the firmware to the 'ROOT' folder
of the removable disk.
3. The firmware will be automatically upgraded when the USB cable is disconnected and turned on.
Troubleshooting
Symptom
It does not turn on
Advanced Operation
Remedy
Charge it.
Is it set to Lock mode?
Disable Lock mode.
Is the memory full?
Delete unnecessary files.
Is the internal charging battery empty?
Charge it.
Is it set to Lock mode?
Disable Lock mode.
Are playable files stored?
Download MP3/WMA/OGG files.
Is the internal charging battery empty?
Charge it.
Is it set to Lock mode?
Disable Lock mode.
Is the volume set to the minimum?
Control the volume appropriately.
The earphone does
not operate
Is the earphone plug connected correctly?
Connect the earphone plug correctly.
Is the volume set to the minimum?
Control the volume appropriately.
The OLED display is
too dark
Is the screen set to dark?
Select MODE ➔ SETUP ➔ GENERAL
and control BRIGHTNESS.
The player does not
download files.
Is the USB cable disconnected?
Make sure that the USB cable is connected
correctly.
Is the memory full?
Delete unnecessary files
It does not record
It does not play
50
Check
Is the internal charging battery empty?
Customer Support
51
0518 SF69-00568A-eng
6/3/05
2:21 AM
Page 52
Specifications
Warranty
Item
Recording
Sound Quality
Specification
See page 26
Max. Recording Time
Mono/Stereo
Product Name
Model Name
Date of Purchase
Location
Color MP3 MINI
SF-Q101/Q102/Q103/Q104
yr
mon
day
Warranty Period 1yr
Paid Amount
Record Format
Recording media
Internal Memory
128MB/ 256MB/ 512MB/1GB
Playback
MP3, WMA, ASF
MP3:All Bit rate, WMA: 32Kbps ~ 192Kbps
FM
Frequency Bandwidth
87.5 ~ 108 MHz
Antenna
Earphone type
Charged Battery Playback Time
20 hours (when an earphone is used)
(In Continuous Playback Mode)
File Structure
SSFDC Forum Specification
PC Interface
USB 2.0
Folder and file support number
99 folders, 4 steps and 999 files
Operating System
Windows 98SE, ME, 2000, XP
Player Power
LI-Polymer 3.7V
USB Power Supply
Max.Output power
Speaker (8Ω): 200mW, Earphone(16Ω): 10mW/CH
Record Input source
Built-in microphone, external audio device,
Telephone call, FM Radio
52
S/N Ratio
85dB
Frequency
20Hz ~ 20kHz
Dimensions
Width: 33.4mm, Length: 61.6mm, Thickness: 14.8mm
Weight
30.5g (Built-in charging battery included)
Customer Support
Paid Service
1. Malfunction due to user’s megligence.
2. Malfunction due to unauthorized Modification or repair
3. Malfunction due to natural hazards
(such as fire, seawater, flood, or war).
4. If the guarantee period is expired.
About Services
1. This product is manufactured under strict quality control and inspection.
2. If a problem occurs within the warranty period and the product has been used normally,
repairs of the product will be provided free of charge.
3. Make sure to fill in the warranty.
(If any item has been skipped on the warranty, free service may not be available.)
4. If any problem occurs with your product, contact your product distributor.
(Free of charge repairs or exchanges are processed after first checking with the head office.)
5. Accessories are excluded from free of charge service.
6. All items except the above items will be rewarded according to the stipulations for customer
rewards.
7. The free of charge warranty period is for one year only from date of purchase
❖ However, the above charged service item is excluded.