1
owner's
manual
MODEL
NO.
113.176120
Serial
Number
Model number is found in
the rear on the UL label.
Serial number will be
found on the inside (back
side) of the latch.
You should record both
model and serial
numbers in a safe place
for future use.
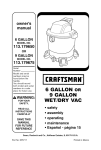
AWARNING"
FOR YOUR
SAFETY,
READ ALL
INSTRUCTIONS
CAREFULLY
CRRFlrsM8 N°
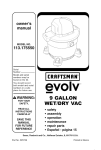
4 GALLON
PORTABLE
WET/DRY
VAC
•
•
•
•
SAVE THIS
MANUAL
FOR FUTURE
REFERENCE
J
safety
assembly
operation
maintenance
• repair parts
• EspaRol- pagina 13
Sears, Roebuck and Co., Hoffman Estates, IL 60179 U.S.A.
Part No. SP6772
Printed in China
Warranty
Craftsman
One Year Full Warranty
If this Craftsman product fails due to a defect in material or workmanship
within one year from the date of purchase, return it to any Sears store,
Sears Service Center, or other Craftsman outlet in the United States for
free repair (or replacement if repair proves impossible).
This warranty applies for only 90 days from the date of purchase
product is ever used for commercial or rental purposes.
if this
This warranty does not include bags or filters, which are expendable
parts that can wear out from normal use within the warranty period.
This warranty gives you specific legal rights, and you may also have
other rights, which vary, from state to state.
Sears= Roebuck and Co. Hoffman Estates
IL 60179
IMPORTANT SAFETY INSTRUCTIONS
Safety is a combination of using common
sense, staying alert, and knowing how your
Wet/Dry Vacuum cleaner ("Vac") works.
• Do not leave Vac when plugged in.
Unplug from outlet when not in use and
before servicing.
Safety
• Sparks inside the motor can ignite
flammable vapors or dust. To reduce
the risk of fire or explosion, do not use
near combustible liquids, gases, or
dusts, such as gasoline or other fuels,
lighter fluid, cleaners, oil-based paints,
natural gas, coal dust, magnesium
dust, grain dust, aluminum dust, or gun
powder.
Signal
Words
A DANGER: Indicates a hazardous
situation which, if not avoided, will result
in death or serious injury.
Ak WARNING: Indicates a hazardous
situation which, if not avoided, could
result in death or serious injury.
CAUTION: Indicates a hazardous
situation which, if not avoided, could
result in minor or moderate injury.
When using your Vac, always follow basic
safety precautions including the following:
WARNING-To
reduce
the risk of fire, electric shock, or
injury:
Read and understand this manual and
all labels on the Vac before operating.
Use only as described in this manual.
Do not leave Vac running while
unattended - you may fail to notice
important signs indicating abnormal
operation such as loss of suction,
debris/liquid exiting exhaust, or
abnormal motor noises. Immediately
stop using Vac if you notice these
signs.
• Do not vacuum anything that is burning
or smoking, such as cigarettes,
matches, or hot ashes.
• Do not vacuum drywall dust, cold
fireplace ash, or other fine dusts with
standard filter. These may pass
through the filter and be exhausted
back into the air. Use a fine dust filter
instead.
• To reduce the risk of inhaling toxic
vapors, do not vacuum or use near
toxic or hazardous materials.
• To reduce the risk of electric shock,
do not expose to rain or allow liquid to
enter motor compartment. Store
indoors.
• Do not allow to be used as a toy. Close
attention is necessary when used by or
near children.
• Donotusewitha tornfilterorwithout • Keephair,looseclothing,
fingers,
and
thefilterinstalled
except
when
allpartsofbodyawayfromopenings
vacuuming
liquids
asdescribed
inthis
andmoving
parts.
manual.
Drydebrisingested
bythe
• Toreduce
theriskoffalls,useextra
impeller
maydamage
themotororbe
carewhencleaning
onstairs.
exhausted
intotheair.
• Toreduce
theriskofpersonal
injuryor
• TurnoffVacbefore
unplugging.
damage
toVac,useonlyCraftsman
recommended
accessories.
• Toreduce
theriskofinjuryfrom
accidental
starting,
unplug
powercord • Toreduce
theriskofeyeinjury,
wear
before
changing
orcleaning
filter.
safety
eyewear.
Theoperation
ofany
• Donotunplug
bypullingoncord.To
utilityVacorblower
canresultin
unplug,
grasptheplug,notthecord.
foreignobjects
beingblownintothe
eyes,whichcanresultinsevere
eye
• Donotusewithdamaged
cord,plugor
damage.
otherparts.IfyourVacisnotworking
asit should,
hasmissing
parts,has
beendropped,
damaged,
leftoutdoors,
ordropped
intowater,callcustomer ,_, CAUTION:
• To reduce the risk of hearing damage,
service.
wear ear protectors when using for
• Donotpullorcarrybycord,usecord
time or in a noisy area.
ashandle,
closea dooroncord,orpull • extended
For dusty operations, wear dust mask.
cordaround
sharpedgesorcorners. • Static shocks are common when the
DonotrunVacovercord.Keepcord
relative humidity of the air is low.
awayfromheated
surfaces.
Vacuuming fine debris with your Vac
• Donothandle
plug,switch,
ortheVac
can deposit static charge on the hose
withwethands.
or Vac. To reduce the frequency of
• Useonlyextension
cordsthatarerated static shocks in your home or when
foroutdoor
use.Extension
cordsin
using this Vac, add moisture to the air
with a humidifier.
poorcondition
ortoosmallinwiresize
canposefireandshockhazards.
Toreduce
theriskofthesehazards,
the following warnings that
besurethecordisingoodcondition Observe
appear on the motor housing of your Vac:
andthatliquiddoesnotcontact
the
connection.
Donotuseanextension F_ DOUBLE INSULATED
cordwithconductors
smaller
than
GROUNDING
NOT REQUIRED.
16gauge(AWG)
insize.Toreduce
WHEN SERVICING
USE ONLY
powerloss,usea 14gaugeextension
IDENTICAL REPLACEMENT PARTS.
cordif25to50ft longand12gauge
for50ftor longer.
,_, WARNING: For your own safety,
• ThisVacisdouble-insulated,
read and understand owner's
eliminating
theneedfora separate
manual. Do not run unattended.
grounding
system.
Useonlyidentical Do not pick up hot ashes, coals,
replacement
parts.Readthe
toxic, flammable or other hazardous
instructions
forServicing
Doublematerials. Do not use around explosive
Insulated
Wet/Dry
Vacs
liquids or vapors.
• Donotputanyobjectintoventilation
_, WARNING: To reduce the risk of
openings.
Donotvacuum
withany
ventilation
openings
blocked;
keepfree electric shock - do not expose to rain store indoors.
ofdust,lint,hairoranything
thatmay
reduce
airflow.
SAVE THIS MANUAL
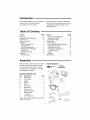
Introduction
This Portable Wet/Dry Vac is intended for
household use. It may be used for
vacuuming wet or dry media.
Read this owner's manual to familiarize
yourself with the product features and to
understand the specific usage of your
new Wet/Dry Vac.
Table of Contents
Section
Page
Warranty ........................
Important Safety Instructions ........
Introduction ......................
Table of Contents .................
Assembly ........................
Carton Contents List .............
Tools Required ..................
Tool Caddy Assembly .............
Wheels/Caster Assembly ..........
Insert Hose .....................
Accessory Storage ...............
Operation ........................
Polarized Plug ..................
2
2-3
4
4
4
4
4
5
5
6
6
7
7
Section
Page
Vacuuming Dry Materials ..........
8
Vacuuming Liquids ...............
8
Emptying the Drum ..............
8
Maintenance .....................
9
Filter Cleaning ..................
9
Filter Removal and Replacement .... 9
Cleaning a Dry Filter ............
10
Cleaning a Wet Filter ............
10
Cleaning and Disinfecting
the Wet/Dry Vac ..............
11
Caster ........................
11
Storage .......................
11
Repair Parts .....................
12
Assembly
Remove entire contents of carton. Check
each item against the Carton Contents
List. Notify your Sears Store or Sears
Service Center immediately if any parts
are damaged or missing.
Carton
Key
A
B
C
D
E
F
G
H
I
J
K
Contents
Tools
Required
Phillips
Screwdriver
List
Description
Wet/Dry Vac ................
Tool Caddy ................
Caster .....................
Wheels ....................
Hose ......................
Car Nozzle .................
Sofa Brush .................
Crevice Toot ................
Extension Wands ............
Bag Assembly ..............
Screws ..................
Owners Manual .............
Qty.
1
1
1
2
1
1
1
1
2
1
4
1
Sears retail replacement filters are sold by
Stock No. 17810.
_j
Assembly
(continued)
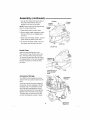
Tool Caddy Assembly
)s
Head
Screw (4)
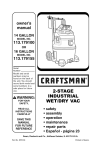
Locate the tool caddy and the bag
assembly in the carton. The tool caddy is
designed to fit on the back of the
4-Gallon drum and MUST BE assembled
to the Vac BEFORE fastening the wheels.
1. Remove the power head from the drum
and set aside.
2. Turn the drum upside down on a flat
surface.
3. Turn the tool caddy upside down and
align to the back of the drum.
4. Install the four screws in the allotted
Drum
Tool Cadd_
holes using a Phillips screwdriver.
Tighten screws until snug. Do not over
tighten as this may tend to deform the
caddy.
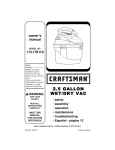
Wheels/Caster
Assembly
The tool caddy MUST BE assembled to
the Vac BEFORE fastening the wheels.
Locate the two wheels and the caster in
the carton. The caster is designed to fit
towards the front of the drum and the
wheels for the back.
1. Insert the caster into the bottom of the
drum as shown
2. Push the caster until the flange on the
caster stem is inserted all the way into
the socket. You will hear the flange
snap into the socket. The caster wilt
swivel easily when positioning is
correct.
3. Position the axle side of one of the
wheels into the drum as illustrated.
Push wheel into the toot caddy hub.
You will hear the wheel snap into the
tool caddy. Repeat for the second
wheel.
_
Caster (1)
Caster Flange
Drum
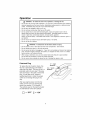
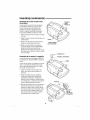
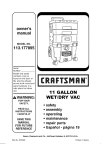
Assembly
(continued)
1. Line up front (label and switch side) of
the power head with the Vac port
located on the front of the drum.
Handle
On/Off
NOTE: Power head must be aligned with
drum for proper attachment.
Cord
Power
Head
2. Place power head on top of drum.
3. Be sure power head completely covers
the top of the drum so leakage does
not occur.
4. Push down the flexible latches, and the
power head wilt attach to the drum.
5. To remove the power head, putl up on
the latches and remove from drum.
Latch (2)
Drum Top
Insert
Hose
Insert the hose locking end of the
"Pos-I-Lock®" hose into the inlet of the
Vac. The hose should snap into place.
To remove the hose from the Vac, press
the release button in the hose assembly
and putl the hose out of the Vac inlet,
as shown.
Release|
Button
Locking End of
"Pos-i=Lock®"
Hose
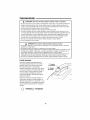
Accessory Storage
Hose
Storage
Your Wet/Dry Vac accessories can be
stored in the tool caddy mounted on the
drum.
Accessory
Storage
The hose may be stored by wrapping it
around the unit and snapping it into the
recessed sides. The extension wands
can be stored underneath the Vac by
sliding the tapered end first through the
allotted hole on the back of the caddy.
The wand stop on the front of the Vac
wilt hold the extension wands in place.
6
Extension
Wand (2)
Operation
,_
WARNING:
To reduce the risk of fire, explosion,
or damage to Vac:
Do not leave Vac running while unattended - you may fail to notice important signs indicating
abnormal operation such as loss of suction, debris/liquid exiting exhaust, or abnormal motor
noises. Immediately stop using Vac if you notice these signs.
Do not leave Vac plugged-in when not in use.
Do not continue running when float has cut off suction.
Do not operate Vac in areas with flammable gases, vapors or explosive dust in the air.
Sparks inside the motor can ignite airborne flammables.
Flammable gases and vapors
include: lighter fluid, solvent-type cleaners, oil-based paints, gasoline,
alcohol, or aerosol sprays. Flammable dusts include: coal, magnesium, aluminum, grain, or
gun powder.
Do not vacuum up explosive dusts, flammable
liquids, or hot ashes.
Do not use Vac as a sprayer.
_.
WARNING:
To reduce the risk of electric shock or injury:
Do not expose to rain or allow liquid to enter motor compartment.
Store indoors.
Do not handle plug, switch, or Vac with wet hands.
Do not service Vac while it is plugged-in. If your Vac is not working as it should, has missing
parts, has been dropped, damaged, left outdoors, or dropped into water, return it to a Sears
service center or call customer service.
• When using an extension cord, use only outdoor-rated cords that are in good condition.
Do not allow the connection to come into contact with liquid.
Do not vacuum toxic materials to reduce the risk of inhaling the vapors or dust.
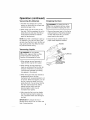
Polarized
Plug
To reduce the risk of electric shock, this
Vac has a polarized plug (one blade is
wider than the other). This plug will fit in a
polarized outlet only one way. If the plug
does not fit fully in the outlet, reverse the
plug. If it still does not fit, contact a
qualified electrician to install the proper
outlet. Do not change the plug in any
way.
After you plug the power cord into the
outlet, turn the unit on by pushing the
switch from position "O" to position "l".
The symbols used on the switch actuator
are international "On & Off" symbols:
O
="OFF"
I =''ON''
Operation (continued)
Vacuuming
Dry Materials
Emptying
1. The filter must always be in correct
position to reduce the risk of leaks and
possible damage to Vac.
2. When using your Vac to pick up very
fine dust, it will be necessary for you to
empty the drum and clean the filter at
more frequent intervals to maintain
peak Vac performance.
NOTE: A dry filter is necessary to pick up
dry material. If you use your Vac to pick
up dust when the filter is wet, the filter wilt
clog quickly and be very difficult to clean.
Dry the filter before storing.
Vacuuming
the Drum
injury from accidental starting, unplug
_power
WARNING:
To emptying
reduce thethe
riskdrum.
of
cord before
1. Remove the power head of the Vac by
pulling outward on the latches located
on each side of the Vac. Lift off the
power head by the handle.
2. Dump the drum contents into the
proper waste disposal container.
j
Handle
Head
Liquids
_, WARNING: Do not operate
without filter cage and float, as they
prevent liquid from entering the
impeller and damaging the motor.
Latch (2)
Pull Latches
1. When picking up small amounts of
liquid the filter may be left in place.
2. When picking up large amounts of
liquid we recommend that the filter be
removed. If the filter is not removed,
it wilt become saturated and misting
may appear in the exhaust.
3. When the liquid in the drum reaches a
predetermined level, the float
mechanism will rise automatically to cut
off air-flow. When this happens, turn off
the Vac, unplug the power cord, and
empty the drum. You wilt know that the
float has risen because Vac airflow
ceases and the motor noise wilt
become higher in pitch, due to
increased motor speed.
4. After using the Vac to pick up liquids,
the filter must be dried to reduce the
risk of possible mildew and damage to
the filter.
IMPORTANT: To reduce the risk of
damage to the Vac do not run motor with
float in raised position.
_
Outward
and Then
Lift Power Head Up
_
By The Handme
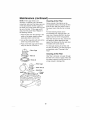
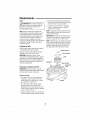
Maintenance
Filter
_, WARNING: To reduce the risk of
injury from accidental starting, unplug
power cord before changing or
cleaning filter.
NOTE: This filter is made of high quality
paper designed to stop very small
particles of dust. The filter can be used
for wet or dry pick up. Handle the filter
carefully when removing to clean or
installing it. Creases in the filter pleats
may occur from installation but creases
will not affect the performance of the
filter.
Filter Cleaning
4. Gently push on the filter plate to seat
the rubber ring of the filter inside the
circular channel of the filter plate.
5. Place the filter nut onto the threaded
screws and tighten it down. Finger
tighten only.
NOTE: Lever of filter nut should be away
from plate as shown.
IMPORTANT: Do not over tighten as this
may deform or crack the filter cage or
filter plate.
NOTE: Your filter has a purple stripe that
matches an in-store disptayer. When you
visit your local Sears store, just
remember the color of your stripe for the
correct size filter.
Your filter should be cleaned often to
maintain peak Vac performance.
_
Be sure to dry the filter before storing or
picking up dry debris.
IMPORTANT: After cleaning, check the
filter for tears or small holes. Do not use
a filter with holes or tears in it. Even a
small hole can cause a lot of dust to
come out of your Vac. Replace it
immediately.
Filter Removal
__
Fitter Nut
Filter P,ate
Latch (2)
Cage
Head
and Replacement
IMPORTANT: To reduce the risk of
damage to the blower wheel and motor,
always reinstall the filter before using the
Vac for dry material pickup.
Filter Removal:
1. To remove the filter for cleaning or
replacement, unscrew the filter nut
from the filter cage, remove filter plate
and lift off filter.
2. To replace the filter, carefully slide the
filter over the filter cage, sliding it over
the center ring covering the three slots
until the filter stops against the power
head.
3. Place the hole in the filter plate over
the threaded screw of the filter cage.
•Drum
Maintenance
(continued)
NOTE: If filter cage needs to be
removed, or replaced, use a flat blade
screwdriver and insert the blade near one
of the tabs between the filter cage and
the center ring of the power head. Pry the
tab out of the slot. Tilt the cage and lift
away from the power head. Replace in
the following manner:
Cleaning
Some removal of dry debris can be
accomplished without removing the filter
from the Vac. Slap your hand on top of
the power head while the Vac is turned
off.
For best cleaning results due to
accumulated dust, clean the filter in an
open area. Cleaning SHOULD be done
outdoors and not in the living quarters.
1. Place the float over the opening in the
center of the power head as shown,
laying face down over the hole.
After filter removal from Vac, remove the
dry debris by gently tapping the filter
against the inside wall of your dust drum.
The debris will loosen and fall.
2. Line up filter cage tabs with slots in the
center ring of the power head.
3. Push on the filter cage until the tabs
snap into slots for a secure fit.
For thorough cleaning of dry filter with
fine dust (no debris), run water through it
as described under "Cleaning A Wet
Filter".
Cleaning
A Wet Filter
After filter is removed, run water through
the filter from a hose or spigot. Take care
that water pressure from the hose is not
strong enough to damage filter.
Slots (3)
Cage
Filter Tab (3)
Solid End
Slots (3)
A Dry Filter
Head
10
Maintenance
(continued)
Cleaning and Disinfecting
Wet/Dry Vac
Storage
the
Before storing your Vac, the drum should
be emptied and cleaned. The cord should
be wrapped around the handle, as shown
and the hose should be stored as
described in this manual. Accessories
To keep your Wet/Dry Vac looking its
best, clean the outside with a cloth
dampened with warm water and mild
soap.
To clean the drum:
should be kept in the same area as the
Vac so they can be readily available.
The Vac should be stored indoors.
1. Dump debris out.
2. Wash drum thoroughly with warm water
and mild soap.
NOTE: If the power cord is damaged,
it must be replaced by the manufacturer,
their service agent or by similarly qualified
personnel to reduce the risk of accident.
3. Wipe out with dry cloth.
Before prolonged storage or as needed
(i.e., waste water pick up) the drum
should be disinfected.
Handle
To disinfect the drum:
Cord
1. Pour 1 gallon of water and 1 teaspoon
chlorine bleach into the drum.
2. Let solution stand for 20 minutes,
carefully swishing every few minutes,
making sure to wet all inside surfaces
of the drum.
3. Empty drum after 20 minutes. Rinse
with water until bleach smell is gone.
Allow drum to dry completely before
sealing the motor on the drum.
Caster
If your caster is noisy, you may put a drop
of oil on the roller shaft to make it quieter.
WARNING: To assure product
SAFETY and RELIABILITY, repairs
and adjustments should be performed
by a Sears Parts & Repair Service
Center, always using Sears
replacement parts.
11
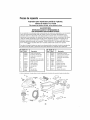
Repair Parts
4 Gallon
Portable
Wet/Dry
Vac - Model Number
113.176120
Always order by Part Number - Not by Key Number
SERVICING
_, WARNING
OF DOUBLE-INSULATED
WET/DRY
VAC
In a double-insulated Wet/Dry Vac, two systems of insulation are provided instead
of grounding. No grounding means is provided on a double-insulated appliance, nor
should a means for grounding be added. Servicing a double-insulated Wet/Dry Vac
requires extreme care and knowledge of the system, and should be done only by
qualified service personnel. Replacement parts for a double-insulated Wet/Dry Vac
must be identical to the parts they replace. Your double-insulated Wet/Dry Vac is
marked with the words "DOUBLE INSULATED" and the symbol _
(square within
a square) may also be marked on the appliance.
To reduce the risk of injury from electrical shock, unplug power cord before
servicing the electrical parts of the Wet/Dry Vac.
Key
No.
Part No.
Description
Key
Nio.
Part Nio.
Description
1
833065
Cord with Terminals
12
833069
Drum Assembly
2
3
830996
833057
Actuator, Switch
Shield Vent Cover
13
833072
14
510080
4
833058
Pad - NR Foam Vent Cover
15
831000
Wand Stop
Caddy Assembly
Caster
5
833068
Latch - Left
16
830995
Hose
17849
1-Extension Wand
6
833067
Latch - Right
17
7
832606
Float Cup
18
17863
1-Crevice Tool
8
9
833056
17810
Filter Cage
1-Filter
19
17868
1-Car Nozzle
20
832610-1
10
16937
1-Filter Plate
21
SP6772
11
16938
1-Filter Nut
1- Stock Item - May Be Secured Through the Hardware
Department
12
Sofa Brush Assembly
Owner's Manual
of Most Sears Retail Stores.
f
manual
del usuari0
NO. DE MODELO
113.176120
N_mero
de serie
El n_mero de modelo se
encuentra en la parte
trasera, en la etiqueta de
UL. El n_mero de serie se
encontrar_,en el interior
(lado trasero) del pestillo.
Usted debe anotar los
n_meros tanto de modelo
como de serie en un lugar
seguro para uso futuro.
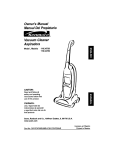
CRRFr MRN°
ASPIRADORA
PARA
MOJADO/SECO
_kADVERTENCIA:
PARA SU
PORTATIL
DE
SEGURIDAD
4 GALONES
LEA DETENIDAIVIENTE
TODASLAS
INSTRUCCIONES
GUARDEESTE
MANUAL
PARAREFERENCIA
FUTURA
J
•
•
•
•
•
seguridad
ensamblaje
funcionamiento
mantenimiento
piezasde repuesto
Sears, Roebuck and Co., Hoffman Estates, IL 60179 U.S.A.
No. de pieza SP6772
Impresoen China
Garantia
r
--
GarantiacompletaCraftsmande unafio
Si este productoCraftsmanfalla debidoa un defecto de material o de fabricaci6ndentro del plazo
de unafio a partir de la fecha de compra, devu_lvalo a cualquiertienda Sears, Centrode Servicio
Sears u otro puntode venta Craftsmanpara que sea reparadogratuitamente (o reemplazadosi la
reparaci6nresulta imposible).
Estagarantia se aplica solamentedurante90 dias a partir de la fecha de compra, si este producto
se utiliza algunavez para fines comercialeso de alquiler.
Esta garantia no incluye las bolsas ni los filtros, que son piezas perecederas que se pueden
desgastarpor causadel uso normaldentrodel periodo de garantia.
Estagarantia le confiere a ustedderechoslegales especificosy es posiblequeustedtengatambi_n
otrosderechosque varian de un estadoa otro.
Sears, Roebuckand Co., Hoffman Estates, IL 60179
INSTRUCCIONES
DESEGURIDAD
IMPORTANTES
La seguridad es una combinaci6n de sentido comt_n,
permaneceralertay saber c6mo funciona la
aspiradora para mojado/seco ("la aspiradora").
•
utilizandoy antes de realizarservicio de revisi6n.
•
Las chispas que se producen en el interior del
motor pueden incendiarlos vapores infiamables
o el polvo. Para reducirel riesgo de incendio o
explosi6n: No use la aspiradora cerca de liquidos,
gases combustibles, o polvos explosivos como
gasolina u otros combustibles, liquido encendedor,
limpiadores, pinturas a basede aceite,gas natural,
polvo de carb6n, polvo de magnesio, polvo de
granos de cereal, polvo de aluminio o p61vora.
•
No recoja con la aspiradora nadaque est_ ardiendo
o humeando, como cigarrillos, f6sforos o cenizas
calientes.
•
No recoja con la aspiradora polvo de pared de tipo
seco ni ceniza fria de chimenea o otros polvos finos
con un filtro estAndar.Estos materiales pueden
pasarpor el filtro y ser expulsadosde vuelta al aire.
Utilice un filtro para polvo fino en lugar de un filtro
estAndar.
Palabrasde serialde seguridad
,_. PELIGRO:indica una situaci6n peligrosa que, si
no se evita, causardla muerte o lesiones graves
_,
No abandone la aspiradora cuando est_ enchufada.
DesenchQfeladel tomacorriente cuando no la est_
ADVERTENCIA:indica una situaci6n peligrosa
que, si no se evita, podria causar la muerte o lesiones
graves
PRECAUCI()N:indica una situaci6n peligrosa que,
si no se evita, pudiera causar lesiones leveso
moderadas.
Cuandoutilice la aspiradora para mojado/seco, siga
siempre las precaucionesb_sicas de seguridad,
incluyendo las siguientes:
• , ADVERTENCIA
- Para reducir el riesgo de incendio, sacudidas
el_ctricas o lesiones:
•
Leay entiendaeste manual del usuario y todas las
etiquetas que est_n colocadas en la aspiradora
antes de utilizarla.
•
Para reducir el riesgo de inhalar vapores t6xicos,
no recoja con la aspiradora materiales t6xicos o
peligrosos ni la use cerca de dichos materiales.
•
Utilice la aspiradora _nicamente de la maneraque
se describe en este manual.
•
•
No deje la aspiradora en marcha mientras est_
desatendida. Usted podria no notar se_ales
importantes que indiquen un funcionamiento
anormal, tal como p_rdida de succi6n, residuos o
liquido que salen por el escapeo ruidos anormales
del motor. Dejede usar la aspiradora inmediatamentesi observa estas se_ales.
Para reducir el riesgo de descargas el_ctricas, no
exponga la aspiradora a la Iluvia ni deje que entren
liquidos en el compartimiento del motor. Guardela
aspiradora en un lugar interior.
•
No permita que la aspiradora se utilice como un
juguete. Se necesitaprestar m_xima atenci6n
cuando sea utilizadapor ni_os o cerca de _stos.
14
•
No use la aspiradora con un filtro desgarrado o sin
tener el filtro instalado, excepto cuando recoja con
ella liquidos de la manera que se describe en este
manual. Los residuos secos absorbidos por el
impulsor podrian daSarel motor o ser expulsados
de vuelta al aire.
•
Mantenga el pelo, la ropa holgada, los dedos y
todas las partes del cuerpo alejados de las
aberturas y de las piezas mOviles.
•
Para reducir el riesgo de caidas, tenga cuidado
adicional al limpiar en escaleras.
•
Para reducir el riesgo de lesiones corporales o
da_os a la aspiradora, utilice t_nicamente
accesorios recomendados por Craftsman.
•
Parareducirel riesgo de lesionesen los ojos, use
protecciOnocular de seguridad.La utilizaciOnde cualquieraspiradorautilitaria o sopladorutilitario puede
hacerquese soplen objetosextra_oshacialos ojos,
Io cual puedecausar da_os gravesen los ojos.
• Apague la aspiradora antes de desenchufarla.
•
Para reducir el riesgo de lesiones debidas a un
arranque accidental, desenchufe el cordon de
energia antes de cambiar o limpiar el filtro.
•
No desenchufela aspiradoratirando del cordon. Para
desenchufarla,agarre el enchufe y no el cordon.
•
No use la aspiradora con el cordon da_ado, el enchufe da_ado u otras piezas da_adas.Si la aspiradora no funciona como debe, lefaltan piezas, se ha
caido, ha sido da_ada, se ha dejado a la intemperie
o se ha caido al agua, Ilame a servicio al cliente.
•
No tire de laaspiradora usando el cordon ni la Ileve
por el cordon, ni use el cordon como asa, ni cierre
una puerta sobre el cordon, ni tire del cordon
alrededor de bordes o esquinas afilados. No pase la
aspiradora en marcha sobre el cordon. Mantenga el
cordon alejadode las superficies calientes.
•
No maneje el enchufe, el interruptor o la aspiradora
con las manos mojadas.
•
Utilice t_nicamentecordones de extension que
tengan capacidad nominal para uso a la intemperie.
Los cordones de extension que est_n en malas
condiciones o tengan un tama_o de alambre
demasiado peque_o puedencrear peligros de
incendio y descargas el_ctricas. Parareducir el
riesgo de estos peligros, asegQresede que el
cordon est_ en buenas condiciones y que el liquido
no entre en contacto con la conexiOn.No utilice un
PRECAUCION:
• Para reducir el riesgo de da_os a la audiciOn, use
protectores de oidos cuando utilice la aspiradora
durante muchas horas seguidas o cuando la
emplee en un Area ruidosa.
• Para operaciones que generan polvo, use una
mascara antipolvo.
• Las descargasde estAticason comunes cuando
la humedad relativadel aire es baja. Si recoge
residuos finos con la aspiradora, se puede
depositar carga estAticaen la manguerao en la
aspiradora. El mejor remedio para reducir la
frecuencia de las descargas de estAtica en su casa
o cuando use esta aspiradora es a_adir humedad al
aire con un humidificador.
Siga las siguientes advertenciasque aparecen en la
caja del motor de la aspiradora.
F_
cordon de extension que tenga conductores con un
diAmetro menor al calibre 16 (AWG).Para reducir la
p_rdidade potencia,utilice un cordon de extension
de calibre 14 si la Iongitudes de 25 a 50 pies,y de
calibre 12 si la Iongitudes de 50 pies o mAs.
•
•
ISLAMIENTODOBLE. NO SEREQUIERE
CONEXIONA TIERRA.
CUANDOHAGASERVICIO DE REVISIONDE
LA ASPIRADORA, UTILICE UNICAMENTEPIEZAS DE
REPUESTOIDt_NTICAS.
ADVERTENCIA:Para su propia seguridad,
lea y entienda el manual del operador. No tenga
en marcha la aspiradora desatendida. No recoja
cenizas calientes, carbon caliente, materiales
tOxicos ni inflamables ni otros materiales
Estaaspiradora tiene aislamiento doble, Io cual
elimina la necesidadde un sistema independiente
de conexiOna tierra. Utilice t_nicamentepiezasde
repuesto id_nticas. Lea las instrucciones de servicio
de revision de las aspiradoraspara mojado/seco
con aislamientodoble.
peligrosos. No use la aspiradora alrededor de
liquidos o vapores explosivos.
No ponga ningQn objeto en las aberturas de ventilaciOn.No recoja nadacon la aspiradora cuando
cualquiera de las aberturasde ventilaciOnest_
bloqueada;mantenga dichas aberturas libres de
polvo, pelusa, pelo o cualquiercosa que pueda
reducir el flujo de aire.
,_
ADVERTENCIA:Para reducir el riesgo de
sacudidas el_ctricas, no exponga la aspiradora a la
uv a y a mac_ne a en nter ores.
GUARDEESTEMANUAL
15
I
I
Introducci6n
Estaaspiradorapara mojado/secoport_.tilest,.
diseSadapara usodom6stico.Se puedeutilizar
para recogermaterialesmojadoso secos.
Leaeste manualdel operadorparafamiliarizarse
con lascaracteristicasdelproducto y paraentender
la utilizaci6nespecificade su nuevaaspiradorapara
mojado/seco.
Indice
Articulo
P;_gina
Garantia ...............................
14
Instruccionesde seguridadimportantes ... 14-15
Introducci6n ...........................
16
fndice .................................
16
Ensamblaje ............................
16
Contenidode la cajade cart6n ............
16
Herramientasnecesarias................
16
Ensamblajede la basede
soporteparaherramientas ............
17
Ensamblajede las ruedasy la ruedecilla .. 17
Introduzcala manguera ................
18
Almacenamientode los accesorios .......
18
Funcionamiento.........................
19
Enchufepolarizado ...................
19
Articulo
P;_gina
Recogidade materialessecos ...........
20
Recogidade liquidos ..................
20
Vaciadodeltambor ...................
20
Mantenimiento ........................
21
Limpiezadelfiltro ....................
21
Remoci6ny reemplazodel filtro .........
21
Limpiezade un filtro seco ................
22
Limpiezade un filtro mojado .............
22
Limpiezay desinfecci6nde laaspiradora
paramojado/seco ...................
23
Ruedecilla...........................
23
AImacenamiento.......................
23
Piezasde repuesto .....................
24
Ensamblaje
Herramientas necesarias
Saquetodo el contenido de la caja de cart6n.
AsegQresede queno falte ningQnarticulo
utilizandola lista del contenidode la caja.
Notifique inmediatamentea la tienda Searsm_.s
cercanasi alguna piezaest,. daSadao falta.
Destornillador
Phillips
Lista del contenidode la caja de carton
Clave
A
B
C
D
E
F
G
H
I
J
K
Descripcibn
Cant.
Aspiradorapara mojado/seco........
1
Basede soporte para herramientas .. 1
Ruedecilla ......................
1
Ruedas ........................
2
Manguera ......................
1
Boquillapara auto ................
1
Cepillopara sof_.s ................
1
Boquillarinconera ................
1
Tubosextensores.................
2
Ensamblajede la bolsa ............
1
Tornillos ......................
4
Manualdel usuario................
1
Los filtros de repuestode venta minorista de
Searsse vendencon el No. de existencias17810.
_j
H
16
Ensamblaje(continuaci6n)
Ensamblajede la basede soportepara
herramientas
de
Phillips (4)
Localice la base de soporte para herramientas y
el ensamblaje de la bolsa en la caja de cart6n.
La base de soporte para herramientas est,.
dise_ada para encajar en la parte trasera del
tambor de 4 galones y DEBE SER ensamblada
en la aspiradora ANTES de instalar las ruedas.
1. Retire el cabezal del motor del tambor y p6ngalo
a un lado.
2. Ponga el tambor en posici6n invertida sobre una
superficie plana.
Tambor
3. Voltee la base de soporte para herramientas y
alin6ela con la parte trasera del tambor.
Basedesol
paraherramientas
4. Instale los cuatro tornillos en los agujeros
provistos utilizando un destornillador Phillips.
Apriete los tornillos hasta que est6n bien
ajustados. No los apriete excesivamente, ya que
esto puede tender a deformar la base de soporte
para herramientas.
_
Ensamblajede las ruedasy la ruedecilla
Ruedecilla
(1)
Pestafiade la ruedecilla
La base de soporte para herramientas DEBE SER
ensamblada en la aspiradora ANTES de instalar las
ruedas.
Localice las dos ruedas y la ruedecilla en la caja de
cart6n. La ruedecilla est,. dise_ada para encajar
hacia la parte delantera del tambor y las ruedas
para encajar en la parte trasera.
1. Inserte la ruedecilla en la parte inferior del
tambor, de la manera que se muestra en la
ilustraci6n.
2. Empuje la ruedecilla hasta que la pesta_a
ubicada en el v_.stagode la ruedecilla est6
completamente insertada en el recept_.culo.
Usted oir_.c6mo la pesta_a se acopla a presi6n
en el recept_.culo. La ruedecilla girarD,f_.cilmente
cuando el posicionamiento sea correcto.
Rueda
3. Posicione el lado del eje de una de las ruedas en
el tambor de la manera que se muestra en la
ilustraci6n. Empuje la rueda al interior del buje
de la base de soporte para herramientas. Usted
oir_. c6mo la rueda se acopla a presi6n en la
base de soporte para herramientas. Repita el
procedimiento para la segunda rueda.
dela
basede
sopo_epara
herramientas
17
Ensamblaje(continuaci6n)
1. Alineelapartedelantera(el lado de laetiquetay
el interruptor)del cabezaldel motorcon el
orificio de aspiraci6nubicadoen la parte
delanteradeltambor.
Interruptor
de encendido
Y
NOTA:El cabezaldel motorse debealinearcon el
tamborpara instalarlocorrectamente.
Cabezal
del motor
Cord6n de
la
2. Coloqueel cabezaldel motor sobrela parte
superiordeltambor.
3. AsegQresede queel cabezaldel motor cubra
completamentela partesuperiordeltambor,
paraqueno hayafugas.
4. Empujehaciaabajolos pestillosflexiblesy el
cabezaldel motorquedar_,sujetoal tambor.
5. Pararetirarel cabezaldel motor,jalehaciaarriba
los pestillosy retiredicho cabezaldel tambor.
(2)
Partesuperor _leltambor
Introduzcala manguera
Introduzca
el extremodefijaci6n de la manguera
"Pos-I-Lock®"en la entradade la aspiradora.La
mangueradeberiaacoplarsea presi6nen su sitio.
Parasacarla manguerade laaspiradora,optima el
bot6n de liberaci6nubicadoen elensamblajede la
mangueray tire de la manguerahastasacarlade la
entradade la aspiradora,de la maneraquese
muestraen lailustraci6n.
liberaci6n
Bot6nde _,
fijaci6n
de la manguera
"Pos-I-Lock ®''
Almacenamientode los accesorios
Los accesoriosde laaspiradoraparamojado/seco
se puedenalmacenaren la basede soportepara
herramientasmontadaen eltambor.
Almacenamie
de la manguera
\Entradade
la aspiradora
Almacenamiento
de los accesorios
La manguerase puedealmacenarenroll_.ndola
alrededorde launidady acopl_.ndola
a presi6nen
los ladosrebajados.Lostubos extensoresse
puedenalmacenardebajode laaspiradora
deslizandoprimero el extremoc6nico atrav6s del
agujeroprovisto en lapartetraserade labasede
soporteparaherramientas.Eltope paratubos
extensoresubicadoen la partedelanterade la
aspiradorasujetar_,lostubos extensoresen la
posici6ncorrecta.
18
extensor
(2)
Funcionamiento
ADVERTENCIA:Para reducir el riesgo de incendio,explosiono dafiosa la aspiradora:
• No deje la aspiradora en marcha mientras est_ desatendida. Usted podria no notar se_ales importantes que
indiquen un funcionamiento anormal, tal como p_rdida de succiOn, residuos o liquido que salen por el
escape o ruidos anormales del motor. Dejede usar la aspiradora inmediatamentesi observa estas se_ales.
• No deje la aspiradora enchufadacuando no se est_ utilizando.
• No contint_eusando la aspiradora cuando el flotador hayacortado la succiOn.
• No utilice la aspiradora en _reascon gases inflamables,vapores inflamables o polvo explosivo en el aire.
Las chispas generadas dentro del motor pueden incendiar los materiales inflamablessuspendidos en el aire.
Los gasesinflamables y los vapores inflamables incluyen: liquido encendedor,limpiadores tipo solvente,
pinturas a base de aceite, gasolina, alcohol o rociadores tipo aerosol. Los polvos inflamables incluyen:
polvo de carbon, polvo de magnesio, polvo de aluminio, polvo de grano de cereal o pOlvora.
• No recoja con la aspiradora polvos explosivos, liquidos inflamablesni cenizascalientes.
• No use la aspiradora como un rociador.
,_
ADVERTENCIA:Para reducirel riesgo de descargasel_ctricas o lesiones:
• No exponga la aspiradora a la Iluvia ni deje que entre liquido en el compartimiento del motor. Almacene la
aspiradora en un lugar interior.
• No manejeel enchufe,el interruptor o la aspiradora con las manos mojadas.
• No haga servicio de ajustes y reparacionesde la aspiradora mientras est_ enchufada.Si la aspiradora no estA
funcionando como deberia, le faltan piezas,se ha caido, estAda_ada, se ha dejado a la intemperieo se ha
caido al agua,devu_lvalaa un centro de servicio independienteo Ilame a servicio al cliente.
• Cuandoutilice un cordon de extension, utilice t_nicamentecordones con capacidadnominal para uso a la
intemperie que est_n en buenas condiciones. No deje que la conexiOnentre en contacto con liquido.
• No recoja con la aspiradora materiales tOxicos, para reducir el riesgo de inhalar los vapores o el polvo.
Enchufe polarizado
Parareducirelriesgo desacudidaselOctricas,
esteaparatoelectrodomOstico
tieneun enchufe
polarizado(unahoja es m_.sanchaquela otra).
Esteenchufeentrar_,en un tomacorriente
polarizadosolamentede unamanera.Si elenchufe
no entrapor completoen el tomacorriente,dole la
vuelta.Si siguesin entrar,p6ngaseen contacto
con un electricistacompetentepara instalarel
tomacorrienteadecuado.NohaganingSntipo de
cambioen elenchufe.
"r': Posicibn
de encendido
"0": Posicibn
deapagado
DespuOsde enchufarel cord6nde energiaen el
tomacorriente,enciendala unidadempujandoel
interruptorde laposici6n"O" a la posici6n"1".Los
simbolosutilizadosen el accionadordel interruptor
son los simbolosinternacionalesde "encendidoy
apagado":
Q
=APAGADO I =ENCENDIDO
19
Funcionamiento
(continuaci6n)
Vaciadodel tambor
Recogidade materiales secos
con la aspiradora
1. El filtro debeestarsiempreen la posici6n
correctapara reducirel riesgodefugasy
posiblesda_osa laaspiradora.
2. Cuandoutilicela aspiradorapara recogerpolvo
muy fino, ser_.necesarioqueustedvacieel
tambor y limpie el filtro a intervalosm_.s
frecuentesparamantenerel m_.ximo
rendimientode laaspiradora.
NOTA:Senecesitaun filtro para mediossecos para
recogermaterialseco.Si utilizala aspiradorapara
recogerpolvo cuandoel filtro est6 mojado,6stese
taponar_,r_.pidamente
y ser_.muy dificil limpiarlo.
Aseg0resede secarel filtro antesde guardarla
aspiradora
J_. ADVERTENCIA:
Parareducirel riesgode
lesionesdebidasa unarranqueaccidental,
desenchufeel cord6ndeenergiaantesde
vaciarel tambor.
1. Retireel cabezaldel motorde la aspiradora
jalandohaciaafueralospestillosubicadosa
cadalado de la aspiradora.Levanteel cabezal
del motor porel asa.
2. Viertaelcontenidodeltambor de laaspiradora
en el recipientede eliminaci6nde residuos
apropiado.
/Asa
Recogidade liquidoscon la aspiradora
delmotor
,_L ADVERTENCIA:
No utilice laaspiradorasin
lajaula del filtro y elfiotador, ya que estas
piezasevitan queentre liquido en el impulsor y
dare e motor.
Pestillo (2)
1. Cuandorecojacantidadespeque_asde liquido,
sepodr_,dejar colocadoelfiltro en laaspiradora.
2. Cuandorecojacantidadesgrandesde liquido,
recomendamosquitarel filtro. Si no se quitael
filtro, est6se saturar_,yes posiblequeaparezca
nieblaen el escape.
3. Cuandoelliquido contenidoen el tambor
alcanceun nivelpredeterminado,el mecanismo
de flotadorsubir_,autom_.ticamente
para cortar
la circulaci6ndeaire.Cuandoesto ocurra,
apaguelaaspiradora,desenchufeel cord6nde
energiay vacieeltambor. Sabr_.queelflotador
ha cortadolacirculaci6nde aireporquela
succi6ncesar_,y el ruido del motoralcanzar_.
unafrecuenciam_.salta debidoal aumentode la
velocidaddel motor.
4. Despu6sde utilizarla aspiradorapara recoger
liquidos,se debesecarel filtro paraevitaruna
posibleformaci6nde mohoy posiblesda_osal
filtro.
IMPORTANTE:
Parareducirel riesgode da_arla
aspiradora,no hagafuncionarel motor con el
flotadoren la posici6nsubida.
20
Jale los pestillos
_
acia luera y levante
el cabezal del motor
por el asa
Mantenimiento
Filtro
4. Empuje suavemente sobre la placa del filtro
para asentar el anillo de goma del filtro dentro
del canal circular de la placa del filtro.
_, ADVERTENCIA:
Parareducirel riesgode
lesionespor causade un arranqueaccidental,
desenchufeel cord6nde energfaantesde
cambiaro limpiar el filtro.
5. Coloque la tuerca del filtro en el esp_.rrago
roscado y apri6tela hacia abajo. Apri6tela
solamente con los dedos.
NOTA: La palanca de la tuerca del filtro debe estar
siempre alejada de la placa, de la manera que se
muestra en la ilustraci6n.
NOTA:Estefiltro est,. hechode papelde alta
calidaddise_adopara detenerpartfculasde polvo
muy peque_as.El filtro sepuedeutilizar para
recogermaterialmojadoo seco. Manejeel filtro
con cuidadocuandoIo quiteparalimpiarlo o
cuandoIo instale.Esposiblequese formen
arrugasen losplieguesdelfiltro como resultadode
la instalaci6n,pero lasarrugasno afectar_.nel
rendimientodelfiltro.
IMPORTANTE: No apriete excesivamente la tuerca,
ya que esto podrfa deformar o agrietar la placa
del filtro, la jaula del filtro o el filtro mismo.
NOTA: El filtro tiene una raya morada que coincide
con un exhibidor ubicado en el punto de venta de
la tienda. Cuando visite una tienda local de Sears,
simplemente recuerde el color de la raya de su
filtro para obtener el filtro de tama_o correcto.
Limpieza del filtro
El filtro se debe limpiar a menudo para mantener
un rendimiento 6ptimo de la aspiradora.
Aseg0rese de secar el filtro antes de guardar la
aspiradora o de recoger residuos secos.
Tuerca del filtro
___Placa
IMPORTANTE:Despu6s de limpiar el filtro,
compruebe si 6ste tiene desgarraduras o agujeros
peque_os. No use un filtro que tenga agujeros o
desgarraduras. Incluso un agujero peque_o puede
hacer que salga mucho polvo de la aspiradora.
C_.mbieloinmediatamente.
,,
_ /
del filtro
Filtro
•
del
RemociOny reemplazodel filtro
i
IMPORTANTE:Para evitar da_ar la rueda del
soplador, reinstale siempre el filtro antes de utilizar
la aspiradora para recoger material seco.
Remoci6ndelfiltro:
1. Paraquitar el filtro con el fin de limpiarlo o
reemplazarlo,quite la tuercadel filtro del
tornillo ubicadoen la jaula del filtro, quite la
placa del filtro y levanteel filtro.
2. Para reemplazarel filtro, deslicecuidadosamenteel filtro sobre la jaula del filtro,
desliz_.ndolosobre el anillo central que cubre
lastres ranuras,hastaqueel filtro se detenga
contrael cabezaldel motor.
3. Coloqueel agujeroubicadoen laplaca delfiltro
sobre elesp_.rragoroscadode la jauladel filtro.
21
71:
Mantenimiento(continuaci6n)
NOTA:Si es necesarioretirar o reemplazarlajaula
del filtro, utiliceun destorniiiadorde hoja pianae
insertela hoja cercade unade laslengiJetasentre
lajauia delfiitro y el anillocentraldel cabezaldel
motor. Hagapalancaen lalengiJetahastasacarla
de la ranura.Inclinela jaulay lev_.ntela
aiej_.ndoia
del cabezaldelmotor.Col6quelade nuevode la
siguientemanera:
Limpieza de un filtro seco
SepuedeIograrun pocode remoci6nde residuos
secossin quitar elfiltro de laaspiradora.D6una
palmadacon la manosobrela partesuperiordel
ensamblajedel motor mientraslaaspiradoraest,.
apagada.
Para obtener6ptimos resultadosde limpieza
debido a la acumulaci6nde polvo, limpie el filtro
en un _.reaabierta. La limpiezaSEDEBErealizar
al aire libre y no en el interior de lavivienda.
1. Coloqueel flotador sobre la abertura ubicada
en el centro del cabezaldel motor, de la
maneraque se muestraen la ilustraci6n,
apoyadode maneraque est6 orientadohacia
abajosobre el agujero.
2. Alinee laslengiJetasde la jaula del filtro con
las ranuras ubicadasen el anillo central del
cabezaldel motor.
Despu6sde quitar elfiltro de laaspiradora,saque
los residuossecosgolpeandosuavementeel filtro
contralaparedinteriordeltambor para polvo.Los
residuossesoltar_.ny caer_.n.
Para unalimpiezaa fondo delfiltro seco con
polvo fino (sin residuos), hagapasaraguaa
trav6sdel filtro tal como se describebajo
"Limpiezade un filtro mojado".
3. Empujesobre lajaula del filtro hastaque las
lengiJetasse acoplena presi6nen las ranuras
para Iograr un ajusteseguro.
Limpieza de un filtro mojado
Despu6sde quitar el filtro, haga pasaragua a
trav6s de 61usandouna manguerao desdeuna
espita.Tengacuidado de que la presi6ndel agua
procedentede la manguerano sea tan fuerte
como para da_arel filtro.
Jauladelfiltro
engiietas(3)
___L_
Flotador
Ranuras(3)
del filtro
Lengiietas
(3)
Ranuras(3):
macizo
Cabezal
delmotor
22
Mantenimiento(continuaci6n)
Almacenamiento
Limpieza y desinfecci6nde la
aspiradora para mojado/seco
Antesdealmacenarlaaspiradora,se debevaciary
limpiarel tambor para polvo.El cord6nse debe
enrollaralrededordel asatal y comose muestraen
la ilustraci6n,y la manguerase debealmacenarde
la maneradescritaen este manual.Los accesorios
se debenmanteneren la misma_.reaque la
aspiradoraparaqueest6nal alcancede la mano
cuandose necesiten.La aspiradorase debe
almacenaren interiores.
Para mantenerel mejor aspectoposible de la
aspiradorapara mojado/seco,limpie su exterior
con un paso humedecidocon aguatempladay
un jab6nsuave.
Para limpiar eltambor:
1. Vacfelos residuosdel tambor.
2. Lavea fondo el tambor con agua templaday
un jab6nsuave.
3. Limpie el tambor con un paso seco.
Antesde un almacenamientoprolongadoo seg0n
sea necesario(por ejemplo,si se recogenaguas
residuales),se debe desinfectarel tambor.
Para desinfectarel tambor:
NOTA:Si el cord6nde energfaest,. da_ado,debe
ser reemplazadopor el fabricante,por el agentede
servicio de6ste o por personalsimilarmente
calificado,para reducirel riesgode accidente.
1. Eche1 gal6n de aguay 1 cucharaditade
blanqueadorde cloro en eltambor.
2. Dejeque lasoluci6n reposedurante 20
minutos y agitelacuidadosamentecadapocos
minutos, asegur_.ndosede mojartodas las
superficiesinteriores del tambor.
3. Vacfeel tambor despu6sde 20 minutos.
Enju_.guelocon agua hasta queel olor a
blanqueadordesaparezca.Dejeque el tambor
se sequecompletamenteantesde sellar el
motor sobre eltambor.
Cord6n
energia
Ruedecilla
Si laruedecillahaceruido, puedeponer unagota
de aceiteen eleje del rodilloparaque6stesea m_.s
silencioso.
ADVERTENCIA: Para garantizar la
SEGURIDAD y CONFIABILIDAD del producto,
las reparaciones y el ajuste deben ser
realizados por Centros de Servicio Sears,
utilizando siempre piezas de repuesto Sears.
23
Piezasderepuesto
Aspiradorapara mojado/secoport;itilde 4 galones,
n_merode modelo113.176120
Pida siempre por n_mero de pieza, no por n_mero de clave
ADVERTENCIA
SERVICIODEAJUSTESY REPARACIONES
DE
UNAASPIRADORACONAISLAMIENTODOBLE
En una aspiradora con aislamiento done se proporcionan dos sistemas de aislamiento en vez de conexi6n
a tierra. No se proporciona ningt_n medio de conexi0n a tierra en un aparato electrodom_stico con
aislamiento done, ni se debe afiadir a _ste ningt_n medio de conexi0n a tierra. El servicio de ajustes y
reparaciones de una aspiradora con aislamiento doble requiere sumo cuidado y conocimiento del sistema,
y debe ser realizado t_nicamente por personal de servicio competente. Las piezas de repuesto para la
aspiradora con aislamiento done deben ser id_nticas alas piezas que reemplazan. La aspiradora con
aislamiento done est_ marcada con las palabras "DOUBLE INSULATED" (con aislamiento done) y puede
que el simbolo []
(un cuadrado dentro de un cuadrado) tambi_n est_ marcado en los aparatos.
Para reducir el riesgo de lesiones por causade una descarga el_ctrica, desenchufe el cord6n de energiaantes
de realizarservicio de ajustes y reparacionesde las piezas el_ctricas de la aspiradora para mojado/seco.
No. de No. de
clave pieza
1
2
3
833065
830996
833057
833058
5
6
7
8
9
10
11
833068
833067
832606
833056
17810
16937
16938
de No. de
clave pieza
No,
Descripci6n
Cord6n con terminales
Accionadordel interruptor
Escudode la cubierta del
respiradero
Almohadillade la cubiertadel
respiraderode espumade NR
Pestillo izquierdo
Pestillo derecho
Copadel flotador
Jauladel filtro
1-Filtro
1-Placadelfiltro
1-Tuercadel filtro
Descripci6n
12
13
14
833069
833072
510080
15
16
17
18
19
20
831000
830995
Manguera
17849
t Tuboextensor
17863
t Boquilla rinconera
17868
t Boquilla para auto
832610-1
Ensamblajedel cepillo
para sof_s
SP6772
Manual del usuario
21
Ensamblajedeltambor
Topepara tubos extensores
Ensamblajede la base de
soportepara herramientas
Ruedecilla
1-Artfculo de existencias. Se puede obtener a traves del departamento de ferreteria de la mayoria de tiendas minoristas Sears.
24
Notes
25
Notes
26
Notes
27
Your Home
For expert troubleshooting
and home solutions advice:
manage
home
www.managemyhome.com
For repair - in your home - of all major brand appliances,
lawn and garden equipment, or heating and cooling systems,
no matter who made it, no matter who sold it!
For the replacement parts, accessories and
owner's manuals that you need to do-it-yourself.
For Sears professional installation of home appliances
and items like garage door openers and water heaters.
1-800-4-MY-HOME ®
Call anytime, day or night
(U.S.A. and Canada)
www.sears.ca
(1-800-469-4663)
www.sears.corn
Our Home
For repair of carry-in items like vacuums, lawn equipment,
and electronics, call anytime for the locations of the nearest
Sears Parts & Repair Service Center
1-800-488-1222 (U.S.A.)
1-800-469-4663 (Canada)
www.sears.com
www.sears.ca
To purchase a protection agreement on a product serviced by Sears:
1-800-361-6665
1-800-827-6655 (U.S.A.)
(Canada)
Au Canada pour serviceen franoais:
1-800-LE-FOYER Mc
Para pedir servicio de reparaci6n a
domicilio, y para ordenar piezas:
(1-800-533-6937)
www.sears.ca
1-888-SU-HOGAR
®
(1-888-784-6427)
_c_Sears Brands, LLC
® Registered Trademark / TMTrademark / sMService Mark of Sears Brands, LLC
® Marca Registrada / TMMarca de Fabrica / sMMarca de Servicio de Sears Brands,
Mc Marque de commerce / MoMarque d_pos_e de Sears Brands, LLC
Part No. SP6772
I
Form No. SP6772
i¸
LLC
Printed in China
06/10
I