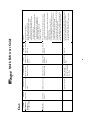
1
Table of Contents
Health & Safety
1
Clay
3
Kiln Firing & Operation
7
Underglazes
14
Glazes
17
Problems, Causes & Solutions
21
Glossary
26
Quick Reference Guide
33
A Word from Mayco...
This booklet is designed to give you a general overview of the ceramics process. We have outlined the
recommended use and application for products, but keep in mind that this is a guideline; often you can achieve
successful results by breaking the rules. Ceramics 101 is meant as a starting point so you will know how and
when to bend the rules to fit your needs.
Mayco has been manufacturing high quality ceramic products for over 50 years. Our products are
enjoyed by different ceramic enthusiasts all-around the world: hobbyists, potters, educators, contemporary studios
and finished-ware producers.
We work very hard to provide you with consistent, top performing glazes in a broad range of color in both
non-toxic and health caution formulas. Our engineers have established very strict quality control procedures to
ensure that the product you receive performs to the very highest standards. All products are tested by an
independent toxicologist and are properly labeled for conformance to ASTM and FDA guidelines.
This guide is designed to provide you with basic information on how the ceramic process works. For
more in-depth product usage information, see our publication, The Mayco Book, for a complete reference on all of
Mayco’s high quality products. Of course, our technical service and education departments are available to work
with you to achieve better understanding, maximizing the performance of our products. For any questions, please
contact us at 614-876-1171 or email your questions to [email protected].
4077 Weaver Court South • Hilliard, Ohio • 43026
614-876-1171 • Fax: 614-876-9904
www.maycocolors.com • [email protected]
Health & Safety
Preparation, Application and Firing
Ceramics is one of the most rewarding and enjoyable of
all hobbies, and one of the safest, if some simple commonsense precautions are taken. As with any activity, responsibility must be taken for safe practices.
General rules of good housekeeping and common sense
should be applied when doing ceramics. Following simple
rules will ensure your safety and help you produce great
results when creating a ceramic project.
Our “Health and Safety Bulletin” is available for that
purpose. It is available on our web site at www.maycocolors.com. In addition to this bulletin, we urge you to read
other health and safety information, and to talk to your
dealer, distributor or certified ceramics teachers about the
safe use of ceramic products. MSDS (Material Safety Data
Sheets) are available on our website or can be obtained by
contacting Mayco Customer Service Department.
All Mayco products are properly labeled for material
safety. Read labels with care. In ceramics, as in all areas of
human activity, proper usage of products ensures safety. It is
the responsibility of the user to read and understand the
product label and to follow the guidelines for safety. Anyone
not able to understand and follow the label instructions and
safety guidelines should have an adult, competent of doing
so, supervising the application and usage of all Mayco
products. This includes the preparation, application and
firing of these products. The person firing a kiln should
have complete knowledge of and understand the specific
instructions for operation of the kiln as provided by the
manufacturer. The user should know any local ordinances
applicable to the installation of the kiln.
• When using solvent-containing ceramic materials, work out
doors, in a locally exhausting hood or with an exhaust fan.
Do not use or store near kilns, other heat sources or an open
flame. Dispose of used rags in an airtight metal container.
• Do not spray apply any product.
• Do not fire kilns in an enclosed area. Use a kiln ventilation
system. Carbon monoxide fumes can build up and present
a danger. Consult with your kiln supplier or manufacturer
for more information.
• If you should ingest ceramic products, seek medical help
immediately.
To ensure your health and safety, follow these simple
rules:
• Keep work surfaces and shelves clean by wiping down
with a wet sponge.
• Clean up spills when they occur. Do not allow to dry.
Keep dust under control at all times.
• Work on a newspaper or paper towel for easy clean up and
disposal.
• Do not smoke, eat or drink when working with hazardous
ceramic materials. Do not put your brush or brush
handle in your mouth.
• Wash your hands before you begin. The natural body oils
and salts on your hands may affect the finished piece. Any
open cuts should be properly covered.
• Wash your hands thoroughly when you are through working.
• Use a smock when working with ceramic materials. Wash
often and separately from other garments.
• Keep children away from kilns and out of glaze dipping
rooms. Only a qualified adult should operate a kiln.
• Children should not use lead-containing glazes or other
hazardous ceramic materials.
• Do not intermix dinnerware safe glazes containing lead.
• If pregnant or contemplating pregnancy, tell your physician
about your work with ceramics.
Non-Toxic Glazes
A neat work area should include the following:
• A table covered with several layers of newsprint and a
comfortable chair.
• An old towel under the newsprint - this will cushion the ware.
• Only the products and pieces that you are working with at
one time to avoid contaminating other pieces.
• Proper ventilation.
The labels on a product are very important and give you
a wealth of information. Read the label for information on
proper product use and hazards, if any.
Ceramic glazes are manufactured using a variety of raw
materials. Most of the ingredients are mined and extracted
from the ground. Some of these materials can be classified
as toxic and if misused can be harmful. The key to safe use
of all art materials starts with professional education and
training. Contact your Mayco distributor for information on
seminars in your area.
Non-Toxic glazes are formulated without the addition of
lead. They are tested for safety by an independent toxicologist. They meet FDA standards and those for the Arts and
Craft Material Institute for which the non-toxic seal is
assigned. You can use these glazes and products with confidence and ease. These products contain no materials in sufficient quantities to be toxic or injurious to humans or to cause
acute or chronic health problems. This does not mean that
any less care should be given while handling these products.
Dinnerware Safe (Food-Safe) Glazes
Many glazes are formulated to be safely used on surfaces
that come into contact with food or drink.
• If surfaces will come into contact with food or drink, use
only glazes that are labeled food or dinnerware safe.
Follow label instructions closely.
• Do not mix lead-containing dinnerware safe glazes, as the
balance of ingredients in each glaze will be disrupted.
Each mixture would have to be re-tested by an approved
laboratory to determine if the mixture is also food safe.
• It is the responsibility of anyone making pieces for resale
to have them tested by an approved laboratory for lead
release.
1
Health & Safety
Labeling Information
• Proper firing of dinnerware safe glazes is critical. Use shelf
cones on the kiln shelves to ensure that the pieces are fired hot
enough, even if the kiln is electronically controlled or has an
automatic kiln sitter. Always fire in accordance with manufacturer’s instructions. If crazed or under fired, these glazes may
not be food safe. Too heavy an application of glaze, fast
firing or not firing to the proper shelf cone listed on the label
may result in a glaze that does not meet the FDA standards.
The labels on a product are very important and give you a
wealth of knowledge. Read and understand the label for
product’s use and hazards, if any. Ceramic hobby glazes are
manufactured with a variety of raw materials that are mined
and extracted from the ground. Some of these materials can
be classified as toxic and if misused can be dangerous. The
key to safe use of all art materials starts with professional
education and training.
Lead and/or Cadmium Containing
Glazes
Lead and cadmium are used in many ceramic glazes.
Cadmium is used to produce brilliant reds and yellows. Lead
gives a brilliance to the glaze and allows the glazes to mature
well at lower firing temperatures (shelf cone 06).
Glazes containing lead and/or cadmium should be handled
with respect. The dust from such glazes should not be inhaled.
Anyone who is pregnant or contemplating pregnancy should
only use these glazes with professional supervision. Use good
personal hygiene when working with these types of glazes and
keep them out of the reach of children.
Application
Instructions
Product Family
Color Name
Firing
Toxicity Status
Instructions
Product Number
Sprays, Solvents and Overglazes
These products are easy to use safely and will present no
problems as long as these important rules are observed:
• Containers should be kept tightly closed when not in use.
• Keep out of reach of children.
• Aerosol sprays, solvents and solvent-based overglazes should
be used outdoors, with a locally exhausting hood or spray
booth or a window exhaust to assure adequate ventilation.
• Do not use near an open flame or heat source.
• Clean up after use and dispose of products properly in a
metal container designed for disposal of flammable
materials. Contaminated materials can be washed or placed
under water until final disposal.
Overglaze
Compatibility
Slip
The mixture of any fine powder like slip requires the use
of a safety mask approved by OSHA. The work area should
be well ventilated with a system that draws all dust. This
area should be away from other working areas so as not to
spread the fine dust particles. Good housecleaning habits are
necessary when mixing and pouring slip. Wipe up spills
immediately. Do not sweep the area. Chronic lung damage
may result from prolonged inhalation and exposure to the
clay dust.
2
Product Lot #
What is Clay?
Clay & Clay Bodies
Clay is a compound of minerals and organic material
resulting from the natural decomposition of certain igneous
rocks (for example, feldspar and granite are two common
sources of clay minerals). As these mineral deposits age and
get moved around by natural forces (wind, water, glaciers),
chemical changes occur which cause the materials to become
clay.
The two major classes of naturally occurring clay
deposits are primary clays and secondary clays. Primary
clays are those that remain at the physical location where the
parent rock decomposed. These clays tend to be the most
pure, but tend to be less plastic than secondary clays.
Secondary clays are deposits that have been transported by
wind, water, or glacial activity. These clays, while still very
pure, generally have had other materials introduced into their
basic composition that change their performance characteristics (color, plasticity, etc.)
Fire Clay
Similar to stoneware clays, fire clays generally contain
less flux (especially calcium and feldspar). Fired alone these
clays won’t fully vitrify – even at high fire temperatures.
Bentonite Clay
Bentonite is formed from the decomposition of volcanic
ash. Bentonite has the finest particle size of any natural clay.
It is very useful as a plasticizer but it must be used in moderation – too much of it in a clay body will result in cracking
during the drying process.
Slip Clay
These are naturally occurring clays that have a high iron
content. At high temperatures these clays melt to form a
glaze; no additives needed.
Pure natural clays almost always have shortcomings – in
a potter’s eyes. The production processes and ultimate use of
the piece dictates the properties the clay needs to have –
either during the forming stage or as a finished piece. A clay
body is a mixture of clay and other materials designed to
meet the needs of the user. Design objectives for a clay body
may involve making it more plastic during the throwing
stage, improving the body’s stability in large-scale work,
helping the body resist thermal shock from firing, and
improving general properties such as vitrification and density.
The “other materials” in a clay body perform a specific
function to make the final product work better for the clay
user. A general description of each component and its
purpose are discussed below.
Types of Clay
Clays can be grouped or classified several ways:
according to the way they are found in nature, by their
physical and chemical properties, by the way they are used to
make finished properties, and so on. One of the first ways to
classify clay is by the methods used by Mother Nature to
create clay deposits. The major types of naturally occurring
clay are as follows:
Kaolin or China Clay
Chemically known as Al2O3-2SiO2-2H2O this clay is
almost pure white as a primary clay and slightly less white
but more plastic as a secondary clay. These clays are a major
component of most high-fire porcelain clay bodies and are
frequently used in stoneware to lighten the fired color.
Components of a Clay Body
All clay bodies involve combining clay (many recipes
call for several types of clay) with non-clay additives. The
basic types of additives and the purpose for each are as
follows:
Ball Clay
These are secondary clays that have been transported to
swampy areas where organic acids have broken down the
mineral particles to ultra fine size. These clays are extremely
plastic – if used alone they will shrink quite a bit, causing
severe cracking.
Flux
These materials act as melting agents, helping to lower
the maturing temperature and assist in the formation of glass
- the essential binder in all ceramics. Some clay contains
higher concentrations of fluxes naturally–feldspar and iron
are the most common.
Earthenware Clay
Earthenware is the most common surface clay found
throughout the world. These clays usually contain high
amounts of iron, which gives the fired wares the characteristic terra cotta color. True earthenware clay cannot vitrify,
which means the clay body remains porous after firing.
Glass-Formers
These materials react with fluxes to form glass. The
most common glass-former is silica. Pure silica melts at very
high temperatures – the proper mix of flux materials and
silica allows for glass to be formed at more manageable
temperatures. This balance must be carefully achieved – too
much flux produces a weak glass, too much silica can lead to
reduced thermal shock resistance.
Stoneware Clay
Stoneware tends to be kaolins that contain more
impurities - usually calcium, feldspar, and iron - resulting in
clays that have finer particle sizes and higher flux content.
The flux materials cause the clay to vitrify at lower firing
temperatures.
Refractories
These materials stabilize the body, providing the physical
3
Clay
structure or binding material for the flux and glass-formers to
bind together. The primary refractory material is alumina.
Rather than add pure alumina high alumina clays, such as fire
clay or kaolin, are blended into the clay body to increase the
alumina content.
better.
Vitrification
The process under which the clay body experiences
chemical and physical changes during firing. The changes
that take place during firing take place in stages. During the
first firing stage the clay is fired to a red heat and the particles
are now stuck together permanently - but the glass-forming
processes have yet to begin. The clay body is said to be
sintered. A sintered body is considered fired – it has now
become bisque. Bisque bodies have strength – not has much
as a vitrified body – and are very porous. At this stage the
clay can no longer be slaked down (reconditioning dry clay to
a more moist state by adding water). For some clay bodies
this stage IS the final stage of firing. Earthenware, for
example, matures at low temperatures and does not vitrify.
Earthenware clays remain porous when bisque fired, requiring
glazing to make a waterproof surface.
As temperatures climb past the sintering stage the fluxes
and glass-formers begin to interact - the particles actually fuse
together, forming glass between and around the mineral
particles. The glassy materials strengthen the sintered connections between the refractory particles and gradually consume
the air spaces in the clay body. When almost all the air spaces
are filled and the glass-forming stage is complete the body is
said to be vitrified. A vitrified body is impervious to water,
very strong and dense (a vitrified body shrinks and condenses
as the air spaces are filled with glassy material).
Each clay body has a maximum firing range whose top
temperature, if exceeded, will result in deformations.
Bloating, warping, slumping, or complete loss of structure are
the physical signs of an overfired body.
Fillers
These gritty, granular materials that improve a clay body
by enhancing the forming strength, decreasing shrinkage,
provide for more even drying and greater thermal shock
resistance. A common filler material is grog – a material
formed by grinding previously fired clay into a sandy grit.
Plasticizers
Occasionally a clay body will need accessory plasticizers
to improve the moldability and flexibility of the clay. Certain
porcelain bodies and pure kaolins benefit from additives such
as bentonite, Veegum T, or macaloid.
The combination and proportion of these ingredients will
affect the general properties of the clay – how it will behave
prior to firing and perform after firing.
Clay Materials Properties
It is a common practice of materials scientists to classify
and evaluate materials by the properties the material contains
or exhibits when manipulated and used. Every material can
be evaluated by objective criteria, such as chemical, electrical,
physical characteristics and behaviors.
There are two fundamental properties that really defines a
clay: its ability to be molded and shaped and how it fires.
Some clays are more flexible, or plastic, than others, some can
be fired to high temperatures while others cannot. Other
attributes one may consider include color (of the clay body
itself), porosity, vitrification (firing characteristics), glaze fit,
shrinkage, maturing temperature, and so on. Some of the
terms and concepts used to describe clay follow:
Porosity
Porosity refers to a material’s ability to absorb moisture
(absorption is the common term used by clay users). Porosity
can easily be measured by weighing a mature fired but
unglazed piece of clay or clay body, then place the sample in a
pan of water, bring to a boil, let cool overnight. Blot off the
excess water and weigh again. The percentage increase in
weight represents the porosity of the clay. Earthenware
typically has an absorption rate of 5% to 14%, stoneware 2%
to 6%, and porcelain 1% to 3%.
Plasticity
Refers to the ability of a clay to be molded and shaped.
There are several factors that affect clay’s plasticity: mineral
particle size, acidity levels, amount of water, amount of non
plastic additives, etc. The state of clay particles “sticking
together” or “separating” has a technical, chemical explanation. Rather than digress into a scientific discussion on
positive or negatively charged particles let’s just come to
understand these opposite processes as follows:
Shrinkage
Shrinkage occurs in all clay bodies as they are dried and
fired. Considerable shrinkage occurs as water evaporates
from the wet greenware stage to the bone-dry greenware
stage. The more plastic the clay body, the greater the drying
shrinkage. A typical shrinkage rate for wet greenware is
between 4% and 10%. Shrinkage from the firing of a clay
body in a large part depends on the flux content and size and
quantity of refractory materials. A pure kaolin clay or clay
body can shrink as much as 8% during firing, whereas
refractory bodies may have extremely low shrinkage. The
addition of grog material can greater aid in reducing the
shrinkage due to firing of a clay body. Grog is finely ground
up bisque added to the clay to reduce the shrinkage or for
thermal shock.
Flocculation
The process of adding an acidic substance which causes
clay particles and minerals to attract one another (flock
together). This process increases the stickiness or plasticity of
a clay body.
Deflocculation
The process of adding an alkaline substance to a clay
mixture that causes the particles to repel one another. While
not commonly added to clay compounds deflocculants are
used to help liquefied clay (slip) stay in suspension and flow
4
Clay
Classifications of Clay Bodies
(calcium phosphate). The calcium reacts with silica to develop
a very glassy material, giving the finished product the traditional translucent look.
Two common methods of classifying clay bodies are
according to the firing temperature range of the clay and by
composition.
Stoneware
These clay bodies use natural stoneware clay and/or
fireclay, with ball clay, kaolins, flint, fluxes and grog or sand as
additives. The choice of additives is truly an issue of material
design and use. For example, adding sand or grog gives more
structure reduces slumping. Clay users who want to hand build
or throw taller wares with thinner bodies may opt for this type
of body. Silica and feldspar may be added to help control the
maturing temperature and glass-forming characteristics of the
body.
Stoneware clay bodies produce durable ware and generally
react favorably to the kiln environment during reduction firings
(reducing or restricting the amount of oxygen in the kiln, which
causes carbon and hydrogen to build up inside the kiln, altering
the appearance of the clay and glazes used in such a firing).
Pyrometric Cones
The evolution and history behind the development of
pyrometric cones is interesting – any practitioner of ceramics
or pottery should be well acquainted with their purpose.
Perhaps the best resource on pyrometric cones in the U.S.
would be the Orton Ceramic Foundation
(www.ortonceramic.com). A non-profit organization dedicated
to the ceramic industry Orton publishes many handbooks and
guides on proper firing and kiln operation. Their publication,
“Cones and Firing” is a mandatory read and reference for
every clay user. A brief overview of cones is all that is needed
at this time.
A pyrometric cone is a small pyramidal-shaped composition of clay, frit and binders that bend at a specific temperature. They are the standard method for determining the
maturing temperature of a clay body. Just like the clay bodies
they monitor, cones respond to temperature, duration, and
atmosphere. As the firing progresses and reaches maturity the
tips of the cones begin to bend down, forming an arch. When
the tip of the firing cone reaches the bottom of the cone the
firing is complete.
The lowest cone number is a cone 022 which “bends” at
around 1080∞ F, while the “hottest” cone is a cone 42 – a cone
used in advanced ceramic industry and a temperature you’ll
never want to experience.
Clay and glazes are commonly classified according to their
firing range. Low-fire clays mature between cones 010 and 06
– referred to as the bisque-fire range; mid-range clays mature
from cone 4 to cone 7; high-fire clays mature at cone 8 to cone
11 – occasionally higher.
Refractory
These clay bodies are used for making firebrick and kiln
furniture (A refractory material is one that can withstand high
temperatures). A hot-face fire brick might include up to 80%
grog and 20% plastic fireclay or low-iron ball clay. While
there are many types of refractory applications, the higher
temperature bodies will require reduced amounts of flux.
*The above information was compiled from
“Clay: A Studio Handbook” by Vince Pitelka.
Determining Which Clay is Best for You
When looking for clay, compare the temperature range
used for the glaze. For example, if using Mayco’s Series 2000,
which is 06-04 glaze, look for an 06-04 clay body, which is
Earthenware clay. This will ensure the best glaze fit.
Clay Body Compositions
Suggested Clay Bodies for Teachers
Earthenware – traditionally red or buff colored, these clays
are rich in iron. To offset the flux properties of the iron a good
earthenware body will include fair amounts of grog or sand –
to give the body structure – and fireclay or stoneware to help
improve the body’s ability to take higher temperatures without
bloating or deforming.
Another type of earthenware clay body that is more
“designed” than found in nature is the whiteware body. These
bodies general exclude the use of natural earthenware clays and
are comprised of talc and ball clays. These clay bodies are
often white (hence the name) and are popularly used for
dinnerware.
While any earthenware clay is ideal for teachers, white
earthenware is the most time-efficient clay to use - since
teachers do not have the time to fire long. Although red
clay gives beautiful results, many teachers do not like iron
in their classrooms or on students’ clothing.
It is easier to achieve bright glaze colors with white
earthenware. This clay body will work for all grades and
projects. A slight addition of grog can be helpful to aid in
crack problems and the capacity of the clay to take on a
variety of forms.
While earthenware clay is suggested, it is important to
remember that they do not totally seal or become impervious to water. Earthenware clay absorbs moisture even
after fired to temperature and is not weatherproof or frostproof. When left outside and exposed to extreme temperatures and weather conditions, glazes applied to Earthenware
clays can craze and crackle.
If someone is looking for weatherproof clay, stoneware or
porcelain clay are better choices as the body is vitrified after
firing. These clays are typically fired to cone 6 or higher.
They can be used outdoors and for functional uses.
Porcelain
Porcelain is most commonly known for their whiteness
and for having some degree of translucency. They are pure
and vitreous, which gives them their inherent glaze, fit quality,
hardness, and durability. The whitest porcelains usually feature
up to 50% kaolin as the primary clay component with additives
such as bentonite or macaloid to help improve plasticity.
True bone china is so titled due to the addition of bone ash
5
Clay
Storing and Reprocessing Clay
Unusual Ideas for Creating Texture
It is necessary to store clay in a sealed plastic container.
Purchase some large plastic bins. When doing a project you
wish to return to later, store the project in the bins to keep
them damp and organized by class. If the projects seem to dry
out, damp paper towels or a damp sponge can be placed in the
bin and will help keep projects moist.
Teachers often have left over clay or inherit clay from a
previous teacher or program. Clay left over from a project can
sometimes get a little too dry, but doesn’t need a total reprocessing effort. Divide the clay into pieces no larger than a golf
ball (students can assist with this
process) and use a mist
bottle to moisten the clay
when it is put into the bag.
Seal the bag and it will be
ready for the next day,
Dry Cleaning
although it will stay soft
garment bags are a
longer than normal. If clay
good source for
is too wet, pull off bag and
expose to air for appropriate
wrapping clay in and
amount of time. Determine
protected projects
appropriate amount of time
from drying out.
by evaluating room temperStudents can bring in
ature, humidity, etc.
discarded laundry
If a block of clay has
bags from parents.
gotten too dry it does not
When creating a clay piece there are
several items you can use to create
texture. Once you start brainstorming,
the ideas are endless. Some unique
items, many of which you will find
around the house, are:
• Tire Treads
• Burlap cloth
• Paper towels
• leaves, branches
• meat tenderizer
• garlic press
• rubber stamps
• cookie cutters
• lace or doilies
• bubble wrap
• jello molds
• waffle iron
• crinkle cutter (for vegetables)
• corn cob (with hard kernels)
• wood
• brush
•comb
• whisk
• toothbrush
• rocks
• dough cutter
• sponge
• beads
• decorated silverware handles
• scouring pads
• screen
work to dump water into the
bag. This will only make the
outside slimy and not penetrate the interior of the block.
Instead, use one of these two ways:
• If the clay is firm, but not totally dry, unbag it. Cut it
into quarters using a wire. Wrap these blocks with a
very damp to wet terrycloth towel. Rebag it and set
aside for a day or two. It can be left longer, but may
get moldy if left for an extended period of time.
• Unbag the clay and cut into thick slices (approximately
1 1/2” – 2”) thick. Use your finger (or if too firm,
something similar in size) to poke deep holes without
going through the bottom. Fill these recessions with
water, stack and rebag. This needs to sit for at least
overnight.
If clay is totally hard or bone dry it will need to be
completely reprocessed. Bone-dry clay reprocesses faster and
more evenly than leather hard clay. You can always get a
student to help break up this piece of dry clay.
To reprocess:
• Get a large trash can and add clay. Cover with water.
Let this sit for a few days, if possible. Dig the clay out
in large handfuls, letting water drain. Place on a dry
plaster slab approximately 2” thick. If you don’t have a
slab, use a thick piece of wood. These materials will
absorb water from the clay. When it is the consistency
you desire, remove it and place in plastic bags. This
clay may take some kneading before or after it is
bagged to prepare for projects.
Get
Creative!
The possibilities
are endless!
*The above information was compiled from Kathy Skaggs at Atlantic
Beach Pottery and Craig Freiburger at Armadillo Clay.
6
All Fired Up . . .
Kiln Firing and Operation
Many kiln operators feel that opening the kiln after the
firing is more exciting than Christmas morning. However,
firing is as big of a responsibility as it is a pleasure. It is the
most essential step the ceramist has in producing the
finished “objets d'art.”
Successful kiln firing requires knowledge and understanding of the equipment, what happens in the kiln during
firing, and the various reactions of the different items and
materials placed into the kiln. Learning these necessary fundamentals are easily obtained with reading and first hand
experience of the kiln. First of all, read and understand the kiln
manual. If you do not have one, write to the manufacturer and
they will send the materials needed to operate your kiln.
There are several types of kilns available. Basically,
kilns are specially designed ovens used for firing (baking)
ceramic objects to a very high temperature. This oven
converts the raw materials into ceramics by subjecting them
to high temperatures. While the electric kiln is most
commonly used kiln, there are also other types of kilns
fueled by oil and gas. The gas and oil are the least
practical, due to their fuel source and their interaction with
the types of glazes used with whiteware.
Kiln installation should be done by a qualified
electrician. Check with your electric company for peak
power demands that can affect your firing. If fuses or
circuit breakers trip during firing, lower amounts of voltage
will go to the kiln, causing the kiln to perform incorrectly.
The location of the kiln should:
• Be on level concrete flooring or an asbestos pad.
• Be located in a well vented room.
• Be located in a protected area, away from foot traffic.
• Allow easy access to the kiln opening, controls and
peepholes.
• Be near the correct electrical outlet. Check the
manufacturer’s requirements for voltage needs.
• Do not allow the pigtail cord or power supply cable to
rest on the side of the kiln.
Cones are a necessary, vital tool in ceramics, signaling
the user that time and temperature have been obtained.
While an extremely slow firing or fast firing can fool the
cone into deforming at a different temperature, cones are
still a very important part to the success you have creating
beautiful pieces.
Fast Firings
Fast firings or rapidly increased temperatures should be
avoided. The rate of temperature should be approximately
250˚ to 350˚ per hour. The temperature rate should never
exceed 500˚ per hour. Most automatic kilns are in the 350˚ to
400˚ rate per hour range. This is important factor for you to
know. Too fast of a firing will not allow the piece or the
glazes to mature. The result will be lackluster color, chalky
surface or immature bisque that can cause problems later in
firing. Although a cupcake can be cooked within minutes of
putting it into the oven, a fruitcake will take several times that
to fully cook; a hotter oven would simply burn the outside
and leave the inside uncooked. The same applies to
ceramics.
Types of Cones
There are two types of cones: small cones (1 1⁄8 inch) are
used in the Dawson Kiln Sitter (see page 8 for explanation of
kiln sitters) that allow the kiln to shut off when the ware has
matured. This can be a triangular pyramid or a bar. The large
cones (2 1⁄2 inch) are called shelf or witness cones. These two
types of cones are not interchangeable in their usage; each
has special needs in order for them to perform as designed.
Shelf or Witness Cones
The large cone commonly referred to as the shelf cone
(or witness cone) is the back-up system to the kiln sitter.
These cones are placed throughout the kiln during firing to
show what is happening during your firings.
Check the cones when they are broken apart from one
another. If there is a hollow spine on the cone, do not use
it; the cone will deform incorrectly during the firing, giving
you a misreading. Shelf cones can be self-supporting or
held in place with some form of holder, as long as they are
at an 8 degree angle. The self-supporting cones eliminate
any error of a wrong angle. Ideally cones should be placed
in the middle of the kiln shelves with a clear visual path to
the peepholes and to the element behind the cone for ease
of viewing during the yellow-hot temperatures. Even if the
ideal is not obtainable, shelf cones should be placed
throughout the kiln on shelves out of a draft and three
inches from the kiln elements.
Shelf cones are used in a series of three:
• The Guide Cone is one cone cooler than the desired
firing temperature.
• The Firing Cone is the cone temperature you wish to
achieve.
• The Guard Cone is one cone hotter than the desired cone.
Pyrometric Cones
The kiln operates using degrees of heat more
commonly referred to as cone numbers. There are several
types of cones and numbering systems for ceramics
throughout the world. The one most accepted in ceramics
is the Orton cone, determined at the National Bureau of
Standards. There are other types and standards that may be
applicable in countries other than the United States.
The pyrometric cone is a small elongated triangular
pyramid composed of clay and other materials. These
cones are a self deforming ceramic piece, that when
subjected to heat and time, signal the kiln sitter (see below
about kiln sitter) that the kiln has done the necessary work.
When the cone has deformed to its specifications, the
objects in the kiln have reached the equivalent of the
needed temperature and length of time to mature the
products used.
7
Firing
Guide
Cone
Firing
Cone
firing. Concurrently, a large shelf cone forced into the sitter
would damage the mechanism.
Guard
Cone
Kiln Sitter
The W.P. Dawson Kiln Sitter is the control for the kiln and
is the most widely used one today. There are newer types of
kilns with computer controls that will be discussed later. We
highly recommend installing a sitter on you kiln for it enables
you to have more consistent firings with less chance of
misfirings.
Place a small cone in the cone supports and the sensing
rod, as illustrated in View A. Try to center the cone in the
sitter, for it can make a few degrees difference in the firing.
The sitter is activated at the beginning of firing manually,
outside of the kiln (View B), and turned off by the deformation
of the small pyrometric cone on the inside of the kiln (View C).
Do not jar the kiln sitter and tube assembly during loading or
firing; it could result in overfiring or misfiring of the kiln.
Make sure to keep your kiln sitter clean. The cone
supports and porcelain tube assembly should be vacuumed
before the first firing and periodically with use. If a piece
explodes during firing, thoroughly clean and vacuum the tube
assembly and the whole kiln (walls, floor and elements) before
the next firing.
Correct Deformation After Firing
Guide
Cone
Firing
Cone
Guard
Cone
These photos are from W.P. Dawson, Inc. Kiln Sitter Operating Manual.
If you did not receive a manual with your kiln, we recommend you obtain
one from the manufacturer.
Shelf cones enable you to get to know the personality of
your kiln. Yes, they do have one, believe it or not. A good
cook knows that their oven performs with different characteristics, as does your kiln. As the kiln fires, there may be areas
of the kiln significantly cooler or hotter, affecting the outcome
of your fired pieces. It is highly recommended that shelf
cones be used with every firing and at various placements on
shelves to develop a graphic picture to the heating peculiarities
of your kiln. Keeping a record of firing times, cone placement
and degree of deformation can alleviate many heartaches
down the road. These records will help you make adjustments
to the firing process. A half cone difference throughout the
kiln chamber is considered very good.
Cone Numbering System
Cone #
10
9
8
7
6
5
4
3
2
1
01
02
03
04
05
06
07
08
09
010
011
012
013
014
015
016
017
018
019
020
021
022
Cone Numbering System Relative to
Temperatures
Cone manufacturers produce firing cones for every
conceivable heat treatment involving maturing clays and
glazes. The chart that follows lists the cones and the temperature where, under specified conditions, they would bend.
The numbering system may appear confusing, but it is
similar to a thermometer. Increasing numbers above an
imaginary zero cone represent higher temperatures, while
increasingly minus numbers below zero represents lower
temperatures. Minus numbers (and lower temperatures) are
indicated by "0" preceding the number. For example, Cone
06 is lower (cooler) than Cone 05. The zero is very
important when reading and following firing directions for
the materials used.
Shelf cones numbered the same as the small cones used
in the sitter are designed to deform and mature at a given
degree of heat. They are not interchangeable in use for the
shelf or sitter. The smaller cones can not be used as a shelf
cone because they require a hotter temperature to deform.
Smaller cones would give inaccurate indication of the kiln
108˚ F*
270˚F+
2345
2300
2257
2219
2194
2151
2134
2106
2088
2077
2043
2014
1987
1922
1888
1816
1783
1733
1679
1629
1627
1591
1586
1533
1454
1407
1341
1285
1234
1157
1116
1085
2381
2336
2305
2264
2232
2185
2167
2134
2124
2109
2079
2048
2014
1940
1915
1830
1803
1751
1693
1641
1641
1623
1566
1540
1479
1458
1377
1323
1261
1175
1137
1112
Kiln Color
Ware Type++
White
Commercial
Porcelain
Hobby Porcelain
& Stoneware
High Fire Glaze
Semi-Vitreous
Ware
Yellow
Earthenware
Low Fire Glazes
Orange
Cherry Red
Semi-Melting Glass
(Bottle Sagging)
Decals
Metallics,
China Paint & Lusters
Dull Red
Glass Colors
Glass Decals
* If rate of heat increase is 108ºF per hour.
+ If rate of heat increase is 270ºF per hour.
Color of objects in kiln at this temperature.
++ Follow manufacturer’s directions when choosing correct cone number.
8
Firing
View A
mistakenly placed into the sitter.
• A cone can become dislodged or allowed to come in
contact with the porcelain tube.
• Cones mishandled roughly, dropped or moistened will
crack and bend too early.
• The weight (hammer) of the sitter may not have
engaged the claw when the cone is placed in it.
• Something can get in the way and prevent the weight
(hammer) from falling when the cone bends.
View B
Porcelain Tube
Cone
Supports
Push Plunger in to
activate kiln.
Sensing
Rod
Safety Timer
The safety timer is a back up shut off device that turns
the kiln off if the kiln sitter fails. This clock shuts off the
kiln after a given time, insuring that severe damage does not
occur. Set the safety timer for approximately 30 minutes
longer than the estimated firing time; this allows for power
influxes and the size of the load. If the timer is set at more
than an hour, it will not turn the kiln off in time to prevent
damage from occurring. To ensure the life of your kiln and
pieces, safety timers are worth the small initial investment
when you purchase your kiln.
View C
Controllers
Proper Formation of Cones in Well-Adjusted Kiln Sitter
Underfired
Correct Adjustment
Approximately 90˚
angle
Kiln controllers automatically fire a kiln using an
electrical signal from a thermocouple (sensor) located in the
kiln. The signal is converted into a temperature and compared
with a program, allowing the controller to decide when to
send current to the heating elements and for how long.
Benefits of using a controller include:
• Automatic, repeatable and accurate control of kiln
• Uniform kiln temperatures with zone control
• Easy to use with many features
Overfired
Pyrometer
A pyrometer is a device that measures temperature
only. It cannot replace a pyrometric cone, because both
time and temperature are required to ensure the "heatwork"
of the kiln. A pyrometer is useful in determining the inside
temperature of the kiln for advancement of switches or
gauging the cooling process.
During normal use of the kiln, corrosion will occur on
the metal surfaces, which can cause the kiln to misfire. The
tube assembly should be replaced periodically depending on
the amount of firing done. To extend the tube assembly life,
keep the lid propped during the early stages of firing and do
not close all the peepholes. It is also normal for glaze to
accumulate in the tube assembly; check this periodically.
Kiln sitters, safety timers and computers cannot fully
replace the operator. Mechanical devices do fail, even
though they appear to be in perfect working condition. To
minimize errors, always use shelf cone. Avoid leaving the
kiln unattended, so you can catch costly mistakes.
Kiln Furniture
Kiln furniture consists of the posts, shelves and supports
(stilts) that are used during firing. These pieces are high
temperature resistant refractory materials that provide support
to the pieces during the firing. Use three posts in a tripod
formation to evenly hold a shelf. Each half shelf should rest on
three posts as well. Posts of proportional size should be used
for added height to ensure stability. Do not use cracked shelves
or posts as they could break apart during the firing, ruining
several layers of ware and the kiln. If a crack should develop
in a shelf because of a hard blow, finish breaking it and use it
as a partial shelf.
Eight Common Problems
The cost of the kiln and firing is very high relative to the
cost of the cones. Here are eight good reasons for using shelf
cones in addition to using a kiln sitter, kiln timer and/or
computer.
• Something can fall onto the sensing rod.
• Crumbs from exploded ware or from the firebrick can
get into the tube assembly.
• Kiln wash on the cone or tube assembly can prevent the
cone from bending.
• Using the wrong (or a previously used) cone can be
Kiln Wash
Kiln wash is a protective coating applied to the top
surface of the shelves. This coating provides a layer of
protection against glaze and other higher firing clays from
adhering to the kiln shelf.
9
Firing
independent and are often confused.
Apply three thin coats (milk consistency) to the top of
each kiln shelf with a large house brush. Allow to dry
completely before firing. Kiln wash is not applied to the lid,
sitter, elements, or the undersides of the shelves. Kiln wash
will last many firings and it is not necessary to reapply
unless the surface has flaked or has a lot of glaze build up on
them. Simply scrape off any buildups of glaze with a putty
knife. If glaze remains on the shelf, use a belt sander with
coarse grit to remove it and then reapply kiln wash. A new
application of kiln wash is required prior to firing any glass
in the kiln.
Venting Systems
New kilns come equipped with mechanical ventilation
systems; older kilns can be retrofitted with them. Systems
that pull the air through a hole(s) in the top of the kiln
maintain a more even temperature throughout the firing
chamber. The oxygen that is pulled through the opening(s)
allows the glazes to develop better during firing. Never place
a piece directly below one of the top vent holes; it can cause
a cold spot on the piece, making it crack during firing.
Peepholes
Firing Preparation
Peepholes are exactly what the name infers: openings in
the kiln wall that allow you to view inside the firing
chamber. They allow air circulation into the kiln chamber
and permit fumes and gases to escape during firing.
Peepholes can have either plugs or hinged coverings.
The top peephole should never be closed in a standard bisque,
glaze or luster firing until the kiln has shut off. The lower
peepholes should always remain closed throughout the firing,
as they can cause two things to happen. An open peephole
can chill the shelf cone causing it to perform inaccurately.
Leaving the peepholes open during any kind of firing can
cause a piece to fracture due to a draft onto the ware. When
firing glass, all peepholes should be closed during the entire
firing to prevent cold drafts from fracturing the glass.
• Maintain your kiln by vacuuming on a regular basis,
and making sure the kiln sitter is adjusted, as they can
become out of line over time.
• Glazed ware or greenware with trapped air pockets (for
example, hollow arms or handle attachments) should be
vented.
• Greenware and glazes should be bone dry. Unnecessary
moisture can affect the glaze or ware, creating bubbles,
craters, glaze crawling, or explosion of the piece.
• Pieces glazed inside and out take longer drying time.
• Turn kiln to OFF.
Loading the Kiln
Keep the four basics of firing
(time, temperature, air circulation
and ventilation) in mind
when loading the kiln.
When arranging the ware,
consider the heat penetration.
Air and heat cannot circulate
If a glazed piece feels
on the kiln floor. Therefore,
cold to the touch, it
the first thing to do is create
indicates that the
a "false bottom" on the kiln
piece is still damp
floor. Place three 1⁄ 2” posts
and needs additional
under a kiln shelf; this shelf
drying time before
will remain in the chamber at
firing.
all times. The improved air
circulation and heat distribution helps overcome stress
in the pieces and other problems in subsequent firings, like
crazing, pinholes, cloudy glazes and ware warping.
Heating every piece evenly requires you to load a
variety of pieces on each shelf when possible. Never put all
of the same shape on the same shelf.
• A good rule to follow when placing pieces in the kiln is a
minimum of two finger spacing for greenware and three
finger spacing for glazes (approximately 2 1⁄2".) Increase
spacing to four fingers (approximately 3 1⁄2") for glass
firings. If you are firing a smaller load, increase the
spacing and spread the ware evenly around the kiln.
• Lids should be placed on the piece during a greenware
firing. Never put pieces inside larger pieces during firing.
• You may prevent warping by "boxing" cups and placing
them rim to rim on top of one another during a
greenware firing.
Stilts
Stilts are bisque platforms with nichrome wire points that
keep the glaze pieces from adhering to the shelf. They come in
various sizes and heights, allowing the best heat and air circulation to the ware during firing. Most stilts are composed of a
three prong configuration to give the best degree of stability to
the ware. There are also multi-pronged stilts for accommodating larger items. Use the largest stilt to fit the size of the
piece to ensure support. Taller stilts should be used for bright
bisque red and orange glazes for better air circulation.
Maintain your stilts by cleaning the points regularly with a
pair of pliers; if the stilt has a glaze-like surface, it needs to be
replaced. Use of old stilts can discolor the glaze on the piece.
Firing's Four Basics
Understanding the basic equipment now leads us to what
happens during the firing process. There are four very
important factors required to complete a properly fired piece:
Time, Temperature, Air Circulation and Ventilation.
Other factors that happen during the firing are: air expansion,
ware shrinkage, and how all these factors interact.
• Time is the length that the piece is subjected to heat.
• Temperature is the degree of heat required to mature
the piece. Time and temperature combined are referred
to as "heat work." This is a very important term to
know and understand.
• Air Circulation is the way movement of air occurs in
the firing chamber.
• Ventilation is the removal of the fumes and gases
during the firing. Air circulation and ventilation are
10
Firing
• Do not place the rims of large plates and bowls next
to an element: this will heat the piece unevenly.
• Flat pieces should be placed on shelves above the
bottom two rows of elements for even firing. In this
instance, it's better to use two half shelves, leaving a
small 3/8” to 1/2” gap between them to promote better
heat and air circulation.
• Generally larger pieces go toward the top of the kiln.
• Large volume pieces should be centered in the
chamber with smaller pieces surrounding the ware.
• Flat objects are never set on end and should be set flat
on a shelf with no overhanging parts.
extravagant scheme for firing, but it will give reliable
results, whether it is a low fire glaze, high fire glaze or
greenware.
If you have a computer programmable kiln, follow the
simple directions as it queues you. Generally the directions are on the side of the kiln. Remember that a 250˚ to
350˚ acceleration rate is best. Do not allow yourself to be
tricked into thinking that the computer automatically
performs correctly, always use shelf cones to verify the
heat work of the kiln.
Kiln Soaking
There are times when you need to "soak" the kiln load.
This is where the kiln, after it has shut off, is restarted and
the switches are turned back to medium for 30-45 minutes.
This can be achieved by pushing the plunger back in on the
kiln sitter. After the duration of this time, it is shut off again
by pushing down the hammer to turn off the kiln. If you do
not have a timer, this must be watched carefully. This can be
done with a manual or computerized kiln. Check your kiln
manual for more information.
While electric kilns are designed for optimum heating
throughout, a heavily filled kiln will not fire accurately.
For a bisque firing, allow at least one inch between the
tallest piece and the shelf above it. During glaze firing, a
two inch or more clearance is best before the shelf is put
in place. At times when you have only a few items to fire,
compensate by "false loading" the kiln with a few extra
shelves and/or posts to act like other pieces in the kiln.
If you suspect that you are firing too fast and the ware
is not receiving the proper heat work, check your firing by
placing a shelf cone in the center of the kiln shelf and
cover it with an unglazed greenware or bisque bowl or pot.
After the firing, examine the cone to see if it has deformed
properly. If it did not, you are firing too fast and need to
slow the rate of firing.
Kiln firing has some basics. If you have switches that
read Off, Low, Medium and High or have numbering from
0-100, the following schedule will help you. The switches
are not turned up concurrently; this would cause an
overfiring in the top and an underfiring in the bottom of
the kiln. The switches are stepped up in stages to
compensate for the heat rising. An hour between turning
up switches is a common time frame.
Switches
Changes that Happen During Firing
It is important to understand what happens to the ware
in each firing. During the early stages of firing (at approximately 100˚-300˚), physical water is driven out of the clay
and glazes. Rapid temperature increase could trap water
molecules in the ware or glaze; a long slow advancement
period during this temperature range is quite beneficial. At
this stage, the kiln lid should be propped three to six inches
to allow the water vapor to escape.
As the temperature rises through the 500˚ to 1300˚
range, impurities in the clay and organic matter are burned
out of the ware. Chemically released water and gases are
driven out of the ware as well. Good ventilation is very
important during this time; if there is not adequate ventilation, glazes may become discolored during this stage.
At around 660˚ to 700˚, greenware transforms from
bisque and can no longer change back into a lump of clay.
This term is referred to as "soft bisque." The ware can still
be cleaned and handled, but does not crumble as before.
At approximately 1000˚, quartz inversion takes place,
turning the quartz in the clay into a crystalline structure.
During this time, pieces actually move in the kiln. As with
everything that is subjected to heat, the ware expands, subsequently shrinking as it cools. When you compare a
greenware piece to a bisque piece, the difference is the
“shrinkage rate" of the clay. With most whiteware, the
shrinkage rate is 4%-10%. Poorly balanced pieces can
topple during this stage. Using kiln wash on the shelves
helps the pieces glide on the shelves during this expansion
and shrinkage. This stage produces the most stress on the
piece and happens every time a piece is fired. This
conversion of the quartz should take place at a slow rate,
both during the acceleration and cooling.
Settings
2
3
4
5
6
Lid Propped
Lid Closed
Off
Low
Low
Med
Med High
Low Low
Med
Med
High High
Med High High
High
High High
1
Top
Middle
Bottom
Top Peep Hole Open/ All Others Plugged
While every loaded kiln and cone temperature is
different, you can modify the firing schedule. A heavier
load or heavier types of ware may take longer in the early
advancement of the switches. This timetable can be
modified to fit any kiln by any kiln manufacturer. The
manual for your kiln should give you guidelines for firing
rates and advancement of the switches and/or dials. After
your first few firings, the personality of your kiln will
dictate your schedule. Remember that over time the kiln's
personality can change; using shelf cones will help you
monitor this. The time table below may sound like and
Overfiring
All clays have a maturing point; once the temperature
11
Firing
defects, as discussed above. Glazes that are labeled dinnerware
safe are only dinnerware safe when the shelf cone stated in the
instructions has been reached. Glazes that are underfired may
appear cloudy or milky and lack the proper sheen to the surface.
Sometimes glazes can be manipulated to accomplish a specific
effect by firing to different temperatures.
All glazed objects need to be stilted when possible,
excluding stoneware and porcelain. Stilts should be fitted to the
size of the object being stilted. Undersized stilts can cause the
ware to shift in the kiln and could cause the piece to deform.
Dry-footing should be discouraged at all times (excluding
stoneware and porcelain, where it is required.) Dry-footing is
the removal of the glaze on the bottom surface where the ware
touches the kiln shelf. While some pieces cannot be stilted, dryfooting is a last resort procedure.
Glaze is like sugar that is being made into candy. Think of
the sugar starting out as fine granules. As heat is applied to the
sugar it starts to melt, bubbling and boiling, as glaze does on the
ware. This is why the heat work is so important. The glaze
needs to come to a boil and then smooth out to a hard
crystalline surface, just like candy. If the firing procedure is
interrupted at any point, problems can occur, such as pinholes,
bubbles trapped in the glaze or blisters in the surface. If the
cooling is too rapid, these problems do not have a chance to
heal themselves.
Mayco glazes are referred to as oxidation glazes; they
require oxygen to develop fully in the kiln environment. The
absence of oxygen can change the color greatly, especially for
bright reds. Give glazed pieces plenty of room to breathe
during the firing. Giving reds a bit more room than normal aids
their development. If glazed pieces are put too close to one
another the oxides in the glaze react with the adjacent color; this
is referred to as fuming, flashing, blushing or shadowing. It
may also appear as a yellow cast on light colored glazes.
Unlike some competitor’s glazes, all Mayco glazes can
be fired with one another, including green and reds. Mayco's
bisque glazes, bright reds, and oranges due not require a
special firing when mixed with other glaze colors like greens.
However these pieces should be put on higher stilts to allow
for better air circulation. Give them wider berths in their kiln
placement, including the placement of shelves over those
pieces. The use of other companies’ colors used in
conjunction with Mayco colors can not be assumed or
ensured; test fire their compatibility prior to applying colors
on a project.
Whether firing whiteware (earthenware), porcelain,
stoneware or glazes, make certain you have a thorough
knowledge of what you are placing in your kiln. The proper
precautions and actions will ensure a product you will be
proud of. Now you are all fired up to operate your own kiln.
exceeds this point, the clay actually starts to soften or
become liquid-like. Although the overfiring may not be
noticeable to the naked eye, some indications are that the
bisque is hard to glaze, underglazes appear darker or fainter,
or glaze colors seem washed out. The ware will also seem
denser or smaller than normal, due to shrinkage.
Underfiring
The complete opposite of overfiring is underfiring.
Underfiring may not be evident until the ware has been glazed
and used. Greenware or bisque can sound hollow or brittle. A
glaze that performs poorly maybe caused from underfired
greenware or even underfired glaze. Problems that can occur
are: blistering, crazing, pinholes, gray discolorations and
black specks in the ware or glaze surface. Fractured pieces can
be directly associated with underfired bisque.
Bisque Firing
Firing low-fire whiteware greenware to mature the clay is
called a bisque firing. Mayco glazes should be applied to
bisque that is fired to a minimum of one cone hotter than the
glaze, but a good rule to follow is to fire two cone numbers
hotter to assure that the minimum of one cone hotter is
reached. During the bisque firing, the organic material in the
greenware or clay is burned off as gas. If the bisque firing is
not at least two cones hotter than the following glaze fire,
additional gases may be produced and show up as glaze
defects such as pinholes, blistering and/or craters. Utilitarian
items should be fired to a minimum of two cones hotter to
make the ware denser and more durable. Check with your
clay manufacturer to make sure it can withstand these temperatures; some clays start to deform at Cone 03 or 02.
Greenware can be safely set on the shelf if no color has
been applied. Generally greenware is not stilted during bisque
firing; if placed on stilts it may soften and deform at the higher
temperatures. Greenware prefers to be fired as it naturally sits.
Cups and pieces with handles or protruding extensions may
distort during a higher bisque firing (cone 02 or higher).
Pieces that are thin at the top and heavy at the bottom, (i.e. a
heavy footed bowl) may fire better inverted upside down.
Porcelain and stoneware are never stilted in any firing.
Opaque and translucent underglazes are applied to
greenware and mature at the same temperature as the
bisque. Underglazes are clay with color pigments added
that are formulated to shrink and develop during the bisque
firing temperatures. If an underglaze seems not dark or rich
enough, it may be underfired. Underglazes that seem dark
may be overfired. Applying underglazes on bisque can lead
to disappointing results, such as faded color or as a defect
called "shivering," where the underglaze has not shrunk at
the same ratio as the ware.
Glaze Firing
Tips for Firing and
Surviving in the Classroom
All glazes all have a maturation point to which they should
be fired. This is stated on each jar on the label. The important
thing to remember is that a glaze firing is a minimum of one
cone lower (cooler) than the bisque firing temperature.
However, a two cone difference is recommended to avoid glaze
Bisque Firing
Dry greenware can touch in a bisque kiln. Bowls and cups
are best stacked rim-to-rim or foot-to-foot. Stack smaller pieces
in larger pieces. Don’t stack objects that are a tight fit together
or have projects touch the elements.
12
Firing
Glaze Firing
Many of the low fire glazes work on greenware
(unfired) projects. Most all clear glazes work well, test
others. These pieces need to be absolutely dry after glazing
and fired like a bisque firing. The good news is you save
one firing. The bad news is
that if something explodes in
a kiln, the exploded glazed
piece sticks to other pieces.
This can only be removed
with a grinder or Dremel
tool.
If a teacher does not
Cadmium reds can be
have enough kiln
very temperamental. If not
applied or fired incorrectly
space for separate
they turn a transparent gray.
bisque and glaze
The mauve, rosy colors are
firing, save time by
less temperamental, but if
doing a single firing
you feel the need for red and
when using Stroke &
it doesn’t work for you try:
Coat®. Many other
• A heavier application
Mayco products can
of glaze
be used in a single
• Leave more room around
fire process. Test
pieces or peeps out, as
them individually.
they like oxygen.
• Fire faster
If you need to
Cracks and Breakage:
combine a glaze fire
Greenware is extremely
and bisque fire, place
brittle. Repairing student
the glaze pieces in the
work can be tricky. Mayco,
cooler part of the kiln
as well as many other
and the clay pieces in
manufacturers, sell products
the hotter part.
to repair greenware.
Cracks do not automatically happen. It is usually
because the project has a thick and thin piece attached
together. The thinner piece dries and shrinks away from the
other. If you are making thick animals with 4th graders they
may need to be hollowed out from the underside with a loop
tool. Poking holes with a needle took or bamboo skewer
may also help in drying and firing.
Explosions in kilns are usually from one of two things:
• The work is not completely dry. The dryer the better.
If there is a small particle of water on the interior of a clay
project, it has to migrate to the surface to evaporate. If it
doesn’t have a chance to evaporate, it will turn to steam
when fired and the piece will break in the kiln.
• Air Pockets. If students put two pieces together with
air trapped between them, it is necessary to pierce the
work with a pin tool to let the air out. This can be a very
small hole in a place that is not visible. If the air pocket is
trapped when the kiln is fired it will expand while the clay
contracts and the piece will break when fired in the kiln.
13
Putting Down a Foundation . . .
Underglazes
Sponging Opaque Underglazes
Underglazes, originally, was a term used to refer to
ceramic colors used under-the-glaze, like a foundation. The
term has now become a general term and a specific material
meaning. Generally the term refers to a product put on
greenware that is covered with a clear glaze. This can be a
translucent or opaque type of material. The translucent types
are referred to as "One Strokes" and are usually covered with
a glaze as well.
The use and application of both opaque and translucent
underglazes are varied. They can be intermixed in each
separate category or intermixed between the two. An
oversimplification is: Opaque Underglazes are mostly clay
with pigment and One Strokes are mostly pigment with little
clay. The amount of clay determines the opacity of the
product and requires the product to be applied to greenware
so that the products shrink at the same rate in the firing.
A sponge is used to apply underglaze to greenware when
texturing a surface, when graduating colors, or when blending
two or more colors on the same piece. A sponge can be used
on an embossed piece. It works well on large surfaces to get
a more even coverage.
A natural sponge works best for applying the color. Make
sure the sponge is not worn out or has been exposed to hot
water. It should have a general spring to it. The color
thickness should be the same as for general brushing. A
slightly dampened sponge is used and the color should be put
out onto a tile for better application and absorption into the
sponge. Pat the color onto the surface in an up and down
motion, with quick motion to avoid smearing or overloading
of the area. Place one dab next to and slightly overlapping of
the previous one completing the piece in a systematic way.
The sponge should be reloaded often. Apply four to five
coats of color to make up the difference of not using a brush.
Application of Opaque Underglazes
• Applied to greenware.
• Lightly dampen ware with water before painting; this
allows better adhesion to the ware and helps alleviate
pinholes.
• Shake the jar well before applying. It should be the
consistency of melted ice cream.
• Applied with a soft brush. Ox hair or Sable brushes are
best. Can be applied with other methods, see below.
• Use the largest brush for the area covered.
• Apply three even smooth coats at right angles to one
another.
• Do not thin for general application.
• Can be intermixed to get more colors.
• Can be tinted with One Strokes.
• Fired to shelf cone 04.
• Water soluble.
• Thin with Mayco Media or water.
• All are non-toxic
• Generally a clear glaze finish is applied after firing to
bring out the true color and vividness of the product.
Other Application Methods
There are several ways of applying underglazes other than
the two previous methods.
Banding: The color is applied onto a surface using a
banding wheel. The color should be slightly thinner to carry it
from the brush to the ware. Naturally the piece is round and
bands or stripes of color are applied while the wheel is turning.
The ware is moistened so the color does not grab from the
brush and the color can be thinned slightly with Mayco Media
to lessen the color from grabbing the ware.
Spattering: The color is spattered onto the ware giving a
speckled look. Using a spatter brush or stiff brush, the color is
loaded into the brush, then the handle end of another brush is
drawn towards you over the bristles of the loaded brush. Make
sure you protect the work surface because the speckles can
travel great distances to other projects.
Stippling: Thin the color slightly and spread it onto a tile.
Load a stiff brush and wipe off the excess color. Test on a piece
of paper each time the brush is loaded. Hold the brush so that
only the tips of the bristles will touch the surface of the ware.
Pounce the brush up and down, gently tapping the color into
place. This technique is used for smaller and tighter areas when
needed. This is good for rims of plates or to fill in design areas.
Embossing: The color is thinned slightly to flow out of the
detailing brush so that several coats can be applied. This will
give a dimensional look to the design. Three coats will be
needed to build color depth.
Underglazes can be used directly from the jar, but
should be put out onto a tile. Make sure the consistency is
the proper thickness, like melted ice cream. Dip the
dampened, blotted brush into the color. Fully load the
brush without dragging the brush on the side of the tile.
Apply the color in a flowing motion, if it starts to drag,
reload the brush. The clay will absorb the moisture from
the color, so care has to be used in the application. As you
flow the color on, avoid any ridges and runs. Brush these
flaws out as you are applying the color. On an embossed
piece do not allow excess color to build up. Brush the
excess out of the crevices as you apply the underglaze.
Apply the first coat; when the dark wet look has left, apply
the second coat at a right angle to the first; the third is
applied at a right angle to the second coat. This will assure
smoother coverage.
Polishing Underglaze
While the application of an Opaque underglaze can be
applied to ware in many ways from brushing to sponging,
there is an interesting technique that is very old. One of the
most striking looks is by polishing the surface of the color to
produce a soft sheen. This technique is unobtainable by any
other method and is unique to opaque underglazes. While the
surface is somewhat sealed, it is not waterproof. It is only
14
Underglazes
thin applications that naturally result from ONE brush stroke.
Very heavy applications of color can lead to problems of dry
areas, cracking or bare spots where the One Strokes may pop
off, taking the clear glaze with it. Bleeding of darker colors of
blue and black may occur, but is generally the result of not
firing the color before glazing or too heavy an application of the
top clear glaze.
If the color is applied too thinly, the color will seem to
disappear under the top coat of clear glaze after firing. The One
Stroke has to be thick enough so the top glaze does not "cannibalize" it and yet feed the glaze to produce the final color.
Thinning with water minimizes the danger of heavy application,
but over-diluting can cause the loss of color. Darker colors can
withstand more thinning than lighter shades. The use of Mayco
Media helps suspend the color without diluting it.
Use a palette knife to thin the color onto a tile to the
consistency of light cream for most applications, such as
large areas, creating bold designs, for sponging and dry
brushing with a flat shader brush. The product should be the
consistency of very light cream for banding wheel work and
decorating over unfired glazes. For washes of color,
spattering or full brush shading over one color with another
color, the consistency should be like milk.
used on decorative items and is not suitable for food or drink.
Design work done in translucent One Strokes can be
completed and then spot glazed to the design, giving a
contrast of texture and surface.
Polishing is accomplished by buffing the opaque underglaze while it is still damp. A smooth surfaced piece works
better for polishing underglaze than an embossed piece.
Care must be taken to avoid removing the color from sharp
angles and rims; it is easy to scratch the ware accidentally
with your fingernails. Apply the color carefully; any ridges
or buildups of color will affect the end result. Using a silk
sponge to apply the color will help overcome some of these
problems. Some colors polish better than others. Those that
dry with a frosty look are less than successful.
• Apply three coats of underglaze with a brush in usual
manner to assure all over coverage. Apply the colors
evenly and smoothly. Do not allow prolonged drying
time between the coats.
• Thin the same color, half and half, with Mayco Media
and mix well. Prepare a ball of soft facial tissue or soft
T-shirt material. Apply the mixture to a small area at a
time. An area about the size of the palm of your hand is
about right. When the shiny wet look disappears and
the color will not stick to the pad, polish that area
briskly. The pressure should be light and the movement
fast. It is the friction that develops the sheen.
• Continue to apply the color mixture to a small area at a
time, each one slightly overlapping the previous one,
until all of the piece has been polished. Now buff the
entire surface again, without wetting, until a high sheen
is developed. If the color looks blotchy, this will
disappear as the piece dries.
• If you wish to add a design with underglaze or One
Stroke, be careful not to mar the surface. Use a soft cloth
to hold the piece. Wait until the piece has thoroughly
dried before tracing the design so the surface is not
marred by the pressure of the transferring.
General rules for One Stroke application:
• Generally applied to greenware Sometimes applied to
bisque, for special techniques like color washes or
Majolica (on top of an unfired glaze).
• Dampen the greenware slightly before applying.
• Shake bottle well and if necessary thin with Mayco
Media and/or water.
• Can be intermixed to get more colors.
• Can be used to tint opaque underglazes, glazes and slip.
• Fired to shelf cone 04.
• Water soluble.
• Non-toxic.
• Generally a clear glaze finish is applied after firing to
shelf cone 04 to bring out true color and vividness of
the product.
Translucent Underglaze
Mayco's One Strokes are translucent underglazes that
have a light, airy look and brilliancy of colors. Mayco's One
Strokes look almost the same color in the bottle as on the
finished piece. This allows mixing, shading and blending
with them to be done with minimal complications. They
can be compared to the artist's water colors. The "seethrough" characteristics of one strokes allow shading of one
color over another to achieve depth and dimension.
As the name states, One Strokes infers one stroke of the
brush. While this does not bind the artist, it does make the
one generous stroke of color the most beautiful aspect of the
product. When multiple colors are applied, the thinning of
the color and thinner layers of the product allow the product
to be used to its full advantage. The thinning of the One
Strokes and the amount of the application is adjusted to the
number of times a color is used on a given area. The final
depth of color should be no more than a generous stroke of
the brush with unthinned One Strokes.
Concentrated translucent colors are designed for relatively
Brushing Translucent Underglazes
Because of the translucent quality of One Strokes, the
direction of the brush stroke is apparent. This makes them
ideal for artistic detail work and designs.
Although One Strokes will not give a solid coverage,
generally they can be used satisfactorily on large areas if
applied in the described manner. Thin the color to the
thickness of whole milk, applying with a flat brush sized for
the area. More than one coat of color thinned properly will
produce a more opaque look.
Sponging One Strokes
A sponge can be used in a variety of ways with One
Strokes, achieving a totally different look each way. Unlike
the opaque underglazes that block out color beneath, One
Strokes allow every overlap of the sponge to show. A light,
airy look is accomplished by choosing a sponge with a
specific pattern to it, rotating the sponge and using lighter
15
Underglazes
Apply the desired glaze surface evenly with the proper
amount of coats for the glaze. Thin the one strokes to the
consistency of light cream or lighter. Two thin applications
are better than one heavier one to produce the desired effect.
Thickness of the color is very important for this technique.
Translucent One Strokes and Opaque underglazes are
interchangeable with most techniques. Creating patterns,
banding, spattering and stippling can all be done equally
well with either product. Keeping in mind that One strokes
are transparent and regular underglazes are opaque. Two
techniques that you cannot interchange products with are
polishing and Majolica.
mixtures of color, allowing the bisque to show through by
Several colors can be blended into the sponge at one time.
Usually One Stokes are thinned to the consistency of light
cream for sponging. Darker shades will block out lighter
colors underneath, while lighter shades applied over darker
ones gives a shadowing to the area.
Color Washes and Antiquing
This technique is done on bisque. Dampen the bisque
surface with water so the color applies more evenly.
Create a wash mixture the consistency of milk. Use a large
brush to apply to the embossed area where it flows into the
recesses and crevices. The color will have a natural tendency to
be darker in the recesses while automatically highlighting the
embossed areas. Mixing the one stroke with Mayco Media
makes the colors brighter and more evenly distributed.
To antique, apply the color and then remove most of the
color using a damp sponge, leaving little color in the embossed
recesses. The consistency of the color is of light cream. Too
thin of color will cause runs and make the color penetrate the
bisque, staining it in a seemingly unsightly manner. When the
color is too thin, it can also cause the color to shiver off with the
glaze after firing. Too thick of color will not allow it to get into
all of the embossed areas and can actually repel the top coat of
clear glaze during the firing. It may cause the color and glaze
to pop off.
Allow the color to dry before removing it from the raised
areas with a damp sponge. Follow the contour of the design on
the piece. Wiping the wrong direction will cause you to
remove too much color, defeating your goal. Rinse the
sponge often to keep the highlighted areas crisp and clean. Too
much pressure on the sponge will also remove excessive
amounts of color.
You can also antique over a fired underglaze. This can be
done to a piece that has several colors applied to the surface, tie
the piece together for an even
look. The underglazes
should be fired to shelf cone
04 before doing this
technique. Antiquing with a
clear glaze is most effective,
but is also quite effective
For a velvety finish to
with a speckled or clear art
the fired underglazes,
glaze.
eliminate the second
firing and application
Majolica
of clear glaze. Or apply
Majolica is a term
a unique look. Apply
borrowed from Italy,
meaning the decorating on
Stroke & Coat® in a
top of an unfired glaze.
Majolica technique
Originally the term meant
glaze over a white nonmoving glaze. Now Majolica most often refers to the use of
one strokes over a glaze, a procedure that gives more
predictable results. This type of decoration is used when a
desirable color or type of glaze is needed that would mute,
mare or discolors the one stroke decoration if it were done
under the clear glaze.
Use geometric shapes to
make these fun animals:
16
This is Going to Come Out Green?
Glazes
brushes, bamboo and stain brushes should not be used for
general glazing of a piece. The brush should be sized for the
task that it is being used for; a small brush used to cover a
large area will give unsatisfactory results. Do not use
brushes previously used with stains. Glaze can be
discolored by remaining traces of stains held in the brush.
Condition of the raw glaze is as important as even application and the choice of brush. Usually a few shakes of the
jar is all that is needed to condition the glaze fully. However,
there are times when a jar of glaze is too full; at times glaze
may need to be removed from the jar to help mix the glaze.
Never thin a glaze prior to vigorously shaking it. If a glaze
should require thinning, use small amounts of distilled water
or Media. For brush application, the product should be the
consistency of ketchup. If the glaze is so thin that it runs out
of the brush before applying it to the ware, the addition of
one or more coats may be needed to get the equivalent of one
coat. Wipe the rim and lid of the jar after use to alleviate
dried glaze from accumulating in the jar. The glaze should
be strained prior to use if this occurs.
The first loading of the brush is the most important step
in glaze application. Dampen the brush and remove the
excess water. This will ensure the glaze brush is completely
clean and will allow the brush to accept the glaze, making it
easier to flow the glaze onto the ware. The brush can be
dipped into the glaze, then pressed against the side of the jar
lid or tile to spread the hair and cause them to accept the
glaze. Jiggle the brush up and down a few times to the ferrule
in order to fully load the reservoir. The brush should look
considerably larger and fluffier than it did before. Do not
empty the brush by wiping the glaze out again on the rim of
the jar. If it is necessary to prevent a drip, barely touch the
rim of the jar. It is important to approach the piece with a
fully loaded brush.
The brush should always be well loaded and saturated so
that the glaze flows onto the bisque with sufficient thickness.
Hold the piece and the brush so the color flows down the hair
of the brush. Stay up on the end of the brush, especially on
detailed embossed articles, so that you can "squiggle" the
glaze into the recessed areas. If too much pressure is applied
to the brush and bends the hairs, you will be removing more
glaze than you are applying. The glaze should ease into
place. Do not scrub, but flow the color onto the piece.
When the brush is properly loaded, start flowing on three
or four strokes, going in one direction only. Now, your brush
is empty. There is still glaze in it, but the reservoir is going
dry. While the brush is nearly empty and the glaze is still
damp, look at what you have done. If there are any ridges or
glaze pile-ups in the embossed areas, use the brush to pick
them up, without taking away too much glaze. Reload the
brush and continue to glaze until the piece is completed.
Each coat of glaze should be allowed to completely dry
before applying each successive coat. Wet ware does not
accept glaze as readily as dry ware. A glaze is dry when it
feels dry, not necessarily when the shiny wet look is gone.
Ceramic glaze is a glass covering that provides a
protective finish for a porous clay object. Over-simplified,
it is a combination of raw materials that reacts to heat to
produce a glass coating on ceramic pieces. Colored and
textured glazes have minerals and additives that produce
exciting colors and effects. While the unfired glaze may
look dull, drab, uninteresting and a totally different color
than before it is subjected to the intense heat of the kiln, it
transforms itself like a butterfly. Some glazes may contain
dyes that are used to better see where they have been
applied and burn out during the firing. Glazes make
ceramics leak-proof, easy to clean, and beautiful. Glazes
come in various colors, surface textures and can be used
alone or in combination with others. Glazes provide one
strokes and opaque underglazes with the protective coating
that brings life to the underlying colors.
Satisfactory glaze finishes result from proper glazing
techniques which are proofed in the kiln. The kiln is the
second largest factor in determining the final outcome of the
glazed pieces. Glaze is not a paint, but is a combination of
chemicals and raw materials. For this reason, mixing two or
more glazes or varying the thickness of application will not
always give dependable results. Mixing a blue and red glaze
does not produce a purple colored glaze. Sometimes the
mixing of two matte glazes may not produce another matte,
but a gloss glaze. Similarly the mixing of two dinnerware
safe glazes does not make a dinnerware safe glaze.
Glazes are sometimes referred to as being "soft" and
"hard." These terms refer to the amount of movement
during the firing and to the final surface of the glaze. One
would think that all fired glazes would be considered hard,
but some may be easily cut with a knife on a dinner plate,
while others withstand repeated use. Other types of glazes
produce special effects like snow, raised designs or metallic
looking finishes. Just remember that if you are experimenting with combinations of glazes that you may be
creating surfaces and textures that behave quite differently
than when you first started.
Applying Glazes
Before discussing the unlimited choices of glazes,
glaze combinations, glazing techniques, and potential
glazing problems and solutions, we should establish the
procedure of applying an all over coverage of glaze. There
are several methods of applying glaze, but the most
common method used is brushing.
Choosing the right brush ensures the job will have a
better finish. The hair of a good glaze brush should feel soft
to the touch when dry. Don't be mislead by the starch the
brush manufacturer puts in the brush for display. The brush
should have uniform hair texture regardless of the type of
bristles. Stiff bristled brushes or ones with a mixture of stiff
and soft hair can detrimentally affect the final glaze surface.
When wet, the brush should be resilient enough to return to
its original shape after pressure has been applied. Stiff fan
17
Glazes
If it is not dry, the brush may pick up the glaze, rather than
put it down. If the glaze starts to shift or crawl while
painting, then more drying time is needed. Crawling can
also be caused by over fired bisque or bisque that has been
sitting around too long, collecting a greasy film. Do not
force faster drying with hair dryers; this can cause the glaze
to perform badly. If a quicker drying time is needed, use
indirect heat or a fan to dry the piece.
When possible, each successive coat of glaze should be
applied at a 45˚ angle to the previous coat to help prevent
streaking and unevenness. Do not be afraid of applying too
much glaze. The problems are more varied when glaze is
applied too heavily, but too thin an application is a much more
common error. Apply the number of coats recommended on
the jar or the technique that you may be following.
It is difficult to establish exactly what is meant by a "coat"
of glaze. The personal traits and work habits of an individual
vary the application. What does three coats mean in glaze
application? Usually a glaze requires three flowing coats for the
proper thickness in order for the glaze to perform to the desired
finish. Three coats could translate to four coats for someone
who is termed a light glazer. While some people may only
require two flowing coats to achieve the right deposit of glaze
onto the surface of the ware, some people will need more than
three coats of glaze. If glaze is applied according to the flowing
method just described, you should have the right amount for a
coat. A good rule to follow is to apply one coat and if there is
still bisque showing through the glaze, do not consider it the
first coat. When the bisque is fully covered in appearance then
that would be the first coat. The next two coats would fill the
requirements of the three coat term. The thickness of a post
card is about the recommended thickness for proper coverage
after 3 applications. You will learn through glazing pieces over
time whether you are a light or heavy glazer and will adjust the
application of glazes to fit your individual habits.
Clear glazes require two coats only, unless lusters or fired
metallics are used over them. Using more than two coats of
clear glaze on top of underglazes and one strokes can cause
the color to float up into the glaze. When two coats of clear
glaze have been applied and allowed to dry completely, it
should not be cold to the touch nor should you be able to see
through the glaze. If you cannot distinguish the colors underneath, then sufficient coverage has been made.
Occasionally you will run into problems when you are
glazing your ware. Hard spots in the bisque are areas that
resist glaze. Do not try to continually apply glaze to this area.
Flow one heavy coat on, letting it dry completely before
attempting to apply more glaze. With successive coats, glaze
the area with a fully loaded brush and a light touch. Each coat
must dry thoroughly or the previous coat will be lifted.
Application of glaze with a sponge is sometimes
beneficial, especially when a textured look is desired or when
an extra smooth application is necessary. For best results, use
a silk decorating sponge with spring to it. Synthetic or sea
wool sponges do not work well for all over glazing; they
produce a texture or a mottled look.
To apply glaze with a sponge, dampen the sponge and
remove the excess water with a paper towel. Pour the glaze
onto a tile, then dip the smoothest area of the sponge into the
glaze. Pat the glaze into place, overlapping slightly with each
pat. A light touch will apply glaze; a heavy touch will pick up
glaze. Pounce the sponge up and down in a straight motion.
Do not slide the sponge across the bisque surface as you
would a brush. Keep the sponge full. Before you reload the
sponge, look over what you have done to see if a heavy
deposit needs to be picked up and redistributed. Four to five
coats applied with a sponge is needed to achieve the three
brushed coats required for most glazes.
Textured looks are obtained by applying all the coats with
a sea wool sponge, allowing the glaze to dry thoroughly
between each coat. Non-flowing glazes will actually be
textured after firing. Flowing glazes will look pebbled, but
feel smooth to the touch.
Semi-transparent glazes tend to appear streaked and
uneven on very smooth pieces if all the glaze is applied with a
brush. If the glaze is applied entirely with a sponge, a pebbled
look will happen. The best way to achieve a perfect finish for
semi-transparent glazes is to alternate sponging and brushing
the coats to the surface. Apply four coats with this method.
Rolling A Glaze
For hard to reach spots inside containers, pouring or
rolling a glaze in the inside surface is a simple alternative to
glazing with a brush. The inside must be free of any debris
and clay dust. Any clay particles left inside the piece can
cause crawling problems. Excessive glaze in or on the
bottom of the piece can cause it to split, pit or crawl. These
problems can be overcome by making sure the excess glaze
is removed by inverting the piece as the glaze dries.
How to Roll:
• Choose a gloss glaze if possible. Smoother application is
easier and allows better cleaning of the fired surface.
• Thin the glaze to the consistency of light cream using
distilled water or Media. Mix enough glaze to completely
cover the area. More glaze is absorbed by the bisque
during this method due to the extra water. The glaze will
be thicker after rolling it into the inside due to absorption of
the bisque. Save all excess glaze and mark it accordingly.
• Dump the diluted glaze into the piece and rotate the piece
with a continuous motion, covering the entire inside
surface with glaze. Drain out the excess glaze and
continue to rotate the piece momentarily to avoid glaze
pile ups in any one place. Keep the piece inverted to dry.
This helps avoid the piece splitting during the firing and
avoids pitting of the glaze
• When the glaze is firm, turn the piece upright and check
for possible missed areas. Glaze these areas with a brush.
If a colored glaze was used, apply one or two light coats
with a brush to the top areas that may show. Wipe off any
glaze on the outside surface with a damp sponge.
• After the correction has been made, allow the piece to dry
before completing the rest of the glazing. You may notice
the dye from the glaze migrating to the outside of the
piece. There is no need for alarm as it fires away; the
glaze is not moving to the outside surface.
18
Glazes
glossier the glaze is, the more it moves in the firing. Heavier
applications of these glossier glazes will produce more
dramatic intermingling of the colors. Not all glazes used in
combination need to be so free moving. A non-moving glaze
will retard the movement of a more active glaze. For example,
applying three coats of a moving glaze on the bisque, then
applying two coats of a non-moving glaze on top, the top glaze
will break up into little islands of the matte color. Using a tuffy
or chore boy sponge to apply leftover amounts of glaze will
create a look similar to crystal glazes. Base coat with a
moving glaze, apply another glaze on top of the first one, then
tuffy sponge the third glaze on top of the previous two.
Antiquing with glazes can be a lot of fun.
• It hides flaws in the bisque.
• The transparency of the glaze adds dimension to the piece.
• Great effects are achieved by antiquing with a matte glaze
under a gloss glaze, as well as the reverse.
• Use a highly embossed piece to allow the glaze to fill in
the crevices.
• One of the glazes used should be non-moving for best
antiquing results.
To antique a piece with glazes, apply one flowing coat to
the entire surface and let it dry. Using a damp sponge, wipe off
the highlights on the piece. Apply two coats of the top glaze
over the entire piece while concentrating the last coat on the
higher points of the embellishments.
Majolica is accomplished by applying a non-moving
glaze to the entire surface, then doing design work on top of
the unfired glaze with other glazes. This technique makes the
design look less rigid and the colors are usually lighter.
There are a number of things to consider when choosing
colors for a majolica technique. Consider the transparency of
the colors. Lighter colors lose their distinctness over darker
colors. Also consider the intensity of the colors being applied
over one another. The thickness of all the colors combined
onto the surface should be taken into the decision. How the
glaze moves during firing should be noted. The shape of the
piece can influence the final outcome as well; a flat piece
versus a vertical piece could dramatically affect the outcome.
Choosing a Glaze Finish
When you glaze a piece you are enhancing its utilitarian
and decorative function, not simply covering it. There is more
to consider than color; the form and function of the piece
should be considered. Choosing the wrong type of glaze
detracts from your piece; the right one enhances the form.
The glaze chosen determines the final character of the clay
shape, but the reverse is also true. A glaze may look one way
on a highly embossed shape and entirely different on a slick,
plain surface. Crystal glazes on a vertical shape smooths out
during the firing. On a plate, the crystals may pit or bubble.
Variation in the heat treatment during the firing of the kiln
can also affect the performance of a glaze. A heavily loaded
kiln, a soak period, a hotter temperature, and a refire will all
cause glazes to flow a little more than usual and could affect
the color stability. This can be a curse or a blessing depending
on the glaze used and the look that is being achieved.
Using More than One Glaze
Many times a ceramic shape suggests a finish of colors
placed side by side. Some beginners get the idea that such
color placement is limited to underglazes. You are not limited
to glaze finishes being placed side by side due to their gloss or
matte finish. The majority of Mayco's glazes, if applied
correctly, do not flow out of control when fired to shelf cone
06. Series 2000 Gloss glazes flow, but only within themselves;
they level out but do not bleed together. However, extremely
heavy applications of these glazes or prolonged or repeated
firings can cause excessive flowing.
Butting glazes is a term used to describe the method of
applying glazes side by side when no color blending is desired.
To butt glazes, you must avoid overlapping glazes. A line
drawn with an ordinary pencil on the bisque will determine the
precise placement of the glazes. While the mark will burn
away in the firing, it does nothing to control the glaze. Only
care facilitates exact application of the glaze. In butting glazes,
the brush is used like a push broom at a 45˚ angle to shove a
small ridge of glaze up to, but not over, the pencil line as the
first coat is applied. This small roll of glaze should give sufficient coverage to the perimeter of the area so that special care
with successive coats is not necessary; they can be applied in
the usual manner.
Butting should be all that is needed to control the flow of
the glazes unless the glaze application is unusually heavy. On
vertical pieces added safety can be added by cutting through
the glaze while the glaze is still wet. Use a sharpened greased
based pencil, following the original pencil mark. The glaze
will flow to meet the one glaze and the grease in the pencil
provides enough of a resisting barrier to keep the glaze in
place.
Glaze combinations or the use of one glaze over another
exploits the differences and characteristics of the wide range of
glazes.
When two or more flowing (or soft) glazes are used one
over another, a blending of the two colors results. The glaze
next to the bisque will always dominate the piece because it
has a stronger footing or hold on the bisque. Usually, the
Food Safety
With the fun of doing ceramics, comes the responsibility
of making pieces that could be used for holding food or drink
"food safe." While you may not plan on a piece being used
for food or drink, it should be finished in a food safe manner
if the shape is such, that it could someday be used for food or
drink. Knowledge of who or how the piece will be used in
the future is lost once it is out of your sight.
The condition, shape, glaze finish and firing procedure
should all be considered if a piece is food safe. Whether it is
cast ware or hand formed, there should be no areas where
food bacteria can build up and be difficult to clean, like open
hollow handles or undercuts inside the bottom of an object.
Areas left intentionally unglazed, whether covered with an
acrylic stain or some other covering, make it unsanitary and
not food safe. The glaze and bisque firing come back into
play to make a piece food safe. Improper firing of either the
bisque or glaze could result in crazed glaze, which is unsafe
19
Glazes
for food and drink. However, this may not be apparent until
months later when the glaze has delayed crazing of the
surface. All glazes should be from reputable manufacturers.
They should have the proper seals from the ASTM guidelines
for food containers. Remember that food safe glazes, when
mixed together or applied one over the other, combine chemically and could produce a finish that is not food safe. Glazes
that do not meet food safe requirements will only release
contaminates when in contact with acidic foods. Some glazes
do meet the government's tests but are unsuitable for
dinnerware due to their texture or glaze surface.
Make your piece safe for food and drink by following these
three rules:
• Choose only dinnerware safe glazes.
• Use acceptable bisque pieces that are smooth and in
good condition.
• Fire the piece to the recommended temperatures during
the bisque and glaze fire.
A glaze is safe for food when it passes the U.S. governments
test for lead and cadmium release. A glaze that is unsuitable
for inside surfaces because of their texture can be used on the
outside of containers. It is only the surfaces that will come in
contact with food that need to receive extra caution.
Semi-opaque: light underglaze colors will not show
through and dark colors will be muted. This can be very
effective for shadowing on animals, faces, etc.
Opaque: most colors will not show through.
Oxidation
The glazes used in ceramics are termed oxidation
glazes. This means they need oxygen to develop their color
during the firing. Oxidation also describes a chemical
reaction to the glaze with the fired metallic lusters put over
them. This change is due to the amount of copper involved
in the coloration of the glaze. Some colors with little copper
in them might only slightly affect the fired metallic luster.
Sometimes dramatic effects can be made by deliberately
putting the fired metallic on the glaze.
The Basics of Applying Glazes
• Generally applied to shelf cone 04 bisque. Check for
exceptions under individual glaze categories.
• Wipe the piece with a damp sponge before starting.
• Shake jar well before using. The thickness should be
about like ketchup.
• Use either an Oval Mop or Flat Glaze brush to apply
most glazes.
• Apply 3 flowing coats unless otherwise noted on jar.
Clear glazes require only 2 coats. Check individual
glaze categories for exceptions.
• Use food safe glazes on all containers for food and drink.
• Fire to shelf cone 06 unless otherwise noted on jar.
• All are water soluble.
Opacity of a Glaze
There are times in the decorating process when there will
be a need to know the opacity or translucency of a glaze. Few
colors are completely transparent, and since they are a form of
glass, few are completely opaque, but there are lots of stages in
between. There will be times where a glaze containing
speckles or with slight coloration is preferred. Then there are
the times when you have totally changed your mind and want
to cover up completely the underlying colors. Darker colors
applied heavily are more opaque. Opaque glazes applied
thinner are still more opaque than lighter colors applied
heavily. This can also be an indication on how carefully to
apply the glaze when used alone.
• Clear glazes add no color and will tolerate more variation
of the thickness of the application.
• White glazes applied over white clay bodies do not show
overlaps of color.
• Dark and opaque glazes seldom show the unevenness of
the color's application.
The surface also comes into play when applying the glaze.
Transparent or semi-transparent colors appear to flow into the
crevices and accentuate the details. On a smooth surface these
glazes should be applied carefully or the unevenness will show
up as colored patches. Applying the three coats at right angles
to the previous one will help alleviate this condition.
The codes for the opacity of glazes are:
Clear: the glaze adds only a wet, glossy look and brings
out the true colors underlying on the piece.
Transparent: the color underneath is slightly tinted with
the overlying glaze changing the appearance only a little
bit.
Semi-transparent: the underglazes underneath these are
identifiable, but are changed by the tone of the glaze over
them.
Sponging is as Easy as . . .
Pre-Cut Sponges
Create complicated-looking
patterns easily! Dampen
sponge, squeeze out excess
water and blot on paper towel.
Brush color onto sponge.
Press onto piece.
Sponge-on-a-Stick
Make perfect circles with
these sponges. Dampen
sponge with water, press out
excess. Dip sponge lightly in
color. Place on piece and
lightly twist.
20
Oops, Now What Do I Do?
Problems, Causes and Solutions
From time to time there are problems that arise during the completion of a piece. This chapter is designed to help
you quickly diagnose the problem, learn the cause and if possible, correct the mishap. The problems are listed in groups
of categories. The problem may be listed more than once in slightly different ways to help you get to the solution.
Glazes
Problem
Cause
Solution
Glaze crawls on inside vase.
Usually caused by deposits of clay
dust in bottom of piece.
Check the inside before glazing and
remove any dust from inside the vase.
Sometimes can be corrected by
thinning glaze and reapplying to bare
spot and re-firing to original shelf
cone.
Vase, cup or tall vertical piece
cracked in kiln.
a. Thermal shock or expansion of two
or more glazes.
a. Try to use the same type of glaze
inside and out when glazing. It's
better to use gloss glaze inside
pieces, even if matte is used
outside. Do not use matte glaze
inside and a gloss outside.
Exceptions are Series 2000.
b. Use glazes from the same
manufacturer to assure compatibility.
c. After rolling glaze on inside of
piece, invert piece to drain excess
glaze.
b. Incompatible glazes from
different manufacturers.
c. Too heavy of glaze in bottom of the
piece.
Crackle glaze piece splits after or
during firing.
Same as above in #3
When applying crackle glaze to the
outside of a piece, bring (apply) the
glaze over into the inside about 1 inch
to help alleviate this problem.
Clear glaze shows green, brown and/or
black specks after the glaze fire.
a. Dirty or corroded ferrule of the brush.
a. Black and brown specks are from
iron rust; green is from the nickel
coating on the ferrule. Do not allow
brushes to stand in water.
b. Do not use the same brushes for
metallic stains and glazing a piece.
Metallic particles left in brush can
contaminate the glaze.
b. Brushes used for stains and then
glazes.
Glaze crawls and leaves bare spots.
a. Caused by dirt, dust or oil.
b. Color is too old to use.
c. Color has been frozen.
d. Too heavy an application.
21
a. Make sure piece is clean before
painting by wiping down with a
damp sponge. Keep hands clean.
b. Color preservative has deteriorated
with age. Do not use old product.
c. Sometimes freezing of the product
will destroy the makeup of the
glaze. Do not use glaze after it has
been frozen.
Problems & Solutions
Problem
Pinholes in glaze.
Cause
Solution
a. Primarily caused by underfired
bisque. Can also be underfired glaze
or a combination of the two firings.
a. Fire bisque to shelf cone 04 or
hotter and at a slower ramping
temperature. Fire glaze to shelf
cone 06. Ware needs a two cone
difference in bisque and glaze
firings.
b. Try "Polishing" the dry glaze with
the heel of your hand before
firing. Sometimes pieces can be
saved by reglazing and refiring.
b. Improper glaze application.
Colored glaze is streaky.
a. Not enough coats applied; coats
brushed on instead of "flowed" on.
b. Color not stirred.
c. Coats not applied at right angles to
each other.
Craters, Fisheyes, Bubbles, or large
pinholes appear in fired glaze.
Caused by gases escaping of during
firing.
a. Underfired bisque.
b. Firing glaze while it is wet.
c. Piece not fired hot enough or piece
was fired or cooled too fast.
a. Apply the proper coats per label
instructions using an Oval Mop
brush. Flow the glaze on evenly.
b. Shake and stir the glaze before use.
c. Apply the coats at right angles to
one another, allowing adequate
drying time between coats.
Sometimes the piece can be saved
by warming the piece; reglazing
with a heavy coat and re-firing.
a. Make sure bisque is fired to shelf
cone 04 or hotter. A two cone
difference between bisque and glaze
is required.
b. Allow glazes to dry 24 hours prior to
firing.
c. Fire glazes to shelf cone 06 or
recommended cone. Glazes need an
even steady ramping of temperature
and cooling as well. Check firing
section. File down craters and
reglaze, refire.
Clear glaze has green or yellow tint
in bottom of bowl, plate, pitcher etc.
Clear glaze was applied too thick.
Generally brushing clear glaze needs
only 2 coats. If glaze is rolled inside,
thin the glaze slightly and then invert
the piece upside down to drain excess.
No correction once fired.
Glaze blisters or bare spots appear on
embossed pieces.
a. Air pockets in glaze where it meets
the bisque when applying the glaze.
b. Grease spots from body oils.
a. Use a flat glaze brush when applying
the glaze to embossed ware.
b. Clean hands before glazing and wipe
down piece with a damp sponge
before glazing. Touch up bare spots
with glaze and refire. File down
blister; reglaze and refire.
22
Problems & Solutions
Problem
Reds fade in the firing, turning white
to dark gray.
Cause
a. Glaze was applied too thinly.
b. Insufficient ventilation in kiln
during firing.
c. Fired too hot or slow.
Solution
a. Reds need 4 coats of glaze. If this
has happened to you before, start
applying the extra coat before firing.
Allow to dry completely between
coats.
b. Allow extra room around the piece
in the kiln. Vent the kiln until the
kiln has been turned or gone to high.
c. Fire quicker than normal to shelf
cone 06. Sometimes can be reglazed
and re-fired to correct.
White or black spots in red glaze.
Contamination from salts or something
in the brush.
Make sure your hands, the brush and
the piece are clean before glazing. Do
not use the same brush for stains and
glazes. Reserve brushes specifically for
red glazes. This is difficult to correct
after firing.
Clear Matte is milky.
Glaze was applied too heavily.
Thin the glaze to a milk consistency
and apply 2-3 coats. Sometimes firing
hotter will reduce the milkiness, but the
matte glaze will be shinier.
Dipping glaze has purple or green
line down piece.
Dipping glaze too heavy in one spot,
where glaze has been overlapped while
dipping.
Dip each side to a 1/4" of each other
and brush the clear glaze together with
a fan brush.
Glaze rolls back.
a. The glaze was applied too heavily,
without sufficient drying time
between the applications of color.
b. Piece was fired when it was too wet.
a. Allow glaze to dry between coats,
applying thinner coats.
c. Glaze not adhered to previous
coat(s).
d. Oil or grease on piece.
Purple Stroke & Coat colors are
discolored or gray looking.
a. Water vapor escaping during the
firing process is trapped in glaze.
b. Use of non-toxic clear glaze on
top of colors.
23
b. After glazing allow 24 hours before
firing.
c. When applying dots make sure color
has made sufficient contact to piece.
d. Make sure the surface of ware is
clean; wipe down with a damp
sponge before decorating and make
sure hands are clean. Sometimes
corrected by sanding down
rollback, reapplying color,
reglazing and refiring.
a. Allow the piece to dry completely
before firing. Use a slow ramp speed
for the temperature.
b. Some non-toxic clear glazes react with
purple, producing a white hazy look.
Sometimes refiring will help clear up
the color. To achieve the best color
development, clear glaze with either a
leaded clear glaze or Mayco’s nontoxic, lead-free dipping glaze, SC-209.
Problems & Solutions
Problem
Cause
Solution
Dipping glaze is too thick.
Dipping glaze loses water with use
through evaporation.
Add small quantities of distilled water
to glaze after dipping multiple pieces.
Cover glaze when not in use.
Smeared colors after firing.
a. Colors not dry prior to dipping or
brushing.
b. Color dragged or disturbed while
brushing clear glaze.
a. Allow colors to dry completely before
dipping or brushing.
b. Remove excess water from brush
before dipping in glaze. Water creates
a barrier between bristles and glaze.
Water softens the underlying colors,
enabling it to smear as it is brushed.
c. Some manufacturer’s glazes are
heavier and as a result, pull the colors
down into the glaze during the firing.
c. Incompatibility of other
manufacturer's product.
Pencil marks or lines left in fired color.
a. Pencil too sharp and carves into
surface of ware or color.
b. Wax type of pencil used.
c. Pencil or marking instrument was
used on wet greenware or color.
d. Top color did not cover or fill in
design.
a. Never use a freshly sharpened
pencil. Dull the tip on a piece of
paper by scribbling several times.
b. Some pencils have a waxy base
which cause the colors resist (i.e.
red marking pencil.)
c. Apply design on top of dry color or
greenware. Use a # 2 soft lead pencil
for best results.
d. Make sure when you fill in a design,
you go over the design line slightly.
Grit in glaze.
Fired or unfired clay dust in glaze.
a. Before the bisque firing, remove
excess dust with a dusting brush
and a slightly damp sponge. Wipe
down ware before decorating with a
damp sponge.
b. Strain dipping glaze using 80 mesh
or finer sieve. Keep glaze tank
covered when not in use.
Fine black specks in flat ware.
a. Dirty thermocouples.
a. Clean and vacuum kiln, wipe down
thermocouples periodically.
b. Allow more space between kiln
shelves. Vary the size and shapes of
pieces on the shelves.
c. Use non-metal shelving for drying
ware. As the shelves are pulled in
and out, the metal surfaces grind and
deposit filings on flat surfaces .
b. Soot being trapped glaze.
c. Aluminum filings from drying
racks.
Dipping glaze too thin.
Dipping glaze over thinned. Dipping
glaze not stirred well.
24
Only add small quantities of distilled
water to thin glaze. Do not add
chemicals to thicken; let water
evaporate to thicken the glaze. Mix for
10 minutes using a mechanical drill
with glaze mixing blade.
Problems & Solutions
Firing
Problem
Blisters, craters and pinholes in glaze.
Cause
a. Bubbles formed and glaze cooled
too quickly.
b. The glaze was fired on immature
bisque.
Reds develop darker spots in the color.
a. Too heavy of application of color.
b. Insufficient amount of oxygen for the
glazes to develop during firing.
Solution
a. Allow kiln to cool slowly, soaking
the kiln. (Turning the kiln back on
low for 1 hour after the kiln has shut
itself off.) This allows the glazes to
heal after the kiln has shut off. Do
not leave kiln unattended.
b. Bisque should be fired two cones
hotter than the glaze.
a. Four coats of color is required for
proper application.
b. Keep kiln propped until the kiln goes
onto high. Allow extra room around
all pieces, including the stilting of
the piece and the shelves above. Do
not place all like sized articles on
one shelf during the firing.
Plates have dark gray areas in the
middle.
Unburned carbon not removed from
the ware.
Do not stack pieces inside one another
during the firing. Allow for proper ventilation and air circulation during the firing
process. If piece has not been glazed,
can be corrected by refiring the piece to
one cone hotter. Then glaze as normal.
Greens migrate to light colored glazes.
Called oxidation (fuming, shadowing
or flashing) where the oxides in the
glaze migrate during firing.
Allow the pieces extra room when
loading the kiln. Fire greens on top
shelf when possible. Some colors are
more susceptible than others, make a
test to ensure this does not happen. Do
not mix color companies' products
without a test first.
Reds have turned gray.
a. Insufficient amount of glaze on piece.
b. Poor ventilation and air circulation
during firing can greatly affect the
color.
c. Overfiring of piece.
a. Apply 4 heavy coats of color.
b. Allow proper ventilation and
placement of pieces in the kiln during
firing.
c. Fire reds to shelf cone 06. Do not
soak or slow fire the colors if possible.
Gloss glaze is matte.
This is underfired glaze.
Fire to the shelf cone mandated on glaze
label. Do not fast cool the glaze firing.
Glaze crackles or crazes after firing.
a. Immature bisque.
a. Make sure the bisque is fired to the
appropriate shelf cone for that clay to
mature the ware.
b. Make sure glaze can be fired on that
type of clay.
b. Glaze and body fit problem. This is
called "coefficient of expansion" of
the glaze to the clay.
Pieces melted during the firing.
Check kiln system to make sure everything is in working order. Kiln should be
cleaned before each firing. Go periodic
checks and maintenance of the tube
assembly and shut off hammer. Never
leave kiln unattended while to avoid this
problem.
Kiln overfired.
25
What's in a Word . . .
Glossary
Binder - Gum Arabic used to make glazes adhere to the ware.
Absorption - The ability of a porous object such as plaster or
bisque, to absorb water; the amount of moisture that will soak
into an item.
Bisque - Ceramics that have been fired to the maturing point of
the clay.
Accenting - Emphasizing a portion of a design with highlights. A
brighter color; outlining or partial outlining.
Bisque, Soft - Ceramics that have been fired to Cone 018 to give
added strength or to set a color. Clay is still workable but can not
go back into solution.
Added Spare - Cylinder of metal or plastic used to increase the
volume of slip a mold can contain.
Blistering - Bubbles on a ceramic glaze surface.
Aesthetic Center - A point in a picture that is just off of dead
center.
Blunger - A container with an agitator for mixing slip.
Body - Refers to the basic material used to make up a piece. The
clay. The body can be a mixture of material such as talc, clays,
flint, feldspars and others. Bodies ore often described by their
composition, as a porcelain body, a white ware (talc) casting body,
a jiggering body, a shale body.
Aging - Letting newly mixed slip or clay set for a prescribed time
(days or weeks) without disturbing it. Allows the slip and clay
time to blend and align the clay particles properly.
Air Brush - A spray gun used for applying glaze or color with the
use of compressed air. Available in several varieties for work
ranging from overall coverage to fine detail. Use care and proper
safety equipment when air brushing.
Bone China - Clay to which bone ash has been added for translucency. Fine china tableware.
Airlock - An air bubble which can interfere with the delivery of
color through an airbrush or prevent slip from draining from a mold.
Bone dry - Greenware that is completely dry,
containing no moisture.
Alcohol, Wood - A solvent for cleaning blanks prior to overglaze
decoration, or to clean your brushes with dried acrylic in them.
Boxing - Firing two cups or bowls on top of each other, rim to
rim, to prevent warping.
Alumina - One of the essential ingredients in all clay and glazes.
Makes clays plastic and gives glazes their stiffness, preventing the
glaze from running.
Brush Cleaner - Type of soap used to clean brushes; removes
color and conditions the brush.
Burnish - To polish; term refers to a type of fired gold luster that
has to be burnished to achieve its true color.
Analogous - Similar or comparable in certain respects; in color,
neighboring colors on the color wheel.
Burnishing Brush - A type of brush containing glass fibers
bound together in a cylinder; used to burnish Roman Gold luster.
Annealing - To hold at a specific temperature to prevent cracking.
Glass must be annealed.
Burnishing Sand - A very fine textured English sand used to
polish Roman Gold Luster.
Antiquing - Wiping down applied color, leaving a darker tone in
the crevices to accent details; to give an antique look to an object.
Camel Hair - Term used for a very soft brush, usually made of
squirrel or pony hair. Name comes from the man who made the brush.
Applique - To apply some material decoration to ware: lace,
yarn, clay, etc.
Casting - The art of pouring slip in a plaster mold; also the object
thus formed.
Backing - Paper on which decals are mounted.
Casting Slip - A liquid clay used for casting a mold.
Balance - The equal ratio of objects and/or color on two halves of
a picture.
Center of Gravity - The point that would be reached at the base of
an object if a weighted line could be dropped from the top center.
Ball Mill - A porcelain jar filled with flint pebbles and rotated
with either a wet or dry charge of chemicals. It is used to grind
and blend clays and glaze ingredients.
Ceramics - In broad terms, any type of clay that is fired into a
permanent shape in a kiln. Any fired body.
Bands - Rubber bands or adjustable straps used to keep the
sections of a mold from opening during the pouring process.
China - A translucent body, usually imported.
Banding Wheel - A turntable, operated by hand or electricity, to
facilitate decoration or hand building.
China Blanks - Usually refers to commercially made white
undecorated china used for china painting.
Bar - Type of pyrometric cone used to measure the heat work in a
kiln and then allows the kiln sitter to operate.
China Painting - Decoration of china using a type of overglaze
colors and enamels.
26
Glossary
Dehydration - Loss of water through drying, evaporating or firing.
Clay - Earth that is relatively pure alumina and silica; one of the
material used in the manufacture of china and pottery.
Density - Proportion of plaster to water; weight of any fluid as
compared to the weight of water.
Clay Carbon - Specially treated paper that will transfer a mark or
pattern to a piece of ware.
Clean-up Tool - Tool used to clean (fettle) the seams on
greenware.
Divitrification - To take away or destroy the glassy qualities of; to
make opaque, hard and crystalline by prolonged heating. Glass
surface that has a wavy rippled quality to it.
Cold Spot - Area in the kiln that is cooler than the rest of the kiln.
Dominant - The most important part.
Color Wheel - An arrangement of the primary, secondary and
tertiary hues and tones.
Double Pour - Casting the outside of a piece in color and the
inside in another color of slip.
Combustion - The process of burning.
Drain - To empty, as in draining a mold.
Complimentary - Those colors that are directly opposite each
other on the color wheel.
Drape Mold - A plaster over which a rolled out slab of clay is
draped to make free form dishes, bowls, etc.
Composition - Arrangement of the parts of a design.
Draping - To apply lace or other material to a
figurine.
Cone - see pyrometric cone.
Cone Plaque - A cube of refractory material used to hold a
pyrometric cone at 8˚ angle for proper deformation.
Drybrushing - Producing a feathery effect by using a dry brush
with wet color; used also for animal fur. Can be done with One
Strokes or Acrylics in similar techniques.
Core Mold - This mold has two or more cavities, but all are
poured through the same pour hole.
Dryfooting - Removing glaze from the portion of a piece that
comes in contact with the kiln shelf during a glaze firing.
Crackle Glaze - A glaze that has been specially formulated to
produce a pattern of hairline cracks.
Dunting - Breaking of ware in the kiln from trapped air in the
piece or from thermal shock from uneven heating or cooling.
Craters - Bubbles that break and set as the kiln cools. Some times
referred to as Fish Eyes.
Earthenware - Non-vitreous (porous) body made from low firing
clays.
Crawling - Glaze pulls together or beads up, leaving bare spots on
the bisque.
Earth tones - Buff, red, brown.
Egyptian Paste - Soluble sodium salts mixed with clay. During
drying a salt deposit is left on the surface of the clay, which makes
the clay self-glazing during firing.
Crazing - Refers to a glaze defect of hairline cracks that appear in
a fired glaze. Can also be used to describe the hairline cracks
forming in a crackle glaze.
Electrolyte - A substance which can have both a negative and
positive reaction; Substance which causes the deflocculation of slip.
Critical Temperatures - Room temperature to 212˚F; 660˚F to
930˚F chemically combined water is driven out of the ware; 1000˚F
quartz inversion takes place; 1060˚F lowest visible red heat; 1650˚F
orange to yellow heat in a kiln.
Elements - Wires that carry the electric current that heats the kiln.
Elephant Ear Sponge - Thin, fine grained natural sponge shaped
like an elephant ear.
Cross Hatch - Criss-cross scratched marks where two piece of
clay are to be joined. Also refers to the application of glaze at 45˚
angles to the previous coat.
Embossing - Creating a raised design.
Emery Stone - An abrasive stone used to remove stilt marks from
the bottom of ware.
Crystals - Specially formulated colored glazes that have been fired
and ground up into various sized bits that melt into a glaze,
forming bursts of colors.
Emphasis - Making one portion of a design more important than
the rest of the design.
Decal - A picture or design, usually overglaze color, sandwiched
between a backing paper and a protective coating; the decal is
slipped from the backing to the ware after a water treatment.
Englobe - A prepared slip which is half way between a glaze and a
clay; contains clay, feldspar, flint, flux and colorants.
Decorate - To apply a design.
Essence - Solvent used for thinning gold and lusters.
Deflocculate - To thin or increase the flowing quality of slip
without adding water.
Etch - To produce a design with the use of acid or mechanical means.
Deformation - Bending of a cone or object.
Exfoliation - To come off in layers, flakes or scales.
27
Glossary
Glassification - Melting into a glass; i.e. Glaze.
Extrude - To draw out; force or press out; force through a narrow
opening, as clay.
Glaze - A glass coating on a ceramic piece.
Face - The outside surface of a mold.
Glaze Butting - The specific placement of two glazes together so
they do not run together. a.k.a. Controlled Glazing.
Fat Oil - A china painting medium produced by the evaporation of
gum turpentine.
Glaze, Dipping - Type of glaze especially designed for a dipping
process.
Ferrule - The metal band that holds the bristles of the brush and
the handle together.
Glaze trailing - The placement of a glaze or color through a
squeeze bottle.
Fettle - To trim the spares from cast pieces or the seam lines from
greenware.
Gloss Glaze - A shiny glaze with a high reflective surface, unlike a
matte or satin glaze.
Fettling Tool - A soft knife or hard blade knife to trim and remove
the mold spare or seam line.
Gold, Dry - Chemically pure gold.
Filler - Any material that will promote drying and lessen shrinkage
of clay, i.e. grog.
Gold, Glass - Gold formulated to flux at cone O22 maturing the
color.
Finger Tool - Needle fine sawtooth tool for cleaning the fingers of
figurines. A fine steel tool for the same purpose.
Gold, Liquid Accent - A form of gold held in colloidal
suspension; fires bright but has less carat content of the gold.
Fire Brick - A refractory brick which withstands high temperatures; used in building kilns.
Gold, Liquid Bright - A form of gold held in colloidal
suspension; fires bright, high carat content of gold. A brighter and
more reflective surface than Accent Gold
Firing - Maturing ceramic products at recommended heats.
Gold, Paste - Has a higher gold content than liquid Roman; fires
dull, must be burnished.
Firing Chamber - The interior of the kiln.
Fit - The adjustment of glaze to the clay; the shrinkage rates are
the same for the glaze and clay to be compatible. Improper fit
results in shivering of the glaze(s).
Gold Roman - Fires dull, must be burnished.
Graining - Creating a wood grain with glaze or acrylic stains;
opaque or translucent.
Fitch Hair - Hair used in making stippling brushes. Hair is stiffer
than Camel hair.
Graphite Paper - Similar to carbon paper; used to transfer designs
to china.
Fixative - A coating used to seal or fix colors.
Greenware - Clay item before it is subjected to bisque firing.
Flashing - A reaction of one glaze onto the surface of another;
cause by chrome in the glaze fuming during the firing.
Grid - A series of uniform squares.
Flint - A form of quartz; a refractory material.
Grind - To eliminate grit from powdered color by mixing with flat
side of a palette knife.
Flocs - Thin, flat oval crystals that cling together and form a
compact mass, as in clay.
Grit Cloth - An abrasive cloth for cleaning greenware.
Flow - To move in firing.
Grit Pad - A foam backed abrasive pad used in sanding or
cleaning.
Flux - A substance which will lower the melting point of ceramic
products.
Grog - Finely ground up bisque added to clays to reduce the
shrinkage or for thermal shock.
Foot - Base of ware.
Gum Arabic - A water soluble gum obtained from several acacias;
used in adhesives as a binder.
Free form - Having no specific geometric form.
Frit - Glass which has been melted, cooled and ground to a fine
powder; used in glaze and enamels.
Fuse - Join by melting together.
Gum Tragacanth - A tasteless odorless white or reddish gum
obtained from several shrubs; used in glazes to keep material in
suspension.
Fusion Point - Degree of heat at which particles will melt together.
Hard Paste - Refers to a type of very hard fine porcelain.
Gang Mold - Several castings can be produced at the same time in
one mold; each casting has its own pour hole.
Hard Spot - A spot on the greenware that resists decoration. Can
follow through to the bisque.
28
Glossary
Lawn - To sift dry color through closely woven material.
Hard Bisque - Term given to bisque that is fired to its hottest
temperature before it goes liquid.
Leach - To cause (a liquid) to filter down through some material; to
extract a soluble substance from some material (as lead leached
from glaze by an acidic liquid - i.e. orange or tomato juice).
Harmonious - A color scheme chosen by some numerical sequence.
Haze - A cloudy deposit on gold or luster cause by insufficient
ventilation during firing.
Lead Safe - A glaze that has been tested and meets government
standards as safe for food and drink containers.
Horizon Line - Point at which sky and land or water seem to
meet, at sea level.
Leatherhard - Cast or handbuilt pieces that are firm enough to
hold their shape without warping, but can still be cut into easily;
stick-ons can still be attached.
Horizontal - Parallel to the horizon.
Liner - A long bristle pointed brush used for lines and scrolls.
Hot Spot - Any area in the kiln that fires to a hotter cone than the
rest of the kiln.
Lint-free - Any cloth that does not produce lint; silk, old sheeting,
etc.
Hump - A plaster shape on which a clay slab can be draped to
make a free form bowl or dish.
Lock Washer - Washer used to keep nuts from loosening.
Hydrometer - A device to measure the density of a liquid.
Loading - Filling the brush with color; stacking the kiln.
Immature Bisque - Bisque which has not been fired to the proper
temperature to mature the clay and drive all carbons and impurities
from the ware.
Luster - An overglaze that gives a lustrous iridescent finish to
glazed ware.
Impervious - Cannot be penetrated.
Luting - Joining leatherhard clay sections together with slip.
Incise - To cut into the clay or greenware surface making a design.
Majolica - Glaze on glaze decoration.
Incompatibility - Ceramic materials that cannot be used together
because of undesirable chemical reactions.
Marbleizing - Creating the effect of marble with any color
medium.
Insulating Brick - A soft refractory brick which can be easily
carved and is used to line hobby kilns. Both firebrick and
insulating brick are available in different degrees of refractoriness
and should be chosen according to the temperature they must
withstand.
Masking - Blocking out sections of a design that are to to be
painted.
Matte - A dull, non-reflective surface; the opposite of glossy.
Maturity - In ceramics, bisque that has been fired to the point
where it will no longer expand when absorbing moisture; point
where underglaze, glaze and overglaze reveal their true color and
state (gloss, matte, etc.)
Intaglio - An incised design in which the carving is done in
several depths.
Jiggering - Forming a pot between a revolving mold which shapes
the outside and a template which shapes the inside.
Maturing Point - Temperature where the clay or color becomes
fully developed.
Kaolin - A clay used for whiteness in some clay bodies; main
ingredient in porcelain.
Medium - Fluid used with colors to facilitate painting.
Mender - A product to repair broken greenware, or attach stick-ons.
Key - Notches cut on the seams of a mold so that the sections will
always fit in the same manner.
Migrate - Tendency of certain glazes to travel to neighboring
pieces during firing; caused by the chrome in the coloring; referred
to as Flashing, Fuming or Shadowing.
Kidney - See rubber kidney.
Kiln - A heating chamber for maturing clay glazes and other
ceramic materials.
Mildew - A fungus that produces dark spots on damp molds when
they are stored without sufficient air circulation; can cause molds
to deteriorate rapidly. Also dark spots developing under glaze on
china that was not glaze and or fired properly.
Kiln Furniture - See furniture.
Kiln Wash - A refractory coating for kiln shelves to protect them
from dripping glaze.
Mishima - Inlaid slip decoration
Knead - To condition clay.
Modeling Clay - Clay used for hand building or throwing.
Lace Tool - A tool with a needle tip to facilitate the arrangement of
lace on a figurine.
Mold - A plaster form used to produce identical objects by pouring
liquid slip into the hollow cavity, then draining.
29
Glossary
Plasticity - The pliability of modeling clay.
Mold Cavity - The hollow section of a mold that is a negative of
the finished casting. That part which is filled with slip to form the
casting.
Plug - A cone shaped section of refractory material used to close
the peepholes in the kiln during firing.
Mold Rubber - Liquid rubber used to make stamps of simple
designs or master molds.
Polish - To buff to a shine.
Monochromatic - A color scheme composed of various tints,
shades and tones of a single color.
Pooling, Puddling - Glaze which runs to the bottom of a bowl or
dishes or fills in the crevices.
Nichrome- A heat resistant wire.
Porcelain - A high-fire translucent, vitreous body.
Nipples - Clay bumps left on the bottom of food and drink
containers by improper draining of the mold in pouring. Threaded
sections of pipe used to connect lamps.
Porosity - The ability of an object to absorb moisture.
Posts - Square, triangular or cylindrical sections of refractory
material used to support shelves in the kiln; may be stacked.
Non-Toxic - That which is not toxic. Can be used with little worry
as to any contaminants and hazardous material in them.
Potters Wheel - Used for throwing clay pots; may be manually or
electrically driven.
Opacifier - A material used to make a translucent color more
opaque. White is an opacifing color.
Pottery - Any low-fire object formed from clay.
Opaque - Not transparent; completely covers any other color
underneath; does not allow light to filter through.
Pounce - To pat; also the powdered graphite used to transfer
pieced patterns.
Open - Refers to a color that remains the form of an insoluble
powder, workable for a long period of time.
Pour Gate - Area of mold that slip is poured into; area that holds
the excess slip to allow for absorption and ensure a proper casting.
Overglaze - Any decorating material that is applied on top of a
fired glaze and has the firing range of cone 022 to 014.
Pouring - See Casting.
Press Mold - Shallow molds used by pressing soft clay in the
cavities; may also be used by pouring slip in the cavities.
Oxidation - Combining with or reacting to oxygen; iron rust or
combining with oxygen; some green glazes may oxidize and turn
black during an 018 firing.
Primary Colors - The three basic colors are Red, Yellow and
Blue.
Palette - Glazed tile or glass on which colors are placed for
mixing and painting from.
Prism - Three sided glass or crystal object that breaks up light into
rainbow colors.
Palette Knife - Flexible knife used for grinding color.
Pug Mill - A machine for mixing and extruding plastic clay.
Parallel - Two lines that are the same distance form each other
throughout their length.
Pyrometer - An instrument for measuring degrees of heat beyond
those shown on the average thermometer.
Peephole - Openings in the side of the kiln through which you can
view a pyrometric cone.
Pyrometric Cone - Pyramids; compounded of ceramic materials
controlled to melt as specific time, temperature relationships used
to control heat treatment of ceramic products.
Perpendicular - A line that is at a right angle to another line.
Quill - A type of brush used for china painting.
Perspective - The science of paintings and drawing so that objects
represented have apparent depth, distance and third-dimension.
Raw Glaze - A glaze that contains no fritted material.
Pierced Carving - A type of design formed by cutouts in the
ware. Usually done on leatherhard greenware.
Raised Paste - An overglaze material used for a base for a raised
gold design.
Pigments - A coloring agent; usually in the form of an insoluble
powder, ground with water, oil or acrylic.
Red Heat - Point at which the interior walls of the kiln and the
ware glow red; 1060˚ F.
Pinholes - A glaze defect cause by underfiring, glazing on
greenware and or condition of greenware.
Reduction Firing - Firing with a reduced oxygen supply.
Opposite of Oxygen firing, which is what low-fire glazes need to
develop.
Plaster - A white powder made of gypsum; quick setting when
added to water which molds are made.
Refractory - Materials that are hard to melt or work.
Plaster Clay - A non-hardening modeling clay.
30
Glossary
Release Time - Length of time needed before a casting can be
removed from a mold.
Shade - Any hue that has been deepened by the addition of black.
See tints and tones.
Relief - A raised design.
Shelf Cone - Pyrometric cone used to tell the temperature at
which the temperature on the shelf has been completed using heat
work. The actual cone temperature.
Renuzit - A dry cleaning material used to clean rubber stamps.
Shelf Support - See Post.
Rib - A rubber, metal or wooden tool used to facilitate wheel
throwing of ceramic forms.
Shivering - Where glaze peels off from the ware because the ware
shrinks more than the glaze; a body fit problem.
Rod, Actuating - That portion of the kiln sitter which drops as the
cone deforms, causing the kiln to shut off.
Short - Stiff clay body caused by low moisture content; lacking
plasticity.
Rolling Glaze - Covering the inside of ware by pouring in thinned
glaze, rolling it around the inside surface and then pouring it out.
Shrinkage - Decrease in the size of the clay object as a result of
drying and firing. About 5 percent in low-fire.
Rouging - Applying color lightly with cloth or finger, or with a pounce.
Silica - One of the basic ingredients in glaze.
Rubber Kidney - A kidney shaped piece of hard rubber used in
shaping wheel-thrown pieces.
Silicate of Soda - Water glass. See Sodium Silicate.
Running - The fluidity of a glaze at its maturing point and before it
cools and hardens.
Silk Sponge - A fine textured sponge used for decorating.
Sitter - A device that is activated by the deformation of a
pyrometric cone, causing the kiln to shut off.
Rhythm - The flow and movement of lines and color in a design.
Sagger - A refractory support for firing porcelain plates and other
shapes that might warp from their own weight; also a support for
firing glass.
Slab - A rolled out section of clay.
Slake - To reclaim dried up clay; it is pounded into small pieces
and covered with water; only completely dry clay can be slaked.
All modeling clay may be reclaimed. However, reclaiming clay to
return to the slip batch is a dangerous practice and should be
avoided.
Sable - Animal hair used to make the finest, most resilient brushes.
Red sable is considered the finest of the hair types.
Satin - A glaze that produces a soft sheen between a gloss and a
matte surface.
Sling - Burlap used to cradle clay to make a slab bowl.
Saturation Point - Point at which an object can absorb no more
moisture.
Slip - A fluid suspension of clay and other chemical materials in
water.
Scoring - The marking into the surface of the piece.
Slip Trailing - Decorating leatherhard greenware with slip applied
from a bulb or bottle with a narrow nozzle.
Scum - A haze that forms on fired gold and luster from insufficient
ventilation in the kiln.
Slurry - A clay body of creamy consistency; used for joining moist
clay together.
Sealer - A coating which closes the pores of bisque or other porous
materials.
Soak - To hold a kiln at one temperature for a period of time.
Seam - The ridge left on greenware at points where the mold
sections join. The surface areas of a mold that meet when the mold
is banded together.
Soda Ash - A deflocculent.
Sodium Silicate - Water Glass; a deflocculent.
Secondary - Those colors on the color wheel that are made by
mixing two primary colors together; green, violet and orange.
Soft Fire - Greenware fired to cone 018; accepts underglaze color
in the same manner as greenware but is more durable.
Set-Up-Time - Length of time that casting slip must remain in the
mold to form the wall of the casting.
Soluble - Able to be dissolved in water.
Solvent - Any fluid that will dissolve or remove color.
Setter - A refractory holder on which porcelain dishes are fired to
prevent warping; see saggers.
Spare - The scrap of clay that is cut off of every casting an area of
the mold that increases the volume of the mold; see pour gate.
Settle Out - Particles of color settle to the bottom of the jar when
the water balance is disturbed.
Sponge - See specific types of sponges; seawool, silk or elephant.
Sgraffito - Cutting through color or a layer of colored clay to produce
a design.
Spatter - Method of applying flecks of color.
31
Glossary
Utilitarian Ware - Any object that will hold or contain food or
liquid drink.
Spray - To apply color by means of some type of air supply.
Sprig - A clay trim, made in a press mold and attached to a
leatherhard casting with mending slip.
Vanishing Point - A point on the horizon line at which the lines of
an object appear to converge; see perspective.
Spur - A metal tripod used to stilt glazes ware during the firing.
Venting - Propping the lid of the kiln open to slight degree or
leaving out peephole plugs until moisture and carbonaceous
impurities have been burned out of the greenware. ( Usually until
temperature reaches red heat). Also the piercing of any portion of a
casting in which air could be trapped. ( Trapped air expands with
heat and can cause the piece to explode or swell).
Stack - To load the kiln.
Stain - Acrylic type of non-fired paint used to decorate bisque; a
clay or glaze pigment.
Stamp - A raised rubber pattern used to transfer or apply a design;
a fired clay cylinder used to texture clay slaps or pots.
Vitrified - A body which fuses sufficiently during firing so that it
is water tight without glazing.
Stamping Oil - Medium used with rubber stamps to hold dry color
to design.
Vitreous - Water tight.
Stencil - A cut-out pattern used to apply a design by brushing,
sponging, stippling or spraying.
Viscosity - The thickness of a liquid; internal friction of a fluid,
cause by molecular attraction; resistance to flow.
Stick-On - Handles, knobs, sprigs or any attachment to a casting.
Warping - Deformation of a clay shape cause by uneven stresses
during shaping, drying or firing.
Stilt - A refractory tripod or bar with nichrome wire prongs used to
raise ware off the kiln shelf during a glaze or overglaze firing.
Wash - A color diluted with water or suitable solvent.
Stipple - To apply color with a series of tiny dots.
Water Glass - Silicate of soda; mender and deflocculent.
Stippler - A brush used to produce a series of tiny dots; also used
to blend colors.
Water Smoking - The firing period during which all water is
driven from the ware. Room temperature to 212˚F.
Stoneware - A clay to which a high percentage of grog has been
added; Needs to be high-fired to vitrify.
Webbing - Material used for making straps.
Strength - The percentage of pure color in a shade, tint or wash.
Wedge - To condition and work clay into a bubble free mass for
throwing or handbuilding.
Stylus - A pointed instrument for writing or drawing. Used to
transfer a design.
Wheel - Turn table operated by foot or electricity for producing
round pots.
Subdominant - Less important part of a design.
Witness Cone - See shelf cone.
Talc - Used as a flux for clay; also used as a mold release.
Wool Sponge, Sea - A very open texture and very absorbent
natural sponge. Used for uneven textures and veiling techniques.
Tint - Hue made with the addition of white.
Thermal Shock - The abrupt change of temperature to the ware.
Template - A pattern or guide.
Tone - Color plus a neutral gray.
Toxic - Poisonous.
Translucent - Able to transmit light as frosted glass, parchment,
sheer fabric. Diffuses the color or light.
Transparent - Easily seen through as glass. No interruption of
light or color.
Underglaze - A mineral color, usually containing some clay and
binder; regular underglazes are opaque and contain a higher
percentage of clay than One Strokes; most One Strokes are
translucent.
32
Shelf cone 06 –10
Opaque after firing
Buff or Gray in Color
Normally white; can
come in some colors
Not Totally
Vitreous
Vitreous
Stoneware
Porcelain
Shelf cone 2-10.
Some industrial
porcelains may reach
cone 30. Translucent
after firing
Shelf cone 06-02
Opaque after firing
Usually white-to-offwhite
Not Vitreous
Firing Range
Earthenware
Pottery or
Ceramic Clay
Fired Color
Surface
Product
CLAY
33
Dinnerware
and Fine Detail
Items
Ornamental and
Dinnerware
pieces
Ornamental and
Dinnerware
pieces
Uses
• Does not need to be glazed, pieces that are to be
used for food or drink are glazed for sanitary reasons.
• When clear glazed, porcelain becomes china.
• Will shrink in the firing up to 20%.
• Needs to be fired slowly in no less than 10 hours.
• Most hobbyist can not fire stoneware to a totally
vitreous state so food and drink containers must be
glazed.
• Stoneware is much stronger and more chip resistant
than earthenware.
• Shrinks in the firing by at least 15-20%.
• Can use a leaded glaze on surface as high degree of
heat attained combines the lead in a form that is not
released or leached out by food or drink.
• Can be used in a slip form for casting molds, for handbuilt items and for wheel throwing.
• Can also add grog to strengthen clay for larger pieces.
• Needs to be fired slowly, in no less than 10 hours.
Pug Clay, Wet and
Dry Slip
Pug Clay, Wet and
Dry Slip
• Least expensive of all clays.
• Most common and easiest to use.
• Bisque must be glazed to make watertight;
earthenware is a low-fired porous body.
• Dinnerware has a greater tendency to chip and
craze than vitreous ware.
• Can be used with both fired and non-fired finishes.
• Can be used in a slip form for casting molds,
for hand-built items and for wheel throwing.
• Shrinks very little during firing.
• Fired in 5 to 7 hours
Notes
Pug Clay, Wet and
Dry Slip
Types of Clay
Quick Reference Guide
2232 – shelf cone 6
350 Ramping Speed
2232
350 Ramping Speed
022
018
015
04
6-10
6-10
51/2-7 hrs.
31/2-4 hrs.
4-6 hrs.
8-10 hrs.
8-10 hrs.
Glazes
Lusters
Greenware/
Earthenware
Stoneware
Porcelain
1940
350 Ramping Speed
1112
1323
1479
350 Ramping Speed
1830 with 350
Ramping speed
1940 with 350
Ramping Speed;
Mid-range cone 6 2194 to 2232
04 to 6
Higher than 6
testing for color
hold should be
done.
06 – 6
6-8 hrs. for
shelf cone 04
8-10 hrs. for
shelf cone 6 or
higher
One Strokes
Opaque
Underglazes
Astro Gems
Temp. &
Ramping Rate
Cone
Time
Product
FIRING
34
Close and Fire
Close and Fire
Close and Fire
Close and Fire
Top peephole open
for first hour of
firing.
Close and Fire
Top peephole open
for first hour of
firing.
Top peephole open
for first hour of
firing.
• Should not load ware when wet and moist.
• Should never touch another piece during firing.
• Remove all excess dust prior to firing.
• Do not stilt unless necessary.
• Should not load ware when wet and moist.
• Should never touch another piece during firing.
• Remove all excess dust prior to firing.
• DO NOT STILT.
• Must use separator on box lids and pieces that will touch.
Use porcelain sand or alumina hydra as separator.
• Better to slow the firing down than to fire fast.
Top peephole left
• Read product labels as to firing instructions and temperature.
• Too hot a firing can cause defects.
open and lid
propped throughout • Too low of a temperature can result in color wiping off after
firing.
firing.
• Stilt all pieces.
• Products need extra venting room when loading kiln.
• Pieces can not touch when loading kiln.
• Pieces should be finished on bottom unless doing stoneware
or porcelain.
• Should stilt pieces before firing unless firing to cone 6 or higher.
• If piece is underfired, glaze may appear milky or cloudy.
Can refire.
• If high fired glazes should be applied to greenware or pieces
fired to 04 then fire to bisque.
Top peephole left
open throughout
firing.
Close and Fire
Close and Fire
• Pieces should not touch when loading the kiln.
• Astro Gems: remove large crystals from bottom of ware and lids.
• Do not stilt greenware unless have too. Never stilt when high firing.
• If opaque underglazes and one strokes are not as dark as the
chip chart, they may be underfired.
Notes
Top peephole left
open throughout
firing.
Non-vented
Kiln
Close and Fire
Vented
Kiln
Quick Reference Guide
Pg. 19
Pg. 22
Pg. 24
Non-toxic
Non-moving
when fired.
Non-toxic
Non-moving
when fired.
One Stroke™
Translucent
Underglaze
Non-toxic
Astro Gem®
Textural Glaze Non-moving
when fired.
Shelf cone 04-6.
Check High Fire
Guide for color
changes at shelf
cone 6.
Shelf cone 04-6.
Check High Fire
Guide for color
changes at shelf
cone 6.
Shelf cone 04-6.
Check High Fire
Guide for color
changes at shelf
cone 6.
Health Status Mayco Book Firing Range
Opaque
Underglazes
Product
PRODUCTS FOR GREENWARE
35
Brush/Sponge
Brush/Sponge
Brush/Sponge
• Ready to use from jar.
• Apply in three even coats, if color streaky not enough color applied.
• Generally used as an all over coverage.
• Can be polished, does not have to be glazed.
• Intermixable
• Apply clear glaze after 04 firing to bring out true color of product.
Fire to shelf cone 06.
• UG-84, 85 & 86 will all fire to shelf cone 10.
• If surface not glazed, use Repellent Sealer AC-301 to make soil
resistant
• Must thin before use; highly concentrated color. Use AC-304 Media
or water to condition or thin.
• Intermixable
• Translucent
• Used for brushstroke designs, in one stroke of the brush; can be used
in all over coverage with multiple coats.
• Can add to Opaque Underglazes, Astro Gems, glazes and liquid slip
to tint color.
• OS 44, 45 and 46 will fire to shelf cone 10.
• Apply in three even coats.
• Intermixable
• Surface is stone-like with matte finish. Contain two sizes of tiny crystals.
• Can use on outside of food containers but not inside.
• Piece must be stilted; if you wipe off large crystals after application of
each coat piece does not need to be stilted. Do not stilt stoneware or
porcelain; dryfoot the piece if using Astro Gems on the bottom surface.
• Can use Mother of Pearl. If using fired gold, apply and fire clear
glaze on the area where gold is desired.
• Porous surface, use Repellent Sealer (AC-301) for water-resistant surface
Can be used on
greenware and/or
bisque. Can be
used for design
work on top of
non-moving glaze
for Majolica
technique
Apply to
greenware
or bisque.
Greenware
preferred due to
drying time and
fit.
Notes
Greenware only.
Can be used to
antique detailed
bisque.
Applied By: General
Application
Quick Reference Guide
Shelf cone 06-6.
Check High Fire
Guide for color
changes at shelf
cone 6.
Shelf cone 06-6.
Check High Fire
Guide for color
changes at shelf
cone 6.
Pg. 12
Pg. 13
Non-toxic
Non-moving
when fired.
Non-toxic
Non-moving
when fired.
Classic
Crackles
Crystalites
Soft Fan Brush
Brush/Sponge
Brush/Sponge
Shelf cone 06-6.
Check High Fire
Guide for color
changes at shelf
cone 6.
Pg. 14
Non-toxic
Non-moving
when fired.
Elements
Brush/Sponge
Applied By:
Shelf cone 06-6.
Check High Fire
Guide for color
changes at shelf
cone 6.
Pg. 16
Non-toxic
Non-moving
when fired.
Series 2000 Gloss,
Specstone &
Stoneware-like
Glazes
Firing Range
Mayco
Book
Health Status
Product
GLAZES: NON TOXIC
• Apply 3 even flowing coats.
• Can work under Classic Crackle using Stroke & Coats or One
Strokes. If applying more than 2 light coats this technique will
change the cracking pattern.
• Can work on top of the Classic Crackle with Stroke & Coats and
One Stroke, but test design first as color could fume.
• Cracks need to be stained after firing for cracks to show up. Can use
ink, translucent stains, shoe polish, etc.
• Apply 3-4 flowing coats.
• Intermixable
• The shape of the object, application, firing temperature, kiln load
and firing time all affect the flow pattern.
• Natural earth tones.
• Surfaces vary from gloss to matte.
• Apply 3 to 4 coats.
• Intermixable
• If doing majolica technique with mattes, best to apply an additional
coat. When handling you wipe off color.
• Very important that bisque be fired 2 cones hotter than glaze firing.
• Series 2000 Clear glazes and Speckled Clear glazes should be applied in
2 coats.
• If pitting occurs, can be refired one cone cooler than original firing for
smooth surface.
Notes
36
Apply to properly
• Apply 3 flowing coats. First coat- shake jar then apply coat of
fired 04 bisque. If
color. Second coat: shake jar and apply coat. Third coat: stir the jar
firing to cone 6 or
and shake before applying.
higher these glazes
• Crystalites do not flow, they just spread or bloom out.
become more fluid.
Do not add crystals
any closer than 1/2”
up from the outside
bottom edge of high
fire pieces.
Apply to properly
fired 04 bisque.
These glazes are
more fluid at cone
6; apply two coats
only.
Apply to properly
fired 04 bisque.
If firing to cone 6
or higher, apply to
the clay in the
greenware or low
fired bisque-04
stage.
Apply to properly
fired 04 bisque.
If firing to cone 6
or higher, apply
to the clay in the
greenware or low
fired bisque-04
stage.
General
Application
Quick Reference Guide
Pg. 11
Pg. 12
Pg. 25
Pg. 22
Non-toxic
Non-moving
when fired.
Non-toxic
Non-moving
when fired.
Non-toxic
Dinnerware Safe
Non-toxic
Dinnerware Safe
Dimensional
Stroke & Coat®
S-2000
Wonder Clear
Dipping
SC-209
Clearly-the-Best
Dipping
Shelf cone 06-6.
Shelf cone 06-6.
Shelf cone 06-6.
Does not high fire;
will flatten out
Shelf cone 06-6.
Check High Fire
Guide for color
changes at shelf
cone 6.
Shelf cone 06-6.
Check High Fire
Guide for color
changes at shelf
cone 6.
Pg. 11
Speckled
Stroke & Coat®
Firing Range
Mayco
Book
Non-toxic
Non-moving
when fired.
Health Status
Stroke & Coat®
Wonderglaze
for Bisque
Product
GLAZES: NON TOXIC
Dipping
Dipping
37
Squeeze Bottle/
Brush
Brush/Sponge
Brush/Sponge
Applied By:
• Speckles have a variety of speck colors.
• Also correspond with a Stroke & Coat® color.
• All other features same as Stroke & Coat®
• Corresponds with Stroke & Coat colors.
• Apply over other colors after they have dried.
• If brushing top coat instead of dipping, apply first coat of glaze with a
sponge.
• Lightens SC-13 Grapel and SC-33 Fruit of the Vine.
• Dries faster, uses less product.
• Does not lighten purples of Stroke & Coats.
Squeeze color
onto piece as
outline or lettering
Apply to properly
fired 04 bisque
Apply to properly
fired 04 bisque
• One, two or three coats governs the fired color.
• Intermixable
• Can use on top of non-moving glazes for Majolica.
• Can be used as an antique under non-moving glazes.
• Product is a glaze. Can clear glaze; if using 3 coats do not need to
clear glaze.
• Unfired color is basically true to the fired results.
• Can be used to tint Roll-A-Coat
• Colors can be layered to build depth in design.
• Shiny when used under a gloss glaze.
• Shiny when used over a S-2000 opaque glaze.
• Shiny when used in multiple coats or heavily over a matte glaze.
• Matte when applied in washes or light coats over matte glazes.
Notes
Apply to properly
fired 04 bisque.
Same as
Stroke & Coat®
Apply 1 to 3 coats
to properly fired
04 bisque.
If firing to cone 6
or higher can be
applied to the clay
in the greenware
or low fired
bisque-04 stage.
General
Application
Quick Reference Guide
Soft Fan Brush
Brush/Sponge/
Squeeze Bottle
Shelf cone 06-6.
Check High Fire
Guide for color
changes at shelf
cone 6.
Shelf cone 06-6.
Check High Fire
Guide for color
changes at shelf
cone 6.
Pg. 15
Pg. 16
Pottery Cascades Non-toxic
Moves when
fired
Pottery Coat
Non-toxic
Non-moving
when fired
Applied By:
Firing Range
Health Status
Mayco
Book
Product
GLAZES: NON TOXIC
38
• Shake jar well before application. Product should be consistency of
melted ice cream
• Apply coats at right angles to minimize brush marks.
• To use on a functional item, such as dinnerware, you must apply
clear glaze to seal the surface.
• Used alone, Pottery Coats are porous and not recommended for use
with dinnerware or other functional items.
• Not overglaze compatible.
• Best looks are achieved when use as a base coat in combination with
Pottery Cascades and a flowing non-toxic glaze, such as Elements.
• Can be applied over, under and in between other glazes and dabbed
on at random, evenly or unevenly to create different flow patterns.
• Should be used in conjunction with other non-toxic glazes
• Clear Cascade (PC-601)moves more than White Cascade (PC-602)
when fired, allowing the color of the base glaze to show through.
• Shape of the piece affects the performance of the glaze.
• Overglaze compatible.
Apply 1-3 coats to
properly fired 04
bisque. Do not
apply below the
halfway point of
the piece.
Notes
Apply 3 even
coats to properly
fired 04 bisque.
General
Application
Quick Reference Guide
Pg. 27
Pg. 32
Pg. 31
Pg. 33
Foodsafe glazes
are marked with
a star *symbol
Not for Food
Items
Bisque Glazes
Clear Art Glazes Not for Food
Items
Not for Food
Items
Art Glazes
Exotic Glazes
Mayco
Book
Health Status
Product
GLAZES: LEADED
Shelf cone 06-6
Check High Fire
Guide for color
changes at shelf
cone 6.
Shelf cone 06-6
Check High Fire
Guide for color
changes at shelf
cone 6.
Shelf cone 06.
Will not high
fire cone 6 or
higher.
Shelf cone 06-6
Check High Fire
Guide for color
changes at shelf
cone 6
Firing Range
Brush/Sponge
Brush/Sponge
Brush/Sponge
Brush/Sponge
Applied By:
39
• Apply four full flowing coats, allowing each coat to dry between
applications.
• Make sure hands and brushes are clean.
• Can intermix these colors except Imperial Yellow.
• Needs more oxygen during firing to develop.
• Glazes in this series are not totally clear.
• Two coats of glaze are sufficient over opaque underglazes.
• If applied too heavily may craze.
• If applied to an embossed piece, color will change in the embossed
areas due to more color in these areas.
• The shape of the piece, glaze application, firing temperature and
kiln load all affects the final surface.
• Can be used when doing glaze combinations to aid in the flowing
pattern.
• Apply three or more flowing coats.
• Re-firing will also bring out more of a pattern change.
• Some colors have a combination of both matte and gloss surfaces.
Apply to properly
fired 04 bisque. If
firing to cone 6 or
higher, apply to
the clay in the
greenware or low
fired bisque- 04
stage.
Apply to properly
fired 04 bisque.
If firing to cone 6
or higher, apply
to the clay in the
greenware or low
fired bisque-04
stage.
• Apply three full flowing coats unless noted differently on the jar.
• Glaze that produces lustrous finishes, dual coloring, multi or single
colored specs, gold or metallic flecks, or a grained or metallic look
is classified as an Art Glaze.
• Great to use in glaze combinations and can be applied one, two or
three coats.
• Apply smoothly to plain surfaces to avoid a spotty finish.
• If applying to stoneware or porcelain, may need to thin product and
apply less color.
Notes
Apply to properly
fired 04 bisque.
Apply to properly
fired 04 bisque.
If firing to cone 6
or higher, apply
to the clay in the
greenware or low
fired bisque-04
stage.
General
Application
Quick Reference Guide
Pg. 18
Pg. 25
Pg. 25
Pg. 25
C-210 Non-Toxic
C-110 Food Safe
Dinnerware Safe
Dinnerware Safe
Dinnerware Safe
Roll-a-Coat
Tintable Glaze
C-100 Clear
Dipping
C-101 Blue
White Clear
Dipping
C-109 Wonder
Clear Dipping
Pg. 26
Mayco
Book
Not for Food
Items
Health Status
Jungle Gem™
Crystal Glazes
Product
GLAZES: LEADED
Shelf cone 06-6
Shelf cone 06-6
Shelf cone 06-6
Shelf cone 06-6
Check High Fire
Guide for color
changes at shelf
cone 6.
Shelf cone 06-6
Check High
Fire Guide for
color changes at
shelf cone 6.
Firing Range
Dipping
Dipping
Dipping
Rolling
Brush/Sponge
Applied By:
40
• Needs to be mixed frequently.
• Dip in, shake off excess and dry.
• This product is the match to C-101 brushing glaze.
• Needs to be mixed more frequently than C-109.
• Thinner than C-109 Dipping
• Very easy to use.
• Do not need to stir frequently.
• Stir about every 15 to 20 minutes.
• Faster drying time
Apply to
properly fired 04
bisque.
Apply to
properly fired 04
bisque.
• Tint Roll-a-Coat with Stroke and Coat or One Strokes.
• Measure 1-2 Tablespoons of Stroke and Coat per 2 oz of Roll-a-Coat.
• If tinting with One Strokes use 1-2 Teaspoon measurement.
• Pour color in, roll with a continuous motion and pour color out.
Place ware upside down to drain. When dry, wipe excess color.
• Most crystal glazes require three coats.
• Avoid a larger concentration of crystal towards the bottom of the
ware.
• Do not use on the inside of food containers.
• If doing container, inside color should be a leaded glaze.
Notes
Apply to properly
fired 04 bisque.
Apply to properly
fired 04 bisque.If
firing to cone 6 or
higher should be
applied to the
clay in greenware
or low fired
bisque-04 stage.
Apply to properly
fired 04 bisque.
If firing to cone 6
or higher, apply
to the clay in
greenware or low
fired bisque-04
stage
General
Application
Quick Reference Guide