1
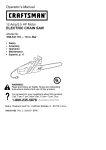
Operator's Manual
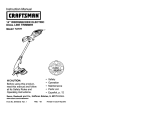
CRAFTSMANo
2.2 cu. in./36cc 2-Cycle
GASOLINE CHAIN SAW
Model No.
358.352162
- 16 in. Bar
@
+
Read and follow
WARNING:
o all Safety Rules and Operating
Instructions before first use of this product.
For answers
to your
questionsor about
this pm,
product:
Call
7 am-7 pm,
Mon.-Sat.,
10 am-7
Sun.
[]
1-800"235"5878
Sears, Roebuck
530087304 01/13/98
_.o_.,_°do,o_°_,_m°)
and Co., Hoffrnan Estates, IL 60179 USA
Warranty
SafetyRules
Assembly
Operation
Maintenance
Serviceand Adjustments
2
2
5
6
11
14
Storage
TroubleShootingChart
PartsList
Spanish
Parts& Ordering
FULL ONE YEAR WARRANTY
CHAIN SAW
ON CRAFTSMAN
16
17
19
22
Back
® GAS
For one year from the date of purchase, when this Craftsman Gas Chain Saw is
maintained, lubricated and tuned up according to the owner's manual, Sears will
repair, free of charge, any defect in material or workmanship.
This warranty excludes the bar, chain, spark piug and air filter, which are
expendable parts, and become worn during normal use.
if this Gas Chain Saw is used for commercial or rental purposes, this warranty
applies for 30 days from the date of purchase.
WARRANTY SERVICE IS AVAILABLE BY RETURNING THIS CHAIN SAW TO
THE NEAREST SEARS SERVICE CENTER IN THE UNITED STATES.
This warranty gives you specific legal rights, and you may also have other rights
which vary from state to state.
Sears_ Roebuck and Co., D/817 WA, Hoffman Estates, tL 60179
WARNING: Always disconnect spark
plug wire when making _epairs except
for carburetor adjustments. Because a
Chainsaw is a high-speed woodcutting
tool, careless or improper use of this
tool can cause serious injury.
PLAN AHEAD
• Restrict the use of your saw to adult
users who understand and can follow
the safety rules, precautions, and opereting instructions found in this
manual.
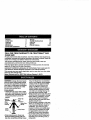
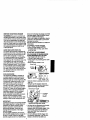
duty, non-slip gloves; eye protection
such as non-fogging, vented goggles
or face screen; an approved safety
hard hat; and sound barriers (ear
plugs or mufflers) to protect your
headng. Regutar users should have
hearing checked regularly as chain
saw noise can damage hearing. Secure hair above shqulder length.
• Keep all pads of your body away from
the chain when the engine is running.
• Keep chitdren, bystanders, and ahimais at least 30 feet (10 meters)
Hearing
_ _
Safety Hat
away from the work area when startProtection_ mh'--.
Eye
ing and using the saw.
t_r"-Protection
Snug
_...=_
• Do not handle or operate a chain saw
Firing -_--_
Heavy Duty
when you are fatigued, ill, or upset, or
if you have taken alcohol, drugs, or
medication. You must be in good
C_othing#hF_r_l_T
_/" Gloves
physical condition and mentalJy alert,
If you have any condition that might
be aggravated by strenuous work,
. sS_..,_
_._
SafetyChaps
check with doctor before operating.
=llalll_
• Do not start cutting until you have a
• Wear protective gear. Always use
clear work area, secure footing, and
steal-toed safety footwear with nonespecially _fyou are felling a tree, a
slip soles; snug-fitting clothing; heavyretreat path.
p.
OPERATE YOUR SAW SAFELY
• Store the unit and fuel in a coot, dry
well ventilated space where fuel va• Do not operate with one hand. Sedpors cannot reach sparks or open
ous injury to the operator, helpers, or
flames from water heaters, electdc
bystanders may resuff from onehanded operation. A chain saw is inmotors or switches, furnaces, etc.
tended for two-handed use.
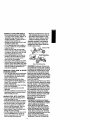
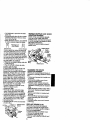
GUARD AGAINST KICKBACK
• Operate the chain saw only in a well- Follow all safety rules to help avoid
ventilated outdoor area.
kickback and other forces which can
• Do not operate saw from a ladder or
result in sedous injury.
in a tree, unless you are specifically
trained to do so.
'_
.i_,_j_./t. KickbackPath
• Make sure the chain will not make
contact with any object while starting
the engine. Never try to start the saw
when the guide bar is in a cut.
AvoidObstructions
• Do not put pressure on the saw, especially at the end of the cut. Doing
so can cause you to lose control
when the cut is completed.
• Stop engine before setting saw down.
• Hand carry saw only when engine is
stopped. Carry with muffler away from
Clear The WorkingArea
body; guide bar & chain projecting beWARNING:
Rotational Kickback can
hind you; guide bar preferably covered with a scabbard.
occur when the moving chain contacts
an object at the upper portion of the tip
MAINTAIN YOUR SAW IN GOOD of the guide bar. Contact at the upper
WORKING ORDER
portion of the tip of the guide bar can
• Have all chainsaw serviceperformed cause the chain to dig into the object,
by a qualifiedservicedealer except
which stops the chain for an instant. The
the itemslistedin the maintenance
result is a lightning fast_ reverse reaction
sectionof this manual:
which kicks the guide bar up and back
toward the operator.
• Make certainthe saw chainstops
movingwhen the throttletriggeris re* Pinch-Kickback and Pull-In occur when
leased.For correction,referto =Car- the chain is suddenly stopped by being
buretorAdjustments."
pinched, caught, or by contacting a for• Keepthe handlesdry,clean,and free eign object in the wood. This sudden
from oilor fuel mixture.
stopping of the chain results in a rever• Keep caps and fasteners securely
sal of the chain force used to cut wood
and causes the saw to move in the op• tightened.
UseonlyCraftsmanaccessories and posite direction of the chain rotation.
replacementpartsas recommended. Pinch-Kickback drives the saw straight
Never modify yoursaw.
back toward the operator. Pull-In pulls
the saw away from the operator.
HANDLE FUEL WITH CAUTION
REDUCE THE CHANCE OF
• Do not smoke while handling fuel or
KICKBACK
while operating the saw.
• Recognize that kickback can happen.
• Eliminate all sources of spanksor flame
W'dha bask_understandingof kickback,
in areas where fuel is mixed or poured.
you can reduce the element of surprise
• Mix and pour fuel in an outdoor area
which contributesto accident_
and use an approved, marked con• Never let the moving chain contact
tainer for all fuel purposes. Wipe up
any object at the tip of the guide bar.
all fuel spills before starting saw.
• Keep working area free from obstruc• Move at least 10 feet (3 meters) from
tions such as other trees, branches,
fueling site before starting.
rocks, fences, stumps, etc. Eliminate
• Turn the engine off and let saw cool in
or avoid any obstruction that your saw
a non-combustible area, not on dry
• chain could hit while cutting.
leaves_ straw, paper, etc. Slowly reKeep saw chain sharp and propedy
tensioned. A loose or dull chain can
move fuel cap and refuel unit.
3
increase the chance of kickback. Follow manufacturer's chain sharpening
and maintenance instructions. Check
tension at regular intervals, but never
with engine running. Make sure bar
° clamp nuts are securely tightened.
Begin and continue cutting, at full
speed, If the chain is moving at a
slower speed, there is greater chance
of kickback occurring.
• Use extreme caution when reentering
a cuL
keep your body from being in a direct
line with the cuttingchain.
• Stand with your weightevenly balanced on both feet.
• DOnotoverreach.Youcouldbe drawn
or thrown off balanceand lose control.
- Do not cutabove shoulderheight.It is
difficultto maintain controlofsaw
above shoulderheight.
KICKBACK SAFETY FEATURES
WARNING: The following features are
includedon yoursaw to helpreduce
hazard of kickback;however,such featip
bar (plunge
cuts); with the
da of
notthe
attempt
cuts starting
tureswillnot totallyaiiminate thisdanWatch for shifting logs or other forces
that could close a cut and pinch or fall get. Do not rely onlyon safetydevices.
into chain.
• Handguard:designedto reducethe
• Use the specified Reduced-Kickback
chanceof your left handcontacting
Guide Bar and Low-Kickback Chain.
the chain ifyour hand slipsoffthe
fronthandlebar.
Avoid Pinch-Kickback:
• Positionoffront and rear handlebars:
• Be extremeJy aware of situations or
designedwith distancebetweenhanobsbuctions that can cause material
dies and =in-line"with eachother.The
to pinch the top of or otherwise stop
spreadand tin-line" posRionofthe
the chain.
handsprovidedby this designwork
• Do not cut more than one log at a
time.
togetherto give balanceand resistance in controllingthe pivotof the
• Do not twist saw as bar is w_:trewn
saw backtowardthe operatorif kickfrom an undercut when bucking°
backoccurs.
Avoid Pull*In:
• Reduced-_ckback GuideBar:de° Always begin cutting with the engine
signedwith a small radiustip which
at ful/speed and the saw housing
reducesthe size ofthe kickbackdanagainst wood.
dger
zone. Thistype bar hasbeen
• Use wedges made of plastic or wood.
emonstratadto sign_canti'yreduce
Never use metal to hold the cut open.
the numberand seriousnessof kickMAINTAIN CONTRQL
backswhentestedin accordance with
Statldto the left of the saw
ANSI
ofhand
Thumbon
_,_j_
B175.I.
Tip Guide Bar
unders_d_
_
Small Radius
Large Radius {
Tip Guide Bar
EJbow
locked
• Low-KickbackChain: has met kickback
performancerequirementswhentested
Neverreverse
handpositions,
on a representativesampleof chain
, A good,firm grip on the saw withboth saws below3.8 cubicinch
han_ willhelp you maintaincontrol,
displacement
specifiedinANSI B175.1.
Dont let go. Grip the rear handlewith Low-K_ckback
Chain
yourrighthand whetheryou are dght
Contoured
DepthGauge
or left handed. Wrapthe fingers of
,,-,_ _'J
J ElongatedGuardLink
your left hand over and aroundthe
p"'="._"-"Deftscts
Kickback
front handlebar,and your leftthumb
_
_._
ForceAndAllows
underthe front handlebar.Keepyour
_
_,,_
Wood.ToGra_uaJly
leftarm straightwith the elbowlocked. _
RioeIntoCuttar
Position yourleft hand on the front
SAFETY NOTICE: Exposure to
handlebar so it is in a straight line with vibrations throughprolonged use of
yourfight hand on the rear handle
gasoline powered hand tools could
when making bucking cuts. Stand
cause blood vessel or nerve damage in
slightlyto the left aide of the saw to
the fingers,hands_and joints of people
4
prone to circulation disorders or
abnormal swelling. Prolonged use in
• cold weather has been linked to blood
vessel damage in otherwise healthy
people. If symptoms occur such as
numbness, pare, loss of strength,
change in skin color or texture, or loss
of feeling in the fingers, hands, or joints.
discontinue the use of this tool and
seek medical attention. An
anti-vibration system does not
guarantee the avoidance of these
problems. Users who operate power
tools on a continual and regular basis
must closely monitor their physical
condition and the condition of this tool.
CHAIN BRAKE If this saw is to be used
for commercial logging, you must order
and install a chain brake to comply with
Federal OSHA Regulations for Commercial Logging. Contact your Sears
Service Center or call 1-800235-5878.
SPARK ARRESTOR: Your saw is
equipped with a temperature limiting
CARTON CONTENTS
Check carton contents against the following list.
Model 358.352162
• Chain Saw (fully assembled)
• Bar toot
• Chain
• Carrying Case
• Gloves
- Gas Can
• Bar & Chain Lube
,2-cycle engine oil
• Examine parts for damage. Do not
use damaged parts.
muffler and spark arresting screen
which meets the requirements of
California Codes 4442 and 4443. All
U.S. forest land and the states of
Califomia, Idaho, Maine, Minnesota,
New Jersey, Oregon, and Washington
require by law that many internal
combustion engines be equipped with a
spark arrestor screen. If you operate a
chain saw in a state or locale where
such regulations exLst,you are legally
responsible for maintaining the
operating condition of these parts.
Failure to do so is a violation of the law.
Refer to Customer Responsibilities
chart in the MAINTENANCE section.
STANDARDS: This chain saw is listed
by Underwriters Laboratories, Inc. in
accordance with American National
Standards for Gasoline-Powered Chain
Saws Safety Requirements (ANSi
B175.1-1991).
• If you need assistance orflnd that
parts are missing or damaged, please
call 1-800-235-5878.
NOTE: It is normal to hear the fuel filter
rattle in an empty fuel tank.
Your unit has been factory tested and
the carburetor precisely adjusted. As a
result you may smell gasoline or find a
drop of oil/fuel residue on the muffler
when you unpack the unit,
ASSEMBLY
,_
Your saw is fully assembled; no
assembly is necessary,
/
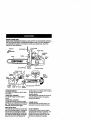
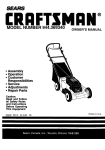
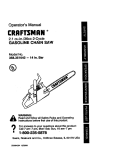
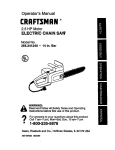
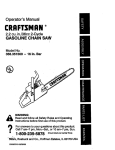
KNOWYOURSAW
READ
THISOPERATOR'S
MANUAL AND SAFETY RULES BEFORE OPERATING YOUR CHAIN SAW. Compare the illustrations with your unit to familiarize
yourself with the location of the various controls and adjustments. Save this
manual for future reference.
BarTool
FrontHandle
StarterRope
ON/STOP
Chin
CRRFTSMRN"
Bar OilFill
Cap
Housing
Fuel Mix Fill Cap
Cylinder Cover
Fast Jdle
p,
Adjus,ng
Screw
Throttle
Trigger
Choke
Knob Bar Clamp
Chain
Direction
'ofTravel
Chain
Bar Clamp Nuts Guide Bar
Catcher
ON/STOP SWITCH
The ON/STOP Switch is used to stop
the engine.
THROTTLE TRIGGER
The throttle trigger controls.engine
speed.
THROTTLE LOCKOUT
The threttie lockout must be pressed
before you can squeeze the throttle trigger. This feature prevents you from accidentally squeezing the trigger.
FAST IDLE LOCK
The fast idle lock holds the throttle trigger in the starting position. Activate the
fast idle lock by pressing the throttle
lockout and squeezing the throttle trigger. With the throttle trigger squeezed,
tess the fast idle lock. Release the
throttle lockout and trigger while holding
the fast idle lock button.
CHOKE KNOB
The Choke Knob activates the choke to
provide additional fuel to the engine
during coJdstarting.
PRIMER BULB
The Primer Bulb circulates fuel to the
carburetor to provide quicker starting.
CHAIN TENSION
It is normalfor a newchaintostretch
duringfirst30 minutes of operation.You
shouldcheck your chaintensionfreqsuentiy.
See ChainTensionunderthe
ervice and Adjustments section.
6
BEFORE
STARTING
ENGINE
WARNING:
Besuretoreadthefuel
handling
information in the safetyrules
lines and carburetor are empty. Use fresh
fuel next season. See STORAGEinstructions for additional information.
Never use engine or carburetor cleaner
section ofthismanual beforeyou begin.
products in the fuel tank or permanent
ff you do not understandthe fuel hanmay occur.
dlinginformationdo not attempttofuel damage
ee the STORAGE section for additional
yourunit.Seek help from someonethat information.
doesunderstandthe informationor call
STOPPING YOUR ENGINE
thecustomerassistancehelp line at
• Move On/Stop switch to STOP.
1-800-235-5878.
GUIDE BAR AND CHAIN OIL
The chain oiler provides continuous lubrication to the chain and guide bar. Be
sure to fill the bar oil tank when you fill
the fuel tank (Capacity = 6,8 fL oz.).
For maximum guide bar and chain life,
we recommend you use Craftsman
chain saw bar oil. If Craftsman bar oil is
not available, you may use a good
grade SAE 30 oil until you are able to
obtain Craftsman brand. The oil output
is automatically metered during operation. Your saw will use approximately
one tank of bar oil for every tank of fuel
mix. Always fill the bar oil tank when
you fill the fuel tank.
FUELING ENGINE
This engine is certified to operate on
unleaded gasoline. Before operation,
gasoline must be mixed with a good
quality 2-cycle air-cooled engine oil. We
recommend Craftsman-brand oil. Mix
gasoline and oil at a ratio of 40:1 (A
40:1 ratio is obtained by mixing 3.2
ounces of oil with 1 gallon of unleaded
gasoline). DO NOT USE automotive oi!
or boat oil. These oils will cause engine
damage. When mixing fuel follow the
instructions printed on the container.
Once oil is added to the gasoline,
shake container momentarily to assure
that the fuel is thoroughly mixed.
Always read and follow the safety rules
relating to fuel before fueling your unit.
• If engine does not stop, pull choke
knob out fully.
STARTING YOUR ENGINE
COLD ENGINE OR WARM ENGINE
AFTER RUNNING OUT OF FUEL
• Fuel engine with 40:t fuel mix.
° Fill bar o_1tank with bar oil.
• Prime engine by pressing primer bulb
six times.
° Move On/Stop switch to ON.
PdmerBulb
ff _
/
Choke Positions
I I I I
I Oft Partial Ful_
• Actuate choke by pulling choke knob
fully out.
• Set saw on the ground. Grip front
handle with your left hand and place
right foot through rear handle.
Starter Rope Handle
i
IMPORTANT
Experience indicates that alcohol blended
ligl FootThroughRear Handle
fuels (called gasohol or using ethanol or
methanol)can attract moLoture which
• Set fast idle by depressing the throttle
leadsto separation and formation of
lock with your right hand. Then,
acids duringstorage. Acidic gas can
squeeze and hold throttle trigger. With
your thumb, press the fast idle lock
damage the fuel system of an engine
down and hold. Next, release the
while in storage.
To avoid engine problems,the fuel systhrottle trigger.
tem shouldbe emptied before storage for - DO NOT squeeze throttle trigger during starting; otherwise, it will be nec30 days or longer. Drain the gas tank,
startthe engine and let it run until the fuel
essary to reset the fast idle lock.
7
I
OPERATING
TIPS
• Check chain tension before first use
and after 1 minute of operat(on. See
Chain Tension in the Maintenance
section.
• Cut wood only. Do not cut metal, plastics, masonry, non-wood building materials, etc.
• Stop the saw if the chain strikes a foreign object. Inspect the saw and repair parts as necessary.
• Keep the chain out of dirt and sand.
Even a small amount of dirt will quickly dull a chain and increase the possibility of kickback.
• Practice cutting a few small logs using
the following steps. This will help you
get the "feel" of using your saw before
you begin a major sawing operation.
• Squeeze the throttle trigger end allow the engine to reach full speed
before cutting.
• Begin cutting with the saw frame
against the log.
• Keep the engine at full speed the
STARTING A WARM ENGINE
entire time you are cutting.
DONOT use thechoketo starta warm
° Allow the chain to cut for you. Exert
engineor flooding and hardstarting
only light downward pressure.
may occur.
• Release the thro.ttletrigger as soon
, Move On/Stopswitchto ON.
as the cut is completed, allowing the
= Set fast idlelock.
engine to idle. If you run the saw at
* Be sure chokeis in theOP_F
position.
full throttle w thout a cutting !cad,
• Withsaw on ground,gripfront handle
unnecessary wear can occur.
withleft handand placeyourrightfoot
• To avoid losing control when cut is
throughrear handle. ,complete, do not put pressure on
o Putlstarterrope handleuntilengine
saw at end of cut,
starts.
•
Stop engine before settingsaw down.
, Squeezeand releasethrottletrigger
NOTE: When pulling the starter rope,
do not use the full extent of the rope.
Do not let starter rope snap back. Hold
handle. Let rope rewind slowly.
* Pull starter rope handle firmly and
quioldy with your right hand until the
engine attempts to start, but no more
than 5 pulls. Then, push in choke
knob to the partial position, Resume
pulling handle until engine starts.
, Above 4O°F, allow engine to run for
approximately 5 seconds. Push the
choke knob in to the OFF position;
then squeeze and release throttle trigger to allow engine to idle.
• Below 40°F, allow engine to warm up
for 30 seconds to 1 minute with choke
at partial position. Push choke knob in
to the OFF position; then squeeze and
release throttle trigger to allow engine
to idle.
, To stop engine, move On/Stop switch
to the STOP position.
to returnengineto idle speed.
TREE FELLING TECHNIQUES
WARNING:
Check for broken or dead
DIFFICULT STARTING
OR
branches which can fall while cutting
STARTING
A FLOODED ENGINE
The engine may be flooded if it has not causing serious injury. Do not cut near
buildings or electrical wires if you do not
started after 10 pulis, Flooded engines
know the direction of tree fall, nor Cut at
can be cleared of excess fuel with the
night since you will not be able to see
following procedure:
welt, nor during bad weather such as
• Engage the fast idle lock."
° Verify that the On/Stop switch is in the rain, snow, or strong winds, etc.
° Carefully plan your sawing operation
ON position.
in advance.
• Push choke knob to the OFF position.
, With saw on ground, grip front handle • Clear the work area. You need a clear
area all around the tree so you can
with left hand and place right foot
have secure footing.
through rear handle.
• Pull starter rope handle until engine
• Study the natural conditions that can
starts.
cause the tree to fall in a particular
direction. These conditions include:
• Starting could require many pulls de• The wind direction and speed.
pending on how badly the unit is
, The lean of the tree. The lean of a
flooded, if engine still fails to start, refer to the TROUBLESHOOTINGchart or
tree might not be apparent due to
call 1-B00-235-5878.
uneven or sloping terrain. Use a
plumb
orleveltodetermine
thedirection of tree lean.
• Weight and branches on one side.
• Surrounding trees and obstacles.
• Look for decay and rot. If the trunk is
rotted, it can snap and fail toward the
operator.
• Make sure there is enough room for
the tree to fall. Maintain a distance of
2-1,2 tree lengths from the nearest
person or other objects, Engine noise
can drown out a warning call.
• Remove dirt, stones, loose bark,
nails, staples, and wire from the tree
where cuts are to be made.
,
(
Plan a dear retreatpath
)..i_-
Directionof Fall
45 °
FELLING LARGE TREES
(6 inches in diameter or larger).
The notch method is used to fell large
trees. A notch is cut on the side of the
tree in the desired direction of fall. After
a felting cut is made on the opposite
side of tree, the tree wilt tend to fall in
the direction of the notch.
NOTE: If tree has large buttress roots,
remove them before m_.l<ingthe notch.
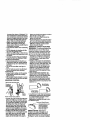
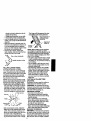
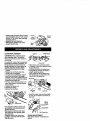
NOTCH CUT AND FELLING TREE
• Make notch out by cutting the top.of
•
the notch first. Cut through 1/3 of the
diameter of the tree. Next complete
the notch by cutting the bottom. See
illustration. Once the notch is cut, remove the wedge of wood from tree,
Finalcut here
Firmcut
,=_
/
4 "
Notch_
_
_.
,.'2_'."_r
'°::',:¢
;2
hetp prevent the tree
in the wrong direction.
Hingeholdstree on
stumpand helps
controlfall
Openingof
fellingcut
NOTE: Before felling cut is complete,
use wedges, to open the cut when
necessary to control the direction of fall.
To avoidkickback and chain damage,
use wood or plastic wedges, but never
steel or iron wedges.
• Be aled to signs that the tree is ready
to fall: cracking sounds, widening of
the felling cut, or movement in the upper branches.
• As tree stads to fail, stop saw, put it
down, and get away quickly on your
planned retreat path.
- Be extremely cautious with partially
fallen trees that may be poody supported. When a tree doesn't fall completely, set the saw aside and pull
down the tree with a cable winch,
block and tackle, or tractor. Donot
use your saw to cut down a partially
fallen tree.
CUTTING A FALLEN TREE
(BUCKING)
Bucking is the term used for cutting a
fallen tree to the desired log size.
WARNING; Do not stand on the log
being cut. Any portion can roll causing
loss of footing and control. Do not stand
downhillof the log being cut.
IMPORTANT POINTS
• Cut only one log at a time.
• Cut shattered wood very carefully;,
sharp pieces of wood could be flung
toward operator.
• Use a sawhorse to cut small logs.
Never allow another person to hold
the log while cutting and never hold
• the log with your leg or foot.
Do not cut inan area where logs,
limbs, and roots are tangled. Drag logs
into a clear area before cuttingthem.
• After removing the wood, make the
BUCKING
TECHNIQUES
fel!ing cut on the opposite side of the
WARNING: If saw becomes pinched
notch. This is done by making a cut
about two inches higher than the cen- or hung in a log, don't try to force it out.
ter of the notch. This will leave
You can lose control of the saw resultenough uncut wood between the felling in injury and/or damage to the saw.
ing cut and the notch to form a hinge, Stop the saw, drive a wedge of plastic
9
orwoodintothe cutuntilthesawcan be Usinga log
removedeasily.Restartsaw andcarefuBy for support
reenterthe cut. Do notusea metal
wedge.Do not attemptto restartyour
saw whenit is pinchedor hungin a log,
Usea wedgetoremove
pinched
saw
I stCut
Turn saw OFF and use a plasticor
woodenwedge to forcecut open.
OvercutUng begins on the top side of
the log with the bottom of the saw
against the log. When overcutting use
light downward pressure.
Overouttlng
Undercutting
2nd Cut
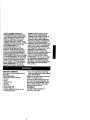
BUCKING USING A LOG OR
SUPPORT STAND
• Remember your first cut is atways on
the compression side of the log. (Refer to the illustration be!ow for your
first and second cut).
• Your first cut should extend 1/3 of the
diameter of the log.
• Finish with your second cut.
Undercutting involves cutting on the
underside of the log with top of saw
against the log. When undercutting use
light upward pressure. Hold saw firmly
and maintain control. The saw will tend
to push back toward you.
WARNING:
Never turn saw upside
down to undercut. The saw cannot be
controlled in this position.
Alwaysmake yourfirstcuton the
compressionside of thelog.
2 nd Cut
__
Firstcut on com_ession sideof log
LIMBING
Secondcut
_:
-%_ ,_._
Firstcut on compressionside of tog
BUCi<ING WITHOUT A SUPPORT
• Overcut through 1/3of the diameter of
the log.
• Roll the log over and finish with a second overcut.
• Watch for logs with a compresion
side. See il/ustration above for cutting
logs with a compression side,
AND PRUNING
WARNING: Never climb into a tree to
limb or prune. Do not stand on ladders,
platforms, a log, or in any position
which can cause you to lose your batance or control of the saw.
IMPORTANT POINTS
• Watch out for springpoles.
Spdngpoles are small size limbs
which can whip toward you, or pull
you off balance, Use extreme caution
when cutting small size limbs.
• Be alert for springback. Watch out for
branches that are bent or under pressure. Avoid being struck by the
branch or the saw when the tension in
the wood fibers is released.
• Frequently clear, branches out of the
way to avoid tripping over them.
10
LIMBING
Limb a tree onlyafter itis cutdown.
Leavethe larger limbsunderneaththe
felled tree to supportthe tree as you
work.
• Startat the base ofthe felled tree and
worktowardthe top, cuttingbranches
and limbs.Remove smalllimbswith
one cut,
• Keep the tree between you and the
chain.
• Remove larger, supporting branches
w_ththe _/3. 2/3 cutting techniques de*
scribed in the bucking section.
• Always use an overcut to cut small
and freely hanging limbs. Undercutting could cause limbs to fair and
pinch the saw.
branchesare higherthanyourshoulder,Get a professionalto do thejob.
Make yourfirst cut 1/3of theway
throughthe bottomofthe limb.
• Nextmake a secondcutall the way
through the limb.
° Firdshthepruningoperationbyusing
an overcutsothatthe stumpofthe
limb protrudes 1 to 2 inches from the
trunk of the tree.
/Se_d
cut
PRUNING
WARNING; Limit pruning to limbs
shoulder height or below. Do not cut if
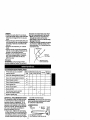
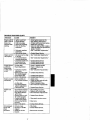
CUSTOMER RESPONSIBILITIES
Fil! in dates as you complete
regular service
l Before! After Even! Every IYearly Service
Use _ Use ..5h_. 25 hrs, ,
,, Dates _I
Check
iord magedtwom
pans
p,,
Check for loose fasteners/parts
/I
/
Check chain tension ,,
Check chain sharpness
p,,
Check guide bar
p,,
Clean unit & labels
p,,
clean air filter
p,,
Clean/inspect spark arrestor
screen & inspect muffler
....
Replace spark plug
GENERAL RECOMMENDATIONS
The warranty on this unit does not cover items that have been subjected to
operator abuse or negligence, To receive full value from the warranty, the
operator must maintain unit as instruct*
ed in this manual. Various adjustments
will need to be made periodically to
propedy maintain your unit,
* Once a year, replace the spark plug,
air filter element, and check guide bar
and chain for wear. A new spark plug
and air filter element assures proper
air.fuel mixture and helps your engine
t-"
run better and fast longer.
:
WARNING: Disconnect the spark plug
before performing maintenance except
for carburetor adjustments.
LUBRICATION
o'
n,o
2 Use Craftsman chain saw bar oil
11
I
CHECK FOR DAMAGED
OR
WORN PARTS
Replacement of darnaged/wom parts
shouldbe referred to your Seam Service Center.
NOTE: It is normal for a small amount
of oil to appear under the saw after engine stops. Do not confuse this with a
leaking oil tank.
• On!Stop Switch- Ensure On/Stop
switch functions propedy by moving
the switch to the "Stop" position.
Make sure engine stops; then restart
engine and continue,
• Fuel Tank- Do not use saw if fuel
tank shows signs of damage or leaks.
° Oil Tank - Do not use saw if oil tank
shows signs of damage or leaks.
CHECK FOR LOOSE
FASTENERS
AND PARTS
• Bar Clamp Nut
• Chain
,,Muffler
• Cylinder Shield
• Air Filter
• Clutch Drum/Sprocket
• Handle Screws
• V_ration Mounts
• Starter Hm_sing
• Handguard
CHECK CHAIN TENSION
• Use the screwdriver end of the bar
tool to move chain around guide bar
to ensure kinks do not exist. The
chain should rotate freely.
BarTool
Bar ClampNuts
• Loosen bar clamp nuts until they are
finger tight against the bar clamp.
• Turn adjusting screw clockwise until
chain barely touches the bottom of
guide bar.
_
AdjusUng
//
AdjustingScrew- 1/4 Turn
• Lift up tip of guide bar to check for
sag. Release tip of guide bar, then
turn adjusting screw I/4 turn clockwise. Repeat until sag does not exist.
• While lifting tip of guide bar, tighten
bar clamp nuts with the bar tool.
Torque to 10-15 ft-lbs.
• Use the screwdriver end of the bar
tool to move chain around guide bar.
• If chain does not rotate, it is too tight.
Slightly loosen bar clamp nuts and
turn adjusting screw 1/4 turn counterclockwise. Retighten bar clamp nuts.
• If chain is too loose, it will sag below
the guide bar. DO NOT operate the
saw if the chain is loose.
CHECK CHAIN SHARPNESS
A sharp chain makes wood chips. A
dull chain makes a sawdust powder
and cuts slowty.
CHAIN SHARPENING
Chain sharpening requires special
tools. You canpurchase sharpening
tools at Sears Or go to a professional
chain sharpener.
....
_: .....
CHECK GUIDE BAR
, ,:
Conditions which require guide bar
maintenance:
• Saw cuts to one side or at an angle.
• Saw has to be forcedthrough the cut.
• Inadequate supply of oil to bar/chain.
Check the condition of guide bar each
time chain is sharpened. A worn guide
bar will damage the chain and make
cutting difficult. To maintain guide bar:.
• Move On/Stop switch to =Stop."
• Remove bar and chain from saw.
• Clean aU sawdust and any other.
debris from the guide bar groove and
sprocket hole after each use.
RemoveSawdust From
GuideBar Groove
Sprocket Hole
• Using bar tool, roll chain around guide
bar to ensure all links are in bar groove.
INSPECT MUFFLER AND SPARK
ARRESTOR SCREEN
Asthe unitis used,carbondeposits
buildup on the mufflerand spark
arrestorscreen,and must be removed
to avoidcreatinga fire hazardor affectit_gengineperformance.
Replacethe sparkarrestor screenif
breaksoccur.
• Add lubricant to sprocket hote after
each use.
• Burring of guide bar mils is a normal
process of rail
wear. Remove these
burrs with,a flat file.
• When rail top is uneven, use a flat file
to restore square edges and sides.
File Edgesand
sidesSquare
MufflerDiffuser
Spark
Arrestor
WornGroove
CorrectGroove
Replace guide bar when the groove is
worn, the guide bar is bent or cracked,
or when excess heating or burring of
the mils occurs. If replacement is necessary, use only the guide bar specified
for your saw in the repair parts list or on
the decal located on the chain saw.
CLEAN UNIT & LABELS
, Clean the unit using a damp cloth with
a mild detergent.
• Wipe off unit with a clean dry cloth.
CLEAN AIR FILTER
A d_rtyair filter decreases the life and
performance of the engine and in*
creases fuel consumption and harmful
emissions. Always clean your air filter
after 15 tanks of fuel or 5 hours of operation, whichever comes first. Clean
more frequently in dusty conditions, A
used air filter can never be completely
cleaned. It is advisable to replace your
air filter with a new oneafter every 50
hours of operation, or annually, whichever comes firsL To clean filter:.
• Loosen 3 screws on cylinder cover.
° Remove cylinder cover.
• Remove air filter.
• Clean the air filter using hot soapy
water. Rinse with clean cool water.
Air dry completely before reinstalling,
• Lightly oiJair filter before installing to
improve the efficiency of air filter. Use
2-cycle engine oil or motor oil (SAE
30). Squeeze excess oil from filter.
• Reinstall air filtero
• Reinstall cylinder cover and 3 screws
( 15-20 in-lbs,}.
CylinderCover
AirF3iter
Screws
Cylinder
Cover
Muffler
Cover
Screws
/
Muffler
Body
MufflerCover
CLEANING THE SPARK
ARRESTOR
SCREEN
Cleaning is required eve_j 25 hours of
operation or annuaFly,whiohever_comes I_l
first.
,. : • .! _: ,:: :
• Loosen and removethe 2 muffler cover screws.
• Remove the muffler cover (cover
snaps off muffler body).
• Remove muffler diffuser and spark
arrestor screen assembly. Notice the
orientation of these parts for reassembling.
• Clean the spark arrestor screen with a
wire brush. Replace screen if breaks
are found.
• Replace any broken or cracked muffler parts.
• Reinstall diffuser and spark arrestor
screen assembly with round holes
facing up.
• Reinstall muffler cover and 2 screws
I
(7-8 ft-Jbs).
REPLACE SPARK PLUG
The spark plug should be replaced
each year to ensure the engine starts
easier and runs better. Ignition timing is
fixed and nonadjustable.
• Loosen 3 screws on:cylinder cover.
• Remove the cylhlde_-cover.
Pull off the spark plug boot..
Remove spark plugfrorn _linder and
discard.
13
• Replace with Champion RCJTY spark
plug and tighten with a 3/4 inc_hsocket
wrench (i0-12 ft4bs). Spark plug gap
should be .025 in.
• Reinstall the spark plug boot.
• Reinstall the cylinder cover and 3
screws (15-20 in-lbs).
CHAIN REPLACEMENT
PlugBoot
Spark
Plug
•
CAUTION: Wear protective gloves
when handling chain. The chain is
sharp and can cut you even when it is
not moving.
It is nonnai for a new chain to stretch during the first 15 minutes of operation. You
shouldrecheck your chain tensionfrequentlyand adjust the chain tension as
required,See Chain Tension sec_n,
= Move On/Stop switch to the Stop
position,
° Replace the old chain when it becomes worn or damaged.
* Use only the Low-Kickback replacement chain specified _ the repair
parts list. The correct replacement bar
and chain is also specified on a decal
located on the chain saw,
° See your Sears Servicp Center to replace and sharpen individualcutters
on your chain,
° Remove bar clamp nuts,
- Remove bar clamp.
• Remove the old chain,
Cutters
Dep_ Gauge
Drive_nks
• Place chain over and behind clutch.
• Fit bottom of drive tinks between teeth
in sprocket nose.
• Fit chain ddve links into bar groove.
• Pull guide bar forward until chain is
snug in guide bar groove,
• Now, install bar clamp making sure
the adjusting pin is positioned in the
lower hole in the guide bar.
Guide Bar
Bar
• Install bar clamp nuts and finger tighten only. Do not tighten any further at
this point.
Clamp
Nuts
• Turnadjustingscrewby handcounter¢loctcwieeuntiladjustingpin just
touchesthe stop.
• Slideguide bar behindclutchdrum
untilguidebar stepsagainst clutch
drumsprocket.
• Carefullyremovenew chainfrom
package.Hold chainwiththe drive
linksas shown.
Bar Ciamp Nuts
CHAIN ADJUSTMENT
See "Chain Tension" in Maintenance
section,
CLEAN FUEL FILTER
Tocteanfuel filter, drainyourunitby
runningdryof fuel, removefuel cap/retainerassemblyfrom tank, Pullfilter
from tank and removefrom line.Clean
with milddetergentand dnse. Dry thoroughly,reeasserebfe.
CARBURETOR
ADJUSTMENT
WARNING: The chain will be moving
during most of this procedure. Wear
your protective equipment and observe
all safety precautions. During the low
speed mixture adjustment recheck idle
speed after each turn of the screw. The
chain must not move at idle speed.
Carburetor adjustment is critical and if
done improperly can permanently damage the engine as well as the carburetor. If you require further assistance or
are unsure about performing this procedure, call our customer assistance help
line at 1-800-235-5878.
Old fuel, a dirty air filter, dirty fuel filter,
or flooding may give the impression of
an improperly adjusted carburetor.
Check these conditions before adjusting the carburetor.
The carburetor has been carefully set at
the factory. Adjustments may be necessary if you notice any of the following
conditions:
• Chain moves at idle. See "idle Speed"
under adjusting procedure.
* Saw will not idle. See "Idle Speed"
and "Low Speed Mixture"under ad• justing procedure.
, Engine dies or hesitates when it
should accelerate. See "Acceleration
Check" under adjusting procedure.
* Loss of cutting power. See "High
Speed Mixture H" under adjusting
procedure.
_There are three adjustment screws on
the carburetor. They are labeled H, L,
and T. They are located in the area just
above the primer bulb.
CARBURETOR
PRESETS
When making adjustments, do not force
the plastic limiter caps beyond the
stops or damage will occur.
If carburetor presets are not needed,
proceed to "idle Speed-T."
Turn both m xture screws counterclockwise until they stop.
-Tum the idle speed screw clockwise
until it stops. Now turn counterclockwise 4-1/2 full turns.
Start motor, let it run for 3 minutes, and
proceedto the adjustmentsection, if
engine does not start, refer to troubleshooting chart or call 1-800-235-5878.
if engine performance is acceptable at
the preset positions and there is no
chain movement at idle, no further adjustment is necessary.
ADJUSTING
PROCEDURE
idle Speed-T
Allow engine to idle. Adjust speed until
engine runs without chain movement or
stalling.
• Turn clockwise to increase engine
speed if engine stalls or dies.
• Turn counterclockwise to decrease
speed.
No further adjustments are necessary if
chain does not move at idle speed and
if performance is satisfactory.
Low Speed Mixture-L
Allow engine to idle. Then accelerate
the engine and note performance. If engine hesitates, bogs down, or smokes
during acceleration, turn mixture screw
clockwise in t/16-tum increments until
performance is satisfactory. Repeat this
procedure as necessary for proper adjustment. After completing adjustments,
check for acceleration and chain movement at idle. Reset if necessary.
High Speed Mix_ture-H
DO NOT operate engine at ful! _hrettle
for prolongedpedods while making adjustments. Damage to the engine can
occur. Make a test cut. Based on performance of the saw while cutting, adjust the high speed mixture setting in
l/t 6-turn increments as foliows:
• Clockwiseuntilsaw has good power in
the cut wi_ no hesitation.Do notadjust
by sound or speed, but judge by how
well the saw performs in the cut.
• Countemlockwise if the saw has
speed, but dies in the cut or lacks
power in the cut.
After completing adjustments, check for
acceleration and chain movement at
idle. Reset if necessary.
Acceleration Check
If the engine dies or hesitates instead of
acselerating, turn the low speed mixture
adjuslment counterclockwiseuntil you
have smooth acceleration with no chain
movement at idle. Recheck and adjust as
necessary for acceptable pedormance.
1,K
/
Prepareyour unitforstorageat the end tive in minimizingtheformation offuel
ofthe season or if it willnotbe used for gum depositsduringstorage.Addstabi30 daysor more.
lizer tothe gasolinein thefuel tankor
fuel storagecontainer.Fellowthe mix
WARNING:
• Allowthe engineto cool,and secure instructions foundon stabilizercontainthe unitbeforestoringortransporting_ers. Run engine at least5 minutes after
addingstabilizer.
• Store chainsaw and fuel in a well
CRAFTSMAN 40:1, 2-cycleengineoil
ventilatedarea wherefuel vapors
(air cooled)is especiallyblended.with
cannotreach sparksor openflames
from water heaters,electricmotorsor fuel stabilizer.If you do not use this
Sears oil,you can add a fuel stabilizer
switches,furnaces,etc.
to your fuel tank.
• Storechain saw withall guardsin
placeand positionchainsaw so that ENGINE
anysharpobjectcannotaccidentally • Removespark p_ugand pour I teacauseinjury.
spoonof 40:1, 2-cycleengineoil(air
• Storechainsaw wellout of the reach
cooled)throughthe sparkplug openof children.
ing. Slowlypull the starterrope8 to
10 timesto distribute oil.
EXTERNAL SURFACES
• Replacespark plugwithnew one of
If yourchainsaw is to be storedfor a
recommendedtype and heatrange.
periodoftime, clean it thoroughly be• Cleanair filter.
fore storage.Store in a clean dry area. • Check entireunitfor loosescrews,
• Lightlyoil external metal surfacesand
nuts,and bolts. Replace any damguidebar.
aged, broken,or wornpads.
• Oil the chainand wrap it in heavypa- • At the beginning of thenext season,
per or cloth.
use onlyfresh fuel havingthe proper
gasolineto oil ratio.
FUEL SYSTEM
UnderFuelingEnginein the Operating OTHER
Sectionof this manual,see message
• Do not storegasoline fromone sealabeled IMPORTANTregardingthe use
son to another.
of gasohelin yourchainsaw.
• Replace your gasoline can if it starts
Fuelstabilizeris an acceptableaitemato rust.
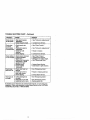
TROUBLE SHOOTING CHART
TROUBLE
Enginewillnot
startor willrun
onlya few
seconds after
starling.
CAUSE
REMEDY
• Ignition switchoff.
• Engine flooded.
o Fueltank empty.
, Spark plugnot fidng.
• Fuelnot reaching
carburetor.
• Move Ignition switch to ON.
• See =Starting Instructions."
° Fill tank with correct fuel mixture.
fnstall new spark plug.
Check for dirty fuel filter;,replace.
Check for kinked or split fuel line
rpair or replace.
• See "Carburetor Adjustments."
• Carburetor r quires
adjustment.
Engine will not
idle properly.
Engine will not
accelerate,
lacks power,
or dies under
a load.
Engine smokes
excessively.
.,, None of the above.
• Idle speed set too high
or too low.
• Contact Sears Servic,e,
• See "Carburetor Adjustments."
• LowSpeed Mixture
requ=msadjustment.
• Crankshaft seals worn.
. Compression low.
• None of the above,
• Air fitter dirty.
• Spark plug fouled.
• See "Carburetor Adjustments."
. Carburetor requires
adjustment.
• Exhaust ports or muffler outlets plugged.
• Compression low.
• None of the above.
• Choke partially on.
• Fuel mixture incorrect.
=4
• Air filter dirty.
• High Speed Mixture
requires adjustment,
• Crankcase leak.
Engine runs
hot.
° Contact Sears Service.
• Contact Sears Service.
• Contact Sears Service.
• Clean or replace air filter,
. Clean or replace plug
and regap.
• See "C,arbum tot Adjustments."
. ContactSears Service.
° Contact Seam Service.
• Contact Sears Service.
• Adjust choke.
• Empty fuel tank and refill with
correct fuel mixture,
• Clean or replace air filter. _
• See "Carburetor Adjustments."
• Contact Sears Service.
• Fuel mixtur incorrect.
• Spark plug incorrect.
• High Speed Mixture
set too lean.
• Exhaust ports or muffler outlets plugged.
• Carbon build-up on
muffler outlet screen.
• Fan housing/cylinder
fins dirty.
• None of the above.
• See "Fueling Your Unit."
• Replace with correct plug,
See "Carburetor Adjustments."
• Contact Sears Service.
• Clean spark arrestor screen.
• Clean area.
• Contact Sears Service.
• Fill oil tank.
• Contact Sears Service.
ONinadequate • Oil tank empty.
for bar and
• Oil pump or oi! filter
chain
clogged.
• Guide bar oil hole
tubflcation,
• Remove bar and clean.
blocked.
17
TROUBLE SHOOTING CHART - Continued
I REMEDY
TROUBLE
CAUSE
Chain moves
at idXespeed,
• Idle speed requires
adjustment.
• Clutch requires repair.
• See "Carburetor Adjustments."
Chain does
not move
when engine
is accelerated.
• Chain tension too
tight.
• Carburetor requires
adjustment.
• Guide bar rails
pinched,
• Clutch slipping.
, See "Chain Tension."
• Contact Sears Service.
• See "Carburetor Adjustments."
• Repair or replace.
,, Contact Sears Service.
! Chain clatters • Chain tension incorrect.
or cuts roughly: I• Cutters damaged.
• Chain worn.
• Cutters dull, improperly
sharpened, or depth
gauges too high.
• Sprocket wom.
• Chain installed
backwards.
Chain stops
within the cut.
Chain Cutsat
an angle,
°
•
•
•
- Contact Sears Service.
• Install chain in right direction.
• Chain cutter tops not
filed fiat.
• Guide bar burred or
bent; rails uneven.
• Clutch slipping
.........
• Cutters damaged on
one side.
• Chain dull on one side.
• Guide bar bent or worn.
See "Chain Tension."
Contact Sears Service.
Resharpen or replace chain.
See =Sharpening Chain."
• See "Sharpening Chain."
• Repair or replace guide bar.
• Contact Sears Service.
L
• See "Sharpening Chainl;
......
• See "Sharpening Chain."
• Replace guide bar.
If situations occur which are not covered in this manual, use care and good
iudgement. If you need assistance, contact Sears Service or the CUSTOMER
ASSISTANCE HELPUNE at 1-800-235-5878.
i
iiiii
iiiiii
i
iii iiiiiiiiiiiii
ii
HIll
IIIII
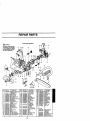
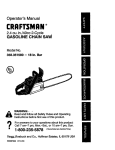
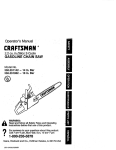
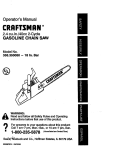
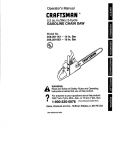
REPAIR PARTS
.
,i
,i
i r
,11
i
r
iii
2O
!
S
Part
NO.
1.
530089723
2,
3.
4,
5,
6.
7.
8.
9,
10,
53002611g
530037809
530037803
530015917
530047_9
530038406
530069803
530094188
530047061
11.
12.
13,
t4.
15.
t6.
17,
18,
19,
20,
22,
23.
530015611
530014949
530038227
530016149
530038264
530015922
530029850
530015814
530O159O7
530015826
530OSg611
5300_38238
I_scdptlor_
Trigger & Lookout Kit
(Includes Pin)
Check V=fue
Wire- Throffie
Clutch Cover
Nut-Bt, rMounting
ChoiCe Lever
Gtommet-Ch_e
Knob
ChaSsis Kit
Clutch Sp_g
Clutch Dnmt Ass'yw/1Brg_
_Vesher - C_utch
3{utch ASe¥
3w_ch Lever
ISw_ch Spring
Plug-Bronze
Vent
NUt
Chain Catcher
Screw
Washer - Thrust
Pin -Eier Acfjusfing
Bar Adjust_g Screw Ki
Bar Mounting Plate
Ref,
Part No.
24.
530069957
Description
Oil Pump _
{Inct, 28&31)
Off Cap Ass'y.
Screw
Screw
Seal 8rock
Elbow-Oil Pickup
pick-Up Oiler
Oft Fitter
Rug- Oil REar
Screw
Fuel Une I_
(Large Ola,)
Fuel Cap Ass'y.
w/Re_ainer
Boll - Bar
26.
28.
29.
30.
31,
32_
33.
34,
35,
36.
53O01O846
530016080
530O1_64
53001920O
53_049477
530038373
530037821
530030189
530015775
_47
38,
530047192
40,
4`/.
530016133
53O047663 Oi_Pic_p
42.
43.
A4,
45,
46.
47,
530O1802O
53_016`/32
539015814
530037820
5300'/9231
5300,37799
•
Ass'y,
(Incr, 32. 33 & 34)
Suew
Bolt
Screw
Worm Gear Spring
DUSt ,,Real
FrOnt Handle
19
Rof.
Pert
No.
48. I 530038224
49, i 530015940
50.
530037485
51.
530069232
52.
530015_
53.
5300493,_S
54.
530027531
! 55
530037817
56.
530039209
_._o40o8_
58,
530001717
59.
530016134
60.
530015920
61.
71-3629
62.
71-36366
157.
Nol
Oes=dpt/on
I H_ndguerd
Screw
Staner Handl_
Rope t0t
Screw "
Fan Hous_g
Recoil Sprig
Rywheel ASS'y:
Washer
Locker
Nut-Flywheel
Scmw
Chad - 16"
Bar - 16_
Shown
530087304
53OO52362
530038486
530038891
530047568
530049246
OperatorManuel
D_hein
Ftea_ust
Decal.-Stop
Dec,_-CtutchCover
Oeca_Fan Hag.
Decat-_tartingInsL
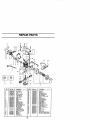
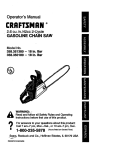
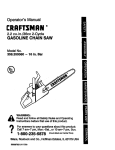
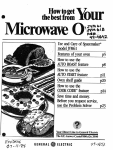
REPAIR PARTS
J,
i.ll
ii
ill
i..
14 12 13
,,
17
5,
29
Rofo
Fllt/ No,
1_
2,
&
4.
5.
530O311O3
530037793
53_16101
530O378O4
_9703
6.
7.
8.
9.
10.
11.
5300_
530015810
53O049700
_30016187
530016102
530053184
13,
;4.
1,_
16,
530038317
_44
5_4756S
530069216
17.
S30O59608
18.
19.
20.
21.
71'-85849
53CO1_49
530069931
530069604
_11_o_
BarWrench
Fakir
FJ_ter
Nut
Air FilterHousing
Cs_uretor K_t
(Incl.12 & 13)
C,arb. Gasket
Garb.Ad_pter
Suew
Cy_def Shield
Limlter Cap-High
L_ltercapLwl
emmrriet-C_rb. A_st
Air PurgeAss'y,
P(cnerLir_ IO-t
_eJi o_)
Eng_e GasketKit
OncLe, 17. _9 & _)
SparkPlug(CJ-7Y)
G_et
C)dinderKit
Pfston K_t"
(mcL_&23)
Rat
23.
24,
25.
26.
27,
!28.
!X
Port
NO.
5300298O5
530015697
530EH7062
530047827
530037935
530016136
530015780
952706e06
530052296
53001_
530O37652
3:t.
3_
530049670
53(X_7207
37.
38,
39.
40.
41.
42.
43.
530037813
530O361O3
530016132
53O339167
530015814
530047442
530049714
530049715
2O
D_scrlpt!on
Piston
Ring
Retainer
Cras_kehsft
Ass'y.
Seal & 8earing Ass'),.
C_p--Cr_k_
Clip-,-Hi_hTension Lead"
Screw
ChainBrokeKit
Wtre HarnessAss'y..
Fuel PickupAss'y,
Heat insulator
MufflerGasket
Muffler B_c_Plate
Muffl_ _'y.
M(IncL33.-<._& 3e-.._)
uffferDiffuser
SparkArreStorSct_af_
S_rew
k_nitl_ U_uto
Screw
GroundStrap
SeaF'C_rb,Adapter(Lower)
Sea_.:arb. Adapter[Upped