1
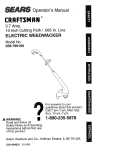
Operator's Manual
CRAFTSMAN
4.6 Amp
15 Inch Cuting Path/.065 In, Line
ELECTRIC WEEDWACKER
Model No.
358.799150
@
_1)
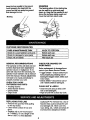
Read and follow all Safety Rules and Operating
WARNING:
Instructions before first use of this product.
For answers
to your
questions
this product:
Call
7 am-7 pro,
Mon-Sat;
Sun,about
10 am-7
pm
•
1-800-235-5878
Sears, Roebuck and Co., Hoffman Estates, IL 60179 USA
530084023
12/10/97
Umited Warranty Statement
Safety Rules
Assembly
Operation
Maintenance
2
2
5
6
8
Service & Adjustments
Storage
Troubleshooting Chart
Spanish
Parts Ordering
9
9
10
11
Back
FULL ONE YEAR WARRANTY ON CRAFTSMAN ELECTRIC WEEDWACKER ®
LINE TRIMMER
If this Craftsman ElectdcWeedwacker ® Line Tdmmer fails to perform properly
due to a defect in matedai or workmanshipwithin (1) one year from the date of.
purchase, Sears will repair or replace it, free of charge.
This warranty does not cover the nylon line.
WARRANTY SERVICE IS AVAILABLEBY RETURNING THE CRAFTSMAN ELECTRIC WEEDWACKER ® LINE TRIMMER TO THE NEAREST SEARS STORE IN
THE UNITED STATES.
This warranty gives you specificlegal rights, and you may also have other dghts
which vary from state to state.
Sears, Roebuok and Co. Dept. D/817WA Hoffman Estates, IL 60179
WARNING: When usingelectric gardening appliances, basic safety precautions must always be followedto
reduce the risk of fire, electric shock,
and serious injury. Read and follow all
instructions.
_
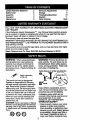
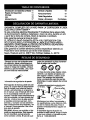
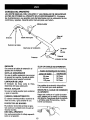
WARNING: Trimmer line throws objects violently.You and others can be
blinded/injured.Wear safety glasses,
boots, and leg protection. Keep body
parts clear of rotatingline.
Safety Glasses or:
afety information
on the unit
This power unitcan be dangerous!
Operator is responsiblefor following
unit and manual instructionsand wamings. Read entire Operator's Manual
before using unit! Be thoroughlyfamiliar with the controlsand the proper use
of the unit. Restrictthe use of this unit
to persons who read, understand,and
follow unitand manual wandngs and
instructions. Never allow childrento
operate this unit.
DANGER: Never useblades or flailing
devices. Unitisdesignedfor linetrimmer
use only. Use of any other accessories
or attachments will increase the risk of
injury.
Keep children, bystanders, and animals 50 feet (15 meters) away. If approached stop unitimmediately.
If situationsoccurwhich are not
covered in this manual, use care and
goo_:ljudgement. If you need
assistance, call 1-800-235-5878
OPERATOR
SAFETY
• Dress properly. Always wear safety
glasses or similar eye protection
when operating, or performing main.
tenance on your uniL (Safety glasses
are available.) Always wear face or
dust mask if operation is dusty. Always wear heavy, long pants, long
@O@
2
sleeves, boots, and gloves. Do not
go barefoot or wear sandals.
• Secure hair above shoulder length.
Secure or remove loose clothing and
jewelry or clothingwith looselyhanging ties, straps, tassels, etc. They
can be caught in movingparts.
• Being fully covered also helps protect you from debds and pieces of
toxic plants thrown by spinningline.
• Stay Alert. Do not operate unitwhen
you are tired, ill, or under influence
of alcohol, drugs, or medication.
Watch what you are doing; use common sense.
• Avoid unintentionalstarting of the
unit. Nevercarry unitwith yourfinger
on the switch. Be sure the switch is
in off positionwhen connecting extension cord.
ELECTRICAL SAFETY
• Use a voltage supply as shown on
unit.
• Avoid dangerous environment. Don't
use appliances in damp or wet locations. Don't use in rain.
• Avoid dangerous situations. Do not
use in the presence of flammable liquids or gases to avoid creating a fire
or explosionand/or causing damage
to unit.
• To reduce the risk of electricalshock,
this equipment has a polarized plug
(one blade is wider than the other).
This plug will fit only one way in a polarized outletof the extension cord.
Ensure you have a polarized extension cord. The plug of the polarized
extensioncord will fit intothe outlet
only one way. If the plug does notfit
fully in the outlet, reverse the plug. If
it stilldoes not fit, contact a qualified
electricianto install proper outlet. Do
not change the plug in any way.
• To reduce risk of electrical shock,
use extension cords specifically
marked as suitable for outdoorappliances having electrical rating not
less than the rating of unit. Cord
must be marked with suffix "W-A" (in
Canada "W"). Make sure your extension cord is in good condition.Inspect extension cord before use and
replace if damaged. An undersized
extension cord will cause a drop in
line voltage resulting in loss of power
and overheating. If in doubt, use the
next heavier gauge. The lowerthe
gauge number, the heavier the cord.
(See "Selectingan extension cord")
• Do not abuse cord. Never carry the
unit by the extensioncord or yank
extension cord to disconnectunit.
• Use cord retainer to prevent disconnection of extension cord from unit.
See =Attachthe extension cord to
your trimmer"under the sectiontitled
=OPERATION".
• Do not use the unit if the switchdoes
not turn the unit on and offproperly.
Repairs to the switchmust be made
by your Sears Service Center.
• Keep the extension cord clear of operator and obstacles at all times. Do
not expose cordsto heat, oil, water,
or sharp edges.
• To avoid the possibilityof electric
shock, avoid body contactwith any
grounded conductor,such as metal
fences or pipes,
• Ground Fault Circuit Interrupter
(GFCI) protectionshouldbe provided
on circuitor outletto be used. Receptacles are available having builtin GFCI protectionand may be used
for this measure of safety.
UNIT SAFETY
• Inspect unlt before use. Replace
damaged parts. Make sure all handles, guards, and fasteners are in
place and securely fastened. Parts
that are damaged must be repaired
or replaced by a Sears Service Center. These include head parts that
are cracked, or chipped, guards, and
any other part that is damaged.
• Do not repair unityourself.
• Use only .065" (1.65 mm) diameter
recommendedtrimmer line. (See
"Accessories")Never use wire, rope,
string etc.
• Use specified trimmer spool. Make
sure spool is properly installedand
all parts are securely fastened.
• Use only recommended replacement
parts and accessories.
CUTTING SAFETY
• Inspect area to be cut. Remove objects (rocks, broken glass, nails,
wire, string, etc.) which can be
3
•
•
•
•
•
thrown or become entangled in cutting head.
Do not overreach or stand on unstable support. Keep firm footing and
balance.
Keep the cutting head below waist
level. Do not raise handles above
your waist. Cuffing head can come
dangerously close to your body.
Keep away from spinning line.
Use unit properly. Use only for trimming, edging, scalping, and mowing.
Do not force unit. It will do the job
better and with less risk of injury at
the rate for which it was designed.
Use only in daylight or in good artificial light.
• Store the unit so the blade cannot
cause injury. See "Extending the
line'.
• Store unit indoors in a high, dry place
out of the reach of children. Store
unit unplugged.
DOUBLE INSULATION
CONSTRUCTION
This unit is Double Insulated to help
protect against electric shock. Double
insulation construction consists of two
separate "layers" of electrical insulation instead of grounding.
Tools built with this insulation system
are not intended to be grounded. No
grounding means is provided on this
unit, nor should a means of grounding
be added to this unit.
MAINTENANCE SAFETY
• Maintain unit according to recommended procedures. Keep cutting
line at proper length. Follow instructions for changing trimmer line.
• Have all service and maintenance
not explained in this manual performed by a Sears Service Center to
avoid creating a hazard.
• Disconnect unit from the power supply before performing maintenance,
or when changing trimmer line.
• Never douse or squirt the unit with
water or any other liquid. Clean unit
and labels with a damp sponge.
Keep handles dry, clean, and free
from oil and grease.
• Keep the air vents clean and free of
debris to avoid overheating the motor. Clean after each use.
Safety precautions must be observed
when operating any electrical tool.
The double insulation system only provides added protection against injury
resulting from an intemai electrical insulation failure.
WARNING:
All electrical repairs to
this unit, including housing, switch,
motor, etc., must be diagnosed and repaired by qualified service personnel
Replacement parts for a double insulated appliance must be recommended
by the manufacturer. A double insulated appliance is marked with the
words "double insulation" or "double
insulated." The symbol (square within
a square) [] may also be marked on
the appliance. Failure to have the unit
repaired by qualified service personnel
can cause the double insulation
construction to become ineffective and
result in serious injury.
SAVE THESE INSTRUCTIONS
TRANSPORTING AND
STORAGE
• Stop the unit and disconnect the
power source when not in use.
• Carry the unit with motor stopped.
4
CARTON CONTENTS
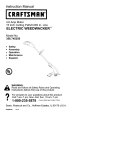
ATTACHING THE SHIELD
Check carton contents against the following list.
WARNING:
The shield must be properly installed. The shield provides partial protection from the dsk of thrown
objects to the operator and others.
Your unit is equipped with a line limiter,
which cuts excess line to the proper
length while running. The line limiter
(on underside of shield) is sharp and
can cut you.
Model 799150
• Trimmer
• Shield
Examine parts for damage. Do not use
damaged parts.
NOTE: If you need assistance or find
parts missing or damaged, call
1-800-235-5878.
ASSEMBLY
WARNING:
If received assembled,
review all assembly steps to ensure
your unit is propedy assembled and all
fasteners are secure.
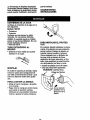
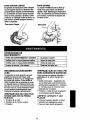
• Extend the tube until it snaps into
place.
• Align the installation arrow on the
shield with the arrow on the motor
housing.
• Insert the shield onto the motor
housing.
• Twist the shield until it snaps securely into place. Make sure the shield is
facing the back of the unit as illustrated on the front cover of this
manual.
CAUTION:
Sharp blade.
Align installation arrows
ADJUSTING THE HANDLE
• Loosenwing nut or knob on handle.
• Rotate the handle on the tube to an
uprightposition;place in a comfortable positionand retightenwing nut.
f
shield in
directionof
arrow to assemble
5
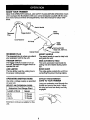
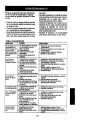
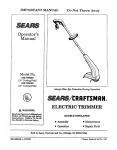
KNOW YOUR TRIMMER
READ THIS OPERATOR'S
MANUAL AND SAFETY RULES BEFORE OPERATING
YOUR
UNIT.Compare the illustrationswith your unitto familiarize yourselfwith the location of the variouscontrols and adjustments. Save this manual for future reference,
Assist Handle
Motor
Housing
Recessed
Plug
/
Cord Retainer
Air Vents
Edge
Guide
_t Semi-automatic
Head with .065" line.
Debds Shield
RECESSED PLUG
The recessed plug is where you attach
your extensioncord to the unit.
TRIGGER
SWITCH
The trigger switch is used to tum on
the unit. Squeeze the trigger switchto
operate the unit.
LINE LIMITER
The line limitercuts the cutting line to
the proper cutting length.
OPERATING
INSTRUCTIONS
Use only a voltage supply as specified
on your unit.
SELECT AN EXTENSION CORD
Extension
Cord Gauge Chart
Length of Cord
Gauge
25 Ft.
50 Ft.
1O0 Ft.
18 Gauge
16 Gauge
16 Gauge
Line Limitsr
ASSIST HANDLE
The assist handle is used to help hold
and guide the unit.
SEMI-AUTOMATIC HEAD
The semi-automatic head holdsthe
cutting line and rotates duringoperation.
EDGE GUIDE
The edge guide protects the unit from
contacting the ground during edging.
ATTACH THE EXTENSION
CORD TO YOUR TRIMMER
Loop your extension cord through the
handle and around the hook. Insure
the plug and cord are firmly and fully
engaged.
Extension cords are available for this
unit.
6
CORRECTOPERATING
POSITION
the line to make contact. Do not force
trimmer line into work area.
Trimming
3 in. (8 cm)
Above Ground
Trimming
EDGING
While edging allow the tip of the line to
make contact. Do not force the line.
The edge guard helps protect the unit
and keeps the unit from contacting the
ground. Take extra caution while edging as objects can be thrown from the
trimmer line,
Edging
Stand as shown and check for the following:
• Operator wearing eye protectionand
heavy clothing.
• Right hand holdinghandle.
• Unit below waist level.
• Use the left side for trimmingso debris isthrown away from the operator. Withoutoperator bending over,
keep the line near and parallel to
ground (perpendicularwhen edging)
and not crowded into matedal being
cut.
Edging •
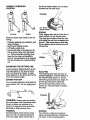
ADVANCING THE CUTTING UNE
Advance line by tapping bottom of cutting head lightly on the ground while
unit is running at full speed. A metal
blade attached to the shield will cut the
line to the proper length.
SCALPING
The scalping technique removes unwanted vegetation. Hold the bottom of
the trimmer head about 3 in. (8 cm)
above the ground and at an angle. Allow the tip of the line to strike the
ground around trees, posts, monuments, etc. This technique increases
line wear.
EDGING POSITION
You can press this button and twist the
lower portion 180 ° into an edging position.
Scalping
Button
WARNING:
Always wear eye protection. Never lean over the trimmer head.
Rocks or debris can ricochet or be
thrown into eyes and face and cause
blindness or other serious injury.
TRIMMING
Hold the bottom of the trimmer head
about 3 in. (8 cm) above the ground
and at an angle. Allow only the tip of
MOWING
Your trimmer is ideal for mowing in
places conventional lawn mowers cannot reach. In the mowing position,
7
keep the line parallel to the ground.
Avoid pressing the head intothe
ground as this can scalp the ground
and damage the tool,
Mowing
SWEEPING
The fanning action of the rotatingline
can be used for a quick and easy
clean up. Keep the line parallel to and
above the surfaces being swept and
move the tool from side to side.
Sweeping "
CUSTOMER
RESPONSIBILITIES
CARE & MAINTENANCE TASK
WHEN TO PERFORM
Check for Loose fasteners and parts
Check for damaged or worn parts
Clean unit and labels
Before each use
GENERAL
Before each use
After each use
RECOMMENDATIONS
CHECK FOR DAMAGED
WORN PARTS
The warranty on this unit does not cover items that have been subjected to
operator abuse or negligence. To receive full value from the warranty, the
operator must maintain unit as instructed in this manual. Various adjustments
will need to be made periodically to
properly maintain your unit.
OR
Refer replacement of damaged/worn
parts to your Sears Service Center,
• Trigger Switch - Ensure switchfunctions propertyby pressing and releasing the trigger switch. Make sure
motor stops.
* Debris Shield - Discontinueuse of
unit if debrisshield is damaged.
CHECK FOR LOOSE
FASTENERS AND PARTS
• Housing Screws
• Assist Handle Screws
• Debris Shield
• Edge Guide
CLEAN UNIT & LABELS
• Clean the unit usinga damp cloth
with a milddetergent.
• Wipe off unit with a clean dry cloth.
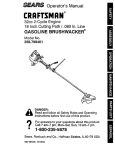
REPLACING
THE LINE
• Remove the spool by firmly pulling
on the tap button.
• Clean entire surface of hub and
spool.
• Replace with a pre-wound spool
(# 71-85837), or cut a length of 30
feet of .065" (1.6 mm) diameter
Craftsman® Pro Trimmer line. Use of
heavier lines could overload the unit
and damage unit. Never use wire,
rope, string, etc., which can break off
and become a dangerous missile.
8
• Insert one end of the line about 1/2
inch (1 cm) into the small hole inside
the spool.
• Wind the line evenly and tightly onto
the spool. Wind in the direction of the
arrow found on the spool.
• Push the line into the notch, leaving
3 to 5 inches (7 - 12 cm) unwound.
• Insert the line into the exit hole in the
hub as shown in the illustration.
• Align the notch with the line exit hole.
• Push the spool into the hub until it
snaps into place.
• Pull the line extending outside the
hub to release it from the notch.
USER REPLACEABLE
SERVICE
Spool
Hub
Line exit hole
PARTS
REPLACEMENT PART
PART NUMBER
Spool with .065" Pro Trimmer Line
Assist Handle
71-85837
Bolt Carriage, 1/4-20
Wing Nut
Shield Assy.
530-401989
530-016152
Edge Guide
Screw_10-16 X 1/2 HI-LO SEMS
530-402661
530-402657
530-402673
530--015815
Prepare unit for storage at end of season or if it will not be used for 30 days
or more.
WARNING:
• Stop the unit and disconnectthe
power source when not in use.
• Carry the unitwith motor stopped.
• Store the unit so the line limiterblade
cannot cause injury.
• Store unit and extension cord indoors in a high, dry place out of the
reach of children. Store unit unplugged.
• Store unit with all guards in place.
Position unit so that any sharp object
cannot accidentally cause injury.
9
TROUBLESHOOTING
CHART
TROUBLE
CAUSE
Semi-automatic • Crowdingtnmmer line
head stops
against material being
under a load or
cut.
REMEDY
• Allow tip of line to do the cutting.
does not turn
when switch is
_ressed.
• Electricalfailure.
• Thrown circuitbreaker
• Debris stopping head
Contact your Sears Service Cir.
Check Breaker Box.
• Remove debris.
Line does not
advance or
breaks while
cutting.
• Line improperly
routed in head.
• Line improporly
wound onto spool.
• Incorrectline size
• Not enough line
outsideof head.
• Dirt buildupon cover.
Line welds
!onto spool.
Line releases
continuously,
Line usage is
excessive.
Une pulls
back into
head.
• Check line routing.
• Rewind line tightly and evenly.
• Use only.065in, diameterline.
• Pull4inches ofline outside of
head.
• Clean coveg
"
• Une size is incorrect.
Incorrectspool.
Line is being crowded
against material being
cut.
spool.line.
i Replace
Use onlywith
.065correct
in. diameter
Cut with tip of line fully extended.
• Line improperly
routedin head.
• Spool damaged.
• Check line routing.
• Line improperly
routedin head.
• Line size is incorrect.
• Crowdingline against
materialbeing cut.
• Spool teeth worn
or damaged.
• Check line routing.
• Too little line outside
of head.
• Line size incorrect.
• Remove cover and pull 4 inches
of line outside of head.
• Use only .065 in. diameter line.
• Replace spool.
10
• Replace spool.
• Cut with tip of linefully extended.
• Replace Spool
Declaraci6n de Garant(a Umitada
Reglas de Segufldad
Montaje
Uso
Mantenimlento
11
11
14
15
17
Serviclo y Ajustes
18
Almacenamlento
19
Tabla Diagn6stica
19
Piezas y Encargos
Contratapa
GARANTIA COMPLETA DE UN AI_O PARA LA CORTADORA A LINEA
ELECTRICO CRAFTSMAN ®
Si esta cortadora eldctr.icaWeedw.acker ®Craftsman tiene alguna falla
de func=onamiento deb_daa matenales o mano de obra, durante un a5o
a partir de la fecha de compra, Sears la reparara o cambiard.
Esta garantfa excluye la Ifnea de nylon.
EL SERVICIO BAJO GARANTIA ESTA A SU DISPOSICION CON
SOLO DEVOLVER LA CORTADORA A LINEA ELECTRICA WEEDWACKER ® CRAFTSMAN AL CENTRO DE SERVICIO SEARS MAS
CERCANO EN LOS ESTADOS UNIDOS.
Estagarantfa le confiere derechos jurfdicos especfficos' adem_.s ud.
Podrdtener otros derechos que varfan entre estados.
Sears, Roebuck and Co. D/817 WA, Hoffman Estates, IL. 60179
Siempre que se use cualquiercortador eldctrico,deben observarse precauciones bdsicas de segundad para
reducirel riesgo de incendio, choque
el6ctdco y graves heridas. Lea y cumpla con todas las instrucciones.
guier otro accesodo o pieza incrementard el pel,gro de heridas.
@0@
La Ifnea de corte arroja objetos violen-
Informaci6n de seguridadsn el aparato
Este aparato de fue=a puede ser peligroso. El usuario tiene la responsabilidad de cumplir con todas las instrucciones y advertencias en el aparato y
en el manual. Lea el Manual del Usuario en su totalidad antes de usar el
aparato! Familiar'icese completamente
con los controles y el uso correcto del
aparato. Limits el uso de este aparatc
a aquellas personas que lean, comprendan, y cumplan con las advertencias e instrucciones en el aparato y en
el manual. Nunca permita a los ninos
que usen el aparato.
PELIGRO: Nunca use cuchillas ni dis_ositivos desgrandores. Este aparato
a sido diseSado exclusivamente
como cortador a Ifnea. El uso de cual-
tamente. Los objetos arrojados pusden cegado o herido a usted y a ter
ceros. Use anteojos de segundad,
botas y protecdci6n para las piemas.
Mantenga el cuerpo alelado de la Ifnea
girante.
Anteojaosde segurldadoprotecci6nsimilar de ojos.
Botas
Mantenga a los nitros, los animalesj.
los espectadores a una distancia mm=ma de 15 metros (50 pies). Pare el
aparato inmediatamente si alguien se
le acerca.
Si acontece alguna situacibn no
prevista en este manual, tenga cuidado
_lause buen criterio, sl necesita ayuda,
me al 1-800-235-5878
11
SEGURIDAD DEL USUARIO
• VItese de forms aproplada. Siempre
use anteojos de ..seguddado protecci6n de ojos similar al hacer uso o
mantenimlento del aparato. (F_xisten
anteojos de seguridad.) Use stempre
m,_scaraprotectors de la cars o
m_.scaraanti-polvo al usar el sparsto en ambientes polvonentos. Use
smmpre pantalones largos gruesos,
mangas largas, botas y guantes. No
use el aparato descalzo nl con sandallas.
• Mantenga el cabello por encima de
Io.shombros, at_.ndolopars tal efecto
st es necasado. No use joyas, ropa
suelta o ropa con tiras, corbatas,borlas, etc. que cuelguen libremente;
pueden enredarse en las piezas en
mo_nmiento.
tar_.mds protegtdode los escombros
y pedazos de plantas t6xicas arrojai Si
est_
ente tapado, esdos
porcomple._.
Is lines girante.
Mant_ngase alerts. No use este aparsto cuando est6 cansado, enfermo o
bajo la influenci.adel alcohol, de drogas o de remedtos. Viglle bien Io que
est,. haclendo; use dal sentldo
comt_n.
• Evite los arranques no Intenolonales
del motor.AI Ilevar el aparsto de un
lado a otro, nunca .pongael dedo en
el interruptor.Asegurase de qua el
interruptorest6 en la posici6n "Off" al
conectar el cable de extensi6n
SEGURIDAD ELECTRICA
• Use el voltaje especificado en el aparato.
• Evitelosambientespeligrosos,
No
use losaparstosen loca,
leshumedos.No Iouse en lalluvta.
• Evitelassituaclones
peligrosas.
No
' use elaparatoen Ispresenciade
gaseso flq.
uldosinflamablas
parsev=tar
incend=os,
explosiones
y/oda_os
alaparato.
•Para reducir
elrlesgode choque
el6ctrico,
esteequipowene con enchufepolarizado
(unaclavfcula
de
contacto as m_s ancha que laotra).
Este enchufe p.uedeentrar al tomacorrlente polanzado del cable de extensi6n unicamente en un sentido.
Asegt_reseque el cable de extensi6n
sea polarizado. El enchufe del cable
de extensi6n polarizado puede entrar
al tomacorriente en un solo sentido.
Si el enchufe no entra com.pletamente al tomacordente, mwerta el
sentido del enchufe. Si aun asf no
antra, entre en contacto con un elec-
trlcista capadtado pars que Instale
un tomacordente apropiado. No modiflque el ench_.e de modo alguno.
• Pars reducir el nesgo de choque
el6ctdco, use cables de extenst6n (1)
qua vengan especiflcamente mamados como aproplados pars aparatos
de uso an exterioresy (2) que tengan
una clasificacJ6nel6ctrica no manor
qua la del aparato. El cable deber_,
venir marcado con el su)ifo=W-A"
("W" en Canada,). Asegurese de que
el cable de extensi6n est6 en buenas
condi_.'ones.Inspeccione el cable de
extenst6nantes de usarlo y si est,.
dafiado, c_mbielo. Los cables demasiado finos causar_n uns baja en el
voltaje de fines, Io que provocardfalta depotencia y exceso de temperatura. En caso de duds entre dos
cables, useel m_.sgrueso. Cuanto
m=_s.,pequeno
es el nt_merode clasificact6n, m_s grueso es el cable. (Vea
"Seleccibn del cable de extensibn')
• No use el cable indebidamente. Nunca Ileve el aparato por el cable de extensl6n nl la desconecte dal enchufe
tirando del cable.
• Use el retentor de cables pars evitar
que el cable de extensi6n se desconecte del aparato. Vea "Uso del aparato".
• No use el aparato si el interruptorno
Io prende y apags correctamente. El
Proveedor de ServtctoAutorizado
hAUthorizedService Dealer) deb.erd
acer todas las reparacionas al mterruptor.
• Mantenga el cable de extensi6n alejado del-usuarlo y de los obstdculos
en todo momento. No exponga los
cables al calor, al aceite, al agua o a
los bordes filosos.
• Evitetodo contacto del cuerpo con
los conductores a tierra, tales como
las cercas o los caRosde metal para
evitar la
el6_rico.posibilidad de choque
• El circuito o el tomacorriente qua se
use con este aparato debar& estar
provisto de proteccibn de Interruptor
de Fallas en el Circuito a Tierra
_GFroundFault Circuit Interruptor-CI). Los to.macorrientescon protecci6n GFCI _ncorporada pueden
ser usados pars esta medida de seguridad.
SEGURIDAD DEL APARATO
•Inspeccione el aparato completamente antes de cads uso. Hags que
un Proveedor de Sears Service Centar repare o camble las piezas da_a-
12
•
•
•
•
das. Esto incluye las pie.zasdel cabezal que est6n resquebrajadas o
descantilladas, los p.rotectoresy cualquier otra pieza danada.
No intents reparar ud. mismo el aparato.
Use exclusivamentela linea de corte
con didmetro de 1,65 mm (0,065 de
pulgada), recomendado. (Secci6n
"Acoesonos') Nunca use alambre,
soga, hilo, etc.
Use la,bobina especifi.cada.
Asegures.eque la bob,na est_ correctamente =nstal.ada_.que el aro de retencibn estl_bran fijo.
Use exc!usivamentelos repuestos y
accesonos recomendados.
SEGURIDAD AL CORTAR
• Inspeccione el _rea a ser co.rta,
da.
Retire los objetos (piedras, v=drio
roto, clavos, alambre, hilo, etc.) que
_uedan ser arrojados o que se pusan enredar en el cabezal de corte.
• No se incline excesivamente nl se
pare en supedi.=ciesinestables. Mantenga el equd=bdo,con los pies en
una superficiefirms y estable, en
todo momento.
• Mantenga el cabezal de corte por debajo de/nivel de la cintura. No levante las manijas por encima del nivel de la cmtura. El cabezal de corte
se le puede acercar peligrosamente
al cuerpo.
• Mant6ngase alejado de la hnea girante.
• Use el aparato debidamente. Uselo
exclusiv.amentepara recortar y para
cortar cesped. No sobrecargue el
aparato; dar& memor rendimiento
con menor probabilidad de heridas si
se Io hace funcionar al ritmo para el
cual rue dise_ado.
• Use el aparato 5nicamente de dia o
en luz artificialfuerte.
SEGURIDAD EN EL
MANTENIMIENTO
• Haga el mantenimiento del aparato
de acuerdo a los procedimientos recomendados. Mantenga la I[nea de
corte al largo que corresponds.
• Todo servic=oy mantanimiento no explicado en este manual deber_iser
efectuado por el Proveedor de Servicio Autorizado Sears Servcie Center
para evitar peligros.
• Desconecte el aparato de la fuente
de electricidad antes de hacer cualquier mantenimiento.
• Nunca le heche agua ni ning_n otto
flquido al aparato, nile direccione
chorrosde agua ni de ningOnotto
Ii'quido.Ump[e el aparato y las calcomanias y placas con una es._onja
hdmeda. Mantenga las man..ijassecas, Ilmplasy hbresde aceite y grasa.
• Mantenga,las aberturas de vetilaci6n
limplas y hbresde escombro,?para
evitar el calentamiento excesNo del
motor. Umplelas despu_s de cada
USO.
TRANSPORTE Y ALMACENADO
• Pare el motor y desconecte el aparato de la corrienteel6ctdca slempre
que no estd en uso.
manos, mantenga
motorapagado.
i Cuando
cargue el el
aparato
en las
Guarde el aparato de modo que el
lim.ita.,
dot de ll'neano pueda causar
hendas accldentalmente. Vea "Extensl6n de la Ifnea'.
• Guards el aparato al abdgo de la intemperie, desenchufado, en un lugar
alto, seco y fuera del alcance de los
ni_os.
CONSTRUCClON
CON DOBLE
AISLAMIENTO
Este aparato tiene Aislamiento Doble
para mcrementarla protecQbn contra
el choque e.l_ctrico.El Alslamiento
Doble cons,ste,de dos "..capas"
separadas de aislam_entoel_ctrico en vez de
cable a tierra.
Las herramientasy los electrodom_s.ticos con aislamiento doble no neces,tan ,c_le a tierra. No se le ha provisto
ningun medlo de conexJ6na tierra a
este aparato, tampoco se le debe ?gregar ning_n medio de cone.xibna tierra.
Deben observarseprecaucJonesde seguridad al trabajar con toda herrarnienta el6ctrica. El sistema de alslamiento
doble solamente proves una protecci6n adicional contra las hendas provocadas por una falla en el aislamianto
al6ctrico interno.
Todo diagn6stico y reparaci6n de
fndole electdca a este aparato, incluyando a la caja, el interruptor,el motor, etc., deber_.nser efectuados por
personal de servicio capacitado. Los
repuestos para un aparato con aislam_ento doble deben ser recomendados por el fabricante. Los aparatos con
aislamiento doble vienen marcados
con las palabras "double insulation"
(alslamientodoble) o "double insulated" (doblemente alslado). Tambi6n
puede aparecer el s{mbolo (cuadroado
dentro de un cuadroado) [] en el aparato. El aparato debe ser reparado por
13
un Proveedor de Servlclo Autorlzado
(AuthorizedService Dealer); de Io contrarlo el sistema de alslamlento doble
puede quedar inutilizado,acarreando
graveshefldas.
GUARDE ESTAS
INSTRUCClONES
CONTENIDO DE LA CAJA
Verificlue.elcontenido de la caja por la
lista slgulente.
Modelo 799150
• Cortadora
* Protector
Verifiqueque las piezas no est6n
dafiadas.No use piezas dafiadas.
AVISO: Si necesita ayuda o si faltan
pnezaso hay piezas dafiadas. No use
piezas danadas, Ilame al
1-800.235-5878.
TUBO EXTENDDIDO
MAXIMO
AL
• Extienda el tubo hasta que quede
trabado en su lugar.
MONTAJE
Si recibi6 el aparato ya armado, repita
todos los pasos para asegumrse de
que est6 correctamente armado y que
todos los fijadores est6n bien ajustados.
PARA AJUSTAR
PARA INSTALAR EL PROTECTOR
El protectordeber_,instalarse correctamente, El protectorprovee protecci6n
parcial contra el desgo de objetosarrojados hacia el usuarioy tercems.
Viene wquipado con un limitadorde
lea que corta el exceso de Ifnea,
dej_,ndolodel largo adecuado, el limitador (que queda en la superficieinferior del protector)es filosoy corta.
• Instale las piezas come se ilustra.
• Deje las piezas bien ajustadas.
CUIDADO Cuchilla filosa.
Alinee las flechas
LA MANIJA
, Afloje la tuerca mariposa o la perilla
en la manija.
• Haga rotar la manija en el tobo hasta
que quede en posici6n vertical.
coI6quela en una posici6n c6moda y
vuelva a ajustar la tuerca madposa.
Jire elescudo
protectoren la
direccionde la
flecha
14
CONOZCA SU APARATRO
LEA ESTE MANUAL DEL USUARIO Y LAS REGLAS DE SEGURIDAD
ANTES DE PONER EL APARATO EN FUNCIONAMIENTO. Compare
tas ilustracionesa su aparato para familiarizarse con la ublcaci6n de los
controles y ajustes. Guarde este manual para uso futuro.
Manija Auxi!!ar
\
GatilloInterruptor
Enchufe
/
7
Caja dsl
Motor
Retentorde Cable
Abertums de VenUlaci6n
Protector
bordes
Protector
ENCHUFE
Se conecta el cable de extensiSn al
aparato en el enchufe.
GATILLO ACELERADOR
Se usa el gatillo acelerador para poner
el aparato en marcha. Aprete el gatillo
acelerador para hacedo funcionar.
LIMITADOR DE LINEA
El limitador de Ifnea corta la Ifnea,
dejdndola del largo adecuado.
MANIJA AUXlLIAR
Se usa la manija auxiliar para sostener
y guiar el aparato.
CABEZAL
SEMIAUTOMATICO
El cabezal semiautom&tico sostiene la
Ifnea de corte y gira durante el uso.
PROTECTOR
ELIJA UN CABLE DE EXTENSION
Cuadro de Clasiflcaol6n de Cables
Largo de Cable
25 pies
50 pies
100 pies
Cleslflcaci6n
18 Clase
16 Clase
16 Clase
Hay cables de extensi6n disponibles
en el mercado para este aparato.
ENCHUFE EL CABLE DE EXENSlON
AL APARATO
Haga una vuelta en el cable
si6n, p_,sela pot la manija y
del gancho..Asegurese que
y el cable esten firmemente
mente conectados.
DE BORDES
El protector de hordes proteje el aparato contra el contacto con el suelo al
recortar hordes.
USO DEL APARATO
Use exclusivamente el voltaje especificado en el aparato.
15
de extenal rededor
el enchufe
y fuerte-
POSICION
CORRECTA
DE USO
o escombros a los ojos y la cam, causando ceguera u otras hsddas graves.
PARA RECORTAR
Sostenga el cabezal a unes 8 cm (3
pulgadas) del suelo yen dngulo. Permita finicamente que la punta de la
Ifnea haga contacto. No meta la Ifnea
de corte en el drea de trabajo.
Para re¢ortar
,Para Recodar
Para Corta Bordes
Pdrese como se ve en la figura y verifique Io siguiente:
•
El usuario est_ usando anteojos de
seguridad y ropa gruesa como proteccl6n.
•
La mane derecha sostiene la man.
i'_'a,parato"-estd debajo del nivel de
la c_ntura,
• Corte del lado izquierdo para que
los escombros sean arrojados en
direcci6n contraria a donde estd
parado. Sin tener que inclinarse,
mantenga la Ifnea corca del suelo
y paralela al mismo (perpendicular
cuando estd cortando hordes), sin
meteda dentro del material que se
est,. cortando.
EXTENSION DE LA LINEA
Para hacer avanzar la Iinea, toque la
parts inferior del cabezal en el suelo
con el aparato en marcha. La cuchilla
cortar_, la hnea al largo correcto.
POSICION
PARA CORTAR
BORDES
Apret_.ndos este bot6n se puede hacer
g=r'
ar la parte inferior 180° a la posicibn
de cortar bordes.
3 in. (8 cm
arriba del suelq
PARA CORTAR BORDES
AI cortar bordes, deje que la punta de
la Ifnea haga contacto. No fuerce la
Ifnea. El protector de bordes ayuda a
protegar el aparato y Io mantiene separado de la tierra. Ponga mucha
atenci6n mientras est6 usando la podadora y sea precabido, ya que la
Ifnea de corte puede arrojar objetos al
aire.
• ""
Para cortar
bordes
•
-
'"
PARA ESCALPAR
La t_cnica de escalpado retira la vegetaci6n no deseada. Sostenga el cabezal a unos 8 cm (3 pulgadas) de la tierray en dngulo. Deje que la punta de la
Ifnea golpee contra la tierra alrededor
de drboles, ostes, monumentos, etc.
Esta t_=cnicaaumenta el desgaste de
la Ifnea.
Para e
scalpar
Bot6n
Use siempre protecci6n de ojos. Nunca se incline sobre el cabezal: _ste
puede arrojar o hacer rebotar piedras
16
PARA CORTAR CESPED
El aparato es Ideal para cortar c6sped
en los lugares donde no alcanzan las
cortadoras de c6spea convencionales.
En la posici6n de cortar pasto se mantiene la Ifnea paralela a la tierra. Evite
presionarel cabezal contra la tierra, ya
que hacedo puede escalpar la tierra y
dafiar el aparato.
Para €ortar C6sped
PARA BARRER
La acci6n ventiladom de la Ifnea glrante sirve para hacer una limieza
rdpiday fdcil. Mantenga la Ifnea paralela a la superficleque desea limpiary
por encima, moviendoel aparato de
un lado al otro.
Parabarrer
CRONOGRAMA DE
MANTENIMIENTO
TAREA DE MANTENIMIENTO
CUANDO HACER
Antes de cada uso
Antes de cada uso
Y CUIDADO
Verificarque no haya fijadores sueltos
Verificarque no haya piezas da_adas
Limpiar el aparato y las placas
Despu6s de cada uso
RECOMENDACIONESGENERALES
VERIFIQUE QUE NO HAYA PIEZASA DA_IADAS NI GASTADAS
La garantfa de este aparato excluye
aquellos artfculos que hayan sido
sometidosal abuso o a la negligencia
por parte del usuado. Para recibir el
valor completo de la garantia, el usuario deberd hacer el mantenimiento del
aparato de acuerdo a las instrucciones
en este manual. Serd necesario hacer
variosajustes peri6dicamente para
mantener el aparaio debidamente.
VERIFIQUE QUE NO HAYA FIJADORES SUELTOS NI PIEZAS
SUELTAS
• Tornillosde la caja
• Tornillosde la manija auxiliar
• Protector
Haga reponerlas piezas da_adas o
_astadas por el centro de Servicio
_ears.
• Gatillo Interrupter- Asegdrese de
que el interruptorest6 funcionande
debidamente appretando y soltdndoIo. Verifiqueque el motorse haya
detenido por completo.
• Protector- Deje de usar el aparato
si el protectorqueda daSado.
LIMPIE EL APARATO Y LAS
PLACAS
• Limpie el aparato usando un trapo
h_medo con detergente suave.
• Pase un trapo limpio al aparato.
17
PARA HACER AVANZAR LA LINEA DE CORTE
Haga avanzar la Ifnea tocando el cabezal suavemente contra el suelo con el
motor marchando a mdxima velocidad.
La cuchilla de suelo con el motor marchando a mdxima velocidad, La cuchilla
de suelo con el motor marchando a
mdxima velocidad. La cuchilla de metal
instalada en el protector cortard la Ifnea
al largo debido.
PARA CAMBIAR LA LINEA
• Retire la bobina tirando firmemente el
bot6n de toque.
• Limpie la superficie entera del cudo y
de la bobina.
• Cdmbiela pot una bobina prHnroscada, o corte 10 m (30 pies) de Ifnea
mama Craftsman ® con didmetro de
1,6 mm (0,065 de pulgada). Nunca
use alambre, soga, hilo, etc., que se
pueden romper, convirti6ndose asi en
proyectiles peligrosos.
• Meta un crn (1/2 pulgada) de una punta de la Ifnea por el orificio pegue_o en
la bobina.
recci6n que indica la flecha que se encuentre en la bobina.
• Fije la linea en la muesca, dejando
unos 7 a 12 cm (3 a 5 pulgadas) sin enroscar.
• Pase la linea por el orificio de salida en
el cubo como se ilustre.
• Alinee la muesca con el orificio de salida.
• Junte el cubo y la bobina, empujando
_sta hasta que se trabe en su lugarcorespondiente.
• Tire la Ifnea que sobresale del cubo
para soltarla de la muesca.
Oriflcio
Pequei'lo
q_'-
Bobina
Orificio
Oriflciopara salida de la Ifnea
• Enrosque la Ifnea de forma pareja y tirante en la bobina. Enrosque en la di-
18
Prepare el aparato para ser almacenado al final de la temporada o cuando
no se usard el aparato durante 30 dias
o mas.
de co_e
• Guarde el aparato y el cable de exten.
si6n ai abdgo de la intempede,desenchufados, en un lugar alto, seco y
fuem del aloance de los nifios.
• Guarde el aparato con todos los protectores en su lugar correspondiente.
Cologue el aparato de mode que
ning0nobjetofllosopueda causarherIdes accidentalmente.
• Guarde el aparato y el combustible
bien fuero del alcance de los ni5os.
• Pare el motory desconecte el aparato
de la oorriente el_trica siempre que
no est6 en use.
• Cuando cargueel aparato en las manos, mantenga el motorapagado.
• Guarde el aparato de mode que el limitador de Ifnea no pueda causar heddas. Vea Para hacer avanzar la linea
TABLA DIAGNOSTICA
SINTOMA
El cabezaJ semlautorndtico se
detiene bajo cargao no gira
cuando se apreta el gatillo interruptor.
CAUSA
SOLUCION
1 Se estd metiendo la Ifnea
en el matedal que se
estd cortando,
2 Faila el6ctdca.
13 Interrupt or de circulto
aCClOrlaoo.
4 Escombros parando el
cabezaL
!La L/nea no
1 TrayectodaIncorrectade
la Ifnea en el cabezal.
avanza o se
rompe aJ cortar. 2 La Ifnea estd enroscada
1 Comtecon la puntade la Ifnea
0nloamente.
2 Entre en contectocon el Centre de
ervido Sears.
3 Inspecdone la caja de fusibles.
14 Retirelos escombms.
1 Verifique la trayectria de la I_nea.
2 Entrosque nuevamente la Ifnea de
forma pareja y tirante.
3 Use sOlo Ii'nea del didmetro correcto
de forma Incorrectaen la
boblna.
3 DldmetroIncorrectode la
4 Retire la tape y saque 10 crn
Ifnee.
(4 pulgadas) de Ifnea hacia afuera.
4 Insuflcfenclade Ifnea
5 Llmple la tape.
afuera del cabezal
5 Acumulack_nde tiena tapa.
106511o
"La Lfnea se
funde en la bobina.
1 DldmetroIncorrecto de la
Ifnea.
2 BoblnaIncorrecta.
3 Se estd mel_endola Ifnea
en el material que se estd
cortando.
1 Use solo Ifnea del di,@netm correcto
(.065")
2 Use la bobina apropiada.
3 Corte con la punta de la Ifnea
plenamente extendida.
t.a Ifnea avanza
constantemente.
1 Trayectoria Incorrecta de
la II'nea en el cabezaL
2 Boblna da_ada.
1 Veriflque la trayectoda de la Ifnea.
2 Carnble la bobina.
Use o desgaste
excesivo de la
I/nea.
1 Trayectoria Incorrecta de
la Ifnea en el cabeaL
2 Did,metro Incorrecto de la
Ifnea.
3 Se estd metlendo la Ii'nea
en el matedal que se
estd cortando.
4 Los dlentes de la boblna
est_n gastados o dar3ados.
1 Vedflque la trayectorla de la linea.
2 Gamble la bobma.
3 Corte con la punta de la Iinea
plenamente extendida.
4 Camble la boblna.
La Ifnearetrocede al cabeZal.
I Insuflolencla de Ifnea
a/uera del cabezaL
2 Dl_'unetroIncorrecto de la
Ifnea.
1 Retire latap ly saque 10cm
(4 pulgadas] de Ifnea hacla afuera,
2 Use sOlo Ifnq_ del dldmetro correcto,
(.065")
19
For in-home majorbrandrepair service:
Call24 hoursa day,7 daysa week
1-800-4-MY-HOME
TM (z.soo-469.4663)
Para pedir servicio de reparaci6n a domicilio -- 1-800-676-5811
In Canadafor all your serviceandpartsneedscall
Au Canadapourtoutle serviceou lespi_ces "" 1-800-665-4455
Forthe repairor replacementpartsyou need:
Call6 am - 11pmCST,7 daysa week
PartsDirect
TM
1-800-366-PART (1.800-366-7278)
Para'ordenarpiezascon entregaa domicilio -- 1-800-659-7084
Forthe locationof a SearsPartsandRepairCenterin yourarea:
Call24 hoursa day,7 daysa week
1-800-488-1222
For informationon purchasinga SearsMaintenanceAgreement
or to inquireaboutan existingAgreement:
Call9 am - 5 pro,Monday- Saturday
1-800-827-6655
SF.AR8
HomeCentral
=