1
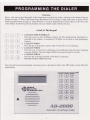
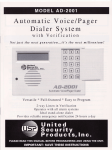
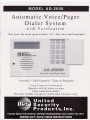
Automatic Voic elPager
Di ale r Sys tem
wi th Ver i f i c a tion
Not just the next generation...it's
--t!-f
the next millennium !
-,f-n
l1l
ll-.i2 l
,E
United
SecuritY
Producls,
r-\
t
lnc.
R
lsll
l-./:
E
ffi
tr
Er
@:
@
tr
/|.E-ETTg.CT
AutomaticVoice/PagerDialer
Versatile * Full-featured * Easy to Program
2-way Listenin Verification
O p e r a t e sw i t h a l l a l a r m s y s t e m s
I d e a l s t a n d - a l o n ed i a l e r
P r o v i d e sr e l i a b l e e m e r g e n c yn o t i f i c a t i o n2 4 h o u r s a d a y
THIS PACKAGE CONTAINS:
I ea.MODEL AD-2000
1 ea.PHONE CABLE
1 ea.INSTRUCTION MANUAL
4 ea.lK RESISTORS
Section
Packagecontents.
PanelDisplays.....
InstallationHookups:Alarm Panel.
InstallationHookups:StandAlone
Programmingthe Dialer
Overview.
Numbers.
ProgrammingPhone/Pager
ProgrammingAuxiliary Information
Programming/Recording
OGMs.
ProgrammingChannels.
TestingYour System
OperatingYour System
AdditionalFeatures.
ProgrammingExample.
SampleProgramPlanner.
Blank ProgramPlanner.
Specifications.....
Dialer Accessories
Important Information
Page number
..
3
4
5
6
7-II
1
8
9
10
10-11
II
12
12
13
13
14
15
15
16
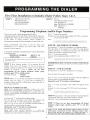
EASY PROGRAMMINC WITH
PROMPT LCD DISPLAY
EASY TOUCH KEYPAD
SLIDING KEYPAD COVER
@
@
@
@
18 0 0 2 2 715 9 2
Unlted
SecurltY
Product's,lnc.
MICROPHONE -\
TO RECORI)
VOICE MESSAGE
@
@
@
ilril
mr
tr4l,
@
MODE -
PLAYBACK
SPEAKER FOR
OGM AND z_'IVAY
VOICE VERIFICATION
PROGRAM
TEST
OPERATE
OFF
RECORDVOICE
PAUSE DIGIT (2SIDIGIT)
A D - 2 O O O F R O N TV I E W
12V
AUX
OUT
A D _ 2 O O OB A C K V I E W
B R E A K _ O F FP A N E L
FOR WIRINGINPUT+
v
TEL
I 2VDC
Lruor,ro,,
ACCESS
ON
BACK
A D - 2 O O OT O P V I E W
Alarm Panel
A L A R M C O N T R O LP A N E L
W I T H D R Y C O N T A C TO U T P U T S
r--r
r\--l )
/n\
\-'i
AD-zooo REAR vrEw
TERMINAL ACCESS
/G\
tq>t
vv
/i
t<>l
-NOTE:
AUX AI"ARM OUTPUT
RATTNG I2VDCI0.3A
MAX
AUX PANEL
.l
TNCOMTNG
PHONE
N.O. or N.C.
DRY CONTACTS
(MOMENTARY
or CONTINUOUS
ACTIVATION)
LINE IIINTF
SEIZURE HOOKUP
rN HousE (""'"
PHONE LINE,]
D R Y C O N T A C TA L A R M P A N T L I N T T R F A C E
ALARM CO\TROL PANEL WITH
V O L T A G ET R I G G E R O U T P U T S
R E A RV I E W
AD_zOOO
TERMINALACCESS
@
_NOTE: AUX ALARM OUTPUT
RATTNGI2VDC/0.3A MAX
AUX PANEL
)L
MOM TRIG: ISEC III\
CONT TRIG: l0MI\ TI
MIN +5VDC
MAX +zBVDT'
TNCOMTNG
l
PHONE LINE
!Une
IN*_HOT]SE I
SrtzunE HooKUp
puoNr lrxp J
INSTALL 1K RESISTORS (SUPPLIED)
IF TRIGGER VOLTAGE IS APPLIED
THROUGH RELAY CONTACT
V O L T A G IT R I G G E R
A L A R MP A N E LI N T E R F A C E
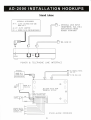
StandAlone
OPTIONALACCESSORIES
AC-l:
AC/DC ADAPTORFOR USE
IYITH PP_ 1
OPTIONAL LINE INPUT
( T E L E P H O N E ,F A X , E T C . )
D I S C O N N E C T SW H E N
DIALER ACTIVATES
AC-1P: AC/DC ADAPTOR
PACK (RECHARGEABLE)
PP-1: PO1TER
TEL LINE IN
P O W E R& T T L I P H O N EL I N E I N T E R F A C E
*OPTIONAL
ll*l"JtL"ot
tl
ll
>r
lt
lttl
\l--1
\.-J
:
To TEL WALL.IACK
\fl
\,J
o
1 2OVAC
60Hz
MODEL AC-2
rzvDc / o.5A
A
rA
!7
AD-zOOO REAR VIEW
T E R M I N A LA C C E S S
A
T''
@
NOTE: AUX ALARM OUTPUT
RATING 12VDc,/0.3A MAX
s-120
SIREN
[.nt
l N P t l T S :l " , o
SENSOR
D O O R& r v l N D O w
''""
C O N T A C TTSE. M P) ^ , , .
S E N S o R SE, r c .
1""
[cH4
t"o*t'
S T A N D - A L O N EI N T E R F A C E
Overview
Please study this sectionthoroughly before beginningto program the dialer, referring to the SampleProgram
Planneron page 13. Then, selectfrom among the optionsfor eachfeature,listing each choice in pencil on the
blank ProgramPlanneron page 14. Once the dialer is correctly programmed,list eachchoice in ink. One copy
of the Plannershouldbe kept by the installer;one copy shouldremain with the end user.
A look At The Keypad
\
[ :- :_ 'l '' , - )
' .-
.t
ri4
ilr @_r
t[.)Lqr[-e]
LIj ild |-#-l
iltlta't@
CALLOUT FOR NUMERALS:
Pressthesekeysto entertelephone
numbersandotherprogramming
informationas
specifiedin this manual.A maximumof 50 digitscanbe input in eachphone/pager
location.
CALLOUT FOR P:
Pressthiskey to programin a pause.Each"P" providesa 2-second
pause.
CALLOUT FOR R:
Pressthis key to recordthe combinationof identificationand directionaloutgoing
(OGMs).Thetotalelapsed
messages
OGM timecannotexceed
5l seconds.
CALLOUT FOR M:
Pressthiskey to changetheModeof thedialer,in sequence:
PROGRAMTESTOPERATEOFF.
Once the unit has beenprogrammed,removing power or placing the dialer in the OFF mode will not affect the
programming.
Uniled
Saeurity
Pr'orluets,
-.d-5.
lrlc'
tr tr:tr
E tr tr
mffi.tr
mmitr'
@;tr tr
AIT-f,TTtrTT
Automatic
Voice/Pager
Dialer
First Time Installation to Initialize Dialer Follow Ste I &2.
STEP 1
Apply powerro theunit.
TheLCD will read:
NOT PROGRAMMED
PRESSKEYPAD#1
STEP !
Pressl.
TheLCD will changero read:
USPAD2OOO
X.X
tften..PROGRAM:
NUMBERS
then: SELECT:l-8
O(DONE)
Programming TelephoneAnd/Or Pager Numbers
You are now ready to begin programmingthe dialer.
All programming can be input before connectingthe dialer to a
telephoneline. Check the unit's LCD as you program numbers
in the dialer to ensure accuracy. Please complete all
programming instructions before attempting to operate the unit.
Press"*" to storethe sequence.
Example: To storenumeric pagernumber 555-1212,a 4-second
Pauseand code 3456:
Press
Before programming your dialer to call the police, fire
department or 9-l-l directly, you must check with these
agenciesfor their approva..
STEP38 - TELEPHONENUMBERS
A maximum of 50 digits (including pauses)can be programmed
in at eachlocation.
*PROGRAM: NUMBERS
SELECT:1-8
r(YES) 2(NO )
O(DONE)
+This prompt will apper after a number has been programmed and this section has been exited.
STEP I Press location number l-8 to program the first
number. This can be any location l-8. You do not have to
program locations in sequence.For example, you can program
numbers in locations 3 and 5. When you are done
programming all the desired telephone and/or pager
numbers, press "Ot'to exit this section.
The LCD will read:
PAGER
I(YES) 2(NO)
STEP 2 Press"1" if you wish to program in a numeric pager
number (step 3A). Press "2" if you wish to program in a
telephonenumber (step 3B), cellular phone numer (step 3B), or
a voice pager(step3C).
STEP 3A. NUMERICPAGERS
NOTE: WHEN PROGRAMMING NUMERIC PAGERS, YOU MUST
P R O G R A MI N O N E O R M O R E P A U S E S .E A C H ' P " P R O V I D E SA 2 SECONDPAUSE. BEFOREPROGRAMMINGIN A PAGER.CALL THE
NUMBERTO DETERMINETHE NUMBER OF 2-SECONDPAUSESTO BE
PROGRAMMEDIN,
I f y o u p r e s s e d" l " t o p r o g r a m i n a n u m e r i c p a g e r . . .
Press the digits of the pager to be called. The numbers will
appear on the LCD, as will the following key designations.
Press "P" one or more times in accordance with the number of
seconds needed to accommodate the pager.
(Remember, each "P" provides a 2-second pause).
Press the digits ofthe numeric pager code.
NOTE: SOME PACER SERVICES REQUIRE A "#" SIGN FOR
SEPARATIONOF THE NUMERIC CODE OR AT THE END OF THE
NUMERICCODE FORPROPERTRANSMISSION.
r-El
@@[ Lll@ttl]@l@[F][-Eri
[tl i@{@]
@
If you pressed"2" and wish to program in a telephonenumber.. .
Press the digits of the number to be dialed. For long-distance
numbers,first press "l" followed by the area code and then the
number.The number will appearon the LCD.
Press"*" to storethe sequence.
Example: Store telephonenumber I -800-555-I 2 I 2 :
Press:
l@:C@iltrlai!i.i?r
@@l(o-j
U i@l
E)
REMEMBER/NOTE:
Before programming your dialer to call the police, fire
department 0r 9-1-1 directly, you must check with these agencies for their
approval.
STEP3C -VOICE PAGERS
If you pressed"2" and wish to program in a voice pager...
Pressthe digits of the pagerto be called.
Press "P" one or more times in accordancewith the number of
secondsneededto accommodatethe pager.
(Remember each "P" provides a 2-secondpause).
Press"*" to store the sequence.The number will appearon the
LCD.
Example: To storevoice pager 555-1212and a 4-secondpause:
Press:
tOtt4jtOLEI
[r.litebll
STEP 4 Repeatsteps1-3fbr eachnumberto be programmed
in
eachlocation.Selectanyof 8 locationnumbersin Step1
(SELECT:1-8)for eachnumberto beprogrammed.
STEP 5 When you are done programming all desired
telephone and/or pager numbers, press tt0tt to exit this
section.
NOTE: IF YOU ENTER THE WRONG CHOICE, PRESS "M" KEY
REPEATEDLY AND RETURN TO THE *PROGRAM MODE", THEN
SELECT THE SECTION TO CHANGE C'T'' ACCEPT SECTION, "2''
FOR NEXT SECTION).THEN ENTER CORRECT INFORMATION,
Programming Auxiliary Information
The dialeris presetat the factoryto typicaltelephoneline (TLINE), PBX, DialingAttemptsandMessage
Repeatoptions.lf
you chooseto acceptthe following defaultprompts,simply
press"2" to scrollto the next section.If your phone system
requires dialing a digit to get an outside line or dial tone,
similar to PBX, then turn PBX on and enter digit to
program.
PRESETS
T-LINE................TONE
PBX......................OFF
A T T E M P T S. ..... . . . . . . . . . . 2
MESSAGE.... ..........2
follow thesesteps.
To changethepresets,
T-LINE
TheLCD will display:
PROGRAM: T-LINE
I(YES) 2(NO)
Press"l " to programT-LINE.
Press"2" to scrollto thenextsection.
PROGRAM: T-LINE
I(TONE) 2(PULSE)
Press"1" for TONE.Press"2" for PULSE.
StructuringYour OutgoingMessages
The AD-2000 dialer was designed with optimum versatility and
functionality in mind. Nowhere is this more apparentthan in the
matrix of outgoing messages(OGMs). The user's ability to "mix
and match" OGMs allows complete system customization and
provides ultimate efficiency.
Total OGM time is 51 seconds.
A beginning identification (ID) messageof up to l5 secondscan
be programmed in (options #4, #6, and #8). Your ID message
should clearly state your name, address and other pertinent
emergencyinformation.
Typically, each OGM will have a specific purpose.For instance,
OGM I can alert the person notified to contact the fire department
while OGM 2 can alerl the person to contact the police
department. Typically the dialer is programmed to notify family,
friends or another responsibleparty. Before programming your
dialer to call the police, fire departmentor 9-l-l directly, you must
check with theseagenciesfor their approval.
TheLCD willdisplay:
PBX
TheLCD will display:
OPTION #l
OPTION #2
PROGRAM: PBX
l(ON) 2(OFF)
Stepl: Press"1" fbr ON. Press"2" for OFF.
theLCD will display:
Step2: If "1" is entered,
PROGRAM: PBX
ENTER PBX NUMBER
EnterPBX number( | dieit).
OPTION #3
OPTION #4
OPTION #5
ATTEMPTS
ATTEMPTSrefersto the numberof timesthe dialerwill call
each designatednumber.Both successfuland unsuccessful
(busyor no answer)call areconsidered
attempts.
PROGRAM: ATTEMPTS
ENTER 1-9
to the numberof
Step 1: Pressthe digit (l-9) corresponding
timesyou wishthedialerto call eachnumber.
TheLCD will display:
MESSAGE
MESSAGErefersto the numberof timeseachmessase
will be
number.
deliveredto eachdesignated
TheLCD will display:
OPTION #6
OPTION #7
OPTION #8
No OGM. Select this option if you do not wish to
record any outgoing messages.
I OGM. Select this option if you wish to record
one OGM, which may be as long as 5l seconds.
2 OGMs. Select this option if you wish to record
two OGMs, each of which may be as long as 25.5
seconds.
ID plus 2 OGMs. Selectthis option if you wish to
record one ID of up to 15 secondsin length, and
two OGMs, each of which may be as long as 18
*
seconds.
3 OGMs. Select this option if you wish to record
three OGMs, each of which may be as long as 17
seconds.
ID plus 3 OGMs. Selectthis option if you wish to
record one ID of up to 15 secondsin length, and
three OGMs, each of which may be as long as 12
x
seconds.
4 OGMs. Select this option if you wish to record
four OGMs, each of which may be as long as
12.75seconds.
ID plus 4 OGMs. Selectthis option if you wish to
record one ID of up 15 secondsin length, and four
OGMs, each of which may be as long as 9 seconds.x
PROGRAM: MESSAGE
REPEAT ENTER 1.3
to the numberof
Step 1: Pressthe digits (l-3) corresponding
to be delivered.
timesyou wishthemessage(s)
Exunple: OPTION#4: ID plus 2 OGMs.
After selectingthe numberof message
repeats,the dialer will
automatically
exitthissection.
lf the ID is l0 seconds,
then eachOGM can be (51 minus l0
equals4l dividedby 2 equals)20.5seconds
in length.
*lfyour ID messageis less than l5 seconds in length, the remaining time will be
e v e n l vd i v i d e d a m o n g t h e O C M s .
Programming And Recording Your
Outgoing Messages
Programming The Channels
The AD-2000 is designed to be adaptable to a complete range of
personalizedapplications.Each of the four input channelscan be
programmed individually for full system customization. ln
addition to setting enable/disable options, entry/exit delays and
type of activation (N.O., N.C., & momentaryor continuous),each
user can specify which emergency messageswill be delivered and
which numberswill be dialed. The first channel activatedwill be
the priority channel.Numbers programmedto that channelwill be
completedbefore the dialer moveson to the next channel(s).
Although comprehensivein scope,the systemis easy to program.
Just fbllow thesesimole steos.
Follow these steps to program and record your outgoing
messages.Skip this portion if you have programmed in only
numeric pagers,which rely on coded DTMF messages.As with
all AD-2000 programming, the unit need not be connected to a
phone line when information is programmedin. Rememberthat
"OPT" on the LCD stands for option: "OGM" stands for
outgoing message.
NOTE: IF YOU ENTER THE WRONG CHOICE, PRESS "M" KEY
REPEATEDLY AND RETURN TO THE "PROGRAM MODE", THEN
SELECT THE SECTION TO CHANGE C'1" ACCEPT SECTION, *2"
FOR NEXT SECTION). THEN ENTER CORRECT INFORMATION.
STEP
NOTE: IF YOU ENTER THE WRONG CHOICE, PRESS "M" KEY
REPEATEDLY AND RETURN TO THE "PROGRAM MODE'" THEN
SELECT THE SECTION TO CIIANGE ('T" ACCEPT SECTION, "2"
FOR NEXT SECTION). THEN ENTER CORRECT INFORMATION.
L Decide which of the eight options you prefer.
STEP 2 Before programming in this option, write down all
your messages. Time them carefully, changing them if
necessary to fit the alotted time frame. Practice saying them,
clearly enunciatingeach messagefor maximum clarity in case
of an emergency.Keep a final recording script.
STBP 3 Programyour option.
A) The LCD will read: PROGRAM: OGMS
l(YES) 2(NO)
B) Press"1" to program your OGMs. Press"2" to scroll to the
next section.
C) Press "l" to select the option (#l- #8) displayed or press
"2" to scroll to the desiredoption.
STBP 4 After selectingyour option as explainedabove.record
your message.
A) The word RECORD will appearin the upper left corner of
the LCD, above the instruction: PRESS R. The option
selectedwill appearin the upper right corner. For instance,
if you selectedoption #2, the LCD will read:
RECORD
OGMI
PRESS R
B) Speak6-12 inches away from the microphone.Referring to
your script and speakingin a normal voice, press and hold
R (the word RECORDING will be displayed),releasingthe
key after you have completed enunciating your messages.
The word DONE will appear on the LCD when the
maximum allotted time has beenreached.
C) The LCD will read: PLAY OGM(S)
1(YES) 2(NO)
Press"1" to play back your recording
D) The LCD will read: ACCEPT
1(YES) 2(NO)
Press" l " to acceptthe recordedOGM(s). Press"2" if you
wish to re-recordthe messages,beginningwith Step 4.
Changing The OGMs
After your system is up and operating,you may changeone or
more of the recorded OGMs and/or choose a completely
diff'erent option. To do so, simply scroll to the programming
sectionon your display: PROGRAM: OGMS
l(YES) 2(NO)
Selectthe option, then begin again from Step 3 above to record
your new message(s).
STEP 1 ttre LCI will read: PROGRAM: CHANNELS
1(YES)2(NO)
Press"1" to beginprogramming
thechannels.
STEP 2 TheLCD will read: SELECT: l-4
O(DONE)
Enterthechannelyou wishto program(1-4).
Enable/Disable
STEP 3 tne r-Cn will read: CH X: ENABLE
I(YES) 2(NO)
("CH )C'beingthechannelselected)
Press"l" to enablethechannel.Press"2" to disablethechannel.
Exit/Entry Delays
Capable of programming up to a maximum of 3 minutes and 20
secondseach.
STEP 4 The LCo will read: CH X: EXIT DELAY
1(YES) 2(NO)
Proceedwith A) if you wish to program an exit delay.
Proceedwith B) if you do not.
A) To programexit delay, press"1".
The LCD will read:
ENTER 0-199THEN
PRESS *
Enter the digits correspondingto the number of secondsyou
wish to install. (For example, press "l20" then press "*", if
you wish to install a 120-secondexit delay).
B) Ifyou do not wish to program an exit delay, press"2".
STEP 5 ttre LCO will read: CH X: ENTRY DELAY
1(YES) 2(NO)
Proceedwith A) if you wish to program an entry delay.
Proceedwith B) if you do not.
A) To program an entry delay, press"1".
The LCD will read:
ENTER 0-199 THEN
PRESS *
"l"
Press
to program a delay. Then enter the digits
correspondingto the number of secondsyou wish to install.
(For example,press"90" then press"*", if you wish to install
a 90-seconddelay).
B) If you do not wish to program an entry delay, press"2".
10
B)
Normally Open/I.{ormally Closed
STEP 6 rne Lco will read:
CHX: N.O./i.{.C.
1(N.O.)
2(N.C.)
A)
B)
Continue the above procedure for each of the up to eight
phone/pagernumbers programmed in.
STEP 9 ttre LCO will read:
CHX: OGMX
I(YES) 2(NO)
("OGM X'being the OGM recordedin OGM options#2 - #8)
A) Press "l" to deliver OGM X when the channel is activated.
Press"2" if you do not wish this OGM to be delivered.
B) Continue the above procedurefor each Channel/OGM.If you
have programmed in and recorded an ID message as one of
your OGM options,this ID will be deliveredto all channels.It
will not appearin the Channeldisplay.
NOTE: ID AND OGM(S)WILL ONLY BE DELIVERED
TO TELEPHONE
NUMBERS,
NUMBERS,
CELLULAR
ANDVOICEPAGERS.
Press"1" to selecta normally open channel.
Press"2" to selecta normally closedchannel.
Momentary/Continuous Activation
STEP 7 rne Lco will read:
CH X: MOIWCONT
I(MOM)2(CONT)
A) Press"1" to selecta momentarytrigger.
B) Press"2" to selectcontinuousactivation.
Numbers Dialed/Outgoing Messages
Completing The Programming
Following thesestepsallows you to choosewhich OGM(s) will
be deliveredand which numberswill be dialed for eachchannel.
NOTE: Dialer LCD will only show programmed numbers and
OGM options.
Once you have programmed in all dialing and OGM options for
eachchannel,the LCD will read:
ACCEPT
1(YES) 2(NO)
STEP 10 Press "1" to accept the Channel programming. Press
"2" to re-program or to revert to previously programmed setting.
STEP 8 rne I-co will read:
CHX: DIAL#X
1(YES)2(NO)
("Dial #X" beingthenumberin phone/pager
locationI -8)
A) Press"l" to dial phone/pager#X
to be dialedwhentheselectedchannelis activated.
Press"2" if youdo not wishthis
numberto be dialed.
You are now ready to review your programming and test the system.
PRESS "M'' TO EXIT PROGRAMMING MODE.
Testyour systembefore an emergenc! occurs.
STEP 4 ttre LCO will read:
SELECT: 1-4
5(ALL) O(DONE)
Selectthe channelyou wish to test ( l -4). Press"5" to test "all"
Channels.Once a channel is selected(or "all") the programmed
channel information will be displayed on the LCD. Verify data
accuracyas the LCD scrollsthrough by comparingthe information
displayed with that specified on your Program Planner.Listen to
your recordedmessage(s)to ensurethat the correct OGM (if programmed)is delivered.Press"0" to exit testing.
Do not neglectto review programmedinformation and verify all
elementsof your systemthoroughly before relying on the dialer
to deliver the necessaryinfbrmation to the desiredparties accurately and completely.
We strongly recommendtesting the system in test mode before
connecting to a telephoneline. The test mode tests the stored
information, not the full tunctionality of the dialer. To test the
full functionality of the dialer, the unit must be testedin the operatemode. In the test mode. the dialer will not make more than
one attempt per number dialed or play any OGM more than
once.
STEP 5 Now connect your dialer to the telephoneline you will
be using and test the system again, to determine if it functions
correctlyin an actualemergencysituation.
NOTE: IF YOU ENTER THE WRONG CHOICE. PRESS"M" KEY
REPEATEDLY AND RETURN TO THE'PROGRAM MODE'" THEN
SELECT THE SECTION TO CHANGE ('T" ACCEPT SECTION, "2''
FOR NEXT SECTION).THEN ENTER CORRECT INFORMATION.
Makesure you notifythe receivingpartyof your intentto call them,
and tell them it is iust a test.
STEP I Pressthe"M" Modekey until theLCD reads:
TEST: T-LINE
rffES) 2(NO)
"
"
2
Press
l
to
display
theT-Lineconfiguration.
STEP
Thedatawill scrollthroughall selections.
Press"2" to scrollto thenextsection.
STEP 3 tne LCo will read:
TEST: CHANNEL(S)
1(YES)2(NO)
Press"l" to testchannels.
Press"2" to scrollto thenextsection.
STEP 6 To test the operationof your entire system,set Mode to
OPERATE and proceed as explained in the next section: Operating Your System.
Test your system on a regular basis, at least once a week.
11
SampleProgram Planner
ADzOOO PROGRAM PLANNER
(exclude
PBX digit,
include
numeric
pager
NAME OF PARTY TO BE REACHED
code)
2345674
John
Johnson s
J456789PP4455
3456789PP5544
John
Johnson s
Jol^e Joh"sor:
house
oooo'
ire
"ode
LINE
TONE
ATTEMPTS
PBX
PULSE
ON
OFF
NUMBER
1 THROUGH 9
MESSAGE REPEAT
1 THROUGH 3
2
2
BRIEFLY DESCRIBE TYPE OF VOICE MESSAG
lD +
y o m e i s l v l o r yS m i t h o n d I n e e d h e p .
2 O G M S l D : l r , 4n
ID +
3 OGMS
OGMl: Co the policedeportment.
O G M 2 :C o l l t h e f i r e d e p o r t m e n t .
specific outgoing messages(OGMs).
Example for Quick Setup
Programming
Before programming the dialer, study the example shown on this page.
This "quick setup" example programs in one telephone number, two
numeric pager numbers. two attempts, two repeats,an ID plus two
additional OGMs, and channels I and.{.
Once you understand the setup. use the blank Program Planner on
page l4 to begin programming your dialer. We recommend making
several blank copies of the Planner befbre beginning the process.It
also is advisableto fill in the Plannerin oencil initiallv.
7 Using a prepared script and speaking six-to-eight inches
STEP
from the dialer's microphone on the front ofthe unit, press "R" when
you are ready to enunciate your l5-second identification message and
your two l8-second messages.Dialer automatically prompts to next
OGM. Make OGMI a messagetelling the receiving party to call the
police department. Make OGM2 a messageto call the fire department.
STEP 8 Press"l" to play back all recordedmessages;press"1" again
to accept. (NOTE:
DIALER
LCD
WILL
ONLY
SHOW
PROGRAMMED NUMBERS AND OGM OPTIONS).
STEP 9 Press"l" to PROGRAM CHANNELS.
"l".
STEP 1 Press
STEP 2 When the LCD reads SELECT l-8, press "1" to install the
first phone number in location I press "2" to indicate no pager; then
*2345678"
press,in sequence,(fictitious) phone number
followed by
"x"
programming
process
for
the
sign to store the
that number.
STEP 5 At the PROGRAM: T-LINE prompt, press "1" to choose
tone; press "2" to indicate no PBX; press "2" to program in two dialing attempts per emergency number called; press "2" to program in
two messagerepeatsfor each call.
STEP l0 Press "1" to program Channel 1. Press "1" to ENABLE.
Press "l" then enter "30" then press "x" for a 3O-secondEXIT delay;
press "1" then enter "15" then press "x" for a l5-second entry delay.
Now press "2" for NORMALLY CLOSED and then "1" for MOMENTARY activation. Press "l" to select phone/pagernumber 1 to be dialed. Press "1" again to select phone/pager number 5 to be dialed. Press
"2" to not selectphone/pagernumber 6 to be dialed. Press"1" to select
OGM1 to be delivered and press "2" to not select OGM2 to be delivered.Press"1" to acceptthe channelconfiguration.
STEP 11 Press "4" to program Channel 4. Press "1" to ENABLE.
Press"2" twice to indicate no EXIT or ENTRY delay. Now press "1"
for NORMALLY OPEN and the "2" for CONTINUOUS activation.
Press "1" to seiect phone/pager number 1 to be dialed. Press "2" to not
selectphone/pager5 to be dialed. Press"1" to selectphone/pagernumber 6 to be dialed. Press "2" to not select OGMI to be delivered and
press"1" to selectOGM2 to be delivered.Press"l" to acceptthe channel configuration.
STEP 6 Press"l" to PROGRAM OGM(S). Press"2" three trmes to
Scroll to option #4; press"l" to program in an ID messageand two
STEP 12 Press "0" to exit PROGRAM: CHANNELS.
Press "M" to exit programming mode.
STEP 3 Press"5" to install the secondphone number in location 5;
press "1" to indicate numeric pager; then press'in
sequence,
"3456189PP4455#" followed by the "x" sign. The first seven digits
representthe pager number dialed; each P standsfor a 2-secondpause;
the next four digits followed by the # sign represent the pager code
and the * stores the programming process for that number.
Now press "6" to install the third phone number in location 6; press
"1" to indicate numeric pager; then press, in sequence,
"3456789PP5544#"followed by the "E" sign.
STEP
4 Press"0" to exit PROGRAM NUMBERS.
13
Fill out this ProgramPlannerin pencil initially
ADzOOOPROGRAM PLANNER
.I'ELTJPHON-tJ
PAGER
YES NO
NUMBER
(exclude
PBX
digit,
include
N UMBER
numeric
pager
- --__l
Io"t".
NAME OF PARTY TO BE REACI{ED
code)
I
2
+
5
7
PROGRAM: T_LINE
TONE
PBX
PULSE
ON
OFF
ATTEMPTS
1 THROUGH 9
MESSAGE REPEAT
1 THROUGH 3
NUMBER
PROGRAM: OGMs
]N
3
BRIEFLY DESCRIBE TYPE OF VOICE MES
NO OGM
I OGM
2 OGMs
+
ID
?
OGMS
3 OGMs
ID + 3 OGMS
7
OGMS
4
ID
+
ENABLE
YES NO
CH
4
OGMS
EXIT DELAY(SEC)
YES N O
o-199
E N T R Y D E L A Y ( S E C}
YES N O
o-199
ACl'IVA't'ION
NO
NC
I MOM
CONT
2
DIAL NUMBER
D
3
PLAY OGM
7
B
I
I
3
4
ADzOOO PROGRAM PLANNER
PAGER
YES
NO
NUMBER
(exclude
TELEPHONE NUMBER
PBX digit, include numeric
pager
l5;t",----------l
NAME OF PARTY TO BE REACHED
code)
I
3
4
5
6
7
PROGRAM: T-LINE
TONE
PtsX
PULSE
ON
OFF
ATTEMPTS
THROUGH 9
MESSAGE REPEAT
T THROUGH 3
NUMBER
PROGRAM:
OGMS
N
I
2
OGM
1 OGM
2
CH
BRIEFLY DESCRIBETYPE OF VOICE MESSACE(S
S'I'YLE
NO
OGMS
4
ID +
5
3
2 OGMS
6
lD
7
I
4 OGMs
ID + 4 OGMS
OGMS
+
ENABLE
YES N O
3
OGMS
YES
IT DELAY(SEC)
NO
o-199
ENTRY DELAY( SEC )
YES
A Ct l V A l ' t o N
NO
NC
MOM
coN'r
DIAL NUMBER
4
7
B
I
2
3
4
After thoroughlytestingyour system,redo your ProgramPlannerin ink.
Onecopy shouldbe kept in a safeplaceby the end user;one copy shouldbe retainedby the installer.
14
I
PLAY OGM
2
3
4
Care And Precautions
LOCATION
with the manufacturer's instructions, may cause interference to
radio and television reception. It has been type tested and found
to comply with the limits for a Class 'B' computing device in
accordance with the specifications in Subpart B of FCC Rules
and Regulations (as outlined in the Code of Federal Regulation,
Tirle 4'7), which are designed to provide reasonable protection
againstsuch interferencein a residentialinstallation.
Place the dialer on a flat level surface or mount the unit on the
wall, away from extremecold or heat,direct sunlight,excessive
humidity and away from equipment that generate strong magnetic fields. Avoid placing near large metal objects and areas
that produce smoke, dust and mechanical vibrations.
CARE
User Instructions
If this equipment does cause interferenceto radio or television
reception, which can be determined by turning the equipment off,
then on, the user is encouraged to try to correct the interference
by one or moreof the following measures:
Clean the housing with a soft cloth lightly moistened with
water or mild detergentsolution. Never use solvents such as
alcohol or thinner. Do not allow liquids to spill into the unit.
OPTIONAL BACKUP
To ensurecontinuousoperationduring power outages,hookup
to a I2VDC backup battery pack is recommended. (PP-l)
Available from United SecurityProducts.
r
r
o
CAUTION
.
Do not use the dialer if a gas leak is suspectedor during lightning.
Changesor modifications not expressly approvedby United security Products,Inc. could void the user's authority to operatethe
equipment.
PROBLEMS
If liquid or a foreign object penetratesthe unit, disconnectit
immediately and contact your installer or other qualified technician.
Before calling USP, pleasemake sure...
.
o
o
Reorientor relocateradio or television.
Increasethe separationbetweenthe equipmentand receiver.
Connect the equipment into a different outlet so that the
equipment and receiver are on different branch circuits.
Consult the dealer or an exoerienced radio/TV technician for
help.
You have read this manual and understand how to operate
the dialer.
Your phone line is working.
You check out the entire system,including external hookup wiring and sensorsattached.
If you still have questions or concerns, call our USP Technical
Service Departmentbetween the hours of 7:30 AM and 4:00
PM, PST, Monday through Friday.
Federal Communications Commission Radio And Television Interference Statement For A Class 'B' Device
This equipment generatesand uses radio frequency energy and
ifnot installedand usedproperly, that is, in strict accordance
United Security Products
Issue date: 4127/98
16