1
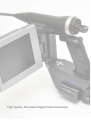
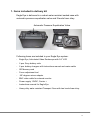
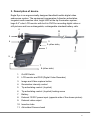
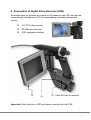
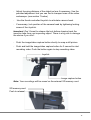
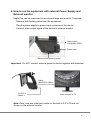
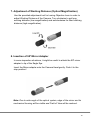
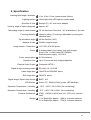
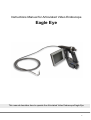
Instructions Manual for Articulated Video Endoscope Eagle Eye manual describes how to operate the Articulated Video Endoscope Eagle Eye This 1 High Quality, Articulated Digital Video Endoscope 2 Table of Contents 1. Items included in delivery kit ……………………………………….. 4 2. Safety and maintenance Instructions …………………………. … 5 3. Description of Device ..………………………..…………………... 6 4. Description of Digital Video Recorder (DVR) .……………….….. 7 5. Flow chart of Digital Video Recorder .………………..…….……. 8 6. How to operate the device …………………..………………….…. 10 7. How to run with external Power Supply & external Monitor ...…. 12 8. Adjustment of Working Distance (Optical Magnification) …….… 13 9. Installing the 90º Mirror Adapter ………………………………...… 13 10. Specification …………..………………………..………………….. 14 11. Warranty information…………………………….………………….. 15 12. Notes 16 …………..……………………………….………………….. 3 1. Items included in delivery kit Eagle Eye is delivered in a robust water resistant sealed case with automatic pressure equalization valve and 2-levels foam inlay. Automatic Pressure Equalization Valve Following items are included in your Eagle Eye system: - Eagle Eye, Articulated Video Endoscope with 5.6” LCD - 2 pcs. Sony battery units - 2 pcs. battery chargers with Instructions manual and mains cable - SD Memory card - Focus adjustment tool - 90º degrees mirror adapter - BNC video cable for external monitor - Power supply 12VDC, Center + - Instructions manual for Eagle Eye - Heavy duty water resistant Transport Case with two levels foam inlay 4 2. Safety and maintenance Instructions Do not operate the video endoscope in explosive atmospheres, such as in the presence of flammable liquids, gases, or heavy dust. This equipment is intended for use in industrial applications. Never use this tool for inspecting or examination of human body or animals! Do not use the tool around corrosive chemicals which can damage the equipment. Keep the tool dry, clean and free from oil, water and grease. Use a mild detergent and a soft cleaning tissue to clean the insertion tube or body of the instrument. Keep optical surfaces of the equipment clean. Use Lens Cleaning Tissue and Pure Ethanol or Isopropyl for cleaning optical surfaces of the device. Never use Acetone or other similar solvents for cleaning. Never knock or drop the Video Endoscope. Keep Video Endoscope away from direct sun-light, heat and extreme humidity. Store Video Endoscope inside case when not used. Protect the Objective and Ring Light by the supported Rubber Cap when Video Endoscope is not in operation. Do not pull back Insertion Tube of the endoscope from your inspection object while camera head tip is bent. Only use accessories provided or approved by Optilia. This equipment is a precision optical device and shall be handled with great care! 5 3. Description of device Eagle Eye is an ergonomically designed handheld mobile digital video endoscope system. The equipment incorporates 4-direction articulation, tungsten mesh insertion tube, bright LED-at-the-tip illumination system, large 5.6" color LCD monitor with built-in DVR for recording digital video or still pictures and two exchangeable, rechargeable standard battery cells. 6 10 5 4 3 2 (other side) 1 11 9 7 8 (other side) 1. On/Off Switch 2. LCD monitor and DVR (Digital Video Recorder) 3. Image and Video capture button 4. Illumination intensity control 5. Tip articulating control (Joystick) 6. Tip articulating control (Joystick) locking screw 7. Battery 8. External 12VDC power input (opposite side of the shown picture) 9. External video output 10. Insertion tube 11. Articulated Camera head 6 4. Description of Digital Video Recorder (DVR) Recorded video or pictures are saved on SD-memory card. SD card can be removed and inserted into a PC for downloading recorded pictures and videos. 12. 5.6” TFT color monitor 13. SD Memory card slot 14. DVR navigation buttons 12 14 13 Push SD card to remove! Important: Note direction of SD card when inserting into the DVR. 7 4. Flow chart of Digital Video Recorder SEARCH AND PLAY EVENT SEARCH Search by recorded videos. SET DATE/TIME 5. PHOTO SEARCH Search by captured photos MANUAL RECORD SD CARD OPTIONS SYSTEM STATUS DATE FORMAT Specify date format. Select Y/M/D, M/D/Y and D/M/Y SET YEAR Set current year MANUAL RECORD SET MONTH Set current month SD CARD OPTIONS SET DAY Set current day SYSTEM SET TIME Set current time h:m:s STATUS DAYLIGHT SAVING Set daylight saving on or off START Set start date and time M/D h:m:s END Set end date and time M/D h:m:s SEARCH AND PLAY SET DATE/TIME SEARCH AND PLAY SET DATE/TIME VIDEO SIZE Specify resolution of video recording. Select between 704x576 and 352x285 [pixels] FRAME RATE Specify frame rate of video recording. Select between 1/5, 1/3, 1, 2, 3, 4, 8, 12, 17, 25 [frames/s] MANUAL RECORD QUALITY SD CARD OPTIONS SYSTEM AUDIO Specify quality of video recording. Select between low, medium and high Record with or without audio STATUS Note: Audio is not supported in current version of Eagle Eye 8 DISC TOTAL Displays total memory capacity DISC REMAINING Displays remaining memory capacity CARD FULL LOOP or STOP. LOOP overwrites old data if memory is full, STOP stops if memory is full MAX FILE SIZE Limit the maximum file size FORMAT Format SD CARD SD UNMOUNT Unmount SD REMAINING TIME Displays remaining recording time based on remaining memory, quality and resolution SEARCH AND PLAY LANGUAGE SET DATE/TIME COPY SETUP TO SD CARD Specify a language, choose between: English and Chinese SEARCH AND PLAY SET DATE/TIME 6. MANUAL RECORD SD CARD OPTIONS SYSTEM STATUS MANUAL RECORD SD CARD OPTIONS SYSTEM Copy the currently used setup to SD DOWNLOAD SETUP FROM SD CARD Download and install setup from the SD CARD. This will replace the currently used setup. UPGRADE Upgrade firmware from the SD CARD RECALL DEFAULT Reset to default settings STATUS SEARCH AND PLAY SET DATE/TIME MANUAL RECORD SD CARD OPTIONS SYSTEM STATUS Displays version number, if card should loop or stop when it’s full, currently used resolution, frame rate and quality 9 5. How to operate the device ‐ Take out the video endoscope from its transport case. ‐ Attach both batteries to the video endoscope. Make sure both batteries are fully charged. Put the battery and push forward! ‐ Remove the protection rubber cap from camera head. Important: Camera head including illumination LEDs is the most sensitive part of the device and shall be protected from mechanical impacts or shocks! ‐ Turn on the device. On/off main switch Illumination Intensity Control ‐ Insert the tube gently into your object. ‐ Adjust the light intensity for best picture. Note: Camera has automatic gain control; therefore in most cases you can set light intensity of Eagle Eye to maximum! 10 ‐ Adjust focusing distance of the objective lens if necessary. Use the provided adjustment tool you can find in transport case of the video endoscope. (see section 7 below) ‐ Use the thumb controlled Joystick to articulate camera head. ‐ If necessary, lock position of the camera head by tightening locking screw of the Joystick. Important: Don´t forget to release the lock before drawing back the insertion tube from you inspecting object. There is a big risk to damage the device if you don´t. ‐ Push the image/video capture button shortly to snap a still picture ‐ Push and hold the image/video capture button for 2 second to start recording video. Push the button again to stop recording video. Joystick Image capture button Note: Your recordings will be saved on the external SD-memory card. SD memory card. Push to release! 11 6. How to run the equipment with external Power Supply and External monitor Eagle Eye can be connected to an external large size monitor if required. ‐ Remove both battery packs from the equipment ‐ Plug the power supply to power input connector of the device ‐ Connect video output signal of the device to external monitor Video output Composite (BNC) Power input Remover both battery packs! Important: Do NOT connect external power to device together with batteries! Video (BNC-RCA cable) 12 VDC in Center + Video monitor or TV Note: Date, time and other text visible on the built-in 5.6” LCD are not shown on the external monitor. 12 7. Adjustment of Working Distance (Optical Magnification) Use the provided adjustment tool for turning Objective Lens in order to adjust Working Distance of the Camera. Turn clockwise to get long working distance (low magnification) and anticlockwise for short working distance (high magnification). 8. Insertion of 90º Mirror Adapter In some inspection situations, it might be useful to attach the 90º mirror adapter to tip of the Eagle Eye. Insert the Mirror adapter onto the Camera Head gently. Push it to the stop position! Note: Due to wide angle of the optical system, edge of the mirror and its mechanical housing will be visible and Field of View will be reduced. 13 9. Specification Inserting tube length / diameter Lighting system Direction of view Viewing angle of optics (diagonal) Articulating angle of camera head Focusing distance 1.3m, 3.0m / 7mm (camera head 8mm) Ultra bright white LED light on camera head Straight (0°), 90° with mirror adapter Approx. 80° 70° all directions 3.0m tube. 90° all directions 1.3m tube 10mm to infinity ( Focusing is adjustable by turning the objective lens ) Tip articulation angle All the direction (360°) Material of tube Flexible tungsten braid Image sensor / Resolution Power Power consumption Operation time External Video Output Digital image recording media Video image size Still image size Digital image/ Digital video format LCD Monitor 1/6” CCD / 470 000 pixels 2 rechargeable Li-Ion battery units with charger Sony Li-ion, 11.8Wh model NP-FM500H External power supply, 110-240 V 9.6 W maximum Up to 3 hours with fully charged batteries Composite (NTSC) SD card, 2.0 -16.0 GB 704x576 and 352x285 pixels 704x576 pixels BMP / AVI Colour 5.6”, 960(H)x234(V) pixels, LED backlight Operation Temperature / Humidity - 10°C ~+60°C / Rh.0~90% (No condensing) Operation Temperature / Humidity - 0°C ~+40°C / Rh.0~90% (No condensing) External Dimensions Weight 270(L) x 240(H) x 80(W) mm (incl. LCD, excl. insertion tube) 1.3 m Eagle Eye Approx. 1 400 gr. Inclusive batteries 3.0 m Eagle Eye Approx. 1 700 gr. Inclusive batteries 14 10. Warranty information Optilia provides the following non-transferable warranties for the benefit of the original end-use purchaser of a product. Optilia warrants that all Optilia products shall be free from defects in material and workmanship for one (1) year from the date of purchase. The above warranties are in lieu of all other warranties, express or implied, including all warranties of merchantability and/or fitness for a particular purpose. Optilia´s liability under these warranties, including any damages sustained by the customer through malfunction or failure of the Optilia product, shall not exceed the amount of the purchase price of the Optilia product, regardless of the extent of any such damage, including any special, consequential, or incidental damages of any kind. This warranty shall only apply to products in ordinary use. Optilia shall have no obligation under this warranty with respect to damage caused by accident, transportation, neglect, misuse, unauthorized alterations or repair, improper installation, or operating conditions. All repairs of Products shall take place at Optilia’s facility in Sollentuna, Sweden. Any defective Products shall be returned to Optilia in an adequate shipping container. Written notice of, and an explanation of the circumstances of, any defect believed to be covered by this agreement shall be provided promptly to Optilia by the customer following discovery of the defect. In satisfaction of its warranty liability, Optilia agrees to take reasonable and prompt action to correct the defect, either by repair or replacement, at its option. 15 11. Notes: ……………………………………………………………………………………………………………………………………………………………. ……………………………………………………………………………………………………………………………………………………………. ……………………………………………………………………………………………………………………………………………………………. ……………………………………………………………………………………………………………………………………………………………. ……………………………………………………………………………………………………………………………………………………………. ……………………………………………………………………………………………………………………………………………………………. ……………………………………………………………………………………………………………………………………………………………. All rights reserved. The information contained herein is designed only for use with Optilia Instruments AB,s video endoscope Eagle Eye. Optilia Instruments AB is not responsible for any use of this information for other purposes. Optilia Instruments AB shall not be liable to the purchaser of this product or third parties for damages, losses, costs or expenses incurred by the purchaser or third parties as result of: accident, misuses, or abuse of this product or unauthorized modifications, repairs or alternations to this product, or failure to strictly comply with Optilia Instruments AB´s operating and maintenance instructions Optilia Instruments AB shall not be liable for any damages or problems arising from the use of any options or any consumable products other than those designated as original Optilia products or Optilia approved products by Optilia Instruments AB. Optilia Instruments AB shall not be held liable for any damages resulting from electromagnetic interference that occurs from the use of any interface cables or devises other than those provided by or designated as Optilia-approved Products by Optilia Instruments AB. Djupdalsvägen 22 S-192 51, Sollentuna Sweden Phone: +46 (0)8 35 33 60 Fax: +46 (0)8 35 33 63 [email protected] E-mail: www.optilia.eu Web: RevC, March‐12 we reserve the right to modify data, specifications and component parts without prior notice. 16