1
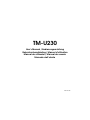
TM-U230
User’s Manual / Bedienungsanleitung
Gebruikershandleiding / Manuel d’utilisation
Manual do utilizador / Manual do usuario
Manuale dell’utente
401291604
A
1
2
3
4
B
5
C
6
7
English
D
E
F
G
TM-U230 TM-U230 User’s Manual 3
English
I
H
J
K
L
8
4 TM-U230 TM-U230 User’s Manual
9
English
TM-U230
User’s Manual
Illustrations
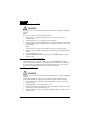
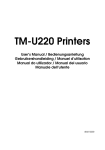
All of the illustrations are at the beginning of this manual. They are identified by letters (A, B, C . . .).
In the text the illustrations are referred to by these letters. (“See illustration A,” for example.) Some of
these illustrations have numbered arrows or lines pointing to parts of the illustration. See the list
below for the meaning of the numbers.
Illustration A
1.Roll paper cover
2.Ribbon cassette
cover
3.Control panel
4.Power supply switch
Illustration B
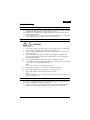
Illustration L
5.Interface
8.Cutter blade
6.Drawer kick-out 9.Hole
connector
7.Power supply
All rights reserved. No part of this publication may be reproduced, stored in a retrieval system, or
transmitted in any form or by any means, electronic, mechanical, photocopying, recording, or
otherwise, without the prior written permission of Seiko Epson Corporation. No patent liability is
assumed with respect to the use of the information contained herein. While every precaution has been
taken in the preparation of this book, Seiko Epson Corporation assumes no responsibility for errors or
omissions. Neither is any liability assumed for damages resulting from the use of the information
contained herein.
Neither Seiko Epson Corporation nor its affiliates shall be liable to the purchaser of this product or
third parties for damages, losses, costs, or expenses incurred by purchaser or third parties as a result
of: accident, misuse, or abuse of this product or unauthorized modifications, repairs, or alterations to
this product, or (excluding the U.S.) failure to strictly comply with Seiko Epson Corporation’s
operating and maintenance instructions.
Seiko Epson Corporation shall not be liable against any damages or problems arising from the use of
any options or any consumable products other than those designated as Original EPSON Products or
EPSON Approved Products by Seiko Epson Corporation.
EPSON is a registered trademark of Seiko Epson Corporation.
NOTICE: The contents of this manual are subject to change without notice.
Copyright © 2003 by Seiko Epson Corporation, Nagano, Japan.
TM-U230 User’s Manual 5
English
EMC and Safety Standards Applied
Product Name: TM-U230
Model Name: M166A
The following standards are applied only to the printers that are so labeled. (EMC is tested using the EPSON power
supplies.)
Europe:
CE marking
Safety: EN 60950
North America: EMI: FCC/ICES-003 Class A
Safety: UL 1950/CSA C22.2
No. 950
Japan:
EMC: VCCI Class A
JEIDA-52
Oceania:
EMC: AS/NZS 3548 Class B
WARNING
The connection of a non-shielded printer interface cable to this printer will invalidate the EMC standards of this
device.
You are cautioned that changes or modifications not expressly approved by SEIKO EPSON Corporation could void
your authority to operate the equipment.
CE Marking
The printer conforms to the following Directives and Norms:
Directive 89/336/EEC EN 55022 Class B
EN 55024
IEC 61000-4-2
IEC 61000-4-3
IEC 61000-4-4
IEC 61000-4-5
IEC 61000-4-6
IEC 61000-4-11
FCC Compliance Statement For American Users
This equipment has been tested and found to comply with the limits for a Class A digital device, pursuant to Part 15
of the FCC Rules. These limits are designed to provide reasonable protection against harmful interference when the
equipment is operated in a commercial environment.
This equipment generates, uses, and can radiate radio frequency energy and, if not installed and used in accordance
with the instruction manual, may cause harmful interference to radio communications.
Operation of this equipment in a residential area is likely to cause harmful interference, in which case the user will be
required to correct the interference at his own expense.
For Canadian Users
This Class A digital apparatus complies with Canadian ICES-003.
Important Safety Information
This section presents important information intended to ensure safe and
effective use of this product. Read this section carefully and store it in an
accessible location.
Key to Symbols
The symbols in this manual are identified by their level of importance, as
defined below. Read the following carefully before handling the product.
WARNING:
Warnings must be followed carefully to avoid serious bodily injury.
6 TM-U230 User’s Manual
English
CAUTION:
Cautions must be observed to avoid minor injury to yourself or damage
to your equipment.
Safety Precautions
WARNING:
Shut down your equipment immediately if it produces smoke, a strange
odor, or unusual noise. Continued use may lead to fire. Immediately
unplug the equipment and contact your dealer or a SEIKO EPSON
service center for advice.
Never attempt to repair this product yourself. Improper repair work can
be dangerous.
Never disassemble or modify this product. Tampering with this product
may result in injury or fire.
Be sure to use the specified power source. Connection to an improper
power source may cause fire.
Do not allow foreign matter to fall into the equipment. Penetration by
foreign objects may lead to fire.
If water or other liquid spills into this equipment, unplug the power cord
immediately and then contact your dealer or a SEIKO EPSON service
center for advice. Continued usage may lead to fire.
CAUTION:
Do not connect cables in ways other than those mentioned in this
manual. Different connections may cause equipment damage and
burning.
Be sure to set this equipment on a firm, stable, horizontal surface.
Product may break or cause injury if it falls.
Do not use in locations subject to high humidity or dust levels. Excessive
humidity and dust may cause equipment damage or fire.
Do not place heavy objects on top of this product. Never stand or lean
on this product. Equipment may fall or collapse, causing breakage and
possible injury.
To ensure safety, unplug this product before leaving it unused for an
extended period.
Do not use aerosol sprayers containing flammable gas inside or around
this product. Doing so may cause fire.
TM-U230 User’s Manual 7
English
Caution Labels
WARNING:
Do not connect a telephone line to the drawer kick-out connector;
otherwise the printer and the telephone line may be damaged.
CAUTION:
Print head is hot.
CAUTION:
Be sure not to touch the manual cutter. Otherwise your fingers might be
injured.
Purpose of This Manual
This manual provides information to operators of the TM-U230 to describe
basic operations to enable safe and correct use of the printer.
Notes for Cleaning the Printer
The following instructions apply only to printers with the fine coating.
A fine coating is used for the external surface of the plastic case of the printer,
which makes wiping and removing kitchen stains easy; however, you should
note the following when cleaning the surface in order to preserve the quality
of the coating (the metal plate and the inside of the case do not have the fine
coating):
❏ Do not scrub the surface with a hard object. Otherwise, the case will be
scratched and harder to clean.
❏ Do not use a cleanser that includes polishing materials such as grains of
glass, metal, or ceramics. Otherwise, the case will be scratched and harder
to clean.
❏ Do not use disinfectant, bleach, alcohol, benzine, thinner, chlorine solvent,
or ketone solvent. Otherwise, the case will be harder to clean, and the case
may be seriously harmed or even deformed and its color may be changed.
Part Names
See illustrations A through L.
Unpacking
The following items are included for the standard specification printer. If any
items are damaged, contact your dealer.
❏ Printer
❏ Ribbon cassette [ERC-38 (B/R)]
❏ Roll paper
❏ Switch panel label used for horizontal installation
❏ AC adapter [PS-180] (*)
8 TM-U230 User’s Manual
English
❏ Power supply box (case and lid) (*)
❏ Hexagonal lock screws (2 pcs) (only for the serial interface)
❏ Shorter screws for attaching the lid to the power supply box (2) (*)
❏ Longer screws for attaching the power supply box to the printer (2) (*)
❏ Usage Precautions for the PS-180 Power Unit (*)
(*) May not be included with the printer.
Selecting the Place
With its three installation positions, the printer is designed to fit every kitchen.
You can install the printer vertically (with the paper exit at the front) either on
a flat surface or by hanging it on a wall (using the optional hanging bracket set,
WH-10). You can also install it horizontally (with the paper exit on top).
Vertical Installation
You can install the printer vertically or hang it on the wall. Illustration C
shows the printer installed vertically, both with and without the power supply
box attached.
Note:
To hang the printer on the wall, see the Wall Hanging Bracket Set Installation Manual
provided with the WH-10 for instructions.
Horizontal Installation
You can install the printer horizontally. Illustration D shows the printer with
the power supply box attached.
Important notes on integrating the PS-180 AC adapter into
the printer
When integrating the PS-180 AC adapter into the power supply box of the
printer unit, be sure to read the information on the label of the AC adapter
(rating, Warning/Cautions) thoroughly and understand it well before you
integrate the AC adapter into the printer unit.
Control Panel
LEDs and Button
POWER LED
Lights when the power is on, and is off when the power is off.
ERROR LED
Off when the printer is online, lights when the printer is offline, and flashes
when an error occurs.
PAPER OUT LED
Lights when roll paper is nearly out.
FEED button
Feeds the roll paper.
TM-U230 User’s Manual 9
English
Installing the Paper Roll
CAUTION:
Be sure not to touch the manual cutter. Otherwise your fingers might be
injured.
Note:
Be sure to use roll paper that meets the specifications.
1. Using scissors, cut the leading edge of the roll paper, as shown in
illustration E.
2. Open the paper roll cover; then turn on the printer.
3. Insert a paper roll; then hold both edges of the paper and insert it straight
into the paper insert slot until the paper is fed automatically, as shown in
illustration F.
Note:
Note the direction the paper comes off the roll, as shown in Illustration G.
4. When the paper feeding is finished, tear off the fed paper with the manual
cutter.
5. Close the paper roll cover.
6. When the PAPER OUT LED flashes, press the FEED button to set the
printer online.
Note on the PAPER OUT LED
When the paper has reached the end or near end, the PAPER OUT LED
comes on. The buzzer will also sound if the printer has been set for the buzzer
to sound for the end or near end of the paper. Opening the cover to replace
paper or pressing the FEED button stops the buzzer sound.
Installing the Ribbon
CAUTION:
Be sure not to touch the manual cutter. Otherwise your fingers might be
injured.
Use the EPSON ERC-38. The use of any ribbon cassettes other than those
approved by EPSON may damage the printer and will void the warranty.
1. Turn on the printer. Turn the knob on the ribbon cassette, as shown in
illustration H.
2. Open the paper roll cover and cutter cover.
3. Lift the autocutter, using the tab, as shown in illustration I; then insert the
new ribbon, as shown in illustration J.
4. Turn the knob 2 or 3 times again and check if the ribbon cassette is in the
right position.
10 TM-U230 User’s Manual
English
Troubleshooting
ERROR LED on or flashing.
❏
❏
❏
Check to see that the paper roll and cutter covers are closed, and check the
PAPER OUT LED. Replace the paper when necessary.
If the paper is jammed, remove the jammed paper, following the paper
jam description below.
Turn off the printer for a few seconds and then turn it back on. If the LED
is still flashing, call your supervisor or a service person.
Paper jam.
CAUTION:
Print head is hot.
1.
2.
3.
4.
5.
6.
7.
8.
Turn off the printer, open the paper roll cover and cutter cover; then lift
the autocutter, using the tab, as shown in illustration I.
Cut the paper off behind the paper insert slot and remove the paper roll
from the printer.
Remove the jammed paper by pulling it in the paper feed direction.
Always pull the paper in the paper feed direction to prevent damage to
the printer mechanism.
If paper still remains in the printer, remove the ribbon cassette.
Loosen the screw securing the print head cover. Turn the screw only until
you can tilt it as shown in illustration K.
Note:
Do not remove the screw from the print head cover.
Lift up the print head cover; then remove the jammed paper.
Replace the print head cover and secure it with the screw.
Replace the ribbon cassette and close the autocutter.
Note:
Choose an installation place so that fed paper does not accumulate. Otherwise a
paper jam might occur.
The autocutter blade is not in its normal position.
If you can see the blade in the autocutter slit, the blade is not in the normal
position. This might be caused by a paper jam.
❏ Insert a screwdriver to the right side of the autocutter and turn the gear
inside to move the blade to the normal position. See illustration L.
TM-U230 User’s Manual 11
English
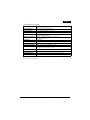
DIP Switch Tables
Serial (DIP Switch 1)
Parallel (DIP Switch 1)
SW
Function
On
Off
SW
Function
On
1
Data receive error
Ignored
Prints “?”
1
Auto line feed
Enabled
Off
Disabled
2
Receive buffer
capacity
1KB
16KB
2
Receive buffer
capacity
1kB
16KB
3
Handshaking
XON/XOFF
DTR/DSR
3~7
Undefined
-
-
4
Word length
7 bits
8 bits
8
BUSY condition
5
Parity check
Yes
No
Receive
buffer full
Receive
buffer full
or Offline
6
Parity selection
Even
Odd
7
Transmission speed
4800 bps
9600 bps
BUSY condition
Receive
buffer full
Receive
buffer full
or Offline
8
Parallel (DIP Switch 2)
SW
Function
1
Selects number
42/35
of characters per
line (cpl)
7 × 9 font/ 9 × 9
font
40/33
2
For internal use
Enabled
only
(autocutter)
(Do not change)
Disabled
3
Undefined
-
4
Pin 31 reset signal Used
Not used
5
PAPER OUT LED
flashing pattern
Lights on
6
For internal use
Enabled
only (flash
memory
rewriting)
(Do not change)
7
For internal use
Asynchronous Synchronous
only (interface
with clock
synchronization)
(Do not change)
8
Internal buzzer
Serial (DIP Switch 2)
SW
Function
1
Selects number of
42/35
characters per line
(cpl)
7 × 9 font/ 9 × 9 font
40/33
2
For internal use only
(autocutter)
(Do not change)
Enabled
Disabled
3
Pin 6 reset signal
Used
4
Pin 25 reset signal
Used
Not used
5
PAPER OUT LED
flashing pattern
Flashes
Lights on
6
For internal use only Enabled
(flash memory
rewriting)
(Do not change)
7
8
On
Off
Not used
Disabled
For internal use only Asynchronous Synchronous
(internal
with clock
synchronization)
(Do not change)
Internal buzzer
Disabled
On
-
Flashes
Disabled
Off
Disabled
Enabled
[bps: bits per second]
Enabled
.
TM-U230 Specifications
Print method
9-pin serial impact dot matrix
Print font
7×9/9×9
Columns
40 / 42 or 33 / 35
Character size
(W × H)
7 × 9: ANK/Graphic
1.2 × 3.1 mm {0.05 × 0.12"} / 1.7 × 3.1 mm {0.07 × 0.12"} or
1.2 × 3.1 mm {0.05 × 0.12"} / 1.6 × 3.1 mm {0.06 × 0.12"}
9 × 9: ANK/Graphic
1.6 × 3.1 mm {0.06 × 0.12"} / 2.0 × 3.1 mm {0.08 × 0.12"} or
1.6 × 3.1 mm {0.06 × 0.12"} / 1.9 × 3.1 mm {0.07 × 0.12"}
Character sets
95 alphanumeric, 37 international characters, 128 × 8 graphic
12 TM-U230 User’s Manual
English
TM-U230 Specifications
Print speed
3.5 lps (40 columns, 16 cpi)
6.4 lps (16 columns, 16 cpi)
Paper dimensions
76 ± 0.5 × 83 mm {3.0 ± 0.02 × 3.3"}
Paper thickness
0.06 ~ 0.085 mm {0.0024 ~ 0.0033"}
Inked ribbon
ERC-38 (Black, Black/Red)
Ribbon life
Black: 3,000,000 characters, B/R: 1,500,000 characters (Black),
750,000 characters (Red)
Interface (compatible)
RS-232C / Bi-directional parallel / 10 Base T I/F
Dealer option: USB
Data buffer
1 KB/16 KB
D.K.D. function
2 drives
Power supply
DC +24 ~ +34 V
Current consumption
Operating: 38 W avg. Standby: 3 W avg.
Temperature
Operating: 0 to 50 °C {32 to 122 °F}
Storage: –10 to 50 °C {14 to 122 °F}
Humidity
10 to 90% without condensation
Reliability
MTBF: 180,000 hours, MCBF: 18,000,000 lines
Overall dimensions
259.5 × 166 × 168 mm {10.21 × 6.54 × 6.61"} (H × W × D)
Weight (mass)
Approximately 2.8 kg {6.2 lb}
lps: lines per second, cpi: characters per 25.4 mm (characters per inch)
Inch values are approximate.
TM-U230 User’s Manual 13