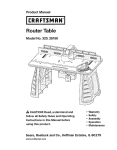
1
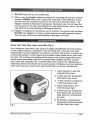
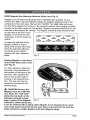
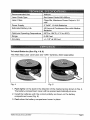
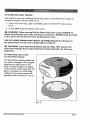
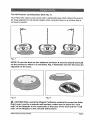
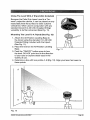
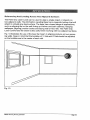
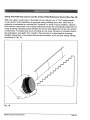
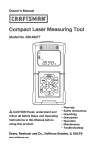
Owner's
Manual
°!
Palm Grip LASER
with Laser Trac ®
Model
No. 320.48291
CAUTION!
Before using this
product, read this manual and
• Safety
follow all its Safety Rules
and Operating
Instructions.
° Magstlc ®
° Maintenance
Sears Brands Management
www, craftsman.com
, Operation
Corporation
Warranty
Page 2
Safety instruction
Page 3
Description
Page 4
Operation Instructions
Page 6
Applications
Page 11
Maintenance
Page 14
Troubleshooting
Page 15
Parts List
Page 15
ONE YEAR FUt.L WARRANTY ON CRAFTSMAN®PRODUCT
If this Craftsman product fails due to a defect in material or workmanship
within one year from the date of purchase, RETURN IT TO THE
NEAREST SEARS STORE OR OTHER CRAFTSMAN OUTLET IN THE
UNITED STATES FOR FREE REPLACEMENT.
This warranty does not include expendable parts such as lamps,
batteries, bits or blades°
If this Craftsman product is used for commercial or rental purposes,
this warranty applies for only 90 days from the date of purchase,
This warranty gives you specific legal rights, and you may also have
other rights, which vary from state to state,
Sears, Roebuck and Coo, Hoffman Estates, IL 60179
Contents And Accessories
Palm Grip Laser Level with All-Position
6-pieces
of Magstic ® and Operator's
Leveling Base, Belt Carrying Case
Manual.
SAVE THESE INSTRUCTIONS!
READ ALL INSTRUCTIONSI
48291
ManuaLRe_sed_06.O907
Page 2
WARNING BE SURE to read and understand all instruction in this manual
before using this Laser Level. Failure to follow all instructions may result in
hazardous radiation exposure, electric shock, and/or bodily injury.
CAUTION The use of optical instrument with this product wilt increase
eye hazard, Use of controls or adjustments or performance of procedures
other than those specified herein, may result in hazardous laser radiation
exposure.
IMPORTANT: The following labels are on your
unit. They indicate where the laser light is emitted. ALWAYS BE AWARE of their location when
using the laser tool, ALWAYS MAKE SURE that
any bystanders in the vicinity of use are made
aware of the dangers of looking directly into the
laser.
_A_LID
r.xPos_RE,_
WARNING! LASER LIGHT. LASER RADIATION°
Avoid Direct Eye Exposure. Do Not Stare into
Fan Beam.
1. DO NOT remove or deface any product tabetsr. Removing product labels
increases the risk of exposure to laser radiation
2, DO NOT stare directly at the laser fan beam or project the laser fan beam
directly into the eyes of others.. Serious eye injury could result.
3.. DO NOT place the tool in a position that may cause anyone to stare into the
laser fan beam intentionally or unintentionally. Serious eye injury could result,
4. DO NOT use any magnifying optical tools such as, but not limited to telescopes or transits to view the laser fan beam. Serious eye injury could result,
5, DO NOT operate the tool around children or allow children to operate the
tool Serious eye Injury could resulL
6.. ALWAYS turn the tool off when not in use.. Leaving the tool on increases the
risk of someone inadvertently staring into the laser fan beam
7o DO NOT operate tool in combustible
flammable liquids, gases or dusL
areas such as in the presence of
8o When using any of the base plates, ALWAYS check to be sure that the tool
is securely mounted on the base. Damage to the tool and/or serious injury
to the user could result if the tool falls_
9. ALWAYS use only the accessories that are sold by Sears for use with this
product. Use of accessories that have been designed for use wlth other laser
tools could result in serious injury°
! 0. DO NOT use this tool for any purpose other than those outiined in this
manual° This could result in serious injury..
4B291
ManuaI.Revlsed._06-0907
Page 3
11o DO NOT leave this tool on unattended_
!2. When using the Magstic adhesive material for mounting the tool to a smooth
surface, ALWAYS make sure to place the "tool-side" of the adhesive to the
tool first and then position the tool on the wall in the desired location. The
Magstic material is intended for temporary hands-free use° Do not leave the
tool mounted to the wall using Magstic for extended periods of timer The tool
may fall from the wall resulting in damage to the toolo
13., Magstic is designed for temporary use on smooth, non-porous wall surfaces_
DO NOT use Magstic on porous, heavily textured or wall-papered surfaces_
The tool may fall from the wall resulting in damage to the tool.
Know Your Palm Grip Laser Level (See Fig,l)
Your Craftsman Palm Grip Laser Level is a highly versatile laser tool that enhances the traditional pencil, carpenter's mark, and chalk lineo tt can be hand-held,
magnetically mounted, Magstic ® mounted to a smooth walt surface or leveled on
a horizontal surface or tripod stand and provides a laser guide line on your working area. This marking and leveling tool is easy to use in many applications from
simple home decorating projects to professionally installed cabinets, counter
tops, hand rails, banisters, etco The Palm Grip Laser Level is not calibrated as a
measuring device and should not be used as such° It will give a precise reference
mark when used as a hand-held, wall mounted tool, or tripod mounted tool
1. Laser Aperture: Laser line
projected from here.
2o X-Vial: Used for leveling the
Palm Grip Laser Level.
3. Y-Vial: Used for leveling the
Palm Grip Laser Level.
4_ Laser Push Button: Turn
on/off the laser lighL
5. Z-Vial: Used for leveling the
Palm Grip Laser Level when
laser level is in vertical position only_
6 All-Position Leveling Base:
leveling and supporting base
of Palm Grip Laser Level.
Fig,, 1
48291
Manual
Revised
06-0cj07
Page 4
NEWI Magstic Non-Marring
Adhesive Strips. (see Fig. 2)
Magstic is an innovative technology that is washable and reusable.. To use,
remove the "RED" tab (Toot Side) and apply the Magstic adhesive strip to the
underside of the tool's base, Remove the "GREEN" tab (Wall Side) and press
the tool firmly against the surface in the desired location° After leveling, carefully
remove the tool and base from the surface. Replace the green plastic tab on the
wall side of the Magstic for storage. The Magstic adhesive strips should remain
on the base of the toot. Once
Magstic is removed from the
tools base, it will no longer be
|"
, ll,.
"
. t./,.
. U,.
"
. U,._
I
usable,
To clean the wall side of the
Magstic adhesive, wipe a
damp cloth across each strip..
Once the wall side adhesive
has become non-usable,
replace with fresh adhesive
strips,
Fig_2
Placing Magstic on the Base
of the Palm Grip Laser Level
(see Fig, 3)
For best adhesion, place the
tool side of the adhesive on
the bottom of the base of the
too! firsL Then position the
tool on the smooth wall or
surface in the desired location. The tool can then be
leveled on the base for the
desired angle.
,_
CAUTION Remove the
Magstic from the wall after
use, Place the "wall-side"
protective tab back on the
adhesive material to help
Fig, 3
keep it clean. If the Magstic
material is soiled during use,
it can be cleaned with a damp cloth, Magstic is not intended to be used
once it has been removed from the tool. Once removed from the tool, the
strips wilt not be usable, Replace with new Magstic strips,
¢
4B291
ManLtBLRevlsed_O6,Ogo7
F_ge 5
Recommended
Use
Indoors
Laser Diode Type
Red Laser Diode 635-665nm
Laser Class
Class Ilia, Maximum Power Output _ 2,.5
mW
Power Supply
2 "AAA" 1,5_Volt Batteries
Estimated Battery Life
40 Hours of Continuous Run with Alkaline
Batteries
Optimum Ope;ating Temperature
30°F to 104°F (-1°C to 40°€) .........
Range
0--30 Feet
Accuracy
+/- 1/2" at 30 Feet
To Install
Batteries (See Fig. 4 & 5)
This Palm Grip Laser Level uses two "AAA" batteries° (Sold separately)
Fig. 4
Fig.. 5
!o Push lightly on the level in the direction of the marked arrow shown in Fig° 4o
The battery compartment cover will be opened automatically at once_
2o Install the batteries with the correct polarity as shown on the battery
compartment cover (Fig..5)_.
3o Push close the battery compartment
,18291 ManuaERevised 05,O907
cover in place.
Page 6
3"0 TURN THE TOOL ON/OFF
The button to turn the Craftsman Palm Grip Laser Level ON/OFF is located on
the top housing of the tool, (See Fig° 1)
1o To turn the Palm Grip Laser Level ON, push the "ON/OFF" button down
once.
2,, To turn OFF, push the button down once.
WARNING When turning ON the Palm Grip Laser Level, ALWAYS be
aware of protecting your eyes and those around you. NEVER point the Palm
Grip Laser Level at anyone's face including your own.
USE OF LASER ENHANCING SAFETY GLASSES (Supplied) will improve
the performance of the toot in bright light conditions.
_k WARNING Laser Enhancing Safety Glasses WILL NOT protect the
eyes from damage that could result from looking directly into the laser
projection.
The Palm Grip Laser Level
Is A Two-Piece Device
The All-Position leveling base has
two built in magnets° One magnet
attaches the palm laser to the
base, Another magnet is located
on the bottom of the base and will
allow it to attach to a steel plate.
Pulling the two pieces apart witl
separate them as shown in Fig. 6.
Fig°6
4B29:[ Manual_Revised06,,0907
Page 7
The All-Position
Leveling Base (See Fig. 7)
"Your Palm Grip Laser Level comes with a spherical base which aliows the level to
be finely adjusted to the desired angie when using the base on a surface that is
not level or plumb,
I
i
I
I
1
I
l
g
II
il
II
II
g
U
U
U
8
I
Fig. 7
NOTE: To use the level on two adjacent surfaces it must be plumb (vertical)
on the surface to which it is mounted. Fig. 7 illustrates how the level can be
adjusted on the base,
Fig,, 8
Fig° 9
CAUTION When using the Magstic® adhesive material to secure the Palm
Grip Laser Level to a smooth wall surface, make sure to place the "tool
side" of the Magstic to the underside of the base of the tool and the "wall
side" of the Magstic to the smooth walt surface.
48291 ManuaERevlsed_06-0907
I_,_e 8
Using The All-Position
Leveling Base
To use the All-Position Leveling Base in conjunction with the Patm Grip Laser
Level, it is best to place the level on the base for preliminary alignment of the
laser line on the wail.
1. Without turning the Laser Level on, place it on the Al_-Position Leveling Base..
3_vo magnets (one in the bottom of the laser and one in the top of the base)
hold the base and the level together_ This sphedcaVmagnetic design allows
adjustment for horizontal (level) and vertical (plumb) of the laser line..
2. Once the level is on the base, turn the level "ON" being careful not to point
the laser line in the direction of anyone's eyes including your own..
3o Place the level/base assembly on the wall and position the line across the
surface(s) and at the approximate height you want to draw a level line,
Leveling The Palm Grip Laser Level On
All-Position Leveling Base (See Fig. 10)
There are two level vials (x, y) on the top of
the Palm Grip Laser Level and a third vial
located on the side (z) of the laser level (Fig°
1 #5)° With the AIFPosition Leveling Base
and the Palm Grip Laser Level connected,
align the bubble of one or both of the
(x,y) or (z) vials° This will allow for horizontal
(level) or vertical (plumb) level adjustments
(Fig. !0),
Fig. 10
48291 Manual_Rev'ise_ 06,.0907
Page 9
Using The Level With A Tripod (Not Included)
Because the Palm Grip Laser Level is a "forward" projection device, it can be placed on any
reasonably level flat surface to draw a plumb
vertical line, When used in conjunction with any
standard tripod (1/4-20 UNC threaded fitting)
versatility is further enhanced (See Fig° 1!).
Mounting The Level To A Tripod (See Fig. 12)
1. Attach the All-Position Leveling Base to
the tripod using the standard 1/4-20 UNC
threaded fitting included with the tripod.
(See Fig° 11).
2. Place the level on the All-Position Leveling
Base.
3_,Push the "ON/OFF" button once to turn
Fig, 11
the level. DO NOT point tool in the direction
of your eyes or anyone else's eyes in the
vicinity of use,
4. Determine a line with two points A, B (Fig_ 12). Align your laser fan beam to
these points.
A
Fig° 12
48291
M anuaLRevised~06
_0907
Page t0
Referencing And Leveling Across Two Adjacent
Surfaces
The Palm Grip Laser Level can be used to align a single object or objects on
two adjacent walls,, The All-Position Leveling Base has a magnetic bottom that will
attach to virtually any steel surface° The laser has a broad range of apptications,
such as aligning tile on the wall, lining up kitchen and bath cabinets, hanging
wallpaper, aligning junction boxes and laying walt or floor tile,, The Palm Grip
Laser Level's laser fan beam is also useful when working with two adjacent surfaces_
Fig. 13 illustrates the use of the laser fan beam in aligning pictures on two opposing walls,, Keep in mind that the bubbles of Y-Vial and Z-Vial should be adjusted
so the bubbles are in the center of each vial,,
Fig. 13
48291 M_nuaLRevised_06.0907
Page 11
Working With Obstructions
And User Interference
As discussed, the Palm Grip Laser Level is a forward projection device. The
nature of the laser light as it is projected from the level is that of a plane rather
than a line_This laser fan beam covers the entire line area from end point to end
point (Fig 14)_As such the line is not completely blocked by obstructions or user
interference°
Fig 14
Note in Fig.15 how the laser line
projects around the hot water
heater and the adjacent line on
either side of the heater remains
straight and level
:_;I'IWAT_,:!:!
Fig. 15
48291
ManuaLRevEsed_06.0907
Page 12
Using The Palm Grip Laser Level As A Hand-Held Reference Device (See Fig. 16)
With the Laser Level body in the palm of your hand, turn it "ON" being careful
not to point it in the direction of anyone's eyes including your own° Note that it
projects a horizontal or vertical line "forward" in front of your position.. Used in
this manner it becomes a very handy reference device for checking the alignment of
most anything including quick references across and alignment of any two points
of reference_ It makes easy work of lining up cut-outs, fixtures on drywall, checking wall paper, and paint trim. Used in this manner it is atso ideal for insuring
straight placement of mounted fixtures and brackets, such as stair raiting fittings
as shown in Fig.. 16.
\
\
Fig, 16
48291 ManuaLRevlsed_06-O907
Page !3
This Palm Grip Laser Level has been designed to be a low-maintenance tool
However, in order to maintain its performance, you must always follow these
simple directions°
1, ALWAYS handle the tool with care, Treat it as an optical device, such as a
camera or binoculars,,
2o AVOID exposing the tool to shock, continuous
cold temperature.
vibration or extreme hot or
3, ALWAYS store the tool indoors., When not in use, ALWAYS store the tool in
its protective case.
4. ALWAYS keep the tool free of dust and liquids,, If needed, use ONLY a soft
cloth or cotton swab and glass cleaner to clean the laser emitting window,
5. ALWAYS clean and thoroughly dry the tool after each use,
6. Check the batteries regularly to avoid deterioration° ALWAYS remove the
batteries from the tool if it is not going to be used for an extended period of
time.
7o DO NOT disassemble the Palm Grip Laser Level., This wili not only void the
warranty, but coutd expose the user to hazardous radiation exposure,,
8. DO NOT attempt to change any part of the laser lens,,
9, ALWAYS remove the Magstic adhesive material from the wall surface
immediately after use and place the protective tabs back on the adhesive for
storage° If the Magstic material gets soiled, it can be cleaned with a damp
cloth,,
10, Magstic is intended to be used on smooth surfaces only. Magstic is NOT
intended to be used on rough textured or rough wall-papered walls°
11. Do not remove Magstic from the base of the tool unless new Magstic is
required. Removing Magstic from the base of the tool will damage the
adhesive strips and they will no longer be usable.
48291 ManuaLRevtsed_06_)907
Page 14
The Laser line
projection is weak
Batteries are weak
Replace with new batteries
The Laser line is
hard to see
The tool is too far
from the target
Move the too! closer to the target
The Laser Fineis
not projected
Power button is not
"ON'*
Check to make sure the power button
is in the "ON" position
The Laser line
projected is not
level
Magstic adhesive
is not adhering to
surface
Magstic adhesive
is not adhering to
the tool
Polarity of the
Reinstallthe batteries according to
batteries is incorrect the polarity indicator in the battery
compartment
The level bubbles
Attach the laser level to the precision
of the vials are not
leveling base and turn adjustment
centered
knobs until the bubbles are centered
in the middle of the two reference
lines
Magstlc is dirty
Clean Magsttc thoroughly with a damp
cloth and let dry
Magstic adhesive
has expired
Replace Magstlc material
"Wall Side" of the
adhesive is used
on the tool
Make sure the "Tool Side" of the
adhesive Is used on the base of the
tool
Magstic adhesive
has expired
Replace Magstlc material
V A
=
=
¥
The Laser Level Model Number is found on the cover of this manual. Always
mention the Model Number when ordering replacement Magstic adhesive strips.
Parts No,
Part Description
3703724001
Magstic
48291 Manuel. Revlsed_O_-0907
...............
Quantity
6 Pieces
Page 15
?!:_j:_j:::!:=_i:i_ji
_¸
Your Home
For expert troubleshooting and home solutions
manage
advice:
home
L:i::::!_
www.managamyhome,
com
For repair - in your home - of all major brand appliances,
lawn and garden equipment, or heating and cooling systems,
no matter who made it, no matter who sold it !
For the replacement parts, accessories and
owner's manuals that you need to do-it*yourselL
For Sears prolessional installation of home appliances
and items like garage door openers and water heaters°
1-800-4-MY-HOME
(1-800.4694663)
www,sears,com
®
catz anytime, day or nigh!
(USA, and Canada)
www,searsoca
Our Home
For repair of carry-in items like vacuums, lawn equipment,
and electronics, call anytime for the location of the nearest
Sears Parts & Repair Service Center
1-800-488-1222 (USA,,)
www,sears.com
1-800-469-4663 (Canada)
www,searsoca
To purchase a protectionagreement on a product serviced by Sears:
1-800-827-6655 (u,sA.)
....
: : ::,=
i: :.
Para pedir serviciode reparaciSn
a domicilio, y pars ordenar piezas:
1-888-SU-HOGAR®
(1-88_784_o4;_7)
1-800-361-6665
(Canada)
Au Canada pour service en fran(;ais:
I_800-LE-FOYER Mc
(1-_)-533-6937)
wwwsears,ca
© SealsB_r_, LLC
® Registered Trademark I 1M Trademark f SM Service M_rk el Sears Brands. LLC
@ Marca Regislrads 1Tu Mama de F_bt[ca t su Marca de Serviclo de S_ata Bra_ds. LLC
_c Marque de commerce I _o Marque dBpos_e de Sears Brands, LLC
....
_:,:,: