1
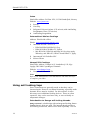
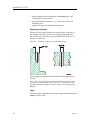
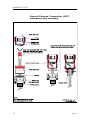
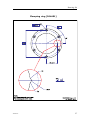
Installation manual
Simrad ES333-7CD
200 kHz split-beam deep water transducer
www.simrad.com
TECHNOLOGY
FOR
SUSTAINABLE
FISHERIES
Simrad ES333-7CD
Installation manual
This document provides a general description of how to
install the Simrad ES333-7CD Split-beam transducer. The
information must be regarded as general guidelines and
recommendations only. The installation shipyard must
design and manufacture installation hardware to fit the
ES333-7CD transducer on each individual towed body.
329787/A
15 January 2009
Document history
Simrad document number: 329787 / ISBN: 978-82-8066-105-0 / Current revision: A
Rev.A
January 2009
First version.
Copyright
©2009 Kongsberg Maritime AS
The information contained in this document remains the sole property of Kongsberg Maritime AS. No part
of this document may be copied or reproduced in any form or by any means, and the information contained
within it is not to be communicated to a third party, without the prior written consent of Kongsberg
Maritime AS. The document, or any part of it, may not be translated to any other language without the
written approval from Kongsberg Maritime AS.
Disclaimer
Kongsberg Maritime AS endeavours to ensure that all information in this document is correct and fairly
stated, but does not accept liability for any errors or omissions.
Warning
The equipment to which this manual applies must only be used for the purpose for which it was
designed. Improper use or maintenance may cause damage to the equipment and/or injury to
personnel. The user must be familiar with the contents of the appropriate manuals before attempting
to install, operate or work on the equipment.
Kongsberg Maritime AS disclaims any responsibility for damage or injury caused by improper
installation, use or maintenance of the equipment.
Support
If you require maintenance on your Simrad product contact your local dealer. You can also contact us using
the following address: [email protected]. If you need information about our other products,
visit www.simrad.com. On our web site you will also find a list of our dealers and distributors.
S im r a d
Ko n g s b e r g M a r it im e A S
S t ra n d p rom e n a d e n 5 0
P. O. Bo x 1 1 1
N- 3 1 9 1 H o r t e n , N o r w a y
Te le p h o n e : + 4 7 3 3 0 3 4 0 0 0
Te le fa x : + 4 7 3 3 0 4 2 9 8 7
w w w . s im r a d . c o m
c o n t a c t @ s im r a d . c o m
Installation manual
Table of contents
ABOUT THIS MANUAL ....................................................... 5
SIMRAD ES333-7CD .......................................................... 6
TOWED BODY DESIGN ...................................................... 7
HOW TO INSTALL THE TRANSDUCER ................................ 9
TRANSDUCER HANDLING AND MAINTENANCE ................ 13
Rules for transducer handling.................................................................................13
Approved anti-fouling paints..................................................................................13
Using self-locking taps ...........................................................................................14
TRANSDUCER CABLE SPLICING....................................... 18
STEEL CONDUIT .............................................................. 19
DRAWING FILE ............................................................... 20
Echo sounder connections ......................................................................................20
Splicing the transducer cable ....................................................................... 20
General Purpose Transceiver (GPT) wiring................................................... 21
General Purpose Transceiver (GPT) transducer plug assembly ....................... 22
Outline dimensions and installation drawings........................................................23
Outline dimensions [318747]....................................................................... 24
Mounting ring [204449] .............................................................................. 25
Clamping ring [204451] .............................................................................. 27
329787/A
3
Simrad ES333-7CD
4
329787/A
About this manual
ABOUT THIS MANUAL
Purpose
The purpose of this installation manual is to provide generic
descriptions and illustrations allowing the reader to understand
the basic principles for echo sounder transducer installation.
About the information provided in this document
The information in this document must be regarded as general
guidelines and recommendations only. The installation shipyard
must design and manufacture installation hardware to fit each
individual transducer and vessel.
Approval by maritime authorities
Whenever required, the installation shipyard must also have the
installation approved by the applicable maritime authorities.
Additional information
For additional detailed information about the transducer to
be installed, refer to the documentation provided with the
transducer. Drawings and descriptions can also be obtained from
http://www.simrad.com.
329787/A
5
Simrad ES333-7CD
SIMRAD ES333-7CD
The purpose of this manual is the provide the basic information
required to install the Simrad ES333-7CD Split-beam transducer.
Transducer and documents order numbers
• Simrad ES333–7CD: 312902
• Product specification: 329782
• Outline dimensions: 318747
• Mounting ring: 871-204449
• Clamping ring: 871-204451
Note
Note that although drawings are provided to explain the
installation principles, the manufacturer of the towed body
must provide the final drawings required to fit the transducer.
Transducer installation
The next chapters in this manual provide general guidelines for
transducer installation. The drawings specific for the ES333-7CD
transducer are located in the Drawing file on page 20.
Technical specifications
Refer to the ES333-7CD product specification.
Additional parts provided for installation
The following items can be supplied by Simrad to facilitate
installation:
• Mounting ring: ES2–204464
• Clamping ring: ES2–200879
• Transducer cable (for extension): 642–078215
Note
This cable is NOT suitable as a tow cable!
• The following parts must (if required) be provided by the
installation shipyard:
– Male bulkhead connector: 8–pin Burton 5500 Series
(www.burtonee.com)
6
329787/A
Towed body design
TOWED BODY DESIGN
The towed body used to hold the ES333-7CD Split-beam
transducer is not provided by Simrad. The design and
manufacturing of such a body must be made by your own
organisation, or by a third party you wish to engage to do this.
During the design phase, the following considerations must be
made.
Figure 1
Example, towed body
(CD017201C)
D
E
C
B
A
A
B
C
D
E
Transducer mounted through the body plating by means of
a mounting ring
Watertight compartment with transceiver electronics
Tail fin
Tow line with built-in cables for power supply, control and
data transfer (ethernet)
Fairings
Location of transceiver electronics
If your towed body design comprises a watertight compartment,
you may choose to install the transceiver circuitry inside the
towed body. In order to do so, you must install watertight sockets
on the bulkhead in order to connect the transducer cable(s),
control and data transfer (Ethernet) and operating power. By
using a this arrangement, you avoid the signal loss you may
experience using a long transducer cable.
Depth
The upper water layers of the sea contain a myriad of small
air bubbles created by the breaking waves. In heavy seas the
uppermost 5 to 10 metres may be air-filled, with the highest
concentrations near the surface. Air bubbles absorb and reflect
329787/A
7
Simrad ES333-7CD
the sound energy, and may in worst cases block the sound
transmission totally. Therefore, design the towed body so that it
can operate in deep water.
Caution
Observe the maximum operational depth of the
transducer. Do not exceed this limitation.
Do not allow the towed body to hit the sea bed. This
may inflict permanent damage to the transducer(s).
Noise from protruding objects on the body
Objects protruding from the towed body, such as zinc anodes,
sonar transducers or even a rudder or a keel, may generate
turbulence and flow noise. Holes and pipe outlets are also
possible noise sources, as these may act as resonant cavities
amplifying the flow noise at certain frequencies. Do not place
an echo sounder transducer in the vicinity of such objects, and
especially not close behind them. For the same reason, it is
very important that the body area adjacent to the transducer
face is as smooth and level as possible. Even traces of sealing
compound, sharp edges, protruding bolts or bolt holes without
filling compound will create noise.
Inclination of the transducer face
Ideally, the transducer face should be mounted in parallel with
the sea surface when the towed body is in normal trim, as this
will provide the most accurate echo information. However, it is
also very important that the water flow over the transducer face
is laminar. In order to ensure laminar flow, the transducer face
may be tilted slightly upwards in relation to the water flow. This
allows the flowing water to meet the face directly, and assures
laminar flow. The inclination angle must however be determined
carefully. The angle must be small on transducers with narrow
beam angles. As a rule of thumb, mount transducers with beam
angles smaller than seven degrees with minimum inclination
angle. The smaller beam angle your transducer has, the smaller
the inclination angle can be. Make sure that you do not mount
the transducer with a negative inclination angle. This may cause
turbulence under the transducer face, and reduced echo sounder
performance.
8
329787/A
How to install the transducer
HOW TO INSTALL THE TRANSDUCER
Installation on a towed body
Transducers designed to withstand large water pressure are
provided for use in towed bodies. The recommended installation
method is through the hull plating hull using mounting and
clamping rings. The installation arrangement on the towed body
must be designed by the manufacturer of the towed body to fit
its shape and characteristics.
Use mounting and clamping rings whenever
provided
Circular transducers may be provided with mounting and
clamping rings, or with drawings to allow for local production of
these. The mounting ring is welded to the hole in the towed array,
while the clamping ring fits around the edge of the transducer
body. Bolts through the clamping ring into the mounting ring will
then secure the transducer between them. Note that all split-beam
transducers use direction guides to allow correct mounting.
Smooth surface is important
Mounting screws or bolts must not be extruding from the vehicle.
Ensure that the surface of the transducer face, the vehicle, the
vehicle plating and putty around the transducer is as even and
smooth as possible. Obstructions on these surfaces will create
problems with the water flow.
329787/A
9
Simrad ES333-7CD
Example: Installation of small transducer
The illustration below shows the installation principle of a small
circular transducer using clamping and mounting rings.
Figure 2
10
Installation principle, small transducer
A
Mounting ring
B
Hull plating on towed body
C
Transducer
D
Clamping ring
E
Bolt
329787/A
How to install the transducer
Example: Installation of medium and large
transducers
The illustration below shows the installation principle of a
medium or large transducers. Note that a clamping ring is not
required, as the transducer body is shaped to facilitate this
function.
Figure 3
Installation principle, medium and large transducers
A
B
C
D
(CD017010G)
329787/A
E
A
Mounting ring
B
Hull plating on towed body
C
Transducer
D
“Clamping ring” functionality facilitated by transducer
body
E
Bolt
11
Simrad ES333-7CD
Example: Dual transducer arrangement in towed
body
The illustration below shows a typical through the hull installation
of small and large circular transducers on a towed body.
Figure 4
Dual transducer arrangement
(CD017201B)
C
A
12
B
A
Small transducer
B
Medium or larger transducer
C
Electronic equipment in watertight compartment
329787/A
Transducer handling and maintenance
TRANSDUCER HANDLING AND
MAINTENANCE
You MUST observe the following rules for handling,
maintenance and painting.
Topics
• Rules for transducer handling on page 13
• Approved anti-fouling paints on page 13
• Using self-locking taps on page 14
Rules for transducer handling
Note
Do not lift the transducer by the cable.
Do not expose the transducer to direct sunlight.
Do not expose the transducer to excessive heat.
Transport protection
Some transducers are delivered with a cover plate on the face
for protection during transport. Let this plate stay on as long as
possible, but do not forget to remove it before the vessel goes
into the sea.
Painting the transducer face
An anti-fouling paint may be applied to the transducer face.
Because some paint types may be aggressive to the polyurethane
in the transducer face, please consult Simrad’s list of approved
paints. See Approved anti-fouling paints on page 13.
Cleaning the transducer face
Whenever opportunity arise, for example when the vessel is dry
docked, the transducer face may be cleaned for shells and other
marine fouling. Be careful not to make cuts in the transducer
face. Use a piece of soft wood or a very fine grade emery paper.
Special rules for acoustic windows
Arctic tanks have acoustic windows made of polycarbonate.
These must neither be painted nor cleaned with chemicals.
Approved anti-fouling paints
This is Simrad’s list of approved antifouling paints on
polyurethane transducer housing.
329787/A
13
Simrad ES333-7CD
Jotun
Head office address: P.O.Box 2021, N-3248 Sandefjord, Norway
Website: www.jotun.com.
1 Racing
2 Non-stop
3 Safeguard Universal primer (125 micron) with Antifouling
SeaQuantum Ultra (125 micron)
4 Antifouling Seaguardian
International Marine Coatings
Address: World-wide offices
Wesite: www.international-marine.com.
1 Intersleek tie coat + 425 FCS
• BXA386/BXA390/BXA391 Grey
• HKA563/HKA570/HKA571 Yellow
• Mix BXA386, BXA390 and BXA391 first, then apply.
When dry, mix HKA563, HKA570 and HKA571, apply.
2 Intersmooth 360 Ecoloflex SPC
3 Micron Ekstra
Hempel IFA Coatings
Head office address: Hempel A/S, Lundtoftevej 150, Kgs.
Lyngby, DK-2800 Copenhagen, Denmark
Website: www.hempel.com.
1 Hempel A/F Classic 76550
Note
Refer to the manufacturer’s documentation and data sheets for
a complete procedure.
Using self-locking taps
Screw connections are generally made so that they can be
loosened again. However, accidental loosening, especially under
dynamic stress, must be avoided. For this reason it is often
necessary to use additional locking devices. These are often
expensive, they can be used once only, or react critically to
temperature changes.
Introduction to Emuge self-locking threads
Emuge self-lock is a bolt design with an integrated locking feature.
Standard metric bolts are used. The internal thread provides a
self-locking connection, which can be used repeatedly. It is not
14
329787/A
Transducer handling and maintenance
necessary to involve a secondary locking device (e.g. chemical,
nylon or mechanical). The Emuge self-lock bolts withstand
vibrations better than standard (metric) threads, because the
thread contact stops the sideways movement. The special
design of the internal thread profile also provides a more even
distribution of the tightening stress over the whole thread length.
The assembly is just as easy as with a normal (metric) thread.
There is no general applicable standard (e.g. DIN standard) for
the Emuge self-lock thread.
Figure 5
Example, internal and external threads
A
B
C
2
1
(CD017020B)
A
Emuge’s saw-tooth profile up to pitch P ≤ 0.7 mm
B
Emuge’s saw-tooth profile up to pitch P ≥ 0.7 mm
C
Standard thread
1
External thread
2
Internal thread
The advantages of using Emuge self-lock thread include:
• The thread locking feature is integrated in the internal thread
• Modified profile with ramp surface in the direction of stress
• 30 degree ramp surface provides self-locking effect
• Easy assembly
• No assembly errors (forgetting the locking device) possible
• Use of standard external threads (screws) with tolerance class
“medium”
• Even distribution of stress over the whole thread length
• No stripping of threads
• Economically efficient locking system, no additional
components are necessary
• Undiminished holding power even under dynamic stress
• Repeated loosening and re-tightening without loss of function
329787/A
15
Simrad ES333-7CD
• Internal threads can be produced with Emuge taps, cold
forming taps or thread mills
• Larger thread hole diameters, i.e. increased tool life for
threading tools
• Larger tolerances for thread hole diameters
Drawing standard
Whenever self-locking threads are required, this is shown on
the technical drawing. In the case of tapping through holes,
the arrow at the end of the center line illustrates the screw-in
direction of the bolt.
Figure 6
Drawing examples, self-locking thread
M8 SL*
M10 SL*
(CD017020A)
The drawing is normally provided with the following text (or
similar):
Note: The self-lock threads marked with SL* must be made in
accordance with procedure 842–202125. Drill diameters for
threads differ from standard. Self-lock taps can be supplied by
Simrad.
Taps
The pretension locking thread self–lock (taps) from manufacturer
Emuge must be used.
16
329787/A
Transducer handling and maintenance
Figure 7
Example of use
(CD017020C)
Note
In the case of tapping through holes it is important that the
profile of the Emuge self-lock threads is in the correct direction
compared with the entering direction of the bolt.
Gauge
Use Emuge self-lock gauges. Note that the gauge must be used
in the correct direction.
Self-lock taps provided by Simrad
The following self-lock taps are on stock at Simrad, and can be
ordered from us.
Threads
Drill diameter for
threads
Part.no
M6
ø5.2
700-078838
M8
ø7.0
700-078531
M10
ø8.8
700-078408
M12
ø10.7
700-078409
M16
ø14.5
700-078410
Supplier and manufacturer
Norwegian supplier is:
Tingstad AS, P.O.Box 83, Kalbakken, 0902 Oslo, Norway
http://www.tingstad.no
Manufacturer is:
EMUGE-Werk Richard Glimpel, Nurnberger Strasse 96-100,
D-90607 Lauf, Germany
http://www.emuge.de
329787/A
17
Simrad ES333-7CD
TRANSDUCER CABLE SPLICING
If you need to cut or lengthen the transducer cable, you must
splice it correctly. The cable between the junction box and the
transceiver must then be supplied by Simrad, and this must be
the same type as used on the transducer(s). To splice the cable,
use a metal junction box with EMC cable glands and a terminal
block. The terminal block must provide solid fastening of the
cable ends as well as sufficient insulation between the wires. We
recommend that the cable screen is connected to the junction
box chassis using the EMC cable glands, but if you do this, the
junction box chassis must not be connected to vessel’s ground.
Note
Do not solder the wires together with only electrical tape for
insulation. This will result in electrical noise and reduced
operational performance.
Do not connect the cable screen to the vessel’s ground.
18
329787/A
Steel conduit
STEEL CONDUIT
Why use steel conduits with a towed body?
It is strongly recommended to lay a steel conduit from the
connection point of the tow cable to the echo sounder transceiver,
and to pull the transducer cable through this conduit. There are
several reasons for this.
• It will make it easier at a later stage to replace the cable.
• Noise and interference from other electrical equipment is
greatly reduced.
With a steel conduit the installation will satisfy the EU
regulations for EMC interference. Without a steel conduit, there
is a risk of reduced echo sounder performance.
Steel conduits qualities and shielding
The steel conduit must be unbroken and watertight from the
transducer to above the water line. From there, the cable can
be pulled further, or a junction box can be installed to facilitate
further connections. Note that the steel conduit must act as
a continuous electrical screen all the way. To ensure proper
shielding, the conduit must be electrically connected to the echo
sounder transceiver chassis.
Steel conduit dimensions:
• minimum 35 mm inner diameter
• minimum 6 mm wall thickness (4.5 mm if galvanised)
More that one transducer cable?
If two or more transducers are installed close to each other it is
possible to pull their cables in the same steel conduit, provided
the conduit diameter is increased accordingly. However, for easy
replacement it is recommended that each transducer has its own
steel conduit.
329787/A
19
Simrad ES333-7CD
DRAWING FILE
This chapter contains relevant drawings related to the electrical
and physical installation of the ES333-7CD Split-beam
transducer.
Note
The mechanical drawings are for information and guidance only.
They are not in scale. All dimensions are in mm unless otherwise
is noted.
The original installation drawings are available on PDF and/or
AutoCad format. Visit www.simrad.com to download.
Topics
• Echo sounder connections on page 20
• Outline dimensions and installation drawings on page 23
Echo sounder connections
Observe the following information related to electrical
connection of the ES333-7CD Split-beam transducer.
Topics
• Splicing the transducer cable on page 20
• General Purpose Transceiver (GPT) wiring on page 21
• General Purpose Transceiver (GPT) transducer plug assembly
on page 22
Splicing the transducer cable
If you need to splice the transducer cable, it is very important to
use the correct cable, and to avoid ground loops. We strongly
recommend the use of a junction box. We also recommend that
you install the transducer cable in a steel conduit.
Related topics
• Transducer cable splicing on page 18
• Steel conduit on page 19
• General Purpose Transceiver (GPT) transducer plug assembly
on page 22
20
329787/A
Drawing file
General Purpose Transceiver (GPT) wiring
3
2
1
6
5
4
8
GPT Transducer
socket
B
7
A
N
M
C
Pin 1
Pin 4
Pin 2
Pin 5
Pin 3
Pin 6
Pin 7
Pin 8
+
+
+
+
-
Burton
connector
Q1
Q2
Forward
Aft starboard
3
Aft port
Q3
Fore port
Q4
Fore starboard
D
K
E
4
Port
L
F
H
J
Starboard
2
1
Quadrants seen from top
of the transducer
Connection box
with Burton socket
1
4
1
4
Quadrant 1
H
J
2
5
2
5
Quadrant 2
E
F
3
6
3
6
Quadrant 3
C
D
7
8
7
8
Quadrant 4
A
B
Screen to plug housing
W802-1 1
Rev.A
329787/A
Deep water transducer
, termination
21
Simrad ES333-7CD
General Purpose Transceiver (GPT)
transducer plug assembly
Upper plug case
Plug
fastening ring
Contact body
Retaining ring
Outer screen and inner screen braid wire
untaped and spread out under washer
Outer screen together with inner screen.
Drain wire, fold back over jacket
and temporary fastened with tape.
Heat-shrinkable tubing
Lower plug case
Washers
Bottom cap
and cable clamp
Rubber sleeve
Rubber sleeve
Note:
All measurements are in mm.
The drawing is not in scale.
22
CD010219A Page 1 of 1
824-201575 Rev .C
329787/A
Drawing file
Outline dimensions and installation drawings
Note
Observe the maximum torque (17 Nm) when the transducer is
bolted into the mounting ring!
Topics
• Outline dimensions [318747] on page 24
• Mounting ring [204449] on page 25
• Clamping ring [204451] on page 27
329787/A
23
Simrad ES333-7CD
Outline dimensions [318747]
24
329787/A
Drawing file
Mounting ring [204449]
138
30°
60°
M10 Self-lock
(6 holes)
Bore diameter 8.8 mm
ø0.2
Material:
Steel tube, ST .52-3N (DIN 17121), ø193.7/ø83.7 x100
Surface treatment:
Sand blasted to SA
2.5, one coating of red ferric oxide primer
M10 Self-lock taps:
Refer to specific description. Self-lock taps can be provided by Simrad.
Note:
All measurements are in mm.
The drawing is not in scale.
329787/A
CD017018F Page 1 of 2
871-204449 Rev .B
25
Simrad ES333-7CD
85 ±1
15 +0.3/-0
60 +0.1/-0
0.075
Champer 3x45°
45°
ø166 ±1
ø162 +0.5/-0
ø121 +0.5/-0
ø88 ±1
ø180 ±1
R1
R0.75 max
20 ±2
6.3
30 ±1
Note:
All measurements are in mm.
The drawing is not in scale.
26
CD017018F Page 2 of 2
871-204449 Rev .B
329787/A
Drawing file
Clamping ring [204451]
ø11
ø0.2
60 o
30
o
138
50 ±0.1
R1
6.3
(
)
R5.5
R1
Note:
All measurements are in mm.
The drawing is not in scale.
329787/A
CD017016G Page 1 of 2
871-204451 Rev .A
27
Simrad ES333-7CD
(15)
R0.5
ø101 +0.5/-0
ø160 +0.5/-0
R0.5
R1.5
ø18
10
Material: 15 mm steel plate, St37/St52
Note:
All measurements are in mm.
The drawing is not in scale.
28
CD017016G Page 2 of 2
871-204451 Rev .A
329787/A
Index
Index
A
About, 5
information in this
manual, 5
Additional information, 5
Air bubbles, 7
Anti-fouling
paint, 13
Approval
maritime authorities, 5
C
Cable
transducer, splicing, 18
Clamping ring
blister, 9
drawing, 27
example, 10
D
Depth, 7
Diameter
steel conduit, 19
Dimensions
drawing, 24
Drawing
Clamping ring, 27
GPT Transducer plug, 22
Mounting ring, 25
outline dimensions, 24
Drawing file, 20
E
Emuge, 14
Example
Clamping ring, 10
Mounting ring, 10
G
GPT Transducer plug
drawing, 22
H
Handling, 13
Handling rules, 13
Heat, excessive
do NOT expose, 13
I
Inclination
329787/A
angle, 8
Installation
drawings, 6, 20
hardware, 6
responsibility, 6
Installation method
Towed body, 9
Introduction, 6
L
Laminar flow, 8
Lifting, 13
M
Maintenance, 13
Maritime authorities
approval, 5
Mounting ring
blister, 9
drawing, 25
example, 10
N
Noise
air bubbles, 7
protruding objects, 8
Splicing
transducer cable, 18
Steel conduit
diameter, 19
qualities, 19
shielding, 19
Sunlight
do NOT expose, 13
Surface
blister, 9
T
Taps, self-locking, 14
Towed body
installation, 9
Transceiver circuitry
location, 7
Transducer
depth, 7
lifting, 13
order number, 6
Transducer cable
splicing, 18
Transducer plug
drawing, 22
W
Watertight, 7
O
Order number
transducer, 6
Outline dimensions
drawing, 24
P
Paint
anti-fouling, 13
Physical dimensions
drawing, 24
Protruding objects, 8
Purpose
this manual, 5
S
Self-locking taps, 14
Shielding
steel conduit, 19
Simrad website, 5
Smooth surface, 9
29
Simrad document number: 329787
ISBN: 978-82-8066-105-0
©2009
Kongsberg Maritime AS
S im r a d
Ko n g s b e r g M a r it im e A S
S t ra n d p rom e n a d e n 5 0
P. O. Bo x 1 1 1
N- 3 1 9 1 H o r t e n , N o r w a y
Te le p h o n e : + 4 7 3 3 0 3 4 0 0 0
Te le fa x : + 4 7 3 3 0 4 2 9 8 7
w w w . s im r a d . c o m
c o n t a c t @ s im r a d . c o m