1
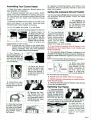
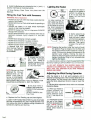
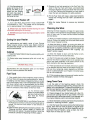
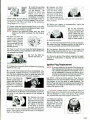
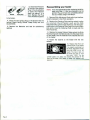
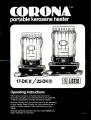
CORON
portable kerosene heater
Operating Instructions
This manual contains complete instructions for
assembly, operation and maintenance of the CORONA
17-DK© and 22-DKO Portable Kerosene Heaters.
Use this manual until you are familiar with the operation
of your heater. Keep it handy for future reference as a
guide to proper operation and maintenance of your
heater.
Read all materials packed with your heater before you
begin assembly or operation .
1981
This instruction manual is important to you.
Please read it thoroughly.
In a short time this manual will show you how to assemble,
operate and maintain your heater for best performance . It shows
you simple things to check before you contact your Corona
dealer . ..so you may save the cost of unnecessary service.
Before using your heater read these important words of caution:
1 . WARNING : RISK OF ASPHYXIATION :, Use the 7. NEVER ATTEMPT TO FILL THE FUEL TANK
heater only in a well ventilated area. NEVER
while heater is in operation . When filling the
use the heater in a tightly enclosed area, like a
tank, be certain to wipe away any kerosene
bathroom or hallway.
spilled on exterior of the Heater Cabinet .
2. Use only clean, water-clear kerosene in your 8. Use the Siphon Pump that came packed with
heater. NEVER use gasoline, benzol, alcohol,
your heater to fill the Fuel Tank. Always fill the
No. 2 fuel oil, diesel oil, white gas or camping
Fuel Tank outdoors. Make certain the heater is
stove fuel in your heater. The use of any subturned "OFF" before filling Tank.
stance other than kerosene could result in an
9. DO NOT move heater while it is in operation .
EXPLOSION OR FIRE.
3. NEVER LEAVE HEATER UNATTENDED or 10. Store kerosene supply in an approved container, tightly capped, in a cool, dark place .
sleep while heater is in operation .
NEVER store in direct sunlight . NEVER store
4. Keep your heater away from drafts to avoid unkerosene in a glass container.
even burning and poor performance.
11. DO NOT place a pan of water on top of heater
5. Pick a location that's convenient but DO NOT
or attempt to cook on top .
place heater in a high traffic area where it
could be bumped or jarred . Be sure heater is 12. DO NOT use your heater if it has been damaged or is burning irregularly.
sitting on a level surface during operation and
away from direct sunlight.
13. DO NOT attempt to operate your heater until
the Automatic Shut-off System has been set .
6. WARNING : DO NOT TOUCH THE HEATER
CABINET TOP during operation . This surface 14. DO NOT attempt to modify or repair the
becomes very HOT . Don't allow children or
Automatic Shut-off System.
pets to play near the heater . Keep combustible
materials away from the heater . DO NOT place 15. Not recommended for use at elevations higher
than 3,000 feet above sea level.
combustibles, like laundry, near heater.
J
TABLE OF CONTENTS
Words of Caution . . . . . . . . . . . . . . . . . . . . . . . .
Major Parts . . . . . . . . . . . . . . . . . . . . . . . . . . . .
General Specifications . . . . . . . . . . . . . . . . . . .
Assembling Your Corona Heater . . . . . . . . . . .
Setting the Automatic Shut-Off System . . . . . .
Operating Your Heater . . . . . . . . . . . . . . . . . . . .
Filling the Fuel Tank with Kerosene . . . . . . . . .
Lighting the Heater . . . . . . . . . . . . . . . . . . . . . .
Adjusting the Wick During Operation . . . . . . . .
Turning Your HeaterOff . . . . . . . . . . . . . . . . . .
.
.
.
.
.
.
.
.
1
g
g
q
. .q
. q
. . 5
. . 5
. . 5
. .6
Caring for Your Heater . . . .
Cabinet . . . . . . . . . . . . . . .
FuelTank . . . . . . . . . . . . . .
Cleaning the Wick . . . . . . .
Long Term Care . . . . . . . . .
Wick Replacement . . . . . .
Ignition Plug Replacement
Reassembling Your Heater
Trouble Shooting Guide . .
.
.
.
.
.
.
.
.
.
.
.
.
.
.
.
.
.
.
.
.
.
.
.
.
.
.
.
.
.
.
.
.
.
.
.
.
.
.
.
.
.
.
.
.
.
.
.
.
.
.
.
.
.
.
.
.
.
.
.
.
.
.
.
.
.
.
.
.
.
.
.
.
.
.
.
.
.
.
.
.
.
.
.
.
.
.
.
.
.
.
.
.
.
.
.
.
.
.
.
.
.
.
.
.
.
.
.
.
. .
. .
. .
. .
. .
. .
. .
. .
. .
.
.
.
.
.
.
.
.
.
.
.
.
.
.
.
.
.
.
.
.
.
.
.
.
.
.
.
. g
.g
. 6
. g
. g
.
. g
. s
.1p
Major Parts
/00
Heater Cabinet
Top Plate
Grille Guard
Carrying Handle
Cabinet Screws
Inspection Window
Automatic Shutoff Lever
Burner Handle Access Door
Ignition Lever
Wick Adjustment Knob
Fuel Tank
Fuel Cap
Base Screws
Heater Base
Ignition Plug
Dressing Plate
Wick Guide Assembly
J
GENERAL SPECIFICATIONS
Corona Portable Kerosene Heaters
Model 17-DK© and 22-DK©
Model
17-DK©
Heating Output :
17,600 BTU/ hr.
Kerosene Capacity :
1 .6 gallons
Burning Rate :
.53 qt/hr.
(.1325 gals .)
Model
22-D K
Heating Output
22,600 BTUIhr.
Kerosene Capacity.
1 .82gallons
Burning Rate :
.68 qtl hr.
(17 gals.)
Recommended Heating Area :
640 sq . ft .
Recommended Heating Area :
800 sq . ft .
Continuous Hours of Heating:
About 12
Continuous Hours of Heating:
About 11
Ignition :
Size :
Weight: (empty)
Accessories:
2.8v. Ignition Plug :
2 "D" size dry cell batteries,
1 .5 v each
22.2"h x 18 .4"w
x 18 .4"d
23 .5 I bs .
2 "D" size dry cell batteries
and refillingSiphon
Ignition :
Size :
Weight : (empty)
Accessories:
2.8v. Ignition Plug :
2 "D" size dry cell batteries,
1 .5 v each
23 .8"h x 18.4"w
x 19"d
26 .4 Ibs .
2 "D" size dry cell batteries
and refilling Siphon
Assembling Your Corona Heater
1 . Read this entire Instruction Manual before you
begin assembly and operation .
2. Lift packing material from top of carton . NOTE:
Carton will contain: Batteries for ignition and pump,
Top Plate, Base (in slot at side of carton), Siphon Pump
for fueling, and the heater with Carrying Handle
in place .
3. Remove the Base from its place in the side of the
carton and place it on the floor . Front and back
indications are clearly marked on the base.
12. Replace the Carrying Handle . Your heater is now
assembled . Return all packing material to carton and
store in a dry place.
Setting the Automatic Shut-off System
Your Corona Heaterwill not operate unless you have set
the Automatic Shut-off System . Follow the steps
outlined below .
1 . Press DOW N on the
Automatic Shut-off lever. The System is now
set and will allow your
heater to operate .
4. Lift out heater and place it on the Base.
5. Lift plastic cover from heater and save it for later use.
6 . Fasten heater to
the Base using the two
screws already in place
on the Base. Use fingers only to tighten
screws . Use of a screwdriver or pliers will
cause screws to crack or split .
NOTE: If screws are not in place on the heater base,
look for them in the bottom of the carton among
packing materials . They may have separated
from the Heater Base during shipping .
7 . The Burner is
packed upside-down in
the heater Cabinet. Be
sure you have removed
the parking material
from the Burner .
F---r
8 . Place the Burner
inside the heater Cabinet by turning it rightside-up and placing it
on top of the metal ring
which aligns it.
9. Align Burner Handle so that it can be
reached through the Access Door.
RIGHT
5. When you move
your heater, use the Carrying Handle . Lift the
heater completely off
the floor. Carry the
heater in a level position to avoid setting off
the Automatic Shut-off System.
6 . NEVER move your heater while it is in operation .
7. NEVER attempt to disassemble or modify the Automatic Shut-off System .
8. Keep the Automatic Shut-off System clean and free
of dust and kerosene spills .
Operating Your Heater
10. Remove the Carrying Handle from the
holes in the top of cabinet . Grasp both sides of
Handle and pull away
from the Cabinet .
11 . Place the Top Plate
on heater. Make certain
the holes on the Fastening Tabs align with Carrying Handle holes in
the Cabinet .
2. Turn the Wick Adjustment Knob CLOCKWISE. You will notice a
heavy clicking sound.
This is normal. In subsequent use the Wick
Adjustment
Knob
should turn freely and smoothly.
3. If your heater's Automatic Shut-off System is ever
activated you must repeat Steps 1 and 2 before your
heater will operate .
4. The Automatic Shut-off System is designed to be
activated if the heater is jarred, bumped or vibrated excessively. Weak vibrations or a gentle incline will not set
it off.
NOTE: If the Automatic Shut-off System is activated, it
will produce some smoke and odor.
1 . TobesuretheBurner is properly positioned,
grasp the Adjusting
Handle through the Access Door as shown and
ROTATE the Burner
LEFT and RIGHT two or three times. When the Burner
is properly seated it will move with little resistance .
2. Place the two "D"
cell Batteries which
power the Automatic Igniter in the Battery Case
located on the lower
back of the heater
Cabinet.
Page 4
3. Install the Batteries as indicated by the ( + ) and (- )
polarity markings as illustrated above.
Lighting the Heater
4. Snap Battery Case Cover into place over the
Batteries .
Filling the Fuel Tank with Kerosene
WARNING : Risk of Expios,on
NEVER use any fuel other than clean, water-clear kerosene in your heater .
I I NEVER refill the Fuel Tank while heater is operating or
still hot .
NEVER use heater in an area where flammable
vapors or dust may be present .
NEVER fill heater Fuel Tank in living space . ALWAYS
fill Fuel Tank outdoors .
CJ NEVER store kerosene in any container other than an
approved container, tightly capped, in a cool,dark
place .
F I NEVER store kerosene in direct sunlight.
NEVER store kerosene in a glass container.
O NEVER store kerosene in the living space.
E: NEVER operate heater without Fuel Cap in place.
1 . Remove Fuel Cap
from the Fuel Tank by
turning COUNTERCLOCKWISE .
2. Always use the Siphon Pump provided
with your heater to
transfer kerosene from
theStorage Container
to the Fuel Tank.
NOTE: Be sure you have
tightened the Vacuum
Release Knob on the
Siphon Pump Bulb by
turning it CLOCKWISE .
After the Fuel Tank has
been properly filled, turn the Vacuum Release Knob
COUNTER-CLOCKWISE to drain the Siphon .
3 .The Fuel Tank is
properly filled when the
needle on the fuel gauge
is on"F".
DO NOT OVERFILL the
Fuel Tank.
4. Replace the Fuel Feeding cap and hand-tighten .
5. WAIT THIRTY MINUTES AFTER FILLING THE TANK
BEFORE ATTEMPTING TO LIGHT YOUR HEATER. This
time allows the Wick to absorb enough kerosene for
satisfactory lighting and burning.
2. After waiting for
NOT LESS than 30 minutes, raise the Wick to
its full height by turning
the Wick Adjustment
Knob CLOCKWISE to
the "HIGH" position until it comes to a firm stop.
1 . Check the level indicator on the heater to
confirm it is sitting level. If it is not level, the
heater will not burn
properly.
3. Gently press the Ignition Lever DOWN .
Hold the Lever in place
until the flame appears .
(Approximately 3 to 5
seconds) . Then gently
release the Ignition
Lever.
NOTE: Pressing the Ignition Lever too hard will push
the Ignition Plug too deeply into the Wick and
will produce white smoke instead of a clean ignition . If this occurs, release the pressure on the
Ignition Lever slightly . Holding the lever in
place too long will produce smoke and odor. Be
certain the Ignition Plug is fully retracted after
lighting the heater.
4. After the Wick is lighted, check the alignment of the
Burner by rotating it LEFT and RIGHT two or three times.
5. DO NOT OPERATE THE IGNITER WHILE THE
HEATER IS IN OPERATION . YOU WILL DAMAGE THE
WICK AND THE IGNITION PLUG AND PRODUCE
SMOKE AND ODOR.
Adjusting the Wick During Operation
After the heater is lit, it will warm gradually until it
reaches full heating power . This normally takes ten to fifteen minutes . You can control your heater's output by
using the Wick Adjustment Knob to raise or lower the
Wick.
1 . Set the Wick Adjustment Knob within the indicated
Operating Range .
2. When your heater is
properly adjusted, the
flame will burn in an
evenly balanced circle
~," to y " over top of the
Burner.
3. If the flame touches
the wall of the heater,
the Wick is adjusted too
high . NOTE : Smoke
and odor will be produced when flame is
too high.
NORMAL
4. If the flame does not
appear at the top of the
Burner, the Wick is adjusted too low. Smoke
and soot may result if
heater is operated with
the flame too low.
FLAME
TOO
LOW
Turning your Heater off
1 . Turn the Wick Adjustment Knob COUNTERCLOCKWISE to "OFF". The heater will be completely
out in approximately 3 to 4 minutes .
2. Always turn your heater off when leaving the room
and before retiring for the evening.
3. NEVER leave your heater burning overnight or while
unattended .
Caring for your Heater
For performance and safety, parts of your Corona
Heater require simple, routine care . Major problems
and potential danger can be avoided with a little preventive maintenance .
Cabinet
1 . Keep the Heater Cabinet clean by wiping lightly with
a damp cloth.
2. Always wipe away kerosene spills with a soft. dry
cloth.
CAUTION : Risk of Fire.
Accumulated dirt and kerosene spills on the Heater
Cabinet create a potential fire hazard .
Fuel Tank
1 . Poor quality fuel or fuel containing water entering
the Fuel Tank will cause poor performance (i .e. slow or
no lighting, low heat output, irregular burning, or a bad
odor.) Poor quality fuel or fuel contaminated with water
will cause carbon and tar accumulation on the Wick,
which will interfere with the heater's performance and
result in corrosion of the interior of the Fuel Tank.
2 . To remove poor
quality orcontaminated
fuel you must pump the
Fuel Tank dry . Follow
these steps:
A. Insert the non-flexible tube on your Siphon Pump into
the Fuel Tank, as shown until all fuel and water are removed . Tilt the unit to be certain no fuel remains in
the Tank.
B. Clean the Wick following the procedure outlined in the
"Cleaning the Wick" section, page 6 . If cleaning the
Wick does not restore it to good condition, follow the
procedure outlined for Replacing the Wick, page 7 .
C. Dispose of any fuel remaining in the Fuel Tank. Partially fill the Fuel Tank with clean, uncontaminated
kerosene. Replace the Cap and slosh the fuel around
in the Tank. Remove the kerosene you have used to
clean the tank and dispose of it safely outdoors .
D. Fill the Fuel Tank with clean, water-clear kerosene.
Follow the "Filling the Fuel Tank" procedures on
page 5 .
E. Wipe the heater Cabinet to remove any kerosene
spills .
Cleaning the Wick
Cleaning the Wick regularly will keep it in good condition. Once or twice a week is recommended during seasons of heavy use. To clean the Wick follow the steps
outlined below :
1 . Move your heater outdoors . Leave the Burner in the
Cabinet. Protect the heater from wind and drafts which
could cause irregular burning .
2. Raise the Wick to "HIGH" by turning the Wick Adjustment Knob CLOCKWISE . Before lighting, be certain
the Burner is properly positioned . Light the heater following the procedures outlined in the "Lighting the
Heater" section, page 5.
3. Allow the heater to burn until the flame is completely out and all fuel has burned away.
4. Wait 15 minutes and re-light the heater . (This allows
time for the Wick to absorb every bit of available fuel
which may have remained in the lower portion of the
Wick during the first burning operation .)
5. These procedures will normally remove any carbon
or tar deposits that may have accumulated through normal use. Any remaining carbon deposits on the Wick
can be crushed between your fingers or brushed away
with an old toothbrush .
6. If this procedure does not remove all carbon and tar
deposits, replace the Wick. See page 7 .
Long Term Care
1 . At the start of the heating season check the
condition of the Wick and Ignition Plug . Always start the
season with new Batteries . To determine whether or not
the Wick and Ignition Plug need to be replaced, refer to
the "Trouble shooting Guide" section, page 10.
2. Proper storage of your heater takes just a few minutes and will prolong the life of your heater . The most
convenient way to store and protect it from damage, is in
the original shipping carton and packing material .
3. Move the heater outdoors and follow the procedures
outlined in "Cleaning the Wick", page 6 .
4. After the heater has cooled, remove the Cabinet (see
below) . Drain the Fuel Tank as shown on page 6 . Clean
off all kerosene or dust on the Wick Assembly and the
Automatic Shut-off System, using a clean, dry cloth .
Wipe clean all areas you can reach.
5. Clean the Cabinet interior and exterior with a damp
cloth . Use a mild detergent solution if necessary. Wipe
them dry with a soft cloth . Avoid scratching any surfaces of your heater .
6. Trip the Pendulum
on the Automatic Shutoff System as shown to
activate it .
7. Remove the Dressing Plate by lifting it
from the back and tilting it forward to clear
the Wick Adjustment
Assembly.
8. Trip the Pendulum
on the Automatic ShutOff System to activate it.
7. Replace the Cabinet as outlined on page 9.
8. Remove the Batteries from the Battery Case and
discard them. Replace the Batteries with new ones at
the start of the next heating season .
9. Cover the Heater Cabinet with the plastic shipping
cover provided and return the unit to the original shipping carton for storage . Place the heater in a safe, dry
place .
Wick Replacement
If cleaning the Wick does not improve performance, you
will need to replace the Wick. Refer to the "Checklist for
Trouble Symptoms" section, pagel0 which outlines
conditions under which the Wick should be replaced .
1 . Use ONLY a genuine Corona Replacement Wick .
DO NOT attempt to substitute any other type of Wick device or a Wick designed for another brand or model heater. You could damage the heater and create a potential
fire hazard .
2. The only tools needed to replace the Wick are :
" A Pair of Pliers
" A Flat blade Screwdriver
" A Plastic Bag with a Twist Tie
" A pair of Scissors for Wick change
3. Lower Wick byturning Wick Adjustment
Knob
COUNTERCLOCKWISE to "OFF".
4. Use Pliers to loosen and remove cabinet screws on
either side of the Heater Cabinet .
5. Use the Carrying I
Handle to lift the Cabinet straight up and
away from the heater .
6 . Gently pull the
Wick Adjustment Knob
off the heater.
9 . Remove the four
wing nuts which hold
the Wick Assembly to
the heater and carefully
lift the Wick Assembly
from the heater .
10. Replace the Wick Adjustment Knob temporarily .
Turn the Knob CLOCKWISE to raise the Wick and to reset the Automatic Shut-Off System .
11 . Turn the Wick Assembly upside-down .
Check the Automatic
Shutoff Lever to make
certain it is engaged as
shown .
12. Place the white plastic strip, packed with the Wick,
on the Wick Cover to protect your fingers .
13. While still holding
the Wick Assembly upside-down, grasp the
Wick Cover firmly and
PULL it off with a sharp
tug .
14. Locate the three
Pins which connect the
Wick Sleeve to the Wick
Assembly. Press in gently (toward the center)
one at a time to disconnect them.
NOTE: A Flat Blade Screwdriver may aid you in this
operation . As each Pin is pressed in, use the
Screwdriver to gently move the Pin away from
its Slot.
15. When all three Pins are disconnected, pull out the
Wick Sleeve and old Wick together. Disengage the old
Wick and discard it. CAUTION : The Retainer Teeth are
sharp. Handle the Wick Sleeve with care to avoid injury.
After you have removed the old Wick, use the Plastic Bag
with the Twist Tie for proper disposal of the old Wick.
DO NOT DISPOSE OF THE WICK INDOORS . Vapors
could create a potential fire hazard .
16. Insert the new Wick
into the Wick sleeve from the bottom .
Be
careful to match the
Black Line on the
orange tape exactly to
the bottom of the Wick
sleeve . Make sure the Black Line matches all the way around the inside of the Wick sleeve . This will ensure that the new Wick will raise to the correct burning height of 3/a"(1 Omm) .
17. Reach inside the Wick and press firmly on all sides
to securely attach the Wick to the Retainer Teeth. Work
carefully to avoid wrinkles or bulges.
NOTE: Remove the protective strips from the Wick
Sleeve as the Wick is pressed into the Retainer
Teeth .
18. With the Wick Assembly still upside
down, position the Wick
Sleeve making certain
the connecting Pins are
aligned to fit into the
slanted grooves.
19. Press on each Pin and insert the Wick Sleeve into
the W ick Assembly. Check carefully to see that each Pin
has snapped into place.
20. Turn the Wick Assembly right side up.
21. Engage the Automatic Shut-off System by pressing
DOWN on the Lever .
22. Turn the Wick Adjustment Knob CLOCKWISE . This
will produce a slight click and a complete stop. Now
turn the Wick Adjustment Knob to raise and lower the
Wick several times to confirm smooth operation .
23. Turn the Wick Assembly upside down to
replace the Wick Cover.
Make certain the skirt of
the Wick is completely
within the cover at the
top .
24. Align the four tabs on the Wick Cover with the four
screw holes on the Bottom of the Assembly, as shown,
and snap it into place. Be certain of firm contact at
all points .
25. Replace the Wick
Cover. Turn the Wick
Adjustment Knob to the
fully retracted position.
Pull lightly on the skirt
of the Wick to remove
any slack . Tuck the skirt
of the Wick into the recessed area of the Wick Cover as
shown . Press lightly to secure the skirt to the Retainer
Teeth on the Wick Cover.
26. Replace the Wick
Assembly on the heater
with the Wick raised .
Replace two diagonally
opposite Wing Nuts
first, then the remaining
two . Tighten each of the
four Wing Nuts gradually until the Wick Assembly is
firmly in place.
1
-!
27. While your heater is disassembled, check the
Automatic Shut-off System .
is operating correctly .
28. Trip the Automatic
Shut-off System by
nudging the Brass Pendulum . Reset the Svstem by pressing the Set
Lever DOWN . Trip it
again to make certain it
29. Turn the Wick Adjustment Knob to test its operation .
Be certain the Wick operates smoothly as the Knob is
turned CLOCKWISE and COUNTER-CLOCKWISE .
30. Test Ignition . Raise the Wick to its full height. The
Ignition Plug should be within Y " to y," (1 mm to 2mm) of
the Wick when the Lever is fully depressed .
31 . Check the Ignition Plug before replacing the heater
Cabinet . If replacement is required, use the following
procedure .
Ignition Plug Replacement
NOTE: If you are replacing the Ignition Plug during the
Wick Replacement procedure, your heater Cabinet is already separated from the heater. If not, it
will be necessary to remove the Cabinet by removing the set screws on either side, and lifting
it off to gain access to the Ignition System .
Use ONLY a Genuine Corona Ignition Plug. They are
available from your Corona Dealer. Check to be certain
the problem is not the result of weak Batteries . The
Ignition Plug may need to be replaced even though there
is some glow in the Plug but the heater will not light . To
replace the Ignition Plug :
1 . CAUTION Always remove the Batteries from the
Battery Case. Do not attempt to remove the Ignition Plug
with the Batteries in place. The Ignition Plug creates
very intense heat and could cause a severe burn.
2. Press the Ignition
Lever DOWN. Grasp the
Ignition Plug, turn
COUNTERCLOCKWISE and remove it
from the Plug Socket.
GOOD
to be broken .
REPLACE
3 Check the Filament
in the tip of the Ignition
Plug. It may be possible
to bend the Filament
back into place if it is
bent . Replace the Plug
if the Filament appears
4. Place the new Ignition Plug in the Socket with the
Ignition Guard facing DOWN. Grasp firmly and turn
CLOCKWISE .
5. Replace the Batteries and test for satisfactory
lighting .
Reassembling your heater
NOTE: If you are reassembling after replacing the Wick,
begin with Step 1 . If you have replaced only the
Ignition Plug, and have not completely dismantled your heater, begin with Step 3.
1 . Remove Wick Adjustment Knob which youhadtemporarily replaced to test Wick operation .
2. Replace the Dressing Plate making certain to align
the Automatic Shut-off System Lever and the Wick
Adjustment Rod, which holds the Knob, with the appropriate slots in the Dressing Plate . Begin by aligning them
and gently snap the Dressing Plate in place over the
Wick Assembly.
3. Replace the heater Cabinet . Make certain the Grille
Guard prongs are inserted securely into the proper holes
on the heater, and the Cabinet Front matches the front
of the heater .
4. Fasten the Cabinet to the heater with the two
screws .
5 . Replace the Wick Adjustment Knob.To be certain
it is properly positioned on
the Wick Adjustment Shaft,
raise the Wick to its full
height. The black mark on
the knob must line up with
the word 'HIGH'" on the
controll panel . If it does not, reverse the position of the
knob on the shaft. Your heater is ready for refilling and
operation .
ri.
In case of trouble, check here before you take your Corona Heater to your dealer.
If you're having this kind of problem:
7
Bums with red flame and creates soot.
Flame burns too high .
:,Burns With' k6roson6-pdor~'
Flame appears only on one side of Burner .
111--11=1110
!
hill h"LAW
Flame will not go out.
T,
Wick will not lower.
Flame spreads too slowly
Wick moves heavily.
Uneven burning,
Flame goes out.
+
2. Check these things
Batteries may be dead or weak .
Ignition Plug Filament may be bent or broken .
Wick is too low, too high, or improperly installed.
Burner is not properly positioned .
Kerosene is of poor quality or contaminated with water.
NIEMEN
EVIONE M
Wick may be dirty.
Wick Guide Assembly may be damaged .
Wick Adjustment Shaft is not properly engaged with Wick Guide .
Wick is not correctly seated in Wick Assembly .
3. Adjustments or corrective action
anon
Replace old Batteries with new ones .
Replace Ignition Plug with new one.
Use Wick Adjustment Knob to adjust Wick for proper exposure .*
If Wick Adjustment fails, reinstall wick to proper height .
i
Rotate Burner RIGHT and LEFT to position properly .
Be sure Ignition Assembly is fully retracted.
1013 -7
Replace contaminated or poor quality kerosene supply .
Clean Wick . Replace if necessary.
Check Wick Assembly for proper seating and
general condition . Replace if necessary.
Take your heater to a Corona Dealer for Service.
MWkcannot badjusted Wproper exposure, reinstall
lshown m "e7
'EMMUMMI "i
CORONA
Portable
Kerosene Heater
Manufactured by Uchlda Manufacturing Co ., LTD.
Niigata, Japan
GLO-international'
COPPOPAOON
Dayton, Ohio 45414
Exclusive Importer
1981
Printed in Japan 581