1
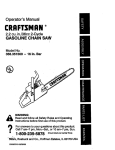
Instruction Manual
I [,RRFTSMRN*I
25cc/1.5 cu.in. 2-Cycle
17 Inch Cutting Path/0.080
Inch Line
GASOLINE WEEDWACKER ®
•Model No.
358.795501
•
•
•
•
•
Safety
Assembly
Operation
Maintenance
Parts List
• Espa_ol
For Occasional Use Only
®
Read and follow all Safety Rules and Operating
WARNING:
Instructions before first use of this product.
For answers
to your
questionsor about
this pm,
product:
Call
7 am-7 pm,
Mon.-Sat.,
10 am-7
Sun.
1-800-235-5878
(Hours listed are Central Time)
Sears, Roebuck and Co., Hoffman Estates, IL 60179 U.S.A.
53o1838s4 _m04
Warranty Statement
Identification of Symbols
Safety Rules
Assembly
Operation
Maintenance
Service & Adjustments
2
2
3
9
10
14
15
Storage
Troubleshooting Table
Emissions Statement
Parts List
Spanish
Parts and Ordering
16
17
17
19
21
Back Cover
FULL ONE YEAR WARRANTY ON CRAFTSMAN ® GASOLINE POWERED
WEEDWACKER ® LINE TRIMMER.
For one year from the date of purchase, when this Craftsman Gasoline Powered
Weedwacker Line Trimmer is maintained, lubricated, and tuned up according to
the operating and maintenance instructionsin this manual, Sears will repair, free
of charge, any defect in materials or workmanship.
This warranty excludes nylon line, spark plug, and air filter, which are expendable
parts and become worn during normal use.
Ifthis Weedwacker Une Tnmmer is usedfor commercialpurposes,thiswarrantyapplies for only 90 days fromthe date of purchase,if this Weedwacker Line Trimmeris
used for rental purposes, this warrantyapplies for only 30 days fromthe date of purchase. This warrantyapplies only while this productis in usa in the United States.
WARRANTYSERVICEISAVAILABLE
BY RETURNINGTHEWEEDWACKERUNETRIMMER
TO THENEARESTSEARSSTOREOR SERVICECENTERINTHE UNITEDSTATES.
This warranty gives you specific legal rights, and you may also have other rights
which vary from state to state.
Sears, Roebuck and Co., D/817WA, Hoffman Estates, IL 60179
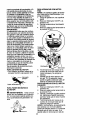
WARNING!
This trimmer
can be dangerous! Caretess or
Jmproper use can cause
Read and understand the
instruction manual before
using the trimmer.
seriousor even fatal injury.
Always wear appropriateear protection, eye protection and head protection.
Only the following Gasoline Powered Combination Gardening Ap.pliance powerhead models andtheir respective attachments have been Classified by.Underwriters Laboratories,
Inc., in accordance with the applicable safety requirements.
Powerhead including trimmer attachment
....................
Optional brushcutter attachment
......................
Optional blower attachment
................................
_ .....
358.795501
358.792441
358.792421
The following attachment is Lis_ed by Underwriter's
Laboratories, Inc., in accordance with UL Standard 1602, Gasoline-Engine-Powered,
Rigid-Cutting
Member Edgers and Edge-Trimmers."
Optional
edger attachment
.................................
2
358.792401
OPERATOR SAFETY
• Dress properly. Always wear safety
_b, WARNING:
When using gardening appliances, basic safety precautions must always be followed to
reduce the risk of fire and serious
injury. Read and follow all instructions.
This power unit can be dangerous! Operator is responsible for following
instructions and wamings on unit and in
manual. Read entire instruction manual
before using unit! Be thoroughly familiar
with the controls and the proper use of
the unit. Restrict the use of this unit to
persons who have read, understand,
and will follow the instructions and
- warnings on the unit and in the manual.
Never allow children to operate this unit.
INSTRUCTION
MANUAL
DANGER:
•
•
•
•
SAFETY INFORMATION
ON THE UNIT
•
Never use blades
•
with line trimmer attachment. Never
use flailing devices with any attachment. This unit (when used with supplied line trimmer attachment) is designed for line trimmer use only. Use
of any other accessories with line trimmer attachment will increase the risk
of injury.
•
•
@Q©
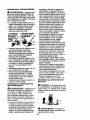
WARNING:
•
•
•
•
Tdmmar line throws
objects violently. You and others can be
blinded/injured. Wear eye and leg
protection. Keep body parts clear of rotating line.
•
Protection
•
•
Keep children, bystanders, and animals
50 feet (15 meters) away. Stop unit immediately if approached.
If situations occur which are not covered in this manual, use care and
good judgment. If you need assistance, contactyour Sears Service
Center or call 1-800-235-5878.
•
3
glasses or similar eye protection
when operating, or performing maintenance, on your unit (safety
glasses are available).
Eye protection should be marked Z87.
Always wear face or dust mask if operation is dusty.
Always wear heavy, long pants, long
sleeves, boots, and gloves. Wearing safety leg guards is recommended.
Always wear foot protection.
Do not
go barefoot or wear sandals. Stay
clear of spinning line.
Secure hair above shoulder length.
Secure or remove loose clothing or
clothing with loosely hanging ties,
straps, tassels, etc. They can be
caught in moving parts.
Being fully covered also helps protect you from debris and pieces of
toxic plants thrown by spinning line.
Stay Alert. Do not operate this unit
when you are tired, ill, upset or under the influence of alcohol, drugs,
or medication.
Watch what you are
doing; use common sense.
Wear hearing protection.
Never start or run inside a closed
room or building. Breathing exhaust
fumes can kill.
Keep handles free of oil and fuel.
Always keep engine on the right
hand side of your body.
Hold the unit firmly with both hands.
Keep trimmer head (or other optional attachment) below waist level and
away from all parts of your body. Do
not raise engine above your waist.
Keep allparts of your body away
from muffler and spinning line (or
other optional attachment).
Keep
engine below waist level. A hot muffler can cause serious burns.
Keep firm footing and balance. Do
not overreach or use from unstable
surfaces such as ladders, trees,
steep slopes, rooftops, etc.
Use only in daylight or good artificial
light.
Use only for jobs explained in this
manual (or manuals for optional attachments).
• Store unit so line limiter blade cannot accidentally cause injury. The
unit can be hung by the shaft.
• Store unit out of reach of children.
UNiT I MAINTENANCE
SAFETY
• Disconnect the spark plug before
performing maintenance except carburetor adjustments.
• Look for and replace damaged or
loose parts before each use. Look
for and repair fuel leaks before use.
Keep in good working condition.
• Replace trimmer head parts that are
chipped, cracked, broken, or damaged in any other way before using
the unit.
• Maintain unit according to recommended procedures. Keep cutting
line at proper length.
• Use only 0.080 inch (2 ram) diameter Craftsman® brand line. Never
use wire, rope, string, etc.
• Install required shield properly before using the unit. Use only specified trimmer head; make sure it is
properly installed and securely fastened.
• Make sure unit is assembled correctly as shown in this manual.
• Make carburetor adjustments with
lower end supported to prevent line
from contacting any object.
• Keep others away when making carburetor adjustments.
• Use only recommended Craftsman
accessories and replacement parts.
• Have all maintenance and service
not explained in this manual performed by a Sears Service Center.
FUEL SAFETY
• Mix and pour fuel outdoors.
• Keep away from sparks or flames.
• Use a container approved for fuel.
• Do not smoke or allow smoking near
fuel or the unit.
• Avoid spilling fuel or oil. Wipe up all
fuel spills.
• Move at least 10 feet (3 meters)
away from fueling site before starting engine.
• Stop engine and allow to cool before
removing fuel cap.
• Always store gasoline in a container
approved for flammable liquids.
TRANSPORTING
AND STORAGE
• Allow engine to cool before storing
or transporting in vehicle.
• Empty the fuel tank before storing or
transporting the unit. Use up fuel left
in the carburetor by starting the engine and letting it run until it stops.
• Store unit and fuel in area where fuel
vapors cannot reach sparks or open
flames from water heaters, electric
motors or switches, furnaces, etc.
SAFETY NOTICE: Exposure to vibrations through prolonged use of gasoline powered hand tools could cause
blood vessel or nerve damage in the
fingers, hands, and joints of people
prone to circulation disorders or abnormal swellings. Prolonged use in
cold weather has been linked to blood
vessel damage in otherwise healthy
people. If symptoms occur such as
numbness, pain, loss of strength,
change in skin color or texture, or loss
of feeling in the fingers, hands, or
joints, discontinue the use of this tool
and seek medical attention. An antivibration system does not guarantee
the avoidance of these problems. Users who operate power tools on a continual and regular basis must monitor
closely their physical condition and
the condition of this tool.
SPECIAL NOTICE: This unit is
equipped with a temperature limiting
muffler and spark arresting screen
which meets the requirements of California Codes 4442 and 4443. All U.S.
forest land and the states of California,
Idaho, Maine, Minnesota, New Jersey,
Oregon, and Washington require by
law that many internal combustion enpines be equipped with a spark arrestng screen. If you operate in a locale
where such regulations exist, you are
legally responsible for maintaining the
operating condition of these parts.
Failure to do so is a violation of the
law. For normal homeowner use, the
muffler and spark arresting screen will
not require any service. After 50
hours of use, we recommend that your
muffler be serviced or replaced by a
Sears Service Center.
LINE TRIMMER
SAFETY
_)AWARNING:
Inspect the area to
be trimmed before each use. Remove
objects (rocks, broken glass, nails,
wire, etc.) which can be thrown by or
become entangled in line. Hard objects can damage the trimmer head
and be thrown causing serious injury.
• Use only for trimming, scalping, mowing and sweeping. Do not use for
edging, pruning or hedge trimming.
• Cut only from your right to your left.
Cutting on left side of the shield will
throw debris away from the operator.
4
ADDITIONAL SAFETY RULES
FOROPTIONALA'n'ACHMENTS
• Always push the unit slowly over the
ground. Stay alert for uneven sidewalks, holes in the terrain, large
roots, etc.
• Always use the handlebar when using edger attachment.
BLOWER/VACUUM
SAFETY
_ WARNING:
For each optional
attachment used, read entire operators manual before use and follow all
warnings and instructions in manual
and on attachment.
_IL WARNING:
_WARNING:
Inspect area before
starting unit. Remove all debris and
hard objects such as rocks, glass,
wire, etc. that can ricochet, be thrown,
or otherwise cause injury or damage
during operation.
• Do not set unit on any surface except a clean, hard area while engine
is running. Debris such as gravel,
sand, dust, grass, etc., could be
picked up by the air intake and
thrown out through discharge opening, damaging unit, property, or
causing serious injury to bystanders
or operator.
• Never place objects inside the blower tubes, vacuum tubes or blower
outlet. Always direct the blowing debris away from people, animals,
glass, and solid objects such as
trees, automobiles, walls, etc. The
force of air can cause rocks, dirt, or
sticks to be thrown or to ricochet
which can hurt people or animals,
break glass, or cause other damage.
• Never run unit without the proper
equipment attached. When using
your unit as a blower, always install
blower tubes.
• Check air intake opening, blower
tubes or vacuum tubes frequently,
always with engine stopped and
spark plug disconnected. Keep
vents and discharge tubes free of
debris which can accumulate and
restrict proper air flow.
• Never place any object in air intake
opening as this could restrict proper
air flow and cause damage to the
unit.
• Never use for spreading chemicals,
fertilizers, or other substances which
may contain toxic materials.
• To avoid spreading fire, do not use
near leaf or brush fires, fireplaces,
barbecue pits, ashtrays, etc.
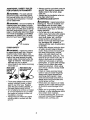
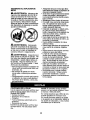
Ensure handlebar is
installed when using edger or brushcutter attachments. Attach handlebar
above arrow on safety label on the upper shaft (engine end of unit). If your
edger or brushcutter attachment does
not include a handlebar, a handlebar
accessory kit (#530071451)
is available from your Sears Service Center.
_Handlebar
EDGER SAFETY
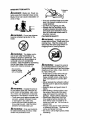
WARNING:
Inspect the area to
be edged before each use. Remove
objects (rocks, broken glass, nails,
wire, etc.) which can be thrown by the
blade or can wrap around the shaft.
• Blade rotates momentarily after the
trigger is released. The blade can
seriously cut you or others.
• Allow blade to stop before removing
it from the cut.
Bladerotates
Allow blade to stop
momentarily •
before removingItI
after the
rele__
triggeris /
/
I from _e cut. /
II_/
• Throw away blades that are bent,
warped, cracked, broken or damaged in any other way. Replace
parts that are cracked, chipped, or
damaged before using the unit.
• Do not attempt to remove cut material nor hold material to be cut when
the engine is running or when cutting blade is moving.
• Always keep the wheel and depth
adjusting skid in contact with the
ground.
5
BRUSHCUTTER
SAFETY
PrOo iS
DANGER:
Blade can thrust violentlyaway from material itdoes not cut.
Blade thrust can cause amputation of
arms or legs.
• Use only specified blade and make
sure it is properly installed and securely fastened.
tL
Cut from your rightto your left.
Always use thehandlebar and a
properly adjusted shoulder strap
with blade (see ASSEMBLYinstructions in brushcutter attachment instruction manual).
CULTIVATOR SAFETY
_________
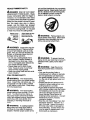
all, WARNING:
Do not use trimmer
head as a fastening device for the
blade.
_WARNING:
RotaUng tines can
cause serious injury. Keep away from
rotatingtines. Stop the engine and
disconnect the spark plug before unclogging tines or making repairs.
_ WARNING:
The blade continues to spin after the throttle is released or engine is turned off. The
coasting blade can throw objects or
seriously cut you if accidentally
touched. Stop the blade by contacting
the left hand side of the coasting
blade with material already cut.
_, WARNING:
Inspect the area to
be cultivated before starting the unit.
Remove all debris end hard and sharp
objects such as rocks, vines, branches, rope, string, etc.
• Avoid heavy contact with solid objects that might stop the tines. If
heavy contact occurs, stop the engine and inspect the unit for damage.
• Never operate the cultivator without
the tine cover in place and properly
secured.
• Keep the tines and guard clear of
debris.
• After striking a foreign object, stop
the engine, disconnect the spark
plug and inspect the cultivator for
damage. Repair before restarting.
• Disconnect attachment from the
drive engine before cleaning the
tines with a hose and water to remove any build-up. Oil the tines to
prevent rust.
• Always wear gloves when servicing
or cleaning the tines. The tines become very sharp from use.
• Do not run unit at high speed unless
cultivating.
Stop coasting
blade by contact
with cut material.
®
WARNING:
Inspect the area to
be cut before each use. Remove objects (rocks, broken glass, nails, wire,
etc.) which can be thrown or become
entangled in the blade or trimmer line.
• Throw away and replace blades that
are bent, warped, cracked, broken
or damaged in any other way.
• Install required shield properly before using the unit. Use the metal
shield for all metal blade use.
_ILWARNING:
Only use brushcutter attachments that provide a metal
shield with proboscis nose.
6
HEDGE TRIMMER SAFETY
unit until the blade/chain has completely
stopped moving. Keep hands, face and
feet at a distance from all moving parts.
Do not attempt to touch or stop the
blade or chain when it is moving.
DANGER: RISK OF CUR KEEP
HANDS AWAY FROM BLADE - Blade
moves momantadly after the trigger ls
released. Do not attemptto clear away
cutmaterial when the blade is in motion.
Make sure the switch is in the OFF position, the spark plug wire is disconnected, and the blade has stopped
moving before removingjammed material from the cutting blade. Do not grab
or hold the unit by the cutting blade.
Blades move
momentarily
after the
ed.trigger
is
Allow blades to stop
before removing
them from the cut.
_WARNING:
Falling objects can
cause severe head injury. Wear head
protectionwhen operating this unit
with a pole pruner attachment.
WARNING:
Inspect the area before starting the unit. Remove all debris and hard objects such as rocks,
glass, wire, etc. that can ricochet, be
thrown, or otherwise cause injury or
damage during operation.
• Do not use a cutting blade that is
bent, warped, cracked, broken or
damaged in any other way. Have
worn or damaged parts replaced by
your Sears Service Center.
• Always keep unit in front of your
body. Keep all parts of your body
away from the cutting blade.
• Keep the cutting blade and air vents
clear of debris.
_ WARNING:
To prevent serious
injury, do not use more than one boom
extension with a pole pruner attachment.
WARNING:
Keep the pruner
away from power lines or electrical
wires.
• Only use for pruning limbs or
branches up to 4 inches in diameter.
• Do not operate the unit faster than
the speed needed to prune. Do not
run the unit at high speed when not
pruning.
• Always stop the unit when work is
delayed or when walking from one
cutting location to another.
• If you strike or become entangled
with a foreign object, stop the engine
immediately and check for damage.
Have any damage repaired by a
Sears Service Center before attempting further operations. Discard
blades that are bent, warped,
cracked or broken.
• Stop the unit immediately if you feel
excessive vibration. Vibration is a
sign of trouble. Inspect thoroughly
for loose nuts, bolts or damage before continuing. Contact Sears Service for repair or replacement of affected parts as necessary.
POLEPRUNERSAFETY
_' WARNING:
The reciprocating
blade/rotating chain can cause severe
injury. Inspect the unit before use. Do
not operate unit with a bent, cracked
or dull blade or dull chain. Keep away
from the blade/chain.
WARNING:
The reciprocating
blade/rotating chain is sharp. Do not
touch. To prevent serious injury, always stop engine and ensure blade/
chain has stopped moving, disconnect
spark plug, and wear gloves when
changing or handling the blade or
chain.
WARNING:
A coasting blade/rotating chain can cause injury while it
continues to move after the engine is
stopped. Maintain proper control of the
7
SNOWTHROWERSAFETY
• Make sure the rotorwill spin freely
before attaching the snowthrowerto
the powerhead.
• If the rotor will not rotate freely due
to frozen ice, thaw the unit before
thoroughly before attempting to operate under power.
• Keep the rotor clear of debris.
• Do not throw snow near other
people. The snow thrower could
propel small objects at high speed
causing injury.
• After striking a foreign object, stop
the engine, disconnect spark plug
and inspect the snowthrowerfor
damage and repair if necessarybefore restartingunit.
• Never operate the snowthrowernear
glass enclosures, automobiles and
trucks.
• Never attempt to use the snowthrower on a roof.
• Never operate the snowthrower near
window wells, dropoffs,etc.
• Never discharge snow onto public
roads or near moving traffic.
• Clear snow from slopes by going up
and down; never across. Use caution when changing directions. Never clear snow from steep slopes.
• Let snowthrower run for a few minutes after clearing snow so moving
parts do not freeze.
• Look behind and use care when
backing up. Exercise caution to
avoid slipping or falling, especially
when operating in reverse.
• Know how to stop quickly.
WARNING:
Keep hands and
feet away from the rotor when starting
or running the engine. Never attempt
to clear the rotor with the engine/motor
running. Stop engine and disconnect
spark plug before unclogging snow or
debris from discharge chute or when
adjusting vanes.
_1_WARNING:
Never lean over discharge chute. Rocks or debris could
be thrown into the eyes and face and
cause serious injury or blindness.
_ WARNING:
Inspectthe area
where the unit is to be used. Remove
objects that could be thrown or damage the unit. Some objects may be
hidden by fallen snow - be alert for
the possibility.
• Direct material discharge away from
glass enclosures, automobiles,
etc.
• Do not run engine at high speed
while not removing snow.
• Be attentive when using the snowthrower, and stay alert for holes in
the terrain and other hidden hazards.
8
CARTON CONTENTS
Check carton contents against the following list.
Model 358.795501
• Powerhead
• Trimmer Attachment
• Shield
• Wing Nut (screwed onto shield)
° Container of Oil
Examine parts for damage. Do not
use damaged parts.
NOTE= If you need assistance or find
parts missing or damaged, call
1-800-235-5878.
Coupler
Shaft
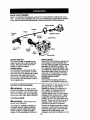
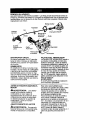
ASSEMBLY
________
TRIMMER
A'I'rACH-
CAUTION:
When Installing trimmer
attachment, place the unit on a flat
surface for stability.
1. Loosen the coupler by turning the
knob counterclockwise.
Coupler
Shipping
protector
Shield
TIGHTEN
2.
3.
4.
5.
6.
Lower
Attachment
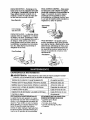
m_WARNING:
The shield must be
properly installed. The shield provides
partial protection from the risk of thrown
objects to the operator and others and
is equipped with a line limitar blade
which cuts excess line to the proper
length. The line limiter blade (on underside of shield) is sharp and can cut you.
For proper orientation of shield, see
KNOW YOUR TRIMMER illustration in OPERATION section.
1. Remove wing nut from shield.
2. Insert bracket into slot as shown.
3. Pivot shield until bolt passes
through hole in bracket.
4. Securely tighten wing nut onto
bolt.
llWARNING:
If received assembled, repeat all steps to ensure
_,aOUr
unit Is properly assembled and all
steners are secure.
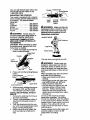
INSTALLING
MENT
Release
Button
WARNING:
Make sure the locking/release button is locked in the pdmary hole and the knob is securely
tightened before operating the unit.
All attachments are designed to be
used in the primary hole.
For optional attachments, see the ASSEMBLYsection of the applicable attachment instruction manual.
ATTACHING SHIELD
It is normal for the fuel filter to rattle in
the empty fuel tank.
Finding fuel or oil residue on muffler Is
normal due to carburetor adjustments
and testing done by the manufacturer.
A
Primary Hole
Guide Recess
%
,= ,_\\
Knob
Remove shipping protector from
coupler.
Remove the shaft cap from the
trimmer attachment (if present).
Position locking/release button of
attachment Into guide recess of
coupler.
Push the attachment into the coupler until the locking/release button
snaps into the primary hole.
Before using the unit, tighten the
knob securely by turning clockwise.
Line Limiter Blade
ADJUSTING
Slot
Bracket
NuTg
THE HANDLE
_WARNING:
When adjusting the
handle, be sure it remains above the
safety label and below the mark or arrow on the shaft.
1. Loosen wing nut on handle.
2. Rotate the handle on the shaft to
an upright position; retighten wing
nut.
9
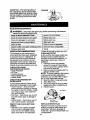
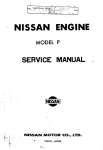
KNOWYOURTRIMMER
READ THIS INSTRUCTION MANUAL AND SAFETY RULES BEFORE OPERATING YOUR
UNIT. Compare the illustrationswith your unitto familiarizeyourself with the location
of the various conb'ols and adjustments. Save this manual for futurereterence.
Assist Handle
Coupler
Shaft
Trimmer
Head
_/
_
ON/OFF Switch
Starter
Handle
Shield
Spark Plug
/
Line Limiter
Blade
Thro_le
Trigger
Muffler
Start
Lever
Primer Bulb
ON/OFF SWITCH
The ON/OFF switch is located on the
trigger handle and is used to stop the
engine. Move the switch to the OFF
position to stop the engine.
PRIMER BULB
The PRIMER BULB removes air from
the carburetor and fuel lines and fills
them with fuel. This allows you to start
the engine with fewer pulls on the
starter rope. Activate the primer bulb
by pressing it and allowing it to return
to its original form.
START LEVER
BEFORE
brand synthetic oil. Mix gasoline and oil
at a ratio of 40:1. A 40:1 ratio is
obtained by mixing 3.2 ounces of oil
with 1 gallon of unleaded gasoline.
Included with this trimmer is a 3.2
ounce container of oil. Pour the entire
contents of this container into 1 gallon
of gasoline to achieve the proper fuel
mixture. DO NOT USE automotive oil or
boat oil. These oils will cause engine
damage. When mixing fuel, follow
instructions printed on container.
Once oil is added to gasoline, shake
container momentarily to assure that
the fuel is thoroughly mixed. Always
read and follow the safety rules
relating to fuel before fueling your unit.
STARTING
WARNING:
ENGINE
Be sure to read
the fuel information in the safety rules
before you begin. If you do not understand the safety rules, do not attempt
to fuel your unit. Call 1-800-235-5878.
FUELING
ENGINE
_' WARNING:
Remove
slowly when refueling.
fuel cap
This engine is cerlitied to operate on
unleaded gasoline. Before operation,
gasoline must be mixed with a good
quality synthetic 2-cycle air-cooled
engine oil. We recommend Craftsman
The STARTLEVERhelps to supply fuel
to the engine to aid in starting. Activate the starting system by moving the
start lever to the STARTposition. DO
NOTsqueeze the throttle trigger until
the engine has started and runs. After
the engine starts, allow the engine to
warm-up 10-15 seconds, then fully
squeeze the throttle trigger to deactivate the starting system.
COUPLER
The COUPLER enables optional attachments to be installed on the unit.
10
IMPORTANT
Expedence Indicates that alcohol
blended fuels (called gasohol or using
ethanol or methanol) can attract moisture which leads to separation and
formation of acids during storage.
Acidic gas can damage the fuel system of an engine while in storage. To
avoid engine problems, empty the fuel
system before storage for 30 days or
longer. Drain the gas tank, start the
engine and let it run until the fuel lines
and carburetor are empty. Use fresh
fuel next season. Never use engine or
carburetor cleaner products in the fuel
tank or permanent damage may occur. See the STORAGEsection for
additional information.
HOW TO STOP YOUR UNIT
• To stop the engine, move the
ON/OFF switch to the OFF position.
Start Lever
Primer Bulb
_/ON/OFF
5.
Throttle Trigger _
HOW TO START YOUR UNIT
WARNING:
Avoid any contact
with the muffler.A hot muffler can
cause serious burns.
STARTING
A COLD ENGINE
NOTE: DO NOT squeeze the throttle
trigger until the engine has started and
runs.
1. Set unit on a flat surface.
2. Move ON/OFF switch to the ON
position.
3. Slowly press the primer bulb 6
times.
4. Move the start lever to the START
position.
Jffler
Pull starter rope handle sharply
until engine starts and runs.
6. Allow unit to run for 10-15 seconds,
then fully squeeze the throttle trigger
to disengage the starting system.
STARTING A WARM ENGINE
1. Move ON/OFF switch to the ON
position.
2. Move the start lever to the RUN
position.
3. Squeeze and hold the throttle trigger. Keep throttle trigger fully
squeezed until engine runs
smoothly.
4. Pull starter rope sharply while
squeezing throttle trigger until engine runs.
NOTE: Normally, the warm starting
procedure can be used within 5-10
minutes after the unit is turned OFF. If
the unit sits for more than 10 minutes
without being ran, it will be necessary
to start the unit by following the steps
under STARTING A COLD ENGINE or
following the starting instruction steps
shown on the unit.
STARTING A FLOODED ENGINE
Flooded engines can be started by
placing the ON/OFF switch in the ON
position. Move the start lever to the
RUN position and fully squeeze throttle
trigger. Pull the starter handle repeatedly while squeezing throttle trigger
until engine starts and runs. This
could require pulling the starter handle
many times, depending on how badly
the unit is flooded.
11
If the unit still doesn't start, refer to the
TROUBLESHOOTING TABLE or call
1-800-235-5878.
OPERATING
Coupler Primary Hole
THE COUPLER
This model is equipped with a coupler
which enables optional attachments to
be installed. The optional attachments are:
Edger .................
358.792401
Cultivator ..............
358.792410
Blower ................
358.792421
Brushcutter ............
358.792441
Pruner ................
358.792450
WARNING:
Always stop unit
and disconnect spark plug before removing or installing attachments.
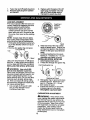
REMOVING TRIMMER ATrACHMENT (OR OTHER OPTIONAL ATTACHMENTS)
CAUTION: When removing or installing attachments, place the unit on a
flat surface for stability.
1. Loosen the coupler by turning the
knob counterclockwise.
Upper
Shaft
Locking/
Release
Button
Attachment
_'WARNING:
Make sure the locking/release buttonis locked in the primary hole and the knob is securely
tightened before operating the unit.
OPERATING POSITION
ALWAYS WEAR:
Eye Protection
Long Pants
Heavy Shoes
Upper Shaft
Coupler
Lower
Attachment
TIGHTEN
2.
.OOSEN
Knob
Press and holdthelocking/release
button.
Locking/Release
Button
/
Lower Attachment
Upper Shaft
3. While securely holding the engine
and upper shaft, pull the attachment straight out of the coupler.
INSTALLING OPTIONAL ATTACHMENTS
1. Remove the shaft cap from the attachment (if present).
2. Position locking/release
button of
attachment into guide recess of
coupler.
3. Push the attachment into the coupler until the locking/release
button
snaps into the primary hole.
4. Before using the unit, tighten the
knob securely by turning clockwise.
Cut only from your rightto your left.
_1_ WARNING:
Always wear eye
protection. Never lean over the tnmmer head. Rocks or debris can ricochet or be thrown into eyes and face
and cause blindness or other serious
injury.
When operating unit, stand as shown
and check for the following:
• Wear eye protection and heavy
clothing.
• Hold trigger handle with right hand
and assist handle with left hand.
• Keep unit below waist level.
• Cut only from your right to your left
to ensure debris is thrown away
from you. Without bending over,
keep line near and parallel to the
ground and not crowded into material being cut.
Do not run the engine at a higher
speed than necessary. The cutting
line will cut efficiently when the engine
is run at less than full throttle. At lower
speeds, there is less engine noise and
vibration. The cutting line will last
longer and will be less likely to '_veld"
onto the spool.
Always release the throttle trigger and
allow the engine to return to idle
speed when not cutting.
12
To stop engine:
: Release
throttle
tdgger,the OFF:
Move thethe
ON/OFF
switchto
position.
TRIMMER LINE ADVANCE
The cutting head advances line automatically. Do not tap head on the
ground to advance line. This may
break parts and cause cutting headto
malfunction.
Upon unit startup, the linewill advance
automaticallyto the correctcuttingpath
length
Always keep the shield in place when
the tool is being operated.
WARNING:
Dee only 0.080"
(2 mm) diameter round line. Other
sizes and shapes of line will not advance propedy and will result in improper cutting head function or can
cause serious injury.Do not use other
materials such as wire, stdng, rope,
etc. Wire can break off during cutting
and become a dangerous missile that
can cause serious injury.
CUTTING METHODS
_I=WARNING:
Use minimum
speed and do not crowd the line when
cutting around hard objects (rock,
gravel, fence posts, etc.), which can
damage the trimmer head, become
entangled in the line, or be thrown
causing a serious hazard.
• The tip of the line does the cutting.
You will achieve the best performance and minimum line wear by not
crowding the line into the cutting
area. The right and wrong ways are
shown below.
Line Crowded Into
Tip of the Line
Work Area
Does The Cutting
During lightduty cutting.
Near objects around which the line
can wrap such as small posts,
trees or fence wire.
• For mowing or sweeping, use full
throttlefor a good clean job.
TRIMMING - Hold the bottom of the
trimmer head about 3 in. (8 cm) above
the ground and at an angle. Allow only
the tip of the line to make contact. Do
not force trimmer line into work area.
Trimming
3 in. (8 cm)
Above Ground
SCALPING - The scalping technique
removes unwanted vegetation down
to the ground. Hold the bottom of the
trimmer head about 3 in. (8 cm) above
the ground and at an angle. Allow the
tip of the line to strike the ground
around trees, posts, monuments, etc.
This technique increases line wear.
Scalping
MOWING - Your trimmer is ideal for
mowing in places conventional lawn
mowers cannot reach. In the mowing
position, keep the line parallel to the
t_ound. Avoid pressing the head into
e ground as this can scalp the
ground and damage the tool.
•
Right
Mowing
Wr
• The line will easily remove grass
and weeds from around walls,
fences, trees and flower beds, but it
also can cut the tender bark of trees
or shrubs and scar fences.
• For trimming or scalping, use less
than full throttle to increase line life
and decrease head wear, especially:
13
SWEEPING - The fanning action of
the rotating line can be used to blow
away loose debris from an area. Keep
the line parallel to and above the area
surface and swing the tool from side
to side.
Sweeping____X_
_
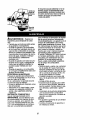
MAINTENANCE SCHEDULE
,_ WARNING:
Disconnect the spark plug before performing maintenance
except for carburetor adjustments.
WHEN TO PERFORM
CARE & MAINTENANCE TASK
Before each use
Check for loose fasteners and parts
Check for damaged or worn parts
Inspect and clean unit and labels
Clean air filter
Before each use
Affereach
use
Every 5 hours of operation
Inspect muffler and spark arresting screen
Every 50 hours of operation
Replace
Yearly
spark plug
GENERALRECOMMENDATIONS
The warranty on this unit does not
cover items that have been subjected
to operator abuse or negligence. To
receive full value from the warranty,
the operator must maintain unit as
instructed in this manual. Various adjustments will need to be made periodically to properly maintain your unit.
CHECK FOR LOOSE
FASTENERS AND PARTS
• Spark Plug Boot
• Air Filter
• Housing Screws
• Assist Handle Screw
• Debris Shield
CHECK FOR DAMAGED OR
WORN PARTS
Contact Sears Service Center for replacement of damaged or worn parts.
• ON/OFF Switch - Ensure ON/OFF
switch functions properly by moving
the switch to the OFF position. Make
sure engine stops; then restart engine and continue.
• Fuel Tank - Discontinue use of unit if
fuel tank shows signs of damage or
leaks.
• Debris Shield - Discontinue use of
unit if debris shield is damaged.
INSPECT AND CLEAN UNIT AND
LABELS
• After each use, inspect complete
unit for loose or damaged parts.
Clean the unit and labels using a
damp cloth with a mild detergent.
Wipe off unit with a clean dry cloth.
CLEAN AIR FILTER
A dirty air filter decreases engine performance and increases fuel consumption and harmful emissions. Always clean after every 5 hours of
operation.
1. Clean the cover and the area
around it to keep dirt from falling
into the carburetor chamber when
the cover is removed.
2. Remove parts by pressing latch to
release air filter cover.
NOTE: To avoid creating a fire hazard
or producing harmful evaporative
emissions, do not clean filter in gasoline or other flammable solvent.
3. Wash the filter in soap and water.
4. Allow filter to dry.
5. Add a few drops of oil to the filter;
squeeze the filter to distribute oil.
6. Replace parts.
Air Filter
/
Air Filter
Cover Latch
REPLACE
SPARK PLUG
Replace the spark plug each year to
ensure the engine starts easier and
runs better. Set spark plug gap at
0.025 inch. Ignition timing is fixed and
nonadjustable.
14
1. Twist, then pull off spark plug boot.
2. Remove spark plug from cylinder
and discard.
3.
4.
Replace with Champion RCJ-6Y
spark plug and tighten securely
with a 3/4 inch socket wrench.
Reinstall the spark plug boot.
LINE REPLACEMENT
Pre-wound spools offerthe most convenient method for replacing line and
ensuring optimum performance.
• Replacement spools are colorcoded to ensure use of the correct
spool with your unit. Be sure to use
the same color spool as the existing
spool.
NOTE: Always clear dirt and debris
from cutting head components when
performing any type of maintenance.
• Hold spool and unscrew cap by turning in the direction shown on top of
the cap.
• Remove line guide ring and spool.
Line guide ring
Cap
"_
0-
_'_"_\_,
direCtion
"_L¥-_ 1 shown on
= oo,
_
Feed line in
Spool
Insert one end of line into center
cavity of empty spool. Ensure line
will feed into spool in the direction
shown on the spool (counterclockwise).
3. Continue feedingline
into spooJ,
leaving 4 - 6 inches (10 - 15 cm)
unwound from center of spool.
INSTALLING SPOOL WITH LINE
1. Install replacement spool.
2. Thread line through line guide ring.
2.
0oo,
Use a pre-wound spool or refill
spool
withline.Ifusing a pre-wound spool,
remove tape stripfrom lineand spool.
REFILLING THE SPOOL WITH LINE
WARNING:
Use only 0.080
inch (2 mm) diameter round line.
Other sizes and shapes of line wilt not
advance properly and will result in improper cutting head function or can
cause serious injury. Do not use other
materials such as wire, string, rope,
etc. Wire can break off during cutting
and become a dangerous missile that
can cause serious injury.
1. Cut a length of 25 feet of 0.080
inch (2 mm) diameter round
Craftsman brand line.
Line through guide ring
"__
3.
4.
Slot
Replacement Spool
Rest guide ring on spool and place
line through slot. Allow line to extend 4 - 6 inches (10 - 15 cm)
from center of spool.
Ensure line remains in slot while
screwlngcap on to the shaft.
Only tighten cap hand tight!
CARBURETOR
_ WARNING:
ADJUSTMENT
Keep others away
when making idle speed adjustments.
The trimmer head or any optional attachment will be spinning during most
of this procedure.
Wear your protective equipment and observe all safety
precautions.
After making adjustments the trimmer head or any optional attachment must not move/sp n
at idle speed.
15
The carburetor has been carefully set
at the factory.Adjustments may be
necessary if you notice any of the following conditions:
• Engine will not idle when the throttle is
released.
• The trimmer head or optional attachment moves/spins at idle.
Make adjustmentswith the unit supportedso the cuttingattachmentis off
the ground and will not make contact
withany object. Hold the unitby hand
while runn=ngand making adjustments.
Keep all partsof your body away from
the cuttingattachmentand muffler.
Idle Speed Adjustment
Allow engine to idle. Adjust speed until
engine runs without trimmer head or
optional attachment moving or spinning (idle too fast) or stalling (idle
speed too slow).
• Turn idle speed screw clockwise to
increase engine speed if engine
stalls or dies.
• Turn idle speed screw counterclockwise to decrease engine speed if
trimmer head or optional attachment
moves or spins at idle.
_)& WARNING:
Perform the follow-
ing steps after each use:
• Allow engine to cool before storing
or transporting.
• Store unit andfuel in a well ventilated area where fuel vapors cannot
reach sparks or open flames from
water heaters, electric motors or
switches, furnaces, etc.
• Store unit with all guards in place.
Position unit so that any sharp object cannot accidentally cause injury.
• Store unit and fuel wel/out of the
reach of children.
SEASONAL
STORAGE
Prepare unit for storage at end of season or if it will not be used for 30 days
or more.
If your unit is to be stored for a period
of time:
• Clean the entire unit before lengthy
storage.
• Store in a clean dry area.
• Lightly oil external metal surfaces.
FUEL SYSTEM
Under FUELING ENGINE in the OPERATION section of this manual, see message labeled IMPORTANT regarding
_)& WARNING:
Recheck the idle
speed after each adjustment. The
trimmer head or optional attachment
must not move ,or spin at idle speed to
avoid serious injury to the operator or
others.
Idle
Speed
Screw
Air Filter
Cover
If you require further assistance or are
unsure about performing this procedure, contact your Sears Service Center or call our customer assistance
help line at 1-800-235-5878.
the use of gasohol in your engine.
Fuel stabilizer is an acceptable alternative in minimizing the formation of
fuel gum deposits during storage. Add
stabilizer to the gasoline in the fuel
tank or fuel storage container. Follow
the mix instructions found on stabilizer
container. Run engine at least 5 minutes after adding stabilizer.
Craftsman 40:1,2-cycle
engine oil (air
cooled) is already blended with fuel
stabilizer. If you do not use this Sears
oil, you can add a fuel stabilizer to
your fuel tank.
ENGINE
• Remove spark plug and pour 1 teaspoon of 40:1, 2-cycle engine oil (air
cooled) through the spark plug
opening. Slowly pull the starter rope
8 to 10 times to distribute oil.
• Replace spark plug with new one of
recommended type and heat range.
• Clean air filter.
• Check entire unit for loose screws,
nuts, and bolts. Replace any damaged, broken, or worn parts.
• At the beginning of the next season,
use only fresh fuel having the proper
gasoline to oil ratio,
16
OTHER
• DO not store gasoline from one season to another,
• Replace your gasoline can if it starts
to rust.
TROUBLESHOOTING
TABLE
WARNING:
Always stop unit and disconnect spark plug before performing all of the recommended remedies below except remedies that require
operation of the unit.
TROUBLE
Engine will not
start.
CAUSE
1. ON/OFF switch in
OFF position.
2. Fuel tank empty.
3. Spark plug notfiring.
4. Fuel not reaching
carburetor.
5. Carburetor requires
adjustment.
REMEDY
1, Move ON/OFF switch to ON.
2. Fill tank with correctfuel mixture.
3. Install new spark plug.
4. Check for dirty fuel filter; replace.
Check for kinked or split fuel line;
repair or replace.
5. Contact Sears Service (see back cover).
Engine will
not idle
properly.
1. Carburetor requires
adjustment.
2. Crankshaftseals worn.
3. Compressionlow.
1. See "Carburetor Adjustment"in
Service and AdjustmentsSection.
2. Contact Sears Service (see back cover).
3. Contact Sears Service (see back cover).
Engine will not
accelerate,
lacks power,
or dies under
a load.
1. Air filter dirty.
2. Spark plug fouled.
1. Clean or replace air filter.
2. Clean or replace plug
and regap.
3. Contact Sears Service (see back cover).
Engine
smokes
excessively.
Engine runs
hot.
3. Carburetorrequires
adjustment.
4. Carbon build-Upon
muffler outlet screen.
5. Compressionlow.
1. Fuel mixtureincorrect.
2. Air filterdirty.
3. Carburetorrequires
adjustment.
1. Fuel mixture incorrect.
2. Spark plug incorrect.
3. Carburetorrequires
adjustment.
4. Carbon build-upon
muffleroutletscreen.
YOUR WARRANTY
RIGHTS AND
OBLIGATIONS: The U. S. Environmental Protection Agency and Sears,
Roebuck and Co., U.S.A., are pleased
to explain the emissions control system
warranty on your year 2002-2004 small
off-mad engine. Sears must warrant
the emission control system on your
small off-road engine for the periods of
4. Contact Sears Service (see back cover).
5. Contact Sears Sen/ice (see back cover).
1. Empty fuel tank and refill with
correctfuel mixture.
2. Clean or replace air filter.
3. Contact Sears Service (see back cover).
1. See "Fueling Engine"in Operation
section.
2. Replace with correct spark plug.
3. Contact Sears Service (see back cover).
4. Contact Sears Service (see back cover).
time listed below provided there has
been no abuse, neglect, or improper
maintenance of your small off-road engine. Your emission control system includes parts such as the carburetor and
the ignition system. Where a warrantable condition exists, Sears will repair
your small off-road engine at no cost to
you. Expenses covered under warranty
17
include diagnosis, parts and labor.
MANUFACTURER'S
WARRANTY
COVERAGE: If any emissions related
part on your engine (as listed under
Emissions Control Warranty Parts List)
is defective or a defect in the materials
or workmanship of the engine causes
the failure of such an emission related
part, the part will be repaired or re_aced bySears. OWNER'S WARANTY RESPONSIBILITIES:
As the
small off-road engine owner, you are
responsible for the performance of the
required maintenance listed in your instruction manual. Sears recommends
that you retain all receipts covering
maintenance on your small off-read engine, but Sears cannot deny warranty
solely for the lack of receipts or for your
failure to ensure the performance of all
scheduled maintenance. As the small
off-read engine owner, you should be
aware that Sears may deny you warrarity coverage if your small off-road
engine or a part of it has failed due to
abuse, neglect, improper maintenance,
unappreved modifications, or the use of
parts not made or approved by the original equipment manufacturer. You are
responsible for presenting your small
off-read engine to a Sears authorized
repair center as soon as a problem exists. Warranty repairs should be completed in a reasonable amount of time,
not to exceed 30 days. If you have any
questions regarding your warranty rights
and rasponsibilitias, you should contact
your nearest authorized service center
or call Sears at 1-800-469-4663.
WARRANTY COMMENCEMENT
DATE: The warranty period beduinson
the date the small off-road engine is
purchased. LENGTH OF COVERAGE:
This warranty shall be for a period of
two years from the initial date of purchase. WHAT IS COVERED: REPAIR
OR REPLACEMENT
OF PARTS. Repair or replacement of any warranted
part will be performed at no charge to
the owner at an approved Sears servicing center. If you have any questions
regarding your warranty rights and responsibilities, you should contact your
nearest authorized service center or call
Sears at 1-800-469-4663.
WARRANThis engine is certified
[]
Moderate
[]
Intermediate
[]
Extended
to be emissions
TY PERIOD: Any warranted part which
Is not scheduledfor replacementas required maintenance, or which is scheduled only for regular inspectionto the
effectof "repair or replaceas necessary"shall be warrantedfor 2 years.
Any warranted part which isscheduled
for replacement as requiredmaintenance shall be warrantedfor the period
of time up to the first scheduledreplacernent point for that part. DIAGNOSIS:
The owner shall not be charged for
diagnosticlabor which leads to the determinationthat a warrantedpart is defective If the diagnosticwork is performed at an approvedSears servicing
canter. CONSEQUENTIAL DAMAGES:
Sears may be liable for damages to
otherengine componentscaused by
the failure of a warrantedpart stillunder
warranty. WHAT IS NOT COVERED:
All failures caused by abuse, neglect,or
impropermaintenanceare not covered.
ADD-ON OR MODIRED PARTS: The
use of add-on or modifiedpartscan be
groundsfor disallowinga warranty
claim. Sears is not liable to cover failuresof warrantedpartscaused by the
use of add-on or modifiedparts. HOW
TO FILE A CLAIM: If you have any
questionsre_ardingyourwarranty rights
and raspons=bilities,
you should contact
your nearest authorizedservicecenter
or call Sears at 1-800-469-4663.
WHERE TO GET WARRANTY SERVICE: Warranty servicesor repairsshall
be providedat all Sears service centers.
Call 1-800-469-4663. MAINTENANCE, REPLACEMENT AND REPAIR OF EMISSION RELATED
PARTS: Any Sears approved replacernent part used in the performance of
any warranty maintenance or repair on
emission related parts will be provided
without charge to the owner if the part is
under warranty. EMISSION CONTROL
WARRANTY PARTS UST: Carburetor,
Ignition System: Spark Plug (covered
_odtO maintenance schedule), Ignition
ule. MAINTENANCE STATEMENT: The owner is responsible for the
performance of all required maintenance as defined in the instruction
manual.
compliant
(50 hours)
(125 hours)
(300 hours)
18
for the following
use:
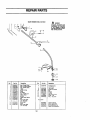
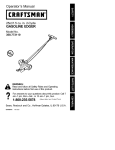
REPAIR PARTS
SEARS TRIMMER MODEL 366.796601
_A
1
3
4
5
6
WARNING
All repairs, adjustments and
maintenance not described
In the Operator's Manuel
must be pwforrned by quelifled service personnel.
14
15
__23
_--24
_m25
RSt.
Part No.
1.
2,
3.
4.
6
6.
7
6
9.
10.
11.
12.
13
630056241
530047307
630053968
630056334
530027597
530015666
530069672
530053969
530056250
530016116
530055126
530015620
530071608
14
15.
16.
530016343
530016344
530071445
Des©rlptlon
Ref.
Assy-Throtfte Cable
Assy -Throttle Leadwim
Hsg.-Throttle (Right)
Trigger
Spring-Throttle
Screw
Kit-Sv_tch
Hsg.-Throttle (Left)
Handle-Assist
Wingnut
Clamp-Assist Handle
Bolt
Assy-Upper Shaft
(incl. flex shaft)
Screw-Align
Screw
Assy-Lower Shaft
(inct flex shaft)
Part No.
17.
530069779
16.
10.
20,
21.
22.
23.
24
25
530052266
530015805
530015820
530016118
530094543
71-85939
530403949
530054222
Oescdpfion
Kit-Shield Ass'y.
(IncL17-20)
Line Limiter
Screw-Line Umlter
Bolt
Wingnut
Dustcup
Ass'y-Wound Hub
Guide - Line
Assy - Cap 5/16"
Not Shown
530163854
530057296
530055410
530057574
19
Operator Manual
Decal-Upper Shaft
Decal-Shaft Waming
Decal-On/Off/Instruction
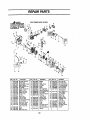
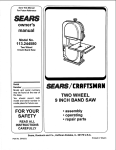
REPAIR PARTS
SEARS TRJMMER MODEL 358.796501
15
13
35
16
!8
19
20
49
43
44
63
Rlf.
Part No.
1.
2.
3,
4,
5.
6.
7.
8.
9
10.
11.
12.
!3.
14.
15.
16.
17.
18.
19.
20.
530071396
530042088
530071391
53(}015953
Champion
530071359
530071363
530057635
530016014
530071363
530071698
530057371
530016394
530036575
530056804
530071731
530039211
530016357
530047278
530071363
21.
22.
23.
530015767
530015886
530071697
Du©dptlon
Jr-Muffler (incL2.3)
qufflerSpring
_:reen-Spark Arreslor
/Jrew- Cytlnder
;park Plug (RCJ-6Y}
_t-Cylinder
;asker- Cyl/Car b.{kit)
,d_or-Carb
;crew-Carb Adptr,
iasketCarb (kll)
:it-_.
(FE)
,JrBox
Hrew-Carb.
oarn-Air Filter
',over-Air Filler
_it- Mo(:i. Spacer/Borewl
_nition Module
Hrew-lgnll. Module
_ssy-Switch Wire
:it- Engine Gasket
Incl. 7,10,31,497
_rew
Hn_w
kssy-Clulch Hsg.
Ref,
Part No.
24,
25.
26
27
28
29
30
31.
32.
33.
34,
35.
530015828
530015810
530027569
530071325
530016326
53O016376
530015941
530071363
53C069945
530655120
530015162
53(3071357
36,
37
3B.
39
40.
41
42
43
530055728
530071615
530032125
530016349
530015810
530016349
530057384
530049296
44
530016379
o==='iption
Washer
Screw
Handle-Starter
Kll-Ropa
Screw
Spacer
Ret R_C'shak
Gasket-Cylinder(kit)
Kll-Ccnnecting Rod
Ring-Piston
Piston Pin Retainer
Kit-Piston
(incls. 33,34)
8earing-Outer
Kit-C'case Seal
Seadng-lnnef
Screw
Screw
Screw
Assy-Rear Shroud
Assy-Fuel Tank
(In_. 45,46 wJllnes)
Reta_er
20
Ref
Pan No.
45
4E
47.
48.;
49;
50,
51.
530014347
530095646
530(_9216
53(_69247
53_071363
5306"28800
53(_71627
52.
530071730
53.
54
55.
56.
57.
530069886
530015149
530016224
530053985
530(}71324
58.
59,
60.
61,
62.
63,
530042086
530057373
530015611
530069491
5306266(_5
530015768
Selotiptlon
Assy-Fuel Cap
Assy-Fuel Pickup
Kit-Line(tanldl_rga)
Kit-Line(carb/putge)
O-ring-C'case(kit)
Assy-Orankspaft
Assy-Crankcase
(incl. 36-38)
Assy- C'case/C'shaft
(Incl. 3030,51
Assy-Flywheel
Washer-Flat
Borew- pulley
Retak_er- Palley
Kit -Starter Pulley
(incl. 28)
Starter Spdng
Assy-Fan Hs0.
Washer-Clutch
KJt-Clulch (Ir_l.60)
Nut-ClulCn
Locknul
Declaraci6nde Garantfa
ldenUficaci6n de Sfmbolos
Reglas de Seguridad
Montajs
Uso
Mantenimiento
21
21
22
28
30
34
Servicio y Ajustes
35
Almacenaje
37
Tabla Diagn6stica
38
Declaraci6n de Emision
39
Lista de Piezas
19
Repuesto y Encargos
Contratapa
GARANTIA DE UN ANO COMPLETO PARA LA CORTADORA
SOMNA WEEDWACKER
® DE CRAFTSMAN ®
DE LINEA A GA-
Durante un afio, a parUr de la fecha de compra, siempre que se haga el mantenimiento, la lubricacl6n y los ajustes a esta Cortadora de Unea a Gasolina Weedwacker
de Craftsman segdn las instrucclones de uso y rnantenimiento en el manual, Sears
reparard cualquier defecto de matedales o de mano de obra gratuitamente.
Esta garantfa excluye la II'nea de nil6n, la bujfa y el filtro de aire, qua son piezas
fungibles que se gastan con el uso normal.
Si se usa esta Cortadora de Llnea Weedwacker de Craftsman para fines comerciales, esta garantfa tendrd validez por s61a 90 dfas a partir de la fecha de compra. Si se usa esta Cortadora de Lfnea Weedwacker de Craftsman para fines de
alquiler, esta garantfa tendrd validez por s61a 30 dfas a partir de la fecha de compra. Esta garanfla tendrd validez enicamente mientras se use este producto dentro de los Estados Unidos.
SE OBTENDRA SERVICIO BAJO GARANTIA DEVOLVlENDO LA CORTADORA DE LINEA
WEEDWACKER AL TIENDA DE SEARS O CENTRO DE SERVIClO MAS CERCANO EN
LOS ESTADOS UNIDOS.
Esta garantfa confiere derechos legales especfficos al propietario, que tal vez
tenga asimismo otros derechos que varfan entre estados.
Sears, Roebuck and Co., D/817 WA, Hoffman Estates, IL 60179
cortadora de hierbas puede ser
peligrosal El uso descuidado o
ADVERTENCIA:
IEsta
indebido de esta herramienta
Lea y eomprenda el
manual
de
instrucciones antes de usar la
cortadorade hierbas.
puede causar graves o at.in
heridas fatales!
Use siempre la protecci6n de ofdos apropiada,la protecci6n de
ojos y la protecei6n de la cabeza.
21
So amente las siguientes comblnaciones de herramientas de jardinerfa con use
de cabeza de motor a gasolina y sus accesorios respectivos ban sido C as f cadas por los Underwriters Laboratories, Inc, de acuerdo con los requlsitos de seguddad aplicables.
Cabeza de motor con el accesodo del cortadora ..............
358.795501
Accesorio opcional del cortadora de malezas .................
358.792441
Accesodo opcional del propulsor de aire .....................
358.792421
El siguiente accesorio est& Enlistado por Underwriter's Laboratories, Inc., de
acuerdo con la Norma UL 1602, =Motores a Gasolina, Miembro Rfgido del Corte,
Cortadoras de Bordes y Recortadoras de Bordes?
Accesorio opcional del cortadora de hordes ..................
358.792401
_, ADVERTENClA:
AI usarcualquier herramienta de fuerza de jardinerfa,
deberbn observarse precauciones 10dsicas de seguirdad en todo momentopara
reducirel nesgode incendioy gravesheridas. Lea y cumpla con todas las instrucclones.
iEsta herramienta de fuerza puede set
peligrosa/Cabe al usuario le responsabilidad de cumplir con todas las advertencias e instrucciones, iLea el manual
de instrucciones en su totalidad antes
de usar el aparato! Est6 completamente
familiarizado con los controles y con el
uso correcto del aparato. Limite el uso
de este aparato a aquellas personas
qua hayan lefdo y comprendido, y que
vayan a obedecer, todas las advertencias e instrucciones tanto en el aparato
como en el manual. No permita nunca a
los nifios qua usen este aparato.
MANUAL DE
INSTRUCCIONES
INFORMACION
DE SEGURIDAD
DEL APARATO
PELIGRO:
Nunca use cuchillas
con accesorio del cortadora de linea.
Nunca use dispositivos desgranadores
con accesorios. EI aparato rue fisefiado
para ser usado exclusivamente como
cortodora de Ifnea. El uso de cualquier
otro accesorios con accesorio del cortadora de linea incrementar_ el peligro de
heridas.
_ADVERTENClA:
La Ifnea de
corte arroja objetos violentamente.
Usted, al igual qua otras personas,
puede quedar ciego o herido. Use anteojos de seguridad y protecci6n en las
piernas. Mantenga todas las partes del
cuerpo alejadas de la Ifnea g=rante.
Use anteojos de seguridad
Mantenga a los nifios, los espectadores y animales a una distancia minima de 15 metros (50 pies). Pare el
motor inmediatamente
si alguien se le
acerca.
Si acontece alguna situaci6n no prevista
en este manual, tenga cuidado y use
buen criterio. Si necesita ayuda, entre
en contacto con su Cenb'o de Servicio
Sears o Ilame al 1-800-235-5878.
SEGURIDAD
DEL USUARIO
• Vistase apropiadamente.
Siempre
use anteojos de seguridad o similar
protecci6n pare los ojos cuando use
o d_ mantenimiento
a este aparato
(anteojos de seguridad est_n disponibles). La protecci6n para los ojos
se debe marcar con Z87.
• Siempre utilize mascarilla para la
cara o mascarilla a prueba de polvo
si se va a trabajar en condiciones
donde hay polvo.
• Siempre utilize pantalones pesados
y largos, mangas largas, botas y
guantes. Se recomienda el uso de
pantorrilleras
de seguridad.
22
• Siempre utilize protecci6n para los
pies. No trabaje descalzo nl en
sandallas. Evite la Ifnea girante,
• Mantenga el cabello por encima de
los hombros, atSndolo para tal efecto
si es necesario. No use ropa suelta
ni ropa con corbatas, tiras, borlas,
etc. que cuelgan libremente. Pueden
enredarse en las piezas en movimiento.
• Si estd completament tapado, estard
rods protegido de los escombros y
pedazos de plantas t6xicos arrojados por la Ifnea girante.
• Mant_ngase alerta. No haga uso del
aparato estando cansado, enfermo,
trastornado o bajo la influencia del
alcohol, de drogas o de remedios.
Vigile bien Io que est& haciendo; use
del sentido comt_n.
• Use protecci6n de o|dos.
• Nunca ponga el aparato en marcha
ni Io deje en marcha dentro de un
recinto cerrado. Respirar los vapores
del combustible Io puede matar.
• Mantenga las manijas libres de
aceite y de combustible.
• Mantenga siempre el motor junto al
lado derecho de su cuerpo.
• Sostenga siempre el aparato con
ambas manos mlentras est_ en funcionamiento.
• Mantenga el cabezal de corte (o
otras accesorios opcional) por debajo de la cintura y lejos de todas las
partes de su cuerpo. No levante el
motor por encima de su cintura.
• Mantenga todas las partes del cuerpo alejadas del silenciador y de la
Ifnea girante (o otras accesorio opcional). Mantenga el motor por debajo del nivel de la cintura. El silenciador puede causar graves quemaduras cuando est_ caliente.
• Mantenga el equilibrio, con los pies
en una superficie estable. No se extienda demasiado o use el aparato
desde superficies inestables como
escaleras manuales, _rboles,
cuestas empinadas, techos, etc.
• Use el aparato enicamente de dfa o
en luz artificial fuerte.
• Use exclusivemente
para trabajos
descritos en este manual (o el manual para accesorios opcional).
SEGURIDAD DEL APARATO Y EN
EL MANTENIMIENTO
• Desconecte la bujia antes de hacer
cualquier mantenimiento menos los
ajustes al carburador.
• Inspeccione el aparato y cambie las
piezas dai_adas o flojas antes de
cada uso. Repare toda fuga de combustible antes de usar el aparato.
Mantenga el aparato en buenas condiciones de uso.
• Cambie todas las piezas del cabezal
que est_n descantilladas,
resquebrajadas, quebradas o daSadas de cualquier otro modo, antes de usar el
a0arato.
• Haga el mantenimiento
del aparato
de acuerdo a los procedimientos recomendados. Mantenga la Ifnea de
corte el largo aprodiado.
• Use solamente Ifnea de didmetro 2
mm (0,080 de pulgada) de la marcha
Craftsman®.
Nunca use alambre,
soga, hilo, etc.
• Instale la protector requerida antes
de usar su aparato. Use la bobina
especificada. AsegL_rese que la bobina est_ correctamente instalada y
est_ bien fijo.
• AsegL_rese que el aparato est_ correctamente armado como se muestra en el manual.
• Haga los ajustes al carburador con
el cabezal apoyado de modo que la
Ifnea no pueda tocar nada.
• Mantenga alejadas aias demos personas slempre que haga ajustes al
carburador.
• Use exclusivamente los accesorios y
repuestos Craftsman recomendados.
• Todo servicio y mantinimiento
no explicado en este manual deber_ ser
efectuado por un Centro de Servicio
Sears.
SEGURIDAD CON EL COMBUSTIBLE
• Mezcle y vierta el combustible al aire
libre.
• Mant_ngalo alejado de las chispas y
de las llamas.
• Use recipiente aprobado para el
combustible.
• No fume ni permita que se fume cerca del combustible ni del aparato ni
mientras _ste est_ en uso.
• Evite derramar el combustible o el
aceite. Limpie todo el combustible
derramado.
• Al_jese a por Io menos 3 metros (10
pies) del iugar de abastecimiento
antes de poner en marcha el motor.
• Pare el motor y permita que se enfde
el aparato antes de retirar la tapa del
tanque.
• Almac_ne siempre combustible en
un recipiente aprobado para los
liquidos inflamables.
23
TRANSPORTE Y ALMACENAMIENTO
• Espere que el motor se enfrfe y fije
blen el aparato antes de quardarlo o
de transportarlo en un vehfculo.
• Vacfe el tanque de combustible antes
de guardar el aparato o de transportado. Consuma todo el combustible
restante en el carburador poniendo el
motor en marcha y dejdndolo en marcha hasta que le motor se pare solo.
• Guarde el aparato y el combustible
en un lugar donde los vapores del
combustible no puedan alcanzar
chispas ni llamas provenientes de
los termotanques, los motores o interruptores el_ctricos, los calefactores centrales, etc.
• Guarde el aparato de modo que el
cuchilla limitadora de Ifnea no pueda
causar heddas accidentales.
Se
puede colgar el aparato por la caja el
eje de propulsi6n.
• Guarde el aparato fuera del alcance
de los niSos.
AVISO SPECIAL: El estar expuesto a
las vibraciones a trav_s del uso proIongado de herramientas de fuerza a
gasolina puede cuasar daSos a los vasos sangufneos o a los nervios de los
dedos, las manos y las coyunturas en
aquelias personas que tienen propensidad a los trastornos de la circulaci6n
o alas hinchazones anormales. El uso
prolongado en tiempo fifo ha sido asociado con dafios a los vasos snagufneos de personas que por otra
parte se encuentran en perfecto estado de salud. Si ocurren sfntomas tales
como el entumecimiento,
el dolor, la
falta de fuerza, los cambios en el color
o la textura de la piel o falta de sentido
en los dedos, las manos o las coyunturas, deje de usar esta mdquina inmediatamente
y procure atenci6n
mOdica. Los sistemas de anti-vibraci6n no garantizan que se eviten tales
problemes. Los usuarios que hacen
uso continuo y prolongando de las
herramientas de fuerza deben fiscalizar atentamente su estado flsico y el
estado del aparato.
AVISO ESPECIAL:
Su aparato viene
equipada con silenciador Iimitador de
temperatura y con rejilla antichispa que
cumpla los requisitos de los C6digos de
California 4442 y 4443. Todas las tierras
forestadas federales, rods los estados
de California, Idaho, Maine, Minnesota,
Nueva Jersey, Washington y Oreg6n,
requlerenpor ley que muchosrnotores
de combusti6nIntema est_mequlpados
con rejillaantlchispa.SI ustedel aparato
en un estado y otra Iocalidaddondeexisten tales reglarnentos,ustedtiene la
responsabilidadjurfdicade mantener
estas piezas en correctoestadode funcionamiento.De Io contrario,estarden
infracci6nde la ley. Pare el uso normal
del dueSo de la casa, el silenciadory la
rejillaantichispano requed_n ningun
servicio. Despu_s deS0 horasde uso,
recomendamosque al silenciadorse le
de servicioo sea substituidopot un
Centro de Servicio Sears.
SEGURIDAD AL RECORTAR
,_ ADVERTENClA:
Inspeccioneel
drea antes de carla uso. Retirelos objetos (piedres,viddo roto,clavos,alambre,
etc.) que se puedan enredaren la Ifnea
o que dsta pueda arrojar.Los objetos
duros pueden daSar el cabezal y _ste
los puede arrojar,causando graves heridas.
• Use el aparato exclusivameote para
recortar,para cortarcrispedy para
barter. No Io use para cortarbordes,
para podar ni para recortarseto.
• Corte siempre de derecha a izquierda.
Si se corta con la Ifneadel lado izquierdo del protector,los escombros
volardnen sentido opuestoal usuado.
REGLAS ADIClONALES
DE SEGURIDAD PARA ACCESORIOS
OPClONAL
ADVERTENClA:
Paracada accesorio opcional usada, lea a manual
de instruccionesenteros antes de uso
y siga todas las advertencias e instrucciones en manual y en la accesorio.
ADVERTENClA:
Aseg0rese el
mango est& instalado al usar les accesorios al cortar bordes o al cortadora
de malezas. Instale el mango sobre la
flecha de la etiqueta de seguridad del
eje superior (extremo con el motor del
aparato). Si su accesorios del cortar
bordes o del cortadora de malezas no
incluye un mango, un kit de accesorios
del mango (#530071451)
est_ disponible de su Centro de Servicio Sears.
__iango
24
SEGURIDADAL CORTARBORDES
ADVERTENClA: Inspeccioneel
_rea a ser cortada antes de cada uso.
Retire los objetos (piedras, vicrio roto,
clavos, alambre, hilo, etc.) que puedan
ser arrojados pot la cuchilla o que puedan enroscarse en el eje.
• La cuchilla contin=lagirando por un
instante despu_s de que se suelte el
gatillo. La cuchilla puede herir gravemente al ususario o a terceras.
• Deje que la cuchilla se detenga
antes de sacarla del corte.
La cuchi//agira
por unlnstante
dospuasde
Dejequela cuchllla
se detengaantes
de sacariadel
elgatlUo.
• Deseche toda cuchilla doblada, torcida, resquebrajada, quebrada o
daSada de cualquier otro modo.
Cambie todas laspiezas resquebrajadas, descantilladas o daSadas
antes de usar el aparato.
• No intente remover el material y cortado o sostenga el material a ser cortado mientras el motor se encuentre
en marcha o cuando el dispositivo
que corta se encuentre en movimiento.
• Mantenga siempre las rueda y el calzo en contacto con el suelo.
• Siempre empuje el aparato lentamente sobre el terreno. Cufdese
constantemente contra las aceras
desniveladas, hoyos en el terreno,
farces grandes, etc.
• Siempre use el mango al usando accesorio al cortar bordes.
SEGURIDAD AL PROPULSOR DE
AIRE/ASPIRADORA
_, ADVERTENClA:
Inspeccione el
_rea antes de porter en matodos los
escombros y objetos s61idos tales
como piedras, vidrio, alambre, etc.,
que el aparato pueda arrojar al aire o
hacer rebotar causando heridas de
este o cualquier otro modo durante el
uso del mismo.
• No apoye el aparato con el motor en
marcha en ninguna superficie que
no est_ limpia o que no sea s61ida.
El aparato podrfa aspirar escombros
tales como gavilla, arena, polvo,
c_sped, etc. por la entrada de aspiraci6n y arrojarlos por la salida de
propulsion, daSando el aparato y/u
otros objetos, o causando graves
heridas a espectadores o al usuario.
• Nunca coloque objetos dentro de los
tubos de propulsi6n, tubos de aspiracibn o salida de aire; siempre dirija
los escombros en direccibn contraria
a donde personas, animales, vidrierasu otros objetos s61idos tales como
drboles, autom6viles,
paredes, etc.
se encuentran. La fuerza del aire
puede arrojar o hacer rebotar piedras, tierra o ramas, hiriendo a personas o animales, rompiendo vidrieras o causando otros daSos.
• Nunca ponga el aparato en marcha
sin toner todo el equipo correspondiente instalado. AI usar el aparato
como propulsor de aire, sirmpre
instale los tubos de propulsi6n.
• Inspeccione frecuentemente
la abertura de entrada de aire, los tubos de
propulsion, y los tubos de aspiraci6n
siempre con el motor detenido y la
bujfa desconectada.
Mantenga las
aberturas de ventilaci6n y los tubos
de descarga libres de escombros
que se pueden acumular y limitar la
circulaci6n debida de aire.
• Nunca coloque objeto alguno dentro
de la entrada de airs ya que de hacerIo podrfa limitar la circulaci6n d'aire y
daSar el aparato.
• Nunca use el aparato para esparcir
substancias quimicas, fertUizantes u
otras substancias que puedan contener materiales t6xicos.
• Para evitar la propagaci6n de incendios, no use el aparato cerca de hogueras de hogassecas o de matorrales, de hogares de lena, de
parrillas, barbacoas, ceniceros, etc.
SEGURIDAD AL CORTADORA
DE
MALEZAS
_:_ PELIGRO: La cuchilla puede rebotar violentamente en materiales que no
puede cortar. Los rebotes de la cuchilla
pueden causar la amputaci6n de brazos
o piemas.
ADVERTENClA:
No utilice el
cabezal podador como dispositivo de
sujeci6n de la cuchilla.
25
manual de Instrucciones de la accesorio del podadora).
SEGURIDAD AL CULTIVADOR
A_IADVERTENClA:
La cuchilla sigue girando incluso despu_s de soltar
el acelerador o de apagar el motor. Incluso cuando est_ girando libremente,
la cuchilla puede despedir objetos o
causar cortes profundossi se toca accidentalmente. Detenga la cuchilla poniendo en contacto el lado izquierdo
de la misma con material ya cortado.
Para detener la
cuchilla cuando
gire libremente,
p6ngala en confacto con material previamente
cortado.
®
ADVERTENClA:
Antes de cada
uso, inspeccione la zona de trabajo.
Retire todos los objetos (rocas, cristales rotos, clavos, cables, hilos, etc.)
que puedan ser despedidos o quedar
enredados en la cuchilla o en el cabezal podador.
• Deseche y sustituya la cuchillas dobladas, dentadas, partidas, rotas o
deterioradas de alg0n modo.
• Antes de utilizar el aparato, instale el
protector apropiada. Utilice el
protector metSlica siempre que trabaje con una cuchilla met_lica.
_ADVERTENClA"
Utilice solamente las accesorios al cortadore de
malezas que proveen de un protector
met_lica con la nariz acentuada.
entuada
• Utilice exclusivamente
la cuchilla especificado y asegerese de que est6
correctamente
instalado y firmemente sujeto.
• Corte siempre de derecha a izquierda.
• Siempre que trabaje con cuchilla, utilice el mango y una correa al hombro
correctamente
ajustada (vea las
instrucciones de MONTAJE en el
ADVERTENClALas pLeaSgiratorias pueden causargraves heridas.
Mant_ngase alejado de las puas giratorias. Apague el motor antes de desatascar las p0as o hacer reparaciones.
ADVERTENClA"
Inspeccione el
_rea a cultivar antes de arrancar el
aparato. Retire todos los residuos y
los objetos duros y cortantes como rocas, enredaderas, ramas, soga, cuerda, etc.
• Evite el contacto con objetos s61idos
que peudan detener las peas. Si
ocurre un contacto fuerte, pare el
motor e inspeccione el aparato para
ver si hay daSos.
• No opere nunca el aparato sin la
_rotector de la peas en su lugar y
ien asegurada.
• Mantenga las peas y la protector
libre de residuos.
• Luego de golpear un objeto extraSo,
pare el motor, inspeccione el cultivador para ver si hay dahos y rep_.relos antes de volver a arrancar el
aparato.
• Desconecte el cultivador del ensamble del motor antes de limpiar la
peas con una manguera y agua para
retirer todo Io que se haya acumulado. Luego lubrique las peas con
aceite para evitar la oxidaci6n.
• Use siempre guantes cuando haga
reparaciones o limpie las peas ya
que se afilan mucho con el uso.
• No funcione el aparato en revoluoiones altas a menos que cultive.
SEGURIDAD AL PODADORA DE
SETOS
PELIGRO:
RIESGO
DE CORTA-
DURAS; MANTENGA LAS MANOS
ALEJADAS
DE LA CUCHILLA - La
cuchilla continuar& girando moment_neamente
al soltar el gatillo
acelerador.
No intente limpiar material
ya cortado mientras la cuchilla se encuentre girando. Asegt_rese de que el
26
interruptor se encuentre en la posici6n
OFF, el cable de la bujfa desconectado, y la cuchilla detenida antes de remover el material que se haya atascado en la cuchilla. No sosten_]a o
agarre el aparato por la cuch=lla.
La cuchilla contiPermita que /as
nuard girando toocuchillasse dementdneamente al
tengan antes de
,_. soltar el gati/Io
remover/as de/
erador
las panes mdviles. No intente tocar ni
detener la cuchillao la cadena mientras
estd en movimiento.
rea de corte.
_ ADVERTENClA:
t
)
ADVERTENClA:
Inspeccione el
brea de trabajo antes de comenzar.
Retire todos los desechos y material
sdlido como rocas, vidrio roto,
alambre, etc. que puedan rebotar, ser
arrojados al aire o de otra manara
causar accidentes o dafios durante el
uso del aparato.
• No use el aparato si la cuchilla se
encuentra doblada, torcida, astillada,
rota o dafiada de cualquier manera.
Entre en contacto con el Cantro de
Servicio Sears para el reemplazo de
piezas dafiadas o desgastadas.
• Siempre mantenga el aparato en
frente suyo. Mantenga todas las
partes del cuerpo alejadas de la
cuchilla.
• Mantenga la cuchilla y los respiraderos de aire libres de desechos.
SEGURIDAD AL CORTADORA
DE
RAMAS
ADVERTENCIA:
La cuchilla os-
cilanteJcadena giratoria pueden causar
graves lesiones. Inspeccione el aparato
antes de usarla. No opere el aparato
con una cuchilla doblada, quebrada ni
desafllada o cadena desafilada. Mant_ngase alejado de la cuchilla/cadena.
ADVERTENClA:
La cuchUla oscilante/cadena giratoria est& afilada. No
la toque. Para evitar graves lesiones,
siempre apague el aparato y asegdrese
de que la cuchilla/cadena se haya detenido completamente, desconecte la
bujfa y use guantes cuando cambie o
maneje la cuchilla o la cadena.
ADVERTENClA:
La cuchilla en
descenso/cadena giratoria puede causar lesiones al contJnuar su movimiento
luego de apagar el aparato. Mantenga
un control adecuado de la aparato hasta
que la cuchilla/cadena haya dajado de
moverse por completo. Mantenga las
manos, la cam y los pies lejos de todas
Los objetos
que caen pueden causar graves lesiones en su cabeza. Usa protecci6n
en su cabeza mientras opere esta
aparato con una accasorio al cortadora de ramas.
IIADVERTENCIA:
Para evitar
graves lesiones, no use rods de un brazo de extensi6n con el accesorio cortadora de ramas.
A(_ ADVERTENClA:
Mantenga el
cortadora de ramas lejos de Ifneas de
fuerza el_.trica y cables de electricidad.
• Solamente uso para podar las ramas
hasta 4 pulgadas de di&metro.
• No opere el aparato a una velocidad
mayor que la necesaria para podar.
No haga funcionar el aparato a alta
velocidad mientras no est,. podando.
• Apague siempre el aparato cuando
se demore el trabajo y mientras camina entre zonas de corte.
• Si golpea o se enreda con algdn abjeto extrafio, apague el motor de inmediato e inspeccione si existen
dafios. Haga cualquier dafio reparar
por un Centro de Servicio Sears
antes de procurar otras operaciones.
Descarte las cuchillas que esten dobladas, combadas, rajadas o rotas.
• Apague el aparato de inmediato si
siente una vibraci6n excesiva.
La
vibracibn indica que hay problemas.
Inspeccione en detalle si existen
tuercas o pernos flojos o dafio antes
de continuar. Entre en contacto con
el Centro de Servicio Sears para el
remplazo de piezas dafiadas el necesario.
27
SEGURIDAD
NIEVE
AL SOPLADOR
DE
_ ADVERTENCIA:
Mantenga las
manos y pies alejadas del rotor al arrancar or funcionar el motor. Nunca
trate de limpiar el rotorcuando el motor est_ en marcha nuevamente. Apague el motor y desconecte la bujfa
antes de limpiar la nieve o esoombros
del dispositivo de descarga o cuando
ajuste los deflectores.
• AsegOrese de que el rotor gira librement antes de Instalar el soplador de
nleve en el aparato motrlz.
• Si el motor no gira libramente debido
a hielo congelado, descongele la
herramienta antes de intentar usarla
bajo corriente.
•
•
•
_ ADVERTENCIA:
Nunca este
cerca de la apertura de la descarga.
Rocas o escombros se puedan lanzar
en los ojos y la cara, el resultado le
causarua kesu6n o ceguera seria.
ADVERTENClA:
Inspeccione el
&tea donde se utilizar_ el aparato. Retire todos los objectos que puedan ser
despedidos o puede haber daSos en
la aparato. Algunos objetos se pueden ocultar por la nieve cafda -- est_
alerta para la posibilidad.
• Nunca haga funcionar el soplador de
nieve cerca de recintos de vidrio, autom6viles, etc.
• No funcione el aparato en revoluciones altas a menos que remueva
nieve.
• Ponga atenci6n cuando est_ usando
el soplador de nieve y est_ alerta si
hay hoyos en el terreno u otros riesgos escondidos.
CONTENIDO
DE LA CAJA
Use la siguiente lista para verificar que
todas la piezas hayan sido inclufdas:
Modelo 358.795501
• Cabeza de Motor
• Accesorio del Cortadora
• Protector
• Tuerca Mariposa (atornillada en la
protector)
• Recipiente de Aceite
Examine las piezas para verificar que
no haya daSos. No use piezas daSadas.
•
•
•
•
•
•
Mantenga el rotor limpio de basuras.
No sople nieve cerca de otras personas. El soplador de nieve puede
lanzar objetospequeSos a alta velocidad, causando lesiones.
Despu_s de golpear un objeto extra5o, pare el motor, desconecte la
bujfa e inspeccione si el soplador de
nieve ha sufrido daSo y rep_relo
antes de volver a usarlo.
Nuna haga funcionar el soplador de
nieve cerca de recintos de vidrio, autom6viles y camiones.
Nunca utilice el soplador de nieve
sobre un techo.
Nunca haga funcionar el soplador de
nieve cerca de ventanas, bajadas,
etc.
Nunca lance la nieve hacia caminos
pSblicos o cerca del tr_fico.
Limpie la nieve de las pendientes
yendo hacia arriba y hacia abajo;
nunca de manera horizontal. Tenga
cuidado cuando cambie de direcci6n. Nunca limpie la nieve de pendientes demasiado empinadas.
Deje que el soplador de nieve funclone durante unos minutos antes de
comenzar a limpiar la nieve para que
las piezas m6viles no se congelen.
Mire detr_s suyo y tenga cuidado
cuando retroceda. Tenga cuicado
para evitar resbalarse o caerse.
Aprenda a detener la herramienta en
forma r_pida.
AVISO: Si necesita ayuda, si faltan
piezas o si hay piezas daSadas, Ilame
al n_mero t-800-235-5878.
Es normal escuchar que el filtm de combustible golpetee en el tanque vacfo.
Es normal encontrar residuos de aceite
o de gasolina en el silenciador, debido a
los ajustes al carburador y alas pruebas
efectuadas por el fabrfcante.
28
MONTAJE
INSTALACION DE LA PROTECTOR
ADVERTENClA:
Si recibi6 el
aparato ya armado, repita todos los
pasos para asegurar que el mismo se
encuentre correctamente armado y
que todos los fijadores se encuentren
bien ajustados.
INSTALAClON DE LA ACCESORIO
DEL CORTADORA
PRECAUCION: AI instalar las accesorio del cortadora, ponga el aparato
en una superficie plana para estabilidad.
1. Afloje el acoplador dando vuelta a
la perilla a la izquierda.
_, ADVERTENCIA:
El protector
deber_ ser instalado correctamente. El
protector provee protecci6n parcial
contra el riesgo de los objetos arrojados hacia el usuario y otras personas
y viene equipado con un cuchilla limitadora de linea que corta el exceso de
linea. El cuchilla limitadora de linea
(en la parte inferior del protector)es
filoso y puede cortar. Para conseguirla
orientaci6napropiada para el protector,
vea la ilustraci6nCONOZCASU APARATO
que se encuentraen la secci6n de USO.
1. Remueva la tuema mariposa de la
protector.
2. Introduzca el soporte dentro de la
ranura como se muestra.
3. Haga girar la protector hasta que el
tornillo pase a trav_s del hueco en
el soporte.
4. Apriete firrnemente la tuerca marlposa en el tornillo.
Ranura
Acoplador
AFLOJE
Protectorde \
embarque
Perilla
APRIETAN
Remueva el protector de embarque del acopiador.
3. Retire la tapa de eje del accesorio
del cortadora (si presente).
4. Coloque el bot6n de conexi6n/desconexi6n del accesorio en el agujero de la gufa del acoplador.
Empuje e/accesorio en el acopladot hasta que el bot6n de conexi6n/desconexi6n se encaje en el
primer agujero.
Antes de usar el aparato, apriete la
perilla firmemente dando vuelta a
la derecha.
Protector
_
,
Cuchilla
Limitadora
de Lfnea
.
,
Acoplador
Primer
Agujero Agujero de
_t_=la Guia
Eje
Superior
Bot6n de Accesorio
Conexi6n/
Inferior
Desconexi6n
/
AJUSTE
Soporte
Mariposa
DEL MANGO
_k, ADVERTENCIA:
AI ajustar la
manija auxiliar, asegL_reseque _ste se
mantenga sobre la etiqueta de seguridad y debajo la marca o la flecha en el
eje.
1. Afloje la tuema mariposa en el
mango.
2. Gire el mango en posici6n vertical.
Vuelva a apretar la tuerca madposa firmemente.
ADVERTENCIA:
Antes de operar esta aparato, aseg_rese de que el
bot6n de conexi6n/desconexi6n
est_
asegurado en el primer agujero y la
perilla est_ bien ajustada. Todos los
accesorios han sido disefiados para
ser utilizados en el primer agujero.
Para las accesorios opcional, yea la
secci6n MONTAGE de la aplicables
manual de instrucciones de la accesorio.
29
CONOZCA SU APARATO
LEA ESTE MANUAL DE INSTRUCCIONES Y LAS REGLAS DE SEGURIDAD ANTES DE
PONER EL APARATO EN MARCHA. Compare las ilustraciones con su aparato para
familiarizarse
con la ubicaci6n de los diversos controles y ajustes. Guarde este
manual para uso futuro.
Auxiliar
Acoplador
Eje
_,
Cabezal
de corte
/
Cuchilla
Limitadora de
Lfnea
Interruptor ON/OFF
Mango de la
Cuerda de
Shield
Gatillo
Acelerador
Silenciador
/
Palanca del
arrancador
INTERRUPTOR
ON/OFF
Se usa el interruptor ON/OFF para detener el motor. Coloque el interruptor
ON/OFF en la posici6n OFF para detener el motor.
BOMBEADOR
El BOMBEADOR retira el aire de el carburaclor y de las Ifneas de combustible
y las Ilena de mezcla de combustible,
permiti_ndole
poner el motor en marcha con menos tirones de la cuerda de
arranque. Accione el bombeador oprimi_ndolo y luego dejando que este recobre su forma original.
ANTES DE PONER EN MARCHA
MOTOR
EL
_,ADVERTENCIA:
Lea atentamente la informaci6n sobre el
combustible
en laas reglas de
seguridad antes de comenzar. Si no
comprende tas reglas de seguridad,
no intente abastecer el aparato de
combustible.
Llame al n_mero
1-800-235-5878.
ABASTECIMIENTO
Bujfa
DEL MOTOR
_L, ADMERTENCIA:
Remueva la
tapa del tanque de combustible
lentamente al reabastecer combustible.
Bombeador
PALANCA DEL ARRANCADOR
La PALANCADEL ARRANCADOR ayuda a
suministi'ar combustible al motor para
facilitar el arranque. Active el sistema
de arranque colocando la palanca en la
posici6n STARq-.NO apriete el gatJllodel
acelerador hasta que el motor arranque
y se ponga en marcha. Despu_s de que
el motor se haya puesto en mamha,
perrnita que el motor este en marcha
por 10-15 segundos; luego, apriete el
gatillo acelerador para desactivar el sistema de arranque.
ACOPLADOR
El ACOPLADOR permite la instalaci6n
de accesodos opcionales.
Este motor est_ habilitado para
funcionar con gasolina sin plomo. Antes
de comenzar con el uso, se deber_
mezclar la gasolina con un aceite de
sint_tico de buena calidad para motores
de 2 tiempos enfriados a aire.
Recomendamos el aceite de sintdtico
de la marca Craftsman. Mezcle la
gasolina con el aceite en la proporci6n
40:1. Se obtiene una proporci6n de 40:1
mezclando 3,2 onzas de aceite con
cada gal6n de gasolina sin plomo. Se
incluye con esta aparato un recipiente
de 3,2 onzas de aceite. Adiera el
contenido entem de este reclpiente en 1
gal6n de gasolina para alcanzar la
3O
mezclaapropiadadel
combustible. NO
USE aceite para autorn6viles nl para
barcas. Estos aceites deha_n el motor.
AJ mezclar el combustible, slga las
instrucoiones impresas en el recipiente.
Una vez haya ahadido el aceite a la
gasolina, agite al recipiente brevernente
para esegurar que el combustible est_
completamente mezclado. Siempre lea
y siga las instrucciones de seguridad
que tienen que ver con el combustible
antes de abastecer el aparato.
IMPORTANTE
La experiencia indica que los combustible mezclados con alcohol (los llamados gasohol o los que contienen etanol
o metanol) pueden atraer la humedad,
Io que puede causar la separaci6n y la
formaci6n de dcidos durante el almacenaje. La gasolina dcida puede daSar el
sistema de combustible del motor durante el almacenaje. Para evitar problemas con el motor, deberd vaciarse el
sistema de combustible antes de almacenar el aparato por 30 dfas o mds.
Vacfe el tanque de combustible, ponga
el motor en marcha y ddjelo en marcha
hasta que las Ifneas de combustible y el
carburador queden vacfos. Use combustible fresco para ta prbxima temporada. Nunca use productos de limpieza de
motor o carburador en el tanque de
combustible ya que de hacerla puede
provocar danos permanentes.
Vea la seccibn de ALMACENAJE para
informaci6n adicional.
PARA DETENER EL MOTOR
• Para detener el motor, mueva el interruptor ON/OFF a la posici6n OFF.
"_-_b.
_
Gatillo Acelerador q_
Interruptor
\
PARA PONER EN MARCHA
EL MOTOR
_tL ADVERTENCIA:
Evite el hacer
ningen tipo de contacto con el silenciador. Un silenciador caliente podrfa provocar quemaduras de gravedad si se
toca.
PARA ARRANCAR CON MOTOR
FRIO
AVISO: NO apdete el gatillo del acelerador hasta que el motor arranque y se
ponga en marcha.
1. Ponga el aparato en una superficie
plana.
2. Mueva el interruptor ON/OFF a la
posici(_n ON.
3. Oprima lentamente el bombeador
6 veces.
4. Mueva la palanca del arrancador a
la posici6n START,
de Arranque
Bombeador
Silenciador
5.
Tire firmemente del mango de la
cuerda de arranque hasta que el
motor arranque y se ponga en
marcha.
6. Permita que el motor este en marcha por 10-15 segundos; luego,
apdete el gatillo acelerador para desactivar el sistema del arranque.
PARA ARRANCAR CON EL MOTOR
CALIENTE
1. Mueva el interruptor ON/OFF a la
posici6n ON.
2. Mueva la palanca del arrancador a
la posici6n RUN.
3. Optima y sostenga el gatillo acelerador. Mantenga el gatillo totalmente
oprimido hasta que el motor marche
sm problemas.
4. Tire firmemente del mango de la
cuerda de arranque hasta que el
motor se ponga en marcha.
AVISO" Normalmente, el procedimiento
para arrancar con el motor caliente
puede ser utilizado dentro 5-10 minutos
despu_s que el motor se para. Si el
aparato esta sin funcionar por m_s de
31
10 minutos, serd necesado arrancar el
aparato stgulendo los pasos abajo PARA
ARRANCAR CON MOTOR FRIO O despu_.s trate los pesos de las instrucci6nes de como arrancar el aparato.
ARRANQUE
DE MOTOR AHOGADO
Lots motores ahogados pueden ponerse en marcha moviendo el interruptor
ON/OFF a la posici6n ON. Moviendo la
palanca del arrancador a la posici6n
RUN y optima y sostenga el gatillo acelerador. Tire de la cuerda repetidas
veces mientras que presiona el gatillo
acelerador hasta el motor arranque y se
ponga en marcha. Esto podr_ requerir
que se tire de la cuerda del mango repetidas veces dependiendo que tan
ahogado se encuentre el motor.
Si el aparato sigue sin ponerse en
marcha, vea la TABLA DIAGNOSTICA o
Ilame al nt3mero 1-800-235-5878.
OPERACION
DEL ACOPLADOR
Este modelo est_ equipado con un
acoplador, el cual permite la instalaci6n de accesorios opcionales.
Los
accesorios opcionales son:
Cortadora de Bordes ....
358.792401
Cultivador
.............
358.792410
Propulsor de Aire .......
358.792421
Cortadora de Malezas...
358.792441
Cortadora de Ramas ....
358.792450
ADVERTENCIA:
Siempre apao
gue el aparato y desconecte la bujfa
antes de retirar o instalar los accesorios.
COMO REMOVER EL ACCESORIO
DEL CORTADORA
(U OTRAS ACCESORIOS OPClONAL)
PRECAUClON:
AI retirar o instalar las
accesorios, ponga el aparato en una
superficie plana para estabilidad.
1. Afloje el acoplador dando vuelta a
la perilla a la izquierda,
Acoplador
Eje
Superior
2,
Oprtma y sostenga el bot6n de
conexl6n/desconexl6n.
Bot6nde Conexi6n/
Desc°n_"_,_
/Acoplador
==',_._---.,\
/
_'
Eje Superior
Accesorio Inferior
3.
Mientras sostiene el motory el eje
superior con firmeza, quite el accesorio inferior del acoplador en forma recta.
INSTALACl6N
DEL ACCESORIOS
OPClONAL
1. Retire la tapa de eje del accesorio
(si presente).
2. Coloque el bot6n de conexi6n/desconexi6n del accesorio inferior en
el agujero de la gufa del acoplador.
3. Empuje el accesorio inferior en el
acoplador hasta que el bot6n de
conexi6n/desconexi6n
se encaje
en el primer agujero.
4. Antes de usar el aparato, apriete la
perilla firmemente dando vuelta a
la derecha.
Primer
Acoplador
^.=^.^ Agujerode
I
....
Accesorie
Sup; rior DeU°noenX_xn_
n inferior
'_ ADVERTENClA:
Antes de operar esta aparato, aseg0rese de que el
bot6n de conexi6n/desconexi6n
estO
asegurado en el primer agujero y la
perilla est_ bien ajustada.
POSICION DE USO
SIEMPRE USE:
AFLOJE
Protecci6n
para los
Ojos
Accesorio
inferior
Pantolones
Largos
Perilla
Zapatos
Gruesos
Corte siempre de derecha a izquierda.
32
ADVERTENCIA: Usesiempre
protecci6nparalos ojos.Nuncase incline por enclmadel cabezal.La Ifnea
puedearrojaro hacerrebotarpiedras
o desechoshacialos ojosy la cara,
pudiendocausarla p6rdidade la vista
u otrasgravesheridas.
Cuandoaparatodefuncionamiento,
_drese como se vea en la figura y verique Io siguiente:
• Usando anteojosde seguridad y ropa
gruesa como protecci6n.
• Sostengala manija del gaUlloaceleradot con la mano derecha y manija
auxiliarcon la mano izquierda.
• Mantenga el aparato debajo del nivel
de la cintura.
• Corte siempre desde la derecha hacia la izquierda para que los escombros sean arrojados en direccibn
contrada a donde estd parado. Sin
tener que inclinarse, mantenga la
Ifnea cerca del suelo y paralela al
mismo, sin meteda dentro del material que se estd cortando.
No haga mamhar el motora revoluclones mds altas que las necesarias.
La Ifnea de corte cortardde una forma
r'n_seficientesin que el motorestd acelerado a rondo. A revolucionesrn_sbajas, habrd menosruidoy menor vibraci6n del motor.La Ifnea de cortedurard
rn_stiempo y tendrd menor pmbabilidad
de "fundirse" en la bobina.
ADVERTENCIA:
(0,080 de pulgada) de didmeb'o. Otto
tipode tamahosy formashar_n que la
Ifnea no gire de forma apropiada Io que
resultarden el funcionamiento inadecuado del cabezal de corte o en accidentes
de seria graveded. No utiliceotto tipo
de matenalestales como alarnbre,hUe,
soga, etc. El alambre puede romperse
durante el cortey convertirseen un misil
peligrosoIo que puede causar lesiones
de seria gravedad.
METODOSDECORTE
'_ ADVERTENClA:
Use la velocidad mfnima y no acerque el aparato
demasiado al cortar cerca de objetos
s61idos(piedra, gravilla, postes, etc.):
estos pueden da_ar el cabezal, pueden enredarse en la Ifnea o la Ifnea los
puede arrojar violentamente al aire,
causando sedo peligro.
• La punta de la Ifnea es la que corta.
Se conseguird mejor rendimiento y
el mfnimo desgaste si no se mete la
Ifnea dentro del material que se esta
cortando. La ilustraci6n a continuacibn muestra la forma correcta e incorrecta de cortar.
La punta de la linea
es la que corta
Siempre que no se halle cortando,
suelte el gatillo acelerador y permita
que el motorvuelva a marcha lenta.
Para detener el motor:
Suelte el gatillo acelerador.
Mueva el interruptor ON/OFF a la posici6n OFF.
AVANCE
DE LA L|NEA DE CORTE
El cabezal de corte hace mover autom_tticamente la linea hacia adelante. Para que la Ifnea de corte se
mueva hacla adelante, no es necesarlo dar golpes contra el suelo al
cabezal de corte. De Io contrario,
esta acci6n podrfa tener como resultado piezas rotas y el funcionamiento
defectuoso del cabezal.
Despu_s de que el aparato se haya
puesto en marcha, la Ifnea progresar_
el largo correcto para efectuar el corte
de manera autom_tica.
Mantenga siempre el protector en su
lugar cuando la herramienta se encuentre en funcionamiento.
Utillce exclu-
slvamente llnea redonda de 2 mm
Corr_to
La linea est_l metida dentro del material de trabajo
Incorrecto
• La linea retira f&cilmente el c_sped y
las males hierbas de alrededor de paredes, cercados, _lrboles y macizos de
flores; pero tambi_n es capaz de cortar la corteza tiema de _rboles y arbustos y de marcar las cercas. Para
evitar daSos, especialmente a la vegetaci6n delicada o a los _lrboles con
corteza fina, acorte la Ifnea a unos 10
a 13 cm (4 a 5 pulgadas) y use el
aparato sin acelerar a rondo.
• Para recortar o escalpar, use el aparato sin acelerar a fondo, para incrementar la vida etil de la Iinea y disminuir el
desgaste del cabezal, especialmente:
• AI hacer trabajos livianos.
• Cerca de objetos con los cuales la
linea se puede enredar, como son
los postes o _rbotes de poco di_lrnetroy el alambre de las cercas.
• Para cortar cesped y barrer, acelere
el motor a fondo para Iograr un buen
trabajo de limpieza.
33
PAPA CORTAR CESPED - Este parato
es ideal para cortarc_ped en lugares
donde las cortadorasconvenclonalesno
Ilegan. En posici6nde cortarc_sped,
mantenga la Ifnea paralela al suelo.
Evite presionarel eabezal contrael sueIo, ya que de hacerlopodrfaescalpar la
vegetaci6n y daCtarel aparato.
PARA RECORTAR - Sostenga el cabezel unos 8 cm (3 pulgadas) del suelo
yen dngulo. Unicamente la punta de la
Ifnea deber_ hacerel contacto con el
material a cortar. No meta la Ifnea dentro del drea que se est_ cortando.
Para Reco_ar
Para Cortar
C6sped
8 cm (3 pulga- "_<_._
das) del suelo
PARA ESCALPAR - La t_cnica del ascalpado retira la vegetaci6n no deseada abajo ala tierra. Sostenga el cabezal unos 8 cm (3 pulgadas) del suelo y
en dngulo. Deje que la punta de la
Ifnea golpee contra el suelo cerca de
los drboles, los postes, los monumentos, etc. Esta t_cnica incrementa el
desgaste de la lfnea.
PARA BARRER - Se puede usar la
acci6n ventiladora de la Hnea girante
para barrer r_pida y fdcilmente un _rea
daterminada. Mantenga la Ifnea paralela al suelo directamente encima de
las superficies que se quiera barrer y
meuva el aparato de un lado al otro
rdpidamente.
Para Escalpar
Para Barrer __
CRONOGRAMA
DE MANTENIMIENTO
ADVERTENClA:
Desconecte la bujfa antes de hacer cualquier mantenimiento, con la excepci6n de los ajustes al carburador.
TAREA DE CUIDADO
Y MANTENIMIENTO
Inspeccione
Limpiar
sueltos
o gastadas
Antes de cada uso
y limpie el aparato y sus placas
el filtro de aire
Inspeccione
el silenciador
HACER
Antes de cada uso
Verificar que no haya piezas ni fijadores
Verificar que no haya piezas daSadas
CUANDO
Despu6s
de cada uso
Carla 5 horas de uso
y la rejilla antichispa
Cambiar la bujfa
RECOMENDACIONES
GENERALES
La garantfa de este aparato no cubre
los articulos que han sido sometidos al
abuso o ala negligencia por parte del
usuario. Para recibir el valor completo
de la garantfa, el usuario deber_ mantener el aparato segen las instrucclones en este manual. Har_. falta hacer varios ajustes peri6dicamente
para
mantener el aparato de forma debida.
Cada 50 horas de uso
Anualmente
VERIFIQUE QUE NO HAYA FIJADORES NI PIEZAS SUELTAS
• Cubierta de la Bujfa
• Filtro de Aire
• Tornillos de la Caja
• Tornillo del Mango Auxiliar
• Protector
34
VERIFIQUE QUE NO HAYA PIEZAS
DANADAS O GASTADAS
Entre en contacto con el Centre de
Servlcio Sears para el reemplazo de
piezas danadas o desgastad,as.
• Interrupter ON/OFF - Asegurese de
que el interrupterON/OFF est_ funcionando correctamente coloc_mdolo
en la posicibn OFF.Asegt3rese de
que el motor se haya detenido per
complete, luego, ponga el motor en
marcha nuevamente y contint_e.
• Tanque de Combustible- Deje de
usar el aparato si hay sehales de
da5os o p_ddidas en el tanque de
combustible.
• Protector - Deje de usar el aparato
si el protector est_ da_ado.
INSPECClONE Y LIMPIE EL APARATO Y SUS PLACAS
• Despu_ de que cada use, inspeccione la aparatocompleta para saber
si hay piezas flojaso da_adas. Limpie
el aparatoy las placas usando un trapo ht_rnedocon un detergente suave.
• Seque el aparato usando un trepo
seco y limpio.
LIMPIE EL FILTRO DEL AIRE
Los filtros de aire sucios disminuyen la
vida L_tily el rendimiento del motore
incrementan el consume de combustible y de emiciones nocivas. Limpie
siempre el filtrode aire despu_s de
cada 5 horas de use.
1. Limpie la tapa y el _.rea alrededor
de la tapa para evitar que caiga suciedad o desechos en el carburador cuando se saque la tapa.
REEMPLAZO DE LA LINEA
El use de bobinas previamente enrolladas es el metodo m_.s conveniente
para reemplazar la linea de corte y
asegurarse qua el aparato rinda un
funcionamiento
6ptimo.
• Las bobinas de repuesto vienen con
codificadas en colores para asegurarnos el use correcto de la bobina
con el aparato correspondiente.
Asegl_rese de usar el mismo color
de bobina de repuesto qu el de la
bobina existente.
AMISO: Mantenga siempre el cabezal
de corte limpio de escombros y suciedad al efectuar cualquier tipo de mantenimiento.
• Sujete el bobina y desenrosque
la
tapa girande en la direcci6nilustrada
en la parte superior de la misma.
2.
Remueva las piezas presionando el
cierre para aflojar la tapa del filtro de
aire.
AVISO: Para evitar peligro de incendio
_ide emiciones evaporativas nocivas, no
mpie el filtro de aire con gasolina ni cualquier otro solvente inflamable.
3. Limpie el filtro con agua y jabbn.
4. Permita que el filtro se seque.
5. Aplique varias gotas de aceite al
filtro; exprima el filtro para distribuir
el aceite.
6. Reponga las plazas.
Cierre de Tapa
del Filtro de Aire
CAMBIE LA BUJIA
Deber& cambiarse la buj/a anualmente
p ara asegurar que el motor arranque
cilmente y tenga un meier rendimeinto. Ajuste la separaci6n de los electrodos a 0,025 de pulgada. El encendido
es fijo e inalterable.
1. Gire y saque la cubierta de la bujla.
2. Retire la bujla del cilindro y deskchela.
3. C&mbiela per una bujia Champion
RCJ-6Y y ajuste firmemente la
bujia nueva con una Ilave de cube
de 3/4 de pulgada.
4. Instale nuevamente la cubierta de
la bujia.
• Retire el are que gufa la linea y la
bobina.
Are que guia la linea
obina
Utilice una bobina previamente enrollada o vuelva a enroscar linea nueva
en la bobina existente. Si utiliza una
bobina pre-enrollada,
retire la tira adhesiva de la linea y la bobina.
COMO REBOBINAR
LA BOBINA
CON LINEA NUEVA
ADVERTENCIA:
Utilice exclusivamente linea redonda de 2 mm
(0,080 de pulgada) de dldmetro. Otto
35
tipode tamaSosy formashar'&nque la
Ilnea no gin) de forrna apropiada Io que
resultar_,en el funcionamiento inadecuado del cabezal de corteo en accidentes
de seda gravedad. No utiliceotrotlpo
de materlales tales como alambre, hilo,
soga, etc. El alambn) puede rornperse
durante el cortey converUrseen un misil
peligrosoIo que puede causar lesiones
de seria gravedad.
1. Corte una Iongitud de 8 metros (25
pies) de Ifnea redonda de 2 mm
(0,080 de pulgada) de di_metro de
la maroa Craftsman.
Ifnea en la direcci6n que se
muestra en la
bobina
ntroduzca la
__
\
Bobina
Introduzca un extremo de la Ifnea
dentro de la cavidad central de la
bobina vacfa. Aseg0rese de que la
Ifnea enrolle en labobina en la direcci6n que se ilustra en la misma
(en sentido contrario al de las agujas del reloj).
3. Contin0e enrollando la Ifnea en la
bobina, dejando sin enrollar de 10
a 15 cm (4 a 6 pulgadas) desde el
centro de la bobina.
COMO INSTALAR LA BOBINA CON
LA LINEA DE CORTE
1. Instale la Ioobina de repuesto.
2. Enrolle la Ifnea a trav_s del aro
gufa.
L_neaa traves del aro gufa.
2.
'\_!
//f-_
Ranura (_
Bobina de Repuesto
3.
4.
Coloque el aro gufa en la bobina y
pase la Ifnea por la ranura. Perm_ta que la Ifnea se extienda de 10 a
15 cm (4 a 6 pulgadas) desde el
centro de la bobina.
Asegure de que la Ifnea permanezca dentro de la ranura mientras enrosca la la tapa en la eje. Ajuste
la tapa manualmente.
AJUSTEALCARBURADOR
_ ADVERTENCIA:
Mantenga a
otras personasalejadas de la zona en
donde se encuentre haclendo ajustes
de marcha lenta. El cabezal de corte o
cualquieropclonalaccesoriose encontrar_n girandodurante la mayorparte de
este procedimiento. Use su equipo protectory observetodas las precauciones
de seguridad. Despu_ de flnalizarcon
el procedimientode ajuste, el cabezal
de corteo cualquieropcionalaccesorio
debe_n parar de rnoverseo de girar
rnientrasel motorse encuentraa la veIocidadde marcha lenta.
El carburador ha sido ajustado cuidadosamente en la fdbrica. Posiblemente sea necesario hacer ajustes si
se nota cualquiera de las siguientes
condiciones:
• El motor no funciona en marcha lenta cuando se suelta el acelerador.
• El cabezal de corte o cualquier opcional accesorio conUnuan en movimiento o girando en marcha lenta.
Haga los ajustes sosteniendo el equipo de manera que el accesorio de
corte se encuentre alejado del suelo y
no haga contacto con ning0n objeto.
Sostengael aparato manualmente
mientras el motorse encuentn)encendido y mientras usted se encuentre haciendo los ajustes. Mantenga todas las
partes de su cuerpo alejadas de los accesorios de corte y del silenciador.
Marcha Lenta
Deje el motor en marcha lenta. Ajuste
las revoluciones hasta que el motor se
mantenga en marcha sin que el cabezal de corte o cualquier opcional accesorio se muevan o continuen girando
(la rnarcha lenta es demasiado) o que
el motor se ahogue (la marcha lenta
es demasiado lenta).
• Gire el tomillo de marcha lenta hacia
la derecha para aumentar las revoluclones si el motor se ahoga o se para.
• Gire el tomillo de marcha lenta hacia
la izquierda para reducir las revoluciones si el cabezal de corte o cualquier opcional accesodo permanecieran
rnovi_ndose o girando mientras el motor se encuentra en marcha lenta.
_,ADVERTENCIA:
Vuelva a vedficar la marcha lenta despu_s de cada
ajuste. El cabezal de corte o cualquJer
opcional accesodo no deber_n moverse
o girar cuando el motor se encuentra en
marcha lenta para asf evitar graves heddes al usuario o a otras personas.
36
TomUlode
Ajuste
de
la Marcha
Lenta
Si raquiriera ayuda adicional o no se
sintiera seguro al desempefiar este
procedimiento, entre en contacto con
el Centro de Servicio Sears o Ilame al
n_mero de ayuda al consumidor
1-800-235-5878.
Aire
ADVERTENCIA:
Realice los
siguientes pasos despu6s de cada
USO:
• Permita que el motor se enfrfe antes
de guardarlo O transportarlo.
• Guarde el aparato y el combustible
en un lugar bien ventilado donde los
vapores del combustible no puedan
entrar en contacto con chispas ni llamas abiertas provenientes de clentadotes de agua, motores o interrputotes el_ctricos, calefactores
centrales, etc.
• Guarde el aparato con todos los protectores en su lugar y coloquelo de
modo que las piezas cortantes no
puedan causar heridas por accidente.
• Guarde el aparato y el combustible
en un lugar completamente tuera del
alcance de los nifios.
ESTACIONAL
ALMACENAJE
Prepare el aparato para almacenarlo
al final de la temporada o si no Io va a
usar por m_s de 30 dfas.
Si va a almacenar el aparato durante
un periodo largo de tiempo:
• Limpie el aparato por completo antes
del almacenaje.
• Almacene en un _.rea limpia y seca.
• Aplique una pequefia cantidad de
aceite alas superficies extemas
met_lJcas.
SISTEMA DE COMBUSTIBLE
Vea el mensaje marcado como
IMPORTANTE,
que se refiere al uso
de combustibles con mezcla de alcohol en su aparato, en la secci6n de
USO, bajo ABASTECIMIENTO DEL MOTOR. Los estabilizadores de combustible son una alternativa aceptable
para minimizar la formaci6n de dep6sitos de goma durante el almacenaje.
Afiada estabilizador a la gasolina en el
tanque de combustible o en el reci_aiente para almacenar el mismo. Siga
s instrucciones de mezcla que se encuentran impresas en el envase. Ponga el motor en marcha y d_jelo en
marcha pot unos 5 minutos despues
de haberle puesto estabilizador.
El aceite Craftsman 40:1 para motores
a 2 tiempos (enfriados a aire) viene
mezclado con estabilizador de combustible. Si no usa este aceite de
Sears, usted podr_ afiadir estabilizador al tanque de combustible.
MOTOR
• Retire la bujfa y vierta una cucharadita de aceita 40:1 para motores a 2
tiempos (enfriados a aire) por la abertura para la bujfa. Lentamente, tire
de la cuerda de arranque de 8 a 10
veces para distribuir el aceite.
• Cambie la bujfa pot una nueva del
tipo y de la gama de calor recomendados.
• Limpie el filtro de aire.
• Examine todo el aparato para verificar que no haya tomillos, tuercas ni
pemos sueltos. Cambie todas la piezas dafiadas, quebradas o gastadas.
• AI principio de la pr6xima temporada,
use exclusivamente
combustible
fresco con la proporci6n correcta de
gasolina a aceite.
OTROS
• NO guarde la gasolina de una temporada a la pr6xlma.
• Cambie el recipiente de gasolina si
se empieza a oxidar.
37
TABLA DIAGNOSTICA
_,
ADVERTENClA:
Siernpre apague el aparato y desconecte la bujfa antes
de hacer cualquiera de las reparaciones recomendadas a contlnuaci6n que
no requieran que la unidad estd enc _eracl6n.
SINTOMA
El motor no
arranca.
CAUSA
SOLUCION
1. Et interruptor ON/OFF estd
en posici6nOFF.
2. El tanque de combustible
estd vac{o.
3. La bujfa no estd haciendo
chispa.
4. El combustible no estd
Ilegando al carburador.
1. Coloque el interruptorON/OFF a la
posici6n ON.
2. Llene el tanque con la mezcla
correcta de combustible.
3, Instale una bujfa nueva.
5. El carburadorrequier
ajuste.
4. Verifiquesi el filtro de combustibleno
est6 sucio;cdmbielo. Verifiquesi hay
dobleces en la hnea de combustible
o si estd partida; repdrela o cdmbiela.
5. Entre en contactocon el Servicio
Sears (vea parte trasera del manual).
El motor no
anda en
marcha lenta
como debe.
1. El carburador requier
ajuste,
2. Las lunas del ciguefial
estdn gastadas.
3. La compresi6n est_ baja.
1. Vea "Ajuste al Carburador" en la
secci6n Servicio y Ajustes.
2. Entre en contactocon el Servicio
Sears (vea parte trasera del manual).
3. Entre en contactocon el Servicio
Sears (vea parte trasera del manual).
El motor no
acelera, le
falta
potencia o
se para bajo
carga.
1. El filtro de aire est_l sucio.
2. La bujfa est,, carbonizada.
1. Limpie o cambie el filtrode aire.
2. Limpie o cambie la bujfa y calibre
la separaci6n.
3. Entre en contacto con el Servicio
Sears (vea parte trasera del manual).
4. Entre en contacto con el Centro de
Servicio Sears.
5. Entre en contacto con el Centro de
Servicio Sears.
3. El carburador requiere
ajuste.
4. Acumulaci6n de Carb6n.
5. La compresL6n est_l baja.
El motor
humea excesivamente
1. La mezcla de combustible
se ha hecho incorrectamente.
2. El filtro de aire est_l sucio.
3. EI carburador requiere
ajuste.
El motor
marcha con
temperatura
elevada.
1. La mezcla de combustible
est& se he hecho
incorrectamente.
2. Se ha instalado la bujia
incorrecta.
3. El carburador requiere
ajuste.
4. Acumulaci6n de Carb6n.
1. Vaci6 el tanque de combustible y
Ildnelo de combustible con la mezcla
correcta.
2. Limpie o cambie el filtro de aire.
3. Entre en contacto con el Servicio
Sears (vea parte trasera del manual).
1,
2,
Vea "Abastecimiento del Motor" en la
secci6n Uso.
Cambie por la bujia correcta.
3. Entre en contacto con el Servicio
Sears (vea parte trasera del manual).
4. Entre en contactocon el Servicio
Sears (vea parte trasera del manual).
38
SUS DERECHOS Y OBLIGACIONES
DE GARANTIA:
La Agencia de Protecci6n Ambiental de los Estados Unidos y Seam, Roebuck and Co.,
U.S.A., se complacen en explicar la
gdarantfa con la que cuenta el sistema
e control de emisi6n en su motor pequefio, modelo 2002-2004,
para uso
fuera de carretera. Sears deber_, garantizar el sistema de control de emisi6n en su mdquina de motor pequefio
para uso fuera de carretera por los
perfodos de tlempo que explicamos a
continuaci6n y con la condici6n de que
su mbquina de motor pequefio para
uso fuera de carretera no haya sufrido
ning_n tipo de abuso, negligencia o
mantenimiento
inapropiado. Su sistema de control de emisi6n incluye piezas tales como el carburador y el sistema de ignici6n. Donde exista una
condici6n que requiera reparaci6n
bajo garantfa, Sears reparard gratis su
motor pequefio para uso fuera de carretera. Los gatos cubiertos bajo la garantfa incluyen el diagn6stico,
las piezas ylabor. CUBIERTA DE GARANTIA DEL FABRICANTE:
Si cualquier
pieza relacionada con el sistema de
emisi6n de su motor (como hemos enumerado en la lista de piezas de control de emisi6n bajo garantfa) se encontrara defectuosa o defectos en el
material o en la labor del motor causaran que tal pieza comenzara a fallar, la
pieza serd reparada o reemplazada
por Sears.
GARANTIA DE RESPONSABILIDAD
DE DEL DUENO:
Como duefio de una mdquina de motor pequeho para uso fuera de carretera, usted serd responsable por el
mantenimiento
adecuado en los perfodos previamente programados y enumerados en su manual de instrucclones. Sears recomienda que guarde
todos los recibes que indiquen que se
ha desempefiado mantenimiento
en
su m&quina de motor pequeflo para
uso fuera de carretera, pero Sears no
podr_, negar el servicio bajo garantia
_nicamente a causa de la falta de recibos o por el incumplimiento de su
parte en asegurarse que el mantenimiento programado haya sido desempefiado.
Como dueho de una
m,_quina de motor pequeho para uso
fuera de carretera, usted deber& contar con el conocimiento
de que Sears
puede negar la cubierta bajo garantfa
si su mdquina de motor pequefio para
uso fuera de carretera o alguna pieza
de la misma ha dejado de funcionar
debido al abuso, negligencia, mantenimiento inapropiado, modificaciones
no aprobadas o el uso de piezas que
no hayan sido fabricadas o aprobadas
por el fabricante original del equipo.
Es responsabilidad
suya el Ilevar su
mdquina de motor pequefio para uso
fuera de carretera a un centro de reparaci6n autorizado Sears tan pronto
como se presente el problema.
Las
reparaciones
bajo garantfa deber_in
ser completadas en un perfodo de
tiempo razonable, que no exceda los
30 dfas. Si cuenta usted con alguna
pregunta en relaci6n a sus derechos y
responsabilidades
de garantfa, usted
deber_ comunicarse con su distribuidor autorizado del servicio m&s cercano o Ilamar a Sears al
1-800-469-4663.
FECHA DEL
COMIENZA DE LA GARANTIA: El
perfodo de garantfa comienza en la
fecha de compra de la mdquina de
motor pequefio para uso fuera de carretera. DURAClON DE LA GARANTIA: Esta garantfa cuenta con un perfodo de duraci6n de dos afios
comenzando en la fecha inicial de
compra. QUE CUBRE LA GARANTIA: REPARACION O REEMPLAZO
DE PIEZAS. La reparaci6n o el reemplazo de cualquier pieza garantizada
sera.n desempefiados
y ofrecidos al
duefio sin costo alguno en un distribuidor autorizado del servicio Sears. Si
cuenta usted con alguna pregunta en
relaci6n a sus derechos y responsabilidades de garantfa, usted deber_
comunicarse con su distribuidor autorizado del servicio m_.s cercano o Ilamar a Sears al 1-800-469-4663.
PERIODO DE GARANTIA:
Cualquier
pieza garantizada que no est_ programada para ser reemplazada como
parle del mantenimiento
requerido, o
que est6 programada 0nicamente para
inspecci6n regular para efectos de "reparaci6n o reemplazo si fuera necesario" deber_ garantizarse por un perfodo de dos afios. Cualquier pieza
garantizada que est_ programada
para ser reemplazada como parte del
mantenimiento
requerido deber_l estar
garantizada por el perfodo de tiempo
que comienza en la fecha de compra
inicial hasta la fecha del primer reem39
plazo programado para dicha pieza.
DIAGNOSTICO:
No se deber=_ cobrar
al duefio ningt]n tipo de cargos por la
labor de diagn6stico la cual determine
que una pieza garantizada se encuentra defectuosa sl el trabajo de
diagn6stico ha sido desempefiado por
un distribuidor autorizado del servicio
Seam. DANOS POR CONSECUEClA:
Sears podr_ ser responsable de
dafios ocurridos a otras piezas del motor causados por la falla de una pieza
garantizada que se encuentre bajo el
perfodo de garantfa. QUE NO
CUBRE LA GARANTIA: Todas las fallas causadas por el abuso, negligenc,ia o mantenimiento
inapropiado no
estbn cubiertas. PIEZAS ANADIDAS
O MODIFICADAS:
El uso de piezas
afiadidas o la modificaci6n de piszas
podr_.n servir como base para que se
anule la reclamaci6n de garantfa. La
garantfa de Sears no se responsabiliza por el real funcionamiento
debido al
uso de piezas afiadidas o de piezas
modificadas.
COMO ENTABLAR
UNA RECLAMAClON:
Si cuenta
usted con alguna pregunta relacionada con sus derechos y responsabilidades de garantfa, usted deber__ enSe certifica
siguientes:
este motor para satisfacer
[]
Moderado
(50 horas)
[]
Intermedio
(125 horas)
[]
Extendido (300 horas)
trar en contacto con su dlstrlbuidor
autodzado del servicio Sears mds cercano o Ilamar a Sears al
1-800-469-4663.
DONDEOBTENER SERVIClO DE GARANTIA: Servicio o reparaciones bajogarantfa deberdn ser provistas en todos los
distribuidors autorizado del servicio
Sears. Por favorcomunfquese
al
1-800-469-4663.
MANTENIMIENTO,
REEMPLAZO Y REPARAClON
DE
PIEZAS RELAClONADAS
CON LA
EMISION: Cualquier pieza de repuesto Sears aprobada y utilizada en el desempefio de cualquier servicio de
mantenimiento
o servioio de reparaci6n bajo garantfa de piezas relacionadas con la emisi6n serd provisto sin
costo alguno al duefio si la pieza se
encuentra bajo garantfa. LISTA SE
PIEZAS DE CONTROL DE EMISlON
GARANT1ZADAS:
Carburador, Sistema de Ignici6n: Bujfa (cubierta hasta la
fecha de mantenimiento
programada),
M6dulo de Ignici6n. DECLARAClON
DE MANTENIMIENTO:
El duefio es
responsable de adquirir todo el mantenimiento requerido como Io define en
el manual de instruooiones.
los requisitos
40
de emisi6n para los uso
Your Home
For repair - in your home - of all major brand appliances,
lawn and garden equipment, or heating and cooling systems,
no matter who made it, no matter who sold it!
For the replacement parts, accessories and
owner's manuals that you need to do-it-yourself.
For Sears professional installation of home appliances
and items like garage door openers and water heaters.
ili!i_i!i_iii!ii!!!
i!i!!iiii_iiiii_iii
1-800-4-MY-HOME
(1-800-469-4663)
www.sears.com
_)
Anytime, day or night
(U.S.A. and Canada)
www.sears.ca
Our Home
ii!iiii!iiii_iiiii!
iiii%!!!!i!!ii
iiiii_iiiiiiiiii;i!i
iiiii_ii_ii!_iii!
For repair of carry-in products like vacuums, lawn equipment,
and electronics, call or go on-line for the nearest
Sears Parts and Repair Center.
!iiiiiiiiiiii;iii_i
1-800-488-1222
Anytime, day or night (U.S.A. only)
www.sears.com
To purchase a protection agreement (U. S .A .)
or maintenance
agreement (Canada) on a product serviced
"_'
:,_
1-800-827-6655
(U.S.A.)
1-800-361-6665
.;:,_,,,.,,,_.'_'_"_"'_'_:.:_:_.,:"
,,,,,,,,:,,,,,,,
by Sears:
(Canada)
ii;iiiii!!iiiii
ii!!]iiii!iiii_i!i!i
iiiiii!i!ii!i!i!i;i
ii_:_iii!_iiiii_.(
ii_iil;i;iiii:i;i
]iiiiii!i!i!i_?
!iii;i!!!_!!ii_ii!
'"=''="='* Para _lir serqcio de reparacidn
_:_%_ a domicilio, ypara ordenar piezas:
ii'iiiiiiil
ii;iiii;iii;
1-_-$U
. HOGAR s_
iiii;iiii!iiiiiii_
;iiiiii[!?i
:!i?i8i:8;¢i
_ii !_!_!iiiii!i!
(1-888-784-6427)
Au Canada pour service en frar_s
1-800-LE-FOYER Mc
(1-_-_
www.sears.ca
i_iiii!_!iiiiiiiiiiiiil}i:ii_
© Sears,Roebuck
a_l Co.
® Registered Trademark / TMTrademark / SMService Mark of Seam, Roebuck and Co.
® Mama Registrada / TMMama de Fdbdca / SMMarca de Servicio de Seam, Roebuck and Co.
MCMarque de commerce / MOMarque deposee de Sears, Roebuck and Co.
_
!ii:iiiii:!:i!
!i::iiiiii!ii_.
_i _ili:i,:!:_
_i;iiii;?iiii
...................
_i_ij_;
_i_i_i_i