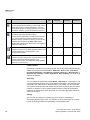
1
Documentation
OpenScape Office, myPortal
for HiPath OpenOffice ME and HiPath 3000 V8 and
higher
User Guide
A31003-P1000-U102-7-7619
Communication for the open minded
Siemens Enterprise Communications
www.siemens.com/open
Copyright © Siemens Enterprise
Communications GmbH & Co. KG 2009
Hofmannstr. 51, D-80200 München
Siemens Enterprise Communications GmbH & Co. KG
is a Trademark Licensee of Siemens AG
Reference No.: A31003-P1000-U102-7-7619
Communication for the open minded
Siemens Enterprise Communications
www.siemens.com/open
The information provided in this document contains
merely general descriptions or characteristics of
performance which in case of actual use do not
always apply as described or which may change as
a result of further development of the products. An
obligation to provide the respective characteristics
shall only exist if expressly agreed in the terms of
contract. Subject to availability. Right of modification reserved. The trademarks used are owned by
Siemens Enterprise Communications
GmbH & Co. KG or their respective owners.
Contents
0
1 Introduction . . . . . . . . . . . . . . . . . . . . . . . . . . . . . . . . . . . . . . . . . . . . . . . . . . . . . . . . . . . . . . . . . . . . . . . . . . .
1.1 myPortal . . . . . . . . . . . . . . . . . . . . . . . . . . . . . . . . . . . . . . . . . . . . . . . . . . . . . . . . . . . . . . . . . . . . . . . . . . . . .
1.2 Types of Topics . . . . . . . . . . . . . . . . . . . . . . . . . . . . . . . . . . . . . . . . . . . . . . . . . . . . . . . . . . . . . . . . . . . . . . .
1.3 Display Conventions . . . . . . . . . . . . . . . . . . . . . . . . . . . . . . . . . . . . . . . . . . . . . . . . . . . . . . . . . . . . . . . . . . .
1.4 User Interface Elements. . . . . . . . . . . . . . . . . . . . . . . . . . . . . . . . . . . . . . . . . . . . . . . . . . . . . . . . . . . . . . . . .
7
7
7
8
9
2 Installing and Starting myPortal . . . . . . . . . . . . . . . . . . . . . . . . . . . . . . . . . . . . . . . . . . . . . . . . . . . . . . . . .
2.1 Prerequisites for myPortal . . . . . . . . . . . . . . . . . . . . . . . . . . . . . . . . . . . . . . . . . . . . . . . . . . . . . . . . . . . . . .
2.2 How to Install myPortal . . . . . . . . . . . . . . . . . . . . . . . . . . . . . . . . . . . . . . . . . . . . . . . . . . . . . . . . . . . . . . . .
2.3 How to Start myPortal . . . . . . . . . . . . . . . . . . . . . . . . . . . . . . . . . . . . . . . . . . . . . . . . . . . . . . . . . . . . . . . . .
2.4 How to Uninstall myPortal . . . . . . . . . . . . . . . . . . . . . . . . . . . . . . . . . . . . . . . . . . . . . . . . . . . . . . . . . . . . . .
11
11
12
12
13
3 First Steps . . . . . . . . . . . . . . . . . . . . . . . . . . . . . . . . . . . . . . . . . . . . . . . . . . . . . . . . . . . . . . . . . . . . . . . . . . .
3.1 How to Change your Password . . . . . . . . . . . . . . . . . . . . . . . . . . . . . . . . . . . . . . . . . . . . . . . . . . . . . . . . . .
3.2 How to Select the Language of the User Interface . . . . . . . . . . . . . . . . . . . . . . . . . . . . . . . . . . . . . . . . . . .
3.3 How to Select the Language of the Voicemail Box . . . . . . . . . . . . . . . . . . . . . . . . . . . . . . . . . . . . . . . . . . .
3.4 How to Record your Name Announcement . . . . . . . . . . . . . . . . . . . . . . . . . . . . . . . . . . . . . . . . . . . . . . . . .
3.5 How to Record your Personal Greeting . . . . . . . . . . . . . . . . . . . . . . . . . . . . . . . . . . . . . . . . . . . . . . . . . . . .
3.6 How to Specify an E-Mail Address. . . . . . . . . . . . . . . . . . . . . . . . . . . . . . . . . . . . . . . . . . . . . . . . . . . . . . . .
3.7 How to Create a Favorites List. . . . . . . . . . . . . . . . . . . . . . . . . . . . . . . . . . . . . . . . . . . . . . . . . . . . . . . . . . .
3.8 How to Enable the Import of Outlook Contacts at Startup . . . . . . . . . . . . . . . . . . . . . . . . . . . . . . . . . . . . . .
14
15
16
16
16
17
18
18
19
4 Making Calls . . . . . . . . . . . . . . . . . . . . . . . . . . . . . . . . . . . . . . . . . . . . . . . . . . . . . . . . . . . . . . . . . . . . . . . . .
4.1 Call Number Formats . . . . . . . . . . . . . . . . . . . . . . . . . . . . . . . . . . . . . . . . . . . . . . . . . . . . . . . . . . . . . . . . . .
4.2 Call Functions . . . . . . . . . . . . . . . . . . . . . . . . . . . . . . . . . . . . . . . . . . . . . . . . . . . . . . . . . . . . . . . . . . . . . . .
4.2.1 How to Answer a Call . . . . . . . . . . . . . . . . . . . . . . . . . . . . . . . . . . . . . . . . . . . . . . . . . . . . . . . . . . . . . .
4.2.2 How to Pick up a Call for Another Subscriber. . . . . . . . . . . . . . . . . . . . . . . . . . . . . . . . . . . . . . . . . . . .
4.2.3 How to Dial a Number. . . . . . . . . . . . . . . . . . . . . . . . . . . . . . . . . . . . . . . . . . . . . . . . . . . . . . . . . . . . . .
4.2.4 How to Make a Call from the Directory . . . . . . . . . . . . . . . . . . . . . . . . . . . . . . . . . . . . . . . . . . . . . . . . .
4.2.5 How to Make a Call from the Favorites List . . . . . . . . . . . . . . . . . . . . . . . . . . . . . . . . . . . . . . . . . . . . .
4.2.6 How to Make a Call from the Journal . . . . . . . . . . . . . . . . . . . . . . . . . . . . . . . . . . . . . . . . . . . . . . . . . .
4.3 Directories . . . . . . . . . . . . . . . . . . . . . . . . . . . . . . . . . . . . . . . . . . . . . . . . . . . . . . . . . . . . . . . . . . . . . . . . . .
4.3.1 How to Search in Directories . . . . . . . . . . . . . . . . . . . . . . . . . . . . . . . . . . . . . . . . . . . . . . . . . . . . . . . .
4.3.2 How to Sort a Directory. . . . . . . . . . . . . . . . . . . . . . . . . . . . . . . . . . . . . . . . . . . . . . . . . . . . . . . . . . . . .
4.3.3 How to Zoom in on an Entry . . . . . . . . . . . . . . . . . . . . . . . . . . . . . . . . . . . . . . . . . . . . . . . . . . . . . . . . .
4.3.4 How to Add a Personal Contact . . . . . . . . . . . . . . . . . . . . . . . . . . . . . . . . . . . . . . . . . . . . . . . . . . . . . .
4.3.5 How to Edit a Personal Contact . . . . . . . . . . . . . . . . . . . . . . . . . . . . . . . . . . . . . . . . . . . . . . . . . . . . . .
4.3.6 How to Delete a Personal Contact . . . . . . . . . . . . . . . . . . . . . . . . . . . . . . . . . . . . . . . . . . . . . . . . . . . .
4.3.7 How to Enable or Disable the Import of Outlook Contacts at Startup . . . . . . . . . . . . . . . . . . . . . . . . . .
4.4 Favorites List . . . . . . . . . . . . . . . . . . . . . . . . . . . . . . . . . . . . . . . . . . . . . . . . . . . . . . . . . . . . . . . . . . . . . . . .
4.4.1 How to Add a Group to the Favorites List . . . . . . . . . . . . . . . . . . . . . . . . . . . . . . . . . . . . . . . . . . . . . . .
4.4.2 How to Rename a Group in the Favorites List . . . . . . . . . . . . . . . . . . . . . . . . . . . . . . . . . . . . . . . . . . .
4.4.3 How to Delete a Group from the Favorites List. . . . . . . . . . . . . . . . . . . . . . . . . . . . . . . . . . . . . . . . . . .
4.4.4 How to add a Contact to the Favorites List . . . . . . . . . . . . . . . . . . . . . . . . . . . . . . . . . . . . . . . . . . . . . .
4.4.5 How to Delete a Contact from the Favorites List . . . . . . . . . . . . . . . . . . . . . . . . . . . . . . . . . . . . . . . . .
4.4.6 How to Specify a Default Number for a Favorite . . . . . . . . . . . . . . . . . . . . . . . . . . . . . . . . . . . . . . . . .
4.4.7 How to Change the Width of the Favorites List . . . . . . . . . . . . . . . . . . . . . . . . . . . . . . . . . . . . . . . . . .
4.5 Journal . . . . . . . . . . . . . . . . . . . . . . . . . . . . . . . . . . . . . . . . . . . . . . . . . . . . . . . . . . . . . . . . . . . . . . . . . . . . .
4.5.1 How to Group Journal Entries. . . . . . . . . . . . . . . . . . . . . . . . . . . . . . . . . . . . . . . . . . . . . . . . . . . . . . . .
20
20
21
21
21
22
22
22
23
23
25
26
26
27
27
27
28
28
29
30
30
30
31
31
31
32
33
A31003-P1000-U102-7-7619, 02/2009
OpenScape Office, myPortal, User Guide
3
Contents
4.5.2 How to Sort the Journal . . . . . . . . . . . . . . . . . . . . . . . . . . . . . . . . . . . . . . . . . . . . . . . . . . . . . . . . . . . . . 34
5 Screen Pops . . . . . . . . . . . . . . . . . . . . . . . . . . . . . . . . . . . . . . . . . . . . . . . . . . . . . . . . . . . . . . . . . . . . . . . . . . 35
5.1 How to Enable or Disable Screen Pops on Inbound Calls . . . . . . . . . . . . . . . . . . . . . . . . . . . . . . . . . . . . . . 36
5.2 How to Enable or Disable the Opening of Personal Contacts on Inbound Calls . . . . . . . . . . . . . . . . . . . . . 37
5.3 How to Enable or Disable Screen Pops on Outbound Calls . . . . . . . . . . . . . . . . . . . . . . . . . . . . . . . . . . . . . 37
5.4 How to Enable Screen Pops for New Voicemails and Fax Messages . . . . . . . . . . . . . . . . . . . . . . . . . . . . . 37
6 Functions During a Call . . . . . . . . . . . . . . . . . . . . . . . . . . . . . . . . . . . . . . . . . . . . . . . . . . . . . . . . . . . . . . . . 39
6.1 How to Configure the Transfer Method. . . . . . . . . . . . . . . . . . . . . . . . . . . . . . . . . . . . . . . . . . . . . . . . . . . . . 39
6.2 How to Transfer a Call . . . . . . . . . . . . . . . . . . . . . . . . . . . . . . . . . . . . . . . . . . . . . . . . . . . . . . . . . . . . . . . . . 40
6.3 How to End a Call . . . . . . . . . . . . . . . . . . . . . . . . . . . . . . . . . . . . . . . . . . . . . . . . . . . . . . . . . . . . . . . . . . . . . 40
6.4 How to Record a Call or a Conference . . . . . . . . . . . . . . . . . . . . . . . . . . . . . . . . . . . . . . . . . . . . . . . . . . . . . 40
6.5 How to End a Call . . . . . . . . . . . . . . . . . . . . . . . . . . . . . . . . . . . . . . . . . . . . . . . . . . . . . . . . . . . . . . . . . . . . . 41
7 Controlling Availability . . . . . . . . . . . . . . . . . . . . . . . . . . . . . . . . . . . . . . . . . . . . . . . . . . . . . . . . . . . . . . . . . 42
7.1 How to Forward a Call to your Voicemail Box . . . . . . . . . . . . . . . . . . . . . . . . . . . . . . . . . . . . . . . . . . . . . . . 42
7.2 Presence status . . . . . . . . . . . . . . . . . . . . . . . . . . . . . . . . . . . . . . . . . . . . . . . . . . . . . . . . . . . . . . . . . . . . . . 43
7.2.1 How to Change the Presence Status Office or CallMe to Absent . . . . . . . . . . . . . . . . . . . . . . . . . . . . . 46
7.2.2 How to Change the Presence Status to Office . . . . . . . . . . . . . . . . . . . . . . . . . . . . . . . . . . . . . . . . . . . 47
7.2.3 How to Enable or Disable Automatic Resetting of the Presence Status . . . . . . . . . . . . . . . . . . . . . . . . 47
7.2.4 How to Change the Visibility of your Presence Status for Others . . . . . . . . . . . . . . . . . . . . . . . . . . . . . 47
7.2.5 How to Enable or Disable Automatic Updating of the Presence Status via Outlook Appointments . . . 48
7.2.6 How to Enable or Disable the Automatic Creation of Outlook Appointments when Absent . . . . . . . . . 49
7.2.7 How to Enable or Disable Screen Pops on Changing the Presence Status . . . . . . . . . . . . . . . . . . . . . 49
7.2.8 How to Enable or Disable Screen Pops on Changing the Presence Status to Office . . . . . . . . . . . . . . 50
7.3 CallMe service . . . . . . . . . . . . . . . . . . . . . . . . . . . . . . . . . . . . . . . . . . . . . . . . . . . . . . . . . . . . . . . . . . . . . . . 50
7.3.1 How to Enable the CallMe Service . . . . . . . . . . . . . . . . . . . . . . . . . . . . . . . . . . . . . . . . . . . . . . . . . . . . 51
7.4 Status-based Call Forwarding . . . . . . . . . . . . . . . . . . . . . . . . . . . . . . . . . . . . . . . . . . . . . . . . . . . . . . . . . . . 51
7.4.1 How to Configure Status-based Call Forwarding . . . . . . . . . . . . . . . . . . . . . . . . . . . . . . . . . . . . . . . . . 52
7.5 Rule-Based Call Forwarding . . . . . . . . . . . . . . . . . . . . . . . . . . . . . . . . . . . . . . . . . . . . . . . . . . . . . . . . . . . . . 52
7.5.1 How to Add a Call Forwarding Rule . . . . . . . . . . . . . . . . . . . . . . . . . . . . . . . . . . . . . . . . . . . . . . . . . . . 53
7.5.2 How to Edit a Call Forwarding Rule. . . . . . . . . . . . . . . . . . . . . . . . . . . . . . . . . . . . . . . . . . . . . . . . . . . . 54
7.5.3 How to Copy a Call Forwarding Rule . . . . . . . . . . . . . . . . . . . . . . . . . . . . . . . . . . . . . . . . . . . . . . . . . . 56
7.5.4 How to Rename a Call Forwarding Rule . . . . . . . . . . . . . . . . . . . . . . . . . . . . . . . . . . . . . . . . . . . . . . . . 56
7.5.5 How to Remove a Call Forwarding Rule . . . . . . . . . . . . . . . . . . . . . . . . . . . . . . . . . . . . . . . . . . . . . . . . 56
7.5.6 How to Change the Order of Call Forwarding Rules . . . . . . . . . . . . . . . . . . . . . . . . . . . . . . . . . . . . . . . 57
7.6 Personal AutoAttendant . . . . . . . . . . . . . . . . . . . . . . . . . . . . . . . . . . . . . . . . . . . . . . . . . . . . . . . . . . . . . . . . 57
7.6.1 How to Edit a Profile for the AutoAttendant . . . . . . . . . . . . . . . . . . . . . . . . . . . . . . . . . . . . . . . . . . . . . . 60
8 Conferencing (only HiPath OpenOffice ME) . . . . . . . . . . . . . . . . . . . . . . . . . . . . . . . . . . . . . . . . . . . . . . . . 61
8.1 Ad-hoc conference . . . . . . . . . . . . . . . . . . . . . . . . . . . . . . . . . . . . . . . . . . . . . . . . . . . . . . . . . . . . . . . . . . . . 64
8.1.1 How to Configure and Initiate an Ad-hoc Conference . . . . . . . . . . . . . . . . . . . . . . . . . . . . . . . . . . . . . . 64
8.1.2 How to View an Ad-hoc Conference as a Conference Controller . . . . . . . . . . . . . . . . . . . . . . . . . . . . . 65
8.1.3 How to Add Conference Participants. . . . . . . . . . . . . . . . . . . . . . . . . . . . . . . . . . . . . . . . . . . . . . . . . . . 65
8.1.4 How to Disconnect a Conference Participant . . . . . . . . . . . . . . . . . . . . . . . . . . . . . . . . . . . . . . . . . . . . 66
8.1.5 How to Reconnect Conference Participants . . . . . . . . . . . . . . . . . . . . . . . . . . . . . . . . . . . . . . . . . . . . . 67
8.1.6 How to Remove Conference Participants . . . . . . . . . . . . . . . . . . . . . . . . . . . . . . . . . . . . . . . . . . . . . . . 67
8.1.7 How to Specify Another Conference Controller. . . . . . . . . . . . . . . . . . . . . . . . . . . . . . . . . . . . . . . . . . . 67
8.1.8 How to End an Ad-hoc or Scheduled Conference. . . . . . . . . . . . . . . . . . . . . . . . . . . . . . . . . . . . . . . . . 68
8.1.9 How to Repeat an Ad-hoc Conference . . . . . . . . . . . . . . . . . . . . . . . . . . . . . . . . . . . . . . . . . . . . . . . . . 68
8.2 Scheduled Conference . . . . . . . . . . . . . . . . . . . . . . . . . . . . . . . . . . . . . . . . . . . . . . . . . . . . . . . . . . . . . . . . . 69
8.2.1 How to Configure a Scheduled Conference . . . . . . . . . . . . . . . . . . . . . . . . . . . . . . . . . . . . . . . . . . . . . 71
8.2.2 How to Display a Scheduled Conference as the Conference Controller . . . . . . . . . . . . . . . . . . . . . . . . 72
4
A31003-P1000-U102-7-7619, 02/2009
OpenScape Office, myPortal, User Guide
Contents
8.2.3 How to Determine the Dial-in Number for a Scheduled or Permanent Conference . . . . . . . . . . . . . . .
8.2.4 How To Determine the PIN for a Scheduled or Permanent Conference . . . . . . . . . . . . . . . . . . . . . . .
8.2.5 How to Change the Password for a Scheduled or Permanent Conference . . . . . . . . . . . . . . . . . . . . .
8.2.6 How To Display a Scheduled or Permanent Conference as the Conference Controller . . . . . . . . . . .
8.2.7 How to Extend a Scheduled Conference . . . . . . . . . . . . . . . . . . . . . . . . . . . . . . . . . . . . . . . . . . . . . . .
8.2.8 How to Delete a Scheduled Conference. . . . . . . . . . . . . . . . . . . . . . . . . . . . . . . . . . . . . . . . . . . . . . . .
8.3 Permanent Conference . . . . . . . . . . . . . . . . . . . . . . . . . . . . . . . . . . . . . . . . . . . . . . . . . . . . . . . . . . . . . . . .
8.3.1 How to Configure a Permanent Conference . . . . . . . . . . . . . . . . . . . . . . . . . . . . . . . . . . . . . . . . . . . . .
8.3.2 How to Display a Permanent Conference as the Conference Controller . . . . . . . . . . . . . . . . . . . . . . .
8.3.3 How to Delete a Permanent Conference . . . . . . . . . . . . . . . . . . . . . . . . . . . . . . . . . . . . . . . . . . . . . . .
73
73
74
74
75
75
75
77
77
78
9 Instant Messaging. . . . . . . . . . . . . . . . . . . . . . . . . . . . . . . . . . . . . . . . . . . . . . . . . . . . . . . . . . . . . . . . . . . . . 79
9.1 How to Send an Instant Message . . . . . . . . . . . . . . . . . . . . . . . . . . . . . . . . . . . . . . . . . . . . . . . . . . . . . . . . 79
10 Voice Messages and Fax . . . . . . . . . . . . . . . . . . . . . . . . . . . . . . . . . . . . . . . . . . . . . . . . . . . . . . . . . . . . . . 80
10.1 Voicemail . . . . . . . . . . . . . . . . . . . . . . . . . . . . . . . . . . . . . . . . . . . . . . . . . . . . . . . . . . . . . . . . . . . . . . . . . . 80
10.1.1 How to Determine the Call Number for your Voicemail Box . . . . . . . . . . . . . . . . . . . . . . . . . . . . . . . . 83
10.1.2 How to Select Recording or Announcement Mode . . . . . . . . . . . . . . . . . . . . . . . . . . . . . . . . . . . . . . . 84
10.1.3 How to Record an Announcement . . . . . . . . . . . . . . . . . . . . . . . . . . . . . . . . . . . . . . . . . . . . . . . . . . . 84
10.1.4 How to Import an Announcement . . . . . . . . . . . . . . . . . . . . . . . . . . . . . . . . . . . . . . . . . . . . . . . . . . . . 85
10.1.5 How to Enable or Disable the Announcement of your Presence Status for External Callers . . . . . . . 85
10.1.6 How to Enable or Disable the Announcement of your Presence Status for Specific Callers . . . . . . . 86
10.1.7 How to Grant or Deny the Attendant Permission to Retrieve Voicemail and Fax Messages . . . . . . . 87
10.1.8 How to Activate or Deactivate the Password Prompt for the Voicemail Box . . . . . . . . . . . . . . . . . . . 87
10.1.9 How to Select the Language of the Voicemail Box . . . . . . . . . . . . . . . . . . . . . . . . . . . . . . . . . . . . . . . 88
10.2 Managing Voicemail. . . . . . . . . . . . . . . . . . . . . . . . . . . . . . . . . . . . . . . . . . . . . . . . . . . . . . . . . . . . . . . . . . 88
10.2.1 How to Listen to a Voice Message on the Phone . . . . . . . . . . . . . . . . . . . . . . . . . . . . . . . . . . . . . . . . 90
10.2.2 How to Listen to a Voice Message on the PC . . . . . . . . . . . . . . . . . . . . . . . . . . . . . . . . . . . . . . . . . . 90
10.2.3 How to Call the Sender of a Voice Message . . . . . . . . . . . . . . . . . . . . . . . . . . . . . . . . . . . . . . . . . . . 91
10.2.4 How to Forward a Voicemail Message . . . . . . . . . . . . . . . . . . . . . . . . . . . . . . . . . . . . . . . . . . . . . . . . 91
10.2.5 How to Move a Voice Message . . . . . . . . . . . . . . . . . . . . . . . . . . . . . . . . . . . . . . . . . . . . . . . . . . . . . 91
10.2.6 How to Save a Voice Message as a WAV File . . . . . . . . . . . . . . . . . . . . . . . . . . . . . . . . . . . . . . . . . . 92
10.2.7 How to Sort Voice Messages . . . . . . . . . . . . . . . . . . . . . . . . . . . . . . . . . . . . . . . . . . . . . . . . . . . . . . . 92
10.2.8 How to Delete a Voice Message. . . . . . . . . . . . . . . . . . . . . . . . . . . . . . . . . . . . . . . . . . . . . . . . . . . . . 92
10.3 Fax Box . . . . . . . . . . . . . . . . . . . . . . . . . . . . . . . . . . . . . . . . . . . . . . . . . . . . . . . . . . . . . . . . . . . . . . . . . . . 93
10.3.1 How to Determine your own Fax Number. . . . . . . . . . . . . . . . . . . . . . . . . . . . . . . . . . . . . . . . . . . . . . 93
10.4 Managing Fax Messages . . . . . . . . . . . . . . . . . . . . . . . . . . . . . . . . . . . . . . . . . . . . . . . . . . . . . . . . . . . . . . 94
10.4.1 How to Display a Fax Message . . . . . . . . . . . . . . . . . . . . . . . . . . . . . . . . . . . . . . . . . . . . . . . . . . . . . 95
10.4.2 How to Call the Sender of a Fax Message . . . . . . . . . . . . . . . . . . . . . . . . . . . . . . . . . . . . . . . . . . . . . 95
10.4.3 How to Forward a Fax Message . . . . . . . . . . . . . . . . . . . . . . . . . . . . . . . . . . . . . . . . . . . . . . . . . . . . . 96
10.4.4 How to Move a Fax Message . . . . . . . . . . . . . . . . . . . . . . . . . . . . . . . . . . . . . . . . . . . . . . . . . . . . . . . 96
10.4.5 How to Save a Fax Message as a TIFF File. . . . . . . . . . . . . . . . . . . . . . . . . . . . . . . . . . . . . . . . . . . . 96
10.4.6 How to Sort Fax Messages. . . . . . . . . . . . . . . . . . . . . . . . . . . . . . . . . . . . . . . . . . . . . . . . . . . . . . . . . 97
10.4.7 How to Display Fax Messages in the Send Queue . . . . . . . . . . . . . . . . . . . . . . . . . . . . . . . . . . . . . . 97
10.4.8 How to Display Sent Fax Messages . . . . . . . . . . . . . . . . . . . . . . . . . . . . . . . . . . . . . . . . . . . . . . . . . . 97
10.4.9 How to Delete a Fax Message . . . . . . . . . . . . . . . . . . . . . . . . . . . . . . . . . . . . . . . . . . . . . . . . . . . . . . 98
10.5 Sending Fax Messages . . . . . . . . . . . . . . . . . . . . . . . . . . . . . . . . . . . . . . . . . . . . . . . . . . . . . . . . . . . . . . . 98
10.6 Notification Service for Messages . . . . . . . . . . . . . . . . . . . . . . . . . . . . . . . . . . . . . . . . . . . . . . . . . . . . . . . 99
10.6.1 How to Enable or Disable E-mail Notifications . . . . . . . . . . . . . . . . . . . . . . . . . . . . . . . . . . . . . . . . . . 99
10.6.2 How to Enable or Disable the Notification by Phone . . . . . . . . . . . . . . . . . . . . . . . . . . . . . . . . . . . . 100
10.6.3 How to Enable or Disable SMS Notification . . . . . . . . . . . . . . . . . . . . . . . . . . . . . . . . . . . . . . . . . . . 101
10.7 Phone Menu of the Voicemail Box . . . . . . . . . . . . . . . . . . . . . . . . . . . . . . . . . . . . . . . . . . . . . . . . . . . . . . 101
A31003-P1000-U102-7-7619, 02/2009
OpenScape Office, myPortal, User Guide
5
Contents
11 Configuration . . . . . . . . . . . . . . . . . . . . . . . . . . . . . . . . . . . . . . . . . . . . . . . . . . . . . . . . . . . . . . . . . . . . . . . 103
11.1 How to Edit your own Name . . . . . . . . . . . . . . . . . . . . . . . . . . . . . . . . . . . . . . . . . . . . . . . . . . . . . . . . . . . 104
11.2 How to Specify an E-Mail Address . . . . . . . . . . . . . . . . . . . . . . . . . . . . . . . . . . . . . . . . . . . . . . . . . . . . . . 104
11.3 How to Define an Additional Phone Number . . . . . . . . . . . . . . . . . . . . . . . . . . . . . . . . . . . . . . . . . . . . . . 104
11.4 How to Provide your own Picture . . . . . . . . . . . . . . . . . . . . . . . . . . . . . . . . . . . . . . . . . . . . . . . . . . . . . . . 105
11.5 How to Delete your own Picture . . . . . . . . . . . . . . . . . . . . . . . . . . . . . . . . . . . . . . . . . . . . . . . . . . . . . . . . 105
11.6 Programming the Function Keys of the Telephone . . . . . . . . . . . . . . . . . . . . . . . . . . . . . . . . . . . . . . . . . 105
11.6.1 How to Program the Function Keys of the Telephone. . . . . . . . . . . . . . . . . . . . . . . . . . . . . . . . . . . . 106
11.7 How to Change the Password . . . . . . . . . . . . . . . . . . . . . . . . . . . . . . . . . . . . . . . . . . . . . . . . . . . . . . . . . 107
11.8 How to Enable or Disable an Automatic Logon . . . . . . . . . . . . . . . . . . . . . . . . . . . . . . . . . . . . . . . . . . . . 108
11.9 How to Select the Language of the User Interface . . . . . . . . . . . . . . . . . . . . . . . . . . . . . . . . . . . . . . . . . . 108
11.10 How to Change Skin Colors . . . . . . . . . . . . . . . . . . . . . . . . . . . . . . . . . . . . . . . . . . . . . . . . . . . . . . . . . . 108
11.11 How to Change the Server Address . . . . . . . . . . . . . . . . . . . . . . . . . . . . . . . . . . . . . . . . . . . . . . . . . . . . 109
11.12 Automatic Updates . . . . . . . . . . . . . . . . . . . . . . . . . . . . . . . . . . . . . . . . . . . . . . . . . . . . . . . . . . . . . . . . . 109
11.12.1 How to Perform Automatic Updates . . . . . . . . . . . . . . . . . . . . . . . . . . . . . . . . . . . . . . . . . . . . . . . . 110
11.13 Troubleshooting . . . . . . . . . . . . . . . . . . . . . . . . . . . . . . . . . . . . . . . . . . . . . . . . . . . . . . . . . . . . . . . . . . . 110
11.13.1 Problem Resolution: No Connection to the Communication System . . . . . . . . . . . . . . . . . . . . . . . 110
11.13.2 Problem Resolution: The Nokia Application Suite Starts Instead of myPortal. . . . . . . . . . . . . . . . . 111
11.13.3 Problem Resolution: Empty Browser Window for Key Programming . . . . . . . . . . . . . . . . . . . . . . . 111
11.13.4 Problem Resolution: No Automatic Update . . . . . . . . . . . . . . . . . . . . . . . . . . . . . . . . . . . . . . . . . . . 111
Index . . . . . . . . . . . . . . . . . . . . . . . . . . . . . . . . . . . . . . . . . . . . . . . . . . . . . . . . . . . . . . . . . . . . . . . . . . . . . . . . . 112
6
A31003-P1000-U102-7-7619, 02/2009
OpenScape Office, myPortal, User Guide
Introduction
myPortal
1 Introduction
This document is intended for the users of myPortal and describes its installation,
configuration and operation.
Related Topics
•
•
•
•
myPortal
Types of Topics
Display Conventions
User Interface Elements
1.1 myPortal
myPortal is an application for unified communications. Besides convenient dialing
aids via phone directories and favorites and information on the presence status
of other subscribers, myPortal can, for example, also be used to access
voicemails and Fax messages.
myPortal provides the following features:
•
Directories
•
Favorites List
•
Journal
•
Screen Pops (also called pop-up windows)
•
Presence status
•
CallMe service
•
Status-based call forwarding
•
Personal AutoAttendant
•
Conferencing (only HiPath OpenOffice ME)
•
Record calls
•
Record conferences (only HiPath OpenOffice ME)
•
Instant Messaging
•
Voice and Fax messages
Related Topics
•
Introduction
1.2 Types of Topics
The types of topics include concepts and operating instructions.
A31003-P1000-U102-7-7619, 02/2009
OpenScape Office, myPortal, User Guide
7
Introduction
Display Conventions
Type of topic
Contents
Caption
Concept
Explains the "What".
Usually without a verb, e.g.: Call
Functions.
Operating
instructions
Describe task-oriented application cases – i.e., the "How" – and
assumes familiarity with the associated concepts.
Starts with "How to" followed by a
verb, for example: How to Dial a
Call Number.
Related Topics
•
•
Introduction
Display Conventions
1.3 Display Conventions
This documentation uses a variety of methods to present different types of
information.
Purpose
Presentation
Example
User Interface
Elements
Bold
Click OK.
Menu sequence
>
File > Exit
Special emphasis
Bold
Do not delete Name.
Cross-reference text Italics
You will find more information in the topicNetwork.
Output
Monospace font, e.g., Courier Command not found.
Input
Monospace font, e.g., Courier Enter LOCAL as the file name.
Key combination
Monospace font, e.g., Courier <Ctrl>+<Alt>+<Esc>
Work Steps and
Substeps
Numbered and alphabetical
lists
1. Configure the DSL telephony stations with the associated
DID phone numbers.
a) Click Add.
Alternative Work
Steps
•
Enumeration
•
b) Enter the name of the Internet telephony station under
Internet Telephony Station.
If you want to output amounts, enable the check box
Display amounts instead of units.
If you want to output units, clear the check box Display
amounts instead of units.
Related Topics
•
•
8
Introduction
Types of Topics
A31003-P1000-U102-7-7619, 02/2009
OpenScape Office, myPortal, User Guide
Introduction
User Interface Elements
1.4 User Interface Elements
The user interface of myPortal consists of the main window and various screen
pops, depending on the situation.
The Main Window consists of the following elements:
1
3
2
4
5
•
Menu bar (1) with:
–
Drop-down list for call numbers with the Dial button (Answer during an
incoming call or Hang Up during an ongoing call).
The drop-down list contains already dialed numbers and is an input field
for call numbers.
–
Conference menu
–
Setup menu
If the myPortal Setup window does not show all tabs, you can scroll
horizontally or vertically within it with the two triangular symbols.
–
Help menu
–
Drop-down list for Presence status
–
Name of the logged in user
•
Favorites list (2)
•
Tabs (3):
–
Journal
–
Voice messages
–
Fax Messages
–
Directories
A31003-P1000-U102-7-7619, 02/2009
OpenScape Office, myPortal, User Guide
9
Introduction
User Interface Elements
•
Workspace (4):
The information and actions available in the workspace depend on the
selected tab.
•
Status bar (5) with:
–
Status of myPortal, e.g., Connected
–
Date and Time
–
Version information on the communication system, myPortal and Java
Context menus
Context menus provide situation-based actions for selection. Context menus can
be opened by clicking on the relevant object with the second (usually the right)
mouse button.
Related Topics
•
•
•
•
•
•
•
•
•
•
•
•
•
10
Introduction
Favorites List
How to Change the Width of the Favorites List
How to Dial a Number
Screen Pops
Conferencing (only HiPath OpenOffice ME)
Presence status
Journal
Directories
Managing Voicemail
Managing Fax Messages
How to Select the Language of the User Interface
How to Change Skin Colors
A31003-P1000-U102-7-7619, 02/2009
OpenScape Office, myPortal, User Guide
Installing and Starting myPortal
Prerequisites for myPortal
2 Installing and Starting myPortal
The installation of myPortal is subject to specific hardware and software
requirements.
myPortal myPortal supports operation with multiple Windows user accounts on
shared PCs. The individual settings of all users are retained.
Related Topics
•
•
•
•
Prerequisites for myPortal
How to Install myPortal
How to Start myPortal
How to Uninstall myPortal
2.1 Prerequisites for myPortal
In order to use myPortal, the client PC of the subscriber must be equipped with
the appropriate hardware and software configurations. The available functionality
depends on the communication system being used and, for HiPath OpenOffice
ME, also on the licenses being used.
myPortal can only be used in combination with the following system telephones
(HFA): OpenStage, optiPoint 410 and optiPoint 420.
Minimum Requirements for client PCs:
•
•
•
Supported operating systems:
–
Windows XP (SP2) (32 bit)
–
Windows 2003 (32 bit)
–
Windows Vista (32 bit)
Supported Web browser: (for programming the function keys of the
telephone):
–
Microsoft Internet Explorer Version 6 (Windows XP and Windows 2003)
–
Microsoft Internet Explorer Version 7 (Windows XP, Windows 2003 and
Vista)
–
Mozilla Firefox Version 3 (Windows XP, Windows 2003, Windows Vista
and Linux)
Additional Software
–
•
Java 1.6
Hardware
–
2 GHz CPU
–
512 MB RAM
–
100 Mbps LAN
–
SVGA (800x600) screen resolution
A31003-P1000-U102-7-7619, 02/2009
OpenScape Office, myPortal, User Guide
11
Installing and Starting myPortal
How to Install myPortal
Conferencing is only available with HiPath OpenOffice ME and only with the
Comfort Plus User license.
The Fax functionality (incoming and outgoing) is likewise only available with
HiPath OpenOffice ME and only with the Comfort Plus User license. Fax
messages can only be displayed under Windows operating systems.
Related Topics
•
•
Installing and Starting myPortal
How to Install myPortal
2.2 How to Install myPortal
Prerequisites:
Step by Step:
•
Your PC meets the requirements described under Prerequisites for myPortal.
•
Your Windows user account has local administration rights.
•
Your administrator of the communication system has made the installation file
available to you.
1. Perform the installation.
2. If the User Account Control window appears with the message An
unidentified program wants access to your computer., click
on Allow.
3. Follow the installation instructions.
Next steps:
Start myPortal.
Related Topics
•
•
•
•
Installing and Starting myPortal
Prerequisites for myPortal
How to Start myPortal
How to Uninstall myPortal
2.3 How to Start myPortal
Prerequisites:
Step by Step:
•
myPortal is installed on your PC.
1. Click Start > Program Files > Communication Clients > myPortal.
2. Enter your User Name in the Login window. This is usually your call number.
If you have any questions about this, please contact the administrator of the
communication system.
3. Enter your password. The password when logging on for the first time is
1234.
12
A31003-P1000-U102-7-7619, 02/2009
OpenScape Office, myPortal, User Guide
Installing and Starting myPortal
How to Uninstall myPortal
4. If you want to use myPortal with an automatic logon in the future, enable the
check box Save Password. The Login window will then no longer be
displayed. You can change this option at any time.
NOTICE: Use the automatic login only if you are sure that no one
else has access to your Windows user account. Otherwise,
unauthorized users could, for example, potentially access your
voicemails and fax messages or redirect your station number to
external toll-based destinations by simply using the default
password.
5. Click Login.
Next steps:
Change your password after starting myPortal for the first time.
Related Topics
•
•
•
•
•
•
Installing and Starting myPortal
How to Install myPortal
How to Change the Password
How to Enable or Disable an Automatic Logon
Problem Resolution: No Connection to the Communication System
Problem Resolution: The Nokia Application Suite Starts Instead of
myPortal
2.4 How to Uninstall myPortal
Step by Step:
1. Close myPortal.
2. Click on Programs and Features in the Control Panel.
3. Click on Uninstall in the context menu of myPortal.
4. Click Continue.
5. In the myPortal Uninstall window, click on Yes.
6. If a message about deleting shared user files appears, click on No to all.
Related Topics
•
•
A31003-P1000-U102-7-7619, 02/2009
OpenScape Office, myPortal, User Guide
Installing and Starting myPortal
How to Install myPortal
13
First Steps
3 First Steps
The First Steps describes the recommended actions to be taken right at the
beginning.
Change the password
NOTICE: For security reasons, you should change your
password after logging in for the first time. Otherwise,
unauthorized users could, for example, potentially access your
voicemails and fax messages or redirect your station number to
external toll-based destinations by simply using the default
password.
Select the language settings
Select the user interface language for myPortal and, separately, also the
language to be used by the voicemail box to play back the menu and internal
system announcements.
Record your name announcement
Your name announcement is used as an independent component of the
announcements played back by the communication system:
•
when your voicemail box notifies callers about your Presence status
•
for conferences where you are the inviter, as a greeting to the participants:
"... has invited you to participate in a conference"
•
for conferences, to inform participants that you have joined:
"... has joined the conference."
Record your personal greeting
Your personal greeting is played back to callers by default when they reach your
voicemail box. For example: "I am unfortunately unable to take your call at the
moment …". The following announcements are possible as personal greetings:
•
general personal greeting
•
Personal greeting for Busy:
•
Personal greeting for No Answer:
INFO: You can record further announcements; see Voicemail.
Specify your e-mail address
Enter your e-mail address so that the communication system can invite you to
conferences by e-mail and notify you about new voice and Fax messages.
14
A31003-P1000-U102-7-7619, 02/2009
OpenScape Office, myPortal, User Guide
First Steps
How to Change your Password
Create your Favorites list
Your Favorites list will provide you with a constant view of your most important
contacts and enable you to call them with one click.
Importing Outlook Contacts in myPortal
You can have your Outlook contacts imported into the personal directory of
myPortal automatically on starting myPortal. You can then call them conveniently
by using myPortal, for example.
Related Topics
•
•
•
•
•
•
•
•
•
How to Change your Password
How to Select the Language of the User Interface
How to Select the Language of the Voicemail Box
How to Record your Name Announcement
How to Record your Personal Greeting
How to Specify an E-Mail Address
How to Create a Favorites List
How to Enable the Import of Outlook Contacts at Startup
Voicemail
3.1 How to Change your Password
NOTICE: For security reasons, you should change your
password after logging in for the first time. Otherwise,
unauthorized users could, for example, potentially access your
voicemails and fax messages or redirect your station number to
external toll-based destinations by simply using the default
password.
INFO: You can also change the password via the Phone menu of
the voicemail box.
Step by Step:
1. Click Setup.
2. Click on the Personal Details tab.
3. Click in the My Personal Details are under Password on Reset.
4. Enter your current password in the Current field.
A31003-P1000-U102-7-7619, 02/2009
OpenScape Office, myPortal, User Guide
15
First Steps
How to Select the Language of the User Interface
5. Enter your new password in the New and Confirm fields. The password must
not consist of only digits.
INFO: The password applies to myPortal, myPortal for Outlook
and myPortal for Outlook as well as phone access to your
voicemail.
6. Click on OK, followed by Save.
Related Topics
•
First Steps
3.2 How to Select the Language of the User Interface
Step by Step:
1. Click Setup.
2. Click on the Program Settings tab.
3. Choose the Language in the Miscellaneous area.
4. Click Save.
Next steps:
Exit myPortal and restart the application.
Related Topics
•
First Steps
3.3 How to Select the Language of the Voicemail Box
Step by Step:
1. Click Setup.
2. Click on the Program Settings tab.
3. Choose the desired language from the VoiceMail Language drop-down list
in the Miscellaneous area.
4. Click Close.
Related Topics
•
First Steps
3.4 How to Record your Name Announcement
INFO: You can also record your name announcement via the
Phone menu of the voicemail box.
16
A31003-P1000-U102-7-7619, 02/2009
OpenScape Office, myPortal, User Guide
First Steps
How to Record your Personal Greeting
Step by Step:
1. Click Setup.
2. Click on the Profiles tab.
3. Click Record.
4. Click on My VoiceMail Name in the list of announcements.
5. Click Record. The voicemail box will now call you on your phone.
6. Answer the call.
7. Speak out your name after the tone.
8. Click Stop.
9. If you want to listen to the announcement on the phone, click on Play. To exit
the playback loop, click on Stop.
10. If you want to record the announcement again, click on Record.
11. Click on Close, followed by Save.
Related Topics
•
•
•
First Steps
Voicemail
Phone Menu of the Voicemail Box
3.5 How to Record your Personal Greeting
INFO: You can also record your personal greeting via the Phone
menu of the voicemail box.
Step by Step:
1. Click Setup.
2. Click on the Profiles tab.
3. Click Record.
4. Select one of the following options:
•
If you want to record the general personal greeting, click on My VoiceMail
Greeting.
•
If you want to record the personal greeting for Busy, click on Busy.
•
If you want to record the personal greeting for No Answer, click on No
Answer.
5. Click Record. The voicemail box will now call you on your phone.
6. Answer the call.
7. Speak out your personal greeting after the tone.
8. Click Stop.
A31003-P1000-U102-7-7619, 02/2009
OpenScape Office, myPortal, User Guide
17
First Steps
How to Specify an E-Mail Address
9. If you want to listen to the announcement on the phone, click on Play. To exit
the playback loop, click on Stop.
10. If you want to record the announcement again, click on Record.
11. Click on Close, followed by Save.
Related Topics
•
•
•
First Steps
Voicemail
Phone Menu of the Voicemail Box
3.6 How to Specify an E-Mail Address
Prerequisites:
Step by Step:
•
Your administrator of the communication system has configured e-mail
forwarding.
1. Click Setup.
2. Click on the Personal Details tab.
3. Enter your E-mail Address in the My Contact Details area.
4. Click Save.
Related Topics
•
First Steps
3.7 How to Create a Favorites List
Step by Step:
1. Right-click in a free area of the Favorites list to open the context menu and
select New Group.
2. Enter a Group Name.
3. Click OK.
4. Click the Directories tab.
5. Click on one of the directories: Internal Directory, External Directory or
Personal Directory.
6. Drag the desired contact to the group name in the Favorites list.
Related Topics
•
•
18
First Steps
Favorites List
A31003-P1000-U102-7-7619, 02/2009
OpenScape Office, myPortal, User Guide
First Steps
How to Enable the Import of Outlook Contacts at Startup
3.8 How to Enable the Import of Outlook Contacts at Startup
Step by Step:
1. Click Setup.
2. Click on the Program Settings tab.
3. Enable the Import Outlook Contacts on Startup check box.
4. Click Save.
Related Topics
•
A31003-P1000-U102-7-7619, 02/2009
OpenScape Office, myPortal, User Guide
First Steps
19
Making Calls
Call Number Formats
4 Making Calls
You can use myPortal for simple call functions as well as all the convenient
functions offered via the directories, the Favorites list and the Journal.
Related Topics
•
•
•
•
•
Call Number Formats
Call Functions
Directories
Favorites List
Journal
4.1 Call Number Formats
Call numbers can be specified in different formats.
Format
Description
Example
Canonical Begins with + and always includes the country code, area code and
the full remaining station number. Blanks and the special characters
+ ( ) / - : ; are allowed.
+49 (89) 722-98765
Dialable
•
321 (internal)
•
72298765 (own local network)
•
08972298765 (external local
network)
•
00498972298765 (international)
Exactly as you would dial the call number on the phone, always
without the trunk access code.
Related Topics
•
•
•
•
•
•
•
•
•
•
•
20
Making Calls
How to Dial a Number
How to Enable the CallMe Service
How to Add a Call Forwarding Rule
How to Edit a Call Forwarding Rule
How to Edit a Profile for the AutoAttendant
How to Configure and Initiate an Ad-hoc Conference
How to Configure a Scheduled Conference
How to Configure a Permanent Conference
How to Enable or Disable the Notification by Phone
How to Define an Additional Phone Number
A31003-P1000-U102-7-7619, 02/2009
OpenScape Office, myPortal, User Guide
Making Calls
Call Functions
4.2 Call Functions
You can control call functions with myPortal, e.g., answer calls or pick up calls for
another subscriber. You can also dial phone numbers directly from the Journal,
the Favorites list or a directory. The call functions can be controlled both in screen
pops and in the menu bar.
Related Topics
•
•
•
•
•
•
•
•
Making Calls
How to Answer a Call
How to Pick up a Call for Another Subscriber
How to Dial a Number
How to Make a Call from the Directory
How to Make a Call from the Favorites List
How to Make a Call from the Journal
Screen Pops
4.2.1 How to Answer a Call
Step by Step:
1. Select one of the following options:
•
Click in the Inbound Call screen pop on Answer.
•
Click on Answer in the menu bar.
Related Topics
•
•
Call Functions
How to Enable or Disable Screen Pops on Inbound Calls
4.2.2 How to Pick up a Call for Another Subscriber
Step by Step:
1. Select one of the following options:
•
Click in the Favorites list on the subscriber being called and select Call
Pickup from the context menu.
•
Click under Directories > Internal Directory on the subscriber being
called and select Call Pickup from the context menu.
Related Topics
•
•
•
A31003-P1000-U102-7-7619, 02/2009
OpenScape Office, myPortal, User Guide
Call Functions
Directories
Favorites List
21
Making Calls
Call Functions
4.2.3 How to Dial a Number
Step by Step:
1. Select one of the following options:
•
Enter the phone number in dialable format or in canonical format in the
drop-down list for phone numbers in the menu bar and press the Enter
key.
•
Select a phone number from the drop-down list for phone numbers in the
menu bar and press the Enter key.
Related Topics
•
•
•
Call Functions
User Interface Elements
Call Number Formats
4.2.4 How to Make a Call from the Directory
Step by Step:
1. Click the Directories tab.
2. Click on one of the directories: Personal Directory, External Directory or
Internal Directory.
3. Select one of the following options:
•
Double-click in the relevant directory entry on the desired station number.
•
Click in the context menu of the relevant directory entry on the desired
station number.
Related Topics
•
•
Call Functions
Directories
4.2.5 How to Make a Call from the Favorites List
Step by Step:
1. If required, double-click on the triangle on the left of the relevant group to
expand the associated entries in the Favorites list.
2. Select one of the following options:
•
22
Double-click on the relevant station.
A31003-P1000-U102-7-7619, 02/2009
OpenScape Office, myPortal, User Guide
Making Calls
Directories
•
Click in the context menu of the relevant subscriber on the desired station
number.
Related Topics
•
•
•
Call Functions
Favorites List
How to Specify a Default Number for a Favorite
4.2.6 How to Make a Call from the Journal
Step by Step:
1. Click on the Journal tab.
2. Click on one of the folders: Open, All Calls, Missed, Answered, Internal,
External, Inbound or Outbound.
3. If required, double-click on the triangle on the left of the relevant group to
expand the associated Journal entries.
4. Select one of the following options:
•
Double-click on the relevant Journal entry.
•
Click in the context menu of the relevant Journal entry on the desired
station number.
Related Topics
•
•
Call Functions
Journal
4.3 Directories
Directories organize your contacts.
myPortal provides the following directories, which support the following functions:
A31003-P1000-U102-7-7619, 02/2009
OpenScape Office, myPortal, User Guide
23
Making Calls
Directories
Symbol
Directory
Personal directory:
Make
Call
Send Instant
Message
Add to
Favorites
Add to
Conference
x
-
x
x
x
x
x
x
x
-
x
x
x
-
x
x
You can use the personal directory to either add, edit and
delete your personal contacts individually or to import
your Outlook contacts on starting myPortal. If you import
the Outlook contacts, you cannot edit them in myPortal.
Internal directory (symbol for system phones in
accordance with current Presence status)
Contains internal subscribers with their Presence status
(only system telephones) and their additional phone
numbers. When a subscriber is absent, you can see the
scheduled time of return in the Date / Time column,
provided that subscriber has allowed his or her Presence
status to be visible to you.
External offline directory:
Contains contacts from an offline corporate directory and
must be configured by the administrator of the
communication system.
External directory:
Contains contacts from the LDAP corporate directory and
must be configured by the administrator of the
communication system. The entries are always updated
whenever you the directory.
Contact Details
Depending on the directory involved, the List view of the contacts shows different
details from among those listed below: Extension, Date / Time, Last Name,
First Name, Mobile Ph., Assistant Ph., External, Home Ph. 1, Business Ph. 1,
Business Ph. 2, Fax Ph., E-mail, Department, Site, Company. The width of all
columns is variable.
Searching
You can search the directories by First Name, Last Name or a call number. You
can select which directories are to be included in the search. The directories are
searched in the order shown in the table above. The search can be conducted
using whole words and also with partial search terms such as a part of a station
number, for example. The set search options remain in effect for subsequent
searches. Al search terms used are saved. You can optionally delete the list of
search terms used.
Sorting
You can sort the contacts of a directory by any column in ascending or
descending alphanumeric order. The direction in which the triangle at a column
header is pointing indicates the ascending or descending order.
24
A31003-P1000-U102-7-7619, 02/2009
OpenScape Office, myPortal, User Guide
Making Calls
Directories
Zooming in on an Entry
You can zoom in on a specific entry one character at a time in the column by
which the entries are sorted. For example, you could jump to the first Last Name
starting with "Sen" one letter at a time. This method can also be used in the results
of a search.
Related Topics
•
•
•
•
•
•
•
•
•
•
•
•
•
•
•
•
•
•
•
Making Calls
How to Search in Directories
How to Sort a Directory
How to Zoom in on an Entry
How to Add a Personal Contact
How to Edit a Personal Contact
How to Delete a Personal Contact
How to Enable or Disable the Import of Outlook Contacts at Startup
User Interface Elements
How to Pick up a Call for Another Subscriber
How to Make a Call from the Directory
How to Enable or Disable the Opening of Personal Contacts on Inbound
Calls
How to Send an Instant Message
How to add a Contact to the Favorites List
How to Add Conference Participants
Favorites List
Screen Pops
Presence status
Configuration
4.3.1 How to Search in Directories
Step by Step:
1. Click the Directories tab.
2. Click on Search to open the Search mask.
3. Select one of the following Search options:
•
If you want to search for a full word, enable the Match Full Word check
box.
•
If you want to search for a part of a word, clear the Match Full Word
check box.
4. Select which directories are to be included in the search by enabling or
clearing the Internal Directory, Personal Directory, External Directory and
External Offline Directory check boxes as required.
5. Enter a search term in the drop-down list and click Search. If your search
returns a result, myPortal will display a hit list.
A31003-P1000-U102-7-7619, 02/2009
OpenScape Office, myPortal, User Guide
25
Making Calls
Directories
6. To abort an ongoing search, click Stop.
7. To delete the list of search terms used, click Clear History.
8. To return from the hit list to the directory, click on the directory.
Related Topics
•
•
•
Directories
How to add a Contact to the Favorites List
How to Add Conference Participants
4.3.2 How to Sort a Directory
Step by Step:
1. Click on the Directories tab.
2. Click on the desired directory, e.g., Internal Directory.
3. Click on one of the column titles, e.g., Last Name, to sort the contacts by this
criterion in ascending alphanumeric order.
4. If you want to reverse the sort order, click again on column header.
5. To jump to the first entry in the sorted column that begins with a specific
character, click on any contact in the directory and enter the desired
character.
Related Topics
•
•
Directories
How to Zoom in on an Entry
4.3.3 How to Zoom in on an Entry
Prerequisites:
Step by Step:
•
The list is sorted by the column containing an item that you want to zoom in
on.
1. Click on any item in the list.
2. Enter the first character of the desired hit.
Related Topics
•
•
•
•
26
Directories
How to Sort a Directory
Journal
How to Sort the Journal
A31003-P1000-U102-7-7619, 02/2009
OpenScape Office, myPortal, User Guide
Making Calls
Directories
4.3.4 How to Add a Personal Contact
Prerequisites:
Step by Step:
•
The importing or Outlook contacts at startup is disabled.
1. Click the Directories tab.
2. Click on Personal Directory.
3. Click Add.
4. Enter the contact data in the Personal Contact window.
5. Click Save.
Related Topics
•
•
•
•
Directories
How to Edit a Personal Contact
How to Delete a Personal Contact
How to Enable or Disable the Import of Outlook Contacts at Startup
4.3.5 How to Edit a Personal Contact
Prerequisites:
Step by Step:
•
The importing or Outlook contacts at startup is disabled.
1. Click the Directories tab.
2. Click on Personal Directory.
3. Click on the relevant personal contact.
4. Click Edit.
5. Edit the contact data in the Personal Contact window.
6. Click Save.
Related Topics
•
•
•
•
Directories
How to Add a Personal Contact
How to Delete a Personal Contact
How to Enable or Disable the Import of Outlook Contacts at Startup
4.3.6 How to Delete a Personal Contact
Prerequisites:
Step by Step:
•
The importing or Outlook contacts at startup is disabled.
1. Click the Directories tab.
2. Click on Personal Directory.
3. Select one of the following options:
A31003-P1000-U102-7-7619, 02/2009
OpenScape Office, myPortal, User Guide
27
Making Calls
Favorites List
•
Click on the relevant personal contact.
•
Mark the relevant personal contacts.
4. Click on Remove, followed by Yes.
Related Topics
•
•
•
•
Directories
How to Add a Personal Contact
How to Edit a Personal Contact
How to Enable or Disable the Import of Outlook Contacts at Startup
4.3.7 How to Enable or Disable the Import of Outlook Contacts at Startup
Step by Step:
1. Click Setup.
2. Click on the Program Settings tab.
3. Choose one the following options in the Outlook area:
•
If you want to enable the importing of Outlook contacts on starting
myPortal, select the Import Outlook Contacts on Startup check box.
•
If you want to disable the importing of Outlook contacts on starting
myPortal, clear the Import Outlook Contacts on Startup check box.
4. Click Save.
Related Topics
•
•
•
•
Directories
How to Add a Personal Contact
How to Edit a Personal Contact
How to Delete a Personal Contact
4.4 Favorites List
The Favorites list provides you with a constant view of selected contacts. These
contacts can also be called very easily directly from the Favorites list. Internal
subscribers (with system telephones) are shown together with their Presence
status and can be contacted via instant messaging.
You can add contacts from all directories to the Favorites list. For favorites that
do not come from the internal directory, instead of the symbol for the Presence
status, the symbol for the source of the contact is displayed.
The Favorites list manages contacts in groups. The contacts of a group are, in
turn, sorted by Last Name.
28
A31003-P1000-U102-7-7619, 02/2009
OpenScape Office, myPortal, User Guide
Making Calls
Favorites List
When an internal subscriber is absent, you can determine the scheduled time of
his or her return by positioning the mouse pointer over the entry for that
subscriber, provided the subscriber has allowed his or her Presence status to be
visible to you.
For favorites with multiple phone numbers, you can specify a default number with
which the contact is to be called. The default phone number of a favorite can be
determined in the context menu from the symbol with the activated check box.
Related Topics
•
•
•
•
•
•
•
•
•
•
•
•
•
•
•
•
•
Making Calls
How to Add a Group to the Favorites List
How to Rename a Group in the Favorites List
How to Delete a Group from the Favorites List
How to add a Contact to the Favorites List
How to Delete a Contact from the Favorites List
How to Specify a Default Number for a Favorite
How to Change the Width of the Favorites List
User Interface Elements
How to Pick up a Call for Another Subscriber
How to Create a Favorites List
Directories
How to Make a Call from the Favorites List
How to Add Conference Participants
How to Send an Instant Message
Presence status
Configuration
4.4.1 How to Add a Group to the Favorites List
Step by Step:
1. Right-click in a free area of the Favorites list to open the context menu and
select New Group.
2. Enter a Group Name.
3. Click OK.
Next steps:
Add contacts to the Favorites list.
Related Topics
•
•
•
•
A31003-P1000-U102-7-7619, 02/2009
OpenScape Office, myPortal, User Guide
Favorites List
How to add a Contact to the Favorites List
How to Delete a Group from the Favorites List
How to Rename a Group in the Favorites List
29
Making Calls
Favorites List
4.4.2 How to Rename a Group in the Favorites List
Step by Step:
1. Click on Rename Group in the context menu for the relevant group name in
the Favorites list.
2. Enter a Group Name.
3. Click OK.
Related Topics
•
•
•
Favorites List
How to Add a Group to the Favorites List
How to Delete a Group from the Favorites List
4.4.3 How to Delete a Group from the Favorites List
Step by Step:
1. Click on Remove Group in the context menu for the relevant group name in
the Favorites list.
2. Click Yes.
Related Topics
•
•
•
Favorites List
How to Add a Group to the Favorites List
How to Rename a Group in the Favorites List
4.4.4 How to add a Contact to the Favorites List
Prerequisites:
Step by Step:
•
The Favorites list contains at least one group.
1. Click the Directories tab.
2. Select one of the following options:
30
•
Click on one of the directories: Internal Directory, External Directory or
Personal Directory.
•
Perform a search in the directories; see How to Search in Directories for
details.
A31003-P1000-U102-7-7619, 02/2009
OpenScape Office, myPortal, User Guide
Making Calls
Favorites List
3. Drag the desired contact to the group name in the Favorites list.
Related Topics
•
•
•
•
•
•
Favorites List
Directories
How to Search in Directories
How to Specify a Default Number for a Favorite
How to Add a Group to the Favorites List
How to Delete a Contact from the Favorites List
4.4.5 How to Delete a Contact from the Favorites List
Step by Step:
1. Click on Remove Favorite in the context menu for the relevant contact in the
Favorites list.
Related Topics
•
•
Favorites List
How to add a Contact to the Favorites List
4.4.6 How to Specify a Default Number for a Favorite
Step by Step:
1. Click on Select Phone Number in the context menu for the relevant contact
in the Favorites list.
2. Select the phone number that you want to use by default for this favorite from
the drop-down list.
3. Click OK.
Related Topics
•
•
•
Favorites List
How to add a Contact to the Favorites List
How to Make a Call from the Favorites List
4.4.7 How to Change the Width of the Favorites List
Step by Step:
1. Move the right edge of the Favorites list with the mouse in the desired
direction.
Related Topics
•
•
A31003-P1000-U102-7-7619, 02/2009
OpenScape Office, myPortal, User Guide
Favorites List
User Interface Elements
31
Making Calls
Journal
4.5 Journal
The Journal is the list of all your inbound and outbound calls. You can use it to
quickly and easily call back your contacts or call them again directly from within
the Journal.
Storage duration
The communication system saves a record of the calls in the Journal for a limited
period of time, which can be configured by the administrator. When this time
period expires, the entries are automatically deleted by the communication
system.
Folder for Call Types
The calls are arranged on the following tabs:
•
Open
Contains the unanswered missed calls for which a call number was
transmitted. As soon as you answer one of these calls, all associated entries
with that call number are dropped from the list.
•
All calls
•
Missed
•
Answered
•
Internal
•
External
•
Inbound
•
Outbound
Call Details
Every call is shown with the Date and Time and, if available, with the Call
number. If a directory contains further details on the call number such as the Last
Name, First Name and Company, then this information is also shown. In
addition, the Direction, Duration and the Call Complete column are displayed.
The width of all columns is variable.
Direction
Meaning
Inbound
Outbound
Call Complete
Meaning
The call was successful or was answered.
32
A31003-P1000-U102-7-7619, 02/2009
OpenScape Office, myPortal, User Guide
Making Calls
Journal
Grouping
The calls in all folders are grouped by the same criterion, as selected by you:
•
Date (for example, Today, Yesterday, etc., Last Week, Two Weeks Ago,
Three Weeks Ago, Last Month and Older)
•
Call number
•
Last Name, First Name
•
First Name, Last Name
•
Company
The number of Journal entries contained in the group is displayed on the right of
the group designation in parentheses.
Sorting
You can sort the calls in the Journal by any column in ascending or descending
alphanumeric order. The direction in which the triangle at a column header is
pointing indicates the ascending or descending order.
Zooming in on an Entry
You can zoom in on a specific entry one character at a time in the column by
which the entries are sorted. For example, you could jump to the first Last Name
starting with "Sen" one letter at a time. This method can also be used in the results
of a search.
Related Topics
•
•
•
•
•
•
Making Calls
How to Group Journal Entries
How to Sort the Journal
User Interface Elements
How to Make a Call from the Journal
How to Zoom in on an Entry
4.5.1 How to Group Journal Entries
Step by Step:
1. Click on the Journal tab.
2. Click on one of the groups: Open, All Calls, Missed, Answered, Internal,
External, Inbound or Outbound.
3. Select one of the following options in the context menu of any column header:
•
Group By:Date
•
Group By:Phone Number
•
Group By:Last Name, First Name
•
Group By:First Name, Last Name
•
Group By:Company
A31003-P1000-U102-7-7619, 02/2009
OpenScape Office, myPortal, User Guide
33
Making Calls
Journal
4. Double-click on the triangle on the left of the relevant group to expand the
associated Journal entries.
Related Topics
•
•
Journal
How to Sort the Journal
4.5.2 How to Sort the Journal
Step by Step:
1. Click on the Journal tab.
2. Click on one of the groups: Open, All Calls, Missed, Answered, Internal,
External, Inbound or Outbound.
3. If required, double-click on the triangle on the left of the relevant group to
expand the associated Journal entries.
4. Click on one of the column titles, e.g., Last Name, to sort the Journal entries
by this criterion in ascending alphanumeric order.
5. If you want to reverse the sort order, click again on column header.
Related Topics
•
•
•
34
Journal
How to Group Journal Entries
How to Zoom in on an Entry
A31003-P1000-U102-7-7619, 02/2009
OpenScape Office, myPortal, User Guide
Screen Pops
5 Screen Pops
Screen Pops (also called pop-up windows) offer you convenient ways to respond
to incoming calls or new voicemails with a single click, for example.
A screen pop appears in the lower right corner of the screen. You can enable or
disable screen pops by different methods. Some buttons in the screen pops
change, depending on the situation.
Screen Pops on Inbound Calls
Screen pops show the caller's phone number and name (if the name details are
available in a directory). The directories are searched in the following order:
Personal Directory, Internal Directory, External Offline Directory and External
Directory. The first hit, if found, is shown in the screen pop. The following
functions are available:
•
Answer and Hang Up
•
Forward to voicemail box
•
Transfer
•
Hold and Reconnect
•
Record and Stop Rec.
Opening Personal Contacts on Inbound Calls
You can select whether myPortal should open the appropriate personal contact
for an inbound call.
Screen Pops on Outbound Calls
Screen pops show the caller's phone number and name (if the name details are
available in a directory). The following functions are available:
•
Hang Up
•
Transfer
•
Hold and Reconnect
•
Record and Stop Rec.
Screen Pops on New Voicemails
Screen pops show the caller's phone number and name (if the name details are
available in a directory) as well as the date and time the call was received. This
can only be activated collectively for voicemails and fax messages. The following
functions are available:
•
Rewind
•
Play and Pause
•
Stop
•
Forward
A31003-P1000-U102-7-7619, 02/2009
OpenScape Office, myPortal, User Guide
35
Screen Pops
How to Enable or Disable Screen Pops on Inbound Calls
Screen Pops for New Fax Messages
Screen pops show the caller's phone number and name (if the name details are
available in a directory) as well as the date and time the call was received. This
can only be activated collectively for voicemails and fax messages. The View
function is available.
Related Topics
•
•
•
•
•
•
•
•
•
•
•
•
How to Enable or Disable Screen Pops on Inbound Calls
How to Enable or Disable the Opening of Personal Contacts on Inbound
Calls
How to Enable or Disable Screen Pops on Outbound Calls
How to Enable Screen Pops for New Voicemails and Fax Messages
User Interface Elements
Call Functions
Directories
Functions During a Call
How to Enable or Disable Screen Pops on Changing the Presence Status
How to Enable or Disable Screen Pops on Changing the Presence Status
to Office
Voicemail
Fax Box
5.1 How to Enable or Disable Screen Pops on Inbound Calls
Step by Step:
1. Click Setup.
2. Click on the Program Settings tab.
3. Choose one the following options in the Notifications area:
•
If you want to enable screen pops for inbound calls, select the check box
Display tray pop on inbound calls.
•
If you want to disable screen pops for inbound calls, clear the check box
Display tray pop on inbound calls.
4. Click Save.
Related Topics
•
•
•
•
•
•
•
36
Screen Pops
How to Answer a Call
How to Forward a Call to your Voicemail Box
How to Transfer a Call
How to End a Call
How to Record a Call or a Conference
How to End a Call
A31003-P1000-U102-7-7619, 02/2009
OpenScape Office, myPortal, User Guide
Screen Pops
How to Enable or Disable the Opening of Personal Contacts on Inbound Calls
5.2 How to Enable or Disable the Opening of Personal Contacts on Inbound
Calls
Step by Step:
1. Click Setup.
2. Click on the Program Settings tab.
3. Choose one the following options in the Notifications area:
•
If you want to enable the opening of personal contacts on inbound calls,
select the check box Display screen pop on inbound calls.
•
If you want to disable the opening of personal contacts on inbound calls,
clear the check box Display screen pop on inbound calls.
4. Click Save.
Related Topics
•
•
Screen Pops
Directories
5.3 How to Enable or Disable Screen Pops on Outbound Calls
Step by Step:
1. Click Setup.
2. Click on the Program Settings tab.
3. Choose one the following options in the Notifications area:
•
If you want to enable screen pops for inbound calls, select the check box
Display tray pop on inbound calls.
•
If you want to disable screen pops for inbound calls, clear the check box
Display tray pop on inbound calls.
4. Click Save.
Related Topics
•
•
•
•
•
Screen Pops
How to Transfer a Call
How to End a Call
How to Record a Call or a Conference
How to End a Call
5.4 How to Enable Screen Pops for New Voicemails and Fax Messages
Step by Step:
1. Click Setup.
2. Click on the Program Settings tab.
3. Choose one the following options in the Notifications area:
A31003-P1000-U102-7-7619, 02/2009
OpenScape Office, myPortal, User Guide
37
Screen Pops
How to Enable Screen Pops for New Voicemails and Fax Messages
•
If you want to enable screen pops for new voicemails and Fax messages,
select the check box Display tray pop on new voice mail.
•
If you want to disable screen pops for new voicemails and Fax messages,
clear the check box Display tray pop on new voice mail.
4. Click Save.
Related Topics
•
•
•
•
•
38
Screen Pops
Voicemail
Fax Box
Voicemail
Fax Box
A31003-P1000-U102-7-7619, 02/2009
OpenScape Office, myPortal, User Guide
Functions During a Call
How to Configure the Transfer Method
6 Functions During a Call
Many control functions are available from the Desktop during a call. For example,
you can record a call, place a call on hold and then resume (unhold) the call,
transfer it to another subscriber or end the call. Control functions during a call are
also available in screen pops and in the menu bar.
Transferring a Call
The following methods can be configured for transferring calls:
•
Blind transfer (also called an unscreened transfer):
You can transfer the call without an answer from the subscriber at the
destination of the transfer. In this case, you will receive a screen pop with the
prompt: Does the other party wish to accept this call?
•
Consultation transfer:
You can transfer the call only if the subscriber at the destination of the transfer
answers.
Placing a Call on Hold
The party placed on hold hears Music On Hold or an announcement until you
resume the call.
Recording a Call or a Conference
Calls can only be recorded by one of the parties involved, and conferences can
only be recorded by the conference controller. Active voice recording is signaled
by an advisory tone every few seconds. If the communication system is
configured for France, the parties receive an announcement at the start of the
recording to indicate that the call is being recorded. After the recording is
completed, this is indicated in the voicemail Inbox of the person recording the call.
Related Topics
•
•
•
•
•
•
How to Configure the Transfer Method
How to Transfer a Call
How to End a Call
How to Record a Call or a Conference
How to End a Call
Screen Pops
6.1 How to Configure the Transfer Method
Step by Step:
1. Click Setup.
2. Click on the Program Settings tab.
3. Select one of the following options from the Transfer Method drop-down list
in the Miscellaneous area:
A31003-P1000-U102-7-7619, 02/2009
OpenScape Office, myPortal, User Guide
39
Functions During a Call
How to Transfer a Call
•
If you want to use a blind (i.e., unscreened) transfer, select Blind
Transfer.
•
If you want to use a consultation (i.e., screened) transfer, select
Consultation Transfer.
4. Click Save.
Related Topics
•
•
Functions During a Call
How to Transfer a Call
6.2 How to Transfer a Call
Prerequisites:
Step by Step:
•
Screen pops for inbound and outbound calls have been activated.
1. Click on Transfer in the Inbound Call and Outbound Call to … screen pops.
2. Click on the desired subscriber in the subscriber list and then on Transfer.
3. If you receive a window with the prompt: Does the other party wish
to accept this call?, click Yes.
Related Topics
•
•
•
•
Functions During a Call
How to Enable or Disable Screen Pops on Inbound Calls
How to Enable or Disable Screen Pops on Outbound Calls
How to Configure the Transfer Method
6.3 How to End a Call
Prerequisites:
Step by Step:
•
Screen pops for inbound and outbound calls have been activated.
1. Click on Hold in the Inbound Call and Outbound Call to … screen pops.
2. When you want to resume (unhold) the call, click on Reconnect.
Related Topics
•
•
•
Functions During a Call
How to Enable or Disable Screen Pops on Inbound Calls
How to Enable or Disable Screen Pops on Outbound Calls
6.4 How to Record a Call or a Conference
Prerequisites:
40
•
Screen pops for inbound and outbound calls have been activated.
•
You are currently conducting a call or participating in a conference.
A31003-P1000-U102-7-7619, 02/2009
OpenScape Office, myPortal, User Guide
Functions During a Call
How to End a Call
Step by Step:
1. Click on Record in the Inbound Call and Outbound Call to … screen pops.
2. If you want to stop the recording before the call ends, click on Stop Rec..
Related Topics
•
•
•
•
•
Functions During a Call
How to Enable or Disable Screen Pops on Inbound Calls
How to Enable or Disable Screen Pops on Outbound Calls
Ad-hoc conference
Scheduled Conference
6.5 How to End a Call
Step by Step:
1. Select one of the following options:
•
Click on Hang Up in the Inbound Call and Outbound Call to … screen
pops.
•
Click on Hang Up in the menu bar.
Related Topics
•
•
•
A31003-P1000-U102-7-7619, 02/2009
OpenScape Office, myPortal, User Guide
Functions During a Call
How to Enable or Disable Screen Pops on Inbound Calls
How to Enable or Disable Screen Pops on Outbound Calls
41
Controlling Availability
How to Forward a Call to your Voicemail Box
7 Controlling Availability
You can control your availability by using a number of powerful functions of the
communication system.
Forwarding a Call to the Voicemail Box
If you do not want to accept a call, you can forward it to your voicemail box with
one click.
Presence-based Functions
You can control your availability based on your Presence status by the following
methods:
•
Status-based call forwarding
•
Rule-based call forwarding
•
Personal AutoAttendant
CallMe Service
The CallMe Service enables you to use the Unified Communications functions of
the communication system at any workplace exactly as in your office: at the
phone and also with myPortal (provided you are connected to your company
LAN).
Related Topics
•
•
•
•
•
•
How to Forward a Call to your Voicemail Box
Presence status
CallMe service
Status-based Call Forwarding
Rule-Based Call Forwarding
Personal AutoAttendant
7.1 How to Forward a Call to your Voicemail Box
Prerequisites:
Step by Step:
•
Screen pops for inbound calls have been activated.
1. Click in the Inbound Call screen pop on Forward.
Related Topics
•
•
•
42
Controlling Availability
How to Enable or Disable Screen Pops on Inbound Calls
Voicemail
A31003-P1000-U102-7-7619, 02/2009
OpenScape Office, myPortal, User Guide
Controlling Availability
Presence status
7.2 Presence status
The Presence status indicates the availability of internal subscribers in the
Favorites list, the internal directory, the virtual conference room and via voicemail
announcements. In addition, the Presence status controls the availability of
internal subscribers with status-based call forwarding, rule-based call forwarding
and the personal AutoAttendant.
You can change your Presence status in myPortal and also in the Phone menu
of the voicemail box. For every change in the Presence status (except for Office
and CallMe), you also define the scheduled time of your return to the Office or
CallMe status.
The drop-down list for the Presence status includes the following symbols:
Symbol
Presence status
Office
Availability
Available at the normal workplace
Only selectable if the CallMe service is not active Otherwise,
CallMe appears here.
CallMe
Available at an alternative workplace
Only selectable if the CallMe service is active Otherwise, Office
appears here.
Meeting
Absent
Sick
Absent
Break
Absent
Out of the Office
Absent
Vacation
Absent
Lunch
Absent
Gone Home
Absent
Do Not Disturb
Absent
A31003-P1000-U102-7-7619, 02/2009
OpenScape Office, myPortal, User Guide
43
Controlling Availability
Presence status
CallMe is shown in the Favorites list and in the internal directory as Office. The
following additional symbols are available there:
Symbol
Presence or connection status
Phone is ringing
Subscriber is calling
Subscriber is on the phone
Presence status is not visible
Phone is not connected
INFO: For subscribers without system telephones (e.g., ISDN or
analog), the Favorites list and the internal directory do not indicate
any presence, but only the connection status.
Call Forwarding to the Voicemail Box
If your Presence status is not Office or CallMe, the communication system
redirects calls to you to your voicemail box by default and notifies the callers via
status-based announcements about the nature of your absence and the
scheduled time for your return.
Automatic Reset of the Presence Status
You can have your Presence status automatically reset to the previously active
Office or CallMe status at the end of your scheduled absence. Otherwise, the
communication system extends the current Presence status in increments of 15
minutes until you change it yourself.
Visibility of your Presence Status
For each subscriber in the internal directory, you can specify whether that
subscriber can see your Presence status other than Office and CallMe as well as
the scheduled time of your return.
Automatic Update of Presence Status via Outlook Appointments
You can automatically control your Presence status via Outlook appointments by
using the following keywords in the Subject line:
44
A31003-P1000-U102-7-7619, 02/2009
OpenScape Office, myPortal, User Guide
Controlling Availability
Presence status
•
Meeting
•
Sick
•
Pause
•
Out of the Office
•
Vacation
•
Lunch
•
Gone Home
The keywords depend on the language set for the user interface. The keywords
may be located anywhere in the Subject line. If the Subject line contains more
than one such keyword, only the fist takes effect. When this function is enabled,
your Presence status changes automatically at the start and end time of the
relevant appointment. Your PC need not be operating at this time.
NOTICE: When enabling this function, please bear in mind that
any Outlook appointments with these keywords in the Subject line
could lead to undesirable changes in your Presence status.
Consequently, you may nee to change the Subject line if needed.
Automatic Creation of Outlook Appointments when Absent
You can have appropriate Outlook appointments created automatically when you
are absent by a change in your Presence status. The Subject line of the
corresponding Outlook appointment consists of your Presence status and the text
"(Auto)", for example: "Meeting (Auto)". The start and end times for the
appointment involved correspond to your entries in myPortal. The end time of the
Outlook appointment remains unchanged in the event of a possibly delayed
return. The Outlook appointments are created on the Exchange Server,
regardless of whether or not your Outlook is open.
A31003-P1000-U102-7-7619, 02/2009
OpenScape Office, myPortal, User Guide
45
Controlling Availability
Presence status
Screen Pops on Changing the Presence Status
You can have changes to your Presence status indicated by a screen pop. You
can set this separately for the Office status.
Related Topics
•
•
•
•
•
•
•
•
•
•
•
•
•
•
•
•
•
•
•
Controlling Availability
How to Change the Presence Status Office or CallMe to Absent
How to Change the Presence Status to Office
How to Enable or Disable Automatic Resetting of the Presence Status
How to Change the Visibility of your Presence Status for Others
How to Enable or Disable Automatic Updating of the Presence Status via
Outlook Appointments
How to Enable or Disable the Automatic Creation of Outlook
Appointments when Absent
How to Enable or Disable Screen Pops on Changing the Presence Status
How to Enable or Disable Screen Pops on Changing the Presence Status
to Office
User Interface Elements
Directories
Favorites List
How to Enable or Disable the Announcement of your Presence Status for
External Callers
How to Enable or Disable the Announcement of your Presence Status for
Specific Callers
CallMe service
Status-based Call Forwarding
Rule-Based Call Forwarding
Personal AutoAttendant
Phone Menu of the Voicemail Box
7.2.1 How to Change the Presence Status Office or CallMe to Absent
Step by Step:
1. Select one of the following options in the drop-down list for the Presence
status: Meeting, Sick, Break, Out of the Office, Vacation, Lunch, Gone
Home or Do Not Disturb.
2. Select one of the following options to specify the time of your return:
46
•
Click on one the four buttons with the desired time duration.
•
Select a time and a date in the calendar control.
A31003-P1000-U102-7-7619, 02/2009
OpenScape Office, myPortal, User Guide
Controlling Availability
Presence status
3. Click OK.
Related Topics
•
•
•
•
Presence status
How to Change the Presence Status to Office
How to Enable or Disable Automatic Resetting of the Presence Status
How to Enable the CallMe Service
7.2.2 How to Change the Presence Status to Office
Step by Step:
1. Select Office in the drop-down list for the Presence status.
2. Click on Return to the office and then on OK.
Related Topics
•
•
•
Presence status
How to Change the Presence Status Office or CallMe to Absent
How to Enable or Disable Automatic Resetting of the Presence Status
7.2.3 How to Enable or Disable Automatic Resetting of the Presence Status
Step by Step:
1. Click Setup.
2. Click on the Program Settings tab.
3. Choose one the following options in the Miscellaneous area:
•
If you want to enable automatic resetting of the Presence status to Office
or CallMe, select the Auto back to office check box.
•
If you want to disable automatic resetting of the Presence status to Office
or CallMe, clear the check box Auto back to office check box.
4. Click Save.
Related Topics
•
•
•
•
Presence status
How to Change the Presence Status Office or CallMe to Absent
How to Change the Presence Status to Office
How to Enable the CallMe Service
7.2.4 How to Change the Visibility of your Presence Status for Others
Step by Step:
1. Click Setup.
2. Click on the Program Settings tab.
A31003-P1000-U102-7-7619, 02/2009
OpenScape Office, myPortal, User Guide
47
Controlling Availability
Presence status
3. Select one of the following options in the Presence Visibility area:
•
If you want to make your presence visible to a specific subscriber, enable
the check box in the appropriate row.
•
If you want to make your presence invisible to a specific subscriber, clear
the check box in the appropriate row.
•
If you want to make your presence visible to all subscribers, click Select
All.
•
If you want to make your presence invisible to all subscribers, click
Unselect All.
4. Click Save.
Related Topics
•
•
•
Presence status
How to Enable or Disable the Announcement of your Presence Status for
Specific Callers
How to Enable or Disable the Announcement of your Presence Status for
External Callers
7.2.5 How to Enable or Disable Automatic Updating of the Presence Status
via Outlook Appointments
Step by Step:
1. Click Setup.
2. Click on the Program Settings tab.
3. Choose one the following options in the Outlook area:
•
If you want to enable automatic updating of the Presence status via
Outlook appointments, select the Outlook Calendar Integration check
box.
•
If you want to disable automatic updating of the Presence status via
Outlook appointments, clear the Outlook Calendar Integration check
box.
4. Click Save.
Related Topics
•
•
48
Presence status
How to Enable or Disable the Automatic Creation of Outlook
Appointments when Absent
A31003-P1000-U102-7-7619, 02/2009
OpenScape Office, myPortal, User Guide
Controlling Availability
Presence status
7.2.6 How to Enable or Disable the Automatic Creation of Outlook
Appointments when Absent
Step by Step:
1. Click Setup.
2. Click on the Program Settings tab.
3. Choose one the following options in the Outlook area:
•
If you want to enable the automatic creation of Outlook appointments
when you are absent, select the check box Automatically generate
calendar appointments from my presence changes..
•
If you want to disable the automatic creation of Outlook appointments
when you are absent, clear the check box Automatically generate
calendar appointments from my presence changes..
4. Click Save.
Related Topics
•
•
Presence status
How to Enable or Disable Automatic Updating of the Presence Status via
Outlook Appointments
7.2.7 How to Enable or Disable Screen Pops on Changing the Presence
Status
Step by Step:
1. Click Setup.
2. Click on the Program Settings tab.
3. Choose one the following options in the Notifications area:
•
If you want to enable screen pops on changing the Presence status,
select the check box Display tray pop on change of presence (status).
•
If you want to disable screen pops on changing the Presence status, clear
the check box Display tray pop on change of presence (status).
4. Click Save.
Related Topics
•
•
•
A31003-P1000-U102-7-7619, 02/2009
OpenScape Office, myPortal, User Guide
Presence status
Screen Pops
How to Enable or Disable Screen Pops on Changing the Presence Status
to Office
49
Controlling Availability
CallMe service
7.2.8 How to Enable or Disable Screen Pops on Changing the Presence
Status to Office
Step by Step:
1. Click Setup.
2. Click on the Program Settings tab.
3. Choose one the following options in the Notifications area:
•
If you want to enable screen pops on changing the Presence status to
Office, select the check box Display tray pop for In Office presence.
•
If you want to disable screen pops on changing the Presence status to
Office, clear the check box Display tray pop for In Office presence.
4. Click Save.
Related Topics
•
•
•
Presence status
Screen Pops
How to Enable or Disable Screen Pops on Changing the Presence Status
7.3 CallMe service
The CallMe service, which is extremely practical for teleworkers, in particular, can
be used to define any phone at an alternative workplace as the CallMe destination
at which you can be reached through your own internal phone number. You can
use myPortal at your alternative workplace exactly as in the office and thus also
make outgoing calls from the CallMe destination.
Inbound Calls
Inbound calls to your internal phone number are forwarded to your CallMe
destination. Your internal phone number is displayed to the caller.
Outbound Calls
For outbound calls with myPortal, the communication system sets up two
connections. It first calls you at your CallMe destination. If you answer the call, the
communication system then calls the desired destination and connects you with
it. Your internal phone number is displayed at the destination.
Presence status
When the CallMe service is enabled, the message "CallMe active" appears
on the display of your telephone. For other subscribers, your Presence status is
Office.
50
A31003-P1000-U102-7-7619, 02/2009
OpenScape Office, myPortal, User Guide
Controlling Availability
Status-based Call Forwarding
Activation
You can activate the CallMe service manually. In addition, the CallMe service also
reactivated by an automatic reset of the Presence status following an absence,
provided it was active earlier.
Deactivation
The CallMe service remains active until your Presence status changes.
Related Topics
•
•
•
Controlling Availability
How to Enable the CallMe Service
Presence status
7.3.1 How to Enable the CallMe Service
Step by Step:
1. Select Office in the drop-down list for the Presence status.
2. Click on Enable CallMe service.
3. Set the call number of the CallMe destination by one of the following methods:
•
Select one of your additional call numbers from the drop-down list.
•
Enter the phone number in dialable format or in canonical format in the
drop-down list
4. Click OK.
Related Topics
•
•
•
•
•
CallMe service
Call Number Formats
How to Change the Presence Status Office or CallMe to Absent
How to Enable or Disable Automatic Resetting of the Presence Status
How to Define an Additional Phone Number
7.4 Status-based Call Forwarding
Status-based call forwarding enables you to forward calls based on your
Presence status to one of your additional phone numbers or your voicemail box.
A31003-P1000-U102-7-7619, 02/2009
OpenScape Office, myPortal, User Guide
51
Controlling Availability
Rule-Based Call Forwarding
You can configure status-based call forwarding for every Presence status except
Office, CallMe and Do Not Disturb. When you change your Presence status, the
communication system activates call forwarding to the destination defined by you
for this purpose. For example, if you are away from the office, to your mobile
phone or if you are on vacation, to your representative.
Related Topics
•
•
•
•
•
Controlling Availability
How to Configure Status-based Call Forwarding
Presence status
How to Define an Additional Phone Number
Rule-Based Call Forwarding
7.4.1 How to Configure Status-based Call Forwarding
Prerequisites:
Step by Step:
•
You have configured at least one additional phone number.
1. Click Setup.
2. Click on the Forwarding Destinations tab.
3. Choose one of the following destinations from the drop-down list in the row
with the appropriate Presence status in the Destinations area: None,
Mobile, Assistant, External 1, External 2, Home or voicemail.
4. Click Save.
Related Topics
•
•
Status-based Call Forwarding
How to Define an Additional Phone Number
7.5 Rule-Based Call Forwarding
Rules-based call forwarding enables you to forward calls based on numerous
conditions and exceptions even more flexibly than with status-based call
forwarding.
In addition, rule-based call forwarding also supports:
•
Any destinations
•
Presence status Office, CallMe and Do Not Disturb
You can define rules are activate or deactivate them at any time by using the
Rules wizard. A rule can only be active if your phone has not been forwarded.
When a call forwarding rule is active, its name appears on the display of your
telephone.
52
A31003-P1000-U102-7-7619, 02/2009
OpenScape Office, myPortal, User Guide
Controlling Availability
Rule-Based Call Forwarding
When an inbound call is received, the communication system checks the
applicability of the active rule in accordance with its sequential order in the Rules
wizard. Only the first applicable rule is executed. In this case, your phone will ring
once, and the communication system will then forward your call to the defined
destination.
You can define several types of conditions and exceptions (except when ...) in
one rule. However, you cannot define a condition with an exception of the same
type. For example, it is not possible to define a condition of the type "On certain
weekdays" together with an exception of the type "Except on certain weekdays".
Types of Conditions and Exceptions
•
(except) for certain Presence status
•
(except) from certain people (in the internal directory, external directory,
personal directory or from any station number)
•
(except) when transferred to you from certain people (in the internal directory,
external directory, personal directory or from any station number)
•
(except) from a certain type, i.e., internal or external
•
(except) on a certain date (also on multiple dates)
•
(except) on certain weekdays
•
(except) between a certain Start and End date
•
(except) between a certain Start and End time
Related Topics
•
•
•
•
•
•
•
•
•
Controlling Availability
How to Add a Call Forwarding Rule
How to Edit a Call Forwarding Rule
How to Copy a Call Forwarding Rule
How to Rename a Call Forwarding Rule
How to Remove a Call Forwarding Rule
How to Change the Order of Call Forwarding Rules
Presence status
Status-based Call Forwarding
7.5.1 How to Add a Call Forwarding Rule
Step by Step:
1. Click Setup.
2. Click on the Forwarding Destinations tab.
3. Click in the Rules Engine area on New.
4. Enter a name for the rule under Name for rule (max. 15 characters).
5. Select one of the following options:
•
A31003-P1000-U102-7-7619, 02/2009
OpenScape Office, myPortal, User Guide
If you want the rule to take effect immediately, enable the check box This
rule is active.
53
Controlling Availability
Rule-Based Call Forwarding
•
If you do not want the rule to take effect yet, clear the check box This rule
is active.
6. Click Destination.
7. Enter the phone number in dialable format or in canonical format and click
OK.
8. Click Next.
9. If you want to add a condition, enable the check box When ... in the
appropriate row and click in the lower area on the desired underlined details
(Start Date, End Date, Start Time, End Time, People, Type, Date Values,
Weekdays, transfer people or Presence Status) to specify the condition
more precisely in the next dialog.
10. Click Next.
11. If you want to add an exception, enable the check box Except when ... in the
appropriate row and click in the lower area on the desired underlined details
(Start Date, End Date, Start Time, End Time, People, Type, Date Values,
Weekdays or Presence Status) to specify the exception more precisely in
the next dialog.
12. Click on Next, followed by Finish.
13. Click Save.
Related Topics
•
•
•
•
•
•
•
Rule-Based Call Forwarding
Call Number Formats
How to Edit a Call Forwarding Rule
How to Copy a Call Forwarding Rule
How to Rename a Call Forwarding Rule
How to Remove a Call Forwarding Rule
How to Change the Order of Call Forwarding Rules
7.5.2 How to Edit a Call Forwarding Rule
Step by Step:
1. Click Setup.
2. Click on the Forwarding Destinations tab.
3. Click on the relevant rule in the Rules Engine area and then on Edit.
4. Select one of the following options:
54
•
If you want the rule to take effect immediately, enable the check box This
rule is active.
•
If you do not want the rule to take effect, clear the check box This rule is
active.
A31003-P1000-U102-7-7619, 02/2009
OpenScape Office, myPortal, User Guide
Controlling Availability
Rule-Based Call Forwarding
5. If you want to change the phone number, click in the lower area on the
underlined phone number and then enter the desired phone number in
dialable format or in canonical format and click OK.
6. Click Next.
7. Select one of the following options:
•
If you want to add a condition, enable the check box When ... in the
appropriate row and click in the lower area on the desired underlined
details (Start Date, End Date, Start Time, End Time, People, Type,
Date Values, Weekdays, transfer people or Presence Status) to
specify the condition more precisely in the next dialog.
•
If you want to edit a condition, click in the lower area on the appropriate
underlined detail (Start Date, End Date, Start Time, End Time, People,
Type, Date Values, Weekdays, transfer people or Presence) to specify
the exception more precisely in the next dialog.
•
If you want to remove a condition, clear the When … check box in the
appropriate row.
8. Click Next.
9. Select one of the following options:
•
If you want to add an exception, enable the check box Except when ... in
the appropriate row and click in the lower area on the desired underlined
details (Start Date, End Date, Start Time, End Time, People, Type,
Date Values, Weekdays or Presence Status) to specify the exception
more precisely in the next dialog.
•
If you want to edit an exception, click in the lower area on the appropriate
underlined detail (Start Date, End Date, Start Time, End Time, People,
Type, Date Values, Weekdays or Presence Status) to specify the
exception more precisely in the next dialog.
•
If you want to remove an exception, clear the Except when … check box
in the appropriate row.
10. Click on Next, followed by Finish.
11. Click Save.
Related Topics
•
•
•
•
•
•
•
A31003-P1000-U102-7-7619, 02/2009
OpenScape Office, myPortal, User Guide
Rule-Based Call Forwarding
Call Number Formats
How to Add a Call Forwarding Rule
How to Copy a Call Forwarding Rule
How to Rename a Call Forwarding Rule
How to Remove a Call Forwarding Rule
How to Change the Order of Call Forwarding Rules
55
Controlling Availability
Rule-Based Call Forwarding
7.5.3 How to Copy a Call Forwarding Rule
Step by Step:
1. Click Setup.
2. Click on the Forwarding Destinations tab.
3. Click on the relevant rule in the Rules Engine area and then on Copy.
4. Enter a name for the new rule (max. 15 characters) and click OK.
5. Click Save.
Related Topics
•
•
•
•
•
•
Rule-Based Call Forwarding
How to Add a Call Forwarding Rule
How to Edit a Call Forwarding Rule
How to Rename a Call Forwarding Rule
How to Remove a Call Forwarding Rule
How to Change the Order of Call Forwarding Rules
7.5.4 How to Rename a Call Forwarding Rule
Step by Step:
1. Click Setup.
2. Click on the Forwarding Destinations tab.
3. Click on the relevant rule in the Rules Engine area and then on Rename.
4. Enter a new name for the new rule (max. 15 characters) and click OK.
5. Click Save.
Related Topics
•
•
•
•
•
•
Rule-Based Call Forwarding
How to Add a Call Forwarding Rule
How to Edit a Call Forwarding Rule
How to Copy a Call Forwarding Rule
How to Remove a Call Forwarding Rule
How to Change the Order of Call Forwarding Rules
7.5.5 How to Remove a Call Forwarding Rule
Step by Step:
1. Click Setup.
2. Click on the Forwarding Destinations tab.
3. Click on the relevant rule in the Rules Engine area and then on Remove.
56
A31003-P1000-U102-7-7619, 02/2009
OpenScape Office, myPortal, User Guide
Controlling Availability
Personal AutoAttendant
4. Click on Yes, followed by Save.
Related Topics
•
•
•
•
•
•
Rule-Based Call Forwarding
How to Add a Call Forwarding Rule
How to Edit a Call Forwarding Rule
How to Copy a Call Forwarding Rule
How to Rename a Call Forwarding Rule
How to Change the Order of Call Forwarding Rules
7.5.6 How to Change the Order of Call Forwarding Rules
Step by Step:
1. Click Setup.
2. Click on the Forwarding Destinations tab.
3. Click in the Rules Engine area on the rule that you want to move.
4. Select one of the following options:
•
If you want to move the rule up by one position in the order, click on Move
Up.
•
If you want to move the rule down by one position in the order, click on
Move Down.
5. Click Save.
Related Topics
•
•
•
•
•
•
Rule-Based Call Forwarding
How to Add a Call Forwarding Rule
How to Edit a Call Forwarding Rule
How to Copy a Call Forwarding Rule
How to Rename a Call Forwarding Rule
How to Remove a Call Forwarding Rule
7.6 Personal AutoAttendant
The personal AutoAttendant offers callers the option of forwarding their calls to
the phone numbers defined by you or to your voicemail box, depending on your
Presence status. Callers signal their choice by entering digits at the phone.
Custom Profiles for Presence Status
For every Presence status there is a custom profile in which you can define the
choices for your callers. You can activate or deactivate each profile separately.
By default, no profile is active. When you deactivate a profile, the default behavior
of your voicemail applies to the Presence status involved.
A31003-P1000-U102-7-7619, 02/2009
OpenScape Office, myPortal, User Guide
57
Controlling Availability
Personal AutoAttendant
Announcements
When this profile is activated, the voicemail box plays back the following
announcements:
•
Name announcement:
If you have enabled dynamic announcements, the name announcement you
recorded is used for the greeting, unless your Presence status is Office,
CallMe or Do Not Disturb.
•
Dynamic announcements:
If you have enabled dynamic announcements, the voicemail box generates
situation-based announcements for your Presence status (except for Office,
CallMe and Do Not Disturb) with an indication of the scheduled time of your
return, e.g., "... is in a meeting until two thirty p.m. today".
You can activate or deactivate the playback of dynamic announcements
individually for each profile. If the dynamic announcements for a profile have
been enabled, you can activate or deactivate the announcements for your
Presence status for certain callers and for all external callers separately.
•
Personal announcement for the profile:
Before you activate a profile, you must record a personal announcement for
this profile that indicates to your caller the appropriate digits and associated
choices, e.g.: To leave a message, press 1. To speak with my representative,
press 2. To forward this call to my mobile phone, press 3." When you disable
dynamic announcements for the profile, you may find it useful to start your
personal announcement by indicating your Presence status.
The voicemail box plays back announcements for a profile in the following order
(from left to right):
Profile
Name announcement
Dynamic greetings
Personal
announcement for
profile
Busy
-
-
x
No answer
-
-
x
Meeting
x (if dynamic
announcements have
been enabled)
x (if dynamic
announcements have
been enabled)
x
-
-
x
Sick
Pause
Out of the Office
Vacation
Lunch
Gone Home
Do Not Disturb
58
A31003-P1000-U102-7-7619, 02/2009
OpenScape Office, myPortal, User Guide
Controlling Availability
Personal AutoAttendant
Example: dynamic announcements enabled
Profile
Name announcement
Meeting
"Natalie Dubois"
Dynamic greetings
Personal
announcement for
profile
"is in a meeting
until two thirty
p.m. today".
"To leave a message,
press 1. To speak with
my representative,
press 2."
Example: dynamic announcements disabled
Profile
Name announcement
Out of the Office
-
Dynamic greetings
-
Personal
announcement for
profile
"I am currently out of the
office. To leave a
message, press 1. To
speak with my
representative, press 2.
To forward this call to
my mobile phone, press
3."
Actions
When editing the profile, you can define the appropriate actions for the digits
indicated in the announcement.
•
Record
The caller can leave a message in your voicemail box.
•
Transfer
The caller is redirected to a destination defined by you.
•
- None The announcements for this profile are repeated.
Related Topics
•
•
•
•
•
Controlling Availability
How to Edit a Profile for the AutoAttendant
Presence status
How to Enable or Disable the Announcement of your Presence Status for
External Callers
How to Enable or Disable the Announcement of your Presence Status for
Specific Callers
Voicemail
A31003-P1000-U102-7-7619, 02/2009
OpenScape Office, myPortal, User Guide
59
•
Controlling Availability
Personal AutoAttendant
7.6.1 How to Edit a Profile for the AutoAttendant
Prerequisites:
Step by Step:
•
You have recorded an announcement for the relevant status.
1. Click Setup.
2. Click on the Profiles tab.
3. Select the profile for the relevant status in the Profiles drop-down list.
4. In the row with the appropriate digit, select one of the following options for the
desired Action:
•
If the callers are to be redirected to the voicemail box on entering this digit,
select Record.
•
If the callers are to be transferred to another destination on entering this
digit, select Transfer.
•
If no action is to be taken on entering this digit, select - None -.
5. If you have selected Transfer, enter the phone number in dialable format or
in canonical format in the Destination field.
6. Select one of the following options for the function of the profile:
•
If you want to activate the profile, enable the Profile Active check box.
•
If you want to deactivate the profile, disable the Profile Active check box.
7. Select one of the following options for the announcement of your Presence
status:
•
If you want your voicemail box to announce your Presence status, clear
the Skip Dynamic Greeting check box.
•
If you do not want your voicemail box to announce your Presence status,
enable the Skip Dynamic Greeting check box.
8. Click Save.
Related Topics
•
•
•
60
Personal AutoAttendant
Call Number Formats
How to Record an Announcement
A31003-P1000-U102-7-7619, 02/2009
OpenScape Office, myPortal, User Guide
Conferencing (only HiPath OpenOffice ME)
8 Conferencing (only HiPath OpenOffice ME)
In a conference, multiple participants can communicate with one another at the
same time. The Conference Management function of myPortal enables you to
quickly and easily host different types of conferences and also to schedule them
in advance.
INFO: Only conferences initiated with myPortal can be used in
myPortal. Conferences initiated by phone can only be used with a
phone.
The various conference types have the following features:
Feature
Ad-hoc
Scheduled (MeetMe)
Permanent
Start
Manually, immediately
Automatically by schedule
Manually
End
Manually
Automatically by schedule or
manually
Manually
Extension possible
-
x
-
Recurrence possible
Manually
Regularly by schedule
-
Direction of connection setup Outbound
from the viewpoint of the
communication system
Outbound or Inbound
Inbound
Authentication of conference
participants possible
-
x
x
Recording possible
x
x
-
Virtual conference room
The virtual conference room enables you to follow a conference and its
participants in a graphical environment and to also manage the conference if you
are the conference controller.
Symbol
Meaning
Conference Controller
Communication system – Conference is stopped
Communication system – Conference is being started
A31003-P1000-U102-7-7619, 02/2009
OpenScape Office, myPortal, User Guide
61
Conferencing (only HiPath OpenOffice ME)
Symbol
Meaning
Communication system – Conference has started
Communication system – Conference is being recorded
Communication system – Conference is being stopped
Scheduled conference participant (symbol in accordance with current Presence status)
Called conference participant
Dial-in conference participant
Authenticating conference participant
Connected conference participant
Every arrow between the communication system and the conference controller or
its participants indicates the direction of the connection setup from the viewpoint
of the communication system.
•
Outbound:
The communication system calls the participant. Note that this applies to
internal participants only if the subscriber has not enabled forwarding to
voicemail.
•
Inbound:
The conference participants or conference controller dials into the conference
using the dial-in number.
While participating in a conference, making calls or accepting another call
disconnects the participant from the conference.
Conference Controller
The initiator of a conference is the conference controller. The controller can:
•
62
Add or remove conference participants:
Removed participants do not remain in the virtual conference room.
A31003-P1000-U102-7-7619, 02/2009
OpenScape Office, myPortal, User Guide
Conferencing (only HiPath OpenOffice ME)
•
Disconnect or reconnect conference participants:
Disconnected participants remain in the virtual conference room. When
connecting or disconnecting a conference participant, the other participants
hear an alert tone. When the conference controller is connecting a conference
participant, all other conference participants remain connected to one
another. If there is only one participant connected, that participant will hear
music on hold.
•
Record the conference (ad-hoc and scheduled conferences)
•
Set another internal participant as the conference controller
•
Leave the conference without ending it:
The internal participant who has been attending the conference for the
longest period of time automatically becomes the conference controller.
•
End the conference
Dial-in Number
The dial-in number for conferences must be set by the administrator. myPortal
shows this number.
Automatic End of Conference without Internal Conference Participants
If only external participants remain in a conference, the communication system
ends the conference automatically after a time period set by the administrator
expires. Before this occurs, the conference participants hear an alert tone.
External Conference Participants
The maximum number of external conference participants is determined, among
other things, by the number of available trunks.
System-Specific Information
•
Maximum of 5 conferences simultaneously
•
Maximum of 16 conference participants in total
•
Maximum of 16 conference participants in a single conference
•
Maximum of 10 conferences per subscriber
•
Maximum duration until automatic release of a conference without a
conference controller
255 minutes
•
Maximum time interval from alert tone until automatic termination:
5 minutes
Related Topics
•
•
•
•
•
A31003-P1000-U102-7-7619, 02/2009
OpenScape Office, myPortal, User Guide
Ad-hoc conference
Scheduled Conference
Permanent Conference
User Interface Elements
How to Specify an E-Mail Address
63
Conferencing (only HiPath OpenOffice ME)
Ad-hoc conference
8.1 Ad-hoc conference
An ad-hoc conference occurs spontaneously and is started manually by the
conference controller. The conference controller can save ad-hoc conferences in
order to set them up again at some later point in time.
Starting the Conference
The communication system opens the window with the virtual conference room
automatically for all conference participants, provided the participants have
started myPortal or myPortal for Outlook. The communication system calls all
conference participants simultaneously. On joining the conference, each
conference participant hears a greeting announcement with the name of the
conference controller.
Recording the Conference
The conference controller can optionally record an ad-hoc conference in his or
her voicemail box. The duration of the recording is only limited by the available
storage capacity of the communication system.
Ending the Conference
The conference controller can end the conference in the virtual conference room
or simply hang up. Alternatively, the conference ends when all conference
participants have left the conference.
Related Topics
•
•
•
•
•
•
•
•
•
•
•
Conferencing (only HiPath OpenOffice ME)
How to Configure and Initiate an Ad-hoc Conference
How to View an Ad-hoc Conference as a Conference Controller
How to Add Conference Participants
How to Disconnect a Conference Participant
How to Reconnect Conference Participants
How to Remove Conference Participants
How to Specify Another Conference Controller
How to End an Ad-hoc or Scheduled Conference
How to Repeat an Ad-hoc Conference
How to Record a Call or a Conference
8.1.1 How to Configure and Initiate an Ad-hoc Conference
Step by Step:
1. Click Conference.
2. Click Start new conference. The AdHoc Conference window opens with
you set as the conference controller.
3. Add any conference participants as needed; see How to Add Conference
Participants for details.
64
A31003-P1000-U102-7-7619, 02/2009
OpenScape Office, myPortal, User Guide
Conferencing (only HiPath OpenOffice ME)
Ad-hoc conference
4. Click in the AdHoc Conference window on Conference Room > Start. The
communication system now calls you and the conference participants.
5. If you want to repeat the ad-hoc conference with the same set of participants
later, you can now save it. To do this:
a) Click File > Save
b) Click on the General Settings tab and enter a name for the conference
in the input field.
c) Click Save.
Related Topics
•
•
•
•
•
Ad-hoc conference
Call Number Formats
How to End an Ad-hoc or Scheduled Conference
How to Repeat an Ad-hoc Conference
How to Add Conference Participants
8.1.2 How to View an Ad-hoc Conference as a Conference Controller
Step by Step:
1. Click Conference.
2. Click Manage my conferences.
3. Click on the My Conferences tab.
4. Click on a conference under Conference Name.
5. Click View.
Related Topics
•
Ad-hoc conference
8.1.3 How to Add Conference Participants
Prerequisites:
Step by Step:
•
A conference with you as the conference controller has been started in the
virtual conference room.
1. Add the conference participants by one of the following methods:
•
From the Favorites list:
Using the mouse, drag one of the participants from the Favorites into the
AdHoc Conference window. Select a station number from the Number
To Contact drop-down list in the Select Participant Contact Number
window and click OK.
A31003-P1000-U102-7-7619, 02/2009
OpenScape Office, myPortal, User Guide
65
Conferencing (only HiPath OpenOffice ME)
Ad-hoc conference
•
From a directory:
Using the mouse, drag one of the participants from the Directories into
the AdHoc Conference window. Select a station number from the
Number To Contact drop-down list in the Select Participant Contact
Number window and click OK.
•
From the results of a search:
Search the directories (see How to Search in Directories for details) and
then drag any of the participants from the listed results into the AdHoc
Conference window. Select a station number from the Number To
Contact drop-down list in the Select Participant Contact Number
window and click OK.
•
Any participant:
Click in the AdHoc Conference window on Participants > Add
Participant. Enter the following details for the participant in the Add
Participants window: Name, Phone Number in dialable format or in
canonical format and E-mail and then click OK.
Related Topics
•
•
•
•
•
•
•
•
•
•
Ad-hoc conference
Directories
How to Search in Directories
Favorites List
How to Configure and Initiate an Ad-hoc Conference
How to Configure a Scheduled Conference
How to Configure a Permanent Conference
How to Remove Conference Participants
Scheduled Conference
Permanent Conference
8.1.4 How to Disconnect a Conference Participant
Prerequisites:
Step by Step:
Result:
•
An active conference with you as the conference controller has been started
in the virtual conference room.
1. Click in the context menu of the relevant conference participant on
Disconnect > Disconnect Participant.
The connection to the participant is cleared. The participant remains in the virtual
conference room.
Related Topics
•
•
•
66
Ad-hoc conference
How to Reconnect Conference Participants
Scheduled Conference
A31003-P1000-U102-7-7619, 02/2009
OpenScape Office, myPortal, User Guide
Conferencing (only HiPath OpenOffice ME)
Ad-hoc conference
8.1.5 How to Reconnect Conference Participants
Prerequisites:
Step by Step:
•
An active conference with you as the conference controller has been started
in the virtual conference room.
1. Click in the context menu of the relevant conference participant on
Reconnect Participant.
Related Topics
•
•
•
Ad-hoc conference
How to Disconnect a Conference Participant
Scheduled Conference
8.1.6 How to Remove Conference Participants
Prerequisites:
Step by Step:
Result:
•
A conference with you as the conference controller has been started in the
virtual conference room.
1. Select one of the following options in the context menu of the relevant
conference participant:
•
If the conference participant is currently active, click Remove.
•
If the conference participant is not currently active in the conference, click
on Disconnect > Disconnect and Remove Participant.
The connection to the participant is cleared. The participant is removed from the
virtual conference room.
Related Topics
•
•
•
•
Ad-hoc conference
How to Add Conference Participants
Scheduled Conference
Permanent Conference
8.1.7 How to Specify Another Conference Controller
Prerequisites:
Step by Step:
•
A conference with you as the conference controller has been started in the
virtual conference room.
1. Click in the AdHoc Conference window on Conference Room > Properties.
2. Click on the Participants tab.
3. Click on the conference participant whom you want to set as the conference
controller.
4. Click in the area with the participant details on Set as conference controller.
A31003-P1000-U102-7-7619, 02/2009
OpenScape Office, myPortal, User Guide
67
Conferencing (only HiPath OpenOffice ME)
Ad-hoc conference
5. Click Save.
Related Topics
•
•
•
Ad-hoc conference
Scheduled Conference
Permanent Conference
8.1.8 How to End an Ad-hoc or Scheduled Conference
Prerequisites:
•
An active conference with you as the conference controller has been started
in the virtual conference room.
INFO: You can also end an ad-hoc conference by hanging up.
Step by Step:
1. Click Conference Room > Stop.
2. Under End In:, enter the waiting time in seconds until the conference is to be
terminated and then click OK.
Related Topics
•
•
•
Ad-hoc conference
How to Configure and Initiate an Ad-hoc Conference
Scheduled Conference
8.1.9 How to Repeat an Ad-hoc Conference
Prerequisites:
Step by Step:
•
You have saved an ad-hoc conference.
1. Click Conferencing.
2. Click Manage my conferences.
3. Click on the My Conferences tab.
4. Click on a conference under Conference Name.
5. Click Start Conference. The communication system now calls you and the
conference participants.
Related Topics
•
•
68
Ad-hoc conference
How to Configure and Initiate an Ad-hoc Conference
A31003-P1000-U102-7-7619, 02/2009
OpenScape Office, myPortal, User Guide
Conferencing (only HiPath OpenOffice ME)
Scheduled Conference
8.2 Scheduled Conference
A scheduled conference (Meet-Me conference) occurs at some point in the future
with a defined duration and may be set up to recur repeatedly at the same time.
A scheduled conference will run for the entire scheduled duration even if there are
no active participants. The conference controller saves a scheduled conference
under a specified name.
Options for Configuring a Scheduled Conference
The initiator of the conference can define the following properties:
•
Start time and End time
•
Recurring conference
•
Presence of conference controller required
•
Authentication of conference participants on joining the conference required
(by entering a PIN and Password via the phone keypad).
INFO: Mobility Entry users must enter the code for DTMF dialing
before their authentication.
The default password for conferences is 1234. The conference controller can
change this for the conference participants individually.
•
Language of announcements before the conference begins
•
Direction for the connection setup for each conference participant (default:
outbound).
Invitation
The conference controller must inform the participants about the details of the
conference. This includes:
•
Date and time of the start and end of the conference
•
Participant's PIN (optional)
•
Password (optional)
•
Dial-in number (mandatory for conference participants for whom the direction
of the connection setup is Inbound)
Starting the Conference
The communication system opens the window with the virtual conference room
at the scheduled time automatically for all conference participants, provided the
participants have started myPortal or myPortal for Outlook. If the presence of the
conference controller is required, the communication system first calls the
controller. After the successful authentication of the controller, all the other
conference participants are called simultaneously. Conference participants who
have forwarded their calls to their voicemail boxes or who are determined to be
absent by their presence status are not called. Depending on how the connection
setup has been configured, the communication system calls the conference
participants or the participants can dial in themselves. The communication
A31003-P1000-U102-7-7619, 02/2009
OpenScape Office, myPortal, User Guide
69
Conferencing (only HiPath OpenOffice ME)
Scheduled Conference
system announces every participant who joins the conference by name, as in:
".... has joined the conference", provided the initiator has recorded
his or her name announcement.
INFO: In order to enable the participants of a conference you
have scheduled without authentication to hear the name
announcement at the start of the conference, you will need to
have first already initiated a conference with authentication on
one occasion.
Dialing In
Every conference participant can use the dial-in number to dial into the
conference within the scheduled time period, regardless of which direction for the
conference setup was set for that participant.
Extending the Conference
Ten minutes before the scheduled end of the conference, the participants hear an
announcement indicating that the conference is about to end and are offered the
option of extending the conference by dialing a specific digit. Any conference
participant can extend the conference by dialing that specific digit. The
conference controller can extend the conference in myPortal at any time.
Recording the Conference
The conference controller can optionally record a scheduled conference in his or
her voicemail box. The duration of the recording is only limited by the available
storage capacity of the communication system.
70
A31003-P1000-U102-7-7619, 02/2009
OpenScape Office, myPortal, User Guide
Conferencing (only HiPath OpenOffice ME)
Scheduled Conference
Ending the Conference
The conference ends at the time scheduled for the end of the conference or if the
conference controller terminates the conference in the virtual conference room.
Related Topics
•
•
•
•
•
•
•
•
•
•
•
•
•
•
•
•
Conferencing (only HiPath OpenOffice ME)
How to Configure a Scheduled Conference
How to Display a Scheduled Conference as the Conference Controller
How to Determine the Dial-in Number for a Scheduled or Permanent
Conference
How To Determine the PIN for a Scheduled or Permanent Conference
How to Change the Password for a Scheduled or Permanent Conference
How To Display a Scheduled or Permanent Conference as the
Conference Controller
How to Extend a Scheduled Conference
How to Delete a Scheduled Conference
How to Add Conference Participants
How to Disconnect a Conference Participant
How to Reconnect Conference Participants
How to Remove Conference Participants
How to Specify Another Conference Controller
How to Record a Call or a Conference
How to End an Ad-hoc or Scheduled Conference
8.2.1 How to Configure a Scheduled Conference
Prerequisites:
Step by Step:
•
Your administrator has configured a dial-in number for conferences.
1. Click Conference.
2. Click Start new conference. The AdHoc Conference window opens with
you set as the conference controller.
3. Add any conference participants as needed; see How to Add Conference
Participants for details.
4. Click in the AdHoc Conference window on Conference Room > Properties.
5. Click on the General Settings tab and enter a name for the conference in the
input field.
6. Enable the check box This conference is active.
7. If you want the conference to occur only when the conference controller is
present, enable the check box This conference requires the controller to
be present.
8. If you want to waive the requirement of entering a PIN to join the conference,
enable the check box This conference will not ask participants to enter
their PIN numbers, or record their names..
A31003-P1000-U102-7-7619, 02/2009
OpenScape Office, myPortal, User Guide
71
Conferencing (only HiPath OpenOffice ME)
Scheduled Conference
9. Select the desired Conference Language in which the announcements for
the authentication of the conference participants is to occur.
10. Click on the Schedule tab and select the Start Date, Start Time and End
Time.
11. If the conference is to occur recurrently, click on Recurring Conference.
a) Select an End Date for the last recurrence.
b) Click on either Daily Recurrence, Weekly Recurrence or Monthly
Recurrence and then select the additional options desired for it in the
details.
12. If you want to change the direction of the connection setup for a conference
participant, click on the Participants tab..
a) Click in the context menu of the relevant conference participant on
Properties.
b) Under Direction, then click on Outbound or Inbound.
13. Click Save.
Related Topics
•
•
•
•
Scheduled Conference
Call Number Formats
How to Add Conference Participants
How to Delete a Scheduled Conference
8.2.2 How to Display a Scheduled Conference as the Conference Controller
Step by Step:
1. Click Conference.
2. Click Manage my conferences.
3. Click on the My Conferences tab.
4. Click on a conference under Conference Name.
5. If you want to display the virtual conference room, click View.
6. If you want to display the schedule of the conference, click on Edit and then
on the Schedule tab.
7. If you want to display the general settings of the conference, click on Edit and
then on the General Settings tab.
Related Topics
•
•
72
Scheduled Conference
How To Display a Scheduled or Permanent Conference as the
Conference Controller
A31003-P1000-U102-7-7619, 02/2009
OpenScape Office, myPortal, User Guide
Conferencing (only HiPath OpenOffice ME)
Scheduled Conference
8.2.3 How to Determine the Dial-in Number for a Scheduled or Permanent
Conference
Prerequisites:
•
You are the conference controller.
INFO: As the conference controller, you can obtain the dial-in
number from the e-mail with the invitation to the conference.
Step by Step:
1. Click Conference.
2. Click Manage my conferences.
3. Click on the My Conferences tab.
4. Click on a conference under Conference Name.
5. Click Edit.
6. Click on the General Settings tab. The dial-in number can be found under
Conference DID.
7. Click Close.
8. Click Close.
Related Topics
•
•
Scheduled Conference
Permanent Conference
8.2.4 How To Determine the PIN for a Scheduled or Permanent Conference
Prerequisites:
•
You are the conference controller.
INFO: As the conference controller, you can obtain the PIN from
the e-mail with the invitation to the conference.
Step by Step:
1. Click Conference.
2. Click Manage my conferences.
3. Click on the My Conferences tab.
4. Click on a conference under Conference Name.
5. Click Edit.
6. Click on the Participants tab.
7. Click in the context menu of the relevant conference participant on
Properties. The PIN can be found under Identification Code.
8. Click Cancel.
A31003-P1000-U102-7-7619, 02/2009
OpenScape Office, myPortal, User Guide
73
Conferencing (only HiPath OpenOffice ME)
Scheduled Conference
9. Click Close.
Related Topics
•
•
Scheduled Conference
Permanent Conference
8.2.5 How to Change the Password for a Scheduled or Permanent
Conference
Prerequisites:
Step by Step:
•
You are the conference controller.
1. Click Conference.
2. Click Manage my conferences.
3. Click on the My Conferences tab.
4. Click on a conference under Conference Name.
5. Click Edit.
6. Click on the Participants tab.
7. Click in the context menu of the relevant conference participant on
Properties.
8. Enter the new Password.
9. Click OK.
10. Click Save.
11. Click Close.
Related Topics
•
•
Scheduled Conference
Permanent Conference
8.2.6 How To Display a Scheduled or Permanent Conference as the
Conference Controller
Step by Step:
1. Click Conference.
2. Click Manage my conferences.
3. Click on the Conferences that I belong to tab.
74
A31003-P1000-U102-7-7619, 02/2009
OpenScape Office, myPortal, User Guide
Conferencing (only HiPath OpenOffice ME)
Permanent Conference
4. Click on a conference under Conference Name and then on View.
Related Topics
•
•
•
•
Scheduled Conference
How to Display a Scheduled Conference as the Conference Controller
Permanent Conference
How to Display a Permanent Conference as the Conference Controller
8.2.7 How to Extend a Scheduled Conference
Prerequisites:
Step by Step:
•
An active conference with you as the conference controller has been started
in the virtual conference room.
1. Under Conference Room > Extend Conference, select one of the following
methods:
•
Click on one of the entries 10 minutes, 20 minutes, 30 minutes or 1
hour.
•
Then click on More …, enter the desired time period for the extension
under Extend by: in minutes, and click OK.
Related Topics
•
Scheduled Conference
8.2.8 How to Delete a Scheduled Conference
Prerequisites:
Step by Step:
•
You are the conference controller.
1. Click Conference.
2. Click Manage my conferences.
3. Click on the My Conferences tab.
4. Click on a conference under Conference Name.
5. Click on Remove, followed by Close.
Related Topics
•
•
Scheduled Conference
How to Configure a Scheduled Conference
8.3 Permanent Conference
A permanent conference is not subject to time restrictions. The conference
participants can dial in at any time.
A31003-P1000-U102-7-7619, 02/2009
OpenScape Office, myPortal, User Guide
75
Conferencing (only HiPath OpenOffice ME)
Permanent Conference
The conference controller saves a scheduled conference under a specified name.
The conference is retained until it is explicitly deleted.
Options for Configuring a Scheduled Conference
The initiator of the conference can specify:
•
whether the conference participants need to authenticate themselves by
entering a PIN and password via the phone keypad when joining the
conference.
INFO: Mobility Entry users must enter the code for DTMF dialing
before the authentication.
The default password for conferences is 1234. The conference controller can
change this for the conference participants individually.
•
in which language the announcements before the start of then conference are
to be made.
Starting the Conference
As soon as the first conference participant dials in, the communication system
opens the virtual conference room for all internal conference participants. All
conference participants dial in themselves. The communication system
announces every participant who joins the conference by name, as in: "....
has joined the conference."
Dialing In
Every conference participant can use the dial-in number to dial into the
conference at any time.
Related Topics
•
•
•
•
•
•
•
•
•
•
•
76
Conferencing (only HiPath OpenOffice ME)
How to Configure a Permanent Conference
How to Display a Permanent Conference as the Conference Controller
How to Delete a Permanent Conference
How to Add Conference Participants
How to Remove Conference Participants
How to Specify Another Conference Controller
How to Determine the Dial-in Number for a Scheduled or Permanent
Conference
How To Determine the PIN for a Scheduled or Permanent Conference
How to Change the Password for a Scheduled or Permanent Conference
How To Display a Scheduled or Permanent Conference as the
Conference Controller
A31003-P1000-U102-7-7619, 02/2009
OpenScape Office, myPortal, User Guide
Conferencing (only HiPath OpenOffice ME)
Permanent Conference
8.3.1 How to Configure a Permanent Conference
Prerequisites:
Step by Step:
•
Your administrator has configured a dial-in number for conferences.
1. Click Conference.
2. Click Start new conference. The AdHoc Conference window opens with
you set as the conference controller.
3. Add any conference participants as needed; see How to Add Conference
Participants for details.
4. Click in the AdHoc Conference window on Conference Room > Properties.
5. Click on the General Settings tab and enter a name for the conference in the
input field.
6. Enable the check box This conference is active.
7. If you want the conference to occur only when the conference controller is
present, enable the check box This conference requires the controller to
be present.
8. If you want to waive the requirement of entering a PIN to join the conference,
enable the check box This conference will not ask participants to enter
their PIN numbers, or record their names..
9. Enable the check box Permanent Conference.
10. Select the desired Conference Language in which the announcements for
the authentication of the participants is to occur.
11. Click Save.
Related Topics
•
•
•
•
Permanent Conference
Call Number Formats
How to Add Conference Participants
How to Delete a Permanent Conference
8.3.2 How to Display a Permanent Conference as the Conference Controller
Step by Step:
1. Click Conference.
2. Click Manage my conferences.
3. Click on the My Conferences tab.
4. Click on a conference under Conference Name.
5. If you want to display the virtual conference room, click View.
A31003-P1000-U102-7-7619, 02/2009
OpenScape Office, myPortal, User Guide
77
Conferencing (only HiPath OpenOffice ME)
Permanent Conference
6. If you want to display the general settings of the conference, click on Edit and
then on the General Settings tab.
Related Topics
•
•
Permanent Conference
How To Display a Scheduled or Permanent Conference as the
Conference Controller
8.3.3 How to Delete a Permanent Conference
Prerequisites:
Step by Step:
•
You are the conference controller.
1. Click Conference.
2. Click Manage my conferences.
3. Click on the My Conferences tab.
4. Click on a conference under Conference Name.
5. Click on Remove, followed by Close.
Related Topics
•
•
78
Permanent Conference
How to Configure a Permanent Conference
A31003-P1000-U102-7-7619, 02/2009
OpenScape Office, myPortal, User Guide
Instant Messaging
How to Send an Instant Message
9 Instant Messaging
Instant Messaging enables you to exchange instant messages (i.e., to chat) with
other internal subscribers.
Sent and received instant messages appear on your screen and on the screens
of your communication partners as a dialog in a separate Instant Messaging
window An instant message always has only one recipient. When messaging with
and alternating between multiple communication partners, every dialog has
separate tabs with the name of each communication partner.
Context menus with the menu item Send Instant Message indicate whether the
relevant subscriber is logged in by a symbol on the left.
Symbol
Status
Logged in
Logged out
INFO: If your communication partner has not started myPortal,
the communication system saves your Instant Message and
displays it at the next logon.
Related Topics
•
How to Send an Instant Message
9.1 How to Send an Instant Message
Step by Step:
1. Select the recipient by one of the following methods:
•
Click on an internal subscriber in the Favorites list.
•
Click on a subscriber in Directories > Internal Directory.
2. Select Send Instant Message in the context menu.
3. Enter the text in the Instant Messaging window and click Send.
Related Topics
•
•
•
A31003-P1000-U102-7-7619, 02/2009
OpenScape Office, myPortal, User Guide
Instant Messaging
Directories
Favorites List
79
Voice Messages and Fax
Voicemail
10 Voice Messages and Fax
The unified messaging services Voicemail and Fax offer you convenient user
interfaces for receiving and managing messages.
The Fax service is only available if your administrator of the communication
system has configured it for you.
Related Topics
•
•
•
•
•
•
•
Voicemail
Managing Voicemail
Fax Box
Managing Fax Messages
Sending Fax Messages
Notification Service for Messages
Phone Menu of the Voicemail Box
10.1 Voicemail
The voicemail box records voicemail messages and recorded calls centrally. You
can access these messages using myPortal.
You can view or edit the settings of your voicemail box; for example, you can
select the language of the voicemail box, determine its call number, switch
between recording and announcement modes, record your announcements and
control the announcement of your Presence status.
INFO: In order to enable callers to reach your voicemail box on
Busy and No Answer, the administrator must set up call
forwarding to your voicemail box. Alternatively, you can also do
this yourself by setting up a "call diversion after time" on your
phone.
Determining the Call Number of the Voicemail Box
You can determine under which extension you can reach the voicemail box from
any phone to listen to your voicemails or change your Presence status, for
example.
Selecting the Recording or Announcement Mode
In Recording mode, callers can leave a message for you on reaching your
voicemail box exactly as with an answering machine, whereas in Announcement
mode, they will only hear your announcement. You can specify this setting
separately for every Presence status.
80
A31003-P1000-U102-7-7619, 02/2009
OpenScape Office, myPortal, User Guide
Voice Messages and Fax
Voicemail
Announcements
You can record or import the following types of announcements:
•
Name announcement:
Your name announcement is used at the start of conferences for which you
have invited others and to announce when you join a conference. In addition,
the name announcement you have recorded is used as a greeting when you
have enabled the announcement of your Presence status for the caller
involved and your Presence status is not Office, CallMe or Do Not Disturb.
•
General personal greeting
This announcement is heard by callers in default mode (i.e., when no custom
profiles of the personal AutoAttendant are enabled) on reaching your
voicemail box. For example: "I am unfortunately unable to take your call at this
moment …"
•
Personal greeting for Busy:
This announcement is heard by callers in default mode (i.e., when no custom
profiles of the personal AutoAttendant are enabled) on reaching your
voicemail box when your line is busy. For example: "I am currently on the
phone and unable to take your call …" If no personal greeting for Busy has
been recorded, callers will hear your general personal greeting.
•
Personal greeting for No Answer:
This announcement is heard by callers in default mode (i.e., when no custom
profiles of the personal AutoAttendant are enabled) when their calls are
forwarded to your voicemail box manually or on no answer after a specific
amount of time. For example: "I am unfortunately unable to take your call at
this moment …" If you have not recorded any personal greeting for No
Answer, callers will hear your general personal greeting.
•
Personal announcements for custom profiles of the personal AutoAttendant:
These announcements are not used by the voicemail box in default mode, but
only in conjunction with the personal AutoAttendant.
The voicemail box can generate situation-based announcements of your
Presence status (except for Office, CallMe and Do Not Disturb) with an
indication of your scheduled time of return; for example: "xxx is in a
meeting until two thirty p.m. today". You can enable or disable the
announcement of your Presence status for specific callers and for all external
callers separately.
In default mode, the voicemail box plays back announcements in the following
order (from left to right):
Profile
Busy
Name announcement
-
Announcement of your
Presence status
-
Personal greeting
for Busy
(if not recorded: general)
No answer
-
-
for No Answer
(if not recorded: general)
A31003-P1000-U102-7-7619, 02/2009
OpenScape Office, myPortal, User Guide
81
Voice Messages and Fax
Voicemail
Profile
Meeting
Sick
Name announcement
Announcement of your
Presence status
Personal greeting
x (if you have enabled the
x (if you have enabled the
general
announcement of your Presence announcement of your Presence
status for the caller involved)
status for the caller involved)
Pause
Out of the Office
Vacation
Lunch
Gone Home
Do Not Disturb
-
-
general
Example: Announcement of your Presence status is enabled for the caller
Profile
Meeting
Name announcement
"Natalie Dubois"
Announcement of your
Presence status
"is in a meeting until
two thirty p.m. today".
Personal greeting
"I am unfortunately unable to
take your call at the moment …"
Example: Announcement of your Presence status is disabled for the caller
Profile
Out of the Office
Name announcement
-
Announcement of your
Presence status
-
Personal greeting
"I am unfortunately unable to
take your call at the moment …"
Central AutoAttendant
The central AutoAttendant enables the administrator of your communication
system to offer callers time-based choices to forward their calls to numbers he or
she has defined or to your voicemail box. As with the personal AutoAttendant,
callers signal their choices by entering digits at the phone. Due to the central
AutoAttendant, further announcements may follow those described above.
Announcement of your Presence Status
You can define whether callers should hear the announcement of your Presence
status on reaching your voicemail box. You can enable or disable this collectively
for all external callers and for specific subscribers.
Retrieving your Voicemail through the Attendant
Using myAttendant, you can grant or deny the Attendant permission to access
your voicemails and Fax messages. In the latter case, the Attendant can only
determine how many messages you have.
82
A31003-P1000-U102-7-7619, 02/2009
OpenScape Office, myPortal, User Guide
Voice Messages and Fax
Voicemail
Bypassing the Password Prompt
If you call the voicemail box from one of your additional phone numbers, you can
bypass the password prompt. This setting also applies to the phone notification
service of the voicemail box.
Language the Voicemail Box
You can define in which language the voicemail box plays back the menu choices
and the internal system announcements.
Related Topics
•
•
•
•
•
•
•
•
•
•
•
•
•
•
•
•
•
•
•
•
•
Voice Messages and Fax
How to Determine the Call Number for your Voicemail Box
How to Select Recording or Announcement Mode
How to Record an Announcement
How to Import an Announcement
How to Enable or Disable the Announcement of your Presence Status for
External Callers
How to Enable or Disable the Announcement of your Presence Status for
Specific Callers
How to Grant or Deny the Attendant Permission to Retrieve Voicemail and
Fax Messages
How to Activate or Deactivate the Password Prompt for the Voicemail Box
How to Select the Language of the Voicemail Box
First Steps
Screen Pops
How to Enable Screen Pops for New Voicemails and Fax Messages
How to Forward a Call to your Voicemail Box
Personal AutoAttendant
How to Record your Name Announcement
How to Record your Personal Greeting
How to Enable Screen Pops for New Voicemails and Fax Messages
Managing Voicemail
Notification Service for Messages
How to Define an Additional Phone Number
10.1.1 How to Determine the Call Number for your Voicemail Box
Step by Step:
1. Click Setup.
2. Click on the Personal Details tab.
3. The call number for the voicemail box can be found in the My Contact Details
area in the VoiceMail Number: field.
A31003-P1000-U102-7-7619, 02/2009
OpenScape Office, myPortal, User Guide
83
Voice Messages and Fax
Voicemail
4. Click on Close, followed by OK.
Related Topics
•
Voicemail
10.1.2 How to Select Recording or Announcement Mode
Step by Step:
1. Click Setup.
2. Click on the Forwarding Destinations tab.
3. Select one of the following values for each Presence status in the Voicemail
Recording area:
•
If you want callers to be able to leave messages in your voicemail box,
select Active.
•
If you want callers to only hear the announcements of your voicemail box,
select Inactive.
4. Click Save.
Related Topics
•
Voicemail
10.1.3 How to Record an Announcement
Step by Step:
1. Click Setup.
2. Click on the Profiles tab.
3. Click Record.
4. Click on the announcement with the desired designation in the list of
announcements.
5. Click Record. The voicemail box will now call you on your phone.
6. Answer the call.
7. Speak out the text of your announcement after the tone.
8. Click Stop.
9. If you want to listen to the announcement on the phone, click on Play. To exit
the playback loop, click on Stop.
10. If you want to record the announcement again, click on Record.
84
A31003-P1000-U102-7-7619, 02/2009
OpenScape Office, myPortal, User Guide
Voice Messages and Fax
Voicemail
11. Click on Close, followed by Save.
Related Topics
•
•
•
Voicemail
How to Edit a Profile for the AutoAttendant
How to Import an Announcement
10.1.4 How to Import an Announcement
Prerequisites:
Step by Step:
•
The audio file is available as a PCM file with the following properties: 8 kHz,
16 bit, mono.
1. Click Setup.
2. Click on the Profiles tab.
3. Click Record.
4. Click Upload.
5. Click on OK in the Warning!!! window.
6. Click OK.
7. Click on Close, followed by Save.
Related Topics
•
•
Voicemail
How to Record an Announcement
10.1.5 How to Enable or Disable the Announcement of your Presence
Status for External Callers
Step by Step:
1. Click Setup.
2. Click on the Program Settings tab.
3. Select one of the following options in the Presence Visibility area:
•
If you want to activate the voicemail box announcement of your Presence
status for external callers, enable the check box My presence will be
played to external callers when they reach my VoiceMail.
•
If you want to deactivate the voicemail box announcement of your
Presence status for external callers, clear the check box My presence
will be played to external callers when they reach my VoiceMail.
A31003-P1000-U102-7-7619, 02/2009
OpenScape Office, myPortal, User Guide
85
Voice Messages and Fax
Voicemail
4. Click Save.
Related Topics
•
•
•
•
•
Voicemail
Presence status
How to Change the Visibility of your Presence Status for Others
Personal AutoAttendant
How to Enable or Disable the Announcement of your Presence Status for
Specific Callers
10.1.6 How to Enable or Disable the Announcement of your Presence
Status for Specific Callers
Prerequisites:
Step by Step:
•
In order to disable the announcement of your Presence status for a specific
number, this number must be transmitted with the call.
1. Click Settings.
2. Click on the Program Settings tab.
3. Select one of the following options in the VoiceMail Presence area:
•
If you want to suppress the voicemail box announcement of your
Presence status for a specific number, click Add, enter the desired
number in the input field, and click OK.
INFO: You can use the following character as placeholders to
define a call number range:? for any single digit and * for any
number of digits.
•
If you want to allow the voicemail box announcement of your Presence
status for a specific number, click on desired entry and then on Remove.
4. Click Save.
Related Topics
•
•
•
•
•
86
Voicemail
Presence status
How to Change the Visibility of your Presence Status for Others
Personal AutoAttendant
How to Enable or Disable the Announcement of your Presence Status for
External Callers
A31003-P1000-U102-7-7619, 02/2009
OpenScape Office, myPortal, User Guide
Voice Messages and Fax
Voicemail
10.1.7 How to Grant or Deny the Attendant Permission to Retrieve
Voicemail and Fax Messages
Step by Step:
1. Click Setup.
2. Click on the Program Settings tab.
3. Select one of the following options in the Security and Access area:
•
If you want to allow your voicemail and fax messages to be retrieved by
the Attendant, enable the check box Receptionists are able to listen to
my voicemail.
•
If you want to prevent your voicemail and fax messages from being
retrieved by the Attendant, clear the check box Receptionists are able
to listen to my voicemail.
4. Click Save.
Related Topics
•
•
Voicemail
Fax Box
10.1.8 How to Activate or Deactivate the Password Prompt for the
Voicemail Box
NOTICE: If you deactivate the password prompt for your
voicemail box, unauthorized users could access your voicemail by
phone and listen to your voice messages, for example, or call
external destinations at your cost.
Step by Step:
1. Click Setup.
2. Click on the Program Settings tab.
3. Select one of the following options in the Security and Access area:
•
If you want to activate the password prompt on calling your voicemail box,
clear the Bypass password when calling voicemail check box.
•
If you want to deactivate the password prompt on calling your voicemail
box, enable the Bypass password when calling voicemail check box.
4. Click Save.
Related Topics
•
A31003-P1000-U102-7-7619, 02/2009
OpenScape Office, myPortal, User Guide
Voicemail
87
Voice Messages and Fax
Managing Voicemail
10.1.9 How to Select the Language of the Voicemail Box
Step by Step:
1. Click Setup.
2. Click on the Program Settings tab.
3. Choose the language from the VoiceMail Language drop-down list in the
Miscellaneous area.
4. Click Close.
Related Topics
•
Voicemail
10.2 Managing Voicemail
You can listen to and forward voicemails, for example, or move them to another
folder, save them as WAV files or call the sender.
Folders for Voicemail
myPortal organizes voice messages in the following folders:
•
Inbox
•
Played
•
Saved
•
Deleted
Displaying Voicemail
The following symbols identify different types of voicemail:
Symbol
-
Type of voicemail
Voicemail to a subscriber
Voicemail to a group
Recorded call
Recorded conference
The List view of voicemails shows the following details:
88
•
Symbol for the type of voicemail
•
Date
•
Time
A31003-P1000-U102-7-7619, 02/2009
OpenScape Office, myPortal, User Guide
Voice Messages and Fax
Managing Voicemail
•
Group, if available
•
Call number, if available
•
Last Name, if available
For recorded conferences: conference name, if available; otherwise, Last
Name of the second conference participant, if available
•
First Name, if available
•
Company, if available
•
Priority
Color coding: urgent (rot), private (blue), normal (black). When listening to the
voicemail Inbox, an announcement notifies you of the number of messages
per priority.
•
Duration
The width of all columns is variable.
Voicemail Messages for Groups
The administrator can set up groups for voice messages with a separate call
number for each group. The communication system forwards voice messages to
a group to each group member. As soon as one of the subscribers has listened
to a new message, that message is flagged as "played" for all group members. If
a group member deletes a message, that entry is also deleted for all other group
members.
Listening to Voice Messages
You can optionally listen to voice messages on the phone or your PC. When a
new voice message is listened to for the first time, the communication system
moves it automatically from the Inbox folder to the Played folder.
Calling the Sender of a Voice Message
You can call the sender of a voice message.
Forwarding a Voice Message
You can forward a voice message easily to other internal subscribers.
Moving a Voice Message
You can move a voice message to another folder.
Saving a Voice Message as a File
NOTICE: The communication system saves voice messages for
a limited period of time, which can be configured per folder by the
administrator. When this time period expires, the voice messages
are automatically deleted by the communication system.
A31003-P1000-U102-7-7619, 02/2009
OpenScape Office, myPortal, User Guide
89
Voice Messages and Fax
Managing Voicemail
You can save a voice messages as a WAV file in the file system of your PC to
archive it permanently or send it to any recipient by e-mail.
Related Topics
•
•
•
•
•
•
•
•
•
•
•
Voice Messages and Fax
How to Listen to a Voice Message on the Phone
How to Listen to a Voice Message on the PC
How to Call the Sender of a Voice Message
How to Forward a Voicemail Message
How to Move a Voice Message
How to Save a Voice Message as a WAV File
How to Sort Voice Messages
How to Delete a Voice Message
User Interface Elements
Voicemail
10.2.1 How to Listen to a Voice Message on the Phone
Prerequisites:
Step by Step:
•
Your Presence status is Office or CallMe.
1. Click on the VoiceMail tab.
2. Click on the desired folder, e.g., Inbox.
3. Click on the desired voicemail.
4. Click on Play Message > Through Phone in the context menu.
Next steps:
Answer the call.
Related Topics
•
•
Managing Voicemail
How to Listen to a Voice Message on the PC
10.2.2 How to Listen to a Voice Message on the PC
Prerequisites:
Step by Step:
•
Your PC has a properly configured sound card with speakers or headphones.
1. Click on the VoiceMail tab.
2. Click on the desired folder, e.g., Inbox.
3. Click on the desired voicemail.
4. Click on Play Message > Through Speakers in the context menu.
90
A31003-P1000-U102-7-7619, 02/2009
OpenScape Office, myPortal, User Guide
Voice Messages and Fax
Managing Voicemail
5. Click on the Play button in the screen pop.
Related Topics
•
•
Managing Voicemail
How to Listen to a Voice Message on the Phone
10.2.3 How to Call the Sender of a Voice Message
Step by Step:
1. Click on the VoiceMail tab.
2. Click on the desired folder, e.g., Played.
3. Click on the desired voicemail.
4. Click in the context menu on the item Dial ... with the appropriate phone
number.
Related Topics
•
Managing Voicemail
10.2.4 How to Forward a Voicemail Message
Step by Step:
1. Click on the VoiceMail tab.
2. Click on the desired folder, e.g., Played.
3. Click on the desired voicemail.
4. Click on Forward Message, in the context menu.
5. Click on the desired station and then on Forward.
Related Topics
•
Managing Voicemail
10.2.5 How to Move a Voice Message
Step by Step:
1. Click on the VoiceMail tab.
2. Click on the desired folder, e.g., Played.
3. Click on the desired voicemail.
4. Select the desired folder in the context menu under Move Message to > ….
Related Topics
•
A31003-P1000-U102-7-7619, 02/2009
OpenScape Office, myPortal, User Guide
Managing Voicemail
91
Voice Messages and Fax
Managing Voicemail
10.2.6 How to Save a Voice Message as a WAV File
Step by Step:
1. Click on the VoiceMail tab.
2. Click on the desired folder, e.g., Played.
3. Click on the desired voicemail.
4. Click on Save as WAV in the context menu.
5. Select a folder in the Save window, enter a file name of your choice in the
input field, and click Save.
Related Topics
•
Managing Voicemail
10.2.7 How to Sort Voice Messages
Step by Step:
1. Click on the VoiceMail tab.
2. Click on the desired folder, e.g., Played.
3. Click on one of the column titles: Date, Time, Phone Number, Last Name,
First Name, Company, Priority or Duration to sort the voicemails by this
criterion in ascending alphanumeric order.
4. If you want to reverse the sort order, click again on column header.
Related Topics
•
Managing Voicemail
10.2.8 How to Delete a Voice Message
Step by Step:
1. Click on the Voice Messages tab.
2. Click on one of the folders: Inbox, Played or Saved.
3. Select one of the following options:
•
Click on the desired voicemail.
•
Mark the desired voicemails.
4. Select Move Message to > Move to Deleted in the context menu.
5. If you want to delete the Fax messages permanently:
92
A31003-P1000-U102-7-7619, 02/2009
OpenScape Office, myPortal, User Guide
Voice Messages and Fax
Fax Box
a) Click on the Deleted folder.
b) Select the desired voice message(s).
c) Select Move Message to > Permanently Delete Message in the context
menu.
Related Topics
•
Managing Voicemail
10.3 Fax Box
The Fax box saves Fax messages centrally. You can access these messages
using myPortal.
You can view or edit the following settings of your Fax box:
Determining your own Fax Number
You can determine under which Fax number you can be reached.
Retrieving Fax Messages through the Attendant
Using myAttendant, you can grant or deny the Attendant permission to access
your Fax messages and voicemails. In the latter case, the Attendant can only
determine how many messages you have.
Related Topics
•
•
•
•
•
•
•
•
•
Voice Messages and Fax
How to Determine your own Fax Number
Screen Pops
How to Enable Screen Pops for New Voicemails and Fax Messages
How to Enable Screen Pops for New Voicemails and Fax Messages
Managing Fax Messages
How to Grant or Deny the Attendant Permission to Retrieve Voicemail and
Fax Messages
Sending Fax Messages
Notification Service for Messages
10.3.1 How to Determine your own Fax Number
Prerequisites:
Step by Step:
•
Your administrator has configured a Fax number for you.
1. Click Setup.
2. Click on the Personal Details tab.
3. Your Fax number can be found in the My Contact Details area in the Fax
Number field.
A31003-P1000-U102-7-7619, 02/2009
OpenScape Office, myPortal, User Guide
93
Voice Messages and Fax
Managing Fax Messages
4. Click on Close, followed by OK.
Related Topics
•
Fax Box
10.4 Managing Fax Messages
You can display or forward Fax messages, for example, or move them to another
folder, save them as TIFF files and even call the sender.
Folder for Fax Messages
myPortal organizes Fax messages in the following folders:
•
Inbox
•
Read
•
Deleted
•
Sent Items:
Contains the Fax messages already sent by the communication system
•
Sending Items
Contains queued Fax messages that have not yet been sent The
communication system tries to transmit a Fax message up to 5 times within
25 minutes.
Details of Fax Messages
Depending on the folder involved, the List view of the Fax messages shows
different combinations of the following details: Date, Time, Call number, Last
Name, First Name, Company, Fax Group, Pages, Status, Destination and
Progress. The width of all columns is variable.
Fax Messages for Groups
The administrator can set up groups for Fax messages with a separate Fax
number for each group. The communication system forwards Fax messages to a
group to each group member. As soon as one of the subscribers has viewed a
new message, the message is flagged as "read" for all group members. If a group
member deletes a message, that entry is also deleted for all other group
members.
Calling the Sender of a Fax Message
You can call the sender of a Fax message.
Forwarding a Fax Message
You can forward a Fax message easily to other internal subscribers.
Moving a Fax Message
You can move a Fax message to another folder.
94
A31003-P1000-U102-7-7619, 02/2009
OpenScape Office, myPortal, User Guide
Voice Messages and Fax
Managing Fax Messages
Saving a Fax Message as a File
You can save a Fax message as a TIFF file in the file system of your PC to archive
it permanently or send it by e-mail to any recipient.
Displaying Fax Messages
When a new Fax message is viewed for the first time, the communication system
moves it automatically from the Inbox folder to the Read folder.
Related Topics
•
•
•
•
•
•
•
•
•
•
•
•
Voice Messages and Fax
How to Display a Fax Message
How to Call the Sender of a Fax Message
How to Forward a Fax Message
How to Move a Fax Message
How to Save a Fax Message as a TIFF File
How to Sort Fax Messages
How to Display Fax Messages in the Send Queue
How to Display Sent Fax Messages
How to Delete a Fax Message
User Interface Elements
Fax Box
10.4.1 How to Display a Fax Message
Prerequisites:
Step by Step:
•
TIFF files are associated with an application in which they can be viewed.
1. Click on the Fax Messages tab.
2. Click on the desired folder, e.g., Inbox.
3. Select View Fax in the context menu of the appropriate Fax message.
Related Topics
•
Managing Fax Messages
10.4.2 How to Call the Sender of a Fax Message
Step by Step:
1. Click on the Fax Messages tab.
2. Click on the desired folder, e.g., Read.
3. Click on the desired Fax message.
A31003-P1000-U102-7-7619, 02/2009
OpenScape Office, myPortal, User Guide
95
Voice Messages and Fax
Managing Fax Messages
4. Click in the context menu on the item Dial ... with the appropriate phone
number.
Related Topics
•
Managing Fax Messages
10.4.3 How to Forward a Fax Message
Step by Step:
1. Click on the Fax Messages tab.
2. Click on the desired folder, e.g., Read.
3. Select Forward Message in the context menu of the appropriate Fax
message.
4. Enable the check box for the desired recipient in the Forward Fax Message
window and click OK.
Related Topics
•
Managing Fax Messages
10.4.4 How to Move a Fax Message
Step by Step:
1. Click on the Fax Messages tab.
2. Click on the desired folder, e.g., Read.
3. Click on the desired Fax message.
4. Select the desired folder in the context menu under Move Message to > ….
Related Topics
•
Managing Fax Messages
10.4.5 How to Save a Fax Message as a TIFF File
Step by Step:
1. Click on the Fax Messages tab.
2. Click on the desired folder, e.g., Read.
3. Click on the desired Fax message.
4. Click on Save as tiff in the context menu.
96
A31003-P1000-U102-7-7619, 02/2009
OpenScape Office, myPortal, User Guide
Voice Messages and Fax
Managing Fax Messages
5. Select a folder in the Save window, enter a file name of your choice in the
input field, and click Save.
Related Topics
•
Managing Fax Messages
10.4.6 How to Sort Fax Messages
Step by Step:
1. Click on the Fax Messages tab.
2. Click on the desired folder, e.g., Read.
3. Click on one of the column titles: Date, Time, Phone Number, Last Name,
First Name, Company, Fax Group or Pages to sort the Fax messages by
this criterion in ascending alphanumeric order.
4. If you want to reverse the sort order, click again on column header.
Related Topics
•
Managing Fax Messages
10.4.7 How to Display Fax Messages in the Send Queue
Step by Step:
1. Click on the Fax Messages tab.
2. Click on the Sending Items folder.
3. Click on one of the column titles: Date, Fax Group, Last Name, First Name,
Company, Destination, Pages or Progress to sort the Fax messages by this
criterion in ascending alphanumeric order.
4. If you want to reverse the sort order, click again on column header.
Related Topics
•
•
Managing Fax Messages
How to Display Sent Fax Messages
10.4.8 How to Display Sent Fax Messages
Step by Step:
1. Click on the Fax Messages tab.
2. Click on the Sent Items folder.
3. Click on one of the column titles: Date, Fax Group, Pages, Status, Last
Name, First Name, Company or Destination to sort the Fax messages by
this criterion in ascending alphanumeric order.
A31003-P1000-U102-7-7619, 02/2009
OpenScape Office, myPortal, User Guide
97
Voice Messages and Fax
Sending Fax Messages
4. If you want to reverse the sort order, click again on column header.
Related Topics
•
•
Managing Fax Messages
How to Display Fax Messages in the Send Queue
10.4.9 How to Delete a Fax Message
Step by Step:
1. Click on the Fax Messages tab.
2. Click on one of the folders: Inbox, Read, Sent Items or Sending Items.
3. Select one of the following options:
•
Click on the desired Fax message.
•
Mark the desired Fax messages.
4. Select Move Message to > Move to Deleted in the context menu.
5. If you want to delete the Fax messages permanently:
a) Click on the Deleted folder.
b) Select the desired Fax message(s).
c) Select Move Message to > Permanently Delete Message in the context
menu.
Related Topics
•
Managing Fax Messages
10.5 Sending Fax Messages
The HiPath OpenOffice Fax Printer can be used to send Fax messages under
Windows.
Detains on sending Fax messages can be found in the documentation of the
HiPath OpenOffice Fax Printer.
Acknowledgment on Sending a Fax Message
After a Fax message is sent, a screen pop of myPortal notifies you whether the
transmission succeeded or failed.
Related Topics
•
•
98
Voice Messages and Fax
Fax Box
A31003-P1000-U102-7-7619, 02/2009
OpenScape Office, myPortal, User Guide
Voice Messages and Fax
Notification Service for Messages
10.6 Notification Service for Messages
The communication system can optionally notify you about a new message by email, by phone or with an SMS.
The Notification Service works as follows:
Message
Notification
Action
Voicemail,
E-mail
You receive an e-mail with the message as a WAV file, the date and time it was
received, the duration of the message and, if available, the phone number and name
of the sender. Voicemails with "urgent" priority are flagged as e-mails with
"Importance: High".
Voicemail
by phone
Your voicemail box calls you at the number you have specified and plays back the
message to you.
Voicemail
SMS
You receive an SMS about the received message at the phone number defined by
you.
Fax
E-mail
You receive an e-mail with the message as a TIFF file, the date and time it was
received, the number of pages and, if available, the phone number and name of the
sender.
You can enable or disable every type of notification for each Presence status
individually.
The notification by phone can be restricted to the business hours configured by
your administrator. You can define the number and intervals for the repeated
attempts for the notification by phone.
Related Topics
•
•
•
•
•
•
Voice Messages and Fax
How to Enable or Disable E-mail Notifications
How to Enable or Disable the Notification by Phone
How to Enable or Disable SMS Notification
Voicemail
Fax Box
10.6.1 How to Enable or Disable E-mail Notifications
Prerequisites:
Step by Step:
•
Your administrator of the communication system has configured e-mail
forwarding and your e-mail address is specified under Personal Details.
1. Click Setup.
2. Click on the Notifications tab.
3. Select one of the options below in the Email row of the Notification table for
each column with one of the following Presence statuses: Office, Meeting,
Sick, Break, Out of the Office, Vacation, Lunch, Home or Do Not Disturb:
A31003-P1000-U102-7-7619, 02/2009
OpenScape Office, myPortal, User Guide
99
Voice Messages and Fax
Notification Service for Messages
•
If you want to activate the notification for a Presence status, enable the
corresponding check box.
•
If you want to deactivate the notification for a Presence status, clear the
corresponding check box.
4. Click Save.
Related Topics
•
•
Notification Service for Messages
How to Specify an E-Mail Address
10.6.2 How to Enable or Disable the Notification by Phone
Step by Step:
1. Click Setup.
2. Click on the Notifications tab.
3. Select one of the options below in the Outbound row of the Notification table
for each column with one of the following Presence statuses: Office,
Meeting, Sick, Break, Out of the Office, Vacation, Lunch, Home or Do Not
Disturb:
•
If you want to activate the notification for a Presence status, enable the
corresponding check box.
•
If you want to deactivate the notification for a Presence status, clear the
corresponding check box.
4. Choose one the following options in the Outbound Notification Times area:
•
If you want to be notified only during business hours, click on During
Business Hours Only.
•
If you want to be notified at any time, click on 24 Hours a Day.
5. Enter the desired phone number in the Outbound Number field in dialable
format or in canonical format
6. Enter the desired time interval and the number of attempts to be made when
repeating the notification if required in the Attempts area.
7. Click Save.
Related Topics
•
•
•
100
Notification Service for Messages
Call Number Formats
Phone Menu of the Voicemail Box
A31003-P1000-U102-7-7619, 02/2009
OpenScape Office, myPortal, User Guide
Voice Messages and Fax
Phone Menu of the Voicemail Box
10.6.3 How to Enable or Disable SMS Notification
Prerequisites:
Step by Step:
•
Your administrator of the communication system has defined an appropriate
SMS template for you.
1. Click Setup.
2. Click on the Notifications tab.
3. Select one of the options below in the SMS row of the Notification table for
each column with one of the following Presence statuses: Office, Meeting,
Sick, Break, SMS of the Office, Vacation, Lunch, Home or Do Not
Disturb:
•
If you want to activate the notification for a Presence status, enable the
corresponding check box.
•
If you want to deactivate the notification for a Presence status, clear the
corresponding check box.
4. Click Save.
Related Topics
•
Notification Service for Messages
10.7 Phone Menu of the Voicemail Box
You can edit your voicemail box or change your Presence status and also access
further functions from a phone.
The password for accessing your voicemail box is the same as for myPortal.
A31003-P1000-U102-7-7619, 02/2009
OpenScape Office, myPortal, User Guide
101
Voice Messages and Fax
Phone Menu of the Voicemail Box
OpenScape Office
User Menu Structure
Enter mailbox
Enter PIN
1
2
Enter mailbox
3
Set status
Inbox
Played
Saved
Deleted
1
2
3
4
4
Record greetings
1
Name
2
Greeting
3
Profiles
1
Replay
1
Office
1
Office
2
Callback
2
Meeting
2
Meeting
3
Next
3
Sick
3
Sick
4
Save
4
Break
4
Break
5
Save as new
5
Gone Out
5
Gone Out
6
Delete
6
Vacation
6
Vacation
7
Copy
7
Lunch
7
Lunch
0
Date & Time
8
Home
8
Home
4
5
Change PIN
Leave message
Common keys:
1 = Accept
2 = Change
= Enter Extension
# = Up one level
*
CLI Recognition
Related Topics
•
•
•
•
•
•
102
Voice Messages and Fax
Presence status
How to Record your Name Announcement
How to Record your Personal Greeting
How to Enable or Disable the Notification by Phone
How to Change the Password
A31003-P1000-U102-7-7619, 02/2009
OpenScape Office, myPortal, User Guide
Configuration
11 Configuration
You can configure myPortal to suit your requirements by editing your personal
data or the program settings, for example.
INFO: When you make multiple changes under Setup on
different tabs, it is sufficient to Save all the changes once at the
end.
Defining Additional Phone Numbers
Additional phone numbers are typically used for:
•
Status-based call forwarding
•
CallMe service
Your additional phone numbers are visible in the internal directory.
Providing your own Picture
If you provide your own picture, it will be shown to other subscribers when they
position their mouse pointers over your entry in the internal directory (Extension
column) or in the Favorites list. You can use an image of any file size. The
communication system saves a copy with a width and height restricted to 200
pixels.
Automatic Logon
If you use an automatic logon, the Login window is not displayed. For security
reasons, you should avoid using the automatic logon if you have shared Windows
user accounts.
Related Topics
•
•
•
•
•
•
•
•
•
•
•
•
•
•
•
A31003-P1000-U102-7-7619, 02/2009
OpenScape Office, myPortal, User Guide
How to Edit your own Name
How to Specify an E-Mail Address
How to Define an Additional Phone Number
How to Provide your own Picture
How to Delete your own Picture
Programming the Function Keys of the Telephone
How to Change the Password
How to Enable or Disable an Automatic Logon
How to Select the Language of the User Interface
How to Change Skin Colors
How to Change the Server Address
Automatic Updates
Troubleshooting
Directories
Favorites List
103
Configuration
How to Edit your own Name
11.1 How to Edit your own Name
Step by Step:
1. Click Setup.
2. Click on the Personal Details tab.
3. Enter your name in the My Personal Details area in the First Name and Last
Name fields.
4. Click Save.
Related Topics
•
Configuration
11.2 How to Specify an E-Mail Address
Prerequisites:
Step by Step:
•
Your administrator of the communication system has configured e-mail
forwarding.
1. Click Setup.
2. Click on the Personal Details tab.
3. Enter your E-mail Address in the My Contact Details area.
4. Click Save.
Related Topics
•
•
•
Configuration
Conferencing (only HiPath OpenOffice ME)
How to Enable or Disable E-mail Notifications
11.3 How to Define an Additional Phone Number
Step by Step:
1. Click Setup.
2. Click on the Personal Details tab.
3. Enter an additional phone number in dialable format or in canonical format in
the My Contact Details area in one of the following fields: Mobile Number,
External Number 1, External Number 2, Private Number or Assistant
Number.
104
A31003-P1000-U102-7-7619, 02/2009
OpenScape Office, myPortal, User Guide
Configuration
How to Provide your own Picture
4. Click Save.
Related Topics
•
•
•
•
•
•
Configuration
Call Number Formats
How to Enable the CallMe Service
Status-based Call Forwarding
How to Configure Status-based Call Forwarding
Voicemail
11.4 How to Provide your own Picture
Prerequisites:
Step by Step:
•
You have an image file with your picture in one of the following file formats:
BMP, GIF, JPG.
1. Click Setup.
2. Click on the Personal Details tab.
3. Click in the My Picture area on Select.
4. Choose a folder and the desired file in the Open window and click Open.
5. Click Save.
Related Topics
•
•
Configuration
How to Delete your own Picture
11.5 How to Delete your own Picture
Step by Step:
1. Click Setup.
2. Click on the Personal Details tab.
3. Click in the My Picture area on Delete.
4. Click Save.
Related Topics
•
•
Configuration
How to Provide your own Picture
11.6 Programming the Function Keys of the Telephone
You can customize the function keys of your telephone and any available key
module or BLF module with myPortal to suit your requirements.
A31003-P1000-U102-7-7619, 02/2009
OpenScape Office, myPortal, User Guide
105
Configuration
Programming the Function Keys of the Telephone
This applies to both the predefined function keys and the other function keys, but
not the local application keys (Local App.).
INFO: In the case of phones with a display, you can also program
some function keys directly at the phone.
Programming Function Keys on Different Levels
You can program the function keys on two levels: the first level can be assigned
all the offered functions, and the second level can be assigned external phone
numbers. The Shift key must be configured on the phone in order to use the
second level. The LED of the function key is always assigned to the first level.
Related Topics
•
•
Configuration
How to Program the Function Keys of the Telephone
11.6.1 How to Program the Function Keys of the Telephone
Step by Step:
1. Click Setup.
2. Click on the Personal Details tab.
3. Click on Program Phone Keys. A window for programming the function keys
of the telephone is opened in the Browser.
a) If a message such as There is a problem with the security
certificate of this website appears, click on Continue loading
this website.
4. Under the phone icon, click on the key area that you want to edit.
5. In the detailed view of the key area, click on the key icon at end of the
corresponding row. The key icon goes red and indicates that the function is
active for programming.
a) If you want to display details on the current function of a key, move the
mouse pointer over the label field to the left of the key.
6. Select the desired function from the Choose Function drop-down list.
a) If a function requires additional information (parameters), select these
details or enter the required data.
INFO: Select the Shift Key function for a function key to access
a second level where you program external phone numbers.
7. Click Save.
8. If you selected a system phone with automatic key labeling (such as an
optiPoint 420 Standard, for example), you can enter the text that should
appear in the display of the function key in the Labeling column.
106
A31003-P1000-U102-7-7619, 02/2009
OpenScape Office, myPortal, User Guide
Configuration
How to Change the Password
9. If you have programmed a function key as the Shift Key, select the check box
2. Level. Enter the external phone numbers as described under steps 6 to8.
10. If you want to program further function keys, repeat steps 4 to 9.
11. Close the Browser window for key programming.
12. Click in the myPortal Setup window on Save.
Related Topics
•
•
Programming the Function Keys of the Telephone
Problem Resolution: Empty Browser Window for Key Programming
11.7 How to Change the Password
NOTICE: For security reasons, you should change your
password after logging in for the first time. Otherwise,
unauthorized users could, for example, potentially access your
voicemails and fax messages or redirect your station number to
external toll-based destinations by simply using the default
password.
INFO: You can also change the password via the Phone menu of
the voicemail box.
Step by Step:
1. Click Setup.
2. Click on the Personal Details tab.
3. Click in the My Personal Details are under Password on Reset.
4. Enter your current password in the Current field.
5. Enter your new password in the New and Confirm fields. The password must
not consist of only digits.
INFO: The password applies to myPortal, myPortal for Outlook
and myPortal for Outlook as well as phone access to your
voicemail.
6. Click on OK, followed by Save.
Related Topics
•
•
•
A31003-P1000-U102-7-7619, 02/2009
OpenScape Office, myPortal, User Guide
Configuration
How to Start myPortal
Phone Menu of the Voicemail Box
107
Configuration
How to Enable or Disable an Automatic Logon
11.8 How to Enable or Disable an Automatic Logon
NOTICE: Use the automatic login only if you are sure that no one
else has access to your Windows user account. Otherwise,
unauthorized users could, for example, potentially access your
voicemails and fax messages or redirect your station number to
external toll-based destinations.
Step by Step:
1. Click Setup.
2. Click on the Program Settings tab.
3. Select one of the following options in the Security and Access area:
•
If you want to enable the automatic logon, select the check box
Remember my password and automatically log me into myPortal.
•
If you want to disable the automatic logon, clear the check box
Remember my password and automatically log me into myPortal.
4. Click Save.
Related Topics
•
•
Configuration
How to Start myPortal
11.9 How to Select the Language of the User Interface
Step by Step:
1. Click Setup.
2. Click on the Program Settings tab.
3. Choose the Language in the Miscellaneous area.
4. Click Save.
Next steps:
Close myPortal and restart the application.
Related Topics
•
•
Configuration
User Interface Elements
11.10 How to Change Skin Colors
Step by Step:
1. Click Setup.
2. Click on the Program Settings tab.
3. Select the option with the desired appearance in the Skin area.
108
A31003-P1000-U102-7-7619, 02/2009
OpenScape Office, myPortal, User Guide
Configuration
How to Change the Server Address
4. Click Save.
Next steps:
Close myPortal and restart the application.
Related Topics
•
•
Configuration
User Interface Elements
11.11 How to Change the Server Address
INFO: Do not change the server address unless you are
instructed to do so by your administrator. You cannot use
myPortal with an invalid server address.
Step by Step:
1. Click Setup.
2. Click on the Program Settings tab.
3. Enter the IP address of the communication system in the Server Address
field in the Security and Access area.
4. Click Save.
Related Topics
•
Configuration
11.12 Automatic Updates
Automatic updates ensure that myPortal is always kept up-to-date with the latest
version.
If myPortal detects that a new version of myPortal is available on the
communication system at startup, you will receive a corresponding message and
can then update myPortal.
Related Topics
•
•
A31003-P1000-U102-7-7619, 02/2009
OpenScape Office, myPortal, User Guide
Configuration
How to Perform Automatic Updates
109
Configuration
Troubleshooting
11.12.1 How to Perform Automatic Updates
Prerequisites:
Step by Step:
Next steps:
•
You have received a message such as: A new version of myPortal is
available and will be downloaded shortly. myPortal will
be automatically closed and restarted.
1. Click OK.
myPortal is automatically closed and updated. You can then restart myPortal.
Related Topics
•
•
Automatic Updates
Problem Resolution: No Automatic Update
11.13 Troubleshooting
Help on known issues can be found under Troubleshooting.
Related Topics
•
•
•
•
•
Configuration
Problem Resolution: No Connection to the Communication System
Problem Resolution: The Nokia Application Suite Starts Instead of
myPortal
Problem Resolution: Empty Browser Window for Key Programming
Problem Resolution: No Automatic Update
11.13.1 Problem Resolution: No Connection to the Communication System
The Windows/Vista Personal Firewall is enabled by default on installing Windows.
The firewall prevents the connection of your application with the communication
system. Contact your network administrator or your administrator of the
communication system to have the following steps performed:
Step by Step:
1. Add the application to the list of exceptions in the Windows Firewall settings
in the Control Panel.
Related Topics
•
•
110
Troubleshooting
How to Start myPortal
A31003-P1000-U102-7-7619, 02/2009
OpenScape Office, myPortal, User Guide
Configuration
Troubleshooting
11.13.2 Problem Resolution: The Nokia Application Suite Starts Instead of
myPortal
If the Nokia Application Suite is installed on your PC, Java applications with the
.jar extension such as myPortal, for example, are automatically associated with
that application. Note that the Nokia Application Suite will automatically become
the default application for .jar files when it is reinstalled. Contact the administrator
of your network to have the following steps performed:
Step by Step:
1. Reinstall the Java Runtime Software on the PC involved.
Related Topics
•
•
Troubleshooting
How to Start myPortal
11.13.3 Problem Resolution: Empty Browser Window for Key Programming
On clicking the Program Phone Keys link, your Browser opens with only an
empty window.
Step by Step:
1. Disable the proxy server temporarily in the Connection settings of your
Browser.
2. Refresh the page for programming function keys in your Browser and
complete the key programming.
Next steps:
Then reactivate the proxy server in your browser.
Related Topics
•
•
Troubleshooting
How to Program the Function Keys of the Telephone
11.13.4 Problem Resolution: No Automatic Update
The automatic update is not executed correctly. This could be because your
Windows user account does not have local administration rights. Contact your
network administrator to have the following steps performed:
Step by Step:
1. Make sure that the user has local administration rights.
Related Topics
•
•
A31003-P1000-U102-7-7619, 02/2009
OpenScape Office, myPortal, User Guide
Troubleshooting
How to Perform Automatic Updates
111
Index
A
Absence 43
automatic creation of Outlook appointments 43
Ad-hoc Conference 61
Ad-hoc conference 64
alternative workplace 50
announcement 80
announcement mode 80
authentication
conference participant 61
AutoAttendant
central 80
personal 57, 80
automatic logon 103
automatic updates 103
availability 42
B
Break 43
C
call
accept 21
exit 39
forward to voicemail box 42
hold 39
Journal, accepted 32
Journal, external 32
Journal, inbound 32
Journal, internal 32
Journal, missed 32
Journal, open 32
Journal, outgoing 32
pick up for another subscriber 21
record 39
transfer 39
call forwarding
rule-based 52
status-based 52
Call Functions 21
call number format 20
call sender
Fax message 94
voicemail 88
callback
Journal 32
Phone menu 101
A31003-P1000-U102-7-7619, 02/2009
OpenScape Office, myPortal, User Guide
Z
CallMe 43, 50
CallMe service 50
canonical format 20
color
user interface 103
Concept 8
condition
rule-based call forwarding 52
Conference 61
conference
record 39
configuration 103
Contact 23, 28
controlling availability 42
D
dialable format 20
dial-in number
conference 61
Directory 23
directory
make call 21
Display Conventions 8
Do Not Disturb 43
Dynamic greetings 57
E
e-mail
invitation to conference 61
notification 99
specify address 103
exception
rule-based call forwarding 52
external directory 23
F
Favorites List 28
Favorites list
make call 21
Fax 80
Fax Box 93
Fax message
delete 94
display 94
forward 94
group 94
move 94
retrieve through attendant 80, 93
112
Index
send 98
Fax number 93
First Steps 14
folder
Fax messages 94
Journal 32
voicemail 88
function keys
program 103
functions
during a call 39
myPortal 7
G
general personal greeting 80
group
voicemail 88
name announcement 57, 80
Notification
Fax message 99
voicemail 99
notification by phone 99
Notification service 99
O
Office 43
OpenScape Office, hardware and software prerequisites 12
Operating instructions 8
Out of the Office 43
Outlook contact
import 23
P
make call 20
Meeting 43
myPortal
functions 7
password
change 103
Phone menu 101
voicemail box 80
permanent conference 61, 76
personal announcement 57
personal AutoAttendant 57
personal contact 23
personal details 103
personal directory 23
personal greeting 14, 80
Phone menu 101
phone number
additional 103
dial 21
voicemail box 80
picture
delete 103
provide 103
Presence status 43, 57
announcements 80
automatic reset 43
automatic updating of Outlook appointments 43
call forwarding 52
Phone menu 101
screen pops 43
visibility 43
Priority 88, 99
private voicemail 88
profile for personal AutoAttendant 57
program settings 103
N
R
H
Home 43
I
importing Outlook contacts 23
Installation 11
Instant Message 79
internal directory 23
Introduction 7
invitation
conference 61
J
Journal 32
grouping entries 32
make call 21
K
key programming 106
L
language
user interface 103
voicemail box 80
Lunch 43
M
name
change 103
Name announcement 14
A31003-P1000-U102-7-7619, 02/2009
OpenScape Office, myPortal, User Guide
recording mode 80
Rule 52
113
Index
rule-based call forwarding 52
S
Scheduled Conference 69
scheduled conference 61
screen pop, pop-up window 35
searching in a directory 23
sent Fax messages 94
server address 103
Setup 103
Sick 43
skin color 103
SMS
notification 99
sorting
directory 23
Fax messages 94
Journal 32
voicemail 88
starting myPortal 11
status-based call forwarding 52
voicemail box 57
Phone menu 101
W
WAV file
notification 99
voicemail 88
Z
zoom function 23
T
teleworking 50
TIFF file
Fax message 94
notification 99
topics, types of 8
transfer method 39
Troubleshooting 110
Types of Topics 8
U
uninstallation 11
urgent voicemail 88
user interface
color 103
elements 9
language 103
User Interface Elements 9
user-defined profile, custom profile 57
V
Vacation 43
virtual conference room 61
Voicemail 80
voicemail
delete 88
forward 88
listen to 88
move 88
private 88
urgent 88
114
A31003-P1000-U102-7-7619, 02/2009
OpenScape Office, myPortal, User Guide