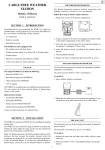
1
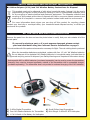
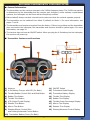
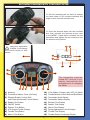
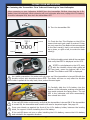
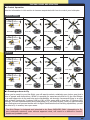
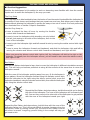
1
TABLE OF CONTENTS
Introduction................................................. 2
Preparing to Fly Your Helicopter.................... 9
Warranty Terms........................................... 2
Flying Your Helicopter..................................11
Customer Service Information....................... 3
Troubleshooting Guide.................................16
Safety Warnings and Important Information... 3
Exploded View Assembly Drawing.................17
Kit Contents and Parts Identification.............. 5
Replacement Parts List................................18
Becoming Familiar with Your Helicopter.......... 6
Warranty Service Information.......................19
INTRODUCTION
Thank you for purchasing the EF Helicopter’s Mini-Stinger EP 2.4GHz RTF Helicopter.
The Mini-Stinger is a high-quality 2.4GHz electric-powered co-axial helicopter that's perfect for the
beginner to learn to fly, or for the more experienced pilot to simply have fun. The Mini-Stinger is
designed specifically to fly indoors, either in your house or other indoor area. The helicopter is
powered by two electric motors which drive a co-axial rotor head which results in a very stable flying
model that makes learning to fly much easier. In addition, an innovative 2.4GHz digital transmitter
with LCD and integral Li-Po charger for the helicopter's onboard battery is included.
Before flying your new helicopter, please carefully read through this Instruction Manual in its entirety.
Doing so will ensure your success the first time around. As you can see, there's not much to it!
Read the Safety Warnings and Important Information on Pages 3 through 5
Identify the Parts and Familiarise Yourself with Your New Helicopter
l Charge the Li-Po Battery
l
l
l
l
l
Test Your Helicopter and Make Final Pre-Flight Checks
Become Familiar with How Your Helicopter Flies
Choose Your Flying Area and Fly!
WARRANTY TERMS
EF Helicopters guarantees this kit to be free from defects in both material and workmanship, at the
date of purchase. This does not cover any component parts damaged by use, misuse or modification.
In no case shall EF Helicopter's liability exceed the original cost of the purchased kit.
In that EF Helicopters has no control over the final assembly or material used for final assembly,
no liability shall be assumed for any damage resulting from the use by the user of the final
user-assembled product. By the act of using the final user-assembled product, the user accepts
all resulting liability.
In North America
Your EF Helicopters Mini-Stinger EP 2.4GHz RTF Helicopter is warranted against manufacturer
defects in materials and workmanship, at the date of purchase.
In the United Kingdom/Europe
Your EF Helicopters Mini-Stinger EP 2.4GHz RTF Helicopter is warranted against manufacturer defects
in materials and workmanship for a period of 1 (one) year from the date of purchase. Warranty
service will be provided within one (1) year of the date of purchase only if you are able to provide
the original or a copy of the original dated sales receipt. This does not affect your statutory rights.
2
CUSTOMER SERVICE INFORMATION
For customer service questions or comments, please contact your local distributor. For information
about returning your product for warranty consideration, please see page 19.
In North America
In Europe
Global Services
18480 Bandilier Circle
Fountain Valley, CA 92708
Phone: (714) 963-0329
Fax: (714) 964-6236
Email: [email protected]
Ripmax Ltd.
241 Green Street
Enfield, EN3 7SJ, U.K.
Phone: (0) 20 8282-7500
Fax: (0) 20 8282-7501
Website: http://www.ripmax.com
Check out our support website at http://globalservices.globalhobby.com. There you will find public message boards frequented
by other modelers and our technical support staff. This is a great place to get quick answers and advice on your new product.
To enable us to better serve your needs, please include your Email address with any correspondence you send to us. Your Email
address will be added to our Customer Service Database so you will automatically receive free updates and tech notices for your
particular product. You will also receive repair status updates (if applicable) and other important information about your product
as it becomes available.
IMPORTANT INFORMATION ABOUT YOUR EMAIL ADDRESS
Global Hobby Distributors will not disclose the information it collects to outside parties.
We do not sell, trade, or rent your personal information to others. Your privacy is important to us.
SAFETY WARNINGS AND IMPORTANT INFORMATION
n General Warnings
l
l
l
l
l
l
l
l
l
l
This model is not a toy, and it should not be treated as such. Children under 14 years of age
should not use this product unless closely supervised by an adult.
This model is powered using a 1 cell Lithium Polymer (Li-Po) battery. In addition to these General
Warnings, please read and understand the Li-Po battery warnings on page 4.
Fly only indoors or in an area outside that is free of ANY wind at ALL times. Attempting to fly
your model in any type of wind will make your model difficult or impossible to control.
Even though this model is powered by electric motors it doesn't mean that you shouldn't exercise
caution when flying and operating it. You must use caution during use.
Always be conscious of the spinning rotor blades. Be careful not to allow loose clothing to be
drawn into the spinning rotor blades.
Because this model is operated by radio control, it is important to make sure you are always
using fresh and/or fully charged batteries. Never allow the batteries to run low or you could lose
control of the model.
Do not allow any of the electrical components to get wet or electrical damage may occur.
You should complete a successful check of the radio control system prior to each new day of
flying, or prior to the first flight of a new or repaired model.
If your model gets dirty, do not use any solvents to clean it. Solvents may damage the plastic.
We strongly suggest that when you first begin flying your model that you perform only basic
manoeuvres, such as hovering, until you are more familiar with the setup and flight characteristics
of the model. This will give you time to feel comfortable with the way the model reacts to control
inputs and power.
l
Never fly your helicopter in the street or at night. Always fly in an area free of obstructions.
l
When flying, make sure any spectators are behind you.
l
Do not use your model to chase or harass pets or other animals.
3
SAFETY WARNINGS AND IMPORTANT INFORMATION
n Lithium Polymer (Li-Po) Battery Warnings
Lithium Polymer (Li-Po) batteries are significantly more volatile than alkaline or NiCd/NiMH
batteries used in RC applications. All instructions and warnings must be followed closely.
Mishandling of Li-Po batteries can result in fire.
l
l
Instructions about charging the Li-Po battery can be found on pages 9 and 10.
DO NOT attempt to charge the Li-Po battery with any charger other than the integrated charger
in the transmitter that is included with your model or the optional AC or Mains charger for your
region listed on page 18.
l
Do Not leave the Li-Po battery unattended during the charging process.
l
Always remove the Li-Po battery from the transmitter charger when not in use.
l
l
l
l
l
l
l
l
l
Always charge the Li-Po battery on a fire-resistant surface and never charge the Li-Po battery
near any flammable material.
Do NOT use or charge the Li-Po battery if it's hot to the touch.
Do NOT leave the Li-Po battery in direct sunlight or in a hot car or storage area, or get the Li-Po
battery wet or expose it to moisture.
Do NOT short-circuit the Li-Po battery.
Do NOT leave the Li-Po battery plugged into the model when not in use. The Li-Po battery should
be stored in a fire-proof container.
Always let the Li-Po battery cool between uses and charging.
Inspect the Li-Po battery before each use for swelling or other malformation. If the Li-Po battery
is damaged, it should be discarded. For more information, see page 5.
do not poke, bend or damage the Li-Po battery. The Li-Po battery's outer casing is soft and can
be damaged.
DO NOT allow the Li-Po battery to ever exceed 160ºF (71ºC) for any reason.
n FCC Information
This equipment has been tested and found to comply with the limits for a Class B digital device,
pursuant to Part 15 of the FCC Rules. These limits are designed to provide reasonable protection
against harmful interference in a residential installation. This equipment generates, uses, and can
radiate radio frequency energy and, if not installed and used in accordance with the operating
instructions, may cause harmful interference to radio communications. However, there is no
guarantee that interference will not occur in a particular installation.
If this equipment does cause harmful interference to radio or television reception, which can be
determined by turning the equipment off and on, the user is encouraged to try to correct the
interference by one or more of the following measures:
l
Reorient or relocate the receiving antenna. Increase the separation between the equipment and
the receiver. Connect the equipment into an outlet on a circuit different from that to which the
receiver is connected. Consult the dealer or an experienced technician for help.
This device complies with Part 15 of the FCC Rules and with RSS-210 of Industry Canada.
Operation is subject to the following two conditions:
1) This device may not cause harmful interference, and....
2) This device must accept any interference received, including interference that may cause
undesired operation.
4
SAFETY WARNINGS AND IMPORTANT INFORMATION
n Lithium Polymer (Li-Po) and 'AA' Alkaline Battery Instructions for Disposal
This product must not be disposed of with other household waste. Instead, it is the user's
responsibility to dispose of this product by handing it over to a designated collection point
for the recycling of waste electrical and electronic equipment. The separate collection and
recycling of this product at the time of disposal will help to conserve natural resources and
ensure that it is recycled in a manner that protects human health and the environment.
For more information about where you can drop off this product for recycling, please
contact your local city or municipal office, your household waste disposal service, or where you
purchased the product.
KIT CONTENTS AND PARTS IDENTIFICATION
Remove the parts from the box and use the photo below to verify that your set contains all of the
correct parts.
If your set is missing a part, or if a part appears damaged, please contact
your local distributor using the Customer Service Information on page 3.
This set contains all of the parts and accessories necessary for flight. There is nothing else to purchase!
When the transmitter batteries are depleted, replace with four 1.5 volt 'AA' Alkaline batteries.
Do not dispose of the depleted 'AA' Alkaline batteries in household waste, but take them to
an approved recycling centre for disposal (see Safety Warnings and Important Informaton above).
Rechargeable NiCd or NiMH batteries (purchased separately) can be used to power the transmitter.
However, they must be charged separately outside of the transmitter with a compatible charger
(available separately). The transmitter does not provide for onboard charging of the 'AA' batteries.
1
5
3
2
4
1) 2.4GHz Digital Transmitter
4) Small Philips Head Screwdriver
2) Four 'AA' Alkaline Batteries for Transmitter
5) Mini-Stinger 2.4GHz EP RTF Helicopter
3) 1 Cell 110mAh Li-Po Battery for Helicopter
5
BECOMING FAMILIAR WITH YOUR HELICOPTER
n General Information
l
l
l
l
l
The transmitter and the receiver operate in the 2.4GHz frequency band. The 2.4GHz connection
is determined by the transmitter and the receiver pair, therefore, unlike ordinary crystal-based
systems, the helicopter can be flown without frequency conflicts.
Before takeoff, always conduct a bench test to make sure that the controls operate properly.
The transmitter can be switched from Mode 2 (default) to Mode 1. For more information, see
pages 7 and 8.
The transmitter and receiver are paired from the factory. If there is a problem and the transmitter
does not control the helicopter, the transmitter and receiver should be paired again. For more
information, see page 10.
The receiver does not have an ON/OFF switch. When you plug the Li-Po battery into the helicopter,
the receiver will power up.
n Transmitter Features and Functions
12
1
19
13
11
18
14
2
15
16
17
10
9
3
4
5
6
7
8
1) Antenna
11) ON/OFF Switch
2) Li-Po Battery Charger with LED (On Back)
12) Transmitter Mode Display
3) Throttle/Rudder Control Stick and Bind Button
13) Transmitter Battery Display
4) Rudder Trim Button
14) Throttle Trim Display
5) Throttle Trim Button
15) Rudder Trim Display
6) LCD (Liquid Crystal Display)
16) Throttle Power Percentage Display
7) Elevator Trim Button
17) Aileron Trim Display
8) Aileron Trim Button
18) Elevator Trim Display
9) Elevator/Aileron Control Stick
19) Primary/Advanced Control Display
and Primary/Advanced Control Button
10) Transmitter Battery Cover (On Back)
6
BECOMING FAMILIAR WITH YOUR HELICOPTER
n Helicopter Features
1
2
3
4
5
6
12
13
11
10
7
9
8
1) Flybar
8) Landing Skids
2) Flybar Weights
9) Li-Po Battery
3) Upper Main Rotor
10) Main Gears
4) Main Shaft
11) Main Motors
5) Lower Main Rotor
12) Tail Boom
6) Swash Plate
13) Vertical Fin
7) Canopy
For a list of replacement parts,
please see page 18.
Do not fly the Mini-Stinger without the
canopy installed. The helicopter will be
unstable if flown without the canopy, and
in addition, the canopy helps protect the
components inside the helicopter during
a mishap.
n Switching Transmitter Modes - Mode 2 to Mode 1
The transmitter can be switched from Mode 2 to Mode 1 to suit the user's preference. Mode 2 is
the default configuration. In Mode 2, the throttle and rudder controls are on the left control stick and
the aileron and elevator controls are on the right control stick as depicted in the photo on page 6. Mode
2 is typically used in North America and the U.K. Mode 1 places the throttle and aileron controls on
the right control stick and the elevator and rudder controls on the left control stick as depicted in the
photo on page 8. Mode 1 is more popular in Europe and is used in some parts of North America.
To switch from Mode 2 to Mode 1, follow the procedures below:
q Make sure that the transmitter is turned OFF.
q Remove the two screws from the antenna
mount on the back of the transmitter, then
remove the antenna mount.
7
BECOMING FAMILIAR WITH YOUR HELICOPTER
q Pull the antenna back so that it is straight
out, then rotate it 180º counter-clockwise and
angle it down into the moulded slot.
q Push the antenna down into the moulded
slot, then reinstall the antenna mount next
to the MODE 1 label that's moulded into the
transmitter and tighten the two screws to lock
the antenna into position.
12
Using the transmitter
in Mode 1 will change
the control layout to that
shown.
19
13
1
18
14
17
15
16
2
11
3
The transmitter must be
turned OFF and the Li-Po
battery removed from the
helicopter prior to changing
the Mode.
4
5
6
7
8
9
10
1) Antenna
10) Li-Po Battery Charger with LED (On Back)
2) Transmitter Battery Cover (On Back)
11) Throttle/Aileron Control Stick and Bind Button
3) Elevator/Rudder Control Stick
12) Transmitter Mode Display
13) Transmitter Battery Display
and Primary/Advanced Control Switch
4) Rudder Trim Button
14) Elevator Trim Display
5) ON/OFF Switch
15) Rudder Trim Display
6) Elevator Trim Button
16) Aileron Trim Display
7) LCD (Liquid Crystal Display)
17) Primary/Advanced Control Display
8) Throttle Trim Button
18) Throttle Trim Display
9) Aileron Trim Button
19) Throttle Power Percentage Display
8
PREPARING TO FLY YOUR HELICOPTER
n Installing the Transmitter Batteries
q Remove the battery cover from the back of
the transmitter.
q Install the four 'AA' Alkaline batteries into
the battery holder, being careful to make sure
that the polarity is correct (+/-) for each battery.
q Reinstall the battery cover, making sure it’s
firmly seated into place.
n Charging the Li-Po Battery
The Li-Po battery must be fully charged prior to flying. Before charging, please read the
Lithium Polymer (Li-Po) Battery Warnings section on page 4.
l
l
l
l
l
The two metal contacts on the Li-Po battery must face toward the front of the charger when
installed for charging.
If the green charging LED does not illuminate when the transmitter is turned ON, remove the
Li-Po battery and reinstall it the opposite direction.
Ensure that the transmitter batteries have sufficient power to charge the Li-Po battery. At least
one bar should be displayed on the LCD Transmitter Battery Display.
The charge time of the Li-Po battery will vary. It can take up to 30 minutes to recharge a
fully-discharged battery.
Do not replace the Li-Po battery charger cover while the Li-Po battery is charging.
q Remove the Li-Po battery charger cover
from the back of the transmitter.
q Turn the transmitter ON. The LCD should
display. If it doesn't, check the polarity of the
batteries and/or replace the batteries with new
fresh batteries.
9
PREPARING TO FLY YOUR HELICOPTER
q Slide the Li-Po battery into the charging
slot, making sure that the two metal contacts
on the Li-Po battery are toward the front of the
transmitter. The Charge LED should illuminate
solid green.
q Allow the Li-Po battery to fully charge. Once fully charged, the Charge LED will go out. At this time,
turn the transmitter OFF, remove the Li-Po battery, then reinstall the Li-Po battery charger cover.
n Primary/Advanced Control Switching
Your helicopter has two control settings - Primary and Advanced, allowing you to choose which
control setup suits your skill level. The current control setting is shown on the LCD as follows:
Primary - Half Circle
l
l
Advanced - Solid Circle
When set to Primary, the throttle curve is adjusted to make the helicopter easier to control. This
is recommended for beginners.
When set to Advanced, the throttle curve is adjusted to make the helicopter more responsive
and more agile. This is recommended for more advanced pilots.
Until you’re familiar with flying the helicopter, we suggest using the Primary control setting.
q To change the Primary/Advanced control setting, turn the transmitter ON, then
press the Aileron/Elevator control stick down until you hear a 'click'. The transmitter
will beep once and the Primary/Advanced Control Display will change on the LCD.
The Primary/Advanced control setting can also be changed during flight.
If you're using Mode 1, press the Rudder/Elevator control stick down.
Click!
Elevator/Rudder
Control Stick - Mode 2
n Binding the Transmitter and Receiver
The transmitter and receiver have already been paired (the binding process) at the factory. You
will only need to follow these procedures if your transmitter and receiver are not communicating
and need to be paired again.
q Press and hold the Throttle/Rudder control stick down until you hear a 'click',
and at the same time, turn the Transmitter ON. The transmitter will beep continuously
and the LCD will display three dashes.
If you're using Mode 1, press the Throttle/Aileron control stick down.
Click!
Throttle/Rudder
Control Stick - Mode 2
q Release the control stick and plug the Li-Po battery into the helicopter. When paired, the
red LED in the helicopter will turn solid and the transmitter LCD will return to normal.
q Test the controls to ensure proper operation. If the controls do not operate properly, or
the red LED in the helicopter continues to blink rapidly, remove the Li-Po battery, turn the
transmitter OFF, then repeat the procedure again.
10
FLYING YOUR HELICOPTER
n Centering the Transmitter Trim Tabs and Powering On Your Helicopter
When powering on your helicopter, ALWAYS turn the transmitter ON first, then plug the Li-Po
battery into the helicopter. When powering off your helicopter after use, unplug the Li-Po battery
from the helicopter first, then turn the transmitter OFF.
q Turn the transmitter ON.
Centred
Centred
Centred
Centred
q Check the four Trim Displays on the LCD to
ensure that each hash mark is centred. If they
are not, press the Trim Button that corresponds
to the hash mark(s) that is not centred either
up or down, or right or left, to centre the hash
mark(s).
q Pull the throttle control stick all the way back
and verify that 000 is displayed on the LCD.
If 000 is not displayed on the LCD, even
with the throttle control stick pulled all
the way back, press the bottom half of the
Throttle Trim Button until 000 is displayed.
Mode 2
As a safety precaution, the motor will not power up if the transmitter is turned ON with the
throttle control stick anywhere above 000. The motor will turn on only after the throttle
control stick is pulled all the way back, then pushed forward again.
q Carefully slide the Li-Po battery into the
bottom of the helicopter, making sure that the
two metal contacts are facing down. The red
LED in the helicopter will blink momentarily,
then should turn solid.
If the red LED blinks continuously, verify that the transmitter is turned ON. If the transmitter
is turned ON, the transmitter and receiver will need to be paired again. See page 10.
Press your thumb up against the front of the Li-Po battery holder, between the landing
skids, to support it while installing the Li-Po battery.
If the red LED does not turn on after installing the Li-Po battery, remove the Li-Po battery
and reinstall it the opposite direction.
11
FLYING YOUR HELICOPTER
n Control Operation
Use the information in this section to become acquainted with how to control your helicopter.
MODE 2 - Default
Throttle
Move Up
Move Down
Rudder
Pivot Left
Pivot Right
Elevator
Move Forward
Move Backward
Aileron
Move Right
Move Left
MODE 1
Rudder
Throttle
Move Up
Move Down
Pivot Left
Pivot Right
Elevator
Move Forward
Move Backward
Aileron
Move Right
Move Left
n Choosing an Area to Fly
When you're ready for your first flight, you will want to select a relatively open indoor area that is
free of people and obstructions. While it is possible for experienced pilots to fly the Mini-Stinger
in a small space due to its small size and controllability, we strongly recommend flying in an area
with at least 3-metres by 3-metres (10ft by 10ft) of floor space and no less than 2.5-metres (8ft)
ceilings. The floor surface should not be obstructing (e.g., no heavy carpet). Once you have trimmed
your helicopter and become familiar with its flight characteristics and handling capabilities, you will
be able to fly in smaller, less open areas.
The Mini-Stinger is designed and intended to be flown INDOORS ONLY. Attempting to fly
your helicopter outdoors, even without apparent wind, will result in a difficult to control
model and probable crash.
12
FLYING YOUR HELICOPTER
n Flying Tips
l
Make sure that the Primary Control Setting is active on the transmitter. For more information,
see page 10.
l
l
l
l
l
l
l
Don't over-control. It's not necessary to move the control sticks very much to achieve the required
amount of control response from the helicopter, especially when you're just learning. Moving the
control sticks too much will make it more difficult to control the helicopter. It's better to make
small corrections of the control sticks.
When starting, don't worry about being able to fly your helicopter with a lot of skill. It will take a
little while to master if you're just beginning. With practice you will become more confident and
your fingers will begin to react spontaneously to control the helicopter the way you intend. Until
then, go slow, being careful not to fly too high or too fast. The goal is always to stay in control.
While learning, don't fly too high. Use the throttle control stick to keep the helicopter about 60cm
(2ft) off the ground - no higher for now. If you feel like the helicopter is getting out of control,
simply pull the throttle control stick back to cut the power and land. You can fly higher once
you've mastered basic flying at low levels.
While learning, always try to keep yourself situated behind the helicopter, with the nose of the
helicopter pointing away from you. This will make control orientation easier.
Always remember that you should 'fly the nose' of the helicopter, not the tail. Getting used to this
concept will really help with orientation and the respective control inputs, especially right and left
aileron and rudder control inputs.
When the helicopter's nose is pointing toward you, the aileron and rudder controls will seem
'reversed'. This takes some time to get used to until it becomes second nature. Imagining yourself
sitting in the cockpit will help you get used to this.
Do not fly less than 30cm (1ft) off the ground for prolonged periods, because the airflow under
the rotating blades may cause ground effect and affect normal flying and operations.
n Flying Procedures
Before flying, make sure that the Li-Po battery is fully charged and that the transmitter batteries
have sufficient power remaining. One or more bars should be displayed on the Transmitter
Battery Display.
q Turn the transmitter ON, then plug the Li-Po battery into the helicopter. The red LED in the
helicopter should turn solid and the controls should operate when you move the control sticks.
q Place the helicopter on the floor in the middle of the room. Stand approximately 2-metres (6ft)
away from the helicopter, behind the tail.
q To take off, push the throttle control stick up slowly until the helicopter begins to get 'light', then
advance the throttle control stick a little more until the helicopter lifts off. Watch closely what the
helicopter is doing and make any corrections with the control sticks to keep the helicopter stable
and in one general area.
q When you're first beginning, you should learn to hover the helicopter, moving the throttle control
stick forward and backward to control the height of the helicopter. For now, try to always keep it
about 60cm (2ft) off the ground. Move the rudder control stick right or left to keep the nose of
the helicopter pointed away from you. If the helicopter slides to the right or to the left, move the
aileron control stick left of right to keep the helicopter in one place.
q Make small control inputs on each of the four control sticks to slowly move the helicopter up and
down, and right and left. Use the practice suggestions in the next section on page 14 to continue
learning to fly your new helicopter.
13
FLYING YOUR HELICOPTER
n Practice Suggestions
Practice the techniques in this section to work on becoming more familiar with how the control
inputs work to make the helicopter fly the way you want.
The Frog Jump
The Frog Jump is an ideal method to learn the basics of how the control inputs affect the helicopter. It
is a series of short hovers and landings that you repeat over and over, that allows you to learn the
basics without allowing the helicopter to get too far away or too out of control. It is best performed
on a laminate floor or similiar. Carpet is unsuitable.
Use the Frog Jump to:
l
l
l
l
Learn to extend the time of hover by moving the throttle
control stick forward and backward.
Learn to hover the helicopter while standing not only behind
the tail, but moving to the side of the helicopter, then to the
front of the helicopter.
Learn to spin the helicopter right and left around its axis by moving the rudder control stick right
and left.
Learn to move the helicopter forward and backward, and slide the helicopter right and left by
moving the elevator and aileron control stick forward and backward, and right and left.
When you move the aileron control stick right or left, the helicopter will skid to the right or left
sideways. To actually turn the helicopter around, you will need to also move the rudder control
stick right or left.
Box Pattern
Use the Box Pattern technique to learn how to move the helicopter in different orientations around
you. This will help you become proficient at using all the controls at the same time to move the
helicopter around.
With the nose of the helicopter pointing away from you, fly the helicopter in
a box pattern. Move the helicopter forward using the elevator control stick,
slide the helicopter to the right using the aileron control stick, move the
helicopter backward, using the elevator control stick, then slide the helicopter
left, using the aileron control stick.
Pilot
Repeat the Box Pattern technique above, but this time while you're facing
the side of the helicopter. The nose of the helicopter will be toward your
left. You can then move to the other side of the helicopter to get practice
with the nose of the helicopter toward your right.
Pilot
Repeat the Box Pattern technique above, but this time with the nose of the
helicopter facing you. This is the most difficult to master, because when the
helicopter's nose is pointing toward you, the aileron and rudder controls
will seem 'reversed'. Imagining yourself sitting in the cockpit will help you
get used to this.
14
Pilot
FLYING YOUR HELICOPTER
n Trimming the Controls
When you first start flying your helicopter, each of the four Trim Displays on the LCD should be
centred, however, you may find that your helicopter wants to move right or left, or forward or
backward at all times, even though the control sticks are centred. You can use the Trim Buttons
to adjust the controls so that the helicopter stays in place when the control sticks are centred.
To determine the amount of trim necessary, place the helicopter in a stable hover, 60cm (2ft) off the
ground, then release the control sticks for a couple of seconds. Carefully watch how the helicopter
reacts, then trim the helicopter as described below.
When trimmed properly, the helicopter should stay in position with the control sticks centred, when
placed in a stable hover.
Throttle Trim Adjustment
If the rotor blades spin without adding throttle, or if they don't spin when you add throttle, the
throttle trim needs to be adjusted.
l
l
If the rotor blades spin without adding throttle, press the Throttle Trim
Button down (D) until the rotor blades stop spinning.
U
If the rotor blades don't start to spin when you begin to add throttle,
press the Throttle Trim Button up (U) until the rotor blades start to spin
as soon as you begin to add throttle.
D
Rudder (Yaw) Trim Adjustment
While hovering, if the helicopter's nose tends to always want to pivot right or left, the rudder trim
needs to be adjusted.
l
l
If the nose of the helicopter pivots toward the right, press the Rudder
Trim Button left (L) until the nose stays straight.
If the nose of the helicopter pivots toward the left, press the Rudder
Trim Button right (R) until the nose stays straight.
L
R
Elevator (Pitch) Trim Adjustment
While hovering, if the helicopter tends to always want to move forward or backward, the elevator
trim needs to be adjusted.
l
l
If the helicopter moves forward, press the Elevator Trim Button
down (D) until the helicopter stops moving forward.
If the helicopter moves backward, press the Elevator Trim Button
up (U) until the helicopter stops moving backward.
U
D
Aileron (Roll) Trim Adjustment
While hovering, if the helicopter tends to always want to move to the right or left, the aileron trim
needs to be adjusted.
l
l
If the helicopter moves toward the left, press the Aileron Trim Button
right (R) until the helicopter stops moving left.
If the helicopter moves toward the right, press the Aileron Trim Button
left (L) until the helicopter stops moving right.
15
L
R
TROUBLESHOOTING GUIDE
Use this Troubleshooting Guide to help you diagnose and solve most problems that you may encounter
with the Mini-Stinger EP 2.4GHz RTF Helicopter. Most problems can be solved by following the
problem-cause-solution sections below.
If you cannot solve the problem using this Troubleshooting Guide, please contact your local
distributor, using the Customer Service Information on page 3.
PROBLEM
1) Transmitter does not turn on
CAUSE
A) Transmitter batteries depleted
SOLUTION
A) Replace/recharge* transmitter
batteries
B) Transmitter batteries not installed B) Reinstall transmitter batteries,
checking polarity (+/-)
properly
2) Motors and/or servos do not
operate
C) Transmitter damaged
C) Contact your local distributor
A) Li-Po battery depleted
A) Charge Li-Po battery
B) Li-Po battery not plugged in
or plugged in backward
B) Plug Li-Po battery in, observing
correct orientation
C) Transmitter not turned ON
C) Turn transmitter ON
D)Transmitter/receiver not paired
D)Pair transmitter and receiver
E) Motor(s) or main board damaged E) Contact your local distributor
3) Red LED in helicopter blinks A) Transmitter/receiver not paired
continuously
A) Pair transmitter and receiver
4) Helicopter difficult to control
A) Advanced control setting
programmed into transmitter
A) Use Primary control setting
B) You are flying outdoors
B) Always fly indoors
C) Transmitter batteries depleted
C) Replace/recharge* transmitter
batteries
D)Li-Po battery depleted
E) Main board antennas not
positioned correctly
F) Helicopter out of trim
5) Li-Po battery does not charge
D)Charge Li-Po battery
E) Orientate the two antennas so
that they are 90º to each other
F) Trim helicopter for hands-off
flight
A) Li-Po battery plugged in backward A) Plug Li-Po battery in, observing
correct orientation
B) Replace/recharge* transmitter
batteries
C) Transmitter batteries not installed
C) Reinstall transmitter batteries,
properly
checking polarity (+/-)
B) Transmitter batteries depleted
6) Transmitter beeps continuously A) Transmitter batteries depleted
A) Replace/recharge* transmitter
batteries
*Do NOT attempt to recharge the 'AA' Alkaline batteries included with your helicopter. These batteries
should be replaced when depleted. Only recharge the transmitter batteries if you are using after-market
rechargeable NiCd or NiMH batteries (available separately), as described on page 5.
16
EXPLODED VIEW ASSEMBLY DRAWING
Note that some parts that are shown separately come
preassembled from the factory into a single sub-assembly.
For a complete list of replacement parts, including photos
with cross-referenced assembly numbers, see page 18.
17
REPLACEMENT PARTS LIST
We stock a complete set of replacement parts for your Mini-Stinger EP 2.4GHz RTF Helicopter.
Listed below are the replacement parts that are available along with their respective part numbers
for easy ordering convenience.
If your hobby retailer does not stock EF Helicopters products, contact your closest distributor for
the name of a local dealer, using the Customer Service Information on page 3.
21x2, 24x2
29x1
EF5662
Transmitter - 2.4GHz
EF5663
Receiver/Servo Board
19x1, 26x1
EF5666
Main Frame
01x2, 02x2, 03x1, 04x1
EF5670
Flybar w/Link
18x1, 32x1
EF5674
Shaft Collar Set
05x2, 09x2
EF5664
EF5665
1S 3.7V 110mAh Li-Po Battery Motor Set w/Pinion Gears
12x1
15x1, 16x1, 17x1
EF5667
Under T-Shape Holder
EF5668
Swash Plate Assembly
10x1, 13x1
07x1
EF5671
Outer Shaft
EF5672
Inner Shaft w/Head
08x2, 20x2
30x1, 31x1
EF5669
Main Gear Set
14x2, 27x2, 28x2
EF5673
Ball Linkage Rod Set
06x6, 11x5
EF5675
Shaft Bearing Set
EF5676
Screw Set
34x1, 35x2, 36x1
22x1, 23x1
EF5678
Rotor Blades - Top & Bottom
EF5679
Landing Skids
EF5680
Tail Boom w/Fin
Charges Two EF5664 Li-Po Batteries
Charges Two EF5664 Li-Po Batteries
Charges Two EF5664 Li-Po Batteries
EF5682
AC Charger - USA
EF5683
Mains Charger - UK
EF5684
Mains Charger - Europe
18
33x1
EF5677
Canopy w/Decals
25x8
EF5681
Rubber Canopy Mounts
EF5685
Aluminium Carry Case
WARRANTY SERVICE INFORMATION
Before returning your Mini-Stinger EP 2.4GHz RTF Helicopter for warranty consideration, the status
of the unit must be within the terms of the Product Warranty printed on page 2 of this Instruction
Manual. When requesting warranty service, please observe the following:
l
l
l
l
l
l
Crash damage will not be covered under warranty. Do not request warranty service for a
crash-damaged product.
Send your Mini-Stinger EP 2.4GHz RTF Helicopter complete with the transmitter and Li-Po
battery. Please unplug and/or remove the batteries both from the transmitter and the helicopter
before returning it. We like to have the helicopter complete so it can be thoroughly tested before
returning it to you.
Include a note detailing the problem or service you are requesting. Service cannot be provided
without this information. Include your daytime phone number, shipping address and/or Email
address in the event we need more details pertaining to the service requested.
If your Mini-Stinger EP 2.4GHz RTF Helicopter is out of the warranty period you may request an
estimate of services at the time you return it for service. An omission of this request implies
permission for Hobby People/Global Services to service your Mini-Stinger EP 2.4GHz RTF
Helicopter at our discretion.
Include a method of payment for any service charges.
Send the unit to us by United Parcel Service, Federal Express or by Insured Mail. Postage is
nonrefundable. Send your package to:
In North America
In Europe
Global Services
18480 Bandilier Circle
Fountain Valley, CA 92708
Phone: (714) 963-0329
Fax: (714) 964-6236
Email: [email protected]
Ripmax Ltd.
241 Green Street
Enfield, EN3 7SJ, U.K.
Phone: (0) 20 8282-7500
Fax: (0) 20 8282-7501
Website: http://www.ripmax.com
19
All Contents Copyright 2009, EF Helicopters - All Rights Reserved
In North America - http://www.globalhobby.com
In Europe - http://www.ripmax.com
Revision 1, October 2009
Model Number EF008
20