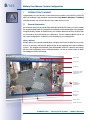
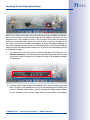
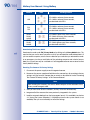
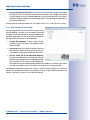
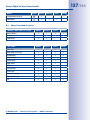
1
EN MxEasy User Manual The HiRes Video Company MxEasy The Easy-To-Use Video Software www.mobotix.com V1.6.1_EN_09/2013 EN Free software download: www.mobotix.com > Support > Software Downloads Latest User Manual PDF file: www.mobotix.com > Support > Manuals HiRes Video Innovations The German company MOBOTIX AG is known as the leading pioneer in network camera technology and its decentralized concept has made high-resolution video systems cost efficient. MOBOTIX AG • D-67722 Langmeil • Tel.: +49-6302-9816-103 • Fax: +49-6302-9816-190 • [email protected] 2/144 MxEasy User Manual: System Configuration MOBOTIX Seminars MOBOTIX offers inexpensive seminars that include workshops and practical exercises. For more information, visit www.mobotix.com > Seminars. Copyright Information All rights reserved. MOBOTIX, the MX logo, MxControlCenter, MxEasy and MxPEG are trademarks of MOBOTIX AG registered in the European Union, the U.S.A., and other countries. Microsoft, Windows and Windows Server are registered trademarks of Microsoft Corporation. Apple, the Apple logo, Macintosh, OS X, iOS, Bonjour, the Bonjour logo, the Bonjour icon, iPod and iTunes are trademarks of Apple Inc. registered in the U.S.A. and other countries. iPhone, iPad, iPad mini and iPod touch are Apple Inc. trademarks. Linux is a trademark of Linus Torvalds. All other marks and names mentioned herein are trademarks or registered trademarks of the respective owners. Copyright © 1999-2013 MOBOTIX AG, Langmeil, Germany. Information subject to change without notice! Download the latest version of this and other manuals as PDF files from www.mobotix.com > Support > Manuals. © MOBOTIX AG • Security Vision Systems • Made in Germany www.mobotix.com • [email protected] 3/144 Table of Contents Contents 1 Introduction To MxEasy 8 1.1 General Information 8 1.2 Example Scenarios 10 1.2.1 House With Two Cameras 1.2.2 Gas Station With Four Cameras 1.2.3 Hotel With Nine Cameras 11 12 13 1.3 Setting Up A Video Surveillance System ‑ Overview 15 2 Installation and Initial Operation 18 2.1Power Supply And Network Connection Of Cameras 18 2.1.1 Power Supply When Connected Directly To A Computer 2.1.2 Power Supply And Network Connection With A PoE Switch 18 19 2.2 Installing MxEasy 20 2.2.1 System Requirements 2.2.2 Installation On Windows Computers 2.2.3 Installation On Mac OS X Computers 20 20 20 2.3 Using MxEasy For The First Time 22 2.3.1 2.3.2 2.3.3 2.3.4 2.3.5 Searching For And Adding Cameras Selecting And Integrating Cameras Special Case: Integrating An IP Video Door Station Activating Microphone And Speaker Setting The Time Settings 22 25 29 32 33 3 Using MxEasy 34 3.1Program Windows And Program Views 34 3.1.1 Program Window Areas 3.1.2 Program Views 3.1.3 Program Window Size 35 37 41 3.2 Live Video Surveillance 44 3.2.1 Displaying And Switching Cameras 3.2.2 Detection Of Alarms 44 44 3.3 Camera Views And Image Settings 46 3.3.1 Selecting Camera Views 3.3.2 Editing The Image Settings 3.3.3 Adjusting Additional Image And Exposure Settings 46 48 51 © MOBOTIX AG • Security Vision Systems • Made in Germany www.mobotix.com • [email protected] 3 4/144 MxEasy User Manual 3.4 Image Sections And Virtual PTZ Features 54 3.4.1 Zooming In On An Image Section 3.4.2 Panning And Tilting An Image Section 3.4.3 Storing And Loading PTZ Views 54 55 55 3.5 Recordings And Alarms 57 3.5.1 Manual Recording 3.5.2 Automatic Recording And Alarming (General) 3.5.3 Automatic Recording And Alarming (Alarm Planner) 57 58 63 3.6 Searching For And Playing Back Recordings 65 3.6.1 Searching And Playing Back In Player Mode 3.6.2 Searching And Playing Back In The Recordings Browser 65 71 3.7 Saving, Printing And Exporting Recordings 73 3.7.1 Saving And Printing Snapshots 3.7.2 Exporting Recordings 3.7.3 Playing Back Exported Video Data 73 73 77 3.8 Using MxAnalytics 78 3.8.1 MxAnalytics Overview 3.8.2 Calling Up Evaluations 78 79 3.9 Using An IP Video Door Station 81 3.9.1 3.9.2 3.9.3 3.9.4 Status Displays In The Main Window 81 Answering Ringing With Intercom 82 Opening The Door And Switching On The Light 82 Recording A Voice Mailbox Announcement And Listening To Voice Mailbox Messages82 3.9.5 Searching And Playing Back Door Events 84 3.9.6 Switching To The Mini Viewer 86 3.10 Additional User Functions 87 3.10.1 Activating/Deactivating Privacy Mode 3.10.2 Working With Different Network Environments 89 4 System Configuration 91 4.1 Setting Access Rights And Passwords 91 4.1.1 Defining Access Rights For MxEasy 4.1.2 Setting The Access Mode For MxEasy 4.1.3 Protecting Access To Cameras 87 91 92 92 © MOBOTIX AG • Security Vision Systems • Made in Germany www.mobotix.com • [email protected] 5/144 Table of Contents 4.2 Managing Cameras 93 4.2.1 4.2.2 4.2.3 4.2.4 93 93 93 94 Adding New Cameras Renaming And Editing Individual Cameras Renaming And Editing Cameras In The Camera List Removing Cameras 4.3 Adjusting Camera Settings 95 4.3.1 4.3.2 4.3.3 4.3.4 4.3.5 4.3.6 4.3.7 95 95 96 97 98 98 99 Audio Settings LED Settings Connection Settings VoIP Settings For Phone Calls E-Mail Settings Recording Settings MxAnalytics Settings 4.4 Adjusting The Default Program Settings 100 4.4.1 4.4.2 4.4.3 4.4.4 100 100 101 102 General Settings Setting Connections Alarm And Doorbell Notification Behavior Setting Intercom Mode 4.5 Configuring MxAnalytics 103 4.5.1 4.5.2 4.5.3 4.5.4 4.5.5 4.5.6 103 106 108 109 109 110 Activating MxAnalytics And Configuring The Settings Defining Detection Areas, Counting Lines And Object Size Setting Up Storage For Future Evaluation Controlling Motion Detection (Time Tables) – Optional Customizing The Report Profiles Used For Analysis Generating Reports And Sending Automatically Via E-Mail 4.6 Configuring An IP Video Door Station 111 4.6.1 Configuring Door Station Options 4.6.2 Setting Up The Intercom Mode On Door Stations 111 112 4.7 Saving The System Properties 113 4.8 Searching For Software Updates 114 4.9 Configuring Different Network Environments 115 4.9.1 Defining And Editing Network Environments 4.9.2 Selecting An Environment And Changing The Network Data 4.9.3 Connecting Remote Cameras Using DynDNS 115 115 117 © MOBOTIX AG • Security Vision Systems • Made in Germany www.mobotix.com • [email protected] 5 6/144 MxEasy User Manual A Additional Information 121 A.1 Components Of A MOBOTIX System 121 A.1.1 Power Supply A.1.2Switch A.1.3Router 121 122 122 A.2 Expansions For The MOBOTIX System 123 B Access Rights For User Access Levels 124 B.1 Button Functions 124 B.2 Menu Command Functions 125 C 128 MOBOTIX Glossary © MOBOTIX AG • Security Vision Systems • Made in Germany www.mobotix.com • [email protected] Table of Contents 7/144 Notes: © MOBOTIX AG • Security Vision Systems • Made in Germany www.mobotix.com • [email protected] 7 8/144 MxEasy User Manual: System Configuration 1 Introduction To MxEasy Congratulations on your decision to select video security products from MOBOTIX. MOBOTIX offers you intelligent, high-resolution camera technology Made in Germany. The MxEasy software provides you with full control of your video security system. 1.1 General Information We introduce you to the concept and the ideas behind MOBOTIX MxEasy in the first chapter. The second chapter leads you through the installation and initial operation of the program using the MxEasy Wizard. In chapter three, you will learn about the MxEasy functions that you will need to work with MxEasy on a daily basis. The last chapter explains how to set up system configurations so MxEasy works according to your requirements. What Is MxEasy? MxEasy allows you to quickly and efficiently configure and control a video security system of up to 16 cameras, making it the perfect choice for all small and mid-sized surveillance systems. The program automatically finds all available MOBOTIX cameras and carries out the initial configuration for the selected cameras. You do not need to have in-depth knowledge of network technology. Menu bar Info bar 1 Toolbars Image bar with camera/event windows Tooltips for MxEasy elements Info bar 2 Dynamic toolbar Status bar Main window © MOBOTIX AG • Security Vision Systems • Made in Germany www.mobotix.com • [email protected] Introduction To MxEasy 9/144 Once the cameras are integrated into the system, you can use MxEasy to comfortably control the most important functions of the connected cameras. Virtual zooming, panning and tilting in the live image are just as easy as activating manual or scheduled recording times. The video data recorded by the cameras can then be viewed and exported in different formats (e.g., MxPEG or AVI with different codecs) at a later time. Easy Operation To keep MxEasy simple and easy to use, the camera operation with MxEasy has been streamlined to include only the most important features. MxEasy is easy to understand and simple to use, so the risk of operating errors is minimal. The buttons are marked with easyto-understand icons and descriptions of each button (“Tooltip“) are displayed automatically. The user interface has also been optimized for use with touch panels. If any problems occur, you can quickly and easily undo any incorrect settings using the automatic configuration backup feature. Security MxEasy provides you with four different access levels (guest, user, owner, administrator), allowing people with different levels of authorization to access the camera images. MxEasy can also be installed on several computers at the same time without causing access-related conflicts. Optional HTTPS encryption (using certificates generated by the camera or created by the administrator) helps you to prevent unauthorized users from accessing MxEasy. Operation Modes Different operation modes enable you to adapt to a variety of application scenarios: In the Switched Off mode, live images are transmitted but not recorded. In the Alarm Planner mode, alarms are analyzed and saved according to the times specified and the events determined in the alarm planner. In the Normal mode, recordings and alarm notifications are done independently of time schedules according to the alarm configuration settings in the camera. In the event of an alarm, the Manual Alarm can also be triggered. All cameras will then record video and audio data for a specific period of time. The Privacy mode serves to protect all integrated cameras from being accessed until this mode is turned off again. It also switches off all recording and alarm functions while it is activated. Why MxEasy And Not MxControlCenter? MxEasy is the perfect choice for all small and mid-sized video security systems using cameras connected in a network. MxEasy has fewer functions than the professional MxControlCenter video management software, because, as its name implies, MxEasy is specially developed for ease of use. All of the main features of the MOBOTIX concept are available in MxEasy. When planning your MOBOTIX system, remember that, with MxEasy, you can connect and manage up to 16 cameras. For larger video security systems, we recommend using MxControlCenter © MOBOTIX AG • Security Vision Systems • Made in Germany www.mobotix.com • [email protected] 9 10/144 MxEasy User Manual: System Configuration 1.2 Example Scenarios The following examples are possible ways to use MxEasy. They contain information about the required components and setup for the individual scenarios: • House with two cameras • Gas station with four cameras • Hotel with nine cameras For a brief overview of all important steps for installing and configuring this type of s urveillance system, see Section 1.3, “Setting Up A Video Surveillance System ‑ Overview“. These steps are described in more detail in Chapters 3 and 4. Notes © MOBOTIX AG • Security Vision Systems • Made in Germany www.mobotix.com • [email protected] Example Scenarios 11/144 1.2.1 House With Two Cameras This scenario consists of two MOBOTIX cameras that guard the entrance and the rear of a house. When the homeowner is away for the weekend, these cameras use integrated video and infrared motion sensors to detect unwanted movements around the house. In the case of an alarm, the video sequences are recorded by the cameras. In addition, this triggers a call to a phone and sends the images via e-mail. Required Components: • 1 MOBOTIX Q24M (entrance) • 1 MOBOTIX D24M with L22 lens and Outdoor Wall Mount (rear of house) • 2 MOBOTIX NPA PoE Set • Switch with at least four ports • Network patch cable • Computer with a Windows, Macintosh or Linux operating system • Configured DSL router registered with a VoIP provider (required for telephone and e-mail notification and external access via DynDNS) © MOBOTIX AG • Security Vision Systems • Made in Germany www.mobotix.com • [email protected] 11 12/144 MxEasy User Manual: System Configuration 1.2.2 Gas Station With Four Cameras In this scenario, a gas station is guarded using a MOBOTIX system. Two cameras record the events at the pumps, the camera in the shop monitors the repair shop, and the camera above the register records the entire cash register area. The cameras are set up to record video and audio data at a continuous rate of two frames per second during business hours. This continuous recording is deactivated outside of the opening hours. If motion is detected (using a motion sensor window), the camera will record at a higher frame rate for a specified period of time and send e-mails to predefined recipients. Different opening times can be set for the cash register and the shop areas of the gas station. In the event of a dangerous situation, continuous recording at a higher frame rate and other actions (e.g., a telephone call) can be triggered by clicking on Manual Alarm . Required Components: • 1 MOBOTIX Q24M-Sec (cash register area) • 2 MOBOTIX D24M-Sec (pumps) • 1 MOBOTIX M24M (repair shop) • 1 PoE switch for powering the four cameras • Uninterruptible power supply (UPS) units for supplying the cameras, the switch and, if desired, the computer • Professionally laid Ethernet cables guided to the mounting positions of the cameras (no separate power cables required) • Computer with a Windows, Macintosh or Linux operating system • Configured DSL router registered with a VoIP provider (required for telephone and e-mail notification and external access via DynDNS) © MOBOTIX AG • Security Vision Systems • Made in Germany www.mobotix.com • [email protected] Example Scenarios 13/144 1.2.3 Hotel With Nine Cameras An entire hotel is guarded using a MOBOTIX system in this scenario. The cameras at the main entrance and the delivery entrance are event-controlled. Each of these cameras is connected to a MOBOTIX ExtIO. Additionally, these cameras can be used as a door intercom and to remotely open the doors. There are two event-controlled cameras in the underground garage that record the comings and goings of cars and people. Cameras in both hallways on the second floor and the third floor, in the gym and in the swimming pool area record all events when persons are present in these areas. A camera located in the lobby makes continuous recordings with a variable frame rate of all events in the entire reception area (lower frame rate for normal operation, max. frame rate in case of an alarm). Hotel staff can trigger an alarm at the reception desk using the Manual Alarm feature. This alarm can be configured to trigger notification via VoIP telephone call (and/or e-mail) to be sent to predefined recipients. Hotel staff can use the following additional features with the connected ExtIO modules for the cameras at both entrances: • Door Opener: Opens the door connected to the corresponding camera. • Light: Switches on the light located near the camera. • Speaker: Switches on the camera microphone and the ExtIO on the speakers of the computer. When the cameras are displayed one after another using the Camera Sequencer, the software plays the sound from the active camera. • Microphone: Activates the sound on your computer microphone and feeds it to the camera speaker (or the connected ExtIO), allowing your voice to be heard. • Acoustic Alarm: Plays a preselected audio file over the camera speaker (or the connected ExtIO). © MOBOTIX AG • Security Vision Systems • Made in Germany www.mobotix.com • [email protected] 13 14/144 MxEasy User Manual: System Configuration Required Components • 6 MOBOTIX Q24M-Sec, 5 with In-Ceiling Set • 1 MOBOTIX D14D-Sec with 1 L22 lens, 1 L43 (parking lot) • 2 MOBOTIX M24M-R16 with L22 lens • 1 PoE switch with at least nine PoE ports • Uninterruptible power supply (UPS) units for supplying the cameras and the switch • Professionally laid Ethernet cables guided to the mounting positions of the cameras (no separate power cables required) • Computer with a Windows or Macintosh operating system • Configured DSL router registered with a VoIP provider (required for telephone and e-mail notification and external access via DynDNS) Notes © MOBOTIX AG • Security Vision Systems • Made in Germany www.mobotix.com • [email protected] Setting Up A Video Surveillance System 1.3 15/144 Setting Up A Video Surveillance System ‑ Overview We will describe the most important steps for basic installation in this section. These steps are the same for all scenarios. For thorough instructions regarding camera installation, see Chapter 2 “Installation“ in the corresponding camera manual. For information on the power supply and connecting cameras to the network, see the section “Connecting The Camera To The Network And To The Power Supply“ in the corresponding camera manual. Mounting And Connecting The Cameras • Installing the Ethernet cable and mounting the cameras: Determine where you want to mount the cameras. Run the Ethernet cable to the mounting position of the camera. Mount the cameras and connect the Ethernet cable to the corresponding camera: – In the House example, one camera (Q24M) is mounted over the front door and the other camera is mounted behind the house under the roof overhang. – In the Gas Station example, two D24M-Sec cameras monitor the pumps in order to record persons and vehicles. The shop camera is mounted in one corner of the room and the register camera is mounted on the ceiling above the cash register area in order to monitor both customers and the register. – In the Hotel example, one Q24M-Sec is mounted at the main entrance of the hotel and the corresponding ExtIO is mounted next to the door of the main entrance where it serves as a door intercom. Two M24M-R16 cameras monitor the entrance and the rear side of the underground garage.The remaining five Q24M-Sec cameras are installed in the planned positions using In-Ceiling Sets (in the hallways of the second and third floors, in the swimming pool area, in the gym, and above the reception desk). The camera mounted above the reception desk is mounted in the ceiling so as to monitor the entire reception area. • Setting Up the Power Supply: Set up the power supply of the camera. Use either a commercial PoE switch, MOBOTIX Network Power Racks or MOBOTIX power supply units in conjunction with Network Power Adapters. • Connecting the cameras: Connect the Ethernet cable from the cameras to the PoE switch (or the Network Power Rack/Network Power Adapter). The PoE switch is connected to the local area network (LAN) via another Ethernet cable. • Checking the cameras: Inspect the LEDs of the operating cameras to make sure that they indicate that the camera is operating normally. The MOBOTIX cameras are now ready to use and available in the local area network. They can now be integrated into MxEasy. © MOBOTIX AG • Security Vision Systems • Made in Germany www.mobotix.com • [email protected] 15 16/144 MxEasy User Manual: System Configuration Connecting Cameras In MxEasy • Installing MxEasy: Insert the MxEasy CD if you have it into your computer, or download the MxEasy software for your operating system. Install the application (see Section 2.2, “Installing MxEasy“ ). • Detecting cameras automatically: Launch MxEasy. The application automatically finds all available MOBOTIX cameras in the network and displays preview images if the cameras are directly accessible. You can manually add cameras located outside of the local network (e.g., in your summer cottage). You can also specify customized names for individual cameras and new access data (see Section 2.3.1, “Searching For And Adding Cameras“ and Section 2.3.2, “Selecting And Integrating Cameras“). • Network configuration for the cameras: MxEasy will prompt you to enter the IP addresses to be used for the cameras in the network (or you may select the option DHCP). • Reset MxEasy to factory defaults: MxEasy will prompt you to choose whether or not you wish to reset the cameras back to the defaults. You may also choose to retain the current settings if you have already configured the cameras using MxEasy or if MxEasy is to be installed on several computers. MxEasy automatically recognizes whether or not these settings have been made and recommends the appropriate option. After you have completed these steps, the cameras are displayed in MxEasy. Using MxEasy • Displaying live images: Click on Next Camera to display each camera one after another in the main window of MxEasy and select the desired image section (see Section 3.2, “Live Video Surveillance“). • Using image sections and virtual PTZ features: Define different image sections and change the zoom settings as needed (see Section 3.4, “Image Sections And Virtual PTZ Features“). • Setting recordings and alarms: Define whether MxEasy should record at any time (Normal operating mode) or at specific times (Alarm Planner operating mode), or completely switch off the recording features with the Switched Off operating mode. For time-dependent recording and alarms, define the time period during which alarms are to be detected, select the events for which the camera alarms are to be triggered, and define the notifications via telephone call, sound and e-mail (see Section 3.5, “Recordings And Alarms“). • Triggering the manual alarm: Click on this button to trigger a manual alarm (this feature can also be used to test the recording functions). © MOBOTIX AG • Security Vision Systems • Made in Germany www.mobotix.com • [email protected] Setting Up A Video Surveillance System 17/144 • Searching and playing recordings: Evaluate the recorded video sequences (see Section 3.6, “Searching For And Playing Back Recordings“). • Saving and exporting recordings: You can save images from the camera (live images or recordings) and even export previously recorded video sequences separately (see Section 3.7, “Saving, Printing And Exporting Recordings“). • Activating the Privacy mode: Activate this mode if you want to prevent all recording features and all access to the integrated cameras. While this lock can be released directly from the current computer, it can only be released from another computer with the user name and password defined here (see Section 3.10.1, “Activating/ Deactivating Privacy Mode“). • Creating access rights and passwords: If the computer is accessible to multiple users, make sure to set up passwords for the administrator, owner, user and guest access levels (see Section 4.1, “Setting Access Rights And Passwords“). • Saving the settings: Save your settings so that you can easily restore the selected settings later (for example, after experimenting with the image settings) (see Section 4.7, “Saving The System Properties“). Note Different Recording Targets are available for the integrated MOBOTIX cameras. The cameras can save sound and video data depending on the model and version to internal storage media (SD cards) or file servers. New cameras (Q24M, D24M, M24M, T24M, D14, with the exception of basic and web models) and R models are equipped with SD cards and preconfigured for recording. © MOBOTIX AG • Security Vision Systems • Made in Germany www.mobotix.com • [email protected] 17 18/144 Use the new blue MX-NPA PoE set for the Q24, M24, D24, D14 and T24, as previous MOBOTIX network power accessories such as the NPA Set, Power Box and Power Rack (MX-NPASet, MX-NPR-4 and MX-NPR8/20) are not suitable for use with these models MxEasy User Manual: Installation And Initial Operation 2 Installation and Initial Operation 2.1 Power Supply And Network Connection Of Cameras MOBOTIX cameras can be supplied with power using a Network Power Adapter (MX-NPA-PoE) or a switch that supports the PoE standard IEE 802.3af. Both of these methods will be briefly described here. For information about additional power supply options and for more details, see Section Network And Power Connection in the corresponding camera manual. 2.1.1 Power Supply When Connected Directly To A Computer 1.Connect the pre-installed cable of the camera to the Camera connector of the Network Power Adapter. 2.Connect the PC/Power connector of the Network Power Adapter to the Ethernet port of the computer. 3.Plug the RJ45 connector of the external power unit into the LAN/Power connector of the Network Power Adapter. PC/Power LAN/Power NPA PoE Set Patch cable cable Camera Patch The IP addresses in the diagram are shown only as an example 192.168.1.12 (255.255.255.0) 10.8.0.99 © MOBOTIX AG • Security Vision Systems • Made in Germany www.mobotix.com • [email protected] 19/144 Power Supply And Network Connection 2.1.2 Power Supply And Network Connection With A PoE Switch 1.Connect the factory pre-installed cable of the camera to the Ethernet PoE port of the PoE switch/router. The switch/router must support the PoE standard IEEE 802.3af. PoE Switch/injector IEEE 802.3af cable 192.168.1.12 (255.255.255.0) Patch Patch cable The IP addresses in the diagram are shown only as an example 10.8.0.99 © MOBOTIX AG • Security Vision Systems • Made in Germany www.mobotix.com • [email protected] 19 20/144 MxEasy User Manual: Installation And Initial Operation 2.2 Installing MxEasy The current version of MxEasy can be downloaded from: www.mobotix.com > Support > Software Downloads > MxEasy. Note Only registered users are permitted to download MOBOTIX software from the website. Registered users have the following benefits: • Access to the entire range of the freely accessible MOBOTIX software. • Automatic subscription to the newsletter (if desired) to inform you about the latest MOBOTIX products. 2.2.1 System Requirements Computer System For your MOBOTIX system to function optimally, it must meet the following requirements: • Computer with a current operating system (Windows XP or higher, Mac OS X 10.6 or higher with Intel processor). The processor must have a speed of at least 2 GHz and 1 GB RAM. Macintosh computers with PowerPC architecture are no longer supported. • Monitor with a minimum resolution of 1024 x 768 pixels. The resolution should be higher (at least 1280 x 1024) in order to be able to use the full-screen display of one or more cameras. • Switch or router with switch functionality to create network connections. 2.2.2 Installation On Windows Computers • Open the file for automatic installation (MxEasy_*_Setup.exe). You can obtain this file by: – Downloading the file (MxEasy_*_Setup.exe) from the MOBOTIX website (release: MxEasy Windows), and saving the file to your computer. – If you have received an installation medium (CD, DVD, USB stick), you can launch the installation file directly from the storage device. The installation file may be opened automatically after you have inserted the storage device. • Follow the instructions of the installation wizard. 2.2.3 Installation On Mac OS X Computers • Open the file for automatic installation (MxEasy *.mpkg). You can obtain this file by: – Downloading the file (MxEasy *.mpkg.zip) from the MOBOTIX website (release: MxEasy Macintosh), and saving the file to your computer. Unpack the file by double-clicking on it. – If you have received an installation medium (CD, DVD, USB stick), you can launch the installation file directly from the storage device. • Follow the instructions of the installation assistant. © MOBOTIX AG • Security Vision Systems • Made in Germany www.mobotix.com • [email protected] 21/144 Installing MxEasy Note Every time the program starts, it checks to see if a newer version is available. If a newer version is available, this is displayed and the update can be downloaded. For additional information on this topic, see Section 4.8 “Searching For Software Updates”. Notes © MOBOTIX AG • Security Vision Systems • Made in Germany www.mobotix.com • [email protected] 21 22/144 MxEasy User Manual: Installation And Initial Operation 2.3 Using MxEasy For The First Time 2.3.1 Searching For And Adding Cameras When you start MxEasy for the first time on a computer, the MxEasy Wizard automatically begins to search for MOBOTIX cameras and displays all cameras found in a list. This camera list will be updated automatically as soon as new MOBOTIX cameras are connected to or removed from the network. Automatic Search For Cameras In Local Network All MOBOTIX cameras that are located in a local network are listed with an indication of their status: Camera list Legend Preview image • Camera list/name: Click on one of the columns to sort the camera list. You can change the order in which the cameras are sorted by clicking again. Double-click on the camera name to change it or click on Edit in the shortcut menu. • Filter: You can enter any filter criteria in this field to narrow the list of cameras displayed (for example, if you enter 3.4.4.7, the list will be narrowed down to the cameras that use that particular software version). • Legend: The status of the cameras is automatically tested and displayed. © MOBOTIX AG • Security Vision Systems • Made in Germany www.mobotix.com • [email protected] Using MxEasy For The First Time 23/144 • Green: The camera is responding, accessible and can be integrated immediately. • Green with a lock symbol: The camera can be integrated, but it is protected by a password. Right-click on the camera, select User & Password and enter the correct user name and password. Once a valid user name and password have been entered, the symbol changes to a green dot and the lock disappears. • Green with a red lock symbol: The camera is in the Privacy mode. Until this mode is lifted, the camera is protected from all access attempts; the sound channel, as well as all recording and alarm features, are deactivated. • Blue: In addition to previously integrated cameras that are already located in the same subnet as your computer, MxEasy also uses the Bonjour service to detect new MOBOTIX cameras with factory IP addresses. Because new cameras are normally located in a subnet other than that of your computer, a video connection cannot be established. This may occur if IP addresses in the network are automatically assigned by a DHCP server (e.g., in the DSL router). The computer (and previously integrated cameras) are in another subnet (e.g., 192.168.178.x) than MOBOTIX cameras with factory IP addresses (always 10.x.x.x). • Yellow: The camera was detected, yet it cannot be integrated at this time because the camera's status cannot be determined. The yellow circle will be replaced by a green or red circle after a short time. • Red: The camera has been detected but is not responding. This status occurs when a camera has been restarted but can also be caused during normal operation by a disruption in the HTTP connection (network error, firewall). • Preview image: Live image from the selected camera, if this camera is accessible (if there are multiple selections, then always the images of the last camera selected). Note If no cameras are detected (in this case there are no entries in the camera list), then check the firewall and proxy settings on your computer. Correct these settings, if necessary, and allow access for MxEasy. © MOBOTIX AG • Security Vision Systems • Made in Germany www.mobotix.com • [email protected] 23 24/144 MxEasy User Manual: Installation And Initial Operation Adding Cameras Outside Of The Local Network MOBOTIX cameras located outside of the local network (e.g., in the Internet), which will not be detected in an automatic search, can be added as follows: 1.Click on Add Camera. 2.Or: Right-click to open the shortcut menu and click on Add. The “Add MOBOTIX Camera“ window opens. 3.Enter the data according to your needs. 4.Click on OK to confirm. Camera name IP address or DynDNS name Camera port, may be on router User name and password for camera access For more information on adding cameras from outside the local network, see Section 2.3.3 “Special Case: Integrating An IP Video Door Station”. © MOBOTIX AG • Security Vision Systems • Made in Germany www.mobotix.com • [email protected] Using MxEasy For The First Time 25/144 2.3.2 Selecting And Integrating Cameras Selecting Cameras 1.Select the cameras you would like to connect: To select more than one camera, simply use Shift KEY for a block selection or the Command key and left-click for individual selection. Command-A selects all cameras. Note: If you want to integrate several password-protected cameras (status: Authentication required) at one time, you can add the cameras to the camera list via the User & Password shortcut menu. This spares you the trouble of having to enter access data several times. Press Shift or the Command key to select more than one 2.Click on the Continue button. The MxEasy security prompt window opens. 3.Confirm the security prompt by clicking on OK. 4.If some of the cameras are password-protected (status: Authentication required in the camera list) and you have not yet unlocked the camera directly in the camera list, then the authentication window will now open: 5.Enter the user name and password. 6.Click on OK to confirm. If cameras that have the status (Invalid Network) were selected, the window for network configuration will now open. 1.Confirm the prompt by clicking on OK. The “Change Camera Network Configuration“ window opens. © MOBOTIX AG • Security Vision Systems • Made in Germany www.mobotix.com • [email protected] 25 26/144 MxEasy User Manual: Installation And Initial Operation Change Camera Network Configuration Choose one of the two configuration methods: Get IP address automatically If your computer automatically gets its IP address from a DHCP server (e.g., DSL router), then it also makes sense for the camera to get its IP address automatically. 1.To do this, select the option Get IP address automatically. Use a specific IP address If you have assigned a static IP address to your computer, you will prefer to assign static IP addresses (issued by your system administrator) to every camera. 1.To do this, select the option Use this IP address. 2.Enter the IP address and the subnet mask. 3.Click on OK. The cameras are reconfigured and the “Select Integration with MxEasy“ window opens. Select Integration With MxEasy Choose whether and how the existing camera configurations are applied in MxEasy. The following options are available: • Complete Integration: The camera configurations are reset to the MxEasy factory defaults. The Wizard helps you to choose the other MxEasy settings. The settings can be restored as needed because a backup copy of the camera configuration is saved for every camera integration. • Limited Integration: The camera configurations are retained. The Wizard helps you to choose the other MxEasy settings, such as Control Mode and Bandwidth. © MOBOTIX AG • Security Vision Systems • Made in Germany www.mobotix.com • [email protected] Using MxEasy For The First Time 27/144 • Quick Start: The camera configurations are applied directly to the system, without asking further questions, with the standard values for the MxEasy settings (e.g., for the Control Mode). We recommend resetting the cameras to the MxEasy factory defaults, unless the cameras were already configured on another computer using MxEasy. In this case, select the Quick Start option. To reset to the factory defaults, select the Complete Integration option. 1.Click on the desired option field you would like to use. 2.Click on the Continue button. The “Configure Access Mode“ window opens. Configure Access Mode Set the control mode for the cameras and select the bandwidth for transmission: 1.Choose the desired Control Mode you would like to use. 2.You can prevent accidental configuration changes with the Control Mode. For example, a camera integrated over the Internet can be set to Image Mode to prevent accidental changes to the recording type. 3.Select the Bandwidth. The Bandwidth determines how, in environments with connections of different speeds, images are retrieved by the cameras and shown as live images or provided for searching. Choosing a Bandwidth enables you to determine the image quality for the cameras. 4.Click on the Continue button. The “Change Camera Access“ window opens. Change Camera Access Set the user name and a password for the cameras to block public access to these cameras. Leave the fields empty if you would like to skip this step. For security reasons, however, we strongly recommend setting a user name and a password. 1.Enter a user name and a password. 2.Repeat the password. 3.Click on the Continue button. If you would like to set up a user name and password at a later date, proceed as described in Section 4.1 “Setting Access Rights And Passwords“. © MOBOTIX AG • Security Vision Systems • Made in Germany www.mobotix.com • [email protected] 27 28/144 MxEasy User Manual: Installation And Initial Operation Caution Make sure that you store your password information. If the administrator password is lost, the passwords for the cameras must be reset at the factory. This service is subject to a fee! If no user name and password have been entered, MxEasy uses the factory defaults (user admin, password meinsm). The cameras are reconfigured and restarted. If one or more Hemispheric cameras (e.g., a Q24M) were selected in the camera list, the “Setup Camera Installation“ window opens. Setup Camera Installation Set the proper mounting position and display mode for the Hemispheric cameras. 1.Select the desired mounting position. 2.Choose the desired display mode. 3.Click on the Continue button. The “Overview“ window opens. Finishing The MxEasy Wizard The “Overview“ window lists all of the selected cameras. 1.Click on Finish to exit the MxEasy Wizard. The selected cameras are integrated and displayed in MxEasy. © MOBOTIX AG • Security Vision Systems • Made in Germany www.mobotix.com • [email protected] Using MxEasy For The First Time 29/144 2.3.3 Special Case: Integrating An IP Video Door Station MxEasy can also be used in combination with an IP video Door Station to use a PC as an additional video two-way communication intercom and easily secure entrances. As a Door Station you can use the standard T24 Door Station or the S15 FlexMount camera, which can be configured as a Door Station. To make use of the Door Station-specific functions, the IP Video Door Stations must first be integrated into MxEasy. When you start MxEasy for the first time after connecting the door cameras, the MxEasy Assistant automatically begins to search for new cameras and displays all cameras detected in a list. This will include the T24 Door Station and the S15. Selecting A Door Camera 1.Proceed as described in Section 2.2.2 “Selecting And Connecting New Cameras.“ If the door camera (T24 or S15) is password-protected (status: Authentication required in the camera list) and you have not yet unlocked the camera directly in the camera list, then the authentication window will now open. Authenticate 1.Enter the user name and password and confirm by clicking on OK. The “Select Integration with MxEasy“ window opens. Select Integration with MxEasy Typically, you will have already conducted an automatic configuration at the T24 or the S15 before integrating the door camera into MxEasy (see the T24 System Manual, Part 2, Initial Operation And Configuration). If this is the case, the system will detect this automatically and open the “Select Integration with MxEasy“ window with the following option fields (see the image at right). The Keep automatic configuration settings option field is automatically selected. 1.Keep this setting. 2.Click on the Continue button. The “Configure Access Mode“ window opens. © MOBOTIX AG • Security Vision Systems • Made in Germany www.mobotix.com • [email protected] 29 30/144 MxEasy User Manual: Installation And Initial Operation If you have not yet conducted an automatic configuration, then the “Select Integration with MxEasy“ window opens with the following option fields (see image). In this case we recommend Complete Integration. 1.Select the Complete Integration option. 2.Click on the Continue button. The “Configure Access Mode“ window opens. Configure Access Mode 1.Proceed as described in Section 2.2.2 “Selecting And Connecting New Cameras.“ The “Change camera access“ window opens. Change Camera Access 1.Proceed as described in Section 2.2.2 “Selecting And Connecting New Cameras.“ The door camera is reconfigured. 2.Click on the Continue button. • If the automatic configuration was run before the camera was integrated, the “Specify Door Station Equipment“ window opens (see further below). • If the automatic configuration was not run, then the “Automatic Configuration“ window opens (see below). • If a S15 FlexMount camera is integrated for which the automatic configuration was not yet run, then the „Configuration as Door Station“ window opens. Click on Yes. The S15 is reconfigured and the „Automatic Configuration“ window opens. Start Automatic Configuration 1. Click on the Start Door Station Configuration button. The system searches for existing Grandstream IP telephones and other Door Station cameras. The Door Station modules found are listed in a “Phone Device Selection“ overview. (When no Door Station modules are found, a system message opens. Then, click on the Continue button). 2. Select the Door Station modules that should be integrated into the system. Click on OK. This starts the automatic configuration. This might take several minutes. Depending on the connected bell module, either the “Initialize Keypad“ window or the „Initialize BellRFID“ window opens. © MOBOTIX AG • Security Vision Systems • Made in Germany www.mobotix.com • [email protected] Using MxEasy For The First Time 31/144 • Initialize Keypad: – Click on Train Keypad button. – Enter the supervisor PIN on the Door Station Keypad, train in the admin card and, if applicable, severaluser cards (see T24 System Manual, Part 2, Section 2.2 “Setting Up The Keypad“). – Click on the Keypad Trained button. The “Specify Door Station Equipment“ window opens. • Initialize BellRFID: – Click on the Train BellRFID module button. – Enter the supervisor PIN on the BellRFID module and set the bell button set (see BellRFID QuickInstall, Installation and Initial Operation). – Click on the BellRFID Trained button. The “Automatic Configuration” window opens once more. If needed, you can run the automatic configuration again to correct any wrong entries. Click on the Continue button. The “Specify Door Station Equipment“ window opens. Specify Door Station Equipment The T24 system includes a fixed bell button on the camera module and – if it exists for your system – one on the keypad. These two bell buttons have the same function and were already integrated into the system during the automatic configuration. When using the BellRFID module, you set the desired bell buttons at the module. When using the MX-232-IO-Box, two buttons are displayed. 1.Select the number of doorbells that will actually be used without including the fixed bell button on the camera module in the count (no display when using a BellRFID module or the MX-232-IO-Box). 2. Activate the desired checkbox. • Door position sensor and/or Lock position sensor: Indicate which door sensors exist in the system and which terminal connectors are relevant. This is important to receive correct status displays (door open/closed/ locked) in MxEasy. If you do not know whether and where door sensors are connected, simply try out the different options and check them using the the status display. 3.Click on the Continue button. The “Define Bells“ window opens. © MOBOTIX AG • Security Vision Systems • Made in Germany www.mobotix.com • [email protected] 31 32/144 MxEasy User Manual: Installation And Initial Operation Define Bells Select which actions should be performed when a bell is rung at the Door Station. Doorbell ringing can be triggered by pressing one of the existing bell buttons (camera, keypad or bell module) or by entering a “contact number“ defined previously when training in RFID cards on the keypad. 1. Select the contact number (person) and/or bell for which an action profile will be entered. 2.Select whether a doorbell ring should be answered – without ringing at the remote station (no phone ring) – only with ringing (ring only) – with ringing and mailbox (ringing and visitors can leave messages if the homeowner does not answer) – with mailbox only (no ringing, visitors can immediately leave messages) – with announcement only for the visitor. 3.If the ringing and mailbox profile was previously selected: – Now select the remote station or enter a new remote station that will indicate when the doorbell at the Door Station is rung. – If you select MxEasy as Remote Station, the IP address of the computer on which MxEasy runs must be entered or selected. For a Voice over IP call, either a SIP number or an IP address for the VoIP telephone to be called must be entered or selected, depending on the configuration. The SIP number is displayed as “*101“. This is the name that was specified on the SIP server for the Grandstream models. “*101“ is then resolved in the real IP address of the Grandstream. – Select how much time should elapse without the doorbell being answered before a message should be played to the visitor. – Select a message that should be played to the visitor. – Activate the checkbox Record Message if the visitor should have the option of leaving a message. 4.If the mailbox only profile was previously selected: – Select a message that should be played to the visitor. – Activate the checkbox Record Message if the visitor should have the option of leaving a message. 5.Click on the Continue button. The door camera is reconfigured. The “Overview“ window opens. © MOBOTIX AG • Security Vision Systems • Made in Germany www.mobotix.com • [email protected] Using MxEasy For The First Time 33/144 Finishing The MxEasy Wizard The “Overview“ window lists the selected door camera. 1.Click on Finish to exit the MxEasy Wizard. The door camera is integrated and displayed in MxEasy. 2.3.4 Activating microphone and speaker If you have a S15 FlexMount camera integrated and use it together with the AudioMount, activate now the AudioMount´s microphone and speaker and adjust the sensitivity and volume, if necessary. Open the „Audio“ tab under the Camera | Camera Options menu item. 1.Activate the Activate Microphone checkbox and select external microphone. Then select the sensitivity. 2.Activate the Activate Speaker checkbox and choose the volume. Note: Since the S15 FlexMount camera and its sensor module do not have speakers, only one speaker is shown here (the speaker of the AudioMount). © MOBOTIX AG • Security Vision Systems • Made in Germany www.mobotix.com • [email protected] 33 34/144 MxEasy User Manual: Installation And Initial Operation 2.3.5 Setting The Time Settings After you have completed the MxEasy Wizard, you should make sure that all integrated cameras and devices are running in a synchronized manner. You can do this by using a time server that synchronizes all cameras to the exact same time. 1. Open the “Time“ tab under the Camera | Camera Options menu item. 2.Select the valid time zone for your location. This allows the system to automatically switch between summer and winter time. 3.Activate the desired checkbox: – Synchronize date and time with time server (NTP): Select a time server from the list or enter the name of your preferred NTP time server. If the camera does not automatically fetch its network data via DHCP, a valid DNS server must also be entered (“Connection“ tab). – Synchronize date and time with master camera If there is no Internet connection and you have several MOBOTIX cameras simultaneously in one network, you should make one master camera be the time server for all devices. This ensures that the system runs in a synchronized manner and that saved video sequences can be replayed in a synchronized format. 4.Activate the checkbox Use as master time server camera for other cameras if the current camera is supposed to be used as the time server master camera. 5.If an NTP time server has not been entered and the camera is not being used as a master time server camera, you can set the camera time to the computer's clock. – Uncheck the synchronizing options and click on Apply. – The camera is reconfigured and restarted. The time of the computer on which you are working right now will be displayed. – Click on Set Date and Time Now to synchronize the camera's time with the computer's local time for the first time. 6.Click on OK to confirm. Note The time display in the title bar of the main window will blink if the system time of an active camera (Live view) in the main window deviates from the system time of the computer by more than 15 seconds. In this case, check the computer to see if it is also synchronized with a time server. Try to set up the same time server for both the computer and the MOBOTIX cameras. © MOBOTIX AG • Security Vision Systems • Made in Germany www.mobotix.com • [email protected] Setting Access Rights And Passwords 35/144 Notes: © MOBOTIX AG • Security Vision Systems • Made in Germany www.mobotix.com • [email protected] 35 36/144 MxEasy User Manual: Using MxEasy 3 Using MxEasy 3.1 Program Windows And Program Views Live camera images are shown once you have completed the MxEasy Wizard. Up to four cameras integrated to MxEasy are displayed simultaneously. The picture can be displayed in the Standard or Panorama view of the MxEasy program window, which is divided into the following areas: Default View Of The MxEasy Program Window Menu bar Info bar 1 Toolbars Image bar with camera/ event windows Tooltips for MxEasy elements Info bar 2 Dynamic toolbar Status bar Main window Note The program window is shown in the Default View when MxEasy is launched for the first time. However, if at least half of the integrated cameras are Hemispheric models, for which the Panorama image view was selected in the Wizard, then the program window is shown in the Panorama view. © MOBOTIX AG • Security Vision Systems • Made in Germany www.mobotix.com • [email protected] Program Windows And Program Views 37/144 3.1.1 Program Window Areas Menu Bar Using the menu bar, you can access most of the features and settings that can be activated using the buttons in the toolbars. There are certain features that can only be activated using the menu bar, for example, switching the current environment. Toolbars Using the buttons located around the main window, you can quickly and easily perform the most important functions for setting up and operating your MOBOTIX video surveillance system. These include functions for live surveillance, controlling the cameras, playing back recorded video and audio data and configuring integrated cameras. The buttons for activating function areas of MxEasy are among the software's special features. Clicking on the dynamic toolbar reveals additional buttons that can be used to define the detailed settings for the following function areas: • Image settings: Here, you can adjust the saturation, image brightness, contrast and sharpness of the camera images to suit your needs. Using the Exposure Window feature, you can adjust the camera's exposure for specific areas of the image. • Image and recording formats: Here, you can set the image format for live images and recordings and adjust the image quality and the frame rate. You can also determine whether the camera's sound channel is to be recorded and whether the displayed image (or a partial image) or the full image is to be recorded. • PTZ views: Here you can predefine specific areas of the image with digital zoom actions that can be called up again later. • Alarm configuration: Here you can specify the type of recording and the sensors that the cameras will use to trigger alarms, actions and messages. • Player mode: Switches to the Player View. Here you can limit recorded events by event type, search for specific events and play back the events you find in the main window. Some buttons also enable the setting of specific values in a shortcut menu. These buttons are identified with an arrow (▼). The shortcut menus can be opened by right-clicking on the button. Hover the mouse pointer over a button or element to display the corresponding Tooltip. © MOBOTIX AG • Security Vision Systems • Made in Germany www.mobotix.com • [email protected] 37 38/144 MxEasy User Manual: Using MxEasy Main Window Depending on the view you have selected, this area of the program window displays the live image of a camera, the recorded video sequences of a camera or the camera overview. When MxEasy is launched for the first time, the program window opens in Default View and displays the live image of the first camera. Image Bar Depending on the current view, the image bar contains the live images or recorded event images of up to four cameras. Live images are displayed with a camera icon and event images are displayed with a cassette icon in the upper right corner of the image. Note There are no event images available because the integrated cameras have not yet recorded any event images when you launch MxEasy for the first time. In this case, a placeholder image is displayed in the lower right corner in the event image area. Because the image bar is filled dynamically according to the number of integrated cameras, MxEasy may display this image multiple times. Status Bar The status bar displays information on elements whenever the mouse pointer hovers over the corresponding elements. For example, this shows camera names or a short description. Information Bars There are two information bars located above and below the main window. The information bars display specific information about the current view (e.g., the camera's recording target). © MOBOTIX AG • Security Vision Systems • Made in Germany www.mobotix.com • [email protected] Program Windows And Program Views 39/144 3.1.2 Program Views Default View The main window is filled with the live image of the first integrated camera. The image for the latest event of this camera is displayed in the image bar at the bottom. The three other windows in the image bar are filled with live images from other cameras. If there are fewer than four cameras in the system or fewer than four cameras have been activated for Default View (see the “Camera Overview And Camera Management“ on page 42 ), the empty windows in the image bar are filled with additional event images from the main camera. Elements Of The Default View: Icon for live image Camera name Live image in main window Date/time of the main camera Live frame rate of the main camera Live images from up to three additional cameras Latest event image of the main camera (if available) Icon for recording target © MOBOTIX AG • Security Vision Systems • Made in Germany www.mobotix.com • [email protected] 39 40/144 MxEasy User Manual: Using MxEasy Panorama View When displaying images from wall-mounted MOBOTIX Hemispheric cameras (e.g., Q24M), MxEasy can be switched to the “Panorama“ view, which displays the images with an aspect ration of 8:3 (instead of the standard 4:3). In this mode, the image bar is located below the window of the main camera. The images in the image bar are arranged from left to right instead of from top to bottom. The window on the lower right is used to display the latest event image. You activate the Panorama view in a shortcut menu that you can open with the Camera Overview and Layouts button or via the Views | Layout menu. Elements Of The Panorama View: Icon for live image Camera name Live image in main window Date/time of the main camera Live frame rate of the main camera Live images from up to three additional cameras Latest event image of the main camera (if available) Time since the last event Icon for recording target Date/time of the latest event of the main camera Panorama view is particularly suited for Hemispheric cameras (e.g., Q24M), which record images in Panorama mode with an aspect ratio of 8:3. If the Panorama view is selected, this aspect ratio is retained, even when a camera image with an aspect ratio of 4:3 (e.g., VGA) is displayed in the main window. © MOBOTIX AG • Security Vision Systems • Made in Germany www.mobotix.com • [email protected] 41/144 Program Windows And Program Views Player View This view permits searching and playback of recorded data while the main window displays the image of the latest event recorded by the main camera. The image bar displays the live images of the first four integrated cameras. The buttons displayed below the main window enable playback and navigation within the recorded audio and video data. You activate the Player View via the Cameras | Player Mode menu or via the Player Mode button. Click on the Player Mode button to return to Default View. Elements Of The Player View: Icon for recording Camera name Event image in main window Date/time of the MxEasy computer Three live cameras in image bar Last image Live image of the current camera Player controls First image Recording start Icon for recording target Current image Recording end Slider bar for event search © MOBOTIX AG • Security Vision Systems • Made in Germany www.mobotix.com • [email protected] 41 42/144 MxEasy User Manual: Using MxEasy Camera Overview And Camera Management The Camera Overview offers a quick overview of all areas under surveillance. It includes live images from all selected cameras. You decide which live images are shown in the Camera Overview by selecting live image display for the cameras in Camera Management. With this selection, you also determine which live images are shown in the Default and Panorama views. This way, it is possible to “lock“ the live images and image playback for individual cameras in certain application scenarios without having to remove these cameras from the system. If you select more than four cameras for display, the live images from these cameras will only be shown if you activate the Camera Sequencer (via the Views | Camera Sequencer menu) or click on the Next Camera button. • Activating Camera Management: You can activate Camera Management via the View | Camera Management menu. This automatically activates the Camera Overview and Layouts button as well. • Activating Camera Overview: You can activate Camera Overview via the Views | Camera Overview and Layouts menu or with the Camera Overview and Layouts button. Elements Of The Camera Overview: Camera live images Click on the Camera Overview and Layouts button to return to Default View. © MOBOTIX AG • Security Vision Systems • Made in Germany www.mobotix.com • [email protected] 43/144 Program Windows And Program Views Mini Viewer The Mini Viewer mode is used to manage door cameras. In this view, the program window is minimized and only those functions that are required for a remote station of a door camera are available. You can activate the Mini Viewer view via the Views | Mini Viewer menu or via the Switch to Mini Viewer button. Click on the Switch from Mini Viewer button in the Mini Viewer mode to return to Default View. Elements Of The Mini Viewer View: Camera name Camera live image Switch from Mini Viewer Toolbar Next camera 3.1.3 Program Window Size The Default, Panorama, Overview and Player views determine the arrangement and format of the elements used for displaying images (main window, image bar). Furthermore, there are also various options for setting the size of the MxEasy program window and the display windows inside of it. The program window can be expanded and reduced with the mouse. MxEasy saves the window size upon closing and using this setting when it launches again. There is also the option of setting the program window's size in such a way that the camera images are displayed in optimal quality. Program Window Modes For all views described above, MxEasy can be switched to two special modes that optimize the available monitor space when displaying the camera in the main window or the Camera Overview. For this, the View menu contains the items Full Screen and Maximize. • Full screen: This setting resizes the main window or the camera overview as well as the surrounding toolbars to cover the entire screen. If the toolbars were previously hidden, the entire screen is now available for displaying camera images. You activate this setting in the View | Full Screen menu or by pressing the Full Screen button. The © MOBOTIX AG • Security Vision Systems • Made in Germany www.mobotix.com • [email protected] 43 44/144 MxEasy User Manual: Using MxEasy frame of the program window and the Windows taskbar are now no longer visible. This mode can be deactivated by clicking on the Full Screen button or by pressing the ESC key. • Maximize: The entire program window is expanded to fill the screen to display the main window and/or Camera Overview together with the toolbars. The frame of the program window with the title bar, the menu bar and the status bar and the Windows taskbar remain visible. You activate this setting in the View | Maximize menu or with the Maximize icon in the Windows title bar. This mode can be deactivated by pressing the ESC key or the Minimize button in the Windows title bar. Size Settings The adjustable sizes, VGA (640 pixels) to MEGA (1280 pixels), refer to the size of the main window. The size of the image bar is automatically adjusted to the new size of the main window. If the size set here is identical to the size of the camera image, this will result in the best image quality You activate the size settings in a shortcut menu via the View | Layout menu or the Camera Overview and Layouts button. When you select Original Size, MxEasy automatically adjust the size of the image. This option is no longer shown in the selection menu because manual PTZ actions can lead to the same result and be changed again • Original size setting: This option ensures that the live image of the current camera in the main window remains unscaled and with the original image resolution from the camera. The main window is set (among the sizes VGA, SVGA, XGA and MEGA) to the next size, which is either exactly the same size as the camera image or smaller. © MOBOTIX AG • Security Vision Systems • Made in Germany www.mobotix.com • [email protected] Live Video Surveillance 45/144 If this size is too small because, for example, the camera displays a QXGA image of 2048 x 1536 pixels or provides an image with a resolution that does not correspond to the four available resolution settings, the main window will display only a centered section of the image instead of the entire camera image. In this case, you can use the digital PTZ commands to see the image areas that are hidden from view. You can find more details on this in “3.4 Image Sections And Virtual PTZ Features“. • The Do Not Scale Up setting: This setting ensures that camera images that are smaller than the main window are not enlarged (scaled up). These images are displayed in their original size, centered in the main window. This option enables you to avoid the lower image quality that can occur when scaling up images. • The Image bar option: You can use the selection menu to either hide or display the image bar. If the camera in the main window records images in Panorama mode (aspect ratio 8 : 3), MxEasy automatically activates the Panorama view after a prompt © MOBOTIX AG • Security Vision Systems • Made in Germany www.mobotix.com • [email protected] 45 46/144 MxEasy User Manual: Using MxEasy 3.2 Live Video Surveillance The Default and Panorama views are used for the display and surveillance of live camera images. The Speaker button can activate playback of live audio data from a camera in the main window. This is only possible, though if the microphone is activated for this camera. If this is not the case, this button is grayed out. 3.2.1 Displaying And Switching Cameras Use the mouse to drag the desired camera into the main window (or double-click on the desired camera) to display a different camera from the image bar in the main window. The cameras then switch places. Manually Cycling Through Cameras Up to four live images can be displayed in Default View. In the Camera Management, however, you can activate up to 16 cameras for live display. Using the Next Camera button, you can cycle through to the next camera in the list of activated cameras. The current camera is removed from the main window and the top camera in the image bar is displayed in the main window. The other two cameras in the image bar move upwards and a new camera from the list of activated cameras is added in the bottom position in the image bar. Automatic Cycling Through Cameras Cycling to the next camera can be automated. This means that the software switches automatically every five seconds to the next camera that has been activated in the Overview. You can select this setting with the Sequencer button. You can also set the frequency of cycling under Tools | Preferences in the “Behavior“ tab. You can switch to the previous camera or the next camera before the set time interval has elapsed using the arrow keys on your keyboard (Ctrl+ or Ctrl+ ). You can stop or restart the automatic cycle through the images by pressing Ctrl+Spacebar. This gives you more time to review a specific situation, for example. ← ← Note Camera Sequence The activated cameras will normally be displayed in the same sequence as they appear in the Camera Management. If a camera in the main window is replaced by a camera in the image bar as described above, this will change the sequence accordingly. Each change in the Camera Overview (activation or deactivation of cameras, switching the sequence of the cameras) changes the display sequence to match the current sequence in the Camera Overview. 3.2.2 Detection Of Alarms If a camera has triggered an alarm, it will be displayed with a flashing red lightning symbol in the live image. This symbol is displayed until you acknowledge the alarm by clicking in the image. This applies to both the main window and the image bar. © MOBOTIX AG • Security Vision Systems • Made in Germany www.mobotix.com • [email protected] Camera Views And Image Settings 47/144 You can specify in detail how the system reacts to an alarm under Tools | Preferences in the “Behavior“ tab (see “4.4.3 Alarm And Doorbell Notification Behavior“). You can find details on how to set up alarms and alarm notification in “3.5 Recordings And Alarms“. © MOBOTIX AG • Security Vision Systems • Made in Germany www.mobotix.com • [email protected] 47 48/144 MxEasy User Manual: Using MxEasy 3.3 Camera Views And Image Settings 3.3.1 Selecting Camera Views To show live camera images, you can select different camera views (e.g., full image or surround mode) in a shortcut menu that opens via the Image Formats and Views button. Camera Views (All Cameras Except Hemispheric Models) • Full image: The entire live image from the camera is displayed. • Lens correction: MxEasy displays a portion of the live camera image (with lens correction). This option is only available for L22 lenses if the camera configuration is adjusted accordingly. • Picture-in-Picture: This option displays a small image from one camera sensor inset in the large image of the other. This setting is available on MOBOTIX Dual models only. • Picture in Zoom: MxEasy displays a small version of the entire live camera image in the lower right corner of the large live camera image. This way, the entire image is visible even when the live image is zoomed. • Event in Picture: MxEasy displays a small version of the latest event image in the lower right corner of the large live camera image. For more information on the different views available for MOBOTIX cameras, see the General Image Settings section in the Software Manual. Camera Views (Hemispheric Models) • Full image: The entire (distorted) full image of the image sensor is displayed. • Normal: A corrected image is displayed. This image can be panned and tilted. This is the factory default image setting for the Hemispheric camera models. • Surround: Partial images from each of the four directions are shown in an allround view. All four views can be changed independently of each other using PTZ commands. • Panorama: The corrected image of an entire room (corrected 180° panorama) from the left to the right wall is shown. The aspect ratio (width to height) is 8:3. This view is only available for Hemispheric models, such as the Q24M. The D14-Sec-180 is an exception among the Dual models. Instead of a right and left image delivered by the right and left sensors on the camera, this model can be configured with a Panorama view that stretches seamlessly over both sensors. Use the Image Formats and Views to open the Panorama installation and configure the Panorama view. For more information, see “3.3.2 Editing The Image Settings“. • Panorama focus : This view is a combination of the Panorama view (8:3) and two smaller individual views (each 4:3) in a single image. This is available for Hemispheric models. © MOBOTIX AG • Security Vision Systems • Made in Germany www.mobotix.com • [email protected] 49/144 Camera Views And Image Settings • Double panorama: A 180° panorama view of the Northern half of the image is shown together with a panorama view of the Southern half of the image with an aspect ratio of 4:3 (width to height). This view only makes sense for the ceiling-mounted MOBOTIX Hemispheric model. Both partial views (North and South) can be changed independently of each other using PTZ commands. Q24 view “Normal“ Q24 view “Surround“ Zoomed image section Q24 view “Full Image“ In the Surround, Panorama Focus and Double Panorama camera views, the images that are delivered by the sensors are displayed as partial views of the entire image. This makes it possible to focus the window view on just one of these partial views. Different displays of the partial views is possible, depending on the camera view. In Surround view, for example, you can focus on the upper left, upper right, lower left and lower right partial views. This applies for Hemispheric and Dual models. To select a partial view, use the Image Formats and Views button to open the shortcut menu and select a partial view. For more information on the views available for MOBOTIX Hemispheric models, see the section First Images And The Most Important Settings In The Browser in the Camera Manual. © MOBOTIX AG • Security Vision Systems • Made in Germany www.mobotix.com • [email protected] 49 50/144 MxEasy User Manual: Using MxEasy 3.3.2 Editing The Image Settings Use the Image Formats and Views button to edit the image settings. More buttons open at the lower edge of the program window, and they can be used to adjust the properties: • Resolution: You can set the resolution of the camera image here. The resolution you set may be different from the resolution displayed in the main window. Regardless of the current resolution of the camera, the camera image in the main window is always displayed with the resolution set here (VGA, SVGA, XGA or MEGA). You can change the image resolution of a camera by using a zoom tool. You activate the zoom tool by clicking on the Resolution button. A magnifying glass appears in the camera image. Click on the plus or minus button on the magnifying glass to change the image resolution on the camera. The image area in the magnifying glass always shows the camera's original resolution. This means that if the image resolution of the camera is set to a value higher than the resolution of the main window, the magnifying glass area will show an enlarged image (for example, 2 times or 4 times the size). This function allows you to accurately judge the image detail provided by the camera and used for the recording. You can also select the desired resolution in a shortcut menu that you open with the Resolution button. • Custom size: You can create a camera image with a custom resolution and size with this option. This function can be used if only certain areas of the camera image are allowed to be monitored. When monitoring pumps at a gas station, for example, it may be useful to resize the image to display only the horizontal strip in the middle that is of possible interest. This means that the images take up less memory and require less bandwidth for live display. © MOBOTIX AG • Security Vision Systems • Made in Germany www.mobotix.com • [email protected] Camera Views And Image Settings 51/144 You create a camera image of a user-defined size when you use your mouse to draw a box directly in the camera image. You can move this defined area with the mouse, change its size or delete it. Deactivating the button automatically saves the defined area. The box is drawn separately for the left and right images for dual models. A Panorama view can be created for the D14 Sec 180 that stretches seamlessly over both images (the camera’s right and left sensors). This allows you to draw a box within the entire image without any problems. • Image quality: The three values (Fast, Normal, High) that can be set using this button influence the image quality in which the image sensor is to be read. Increasing the image quality improves the camera image but also decreases the maximum available frame rate. The Normal option offers a good compromise between the High and Fast options. For more information, see the sections “General Image Settings“ and “Image Programs In The Software Manual.“ • Obscure area: If certain areas in the image are meant to remain unrecognizable, you can use this button to obscure these areas with the camera (e. g., workstations or public areas). To do so, use your mouse to draw one or more boxes directly in the camera image. Windows set up in this manner will be automatically saved and activated once you deactivate this button. The box is drawn separately for the left and right images for dual models. A Panorama view can be created for the D14 Sec 180 that stretches seamlessly over both images (the camera’s right and left sensors). • Camera frame rate: From the shortcut menu of this button (right-click), you can set the frame rate provided by the camera (options: No Limitation, 25 fps, 16 fps, 12 fps, 8 fps or 4 fps). This function can be used as a way to manage bandwidth. The lower the frame rate, the less bandwidth is required to transfer the video data. Note, however, that you should primarily use the functions outlined in Section 4.4.2, “Setting Connections“. © MOBOTIX AG • Security Vision Systems • Made in Germany www.mobotix.com • [email protected] 51 52/144 MxEasy User Manual: Using MxEasy • Mounting position: You can set the mounting position of a MOBOTIX Hemispheric camera (Ceiling or Wall ) from the shortcut menu of this button. If ceiling mounting is enabled, you can also specify the North direction of the camera. Activate the button and turn the image to the right or left using the symbols that are displayed. The North direction set in this manner will be saved automatically once you deactivate this button. Adjusting the North direction also changes the Surround and Double Panorama camera views. For additional information, see the section “First Images And The Most Important Settings“ in the Q24M Camera Manual. • Panorama installation: If a D14 Sec 180 is integrated in MxEasy, then the Panorama Installation button will be shown instead of the Mounting Position button. This enables setup of the panorama image for the D14 Sec 180. As for all dual models, the live image of this camera consists of a combination of a right and left image, which are provided by the camera’s right and left sensors. The D14 Sec 180 can produce a Panorama view that stretches seamlessly over both images. Move the controls until both images are positioned in such a way that the windows merge seamlessly. Clicking on the Panorama Installation button ends the setup and saves the view. Selecting image elements: left image, both, right image The length of the bars determines the subtlety of the movement Panning and tilting the selected image (select left or right image) Combine or move both images away from each other (select both images) Zooming of selected image Correcting the camera’s imbalance • Mounting correction: Corrects the pitch of a camera mounted to a wall. Activate the button and correct the pitch by clicking on the icons that appear. • Panorama correction: If the Panorama view is not centered, this may cause trapezoidshaped distortion. Panorama correction enables this distortion to be adjusted so that the selected image section looks as natural as possible. Activate the button and correct the distortion by clicking on the icons that appear. • Recorded image: This option is important for all cameras for which a zoomed section of the live image (PTZ) is shown instead of the full camera image. Only this section will be recorded when this kind of live image is recorded. You can avoid this by activating the Recorded Image button.This guarantees that a full camera image is always recorded ‑ regardless of the live image that is visible or its settings. © MOBOTIX AG • Security Vision Systems • Made in Germany www.mobotix.com • [email protected] Camera Views And Image Settings 53/144 Note Note that any subsequent search of the full camera image (PTZ functions) is only possible with the Recorded Image (= full image recording) option. • Record audio: If this button is activated, the sound from the camera microphone will be included in the recording. If the button is deactivated, the video sequences will be recorded without sound. Note These settings apply for all recordings. You cannot make separate settings for each recording time range. 3.3.3 Adjusting Additional Image And Exposure Settings You can adjust other settings for color saturation, brightness, backlight and sharpness . To do this, click on the Image Settings button. More buttons open at the lower edge of the program window, and they can be used to adjust the properties: • Saturation: This function increases or decreases the saturation of an image. The higher the value, the more color displayed in the image. • Brightness: This setting allows you to adjust the image brightness. Make sure that the exposure windows are being used effectively before you make any adjustments. • Backlight: This setting improves the display of a camera image that contain overexposed or underexposed areas. A typical example of this is a room that is illuminated only by daylight from the windows. Objects located around the edges are displayed too dark and with too little contrast. Increasing the value will increase overall illumination to properly display the dark areas in the image. This setting is particularly useful for high-contrast (color) night images. • Sharpness: This setting allows you to display sharper camera images. Make sure not to set the sharpness too high since doing so may result in poorer image quality (for example, for high-contrast and finely detailed images). • Exposure windows: The MOBOTIX camera sets the exposure window to ensure the proper exposure/brightness for the live camera image. You can select a predefined set of exposure windows from the shortcut menu of this button. These windows are shown in the live image and can be set there. You can specify whether or not the exposure window will be visible in the camera image (green box) using the Show Exposure Windows option. • Default settings: Click on this button to restore the default values for all settings. Notes On Predefined Exposure Windows • The content of predefined exposure windows is decisive for the camera's exposure control and therefore for the overall appearance of the image. © MOBOTIX AG • Security Vision Systems • Made in Germany www.mobotix.com • [email protected] 53 54/144 MxEasy User Manual: Using MxEasy • The predefined and custom exposure windows are particularly suited for use with full image recording because the recorded full image of MOBOTIX cameras is not affected by PTZ commands. • If the camera is used primarily as a live camera, meaning that is must display high quality images even when PTZ commands are used, we recommend using the Automatic (Visible Area) setting. With this setting, the current visible image section is used as the exposure window. As long as no digital zoom is performed in the camera, this area is identical to the full image displayed by the image sensor. When you perform a digital zoom, the visible area becomes smaller than the full image. This setting optimizes the exposure of the live image, even when you are performing PTZ commands. With the Automatic Exposure (PTZ) setting, images recorded using full image recording are affected by the PTZ commands ‑ whenever the PTZ commands affect the exposure of the image. Image settings are done for each lens for Dual cameras, with the exception of D14-180° models. Click on the Image Settings button to open the shortcut menu and select the lens. Creating Custom Exposure Windows The Custom option (from the shortcut menu of the button) allows you to create and edit individual exposure windows using your mouse. • Creating exposure windows: Use the mouse to draw a frame within the camera image in the main window. • Moving exposure windows: Use the mouse to drag the window to the desired position. If you move the mouse over the window, it automatically turns into a hand cursor. • Modifying exposure windows: Drag the edge of the window using your mouse to increase or decrease the size of a window. If you move the mouse in the edge of the window, it automatically turns into a resize cursor. © MOBOTIX AG • Security Vision Systems • Made in Germany www.mobotix.com • [email protected] Image Sections And Virtual PTZ Features 55/144 • Deleting exposure windows: To delete a window, click on the X button in the upper right-hand corner of the window or press the Delete key on your keyboard. The exposure windows for Dual models are drawn separately for the left and right image. A Panorama view that stretches seamlessly across both images (the right and left sensors of the camera) can be created for the D14 Sec 180. This enables the desired exposure windows to be drawn within this image without a problem. Defining Exclusion Windows Exclusion windows exclude unwanted light sources within the exposure windows from exposure control. In the example image, the lamp in the upper right corner of the image is excluded (the red area). Tips For Defining Exclusion Windows • To create an exclusion window, hold down the Alt key and use the mouse to draw a frame. • Always position the exclusion windows within exposure windows (exclusion windows have no effect outside of exposure windows). The same functions are available for editing exclusion windows as for exposure windows (move, change size, delete). Notes The custom exposure windows – like the predefined exposure windows – are defined as “global“ for the entire sensor image. These windows do not affect the exposure of the image, even when PTZ commands are performed. Exposure and exclusion windows for Hemispheric cameras and cameras with distortion correction are shown as polygons if the image is panned or tilted, or if the camera image is switched from Normal to Full Image. © MOBOTIX AG • Security Vision Systems • Made in Germany www.mobotix.com • [email protected] 55 56/144 MxEasy User Manual: Using MxEasy 3.4 Image Sections And Virtual PTZ Features You can use virtual (digital) zoom to scale the displayed image up or down and pan the modified image area from side to side or tilt it up and down. These functions are called PTZ features (Pan/Tilt/Zoom). 3.4.1 Zooming In On An Image Section The camera image is often delivered in a larger resolution (e.g., MEGA 1280 x 960 pixels) than is displayed in the main window (e.g., VGA 640 x 480 pixels). When you zoom, the local application zoom is automatically activated. This means that only a section of the image supplied by the camera is displayed in the main window instead of the entire image. All further PTZ commands take place within the displayed area. These PTZ commands do not influence the recording of camera-generated images. This allows specific image areas to be focused on while the entire camera image continues to be recorded. If the application zoom is active, you will see a small rectangle in the upper right-hand corner of the image. The rectangle indicates the position of the zoomed area within the overall camera image, and PTZ commands are visible in the movement of the rectangle within the frame. If further zooming in on the image makes the selected section of the camera image exactly as large as it can be displayed in the main window (until the pixels are no longer reduced), then the camera zoom is activated automatically. This means that zooming is now carried out by the camera. PTZ commands take place in the complete image delivered by the camera. PTZ commands change the live image of the camera and, if the full image is currently not being recorded, these commands affect the recording as well. Activate full image recording by pressing the Recorded Image button in the Image | Image Formats and Views or the Image Formats and Views button. PTZ commands performed in the camera are also indicated in the upper right-hand corner: a hash symbol that changes with PTZ commands. Caution The camera zoom is only activated if the camera PTZ is already activated. To do so, click on the Activate PTZ button. Otherwise, PTZ commands are only carried out within the application zoom. If all zoom commands should occur exclusively on the camera, then deactivate the application zoom. To do this, open the shortcut menu of the Activate PTZ button. In this shortcut menu, you can also activate the Zoom On Click option. By clicking on an image area, you then zoom into it and move it to the center. © MOBOTIX AG • Security Vision Systems • Made in Germany www.mobotix.com • [email protected] Image Sections And Virtual PTZ Features 57/144 You can choose between the following options for zooming: • Roll the mouse wheel forwards to zoom in on an image area. Roll the mouse wheel backwards to zoom out from an image area. • Click on a position in the image to quickly zoom in on the image area. If you doubleclick, you zoom out of the image section and the image is centered. Clicking on the upper or lower third of a Panorama view, however, will not result in automatic zooming; instead, the image section will pan upwards or downwards to show previously unseen areas. Clicking on the center of the image performs the usual zooming and centering of this image area. • Press and hold the Alt key (Windows) and use the mouse to draw a rectangle in the live image.* The selected image section is shown in the main window. and • Hold down the Command key and press the keys to zoom in or out of the visible image section. The key combination Ctrl-# displays the entire image again. * MOBOTIX Hemispheric cameras do not perform this kind of zooming • If a joystick is installed on your computer, you can also use it to zoom in and out of the image. 3.4.2 Panning And Tilting An Image Section You can choose between the following options for panning and tilting: • Use the mouse to drag the zoomed image area in the desired direction. • Press the arrow keys on the keyboard to move the image section as desired. • Move the joystick left, right, up or down to pan and tilt the image section as desired. You can use PTZ commands to change the displayed image section however you like. The Home View feature lets you jump back quickly to a previously specified or chosen image section. To do this, save the PTZ view that you want and activate it as needed by clicking on the Home View button. To save a home view, click on the Home View button and hold down the key until the message “Home view stored“ appears. 3.4.3 Storing And Loading PTZ Views In addition to specifying a PTZ view as a home view, you can store several PTZ views with the desired pan, tilt and zoom settings and load them as needed. Proceed as outlined in the following: • Click on the PTZ Views button. The position buttons are activated in the dynamic toolbar. © MOBOTIX AG • Security Vision Systems • Made in Germany www.mobotix.com • [email protected] 57 58/144 MxEasy User Manual: Using MxEasy • Click on one of the numbered position buttons, e.g., Position 2, and hold down the mouse button (about three seconds) until you see the message View 2 stored. The PTZ view is stored on position button 2. The position button is bolded so that you know it has a view stored in it. • The number keys on your computer can also be used to store positions: When you press and hold down a number key (for example, 2), this view is stored (View 10 is stored by pressing 0). • To load a stored position, click briefly on the corresponding button or briefly press the corresponding key (e.g., 2 for position 2). The corresponding view is shown (0 is used to call up position 10). • If you have a joystick with buttons installed on your computer, you can also use these buttons to save frequently-used views. You can use this feature to save up to ten preset views for each camera and activate them as needed. For MOBOTIX Hemispheric models with an L11 lens (360° allround view), you can select additional options in the shortcut menu of the Activate PTZ button. These additional options are only available for Hemispheric cameras. © MOBOTIX AG • Security Vision Systems • Made in Germany www.mobotix.com • [email protected] Recordings And Alarms 59/144 3.5 Recordings And Alarms The recording and alarm functions are an important component in MxEasy. You determine whether and when video sequences are recorded, which events trigger alarms and how you will be notified in case of an alarm. Different operation modes enable you to adapt to a variety of application scenarios: • Switched Off Mode: No recording, transmission of live images only • Normal: Recordings and alarm notifications at any given time according to the alarm configuration settings in the camera • Alarm Planner: Recordings and alarm notifications according to the settings in the alarm planner for the time ranges specified there In the event of an alarm, the Manual Alarm can also be triggered. All cameras will then record video and audio data for a specific period of time. Different recording targets are available for recording. The cameras can save sound and video data, depending on the model and version, to internal storage media (SD cards) or file servers. New cameras (Q24M, D24M, M24M, T24M, D14, with the exception of basic and web models) and R models are equipped with SD cards and preconfigured for recording. If you want to set a recording target other than the preconfigured SD card, open the “Recording“ tab under the Camera | Camera Options menu. 3.5.1 Manual Recording You can trigger a Manual Alarm at any time, for example if you notice a suspicious situation that should be recorded. The images are recorded as you watch the situation in live images. Activate the manual alarm by pressing the Manual Alarm button. You can set the recording time either in the shortcut menu opened by this button or by the number of mouse clicks. One click records one minute, another click records five minutes and more clicking activates the continuous manual alarm. You can end the manual alarm by selecting Manual Alarm Off in the shortcut menu. © MOBOTIX AG • Security Vision Systems • Made in Germany www.mobotix.com • [email protected] 59 60/144 MxEasy User Manual: Using MxEasy 3.5.2 Automatic Recording And Alarming (General) Regardless of time considerations, you set the general recording and alarming behavior of the cameras. In particular, you choose when and how recordings take place and which events lead to which notifications. The alarm configuration in the Normal Mode of operation is available for this purpose: 1. Activate the operating mode under Camera | Operating Mode or with the Operating Mode button . 2. Select Normal Mode and click on OK to confirm. The system is now in normal operating mode. Use the alarm configuration to establish settings for recordings, events and notifications: 1. Activate the alarm configuration under Camera | Alarm Configuration or with the Alarm Configuration button. The dynamic toolbar opens at the lower edge of the program window, and it can be used to adjust properties. Properties are set in shortcut menus that you open either by clicking on the button's arrow (▼) or by right-clicking on the button. Select A Recording Mode © MOBOTIX AG • Security Vision Systems • Made in Germany www.mobotix.com • [email protected] 61/144 Recordings And Alarms • Off: No recordings. Choose this option if, for example, in case of an alarm, a notification should be sent to you or another person, but should not trigger recording. • Continuous recording: The camera records continuously. • Event recording: Records when an event is triggered, such as movement. You must have selected at least one event for event recording. Open the shortcut menu via the Recording Mode button and select the desire recording mode. Hint: The corresponding recording mode is displayed on the left side of the upper information bar, while the recording target is indicated in the lower information bar. If you hover the mouse over an element, you will see tooltips that explain the recording status and recording targets. Note A special advantage of MOBOTIX digital camera technology with integrated buffers is the recording of pre-alarm images. This means that when an event is recorded, the two seconds before the actual event begins are also included in the recording. Selecting Events Select an event or the events that should trigger an alarm and lead to recording and/or notification: • Video motion sensor: Changes in the live image trigger alarms. Video motion windows are used to detect these changes. You can choose from a predefined set of video motion windows or define your own. To do this, open the shortcut menu by clicking on the Video Motion Sensor button and choosing the desired option. You can specify whether the video motion windows should be visible all the time or only when an alarm is triggered with the Always Show VM Windows and Show VM Windows On Event options. Creating And Editing Custom Windows Open the shortcut menu via the Video Motion Sensor button and select “Custom Windows.“ – Creating video motion windows: Use the mouse to draw a frame within the camera image in the main window (see illustration). © MOBOTIX AG • Security Vision Systems • Made in Germany www.mobotix.com • [email protected] 61 62/144 MxEasy User Manual: Using MxEasy – Moving video motion windows: Use the mouse to drag the window to the desired position. If you move the mouse over the window, it automatically turns into a hand cursor. – Resizing video motion windows: Drag the edge of the window using your mouse to increase or decrease the size of a window. If you move the mouse in the edge of the window, it automatically turns into a resize cursor. – Deleting video motion windows: To delete a window, click on the X button in the upper right-hand corner of the window or press the Delete key on your keyboard. The video motion windows for Dual models are drawn separately for the left and right image. A Panorama view that stretches seamlessly across both images (the right and left sensors of the camera) can be created for the D14 Sec 180. This enables the desired video motion windows to be drawn within this image without a problem. Defining Reference Windows Reference windows are used to avoid false alarms triggered by unwanted image changes. If there is lightning, for instance, the sudden brightness changes all of the pixels in the defined motion sensors and would trigger an alarm accordingly. Reference windows can avoid these false alarms to a great extent because the camera does not report an alarm if the motion sensors and reference windows are triggered at the same time. Tips For Defining Exclusion Windows – To create a reference window, hold down the Alt key and use the mouse to draw a frame. – One reference window per camera will normally suffice. – Position the reference windows in image areas whose visible contents do not normally change (e.g., next to windows or inaccessible image areas). – Ensure that reference windows and motion sensors do not overlap. – The same functions are available for editing reference windows as for motion sensors (move, change size, delete). Note The detection of such events as “passive infrared,“ “noise,“ and “signal input“ requires sensors that are already integrated in some MOBOTIX camera models. These events are also available in MxEasy. To enable these events for camera models that do not have integrated sensors, use the MOBOTIX ExtIO module. This module is to be connected to the cameras and must be configured before being used in MxEasy. © MOBOTIX AG • Security Vision Systems • Made in Germany www.mobotix.com • [email protected] Recordings And Alarms 63/144 • Passive infrared: A PIR sensor (passive infrared sensor) is either installed standard in MOBOTIX camera models or the PIR of a connected MOBOTIX ExtIO can be used. The PIR sensor enables motion detection even in the dark. Open the shortcut menu via the Passive Infrared Detection button and select the desired recording mode. The lower the selected trigger level, the more sensitive the detection. • Noises: Noises can trigger alarms. Noise detection is done by the integrated camera microphone or by the microphone of a connected and activated expansion module. Open the shortcut menu via the Noise Detection button and select the desired trigger level. The lower the selected trigger level, the more sensitive the detection. • Signal input: An external device – such as a light barrier, for example – can deliver an electric impulse to the camera that qualifies as an event and triggers an alarm. Such devices can be connected to the existing signal input (SI) on the camera or that of a connected expansion module. Open the shortcut menu via the Signal Input Detection button and select the desired status or status transition in the SI signal to trigger an event. • Door Station: If a T24 Door Station is connected in MxEasy, then the Door Station Events button will be shown instead of the Signal Input Detection button. This enables the triggering of alarms when the doorbell is rung, for example. Open the shortcut menu via the Door Station Events button and select the desired option. Different options will be available, depending on the Door Station model. If, for example, you use a Door Station with a keypad, then you can set the system up to trigger an alarm and even a notification if someone enters an invalid PIN code or an invalid RFID. • Temperature: Temperature changes that can be registered by the camera's internal temperature sensor trigger alarms. Open the shortcut menu via the Temperature Detection button and select the desired temperature range. • Illumination: Changes in the brightness of a live image can trigger alarms. The camera's image sensor performs illumination detection. Open the shortcut menu via the Illumination Detection button and select the desired trigger level. For additional information, see the section “Events“ in the Software Manual. © MOBOTIX AG • Security Vision Systems • Made in Germany www.mobotix.com • [email protected] 63 64/144 MxEasy User Manual: Using MxEasy Setting Up Alarm Notifications If you have specified events that will trigger recordings and/or alarms, you can now determine whether and how you or other people will be notified in case of an alarm: • Sound notification: Different sound files are available. Additional sound files can be uploaded or recorded in the audio options (the “Audio“ tab under Camera | Camera Options or the Camera Options button). Open the shortcut menu via the Sound Notification button and select the desired sound file. The function is activated when you select a sound file. Deactivate sound notification by clicking on the Sound Notification button. • VoIP phone notification: This function can be used, for example, to notify a security firm in case of an alarm. VoIP phone notification requires, however, that you enter the corresponding VoIP settings in the camera options. For additional information on this topic, see Section 4.3.4, “VoIP Settings For Phone Calls“. Activate this function by clicking on the VoIP Phone Notification button. The window for editing a VoIP Addresses opens. Enter or select a VoIP phone number (“Edit Addresses”) and confirm by clicking on OK. Deactivate VoIP phone notification by clicking on the VoIP Phone Notification button. If VoIP phone numbers have already been entered, open the shortcut menu via the VoIP Phone Notification button and select the desired VoIP phone number. The function is activated when you select a VoIP phone number. • E-mail notification: This function sends a file with the “alarm image“ to an e-mail address. This function can be used, for example, to notify an administrator if the temperature in a cooling facility exceeds a specific limit. E-mail notification requires, however, that you enter the corresponding e-mail settings in the camera options. For additional information on this topic, see Section 4.3.5, “E-Mail Settings“. Activate this function by clicking on the E-Mail Notification button. The window for selecting and entering an e-mail address opens. Enter or select an e-mail address © MOBOTIX AG • Security Vision Systems • Made in Germany www.mobotix.com • [email protected] Recordings And Alarms 65/144 and confirm by clicking on OK. Deactivate e-mail notification by clicking on the E-Mail Notification button again. If e-mail addresses have already been entered, open the shortcut menu by clicking on the E-Mail Notification button and then select the desired e-mail address. The function is activated when you select an e-mail address. For additional information, see the section “Actions And Messages“ in the Software Manual. 3.5.3 Automatic Recording And Alarming (Alarm Planner) After you have set the general recording and alarming behavior of MxEasy, you can use the Alarm Planner to define the behavior for specific time ranges, in accordance with your requirements: 1. Activate the Alarm Planner operating mode under the Camera | Operating Mode menu or by clicking on the Operating Mode button . 2. Select Alarm Planner and click on OK to confirm. The system is now in Alarm Planner operating mode. Use the Alarm Planner to establish settings for recordings, events and notifications within specific time ranges: 1. Activate the Alarm Planner under Camera | Alarm Configuration or by clicking on the Alarm Configuration button. The window for setting up properties opens. The general settings that you have already entered are imported into the Alarm Planner. You can see these settings in the background colors and the small icons above the days of the week. A gray background means that no recordings take place, a red background means continuous recording, and a yellow means event-controlled recording. The icons indicate at all times which events trigger alarms, who is notified and how they are notified. Icons such as “Thermometer“ and “Speaker,“ for example, mean that alarms were set up in such away that an alarm is sounded if the temperature falls below or exceeds a specific value. As long as you have not defined any other time ranges, these settings apply for the entire time from Monday 12:00 a.m. to Sunday 12:00 a.m. Setting Up And Editing Time Ranges You set up time ranges for which you would like to configure custom recording or alarm behavior (e.g., in a sales room: continuous recording during opening hours; otherwise, alarm triggered by video motion sensor). • Setting up a time range: Use your mouse to draw a box inside the calendar window. • Moving time ranges: Use your mouse to drag the window to the desired time and day of the week. If you move the mouse over the window, it automatically turns into a hand cursor. • Changing time ranges: Drag the edge of the window using your mouse to increase or decrease the size of a window. A resize cursor appears automatically when the mouse pointer hovers over the edge of the window. You can also use the weekday and time fields (in the lower section of the time planner) to adjust the selected time range down to the minute. © MOBOTIX AG • Security Vision Systems • Made in Germany www.mobotix.com • [email protected] 65 66/144 MxEasy User Manual: Using MxEasy • Deleting time ranges: Select the window with the mouse and press the Delete key on the keyboard (or choose Remove in the shortcut menu). Icons for events and actions in the background Setting and editing time ranges for opening times Customization down to the minute After you have set up the time ranges, decide for each individual time range which recordings should take place and which events should lead to which notifications: 1. Highlight the relevant time range and right-click to open the shortcut menu. 2. Select the desired settings. You can find more information on the individual settings in “Automatic Recording And Alarming (General).“ 3. Click on Apply and confirm by clicking on OK. The settings are applied for the selected camera. 4. Optional: You can transfer the selected settings to all of the other cameras: Activate the Apply to all cameras checkbox and confirm by clicking on OK. After you have defined time ranges to which custom recording and alarm behavior apply, you can use the Alarm Planner at any time to select and edit the times outside of these customized time ranges. The current settings for the events and actions of this “background area“ are always represented by the icons above the days of the week. On the other hand, the settings for the custom-defined time ranges are displayed within these time ranges. © MOBOTIX AG • Security Vision Systems • Made in Germany www.mobotix.com • [email protected] 67/144 Searching For And Playing Recordings 3.6 Searching For And Playing Back Recordings 3.6.1 Searching And Playing Back In Player Mode The MxEasy Player can search and play back recorded event sequences. Activate the Player by clicking on the Player Mode button or under the Camera | Player Mode menu. The view switches to Player View and the last (most recent) event image from the camera is shown in the main window instead of the live image. Additional buttons for searching and playing back recorded data open at the lower edge of the program window: Player mode button Last (most recent) event image in main window Live image of the current camera Date and time entry Player controls Player buttons Filters for search results Play buttons for playback of search results The way that you search depends on whether you want to search for specific events within the recorded event sequences, or if you want to search for events at specific times. © MOBOTIX AG • Security Vision Systems • Made in Germany www.mobotix.com • [email protected] 67 68/144 MxEasy User Manual: Using MxEasy Searching All Recordings For Events You can filter the recordings by event type to find the events that you are looking for as quickly as possible: 1. Open the shortcut menu by clicking on the Filter Event button and select the desired event types. The event filter is activated when you select one or more event types. 2. Navigate through the recorded events with the navigation buttons: – First event and last (most recent) event: Use these buttons to jump to the first or last image of the recordings that have been filtered. The relevant event is shown in the main window. – Previous event and next event: These buttons proceed from the currently displayed event image to the previous or next event image within the recordings limited by the filter. The relevant event is shown in the main window. Searching For Events Within A Time Range If, for example, you have set up specific periods of continuous recording and would like to check whether something happened during this period of time, you can limit your search to these time ranges. 1. Click on the Search Area rotary button. “Search by time“ is activated. The navigation buttons are displayed without lightning bolts. 2. Choose one of the following procedures: • You would like to know whether something happened at a specific time, and if so, what happened. © MOBOTIX AG • Security Vision Systems • Made in Germany www.mobotix.com • [email protected] Searching For And Playing Recordings • 69/144 You would like to run through the recordings forwards or backwards at a specific increment (e.g., 10 min), thereby performing “time leaps.“ 3. Searching for specific time: Enter the date and time in the middle date/time input field in the information bar. Press Enter to confirm. The current event image jumps to the event in the recordings that is closest to this date and time. 4. Performing time leaps: Set the desired increment size for navigating in the recording (the increment duration). Rotate the Search Area rotary button by using your mouse to the desired interval, e.g., 1 hour, 1 minute, 10 minutes or 4 hours. Click on the Previous Frame and/or Next Frame buttons to search for events in the recordings that are as temporally distant from the current image as you have specified. If an event that corresponds precisely to this time leap is not found in the recordings, then the closest event image will be shown. Special Function: Searching With Post Video Motion Detection MxEasy supports post video motion detection. This means that you can search through recordings in the past, looking specifically for changes within one or more camera image areas. You use video motion windows to do this. 1. Click on the Post Video Motion Detection button. 2. Use your mouse to draw one or more video motion windows inside the current main window. 3. Click on the Previous Event and/or Next Event buttons to search for changes in the video motion windows. If the system detects a change in the video motion window, it colors the video motion window red and stops the search process. Playing Back Found Event Sequences You can play back recorded event sequences with the playback buttons. All of the recorded sequences will then be played back (forwards or backwards), starting from the currently displayed event image. You can set the playback speed for event sequences with the Playback Speed rotary button. © MOBOTIX AG • Security Vision Systems • Made in Germany www.mobotix.com • [email protected] 69 70/144 MxEasy User Manual: Using MxEasy 1. Hover with your mouse over the Playback Speed rotary button and turn the button with the mouse to the right or left until the desired speed is shown in the main window (e.g., slow or fast forward or backward). The selection immediately triggers the playback of event sequences. 2. Click on the playback or rewind button (depending on your previous selection) to stop or to pause playback. Furthermore, you can specify how the recorded event sequences should be played back. This is done with clip mode. A clip contains the recording area that belongs to an event. This is normally two seconds of pre-alarm time, the event image and the post-alarm time that you specified when setting up the recording mode (see Section 3.5.2 “Automatic Recording And Alarming, Setting The Recording Mode“). During playback, you can select whether the clip for the current event sequence should be played once or continuously. Alternatively, you can decide to play back all of the clips for the found event sequences. 1. Open the shortcut menu via the Clip Replay Mode button and select the desired clip mode. If you see something during playback that you want to take a closer look at, you can switch directly to single-step mode and examine the recordings image by image: 1. A recording is played back. Click on the Playback Speed rotary button. The rotary button jumps back into output mode and single-step playback is activated. 2. Click on the playback or rewind button to play back the event images in single steps. Special Function: Event Overview And Event Histogram With OnScreen Control In Player Mode, you can search for events and look at events or event sequences by playing them back. The OnScreen Control in Player mode provides you with another option to quickly get an overview of all recorded events for one camera, see event frequency distribution and summarize multiple events and event sequences for export. © MOBOTIX AG • Security Vision Systems • Made in Germany www.mobotix.com • [email protected] Searching For And Playing Recordings 71/144 When you first open the OnScreen Control, the entire time range of available recordings is shown. You can zoom in on any position inside this time range by clicking on it to view individual events. The Histogram function in the OnScreen Control shows the frequency distribution of recorded events. Within a unit, such as a day or an hour, the length of the bars shows you how often an alarm was triggered. By simply clicking and dragging you can include several time ranges that you can subsequently export. If you activate the Marker mode, then all of the replayed video sequences as of this time are automatically selected and collected for export. 1. Use your mouse to click on the arrow in the lower right part of the Player View. The OnScreen Control opens. The red mark on the scale shows the position of the currently shown event image in relation to the overall time range of all available recordings on the camera. 2. Click on the arrow again to get a more detailed view of the time ranges and to edit them. This opens a view divided into units of time (corresponding to the selected scale in months, calendar weeks or days), a bar for selecting time ranges and a scrollbar. Use the scrollbar to move the time range within the entire range of all available © MOBOTIX AG • Security Vision Systems • Made in Germany www.mobotix.com • [email protected] 71 72/144 MxEasy User Manual: Using MxEasy recordings. Select time ranges by dragging the desired time ranges in the selection bar. You can then export these periods. 3. Click on the arrow again to view the distribution of event frequency. The histogram display for existing events opens. 4. Use the zoom buttons to zoom in and out of the currently displayed time range. Use the scrollbar to move the time range of currently displayed events. 5. Activate Marker Mode to select event sequences for export during playback. If, for example, you have found an incident and play it back to the end, everything will be selected for export. You can turn off the marking function by deactivating Marker Mode. Delete marked sequences by clicking on the Delete button . 6. Click on the Export button to export the selected time ranges and event sequences. © MOBOTIX AG • Security Vision Systems • Made in Germany www.mobotix.com • [email protected] 73/144 Saving, Printing And Exporting 3.6.2 Searching And Playing Back In The Recordings Browser You can use the Recordings Browser to search all of the event images stored in a number of cameras at once. You can limit the search by using different selection criteria. The events are then displayed in a browser as preview images with a camera name, the date and the type of recording resolution. You can sort the results by various criteria for a quick overview. Activate the Recordings Browser under the File | Browse Recordings menu. The Recordings Browser opens. The window is structured into the following areas: Filtering recordings Selecting a camera Filtering recordings Sorting results Note The Recordings Browser searches and displays event images. If continuous recording has been selected, there will not be any event images and therefore nothing will be shown in the browser. Toolbar • Sources: Select the cameras that should be included when searching for events. • Search mode: Limit the search results to specific event types, such as video motion sensor (VM), or activate post video motion detection (Post VM). • Time range: Limit the search to specific time ranges, such as the last 24 hours. • Display options: Specify how the results are displayed by using sort order, sort criteria or display size. Search Results The search results are shown as a list of preview images in accordance with the aforementioned selection criteria. © MOBOTIX AG • Security Vision Systems • Made in Germany www.mobotix.com • [email protected] 73 74/144 MxEasy User Manual: Using MxEasy Player Double-click on the desired event image to play back an event. The player opens in the bottom part of the Recordings Browser. To export an event or to add the event to an export list, open the shortcut menu of the event image. Select the desired option in the shortcut menu. Note When you search for events, information on all events within the individual cameras is entered and permanently saved in an event cache that is retained after exiting the program. The more new events there have been since the last cache update, the longer the time it takes to fill the event cache. Especially when cameras of the M12 and D12 model series are concerned, cache updating can result in reduced frame rates. Cache updating is displayed on the right edge of the status bar as an activity. © MOBOTIX AG • Security Vision Systems • Made in Germany www.mobotix.com • [email protected] Saving, Printing And Exporting 75/144 3.7 Saving, Printing And Exporting Recordings 3.7.1 Saving And Printing Snapshots Saving Snapshots Click on the Snapshot button to save a snapshot. The image shown in the main window will be saved as a JPEG file on the desktop. This works for both live images and event images. The file name for the saved JPEG files is comprised of the name of the camera, the recording date and the time (e.g., mxcam 2008-11-24 15-05-13). You can select the destination folder for saved images in the “General“ tab under Tools | Preferences. Printing Snapshots Open the print function under the File | Print menu to print snapshots. This will print the live images for all currently displayed cameras. You can view a print preview before printing where you can adjust the orientation, zoom factor and number of images per page. 3.7.2 Exporting Recordings You can export recorded video data in several ways: • OnScreen Control in Player mode (specific time ranges of the recording) • Recordings Browser (no data from continuous recordings) • Menu bar (only complete recording area) © MOBOTIX AG • Security Vision Systems • Made in Germany www.mobotix.com • [email protected] 75 76/144 MxEasy User Manual: Using MxEasy Exporting From OnScreen Control You can select various time ranges of recordings for export in the selection bar in the OnScreen Control. If Marker Mode is activated, then those events or event sequences that are played back in the Player will be selected automatically for export. Click on the Export button. The export list window opens. The export list provides a list of recordings from within the selected time ranges. 1. Select the desired export format: – File server structure: The recorded data is exported as it exists in the file system. This option does not involve any recoding, which means it requires the least time to export. We recommend this option for preserving evidence for law enforcement purposes because the original files are not altered and the digital signature contained in the data is also exported. – MxPEG: The recorded data is exported as MxPEG files. Files in MxPEG format also include the audio data recorded by the camera. – AVI/MPEG4: The export (recoding) of recorded data is done in the AVI file format, with the option of including or excluding sound. Depending on the video codec used, the AVI file can be played back on different operating systems and with different programs. – Time lapse: Allows the export of recordings as a time lapse, which is interesting for the documentation of construction progress, for example. 2. Select the export settings. You can now specify different options for the export, including a file size limit as well as audio and video encoding options with which you can define parameters such as resolution. Additional settings can also be defined for the MxPEG and AVI/MPEG4 file formats (see Section “Setting The Export Options“). 3. Click on Export. Save the recordings under the desired file name in the desired location. 4. Click on Save. The recordings are exported. © MOBOTIX AG • Security Vision Systems • Made in Germany www.mobotix.com • [email protected] 77/144 Using An IP Video Door Station Exporting From The Recordings Browser You can add recorded events to the export list or export them directly in the Recordings Browser. Select the desired event and open the shortcut menu. 1. Select Export sequence to export. Save the recording under the desired file name in the desired location. Click on Save. The recorded event is exported. 2. Select Add to export list to add a sequence to the export list. The export list opens, and the recorded event is added to the list. Proceed as described above to export the list. Exporting Using The Menu Bar You can also open the export list in the menu bar directly by going to File | Export recordings. Proceed as described above to export the list. Note When opening the export list via the menu bar, the list only contains one entry for the entire recording period. This gives you the option to quickly export a camera's entire recording. The individual time ranges selected for export in the OnScreen Control are not used here. Setting Export Options When exporting audio/video data, there are different export format settings available, depending on the export format (MxPEG and AVI/MPEG4) (no settings are possible for file server structure). The predefined options ensure maximum compatibility for exported data on different operating systems (Windows, Mac OS X). • Encoder: Most of these settings are only changed whenever there are special reasons to do so (for example, if a fixed resolution or specific frame rate has to be used). When selecting the export profile Time lapse, the two control boxes Fixed frame rate and Time lapse are automatically aktive. To better recognize objects, it is recommended to set a low frame rate. Activating the Only use event images checkbox will speed up the export. However, the images in the quick motion export may not correspond exactly to the previously set interval, but may be slightly off. With the minimum interval between frames, you set the interval in which the images are selected for export. Selecting a codec, however, has a significant influence on determining which operating systems can play back the exported data: – Motion-JPEG: This codec saves full JPEG images and can usually be used on all operating systems. Files created with this codec offer the highest quality because the original files from the camera are used as full JPEG images; this means, however, that they also have the highest storage space requirements (approx. factor of 4–6 versus FFMPEG MPEG-4). © MOBOTIX AG • Security Vision Systems • Made in Germany www.mobotix.com • [email protected] 77 78/144 MxEasy User Manual: Using MxEasy – FFMPEG MPEG-4 (standard): This default codec is used by VLC and is also available for Windows and Mac OS X operating systems if other playback software is used. This codec offers the optimal combination of quality and minimal storage space. – Microsoft MPEG-4 V2: A generally useable codec for Windows systems. – DivX V3 MPEG-4 (Low Motion): This codec is available for all operating systems as a free download (www.divx.com). – Windows Media Video 7: Version 7 of the standard codec for Windows system can be played back directly with Windows Media Player. – Windows Media Video 8: Version 8 of the standard codec for Windows system can be played back directly with Windows Media Player. This tab is only available for AVI/MPEG4. • Audio: This setting should not be changed unless there is a special reason to use an audio codec other than PCM. This tab is only available for AVI/MPEG4. • Subtitle: An exported clip with audio/video data has a running time that always starts with “0.“ In order to prevent losing the original time of the recording, a subtitle file can be created or overlays can be generated. A subtitle file is saved as a SubRip file and can be displayed during playback. If overlays are generated, they are always included in the image. They cannot be hidden. You can produce a time stamp (recording time), the camera name or even a customized text. If a time gap of longer than ten seconds exists between the individual clips, the Display recording gaps option can be activated to provide an overview of the beginning and end of individual clips. This displays the end time of the previous clip and the start time of the next clip for ten seconds in the image. This tab is only available for AVI/MPEG4. • File size: You can select a size for the individual files in this tab. If the data being exported is larger, MxEasy automatically creates additional files with the same names and a consecutive number. This tab is only available for MxPEG and AVI/MPEG4. © MOBOTIX AG • Security Vision Systems • Made in Germany www.mobotix.com • [email protected] Using An IP Video Door Station 79/144 3.7.3Playing Back Exported Video Data MxEasy can directly display MxPEG clips and file server structures. Open the files by going to File | Open clip. After installing the MxPEG DirectShow codecs, you can also play MxPEG clips in Windows Media Player and other DirectShow-compatible programs (free codec download at www.mobotix.com under Support > Software Downloads). Exported AVI files can normally be played back with the players that are already installed in the operating system. We recommend the free VideoLAN Player (VLC, www.videolan. org) as an additional universal player that can play back AVI files on all operating systems, yet can also play all other codecs. Both VLC and other players add the exported files to their playlists so that they can be played back automatically in sequence. © MOBOTIX AG • Security Vision Systems • Made in Germany www.mobotix.com • [email protected] 79 80/144 MxEasy User Manual: Using MxEasy 3.8 Using MxAnalytics 3.8.1 MxAnalytics Overview MOBOTIX cameras automatically detect movement within a monitored area. “MxAnalytics” video motion analysis is built into the camera and delivered with every Q24M camera as standard. It makes it possible to track people and objects and collect statistical behavior data. Various specifications should be set in order to collect the appropriate behavior data that deliver useful analysis results. You can find an overview of these technical specifications at www.mobotix.com > Products > Hemispheric Q24 > MxAnalytics. Tracking And Evaluating Movements (Heatmaps) Which shelves in the shop attracted the most customers this month? Which waiting areas in the departure hall are preferred in the afternoon? All movements of objects of a particular size are recorded and evaluated, either in the live image or in a previously defined detection area, to provide answers to questions like these. The frequency of the movements is shown visually through different colors in a heatmap. Counting People And Objects (Counting Lines) How many people go in and out of an entrance to a shop during the day? Counting lines can be defined at the desired positions in the camera’s live image. The system records how often each counting line is crossed within a specified period. The evaluation of the individual counting lines can be viewed as weekly and monthly counting lines reports in a table in the event search. The reliability of the count depends on the similarity of the sizes and shapes of the persons or objects in the image and how effectively they can be visually distinguished from one another and from the underlying surface or background. For this reason, it is not possible to count groups forming at entrances or cashiers using MxAnalytics. Controlling Motion Detection (Time Tables) If the video motion analysis is only be used during specific times (for example, Monday to Friday, 4 p.m. to 7 p.m.), it is possible to set the camera to use a corresponding time table. This provides an advantage by freeing up the full processing power of the camera in the remaining time for other (security) functions such as event-controlled recording and makes more efficient use of the storage space available on the SD card. The movement data collected and saved with MxAnalytics based on the defined settings can be used for statistical analysis using special MxAnalytics evaluations. Evaluations for both counting lines and heatmaps are available here. © MOBOTIX AG • Security Vision Systems • Made in Germany www.mobotix.com • [email protected] 81/144 Using An IP Video Door Station Evaluating movement data is explained in the following section. The necessary activation and set up of MxAnalytics on a Q24M camera and the creation of predefined MxAnalytics evaluations are outlined in Section 4.5.1, “Activating MxAnalytics And Configuring The Settings“ 3.8.2 Calling Up Evaluations You can call up the movement and counting line evaluations as daily heatmap reports or as weekly and monthly counting lines reports. To do this, select heatmap/counting lines report profiles. There are several predefined profiles available. Analysis of the data and its display is performed according to the settings for the profile selected. You can also create custom report profiles. For additional information on creating report profiles, see Section 4.5.5, “Customizing The Report Profiles Used For Analysis“. Calling Up Evaluations In The Recordings Browser 1. Open the Recordings Browser via the File | Browse Recordings menu. 2. Click on Sources and select the desired camera. Click on OK to confirm. 3. Click on Search Mode and select the MxAnalytics Search Mode. Click on OK to confirm. 4. Select the desired profile in the Counting line profile and Heatmap profile selection box. Days, periods of time and type of export (weekly, monthly) are specified in the predefined report profiles. 5. The period of time in the selected profile can be adjusted by setting a reference date. Activate the Set date checkbox and select the desired date. The current date is automatically set as the reference date if no date is entered. The movement data is analyzed and displayed according to the selected settings: Properties bar to select and setup profile and time data Area for dounting line reports in a table Camera reference image with heat map to display the heat map and/or counting lines © MOBOTIX AG • Security Vision Systems • Made in Germany www.mobotix.com • [email protected] 81 82/144 MxEasy User Manual: Using MxEasy • Area for counting line reports in a table: This area displays the reports for the period of time of the selected profile. Line designations and designations for line limits (in both directions) are assigned (automatically or manually) when the counting lines are defined. These designations are shown in the counting lines report. You can show or hide counting lines in the lower part of the reference image. The designations for line limits are then also displayed on the counting lines in the image. This way, it is easy to assign the counting lines to the values in the counting lines report. • Camera reference image with heatmap: This area displays the heatmap for the period of time of the selected profile. You can show and hide the display of the heatmap and the legend for the heat map in the camera’s reference image. The counting line and heat map evaluations can be called up in the event search or generated regularly and automatically sent via e-mail. This way, you have the reports regularly at the desired time intervals. See Section 4.5.6, “Generating Reports And Sending Automatically Via E-Mail“ for additional information on generating and sending report profiles. Furthermore, the counting line reports and heat maps can be directly exported from the event search as HTML and CSV files or as a JPEG file and stored locally or to a storage device. Click on Export... on the corresponding counting line or heat map profiles. © MOBOTIX AG • Security Vision Systems • Made in Germany www.mobotix.com • [email protected] Additional User Functions 83/144 3.9 Using An IP Video Door Station MxEasy can also be used in combination with an IP Video Door Station to use a computer as an additional video two-way communication intercom and easily secure entrances. MxEasy recognizes whenever a T24 Door Station is integrated and offers a number of special Door Station-specific functions in addition to the standard program features. 3.9.1 Status Displays In The Main Window Icons in the main window display various door statuses and processes for a T24. If, for example, someone rings the doorbell, then this is also shown visually by displaying a bell icon. Status icons Live image in main window Icon Function Door is shut Door is open Door is locked Door is unlocked Door sensor error: Check door status! Door light is on Someone is ringing the doorbell © MOBOTIX AG • Security Vision Systems • Made in Germany www.mobotix.com • [email protected] 83 84/144 MxEasy User Manual: Using MxEasy 3.9.2 Answering Ringing With Intercom If, as described in Section 2.2.3, MxEasy was set up as a remote station for an IP Video Door Station and someone rings the doorbell, then a bell icon is shown in the door camera's live image in the main window and the Pickup phone button pulses in the left toolbar. 1. Click on the Pickup phone button to start two-way communication with the Door Station. The voice connection with the Door Station is activated. Click on the Hangup phone button to exit. The voice connection with the Door Station is terminated. 2. If you do not want to have any contact with the visitor, click on the Hangup phone button without accepting the call. This interrupts the acoustic and visual signal without establishing a voice connection. The volume of the voice connection can be changed using the +/- slider. This requires your computer to have a microphone and speaker. You can adjust standard behaviors. To do this, open the “Behavior“ tab under Tools | Preferences and change the settings for doorbell notifications as you like. 3.9.3 Opening The Door And Switching On The Light You can use MxEasy to open the front door and switch the door light on and off. The Door Station must be properly installed and configured for both of these functions to work. 1. To open the door, click on the Door button. A system message opens. Click on Yes to confirm. The door opener is activated. 2. To switch the door light on and off, click on the Light button. The light icon is activated at the upper left corner of the main window, and the door light is switched on. To switch the light off, click again on the Light button. 3.9.4 Recording A Voice Mailbox Announcement And Listening To Voice Mailbox Messages Recording A Voice Mailbox Announcement MxEasy makes it easy to record new voice mailbox announcements. To do this, open the “Audio“ tab under Camera | Camera Options. 1. Click on Add to add an audio file from your computer as an announcement text. 2. Click on Record to record an audio message. This requires that you have a microphone connected. The “Record Audio Message“ window opens. 3. Enter a name and click on Record. When you have finished speaking your message, click on Stop and confirm with OK. 4. To listen to recorded messages, click on Playback. 5. Click on OK to confirm. © MOBOTIX AG • Security Vision Systems • Made in Germany www.mobotix.com • [email protected] Additional User Functions 85/144 Listening And Managing Voice Mailbox Messages If visitors have left messages in your absence, this will be displayed by a red circle on the Door Inspector button in the toolbar. The circle shows the number of mailbox messages. In the T24, the Door Inspector button replaces the Player button of the other cameras. The Player mode in the T24, however, can still be activated under the Camera | Player Mode menu. 1. Open the Door Inspector under Camera | Door Inspector or by clicking on the Door Inspector button. 2. Select the desired mailbox. Click on OK to confirm. 3. An overview of all new messages opens. Messages that have not yet been heard are marked with red text for date and time; messages that have already been heard are identified by white text if the “All Messages“ option is activated. 4. Double-click on the message to play it back. The Player opens in the bottom part of the overview area. Proceed as usual in the Player mode. 5. Messages are automatically marked as seen upon playback. You can manually mark messages as seen or unseen, though. To do this, select the desired message and click on the Message Seen button or on the Message Unseen button. The messages are marked accordingly. 6. You can export recordings from the Door Inspector. To do this, mark the desired preview images and click on the Export button. The export list with the selected recording opens. To perform the export, proceed as described in Section 3.7.2 “Exporting Recordings.“ © MOBOTIX AG • Security Vision Systems • Made in Germany www.mobotix.com • [email protected] 85 86/144 MxEasy User Manual: Using MxEasy 3.9.5 Searching And Playing Back Door Events With the T24, you can also record and play back specific door events (such as when visitors ring the bell or someone tries to open the door with an invalid PIN). In order to do this, the alarm configuration must be set up to determine when and how events are recorded. Proceed as follows to search and play back recorded events: 1. Open the Door Inspector under Camera | Door Inspector or by clicking on the Door Inspector button. 2. Select the desired type of door event: a.Ringing This requires that recording (continuous or event-based) and the Door Station event “Bell pressed“ are activated in the alarm configuration (see Section 3.5.2 “Automatic Recording And Alarming, Selecting Events“). – To see whether someone rang the doorbell while you were gone, click on the Bell Pressed button. This opens an overview of all recordings triggered by a doorbell ring. – Double-click on the desired entry to play back the recording. The Player opens in the bottom part of the overview area. Proceed as usual in the Player mode. You can export the recording. Click on the Export button. The export list with the recording opens. To perform the export, proceed as described in Section 3.7.2 “Exporting Recordings.“ b.Door Opened This requires that recording (continuous or event-based) is activated in the alarm configuration. – To see whether a door was opened, click on the Door Opened button. This opens an overview of all recordings triggered by a door being opened. – Proceed as described above to play back and export these recordings. c. Movements © MOBOTIX AG • Security Vision Systems • Made in Germany www.mobotix.com • [email protected] Program Windows And Program Views 87/144 This requires that recording (continuous or event-based) and the “Video Motion Sensor“ event are activated in the alarm configuration. – To see whether movement has occurred in front of the door, click on the Video Motion Sensor button. This opens an overview of all recordings triggered by movements. – Proceed as described above to play back and export these recordings. d.Invalid RFID Card This requires that recording (continuous or event-based) and the “Invalid RFID Card“ Door Station event are activated in the alarm configuration. – To see whether someone has attempted in your absence to gain entry with an invalid RFID card, click on the Invalid RFID button. This opens an overview of all recordings triggered by the use of an invalid RFID card. – Proceed as described above to play back and export these recordings. e.Invalid PIN This requires that recording (continuous or event-based) and the “Invalid PIN“ Door Station event are activated in the alarm configuration. – To see whether someone has attempted in your absence to gain entry with an invalid PIN, click on the Invalid PIN button. This opens an overview of all recordings triggered by the use of an invalid PIN. – Proceed as described above to play back and export these recordings. Note To select multiple event types, hold down the Ctrl key and click on the desired event types. © MOBOTIX AG • Security Vision Systems • Made in Germany www.mobotix.com • [email protected] 87 88/144 MxEasy User Manual: Using MxEasy 3.9.6 Switching To The Mini Viewer If you use your computer primarily for other applications (such as Office programs, Internet, etc.) yet always want to remain informed about door activity without having to switch back and forth between program windows, then you can use the Mini Viewer. The Mini Viewer is a smaller special view in MxEasy with live camera images, important Door Station features and status displays. You can open the Mini Viewer view under View | Mini Viewer menu or by clicking on the Switch to Mini Viewer button. Click on the Switch from Mini Viewer button in the Mini Viewer mode to return to Default View. If a visitor rings the doorbell, this will also be shown visually by means of a large bell icon, as in Default View. The telephone handset icon (off-hook/on-hook) facilitates control of the live two-way communication intercom function. The volume can be changed using the slider, and the door opener and lighting may also be controlled simply by clicking on the corresponding icons. The Door Inspector can also be opened in the Mini Viewer by clicking on the Door Inspector button . © MOBOTIX AG • Security Vision Systems • Made in Germany www.mobotix.com • [email protected] Program Windows And Program Views 89/144 3.10 Additional User Functions 3.10.1 Activating/Deactivating Privacy Mode If you want to lock access to the cameras for a specific time period and disallow all recordings, then you can activate the Privacy mode. This always affects all cameras integrated in the current network environment (see Section 4.8 “Configuring Different Network Environments“). This lock can only be released on the computer used to lock the cameras; unlocking the cameras from other computers is only possible with defined access data (user name and password). The Privacy mode is signaled on the cameras with a change in the LED flashing pattern. Activating Privacy Mode Activate the mode under File | Privacy Mode or by clicking on the Privacy Mode button. A system prompt opens. Use the automatically generated access data or enter a user name and password of your own making. If you activate the Don't ask me again checkbox, then the system prompt will not be shown the next time the Privacy mode is activated, and the generated access data will automatically be accepted. If you would like to activate the Privacy mode later from another computer, this is only possible with this access data. If this is the case, then the Don't ask me again checkbox should not be activated! Messages that are hidden when the Don't ask me again checkbox is activated can be made to reappear if necessary. To do this, open the “General“ tab under Tools | Preferences and click on the Restore button in the “Hidden Messages“ area. You should exclude T24 Door Stations from the Privacy mode because it not only switches off camera functions, but also door opening, doorbell and twoway communication intercom features Effects of The Privacy Mode • MxEasy creates random access data (user name and password), enters this in the integrated cameras and deactivates all other users. It is only possible to deactivate Privacy mode without this access data on the computer on which the Privacy mode was activated. • Image generation is completely disabled on the cameras ‑ all windows are replaced by a red lock icon. The Privacy Mode button is now white and the lock is closed. • Recordings are completely deactivated. • The cameras' sound channel is completely disabled. • All integrated cameras show a unique flashing pattern to shown that they are in this mode (see below). Camera LED Signaling The Privacy Mode is signaled by different MOBOTIX cameras using the following flashing patterns: © MOBOTIX AG • Security Vision Systems • Made in Germany www.mobotix.com • [email protected] 89 90/144 MxEasy User Manual: Using MxEasy Camera LEDs Flashing Pattern M12 LED 0 blinks red every three seconds LED 3 blinks red every three seconds, synchronized with LED 0 D12, D14 LED 0 blinks red every three seconds LED 3 blinks red every three seconds, synchronized with LED 0 Q22M, D22M, M22M Q24M, D24M, M24M LED 0 blinks green every three seconds LED 1 blinks red every three seconds, synchronized with LED 0 LED 0 blinks green every three seconds LED 1 blinks green every three seconds, synchronized with LED 0 Deactivating The Privacy Mode Deactivate the mode under File | Privacy Mode or by clicking on the Privacy Mode button. This requires that you use the same computer on which you activated the mode to deactivate it. If you use another computer, enter the access data that you used when you activated the mode. In an emergency (such as a total failure of the activating computer and a lack of access data), the system can only be switched on if all integrated cameras are restored to their factory default settings. Resetting The Cameras To Factory Settings 1. Disconnect the power supply to each integrated camera. 2. Reconnect the power supply and hold down the camera keys for resetting to factory settings until you hear the camera play a sound, as described in Section “Resetting The Camera To Factory Settings“ in the Camera Manual. Note After resetting the cameras, the access data used prior to the activation of the Privacy mode are again valid. 3. After you have reset all of the cameras, MxEasy will restart automatically. 4. Integrate all of the cameras that were previously integrated in the system. 5. Load the automatic backup from the last program launch if it is available (see Section 4.6 “Saving The System Properties“). If the backup from the last system launch is not available, then you must manually set all of the settings. © MOBOTIX AG • Security Vision Systems • Made in Germany www.mobotix.com • [email protected] Program Windows And Program Views 91/144 3.10.2Working With Different Network Environments Working With Different Network Environments MxEasy supports cameras access from different locations. This way, for example, the cameras in a gas station can be monitored by a laptop located on site in the local area network (LAN) and later from home, they can be monitored over the Internet using a previously set DynDNS service. Both options each require different network connection data for the same cameras. In order to avoid having to constantly change connection data, MxEasy supports the concept of a (network) environment, which you may already know about from working with your PC/Mac. In MxEasy, an environment defines how the cameras are accessed in a specific network. Switching to a different environment automatically switches the network address data (e.g., IP address, DNS name) for all integrated cameras. Because there are differences in system bandwidth among different networks, as well as various access methods, the bandwidth setting is also coupled with the respective environment. In order to be able to work in different environments, you first define your environments. Then determine which cameras should belong to which environment and configure the network data for these cameras. Then all you need to do is switch to the desired environment to work in it. You can switch environments at various places in MxEasy: • The File | Environment menu • The Tools | Preferences menu, “Connections“ tab • The Camera | Edit Camera menu • The Camera | Show Cameras menu You will find more information on defining environments and configuring network data in Section 4.8 “Configuring Different Network Environments.“ Example Of Working With Different Environments Monitoring a gas station, both on site and from home. Doing this requires the following steps: 1. Integrate the cameras and set up camera access to the local area network: – Launch MxEasy (the Default environment is activated). – Search for the cameras and integrate them into MxEasy (using IP addresses). – Rename the “Default“ environment to “Gas Station – local“ by going to the File | Environment | Edit Environments menu. – Because a fast LAN is available, set the access bandwidth to Local, fast in the “Connections“ tab under Tools | Preferences. 2. Set up external camera access over the Internet: – Set up DynDNS on the DSL router and define ports for the individual cameras. © MOBOTIX AG • Security Vision Systems • Made in Germany www.mobotix.com • [email protected] 91 92/144 MxEasy User Manual: Using MxEasy – Create a new environment called “Gas Station – remote access“ by going to File | Environment | Edit Environments. Click on the Plus button and rename the environment. – Open the Camera | Show Cameras menu and select the “Gas Station – remote access“ environment in the “Environment“ field. – Set up the proper DynDNS addresses in the connection data for all associated cameras. To do this, open the shortcut menu, select Edit and enter the DynDNS names. – If there is only a DSL connection with 1000 kbit/s, then set access Bandwidth under Tools | Preferences in the “Connections“ tab to Remote, slow. At the gas station, the cameras can be accessed via the fast LAN by selecting the Gas Station – local environment (File | Environment). From home, the gas station owner accesses the cameras via the slower DSL connection and DynDNS by selecting the Gas Station – remote access environment (File | Environment). No additional settings are required. © MOBOTIX AG • Security Vision Systems • Made in Germany www.mobotix.com • [email protected] Setting Access Rights And Passwords 4 System Configuration 4.1 Setting Access Rights And Passwords 93/144 4.1.1 Defining Access Rights For MxEasy You will have access to all functions and authorizations (automatic administrator mode) the first time you launch MxEasy on a computer. If several users are going to work with MxEasy and you do not want every user to have unlimited access to all of MxEasy’s functions, you can use predefined access levels (administrator, owner, user, guest) to limit access rights for each computer. An access level is activated automatically for the computer currently being used if you enter a password for this access level. Please note that passwords can only be set up in the Administrator access level. 1. Open the authentication window via the File | Authenticate menu. 2. Click on the access level that you want. The “Change Password“ window opens. 3. Enter a new password and repeat the password. The selected access level is set on the computer currently being used. The individual access levels have the following access rights: • Administrator: You have access to all functions and settings of MxEasy with the Administrator access level. In particular, this allows you to add new cameras to MxEasy and remove existing cameras from the software. This access level is the only one that allows you to set up and change passwords. • Owner: You have access to all of the functions available for the User access level, as well as changing image settings. • User: You have access to the recorded event sequences in addition to the functions available for the Guest access level. • Guest: You can access live views of all cameras and save snapshots with this access level. To change an existing access level, open the window for setting access levels via the File | Authenticate menu and enter the administrator password. Automatic Authentication On Launch If an access level was set for a computer, then the password must be entered every time the program launches. You can automate this. To do this, open the “General“ tab in the Tools | Preferences menu and activate the Automatic Authentication checkbox and select the appropriate access level. The next time the program launches, it will start up at this access level without a password prompt. © MOBOTIX AG • Security Vision Systems • Made in Germany www.mobotix.com • [email protected] 93 94/144 MxEasy User Manual: System Configuration 4.1.2 Setting The Access Mode For MxEasy To protect a camera from unwanted configuration changes, select a Control Mode. If, for example, you want to prevent accidental changes in the recording mode of a camera connected via the Internet, set the Control Mode to Image Mode. This limits configuration changes to image settings and PTZ. The Control Mode can be set differently for any environment: 1. Open the “Properties“ window via the Cameras | Edit Cameras menu. Or: Open the Camera List via the Cameras | Show Cameras menu. Select the desired camera and open the shortcut menu. Click on Edit. The “Properties“ window opens. 2. Click on the “Access Mode“ tab. 3. Choose the desired Control Mode: Full Control: All configuration changes are allowed. Image Mode: Configuration changes are restricted to image settings and PTZ. Display Mode: Configuration is not allowed. 4. Click on OK to confirm. 4.1.3 Protecting Access To Cameras Access levels can be used to restrict how individual users work with MxEasy. In addition, public access to cameras can be protected with user names and passwords. Setting passwords not only provides protection against unauthorized access, it also blocks browser access to the Guest screen (Public Access; for more information, see Section “Users, User Groups, Passwords, Supervisor Mode“ in the Software Manual). 1. Open the authentication window via the File | Authenticate menu. 2. Click on the Camera Access button. The window for entering access data opens. 3. Enter a user name and a password. 4. Verify the password. 5. Click on OK to confirm. The access data for all cameras in the current environment is changed. Note If no user name and password have been entered, MxEasy uses the factory defaults (user admin, password meinsm). This also automatically enables public access to the Guest screen via a browser window. © MOBOTIX AG • Security Vision Systems • Made in Germany www.mobotix.com • [email protected] Managing Cameras 95/144 4.2 Managing Cameras 4.2.1 Adding New Cameras To connect new MOBOTIX cameras in MxEasy, open the MxEasy Assistant via the Cameras | Add Cameras menu. New cameras are detected automatically and listed in the Select A Camera overview as cameras that are not yet integrated. To integrate cameras, follow the instructions in Section 2.3.2 “Selecting And Integrating New Cameras“. 4.2.2 Renaming And Editing Individual Cameras Renaming The Current Camera In The Main Window To rename a camera, double-click on the camera name shown in the upper information bar in the main window. Enter a new name and save it. This also changes the network name of the camera. Editing The Current Camera In The Main Window To edit a camera, open the “Properties“ window via the Cameras | Edit Cameras menu. Here you can edit the camera name, configure access data (IP address, secure connection, proxy, user name, password) and adjust the access mode. You can also edit the network parameters of another environment for the camera shown (see Section 4.8 “Configuring Different Network Environments“). 4.2.3 Renaming And Editing Cameras In The Camera List You can edit individual cameras in the Camera List, and it is also possible to edit multiple cameras in one step, but only for some functions. Open the Camera List via the Cameras | Show Cameras menu. All of the cameras that are accessible in the network are shown. Cameras that are already integrated in MxEasy are shown in bold print. Renaming A Selected Camera Select the camera that you want. Double-click on the camera name or press F2 and change the name. Save the changes by pressing the Enter key. The changed names are stored when you close the Camera List. This change, however, is only local; the camera’s network name does not change. © MOBOTIX AG • Security Vision Systems • Made in Germany www.mobotix.com • [email protected] 95 96/144 MxEasy User Manual: System Configuration Editing A Selected Camera To edit a selected camera, open the shortcut menu or use the corresponding buttons: • Add: Manual addition of one or several selected cameras that, for example, cannot be detected automatically because they are accessed over the Internet. • Edit: Same as “Editing The Current Camera In The Main Window“. – User & password: Change the access data for one or several selected cameras. – Properties: Change the access data and access type of a selected camera. – Change network setup: Change the access data for one or several selected cameras. • Remove: Remove one or more selected cameras from MxEasy. • Hide preview image: Hide and show the preview image. • Show snapshot: Deactivate the livestream from a camera to save bandwidth. • Activate camera search: Normally activated and shows that MxEasy automatically searches for new cameras. Activating/Deactivating A Camera For The Selected Environment You can activate or deactivate cameras integrated to the system for the environment selected in the option field. To do this, you activate or deactivate the corresponding checkbox for the cameras in the first column of the Camera List. 4.2.4 Removing Cameras Open the Cameras | Remove Cameras menu to remove a camera. Click on Remove to remove a camera. Click on Restore and Remove to remove the camera and reset it to the settings it had before it was integrated to MxEasy. When removing cameras, MxEasy offers the option of resetting cameras to the settings they had before being integrated to MxEasy. Note that the passwords provided in MxEasy may also be reset, meaning that the old passwords will apply again. © MOBOTIX AG • Security Vision Systems • Made in Germany www.mobotix.com • [email protected] 97/144 Adjusting Camera Settings 4.3 Adjusting Camera Settings Several of the settings for the cameras can be centrally managed using MxEasy. To do this, open the camera options in the Cameras | Camera Options menu or with the Camera Options button. 4.3.1 Audio Settings You can make the most important sound settings for the camera in this dialog box. • Activate microphone, adjust sensitivity • Activate speaker, adjust volume • Echo Cancellation: In MxEasy you can adjust the audio quality for two-way communicaton. By activating this checkbox, you activate the Echo Cancellation on the camera. Then you can select the desired sound mode (Hands-free talking, Headset or Limited) on the “Intercom” tab in the Tools | Preferences menu. • Add sound files (if supported by the camera) • Record sound files yourself For additional information, see the Sections “Microphone and Speaker“ and “Sound on Event“ in the Software Manual. 4.3.2 LED Settings The LEDs of the cameras can be used to signal certain functions and statuses. You can assign selected flashing patterns to particular camera actions and functions in this dialog box. • Show recording state: The camera LEDs blink if an event occurs and recording takes place. • Show camera access: The camera LEDs blink whenever a camera is accessed, for example, when the configuration is changed. LED Flashing Patterns LED State Flashing Pattern On LED is always on Off LED is off Blinking LED is off, blinks slowly Flash LED is off, blinks rapidly Negative flashing Graphic LED is on, flashing off © MOBOTIX AG • Security Vision Systems • Made in Germany www.mobotix.com • [email protected] 97 98/144 MxEasy User Manual: System Configuration Flashing Patterns For Each Setting Settings LEDs Color Flashing Pattern • Continuous recording: On • Event recording: Neg. flash every 3 s Show recording state Alarm: 1, 5 • Not armed, off: Off • OK: Always on • Critical error: Neg. flash every 3 s Alarm: 1, 5 Power: 0 M12 D12, D14 • Critical error: Blinking • Continuous recording: On • Event recording: Neg. flash every 3 s Show camera access Cameras • Armed, waiting: Flash every 3 s • Critical error: Flashes synchronized with power LED Power: 0 LEDs • Not armed, off: Off • Armed, waiting: Flash every 3 s • Critical error: Flashes synchronized with power LED • Always: Double flash every 3 s Q22M, Q24M, D22M, D24M, M22M, M24M For more information on the LED blinking patterns of MOBOTIX cameras, see the Section “LED Signals And LED Configuration“ in the Software Manual and in the Camera Manual of the respective camera model. 4.3.3 Connection Settings You can also set the parameters for communications with external servers in this dialog box, for example, if you need to send e-mails. • DNS server: If you have cameras integrated to the network via a manual IP address, you can enter the IP address of the DNS server used by your network here. MxEasy will automatically suggest the DNS server that your computer is currently using (the Same as this computer option). A DNS server must be entered in a camera in order for the Time Server, VoIP and E-Mail functions to work, if the respective IP addresses are not known. © MOBOTIX AG • Security Vision Systems • Made in Germany www.mobotix.com • [email protected] Adjusting Camera Settings 99/144 • Secure connections (HTTPS/SSL): If necessary, you can activate encryption for all data transferred via HTTPS between MxEasy and the cameras. We strongly recommend using this option for security-related applications. Note however that the SSL encryption will place a higher load on the network bandwidth, which can lead to a reduction in the camera frame rate. You can find more information about the “Time“ tab in Section 2.2.4 “Setting The Time Settings.“ 4.3.4 VoIP Settings For Phone Calls You can make phone calls with MOBOTIX cameras using Internet telephony. In order to use this feature, you need to register with a VoIP provider for Internet telephony (for example, sipgate.de). You can enter the access data for the registered VoIP account in this dialog box. • Activate SIP telephony: To have a VoIP call performed in case of an alarm, the checkbox needs to be activated. • Local account: No SIP user data is required if telephone calls are to be made within the local network only (for example, to softphones installed on computers). • SIP user name, SIP ID, SIP password, Registrar: Enter the user data that you received from your SIP provider upon registration into the appropriate fields (SIP User Name, SIP ID, SIP Password and Registry). If the cameras are set to automatically obtain their IP addresses via DHCP, then make sure that a valid DNS server is entered in the cameras (the “Connection“ tab). For additional information, see Sections “Phone Call“ and “Phone Profiles“ in the Software Manual. For detailed information on all telephony features of the MOBOTIX cameras, see Section “Telephony Functions“ in the Software Manual. © MOBOTIX AG • Security Vision Systems • Made in Germany www.mobotix.com • [email protected] 99 100/144 MxEasy User Manual: System Configuration 4.3.5 E-Mail Settings MOBOTIX cameras can send e-mails (for alarm notification, for example). In order to use this feature, you need to provide a valid e-mail address. You can enter the access data for the account in this dialog box. • E-mail data: Enter the user data of an e-mail account in the fields provided in the dialog box: SMTP Server, Port (normally Port 25), Authentication (normally SMTP Login) and User Name and Password. If the cameras are set to automatically obtain their network data via DHCP, then make sure that a valid DNS server is entered in the cameras (the “Connection“ tab). For additional information, see Sections “E-Mail“ and “E-Mail Profiles“ in the Software Manual. 4.3.6 Recording Settings The cameras can save their video and audio data on various storage devices with storage capacities up to 4 TB. For the storage medium, you can choose the integrated SD card of the camera or an external USB medium (USB stick, USB hard drive, etc.), for example. The basic settings and basic functions of this feature can be used in this dialog box. • External USB Hard Drive: The camera should record to a directly connected external USB hard drive. • SD Card: The camera records to an inserted SD card. • USB Stick/Flash SSD: The cameras should record to a directly connected USB stick or an external flash solid-state hard drive. • NFS or SMB/CIFS File Server: The camera records to a file server. Select SMB/CIFS if you use a Windows server or a Mac OS X/Linux server that runs a Samba file server. Select NFS if you use a Linux server with NFS shares. © MOBOTIX AG • Security Vision Systems • Made in Germany www.mobotix.com • [email protected] Adjusting Camera Settings 101/144 Storage Requirements And Life Expectancy Of MicroSD Cards Newer cameras (Q22M, Q24M, D24M, D14, M24M, T24M, with the exception of basic and web models) and R models are equipped with SD cards and preconfigured for recording. The life expectancy of a MicroSD card increases proportionally to the storage capacity, since the camera software will execute fewer write/delete cycles on each storage cell. The first deletion will begin once the SD card has been filled to capacity (first full cycle). The theoretical life expectancy of a good quality 16 GB MicroSD card is between 10 and 35 years, depending on the degree of use. You can find further information on saving to SD cards in the Camera Manual of your MOBOTIX camera. 4.3.7 MxAnalytics Settings You can perform video motion analyses with „MxAnalytics“. In order to run the video motion analysis and to receive useful analysis results, MxAnalytics must be activated, the settings have to be configured and the storage has to be set up, among others. You do this on the „MxAnalytics“ tab. For more information on configuring the settings and on setting up storage, see Section 4.5.1, „Activating MxAnalytics And Configuring The Settings“ and Section 4.5.3, „Setting Up Storage For Future Evaluation“. © MOBOTIX AG • Security Vision Systems • Made in Germany www.mobotix.com • [email protected] 101 102/144 MxEasy User Manual: System Configuration 4.4 Adjusting The Default Program Settings To adjust the default program settings, open the Settings window via the Tools | Preferences menu. 4.4.1 General Settings • Language: Language of the MxEasy user interface. • Automatic Authentication: When MxEasy launches, an automatic user login occurs at the selected access level, without a password prompt. See also Section 4.1.1 “Defining Access Rights For MxEasy.“ • Folder for snapshots: Directory or folder for storing images taken with the Snapshot button. • OpenGL/Hardware Acceleration: The hardware acceleration option for high-performance graphic displays can cause problems in some graphics cards. • Restore hidden messages: Message and warning windows that have been hidden by selecting Don’t ask me again are shown again. Note MxEasy will warn you if an error occurs when recording data to a storage medium. This error message can be hidden by selecting Don’t ask me again. 4.4.2 Setting Connections • Proxy Server: If you do not want to use the system’s proxy settings, meaning that you do not want to use the same settings for the cameras and for the system, enter proxy settings for the cameras in the program settings. These settings are done for each environment. • Bypass Proxy Settings: If a proxy server has been entered, access to all network devices will occur over this server even if the device is a remote camera or a local network camera. This may result in slower access to the local camera or even prevent access entirely. You should therefore enter the IP addresses (or symbolic names) of all local network devices in the Bypass proxy settings field. Here, you can enter an address range (e.g., 192.168.*) or multiple addresses separated by semicolons (192.168.1.23;192.168.1.24). These settings are also done for each environment. © MOBOTIX AG • Security Vision Systems • Made in Germany www.mobotix.com • [email protected] Adjusting The Default Program Settings 103/144 • Bandwidth Management: MxEasy supports access to cameras in networks with different bandwidths (e.g., local company network and the Internet). For example, a mobile computer’s access to slow remote camera access via the Internet can be adjusted quickly to current conditions by switching the environment. The assignment of a network bandwidth specifies the appropriate bandwidth in the currently active environment for live image display and for searches that retrieve images from the camera. If cameras can be used in environments with faster and slower connections, this setting can be adjusted individually for each individual camera. The following bandwidths are available: – Fast Local (Fast Ethernet, Gigabit Ethernet) – Slow Local (WLAN/Wi-Fi, Ethernet) – Fast Remote (DSL, UMTS/3G) – Slow Remote (Modem, ISDN, GPRS/2G, EDGE) Information in parentheses are notes on how Internet access is possible. Select the bandwidth that fits your Internet connection. 4.4.3 Alarm And Doorbell Notification Behavior Alarm Notification • Automatically show alarming camera in main view: When this option is activated, a camera’s live image is shown automatically in the main window whenever an alarm occurs for this camera. You will then be able to view the associated event sequence immediately (the View Events button). • Restore application if minimized: If this option is activated, then the minimized program window is restored when an alarm occurs. • Show alarm with red lightning bolt: When this option is activated and an alarm is triggered, a flashing red lightning bolt appears in the live camera images. This image disappears once you have acknowledged the alarm by clicking on the image. • Play sound on alarm: When this option is activated and an alarm is triggered, the selected alarm sound will be played. The alarm sound is ended by an automatic or manual acknowledgment by a user. • Automatically acknowledge alarms after: This setting allows you to specify the time after which MxEasy will automatically acknowledge alarm messages from integrated cameras. Automatic acknowledgement may also end a still active alarm sound. © MOBOTIX AG • Security Vision Systems • Made in Germany www.mobotix.com • [email protected] 103 104/144 MxEasy User Manual: System Configuration Doorbell Notification These options refer exclusively to the T24 Door Stations • Automatically show ringing camera in main view: When this option is activated, the live image of a door camera is automatically shown in the main window whenever a visitor rings the doorbell at the Door Station. • Restore application if minimized: If this option is activated, the minimized program window is restored when a visitor rings the doorbell at the Door Station. • Show red chime on doorbell: If this option is activated and the doorbell is rung on the Door Station, a flashing red chime appears. You can deactivate the chime by clicking on it. • Play sound on doorbell: When this option is activated and a visitor rings the doorbell on the Door Station, the selected alarm sound will be played. The bell sound ends when two-way intercom communication begins. Camera Sequencer • Camera Sequencer Interval: When the camera sequencer is activated, you can use the sequencer interval to define how long the display will last before switching to the image of the next camera. 4.4.4 Setting Intercom Mode If a camera that supports the Echo Cancellation is integrated in MxEasy, you can choose between several sound modes to adjust the audio quality for two-way communication. For that, you may have to activate the Echo Cancellation checkbox first (on the „Audio“ tab in the Camera | Camera Options menu). By default, the echo cancellation is activated in T24 Door Station cameras and therefore, it does not need to be activated in MxEasy afterwards. • The standard setting is the Hands-free talking mode. The sound settings cannot be adjusted in this mode. • In the Headset mode, you can adjust the sound settings. • In very noisy environments you can switch to oneway communication by selecting the Limited mode. © MOBOTIX AG • Security Vision Systems • Made in Germany www.mobotix.com • [email protected] Configuring MxAnalytics 105/144 4.5 Configuring MxAnalytics The following configuration steps are necessary to use MxAnalytics video motion analysis on a Q24M camera in MxEasy: • Activate MxAnalytics and configure the settings (such as detection settings and object display) • Define detection areas, counting lines and object size • Set up storage of MxAnalytics data for future evaluation • Set up time tables to control the motion detection, customize the predefined report profiles used for analysis and set up the generating of reports and their automatic sending via e-mail, where necessary 4.5.1 Activating MxAnalytics And Configuring The Settings In order to run the video motion analysis and to receive useful analysis results, MxAnalytics must be activated and various settings have to be configured. Once you have done this, switch to the MxAnalytics settings to define the detection areas and the counting lines. After switching to the MxAnalytics settings, you can immediately check the effects of the defined settings in the camera live image. Open the “MxAnalytics” tab in the Cameras | Camera Options menu or with the Camera Options button to activate MxAnalytics and to configure the settings. • Enable MxAnalytics: The Activate option must be selected in order to run the video motion analysis. • Save reference image: Saves the current camera image as a reference image. This reference image is used for the export of heatmaps, among others. Thus, it is possible to receive always an identical background image for the heatmap, no matter what the current camera image is. If a reference image has not been set or if the previous reference image has been deleted, the current camera image will be used as backgound image. • Format SD card: We recommend setting up MxAnalytics after activation and then configuring storage of the data generated. See Section 4.5.3, „Setting Up Storage For Future Evaluation“ for information on how to configure this. Detection Settings • Mounting height: Installation height of the camera to the floor in centimeters ‑– It is important to set the value accurately to correctly detect the moving objects. The height should be at least 250 cm. • Sensitivity: Controls the sensitivity of the sensor. A higher value means that the software only recognizes objects that have a noticeable color difference to the background. A lower value means that the software also recognizes objects that are hard to recognize against the background. © MOBOTIX AG • Security Vision Systems • Made in Germany www.mobotix.com • [email protected] 105 106/144 MxEasy User Manual: System Configuration • Low-light supression: Image analysis is disabled if the current illumination falls below the set value. • Counting line deadtime: Specify the period of time within which an object that has crossed a line is no longer counted by the line. This setting increases the accuracy of the object counting process if objects are moving on the line in close proximity and crossing the line more than once. Environment Settings The quality of the analysis results is dependent on the lighting and environmental conditions to which the camera is exposed. You can set various parameters that adapt the camera to different lighting and environmental conditions in order to maintain good quality. Three environment settings are predefined for this purpose. It is also possible to customize the environment setting: • Artificial light, no shadows: Select this option if the environment to be analyzed is illuminated by artificial light only and there are no shadows cast by the objects to be detected. • Sparse sunlight, blurred shadows: Select this option if the environment to be analyzed is subject only to minimal changes in illumination (such as sunlight) and any shadows cast are of a diffuse nature. • Heavy sunlight, well-defined shadows: Select this option if the environment to be analyzed is subject to serious changes in illumination (such as a large window) or harsh shadows arise. • Custom setup: Selecting custom setup opens options and checkboxes that can be used to select and link different illumination situations and shadow detection methods: –Constant illumination: Select this option if there will be no changes in illumination in the environment to be analyzed, for example, in a windowless hall. This option also allows you to follow objects that do not move for several seconds. It has a positive effect on the frame rate as it generates a very low computing load. –Slow change in illumination: This option is suitable for rooms with few windows. Changes in illumination occur gradually and are not distinct. –Quick change in illumination: This option is particularly well-suited for rooms prone to sharp illumination changes, such as is the case in large windows. The computing load is highest here, which has a negative effect on the frame rate. –Shadow: Link the illumination situation selected with a shadow detection method. It is helpful to activate the first shadow detection method for unevenly structured or dark backgrounds. Use the second shadow detection method for bright or finely structured backgrounds. This can be set with © MOBOTIX AG • Security Vision Systems • Made in Germany www.mobotix.com • [email protected] Configuring MxAnalytics 107/144 one of three sensitivity levels. The more sensitive the detection, the more the image is cleansed of shadows. However, the likelihood that the object will be classified as a shadow increases. Visualization Settings • Counting Lines: Specify how counting lines are displayed in the camera image. • Counting line IDs: Choose whether you would like to display the counting line IDs in the camera image. • Counter values: Choose whether you would like to display the counting values in the camera image. • Detection area: Choose whether you would like to display the detection areas in the camera image. Color Settings • Counting line color: Specify the color for counting lines. • Text color: Specify a color for counting values and line IDs to ensure that they are easily visible against different background images. • Bounding boxes: Specify the color for the bounding box surrounding the detected objects. • Track color: Specify the color for object tracking. • Object halo: Specify the color for the movement outline of the moving objects. Heatmap Settings • Display: Choose whether you would like to display heatmaps in the live image. We recommend switching on the display for a short check only, as the display in the live image generates a high computing load. • Minimum and maximum values: This setting allows you to specify whether you would like to display all the movements captured in the heatmap or movements within specific value ranges only. This way, you can choose to only display movements that occur very frequently, for example. • Legend: Choose whether you would like to display an explanation of the color meanings. Report Profile Settings You can call up the movement and heatmap evaluations. To do this, report profiles have to be defined. Several predefined profiles are available in the recordings browser. You can adapt them to your requirements or define new profiles. To define report profile see Section 4.5.5, „Customizing The Report Profiles Used For Analysis“ © MOBOTIX AG • Security Vision Systems • Made in Germany www.mobotix.com • [email protected] 107 108/144 MxEasy User Manual: System Configuration Note We recommend testing the effects of these settings after configuring the process parameters. Only after the settings have been tested can it be guaranteed that MxAnalytics delivers usable data suitable for future evaluation. It is not possible to perform or test evaluations or export processes if the recording is not activated, as described in Section 3.8, „Using MxAnalytics“. Alternatively, you can activate the recording directly and delete any data saved during setup by reformating the recording once configuration is completed. To check the settings, click on OK and open the MxAnalytics settings via the Camera | MxAnalytics Settings menu. You can check the effect of the settings made in the camera live image before you define the detection areas and counting lines in the next step. Allow one or more people to move through the live image and check in the camera’s live image to see whether the movement of people is followed with a track color. Next, define the detection areas, counting lines, and object size and check in the camera´s live image to see whether the counting lines have the correct label and label color, for example. Activate the storage of the data generated once you have correctly set up MxAnalytics and tested the settings. 4.5.2 Defining Detection Areas, Counting Lines And Object Size Tracking and Evaluating Movements (Heatmaps) Select the areas in the camera image that are to be evaluated as detection areas. MxAnalytics can capture and evaluate movements in the camera image. The frequency of the movements is shown in a heatmap. To define the detection areas, open MxAnalytics via the Camera | MxAnalytics Settings menu. The dynamic toolbar for defining detection areas, counting lines and object size opens at the lower edge of the program window. © MOBOTIX AG • Security Vision Systems • Made in Germany www.mobotix.com • [email protected] Configuring MxAnalytics 109/144 1. Click on the Detection Area button. A predefined detection area opens. 2. To adjust this detections area proceed as follows: • Use the mouse to drag the area to the desired position. • Drag the corner of the area using your mouse to increase or decrease its area. • Use the mouse to draw a new area. 3. Click on the Detection Area button to save the defined areas. Counting People and Objects (Counting Lines) Define counting lines at the desired positions in the camera’s live image. MxAnalytics captures how often the counting lines are crossed within a specific period of time. 1. Click on the Counting Lines button. The feature to define counting lines is activated. 2. Use the mouse to draw the counting lines in the desired positions and the desired directions. 3. To edit the counting lines, click on the counting line and open the shortcut menu. 4. Select Edit Details. The window to edit counting lines opens. Name the counting line and the counting direction. Click OK to confirm. 5. To delete a counting line, select it and hit the Delete key on your keyboard (or select the Delete command in the shortcut menu). 6. Click on the Counting Lines button to save the defined counting lines. © MOBOTIX AG • Security Vision Systems • Made in Germany www.mobotix.com • [email protected] 109 110/144 MxEasy User Manual: System Configuration Note The counting lines should be within the detection areas. Otherwise, the computing time increases, which reduces the frame rate of the camera and leads to imprecise results. Defining Object Size Specify the minimum object size for detection. This way, you can make sure that the camera only analyzes objects that are relevant for you. 1. Click on the Object Size button. A predefined object size (yellow square) opens. 2. To adjust this square proceed as follows: • Use the mouse to drag the square to the desired position. • Drag the corner of the square using your mouse to increase or decrease its size. 3. Click on the Object Size button to save the defined die definierten Bereiche zu speichern. Activate the storage of the data generated once you have correctly set up MxAnalytics and tested the settings. 4.5.3 Setting Up Storage For Future Evaluation Movement data must be stored permanently in order to subsequently create and evaluate MxAnalytics statistics and use the export function. To do this, it is necessary to configure and format a MicroSD card accordingly. Configure storage in the MxFFS Volume Partitioning dialog. To open it, click on the Format SD card button in the “MxAnalytics” tab. The dialog contains the following areas • Format Mode: Select Quick Format if you know for certain that your camera is not being accessed. Secure deletion mode requires significantly more time. © MOBOTIX AG • Security Vision Systems • Made in Germany www.mobotix.com • [email protected] Configuring MxAnalytics 111/144 • Activate the Backup existing recordings checkbox to secure recorded data. Otherwise you will permanently lose the data! • Device Usage: Select whether MxAnalytics recordings only (no other recordings are stored) or all other recordings are to be stored • MxAnalytics Volume Size: Approximately 1 GB per month is required to permanently store results data. • Enable Data Encryption: You can encrypt the recordings to ensure the SD cards can be read only by entering the corresponding password. To do this, activate the checkbox and select either the automatically created encryption password (recommended) or create your own password. 4.5.4 Controlling Motion Detection (Time Tables) – Optional Video motion analysis can be permanently enabled or managed by a time table. If, for example, you only want video motion analysis to be active during the opening hours of a store, you must create a time table with the opening hours. Then, proceed to activate video motion analysis and select the time table with these opening hours. Hint: Limiting the analysis using a time table increases the accuracy of the results as objects outside the analysis time frame are not captured or evaluated. You can set up a suitable time table in the browser: 1. Open the Time Tables dialog in Admin > Camera Administration in the browser interface of the camera. Define a suitable time table. 2. Next, select this time table in the “MxAnalytics” tab. 4.5.5 Customizing The Report Profiles Used For Analysis You can call up the movement and heatmap evaluations as daily heatmap reports or as weekly and monthly counting line reports. To do this, select heatmap/counting line report profiles. There are several predefined profiles available, which you can adapt to your requirements or you can define new profiles. To do this, open the “MxAnalytics” tab via the Cameras | Camera Option dialog and click the Configure Counting Line Report Profiles button or the Configure Heatmap Report Profiles button. Configure Counting Line Report Profiles 1. Click on Configure Counting Line Report Profiles. The window to configure counting line report profiles opens. 2. Click on Add New Profile in the lower left corner to define a new profile. 3. Enter a profile name and select the counting line to be included in the evaluation. 4. Decide how many days the report should include. To do this, click on the + button under unter Export content and select the desired day in the selection box. Repeat this step to select several days. © MOBOTIX AG • Security Vision Systems • Made in Germany www.mobotix.com • [email protected] 111 112/144 MxEasy User Manual: System Configuration To depict several consecutive days, select the first day in the selection box, keep the Shift key pressed and select the last day. 5. Decide upon the time range and the export type (weekly or monthly) for the evaluation. 6. Decide upon the export format (HTML or CSV) for exporting the counting line report. 7. Click OK to confirm. Configure Heatmap Report Profiles 1. Click on Heatmap Report Profiles. The window to configure counting line report profiles opens. Click on Configure Heatmap Report Profiles. The window to configure heatmap report profiles opens. 2. Click on Add New Profile in the lower left corner to define a new profile. 3. Enter a profile name and select the day (current or last day) the report should include. 4. With the value range you can decide, whether all movements (0 - 100) are depicted or whther areas that are not frequented much will be excluded (e.g., 30 - 100). 5. Decide if a legend to the heatmap will be included in the export and decide upon the transparency of the heatmap. The higher the value, the more transparent is the heatmap. 6. Click OK to confirm. 4.5.6 Generating Reports And Sending Automatically Via E-Mail The counting line and heatmap evaluations can be called up in the event search or generated regularly and automatically sent via e-mail. To do this, first create an e-mail profile and define a scheduled time task. You can do this in the browser: 1. Open the E-Mail Profile dialog under Admin Menu >Transfer profiles in the browser interface of the camera. Set up a profile according to your needs. For counting line reports, select Counting line report in the E-Mail Attachment field and select the desired counting line report profile in the selection field below. For heatmap reports, select Heatmap report in the E-Mail Attachment field and select the desired heatmap report profile in the selection field below. 2. Next, select the corresponding e-mail profile in the Time Tasks dialog under Admin Menu > Camera Administration for the scheduled time tasks. © MOBOTIX AG • Security Vision Systems • Made in Germany www.mobotix.com • [email protected] Configuring an IP Video Door Station 113/144 4.6 Configuring An IP Video Door Station The settings on the door camera are usually configured when the door camera is integrated with the MxEasy Wizard. This can also be adjusted later, of course. The doorbell behavior and the door station hardware can be configured in the Door Station Options. You open the Door Station Options by opening the Camera | Door Station options menu or clicking on the Door Stations options button. 4.6.1 Configuring Door Station Options Changing Doorbell Behavior For Remote Stations Here you can set and change the doorbell behavior for every individual and already integrated remote station (iOS device iPad/iPhone/iPod touch, PC with MxEasy and IP video phone). Note: When an iOS device connects with a door station for the first time (by integrating the door station to the MOBOTIX App), the door station registers the device as a remote station. It is then available as a remote station in MxEasy. 1. Select the “Doorbell“ tab. 2. Select the contact number and/or bell for which an action profile will be entered. 3. Select whether and how a doorbell ring at the Door Station should be answered: – Without ringing at the remote station The remote station does not respond; residents are therefore not informed of the ringing doorbell. – With a ringing and a message for visitors if the resident does not answer The resident is informed of the ringing doorbell. If the homeowner does not respond after a specified period of time, then a message is played at the Door Station and the visitor can leave a message. – Only with a message for the visitor If a visitor rings the doorbell at the Door Station, then a message is played and the visitor can leave a message. 4. If the ringing and message profile was previously selected: – Now select a remote station or enter a new remote station that will indicate when the doorbell at the Door Station is rung. If you select MxEasy as remote station, the IP address of the computer on which MxEasy runs must be entered or selected. For a Voice over IP call, either a SIP number or an IP address for the VoIP telephone to be called must be entered or selected, depending on the configuration. – Select how much time should elapse without the doorbell being answered before a message should be played to the visitor. – Select a message that should be played to the visitor. © MOBOTIX AG • Security Vision Systems • Made in Germany www.mobotix.com • [email protected] 113 114/144 MxEasy User Manual: System Configuration – Activate the checkbox Record Message if the visitor should have the option of leaving a message. 5. If the message only profile was previously selected: – Select a message that should be played to the visitor. – Activate the checkbox Record Message if the visitor should have the option of leaving a message. 6. Click on OK to confirm. Changing Door Station Hardware If changes occur in the hardware equipment of your Door Station, such as an upgrade of the door sensors or bell buttons, then these changes must also be entered in MxEasy. 1. Select the “Equipment“ tab. 2. Select the number of doorbells that will actually be used without including the fixed bell button on the camera module and the bell button on an existing keypad in the count. 3. Activate the desired checkbox. – Door position sensor and door lock switch: Indicate which door sensors exist in the system and which terminal connectors are relevant. This is important to receive correct status displays (door open/closed/locked) in MxEasy. If you do not know whether and where door sensors are connected, simply try out the different options and check them using the the status display. – Automatic configuration enabled: After successful initial operation and configuration of a T24 system, MOBOTIX recommends preventing automatic reconfiguration by door camera to protect the system from unwanted manipulation from outside. To do this, the checkbox must remain deactivated. 4. Click on OK to confirm. 4.6.2 Setting Up The Intercom Mode On Door Stations For quality purposes, you can set different sound modes for two-way communication on the Door Station. To do this, open the “Door Station“ tab via the Tools | Preferences menu. 1. Choose the desired mode: – The standard setting is the “Hands-free talking“ mode. The sound settings cannot be adjusted in this mode. – In the “Headset“ and “Limited“ modes, you can adjust the sound settings. To do this, open the “Audio“ tab via the Cameras | Camera Options menu. Enter the settings that you want and then click on OK to confirm. © MOBOTIX AG • Security Vision Systems • Made in Germany www.mobotix.com • [email protected] Setting Access Rights And Passwords 115/144 Select “Limited“ mode in a loud environment where two-way intercom communication cannot really take place, and where only listening and speaking are viable. 2. Click on Apply and confirm by clicking on OK. 4.7 Saving The System Properties The Backup feature allows you to save as well as restore all MxEasy settings and the complete configuration of each integrated camera. Creating Backups A backup is created automatically every time the program is launched. However, a backup can be created manually as well. 1. To do this, open the “Configuration Backups“ window via the Tools | Configuration Backups menu or click on the Configuration Backups button. 2. Click on Create Backup. 3. Enter a name for the backup and confirm by clicking on OK. Loading A Backup You can select the following times for loading a backup: • Initial default configuration: This enables the restoration of all cameras and MxEasy itself to the default settings that were set when the program was first launched and the cameras were integrated into the system by MxEasy Assistant. • Most recent startup of application: This backup contains the configuration data of MxEasy when it was last launched. • Yesterday: This backup contains the configuration data of MxEasy when it was first launched on the previous day. • One week ago: With this option you can load the configuration data of a backup from the previous week or earlier. • Manual backup from: You can select a manual backup from the list provided. If you have already created manual backup, you can delete the most recent backup or all manual backups. Clicking on Reset uploads the selected configuration to the integrated cameras and restarts the cameras. Caution When saving the configuration, only those cameras that are currently integrated in MxEasy are saved. You should definitely create a manual backup after making configuration changes or integrated new cameras. © MOBOTIX AG • Security Vision Systems • Made in Germany www.mobotix.com • [email protected] 115 116/144 MxEasy User Manual: System Configuration 4.8 Searching For Software Updates MxEasy Software MxEasy can search for a new program version automatically using the update function. An Internet connection is required to check for updates. You can adjust how often the program checks for updates. 1. To do this, open the “Check for updates“ window via the Tools | Software Update menu. 2. Select the desired interval. 3. Click on OK to confirm. You can also check for updates manually. To do this, click on Check Now. If a new program version is available, it will be shown. 1. Select the update and click on Download Package to download the update. 2. To install directly, click on Install Package. This is only available for supported package types. 3. MxEasy needs to be restarted after the installation is completed. Camera Software The software versions of the integrated cameras can also be updated. 1. To do this, open the “Check for updates“ window via the Tools | Software Update menu. 2. Click on Check Now. If new versions are available, the “Update available“ window opens and the versions are listed as MPL or ZIP files. 3. Select the update you want and click on Download Package to download the update. 4. The installation of the camera software onto the cameras is done in the web browser. For more information, refer to the Camera Manual at Section 6.3 “Updating the Camera Software.“ Caution If you connect to the Internet in your local network via a proxy server, then the proxy settings need to be entered correctly in the MxEasy program settings. © MOBOTIX AG • Security Vision Systems • Made in Germany www.mobotix.com • [email protected] Setting Access Rights And Passwords 117/144 4.9 Configuring Different Network Environments 4.9.1 Defining And Editing Network Environments With MxEasy you can access cameras from various locations. To do this, you define different environments for which you then specify the access data for all cameras. The network environments can be defined in various places in MxEasy: • The File | Environment | Edit Environments menu The “Network Environments“ window opens. Click on the + button and enter a name. Repeat this step until you have entered the number of environments that you want. Click on OK to confirm. • The Tools | Preferences menu, “Connections“ tab Select the “Edit Environment“ option in the “Environment“ field. The “Network Environments“ window opens. Click on the + button and enter a name. Repeat this step until you have entered the number of environments that you want. Click on OK to confirm. • The Cameras | Edit Cameras menu Proceed as described above. • The Cameras | Show Cameras menu Proceed as described above. Existing environments can also be edited in the “Network Environments“ window. The – button can be used to delete environments. Double-click on the environment’s name or press F2 to rename the environment. Note When you create a new environment, MxEasy adopts all camera network data, bandwidth settings and Control Mode from the current environment. 4.9.2 Selecting An Environment And Changing The Network Data Once you have defined the environments, select the one you want and change the network data as required. This also includes configuration of the connection of the cameras and environment-specific settings, such as bandwidth. Establishing A Connection Camera access often takes place via an Internet connection with a DSL router. The DSL router typically serves as a DHCP server, which integrates all connected devices (DHCP clients) into the network and assigns them IP addresses. The IP addresses can change constantly. DynDNS (dynamic domain name system) is the perfect way to access the system. Access takes place via a name that you have assigned and registered with a DynDNS service provider (e.g., www.dyndns.org), instead of an IP address. The integrated DynDNS client in your local router transmits the new IP address to the DynDNS service provider daily or each time a change is © MOBOTIX AG • Security Vision Systems • Made in Germany www.mobotix.com • [email protected] 117 118/144 MxEasy User Manual: System Configuration made. The camera can then be selected by means of its DynDNS name (e.g., Fritz-Mueller. dyndns.org:19801). You assign a port for each local IP address for the cameras that will be accessed externally for port forwarding. You set the proxy depending on the environment. You can find detailed information on DynDNS in Section 4.8.3 “Connecting Remote Cameras Using DynDNS,“ and more information on proxies is available in Section 4.4.2 “Setting Connections.“ Environment-Specific Settings Environment-specific settings must also be established. By assigning the appropriate Network Bandwidth, you determine how images will be retrieved from the cameras, shown as live images and provided for searching in environments with faster or slower connections. The Control Mode prevents accidental configuration changes caused by working in other environments. You will more information on bandwidth in Section 4.4.2 “Setting Connections“ and more information on Control Mode in Section 4.1.2 “Configuring The Access Mode For MxEasy.“ Selecting The Environment And Changing The Network Data You can select the environment and change network data in several places in MxEasy: • The File | Environment menu Select the environment • The Cameras | Edit Cameras menu Select the environment and change the network data. The “Properties“ window opens. Select the desired environment. Click on the “Access Data“ and “Access Mode“ tabs to change the IP address, port, proxy, control mode and bandwidth. • The Cameras | Show Cameras menu Select the environment and change the network data. Open the shortcut menu for the selected camera and click on Edit. The “Properties“ window opens. Select the desired environment. Click on the “Access Data“ and “Access Mode“ tabs to change the IP address, port, proxy, control mode and bandwidth. • The Tools | Preferences menu, “Connections“ tab Select the environment and change the proxy and bandwidth. When you select an environment, MxEasy activates the network connection data, Control Mode and Bandwidth settings associated with this environment for all cameras. All changes you make to the camera addresses, Control Mode and the bandwidth settings after this point will be saved for the current environment. © MOBOTIX AG • Security Vision Systems • Made in Germany www.mobotix.com • [email protected] Setting Access Rights And Passwords 119/144 Assigning Cameras To An Environment Cameras can be assigned to an environment by activating or deactivating them in Camera Management or in the Camera List. Cameras that are not accessible in an environment or should not be available can be hidden without having to remove them completely from the system. Assigning cameras to an environment in Camera Management: 1. Open Camera Management via the View | Camera Management menu. 2. Activate or deactivate the checkboxes for the cameras that should belong or no longer belong to the current environment. 3. Close Camera Management. Assigning cameras to an environment in the Camera List: 1. Open the Camera List via the Cameras | Show Cameras menu. 2. Activate or deactivate the checkboxes for the cameras that should belong or no longer belong to the current environment. 3. Close the Camera List. 4.9.3 Connecting Remote Cameras Using DynDNS MxEasy cannot automatically detect cameras that are located outside the local (WLAN) network; these cameras must be added manually in the Camera List. The cameras, however, are typically connected via a DSL Internet connection that has dynamic IP addresses. DynDNS (dynamic domain name system) is the perfect way to access your system. This protocol does not rely on one (frequently changing) IP address (for example, 213.117.53.215) to provide access; instead, it utilizes a custom name that you can register with a DynDNS service provider (for example, www.dyndns.org). The integrated DynDNS client in your local router transmits the new IP address to the DynDNS service provider daily or each time a change is made. The camera can then be selected by means of its DynDNS name (e.g., Fritz-Mueller.dyndns.org:19801). Note The IP addresses given here for cameras, routers and ports, as well as the DynDNS name “Fritz-Mueller.dyndns.org,“ are merely examples. Never use the names or ports given here; instead, set up your own names and ports for DynDNS access to the cameras. Caution We recommend purchasing flat-rate Internet access for cameras and routers; other access plans could result in high connection costs. Make sure that you have changed the default access data for the cameras (user name “admin“ and password “meinsm“)! © MOBOTIX AG • Security Vision Systems • Made in Germany www.mobotix.com • [email protected] 119 120/144 MxEasy User Manual: System Configuration Example: Internet connection of cameras with a DSL router In this example, all of the cameras are connected via a DSL router with flat-rate Internet access. You need a DynDNS name for the router, which you then enter together with the user data in the router’s DynDNS client. Access to the individual cameras takes place by means of port forwarding, in which the first camera, in our example, can be reached under the name Fritz-Mueller.dyndns.org:19801, the second Fritz-Mueller.dyndns. org:19802, etc. (the numbers behind the colon are examples for the associated ports). A port facilitates the processing of different services for a computer over the same IP address. This means a computer can serve simultaneously as a web server (port 80) and as a mail server (port 25 for sending, port 110 for receiving e-mails) Port forwarding is also set up in the router. Ports for the router’s external IP addresses (19801 and 19802 in the example) are connected with local (internal) IP addresses for cameras (192.168.178.201 and 192.168.178.202 in the example). In our example, both ports are also linked with the IP addresses of the following cameras: • 19801 192.168.178.201 • 19802 192.168.178.202 The router forwards a query to port 19801 at the external IP address 213.63.87.154 to the local IP address 192.168.178.201 and therefore to camera 1. Queries via the external port 19802 are also forwarded to the local IP address 192.168.178.202 and therefore to camera 2. Port 19802 5 1 Hans-Klein.dyndns.org =242.64.82.205 Fritz-Mueller.dyndns.org =231.63.87.154 Gabi-Mustermann.dyndns.org=228.43.75.188 . . . 3 231.63.87.154 5 Camera 2 192.168.178.202 DynDNS server: . . Port 19801 Camera 1 192.168.178.201 Fritz-Mueller.dyndns.org = 231.63.87.154 DynDNS Functions Like This 231.63.87.154:19801 DSL router “Fritz-Mueller.dyndns.org“ Fritz-Mueller.dyndns.org ? 2 & 231.63.87.154:19802 4 www © MOBOTIX AG • Security Vision Systems • Made in Germany www.mobotix.com • [email protected] Setting Access Rights And Passwords • 1: The router updates its external IP addresses at the DynDNS server. • 2: The computer requests the IP address for my-camera.dyndns.org. • 3: The DNS service sends back the IP address 213.63.87.154 to the computer. • 4: The computer uses different ports (19801 and 19802) to access the external IP address 213.63.87.154 on the router. 121/144 The router assign certain ports on its external interface to specific internal addresses (port forwarding) • 5: The router forwards the query to ports 19801 and 19802 at its external IP address 213.63.87.154 to the internal IP addresses (192.168.178.201 and/or 192.168.178.202). Registering A DynDNS Name First register with a suitable DynDNS service (e.g., www.dyndns.org). Keep the user name and password in a safe place because the router will need them to update IP addresses. Also set up a DynDNS name for the router under which you would like to access the desired cameras (e.g., “Fritz-Mueller“). DynDNS providers typically provide several domains that come after the period after the DynDNS name. In our example, we chose “dyndns.org.“ The name used to access the cameras therefore always begins with “Fritz-Mueller.dyndns.org.“ Configuring The Router • Setting up a DynDNS client on a router: Open your router’s user interface in a web browser by entering the IP address or its DNS name (e.g., “http://192.168.178.1“ or “http:// fritz.box“). In your router’s user interface, open the configuration page for setting up a DynDNS client. Set up the DynDNS name that you registered with the DynDNS provider. • Setting up port forwarding: In your router’s user interface, open the configuration page for port forwarding. Now link a port to each local IP address for those cameras that should be externally accessible: • 19801 → 192.168.178.201 • 19802 → 192.168.178.202 Testing The DynDNS Configuration • Testing DynDNS: Open your web browser and enter the registered DynDNS name (example: http://Fritz-Mueller.dyndns.org). You should now see your router’s user interface. • Testing cameras: Enter the DynDNS name and port of the first camera in your web browser (example: http://Fritz-Mueller.dyndns.org:19801). You should now see the user interface of the camera and receive a prompt to enter login data (user name and password). Use the same procedure to test all of the other cameras that you have set up for port forwarding (see above). Caution If necessary, deactivate remote configuration for your router if you activated in Section “Configuring The Router.“ © MOBOTIX AG • Security Vision Systems • Made in Germany www.mobotix.com • [email protected] 121 122/144 MxEasy User Manual: System Configuration Adding A Remote Camera In MxEasy Open the Camera List via the Cameras | Show Cameras menu. 1. Select any camera. 2. Right-click to open the shortcut menu and click on Add. Or: Click on the “+“ button. The “Add MOBOTIX Camera“ window opens. 3. Enter the DynDNS name of the router and the corresponding port as an address. 4. Click on OK to confirm. Camera name IP address or DynDNS name Camera port, may be on router User name and password for camera access 5. If everything is properly configured, status will switch to green show a preview image for this camera. and MxEasy will Setting Up SSL Encryption SSL encryption means that data sent from and to the cameras are always transmitted in an encrypted format. This technique makes the recording of data and spying on access data (nearly) impossible. To activate SSL encryption on the camera, proceed as follows: 1. Open the “Properties“ window via the Cameras | Edit Cameras menu. Or: Open the Camera List via the Cameras | Show Cameras menu. Open the shortcut menu for the desired camera. Click on Edit. The “Properties“ window opens. 2. Activate the checkbox Use secure connections (SSL) in the “Access data“ tab. 3. Click on Apply or on OK to complete the changes on the camera. 4. Reboot your camera when you are prompted to do so. The camera can now be reached via an SSL-encrypted connection. You can also use the encrypted connection from a web browser by entering the camera’s address, as in the following example: https://Fritz-Mueller.dyndns.org:19801 © MOBOTIX AG • Security Vision Systems • Made in Germany www.mobotix.com • [email protected] Components Of A MOBOTIX System A Additional Information A.1 Components Of A MOBOTIX System 123/144 We will introduce the individual components of your MOBOTIX system in this section. You will also find tips about additional information about products found on the MOBOTIX website. A.1.1 Power Supply The Ethernet cable supplies the MOBOTIX cameras with power. You can use either MOBOTIX PoE products or switches with PoE power supply in accordance with IEEE 802.3af. MOBOTIX NPA PoE Set (MX-NPA-PoE SET) This set is used to supply power to a MOBOTIX camera or another PoE-fed device via the Ethernet cable. The integrated crossover function allows the adapter to be used in direct connection (without a switch) with a computer. The integrated LED indicates whether or not the camera is being supplied with power, as well as the available PoE class. For more information on MOBOTIX PoE products, see www.mobotix.com under Products > Accessories > Power Supply. Switches With PoE Power Supply When purchasing switches with PoE power supply in accordance with IEEE 802.3af, make sure that the required number of ports is supported (in certain units, only some of the ports are equipped with PoE power supply). Uninterruptible Power Supplies (UPS) An uninterruptible power supply (UPS) consists of a rechargeable battery and electronic components. These components ensure that the battery is correctly charged and prevent the connected units from being damaged as a result of voltage peaks and lows. If an electrical surge occurs, the voltage peaks are filtered out and in the event of low voltage, the UPS takes over the power supply of the connected units for as long as the power stored in the battery lasts. We recommend safeguarding the network components of your MOBOTIX system (camera power supply, switches, routers and even file servers) using UPS units as they can ensure that your system will continue to operate properly, even in the case of a complete power failure. © MOBOTIX AG • Security Vision Systems • Made in Germany www.mobotix.com • [email protected] 123 124/144 Expansions For The MOBOTIX System A.1.2 Switch A switch connects individual network-ready units to one another and delivers data from the sending units to the receiving units. In larger networks, one or more switches form the backbone of the system over which the data is transferred to the individual computers and/ or network devices. In a smaller network, this function is normally performed by a router with multiple network ports (for example, in a home network). A.1.3 Router A router is normally used to establish a connection to the Internet. Technically speaking, a router transfers requests to external IP addresses of computers that are located outside of the local network. If a router has a sufficient number of network ports, it can also perform the functions of a switch. A router performs these functions, among others, for the units joined in the network: • DHCP: Using this function, individual network devices in the local network (cameras and computers) are automatically assigned unique IP addresses to enable communication between these units. • Internet Connection: The router establishes a connection to an Internet service provider (ISP) and receives a unique public IP address (an address that is recognized and available online). Requests sent to an external IP address (e.g., a website) are sent to this public address via the router and the results are sent back to the requesting computer. Normally, a permanent connection to the provider is established. • DynDNS: Each time the Internet connection is reestablished, the ISP automatically assigns the router a different public IP address (for example, if the provider interrupts the connection overnight). In order to assign a unique, static name to these dynamic IP addresses, register with a DynDNS provider (for example,www.dyndns.org) and create a unique name for your router and Internet connection (for example, myhomenetwork.dyndns.org). This unique name (for example, myhomenetwork.dyndns.org) is entered into the router along with the registration information of the DynDNS provider (user name and password). Each time the router's public IP address is reset by the provider, the router registers this IP address with the DynDNS provider where the address is then linked to your unique name. • Port Forwarding: It is possible to access individual network devices (for example, cameras) from outside the network using this router feature. A camera is assigned to a port in the router. This port sends information to the internal network address of the camera. In conjunction with DynDNS, you can access your first camera as follows: my-camera.dyndns.org:19801. MxEasy configures the integrated cameras automatically so that each camera can be used from outside the network as a proxy camera. For more information on these services, see Section “Directly Accessing MOBOTIX Cameras Via The Internet“ in the Software Manual. DynDNS and Port Forwarding are also dealt with in Section 4.9.3 “Connecting Remote Cameras Using DynDNS”. © MOBOTIX AG • Security Vision Systems • Made in Germany www.mobotix.com • [email protected] Expansions For The MOBOTIX System 125/144 A.2 Expansions For The MOBOTIX System You can expand your MOBOTIX system with the following components to adjust the system to suit your needs: • MOBOTIX ExtIO: This expansion module, which is compatible with all MOBOTIX IT and Secure models, can be used to set up a separate door intercom via a USB or Ethernet cable in addition to the camera (USB: max. 5 m, Ethernet: max. 100 m, Mx2Wire+: max. 500 m). The integrated buttons act as a call button and a light switch, and speech is transmitted over the microphone and speakers of the ExtIO. A key switch can be integrated into one of the two signal inputs, for example. Using the key switch, the system can be manually activated and deactivated. The other input is used to transfer the signals of an additional sensor (for example, a second motion sensor). The two external consumers (for example, door opener and light) are controlled using relays. You can find further information on the MOBOTIX ExtIO at www.mobotix.com under Products > ExtIO. • MOBOTIX Mx2Wire+: This expansion module, which can be used for all MOBOTIX cameras and for other network devices in matching pairs, enables network connections with PoE power supply over two-wire cables of up to 500 m in length. Mx2Wire+ modules allow you to upgrade existing two-wire cabling (bell wire, coaxial cable, power cable, etc.) to multimedia-capable network cabling in a cost-efficient manner. You can find further information on the MOBOTIX Mx2Wire+ at www.mobotix.com under Products > Mx2Wire+. • Joystick: A joystick with three axes (two axes via the control stick and one axis via the rotating grip) and memory buttons for frequently used camera positions simplify the handling of the MOBOTIX system if users need to make frequent use of zoom functions to access saved camera positions. • Key Switch: A key switch can be connected to one of the signal inputs of the MOBOTIX camera or ExtIO to allow for quick activation and deactivation of your MOBOTIX system. © MOBOTIX AG • Security Vision Systems • Made in Germany www.mobotix.com • [email protected] 125 126/144 Expansions For The MOBOTIX System B Access Rights For User Access Levels B.1 Button Functions Button Button Admin Owners Users Guests Upper Toolbar Next Camera X X X X Camera Sequencer X X X X Camera Overview and Layouts X X X X Full Screen X X X X Player Mode X X X Door Inspector (T24) X X X Alarm Configuration X Alarm Planner X Privacy Mode X Operation Mode X X X X X Microphone X X X Speaker X X X Pickup Phone (T24 only) X X X Hangup Phone (T24 only) X X X Volume Up X X X Volume Down X X X Door X X X Light X X X Sound X X X Camera Options X X Manual Alarm Left Toolbar Door Station Options (T24 only) X Right Toolbar Home View X X Activate PTZ X X PTZ Views X X Image Settings X X Image Formats and Views X Snapshot X X X X © MOBOTIX AG • Security Vision Systems • Made in Germany www.mobotix.com • [email protected] 127/144 Access Rights for User Access Levels Button Button Admin Owners Users X X Admin Owners Users Guests About MxEasy X X X X About Qt X X X X Preferences X X “File“ Menu Configuration Backups X Information X Guests B.2 Menu Command Functions “MxEasy“ Menu (Mac OS X Only) Admin Owners Users Guests Open Clip X X X X Close (Mac OS X Only) X X X X Authenticate X X X X Privacy Mode X X Environment X X X Page Setup X X X Print X X X Print Preview X X X Print to PDF X X X Browse Recordings X X X Export Recordings X X X Exit X X X X © MOBOTIX AG • Security Vision Systems • Made in Germany www.mobotix.com • [email protected] 127 128/144 Expansions For The MOBOTIX System Admin Owners Users Guests Next Camera “View“ Menu X X X X Previous Camera X X X X Camera Sequencer X X X X Camera Overview and Layouts X X X X Camera Management X Layout X X X Full Screen X X X X Maximize X X X X Mini Viewer X X X X Toolbars X X X Admin Owners Users X X X X “Camera“ Menu Show Cameras X Edit Camera X Camera Options X Door Station Options X Information X Add Cameras X Remove Camera X Rename Camera X Reload X Reboot X Player Mode X X X Door Inspector X X X Alarm Planner/Alarm Configuration X Operation Mode X Manual Alarm X X X Guests X © MOBOTIX AG • Security Vision Systems • Made in Germany www.mobotix.com • [email protected] 129/144 Access Rights for User Access Levels “I/O“ Menu Admin Owners Users Speaker X X X Volume Up X X X Volume Down X X X Door X X X Light X X X Sound X X X Admin Owners Users Home View X X X Activate PTZ X X X PTZ Views X X X Image Settings X X Image Formats and Views X X Snapshot X X X X Admin Owners Users Guests Preferences (Windows Only) X X Style X X X X Detailed Tooltips X X X X Configuration Backups X Software Update X Admin Owners Users Guests About X X X X About Qt X X X X “Image“ Menu “Tools“ Menu “Help“ Menu (Windows Only) Guests Guests © MOBOTIX AG • Security Vision Systems • Made in Germany www.mobotix.com • [email protected] 129 130/144 MxEasy User Manual: Glossary C MOBOTIX Glossary ActiveX Control element on Windows computers, which can also be used in other programs (including Windows Internet Explorer) to run special tasks. The MxPEG ActiveX control element allows video and audio data from MOBOTIX cameras to be displayed in other applications (including Internet Explorer). Bonjour (French for “hello“) A technology developed by Apple based on the Zeroconf protocol, which is a method to automatically detect network services on IP networks. For example, you can find a printer or a network camera on the local network without knowing the exact IP address of the device you are looking for. CamIO MOBOTIX signal module that the camera uses to directly operate lamps, sirens and access controls, as well as external audio components (speakers and microphones). CCTV Abbreviation for Closed Circuit Television, a television system in which the analog video signal is only transmitted to monitors (for example, within a building). The term CCTV is often used for video surveillance systems. CF Card Abbreviation for Compact Flash Card. An ultra-compact, digital (random-access) memory medium based on flash memory modules and well-known as an image storage medium for digital cameras. CIF, 2CIF, 4CIF (in accordance with PAL TV standard) Common Intermediate Format: CIF = 1/4 TV image with 288 lines and 352 pixels (0.1 megapixel); 2CIF = 1/2 TV image, also with 288 lines but 704 pixels (0.2 megapixel); 4CIF = quality of a conventional TV image with 576 lines and 704 pixels (0.4 megapixel). CMOS Sensor Abbreviation for Complementary Metal Oxide Semiconductor sensor, a sensor for energyefficient digitalization of image information. CMOS sensors are used as image sensors in digital cameras. Codec Made-up word from the English coder/decoder, which describes a process by which data is coded and decoded. There are always two codecs used for audio/video files: an audio codec and a video codec. The typical codecs often include data compression to save transmission bandwidth and storage capacity. DevKit Camera installation kit with independent image sensors based on MOBOTIX M12D or M22M, intended for concealed installation in other devices. © MOBOTIX AG • Security Vision Systems • Made in Germany www.mobotix.com • [email protected] Glossary 131/144 DHCP Abbreviation for Dynamic Host Configuration Protocol. Allows a server to automatically assign devices in the network with the appropriate configuration (including the IP address, DNS server and gateway), as opposed to static IP addresses on the individual network devices. DNS Abbreviation for Domain Name Service. Allows the domain names of servers on the Internet (for example, www.mobotix.com) to be linked (“resolved“) to their corresponding IP addresses (for example, 212.89.150.84). Dome camera Camera generally of a round, compact shape: its lens can be directed and is protected by a transparent dome housing. DSL Abbreviation for Digital Subscriber Line. Denotes a fast Internet connection capable of providing bandwidth of up to 16 Mbps for a typical household. Dual dome camera Dome camera with two lenses and image sensors such as the MOBOTIX D12D. These lenses can deliver Wide Angle and Telephoto images independently of one another. DVR Abbreviation of Digital Video Recorder. DynDNS Abbreviation of Dynamic DNS (or DDNS, Dynamic Domain Name Service). Similar to DNS, this links domain names (for example, mydomain.com) with IP addresses, whereby the IP addresses may change at any time. This service provides a convenient method to access your MOBOTIX cameras from home or work if the camera’s Internet connection is not through a router that assigns a static IP address, but rather via a DSL connection with a dynamic IP address from the provider. A well-known provider of this (free-of-charge) service is www.dyndns.org. Events An event refers to a situation when something happens or changes. In terms of video surveillance, this means a change in the status of an area that is being monitored. This may be movement of a person, a change in brightness, a drop in ambient temperature, the detection of a noise via a microphone, an electrical signal at a signal input, the manual operation of a button, etc. Ethernet The most common technology for communication within a wired network. It facilitates data exchange between all devices (computers, printers, IP cameras, etc.) connected in a local network (LAN). ExtIO MOBOTIX signal module that the camera uses to directly operate lamps, sirens and door openers, as well as external audio components (speakers and microphones). © MOBOTIX AG • Security Vision Systems • Made in Germany www.mobotix.com • [email protected] 131 132/144 MxEasy User Manual: Glossary Fixed dome Camera without moving parts in a dome-shaped housing. Flash memory See CF Card. fps Abbreviation for frames per second. See frame rate. Frame rate The frame rate specifies how many frames per second (fps) are generated and sent by the camera. The human eye perceives movement as a fluid video sequence when more than 14 images per second are produced. HDTV Abbreviation for High Definition TV. HiRes Abbreviation for High Resolution. Refers to high-resolution images (above 1 megapixel). Image compression Image compression reduces the file size of an image. This is particularly important when transferring and saving files. Image processing Digital image processing. The goal is to correct errors made during image generation (caused by overexposure, underexposure, blurring, weak contrast, image noise, etc.) in order to create a “better“ image. IP Network Data network based on the Internet protocol (TCP/IP). IP Phone See VoIP. JPEG Abbreviation for Joint Photographic Experts Group, responsible for the development of the JPEG standard method for image compression. JPEG is the most common lossy image format for photos on the Internet. Loss in image quality is barely noticeable at compression rates lying between 60% and 99%. Latency Time interval elapsed between the time an image is captured by a camera and when that same image is displayed on the monitor. Layout Describes the layout of video sources on a screen in MxControlCenter. The layout determines the positions and resolutions of the images displayed on the monitor when displaying images from network cameras. In addition to the actual video images, you can also incorporate graphic elements such as the location of the cameras, etc. © MOBOTIX AG • Security Vision Systems • Made in Germany www.mobotix.com • [email protected] Glossary 133/144 LED Abbreviation for Light Emitting Diode. An electronic semiconductor component built into MOBOTIX cameras and add-on modules that emits light when a current flows through the component in the correct direction. Linux Free and open source operating system. Serves as the operating system for all MOBOTIX cameras. Megapixel Images that have more than 1 million pixels. Mono dome camera Dome camera with one lens, such as the MOBOTIX D24. Motion detection Action of sensing a movement within a particular area. MOBOTIX cameras use algorithmic methods to detect changes from image to image in predefined areas, while taking preset conditions into account. If a camera detects a movement, it signals an event and triggers an alarm. Motion-JPEG (M-JPEG) A video compression method where each individual image is compressed separately as a JPEG image. Unlike MPEG, the quality of M-JPEG recordings is not dependent on movement within the image. MPEG Motion Pictures Expert Group. Standard for compressing and saving image and video data, resulting in quality loss. Originally created for playing entertainment content on PCs, MPEG concentrates on displaying still image material and compromises the quality of moving image material in order to increase the transmission speed. MxControlCenter MOBOTIX video management software for professional control of medium-sized and large camera networks. MxEasy MOBOTIX video management software for small and compact camera networks of up to 16 cameras. MxPEG Method developed by MOBOTIX to compress and store image and video data with low network load and high image quality. The MxPEG ActiveX control element allows video and audio data from MOBOTIX cameras to be displayed in other applications (including Internet Explorer). NAS Abbreviation for Network Attached Storage, a storage system connected via an Ethernet cable. All network devices (cameras) have access to this storage system. © MOBOTIX AG • Security Vision Systems • Made in Germany www.mobotix.com • [email protected] 133 134/144 MxEasy User Manual: Glossary Network A group of computers that are connected via various cables and share access to data and devices such as printers and IP cameras. PIR Passive infrared sensor for motion detection. PoE Power-over-Ethernet. A technology for supplying network-enabled devices (for example, IP cameras) with power via an Ethernet cable. PTZ Abbreviation for Pan/Tilt/Zoom. Refers to the movement of a video camera to the left and right, up and down, and to the camera’s ability to enlarge an image. Quad Display Layout in which the images from four cameras are displayed in one window. Resolution Indicates the number of pixels used to produce an image. The more pixels an image has, the more recognizable the details remain when the image is enlarged. The resolution is expressed as the number of pixel columns by pixel rows or as a total number of pixels. A VGA image has 640 columns and 480 rows (640 x 480 pixels), which equals 307,200 pixels or approximately 0.3 megapixels. RoHS Abbreviation for Restriction of the use of certain hazardous substances electrical and electronic equipment. Refers to EC Directive 2002/95/EC, which prohibits the use of certain hazardous substances when manufacturing products and components. The goal of this directive is to prevent these substances from harming the environment when the products are disposed of later. Router Network device that connects multiple networks with one another. The router (like a hub) establishes a physical connection between the devices in different networks, analyzes the relevant data packets and forwards (“routes“) these packets to the correct target network. SD Card SD Memory Card (Secure Digital Memory Card). A digital storage medium based on flash storage modules such as USB sticks. Search Monitoring of recordings or searching for a particular event. Sequencer Feature that automatically switches the camera displayed in the main window after a specific time delay. © MOBOTIX AG • Security Vision Systems • Made in Germany www.mobotix.com • [email protected] Glossary 135/144 Signal input/output Coupling a system that triggers an alarm (for example, a fire alarm system or a network camera) to a control center or another type of transmitter (for example, a telephone or IP network). A typical signal input/output scenario in video surveillance progresses as follows: an event triggers an alarm. This alarm then display the video image from the network camera that triggered the alarm on the monitor at a control center. SIP Session Initiation Protocol. Network protocol for setting up, controlling and terminating a communication connection via a computer network. SIP is frequently used in conjunction with IP telephony. Snapshot Photograph of a situation created spontaneously and directly with a mouse click. Switch Hardware used to connect multiple network devices (computers, cameras, printers, etc.) within a network. A PoE switch can also supply the cameras with power over an Ethernet cable. UPS Uninterruptible Power Supply. Refers to devices that continue to supply power in the event of a sudden power failure. These devices usually operate using a battery. A UPS is installed on the power lines of devices and systems in order to protect them in the event of a power failure. VoIP Voice over IP. Telephony using computer networks. WLAN Wireless Local Area Network. Used to provide Internet connections without the need for cables. Wizard Refers to a software component that helps the user install or set up a particular program and guides the user through the configuration process by means of simple questions. © MOBOTIX AG • Security Vision Systems • Made in Germany www.mobotix.com • [email protected] 135 136/144 MxEasy User Manual: Index Index Symbole 2CIF128 4CIF128 A Access Mode Set control mode 92 92 Manage93 Removing94 Rename93 Searching22 Selecting25 Show44 Switch44 Camera screens Hemispheric cameras Non-Hemispheric cameras 46 46 46 Access Rights Set91 Camera search Automatic22 ActiveX128 Camera settings Alarm and ringing settings Audio settings Connection Settings LED Settings Mail Settings Recording Settings VoIP Settings Aktivieren von MxAnalytics103 Alarmdetection44 Alarm Planner 63 Alarms Manual Recording 57 101 95 96, 100 95 98 98 97 Audio/video data Exporting75 Playing back exported data 77 CamIO128 Authentication status CIF128 25 CCTV128 CF Card CMOS Sensor B Bildrate49 128 128 Codec128 Camera access Protections92 Codecs DivX V3 MPEG-4 FFMPEG MPEG-4 Microsoft MPEG-4 V2 Motion JPEG Windows Media Video 7/8 76 76 76 75 76 Camera list 22 Components of a MOBOTIX system 121 Camera Management 40 Computer system 20 Camera Overview 40 Configuring MxAnalytics103 Bonjour128 C Cameras Adding22 Adding outside of local network 24 Add via DynDNS 120 Editing93 Integrating25 Counting Lines MxAnalytics78 © MOBOTIX AG • Security Vision Systems • Made in Germany www.mobotix.com • [email protected] 137/144 Index ExtIO129 D Default View 37 DevKit128 F Fixed dome 130 DHCP122, 129 Flash memory. see CF Card DNS129 fps130 Dome camera 129 Frame rate 130 DSL129 Full Screen 41 Dual dome camera 129 DVR129 G DynDNS122, 129 Connecting remote cameras 117 General Information E H Ethernet129 HDTV130 Evaluations MxAnalytics79 HiRes130 Events129 Event histogram 68 Playback67, 72 Search66, 71 Example Scenarios Gas Station 12 Hotel13 House11 Expansions for the MOBOTIX system Export format AVI clips File server structure MxPEG clips Quick motion 123 74 74 74 74 8 Glossar128 I Image compression 130 Image processing 130 Image settings Customize51 Editing48 Information bar 36 Installation On Mac OS X computers On Windows computers 20 20 Installation and initial operation 18 Internet connection Invalid network 122 25 Exporting74 IP address 23, 26 Export Options Audio76 AVI75 File size 76 IP Network 130 Exposure Windows 51 Custom52 Pre-defined51 IP Phone. see VoIP IP Video Door Station Configuration111 Connecting29 Using81 © MOBOTIX AG • Security Vision Systems • Made in Germany www.mobotix.com • [email protected] 137 138/144 MxEasy User Manual: Index Time tables 78 Use78 J JPEG130 MxAnalytics-Einstellungen99 L MxControlCenter131 Language100 Latency130 Layout130 LED131 Life expectancy SD Cards 99 Linux131 Live Video Surveillance Alarm detection 44 44 M MxEasy131 First use 22 General Information 8, 22 Installing20 Operation Modes 57 Program Views 22, 37 Program Window Areas 22, 35 Wizard22 MxEasy Wizard 22 MxPEG131 N 12, 57 NAS131 Megapixel131 Network132 Menu bar Network configuration Manual Alarm Mini Viewer 35 41, 86 MOBOTIX Glossary128 26 Network data Change115 Network Environment Selecting115 MOBOTIX System ExtIO123 Joystick123 Key switch 123 Mx2Wire+123 Router122 Switch122 Network Environments Configuration115 Definition and editing 115 Working with 89 Mono dome camera 131 OnScreen control Motion detection 131 Motion JPEG 131 Operation Modes Alarm Planner 57 Normal57 Switched off 57 Mounting And Connecting The Cameras 15 O 68 MPEG131 MxAnalytics Configuring103 Counting Lines 78 Evaluations79 Heat maps 78 © MOBOTIX AG • Security Vision Systems • Made in Germany www.mobotix.com • [email protected] 139/144 Index P Proxy Server Panorama View 38 PTZ132 PIR132 PTZ features 54 Loading PTZ views 55 Panning and tilting 55 Saving PTZ views 55 Zoom54 Playback Exported audio/video data 77 Player65 Player Mode Playing recordings Searching recordings 65 65 Player View 39 100 Q Quad Display Quick motion Export format 132 74 PoE132 Port forwarding 122 Post Video Motion Detection 67 Power supply 121 Privacy mode Activate87 Disable88 Program defaults 100 Program Start Automatic Authentication 91 Program Views Camera Overview Default View Mini Viewer Panorama View Player View 40 37 41 38 39 Program Window Full Screen 41 Maximize42 Original size 42 Size41 R Recordings Exporting73 Image Settings 48 Printing73 Saving73 Searching And Playing Back In Player Mode 65 Searching And Playing Back In The Recordings Browser 71 Recordings And Alarms Alarm Configuration 58 Alarm Notification 62 Events59 General58 Recording Mode 58 Time ranges 63 Weekly Planner 63 Recordings Browser 71 Remote cameras DynDNS117 Program Window Areas Image Bar 36 Information Bars 36 Main Window 36 Menu Bar 35 Status Bar 36 Toolbars35 © MOBOTIX AG • Security Vision Systems • Made in Germany www.mobotix.com • [email protected] 139 140/144 MxEasy User Manual: Index Resolution48, 132 Tool bar RoHS132 Tooltip35 Router122, 132 S 35 U UPS121, 133 SD Card 132 SD Cards Life expectancy Storage requirements 99 99 Search132 Sequencer132 Settings Cameras95, 97, 98 General100 Signal input/output 133 SIP133 Use MxAnalytics78 V Video Surveillance System Setup15 VoIP133 Settings for phone calls 97 W Windows computer Installation20 Snapshot133 Wizard22, 128 Software updates Camera Software MxEasy Software WLAN133 114 114 Status Bar 36 Storage requirements SD Cards 99 Switch122, 133 System Requirements 20 System Settings Saving113 T Time ranges 63 Time tables 78 MxAnalytics78 © MOBOTIX AG • Security Vision Systems • Made in Germany www.mobotix.com • [email protected] Index 141/144 Notes © MOBOTIX AG • Security Vision Systems • Made in Germany www.mobotix.com • [email protected] 141 142/144 MxEasy User Manual: Index Notes © MOBOTIX AG • Security Vision Systems • Made in Germany www.mobotix.com • [email protected] MOBOTIX - The HiRes Video Company To demonstrate our confidence in the quality of our products, MOBOTIX cameras were used to capture all the images that appear in this manual. Manufacturer CEO MOBOTIX AG Dr. Ralf Hinkel Kaiserstrasse 67722 Langmeil, Germany Registration Office: Kaiserslautern Local Court Germany Registration Number: HRB 3724 Tel: +49 6302 9816-0 Tax Code: 44/676/0700/4 Fax: +49 6302 9816-190 Tax Office: Worms-Kirchheimbolanden, Germany http://www.mobotix.com VAT ID: [email protected] DE202203501 You can find the latest version of this document at www.mobotix.com under . Technical specifications subject to change without notice! © MOBOTIX AG • Security Vision Systems • Made in Germany www.mobotix.com • [email protected] 143 EN MxEasy User Manual The HiRes Video Company HiRes MxEasy: The Easy-To-Use Video Software EN 3 Megapixel 2048 × 1536 Software zoom Skyline Format free Each image format freely definable 30 Frames/s VGA (640 × 480) 30 F/s Mega Virtual PTZ Digital pan, tilt, zoom Backlight Safe using CMOS without mechanical iris Internal DVR Internal via Flash, external via Network Win/Lin/Mac Recording via Network on PC up to 1 Terabyte Microphone & speaker Audio bi-directional via IP, variable framerates SIP-Client with video IP Telephony Alarm notify, cam remote control VideoMotion Multiple windows precision pixel-based -22 to +122 °F Weatherproof Free software download: www.mobotix.com > Support > Software Downloads Latest User Manual PDF file: www.mobotix.com > Support > Manuals -30 to +50 °C, IP65, no heating necessary IEEE 802.3af www.mobotix.com PoE Network power even in winter HiRes Video Innovations The German company MOBOTIX AG is known as the leading pioneer in network camera technology and its decentralized concept has made high-resolution video systems cost efficient. Robust No moving parts fiber glass housing MxCC/MxEasy MOBOTIX AG • D-67722 Langmeil • Tel.: +49-6302-9816-103 • Fax: +49-6302-9816-190 • [email protected] Licence free Video-ManagementSoftware