1
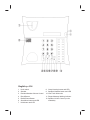
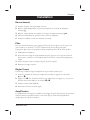
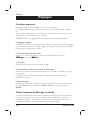
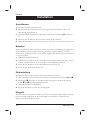
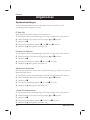
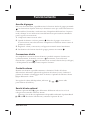
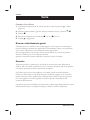
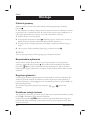
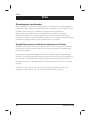
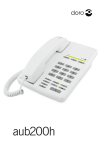
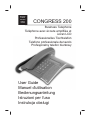
English French German Italian Polish CONGRESS 200 Business Telephone Téléphone avec écoute ampliée et écran LCD Professionelles Tischtelefon Telefono professionale da tavolo Profesjonalny telefon biurkowy User Guide Manuel d'utilisation Bedienungsanleitung Istruzioni per l’uso Instrukcja obsługi English p. 4-14 1 Hook switch 8 Group listening button and LED 2 Speaker 9 Speaker/Headset button and LED 3 Handset/Headset Volume Control 10 One-Touch Memories 4 Recall Button 11 Ringer/Message Waiting Indicator 5 Redial/Pause Button 6 Store/Mute button and LED 12 Speaker Volume Control (on the underside) 7 Hold button and LED Français (voir pages 15-23) 1 Pédale de raccroché 7 Touche de Mise en garde et LED 2 Haut-parleur 8 Touche d’écoute ampliée et LED 3 Réglage du volume du combiné/ casque 9 Touche haut-parleur/casque et LED 4 Touche R 10 Mémoires directes 5 Touche Bis 11 Témoin lumineux de sonnerie 6 Touche d’enregistrement/secret et LED 12 Réglage du volume du hautparleur (sur le côté) Deutsch (siehe Seite 24-31) 1 Gabel 8 Taste für Lauthören und Anzeige 2 Lautsprecher 9 3 Lautstärke für Hörer/Headset Taste für Lautsprecher/Headset und Anzeige 4 R-Taste 5 Wahlwiederholung 6 Taste Speichern/Stummschalten und LED 7 Taste für Gespräch parken und Anzeige 10 Schnellwahl 11 Rufsignalanzeige 12 Lautstärkeregler für Lautsprecher (Unterseite) Italiano (vedere pagine 32-40) 1 Commutatore a gancio 7 Pulsante Attesa e LED 2 Auricolare 8 Pulsante Ascolto di gruppo e LED 3 Regolazione volume per microtelefono/auricolare 9 Pulsante altoparlante/auricolare e LED 4 Pulsante Recall (R) 10 Composizione a un tasto 5 Pulsante Ripetizione numero 11 Indicatore di squillo 6 Pulsante Memorizzazione/ Silenziamento e LED 12 Controllo volume altoparlante (sulla parte inferiore) Polski (patrz strony 41-48) 1 Miejsce na słuchawkę 2 Głośnik 3 Regulator głośności słuchawki/ zest. nagłownego 4 Przycisk Recall (R) 5 Przycisk ponownego wybierania 6 Przycisk i kontrolka wyłączania mikrofonu / zapis 7 Przycisk i kontrolka zawieszenia 8 Przycisk i kontrolka odsłuchu grupowego 9 Przełącznik głośnika/zestawu nagłownego i kontrolka 10 Wybieranie jednym przyciskiem M1-M20 11 Wskaźnik dzwonka/wiadomości oczekującej 12 Regulator głośności głośnika (pod spodem) English Installation Batteries In order for the display, memory and other functions to operate, the telephone requires three good quality AAA 1,5 V alkaline batteries to be installed. If batteries are either not installed or running low, the Mo bAtt symbol will be visible in the display, you will need to change the batteries as soon as possible. The battery compartment is located on the underside of the telephone. 1. Ensure the telephone line cord is not connected to the telephone network wall socket. 2. Remove the battery cover by pressing a small screwdriver (up to Ø 2,5mm) or similar into the hole to the right of the cover. 3. Install the batteries ensuring correct battery polarity is observed. 4. Refit the battery cover. Connection Once the batteries have been installed: 1. Connect the curly cord to the handset and to the socket marked q on the underside of the telephone. 2. Connect the telephone line cord to the socket marked T on the underside of the telephone and then to a telephone network wall socket. 3. A click will be heard when the modular plug is correctly in place. 4. Position the cables in the grooves underneath the telephone. 5. Lift the handset and listen for the dial tone. Your telephone is now operational. Setting the Time 1. 2. 3. 4. Lift the handset (ignore the dialling tone) and press z and *. Press # (to select 12/24 hour display please refer to page 11). Enter time (Hours-Minutes-Seconds) using the telephone keypad (0-9). Replace the handset. The time (clock) will be displayed after 5-10 seconds. Hearing Aid Compatible This telephone is hearing aid compatible. Select the T mode on your hearing aid to enable this feature. 4 www.doro.com Installation English Connection of a headset A headset can be connected to the socket underneath the telephone marked = . Simply press the headset button = to access an incoming call or dial tone, press again to terminate the call. While a headset is connected the speaker function will NOT operate. IMPORTANT! The DORO Congress 200 is designed to operate with DORO original headsets. Other manufacturer headsets may be used, although the function and sound quality cannot be guaranteed. Any damage occurring due to incompatible or non Doro headsets being installed, will not be covered under the telephones guarantee. Making a call with the headset 1. Press = . Dial tone will be heard in the headset and the LED next to the headset button will illuminate. 2. Dial the telephone number required. 3. Press the headset button again to terminate the call. Connection of additional equipment On the side of the telephone there is a socket marked 8, this will allow additional telephone equipment i.e. cordless, modems etc to be connected allowing access to the telephone line. IMPORTANT! When additional equipment is connected to the socket marked 8, only one device at a time will operate. Labels/protective cover Information such as a company logo can be placed under the protective cover. This is especially useful where the back of the telephone is facing a customer/ visitor on a reception desk. The back cover is fastened by 2 pieces of plastic and secured by two screws, these have to be removed first. To memory index cover can be removed by carefully prising the right hand side of the cover using a small flat blade screwdriver. www.doro.com 5 English Operation Redial Button If the number dialled is engaged or if you wish to redial the last number dialled (up to a maximum of 32 digits), lift the handset (or press the /= ) and press the redial button r. Timer Approximately 5 seconds after dialling a timer will be shown on the display. The timer helps you keep track of how long the call lasts. Mute Button The handset/headset microphone can be disabled during a call by pressing z . Press z once more to reactivate the microphone. On Hook Dialling 1. Press . The speaker will be activated and the LED indicator will illuminate. 2. Dial the required telephone number. Adjust the volume, if needed, using the volume control on the underside of the telephone. 3. Once the call is answered, pick up the handset. IMPORTANT! This is not a hands free speaker telephone i.e. there is a microphone in the handset only. When a headset is fitted the on hook dialling function will not operate. Hold Button Press h to place a call on hold. The LED next to the button will illuminate. The call can be resumed by pressing h again or from another telephone connected to the same line. 1. While on a call. 2. Press h to place the telephone call on hold. If the handset is in use it may now be replaced onto the hook switch. 3. To resume the telephone call, lift any handset connected to the same line. 6 www.doro.com Operation English Group Listening During a call, it is possible to activate the Group Listening function by pressing . With this function activated a call can be heard on the loudspeaker as well as from the handset, it is therefore possible for someone in the same room to hear both parties and follow the conversation. 1. Dial a telephone number as usual. 2. When the call is connected, press . Group listening is now activated and the conversation can be heard via the speaker. The indicator by the button will be illuminated. 3. Adjust the volume, if needed, using the volume control on the side . 4. To terminate the Group Listening function, press once again. IMPORTANT! It is recommended that the Group Listening function is terminated before replacing the handset. Direct connection The telephone allows you to dial a number using the telephone keypad (0-9), the One-Touch memories or by pressing r, without picking up the handset or pressing /= . The call is connected to the speaker or headset (if connected) and then the number is dialled. Please refer to page 9 for information on selecting this feature Volume Control The handset/headset earpiece volume may be adjusted in 5 stepped increments during a call. Press $ to increase the volume, or £ to decrease the volume. To adjust the speaker volume (hands free dialling and group listening), use on the side of the phone. Recall Press the recall button R followed by the extension number to transfer calls when connected to a PBX. Access to additional network services can be gained by using the recall button keys. Please refer to page 9 for information on this feature or contact your network operator for more information. www.doro.com 7 English Settings Memory This telephone has 20 One-Touch memories numbered M1-M20. Once a number has been stored in a memory location, you need only to press one button to make the call. Storing One-touch Memories 1. Lift the handset and press z (ignore anything you hear in the earpiece). 2. Select a location M1-M20 by pressing the corresponding button. 3. Enter the telephone number to be stored (up to 22 digits) using the number keys (0-9). Press r if you want a pause in the telephone number. 4. Press z again and replace the handset. The number is now stored. In case of a number change, store the new number in the location of the old one following the above procedure Dialling using One-Touch Memories 1. Lift the handset (or press /= ) and wait for a dialling tone. 2. Dial the desired number by pressing the corresponding memory location, M1-M20. Ringer 1. Lift the handset (ignore anything you hear in the earpiece) and press z and # . 2. Select the desired melody and ringer volume by pressing the number keys 0 - 9 as shown below. 3. Press z and replace the handset. The ring signal is now set. Key/setting Melody type Ringer level 1.......................................... Melody A........................ Low 2.......................................... Melody A........................ Normal 3.......................................... Melody A........................ High 4.......................................... Melody B........................ Low 5.......................................... Melody B........................ Normal 6 (factory setting)................ Melody B........................ High 7.......................................... Melody C ....................... Low 8.......................................... Melody C ....................... Normal 9.......................................... Melody C ....................... High 0.......................................... Off * ............................... - * If 0 is selected, the ringer will be turned off until the next time the handset is lifted. The ringer will then revert to the previous setting. 8 www.doro.com English Settings Technical information On the underside of the telephone you will find several switches located within the battery compartment. These switches determine certain technical parameters when connecting the telephone to e. g. a PBX. Remove the cover by pressing a small screwdriver (up to Ø 2,5mm) or similar into the hole to the right of the cover. IMPORTANT! These switches should only be adjusted by qualified personnel. 1. System Settings Allow system settings to be changed or not. The settings are locked if the switch is on N . See next page for more information about the system settings. 2. Direct connection Allow direct connection to be activated 123 L or not 123 q 3. Recall (R) Button Technology Select Recall (R) type, either Time break recall ( H ) or Earth recall ( ) with the switch H/ . IMPORTANT! If you are unsure of the PBX/network requirements initially select the time break H position. 4. Tone/Pulse Dialling Select dialling type, either Tone (♫) or Pulse (...) using the ♫/... switch. IMPORTANT! If you are unsure of the PBX/network requirements initially select the tone (♫) dialling setting. Message waiting You can select between three types of Message Waiting systems: Neon(80100V)/LED+ (12VLR)/LED- (48VLR). Message Waiting Indicator Many PBX systems use a function called Message Waiting. The telephone can show if a call was received in you absence by flashing the Message Waiting Indicator in standby mode. This function operates differently depending on the PBX in question. Please contact the system controller for more information. www.doro.com 9 English Other System Settings You can select several parameters when connecting the telephone to a PBX. Recall (R) Time Duration (TBR only) This allows you to select TBR recall access timing. The time selected will depend on the PBX, network and country of installation. For example, UK and Australia use 100, New Zealand uses 600. If you are unsure as to the correct setting for your installation initially select 1 = 100ms 1. The system setting switch must be in the position ON, see page 9. 2. Lift the handset (ignore any network announcements) and press z and *. 3. Press 0. 4. Select the required setting ( 1 =100, 2 =300, 3 =600 ms). 5. Press z and replace the handset. Pause Time Duration This allows you to select the Pause timing. The time selected will depend on the PBX and network through which your memory number is being dialled. If you are unsure as to the correct setting for your installation initially, select 1 = 2.0. 1. The system setting switch must be in the position ON, see page 9. 2. Lift the handset (ignore any network announcements) and press z and *. 3. Press 2 . 4. Select preferred setting ( 1 =2.0 and 2 =3.6 s). 5. Press z and replace the handset. 10 www.doro.com Other English Direct Dialling Waiting Time When direct dialling the period of time the telephone waits before dialling can be adjusted between 2.0-3.1 seconds. 1. The system setting switch must be in the position ON, see page 9. 2. Lift the handset (ignore any network announcements) and press z and *. 3. Press 3 . 4. Select preferred waiting time ( 1 =2.0 and 2 =3.1 s). 5. Press z and replace the handset. Display Clock (12 or 24 hour format) 1. The system setting switch must be in the position ON, see page 9. 2. Lift the handset (ignore any network announcements) and press z and *. 3. Press 4 . 4. Select preferred hour display ( 1 =12 hrs and 2 =24 hrs). 5. Press z and replace the handset. www.doro.com 11 English Other Troubleshooting Check that the telephone cord is undamaged and properly plugged in. Disconnect any additional equipment that may be connected. If the problem is resolved, the fault is with the other equipment. Test the equipment on a known working line. If the product works then the fault is with the line. UK If you cannot resolve the fault using the faultfinder section, technical support is available on the Premium Rate Number: 0906 302 0114. Calls cost 50 pence per minute (prices correct at the time of going to press), and is operational between 9AM - 5PM Monday-Friday excluding Bank Holidays. Alternatively, E-mail on: [email protected] You can contact us in writing: Consumer Support Group, Doro UK Ltd., 22 Walkers Road, North Moons Moat, Redditch, Worcestershire, B98 9HE, (regarding any Spares or Technical query), or Telephoning (Spares only): 01527 584377 Web site: www.doro-uk.com Guarantee This product is guaranteed for a period of 24 months from the date of purchase. Proof of purchase is required for any service or support required during the guarantee period. This guarantee shall not apply to a fault caused by an accident or any similar incident or damage, liquid ingress, negligence, abnormal usage or any other circumstances on the purchaser’s part. Furthermore, this guarantee shall not apply to a fault caused by a thunderstorm or any other voltage fluctuations. This guarantee does not in any way affect your statutory rights. (As a matter of precaution, we recommend disconnecting the telephone during a thunderstorm.) 12 www.doro.com Other English Australia and New Zealand If you believe this product is malfunctioning, please refer to the relevant section and/or consult the troubleshooting guide in this manual to ensure that you have followed the instructions carefully. As an alternative you can visit our web site for FAQ’s or send an e-mail for a prompt reply. Guarantee This product is guaranteed for a period of 24 months from the date of purchase. Should you experience difficulties with the product, please contact us for assistance. If the product is then found to be faulty you will be asked to return it directly to us with a copy of the purchase receipt. This guarantee shall not apply to a fault caused by an accident or a similar incident or damage, liquid ingress negligence, abnormal usage or any other circumstances on the purchaser’s part. Furthermore, this guarantee shall not apply to a fault caused by a thunderstorm or lightning, excessive or any other voltage fluctuations or faults on the telephone line. (As a matter of precaution, we recommend disconnecting the telephone during a thunderstorm). This guarantee does not affect your statutory rights. AUSTRALIA DORO Australia Pty Ltd PO Box 6760 Baulkham Hills BC NSW 2153 Australia NEW ZEALAND Atlas Gentech (NZ) Limited Private Bag 14927 Panmure Auckland New Zealand Consumer Support Ph: (02) 8853 8444 Fax: (02) 8853-8489 Email: [email protected] Web site: www.doro.com.au Consumer Support Ph: 0900 50-025 (Toll Call) Fax: (09) 574-2722 Email: [email protected] www.doro.com 13 English Other REN (RN for New Zealand) The REN (Ringer Equivalence Number) or (RN) is of significance only if you wish to connect more than 1 telephone to your telephone line. A standard telephone line has a maximum REN capacity of 3 (RN of 5). It is possible to connect 3 devices with a REN of 1 (RN of 1) with no degradation to the product’s performance. Exceeding this limit may cause the volume of the ringer in any phone to decrease or not ring at all. Notes for operation in New Zealand The grant of a Telepermit for any item of terminal equipment indicates only that Telecom has accepted that the item complies with the minimum conditions for connection to its network. It indicates no endorsement of the product by Telecom, nor does it provide any sort of warranty. Above all, it provides no assurance that any item will work correctly in all respects with another item of Telepermitted equipment of a different make or model, nor does it imply that any product is compatible with all of Telecom’s network services. This equipment shall not be set to make automatic calls to the Telecom “111” Emergency Service. This equipment may not provide for the effective hand-over of a call to another device connected to the same line. 14 www.doro.com Installation Français Raccordement 1. Installez les piles. Voir paragraphe suivant. 2. Reliez le câble téléphonique, à la prise du téléphone et à la fiche du téléphone marquée T. 3. Reliez le cordon spiralé au combiné et à la prise au téléphone marquée q. 4. Placez les câbles dans les rainures situées au dos du téléphone. 5. Prenez le combiné: vous devez entendre la tonalité. Piles Pour son fonctionnement correct, l’appareil a besoin de trois piles 1,5V du type AAA (non fournies). Le symbole Mo bAtt s’allume lorsqu’il faut changer les piles. Changez les piles le plus tôt possible! Utilisez uniquement des piles de haute qualité. 1. Débranchez le téléphone. 2. Pour enlever la trappe du compartiment des piles, appuyez avec un petit tournevis pointu (max. 2.5mm) ou outil similaire dans le trou situé à droite du compartiment à piles. 3. Insérez les piles selon les marques du pôle positif et négatif. 4. Remettez la trappe en place. Régler l’heure Une horloge s'affiche lorsque le téléphone n’est pas utilisé (mode repos). 1. Prenez le combiné (ne tenez pas compte de la tonalité) et appuyez sur la touche z et sur *. 2. Appuyez sur # . Si le format de 12 heures est sélectionné (voir page 21), vous pouvez alterner entre AM et PM avec les touches * et # . 3. Indiquez l’heure (HH-MM-SS). 4. Raccrochez. L’heure est alors réglée. Amplicateur Un amplificateur est intégré au combiné à l’attention des personnes portant une prothèse auditive. Mettez la prothèse auditive sur le mode T pour connecter l’amplificateur téléphonique de la prothèse auditive. www.doro.com 15 Français Installation Raccordement du casque La fiche située au dos du téléphone marquée = permet de raccorder un casque. Lorsque le casque est branché, la touche casque = permet de prendre/ déconnecter la ligne téléphonique (ce qui revient à prendre et à reposer le combiné). Le haut-parleur ne fonctionne pas lorsque le casque est raccordé. Remarque! Seuls les casques DORO sont testés et adaptés au Congress 200. Vous pouvez utiliser d’autres types ou marques de casques; dans ce cas nous ne pourrons pas garantir leur qualité sonore et leur bon fonctionnement. Dans le pire des cas, le casque et le téléphone seront endommagés. La garantie du téléphone ne couvre pas ce type de dommage. Appel téléphonique avec casque 1. Appuyez sur la touche casque = . Vous entendez la tonalité d’appel dans le casque et le témoin lumineux à côté de la touche casque s’allume. 2. Composez le numéro de téléphone de votre correspondant. 3. Appuyez à nouveau sur la touche casque pour terminer la communication. Raccordement d’un modem (Dataport) Une fiche marquée 8est située sur le côté gauche du téléphone. Elle permet de brancher un appareil supplémentaire (téléphone sans fil, modem, etc.) sur la même ligne téléphonique. Cartes mémoires Vous pouvez facilement remplacer les cartes mémoires. Pour cela, enlevez le plastique de protection en insérant délicatement un tournevis pointu dans les encoches situées sur la droite du plastique de protection. Vous pouvez également placer votre logo, votre nom, etc ... sous le plastique protecteur arrière du téléphone, car cette partie est visible par vos clients/ visiteurs. Pour cela, enlevez le plastique de protection en dévissant d’abord les 2 vis situées en haut au dos du téléphone, puis enlevez les 2 pattes plastiques blanches 16 www.doro.com Français Utilisation Touche Bis Lorsque la ligne de votre correspondant est occupée, ou si vous désirez rappeler le dernier numéro composé, prenez le combiné (ou appuyez sur /= ) et appuyez sur la touche Bis r. Chronomètre Un chronomètre de la durée des communications s'affiche juste après le début de la communication. Le chronomètre vous aide à connaître la durée de la communication. Touche secret En cours de communication, le micro peut être coupé en appuyant sur la touche secret z . Appuyez une deuxième fois pour activer le micro. Le voyant lumineux à côté de la touche clignote lorsque le micro est coupé. Haut-parleur 1. Appuyez sur . Le haut-parleur est enclenché et le témoin lumineux à côté de la touche s’allume. 2. Composez le numéro de téléphone. Réglez éventuellement le volume du haut-parleur à l’aide du curseur de réglage du volume situé sur le côté droit du téléphone. 3. Décrochez le combiné dès que votre correspondant a répondu Remarque! Notez qu’il n’ y a un micro que dans le combiné. Le haut-parleur ne fonctionne pas lorsque le casque est raccordé. Mise en garde Utilisez la touche h pour mettre un appel en garde. Vous pouvez reprendre l’appel téléphonique sur un autre téléphone (branché sur la même ligne). 1. Une communication est en cours au combiné/ casque. 2. Appuyez sur la touche h pour mettre l’appel en garde, et raccrochez si vous utilisez le combiné. 3. Pour reprendre l ’appel téléphonique, décrochez le combiné d ’un des téléphones branché sur la même ligne. www.doro.com 17 Français Utilisation Ecoute ampliée Vous pouvez enclencher la fonction d’écoute amplifiée en cours de communication en appuyant sur . La fonction d’écoute amplifiée permet d’écouter au haut-parleur une communication qui est en cours dans le combiné/ casque. De cette manière, d’autres personnes peuvent écouter les deux parties en train de parler, et suivre la discussion. 1. Composez le numéro de téléphone comme d‘habitude. 2. Appuyez sur lorsque la communication est établie. La fonction d’écoute amplifiée est activée et vous pouvez écouter la conversation dans le haut-parleur. Le témoin lumineux à côté de la touche s’allume. 3. Réglez éventuellement le volume de l’écoute amplifiée à l’aide du curseur de réglage de volume situé sur le côté droit du téléphone. 4. Pour terminer la fonction d’écoute amplifiée, appuyez à nouveau sur . 5. Pour terminer la communication, raccrochez le combiné/ casque. Prise de Ligne Sans Décrocher Vous pouvez effectuer un appel sans décrocher le combiné en appuyant sur la touche /= , et en composant directement le numéro de votre correspondant à partir des touches du clavier, des mémoires directes ou encore de la touche r . La ligne est établie dans le casque (si raccordé) ou dans le haut-parleur d’attente, et le numéro est composé ensuite. Réglage du volume Utilisez la touche de réglage du volume pour ajuster le volume du combiné/ casque pendant une communication. Appuyez sur la touche $ pour augmenter le volume et sur la touche £ pour le réduire. Utilisez le curseur pour régler le volume du haut-parleur/ écoute amplifiée (situé sur le côté droit du téléphone). Autocommutateurs / Opérateurs Cet appareil peut être installé derrière la plupart des autocommutateurs. Il peut également vous donner accès à des services additionnels proposés par des opérateurs. Les touches *, # et R vous permettront d’accéder à ces fonctions ou services complémentaires. Pour toute information, adressez-vous directement au fabricant du PABX ou à votre opérateur. 18 www.doro.com Français Réglages Répertoire Ce téléphone possède 20 mémoires directes. Vous composez un numéro de téléphone en mémoire directe en pressant simplement sur une touche mémoire. Les mémoires directes sont numérotées de M1 à M20. Enregistrement de numéros en mémoire directe. 1. Prenez le combiné et appuyez sur z (ne tenez pas compte de la tonalité). 2. Choisissez la mémoire directe (M1 à M20) en appuyant sur la touche correspondante. 3. Composez le numéro de téléphone souhaité (21 chiffres max.) à partir du clavier. Utilisez la touche r pour insérer une pause. 4. Appuyez à nouveau sur z . Raccrochez. Le numéro est alors enregistré. Composer un numéro en mémoire directe. 1. Prenez le combiné (ou appuyez sur /= ) et attendez la tonalité. 2. Choisissez la mémoire directe (M1 à M20) en appuyant sur la touche correspondante. En cas de changement de numéro, remplacez l‘ancien par le nouveau sur la carte mémoire. Réglage de la sonnerie 1. Prenez le combiné (ne tenez pas compte de la tonalité) et appuyez sur la touche z et sur #. 2. Sélectionnez une des sonneries en appuyant sur une des touches numérotées 0 - 9 qui correspondent au tableau suivant. 3. Appuyez sur la touche z et reposez le combiné. La sonnerie est alors réglée. Touche/réglage Mélodie Niveau sonore 1.......................................... Mélodie A....................... Faible 2.......................................... Mélodie A....................... Normal 3.......................................... Mélodie A....................... Fort 4.......................................... Mélodie B....................... Faible 5.......................................... Mélodie B....................... Normal 6 (réglage d’usine) .............. Mélodie B....................... Fort 7.......................................... Mélodie C ...................... Faible 8.......................................... Mélodie C ...................... Normal 9.......................................... Mélodie C ...................... Fort 0.......................................... Silence * ........................ - * Quand la touche 0 est sélectionnée, la sonnerie reste coupée tant que le combiné n’est pas décroché. Après utilisation du combiné, le réglage antérieur de la sonnerie est rétabli. www.doro.com 19 Français Réglages Fonctions avancées Derrière la trappe au dos du téléphone se trouvent cinq réglages. Ces réglages contrôlent les paramètres techniques pour le raccordement à un PABX, etc. Pour enlever la trappe, appuyez avec un petit tournevis pointu (max. 2.5mm) ou outil similaire dans le trou situé à droite de la trappe. IMPORTANT: Ces réglages doivent être effectués par une personne qualifiée. 1. Réglages système Choisissez si les réglages système peut être changés par l’utilisateur ou non. Les réglages sont verrouillés si le curseur est réglé sur N . (Voir page suivante pour de plus amples informations sur les Réglages système) 2. Prise de Ligne sans Décrocher Choisissez si la fonct ion de Prise de Ligne sans Décrocher doit être active 123 L ou inactive 123 q. 3. Touche R Doit toujours être réglée en position normale ( H ). 4. Numérotation Fréquences Vocales ou Décimales Sélectionnez le mode de numérotation fréquences vocales (♫) ou décimales (...) par le curseur ♫/... Ce réglage doit être en position fréquences vocales pour que l’appareil puisse fonctionner en France Lampe message Sélectionnez le réglage de la lampe message en positionnant le curseur sur: Surtension de ligne (Neon), Inversion de polarité (LED+ / LED-) (le réglage par défaut est NEON). Témoin lumineux de Message en attente Certains standards téléphoniques ont une fonction de Message en attente. Quand un message est en attente et que le poste est libre, le témoin lumineux de sonnerie du téléphone clignote. Cette fonction varie selon le type de standard. Pour toute information, adressez-vous au responsable de votre système PABX. 20 www.doro.com Français Autres Réglages système Ces réglages contrôlent les paramètres techniques pour le raccordement à un PABX. Touche R 1. Le curseur des réglages système ne doit pas être en position N , (voir page 20). 2. Prenez le combiné (ne tenez pas compte de la tonalité) et appuyez sur la touche z et sur *. 3. Appuyez sur 0 . 4. Sélectionnez le temps souhaité ( 1 =100, 2 =300, 3 =600 ms). 5. Appuyez sur la touche z et reposez le combiné. Temps de la pause pour la numérotation des mémoires 1. Le curseur des réglages système ne doit pas être en position N , (voir page 20). 2. Prenez le combiné (ne tenez pas compte de la tonalité) et appuyez sur la touche z et sur *. 3. Appuyez sur 2 . 4. Sélectionnez le temps souhaité ( 1 =2.0 ou 2 =3.6 s). 5. Appuyez sur la touche z et reposez le combiné. Temps de la pause en numétoration directe Il s'agit du temps de pause que le téléphone insère avant de composer le numéro, lorsque la fonction de Prise de ligne sans décrocher est active. 1. Le curseur des réglages système ne doit pas être en position N , (voir page 20). 2. Prenez le combiné (ne tenez pas compte de la tonalité) et appuyez sur la touche z et sur *. 3. Appuyez sur 3 . 4. Sélectionnez le temps souhaité ( 1 =2.0 ou 2 =3.1 s). 5. Appuyez sur la touche z et reposez le combiné. Format d’heure (12 ou 24 heures) 1. Le curseur des réglages système ne doit pas être en position N , (voir page 20). 2. Prenez le combiné (ne tenez pas compte de la tonalité) et appuyez sur la touche z et sur *. 3. Appuyez sur 4 . 4. Sélectionnez le format souhaité ( 1 =12 h ou 2 =24 h). 5. Appuyez sur la touche z et reposez le combiné. www.doro.com 21 Français Autres Dépannage Vérifiez que le câble téléphonique est en bon état et qu’il est branché correctement. Débranchez tout autre matériel, rallonges et téléphones. Si l’appareil fonctionne alors normalement, la panne est dûe au matériel additionnel. Testez le matériel sur une autre ligne téléphonique (comme celle d’un voisin). Si le matériel fonctionne sur ce raccordement, cela signifie que votre propre raccordement téléphonique est défectueux. Signalez la panne à votre opérateur de réseau. Au cas où les mesures sus-mentionnées n’ont pas d’effet, veuillez contacter votre revendeur. Garantie et S.A.V. Cet appareil est garanti un an à partir de sa date d’achat, la facture faisant foi. La réparation dans le cadre de cette garantie sera effectuée gratuitement, pièces et main d’oeuvre. La garantie est valable pour un usage normal de l’appareil tel qu’il est défini dans la notice d’utilisation. Les fournitures utilisées avec l’appareil ne sont pas couvertes par la garantie. Sont exclues de cette garantie les détériorations dues à une cause étrangère à l’appareil. En particulier la garantie ne s’appliquera pas si l’appareil a été endommagé à la suite d’un choc ou d’une chute, d’une fausse manoeuvre, d’un branchement non conforme aux instructions mentionnées dans la notice ou aux prescriptions de l’ART (-Autorité de Régulation des Télécommunications), de l’effet de la foudre, de surtensions électriques ou électrostatiques, d’une protection insuffisante contre l’humidité, la chaleur ou le gel. En cas de panne, adressez-vous au S.A.V. de votre revendeur ou installateur. Pour la France En tout état de cause, la garantie légale pour vices cachés s’appliquera conformément aux articles 1641 et suivants du Code Civil. Si vous avez des soucis d’utilisation, contactez notre Service d ’Assistance Téléphonique au 08 92 68 90 18 (N ° Audiotel --2 ,21F /mn ). 22 www.doro.com Français www.doro.com 23 Deutsch Installation Anschliessen 1. Batterien anschliessen. Siehe unten. 2. Schliessen Sie das Telefonkabel an eine geeignete Telefonsteckdose und an den Anschluss T am Telefon an. 3. Schliessen Sie das Spiralkabel an den Hörer und an den Anschluss q am Telefon an. 4. Platzieren Sie die Kabel in die Nut an der Unterseite des Telefons. 5. Heben Sie den Hörer ab und vergewissern Sie sich, dass ein Freizeichen zu hören ist. Batterien Damit das Telefon korrekt funktionert, brauchen Sie drei 1,5V Batterien vom Typ AAA (nicht enthalten). Wenn die Batterieleistung nachlässt, zeigt das Display Mo b A t t . Tauschen Sie die Batterien dann so schnell wie möglich aus! Benutzen Sie nur Batterien von guter Qualität. 1. Ziehen Sie das Telefonkabel ab. 2. Nehmen Sie die Abdeckung ab, indem Sie einen schmalen Schraubendreher (max. Ø 2,5mm) oder ähnliches in das Loch rechts von der Abdeckung drücken. 3. Setzen Sie die Batterien, wie auf den Markierungen gezeigt, ein. 4. Setzen Sie die Abdeckung wieder ein. Zeiteinstellung Das Display zeigt die Uhrzeit, wenn das Telefon nicht benutzt wird. 1. Hörer abnehmen (Freizeichen nicht beachten) und drücken Sie die Tasten z und *. 2. Drücken Sie # . Wenn der 12- Stundenmodus eingestellt ist, können Sie mit den Tasten * und # zwischen AM/PM wechseln. 3. Geben Sie die Zeit ein (SS-MM-ss). 4. Legen Sie den Hörer auf. Die Zeit ist eingestellt. Hörgerät Der Hörer hat eine eingebaute Hörhilfe, wenn Sie ein Hörgerät während des Gesprächs benutzen wollen. Schliessen Sie die Telefonspule an den Hörer an, indem Sie das Hörgerät auf die T-Stellung schalten. 24 www.doro.com Deutsch Installation Headset anschliessen Ein Headset kann am Anschluss mit der Markierung = auf der Unterseite des Telefons angeschlossen werden. Wenn ein Headset angeschlossen ist, wird die Headsettaste = zum Abheben und Auflegen benutzt (enspricht dem Abeheben und Auflegen des Hörers). Wenn das Headset angeschlossen ist, funktioniert der Lautsprecher nicht. Achtung! Das Original-Headset DORO wurde mit dem DORO Congress 200 getestet. Es ist möglich, andere Headsets anzuschliessen. Funktion und Klangqualität können dann jedoch nicht garantiert werden.. Im schlimmsten Fall können andere Headsets das Telefon beschädigen. Die Garantie gilt in diesem Fall nicht. Anruf/Gespräch mit Headset 1. Drücken Sie die Headset-Taste = . Das Freizeichen ertönt und die Anzeige an der Headset-Taste leuchtet. 2. Geben Sie die gewünschte Telefonnummer ein. 3. Drücken Sie die Headset-Taste um das Gespräch zu beenden und aufzulegen. Extraausrüstung anschliessen Auf der Unterseite des Telefons befindet sich ein Anschluss 8, an dem andere Geräte, wie z.B. ein schnurloses Telefon oder ein Modem usw. angeschlossen werden können. Etiketten/Abdeckung Die Etiketten unter der Abdeckung können geändert werden. Die hintere Abdeckung ist mit zwei Plastkstücken befestigt, die von 2 Schrauben gehalten werden. Diese Schrauben müssen entfernt werden. Unter der hinteren Abdeckung könne Logos oder andere Informationen platziert werden. Praktisch, wenn die Rückseite des Telefons zum Kunden/Besucher wie z.b. an einer Rezeption zeigt. www.doro.com 25 Deutsch Bedienung Wahlwiederholung Wenn eine Nummer besetzt ist, oder wenn die zuletzt eingegebene Nummer noch einmal gewählt werden soll, heben Sie den Hörer ab(oder drücken Sie /= ), und drücken Sie die Wahlwiederholungstaste r. Timer Kurz nach Beginn eines Gesprächs wird ein Timer im Display angezeigt. Hier können Sie sehen, wie lange das Gespräch andauert. Mikrofonstummschaltung Das Mikrofon kann während des Gesprächs mit der Taste z abgeschaltet werden. Nochmaliges Drücken der Taste aktiviert das Mikrofon wieder. Ein Indikator an der Taste zeigt an, wenn das Mikrofon ausgeschaltet ist. Lautsprecher 1. Drücken Sie . Der Lautsprecher wird eingeschaltet und die Anzeige an der Taste leuchtet. 2. Wählen Sie die gewünschte Telefonnummer. Stellen Sie die gewünschte Laustärke mit dem Regler an der Unterseite des Telefons ein. 3. Wenn der Teilnehmer antwortet, heben Sie den Hörer ab. Achtung! Das Mikrofon befindet sich im Hörer. Wenn ein Headset angeschlossen ist, funktioniert der Lautsprecher nicht. Gespräch parken Mit der Taste h können Sie ein Gespräch parken. Das Gespräch kann dann von jedem gewünschten Telefon (das an der selben Linie angeschlossen ist), angenommen werden. 1. Ein Gespräch läuft. 2. Drücken Sie die Taste h um das Gespräch zu parken. Legen Sie den Hörer auf. 3. Um das Gespräch wieder aufzunehmen, heben Sie den Hörer des gewünschten Telefons ab. 26 www.doro.com Bedienung Deutsch Lauthören Das Rufsignal kann mit dem Umschalter an der Rückseite des Telefons eingestellt werden. Dadurch wird das laufende Gespräch auch über den Lautsprecher wiedergegeben und andere Personen im Raum können am Gespräch teilnehmen. 1. Rufen Sie, wie gewohnt, die gewünschte Nummer. 2. Wenn die Verbindung steht, drücken Sie die Taste . Die Lauthörfunktion wird eingeschaltet. DieAnzeige an der Taste leuchtet. 3. Stellen Sie die Lautstärke mit den Reglern an der Seite ein. 4. Um die Lauthörfunktion auszuschalten, drücken Sie die Taste erneut. Direktwahl Sie können den Lautsprecher auch schon vor dem Anruf einschalten. Geben Sie die Nummer mit der Tastatur, der Schnellwahl oder mit r direkt ein, ohne den Hörer abzunehmen oder /= zu drücken. Das Gespräch wird über das Headset (wenn angeschlossen) oder über den Lautsprecher geschaltet, und die Nummer danach gewählt. Lautstärke Mit der Lautstärkeregelung kann die Lautsärke im Hörer/Headset während des Gesprächs eingestellt werden. Drücken Sie die Taste $ um die Lautstärke zu erhöhen, und die Taste £ um die Lautstärke zu senken. Die Lautstärke wird mit eingestellt (an der Unterseite). Weitere Dienste Dieses Telefon kann mit den Tasten R , * und # weitere Dienste ausführen. Welche Dienste zur Verfügung stehen, hängt vom Angebot Ihres Netzbetreibers ab. www.doro.com 27 Deutsch Einstellungen Speicher Das Telefon kann 20 Schnellwahltasten speichern. Wenn eine Nummer auf einer dieser Tasten gespeichert ist, kann diese mit nur eine Taste gewählt werden. Die Schnellwahltasten sind mit M1-M20 numeriert. Schnellwahl speichern 1. Hörer abnehmen und z drücken (Freizeichen nicht beachten). 2. Wählen Sie die Schnellwahltaste (M1-M20), indem Sie die jeweilige Taste drücken. 3. Geben Sie die Telefonnummer mit den Zifferntasten ein (max. 21 Zeichen). Pause = r. 4. Drücken Sie z nochmals. Legen Sie den Hörer auf. Die Nummer ist gespeichert. Wählen mit Schnellwahl 1. Hörer abnehmen (oder drücken Sie /= ) und warten Sie auf das Freizeichen. 2. Wählen Sie die Schnellwahltaste (M1-M20), indem Sie die jeweilige Taste drücken Wenn eine Nummer geändert werden soll, speichern Sie die neue Nummer über der alten Nummer. Rufsignal einstellen 1. Hörer abnehmen (Freizeichen nicht beachten) z und # drücken. 2. Wählen Sie das gewünschte Rufsignal mit den Tasten 0 - 9 wie unten erklärt. 3. Drücken Sie die Taste z und legen Sie den Hörer auf. Das Rufsignal ist eingestellt. Zifferntaste Melodietyp Rufsignal 1.......................................... Melodie A....................... Leise 2.......................................... Melodie A....................... Normal 3.......................................... Melodie A....................... Laut 4.......................................... Melodie B....................... Leise 5.......................................... Melodie B....................... Normal 6 (Voreinstellung)................ Melodie B....................... Laut 7.......................................... Melodie C ...................... Leise 8.......................................... Melodie C ...................... Normal 9.......................................... Melodie C ...................... Laut 0.......................................... Aus * .............................. - * Mit der Taste 0 wird das Rufsignal ausgeschaltet, bis der Hörer das nächstemal abgenommen wird. Danach wird das Rufsignal wieder auf den voreingestellten Wert zurückgesetzt. 28 www.doro.com Einstellungen Deutsch Technische Information Hinter der Abdeckung an der Unterseite des Telefons befinden sich mehrere Schalter. Mit diesen Schaltern kann man die technischen Parameter für den Anschluss an z.B. eine Vermittlung usw. einstellen. Nehmen Sie die Klappe ab, indem Sie einen kleinen Schraubendreher (max. Ø 2,5mm) oder ähnliches in das Loch rechts von der Klappe drücken. ACHTUNG: Diese Schalter dürfen nur von dazu befugtem Personal eingestellt werden. 1. Systemeinstellungen Wählen Sie aus, ob die Systemeinstellungen geändert werden sollen N oder nicht. Auf der folgenden Seite finden Sie weitere Informationen. 2. Direktwahl Wählen Sie aus, ob die Direktwahl aktiviert werden sollen 123 L oder nicht 123 q. 3. R-Tastentechnik Muss immer auf der Normalstellung stehen( H ). 4. Ton/Puls Wählen Sie die Wahlmathode Ton(♫) oder Puls (...) mit dem Schalter ♫/... Diese Einstellung wird normalerweise nicht benutzt. Nachricht wartet Drei Arten von Nachricht wartet können eingestellt werden: Neon/LED+/LED-. Anzeige für Nachricht wartet Einige Vermittlungen haben eine „Nachricht wartet“ Funktion. Das Telefon kann dies durch die Rufsignalanzeige signalisierren, die bei einer Nachricht im Standbymodus blinkt. Die Funktion ist bei jeder Vermittlung unterschiedlich. Fragen Sie Ihren Systemadministrator. www.doro.com 29 Deutsch Allgemeines Systemeinstellungen In den Systemeinstellungen können Parameter für den Anschluss an eine Vermittlungsstelle eingegeben werden. R-Taste Zeit Diese Einstellung wird normalerweise nicht benutzt. 1. Der Schalter für Systemeinstellungen darf nicht auf N stehen, siehe Seite 29. 2. Hörer abnehmen (Freizeichen nicht beachten) z und * drücken. 3. Drücken Sie 0 . 4. Gewünschte Einstellung wählen ( 1 =100, 2 =300, 3 =600 ms). 5. Drücken Sie z und legen Sie den Hörer auf . Pausezeit für Speicher 1. Der Schalter für Systemeinstellungen darf nicht auf N stehen, siehe Seite 29. 2. Hörer abnehmen (Freizeichen nicht beachten) z und * drücken. 3. Drücken Sie 2 . 4. Gewünschte Einstellung wählen ( 1 =2.0 und 2 =3.6 Sek.). 5. Drücken Sie z und legen Sie den Hörer auf. Wartezeit bei Direktwahl Die Zeit, die das Telefon wartet, bevor die Telefonnummer gewählt wird, wenn die Direktwahl aktiviert ist. 1. Der Schalter für Systemeinstellungen darf nicht auf N stehen, siehe Seite 29. 2. Hörer abnehmen (Freizeichen nicht beachten) z und * drücken. 3. Drücken Sie 3 . 4. Gewünschte Einstellung wählen ( 1 =2.0 und 2 =3.1 Sek.). 5. Drücken Sie z und legen Sie den Hörer auf . 12 oder 24-Stundenformat 1. Der Schalter für Systemeinstellungen darf nicht auf N stehen, siehe Seite 29. 2. Hörer abnehmen (Freizeichen nicht beachten) z und * drücken. 3. Drücken Sie 4 . 4. Gewünschte Einstellung wählen ( 1 =12 Std. und 2 =24 Std.). 5. Drücken Sie z und legen Sie den Hörer auf. 30 www.doro.com Allgemeines Deutsch Wenn das Telefon nicht funktioniert Vergewissern Sie sich, dass das Telefonkabel unbeschädigt und korrekt eingesteckt ist. Entfernen Sie eventuelle Zusatzausrüstung, Verlängerungskabel und andere Telefone. Wenn das Gerät jetzt funktioniert, liegt der Fehler woanders. Versuchen Sie, das Telefon z.B. bei einem Nachbarn anzuschliessen. Wenn das Gerät dort funktioniert, ist Ihr Telefonanschluss vielleicht gestört. Rufen Sie die Störungsstelle an. Wenn der Fehler dadurch nicht beseitigt wird, fragen Sie Ihren Händler. Garantie Dieses Gerät hat die Warengarantiezeit von einem Jahr. Bei eventuellen Reklamationen wenden Sie sich bitte an Ihren Händler. Der Garantieservice wird nur mit gültiger Kaufquittung bzw. Rechnungskopie ausgeführt. Die Garantie gilt nicht, wenn der Fehler aufgrund eines Unglücks oder ähnlichem entstanden ist. Weiterhin gilt die Garantie nicht bei Gewaltanwendung, eingedrungenen Flüssigkeiten, schlechter Wartung, Missbrauch oder anderer Fehler des Käufers. Die Garantie verfällt auch, wenn die Seriennummer des Telefons vernichtet wurde sowie bei Schäden die durch Gewitter oder andere Spannungsvariationen entstanden sind. Bei Gewitter sollte das Telefon zur Sicherheit von der Steckdose getrennt werden. www.doro.com 31 Italiano Installazione Collegamento 1. Collegare le batterie. Vedere sotto. 2. Collegare il cavo di linea alla presa T sotto il telefono e alla presa a muro della rete telefonica. 3. Collegare il cavo spiralato al microtelefono e alla presa q sul telefono. 4. Posizionare i cavi nelle scanalature sotto il telefono. 5. Sollevare il microtelefono e attendere il segnale acustico di linea libera. Batterie Affinché il telefono funzioni correttamente, sono necessarie tre batterie di tipo AAA da 1,5 V (non incluse). Quando le batterie si stanno scaricando, sul display viene indicato Mo bAtt. Sostituire le batterie quanto prima. Utilizzare unicamente batterie di alta qualità. 1. Estrarre il filo di linea del telefono. 2. Togliere il coperchio premendo con un cacciavite di piccole dimensioni (Ø max. 2,5 mm) o un attrezzo simile nel foro situato a destra del coperchio. 3. Posizionare le batterie secondo il rispettivo polo positivo e negativo. 4. Riposizionare il coperchio della batteria. Impostazione dell’ora Quando non è in corso l’utilizzo del telefono, il display visualizza un orologio. 1. Sollevare il ricevitore (ignorare il segnale acustico di linea libera) e premere il pulsante z e *. 2. Premere # . Se si sceglie un’impostazione in formato a 12 ore, è possibile selezionare AM/PM utilizzando * e #. 3. Inserire l’ora (HH-MM-SS). 4. Riagganciare (riporre il microtelefono). A questo punto l’orario è impostato. Compatibilità con apparecchi acustici Il telefono è dotato di circuito a induzione incorporato. Selezionare la modalità T sull'apparecchio acustico per consentire l'accoppiamento. 32 www.doro.com Installazione Italiano Collegamento dell'auricolare La presa sotto il telefono contrassegnata con = viene utilizzata per il collegamento di un auricolare. Il pulsante Auricolare = serve per la connessione/disconnessione di una chiamata telefonica (equivale al sollevamento e al riposizionamento del microtelefono) quando è collegato un auricolare. Quando l’auricolare è collegato, l’altoparlante di attesa non funziona. IMPORTANTE Gli auricolari DORO originali sono testati e idonei al modello DORO Congress 200. E’ possibile utilizzare altri tipi e marche di auricolari, sebbene non possa essere garantita una qualità di funzionamento e del suono ottimale. La garanzia del telefono non coprirà eventuali danni causati dall’installazione di auricolari non compatibili o di marche diverse da Doro. Esecuzione di una chiamata con l’auricolare 1. Premere il pulsante Auricolare = . Nell'auricolare verrà udito il segnale acustico di linea libera e il LED posto di fianco al pulsante Auricolare si accenderà. 2. Comporre il numer telefonico desiderato. 3. Premere nuovamente il pulsante Auricolare per terminare la chiamata. Collegamento di apparecchi supplementari Sulla parte laterale del telefono è presente una presa contrassegnata con 8 che può essere utilizzata per collegare apparecchi telefonici supplementari alla stessa linea, ad esempio un telefono cordless, un modem, ecc. Etichette/coperchio di protezione È possibile cambiare le etichette poste sotto i coperchi di protezione. Il coperchio posteriore è fissato per mezzo di 2 elementi in plastica, a loro volta trattenuti da 2 viti che devono essere rimosse per prime. Al di sotto di tale coperchio è possibile inserire un logo o altre informazioni. Questo risulta particolarmente utile nei casi in cui il lato posteriore del telefono va a trovarsi di fronte al cliente o al visitatore, ad esempio sul banco di una reception. www.doro.com 33 Italiano Funzionamento Pulsante Ripetizione numero Se il numero composto è occupato o se si desidera richiamare l’ultimo numero composto, sollevare il ricevitore (o premere /= ) e premere il pulsante Ripetizione numero r. Timer Dopo la risposta a una chiamata, viene visualizzato un timer sul display per valutarne la durata. Pulsante Attesa Durante una chiamata è possibile silenziare il microfono del microtelefono/ dell'auricolare premendo il pulsante Silenziamento z . Per riattivare il microfono, premere nuovamente il pulsante Silenziamento. Il LED posto di fianco al pulsante lampeggia quando il microfono è silenziato. Altoparlante di attesa 1. Premere per attivare l’altoparlante. Il LED si accende. 2. Comporre il numero telefonico. Regolare il volume, se necessario, con l’apposito comando situato sulla parte inferiore. 3. Dopo la risposta alla chiamata, sollevare il microtelefono. IMPORTANTE Il microfono è presente soltanto nel microtelefono. Quando l’auricolare è collegato, la funzione altoparlante di attesa non funziona. Pulsante Attesa Premere il pulsante Attesa h per mettere in attesa una chiamata. Il LED posto di fianco al pulsante si accenderà. La chiamata può essere ripresa premendo nuovamente il pulsante Attesa o da un altro telefono collegato alla stessa linea. 1. Quando è in linea una chiamata. 2. Premere il pulsante h per mettere in attesa la chiamata telefonica. Riporre il microtelefono, se utilizzato. 3. Per riprendere la chiamata telefonica, sollevare qualsiasi ricevitore. 34 www.doro.com Italiano Funzionamento Ascolto di gruppo Nel corso di una chiamata, è possibile attivare la funzione Ascolto di gruppo premendo .Con l’attivazione di questa funzione, la chiamata in corso può essere udita attraverso il microtelefono/l’auricolare e anche attraverso l’altoparlante dell’unità base. In questo modo, chiunque si trovi nella stessa stanza dell’unità base potrà ascoltare entrambe le parti e seguire la conversazione. 1. Comporre il numero come al solito. 2. Quando la chiamata è in linea, premere . L’Ascolto di gruppo viene attivato e la conversazione viene udita attraverso l’altoparlante. L’indicatore situato accanto al pulsante si accende. 3. Regolare il volume, se necessario, con l'apposito comando situato lateralmente. 4. Per disattivare la funzione Ascolto di gruppo, premere nuovamente . Connessione diretta Per semplificare l’esecuzione di una chiamata, è possibile comporre il numero con i pulsanti numerici, le memorie a un tasto o r direttamente, senza sollevare il microtelefono o premere /= . La chiamata viene connessa all’auricolare (se collegato) o all’altoparlante di attesa e poi viene composto il numero. Controllo volume Durante una chiamata è possibile aumentare o diminuire il livello del volume dell’auricolare utilizzando i pulsanti di regolazione del volume (5 toni). Utilizzare il pulsante di aumento volume $ per alzare il volume e il pulsante di riduzione volume £ per abbassare il volume. Per regolare il volume dell’altoparlante, utilizzare parte inferiore del telefono). (situato sulla Servizi di rete optional Premere il pulsante Recall R seguito dal numero dell’interno nel caso in cui si sia collegati ad un centralino telefonico interno. L’accesso ai servizi di rete supplementari è disponibile utilizzando il pulsante Recall R e * tasti # . Per ulteriori informazioni, contattare l’operatore di rete. www.doro.com 35 Italiano Impostazioni Memoria Questo telefono è dotato di 20 memorie per la composizione a un tasto. Quando un numero telefonico viene memorizzato in una postazione di memoria, per effettuare la chiamata è sufficiente premere un solo pulsante. Le memorie a un tasto sono numerate da M1 a M20. Memorizzazione dei numeri a un tasto 1. Sollevare il ricevitore e premere il pulsante z (ignorare il segnale acustico di linea libera). 2. Selezionare M1-M20 premendo il pulsante corrispondente. 3. Comporre il numero telefonico (fino a 21 cifre) utilizzando i tasti numerici. Pausa = r. 4. Premere nuovamente z . Riagganciare (riporre il microtelefono). A questo punto il numero telefonico è memorizzato. Utilizzo della composizione a un tasto 1. Sollevare il ricevitore (o premere /= ) e attendere il segnale acustico di linea libera. 2. Selezionare M1-M20 premendo il pulsante corrispondente. In caso di modifica di un numero, memorizzare il nuovo numero nella posizione del vecchio. 36 www.doro.com Impostazioni Italiano Suoneria 1. Sollevare il ricevitore (ignorare il segnale acustico di linea libera) e premere il pulsante z e # . 2. Selezionare il segnale di squillo premendo i tasti numerici 0 - 9 in base alla tabella sotto riportata. 3. Premere il pulsante z e riporre il ricevitore. A questo punto il segnale di squillo è impostato. Tasto/impostazione Tipo di melodia Livello suoneria 1.......................................... Melodia A....................... Basso 2.......................................... Melodia A....................... Normale 3.......................................... Melodia A....................... Alto 4.......................................... Melodia B....................... Basso 5.......................................... Melodia B....................... Normale 6 (impostazione di fabbrica) Melodia B....................... Alto 7.......................................... Melodia C ...................... Basso 8.......................................... Melodia C ...................... Normale 9.......................................... Melodia C ...................... Alto 0.......................................... Off * ............................... - * Se viene selezionato il tasto 0 , il segnale di squillo verrà disattivato fino alla volta successiva in cui verrà risollevato il ricevitore. Dopo tale operazione, il segnale di squillo ritornerà all’impostazione precedente. www.doro.com 37 Italiano Impostazioni Informazioni tecniche Dietro il coperchio situato nella parte sottostante il telefono, si trovano alcuni interruttori. Questi determinano alcuni parametri tecnici per il collegamento del telefono, ad esempio, a un centralino telefonico interno (PBX). Togliere il coperchio premendo con un cacciavite di piccole dimensioni (Ø max. 2,5 mm) o un attrezzo simile nel foro situato a destra del coperchio. NB: Tali interruttori devono essere regolati esclusivamente da personale qualificato. 1. Impostazioni di sistema Consente di scegliere se le impostazioni di sistema possono essere modificate N o meno. Per maggiori informazioni sulle impostazioni di sistema, consultare la pagina seguente. 2. Connessione diretta Consente di scegliere se la connessione diretta deve essere attivata 123 q. 123 L o meno 3. Tecnologia del pulsante Recall (R) Deve essere sempre impostato nella posizione normale( H ). 4. Composizione a toni/impulsi Consente di scegliere il metodo di composizione a toni (♫) o a impulsi (...) utilizzando l’interruttore ♫/.... Messaggio in attesa Consente di scegliere tra tre tipi di indicatori per la funzione Messaggio in attesa: Neon/LED+/LED-. Indicatore di Messaggio in attesa Alcuni sistemi PBX utilizzano una funzione chiamata Messaggio in attesa. È possibile fare sì che il telefono indichi la presenza di un messaggio in attesa facendo lampeggiare l’indicatore del segnale di squillo in modalità standby. Questa funzione opera in modo differente a seconda del PBX in questione. Per ulteriori informazioni, si prega di contattare l’addetto al controllo del sistema. 38 www.doro.com Italiano Impostazioni Impostazioni di sistema È possibile impostare nel programma vari parametri per il collegamento del telefono a un PBX. Regolazione del pulsante Recall (R) Normalmente non è necessario modificare questa impostazione. 1. L’interruttore Impostazione di sistema non deve essere in posizione N , vedere pagina 38. 2. Sollevare il microtelefono (ignorare qualsiasi annuncio di rete) e premere z e *. 3. Premere 0 . 4. Selezionare l’impostazione desiderata ( 1 =100, 2 =300, 3 =600 ms). 5. Inserire z e riagganciare. Regolazione del tempo di pausa in memoria 1. L’interruttore Impostazione di sistema non deve essere in posizione N , vedere pagina 38. 2. Sollevare il microtelefono (ignorare qualsiasi annuncio di rete) e premere z e *. 3. Premere 2 . 4. Selezionare l’impostazione desiderata ( 1 =2,0 e 2 =3,6 s). 5. Inserire z e riagganciare. Regolazione del tempo di attesa di composizione È il tempo atteso dal telefono prima effettuare la composizione quando la composizione diretta è attiva. 1. L’interruttore Impostazione di sistema non deve essere in posizione N , vedere pagina 38. 2. Sollevare il microtelefono (ignorare qualsiasi annuncio di rete) e premere z e *. 3. Premere 3 . 4. Selezionare l’impostazione desiderata ( 1 =2,0 e 2 =3,1 s). 5. Inserire z e riagganciare. www.doro.com 39 Italiano Varie Formato a 12 o a 24 ore 1. L’interruttore Impostazione di sistema non deve essere in posizione N , vedere pagina 38. 2. Sollevare il microtelefono (ignorare qualsiasi annuncio di rete) e premere z e *. 3. Premere 4 . 4. Selezionare l’impostazione desiderata ( 1 =12 ore e 2 =24 ore). 5. Inserire z e riagganciare. Ricerca e individuazione guasti Verificare che il cavo telefonico non sia danneggiato e che la spina sia correttamente inserita. Scollegare qualsiasi altro apparecchio eventualmente collegato. Se il problema viene risolto, il difetto può essere attribuito all'altro apparecchio. Provare l’apparecchio con una linea del cui funzionamento si è certi. Se il prodotto funziona, il difetto può essere attribuito alla linea. Qualora si riscontrino ulteriori difficoltà, contattare il punto d’acquisto. Garanzia Il presente prodotto è garantito per un periodo di 12 mesi a decorrere dalla data di acquisto. Per avere diritto a qualsiasi servizio o assistenza durante il periodo di garanzia è necessario presentare il relativo documento di acquisto. La presente garanzia non verrà applicata ad eventuali guasti causati da incidenti o infortuni o danni simili, eventuale penetrazione di liquidi, negligenza, uso anomalo o qualsiasi altra circostanza simile da parte dell’acquirente. Inoltre, la presente garanzia non verrà applicata ad eventuali guasti causati da temporali o da qualsiasi altra variazione della tensione. La presente garanzia non influisce in alcun modo sui diritti legali del proprietario (come misura precauzionale, si consiglia di scollegare il telefono durante i temporali). 40 www.doro.com Instalacja Polski Podłączanie 1. Włóż baterie. Patrz niżej. 2. Podłącz przewód telefoniczny do gniazdka sieci telefonicznej oraz do gniazdka telefonu oznaczonego symbolem T. 3. Podłącz przewód spiralny do słuchawki do gniazdka oznaczonego q, które znajduje się na telefonie. 4. Ułóż kable w rowkach pod spodem telefonu. 5. Podnieś słuchawkę i sprawdź, czy słychać ciągły sygnał wybierania. Baterie Do prawidłowej pracy telefon wymaga trzech 1,5-woltowych baterii typu AAA (nie dołączone do zestawu). Gdy baterie będą bliskie wyczerpania, na wyświetlaczu pojawi się napis Mo bAtt. W takim wypadku należy jak najszybciej wymienić baterie. Należy używać wyłącznie baterii wysokiej jakości. 1. Wyjmij przewód linii telefonicznej. 2. Zdejmij osłonę, wciskając mały śrubokręt (o maks. średnicy 2,5 mm) lub podobny przedmiot w otwór po prawej stronie pokrywy. 3. Włóż baterie, zachowując właściwą biegunowość. 4. Ponownie załóż osłonę baterii. Ustawianie godziny Gdy telefon nie jest używany, na wyświetlaczu widoczny jest zegar. 1. Podnieś słuchawkę (zignoruj sygnał wybierania) i naciśnij przyciski z i *. 2. Naciśnij # . Jeśli wybrano tryb 12-godzinny, to za pomocą przycisków * i # można wybierać porę dnia AM/PM. 3. Wprowadź godzinę (GG-MM-SS). 4. Rozłącz się (odłóż słuchawkę). Godzina została ustawiona. Podłączanie aparatu słuchowego Ten telefon jest wyposażony we wbudowaną pętlę indukcyjną. Aby uaktywnić sprzężenie z aparatem słuchowym, należy przełączyć aparat w tryb T. www.doro.com 41 Polski Instalacja Podłączanie zestawu nagłownego Gniazdo na spodzie telefonu, oznaczone = , służy do podłączania zestawu nagłownego. Przycisk zestawu nagłownego = służy do przyłączania/odłączania telefonu od linii (jego naciskanie jest równoważne podnoszeniu i odkładaniu słuchawki), gdy podłączony jest zestaw nagłowny. Gdy podłączony jest zestaw nagłowny, nie działa głośnik. WAŻNE! Oryginalne zestawy nagłowne firmy DORO są prz ystosowane do współpracy z telefonem DORO Congress 200 i zostały z nim przetestowane. Wprawdzie możliwe jest uż ycie zestawów nagłownych innych typów i marek, jednak nie gwarantuje to prawidłowego działania ani uz yskania odpowiedniej jakości dźwięku. Gwarancja na telefon nie obejmuje uszkodzeń powstałych w wyniku uż ycia niez godnych lub niepochodzących od firmy Doro zestawów nagłownych. Nawiązywanie połączenia przy użyciu zestawu nagłownego 1. Naciśnij przycisk zestawu nagłownego = . W słuchawkach będzie słychać sygnał wybierania, a kontrolka obok przycisku zestawu nagłownego zaświeci się. 2. WYBIERZ żądany NUMER. 3. Ponownie naciśnij przycisk zestawu nagłownego, aby zakończyć połączenie. Podłączanie dodatkowych urządzeń Z boku telefonu znajduje się gniazdo, oznaczone 8, za pośrednictwem którego do tej samej linii telefonicznej można podłączyć inne urządzenie, np. telefon bezprzewodowy, modem itp. WAŻNE! Jeśli dodatkowe urządzenie jest podłączone, w tym samym czasie można korz ytać tylko z jednego z nich. Etykiety/osłona ochronna Istnieje możliwość wymiany etykiet znajdujących się pod ochronnymi osłonami. Tylna osłona jest przytwierdzona dwoma elementami plastikowymi, które z kolei są przymocowane dwiema śrubami, które najpierw trzeba odkręcić. Pod tylną osłoną można umieścić logo albo inną informację. Możliwość ta bywa użyteczna, jeśli telefon jest zwrócony tyłem do klienta/gościa, np. na biurku w recepcji. 42 www.doro.com Polski Obsługa Przycisk ponownego wybierania Jeśli wybrany numer jest zajęty albo zachodzi potrzeba ponownego wybrania tego samego numeru, podnieś słuchawkę (lub naciśnij /= ) i naciśnij przycisk ponownego wybierania r. Czas połączenia Po rozpoczęciu rozmowy, po około 5 sekundach na wyświetlaczu pojawia się informacja o czasie. Ułatwia ona kontrolowanie czasu trwania połączenia. Przycisk zawieszania Podczas rozmowy można odłączyć mikrofon słuchawki/zestawu nagłownego - należy w tym celu nacisnąć przycisk wyłączania mikrofonu z . Ponowne naciśnięcie tego przycisku spowoduje uaktywnienie mikrofonu. Gdy mikrofon jest odłączony, kontrolka obok przycisku pulsuje. Włączanie głośnika podczas oczekiwania na połączenie 1. Naciśnij . Głośnik włączy się, a kontrolka zacznie świecić. 2. Wybierz numer telefoniczny. W razie potrzeby wyreguluj głośność za pomocą regulatora pod spodem telefonu. 3. Gdy rozmówca odbierze połączenie, podnieś słuchawkę. WAŻNE! Mikrofon znajduje się tylko w słuchawce. Gdy podłączony jest zestaw nagłowny, głośnik nie działa. Zawieszenie Aby zawiesić połączenie, naciśnij przycisk h. Kontrolka obok przycisku zaświeci się. Połączenie można wznowić, naciskając ponownie ten sam przycisk, albo z innego aparatu podłączonego do tej samej linii. 1. Trwa połączenie. 2. Naciśnij przycisk h, aby zawiesić połączenie. Odłóż słuchawkę, jeśli jest używana. 3. Aby wznowić połączenie, podnieś słuchawkę dowolnego aparatu. www.doro.com 43 Polski Obsługa Odsłuch grupowy Podczas rozmowy można uaktywnić funkcję odsłuchu grupowego, naciskając przycisk . Po uaktywnieniu tej funkcji trwającą rozmowę słychać zarówno w słuchawce/zestawie nagłownym, jak i w głośniku aparatu. W ten sposób wszystkie osoby znajdujące się w tym samym pomieszczeniu co aparat, słyszą obu uczestników rozmowy. 1. Wybierz numer w zwykły sposób. 2. Po nawiązaniu połączenia naciśnij . Odsłuch grupowy uaktywni się i rozmowę będzie słychać w głośniku. Wskaźnik obok przycisku zaświeci się. 3. W razie potrzeby wyreguluj głośność, korzystając z regulatora umieszczonego z boku. 4. Aby wyłączyć funkcję odsłuchu grupowego, ponownie naciśnij . WAŻNE! Zaleca się wyłączanie funkcji odsłuchu grupowego przed odłożeniem słuchawki. Bezpośrednie wybieranie Numer można wybrać bezpośrednio za pomocą przycisków z cyframi, pamięci szybkiego wybierania lub przycisku r, bez podnoszenia słuchawki lub naciskania przycisku /= . W zestawie nagłownym (jeśli jest podłączony) albo w głośniku słychać będzie sygnał wybierania, a następnie zostanie wybrany numer. Patrz również strona 46. Regulacja głośności Za pomocą przycisków regulacji głośności można podczas rozmowy zmniejszać lub zwiększać głośność dźwięku w słuchawce/zestawie nagłownym (dostępnych jest 5 poziomów głośności). Przycisk $ służy do zwiększania głośności, a przycisk £ – do zmniejszania głośności. Do ustawiania głośności głośnika służy regulator (na spodzie telefonu). Dodatkowe usługi sieciowe Aby przenieść połączenie, gdy telefon jest podłączony do centrali abonenckiej, naciśnij przycisk R , a następnie wybierz numer wewnętrzny. Za pomocą przycisków R , *, # można uzyskać dostęp do dodatkowych usług sieci telefonicznej. Więcej informacji na ten temat można uzyskać u operatora sieci. Patrz również strona 46. 44 www.doro.com Polski Ustawienia Pamięć Telefon jest wyposażony w pamięć, w której mieści się 20 numerów wybieranych naciśnięciem jednego przycisku. Aby wybrać numer przechowywany w pamięci, wystarczy nacisnąć tylko jeden przycisk. Pamięci ponumerowane są od M1 do M20. Zapamiętywanie numerów wybieranych jednym przyciskiem 1. Podnieś słuchawkę i naciśnij z (zignoruj sygnał wybierania). 2. Wybierz pamięć M1-M20, naciskając odpowiedni przycisk. 3. Wybierz numer (maksymalnie 22 cyfr) za pomocą przycisków z cyframi. Pauzę wprowadza się przyciskiem r. 4. Ponownie naciśnij z . Rozłącz się (odłóż słuchawkę). Numer został zapamiętany. W prz ypadku zmiany numeru, nowy numer należy zapisać w miejsce starego w sposób podany powyżej Wybieranie jednym przyciskiem 1. Podnieś słuchawkę (lub naciśnij /= ) i poczekaj na sygnał wybierania. 2. Wybierz pamięć M1-M20, naciskając odpowiedni przycisk. Dzwonek 1. Podnieś słuchawkę (zignoruj sygnał wybierania) i naciśnij przyciski z i # . 2. Wybierz sygnał dzwonka, naciskając przyciski z cyframi 0 – 9 , korzystając z poniższej tabeli. 3. Naciśnij przycisk z i odłóż słuchawkę. Sygnał dzwonka został ustawiony. Przycisk/ustawienie Typ melodii Głośność dzwonka 1.......................................... Melodia A....................... Niska 2.......................................... Melodia A....................... Normalna 3.......................................... Melodia A....................... Wysoka 4.......................................... Melodia B....................... Niska 5.......................................... Melodia B....................... Normalna 6 (ust. fabryczne)................ Melodia B....................... Wysoka 7.......................................... Melodia C ...................... Niska 8.......................................... Melodia C ...................... Normalna 9.......................................... Melodia C ...................... Wysoka 0.......................................... Brak *............................. - * Po wybraniu prz ycisku 0 sygnał dzwonka będzie wyłączony, aż do następnego podniesienia słuchawki. Po podniesieniu słuchawki prz ywrócone zostanie ostatnio wybrane ustawienie dzwonka. www.doro.com 45 Polski Ustawienia Informacje techniczne Pod pokrywą na spodzie telefonu znajduje się kilka przełączników. Ustawienie tych przełączników określa parametry techniczne obowiązujące przy podłączaniu telefonu np. do centrali abonenckiej (PBX). Zdejmij osłonę, wciskając mały śrubokręt (o maks. średnicy 2,5 mm) lub podobny przedmiot w otwór po prawej stronie pokrywy. UWAGA: Ustawienie tych przełączników powinni zmieniać wyłącznie wykwalifikowani pracownicy. 1. Ustawienia systemowe Zdecyduj, czy zmiana ustawień systemowych ma być możliwa, czy nie N . Więcej informacji na temat ustawień systemowych można znaleźć na następnej stronie. 2. Bezpośrednie wybieranie Zdecyduj, czy bezpośrednie wybieranie ma być uaktywnione 123 123 q. L, czy nie 3. Działanie przycisku Recall (R) Ten przełącznik zawsze powinien znajdować się w pozycji normalnej ( H ). 4. Wybieranie tonowe/impulsowe Za pomocą przełącznika (♫/... ) należy wybrać tonową (...) ♫ lub impulsową (...) metodę wybierania. Wybór zależy od typu centrali telefonicznej. Wiadomość oczekująca Można wybrać trzy typy wskaźników wiadomości oczekującej: Neon (80-100)/LED+(12V)/LED-(48V). Wskaźnik wiadomości oczekującej W niektórych centralach abonenckich wykorzystywana jest funkcja wiadomości oczekującej (Message Waiting). Telefon może informować o oczekującej wiadomości pulsowaniem wskaźnika dzwonka w trybie gotowości. Funkcja ta działa różnie, w zależności od stosowanej centrali abonenckiej. Więcej informacji można uzyskać od konserwatora systemu. 46 www.doro.com Polski Inne Ustawienia systemowe Istnieje możliwość ustawienia kilku parametrów istotnych przy podłączaniu telefonu do centrali abonenckiej. Stała czasowa przycisku Recall ( R) Zwykle ustawienia tego nie trzeba zmieniać. 1. Przełącznik ustawień systemowych nie może znajdować się w położeniu N , patrz strona 46. 2. Podnieś słuchawkę (zignoruj ewentualne sygnały z sieci) i naciśnij przyciski z i *. 3. Naciśnij 0 . 4. Wybierz odpowiednie ustawienie ( 1 =100, 2 =300, 3 =600 ms). 5. Naciśnij z i odłóż słuchawkę. Czas przerwy w wybieraniu numeru z pamięci 1. Przełącznik ustawień systemowych nie może znajdować się w położeniu N , patrz strona 46. 2. Podnieś słuchawkę (zignoruj ewentualne sygnały z sieci) i naciśnij przyciski z i *. 3. Naciśnij 2 . 4. Wybierz odpowiednie ustawienie ( 1 =2,0 s; 2 =3,6 s). 5. Naciśnij z i odłóż słuchawkę. Czas przed rozpoczęciem wybierania bezpośredniego Czas, przez jaki telefon czeka przed rozpoczęciem bezpośredniego wybierania. 1. Przełącznik ustawień systemowych nie może znajdować się w położeniu N , patrz strona 46. 2. Podnieś słuchawkę (zignoruj ewentualne sygnały z sieci) i naciśnij przyciski z i *. 3. Naciśnij 3 . 4. Wybierz odpowiednie ustawienie ( 1 =2,0 s; 2 =3,1 s). 5. Naciśnij z i odłóż słuchawkę. Format 12- lub 24-godzinny 1. Przełącznik ustawień systemowych nie może znajdować się w położeniu N , patrz strona 46. 2. Podnieś słuchawkę (zignoruj ewentualne sygnały z sieci) i naciśnij przyciski z i *. 3. Naciśnij 4 . 4. Wybierz odpowiednie ustawienie ( 1 =12 h, 2 =24 h). 5. Naciśnij z i odłóż słuchawkę. www.doro.com 47 Polski Inne Rozwiązywanie problemów Należy sprawdzić, czy przewód telefoniczny nie jest uszkodzony i czy jest prawidłowo podłączony. Należy odłączyć wszelkie dodatkowe urządzenia, jeśli są podłączone. Jeśli problem został rozwiązany, uszkodzenie występuje w innym urządzeniu. Aparat należy przetestować z linią telefoniczną, która na pewno jest sprawna. Jeśli aparat będzie działał, to prawdopodobnie uszkodzona jest linia telefoniczna użytkownika. Należy w takim przypadku skontaktować się z operatorem telefonicznym. Jeśli nadal występują problemy, należy skontaktować się z serwisem. Uwagi/Gwarancja na urządzenia zakupione w Polsce Produkt ten jest objęty 12-miesięczną gwarancją, liczoną od daty zakupu. Warunkiem skorzystania z serwisu i pomocy technicznej w okresie gwarancji jest przedstawienie kopii dowodu zakupu. Gwarancja nie obejmuje uszkodzeń powstałych w wyniku wypadku lub podobnych zniszczeń, spowodowanych przedostaniem się płynu do wnętrza aparatu, niedbałością, niewłaściwym użytkowaniem lub innymi przyczynami leżącymi po stronie nabywcy. Ponadto gwarancja nie obejmuje uszkodzeń spowodowanych przez burze i inne skoki napięcia. Gwarancja w żaden sposób nie wpływa na ustawowe uprawnienia nabywcy. (Ze względów bezpieczeństwa zaleca się odłączanie telefonu podczas burzy.) 48 www.doro.com www.doro.com 49 50 www.doro.com www.doro.com 51 www.doro.com