1
Operator's
Manual
/
25cc/1.5 cu. in. 2-Cycle
GASOLINE
U
EDGER
Model No.
358.773110
WARNING:
Read and follow all Safety Rules and Operating
Instructions before first use of this product.
For answers to your questions about this product: Call 7
am-7 pm, Mon.-Sat., or 10 am-7 pm, Sun.
1-800-235-5878
Sears, Roebuck
530088961
10/12/00
and Co., Hoffman
{Hoo,s listed are Central Time)
Estates, IL 60179 U.S.A.
Warranty Statement
Safety Rules
Assembly
Operation
Maintenance
Service & Adjustments
2
2
5
6
9
10
Storage
Troubleshooting
Table
Emissions Statement
Illustrated Parts List
Spanish
Parts and Ordering
12
14
15
17
20
Back
FULL ONE YEAR WARRANTY ON CRAFTSMAN ® EDGER
For one year from the date of purchase, when this Craftsman Edger is maintained, lubricated, and tuned up according to the operating and maintenance instructions in the Operator's Manual, Sears will repair, free of charge, any defect in materials or workmanship.
If this Edger is used for commercial purposes, this warranty applies for only 90 days
from the date of purchase,
If this Edger is used for rental purposes, this warranty applies for only 30 days from
the date of purchase.
THIS WARRANTY DOES NOT COVER:
Expendable items which become worn during normal use, such as rotary and/or edger blades, blades guides, blade adaptors, air cleaners, and spark plugs. Repairs
necessary because of operator abuse or negligence, including bent crankshafts and
the failure to maintain the equipment according to the instructions contained int he
operator's manual.
This warranty applies only while this product is in use in the United States.
WARRANTY SERVICE IS AVAILABLE BY RETURNINGTHE CRAFTSMANEDGER TO THE
NEAREST Sears SERVICE CENTER IN THE UNITED STATES.
This warranty gives you specific legal rights, and you may also have other rights
which vary from state to state.
Sears, Roebuck and Co., D/817 WA, Hoffman Estates, IL 60179
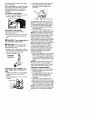
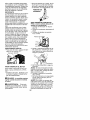
OPERATOR SAFETY
• Dress properly, Always wear safety
glasses or similar eye protection
when operating, or performing maintenance on your unit (safety glasses
are available).
• Always wear face or dust mask if operation is dusty,
• Always wear heavy, long pants, long
sleeves, boots, and gloves. Wearing safety leg guards is recommended.
• Always wear foot protection. Do not
go barefoot or wear sandals.
• Secure hair above shoulder length
Secure or remove loose clothing or
clothing with loosely hanging ties,
straps, tassels, etc. They can be
caught in moving parts.
• Being fully covered also helps protect you from debris and pieces of
toxic plants thrown by spinning
blade.
• Stay alert. Do not operate when you
are tired, ill, upset, or under the influ-
z_
d_I_WARNING: When using gardening appliances, basic safety precautions must always be followed to reduce the risk of fire and serious injury.
Read and follow all instructions.
This power unit can be dangerous!
Operator is responsible for following
instructions and warnings on unit and
in manual, Read entire Operator's
Manual before using unit! Be thoroughly familiar with the controls and
the proper use of the unit, Restrict the
use of this unit to persons who have
read, understand and will follow the
instructions and warnings on the unit
and in the manual, Never allow children to operate this unit. Close attention is necessary when used near children.
INFORMATION
ON THE UNIT
2
enceofalcohol,
drugs,ormedication.Watch
whatyouaredoing;use
common
sense.
• Wearhearing
protection.
• Never
startorruninsideaclosed
roomorbuilding.
Breathing
exhaust
•
fumes can kill.
• Keep handles free of oil and fuel.
• Always use the handle.
UNIT/MAINTENANCE
SAFETY
• Disconnect the spark plug before
performing maintenance (except
carburetor adjustments).
• Inspect entire unit before each use.
Replace damaged parts. Check for
fuel leaks. Make sure all fasteners
are in place and securely fastened.
• Maintain the unit according to recommended procedures.
• Throw away blades that are bent,
warped, cracked, broken, or damaged in any other way. Replace
•
•
•
•
•
parts that are cracked, chipped, or
damaged before using the unit.
Use only recommended Craftsman
parts and accessories. Never use
wire, wire rope, string, flailing devices, etc.
Be sure the blade stops turning
when the engine idles (see CARBURETOR ADJUSTMENTS).
Remove the blade before making
carburetor adjustments. Hold the
unit by hand. Do not make carburetor adjustments from the blade side
of the unit.
Keep others away when making carburetor adjustments.
Never start the unit with the gearbox
removed. The clutch can fly off and
cause serious injury.
Have all maintenance and service
not explained in this manual performed by a Sears Service Center.
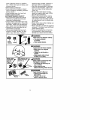
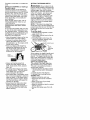
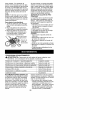
_IkWARNING
Blade can throw objects violently,
• You can be blinded
or injured,
• Wear safety glasses.
WARNING
Hazard zone for thrown objects
• Blade can throw objects
violently.
• Others can be blinded or
injured.
• Keep people and animals
50 feet (15 m) away.
Blade rotates
afterthe
Allowblade tostop
beforeremovingit
fromtheCUL
_WARNING
--Blade rotates momentarily after
the trigger is released,
• The blade can seriously cut
you or others.
* Allow blade to stop
before removing it from the cut.
_IkWARNING
Read Operator's Manual.
• Follow all warnings and
instructions.
• Failure to do so can
result in serious injury.
3
EDGING SAFETY
TRANSPORTING AND STORAGE
• Stop unit before leaving work area.
• Allow unit to cool, run fuel out of the
fuel tank, and secure the unit before
storing or transporting it in a vehicle.
• Before storing, use up fuel left in the
carburetor by starting the unit and
letting it run until it stops. Always allow the unit to cool before storage.
• Store unit and fuel in area where
fuel vapors cannot reach sparks or
open flames from water heaters,
electric motors or switches, furnaces, etc.
• Store unit so blade cannot accidentally cause injury.
• Store unit out of reach of children.
If situations occur which are not covered in this manual, use care and
good judgment. If you need assistance, call 1_800-235-5878.
SPECIAL NOTICE: This unit is not
equipped with a temperature limiting
muffler and spark arresting screen
which meets the requirements of California Codes 4442 and 4443. All U.S.
forest land and the states of California,
Idaho, Maine, Minnesota, New Jersey,
Oregon, and Washington require by
law that many internal combustion engines be equipped with a spark arrestor screen. If you operate in a locale
where such regulations exist, you are
legally responsible for installing and
maintaining the operating condition of
these parts. Failure to do so is a violation of the law.
SPECIAL NOTICE: Exposure to
vibrations through prolonged use of
gasoline powered hand tools could
cause blood vessel or nerve damage
in the fingers, hands, and joints of
people prone to circulation disorders
or abnormal swellings. Prolonged use
in cold weather has been linked to
blood vessel damage in otherwise
healthy people. If symptoms occur
such as numbness, pain, loss of
strength, change in skin color or texture, or loss of feeling in the fingers,
hands, or joints, discontinue the use of
this tool and seek medical attention.
An anti-vibration system does not
guarantee the avoidance of these
problems. Users who operate power
tools on a continual and regular basis
must monitor closely their physical
condition and the condition of this tool.
SAVE THESE INSTRUCTIONS
,d_WARNING:
Inspect the area to
be edged before each use. Remove
objects (rocks, broken glass, nails,
wire, string, etc.) which can be thrown
by the blade or can wrap around the
shaft.
• Keep others including children, animals, bystanders, and helpers at least
50 feet (15 meters) away. Stop the
unit immediately
if you are approached.
• Hold the unit firmly with both hands.
• Keep firm footing and balance. Do not
overreach or stand on unstable support.
• Do net attempt to remove cut material
nor hold material to be cut when the
engine is running or when cutting
member is moving.
• Always keep the wheels and skid in
contact with the ground.
• Keep all parts of your body away from
the blade and muffler.
• Always push the unit slowly over the
ground. Stay alert for uneven sidewalks, holes in the terrain, large roots,
etc.
• Use only for jobs explained in this
manual.
FUEL SAFETY
• Mix and pour fuel outdoors and
where there are net sparks or
flames.
• Use a container approved for fuel.
• Do not smoke or allow smoking near
fuel or the unit; do net smoke while
using the unit.
• Avoid spilling fuel or oil. Wipe up all
fuel spills before starting unit.
• Move at least 10 feet (3 meters)
away from fueling site before starting engine.
• Stop engine and allow to cool before
removing fuel cap.
• Do not store the unit with fuel in the
fuel tank; use up fuel left in the carbureter and fuel line by starting the
unit and letting it run until it stops.
• Store unit and fuel in an area where
fuel vapors cannot reach sparks or
open flames from water heaters,
electric motors or switches, furnaces, etc.
• Always store gasoline in a container
approved for flammable liquids.
4
CARTON CONTENTS
Check carton contents against the followinglist,
Model 358,773110
Edger
Screws
Locknuts
Cable clamp
Hex wrench
2-cycle engine oil
Extra blade
Examine parts for damage. Do not
use damaged parts.
NOTE: If you need assistance or find
parts missing or damaged, call
1-800-235-5878.
ASSEMBLY
.'I,_
_IbWARNING:
If received assembled, repeat all steps to ensure
your unit is properly assembled and all
fasteners are secure.
This operators manual has been developed to help you assemble the unit
and to provide its safe operation. It is
important that you read the entire
manual to become familiar with the
unit before you begin assembly.
Read your operators manual,
Tools you will need:
• Adjustable wrench
• Hex wrench (provided)
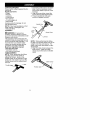
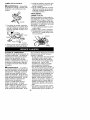
TUBE ASSEMBLY
NOTE: When performing the following steps, be sure the handle is
aligned as follows: label on top,
throttle trigger to the operator's right
hand side. The starter rope and the
throttle cable must not wrap around
the tube.
1. Assemble handle tube to the lower
tube (it will be necessary to pull
some of the starter rope out of the
housing).
2. Align the screw holes; insert the
screws through the aligned holes.
3. Thread one iocknut onto each
screw and tighten securely.
Handle tube
Screws
\
Lower
Tube
Stader Rope
Locknuts
NOTE: When performing the follow_
ing step, be sure the starter rope is not
caught under the cable clamp. The
starter rope must hang freely to oper_
ate properly.
4. Align the cable clamp between the
tube screws. Install the cable
clamp around the tube and throttle
cable.
Cable Clamp
Throttle cable
5
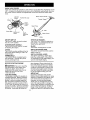
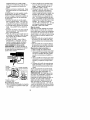
KNOW YOUR EDGER
READ THiS OPERATOR'S MANUALAND SAFETY RULES BEFORE OPERATING YOUR
UNIT. Compare the illustrations with your unit to familiarize yourself with the location of the various controls and adjustments. Save this manual for future reference.
ON/OFF
Switch
Fuel/Oil Mix Cap
StartT_rR_peHandle i_.
Depth
} 4" Control
Lever
Primer Bulb
Muffler and
Guard
_X
Depth
Adjusting
Skid
"4"-"
ON/OFF SWITCH
The ON/OFF switch is used to select
the ON or OFF position.
Blade
THROTTLE TRIGGER
The THROTTLE TRIGGER controls engine speed. It is designed to be activated by the right hand.
BLADE
The BLADE is designed to cut sod.
DEPTH ADJUSTING SKID
The DEPTH ADJUSTING SKID sets the
depth of the cut.
DEPTH CONTROL LEVER
The DEPTH CONTROL LEVER regulares the cutting depth. Move the lever backward for full depth edging, forward for half depth edging.
STARTER ROPE HANDLE
The STARTER ROPE HANDLE is used
for starting the engine.
CHOKE
The CHOKE provides additional fuel to
the engine when starting a cold or refueled engine.
PRIMER BULB
The PRIMER BULB circulates fuel to
the carburetor. Activate the primer
bulb by pressing it fully.
BEFORE STARTING ENGINE
gine damage. When mixing fuel, follow instructions printed on container.
Once oil is added to gasoline, shake
container momentarily to assure that
the fuel is thoroughly mixed. Always
read and follow the safety rules relating to fuel before fueling your unit.
IMPORTANT
Experience indicates that alcohol
blended fuels (called gasohol or using
ethanol or methanol) can attract moisture which leads to separation and
formation of acids during storage.
Acidic gas can damage the fuel system of an engine while in storage. To
avoid engine problems, empty the fuel
system before storage for 30 days or
longer. Drain the gas tank, start the
engine and let it run until the fuel lines
_h_WARNING:
Be sure to read the
fuel information in the safety rules
before you begin. If you do not
understand the safety rules, do not
attempt to fuel your unit. Call
1-800-235-5878.
FUELING ENGINE
This engine is certified to operate on
unleaded gasoline. Before operation,
gasoline must be mixed with a good
quality 2-cycle air*cooled engine oil.
We recommend Craftsman brand oil.
Mix gasoline and oil at a ratio of 40:1
(A 40:1 ratio is obtained by mixing 3.2
ounces of oil with 1 gallon of unleaded
gasoline). DO NOT use automotive oil
or boat oil. These oils will cause em
6
andcarburetor
areempty.
Usefresh
fuelnextseason.
Never
useengine
orcarburetor
cleanerproducts
inthefueltankorpermanentdamage
mayoccur.Seethe
STORAGE
section
foradditional
information.
STOPPING
YOURENGINE
4. Squeeze and hold the throttle trigger. Keep throttle trigger fully
squeezed until the engine runs
smoothly.
• To stop a running engine, move the
switch to the OFF position.
ON/OFF Switch
Primer bulb
5. Pull starter rope sharply 5 times.
NOTE: The engine may sound as if it
is trying to start before the 5th pull. If
so, go to the next step immediately.
6. Move the choke lever to the HALF
CHOKE position,
7. Pull starter rope sharply until engine runs, but no more than 6 pulls.
NOTE: If the engine has not started
after 6 pulls (at HALF CHOKE), check
to make sure the choke lever is in the
proper position. Then, move the
choke lever to the FULL CHOKE posF
tion and press the primer bulb 6 times
squeeze and hold the throttle trigger
and pull the starter rope 2 more times.
Move the choke lever to the HALF
CHOKE position and pull the starter
rope until the engine runs, but no
more than 6 more pulls, If the engine
still has not started, it is probably
flooded. Proceed to STARTING A
FLOODED ENGINE.
8. Allow the engine to run 10 seconds
then move the choke lever to the
OFF CHOKE position. Allow the unit
to run for 30 more seconds at OFF
CHOKE before releasing the throttle
trigger.
NOTE: If engine dies with the choke
lever at the OFF CHOKE position,
move the choke lever to HALF CHOKE
and pull the rope until engine runs.
STARTING A WARM ENGINE:
1. Make sure switch is in ON position.
2. Move the choke lever to the HALF
CHOKE position.
3. Squeeze and hold the throttle trigger. Keep throttle trigger fully
squeezed until the engine runs
smoothly.
4. Pull starter rope sharply until engine runs, but no more than 5 pulls.
5. Allow engine to run 10 seconds, then
move the choke lever to OFF CHOKE
position, Release the throttle triggen
NOTE: If engine has not started, pull
starter rope 5 more pulls, If engine still
does not run, it is probably flooded.
STARTING YOUR ENGINE
(For location of controls, refer to
KNOW YOUR UNIT)
• Fuel the engine; then move 10 feet
(3 meters) away from the fueling
site.
DANGER: The cutting blade will
turn when the engine starts.
z_
4[JWARNING:
Avoid any contact
with the muffler. A hot muffler can
cause serious burns.
• Rest the unit on the ground. Support the unit so the blade is off of the
ground and away from trees,
bushes, onlookers etc.
POSITION
STARTING
STARTING A COLD ENGINE (or a
warm engine after running out of
fuel)
1. Make sure switch in is ON position.
2. Slowly press the primer bulb 6
times.
3. Move choke lever to FULL CHOKE
position.
Choke Lever
FULL
OFF
7
Proceed
GINE.
to STARTING A FLOODED
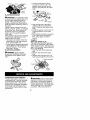
SETTING THE EDGING DEPTH
EN-
_h_WARNING:
Never attempt to adjust the depth adjusting skid when the
engine is running. Always release the
throttle trigger, wait until the blade
stops turning, move the ON/OFF switch
to the OFF position, and disconnect
spark plug before making adjust*
ments. Your edger is equipped with
several edging depths. The depth
used will depend on your personal
edging preference and the condition
of the area where the edging operation is to be done.
NOTE: If the area to be edged has
never been cut or several weeks have
passed since the last cut, the first edg_
ing should be done at no more than
half depth.
To set the depth:
1. Squeeze levers together to disengage depth lock.
2. Move depth control lever to the de_
sired position.
3. Move the depth control lever forward for shallower edging, back_
ward for deeper edging.
DIFFICULT STARTING (or starting a
flooded engine)
Flooded engines can be started by
placing the switch in the ON position
and the choke lever in the OFF CHOKE
position; then, pull the rope to clear
the engine of excess fuel. This could
require pulling the starter rope many
times depending on how badly the
unit is flooded.
If the unit still doesn't start, refer to
TROUBLESHOOTING TABLE or call
1-800-235-5878.
OPERATING
INSTRUCTIONS
EDGING
As you become familiar with your edg_
er, you will be able to determine your
own operating pace. Conditions such
as depth of cut and material being cut
will regulate the speed and time required for your edging job.
• Allow the engine to warm up for one
minute before you begin edging.
• Increase the engine speed before
placing the blade in the cut. For
best operation, run the engine at full
throttle while cutting.
• Keep you edging path straight by
aligning the blade guide rib on the
rear of the blade guard with the
edge of the sidewalk. Keep all
wheels flat on the walkway.
Control Lever
Depth
Adjusting
When edging, the trigger handle must
be raised until the skid rests on the
ground. The trigger handle must be
held in the raised position during the
entire edging operation to maintain a
consistent edging depth.
DEPTH ADJUSTING SKID
The surface of the depth adjusting
skid will wear over a period of time.
This part is reversible to provide a
second wear surface.
1. Remove the two mounting screws
which hold the skid to the support
arm.
2. Rotate the skid 180 degrees.
3. Reinstall the mounting screws.
EDGING TIPS
• Inspect unit before each use.
• Inspect the area to be cut before
each use.
• Keep unit in front of your body.
• Cut at full throttle.
• Keep the wheels and skid in contact
with the ground.
• Always work going away from oth_
ers.
• Always work going away from
people and solid objects such as
walls, large stones, trees, automobiles, etc.
• Be careful when edging near trees
or valuable plants. The high speed
metal blade may cut roots and
cause damage to the plants.
• If the blade stalls, immediately move
the unit rearward slightly to allow the
blade to restart. If the blade continues to stall, stop the engine, disconnect the spark plug, and inspect for
blockage or damage.
• Always keep the blade area clean.
Stop the engine, make sure the
blade has completely stopped turning, and disconnect the spark plug
before cleaning.
8
MAINTENANCE
SCHEDULE
WARNING:
Disconnect the spark plug before performing
except for carburetor adjustments.
CARE AND MAINTENANCE
TASK
maintenance
WHEN TO PERFORM
Before each use
Check for loose fasteners and parts
Check for damaged or worn parts
Inspect and clean unit and labels
Clean air filter
Before each use
After each use
Every 5 hours of operation
Every 5 hours of operation
Yearly
Check or replace blade
Replace spark plug
GEN ERAL RECOMMEN DATIONS
The warranty on this unit does not
cover items that have been subjected
to operator abuse or negligence, To
receive full value from the warranty,
the operator must maintain unit as
instructed in this manual, Various adjustments will need to be made periodically to properly maintain your unit.
All adjustments in the SERVICE AND
ADJUSTMENTS section of this manual
should be checked at least once each
season.
• Once each year, replace the spark
plug, replace air filter element and
check blade for wear. A new spark
plug and a cleanlnew air filter element assures proper air/fuel mixture
and helps your engine run better
and last longer.
BEFORE EACH USE
CHECK FOR DAMAGED OR
WORN PARTS
Contact Sears Service Center for replacement of damaged or worn parts.
• ON/OFF Switch - Ensure ON/OFF
switch functions properly by moving
the switch to the OFF position and
assure the engine stops; then restart
engine and continue.
• Fuel Tank - Discontinue use of edg_
er if fuel tank shows signs of damage or leaks.
• Blade Guard - Discontinue use of
edger if blade guard is damaged.
CHECK FOR LOOSE
FASTENERS AND PARTS
• Blade nut
• Muffler
• Cylinder shield
• Clutch
• Throttle trigger
• Handle screws
• Fasteners
AFTER USE
INSPECT AND CLEAN UNIT & LABELS
• After each use, inspect complete
unit for loose or damaged parts.
Clean the unit and labels using a
damp cloth with a mild detergent.
• Wipe off unit with a clean dry cloth.
EVERY 5 HOURS
CLEAN AIR FILTER
A dirty air filter decreases the life and
performance of the engine and im
creases fuel consumption and harmful
emissions. Always clean your air filter
after 5 tanks of fuel or 5 hours of eperatien, whichever comes first. Clean
more frequently in dusty conditions. It
is advisable to replace your air filter
with a new one after every 50 hours of
operation, or annually, whichever
comes first. To clean filter:
1. Remove the two screws and the air
filter cover from the engine.
2. Remove air filter,
NOTE: Do net clean the air filter with
gasoline or other flammable solvent to
avoid creating a fire hazard or producing harmful evaporative emissions
3. Wash the filter in soap and water.
4. Allow filter to dry,
5. Add 4 or 5 drops of oil to the filter,
NOTE: Do net soak air filter with oil,
6. Squeeze the air filter to distribute
oil,
7. Reinstall air filter in housing.
8. Reinstall air filter cover,
CAUTION: Make sure air filter is fitted
into the corners of the housing to keep
dust from entering engine and causing
engine damage.
9
Air Filter.x... Cover
_,,_-/.f-
,,,
1. To remove the blade, insert a
screwdriver into the hole in the
gearbox; then, remove the nut,
washer, and blade from the blade
shaft.
Cover
Nut
BLADE MAINTENANCE
QWARNING:
The blade will continue to spin after the engine stops or after the throttle trigger has been released. Make sure the blade has
stopped coasting and disconnect the
spark plug before performing work on
the blade.
Always replace a blade that is bent,
warped, cracked, broken, or damaged
in any other way. Never attempt to
straighten and reuse a damaged
blade. Use only specified replacement blade.
Wear protective gloves when handling
or performing maintenance on the
blade to help avoid injury.
• The blade is reversible. When the
cutting edge on one side becomes
worn, turn the blade over.
• Check blade for flatness periodically.
Lay the blade on a flat surface to inspect for flatness. Throw away a
blade that is not flat.
BLADE REPLACEMENT
WARNING: Wear protective
gloves when handling or performing
maintenance on the blade to avoid
injury.
Flat sides
Washer
2. Align the flat area of the blade
opening with the flat side of the
shaft. Place the new blade on the
shaft.
3. Install the washer and nut; turn nut
counterclockwise on the blade
shaft.
4. Bind blade by inserting a screwdriver in to the hole in the gearbox;
then, firmly tighten nut with a
wrench.
YEARLY
REPLACE SPARK PLUG
The spark plug should be replaced
each year to ensure the engine starts
easier and runs better. Set spark plug
gap at 0.025 inches. Ignition timing is
fixed, nonadjustable.
1. Twist then pull off the spark plug
boot.
2. Remove and discard the spark
plug.
3. Replace with Champion RCJ-8Y
spark plug and tighten with wrench.
Spark Plug
Blade
CARBURETOR ADJUSTMENTS
Properly adjusting the carburetor is a
complicated task. Read all warnings
and instructions thoroughly before
starting adjustments. If you do not
think that you completely understand
all warnings and instructions, let a
Sears Service Center perform these
adjustments.
_kWARNING:
Serious injury to the
operator and others can occur if the
carburetor is not properly adjusted.
Keep others away when making carburetor adjustments. The blade shaft
will be spinning during most of this
procedure. Wear your protective
10
equipment and observe all safety instructions.
Remove blade before making carburetor adjustments. Do not make adjustments from the blade side of the
unit. Hold the unit with your hand.
Recheck idle speed after each adjustment. The blade shaft must not turn
at idle speed to avoid serious injury to
the operator or others.
• Poor engine performance can be the
result of other causes such as dirty
air filter, carbon build-up on muffler
outlets, etc. See TROUBLESHOOTING TABLE before proceeding with
carburetor adjustments.
• For best results, it is recommended
that you have a Sears Service Center make all carburetor adjustments.
Your dealer has the training, experience, and tools necessary to properly adjust your unit to meet our factory performance specifications.
This
service is nat covered by warranty. If
it becomes necessary for you to
make carburetor adjustments yourself, follow the described procedures
very carefully.
• Very small adjustments can affect
engine performance. It is important
to turn the screw a very small
amount per adjustment and test performance before making further adjustments. Each adjustment should
be no more than the width of the slot
in the adjusting screw.
• This is a complicated task. Follow
instructions in sequence as indicated.
The carburetor has been carefully set
at the factory. Adjustments may be
necessary if you notice any of the following conditions:
• Engine will not continue to run at idle
position. See IDLE SPEED ADJUSTMENT and LOW SPEED MIXTURE ADJUSTMENT.
• Blade continues to spin when engine idles. See IDLE SPEED ADJUSTMENT.
• Engine dies or hesitates when it
should accelerate. See ACCELERATION CHECK.
• Loss of cutting power which cannot
be corrected by cleaning the air filter. See HIGH SPEED MIXTURE ADJUSTMENT.
• Engine will not run. See TROUBLESHOOTING TABLE. Then, if the carburetor requires adjustment, begin
with INITIAL SETTINGS.
ADJUSTING PROCEDURE
CAUTION: Do not force plastic limiter
caps on screws beyond the built-in
stops or damage will occur.
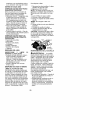
High Speed _/,_
Screw --
Low Speed
Adjustment Screw
Adjustment __
Idle Speed
Adjustment Screw
Initial Settings
1. Turn both mixture screws (L and H)
counterclockwise
until they stop.
2. Turn the idle speed screw clockwise until it stops. Now turn counterclockwise 4/1/2 turns.
3. Start the engine. Edge for 3 minutes to warm the engine, then proceed to adjust screws according to
the following instructions. If engine
performance at initial settings is acceptable, no further adjustments
are necessary. If engine does not
start, refer to the TROUBLESHOOTiNG TABLE. If still unable to remedy
situation, call 1-800-235-5878.
Idle Speed
Allow engine to idle. Adjust idle speed
screw until the engine runs without
stalling (idle too slow) and without the
blade shaft moving (idle too fast).
• Turn idle screw clockwise to increase engine speed.
• Turn idle screw counterclockwise
decrease engine speed.
Low Speed Mixture - L
1. Allow engine to idle.
2. Turn the low speed mixture screw
(L) slowly clockwise until the speed
starts to drop.
3. Turn the low speed mixture screw
(L) counterclockwise until speed increases and then starts to drop
again.
11
4.Setlowspeedmixture
screw(L)at
themidpoint
between
thetwopositions.
Readjust
idlespeed(seeIDLE
SPEED
ADJUSTMENT).
High Speed Mixture - H
CAUTION:
Do not operate at full
throttle for prolonged periods while
making high speed adjustments as
damage to the engine can occur. Adjust the high speed mixture screw (H)
1/16 of aturn at atime. A 1/16 turn is
about the width of the slot in the top of
the screw.
1. Support the unit so the blade shaft
will not make contact with any object. Do not make adjustments
from the blade side of the unit.
2. Allow the engine to idle.
3. Squeeze the throttle trigger fully.
Turn high speed mixture screw (H)
aI_I_WARNING: Perform the following
steps after each use:
• Allow engine to cool before storing
or transporting.
• Store unit and fuel in a well ventilated area where fuel vapors cannot
reach sparks or open flames from
water heaters, electric motors or
switches, furnaces, etc.
• Store unit with all guards in place.
Position unit so that any sharp object cannot accidentally cause injury.
• Store unit and fuel well out of the
reach of children.
• Wear protective gloves when handling blade. The blade is sharp and
can cut you even when it is not moving.
SEASONAL STORAGE
Prepare unit for storage at end of sea_
son or if it will not be used for 30 days
or more.
If your edger is to be stored for a period of time:
• Clean the entire unit.
• Clean air filter (see instructions).
• Inspect the guard area and clean
any dirt, grass, leaves, or debris that
has collected. Inspect the blade and
blade guard; replace a blade that is
bent, warped, cracked, broken or
damaged in any other way.
• Lightly oil external metal surfaces.
very slowly counterclockwise until it
stops.
4. Turn high speed mixture screw (H)
the minimum amount clockwise um
til engine runs smoothly.
After completing adjustments, check
for acceleration and blade shaft movement at idle. Reset if necessary.
Acceleration Check
If the engine dies or hesitates instead
of accelerating, turn the low speed
mixture screw (L) counterclockwise a
small amount (no more than the width
of the slot in the adjusting screw). Repeat step until smooth acceleration is
obtained with no blade shaft movement at idle.
CAUTION: If the engine does not operate according to these instructions
after repeating the adjusting steps, do
not use the unit. Take it to your Sears
Service Center.
• Apply a coating of oil to the entire
surface of the blade; wrap it in heavy
paper or cloth.
• Be sure all handles and guards are
in place and are securely fastened.
Replace any damaged parts.
• Check entire unit for loose screws,
nuts and bolts. Replace any damaged, worn, or broken parts.
• Do not cover with plastic. Plastic
cannot breathe and will induce corn
densation and eventual rust or corrosion.
FUEL SYSTEM
Never use engine or carburetor cleaner products in the fuel tank or permanent damage may occur to fuel system components. Follow these
instructions:
• Drain the fuel from the unit into an
approved fuel container.
• Drain the fuel lines and carburetor
by starting the engine and letting it
run until it stops.
IMPORTANT: It is important to prevent gum deposits from forming in essential fuel system parts such as the
carburetor, fuel filter, fuel hose, or tank
during storage. Also, experience indicates that alcohol blended fuels, those
that us ethanol or methanol (called
gasohol or oxygenated fuel), can attract moisture and form acidic gas
which will damage your engine. To
avoid engine problems, the fuel sys-
12
tern should be emptied before storage
for 30 days or longer.
Fuel stabilizer is an acceptable alternative in minimizing the formation of
fuel gum deposits during storage. Add
stabilizer to the gasoline in the fuel
tank or fuel storage container. Follow
the mix instructions found on stabilizer
container. Run engine at least 5 minutes after adding stabilizer to allow the
stabilizer to reach the carburetor.
Craftsman 40:1, 2-cycle engine oil (air
cooled) is already blended with fuel
stabilizer. If you do not use this Sears
oil, you can add a fuel stabilizer (such
as Craftsman No. 33500) to your fuel
tank.
INTERNAL ENGINE
• Remove spark plug and pour 1 tea_
spoon of 40:1, 2-cycle engine oil (air
cooled) through the spark plug
opening. Slowly pull the starter rope
8 to 10 times to distribute oil to inner
engine surfaces.
• Replace spark plug with new one of
recommended type and heat range.
• Clean air filter. Refer to MAINTENANCE SCHEDULE.
• Re-install all covers and hardware
removed for access; tighten all
screws and fasteners.
• Use fresh fuel next season.
OTHER
• Do not store gasoline from one season to another.
• Replace your gasoline can if it starts
to rust. Rust and/or dirt in your fuel
system will cause problems.
• Store your unit in a well ventilated
area and covered, if possible, to prevent dust and dirt accumulation.
IMPORTANT: Never cover unit while
engine and exhaust areas are still
warm.
13
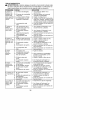
TROUBLESHOOTING
TABLE
WARNING:
Always stop unit and disconnect spark plug before performing all of the recommended remedies below except remedies that require
operation of the unit.
TROUBLE
CAUSE
REMEDY
Engine will not
start or will run
only a few
seconds after
starting.
1. Engine flooded.
1. See "Difficult Starting" in
Operation Section.
2. Fill tank with correct fuel mixture.
3. Install new spark plug.
4. Check for dirty fuel filter; replace.
Check for kinked or split fuel line;
repair or replace.
5. Contact Sears Service.
2. Fuel tank empty.
3. Spark plug not firing.
4. Fuel not reaching
carburetor.
5.Compression
low.
Engine will
not idle
properly.
1. Idle speed set too high
or too low.
2. Carburetor requires
adjustment.
3. Crankshaft seals worn.
4. Compression low.
1. See "Carburetor Adjustment" in
Service and Adjustments Section.
2. See "Carburetor Adjustment" in
Service and Adjustments Section.
3. Contact Sears Service.
4. Contact Sears Service.
Engine will not
accelerate,
lacks power',
or dies under
a load.
1. Air filter dirty.
2. Spark plug fouled.
1. Clean or replace air filter.
2. Clean or replace plug
and regap.
3. See "Carburetor Adjustment" in
Service and Adjustments Section.
4. Contact Sears Service.
5. Contact Sears Service.
Engine
_mokes
_=xcessively.
1. Choke partially on.
2. Fuel mixture incorrect.
3. Carburetor requires
adjustment.
4. Carbon build up.
5. Compression low.
1. Adjust choke.
2. Empty fuel tank and refill with
correct fuel mixture.
3. Clean or replace air filter.
4. See "Carburetor Adjustment" in
Service and Adjustments Section.
3. Air filter dirty.
4. Carburetor requires
adjustment.
Engine runs
hot.
1. Fuel mixture incorrect.
2. Spark plug incorrect.
3. Carburetor requires
adjustment.
4. Carbon build-up.
1. See "Fueling Engine" in Operation
section.
2. Replace with correct plug.
3. See "Carburetor Adjustment" in
Service and Adjustments Section.
4. Contact Sears Service.
1. Carburetor requires
adjustment.
2. Throttle cable binding.
3. Clutch requires repair.
1. See "Carburetor Adjustment" in
Service and Adjustments Section.
2. Replace or repair throttle cable.
3. Contact Sears Service.
Blade stops un- 1. Blade not engaged.
der a load or
2. Carburetor requires
does not turn
adjustment.
when engine is 3. Clutch requires repair.
accelerated.
1. Check gearbox.
2. See "Carburetor Adjustment" in
Service and Adjustments Section.
3. Contact Sears Service.
Blade turns at
idle speed.
14
YOUR WARRANTY RIGHTS AND OBLIGATIONS: The U. S. Environmental
Protection Agency and Sears, Roebuck
and Co., U.S.A., are pleased to explain
the emissions control system warranty
on your lawn and garden equipment
engine. All new utility and lawn and garden equipment engines must be designed, built, and equipped to meet the
stringent anti-smog standards. Sears
must warrant the emission control system on your lawn and garden equipment engine for the periods of time
listed below provided there has been no
abuse, neglect, or improper maintenance of your lawn and garden equipment engine, Your emission control system includes parts such as the
carburetor and the ignition system,
Where a warrantable condition exits,
Sears will repair your lawn and garden
equipment engine at no cost to you, Expenses covered under warranty include
diagnosis, parts and labor. MANUFACTURER'S WARRANTY COVERAGE: If
any emissions related part on your engine (as listed under Emissions Control
Warranty Parts List) is defective or a defect in the materials or workmanship of
the engine causes the failure of such an
emission related part, the part will be
repaired or replaced by Sears. OWNER'S WARRANTY RESPONSIBILITIES: As the lawn and garden equipment engine owner, you are responsible
for the performance of the required
maintenance listed in your Owner's
Manual. Sears recommends that you
retain all receipts covering maintenance
on your lawn and garden equipment
engine, but Sears cannot deny warranty
solely for the lack of receipts or for your
failure to ensure the performance of all
scheduled maintenance.
As the lawn
and garden equipment engine owner,
you should be aware that Sears may
deny you warranty coverage if your
lawn and garden equipment engine or a
part of it has failed due to abuse, neglect, improper maintenance, unapproved modifications, or the use of parts
not made or approved by the original
equipment manufacturer. You are responsible for presenting your lawn and
garden equipment engine to a Sears
authorized repair center as soon as a
problem exists. Warranty repairs should
be completed in a reasonable amount
of time, not to exceed 30 days. If you
have any questions regarding your warranty rights and responsibilities, you
should contact your nearest authorized
service center or call Sears at
1-800-473-7247 WARRANTY COMMENCEMENT DATE: The warranty period begins on the date the lawn and
garden equipment engine is purchased.
LENGTH OF COVERAGE: This warranty shall be for a period of two years
from the initial date of purchase. WHAT
IS COVERED: REPAIR OR REPLACEMENT OF PARTS. Repair or replacement of any warranted part will be performed at no charge to the owner at an
approved Sears servicing center. If you
have any questions regarding your warranty rights and responsibilities, you
should contact your nearest authorized
service center or call Sears at
1-800`473W247, WARRANTY PERIOD: Any warranted part which is not
scheduled for replacement as required
maintenance, or which is scheduled
only for regular inspection to the effect
of "repair or replace as necessary" shall
be warranted for 2 years, Any warranted part which is scheduled for replacement as required maintenance
shall be warranted for the period of time
up to the first scheduled replacement
point for that part. DIAGNOSIS: The
owner shall not be charged for diagnostic labor which leads to the determination that a warranted part is defective if
the diagnostic work is performed at an
approved Sears servicing center. CONSEQUENTIAL DAMAGES: Sears may
be liable for damages to other engine
components caused by the failure of a
warranted part still under warranty.
WHAT IS NOT COVERED: All failures
caused by abuse, neglect, or improper
maintenance are not covered. ADD-ON
OR MODIFIED PARTS: The use of
add-on or modified parts can be
grounds for disallowing a warranty
claim. Sears is not liable to cover failures of warranted parts caused by the
use of add-on or modified parts. HOW
TO FILE A CLAIM: If you have any
questions regarding your warranty rights
and responsibilities, you should contact
your nearest authorized service center
or call Sears at 1-800-473-7247.
WHERE TO GET WARRANTY SERVICE: Warranty services or repairs shall
15
beprovided
atallSearsservice
centers, warranty. EMISSION CONTROL WAR I
call:1-800-473_7247.
MAINTENANCE,
RAN'P( PARTS LIST: Carburetor, IgniREPLACEMENT AND REPAIR OF
EMISSION RELATED PARTS: Any
Sears approved replacement part used
in the performance of any warranty
maintenance or repair on emission related parts will be provided without
charge to the owner if the part is under
tion System: Spark Plug (covered up to
maintenance schedule), Ignition Module. MAINTENANCE STATEMENT:
The owner is responsible for the performance of all required maintenance as
defined in the owner's manual.
16
Declaraci6n de Garantia
Reglas de Seguridad
Montaje
Use
Mantenimiento
Servicie y Ajustes
20
20
24
25
28
30
Almacenaje
Tabla Diagn6stica
Declaraci6n de Emision
Lista de Piezas
Repuesto y Encargos
32
34
35
17
Contratapa
GARANTIA COMPLETA DE UN ANO PARA LA CORTADORA DE BORDES
CRAFTSMAN ®
Durante un aSo, a partir de la fecha de compra, siempre que se haga el mantem
imiento, la lubricaci6n y los ajustes a esta Cortadora de Bordes Craftsman segQn
las instrucciones en el Manual del Usuario, Sears reparar9 cualquier defecto de
materiales o de mane de obra gratuitamente.
Si se usa esta Cortadora de Bordes para fines comerciales, esta garantia tendr&
validez s61amente per 90 dias a partir de la fecha de compra. Si se usa esta Cortandor de Bordes para fines de alquiler, esta garantia tendr_ validez s61amente
per 30 dias a partir de la fecha de compra.
ESTA GARANTIA EXCLUYE:
Las piezas desechables que se pueden gastar con el use normal, tales come las
cuchillas totatorias o de bordes, los guias de cuchilla, las adaptadores de cuchillas, los limpiadores de aire, y las bujias. Las reparaciones necesarias per abuse
o negligencia de aprete del usuario, incluyendo los cig0efiales doblados y la falta
de mantener el equipo de acuerdo a las instrucciones contenidas en el manual
del usuario.
Esta garantia tiene validez exclusivamente cuando el aparato es utilizado dentro
de los Estados Unidos.
SE OBTENDRA SERVICIO BAJO GARANTIA DEVOLVlENDO LA CORTADORA DE
BORDES CRAFTSMAN AL CENTRe DE SERVICIO Sears MAS CERCANO EN LOS ESTADOS UNIDOS.
Esta garantia confiere derechos legales especificos al propietario, que tal vez
tenga asimismo otros derechos que varian entre estados.
Sears, Roebuck and Co., D/817 WA Hoffman Estates, IL 60179
_LADVERTENCIA:
AI usar cualquier herramienta de fuerza de jardineria, debergn observarse precaucienes
basicas de seguirdad en tode memento
para reducir el riesgo de incendie y
graves heridas, Lea y cumpla con todas
las instrucciones,
iEsta herramienta de fuerza puede
ser peligrosa! Cabe al usuario le responsabilidad de cumplir con todas
las advertencias e instrucciones, iLea
el Manual del Usuario en su totalidad
antes de usar el aparato! Est6 completamente familiarizado con los controles y con el use correcto del aparato. Limite el use de este aparato a
aquellas personas que hayan leido y
comprendido, y que vayan a obedecer, todas las advertencias e instruc-
clones tanto en el aparato come en el
manual. No permita nunca a los nifios
que usen este aparato. Toda su aten*
ci6n es necesaria cuando use este
aparato cerca de lugares en donde
haya niSos.
._
DE SEGURIDAD
INFORMACION
DEL APARATO
SEGURIDAD DEL OPERADOR
• Vistase de ferma apropiada. Use
siempre anteojos de seguridad e
protecci6n de ojos similar al usar e
hacer mantenimiento en el aparate.
(Hay anteejos de seguridad disponibles.)
• Use siempre m_scara protectera o
filtradora al trabajar en _reas pop
vrientas.
2O
• Use siempre pantalones largos
gruesos, mangas largas, botas y
guantes,
• Use siempre protecci6n de pieds.
No use el aparato descalzo ni con
sandalias,
• Mantenga el cabello por encima del
nivel de los hombros, atAndolo a tal
efecto si es necesario. La ropa suelta,
las joyas y la ropa con tiras, corbatas,
borlas, etc. que cuelgan libremente
pueden enredarse en las piezas en
movimiento.
• Si est9 completamente tapado, estara
m_s protegido de los escombros y
pedazos de plantas t6xicas arrojados
por la linea girante.
• Mant6ngase alerta. No use el apara*
to cuando est& cansado, enfermo o
bajo la influencia del alcohol, de drogas o de remedios. Vigile bien Io que
est_ haciendo y use sentido comQn.
• Use protecci6n de oidos.
• Nunca ponga ni deje en marcha el
aparato dentro de un recinto o efificio cerrado. Respirar los vapores de
los escapes Io puede matar.
• Mantenga ]as manijas libres de
aceite y de combustible.
• Use la manija en todo momento.
SEGURIDAD DEL APARATO
,_ ADVERTENCIA:
Desconecte
la bujia antes de hacer cualquier mantenimiento (excepto los ajustes al carburador).
• Inspeccione el aparato totalmente
antes de cada uso. Cambie las pie-
•
•
•
•
•
•
•
•
21
zas dafiadas. Verifique que no haya
perdidas de combustible. AsegOrese
que todos los fijadores est6n en su
lugar correspondiente y bien fijos.
Haga el mantenimiento del aparato
segun los procedimientos recomendados.
Deseche toda cuchilla doblada, torcida, resquebrajada, quebrada o
daSada de cualquier otro modo.
Cambie todas las piezas resquebra*
jadas, descantilladas o daSadas
antes de usar el aparato.
Use _nicamente las piezas y accesorios recomemdados de la marca
Craftsman. Nunca utilice alambre,
cable, soga, hilo, dispositivos desgranadores, etc.
Aseg_rese que la cuchilla se detenga por completo cuando el motor
est_ en marcha lenta (vea los
AJUSTES AL CARBURADQR).
Retire la cuchilla del aparato antes
de hacer los ajustes al carburador.
Sostenga el aparato con la mano.
No haga ajustes al carburador
desde el lado de la cuchilla.
Mantenga alajadas alas demos personas siempre que est6 haciendo
ajustes al carburador.
Nunca ponga el aparato en marcha
sin tener la caja de cambios instalada. El embraque puede salir volando y causar graves heridas.
Todo mantenimiento y servicio no explicados en este manual deberan ser
efectuados por un Centre de Servicio
Sears.
"*'_]r_bjetos
.. _
t
_"
Arrojado_
t BB
_1 BIB
_"
+
I
•
_._" /_
Anteojosde B_t_sl
_
/ _
Segundad
t
_
ii
ADVERTENCIA
La cuchilla arroja objetos
violentamente.
* Ud. puede quedar ciego o herido
* Use protecciSn de ojos.
ADVERTENClA
Zona ds peligro de objetos arrojados
• La cuchilla arroja objetos violentamente.
• Los terceros puedsn quedar cegados o
heridos.
• Mantenga a la gents y a los animales a
una distancia minima de 15 metros
(50 piss).
La cuchillagira
Deje queta cuchilla
se detengaantes
de sacariadel
ADVERTENClA
La cuchilla continua girando pot
un instante despu6s de que se
suelte el gatillo.
• La cuchilla puede herir gravemente at usuario o a terceros.
• Deje que la cuchilla se detenga
antes de sacada det code.
ADVERTENCIA
Lea el Manual det Usuario.
• Siga todas las advedencias e
instrucsionss.
• De Io csntrarfo puede sufrir
graves heddas,
SECURIDAD AL CORTAR BORDES
• Mantenga siempre las ruedas y el
calzo en contacto con el suelo.
• Mantenga todas las partes del cuerpo alejadas de la cuchilla y del silenciador.
• Siempre empuje el aparato lentamente sobre el terreno. Cuidese
constantemente contra las aceras
desniveladas, hoyos en el terreno,
raices grandes, etc.
• Use el aparato exclusivamente para
los fines descritos en este manual.
SEGURIDAD CON EL COMBUSTIBLE
• Mezcle y vierta el combustible al
aire libre y donde no haya ni chispas
ni llamas.
• Use recipiente aprobado para el
combustible.
• No fume ni permita que se fume cerca del combustible ni del aparato, ni
cuando este usando el aparato.
• Evite derramar el combustible o el
aceite. Umpie todos los derrames de
combustible antes de poner el apara*
to en marcha.
_lk ADVERTENCIA:
Inspeccione
el _rea a set corada antes de cada
uso. Retire los objetos (piedras, vicrio
roto, clavos, alambre, hilo, etc.) que
puedan ser arrojados por la cuchilla o
que puedan enroscarse en el eje.
• Mantenga a los demas, inclusive a
los nifios, los animales, los espectadores y los asistentes fuera de la
ona de peligro de 15 metros (50
pies). Pare el aparato immediatamente si alguien se le acerca.
• Sostenga el aparato firmemente con
las dos manos.
• Mantenga el balance. No se extiem
da demasiado o se pare en superficies inestables.
• No intente remover el material y cortado o sostenga el material a ser
cortado mientras el motor se encuentre en marcha o cuando el dispositivo que corta se encuentre en
movimiento.
22
• Retirese
aporlamenos
3metros
(10pies)dellugarenqueabasteci6
elaparato
antesdeponerlo
enmarcha.
• Pareelmotory permita
quese
enfrieantesdesacarlatapadeltanquedecombustible.
• Noguarde
elaparato
concombustibleeneltanque;
usetodoelcombustible
restante
enelcarburador
y
enlaslineasdecombustible
poniem
doelaparato
enmarcha
ydejandolo
enmarcha
hastaqueparesolo.
• Guarde
elaparato
y elcombustible
enunlugardondelosvapores
del
combustible
nopuedan
Ilegarhasta
condehayachispas
o llamas
abiertasprovenientes
determotanques,
motores
ointerruptores
el6ctricos,
calefactores
centrales,
etc.
TRANSPORTE Y ALMACENADO
• Pare le motor antes de dejar el &rea
de trabajo,
• Deje que el aparato se enfrie, vacie el
tanque de combustible y fije bien el
aparato antes de guardarlo o de
transportarlo en un vehiculo.
• Antes de almacenar el aparato, con*
suma todo el combustible restanter
en el carburador poniendo el aparato en marcha y dej&ndolo en marcha
hasta que pare solo. Siempre espere a que el aparato se enfrie
antes de aimacenarlo.
• Guarde el aparato y el combustible
en un lugar donde los vapores del
combustible no puedan alcanzar
chispas ni llamas abiertas provenientes de termotanques, motores o
interruptores el6ctricos, los calefactores centrales, etc.
• Guarde el aparato de modo que la
cuchilla no pueda causar heridas
accidentalmente.
• Guarde el aparato fuera del alcance
de los nifios.
Si acontencen situaci6nes no tratadas
en este manual, tenga cuidado y use
de buen criterio, Si necesita ayuda,
llame al Centro de Servicio Sears al
1-800-554-6723.
AVISO SPECIAL: Su sierra no viene
equipada con silenciador limitador de
temperatura ni con rejilla antichispa que
cumpla los requisitos de los Cd_:ligosde
California 4442 y 4443. Todas las tierras forestadas federales, m_s los estados de California, Idaho, Maine, Minnesota, Nueva Jersey, Washington y
Oreg6n, requieren por ley que muchos
motores de combusti6n interna est6n
equipados con rejilla antichispa. Si
usted el aparato donde existen tales reglamento, usted tiene la responsabilidad juridica de instalar y mantener estas piezas en correcto estado de
funcionamiento. De Io contrario, estar_
en infracci6n de la ley.
AVISO SPECIAL: El estar expuesto a
ias vibraciones a trav6s del uso proIongado de herramientas de fuerza a
gasolina puede cuasar dafios a los
vasos sanguineos o a los nervios de
los dedos, las manos y las coyunturas
en aquellas personas que tienen propensidad a los trastornos de la circulaci6n o alas hinchazones anormales.
El uso prolongado en tiempo frio ha
sido asociado con dafios a los vasos
snaguineos de personas que por otra
parte se encuentran en perfecto estado de salud, Si ocurren sintomas tales
como el entumecimiento, el dolor, la
falta de fuerza, los cambios en el color
o la textura de la piel o falta de sentido
en los dedos, las manos o las coyunturas, deje de usar esta m_quina im
mediatamente y procure atenci6n
m6dica. Los sistemas de anti-vibraci6n no garantizan que se eviten tales
problemes. Los usuarios que hacen
uso continuo y prolongando de las
herramientas de fuerza deben fiscalizar atentamente su estado fisico y el
estado del aparato.
GUARDE ESTAS INSTRUCCIONES
23
CONTENICO DE LA CAJA
Use la siguiente Iista para verificar
que todas la piezas hayan sido incluidas:
Modelo 358.773110
Cortadora
Tornillos
Tuercas de Retenci6n
Abrazadera del Cable
Llave Hexagonale
Aceite de motor de 2-ciclos
Cuchilla adici6nal
Examine las piezas para verificar que
no haya dafios. No use piezas daSadas.
AVlSO:
Si necesita ayuda, si faltan
piezas o si hay piezas daSadas, liame
al nt]mero 1-800-235-5878.
MONTAJE
A
_ADVERTENCIA:
Si recibi6 el
aparato ya armado, repita todos los
pasos para asegurarse de que se Io
haya armado correctamente y de que
todos los fijadores est6n bien ajustados.
Este manual del Usuario ha sido desarrollado para ayudarle a armar el
aparato y para proveer seguridad en
su uso, Es importante que lea el
manual en su totalidad para familiarizarse con el aparato antes de empe_
zar a armarlo.
Lea el Manual del Usuario.
Herramientas requeridas:
• Destornillador
• Llave hexagonal (provista)
INSTALLATION DE TUBO
AVISO: AI hacer el pr6ximo paso,
asegQrese de que la manija est6 alineada con el r6tulo hacia arriba y el
gatillo acelerador al lado derecho del
usuario, La sega de arranque y el
cable de aceleraciSn no deen quedar
enroscados alrededor del tubo
Gatillo
_1_.
d..._ R6tulo
Acelerador _
1. Junte el tubo manija al tubo inferior
(ser_ necesario sacar parte de la
soga de arranque de la caja).
2. Haga coincidir los orificios para tornillo; meta los dos tornillos por los
orificios alineados.
3. Enrosque una tuerca en cada tornillo y ajt]stela fuertemente.
Tubo Manija
Tornillos
\
Tubo
Inferior
Soga de arranque
Tuercas de retenci6n
AVISO: AI hacer el pr6ximo paso,
asegOrese de que la soga de arranque
no quede atrapada debajo de la abrazadera del cable. La soga debe tener
el movimiento libre para funcionar debidamente,
4. Coloque la abrazadera del cable
entre los tornillos del tubo. Instale
la abrazadera alrededor del tubo y
del cable de aceleraci6n.
Ab_zade_
Cable de Aceleracion
24
CONOZCA EL CORTADORA DE BORDES
LEA ESTE MANUAL DEL USUARIO Y LAS REGLAS DE SEGURIDAD ANTES DE PONER
EL APARATO EN MARCHA. Compare las ilustraciones con su aparato para familiarizarse con la ubicaci6n de los diversos controles y ajustes. Guarde este manual
para uso futuro.
Interruptor
ON/OFF
/#
Tapa del tanque
de Mezcla de
combustible/aceite
Palanca de
uste de
profundidad
Bombeador
Silendiador y
Protector
\
Filtro de aire
Soporte de
ajuste de
profundidad
_F_r_t_t_ir:e
"4"--
INTERRUPTOR ON/STOP
Se usa el INTERRUPTORON/OFF para
escoger la posicion ON o OFF.
MANIJA DE LA SOGA DE ARRANQUE
Se usa la MANIJA SE LA SOGA DE
ARRANQUE para poner en marcha el
motor.
CEBADOR
El CEBADOR provee combustible
adiciona] al motor para poner en
marcha el motor frio o con tanque
reci6n abastecido.
BOMBEADOR
El BOMBEADOR hace circular el combustible hasta el carburador. Para activar el bombeador, apr6telo al m_ximo.
ANTES DE PONER EL MOTOR EN
MARCHA
_ ADVERTENCIA:
Aseg6rese
de haber leido la informaci6n sobre el
combustible en las reglas de seguridad antes de comenzar. Si no comprende las reglas de seguridad, no intente abastecer el aparato de
combustible. Llame al nQmero
1-800-235-5878.
ABASTEClMIENTO
DEL APARATO
Este motor est9 habilitado para funcionar con gasolina sin plomo. Antes de
la Cuchilla
Cuchilla
GATILLO ACELERADOR
El GATILLO ACELERADOR controla la
velocidad del motor. Ha sido diseSado para el uso con la mano derecha.
CUCHILLA
La CUCHILLA ha sido desefiada para
cortar c6sped.
SOPORTE DE AJUSTE DE PROFUNDIDAD
La SOPORTE DE AJUSTE DE PROFUNDIDAD retira la cuchilla del corte cuando el aparato est9 en uso,
PALANCA DE AJUSTE DE PROFUNDIDAD
La PALANCA DE AJUSTE DE PROFUNDIDAD ajusta la profundidad de corte.
Posicione la palanca hacia atr&s para
cortes de profundidad maxima, hacia
adelante para cortes de media profundidad.
comenzar con el uso, se debera mezclar la gasolina con un aceite de buena
calidad para motores de 2 tiempos enfriados a aire. Recomendamos el aceite
de la marca Craftsman, Mezcle la gasolina con el aceite en la proporci6n 40:1.
(Se obtiene una proporci6n de 40:1
mezclando 3.2 onzas de aceite con
cada gal6n de gasolina sin plomo). NO
USE aceite para autom6viles ni para
barcas. Estos aceites daSar&n el motor.
AI mezclar el combustible, siga las
instrucciones impresas en el recipiente.
Una vez haya afiadido el aceite a la ga25
solina,
agitealrecipiente
brevemente
paraasegurar
queelcombustible
est6
completamente
mezclado.
Siempre
lea
ysigalasinstrucciones
deseguridad
quetienenquevetconelcombustible
antesdeabastecer
elaparato.
IMPORTANTE
La experiencia indica que los combus_
tible mezclados con alcohol (los Ilamados gasohol o los que contienen
etanol o metanol) pueden atraer la humedad, Io que puede causar la separaci6n y la formaci6n de _cidos durante el almacenaje. La gasolina
_cida puede dafiar el sistema de combustible del motor durante el almacenaje.
Para evitar problemas con el motor,
deber& vaciarse el sistema de combustible antes de almacenar el aparato por 30 dias o mgs. Vacie el tanque
de combustible, ponga el motor en
marcha y d6jelo en marcha hasta que
las lineas de combustible y el carbura*
dor queden vacios. Use combustible
fresco para la pr6xima temporada.
Nunca use productos de limpieza de
motor o carburador en el tanque de
combustible ya que de hacerla puede
provocar dafios permanentes.
Yea la secci6n de ALMACENAJE para
informaciSn adicional.
PARA PARAR EL MOTOR
• Para parar el motor, coloque el interruptor en la posici6n OFF.
Interruptor ON/OFF
• Apoye el aparato en el suelo, de forma de que la cuchilla est6 elevada
del suelo y apartada de los arboles,
los arbustos, los espectadores, etc.
POSICION DE
ARRANQUE
PARA ARRANCAR CON MOTOR
FRIO (o motor caliente despu_s de
quedar sin combustible)
1. Coloque el interruptor en la posF
ci6n ON.
2. Oprima el bombeador lentamente 6
veces.
3. Coloque el cebador en posici6n
FULL CHOKE.
Palanca del cebador
4. Aprete y mantenga apretado el gatillo acelerador. Mant_ngale apretado hasta qu el motor marche sin
ahogos ni parades.
Bombeador
PARAR ARRANCAR EL MOTOR
(Para saber la ubicaci6n de los corn
troles, vea las CONOZCA EL APARATO).
• Abastezca el motor. Apgrtese a pot
Io menos 3 metros (10 pies) del lu*
gar de abastecimiento.
A
PELIGRO:
La cuchUla empieza
a girar cuando se pone en marcha
el motor.
_ADVERTENCIA:
Evite todo
contacto con el silenciador. El silenciador caliente puede causar graves
quernaduras.
5. D6 5 tirones bruscos a la soga de
arranque.
AVISO: Tal vez se escuche el motor
tratando de arrancar antes del quinto
tir6n. En ese caso, prosiga de inmediato al pr6ximo paso.
6. Cambie el cebador a la posici6n
HALF CHOKE.
7. De tirones bruscos a la soga hasta
que el motor arranque, pero no
m_s de 6 veces.
AVISO: Si el motor no arranca despu6s del 6 tirones (con la palanca del
cebador en la posici6n HALF CHOKE),
verifique que el interruptor y la posici6n correct& Luego, coloque la palanca del cebador en FULL CHOKE y
optima el bombeador 6 veces; d6
26
otros 2 tirones a la soga de arranque.
Cambie la palanca del cebador a la
posici6n HALF CHOKE y d6 tirones a la
soga hasta que el motor arranque,
pero no m_s de 6 tirones mas,
AVISO: Si el motor no se ha puesta
en marcha es probable que est6 ahogado. Prosiga a ARRANQUE CON EL
MOTOR AHOGADO.
8. Deje que el motor marche de 10 a
15 segundos, luego coloque el ceba*
dor en OFF CHOKE. Deje que el motor marche otros 30 segundos con el
cebador en OFF CHOKE y lurgo
suelte el gatillo acelerador.
AVlSO: Si el motor se detiene con el
cebador en la posici6n OFF CHOKE,
coloque la palanca en la posici6n
HALF CHOKE y tire la soga hasta que
el motor se ponga en marcha.
PARA ARRANCAR CON EL MOTOR
CALIENTE
1. Coloque el interruptor en la posici6n ON,
2. Coloque el cebador en la posici6n
HALF CHOKE,
3. Aprete el gatillo acelerador a fondo
y mant6ngalo apretado. Mantenga
el gatillo apretado hasta que el motor marche sin ahogos ni interrupciones.
4. Tire bruscamente la soga de arran*
que hasta que el motor arranque,
pero no m_s de 5 tirones.
5. Deje que el motor marche por 10
aegundos y despu6s coloque el ce*
bador a la posici6n OFF CHOKE.
Luego, suelte el gatillo acelerador.
AVlSO: Si el motor no arrancado, de
5 tirones m_s a la soga. Si todavia no
arranca, es probable que est6 ahoga*
do. Proceda a ARRANQUE DEL MOTOR AHOGADO.
ARRANQUE DIFICIL (o arranque de
motor ahogado)
Se puede poner en marcha los motores ahogados colocando el interruptor en ON y la palanca del cebador en
la posici6n OFF CHOKE; acto seguido
tire la soga para despejar el exceso
de combustible del motor. Esto podri&
requerir que se tire la manija de arranque muchas veces, dependiendo de
la cantidad de combustible que est6
ahogando el aparato.
Si el motor nor arranca aQn, vea la TABLA DIAGNOSTICA o Ilame al nQmero
1-800-235-5878.
INSTRUCCIONES
DE USO
PARA CORTAR BORDES
A medida que se familiarice con el
aparato, ud. pordri_ determina y su
propio ritmo de trabajo. Los factores
tales como la profundidad del corte y
el material que se est9 cortando afectargn la velocidad y el tiempo requeridos para hacer un trabajo en particular.
• Permita que el motor se caliente du*
rante un minuto antes de empezar a
cortar.
• Aumente las revoluciones antes de
colocar la cuchilla en el corte. Para
obtener los mejores resultados,
corte con el motor acelerado a fondo.
• Mantenga el trayecto del corte derecho alineando la arista que se encuentra en el protector de cuchilla
trasero con el borde de la acera.
Mantenga todas las ruedas en contacto firme con la accra.
Adsta
• Trabaje siempre alej&ndose de la
gente y de los abjetos s61idos tales
como los paredones, las rocas
grandes, los _rboles, los autom6viles, etc.
• Tenga cuidado al cortar cerca de los
arboles o de plantas valiosas. La
cuchilla metglica de alta velocidad
puede cortar las raices y daSar las
plantas.
• Si la cuchilla se par& haga retroceder inmediatemente el aparato para
permitir que la cuchilla vuelva a firar.
Si la cuchilla sigue detenida, pare el
motor, desconecte la bujia e inspecclone el aparato para detectar bloqueo o daSo.
• Mantenga siempre limpia ede la cu*
chill& Pare el motor, asegQrese de
que la cuchilla se haya detenido por
completo y desconecte la bujia
antes de limpiar.
AJUSTE DE PROFUNDIDAD
ADVERTENCIA:
Nunca intente ajustar la rueda de ajuste de
profundidad con el motor en funcionamiento. Suelte siempre el gatillo acelerador, espere hasta que la cuchilla
deje de girar, ponga el interruptor en
OFF y desconecte la bujia antes de
27
hacerajustes,Sucortadora
de
bordes
vieneequipada
paraserajustadaen varias escalas de profundidad
de certe,La profundidad que se use
depender& de su preferencia personal
para los cortes de borde y de las condiciones del area donde se hara el
corte,
AVISO: Si el _rea que se va a cortar
nunca ha side cortada o no se la ha
cortado per varias semanas, el priomer corte deber_ hacerse a no m_s de
media profundidad.
Para ajustar la profundidad:
1. Junte las palancas para desengachar el cierre del ajuste de prefundidad.
2. Mueva la palanca de control de
prefundidad a la posiciSn deseada.
3. Mueva la palanca de control de
prefundidad hacia adalente para
poca profundidad, y hacia atr&s
para berdes m_s profundos.
_X
Palanca de Controt
Ajuste de
Profundidad
Braze
Soporte
CRONOGRAMA
AI hacer bordes, el mango del gatillo
deber9 encontrarse levantado hasta
que el calzo descanse o quede apoyado en el suelo. El mango del gatillo
deber9 sostenerse en esta posici6n
(levantado) durante todo el procedimiento de corte de bordes para mantener una profundidad uniforme,
SOPORTE DE AJUSTE DE PROFUNDIDAD
La superficie de la soporte de ajuste
de profundidad desgastar& durante
tiempo. Esta parte es reversible proporcionar a una segunda superficie
del desgaste.
1. Remueva los dos tornillos de montaje que Ilevan a soporte al braze
de soporte,
2. Rote la soporte 180 grades,
3. Reinstale los tornillos de montaje.
SUCERENCIAS PAPA LOS
CORTES
• Inspeccione el aparate antes de
cada use.
• Inspeccione el _rea que se va a cortar antes de cada use.
• Mantenga el aparato en frente del
cuerpo.
• Corte con el motor acelerado a fondo.
• Mantenga la ruedas en contacto con
el suela.
• Trbaje siempre alej&ndose de las
demos personas.
DE MANTENIMIENTO
_]k ADVERTENCIA:
Deseoneete la bujia antes de hacer eualquier mantenimiento, con la excepei6n de los ajustes al carburador.
TAREA DE CUIDADO Y MANTENIMIENTO
CUANDO HACER
Verificar que no haya piezas ni fijadores sueltos
Antes de cada use
Antes de cada use
Verificar que no haya piezas daSadas ni gastadas
Inspeccione y limpie el aparato y las placas
Limpie el filtro de aire
Inspeccionar o cambiar la cuchilla
Cambiar la buiia
RECOMENDACIONES GENERALES
La garantia de este aparato no cubre
los articulos que ban side sometidos
a] abuse o a la negligencia per parte
del usuario. Para recibir el valor complete de la garantia, el usuario debera
mantener el aparato segt3n las instrucclones en este manual. Har& falta
hacer varies ajustes peri6dicamente
para mantener el aparato de forma
debida.
Despu6s de cada use
Cada 5 horas de use
Cada 5 horas de sue
Anualmente
Deber9 verificarse todos los ajustes
mencionados en la seccion "Servicio y
Ajustes" de este manual per Io menos
una vez pro temporada.
• Una vez per aSo, cambie la bujia,
cambie el elemento del filtro de aire
y examine la cuchilla para ver si
tiene desgaste. Las bujias nuevas y
los elementos nuevos/limpios del
filtro de aire aseguran una mezcla
correcta de aire y combustible y
28
contribuye a un rendimiento mejor y
a uno duraci6n mgs larga del motor.
ANTES DE CADA USO
VERIFIQUE QUE NO HAYA PIEZAS
DANADAS NI GASTADAS
Entre en contacto con el Centre de
Servicie Sears para el remplaze de
piezas dafiadas e desgastadas,
• Interruptor ON/OFF - Asegt_rese que
el interruptor funciene correctamente coloc_ndole en la posici6n
OFF, AsegQrese que el motor y la
cuchilla se juyan detenide por completo y despu6s penga el motor en
marcha nuevamente y continue.
• Tanque de Combustible - Deje de
usar el aparato si hay seSales de
dafios e p6rididas en el tanque de
combustible.
• Protector para la cuchilla - Deje de
usar el aparato si el protector para la
cuchilla est_ dafiado.
VERIFIQUE QUE NO HAYA FIJADORES SUELTOS NI OTRAS PIEZAS SUELTAS
Tuerca de la cuchilla
Silenciador
Protector del cilindro
Embrague
Gatillo acelerador
Tornillos de la manija
Fijadores
DESPUES DEL USO
INSPECCIONE
Y
LIMPIE
EL
APARATO Y LAS PLACAS
• Despu6s de que cada use, inspecclone la aparate cempleta para
saber si hay piezas flejas e
dafiados. Limpie el aparato y sus
placas usan- de u trapo ht_medo
con detergente suave.
• Seque el aparate con un trapo
limpio y seco,
DESPUES DE CADA 5 HORAS
LIMPIE EL FILTRO DE AIRE
Los filtros de aire sucios disminuyen
la vida Qtil y el rendimiendo del motor
e incrementan el consumo de combustible, Siempre despu6s de consumir 5 tanques de combustible o 5 horas de uso, cualquiera viene primaro.
Con mayor frecuencia en condiciones
polvorientas. Es recomendable cambiarse su filtro de aire per un nuevo
despu6s de cada 50 horas de la operaci6n, o anualmente, cualquiera viene
primaro. Para limpiar el filtro:
Para limpiar el filtro:
1. Remueva los dos tornillos y la tapa
del filtro de aire del motor,
2. Remueva el filtro de aire.
NOTE: No limpie al filtro de aire con
gasolina ni cualquier otro solviente inflamable para evitar pelifro de incendio.
3. Lave el filtro con agua y jab6n.
4. Escurra el filtro para secarlo.
5. Ponga 4 o 5 gotas de aceite al filtro
de aire.
AVlSO: No empape el flltro con
aceite,
6. Aprete el filtro de aire para distribuir
al aceite.
7. P6ngalo de vuelta en la lap&
8. Coloque la tapa del filtro de aire
nuevamente en su lugar,
CAUTION: AsegOrese de que el filtro
de aire tenga las puntas matidas en
los rincones de la tapa para ovitar la
entrada de polvo al motor y los dafios
subsiguientes.
Filtro de aire_.._
MANTENIMIENTO
Tapa _//'./_"
DE LA CUCHILLA
ADVERTENCIA:
La cuchilla
sigue girando despues de que el motor para y despu6s de que se suelte el
gatillo. Aseg_rese de que la cuchilla
se haya detenido completamente y
desconecte la bujia antes de hacer
ning_n tragajo con la cuchilla,
Cambio siempre la cuchilla si est_ doblada, otro form& Nunca intente em
derezar y volver a usar una cuchilla
daSada. Use L_nicamente la cuchilla
de repuesto especificada.
Use guantes protectores al tocar u a]
hacer mantenimiento a la cuchilla
para evitar heridas.
• La cuchilla es reversible. Cuando el
filo se baya gastado de un lado, invierta la cuchilla.
• Peri6dicamente verifique que la cuchilla este perfectamente recta,
Apoye la cuchilla en una superficie
plana e inspecci6nela.
Descarte la
cuchilla si no est_ perfectamente
plan&
29
CAMBIO DE LA CUCHILLA
_llb ADVERTENCIA:
Use guantes
de protecci6n al tocar o al hacer mantenimiento a la cuchilla para evitar
heridas.
_Cuchilla
1. Para retirar la cuchilla, introduzca
un destornillador en el orificio de la
caja den engranaje; despu6s retire
la tuerca, arandela, la junta y la cuchilla del eje.
3. Instale la arandela y la tuerca; gire
la tuerca hacia la izquierda en el
eje de la cuchilla.
4. Fije la cuchilla metiendo un destornillador en el orificio en la caja del
engranaje; despu6s ajuste la tuerca usando una llave.
ANUALMENTE
CAMBIE LA BUJ|A
Deber_ cambiarse la bujia cada afio
para asegurara que el motor arranque
m_s f&cilmente y tenga un meier desempeSe. La separaci6n de los electrodos de la bujia deber& ser de 0,025
de pulgada. La calibraci6n del encendido es fija e inallerable.
1. Tuerce y despu6s saque la cubierta de la bujia.
2. Retire la bujia usada y des6chela.
3. Reemplgcela por una bujia Champion RCJ-8Y y ajuste la bujia nueva con una llave.
Tuerca
I
Cubierta
Arandela
2. Alinee la parte recta de la abertra en
la cuchilla con el lade recto del eje.
AJUSTES AL CARBURADOR
El ajuste correcto de la carburaci6n es
una tarea complicada. Lea todas ias
advertencias e instrucciones alentamente antes de empezar con los
ajustes, Si piensa que no ha comprendido completamente todas las advertencias e instrucciones, deja que
su Centro de Servicio Sears efectQe
los ajustes.
_ADVERTENCIA:
El usuarlo y
los terceros pueden sufrir graves heridas si el carburador no est9 ajustado
debidamente. Mantenga a todas las
demAs personas alejadas al hacer
ajustes al carburador. El eje de la cuchilla estar& girando durante la mayor
parte de este procedimiento.
Use su
equipo protector y siga todas las
instrucciones de seguridad.
Saque la cuchilla antes de hacer
ajustes al carburador. No baga
ajustes desde el lade donde va la cuchill& Sostenga el aparato con la
mane. Vuelva a verificar la marcha
lenta despu6s de cada ajuste. El eje
de la cuchilla no debe girar en marcha
lenta para eviter graves heridas al
usuario y a terceros.
• El bajo rendimiento del motor puede
ser debido a otras causas, tales
como diltro de aire sujio, acumulaci6n de carb6n en las salidas del silenciador, etc, Vea le TABLA
DIAGNOSTICA antes de preceder
con los ajustes al carburador.
• Para obtener los mejoren resultados, se recomienda que permita que
un Centro de Servicio Sears haga
todos los ajustes al carburador. El
proveedor tiene el entrenamiente, le
experiencia y las herramientas, necesarios para ajustes su aparato
correctamente alas tolerancias de
f_brida. Este servicio no est_ cubierto porla garantia. Si Ilega a ser
necesario que ud. mismo haga los
ajustes al carburador, siga los procedimientos destritos con sumo cuidado.
• Los ajustes muy pequefios pueden
afectar el rendimiento del motor. Es
importantisimo girar el tornillo una
30
2. Gire el tornillo de la marcha lenta
cantidad
infimaporcadaajustey
verifical
elrendimiento
antesdeanhacia la derecha hasta que se dechodelaranura
eneltornillode
tenga. Luego, girelo hacia la izajuste.
quierda 4 vuelta y media.
• Est6esunatareacomplicada.
Siga 3. Ponga el motor en marcha. Corte
lasinstrucciones
enlasecuencia
indurante 3 minutos para dejar el
dicada.
rotor en tempertura de funciona*
Elcarburador
hasidoajustado
cuidamiento, luego proceda a ajustar los
dosamente
enlaf&brica.Posibletornillos de acuerdo alas instrucmentesehagannecesarios
ajustes
si
clones indicas en la siguiente secci6n. Si el funcionamiento del mosenotacualquiera
delassiguientes
condiciones:
tor es aceptable con las posiciones
anteriores, no bar9 falta hacer m_s
• Elmotorseparaenvezdequadarseenmarcha
lenta,VeaAJUSTE ajustes. Si el motor no arranca,
vea la TABLA DIAGNOSTICA, Si at]n
DELAMARCHA
LENTA
yAJUSTE
DE
LAMEZCLA
PARA
BAJA
VELOClDAD, es incapaz remediar la situaci6n,
Ilamada 1-800-235-5878.
• Lacuchilla
siguegirando
enmarcha
lenta.VeaAJUSTE
DELAMARCHA Marcha Lenta
LENTA.
Deje que el motor trabaje en marcha
• Elmotorseahoga
o separacuando
Ajuste el tornillo de la marcha
deberia
acelerar,
VeaVERIFIClON lenta,
lenta hasta que el motor se mantenga
DELAACELERAClON,
en marcha (la marcha lenta es dema• Faltadepotencia
paracortarqueno siado lenta), y sin que se mueva el eje
secorrigoconlimpiar
elfiltrodeaire. de la cuchilla (la marcha lenta es deVeaAJUSTE
DELAMEZCLA
PARA
masiado).
ALTA
VELOClDAD,
• Gire el tornillo de la marcha lenta a
• Elmotornoanda.Vea]aTABLA
la derecha (en el sentido del reloj)
DIAGNOSTICA,
Despu6s,
sielcar*
para aumentar las revoluciones del
burador
requiere
ajuste,empiece
motor,
conlasPROCEDIMIENTO
INICIAL. • Gire el tornillo de la marcha lenta a
PROCEDIMIENTO DE AJUSTE
PRECAUCION: AI hacer ajustes no
fuerce las tapas limitadores de pl_stico m_s alia de los retenedores o
puede haber dafios.
la izquierda (en el sentido contrario
al reloj) para bajar las revoluciones.
Mezcla para baja velocidad - L
1. Deje el motor en marcha lenta,
2. Gire el tornillo de mezcla para baja
velocidad (L) lentamente a la derecha (en el sentido del reloj) gasta
que las revoluciones empiecon a
bajar,
3. Gire el tornillo de mezcla para baja
velocidad (L) a la revoluciones au*
menten y empiecen a bajar ontra
vez.
Tornillo
de Ajuste
_
Tomillo de Ajuste
Tomillos con
Tapones
Lirr_ad_res
,_baja
Velocidad
delo,__l
To'de
A!juste j
de Marcha Lenta
Procedimiento
Inicial
1. Gire el tornillos de ajuste de mezcla
(L y H) hacia la izquierda hasta que
se detenga.
4. Coloque el tornillo de mezcla para
baja velocidad (L) en al punto medio entre las dos posiciones anteriores.
Ajuste nuevamente la marcha lenta
(vea AJUSTE DE LA MARCHA LENTA).
Mezcla para alta velocidad - H
PRECAUCION: No haga que el motor corra con acelerador a fondo por
periodos porlongados de tiempo
mientras se hacen ajustes de aria veIocidad, ya que puede ocasionar
daSos al motor. Ajuste el tornillo de
alta velocidad por incrementos de
1/16 de vueita cada vez. Un 1/16 de
vuelta es alrededor del mismo diiametro que la renura que se encuentra en
la parte superior del tornillo.
31
1. Sostenga al aparato de modo que
el eje de la cuchilla no pueda hacer
contacto con ning_n objeto, No
haga ajustes desde el lado donde
va la cuchilla,
2. Ponga el motor en marcha lenta,
3. Apreite el gatillo acelerador a fondo,
Gire el tornillo de la mezcla para
alta velocidad (H) muy lentamente
a la izquierda (en contra del sentido
del reloj) hasta que se detenga,
4. Gire el tornillo de la mezcla para
alta velocidad (H) la cantidad minima a la derecha (en el sentido del
reloj) hasta que el motor marcha
garejamente.
Despues de terminar ajustes, verifique
de aceleraci6n y movimiento de la eje
de la cuchilla en la marcha lent&
Reajuste en caso de necesidad.
Verificacibn de Aceleracion
Si el motor trata de parar en vez de
acelerar, gire el tornillo de la mezcla
para baja velocidad (L) en contra del
sentido del reloj una cantidad pequefio (no mgs del ancho de la ranura
en el tornillo de ajuste), Repita pasos
hasta obtener una aceleraci6n pareja.
PRECAUClON: Si el motor no funcio_
na de acuerdo a esta instrucciones
despu6s de haber repetido los pasos
de ajuste, no use el aparato. LI6velo
al Centro de Servicio Sears.
_ADVERTENCIA:
Realice los
siguientes pasos despu6s de cada
USO:
• Deje enfriar el motor antes de guar_
darlo o de transportarlo en un vehiculo,
• Guarde el aparato y el combustible
en un lugar donde los vapores el
combustible no puedan alcanzar
chispas o llamas abiertas prove_
nientes los termotanques.
Los motores o interrputores el6ctricos, calefactores centrales, etc.
• Guarde el aparato con todos los
protectores en su lugar correspondiente. Posicione al aparato de
modo que la cuchilla no pueda herir
accidentalmente,
• Guarde el aparato bien fuera del aF
cance de los ni_os,
• Use guantes protectores siempre
que toque la cuchilla, Es muy filosa
y corta at_n no estando en movimiento,
ALMACENAMIENTO
DE LA CORTADORA
Prepare el aparato para almacenarlo
al final de la temporada o si no Io va a
usar por mgs de 30 dias,
Si se almacene su aparato por un periodo del tiempo:
• Limpie el aparato en su totalidad.
• Limpie el filtro de aire (vea las
instrucciones)
• Inspeccione el &rea del protector y
limpie toda la tierra, el d6sped, las
hajas y los escombros que ne hay-
•
•
•
•
•
on acumulado. Inspecione la cucilla
y el protector; cambie la cuchilla si
est9 doblada, torca, resquebrajada,
quebrada o daSada de cualquier
otro modo,
Aplique una leve capa de aceite a
las superficies metglicas exteriores.
Aplique una capa de aceite a la superficie entera de la cuchilla; envu61vala en papel gureso o tela,
Asegt_rese que todas las manijas y
los protectores est6n en su lugar
correspondiente y bien fijos. Cambie toda pieza daSada,
Examine el aparato en su totalidad
para verificar que no haya tornillos,
tuercas ni pernos sueltos. Cambie
toda pieza dafiada, gastado o quebrad&
No cubra el aparato de pl&stico, El
plgstico no deja paser aire por Io
que promueve la coudensaci6n y la
oxidaci6n o corrosi6n eventuales,
SlSTEMA DE COMBUSTIBLE
Nunca use productos de limpieza de
motor o carburador en el tanque de
combustible ya que hacello puede
provecar daSos permanentes a los
componentes del sistema de combustible, Siga estas instrucciones,
• Vierta todo el combustibel del aparato en no recipiente aprobado para el
combustible.
• Consuma todo el combustible en las
lineas de combustible yen el carburador poniendo el motor en marcha
y dej&ndolo marchar hasta que para
solo.
32
IMPORTANTE: Es importante evitar
que se formen dep6sitos de boma en
las piezas escenciales del sistema de
combustible, tales la manguera de
combustible o el tanque durante el aF
macenado. La experiencia indica
adem_s que los combustibles con
mezcla de alcohol, los que usar etanol
o metanol (llamado "gasohol" o combustible oxigenado), puedan altraer
humedad y format gasolina acidic&
que dafiar9 el motor, Para evitar problemas con el motor, es necesario
guardar el aparato por 30 dias o mas.
El estabilizador de combustible es
una alernativa aceptable para minimizar la formaci6n de dep6sitos de
goma en el combustible durante el aF
macenamiento.
Afiada estabilizador a
la gasolina en el tanque o en el recipiente de almacenamiento de combustible, Siga siempre las instrucclones de mezcla que se
acumentazan en los envases de establilzador. Deje el motor en marcha
par Io menos 5 minutos despues de
concerle estabilizador gara asegura,
que el estabilizador haya Ilegado hasta el carburador,
El aceite Craftsman 40:1 para cotores
de 2 tiempos (enfriados a aire) viene
mezclado con estabilizador de combustible, Si no use este aceite de
Sears. Lentoncea pueda afiadir un
estabilizador (como por ejemplo el
Craftsman No. 33500) al tanque de
combustible.
INTERIOR DEL MOTOR
• Retire la bujia y vierta una cucharada de las de t6 de aceite 40:1 para
motores de 2 tiempos (enfriados a
aire) por la abertura para la bujia,
Tironee lentamente de la soga de
arranque 8 a 10 veces para distribuir el aceite.
• Reamplace la bujia con otra del tipo
y de la gama de calor recomendados.
• Limpie el filtro de aire, Vea las CRONOGRAMA DE MANTENIMIENTO.
• Vuelva a instalant todas las tapas,
los tornillos, las tuercas, etc. que
tuvo que retirar para hacer Io anterior, ajuste todos los tornillos y los
fijadores.
• AI principio de la pr6xima temperada. Use exclusivamente combustible nuevo.
OTROS
• No guarde gasolina de una temporada a la siguiente,
• Cambie el recipiente de gasolina si
se empieza a oxidar. La herramgbre y/o la lierra unusar&n problemos en el sistema de combustible,
• Guarde el aparatos en un lugar bien
ventillado y, si es posible, tapado,
para evitar la acumulaci de polvo y
tierra,
IMPORTANTE:
Nunca tape el aparato el motor y el sistema de escape todavis calientes.
33
TABLA DIAGNOSTICA
ADVERTENCIA:
Siempre apague el aparato y desconecte la bujia antes
de hacer cualquiera de las reparaciones recomendadas a continuaci6n excepto reparaciones que requieran que el aparato est6 en operaci6n.
PROBLEMA
CAUSA
SOLUCION
EI motor no
1. El motor esta ahogado.
1. Vea "Arranque Dificil" en la
arranca o se
mantiene en
mamha s6Io
unos segundos
despu_s de aF
rancar.
2. El tanque de combustible
esta vacio.
3. La bujia no hace chispa.
4. El combustible no esta
Ilegando al carburador.
5. La compresi6n esta
baja.
El motor no
1. Las revoluciones de la
anda en
marcha lenta estan muy
marcha lenta
altos o muy bajas.
como debe.
2. El carburador requiere
ajuste.
3. Las juntas del cigL_e_al
estan gastadas.
4. La compresi6n esta
baja.
El motor no
1. El filtro de aire esta sucio.
acelera, le faIta 2. La bujia esta carbonizada.
potencia o se
3. El carburador requiere
para bajo carajuste.
ga.
4. Acumulaci6n del carb6n.
5. La compresi6n
baja.
El motor
humea
excesivamente.
esta
1. El cebador esta
parcialmente accionado.
2. La mezcla de combustible se ha hecho
secci6n Uso.
2. Llene el tanque con la mezcla
correcta de combustible.
3. Instale una bujia nueva.
4. Verifique si el filtro de combustible
esta sucio; limpielo. Verifique si hay
dobleces en la linea de combustible
o si esta partida: reparla o cambiela.
5. Entre en contacto con el Centro de
Servicio Sears.
1. Yea "Ajuste al Carburador" en Ia
secci6n Servicio y Ajustes.
2. Yea "Ajuste al Carburador" en la
secci6n Servicio y Ajustes.
3. Entre en contacto con el Centro de
Servicio Sears.
4. Entre en contacto con el Centro de
Servicio Sears.
1. Limpie o cambie el flltro de aire.
2. Limpie o cambie la bujia y
calibre la separaci6n.
3. Vea "Ajuste al Carburador" en la
seccion Servicio y Ajustes.
4. Entre en contacto con el Centro de
Servicio Sears.
5. Entre en contacto con el Centro de
Servicio Sears.
1. Ajuste el cebador.
2. Vacie eI tanque de combustible
y 116nelo de combustible con la
mezcia correcta.
3. Limpie o cambie el filtro de aire.
3. El filtro de aire esta
SUCiO.
El motor
marcha con
temperaturea
elvada.
4. El carburador requiere
ajuste.
1. La mezcla de combustible
se ha hecho.
2. Se ha instalado la bujia.
3. El carburador requiere
ajuste.
4. Acumulaci6n del carb6n.
Ei cuchilla gira 1. El carburador requiere
en marcha lenajuste.
2. El cable de aceleraci6n
ta.
esta trabando.
3. EI embrague necesita
reparacion.
La cuchilla se
detiene bajo
carga o gira
cuando.
4. Vea "Ajuste al Carburador" en
la secci6n Servicio y Ajustes.
1. Vea "Abastecimiento
del Aparato"
en la seccion Uso.
2. Cambiela por la bujia correcta.
3. Vea "Ajuste al Carburador" en la
secci6n Servicio y Ajustes..
4. Entre en contacto con el Centro de
Servicio Sears.
se
1. El cuchilla esta desconectada de la propulsi6n.
2. El carburador requiere
ajuste.
3. El embrague necesita
reparaci6n.
34
1. Yea "Ajuste al Carburador" en
la secci6n Servicio y Ajustes.
2. Cambie o repare al cable de
aceleraci6n.
3. Entre en contacto con el Centro de
Servicio Sears.
1. Inspeccione
la caja de engranaje.
2. Yea "Ajuste aI Carburador" en
la seccion Servicio y Ajustes.
3. Entre en contacto con el Centro de
Servicio Sears.
SUS DERECHOS Y OBLIGACIONES
DE GARANTIA:
La Agencia de Protecci6n Ambiental de los Estados Unidos y Sears, Roebuck and Co.,
U.S.A., se cemplacen en explicarle la
garantia del sistema de control de
emisienes en el motor de su equipo
de jardin y c6sped. Tedes los motores de equipo utilitario, de c6sped y
jardin nueves deber_n ser diseSades,
censtruidos y equipados para satisfacer las normas rigurosas en contra
de la contaminaci6n del ambiente.
Sears deber9 garantizar el sistema de
control de emisi6n en el motor del
equipo de cesped y jardin per los periodos de tiempo enumerados a continuaci6n, estipulando que no haya habide ningLin tipo de abuse,
negligencia, o mantenimiento no apropiado del motor de su equipo de
cesped y jardin. Su sistema de control de emisi6n incluye piezas tales
come el carburador y el sistema de
ignici6n. Cuando existe una condici6n bajo garantia, Sears reparar9 el
motor de su equipo de cesped y jardin
sin costo alguno para usted. Los gastos cubiertos bajo garantia incluyen
diagn6stico, piezas y servicio. CUBIERTA DE GARANTIA DEL FABRICANTE: Si cualquier pieza relacionada con la emisi6n en su motor (come
se enumeran en la Lista de Piezas de
Control de Emisi6n Bajo Garantia) se
encontrara defectuosa o un defecto
en los materiales o mane de obra del
motor causara el mal funcionamiento
de tal pieza relacionada con la emisi6n, esta pieza ser& reparada o reemplazada por Sears, GARANTIA DE
RESPONSABILIDAD
DEL DUENO:
Como duefio del equipo de c6sped y
jardin, usted es responsable del mantenimiento requerido indicado en el
Manual del Usuario. Sears recomienda que guarde todos los recibos que
cubren el mantenimiento del motor de
su equipo de c6sped y jardin, pero
Sears no puede negar la garantia t_nicamente per la falta de recibos o per
el incumplimiento de las indicaciones
de mantenimiento.
Como dueSo del
motor del equipo de c6sped y jardin,
usted debe saber que Sears puede
negarle la cubierta de garantla si el
motor de su equipo de cesped y jardin
o una pieza del mismo, ha fallado debide al abuso, negligencia, mantenimi-
ento no apropiado, modificaciones sin
aprobaci6n, o el uso de piezas que no
han sido hechas o aprobadas por el
fbricante original del equipo, Usted
sera el responsable de pre-sentar el
motor del equipo de c6sped y jardin a
un centro de reparaciones autorizado
Sears tan pronto cemo surjaa el problema. Las reparaciones bajo garantia debergn ser completadas en
una cantidad razenable de tiempo, no
excediende los 30 dias. Si cuenta
con alguna pregunta en referencia a
sus dereches y responsabilidades,
usted debera entrar en contacto con
su centro de servicie autorizade m_s
cercano o Ilamar a Sears al
1-800-473W247.
FECHA DEL COMIENZO DE LA GARANTIA: El periodo
de garantia comienza en la fecha en
que se compro el motor del equipo de
c6sped yjardin.
DURAClON DE LA
GARANTIA: Esta garantia tiene un
periodo de cubierta de dos aSos
desde la fecha inicial de compra.
QUE CUBRE: REPARACIONES O
REEMPLAZO DE PIEZAS. Las reparaciones o reemplazo de cualquier
pieza en garantia ser&n efectuadas
sin cargo alguno para el dueSo en un
centro de servicio Sears aprobado. Si
tiene alguna pregunta en relaci6n con
sus derechos y responsabilidades de
garantia, usted deber_ comunicarse
con su centro de servicio autorizado
rags cercano o Ilamar a Sears al
1_800473W247.
PERIOBO BE GARANTIA: Cualquier pieza bajo ga_
rantia que no est6 programada para
ser reemplazada como requisito del
programa de mantenimiento, o la cual
est6 programada para ser inspeccionada de forma regular para efectos de
"reparaciones o reemplazos si es necesario" deber9 garantizarse por dos
aries, Cualquier pieza garantizada
que est6 programada para ser reemplazada como Io es requerido per el
programa de mantenimiento, deber_
ser garantizada per el periodo de
tiempo hasta el primer cambio progra*
made para el reemplazo, DIAGNOSTICO: No se deber_ cargar al duefio
ningt]n tipo de recargos por el servicio
de diagn6stico el cual nos conduce a
la determinaci6n de que una pieza
bajo garantia est9 defectuosa, si el
trabajo de diagn6stico ha side Ilevado
a cabo en un centro de servicio Sears
35
aprobado.
DAI_IOS
PORCONSECUENClAMAGES:
Searspuedeser
responsable
pordaSos
a otroscomponentes
delmotorcausados
potel
fame
deunapiezagarantizada
mientras6staseencuentre
engarantia.
QUENOCUBRE:
Todos
losfallos
causados
potel abuso, la negligencia,
o el mantenimiento no apropiado n9
est_n cubiertos, PIEZAS PAPA ANADIR O MODIFICADAS: El uso de piezas aSadidas o modificadas puede
set la base para anular la garantia.
Sears no se hace responsable de cubrir fames de piezas garantizadas debide al uso de piezas aSadidas o modificadas. COMO ENTABLAR UNA
RECLAMAClON: Si cuenta usted con
alguna pregunta en referencia a sus
derechos y responsabilidades de garantia, usted deber& contactar a su
centro de servicio autorizado mas cercano o Ilamar a Sears al
1-800-473-7247. EN DONDE OBTEN-
ER SERVIClO DE GAPANTIA: Servicio o reparaciones de garantia deber&
ser provistas por todos los centros de
servicio Sears, Ilame al:
1_800473-7247, MANTENIMIENTO,
REEMPLAZO Y REPAPACIONES DE
PIEZAS RELAClONADAS CON LA
EMISlON: Cualquier pieza de reemplazo Sears aprobada usada en la programaci6n de cualquier mantenimiento de garantia o reparaci6n de piezas
relacionadas con la emisiSn ser9 provista al dueSo sin cargo alguno si la
pieza se encuentra bajo garantia, LISTA DE PIEZAS DE CONTROL DE
EMISlON BAJO GAPANTIA: Carburador, Sistema de Ignici6n: Bujia (cubierta t]nicamente hasta el periodo del
primer mantenimiento programado),
M6dulo de IgniciSn. DECLAPAClON
DE MANTENIMIENTO:
El duefio es
responsable de efectuar todo mantenimiento programado como Io define el
Manual del Usuario.
36