1
.........
"Ow
r_s
cti
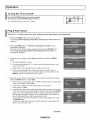
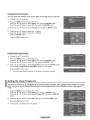
Register your product at www.samsung.com/global/register
Record your Model and Serial number here for future reference.
- Model
- Serial No.
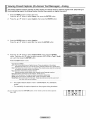
i ImportantWarrantyInformationRegardingTelevisionFormatViewing
Wide screen format PDP Displays (16:9, the aspect ratio of the screen width to height) are primarily designed to view wide
screen format full-motion video. The images displayed on them should primarily be in the wide screen 16:9 ratio format,
or expanded to fill the screen if your modet offers this feature and the images are constantly moving. Displaying stationary
graphics and images on screen, such as the dark side-bars on nonexpanded standard format television video and
programming, should be limited to no more than 5% of the total television viewing per week.
Additionally, viewing other stationary images and text such as stock market reports, video game displays, station Iogos,
web sites or computer graphics and patterns, should be limited as described above for all televisions. Displaying stationary
images that exceed the above guidelines can cause uneven aging of PDP Displays that leave subtle, but permanent
burned-in ghost images in the PDP picture. To avoid this, vary the programming and images, and primarily display
full screen moving images, not stationary patterns or dark bars.
On PDP models that offer picture sizing features, use these controls to view different formats as a full screen picture.
Be careful in the selection and duration of television formats used for viewing. Uneven PDP aging as a result of format
selection and use, as well as burned-in images, are not covered by your Samsung limited warranty.
U.S.A Only
The product unit accompanying this user manual is licensed under certain intellectual property rights of certain
third parties. In particular, this product is licensed under the following US patents: 5,991,715, 5,740,317, 4,972,484,
5,214,678, 5,323,396, 5,539,829, 5,606,618, 5,530,655, 5,777,992, 6,289,308, 5,610,985, 5,481,643, 5,544,247,
5,960,037, 6,023,490, 5,878,080, and under US Published Patent Application No. 2001-44713-A1.
This license is limited to private non-commercial use by end-user consumers for licensed contents. No rights are
granted for commercial use. The license does not cover any product unit other than this product unit and the license
does not extend to any unlicensed product unit or process conforming to ISO/tEC 11172-3 or ISO/IEC 13818-3 used or
sotd in combination with this product unit. The license only covers the use of this product unit to encode and/or decode
audio files conforming to the ISO/IEC 11172-3 or ISO/IEC 13818-3. No rights are granted under this license for product
features or functions that do not conform to the ISO/IEC 11172-3 or ISO/IEC 13818-3.
Other countries
The product unit accompanying this user manual is licensed under certain intellectual property rights of certain third
parties. This license is limited to private non-commercial use by end=user consumers for licensed contents. No rights
are granted for commercial use. The license does not cover any product unit other than this product unit and the license
does not extend to any unlicensed product unit or process conforming to ISO/IEC 11172-3 or ISO/IEC 13818-3 used or
sold in combination with this product unit. The license only covers the use of this product unit to encode and/or decode
audio files conforming to the ISO/IEC 11172-3 or ISO/IEC 13818-3. No rights are granted under this license for product
features or functions that do not conform to the ISO/IEC 11172-3 or ISO/IEC 13818-3.
© 2007 Samsung
Electronics Co., Ltd. All rights reserved.
i
i User instructions
O
Screen
image retention
Do not display a still image (such as on a video game) on the plasma display panel for more than several minutes as it can
cause screen image retention. This image retention is also known as "screen burn". To avoid such image retention, refer to
page 26 of this manual to reduce the degree of brightness and contrast of the screen when displaying a still image.
Altitude
The PDP can only operate normally at heights under 6500ft.
Heat on the top of the PDP TV
The top side of the product may be hot after tong periods of use as heat dissipates from the panel through the vent hole in
the upper part of the product.
This is normal and does not indicate any defect or operation failure of the product.
However, children should be prevented from touching the upper part of the product.
The product is making
a 'cracking' noise.
A 'cracking' noise may occur when the product contracts or expands due to a change of surrounding
temperature or humidity. This is normal and not a defect of the unit.
environment
such as
Cell Defects
The PDP uses a panel consisting of 1,230,000(SD-levet)
to 3,150,000(HD-level)
pixels which require sophisticated
technology to produce. However, there may be a few bright or dark pixets on the screen. These pixels will have no impact
on the performance of the product.
Avoid operating the TV at temperatures below 5°C (41°F}
A still image displayed
too long may cause permanent
damage to the PDP Panel.
Watching the PDP TV in 4:3 format for a tong
the left, right and center of the screen caused
Playing a DVD or a game console may cause
Damages caused by the above effect are not
After-images
period of time may leave traces of borders displayed on
by the difference of light emission on the screen.
similar effects to the screen.
covered by the Warranty.
on the Screen.
Displaying still images from Video games and PC for longer than a certain period of time may produce partial after-images.
To prevent this effect, reduce the 'brightness' and 'contrast' when displaying still images for a tong time.
Warranty
Warranty does not cover any damage caused by image retention.
Burn-in is not covered by the warranty.
i Contents
[] List of Features ..............................................................
[] Accessories ....................................................................
5
5
[] Viewing the Control Panel .............................................
[] Viewing the Connection Panel .......................................
[] Remote Control ..............................................................
6
7
8
[] Installing Batteries in the Remote Control .....................
9
[]
[]
[]
[]
[]
[]
9
10
11
11
12
[]
[]
[]
Connecting VHF and UHF Antennas .............................
Connecting Cable TV ...................................................
Connecting a VCR .......................................................
Connecting an S-VHS VCR .........................................
Connecting a Camcorder .............................................
Connecting a DVD Player/Cable Box/Satellite receiver
(Set-Top Box) ..............................................................
Connecting a DVD Player/Cable Box/Satellite receiver
(Set-Top Box) via HDMI ..............................................
Connecting a DVD Player/Cable Box/Satellite receiver
(Set-Top Box) via DVl .................................................
Connecting a Digital Audio System ..............................
Connecting an Amptifier/DVD Home Theater ..............
Connecting a PC ..........................................................
[]
[]
[]
[]
[]
[]
[]
[]
[]
[]
Turning the TV On and Off ...........................................
Plug & Play Feature .....................................................
Changing Channels .....................................................
Adjusting the Volume ...................................................
Viewing the Display .....................................................
Viewing the Menus ......................................................
Memorizing the Channels ............................................
Setting Up Your Remote Control ..................................
To Select the Source ....................................................
To Edit the Input Source Name ....................................
15
15
17
18
18
18
19
20
25
25
[]
[]
[]
[]
[]
Using Automatic Picture Settings .................................
Digital Noise Reduction ...............................................
Changing the Screen Size ...........................................
Configuring Detailed Settings on the Picture ...............
Active Color ..................................................................
26
27
28
29
30
[]
[]
[]
[]
[]
[]
DNle (Digital Natural Image engine) ............................
Selecting the Film Mode ..............................................
Setting the Blue Screen Mode .....................................
Setting the HDMI Black Level ......................................
Viewing Picture-in-Picture ............................................
Freezing the Current Picture ........................................
30
31
31
31
32
33
[]
[]
[]
[]
[]
[]
[]
[]
[]
Using Automatic Sound Settings .................................
34
Customizing the Sound ................................................
34
Setting the TruSurround XT .........................................
35
Choosing a Multi-Channel Sound (MTS) Track - Digital ..35
Choosing a Multi-Channel Sound (MTS) Track - Analog.. 36
Automatic Volume Control ...........................................
36
Selecting the Internal Mute ..........................................
36
Adjusting the TV On/Off Melody Sound ....................... 37
Listening to the Sound of the Sub (PIP) Picture .......... 37
[]
[]
Symbols
,m
Press
One-Touch
Button
Note
12
[]
[]
[]
[]
[]
[]
[]
[]
R
Selecting the Antenna ..................................................
Adding and Erasing Channels .....................................
Setting Your Favorite Channels ...................................
Viewing the Channel Lists ...........................................
Setting the Default Channel List Mode ........................
Labeling Channels .......................................................
Fine Tuning Analog Channels ......................................
Checking the Digital-Signal Strength ...........................
LNA (Low Noise Amplifier) ...........................................
38
38
39
40
40
41
41
42
42
[] Using Your TV as a Computer (PC) Display ................ 43
! Display Modes ............................................................
43
,,, Setting up the TV with your PC ....................................
44
R Setting the Home Theater PC ......................................
45
R Setting the Time ...........................................................
46
13
13
14
14
14
[]
[]
[]
[]
[]
[]
[]
[]
[]
[]
,,,
Selecting a Menu Language ........................................
49
Using the Game Mode .................................................
49
ViewingClosed Captions (On-ScreenText Messages)- Digital.._50
ViewingClosed Captions (On-ScreenText Messages)-Analog.. 51
Menu Transparency Level ...........................................
52
Setting the Light Effect .................................................
52
Using the Energy Saving Feature ................................
53
Preventing Screen Burn-in ...........................................
53
Reducing the Effects of Screen Burn ........................... 54
Setting the Function Help ............................................
54
Using the V-Chip ..........................................................
55
R Upgrading
m
m
m
m
R
Using
Using
Using
Using
Using
the
the
the
the
the
the Software ...............................................
61
WISELINK Function .....................................
WISELINK Mode .........................................
Photo (JPEG) List ........................................
Music (MP3) List ..........................................
Setup Menu .................................................
62
63
64
70
71
What is Anynet+? .........................................................
Connecting Anynet + Devices .......................................
Setting Up Anynet + ......................................................
m Scanning and Switching between Anynet + Devices....
m Recording ....................................................................
,,, Listening through a Receiver (Home theater) ..............
72
72
73
73
74
75
R Troubleshooting
forAnynet
75
m Troubleshootin_
...........................................................
m
m
m
m
m
m
R
+ ........................................
76
Auto Wall-mount adjustment (Sold separately) (FP-T5084) .. 77
Wall Mount Kit Specifications (VESA) .......................... 78
How to attach the Stand-Base .....................................
79
Specifications ...............................................................
79
Dimensions (FP-T5084) ...............................................
80
Dimensions (FP-T5884) ...............................................
81
Dimensions (FP-T6374) ...............................................
82
i General information
List of Features
. Adjustable
picture settings that can be stored in the TV's memory.
. Automatic
timer to turn the TV on and off.
. A special sleep timer.
. V-Chip function.
.
Excellent Digita! Interface & Networking :
With a built-in HD digital tuner, nomsubscription
Top Box) needed.
HD broadcasts can be viewed with no Cable Box/Satellite
receiver (Set-
.
HDMI/DVl connection
.
Remote Control
The supplied remote can be used to operate the TV as well as most DVD players, Set-top boxes, Cable Boxes and VCRs.
of your PC to this TV.
.
Excellent Picture Quality
- DNle technology provides life-like clear images.
. SRS TruSurround XT
- SRS TruSurround
XT provides a virtual Dolby surround system.
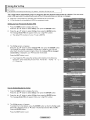
Accessories
Please make sure the following
RemoteControl
(BN59-00599A)/
AAA Batteries
(4301-000103)
Cover-Bottom
/
Screws(2ea)
(FP-T5084iFP-T5884,
Referto page79)
items are included
with your TV. if any items are missing, contact your dealer.
Power Cord
(3903-000144)
Owner's Instructions/
Quick Setup Guide
WarrantyCard /
RegistrationCard /
Safety Guide Manual
Ferrite Core for
Power Cord
(3301-001110)
FerriteCore for
Side-AV/ S-VIDEO/ HDMI
(3301-001305)
Ferrite Core for
Headphone
(3301-001456)
Cloth-Clean
_-- See the bottom of the page for Ferrite Core usage.
The following parts are sold separately
and are available
at most electronics
stores.
S-VIDEO Cable (BN39-00149A)
HDMI Cable (BN39-00641A)
HDMI/DVI cable (BN39-00643A)
PC Cable (BN39-00115A)
PC Audio Cable (BN39-00061B)
Optical Cable
Ferrite Core (Power Cord, Audio/Video Cable, S-Video Cable,
Headphone, HDIVil Cable)
The ferrite cores are used to shield the cables from interference.
When connecting
near the plug.
a cable, open the ferrite core and clip it around the cable
.............................
Component Cables (RCA)
(BN39-00279A)
Antenna Cable (BN39-00333A)
i [ .............................
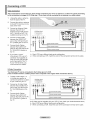
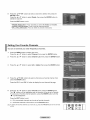
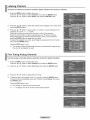
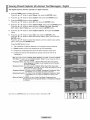
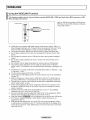
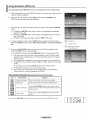
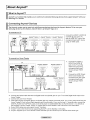
Viewing the Control Panel
Buttons on the Lower-Right Part of the Panel
The buttons on the lower-right
panel control your TV's basic features, including the on-screen
To use the more advanced features, you must use the remote control.
menu.
.............................................................................................................
i
FP-TSO84/FP-T5884
SOURC_
o
CH
.....
i'l
i:!
U
@
i
\._._/
L
J
FP-T6374
s_Msu_o
E
The product color and shape may vary depending
on the model.
SOURCE
Toggles between a!l the avai{able input sources
(TV, AV1, AV2, S-Video1, S-Video2, Component1,
Component2,
PC, HDMI1, HDMI2, or HDMI3).
_ (ENTER)
Press to confirm a selection.
POWER
Press to turn the TV on and off.
In the on-screen menu, use this button as you
would use the ENTER button on the remote control.
Power indicator
(FP-T5084/FP-T5884)
Blinks and turns off when the power is on and tights up
in stand-by mode.
O MENU
Press to see an on-screen
Remote Control
menu of your TV's features.
+ VOL Press to increase or decrease
the volume. In the on-
screen menu, use the + VOL - buttons as you woutd
use the 4 and _ buttons on the remote control.
ACHv
Press to change channels.
In the on-screen menu, use the/_ CH v buttons as
you would use the A and T buttons on the remote
control.
Sensor
Aim the remote controt towards this spot on the TV.
Speakers
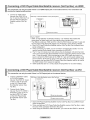
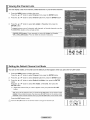
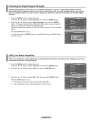
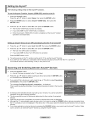
Viewing the Connection Panel
Rear Panel Jacks
Use the rear panel jacks to connect A/V components that wilt be connected continuously, such as VCR or DVD players. For
more information on connecting equipment, see pages 9-14. The product color and shape may vary depending on the model.
O
POWER IN
Connect the supplied power cord.
O
DIGITAL AUDIO OUT (OPTICAL)
Connect to a Digital Audio component.
0
AUDIO OUT (R/L)
Audio outputs to external
Q
ANT 1 IN(AIR)/ANT 2 IN(CABLE)
Uses a 75_ Coaxial connector for an Air/Cable
Network.
Q
EX-LINK
Connect this to the jack on the optional wall mount
bracket. This will attow you to adjust the TV viewing
angle using your remote control.
devices.
PC AUDIO IN
Connect to the audio output jack on your PC.
_,_ The model FP-T5884 / FP-T6374 cannot be wall
mounted. The EX-LINK jack on the FP-T5884
functions as RS-232C control jack. The EX-LINK
jack on the FP-T6374 functions as a service jack.
O PC_N
Connect to the video output jack on your PC.
Q
DVl iN (HDMI 1) (AUDIO-R/L)
Connect to the DVI audio output jack of an external device.
HDMI iN 1, 2
Connect to the HDMI jack of a device with an HDMI
output. (HDMI 1 supports HDMI-DVI IN and connection
from a PC.)
- This input can also be used as a DVl connection with
separate analog audio inputs. An optional HDMI/DVI
cable will be necessary to make this connection.
- When using an optional HDMI/DVl adapter, the DVl
analog audio inputs on your TV allow you to receive left
and right audio from your DVI device.
@ AUDIO-R/L (AV IN 1)
Audio inputs for external devices, such as a camcorder
or VCR.
@ S-VIDEO(AV IN 1)
S-Video input for external devices with an S-Video
output, such as a camcorder or VCR.
_)
VIDEO (AV IN 1)
Video input for external devices, such as a camcorder
or VCR.
_)
COMPONENT IN 1, 2
Component video (Y/PB/PR) and audio (R-AUDIO-L) inputs.
Side Panel Jacks
Use the right side panel jacks to connect a component that is used only occasionally,
The product color and shape may vary depending on the model.
such as a camcorder or video game.
HDMI IN 3
Connect to the HDMI jack of a device with an HDMI output.
WISELINK
Connect a USB mass storage device to view photo files (JPEG) and play audio files (MP3).
{]) S-VIDEO
(AV IN 2)
S-Video input for external devices with an S-Video output.
AVIN2
Video and audio inputs for external devices.
0
HEADPHONE
You can connect a set of headphones
disturbing other people in the room.
if you wish to watch a television program without
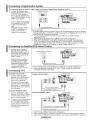
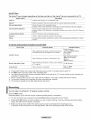
Remote Control
You can use the remote control up to a distance of about 23 feet from the TV. When using the remote, always
point it directly at the TV. You can also use your remote control to operate your VCR, Cable box, DVD player,
or Set-Top Box.
1o
O
POWER
Turns the TV on and off.
t_
NUMERIC BUTTONS
Press to directly select a channel.
_)
Press to backlight the VOL CH,
_)
OPress to select additional channels
(digital and analog) being broadcast
by the same station. For example,
to select channel '54-3", press "54",
then press '-" and '3".
@®®
®®®
O
Q
a
oo
t01Nu
VCR/DVD
- Rewind
MUTE
oo
o
Q
_)
t[_
_)
@
The performance of the remote control
may be affected by bright light.
(Referto pages63 (JPEG)and 69 (MP3))
REC
This remote can be used to control
recording on Samsung DVD
recorders. (Refer to page 74)
I_) t-. CH V
Press to change channels.
_)
volume.
MUTE
Press to temporarily cut off the
(_) UPMDOWN _'/LEFT_/
RIGHT_/ENTER
G*J
Use to select on-screen menu items
EXIT
Press to exit the menu.
and change menu values.
MENU
Displays the main on-screen menu.
S.MODE
_
INFO
Press to display information on the
TV screen.
Press to select the sound mode.
RETURN
Returns to the previous menu.
_)
Anynet+
Runs the Anynet+ functions and sets
up Anynet+ devices.
P.MODE
Press to select the picture mode.
t_) STILL
Press to stop the action during a
particular scene. Press again to
resume normal video.
Controls the caption decoder.
FAV.CH
Press to switch to your favorite
channels.
SLEEP
Press to select a preset time interval
for automatic shut off.
the visually impaired, and has Braille
points on the POWER, Channel,
Volume, STOP, and PLAY/PAUSE
buttons.
_)
* VOLPress to increaseor decrease the
(_) CAPTION
_)
PRE-CH
Tunes to the previous channel.
WBEUNK
This function enables you to view
and play photo (JPEG) and audio
files (MP3) from an external device.
sound,
_
This is a special remote control for
_)
Functions
- Stop
- Play/Pause
- Fast/Forward
®®®®
Press to display all of the available
video sources.
CB LIST
Used to display Channel Lists on the
screen,
ANTENNA
Press to select "AIR" or "CABLE".
and active source button (TV, DVD,
CABLE, STB, VCR) on the remote.
SOURCE
SRS
Selects SRS TruSurround XT mode.
_)
P.SIZE
Press to change the screen size.
_
PIP
Picture-in Picture ON/OFF.
1_) CH ^Iv
Displays the available channels in
sequence, (These buttons change
channels in the PIP window only.)
_)
MTS
Press to choose stereo, mono or
Separate Audio Program (SAP
broadcast).
_)
RESET
When your remote does not work,
change the batteries and press
the RESET button for 2-3 seconds
before use.
SET
Sets the remote to control your TV,
VCR, Cable, DVD player, or Set-Top
Box.
1_) TVIDVDISTBICABLENCR
Press to operate your TV, DVD
player, ST& CABLE (box), or VCR.
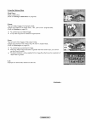
Installing Batteries in the Remote Control
1
Lift the cover at the back of the remote control upward as shown in the figure.
2
Install twoAAAsize
_-_--
3
_,_
batteries.
Make sure to match the "+" and "-" ends of the batteries with the diagram inside the
compartment.
Do not mix battery types, i.e. alkaline and manganese.
Close the cover as shown in the figure.
_,_ Remove the batteries and store them in a cool, dry place if you won't be using the
remote control for a long time. The remote control can be used up to about 23 feet
from the TV. (Assuming typical TV usage, the batteries last for about one year.)
If the remote control doesn't work, check the following:
1. Is the TV power on?
2. Are the plus and minus ends of the batteries reversed?
3. Are the batteries drained?
4. Is there a power cut, or is the power cord unplugged?
5. Is there a special fluorescent light or a neon sign nearby?
i Connections
Connecting VHF and UHF Antennas
If your antenna has a set of leads that look like this, see "Antennas with 300 Q Flat Twin
Leads" below.
If your antenna has one lead that looks like this, see "Antennas with 75 Q Round Leads".
If you have two antennas, see "Separate VHF and UHF Antennas".
Antennas
with 300 Q Flat Twin Leads
If you are using an off-air antenna (such as a roof antenna or "rabbit ears") that has 300 Q
twin flat leads, follow the directions below.
1
Place the wires from the twin leads under the screws on a 300-75 _ adapter (not supplied).
Use a screwdriver to tighten the screws.
2
Plug the adaptor into the ANT1 IN(AIR)orANT21N(CABLE)terminalonthebackoftheTV.
Antennas with 75 £_Round Leads
1
Plugthe antennaleadintotheANT 1IN (AIR)or ANT2 IN (CABLE)terminalon the backof theTV
S_j_arate
VHF and UHF Antennas
If you have two separate antennas for your TV (one VHF and one UHF), you must combine
the two antenna signals before connecting the antennas to the TV. This procedure requires
an optional combiner-adaptor (available at most electronics shops).
1 Connect both antenna leadsto the combiner
2
Plug the combiner into the ANT 1 IN (AIR) or ANT 2 IN (CABLE) terminal on the bottom of the
back panel.
Connecting Cable TV
To connect to a cable TV system,
Cable without
1
follow the instructions
a Cable Box
Plug the incoming cable into the ANT 2 IN(CABLE)
_-- Because this TV is cable-ready,
unscrambled cable channels.
Find the cable that is connected
terminal on the back of the TV.
you do not need a cable box to view
Connectin=q t£ a Cable Box that Descrambles
1
below.
All Channels
to the ANT OUT terminal on your cabte box.
_-- This terminal might be labeled "ANT OUT", "VHF OUT" or simply, "OUT".
2
Connect the other end of this cable to the ANT 2 IN(CABLE)
the TV.
Connecting
to a Cable Box that Descrambles
terminal on the back of
Some Channels
If your cable box descrambles only some channels (such as premium channels),
You will need a two-way splitter, an RF (A/B) switch, and four lengths of Antenna
at most electronics stores.)
1
follow the instructions below.
cable. (These items are available
Find and disconnect the cable that is
connected to the ANT IN terminal on your
cabte box.
This terminal might be labeled 'ANT IN_',
"VHF IN" or simply, "IN".
2
Connect this cable to a two-way splitter.
Incoming
cable
Splitter
Connect an Antenna cable between an
OUTPUT terminal on the splitter and the IN
terminal on the cable box.
Incoming
cable
Splitter
_
J
Cable
Box
Connect an Antenna cable between the
ANT OUT terminal on the cable box and the
B-IN terminal on the RF(A/B) switch.
Incoming
cable
4===
Splitter
.=_
RF (A/B}
Cable
Box
Switch
Connect another cable between the other
OUT terminal on the splitter and the A-IN
terminal on the RF (A/B) switch.
\ _
_J
Cable
RF (A/B)
Switch
Box
Connect the last Antenna cabte between
the OUT terminaI on the RF (A/B) switch
and the ANT 2 IN (CABLE) terminal on the
rear of the TV.
__
_
Spl{tter
_
RF
Sw
_
TV
Rear
(A/B)
ch
After you have made this connection, set the A/B switch to the "A" position for normal viewing. Set the A/B switch to the "B"
position to view scrambled channels. (When you set the A/B switch to "B", you wilt need to tune your TV to the cable box's
output channel, which is usually channel 3 or 4.)
Connecting a VCR
Video Connection
These instructions assume that you have already connected your TV to an antenna or a cable TV system (according
to the instructions on pages 9~10). Skip step 1 if you have not yet connected to an antenna or a cable system,
1
Unplug the cabte or antenna
from the back of the TV.
2
Connect the cable or antenna
to the ANT IN terminal on the
back of the VCR.
3
Connect anAntenna Cable
between the ANT OUT
terminal on the VCR and the
TV Rear Panel
VCR Rear Panel
ANT 1 IN(AIR) orANT 2 iN
(CABLE) terminal on the TV.
4
Connect a Video Cabte
between the VIDEO OUT
jack on the VCR and the AV
iN 1 [VIDEO] jack on the TV.
5
ConnectAudio
Cables
between the AUDIO OUT
jacks on the VCR and the AV
IN 1 [R-AUDIO-L] jacks on
the TV.
if you have a "mono"
(non-stereo) VCR, use a Yconnector (not supplied) to
hook up to the right and left
audio input jacks of the TV.
if your VCR is stereo, you
must connect two cables.
Each VCR has a different back panel configuration.
_-- When connecting a VCR, match the color of the connection
terminal to the cable.
S-Video Connection
Your Samsung TV can be connected to the S-Video jack of a VCR.
(This connection delivers a better picture when comparedto the regular Video connection above.)
1
To begin, follow steps 1-3
in the previous section to
connect the antenna or cable
to your VCR and your TV.
2
Connect an S-Video Cable
between the S-VIDEO OUT
jack on the VCR and the AV
IN 1 [S-VIDEO] jack on the
TV.
Connect Audio Cables
between the AUDIO OUT
TV Rear Panel
VCRReorPo°e,
'
...............
_,.. .....................................
,
®
i
i
.
!++++
,it ,_
+;+
,.
--"++"+--
j ..........
A _q3
jacks on the VCR and the AV
IN 1 [R-AUDIO-L] jacks on
the TV.
An S-Video may be included with your VCR. (If not, check your local electronics store.)
>_ Each VCR has a different back panel configuration.
_-- When connecting a VCR, match the color of the connection terminal to the cane.
Connecting
a Camcorder
The side panel jacks on your TV make it easy to connect a camcorder to your TV.
They allow you to view the camcorder tapes without using a VCR
Connect a Video Cable
TV Side Panel
(or S-Video Cable) between
the AV tN 2 [VIDEO]
(or S-VIDEO) jack on the TV
and the VIDEO OUT jack on
the Camcorder.
/
_'i .............. i_'_
--
--
_.amcoraer
Connect Audio Cabtes
between the AV IN 2
[UAUDIO-R] jacks on the TV
and the AUDIO OUT jacks on
the Camcorder.
_}
I
or
S-Video Cable{Not supplied)
EIVide
o Cable
(Not
supplied)
_1,_.
}
1
O
_"
........
+,; ......
_-- Each Camcorder
_AudioCable
Notsupplied
_[_--I
_"
has a different back panel configuration.
_-- When connecting a Camcorder, match the color of the connection terminal to the cable.
Connecting
a DVD PlayedCable
Box/Satellite
receiver (Set-Top Box)
The rear panel jacks on your TV make it easy to connect a DVD Player/Cable Box/Satellite receiver (Set-Top Box)
to your TV.
1
Connect Component Cables
between the COMPONENT
DVD Player / Cable Box/Satellite
receiver
(Set-Top
Box)
TV Rear Panel
IN 1 [Y, PB, PR] (or
COMPONENT IN 2 [Y, PB,
PR]) jacks on the TV and the
COMPONENT OUT [Y, P+,
PR]jacks on the DVD Player/
Cable Box/Satellite receiver
I+ ++ + +,%+J
" +
++P++
+++
+_m_mm,
(Set-Top Box).
2
ConnectAudio
Cabtes
between the COMPONENT
IN 1 [R-AUDIO-L](or
COMPONENT IN 2
[R-AUDIO-L]) jacks on the TV
and the AUDIO OUT jacks
on the DVD Player/Cable
Box/Satellite receiver (SetTop Box)
Component video separates the video into Y (Luminance (brightness)), PB
(Blue) and PR (Red) for enhanced video quality. Be sure to match the component
video and audio connections. For example, if connecting the video cable to
COMPONENT IN, connect the audio cable to COMPONENT IN also.
_-- Each DVD Player/Cable Box/Satellite receiver (Set-Top Box) has a different back
panel configuration.
When connecting a DVD Player/Cable Box/Satellite receiver (Set-Top Box), match
the color of the connection terminal to the cable.
Connecting a DVD PlayedCable Box/Satellite receiver (Set-Top Box) via HDMI
This connection can only be made if there is an HDMI Output jack on the external device. This connection will
provide the highest quality picture.
Connect an HDMI Cable
between the HDMI IN 2 on
the TV and the HDMI OUT on
DVD Player / Cable Box/Satellite
the DVD Player/Cable Box/
Satellite receiver (Set-Top
Box).
receiver
(Set-Top
TV Rear
Box)
Panel
Z_
EIHDMI
Cable
{Not
supplied)
What is HDMI?
• HDMI, or high-definition multimedia interface, is an interface that enables the
transmission of digital audio and video signals using a single cable.
• The difference between HDMI and DVl is that the HDM! device is smaller in size and
has the HDCP (High Bandwidth Digital Copy Protection) coding feature installed.
_-- Each DVD Player/Cable Box/Satellite receiver (Set-Top Box) has a different back
panel configuration.
_,_ When connecting via HDM!, you do not need to connect Audio Cables. You only
need to connect Audio cables when connecting via HDMI/DVt.
_,_ The TV may not output sound and pictures may be displayed with abnormal color
when DVD players/Cable Boxes/Satellite receivers supporting HDMI versions older
than 1.3 are connected. When connecting an older HDMI cable and there is no
sound, connect the HDMI cable to the HDMI IN 1 jack and the audio cables to the
DVl IN (HDMI1) [R-AUDIO-L] jacks on the back of the TV. tf this happens, contact
the company that provided the DVD player/Cable Box/Satellite receiver to confirm
the HDMI version, then request an upgrade.
_-- HDMI cables that are not 1.3 may cause annoying flicker or no screen display.
Connecting
This connection
1
a DVD Player/Cable Box/Satellite
receiver (Set-Top Box) via DVl
can only be made if there is a DVl Output jack on the external
Connect a HDMI/DVl Cable
DVD Player / Cable Box/Satellite
receiver
device.
(Set=Top Box)
TV Rear Panel
or DVI-HDMt Adapter
between the [HDMI IN 1] jack
on the TV and the DVl jack
on the DVD Player/Cable
Box/Satellite receiver (SetTop Box).
2
ConnectAudio
Cables
between the DV! IN (HDMI 1)
JR-AUDIO-L] jack on the TV
and the AUDIO OUT jacks
on the DVD Player/Cable
Box/Satellite
Top Box).
_lAudio
receiver (Set-
EIHDMI/DVI
Cable
(Not
Cable
supplied)
(Not
supplied}
_-- Each DVD Player/Cable Box/Satellite receiver (Set-Top Box) has a different back
panel configuration.
_,_ When connecting a DVD Player/Cable Box/Satellite receiver (Set-Top Box), match
the color of the connection terminal to the cable.
_,_ When using an HDMI/DVl
cable connection,
you must use the HDMI IN1 terminal.
Connecting a Digital Audio System
The rear panel jacks on your TV make it easy to connect a Digital Audio System to your TV.
1
Connect an Optical Cable
between the DIGITAL AUDIO
OUT (OPTICAL) jacks on
the TV and the Digital Audio
Input (OPTICAL)jacks
on the
Digital Audio System.
When a Digital Audio System
is connected to the "DIGITAL
AUDIO OUT (OPTICAL)"
jack:
Decrease the gain (volume)
of the TV, and adjust the
volume level with the
system's volume control.
Digital
Audio System
TV Rear Panel
What is OPTICAL?
. An optical cable converts an electric signal into an optical light signa!, and transmits
it through glass fibers. S/PDtF is a transmission system of digital audio in the form of
a light wave that uses a glass conductor.
5.1CH audio is possible when the TV is connected to an external device
supporting 5.1CH.
_,_ Each Digital Audio System has a different back panel configuration.
_-- When the COMPONENT IN or HDM! IN jacks are connected, the Optical jack
on the TV outputs 2 channel audio only. if you want to hear 5.1 channel audio,
connect the DIGITALAUDIO
OUT (OPTICAL)jack
on the DVD player or Cable/
Satellite Box directiy to an Amplifier or Home Theater, not the TV.
Connecting an Amplifier/DVD Home Theater
Connect Audio Cables
between the AUDIO OUT
[R-AUDIO-L] jacks on the TV
and AUDIO IN [L-AUDIO-R]
jacks on the Amplifier/DVD
Home Theater.
When an audio amplifier is
connected to the "AUDIO
OUT [R-AU DIO-L]" jacks:
Decrease the gain (volume)
of the TV, and adjust the
volume level with the
Amplifier's volume control.
Connecting a PC
Using the D-Sub Cable
1 Connect a D-Sub Cable
2
TV Rear Panel
Amplifier/DVD
Home Theater
_-- Each Amplifier/DVD Home Theater has a different back panel configuration.
When connecting an Amptifier/DVD Home Theater, match the color of the
connection terminal to the cable.
Using the D-Sub Cable
between PC IN [PC] jack on
the TV and the PC output
jack on your computer.
Connect a PCAudio Cable
between the PC IN [AUDIO]
jack on the TV and the Audio
Out jack of the sound card on
your computer.
Ei.C.°dio
Cob,e
,.o,
supp,edl
D-Sub
Using the HDMI/DVI Cable
1 Connect a HDMI/DVI cable
between the [HDMI tN 1] jack
on the TV and the PC output
jack on your computer.
2
TV RearPanel
Using the HDMI/DVI
Cable
(Not
supplied)
Cable
TV RearPanel
Connect a 3.5 mm Stereo piug
to 2 RCA cable between the
DVI IN (HDMI 1)[R-AUDIO-L]
jack on the TV and the Audio
Out jack of the sound card on
your computer.
_
HDMI/DV_
Cable
(Not
supplied)
Each PC has a different back panel configuration.
When connecting a PC, match the color of the connection terminal to the cable.
_-- When using an HDM!/DVl cable connection, you must use the HDMI IN1 terminaI.
Operation
Turning the TV On and Off
Press the POWER button on the remote control.
You can also use the POWER button on the TV.
It may take a while when your TV starts.
[ ........................
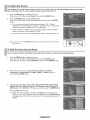
Plug & Play Feature
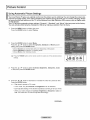
When the TV is initially
1
powered On, basic settings
proceed automatically
and subsequently:
Press the POWER button on the remote control.
The message Menu language,
displayed.
Shop Mode, Channels
and Time will be set. is
Press the ENTER button, the Select the language of the OSD menu is
automatically displayed.
Press the A or T button to select language, then press the ENTER button.
The message Select Home Mode when installing this TV at home. is
automatically displayed.
Press the _ or _ button to select Shop or Home, then press the ENTER
button.
_,_ The default selection
is Home.
_,_ We recommend setting the TV to Home mode for the best picture in your
home environment.
_-- Shop mode is only intended for use in retail environments.
_,_ If the unit is accidentally set to Shop mode and you want to return to
Dynamic (Home) mode, press any Volume button and then hold down the
MENU button for five seconds on the TV panel.
Press the _, or T button to memorize the channels of the selected connection.
Press the ENTER button to select Start.
_,_ If the antenna is connected to ANT1 IN(AIR), select Air and if it is connected
to ANT 2 IN(CABLE), select Cable.
_,_ If both ANT 1 IN(AIR) and ANT 2 IN(CABLE)
select the Air + Cable.
are connected,
_-- In Cable mode, select the correct analog signal cable system source among
STD, HRC, and IRC by pressing the J, or _' button, then press the ENTER
button. If you have Digital cable, select the cable system signal source for
both Analog and Digital. Contact your local cable company to identify the
type of cable system that exists in your particular area.
To memorize the channels, press the _ button to select Start, then press
the ENTER button.
Contact your local cable company to identify the type of cable system that
exists in your particular area.
Con_nued...
J
The TV wilt begin memorizing all of the available channels.
After all the available channels are stored, the Auto program menu reappears.
Press the ENTER button when channel memorization is complete.
The Clock Mode menu is automatically displayed.
_,_ To stop the search before it has finished, press the ENTER button with Stop
selected.
Press the A or _' button to select Manual if you want to set the current
time manually, then press the ENTER button. Set current date and time. is
displayed.
_--
If you select Auto, Set to daylight
step 9.
savings
time. is displayed, then go to
Press the 4 or _, button to move to Month, Day, Year, Hour, Minute, or
am/pro. Set the date and time you want by pressing the A or _' button,
then press the MENU button.
_-- You can set the Month, Day, Year, Hour, and Minute directly by pressing
the number buttons on the remote control.
The message Enjoy your watching, is displayed.
When you have finished, press the ENTER button.
_,_ Even if the ENTER button is not pressed, the message wilt automatically
disappear after several seconds.
Setting
9
the Clock Automatically
Press the A or T button to select On or Off, then press the ENTER button.
Select the time zone in which you live. menu is automatically displayed.
10 Press the A or T button to highlight the time zone for your local area.
Press the ENTER button.
If clock is not automatically
set, see page 48 to set the clock.
11 The message Enjoy your watching, is displayed.
When you have finished, press the ENTER button.
_,_ Even if the ENTER button is not pressed, the message wilt automatically
disappear after several seconds.
Continued...
_ou
want to reset this feature...
1
Press the MENU button to display the menu.
Press the A or T button to select Setup, then press the ENTER button.
2
Press the ENTER button to select Plug & Play. For further details on setting up
options, refer to the page 15~16.
_,_ The Plug & Play feature is only available
in the TV and DTV mode.
Changing Channels
_the
Channel
Buttons
Press the CH A
or CH v
_the
1
Number
[_____[[
..................
2:::_JL___Jl__
........... _r-
Buttons
--'L_---t:j.............
Press the number buttons to go directty to a channel. For example, to select
channel 27, press 2, then 7.
The TV wilt change channels when you press the second number.
Using the "-"
Button
pEE4;H
The "-" button is used to select stations that broadcast
1
//oo
G I4'
o
button to change channels.
_,_ When you press the OH A or OH V button, the TV changes channels in
sequence. You will see all the channels that the TV has memorized.
(The TV must have memorized at least three channels). You will not
see channels that were either erased or not memorized. See page 19 to
memorize channels.
a digital signal.
For example, for Channel 7-1, press 7, then =, then 1.
_,_ HD indicates the TV is receiving a Digital High Definition signal.
SD indicates the TV is receiving a Standard Definition signal.
_,_ For quick channel change, press the number buttons, then press the ENTER
button.
_the
PRE-CH
Button
to select the Previous
Channel
Use the number buttons to quickly tune to any channel.
1
Press the PRE-CH button. The TV will switch to the last channel viewed.
_,_ To quickly switch between two channels that are far apart, tune to one
channel, then use the number button to select the second channel.
Then use the PRE-CH button to quickly alternate between them.
,-----,----__---__---__-----,,-----,
i
"
.....@ ®
.....
/'
i
.....
Adjusting the Volume
the Volume
1
Buttons
Press the VOL + or VOL - button to increase or decrease
the votume.
Using the Mute Button
At any time, you can cut off the sound using the MUTE button.
1
Press MUTE and the sound cuts off.
The word "Mute" win appear in the lower-left corner of the screen.
2
To turn mute off, press the MUTE button again, or simply press the VOL + or
VOL - button.
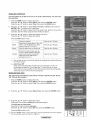
Viewing the Display
The display
identifies the current channel and the status
of certain audio-video
Press the INFO button on the remote control.
The TV win display the channel, the type of sound, and the status of certain
picture and sound settings.
Press the INFO button once more or wait approximately 10 seconds and it disappears
automatically.
Viewing the Menus
1
With the power on, press the MENU button.
The main menu appears on the screen, its left side has five icons:
Picture, Sound, Channel, Setup, input.
2
Use the A or T button to select one of the five icons.
Then press the ENTER button to access the icon's sub-menu.
3
Press the EXIT button to exit.
_-- It takes about one minute until the omscreen
menu disappears.
settings.
Memorizing the Channels
Your TV can memorize and store all of the available channels for both air and cable channels. After the available
channels are memorized, use the CH A or CH v button to scan through the channels. This eliminates the need
to change channels by entering the channel digits. There are three steps for memorizing channels: selecting a
broadcast source, memorizing the channels (automatic) and adding and deleting channels (manual).
Seiectin_the
Video _nal-source
Before your television can begin memorizing the available channels, you must
specify the type of signal source that is connected to the TV (i.e. an air or a cable
system).
1
Press the MENU button to display the menu.
Press the A or T button to select Channel, then press the ENTER button.
2
Press the ENTER button select Antenna.
Press the A or T button to select Air or Cable, then press the ENTER button.
Press the EXIT button to exit.
Storincl Channels in Memor_L_AutomaticMethod_
1
Press the MENU button to display the menu.
Press the A or T button to select Channel, then press the ENTER button.
2
Press the A or T button to select Auto Program,
button.
then press the ENTER
3
Press the A or T button to select the antenna connection,
ENTER button.
then press the
_-- Air: "Air" antenna signa!.
Cable: "Cable" antenna signal.
Air+Cable: "Air" and "Cable" antenna signals.
_-- If the antenna is connected to ANT 2 IN (CABLE), select Cable and if it is
connected to ANT 1 IN (AIR), select Air.
If both ANT 1 IN and ANT 2 IN are connected,
select the Air + Cable.
_-- If you selected Air, then go to step 5.
4
Press the A or T to select the correct analog signal cable system source
among STD, HRC, and IRC, then press the ENTER button. If you have Digital
cable TV, select the cable system signal source for both Analog and Digital.
_-- If you have Digital cable TV, select the signal source for both Analog and
Digital.
_-- STD, HRC, and IRC identify various types of cable TV systems. Contact
your local cable company to identify the type of cable system that exists in
your particular area. At this point the signal source has been selected.
5
The TV begins memorizing att available stations.
If you want to stop Auto Programming, press the ENTER button. The Stop
Auto Program? message wilt be displayed. Select Yes by pressing the 4 or _button.
Press the EXiT button to exit.
The TV must be connected to antenna/cable in order to receive digitat TV
signals. Even if a particular channel is deleted from the memory, you can
always tune to that channel directly by using the number buttons on the
remote control.
• All available DTV and analog channels are automatically
memory.
• It takes approximately
stored in
3 to 10 minutes to memorize channels.
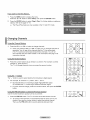
Setting Up Your Remote Control
After your remote control has been properly set up, your remote control can operate in five different modes:
TV, VCR, Cable, DVD, or Set-Top Box. Pressing the corresponding button on the remote control allows you to
switch among these modes, and control whichever piece of equipment you choose.
_-- The remote control might not be compatible with all DVD Players, VCRs, Cable boxes, and Set-Top Boxes.
SettingUj3U the Remote to Operate Your VCR
1
Turn off your VCR
2
Press the VCR button on your TV's remote control.
3
Press the SET button on your TV's remote control.
4
Using the number buttons on your remote control, enter three digits of the VCR code listed
on page 22 of this manual for your brand of VCR. Make sure you enter three digits of the
code_even if the first digit is a "0". (If more than one code is listed, try the first one.)
5
Press the POWER button on the remote control. Your VCR should turn on if your remote
is set up correctly.
If your VCR does not turn on after set-up_ repeat steps 2, 3 and 4, but try one of the other codes
listed for your brand of VCR If no other codes are listed, try each VCR code, %0 through 080.
i......
[
......
i
i
[......
Jk.OOO®
FAV,C_
r-7
1__
C_
EZD _
_Os_
EE3
ORFS_
%_MSUNG
Note on Using Remote Control Modes: VCR
When your remote control is in VCR mode_the volume buttons still control your TV's volume.
Settin_UU
the Remote to Operate Your Cable Box
1
Turn off your cable box.
2
Press the CABLE button on your TV's remote control.
3
Press the SET button on your TV's remote control.
4
Using the number buttons on your remote control, enter three digits of the cable box code
listed on page 23 of this manual for your brand of cable box. Make sure you enter three
digits of the code, even if the first digit is a "0". (If more than one code is listed, try the first
one.)
5
Press the POWER button on the remote control.
Your cable box should turn on if your remote is set up correctly.
o
II
®®
If your cable box does not turn on after set-up, repeat steps 2, 3 and 4, but try one of the other
codes listed for your brand of cable box. If no other codes are listed, try each code, 000 through
046.
FAV,
C_
C_O_
CID C1:13_
_Osg
E_
O_ESg
%_NgiJN[;
Note on Using Remote Control Modes: Cable Box
When your remote control is in CABLE mode, the volume buttons still control your TV's volume.
Continued...
Setting
_
the Remote to _erate
Your DVD
1
Turn off your DVD.
2
Press the DVD button on your TV's remote control.
3
Press the SET button on your TV's remote control.
4
Using the number buttons on your remote control, enter three digits of the DVD code listed
on page 24 of this manual for your brand of DVD. Make sure you enter three digits of the
code, even if the first digit is a '0". (If more than one code is listed, try the first one.)
5
Press the POWER button on the remote control.
Your DVD should turn on if your remote is set up correctly.
...........................
6-------_..............
FOtt_
If your DVD does not turn on after set-up, repeat steps 2, 3 and 4, but try one of the other codes
listed for your brand of DVD. If no other codes are listed, try each code, 000 through 141.
SO_Rt_
\'
I '
A_
c_r
WlSE_K
R_C
....... OOO®
........
CZ3 CZ3 _
!_OSB
C_
O_&_T
_AN$UNG
Note on Using Remote Control Modes: DVD
When your remote control is in DVD mode, the volume buttons still control your TV's volume.
Setting
_
the Remote to _erate
Your Set Top Box
1
Turn off your STB.
2
Press the STB button on your TV's remote control.
3
Press the SET button on your TV's remote control.
4
Using the number buttons on your remote control, enter three digits of the STB code listed
on page 23 of this manual for your brand of STB. Make sure you enter three digits of the
code, even if the first digit is a '0". (If more than one code is listed, try the first one.)
5
Press the POWER button on the remote control.
Your STB should turn on if your remote is set up correctly.
rower
SOURCE
@O
®®
If your STB does not turn on after set-up, repeat steps 2, 3 and 4, but try one of the other codes
listed for your brand of STB. If no other codes are listed, try each code, 000 through 074.
_AMSUHG
Note on Using Remote Control Modes: STB
When your remote control is in STB mode, the volume buttons still control your TV's volume.
Remote Control Codes
VCR
Brand
SAMSUNG
ADMIRAL
AIWA
AKAI
AUDIO DYNAMICS
BELL&HOWELL
BROKBONIC
CANDLE
CANON
CITIZEN
COLORTYME
CRAIG
CURTISMATHES
DAEWOO
DB
DIMENSIA
DYNATECH
ELECTROHOME
EMERSON
FISHER
FUNAI
GENERALELECTRIC
GOVIDEO
LG(Goldstar)
HARMANKARDON
HITACHI
INSTANTREPLAY
JC PENNEY
JCL
KENWOOD
KLH
LLOYD
LOGIK
LXl
JVC
MAGNAVOX
MARANTZ
MARTA
KONIA
ORLON
MEI
MEMOREX
MGA
MIDLAND
MINOLTA
Code
000 001002 003004 005077078 079
020
025
004 027032
007 026
018
022
002 003006 008015 055
021 056
002 003006 008015 055
007
002 024
002 007008 017021 025056064 066
003 010011012 013014015 016
007 026
017
025
034
001 003006 021022 025030032 034
040 047050 052060 063065066 067
069 073
018 024028 029048 05t 061
025
002 005017 021056
002
Brand
MITSUBISHI
MONTGOMERY
WARD
MTC
MULTITECH
NEC
OPTIMUS
PANASONIC
PENTAX
PENTEXRESEARCH+
PHILCO
PHILIPS
PIONEER
PORTLAND
PROSCAN
QUARTZ
QUASAR
RADIOSHACK/
REALISTIC
RCA
006 007008 009010
007
019 025041 042074
021
002 007018 019021 026037041
054 056
007 008018 021026 037
007 008018 026037
070
025
038
025
081 082083
021 056059
007 008018 021026 037062
006
036
073 074075 076
021
006 021024 025
034
005
019 041075
SHIMTOM
SIGNATURE
SONY
SYLVANIA
SYMPHONIC
TANDY
TASHIKA
TATUNG
TEAC
TECHNICS
TEKNIKA
TMK
TOSHIBA
TOTEVlSION
UNITECH
VECTORRESEARCH
VICTOR
VIDEOCONCEPTS
VlDEOSONIC
WARDS
SANSUI
SANYO
SCOTT
SEARS
SHARP
YAMAHA
ZENITH
Code
019034 041046
020
002025
002005 025038
007008 018026 037062 064
020
021056 071072
019041 075
008
021056 059
021080
019026 039053
015049 055
017
018
021056
006018 020021 024025 029034
048056
002017 019021 035041 043057
068076
026
018024
003047 052067
006018 019024 028029 041048 051
020034 045015
027033 038058
025
027033 044
021025 056059
025
018025
006
037
025037 068
021
006021 025031
066
003019 029051 052
002006
002
007026
026
007026
002
002003 006019 020021 024025 034
038041
007008 018026 037
023027 033
Continued...
CABLE BOX
Brand
SAMSUNG
GI
HAMLIN
HITACHI
JERROLD
MACOM
MAGNAVOX
OAK
PANASONIC
PHILIPS
PIONEER
RCA
REGAL
Code
0% 001002 003004 005006007
041
003 024031
025 030
038 039
025 030
019 023028
026
003 022027 037044
019 021023 028
004 018020 044
014 022040
003
Brand
REGENCY
SA
SCIENTIFICATLAN
SPRUCER
STARGATE2000
SYLVANIA
TEXSCAN
TOCOM
UNIVERSAL
VIEWSTAR
WARNERAMEX
ZENITH
Code
015023
042043
042043
022
036
016
016
032
033034
019021 023028
046
017029 035037045
8AMBUNG BET-TOP BOX
Product
GroundwaveSTB
CABLESTB
SatelliteSTB
Code
000001 002008 013
000004 008013
000003 008013
BET-TOP BOX
Brand
Code
Brand
Code
ALPHASTAR
ANAM
CHANNELMASTER
CROSSDIGITAL
CHAPARRAL
DIRECTTV
023
043
018034
019
035
015016 017019 022045 060
061062 065066 067068
074
069070
069
018024 032
027
025069 070071
069
069
065
046047 048063 064
069
056
022
015017
020
020
059
063
069070
LG(Goldstar)
MAGNAVOX
MEMOREX
MOTOROLA
MACOM
MITSUBISHI
NEXTLEVEL
PHILIPS
044073
016021 036038039 040041 042
016
064
018
015
047048 064
015016 017021033 036038 039
04004I 042067
046049 050063
058059 061062
016
065066
051052 053065066
064
057
020027
026
031
005006 007
064
064
054060
015017 028029030 072
060066
016021 037055056 057
02403t 068
DAEWOO
DISHNETWORKSYSTEM
DISHPRO
DRAKE
DXANTENNA
ECHOSTAR
EXPRESSVU
GOI
GE
GENERALINSTRUMENT
HTS
HOMECABLE
HITACHI
HUGHESNETWORK
IQ
IQPRISM
JANEIL
JERROID
JVC
PRIMESTAR
PANASONIC
PAYSAT
PROSCAN
RCA
RADIOSHACK
REALISTIC
STS
STARTRAK
SKY
SKY LIFE
SHACK
STARCHOICE
SONY
TOSHIBA
ULTIMATETV
UNIDEN
ZENITH
Continued...
8AMSUNG DVD
Product
DVD
DVDR
BDRecord
VCR COMBO
VCR Record
DHRCOMBO
Code
0% 001 002
003004
005006
007008 009010 011
012
013
Product
HomeTheaterVCRCOMBO
HDDRecordCOMBO
TWINTRAYCOMBO
STB DVDCOMBO
DVDReceiver
AVReceiver
Code
014015 016
017
018
019
020
021
DVD
Brand
ANAM
AUDIOVOX
AUDIOLOGIC
ANABA
APEX DIGITAL
AIWA
BROKSONIC
BLAUPUNKT
B&K
CURTISMATHES
CYBERHOME
CLARION
CIRRUS
CINEVlSlON
DAEWOO
DENON
FARENHEIT
FISHER
GPX
GOVIDEO
GE
GREENHILL
HITACHI
I-tlTEKER
HOYO
I-tARMAN/ KARDON
IRT
INTEGRA
JBL
JVC
JATON
KENWOOD
KISS
KONKA
KLH
Code
030
075
085
072
070 071074 086083084 088
111112
1t4
062
074
122123
027
065 077078 079082
080 125
08I
095
066
146
067 068
090
060
061 089 133135
069 074
074
064 113
071
073
091 110
089
092
091
022 033 115116
073
05t 108 109
073
059 100 106107
074 075
LG(Goldstar)
LOEWE
LASONIC
MOBILEAUTHORITY
MEMOREX
MALATA
MAGNAVOX
MINTEK
MONYKA
025 031
057
058
054
055
056
076 093
074 094
073
Brand
NORCENT
NEXTBASE
NEC
NANTAUS
NESA
OPTOMEDIAELECTRONICS
OPTIVlEW
ONKYO
PHILCO
PRINCETON
PROSCAN
PANASONIC
PHILIPS
ROTEL
RIO
RCA
RAITE
ROWA
SAMPO
SONY
SHERWOOD
SVA
SYLVANIA
SHARP
SANSUI
SANYO
SI-tlNSONIC
SANYO
THOMSON
TOSHIBA
TECHNICS
TVIEW
TOKAI
TEAC
TECHWOOD
TREDEX
URBANCONCEPTS
VENTURER
VOCOPRO
YAMAHA
YAMAKAWA
XWAVE
ZENITH
Code
048049 050
052
053
144
074
105
072
076092 119
044045
046047
023
024034 124 134136 137138
036076
117118
120
023035 074075131 132
073
038
104
026029 I26 127128 129
130 141
039041
042
043093
140
062
062
094
090
145
028062 076
139
072
073
096
097
098099 101
076
075
102
032063
040073
103
076 121
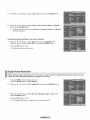
To Select the Source
Use to select TV or other external input sources such as DVD players or Cable Box/Satellite receivers (Set-Top
Box) connected to the TV. Use to select the input source of your choice.
1
Press the MENU button to display the menu.
Press the A or T button to select input, then press the ENTER button.
2
Press the ENTER button to select Source
List.
Press the A or _ button to select the signal source, then press the ENTER
button.
_-- You can choose between the following sets of jacks: AV1, S-Video1,
Component1, Component2, PC, HDMI1, or HDMI2 on the TV's rear panel
and AV2, S-Video2, or HDMI3 on the TV's side panel.
_-- HDMI1, HDMI2, or HDMI3 input can only be selected when the external
device is turned on and connected via HDMI.
_,_ You can choose only those external devices that are connected to the TV.
You can also press the SOURCE button on the remote control to view an external
signal source.
To Edit the input Source Name
You can name the device connected to the input jacks to make your input source
1
Press the MENU button to display the menu.
Press the A or T button to select input, then press the ENTER button.
Press the A or T button to select Edit Name, then press the ENTER button.
2
Press the A or _' button to select AVI, AV2, S-Videol,
S-Video2,
Component1,
Component2,
PC, HDMII, HDMI2, or HDMI3 input jack,
then press the ENTER button.
Press the A or T button to select VCR, DVD, D-VHS, Cable STB, HD STB,
Satellite STB, PVR STB, AV Receiver, DVD Receiver, Game, Camcorder,
DVD Combo, PC, VOD STB, or TV input source, then press the ENTER button.
Press the EXIT button to exit.
_,_ When a PC with a resolution of 1920 x 1080@60Hz is connected to the
HDMI IN 1 port, you should set the HDM!I mode to PC in the Edit Name of
the Input mode. if the HDMI1 mode is not PC, it works depending on the TV
setting.
selection
easier.
i Picture Control
Using Automatic
Picture
Settings
Your new Plasma TV gives you optimal control over the picture you're watching. You can change the screen size,
improve the image quality, even watch something else without turning off what you're currently watching.
Please
be aware that the best picture on this TV will be obtained from High Definition (HD) sources such as Digital cable
or DVD players.
Your TV has three automatic picture settings ("Dynamic",
"Standard",
and "Movie") that are preset at the factory.
You can activate either Dynamic, Standard, or Movie by making a selection from the menu.
1
Press the MENU button to display the menu.
Press the ENTER button to select Picture.
Press the ENTER button to select Mode.
Press the ,tk or _' button to select the Dynamic,
setting, then press the ENTER button.
Standard,
or Movie picture
., Choose Dynamic to increase the clarity and sharpness of the picture.
, Choose Standard for general TV watching mode.
. Choose Movie when watching movies.
......
Press the P.MODE button on the remote control to select one of the standard picture
settings.
',
3
Press the A or T button to select Contrast,
or Tint, then press the ENTER button.
Press the 4 or I_ button to decrease
Press the ENTER button.
Brightness,
Sharpness,
Color,
or increase the value of a particular
item.
_,_ • Tint doesn't operate in PC mode.
• In PC mode, only the Contrast
and Brightness
• Each adjusted setting will be stored separately
can be selected.
according to its input mode.
• When you make changes to Contrast, Brightness,
Sharpness,
Tint. The OSD color wilt also be adjusted accordingly.
Color,
or
Continued...
V"
AV.¢_
r_F110N
......
I_
',
__"__.___.___.__.__"
.....
5
Press the A or T button to select Color Tone, then press the ENTER button.
Press the ,_ or T button to select 0ool2,
then press the ENTER button.
Cool1, Normal,
_,_ When the picture mode is set to Dynamic
cannot be selected.
Resetting
7
the Picture Settings
to the Factory
or Standard,
Warm1, or Warm2,
Warm1 and Warm2
Defaults
Press the A, or T button to select Reset, then press the ENTER button.
Press the A or T button to select OK, then press the ENTER button.
Press the EXIT button to exit.
_-- Each picture mode can be reset.
Digital Noise Reduction
If the broadcast signal received by your TV is weak, you can activate
reduce any static and ghosting that may appear on the screen.
1
Press the MENU button to display the menu.
Press the ENTER button to select Picture.
2
Press the A or T button to select Digital
the Digital
NR, then press the ENTER button.
Press the A or T button to select Off, Low, Mediunm,
press the ENTER button.
High, or Auto, then
Press the EXiT button to exit.
_-- The Digital NR function is available in all modes except PC.
Noise Reduction
feature
to help
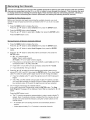
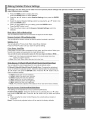
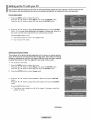
Changing the Screen Size
Occasionally, you may want to change the size of the image on your screen. Your TV comes with six screen size
options, each designed to work best with specific types of video input. Your cable box or satellite receiver may
have its own set of screen sizes as well.
in general you should view the TV in 16:9 mode as much as possible.
1
Press the MENU button to display the menu.
Press the ENTER button to select Picture.
2
Press the A or _' button to select Size, then press the ENTER button.
3
Press the A or T button to select the screen format you want.
Press the ENTER button.
Press the EXiT button to exit.
' 16:9 : sets the picture t0 16:9 wide model
' Zoomt : Magnifies the size Ofthe picture On the Screen.
* Zoom2 : Expands the Zoom1 forma t picture.
'Wide Fit : Enlarges the aspect ratio of the picture to fit the entire screen.
' 4:3 : Sets the picture to 4:3 normat mode.
*Just Scan : Use this function to see the full image without any cutoff when HDMI;
Component (720p/108Oi/tOSOp) or DTV(1OSOi) signals are input.
Press the P.SIZE button on the remote control to change the picture size.
...... ......
I
u
PJ_oD_
s._
L___[l_
I
16:9
Sets the Dic[ure to 16:9
wJac moae,
Zooml
The screer s_zewhen
W_aescreen s vertical y
en_argea,
Zoom2
The screen s_zewnen
the Zoom1 screen is
erbcatty en_argea.
Wide Fit
4.'3
Sets the picture to 4:3
norma_moae,
Just Scan
Use this function [o see [ne
full image wJ[nou[ any cu[off
_nen HDMI, Comaonen[
ff20D/1O80i/1O80pt or
DTV(1080i) signals are inpuL
Enlarges the aspect rat o
of the p_c[ure[o fk me
en_lrescreen.
. Some cable boxes and satellite receivers have their own set of screen sizes,
which may differ from the ones above.
. In TV, VIDEO, S-VIDEO, and COMPONENT(480i,
480p) modes, all screen
modes can be selected. (16:9 -_ Zoom1 -_ Zoom2 -_ 4:3)
. in COMPONENT(720p,
1080i) or HDMI(720p, 1080i) mode, 16:9, 4:3 and
Wide Fit can be selected.
. in Zoom1, Zoom2 and Wide Fit
screen by pressing the A or T
. You can not change the picture
. When Double (_,
r_) mode
be set.
. Wide Fit
Wide Fit
vertically.
does not
modes, you can move the picture on the
button.
size when PiP is set to Double.
has been set in PIP, the Picture Size cannot
can be used when watching a Digital HD (High Definition) signal.
sets the optimum picture format by expanding it both horizontally and
For example, you can reset the picture in 4:3 format to 16:9. Wide Fit
support all external devices (DVD, VCR etc.).
FAV,¢_
r,_IlON
i
s_u. P.s_z_
|j
:#
I
JJ ___J
I
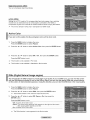
Making Detailed Picture Settings
Samsung's new TVs allow you to make even more precise picture settings than previous models. See below to
make Detailed picture settings.
1
Press the MENU button to display the menu.
Press the ENTER button to select Picture.
2
Press the A or T button to select Detailed
button.
3
Select the desired Detailed Settings option by pressing the A or _' button, then
press the ENTER button.
4
When you are satisfied with your setting, press the ENTER button.
Press the EXIT button to exit.
When the picture mode is set to Dynamic,
selected.
Black _hJst:
Settings,
Detailed
then press the ENTER
Settings
cannot be
OfflLowlMediumlHig_h
You can select the black level on the screen to adjust the screen depth.
Dynamic Contrast: OfflLowlMediumlHi[__
You can adjust the screen contrast so that the optimal contrast is provided.
Gamma:
-3 ~ 3
You can adjust the Primary Color (Red, Green Blue) Intensity.
Press the 4 or !1_button until you reach the optimal setting.
Color Sjoace: AutoNVide
Color space is a color matrix composed of red, green, and blue colors. Select your
favorite color space and experience the most natural color.
You can set the color reproduction space for the input signal to Auto or Wide.
, Auto: Auto Color Space automatica!!y adjusts to the most natural color tone
based on program sources.
• Wide: Wide Color Space offers deep and rich color tone.
White
Balance:
R-OffsetlG-OffsetlB-OffsetlR-GainlG-GainlB-GainlReset
You can adjust the color temperature
for more natural picture colors.
R-OffsetlG-OffsetlB-OffsetlR-GainlG-GainlB-Gain:
Changing the adjustment
value will refresh the adjusted screen. Select the desired option by pressing the
A. or V' button, then press the ENTER button. Press the 4 or _- button until you
reach the optimal setting.
: R 0ffset: Adjusts the red color darkness.
G offset: Adjusts the green Color darkness.
- B offset: Adjusts the blue color darkness.
° R gaim Adjusts the red color brightness.
° G gain: Adjusts the green color brightness.
= B gain: Adjusts the blue color brightness.
• Reset: The previously adjusted white balance will be reset to the factory defaults.
Color Control:
PinklGreenlBluelWhitelReset
This setting can be adjusted to suit your personal
preferences.
Pink/Green/Blue/VVhite:
Select the desired color by pressing the A or T button,
then press the ENTER button. Press the 4 or _- button until you reach the optimal
setting.
When using the My Color Control Feature, the current picture remains in
movement.
Reset: The previously
adjusted colors will be reset to the factory defaults.
Ed_
Enhancement:
You can emphasize
xvYCC:
Off/On
object boundaries.
Off/On
Setting the xvYCC mode to On increases detail and color space when watching
movies from an external device (ie. DVD ptayer) connected to the HDMt or
Component IN jacks.You must set the Picture Mode to Movie to enjoy this feature.
The xvYCC function works only in Component
or HDMI mode.
Active Color
if you turn on this option,
the blue and green colors wi!! be more vivid.
1
Press the MENU button to display the menu.
Press the ENTER button to select Picture.
2
Press the A or T button to select Active
3
Press the A or T button to select Off or On, then press the ENTER button.
Color,
then press the ENTER button.
Press the EXIT button to exit.
_,_ This function is not available in PC mode.
_,_ This function is not available in Standard
or Movie mode.
DNle (Digital Natural image engine)
This TV includes the DNle function to provide high visual quality. If you set DNle to on, you can view the screen
with the DNle feature activated. If you set the DNle to Demo, you can view the applied DNle and normal pictures
on the screen, for demonstration
purposes. Using this function, you can view the difference
in the visual quality.
1
Press the MENU button to display the menu.
Press the ENTER button to select Picture.
2
Press the A or T button to select DNle, then press the ENTER button.
_-_ This function doesn't work when the Input Source is PC.
3
Press the A or 'f' button to select Off, Demo or On, then press the
ENTER button.
Press the EXIT button to exit.
. Off: Switches 0ff the DNle mode.
• Demo: The screen before applying DNle appears on the right and the screen
after applying DN!e appears on the left.
On: Switches on the DNIe mode.
_-- The DNle function is not supported in the Movie mode.
Selecting the Film Mode
Automatically
senses and processes
film signals
from all sources
and adjusts
1
Press the MENU button to display the menu.
Press the A or T button to select Setup, then press the ENTER button.
2
Press the A or _' button to select Film Mode, then press the ENTER button.
3
Press the A or _' button to select Off or On, then press the ENTER button.
the picture for optimum quality.
Press the EXIT button to exit.
Setting the Blue Screen Mode
If no signal is being received or the signal is very weak, a blue screen automatically replaces the noisy picture
background,
if you wish to continue viewing the poor picture, you must set the "Blue Screen" mode to "Off".
Press the MENU button to display the menu.
Press the A or _' button to select Setup, then press the ENTER button.
2
Press the A or _' button to select Blue Screen, then press the ENTER button.
Press the A or _' button to select Off or On, then press the ENTER button.
Press the EXIT button to exit.
_-- A Blue Screen is displayed when there is no signal from an external device,
regardless of the Blue Screen Setting.
Setting the HDMI Black Level
Use this function
1
to adjust the Black Level of the picture while
in HDMI mode.
Press the MENU button to display the menu.
Press the A or _' button to setect Setup, then press the ENTER button.
2
Press the A or _' button to select HDMI Black Level, then press the ENTER
button.
3
Press the A or _' button to select Normal
button.
or Low, then press the ENTER
Press the EXIT button to exit.
_-- This function is active only when an external device is connected
HDMI.
to a TV via
Viewing Picture=in-Picture
This product has one built-in tuner, which does not allow PiP to function in the same mode. For example, you
cannot watch one TV channel in the main screen, and a different one in the PiP screen. Please see 'PiP Settings'
below for details. You can use the PiP feature to simultaneously watch two video sources. (See page 37 to select
the PiP picture sound.)
_,_ While the V-Chip is in operation, the PiP function cannot be used. (Refer to page 55)
Activatin9 Picture-in-Picture
1
Press the MENU button to display the menu.
Press the A or _ button to select Setup, then press the ENTER button.
Press the A or 'V' button to select PIP, then press the ENTER button.
Press the ENTER button again.
Press the A or T button to select On, then press the ENTER button.
_,_ if you turn the TV off while watching in PIP mode and turn it on again, the
PIP window wilt disappear.
Press the PIP button on the remote control to activate or deactivate the PIP.
',
_,_ Analog TV signals can be viewed on the PiP screen while viewing the
picture from an external source (DVD, Set-top box, PC etc.) connected to the
Component 1, 2, PC and HDMI 1, 2, 3 jacks on the main screen.
Main picture
Sub picture
Component 1,2
HDMI 1,2,3
PC
Analog TV broadcasts
Chan ig_the
onty
Size of the PIP Window
Press the A or T button to select Size, then press the ENTER button.
Press the A or T button to select the desired size of the PIP window, then press
the ENTER button.
_,_ If the main picture is in PC and HDMI 1 modes, Size is not available.
_-- You may notice that the picture in the PiP window becomes slightly
unnatural when you use the main picture to view a game or karaoke.
Continued...
SL_E_
SRS
MTS _
,L I
',
Chan_
the Position of the PIP Window
Press the A. or T button to select Position, then press the ENTER button.
Press the A or T button to select the desired PIP window position, then press
the ENTER button.
In Double Window ( rT'] ) and Double Wide ( _
be selected.
) modes, Position cannot
If the PIP window is set to Double Window ( rT1 ) or Double Wide ( _
)
mode, the screen size or alignment may slightly differ depending on the
signal type.
Chan q_i
5
the PIP Channel
Press the & or T button to select Channel, then press the ENTER button.
Press the A or T button at the bottom of the remote to select the desired
channel in the PIP window, then press the ENTER button.
_-
MAIN: PC / HDMI 1,2,3 / Component
PIP: TV(Analog)
1,2
Press the EXIT button to exit.
Press the PIP CH/',
channel.
and CH V
buttons on the remote control to change the PIP
C3
CJ
C3_
Freezing the Current Picture
[-----IT--'c_7
......_ ......_7-11-----i
Press the STILL button to freeze a moving picture.
i
Normal sound will still be heard. Press again to cancel.
II
_-
To prevent screen burn-in, this function will automatically
minutes.
cancel after 5
While V-Chip is in operation, the Still function cannot be used.
FAV.CH
C_TIO_
_
i
II
i Sound Control
Using Automatic Sound Settings
Your TV has automatic sound settings ("Standard", "Music", "Movie", "Speech", and "Custom") that are preset at
the factory. Or you can select "Custom", which automatically recalls your personalized sound settings.
1
Press the MENU button to display the menu.
Press the A or _' button to select Sound, then press the ENTER button.
2
Press the ENTER button to select Mode. Press the A or T button to select
Standard, Music, Movie, Speech,
ENTER button.
or Custom
sound setting, then press the
Press the EXiT button to exit.
* Choose
, Choose
,,Choose
, Choose
. Choose
Standard for the standard factory settings.
Music when watching music videos or c0ncerts:
Movie when watching movies.
Speech when watching a show that is mostly dia!og (i.e., news).
Custom to recall your personalized settings (see Customizing the Sound).
...... ......
L____[[
',
FAV,CH
C/_2110N
Press the &MODE button on the remote controt to select one of the standard sound
settings.
Customizing
The sound
"automatic"
the Sound
settings can be adjusted
settings.)
to suit your personal preference.
(Alternatively,
1
Press the MENU button to display the menu.
Press the A or _' button to select Sound, then press the ENTER button.
2
Press the A or T button to select Equalizer,
3
Press the 4 or _ button to select a particular frequency to adjust.
Press the _, or V button to increase or decrease the level of the particular
frequency, then press the ENTER button.
then press the ENTER button.
Press the EXiT button to exit.
_-- • R/L Sound
speakers.
Balance
Adjustment:
• Frequency Adjustment
(i00Hz,
the levet of different frequencies.
To adjust the sound balance of the R/L
300Hz, 1KHz, 3KHz, 10KHz): To adjust
If you make any changes to the equalizer settings, the sound mode is
automatically switched to the Custom mode.
Resetting
the Equalizer Settings
To operate the Reset function,
(Refer to page 49)
1
to the Factory Defaults
the Game mode must be set to On.
Press the MENU button to display the menu.
Press the A or 'V' button to select Sound, then press the ENTER button.
2
Press the A or V' button to select Reset, then press the ENTER button.
_-- The equalizer
resets to the factory defaults.
Press the EXiT button to exit.
you can use one of the
JJ_____J
Setting the TruSurround XT
TruSurround XT is a patented SRS technology that solves the problem of playing 5.1 multichannel content over
two speakers. TruSurround delivers a compelling, virtual surround sound experience through any two-speaker
playback system, including internal television speakers, it is fully compatible with all multi channel formats.
1
Press the MENU button to display the menu.
Press the ,& or T button to select Sound, then press the ENTER button.
2
Press the A or T button to select SRS TruSurround
ENTER button.
3
Press the A or T button to select Off or On, then press the ENTER button.
XT, then press the
Press the EXIT button to exit.
Press the SRS button on the remote control to select On or Off.
$R$(O)
TruSurround XT SRS and(o)Symbot are [rademarks of
SRS Labs, Inc.
TruSurround XT technology is incorporated under license from
SRS Labs, Inc:
Choosing a Multi-Channel Sound (MTS) Track - Digital
The digitaI-TV broadcast system is capable of simultaneous
transmission
of many audio tracks (for example,
simultaneous
translations
of the program into foreign languages). The availability
of these additional
"multitracks"
depends upon the program.
Preferred
lan uaae
1
Press the MENU button to display the menu.
Press the A or T button to select Sound, then press the ENTER button.
2
Press the A or T button to select Multi-Track
button.
3
Press the ENTER button to select Preferred Language.
Press the A or T button to choose the language (English,
you want, then press the ENTER button.
Options,
then press the ENTER
Spanish,
or French)
Press the EXiT button to exit.
_-- You can onty select the tanguage from among the actuat languages
broadcast.
being
Press the MTS button on the remote control to listen to the language other than the
preferred language.
Choosing a Multi-Channel
Depending
Sound (MTS) Track =Analog
on the par{ioular program being broadcast, you can listen to Mono, Stereo or SAP.
Multi-Track Sound
1
Press the MENU button to display the menu.
Press the A or T button to select Sound, then press the ENTER button.
2
Press the A or T button to select Multi-Track
button.
Options,
3
Press the ENTER button to select Multi-Track
Sound.
then press the ENTER
Press the A or _' button to select a setting you want, then press the ENTER
button.
Press the EXIT button to exit.
, Ch0o_e_-for
channets that are broadcasting !n_ono, or if you are haying a
difficulty receiving a stereo signal
* Choose Stereo for channels that are broadcasting in stereo.
. Choose SAP to listen to the Separate Audio F'rograrn, which is usually a foreigm
language translation.
Press the MTS buttons on the remote control to select Mono, Stereo, or SAP.
i_____u
Automatic
Reduces
Volume
the difference
H____
Control
in volume
level among broadcasters.
1
Press the MENU button to display the menu.
Press the A or T button to select Sound, then press the ENTER button.
2
Press the A or _' button to select Auto Volume,
3
Press the A or _' button to select Off or On, then press the ENTER button.
then press the ENTER button.
Press the EXIT button to exit.
Selecting
the internal
Mute
Sound output from the TV speakers is muted. This is useful when you want to listen to audio through your sound
system instead of the TV.
1
Press the MENU button to display the menu,
Press the A or T button to select Sound, then press the ENTER button.
2
Press the A or _' button to select Internal
Mute, then press the ENTER button.
Continued...
Press the A or T button to select Off or On, then press the ENTER button.
Press the EXIT button to exit.
_,_ • When Internal Mute is set to On, Sound menus except Multi-track Options
cannot be adjusted.
• The left/right audio outputs and digital audio outputs (Optical) remain
enabled.
• The VOL +, VOL = and MUTE buttons do not operate when the Internal
Mute is set to On.
Mute
Sound Output
Sound Output
Adjusting the TV On/Off Melody Sound
The TV power on/off melody
sound volume can be adjusted.
1
Press the MENU button to display the menu.
Press the A or T button to select Setup, then press the ENTER button.
2
Press the A or T button to select Melody,
3
Press the A or T button to select Off, Low, Medium,
ENTER button.
then press the ENTER button.
or High, then press the
Press the EXiT button to exit.
DD_
Manufactured under license from Doiby Laboratories, Dolby and the doub!e:D
D i e I T,_ L symbol are trademarks of Dolby Laboratories.
Listening to the Sound of the Sub (PIP) Picture
When the PiP feature
is activated,
you can listen to the sound of the sub (PIP) picture.
1
Press the MENU button to display the menu.
Press the A or T button to select Sound, then press the ENTER button.
2
Press the A or T button to select Sound Select,
3
Press the A or T button to select Sub, then press the ENTER button.
then press the ENTER button.
Press the EXIT button to exit.
, Maini Used to listen to the sound of the main picture.
, Sub: Used to listen to the sound of the sub picture.
_,_ You can select this option when PIP is set to On.
Sound Output
j Channel Control
Selecting
the Antenna
1
Press the MENU button to display the menu.
Press the A or T button to select Channel, then press the ENTER button.
2
Press the ENTER button to select Antenna.
Press the A or T button to select Air or Cable, then press the ENTER button.
Press the EXIT button to exit.
Press the ANTENNA button on the remote control to select Air or Cable.
If the an[enna _sconnected to ANT1 IN(AIR/.
select Air and _fit is connected to ANT2 IN CABLE.
select CabJe.
:_ If both ANT1 INIAIRI and ANT2 IN(CABLE1 are
connec[ea select the antenna input _)u want. If the
anl:enna InPut ISnot seIectea properly, noise may
aDDear on tne screen.
Adding and Erasing Channels
You can add or delete a channel to display the channels you want. To use the Channel List function,
Program (see page 19).
1
Press the MENU button to display the menu.
Press the A or T button to select Channel, then press the ENTER button.
2
Press the A or T button to select Channel
3
Press the A or T button to select Added,
buttonsto
selecta
List, then press the ENTER button.
then press the ENTER button.
Pressthe
bu_on.
A/T/4/_
channetto
add, then pressthe
Pressthe
channel.
A or T button to select Add, then pressthe
ENTER
ENTER button to add the
Press the RETURN button to return.
_-- Alt added channels wilt be shown in the Added
menu.
Continued...
first run Auto
Press the _,/T/4/_ENTER button.
buttons to select a channel to delete, then press the
Press the A or T button to select Delete, then press the ENTER button to
delete the channel.
Press the EXIT button to exit.
,. RMODE (RED) button! Press repeatedly to select All, Added, Or Favorite.
=
,, &MODE (GREEN) button: Press to add all channels deleted.
• STILL (YELLOW) button: Press to delete all channels memorized.
Setting Your Favorite Channels
You can set channels you watch frequently
as favorites.
1
Press the MENU button to display the menu.
Press the A or T button to select Channel, then press the ENTER button.
2
Press the A or T button to select Channel
3
Press the A or T button to select All or Added, then press the ENTER button.
4
Press the A/T/4/I_
buttons to select a channel as a favorite channel, then
press the ENTER button.
Press the CH _'_ and CH v
5
List, then press the ENTER button.
button to display the next channel list page.
Press the ,& or T button to select Favorite,
then press the ENTER button.
The "_" symbol will be highlighted and the channel will be set as a Favorite.
To cancel your Favorite channel selection, press the ENTER button until the
"U" symbol disappears.
Press the EXIT button to exit.
_,_ Only memorized
_'_ All favorite
channels can be set as favorite channels.
channels will be shown on the Favorite menu.
To select the favorite channels you have set up, press the FAV.CH button on the remote
control.
',
FAV.CH
L___U
CApT_
I_
',
L__i
Viewing the Channel Lists
You can display a list of al! channels,
added channels or your favorite
channels.
1
Press the MENU button to display the menu.
Press the A or T button to select Channel, then press the ENTER button.
2
Press the A or T button to select Channel
List, then press the ENTER button.
Press the A or T button to select All, Added
ENTER button.
or Favorite, then press the
To toggle between your all channels, add channels,
P.MODE(RED) button on the remote control.
or favorite channels,
use the
, P.MODE (RED) button: Press repeatedly to select AIII Added, or Favorite:
* STILL (YELLOW) button: Press to delete all channels memorized.
i
I/
1
P'MODE
&MODE
FAY.OH
_
"a
[ _ _ _ _ _LL _ _ _SLOE _ _ _ _ _P,_ ......
STILL
p._IZE
i
:'P _V
eT&___
[
_ _e___
__ J J_ ____
J
Setting the Default Channel List Mode
You can set All, Added, or Favorite to be the Default List that appears
when you press the CN LIST button.
1
Press the MENU button to display the menu.
Press the A or T button to select Channel, then press the ENTER button.
2
Press the A or T button to select Channel
3
Press the A or T button to select Default
button.
List, then press the ENTER button.
List Mode, then press the ENTER
Press the A or T button to select All, Added,
ENTER button.
or Favorite, then press the
>-- Select the Channet list you want to appear when you press the ON LIST
button.
, All: Shows AII the channels when you press the CH LIST button on the remote Control
, Added: Shows Added channels when you press CH LIST button on the remote control.
• Favorite: Shows Favorite channels when you press CH LIST button on the remote control.
Press the EXIT button to exit.
Pressthe CH LISTbuttonon the remotecontrolto bringup the ChannelList.
o
.....
®
i
Labeling Channels
Channels
1
can labeled so that their cal! letters appear whenever the channel is selected.
Press the MENU button to display the menu.
Press the ,i_ or T button to select Channel, then press the ENTER button.
Press the A or T button to select Name, then press the ENTER button.
2
3
Press the A or T button to select the channel to be assigned a new name, then
press the ENTER button.
Press the A or T button to select a letter, a number or a blank (Results in this
sequence: A~Z, 0~9, +, -, *,/, blank).
Press the !1_button to switch to the next field, which wilt be selected.
Select the second letter or digit by pressing the _, or 'V button, as above.
Repeat the process to select the last three digits. When you have finished,
press the ENTER button to assign the new name.
To erase the assigned new name, select Clear by pressing the 4 or !1_button,
then press the ENTER button.
Press the EXIT button to exit.
_-- The names of digital broadcasting channels are automatically
thus cannot be assigned by users.
assigned and
Fine Tuning Analog Channels
Use fine tuning to manually
adjust
a particular
channel for optimal reception.
1
Press the MENU button to display the menu.
Press the A or T button to select Channel, then press the ENTER button.
2
Press the A or T button to select Fine Tune, then press the ENTER button.
3
Press the 4 or _ button to adjust the fine tuning.
4
To store the fine tuning setting in the TV's memory, press the ENTER button.
To reset the fine tuning setting, press the T button to select Reset, then press
the ENTER button.
Press the EXIT button to exit.
Only analog TV channels can be fine tuned.
_-- " * "wilt appear next to the number of fine-tuned channels.
Checking the Digital-Signal Strength
Unlike analog channels, which can vary in reception quality from "snowy" to clear, digital (HDTV) channels
have either perfect reception quality or you will not receive them at all. So, unlike analog channels, you cannot
fine tune a digital channel. You can, however, adjust your antenna to improve the reception of available digital
channels.
1
Press the MENU button to display the menu.
Press the A or T button to select Channel, then press the ENTER button.
2
Press the A or T button to select Signal Strength, then press the ENTER
button. If the signa! strength meter indicates that the signal is weak, physically
adjust your antenna to increase the signal strength.
Continue to adjust the antenna until you find the best position with the strongest
signal.
Press the EXIT button to exit.
You can also press the ENTER button to select OK then press the EXIT button
to exit the menu.
LNA (Low Noise Amplifier)
if the TV is operating in a weak-signal area, sometimes
preamplifier boosts the incoming signal).
the LNA function
can improve the reception
1
Press the MENU button to display the menu.
Press the A or T button to select Channel, then press the ENTER button.
2
Press the A or 'V' button to select LNA, then press the ENTER button.
Press the A or 'V' button to select Off or On, then press the ENTER button.
Press the EXIT button to exit.
_-- If the picture is noisy with the LNA set to On, select Off.
The LNA setting must be made separately
for each channet.
(a low-noise
PC Display
Using Your TV as a Computer (PC) Display
Settin
U Your PC Software
Based
on Windows
The Windows display-settings for a typical computer are shown below. The actual screens on your PC will probably be
different, depending upon your particular version of Windows and your particular video card. However, even if your actual
screens took different, the same basic set-up information wilt apply in almost alt cases. (If not, contact your computer or
Video Card manufacturer.)
1
2
3
4
First, click on Control Panel on the Windows start menu.
When the control panel window appears, click on Appearance
and Themes and a
display dialog-box will appear.
When the control panel window appears, click on Display and a display dialog-box wilt
appear.
Navigate to the Settings tab on the display dialog-box.
The correct size setting (resolution)
Optimum: 1920 x 1080 pixels
If a vertical-frequency
option exists on your display settings dialog box, the correct value
is 60 or 60 Hz. Otherwise, just click OK and exit the dialog box.
Display Modes
If the signal from the system equals the standard signal mode, the screen is adjusted automatically.
If the signal
from the system doesn't equal the standard signal mode, adjust the mode by referring to your videocard
user
guide; otherwise there may be no video. For the display modes listed below, the screen image has been optimized
during manufacture.
Display
Mode
IBM
VESA
RESOLUTION
Horizontal
Frequency(kHz)
VeAicalFrequency(Nz)
Pixel Clock Frequency(MHz)
_'J_'_
'Syn c Polarity(HtV)
720 X 400
640 X 480
640 X 480
640 X 480
800 X 600
800 X 6OO
800 X 6OO
800 X 6OO
1024 X 768
31.469
70.087
28.322
-/+
31.469
59.940
25.175
-/-
37.861
72.809
31500
-/-
37.500
75.000
31500
-/-
35.156
56.250
36.000
+/+
37.879
60.317
40.000
+/+
48.077
72.188
50000
+/+
46.875
75.000
49.500
+/+
48.363
60.004
65.000
-/-
1024 X 768
1024 X 768
1280 X 1024
I280 X 1024
I600 X 1200
1920 X 1080
56.476
70.069
75.000
-/-
60.023
75.029
78750
+/+
63.981
60.020
108.000
+/+
79.986
75.025
123.000
+/+
75.000
60.000
162.000
+/+
66.587
59.934
138.500
+/-
HDIVlI/DVl Input
Display Mode
IBM
VESA
RESOLUTION
720X 400
840 X 480
800X 600
1024X 768
1280X 1024
1920X 1080
Horizontal
Frequency(kHz)
VerticaIFrequency(Hz)
31.489
70.087
31.489
59.940
37.879
60.317
48.364
83.981
88.587
60.000
60.020
59.934
PixelClock F_quency(MHz)
28.322
25.175
40.000
65.000
108.000
138.500
Sync Polarity(H/V)
-/+
4+/+
4+/+
+/-
. The interlace mode is not supported.
. The TV operates abnormally if a non-standard video format is selected.
. The table above conforms to IBM/VESA regulations and is based on using the PC Input.
• When this TV is used as a PC display,32-bit color is supported.
• Dependingon the manufacturer,your PC display screen might appear different. (and dependingon your particularversion of Windows.)
Check your PC instructionbook for informationabout connectingyour PC to a TV.
• if a vertical and horizontalfrequency-selectmodeexists, select 60Hz(vertical) and 48.4KHz (horizontal).
• in somecases, abnormalsignals(such as stripes)might appearon the TV screenwhen the PCpower is turned off (or ifthe PC is disconnected).
if so, pressthe SOURCEbuttonon the remotecontrolor TV panelto enter a VIDEOmode.Also,make surethat the PC is connected.
Setting up the TV with your PC
Use the Auto Adjust function to have the TV set automatically adjust the video signals it receives from the PC.
The function also automatically
fine-tunes the settings and adjusts the frequency values and positions.
How to Auto Adjust
1
Press the MENU button to display the menu.
Press the A or 'lr button to select Setup, then press the ENTER button.
Press the A or T button to select PC, then press the ENTER button.
Press the A or T button to select Auto Adjustment,
then press the ENTER
button. The message Auto Adjustment
in progress. Please wait. appears on
the screen and the picture adjustments are automatically activated.
Press the EXiT button to exit.
_-- This function does not work in DVI-Digital
mode.
_-- You must be in PC mode.
Adustin
the Screen Qualit
The purpose of the picture quality adjustment
is to remove
noise, if the noise is not removed by fine tuning alone, then
frequency
adjustments
and fine tune again. After the noise
re-adjust the picture so that it is aligned in the center of the
_-- You mustbein
or reduce picture
make the vertical
has been reduced,
screen.
PC mode.
1
Press the MENU button to display the menu.
Press the A or 'lr button to select Setup, then press the ENTER button.
Press the A or T button to select PC, then press the ENTER button.
2
Press the ENTER button to select image Lock.
Press the A or T button to select Coarse or Fine, then press the ENTER
button.
Press the 4 or _- button to adjust the screen quality, then press the ENTER
button.
Press the EXIT button to exit.
_,_ This feature may change the width of the image, if necessary,
position to center.
adjust the
Continued...
the Screen Position
You can adjust the position of the screen after connecting
the TV to your PC.
_-- Change to the PC mode first.
1
Press the MENU button to display the menu.
Press the A or T button to select Setup, then press the ENTER button.
Press the A or T button to select PC, then press the ENTER button.
2
Press the A or T button to select Position, then press the ENTER button.
3
Press the _, or T button to adjust the V-Position.
Press the 4 or _ button to adjust the H-Position.
Press the ENTER button.
Press the EXiT button to exit.
Initializin_
the Screen
Position
_,_ Change to the PC mode first.
1
Press the MENU button to display the menu.
Press the A. or T button to select Setup, then press the ENTER button.
Press the ,& or T button to select PC, then press the ENTER button.
2
Press the A or 'V button to select Image Reset, then press the ENTER button.
The message Image Reset is completed, appears on the screen.
Press the EXIT button to exit.
_,_ The previously
adjusted settings will be reset to the factory defaults.
Setting the Home Theater PC
This function enables you to view higher quality pictures while in PC Mode. After setting the Home Theater PC function
to On, you can go into the Detailed Settings menu and make adjustments without affecting settings in the regular TV
mode.
Press the MENU button to display the menu.
Press the A. or T button to select Setup, then press the ENTER button.
Press the A or T button to select Home Theater PC, then press the ENTER
button.
2
Press the A or T button to select Off or On, then press the ENTER button.
Press the EXIT button to exit.
_,_ This function is available only in PC mode.
i Time Setting
Setting the Time
Setting the clock is necessary in order to use the various
while watching the TV. (Just press the INFO button.)
Ojotion 1: Settingthe
timer features of the TV. Also, you can check the time
Clock Manually
1
Press the MENU button to display the menu.
Press the A or T button to select Setup, then press the ENTER button.
Press the A or _' button to select Time, then press the ENTER button.
2
Press the ENTER button to select Clock.
3
Press the ENTER button to select Clock
Mode.
Press the A or _' button to select Manual,
4
then press the ENTER button.
Press the A or _' button to select Clock Set, then press the ENTER button.
Press the 4 or I_ button to move to Month, Day, Year, Hour, Minute, or am/
pro. Set the date and time you want by pressing the A or T button, then press
the ENTER button.
Press the EXIT button to exit.
_,_ The current time will appear every time you press the INFO button.
_-- You can set the Month, Day, Year, Hour, and Minute directly by presstng
the number buttons on the remote control.
Continued...
the Clock Automatically
The Clock can be set automatically
if you are receiving
a digital signal.
1
Press the MENU button to display the menu.
Press the A. or T button to select Setup, then press the ENTER button.
Press the A or T button to select Time, then press the ENTER button.
2
Press the ENTER button to select Clock.
3
Press the ENTER button to select Clock Mode.
Press the A or T button to select Auto, then press the ENTER button.
4
Press the _, or T button to select Time Zone, then press the ENTER button.
5
Press the A or T button to highlight the time zone for your local area, then
press the ENTER button.
Press the A or T button to select DST (Daylight
ENTER button.
Saving Time), then press the
Press the A or T button to select On or Off, then press the ENTER button.
Press the EXIT button to exit.
_,_ Depending on the broadcast station and signal, the auto time may not be set
correctly. If this occurs, set the time manually.
_-- Antenna or Cable must be connected in order to set the time automatically.
Continued...
Setting
theOn/Off
Use this feature
the clock first.
Timer
to set the TV to turn on or off at a desired time. You must set
Press the MENU button to display the menu.
Press the A or T button to select Setup, then press the ENTER button.
Press the A or T button to select Time, then press the ENTER button.
Press the A or T button to select Timer1, Timer2,or Timer& then press the
ENTER button. The timer menu is displayed.
Press the A, or T button to adjust hour, then press the I_ button to move to the
next step. Set other items using the same method as above.
Press the 4 or D., button to select the desired item below.
Press the A or T button to adjust the setting.
Press the EXIT button to exit.
_--
Repeat
Volume --
Contents
Activate or inactivate
3ress the A or _' button
Select Once Everyday.Mon-FrL Mort-Sat
Sat-Sun. Sets the desired day[s of the
week you want the TV to turn on.
Select the desired turn on volume level.
When the On Timer is active, you can
turn on a specific channel or play back
contents such as photo or audio files.
(Make sure that an USB device is
conneo_ea[o your TV.)
_ress the A or T Du[_o_
3ress the A or T button
=ressthe A or T button
_-- You can set the hour, and minute directly by pressing the number buttons on
the remote control.
_-- Auto Power Off
When you set the timer On, the television
controls are operated for 3 hours after the
This function is only available in timer On
which may occur if a TV is on for too long
Settin
the Sloe
will eventually turn off, if no
TV was turned on by timer.
mode and prevents overheating,
time.
Timer
The sleep timer automatically
120, 150 and 180 minutes).
shuts offthe
TV after a preset time (30, 60, 90,
1
Press the MENU button to display the menu.
Press the A or T button to select Setup, then press the ENTER button.
Press the A or T button to select Time, then press the ENTER button.
2
Press the A or 'V' button to select Sleep Timer, then press the ENTER button.
3
Press the A or T button to select the minute.
Setting the Timer sets the Activation
to On automatically.
To cancel the set sleep timer:
Press the _- button to select Activation.
Press the A or T button to select Off, then press the ENTER button.
Press the EXiT button to exit.
Press the SLEEP button on the remote control until the appropriate time interval appears
(any of the preset values from 30 min to 180 rain).
[ -IF©
i
[_____[[
JJ_____j
Function Description
Selecting a Menu Language
1
Press the MENU button to display the menu.
Press the ,_ or T button to select Setup, then press the ENTER button.
Press the A or T button to select Language, then press the ENTER button.
2
Press the A or V' button to select the appropriate
or Frangais, then press the ENTER button.
language:
English, EspaSol,
Press the EXIT button to exit.
Using the Game Mode
When connecting to a game console such as PlayStation TM or Xbox TM, you can enjoy a more realistic gaming
experience
by selecting the game menu.
1
Press the MENU button to display the menu.
Press the A or T button to select Setup, then press the ENTER button.
2
Press the A or T button to select Game Mode, then press the ENTER button.
3
Select Off or On by pressing the A or T button, then press the ENTER button.
4
Press the EXiT button to exit.
Restrictions
on Game mode (Caution)
• To disconnect the game consote and connect another external device, set
the Game mode to Off in the setup menu.
• If you display the TV menu in Game mode, the screen shakes slightly.
• The icon (_;) appears on the screen which means that Game Mode is on
with the selected source.
if Game Mode is On
• The Picture Mode is automatically
changed to Game and cannot be
changed.
• The Sound Mode in the Sound menu is deactivated.
sound using the equalizer.
• The Reset in the Sound menu is activated.
You must adjust the
The Reset function restores
Equalizer settings to the factory default settings.
_,_ Game Mode is not available in TV mode.
_-- If the picture is poor when a game console is connected to the TV, try turning
the Game Mode Off then On again.
Viewing Closed Captions (On-Screen Text Messages) - Digital
The Digital Captions function
operates on digital
channels.
1
Press the MENU button to display the menu.
Press the A or T button to select Setup, then press the ENTER button.
2
Press the A or T button to select Caption, then press the ENTER button.
3
Press the ENTER button to select Caption.
Press the A or T button to select On, then press the ENTER button.
4
Press the A or T button to select Caption Mode, then press the ENTER button.
Press the A or T button to select submenu (Default, Servicel~Service6,
COl ~0C4 or Text1 ~Text4) you want, then press the ENTER button.
5.
Press the A or T button to select Caption Options,
button.
6
Press the A or _ button to select Size, then press the ENTER button.
Press the A or T button to select the desired caption option, then press the
ENTER button.
then press the ENTER
Press the A or T button to select the desired sub-menu options (see options
below), then press the ENTER button.
Press the EXiT button to exit.
_-- The availability
_,_ Default
of captions depends on the program being broadcast.
means to follow the standard set by the broadcaster.
_,_ Foreground and Background
cannot be set to have the same color.
_-- Foreground Opacity and Background
Transparent.
Opacity cannot be both set to
. Size: This op[ton consts[s of Default. Sma& Standard. and Large. The default is Default.
. Font Style: This option consists of Default Style0 - StyleT. You can change the font you
want. The default is Default
o Foreground Color: This option consists of Default White. Black. Red. Green. Blue.
Yellow. Magenta, and Cyan. You can change [he color of the te[ter.
The default is Default
o Background Color: TNs option consists of Default. White. Black. Red. Green. Blue.
Yellow. Magenta, and Cyan. You can change [ne oacKground color of
[ne caption. The default is Default.
. Foreground Opacity: This op[ion cons_s[s of Default. Transparent. Translucent. Solid.
and Flashing. You can change the opactb of the letter.
o Background Opacity: This op[_on consists of Default. Transparent. Translucent. Solid.
and Flashing. You can change the background opaclt_ of the
cap[lot
, Return to Default: This option sets each of Size. Font Style, Foreground Color
Background Color. Foreground Opacity, and Background Opacity
to its default.
Press the CAPTION button on the remote control to select On or Off.
I°°°°ll
rAM.OH
......
SCEEP
CA_ON
SRS
!_>
s
Viewing Closed Captions (On-Screen Text Messages) -Analog
The Analog Caption function operates in either analog TV channel mode or external signal mode. (Depending on
the broadcasting signal, the Analog Caption function may operate on digital channels.)
1
Press the MENU button to display the menu.
Press the A or T button to select Setup, then press the ENTER button.
2
Press the A or T button to select Caption,
3
Press the ENTER button to select Caption.
Press the A or T button to select On, then press the ENTER button.
then press the ENTER button.
Press the ,_ or V' button to select Caption Mode, then press the ENTER
button. Press the A or T button to select submenu (C01~C04 or Textl~Text4)
you want, then press the ENTER button.
Press the EXIT button to exit.
• The default is Default
• CCt: The Primary Synchronous Caption Service.These are captions in the primary
tanguagethat must be {ns_qcwanme sounc preferably matched [o a seecificframe
• CC2: The Special Non-SynchronousUse Captions.Thischannelcarries ua[a_na[is _tenaea
[o augment informationcarried in the program.
, CC3: SecondarySynchronousCaD[ionService.
Alternate program-relatedcaption data, typtcally second languagecaD[tons.
• CC4: Special Non-SynchronousUseCaptions. Similarto CC2
• Text1: First TextService. This may be various non-programrelated data.
• Text2: Second TextService. Additionaldata. usuallyno[ program reJa[ea.
, Text3/Text4: Third and Fourth TextSerwces. Theseaa[a channels snou_aDeused on., tf
Textl and Text2are not sufficient.
• The Caption feature doesn't work in COMPONENT,
modes.
PC, HDMI(DVI)
• The availability of captions depends on the program being broadcast.
You can also press the CAPTION button on the remote control to select Captions
On or Off.
[_____[I
Menu Transparency Level
Adjusts the transparency
of the menu screen.
1
Press the MENU button to display the menu.
Press the A or _' button to select Setup, then press the ENTER button.
2
Press the A or _' button to select Menu Transparency, then press the ENTER
button.
3
Press the A or _' button to select level, then press the ENTER button.
Press the EXIT button to exit.
Setting the Light Effect
You can turn the blue LED on the front of your TV on/off.
1
Press the MENU button to display the menu.
Press the A or _' button to select Setup, then press the ENTER button.
2
Press the A or T button to select Light Effect, then press the ENTER button.
Press the _, or _' button to select Off, In Standby, in Watching TV, or Always,
then press the ENTER button.
Press the EXIT button to exit.
* Off: The LED is alwaysoff.
, In Standby: The LEDlightswhile in Standby modeand itturns off when yourTV is turned on.
In Watching TV: The LEDlightswhen watchingTV and it tu[ns off whenyou[ TV is turned off.
Always: The LED is always lit.
_-- Set the Light Effect to Off to reduce power consumption.
Using the Energy Saving Feature
This feature
adjusts the power consumption
of the unit in order to save energy.
1
Press the MENU button to display the menu.
Press the A or T button to select Setup, then press the ENTER button.
2
Press the A or T button to select Energy
button.
Saving, then press the ENTER
Press the ,& or T button to select Off, Low, Medium, or High, then press the
ENTER button.
Press the EXIT button to exit.
, Low: Operatesin standard mode.
, Medium: Enters medium power saving mode,
,, High: Enters maximumpower saving mode.
Preventing Screen Burn-in
To reduce the possibility of screen burn, this unit is equipped with screen burn prevention technology.
This
technology
enables you to set picture movement up/down (Vertical Line) and side to side (Horizontal Dot).
The Time setting allows you to program the time between movement of the picture in minutes.
1
Press the MENU button to display the menu.
Press the A or T button to select Setup, then press the ENTER button.
2
Press the A or T button to select Screen Burn Protection,
ENTER button.
then press the
Press the ENTER button to select Pi×el Shift, then press the ENTER button.
Pressing the A or T button will alternate between On and Off.
You will also see the items Norizontal Dot, Vertical Line and Time.
• Pixei sNft: using this function, you can minutely move pixels on the PDPin horizontalor
vertical directionto preventafteFimageson the screen.
Press the A or T button to select the item you wish to change, then press the
ENTER button.
Press the _, or T button to change the value of the item, then press the ENTER
button.
. Optimum condition for pixel shift;
...........
PC
.................................................
££mp0ner!!_@N
I.....
Horizontal
Vertical
Dot
Line
1
2
1
2
................
T!me{m!n) ...................
2............................................................
2 ................................................
Press the EXiT button to exit.
Reducing the Effects of Screen Burn
if screen burn has occurred, you can select a white screen or scrolling
to help remove screen burn artifacts.
1
Press the MENU button to display the menu.
Press the A or _' button to select Setup, then press the ENTER button.
2
Press the ,& or _' button to select Screen Burn Protection,
ENTER button.
3
Press the A or _' button to select White,
then press the ENTER button.
Press the EXiT button to exit.
Scrolling,
then press the
or Side Gray
White
This function removes after-images on the screen by changing the color of pixels to
white. Use this function when there are remaining after-images or symbols on the
screen especially when you displayed a still image on the screen for a long time.
Scrolling
This function removes after-images on the screen by moving all the pixels on the
PDP according to a pattern. Use this function when there are remaining after-images
or symbols on the screen especially when you displayed a still image on the screen
for a long time.
Side Gray=
When you watch TV with the screen ratio of 4:3, the screen is prevented from any
damage by adjusting the white balance on both extreme left and right sides.
To prevent the screen burn from happening, select Dark or Light.
• Bark: When you setthe screen ratio to 4:3, it darkens the left and right sides.
Light: When you set the screen ratio to 4:3, it brightens the leftand right sides.
To remove after-images on the screen, use either the White or Scrolling
function, Although both functions remove after-images on the screen, Scrolling
is more effective,
The after-image removal function has to be executed for a long time
(approximately 1 hour) to effectively remove after-images on the screen. If the
after-image is not removed after performing the function, repeat the function
again.
_-- Press any key on the remote control to cancel this feature,
Setting the Function Help
Displays
1
help on the menu functions.
Press the MENU button to display the menu.
Press the A or _' button to select Setup, then press the ENTER button.
2
Press the A or _' button to select Function
button.
3
Press the A or _' button to select Off or On, then press the ENTER button.
Press the EXIT button to exit.
_,_ The Function Help default setting is On.
Help, then press the ENTER
Using the V-Chip
U.S.A Only
This product is covered by the following U.S. patents : US4,930_158 US4,930_160
The V-Chip feature automatically locks out programs that are deemed inappropriate
for children. The user must
enter a PiN (personal ID number) before any of the V-Chip restrictions are set up or changed.
_,_ When the V-Chip feature is activated, the PIP features do not function.
_,_ V-Chip function is not available in HDMI or component mode.
Your Personal ID Number
1
Press the MENU button to display the menu.
Press the A or T button to select Setup, then press the ENTER button.
2
Press the _, or T button to select V-Chip, then press the ENTER button.
The message Enter PIN will appear. Enter your 4 digit PiN number.
_-- The default PIN number of a new TV set is 0-0-0-0.
The V-Chip screen will appear.
Press the A or T button to select Change PIN, then press the ENTER button.
The Change PtN screen wilt appear. Choose any 4 digits for your PIN and
enter them. Re-enter the same 4 digits. When the message PIN is changed
successfully,
is displayed, your PIN has been memorized.
Press the EXIT button to exit.
_,_ If you forget the PIN, press the remote-control buttons in the following
sequence, which resets the pin to 0-0-0-0 : Power Off. _ MUTE -_ 8 _ 2 -_
4 _ Power On.
<for USA models only>
<for Canada models only>
Now to Enable/Disable
the V-Chijp_
1
Press the MENU button to display the menu.
Press the A or T button to select Setup, then press the ENTER button.
2
Press the ,& or _' button to select V-Chip, then press the ENTER button.
The message Enter PIN will appear. Enter your 4 digit PIN number.
The V-Chip screen wilt appear.
To enable the V-Chip feature, press the ENTER button so that the V-Chip Lock
field is On. (Pressing the A or T button will alternate between On and Off.)
Press the ENTER button.
Press the EXIT button to exit.
How to Set u Restrictions Usin "TV Parental Guidelines"
First, set up a personal identification
number (PIN), and enable the V-Chip.
(See previous section.) Parental restrictions
can be set up using either of two
methods: The TV guidelines or the MPAA rating.
1
Press the MENU button to display the menu.
Press the A or T button to select Setup, then press the ENTER button.
2
Press the A or T button to select V-Chip, then press the ENTER button.
The message Enter PIN wilt appear. Enter your 4 digit PiN number.
3
The V-Chip screen will appear. Press the A or T button to select TV Parental
Guidelines,
then press the ENTER button.
4
The TV Parental Guidelines
screen will appear.
Press the A or T button to select one of the six aged based categories:
• TV-Y: All cn_ldren.The tnemes and e amems _nthis program are specificallI designed
for a very young audience, including children from ages two to six.
• TV-YT: Directed to otde- children. The themes and elements in this program ma}
_nclueemltd phystcaI or comedlc wolence, or may frigh[en cmldren under the age of
seven
• TV-G: General audieqce, ir comalns little or no violence qo strong language, and little
or no sexual alaiog or situations.
• TV-PG: Paren[al guidance suggested. This program may contain infrequent coarse
anguage, llml[ea Violence some sugges[we sexual dialog and slrua[lons
, TV-14: 3arents strongiy cautioned. This program may coma q sophisticated themes
sexual conrem, strong language and more intense violence.
• TV-MA: Mature audiences only. This program may contain mature themes, profane
anguage, graphic violence and exF tcltsexual content.
At this point, one of the TV-Ratings is selected.
Press the ENTER button. Depending on your existing setup, the "@" symbol will
be selected. (Blank = Unblocked, _ = Blocked) While "@" is selected, press the
ENTER button to block or unbiock the category.
To select a different TV-Rating, press the A or T button and then repeat the
process.
>
Allow all: Press to unlock all TV ratings.
Block all: Press to lock all TV ratings.
_,_ The TV-Y, TV-Y7, TV-G, TV-PG, TV-14 and TV-MA have additional
See the next step to change any of the following sub-ratings:
• FV: Eantasy violence.
D: Sexually suggestive dialog.
• L: Adult language.
options.
S: Sexual situation.
• V: Violence.
_-- The V-Chip will automatically block certain categories that are "more
restrictive". For example, if you block TV-Y category, then TV-Y7 wilt
automatically be blocked. Similarly, if you block the TV-G category, then all
the categories in the "young adult" group will be blocked (TV-G, TV-PG,
TV-14, and TV-MA). The subratings (D, L, S, V) work together similarly.
(See next section.)
Continued...
6
How to set the FV, D, L, S and V sub-ratings. First, select one of these TVRatings: TV-Y, TV-Y7, TV-G, TV-PG, TV-14, or TV-MA (See Step 4), and press
the ENTER button. The "_" symbol will be displayed for each
sub-rating. While "@" is selected, press the I_ button to go to a sub rating.
Press the ENTER to block the sub rating. To select a different TV-Rating,
press the A or T button and then repeat the process.
7
Press the EXIT button to clear all the screens. (Or proceed to the next section,
and set up additional restrictions based on the MPAA codes.)
_,_ These categories consist of two separate groups: TV-Y and TV-Y7 (young
children through age 7), and TV-G through TV-MA (everybody else).
The restrictions for these two groups work independently: If a household
includes very young children as well as young adults, the TV guidelines must
be set up separately for each age group.
H_=
=
Ratin s"
G, PG, PG-13 R NC-17 X, NR
The MPAA rating system uses the Motion Picture Association
of America
(MPAA) system, and its main application
is for movies. When the V-Chip
lock is on, the TV will automatically
block any programs that are coded with
objectionable
ratings (either MPAA or TV-Ratings).
1
Press the MENU button to display the menu.
Press the A or T button to select Setup, then press the ENTER button.
2
Press the A or T button to select V-Chip, then press the ENTER button.
The message Enter PIN will appear. Enter your 4 digit PiN number.
3
The V-Chip screen will appear. Press the A or T button to select MPAA
Rating, then press the ENTER button.
Press the _, or T button to select an appropriate restriction.
Press the ENTER button to activate the restriction selected.
The "_" symbol is indicated. While "@" is selected, press the ENTER button to
block or unblock the category.
Press the EXIT button to exit.
>
Allow all: Press to unlock all TV ratings.
Block al!: Press to lock all TV ratings.
-PG-13: Parents strongly cautioned.
- R: Restricted. Children under 17 shou!d be accompanied bY an adu!t_
• NC-17: No children underage !7,
° X: Adults only.
• NR: Not rated.
_,_ The V-Chip will automatically block any category that is "more restrictive".
For example, if you block the PG-13 category, then R, NC-17 and X will
automatically be blocked also.
Now to Set u Restrictions Usin "Canadian En_for
Canada Models)
1
Press the MENU button to display the menu.
Press the A or T button to select Setup, then press the ENTER button.
2
Press the A or T button to select V-Chip, then press the ENTER button.
The message Enter PiN wilt appear. Enter your 4 digit PIN number.
3
The V-Chip screen will appear. Press the A or T button to select Canadian
English, then press the ENTER button
Press the A or T button to select an appropriate restriction.
Press the ENTER button to activate the restriction selected. The "_"
indicated.
symbol is
Press the EXIT button to exit.
_-- AHow all: Press to unlock all TV ratings.
Block all: Press to lock all TV ratings.
• c:
Programmingintendedfor childrenunderage8.
,, C8÷: programminggenerallyconsidered
acceptableforchi!d_en8 yearsandOvertowatchOntheirown.
,,G: Generatprogramming,Suitablefor all audiences.
• PG; Parentalguidance.
• t4÷: Programmingcontainsthemesor contentwhichmay notbe suitablefor vie_veraundertheage
of 14.
• 18+: Adult programming.
The V-Chip wilt automatically block any category that is "more restrictive".
For example, if you block G category, then PG, 14+ and 18+ will
automatically be blocked also.
How to Set _
Restrictions Usin_q"Canadian French" (for Canada Models)
1
Press the MENU button to display the menu.
Press the ,& or T button to select Setup, then press the ENTER button.
2
Press the A or T button to select V-Chip, then press the ENTER button.
The message Enter PIN will appear. Enter your 4 digit PIN number.
3
The V-Chip screen will appear. Press the A or T button to select Canadian
French, then press the ENTER button.
Press the _, or T button to select an appropriate restriction.
Press the ENTER button to activate the restriction selected. The "_"
indicated.
symbol is
Press the EXIT button to exit.
_-- Allow all: Press to unlock all TV ratings.
Block al!: Press to lock all TV ratings.
- t3 ans+: Programming may not be suitab{e for children under the age of ! 3:
• 16 ansi: Programming is not suitable for children ui_der the age of 16.
= 18 arts+: Programming restricted to adults.
_-- The V-Chip will automatically block any category that is "more restrictive".
For example, if you block 8 ans+ category, then 13 ans+, 16 ans+ and 18
ans+ will automatically be blocked also.
Usin
theV-Chi
for Di italchannels
Parental restriction
information
can be used while watching
DTV channels.
1
Press the MENU button to display the menu.
Press the A or T button to select Setup, then press the ENTER button.
2
Press the A or T button to select V-Chip, then press the ENTER button.
The message Enter PIN will appear. Enter your 4 digit PIN number.
3
The V-Chip screen will appear. Press the A or T button to select
Downloadable
U.S. Rating, then press the ENTER button.
_,_ If information is not downloaded from the broadcasting
Downloadable
U.S. Rating menu is deactivated.
_,_ Parental restriction information is automatically
DTV channels. It may take several seconds.
station, the
downloaded
while watching
_-- The Downloadable
U.S. Rating menu is available for use after information
is downloaded from the broadcasting station. However, depending on the
information from the broadcasting station, it may not be available for use.
4
Press the A or T button to select an appropriate restriction
Press the ENTER button to activate the restriction selected.
The "_"
symbol is indicated.
Press the EXIT button to exit.
_-- Allow all: Press to unlock all TV ratings.
Block all: Press to lock all TV ratings.
_-- Parental restriction levels differ depending
_-- The default menu name and downloadable
the downloaded information.
on the broadcasting
station.
US rating changes depending
on
Rating title
The number ofcurrent rating
information
_,_ Even if you set the on-screen display to your desired language, the
Downloadable
U.S. Rating menu will appear in English only.
_,_ The rating wilt automatically
restrictive.
block certain categories
that are more
_-- The rating titles (for example: Humor Levet..etc) and TV ratings (for
example: DH,MH,H..etc) may differ depending on the broadcasting station.
The number of
al_ the rating
information
N_
after the V_nnel
"Emer
If the TV is tuned to a restricted channel, the V-Chip will block
wi!! go blank and the following
message will appear:
eric
Esca
e"
it. The screen
1
Enter your PtN.
To resume normal viewing, tune to a different channel using CH A or
CH v button. Under certain conditions (depending on the rating of the local TV
programs) the V-Chip might lock out all the channels. In this case, use the
V-Chip function for an "emergency escape":
2
Press the MENU button. Press the A or T button to select Setup, then press
the ENTER button.
3
Press the A or T button to select V-Chip,
4
Enter your PIN, then press the ENTER button, and press the A or T button to
temporarily disable the V-Chip Lock.
then press the ENTER button.
_,_ If you forget the PIN, press the remote-control buttons in the following
sequence, which resets the pin to O-O-O-O: Power Off. _ MUTE _ 8 -_ 2
4 -_ Power On.
Upgrading the Software
Samsung may offer upgrades for your TV's firmware in the future. Please contact the Samsung call center at
1-800-SAMSUNG to receive information about downloading upgrades and using a USB drive. Upgrades will be
possible by connecting a USB drive to the USB port located on the side of your TV.
1
Insert a USB drive containing
on the side of the TV.
2
Press the MENU button to display the menu.
the firmware upgrade into the USB Upgrade
Port
Press the A or T button to select Setup, then press the ENTER button.
3
Press the A or T button to select SW Upgrade,
4
Press the ,& or V' button to select USB, then press the ENTER button.
The message Scanning for USB... It may take up to 30 seconds, is displayed.
5
If the firmware on the USB is properly recognized, the message Upgrade
version xxxx to version xxxx? The system would be reset after upgrade,
displayed.
Press the ,9 or _,- button to select OK, then press the ENTER button.
then press the ENTER button.
is
The upgrade starts.
Please be carefut not to disconnect the power or remove the USB drive while
upgrades are being appiied.
The TV wilt shut off and turn on automatically after completing the firmware
upgrade.
_,_ When software is upgraded, video and audio settings you have made will
return to their default (factory) settings. We recommend you write down your
settings so that you can easily reset them after the upgrade.
@
i WiSELiNK
Using the WiSELiNK Function
This function enables you to view and listen to photo (BASELINE, JPEG) and audio flies (MP3) saved on a USB
Mass Storage Class device.
insert a USB device containing JPEG and/or
MP3 files into the WISELINK jack (USB jack)
on the side of the TV.
TV Side Panel
USB (Not supplied)
@
S-VIDe(
®
WDE_
_,_ WISELINK only supports USB Mass Storage Class devices (MSC). MSC is a
Mass Storage Class Bulk-Only Transport device. Examples of MSC are Thumb
drives and Flash Card Readers. It does not support USB HDD and HUB.
_,_ This product supports USB devices that have only 512byte data block size.
_-- Do not apply excessive force when you insert/eject the memory card or USB
device.
_,_ Do not place the memory card or USB device near a strong electro-magnetic
device.
_,_ Do not allow metal substances to come in contact with the terminals on the
memory card.
_-- Do not bend, drop or apply strong shock to memory cards or USB devices.
_,_ Only alphanumeric characters must be used as a folder name or filename
(photo, music). The fitename with non-alphanumeric
characters is displayed with
,???,,.
_,_ If a filename is too long, the filename is represented as follows: "filename...+.jpg"
or "filename...+.mp3".
_,_ The file system supports FAT16/32, not NTFS.
_,_ Certain types of USB Digitat camera and audio devices may not be compatible
with this TV.
_,_ Before inserting your memory card or USB device into the TV, please back up
your files. SAMSUNG is not responsible for any data file damage or data loss.
_-- The data files in memory cards might be erased due to electrostatic discharge
(EST), loose contact, or dust.
_-- Some memory devices may not be recognized when the TV is turned on and
switched to WISELINK Mode. If this occurs, remove and reinstall the memory
device in question.
_-- Directly connect the USB device to the USB jack on your TV. Compatibility
problems may occur when using a USB hub.
_,_ We recommended using the sequential JPEG format. If the progressive JPEG
mode is used, decoding may fail due to use of much memory.
_,_ When the loading (
) icon is displayed, do not remove the USB device.
_,_ PTP (Picture Transfer Protocol) or MTP (Media Transfer Protocol) is not
supported on this TV.
_,_ USB devices that require their own driver CDs may not be recognized. (When
a USB device is connected to your PC, Windows searches for an eligible driver
for the device. However, if the USB device is not a bulk-only device it cannot be
used with the PC.)
Using the WISELINK Mode
1
Press the MENU button to display the menu.
Press the ENTER button to select input.
Press the A or T button to select WISELINK,
then press the ENTER button.
Press the A or T button to select a corresponding
the ENTER button.
memory device, then press
A menu for selecting the Photo or Music files or setup function on a selected
memory device wilt be displayed.
The WISELINK menu differs depending
connected to TV.
on the USB Memory Device
Press the 4 or _ button to select an icon (Photo, Music or Setup), then press
the ENTER button.
To exit WlSELINK
mode, press the WISELINK
button on the remote control.
Exit the screen by pressing the WISELINK
and enter the WISELINK screen again.
button on the remote control,
Press the WISELINK button on the remote control to turn on the WISELINK mode.
_the
Remote
Button
Control
Button
in WISELINK
Menu
Operations
Move the cursor and select an item.
Select the currently selected item.
Play or pause the Slide Show or MP3 file.
RETURN
,_
Return to the previous menu.
Stop the current function and return to the previous menu.
Run various functions from the Photo and Music menus.
Stop the current slide show or MP3 file.
Page Up or Down (file list item)
i l[°°: tlJi
i
Using the Photo (JPEG) List
You can play back the JPEG flies saved on a memory
device in various
1
After switching the mode to WISELINK,
inserted. (Refer to page 63)
2
Press the ,,1 or I_ button to select Photo, then press the ENTER button.
JPEG files and existing folders are displayed.
Press the A/T/4/I_
ways.
select the memory device that you have
buttons to select a file, then press the ENTER button.
:,_
Pressing the button over a photo icon displays the currently selected photo
in full screen. However, JPEG files smaller than 640x480 pixels are zoomedin at 4 times their original size. (e.g. If a photo's original size is 200x200
pixels, it is displayed at 800x800 pixels.)
_-- Press the INFO button and select View to view a photo image at its original
size.
_-- Pressing the button over a folder icon shows the JPEG files included in the
folder.
:,_ While a full screen is displayed, 4 or I_ buttons will let you see another
photo image in the same folder.
:,_ Press the PLAY/PAUSE button when a Photo icon is selected to start a Slide
Show.
To exit WISELINK
mode, press the WBELINK
Folder icon
_:
Photo icon
_,. . Move to the previous
folder stage icon
button on the remote control.
_-- Moving to a photo may take a few seconds because the file needs to be
loaded. At this point, the icon will appear.
_-- This menu shows only the files whose extension is jpeg (or jpg).
Files with other formats such as gif or tiff will not be displayed.
:,_ Fifteen thumbnail photos are displayed per page.
_-- The thumbnails are numbered from left to right and from top to bottom, from
1 to15.
:,_
:,_
_-:,_
:,_
_--
Folders are displayed first and they are followed by all JPEG files in the
current folder. The folders and JPEG files are sorted in alphabetical order.
If the photo is displayed in full screen, you can zoom in and out or rotate the
photo on the screen. (Refer to pages 68~69)
It takes a while to show JPEG files as thumbnail images.
WISELINK for this product supports JPEG files up to 8K x 8K pixels. For
progressive JPEG files or files whose size exceeds 8MB, the photo will be
displayed as a thumbnail only. When trying to view a progressive JPEG file,
the message Not supported
mode wilt appear. When trying to view a file
exceeding 8MB, the message This file is too large to decode will appear.
The higher the image resolution advances, the longer the display time takes.
You cannot decode images beyond a horizontal resolution of 5000.
You cannot decode images beyond a vertical resolution of 4000.
Press the WISELINK button on the remote control to turn on the WISELINK mode.
,-----,,----..---..--__-----,,-----,
L
I
II
A_3FNNA
CHLIST
WlSELINK
REC
11
......
l|
I
Usin theO
tions Menu
Slide Show:
Starts a slide show.
(Refer to Viewing
a Slide Show on page 66)
Rotate:
You can rotate images in full screen mode.
Images are rotated in the order of 90 °, 180 °, 270 ° and 0 ° (original state).
(Refer to Rotating on page 68)
_-- You cannot save a rotated image.
It may take tong time to rotate the large-size file.
Zoom:
You can zoom into images in full screen mode.
Images are zoomed in the order of X2, X4 and Xl (original size).
(Refer to Zooming-In
on page 69)
_-- You cannot save a zoomed-in
image.
When the JPEG image resolution
use the Zoom function.
is greater than the screen size, you cannot
The Zoom function is not available for the image files that have the resolution of
1920x1080 or greater.
List:
Displays the stored files, folders and file info.
Continued...
_a
Slide Show
1
After switching the mode to WISEUNK,
inserted. (Refer to page 63)
select the memory device that you have
2
Press the 4 or _- button to select Photo, then press the ENTER button.
JPEG files and existing folders are displayed.
3
Press the INFO button to display the option (Slide Show,
file).
4
Press the A or T button to select Slide Show, then press the ENTER button.
Cancel the selected
_-- The Slide show displays all JPEG files in the selected folder at a preset
speed.
_,_ During the slide show, files are displayed in order from the currently shown
file.
_,_ MP3 files can be automatically played during the slide show if the Default
Background
Music is set to On. To enable this function, MP3 files and
other photo files must be located in the same folder on the memory device.
_,_ To run the slide show repeatedly, change the setting by referring to page 71.
_-- Press the PLAY/PAUSE button when a Photo icon is selected to start a Slide
Show.
5
Press the INFO button during the slide show to set the following options (Slide
Show Speed, Background
Music, Background
Music Setting, List).
6
Press the A or _' button to select the option, then press the ENTER button.
Press the WISELINK button on the remote control to turn on the WISELINK mode.
Continued...
,-----,----__---__--__-----,,-----,
i-
cHL' '
i U22,
Z ''JlJi
Usin
the Menu durin
a Slide Show
Slide Show Speed:
Setect to control the Slide Show Speed.
Each time the ENTER button is pressed, the speed changes
(Normal _ Slow -_ Fast)
repeatedly.
Background
Music:
Select to choose whether you want to play MP3 files during a slide show. Each time
the ENTER button is pressed, the background music activation changes repeatedly.
(On _ Off)
Background
Music Setting:
While the slide show is in progress, MP3 files and folders under the same directory
are displayed.
Setect a folder using the A or T button and press the ENTER button.
The selected folder will be highlighted.
Press the RETURN button again to return to the slide show screen.
The selected background music is played.
_,_ if you turn Off the Background Music, even if the Background
have been set up, the background music wilt not be ptayed.
Music Settings
List:
JPEG flies and existing folders are displayed. To exit WISELINK mode, press the
WISELINK button on the remote control. Press the EXiT button to switch to the
WISELINK
start screen where another memory card can be selected.
_,_ When selecting a photo file, the photo file information is displayed on the Top
left of the TV screen, such as the resolution, the size, the date modified and
the order of the file in the current directory.
Resolution
Date modified
in the current
directory
Condnued...
Rotatin=q,
1
After switching the mode to WISELINK,
inserted. (Refer to page 63)
select the memory device that you have
2
Press the ,,1 or !1_button to select Photo, then press the ENTER button.
JPEG files and existing folders are displayed.
3
Press the A/T/,_/I_
buttons to select a file, then press the ENTER button.
Pressing the button over a photo icon shows the currently selected photo in full
screen.
Press the INFO button to display the option (Slide Show, Rotate, Zoom, List).
Press the A or T button to select Rotate, then press the ENTER button.
Each time the ENTER button is pressed, the photo rotates repeatedly.
(900 -_ 1800 -_ 2700 -_ Oo)
Rotating directly from 90 degrees to 270 degrees is not possible.
_-- When rotating a photo, the edge of the photo may not be displayed
screen.
To exit WISELINK
mode, press the WlSELINK
on the
button on the remote control.
_-- The rotated file is not saved.
function
Icon
information
Current OSD
icon _ed
at the to_oleft of the screen_.
Function
Rotating (90°)
To rotate a photo by 90 degrees
Rotating (180°)
To rotate a photo by 180 degrees
Rotating (270°)
To rotate a photo by 270 degrees
Rotating (0°)
To rotate a photo to its original state.
Press the WISELINK button on the remote control to turn on the WISELINK mode.
Continued...
,-----,,----..---__--__-----,,-----,
j
k
n
_..A CHUST
w_s_u_K
_c
a
j
* II......
1
After switching the mode to WISELINK,
inserted. (Refer to page 63)
2
Press the _1 or m,-button to select Photo, then press the ENTER button.
JPEG files and existing folders are displayed.
3
Press the A/T/4/I_
buttons to select a file, then press the ENTER button.
Pressing the button over a photo icon shows the currently selected photo in full
screen.
Press
Press
Each
(Xl _
the
the
time
X2
select the memory device that you have
INFO button to display the option (Slide Show, Rotate, Zoom,
_, or T button to select Zoom, then press the ENTER button.
the ENTER button is pressed, the photo size increases.
_ X4)
List).
, Xl: Restore the photo to its original size.
, X2: Zoom-in to the photo X2.
, X4: Zoom-in to the photo X4.
To move the enlarged photo image up/down/left/right,
buttons.
To exit WISELINK
Zoom function
Icon
mode, press the WISEUNK
information
icon _ed
press the A/T/4/I_-
button on the remote control.
at the toj_ left of the screen).
Current OSD
Function
Zoom (x2)
Zoom-in to a photo x2.
Zoom (x4)
Zoom-in to a photo x4.
Zoom (xl)
Restore a photo to its original size.
Pan Down
Pan down to view the lower part of a zoomed-in photo.
Pan Up
Pan up to view the upper part of a zoomed-in photo.
Pan Right
Pan right to view the right side of a zoomed-in photo.
Pan Left
Pan Down (END)
Pan Up (END)
Pan left to view the left side of a zoomed-in photo.
Pan to the bottom of a zoomed-in photo
Pan to the top of a zoomed-in photo.
Pan Right (END)
Pan to the right-most part of a zoomed-in photo.
Pan Left (END)
Pan to the left-most part of a zoomed-in photo.
Press the WISELINK button on the remote control to turn on the WISELINK mode.
r----[r----_:zz--,,_y--._cT---ll-----i
"
H
_
C}{LIST_SE _K REC
||
',
i II 000 ,@
// i
REW
STOP _L_YIP_gSE_
I
L ___[L____,'::'__
__r__
_L: ..... _',_____
JJ_____:
I
Using the Music (MP3) List
You can play back the MP3 flies saved on a memory
device in various ways.
1
After switching the mode to WISEUNK,
inserted. (Refer to page 63)
select the memory device that you have
2
Press the 4 or I_ button to select Music, then press the ENTER button.
MP3 files and existing folders are displayed.
Press the A or T buttons to select a file to be played, then press the ENTER
button.
_-- Pressing the ENTER button while a music file is highlighted immediately
plays the music file.
:,_ Pressing the ENTER button while a folder is highlighted shows the music
files in the folder.
:,_ To select a file on the next page, press the REW or FF button.
To select all files or a file, press the INFO button to display the Music menus.
Press the ENTER button to select Play, Music Repeat, or Cancel the selected
file,
Folder icon
:Music
listicon
Move to the previous
folder stage icon
Press the PLAY/PAUSE button while playing an MP3 file to pause the file.
Press the STOP button to stop playback.
To exit WISELINK
mode, press the WBELINK
button on the remote control.
_-- This menu shows only the files whose extension is mp3. Files with other
extensions are not displayed, even if they have been saved on the same
memory device.
_-- The selected file is displayed on the top of the screen with its playing time.
:,_ To adjust the music volume, press the VOL+ or VOL= button on the remote
control.
To mute the sound, press the MUTE button on the remote control.
:,_ FF and REW functions do not work during the play.
_-- The playing time of each MP3 file can be found in the file information.
When not found, it may be displayed as 00:00:00.
Music function
Icon
information
Current OSD
icon
Dis la ed at the to left of the screen.
Function
(Music) All Repeat
When all music files in the folder are repeated.
(Music) All
When all music files in the folder are played once.
(Music) Play/Pause
Pressing PLAY/PAUSE button on the remote control
stops music for a while. Pressing this button once more
resumes music.
(Music) Stop
Music stops by pressing STOP button on the remote
control.
Press the WISELINK button on the remote control to turn on the WISELINK mode.
,-----,,----__---__--__-----,,-----,
, , .000.,,., ,, ,, ,,.,
Using the Setup Menu
Setup displays the user settings
of the WISELINK
menu
1
After switching the mode to WISELINK,
inserted. (Refer to page 63)
select the memory device that you have
2
Press the 4 or _,- button to select Setup, then press the ENTER button.
The Setup menu is displayed.
3
Press the ,_ or T button to select an item you want, then press the ENTER
button.
4
Press the ,_ or T button to select the option, then press the ENTER button.
Slide Show Speed:
Select to control the Slide Show Speed.
You can select Fast, Normal or Slow,
_round
Music:
Select whether to play an MP3 file, or not, during a slide show.
You can select Background Music On or Music Off.
Sack
round
Music Settin
:
While a slide show is in progress, use the Background
music file to listen to.
Select an MP3 file as the background
Music Setting to select a
music.
Music Repeat:
• On: Plays back a music file or all music files repeatedly.
• Off: Doesn't play back repeatedly.
Screen Saver:
Select to set the waiting time before the screen saver appears.
The screensaver will appear when no button is pressed for 1, 3 or 5 minutes.
Press the WISELINK button on the remote control to turn on the WISELINK mode.
i About Anynet+
What is Anynet+?
Anynet+ is a function that enables
Samsung TV's remote.
Connecting
you to control all connected
Samsung
devices that support
Anynet+ with your
Anynet + Devices
The Anynet+ system can be used only with Samsung devices
Samsung device has this feature, check if there is an Anynet+
that have the Anynet+
logo on it.
feature.
To be sure your
To connect to a TV
TV
Anynet + Device 1 Anynet + Device 2
Anynet + Device 3
Connect the [HDMI 1], [HDMI 2]
or [HDMI 3] jack on the TV
and the HDMI OUT jack of the
corresponding Anynet + device
using an HDMI cable.
To connect to a Home Theater
Connect the [HDMt 1],
[HDMI 2] or [HDMI 3]
jack on the TV and the
HDMI OUT jack of the
corresponding Anynet +
device using an HDMI
cable.
TV
2,
Home Theater
Anynet + Device
Connect the HDMI IN jack
of the home theater and
the HDMI OUT jack of the
corresponding Anynet +
device using an HDMI
cable.
Optical Cable
_-- Connect the Optical cable between the Digital Audio Out (Optical) jack on your TV and the Digital Audio Input on the
Home Theater.
Connect only one Home Theater.
_-- When following the connection above, the Opticat jack only outputs 2 channel audio. You will only hear sound from the
Home Theater's Front Left and Right speakers and the subwoofer. If you want to hear 5.1 channel audio, connect the
DIGITAL AUDIO OUT (OPTICAL) jack on the DVD player or Cable/Satellite Box (ie Anynet Device 1 or 2) directly to
the Amplifier or Home Theater, not the TV. Please see the home theater's user manual for more information.
Some HDMt cables may not support Anynet + functions.
_-- Anynet + works when the AV device supporting Anynet + is in the Standby or On status.
_,_ Anynet + supports up to 12 AV devices in total. Note that you can connect up to 3 devices of the same type.
Setting Up Anynet +
The following
settings
To use the Anynet+
help set the Anynet + functions.
Function, AnjLEet+_HDMI-CEC)
must be set to On
1
Press the Anynet + button.
Press the A or T button to select Setup, then press the ENTER button.
2
Press the ENTER button to select Anynet+
ENTER button.
(HDMI-CEC),
then press the
Press the A or T button to select On, then press the ENTER button.
_,_ The Anynet+
(HDMI-CEC)
_-- If you select Off, Anynet+
function is enabled.
(HDMI-CEC)
_-- When the Anynet+ (HDMI-CEC)function
operations are deactivated.
_net+
2
3
is disabled.
is disabled, all the Anynet + related
Device to turn Off Automatically
when the TV is Turned Off
Press the A or T button to select Auto Turn Off, then press the ENTER button.
Press the & or T button to select On, then press the ENTER button.
_,_ The Auto Turn Off function is enabled.
_,_ If you select Off, the Auto Turn Off function is canceled.
Press the EXIT button to exit.
_-- The active source on the TV remote must be set to TV to use the Anynet + function.
_,_ If you set Auto Turn Off to On, connected external devices are also turned off when the TV is turned off.
If an external device is still recording, it may or may not turn off.
Scanning and Switching between Anynet + Devices
1
2
Press the Anynet + button.
_-- Anynet + devices connected
to the TV are listed.
Press the _, or T button to select a particular device and press the ENTER button.
It is switched to the selected device.
If you cannot find a device you want, press the A or _' button to select Searching
Connections, then press the ENTER button.
The message Configuring
Anynet + connection..,
is displayed.
When searching devices complete, the connected devices are listed in the Anynet+
menu.
_,_ Switching to the selected devices may take up to 2 minutes. You cannot cancel the
operation during the switching operation.
_-- The time required to scan for devices is determined by the number of connected
devices.
_-- When the device scan is complete, the number of devices found are not displayed.
_-- Although the TV automatically scans devices when it is turned on using the POWER button, devices connected when
the TV is already on are not displayed in the device list. In this case, select the Searching Connections menu to search
devices.
_,_ If you have selected an external device by pressing the SOURCE button, you cannot use the Anynet + function. Make
sure to switch to an external Anynet + device by using the Anynet + button.
Continued...
Anynet + Menu
The Anynet + menu changes depending
on the type and status of the Anynet + devices connected
Anynet + Menu
to the TV.
Description
View TV
Switches from Anynet + to TV broadcast mode.
Record
Starts a recording. (This menu works only for a device supporting recording.)
(Device_Name) Menu
Shows the menu of the connected device.
Example: When a DVD Recorder is connected, the DVD Recorder's title menu appears.
(Device_Name) Operation
Shows the play control menu of the connected device.
Example: When a DVD Recorder is connected, the play control menu of the DVD Recorder
appears.
Connect (Device_Name)
Your TV connects to the corresponding device.
Receiver
Sound is output through the receiver (home theater).
Setup
You can set the Anynet+ (HDMI-CEC), auto turn off, and searching connections for using
Anynet +.
TV Remote
Control Buttons
......
Device Type
Available
in Anynet + Mode
Operating Status
............... Avai"i
Numeric buttons
After switching to the device, when the menu of the
corresponding device is displayed on the screen.
A/_r/4/_/ENTER
Color buttons
EXIT button
After switching to the device, while playing a file
44 (Backward search)
_ (Forward search)
[] (Stop)
_11(Play/Pause)
Device with built-in Tuner
After switching to the device, when you are watching
a TV program
CH A/_' button
Audio Device
When a Receiver is activated
VOL +/- button
MUTE button
Anynet + Device
buttons
The Anynet + function only works when the active source on the TV remote control is set to TV.
_-- The REC button works only while in the recordable state.
_-- You cannot control Anynet + devices using the buttons on the side of the TV. You can control Anynet + devices only
using the TV remote control.
_-- The TV remote control may not work under certain conditions, in this case, reselect the Anynet + device.
_,_ The Anynet + functions do not operate with other manufacturers' products.
_,_ The 44, _i_ operations may differ depending on the device.
Recording
You can make a recording of a TV program using a recorder.
Press the REC button.
Recording
begins. (Only when the Anynet + enabled recording device is connected.)
_-- You can record the source streams
by selecting
Record
after pressing the Anynet + button.
_,_ Pressing the REC button will record whatever you are currently watching,
device, the video from the device is recorded.
if you are watching video from another
_-- Before recording, check whether the antenna jack is property connected to the recording device.
To properly connect an antenna to a recording device, refer to the recording devices users manual.
Listening through a Receiver (Home theater)
You can listen to sound through
a receiver instead of the TV speaker.
1
Press the Anynet + button.
Press the A or T button to select Receiver, then press the ENTER button.
2
Press the 4 or _- button to select to On, then press the ENTER button.
Now you can listen to sound through the receiver.
3
Press the EXIT button to exit.
When the receiver (home theater) is set to On, you can hear sound output from the TV's Optica(
jack. When the TV is displaying a DTV(air) signal, the TV will send out 5.1 channel sound to the
Home theater receiver. When the source is a digital component such as a DVD and is connected
to the TV via HDM!, only 2 channel sound will be heard from the Home Theater receiver.
_-- If your receiver supports audio on(y, it may not appear in the device list.
The receiver will work when you have properly connected the Optical IN jack of the receiver to the Optical Out jack of
the TV.
_-- When using the WlSELINK feature, sound may not output properly through the receiver.
When listening through the receiver, there are restrictions for using the PIP and audio-related(MTS,
language) menus.
Preferred
Troub(eshooting for Anynet +
Symptom
Solution
Anynet + does not work.
m
I want to start Anynet +,
m
Check if the device is an Anynet + device. The Anynet + system supports Anynet+ devices
only.
m Connect only one receiver (home theater).
_= Check if the Anynet+ device power cord is properly connected.
m Check the Anynet + device's Video/Audio/HDMI 1.3 cable connections.
m Check whether Anynet+ (HDMI-CEC) is set to On in the Anynet+ setup menu.
m Check whether the TV remote control is in TV mode.
m Check whether it isAnynet+ exclusive remote control.
m Anynet+ doesn't work at a certain condition. (Searching channels, Operating WlSELINK)
m When connecting or removing the HDMI 1.3 cable, please make sure to search devices
again or restart your TV.
m Check if the Anynet+ Function of Anynet+ device is set on.
m
Check if the Anynet+ device is properly connected to the TV and check if the Anynet+
(HDMI-CEC) is set to On in the Anynet+ Setup menu.
Press the TV button on the TV remote control to switch to TV. Then press the Anynet +
button to show the Anynet + menu and seiect a menu you want.
I want to exit Anynet +,
_= Select View TV in Anynet + menu.
m
Press the SOURCE button on the TV remote control and select a device other than
Anynet + devices.
m Press any of CH, CH LIST, PRE-CH, and FAV.CHto change the TV mode.
(Note that the channel button operates only when an Anynet + device with a built-in tuner
is not connected.)
The message Connecting to
Anynet + device.., appears on the
screen,
m
The Anynet + device does not play.
You cannot use the play function when Plug & Play is in progress.
The connected device is not
displayed,
_=
m
m
_=
m
The TV program cannot be
recorded.
Check whether the antenna jack on the recording device is properly connected.
The TV sound is not output through
the receiver.
Connect the optical cabte between TV and the receiver.
m
You cannot use the remote control when you are configuring Anynet+ or switching to a
view mode.
Use the remote control when the Anynet+ setting or switching to view mode is comp)ete.
Check whether or not the device supports Anynet+ functions.
Check whether or not the HDMI 1.3 cable is properly connected.
Check whether Anynet+ (HDMI-CEC) is set to On in the Anynet+ setup menu.
SearchAnynet+ devices again.
You can connect an Anynet+ device using the HDMI 1.3 cane only. Some HDMI cabtes
may not support Anynet + functions.
i Appendix
Troubleshooting
if the TV seems to have a problem, first try this list of possible problems and solutions.
if none of these troubleshooting tips apply, call your nearest Samsung service center.
Problem
Possible Solution
Poor picture quatlty.
Try another channel.
Adjust the antenna.
Check all wire connections.
Poor sounc quaH[y
Try another channel.
AciiUStthe aa!er!na:
Try another channel.
Press the SOURCE button.
Make sure the TV is plugged in.
Check the antenna connections.
No picture or souna.
No sound or sound is too low al
maximum voJume.
Picture rolls vertically
, Make su[e the MUTE I_u!!£9is 0ft. ......................................................................
First, check the volume of units connected to your TV (digital broadcasting receiver, DVD, cane
, broadcasting receiver, VCR, etc.). Then, adjust the TV volume accordingly.
Check alt connections.
The TV ooerates erratically
Unl_]ug!t_eTVf0[ 30 sec£nds, thee try operating it again.
The TV won't turn on.
Remote control malfunctions
Makt su[e the we!! autle! is walk{JigReplace the remote control batteries.
Clean the upper edge of the remote control (transmission window).
Check the battery terminals.
Press the TV button to put your remote control in the TV mode.
Make sure the remote has batteries.
che£k :[hatthe i'!-I and ":' ends °f the batteries are inse(ted €£[[ectly -
Digital broadcasting screen prouiem.
Please check the digital signal strength and input antenna.
The image is too light or too dark.
Adjust the Brightness and Contrast.
Adjust the Fine tuning.
The image ,stoo large or 1oosmall.
/ _ct}_iSiih_ Si_e _ei!i_g_.
.................................................................................
...........
The visual ]uatities of digital channels The visual qualities of digital channets may vary depending on the original production method
cary.
(analog or digital).
If the original production method is digital: High visual quality.
If the original production method is analog: The digital program displayed on the screen is
originally an analog program which has been converted to digital.
-he yisual qual!!y !s0[a n SD(Sta_?_ta
[d Def!niti0n) glade:
Screen is black aria power indlcatoight blinks steadtt}
Although the TV caption shows HD,
the visual quality is not satisfactory.
The damaged picture appears inthe
c0[De[ °fthe screen,
On your computer; check the Power and Signal Cable.
The TV is using its power management system.
Moye the fi£mputerlS mouse Or p[ess any key 2!_!be keYb?ard.....
on your equipment cheek (STB, DVD, etc) ; Power and Signal Cable.
The TV is using its power management system.
Press the Source button on the panel or remote control.
Turn the TV off and on.
Information button on the remote control means the selected channel is a digital channel. If the
broadcasting station converts an analog signal into digital and transmits the signal, the visual
qua ty may not be perfect.
If :Just Scan is seieciect in sonie exiernal devices, ihe clamaged pictuie may appear in :_he
cc'[ne[ af the sc[ee n. This sYmp!om is caused bY exte[r_a/devices, not T_!-
Auto Wall-mount adjustment (Sold separately) (FP=T5084)
Once the auto wall mount
is installed, the position of your TV can be easily adjusted.
Auto Wall=Mount
TV Rear Panel
;3
f
J
i
m
EX-UNK Cable (Not supplied)
Entering the menu
1
Press the MENU button to display the menu.
Press the A or T button to select Setup, then press the ENTER button.
2
Press the A or T button to select Wall=Mount
ENTER button.
3
Adjust to the desired position using the A/Y/4/_
Adjustment,
then press the
buttons.
Press the EXIT button to exit.
_-- If you press an arrow button when no OSD is displayed on the TV screen, the
Adjustment screen appears.
_,_ When you turn the power off, your TV moves to the initial installation position.
When you turn the power on, your TV moves to the last adjusted position.
Using the remote Control Buttons
Wall-mount
adjustment
(_
angle
Reset
Remembering the
_osition and moving
to the remembered
_osition
mp._0oE
Moves to the initial installation position.
1. Select the Direction buttons of the remote control.
2. Press the red button (Select Position 1).
3. Adjust the set to a desired position following the wall mount owner's manual.
4. When 10 seconds have passed in a particular position, the wall mount
adjustment screen disappears and the current position is stored in Setect
Position 1.
5. By using the green button (Setect Position 2), and the yellow button (Select
Position 3), you can save positions according to the procedures above.
6. You can save 3 respective positions. To the red button (Select Position I),
green button (Setect Position 2), and yellow button (Select Position 3). If you
press a button after saving, the set automatically moves to that saved angle.
7. If you additionally move the set from a saved position, the last position is
saved.
_S.fa0DE _
For installation,
Tilt Up, Tilt Down, Move right, Move left
refer to the Installation
Manual provided with the walt mount.
_,_ For product installation and the installation and moving of the watt mount, make
sure to consult a specialized installation company.
_,_ This installation manual is to be used when attaching the wall mount to a wall.
When attaching to other building materials, please contact your nearest dealer.
Wall Mount Kit Specifications (VESA)
Install your wall mount on a solid wall perpendicular to the floor.
When attaching to other building materials, please contact your nearest dealer.
If installed on a ceiling or slanted wall, it may fall and result in severe personal injury.
Product Family
inch
VESA Spec. (A* B)
Standard Screw
23 ~ 26
200.100
M4
32 ~40
200*200
M6
46 ~ 52
600*400
LCD-TV
57
700*400
(No VESA)
57 ~ 70
800*400
80 ~
1400"800
42 ~ 50
600*400
55 ~ 70
800*400
Quantity
M8
PDP-TV
M8
63
No VESA
6
80 ~
1400"800
4
_,_ We provided the standard dimensions for wall mount kits as shown in the table above.
_-- When purchasing our wall mount kit, a detailed installation manual and all parts necessary for assembly are
provided.
Do not use screws longer than the standard dimension, as they may cause damage to the inside of the TV set.
_-- For wall mounts that do not comply with the VESA standard screw specifications, the length of the screws may differ
depending on their specifications.
_-- Do not use screws that do not comply with the VESA standard screw specifications.
Do not use fasten the screws too strongly, this may damage the product or cause the product to fall, leading to
personal injury. Samsung is not liable for these kinds of accidents.
_-- Samsung is not liable for product damage or personal injury when a non-VESA or non-specified walt mount is used
or the consumer fails to follow the product installation instructions.
_,_ Our 57" and 63" models do not comply with VESA Specifications.
mount kit for this model.
_,_ Do not exceed 15 degrees tilt when mounting this TV.
z_Do
not install your Walt Mount Kit while your TV is turned on.
It may result in personal injury due to electric shock.
Therefore,
you should use our dedicated walt
How to attach the Stand-Base
Using the screws for securing the stand base and the monitor, firmly attach
the monitor to the stand base.
(The exterior of the set may be different from the picture.)
FP-T5084/FP-T5884
When mounting your TV on a wall,
install the cover (O) on the stand-base
using two screws.
FP-T6374
Warning
Firmly secure the stand to the TV before moving it, as the stand may fall and
could cause serious injury.
_,_ Two or more people should carry the TV. Never lay the TV on the floor
because of possible damage to the screen. Always store the TV upright.
Specifications
Model Name
Screen Size (Diagonal)
50 inch
58 inch
63 inch
1920 x 1080 @ 60 Hz
1920 x 1080 @ 60 Hz
1920 x 1080 @ 60 Hz
15W + 15W
15W + 15W
15W + 15W
50.8X 29I X 37 inches
(1289.3X 7392 X 94.7ram)
58.8X 31.7X 12.6inches
(1289.3X 804X 319.9ram)
57.7X 33 X 3.9 inches
(14651 X 838X 99.7 ram)
577 X 35.6 X 13.6inches
(1465.1X 904.7X 3447 mm)
602 X 39.4X 3.5inches
(1528X 1001X 88 ram)
602 X 42.8 X 16.7inches
(1528X 1087X 423 ram)
98.8 Ibs (44.8 kg)
106.9 Ibs (48.5 kg)
130.1 Ibs (59.0 kg)
141.1 Ibs (64.0 kg)
149.9 Ibs (68.0 kg)
196.2 Ibs (89.0 kg)
50 °F to 104 °F (10 °C to 40 °C)
10% to 80%, non-condensing
-4 °F to 113 °F (-20 °C to 45 °C)
5% to 95%, non-condensing
50 °F to 104 °F (10 °C to 40 °C)
10% to 80%, non-condensing
-4 °F to 113 °F (-20 °C to 45 °C)
5% to 95%, non-condensing
50 °F to 104 °F (10 °C to 40 °C)
10% to 80%, non-condensing
-4 °F to 113 °F (-20 °C to 45 °C)
5% to 95%_ non-condensing
PC Resolution
Sound (Output)
Dimension (Wx H x D)
Bod_,
With stand
Weight
Bod_,
With stand
Environmental Considerations
Operating Temperature
Operating Hum=dJty
Storage Temperature
Storage Humidity
_-- This device is a Class B digital apparatus.
Design and specifications are subject to change without prior notice.
_-- For the power supply and Power Consumption, refer to the label attached to the product.
Stand Swivel (Left / Right)
-20* ~ 20 °
Dimensions (FP-T5084)
5O 8
444
436
, \
TOP VIEW
FRONT VIEW
JACK PANEL DETAIL 2.3"H x 18.8"W @ 5.8" UP FROM BOTTOM
236
=
(£
o
SIDE VIEW
REAR VIEW
NO1E: All drawings not necessarily toscale Some
dimensions are subject to _ange withol_t prior no_ice
Refer to dimension8 on eac_ uni_prio_¸ _opedo_min_
any carpentry Not _ospon_ibl_ fo_ _ypogfaphicalo_
p_in_d e_ro_s
© 2OO7Sa_su_lg Electronics AmeFl_ Inc
Dimensions (FP-T5884)
577
TOP VIEW
FRONT VIEW
JACK PANEL DETAIL 2.3"H x 18.8"W @ 5.8" UP FROM BOTTOM
39
236
=
£
o
SIDE VIEW
REAR VIEW
NO1E: All drawings not necessarily toscale Some
dimensions are subject to _ange withol_t prior no_ice
Refer to dimension8 on eac_ uni_prio_¸ _opedo_min_
any carpentry Not _ospon_ibl_ fo_ _ypogfaphicalo_
p_in_d e_ro_s
© 2OO7Sa_su_lg Electronics AmeFl_ Inc
Dimensions (FP-T6374)
6O 2
55 6
54 8
356
TOP VIEW
FRONT ViEW
JACK PANEL DETAIL 2.3"H x 18.8"W @ 5.8" UP FROM BOTTOM
34
266
=
(-
8£[]I ;0_¢
}
.E
=
= ,
o
REAR ViEW
SIDE VIEW
NO1E: All drawings not necessarily toscale Some
dimensions are subject t_ _an_e withol_t prior no_ice
Refer to dimension8 on e_c_ uni_prio_¸ _ope4o_min_
a_y carpentry Not _ospon_ibl_ fo_ _ypogfap_icalo_
p_in_ede_ro_
© 2OO7Samsung Electronics Amerlc_ Inc
Contact SAMSUNG WORLD-WIDE
If you have any questions or comments relating to Samsung products, please contact the SAMSUNG customer care center.
Communiquez avec SAMSUNG WORLD-WIDE
Pour toute question ou commentaire se rapportant aux produits Samsung, veuiltez communiquer avec te centre de service a la clientele
SAMSUNG.
Contacte con SAMSUNG WORLD-WIDE
Si tiene atguna pregunta o comentario referente a nuestros productos, per favor contacte con nuestro Servicio de Atenci6n al Cliente.
CANADA
U.S.A
Samsung Electronics Canada Inc., Customer Service
55 Standish Court Mississauga, Ontario L5R 4B2
Canada
1-800-SAMSUNG (7267864)
www.samsung.com/ca
1-800-SAMSUNG (7267864)
www.samsung.com
Samsung Electronique Canada Inc., Service a la Clientele
55 Standish Court Mississauga, Ontario L5R 4B2
Canada
Samsung Electronics America, Inc.
105 Challenger Road
Ridgefield Park, NJ 07660-0511
BN68-O 11 83Z-01