1
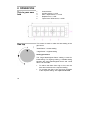
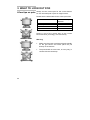
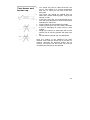
Operating, installation and caring instructions ER59553EU 1 GB Operating, installation and caring instructions page 02 English Dear Customer, We thank you and congratulate you on your choice. This practical appliance, which is modern and functional, has been manufactured from top-quality materials which have been subjected to a strict quality control during the entire manufacturing process and have been carefully tested so that they will meet all your cooking needs. We strongly advise you to read through these simple instructions, so as to ensure that you get perfect results from the moment you first use this appliance. This booklet contains important information, not only on how to use the appliance, but also on maintenance and safety. When our products are being transported, they must be provided with suitable protective packaging. However, we have reduced our packaging to the bare essentials, and the materials are all completely recyclable. You too can contribute to the conservation of the environment by depositing the packaging in the nearest recycling container. Before you get rid of an old appliance, make sure you render it useless, and then take it to a centre for the recovering recyclable materials. Ask your local authorities for details on the nearest centre to your home. Safety Warnings 2 Read this user’s manual carefully, to ensure that you use this appliance as effectively and safely as possible. The following instructions are only valid in countries whose symbol appears on the rating plate of the appliance. To adapt the appliance to conditions of use in your country, always follow the technical instructions. Make sure you keep these instructions for use and assembly, so that you can hand them on with the appliance if it ever changes owner. The diagrams contained in this instruction book are for orientation purposes only. This appliance is intended solely for household use only. Only use this appliance for cooking, and never as a form of heating. In accordance with current regulations, installation of the appliance, changing of gas types or other adjustments to the interior of the appliance may only be carried out by an officially authorised technician. Before having your new cooking hob installed, check that the measurements are correct. This appliance shall be installed in accordance with the regulations in force and only used in a well ventilated location. Read the instructions before installing or using this appliance. Isolate the appliance from the mains during every maintenance operation. To do this, remove the plug from the mains or actuate the corresponding fuse. Close the gas supply. This appliance should not be connected to a combustion products evacuation device. When connecting electrical appliances in the proximity of the appliance, make sure that connection cables do no come into contact with hot cooking surfaces. Thoroughly clean the appliance and accessories before using them for the first time. This will eliminate any "newness" smells and soiling. Keep packaging from the appliance and dispose of it properly. Keep packaging elements away from children. Do not leave the appliance unattended while in operation As the appliance’s heating and cooking surfaces get very hot during operation, always use with care. Always, keep children away from the appliance. Very hot fat or oil can easily catch fire, and so if you are cooking with fat or oil keep an eye on the pan. DANGER If a pan containing fat or oil catches fire, do not pour water onto it, as this may cause burns. Cover the pan with at damp cloth to extinguish the fire and disconnect the cooking appliance. Never use a malfunctioning appliance. In the event of a malfunction, turn-off the appliance’s gas and electricity supply, before calling our technical assistance service. Make sure that pans are always placed centrally on the gas burner and never place the pot directly on the burners. Never place unstable pans or containers on the cooking hob or the burners, as they may accidentally tip over. Do not operate the appliance without pots and pans placed on it. Make sure that all the burner parts are correctly fitted. Do not heat up any empty pots or pans; this may result in a build-up of heat. Be sure to switch the burners to the lowest setting whenever you remove pots or pans briefly. In this way, you reduce the risk of burns when working next to flames; you also save gas and reduce pollution. Pots and pans with thick bottoms can improve heat distribution. The flame is better exploited and costs can be saved. Pots and pans with a diameter greater than 28cm should not be used. Wok supports for concave woks are sold separately. 3 If a gas tap gets stuck, do not force it. Call our service technician immediately. Do not clean the appliance with a steam cleaning apparatus or with water pressure – risk of short-circuiting. Whenever the appliance is fitted under a vapour extractor hood and the hob is in use, always have pots or pans over the burners in use. With an open flame the vapour extractor hood may become damaged by external heat development or grease residues in the filter may ignite. Ensure an adequate air supply when using a vapour extractor hood operating in the exhaust air mode. Use of a gas cooker generates heat and humidity in the room where it is installed. Please be sure you have good kitchen ventilation. Natural ventilation openings must be kept unobstructed. Prolonged use of the appliance with few or all burners may call for additional ventilation such as opening a window or a door, and/or stronger air extraction by an extractor hood. Make sure that the appliance is not subjected to strong draughts, as they might blow out the burners. As the user, you are responsible for maintenance and proper use in the household. Note: The rating plate for this appliance is included in this instruction manual. Keep the rating plate in a safe place along with your operating and assembly instructions. Please pay particular attention to Sections 3 and 4 of these operating instructions so that you can enjoy all the advantages which this appliance has to offer. 4 CONTENTS 1. INSTALLATION ................................................................................................. 6 Before installation ................................................................................................... 6 Installation (for the installer) ................................................................................... 9 Electrical connection............................................................................................. 11 Gas connection (for the fitter)............................................................................... 12 Caution ................................................................................................................. 15 Converting the burners to another type of gas (for the fitter) ............................... 16 Changing the nozzles ........................................................................................... 16 Nozzle table.......................................................................................................... 17 2. OPERATION .................................................................................................... 18 This is your new hob............................................................................................. 18 Gas tap ................................................................................................................. 18 Ignition .................................................................................................................. 19 Switching the Burners to the "Off Position" .......................................................... 19 Note ...................................................................................................................... 19 3. WHAT TO LOOK OUT FOR ............................................................................ 20 A few tips on pots ................................................................................................. 20 Notes on cooking using the wok burner ............................................................... 21 4. CARE AND CLEANING................................................................................... 22 How to care for your gas hob: Cleaning............................................................... 22 Your burner and burner cap ................................................................................. 23 Pan support .......................................................................................................... 24 Home troubleshooting .......................................................................................... 24 After-sales service.............................................................................................. 26 E number and FD-number.................................................................................... 26 Packing and old appliances .............................................................................. 26 5 1. INSTALLATION Before installation These built-in hobs are intended for insertion into a cut out in the worktop. The appliance must only be connected by an authorized gas and electrical fitter to ensure that statutory regulations and the connection requirements of the local electricity and gas supply company are met. Before installing the unit, remove any protective film. When the hob is built in over a cabinet with drawers, the upper drawer has to be replaced with a cabinet front. No installation directly over a drawer! Do not install refrigerators, dishwashers, ovens and/or cookers or any laundry appliances underneath the hob. Be sure to keep minimum distances of 100 mm from the side wall and 50 mm from the back wall. The minimum width of the worktop should be 600 mm. The installation dimensions can be seen on the following page. 6 7 approx. 60 Dimensions in mm Chimney cooker hoods are to be installed in accordance with the installation instructions of the hood. On the furniture into which the appliance is to be installed, the plastic coating and/or veneer must have been treated with a heat-resistant adhesive, otherwise it may become distorted or peel off, especially on the narrow sides. The rough edges of the cut-out must be sealed using a watertight material. Prior to connection of the appliance, it must be checked that the appliance specifications comply with local connection requirements (gas type and pressure). Please also check for any special regulations of your local supply company. The specifications of this appliance are listed on the rating plates which are located on the underside of the gas hob. This appliance is not to be connected to the exhaust air outlet. It must be installed and connected according to the currently effective installation conditions. Particular care must be taken to provide suitable means of ventilation. 8 Installation (for the installer) Installation must be made by a kitchen installation expert. Note: If you intend to have the gas hob welded into a stainless steel worktop, for safety reasons and in order to fully maintain the requirements of your Siemens warranty, we recommend that this type of installation be done solely through our designated partner: Bautek. (Address available on request). Picture 1 IMPORTANT!!! The countertop must have a thickness of 30 mm and a maximum of 40 mm. Do not use liquid silicone to glue the hob to the countertop. The furniture below the countertop should have an opening for passage of the gas pipe and electric wires measuring at least 50x50 mm. Any eventual cabinet, resting on the worktop, at any of the two sides of the hob, and the upstand on the back of the hob, each must be at least 50 mm from the edge of the hob itself. In case of elements sold complete with cabinet, the instructions for installation of the cooker hob are provided in the manual for the cabinet. Apply the sealing gasket along the edge of the opening taking care to overlap the joints (picture 1). Picture 2 Fit hook B in angle iron A welded on the unit (picture 2) taking care to block it in the holes provided, depending on the thickness of the countertop (30 mm, max. 40 mm), picture 3. Turn tab C and position it under the countertop, then tighten screw D. Trim, if necessary, the part of the gasket extending beyond the cooker hob. 9 Picture 3 10 Electrical connection Prior to connection check the voltage and total output on the technical label affixed to the appliance. It is obligatory that this appliance be earthed. When connecting the appliance, ensure the earth wire is connected first and that all wires are connected to the correct terminals. If a direct connection to the mains is required, it is necessary to install a device that ensures an omnipolar disconnection from the mains, with an opening distance of the contacts such as to ensure the complete disconnection in the conditions foreseen by the category of overvoltage III, as per the installation’s regulation. This is not the case if the connection is by means of a plug, provided the user has easy access to the plug itself. Fuse rating: 3 Amp. When connecting the appliance please ensure that the earthing wire is properly connected. In the event of an accident due to the fact that the appliance is not earthed, or that the earthing is faulty, we do not accept any form of responsibility. The type of cable connecting the appliance to the electricity supply must be H05RR-F3 G 0.75. In the event that the connecting cable must be replaced due to damage only this type of cable should be used. This should only be carried out by one of our after-sales service technicians. CE: This appliance complies with the following EU directives: - 72/23/EEC - Low Voltage Directive - 89/336/EEC - EMC Directive - 90/396/EEC - Directive on Gas Appliances 11 Gas connection (for the fitter) The gas supply system must comply with the local standards in the country in effect. Attach the elbow coupling to the appliance gas supply, using the seal provided. Your hob is pre-mounted with the connection ISO 7-1. In order to change the elbow coupling (see picture 4) Picture 4 12 13 In compliance with the currently effective regulations, the hob must be connected to the gas pipe with a stop valve. This valve must be easily accessible at all times. After connecting the unit to the gas mains always check the seal of the connection using a solution of soapy water. Never check the seal using a flame. Using flexible pipes: • do not allow the pipes to be constricted or crushed; • the pipes must not be subjected to traction or twisting forces; • do not allow the pipes to come into contact with cutting or sharp edges, etc... • do not allow any gas connecting pipe and/or any electric connecting wire to come into contact with the bottom of the hob; make sure that the entire length of the pipes and/or electric connecting wire is available for inspection. Particular care must be taken to ensure leak proof connection. The maximum permissible length of the gas connecting pipe is 2.5 m. IMPORTANT!!! This safety gas tube must be routed in such a way that it is not fed through hot areas and does not come into contact with any hot parts of the appliance, e.g. underside of hob. Installation of the tube must ensure that it runs freely and that it cannot come into contact with any movable parts of the kitchen cabinets, e.g. a drawer. 14 Caution Only switch on the circuit breaker or main switch once the appliance has been installed. The appliance must be installed in the furniture in accordance with these operating, installation and maintenance instructions. It is important to note that we shall accept no liability for damage which is a direct or indirect result of improper connection or installation. The appliance must always be disconnected from the mains before repairs are carried out. If repairs are needed, never open the appliance yourself, but call our after-sales service. Particular care must leak-proof connection! be taken to ensure Gas connection may only be completed by an approved fitter in accordance with applicable regulations. In addition, local regulations and the requirements of the local gas supply company must also be observed. This guarantees that the regulations and the local supply company's requirements are observed. 15 Converting the burners to another type of gas (for the fitter) Changing the nozzles Nozzles for conversion to LPG are provided with this appliance or can be obtained from the after sales service (see list included). Prior to making the necessary adjustments, the hob must be disconnected from the mains. To see which gas type has been preset in the factory; refer to the rating plate in this manual or on the underside of the hob. CHANGING THE NOZZLES The burners are adaptable to different types of gas by replacing only the nozzles for the type of gas used (see data table). To access the nozzle, simply remove the cap and flame-breaker. To change the nozzles, use a no. 7 socket wrench (picture 5). Picture 5 Picture 6 REGULATION OF MINIMUM FROM LPG TO NG Our taps are suitable for all types of gas and are regulated at the minimum as follows: 1. Light the burner and turn the knob to the minimum position. If the flame should go out, proceed as follows: a.) light the burner at maximum capacity (large flame) b.) remove the knob c.) introduce a small screwdriver in hole B on the shaft of the tap (picture 6) and unscrew the adjustment screw by two turns. d.) replace the knob and turn to the minimum position (small flame) 2. Remove the knob from the tap 3. Introduce a small screwdriver in hole B (picture 6) and tighten or loosen the adjustment screw (taking care not to turn the shaft of the tap) until the burner flame is properly adjusted at the minimum. Check that when passing quickly from the maximum position to the minimum the flame does not go out. 16 Nozzle table REGULATION OF MINIMUM FROM NG TO LPG 1. Light the burner and turn the knob to the minimum position. 2. Remove the knob from the tap 3. Introduce a small screwdriver in hole B (picture 6) and tighten the adjusting screw completely (taking care not to turn the shaft of the tap). Check that when passing quickly from the maximum position to the minimum the flame does not go out. 17 2. OPERATION This is your new hob 1 2 3 4 5 Control knobs Auxiliary burner, 1.0 kW Semi - Rapid burner, 1.75 kW Rapid burner, 2,7 kW Triple Crown Wok burner, 3.5 kW Gas tap This control is used to make the heat setting of the gas burner. "Small flame" = lowest setting "Large flame" = highest setting Setting procedure: The "large flame/highest flame" setting is used for initial boiling. For ongoing cooking, a variable setting between the "large flame/highest flame" and "small flame" can be made. • • 18 To reduce the flame from high to low, turn the knob anti-clockwise to the required setting. To increase the flame, turn the knob clockwise to the required setting, with a pan on the hob. Ignition The knob for the relevant burner is first pushed down and turned anti-clockwise to "large flame". Press the knob down firmly and hold for approx. 3 seconds - only then will the gas be released from the burner and safely ignited by the sparks. When the burner is ignited release the knob. Note: if it does not light immediately: 1. check gas supply and burner position. 2. try again while holding for up to 10 seconds. If for any reason the burner flames are extinguished, switch off the control knob and wait at least 1 minute before making a new ignition attempt. If the burner still doesn’t ignite call the after sales service. Switching the Burners to the "Off Position" The burners are turned off by means of switching the control knob to its initial position. Note The use of a gas cooker leads to the production of heat and moisture in the kitchen. For this reason, make sure that the room is properly ventilated: Keep natural ventilation openings open or provide a mechanical ventilating device (e. g. an exhauster hood). Long and intensive use of the appliance may necessitate additional ventilation, e. g. opening of a window, or a more effective type of ventilation, such as a mechanical appliance operating on a higher power stage. 19 3. WHAT TO LOOK OUT FOR A few tips on pots Always use the correct pan for the correct burner! Do not use small pots or pans on large burners. Please see the below table for the correct pot sizes. Auxiliary burner Semi-Rapid burner Rapid burner Triple Crown Wok burner Recommended pan diameter 60 - 140 mm 150 - 200 mm 210 - 260 mm 240 - 280 mm Placing a pot of the correct size on the correct burner will save you energy, time and money. Warning: 20 • Make sure that pans are always placed centrally on the gas burner and never place the pot directly on the burners. • The pots should not come onto, or in any way, in contact with the countertop. Notes on cooking using the wok burner The diameter of the saucepan or frying pan base must be no greater than 280 mm. Using larger pans could cause the hot waste gas flowing out from underneath the pan to damage the worktop or a wall that is not heat-resistant. Note: When using a concave wok pan, please use the additional wok support which has to be placed on the main pan support over the wok burner. When using your concave wok pan, please make sure that the wok pan is placed over the wok support; the bottom of the wok pan is not to come in direct contact with the main pan support or burner. 21 4. CARE AND CLEANING How to care for your gas hob: Cleaning If cared for properly, your gas hob will continue to look good for a long time, and cleaning will also be easier. Use a sponge and soapy water (or a specialist cleaning product) to care for stainless steel components, but always wait until the appliance has cooled down completely. In the event of yellowing; a special stainless steel cleaning solution available in the trade is recommended. Use a clean, dry cloth to polish the hob, or better still a chamois leather. The control knobs can be removed by pulling them upwards. Never use pliers or attempt to lever off the controls. Unsuitable cleaning agents: Do not under any circumstances use an abrasive sponge or a scouring agent. Do not use acidic substances (lemon juice, vinegar etc.). Nor should any chemically aggressive cleaners such as oven sprays or stain removers be used. 22 Your burner and burner cap • • • • • • • You should only start to clean the burner cap once it has cooled to its normal temperature after use, i.e. when you can touch it with your bare hand. The burner cap should be cleaned with hot water and a normal cleaning agent, using a soft sponge or cloth. If the cap is very dirty, we recommend that you soak the removable parts in warm water before attempting to clean them. Avoid scraping off food residues if possible. Cleaning the burner cap with caustic chemicals is just as damaging as using acids or paint stripper. Rough pan scourers or sand paper will ruin the surface just as scouring powder and glass wool do. Do not clean the burner cap in a dishwasher. Once the surface of the appliance has been cleaned, ensure that the burner cap is put back on properly; otherwise the electrical ignition will not connect. The burner and the burner cap must be completely dry before they are replaced. 23 Pan support • • • • • • • • Only clean the pan support once it has cooled to its normal temperature, i.e. when you can touch it with your bare hand. The pan support can be removed for cleaning. The pan support should be cleaned with hot water and a standard cleaning agent, using a soft sponge or cloth and afterwards, dried thoroughly with a towel. Never use aggressive or abrasive cleaning products. Avoid scraping off food residues if possible. Cleaning the burner cap with caustic chemicals is just as damaging as using acids or paint stripper. Rough pan scourers or sand paper will ruin the surface just as scouring powder and glass wool do. Do not clean the pan stands in a dishwasher. The pan stands must be completely dry before they are replaced. Home troubleshooting You do not always need to call the After Sales Technical Assistance. Very often, you can solve the problem on your own. The table on the following page contains a few pieces of advice. Important note: Only authorised personnel from our After Sales Technical Department can carry out work on the gas and electrical supply systems. 24 What has gone wrong? The electric sparker does not work The flames on the burners are not uniform ...if the gas flow does not seem normal, or no gas comes out? There is a smell of gas in the kitchen area ...if the safety valves on the different burners do not work? Probable cause Solution - Defective fuse. - Check the fuse in the main fuse box and change it if necessary. - The automatic fuse may have fused or the trip switch has tripped. - Check the main fuse box to see whether the automatic trip switch or a differential switch has tripped. - There may be food or cleaning residue between the sparker and the burners. - Carefully clean the spaces between the sparker and the burners. - The burners are wet. - Dry the burner covers and sparkers carefully - The burner covers are not properly seated. - Make sure that the burner covers are properly seated. - No electrical connection - Make sure that the electrical connection has been done correctly. - The different parts of the burners have not been properly seated. - Place the different pieces in the correct position. - The grooves on the burners' gas outlets are dirty. - Clean the grooves on the burners' gas outlets. - The gas mains are turned off. - Turn on all mains' taps. - If the gas is coming from a gas bottle, it may be empty. - Replace the gas bottle with a full one. - There may be a leak at the connection between the pipe and the main gas supply. - Make sure that the connection is airtight. - The control knob has not been pressed in for long enough. - Light the burner, and then keep the control knob pressed in a few seconds longer. - The grooves on the burners' gas outlets are dirty. - Clean the grooves on the burners' gas outlets. 25 After-sales service Our after-sales service is there for you if your hob should need to be repaired. You will find the address and telephone number of your nearest after-sales service centre in the phone book. The after-sales service centres listed will also be happy to advice you of a service point in your local area. E number and FD-number Please provide the E number (product number) and the FD number (production number) of your appliance when contacting the After Sales Service. The rating plate with the numbers can be found in this manual or on the under side of the hob. Packing and old appliances Your new appliance was protected by suitable packaging while it was on its way to you. All materials used for this purpose are environmentally friendly and can be recycled. Please make a contribution to protecting the environment by disposing of the packaging appropriately. Old appliances are not worthless rubbish. Environmentally-conscious recycling can reclaim valuable raw materials. Before disposing of your old appliance, please make sure that it is unusable, or label it with a sticker stating "Caution, scrap". Up-to-date information on how to dispose of your old appliance and the packaging from the new one can be obtained from your retailer or local authority. 26 This appliance is marked according to the European directive 2002/96/EC on Waste Electrical and Electronic Equipment (WEEE).By ensuring this product is disposed of correctly, you will help prevent potential negative consequences for the environment and human health, which could otherwise be caused by inappropriate waste handling of this product. The symbol on the product, or on the documents accompanying the product, indicates that this appliance may not be treated as household waste. Instead it shall be handed over to the applicable collection point for the recycling of electrical and electronic equipment. Disposal must be carried out in accordance with local environmental regulations for waste disposal. For more detailed information about treatment, recovery and recycling of this product, please contact your local city office, your household waste disposal service or the shop where you purchased the product. 27 Service If you should contact our Customer Service, please state E- and FD-number of your gas hob. Siemens-Electrogeräte GmbH Carl-Wery-Str. 34 D-81739 München 10.2007 28