1
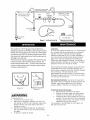
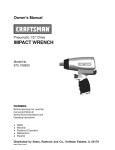
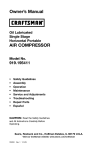
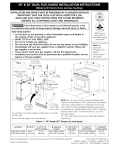
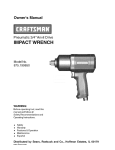
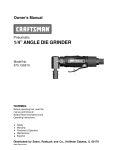
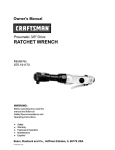
Owner's Manual
i
PROFESSIONAL
i
Pneumatic 1/2-inch Drive
COMPOSITE
IMPACT WRENCH
Model No.
875.198641
WARNING:
Before operating tool, read this
manual and follow all
Safety Recommendations
Operating Instructions.
,
,
,
,
Safety
Warranty
Features &Operation
Maintenance
,
Espahol
Distributed
www.Sears.com
and
by Sears, Roebuck
and Co., Hoffman
Estates,
IL 60179
FULL ONE WARRANTY ON
CRAFTSMAN AIR-DRIVE TOOLS
If this Craftsman tooI fails to give complete satisfaction
within one year from the date of purchase, RETURN IT TO
THE NEAREST SEARS STORE IN THE UNITED STATES,
and Sears will repair it free of charge. If this Craftsman
tool is used for commercial or rental purposes, this
warranty applies for only 90 days from the date of
purchase. This warranty gives you specific legal rights,
and you may also have other rights which vary from state
to state.
ReadOperating
Instructions
Please become familiar with all the instructions
and
warnings before operating any pneumatic tool.
Always Wear Approved Eye Protection
Impact resistant eye protection should meet or exceed
the standards set forth in ANSI Z87.1, Occupational and
Educational Eye and Face Protection. Look for marking
Z87.1 on your eye protection to ensure that it is an
approved style.
Hearing Protection is Recommended
Hearing protection should be used when the noise level
exposure equals or exceeds an 8 hour time-weighted
average sound level of 85dBA. Process noise, reflective
surfaces, other tools being operated nearby, all add to the
noise level in a given work area. If you are unable to
determine your noise level exposure, we recommend the
use of hearing protection.
Avoid Prolonged Exposure to Vibration
Pneumatic tools can vibrate during use. Prolonged
exposure to vibration or very repetitive hand and arm
movements can cause injury. Discontinue the use of any
tool if you experience tingling, numbness, discomfort or
pain in your hands or arms. You should consult your
physician before resuming use of tool.
90 PSI Maximum
This tool is designed to operate at an air pressure of 90
pounds per square inch gauge pressure (90 PSi)
maximum, at the tool. Use of higher air pressure can, and
may cause injury. Also, the use of higher air pressure
places the internal components under loads and
stresses they were not designed for, causing premature
tool failure.
Distributed by Sears, Roebuck and Co., Dept. 817WA,
Hoffman Estates, IL 60179.
The Craftsman Model 875.198641 1/2" Square Drive
Professional Impact Wrench is designed for demanding
fastening and maintenance applications.
Features
The Craftsman 1/2" Drive impact Wrench is equipped
with a power regulator. This tool features full power in
reverse and 3 power levels in forward. The numbers 1
through 3 on the housing are only for reference and do
not denote a specific power output. One (1) designates
the lowest power output in forward, while three (3)
designates the highest power output in forward.
Specifications
Drtve size ..................................................................................1/2"
No load speed ................................................................8,500 RPM
Max torque (Forward)...................................................... 570 ft/Ibs
Max torque (Reverse) ..................................................... 700 ft/Ibs
Length ..........................................................................................7"
Weight ................................................................................. 4.5 Ibs.
Air inlet ............................................................................. 1/4" NPT
Recommended hose size ..................................................3/8" I.D.
Average air consumption ................................................. 5.5CFM
Maximum operating pressure ...............................................90 psi
NOTE: THEAIR SUPPLY SHOULD BE CLEAN, DRYAND
PREFERABLY LUBRICATED. FOR BEST RESULTS
DRAIN THE MOISTURE FROM YOUR COMPRESSOR
DALLY.
Use Only Impact Sockets & Accessories
Only use sockets designated "FOR USEWITH
IMPACTWRENCHES." Hand tool sockets can break,
creating a hazard from flying pieces. Always check
sockets, retainers and drives regularly for wear or
damage and replace when necessary.
Pre-Operation
Before the tool is connected to the air supply, clear the air
hose of accumulated dust and moisture by running air
freely through the air hose for 5-10 seconds. Before
removing a tool for service or changing sockets, make
sure the air line is shut-off at the compressor. This will
prevent the tool from operating if the throttle is accidently
engaged.
Some dust created by power sanding, sawing, grinding,
drilling and other construction activities contains chemicals known to cause cancer, birth defects or other
reproductive harm. Some examples of these chemicals
are:
Lead from lead based paint
crystalline silica from bricks and cement
and other masonry products, and
arsenic and chromium from chemicallytreated lumber.
Your risk from those exposures varies, depending on how
often you do this type of work. To reduce your exposure to
these chemicals: work in a well ventilated area, and work
with approved safety equipment, such as dust masks that
are specifically designed to filter out microscopic particles.
Installation
(See figure
1)
This tool is designed to operate at 90 psi. Lower pressure (below 90 psi) will reduce performance of the tool
while higher air pressure (over 90 psi) raises the performance of the tool beyond its rated capacity and could
cause serious damage to tool and user.
Always use clean dry air. Excessive moisture and dirt will
greatly reduce the life of any air motor. We recommend
the installation of an in-line filter-regulator-lubricator
as
close to the tool as possible.
A 3/8" air hose is required up to a length of 8 ft. If more
length is required a 1/2" air hose should be used at the
compressor. Attach a 3/8" whip hose for the remaining
4 - 8 ft. for flexibility. Be sure all hoses and fittings are the
correct size and tightly secured before using air tool.
(2)
._
"If
I I
ranch ne = 2 t
........
iool mien/nose size
II
Morse
tha_n
1/100slo.
pe
I I
I I
Sto _
_"
Valve
II
_
Filter
Reaulator
Main line = 3 times
Tool inlet/hose size
_
_)A_lve
(
_"
Figure I - Air Hose Hook Up
Stop a
Air Compressor
-_r .\ .........
x x \x\\\\\\\\l"".
Lubrication
An in-line filter-regulator-lubricator
(fig 1) is recommended
as it increases tool life and keeps the tool in sustained
operation. The in-line lubricator should be regularly
checked and filled with air tool oil. Proper adjustment of
the in-line lubricator is performed by placing a sheet of
paper next to the tools exhaust ports and holding the
throttle open approximately 30 seconds. The lubricator is
properly set when a light stain of oil collects on the paper.
Excessive amounts of oil should be avoided.
The Craftsman 1/2" Professional Impact Wrench is
designed to operate on 90 PSIG. Lower pressure (below
90 PSI) will reduce performance of the tool, while higher
air pressure (over 90 PSI) raises the performance of the
tool beyond its rated capacity and could cause serious
damage to tool and user.
The tool features a built in regulator with reverse having
maximum power and forward having 3 positions. The
three forward positions are 1,2 and 3, with 3 being the
maximum torque output and 1 being the least amount
of torque output (figure 2 ).
In the event that it becomes necessary to store the tool for
an extended period of time (overnight, weekend, etc.), it
should receive a generous amount of lubrication through
the air inlet (fig 3). The tool should be run for
approximately 30 seconds to ensure oil has been evenly
distributed throughout the tool. The tool should be stored
in a clean and dry environment.
Recommended lubricants:
Use air tool oil or any other
high grade turbine oil containing moisture absorbent, rust
inhibitors, metal wetting agents and an EP (extreme
pressure) additive. (See Fig. 3 for location/air inlet).
(Figure 2)
(Figure 3)
To lubricate the air tool manually:
•
Disconnect the tool from the air supply
•
Depress the throttle trigger and place several
drops of air tool oil into the air inlet.(Figure 3)
•
Connect the tool to the air supply and run for 30
seconds. This will allow the oil to be distributed
throughout the tool motor. The excess oil will be
expelled through the tool exhaust.
This procedure is recommended for both before and
after each use of the tool.
[ ,WARNINe]
To operate the tool:
°
Connect the tool to the air hose
°
Adjust the air compressor regulator to 90 PSI. This
tool operates at 90 PSI. Use of pressure, higher than
90 PSI at the tool, may cause injury to the user or
damage to the tool.
°
Depress the elongated throttle lever to operate the
tool. The speed of the tool can be varied by teasing
the trigger.
°
To stop tool, release the throttle
(3)
Sears CRAFTSMAN
Pneumatic 1/2-inch
Model 875.198641
COMPOSITE IMPACT
WRENCH
Exploded View and Parts List
15
19
14
13
12
11
24
11
j
22
18
25 26
17
1
2
3
4
5
6
7
8
9
10
11
12
13
14
15
16
17
18
19
20
21
30
33 32
27
(
28
/
./
37
21
20
10
9
34
Ref.
27 29
6
Description
Motor Housing
Valve Stem
Throttle Spring
Exhaust Deflector
Hose Adaptor
O-Ring
Throttle Trigger
O-Ring
O-Ring (2)
Reversing Regulator
Ball Bearing (2)
Oil Seal
O-Ring
Front Plate
Cylinder
Rotor
Rotor Blade (6)
Rear Plate
Guide Pin
End Cap Gasket
End Cap
Part No.
Ref.
8700974
8700862
8700362
8700864
8700975
8700866
8700882
8729936
8731200
8700883
8729478
8729477
8700868
8700884
8700885
8700886
8700887
8700888
8730032
8700889
8700973
(4)
36
38
Description
Part No.
22
23
24
25
26
27
28
Regulator Lever
Torx Screw (4)
Hammer Cage
Cam Ball Pilot
Cam Ball
Hammer Pin (2)
Hammer Cam
8700972
8700871
8700095
8572035
8572034
8700315
8700096
29
30
31
32
33
34
35
36
37
38
Cam Release Spring
Anvil
Anvil Collar
Socket Retaining Ring
O-Ring
Front Gasket
Oil Plug
Clutch Housing
Torx Screw (2)
Oil Seal
8700098
8700895
8700896
81013129
81008695
8700894
8729739
8700989
8700744
8730022
39
40
41
Support Rod (4)
Valve Stem Bushing
Washer
8700897
8700880
8700923
Troubleshooting
Tool runs slowly or will not operate
1. Grit or gum in tool
1. Flush the tool with air tool oil or gum
solvent.
2. No oil in tooI
2. Lubricate the tool according to the lubrication
instructions in this manual.
3. a. Adjust the regulator on the tool to the maximum setting.
b. Adjust the compressor regulator to tool
maximum of 90 psi.
4.Tighten and seal hose fittings. If leaks are found
use teflon tape.
5. a. Be sure the hose is the proper size. Long
hoses or tools using large volumes of air may
require a hose with an I.D. of 1/2" or larger
depending on the total length of the hose.
b. Do not use a multiple number of hoses
connected together with quick connect fittings.
This causes additional pressure drops and
reduces the tool power. Directly connect the
hoses together.
6. Replace rotor blade.
7. Remove and inspect bearing for rust, dirt and
grit. Replace or clean and grease bearing with
bearing grease.
3. Low air pressure
4. Air hose leaks
5. Pressure drops
6. Worn rotor blade in motor
7. Worn ball bearing in motor
Moisture blowing out of tool exahust
1. Water in tank
1. Drain tank. (See air compressor manual). Oil tool
and run until no water is evident. Oil tool again and
run 1-2 seconds.
(5)
Manual del Propietario
La Ilave profesional de impacto con impulsor cuadrado
Modelo
875.198641
ADVERTENCIA:
Antes de usar esta herramienta,
lea este manual y siga todas las
recomendaciones
de seguridad
e instrucciones de operaci6n.
•
•
Seguridad
Garantia
•
•
Caracteristicasyoperaci6n
Mantenimiento
•
EspaSol
Distribuido
www.Sears.com
por Sears, Roebuck
and Co., Hoffman
Estates,
IL 60179
GARANTIA PLENA DE U NO AI_IOPARA LAS HERRAMIENTAS
NEUMATICAS DE CRAFTSMAN
Siesta herTanlienta neum_ttica Craftsman no le diese una
satisfacci6n total dentro de uno aflo de su fecha de compra,
DEVUELVALAAL CENTRO! DEPARTAMENTO DE SERVlCIO DE
SEARS MAS CERCANO EN LOS ESTADOS UNIDOS, y Sears la
reparar_t o reemplazada repsin cargo. Siesta herramienta
Craftsman se usa con fines comerciales o de alquiler, esta
garantia se aplica a s61o 90 dfas de su fecha de compra, esta
garantia le confiere a usted derechos legales especificos,
siendo posible que usted tambien tenga otros derechos que
varian de un estado a otro.
Distributed
by Sears, Roebuck and Co., Dept. 817WA,
Hoffman Estates, IL 60179
Lea las instrucciones de operacion
Por favor familiaricese con todas las instrucciones y
advertencias antes de operar cuaIquier herramienta
neum4ttica.
Siempre use proteccion aprobada para la vista
La protecci6n a ia vista resistente al impacto debe
satisfacer o exceder ias normas establecidas en ANSI
Z87.1, Protecci6n Educativa y Ocupacionat de los Ojos y
el Rostro. Busque la marca Z87.1 en su protecci6n de Ia
vista para asegurarse que es un estilo aprobado.
Se recomienda proteccion del oido
La protecci6n del oido debe usarse cuando la exposici6n
al nivel del ruido iguala o excede un nivel promedio de
sonido ponderado de tiempo en 8 horas, de 85dBA.
Ruido del proceso, superficies refiectoras, otras
herramientas que se operan en la cercania, todos
agregan aI nivel deI ruido en una area de trabajo dada. Si
usted no puede determinar su exposici6n a! niveI de
ruido, recomendamos el use de protecci6n de oido.
Evite exposicion prolongada a la vibracion
Las herramientas neum_tticas pueden vibrar durante el
uso. Una exposici6n prolongada a Ia vibraci6n o
movimientos muy repetitivos de la mano y el brazo
pueden causar lesiones. Discontint3e el uso de
cualquiera
herramienta si usted experimenta cosquilleo,
entumecimiento, incomodidad o dolor en sus manos o
brazos. Usted debe consultar con su medico antes de
reanudar el uso de herramienta.
90 PSI maximas
Esta herrarnienta esta diseflada para operar a una
presi6n atmosferica maxima de 90 libras por pulgada
cuadrada de medidor de presi6n (90 PSi), en la
herramienta. El uso de presiones atmosfericas mas
altas puede causar lesiones. Tambien, el uso de
presiones atmosfericas ma_s altas coloca a los
componentes interiores bajo cargas y tensiones para las
que no fueron diseflados, causando una faIla prematura
de Ia herramienta.
La Ilave profesional
de impacto con impulsor
cuadrado
de 1/2", Modelo 875.198641 de Craftsman, ha sido
diseflada para aplicaciones severas en trabajos de instalaci6n
y mantenimiento.
Caracteristicas
La Ilave de impacto Craftsman, con impulsor
est,. equipada con un regulador de potencia.
puede operar en reversa con plena potencia
cuadrado de 1/2",
Esta herramienta
y tiene 3 niveles
de potencia para su operaci6n normal hacia adelante. Los
n0meros 1 a 3, en la caja de la herrarnienta, son s61o de
referencia y no indican una potencia especifica de operaci6n.
El ntJmero uno (1) indica la potencia de operaci6n rn_.s baja
hacia adelante, mientras que el nOrnero tres (3) indica la
potencia m_ts alta hacia adelante.
Especificaciones
Tamaflo del impulsor .............................................................
1/2"
Velocidad sin carga ...................................................
8,500 RPM
Torsi6n maxima (hacia adelante) ............................
570 pies/Ibs
Torsi6n rn&xima (en reversa) ..................................
700 pies/Ibs
Longitud ..................................................................................
7"
Peso ...............................................................................
4.5 Ibs.
Entrada de aire ............................................................
1/4" NPT
NOTA: EL SUMINISTRO NEUMATICO DEBE ESTAR
LIMPIO, SECO Y PREFERENTEMENTE LUBRIFICADO.
PARAOBTENER LOS MEJORES RESULTADOS, DRENE
DIARIAMENTE LA HUMEDAD DE SU COMPRESOR.
Tamaflo de manguera recomendado ................. 3!8" Dia. Interno
Consumo promedio de aire ................... 5.5 pies cObicos/minuto
Presi6n m_.xima de
90 Ibs.,
ADVERTENCIA
Algo del poIvo creado por lijado, aserrado, desgastado
mecanico, y otras actividades de construcci6n, contienen
quimicos conocidos como causantes de cancer,
defectos cong6nitos o otras lesiones al sistema
reproductivo. Algunos ejemplos de estos quimicos son:
•
El plomo en la pintura basada en plomo.
•
La silice cristalina de los Iadrillos y cemento
y otros productos de albaflileria, y el arsenico y
cromo de Ia madera quimicamente tratada.
Pre-Operacion
Antes que la herramienta se conecte al suministro neumatico,
limpie la manguera neumatica de polvo y humedad acumulados,
haciendo circular aire a traves de la manguera neumatica
durante 5-10 segundos. Antes de extraer una henamienta para
prestar servicio o cambiar cubes, asegLirese que la tuberfa
neum_.tica este cerrada en el compresor. Esto evitara que la
herramienta funcione si el acelerador se activa accidentalmente.
Instalacion
(Vea la figura 1)
Esta herramienta esta diseSada para operar a g0 psi, una presi6n
menor (menor de 90 psi) reduce el rendimiento de la herramienta,
mientras que una presion neum_.tica mayor (mayor de 90 psi)
eleva el rendimiento de la herramienta mas alia de su capacidad
nominal y puede causar lesiones graves y dafios extensos al
usuario y a la herramienta.
Use siempre aire limpio seco. Una humedad y suciedad excesivos
reducira substancialmente
la duraci6n de cualquier motor
neumatico. Recomendamos
la instalacion de un filtro-reguladorlubricador en linea tan cerca como sea posible de la herramienta.
Se requiere una manguera neumatica de 3/8" hasta un largo de 8
pies. Si se requiere una largo mayor debe usarse una manguera
neum_ttica de 1/2" en el compresor. Fije una manguera de tipo
"l&tigo" de 3/8" para los 4-8 pies restante, por flexibilidad. Antes
de usar la herramienta neumb.tica, asegOrese que todas las
mangueras y adaptadores sean del tamaflo correcto y esten bien
asegurados
Su riesgo de esas exposiciones varia, dependiendo de
cuan a menudo usted hace este tipo de trabajo. Para
reducir su exposici6n a estos quimicos: trabaje en una
4trea bien ventilada, y con un equipo de seguridad
aprobado, como mascaras protectoras contra el polvo
que se diseflan especificamente
para filtrar particuIas
microsc6picas.
(6)
Indinaci6n
4
mas de 1/100
ada de la herramienta/
Valvula
Regulador
a_o de ta_
de cierre
Lubricador
eria derivada
= 2 veces la
Tuberia
principal
entrada
de ]a herramienta/
= 3 veces ]a
tamaflo
de la manguera
--....
Filtro
]
Valvula
de cierre
I I
Va]vu]a
_j
W_
de_
autodrenaje
Herramienta
de
Co_mp r
_
_1:_ )Vatvuta de
a i re
k/f
l,
esord
*
_
a_odrenaje
ii
I_
_\\\\\\\\\\\_\\
Figura 1 - Preparaci6n de Tuberia de Aire Re¢omendada
Lubricacion
La Ilave profesional de impacto de 1/2" de Craftsman ha
sido diseflada para operar con una presi6n de 90
PSlG. Una presi6n mas baja (menor de 90 psi) reducira
el rendimiento de Ia herramienta, mientras que una
presi6n mas alta (mayor de 90 psi) aumentara Ia
potencia de la herramienta mas alia de su capacidad
maxima y podria causar series daflos en la herramienta
y Iesiones en Ia persona que Ia usa. La herramienta esta
provista de un reguIador integral, con operaci6n en
reversa a maxima potencia y con 3 niveles de potencia
cuando opera hacia adelante. Las tres posiciones de
operaci6n hacia adelante estan marcadas con los
nOmeros 1, 2 y 3, con 3 correspondiendo
a la posici6n
que produce la torsi6n maxima y 1 a Ia posici6n con
torsi6n minima (Figura 2).
Se recomienda
usar un filtro-regulador-lubricador
en linea (fig 1)
ya que incrementa la duraci6n de la herramienta y mantiene la
misma en una operaci6n sostenida. El lubricador en Ifnea debe
inspeccionarse
regularmente
y Ilenarse con aceite para
herramientas neumaticas. Un ajuste apropiado del lubricador en
linea se efectea colocando una hoja de papel cerca de los
orificios de escape neumaticos
de la herramienta
y manteniendo
el acelerador abierto per 30 segundos aproximadamente.
El
lubricador esta apropiadamente regulado cuando una mancha
leve de aceite se deposita sobre el papel. Deben evitarse
cantidades excesivas de aceite.
En el caso que se haga necesario almacenar la herramienta pot
un periodo prolongado (durante la noche, fin de semana, etc.), la
misma debe recibir una gran cantidad de lubricaci6n
a traves de
la entrada neumb.tica (fig 3). La herramienta debe hacerse
funcionar per 30 segundos aproximadamente
para asegurar
que
el aceite se haya distribuido uniformemente
a traves de la
herramienta. La herramienta debe almacenarse en un ambiente
limpio y seco.
Lubricantes
neumatica
recomendados:
Use aceite de herramienta
o cualquier otro aceite de turbina de grado elevado
que contenga un absorbente de humedad, inhibidores de 6xido,
agentes humectantes de metal y un aditivo EDP (presi6n
extrema).
(Figura 2)
(Figura 3)
Para operar la herramienta:
• Conecte la herramienta a Ia manguera de aire
comprimido.
• Ajuste el regulador del compresor de aire a 90 PSi. La
herramienta opera a una presi6n de 90 PSi.
El use de una presi6n mayor de 90 PSi en la
herramienta puede causar lesiones a la persona que
Ia usa o daflos en la herramienta.
• Oprima la palanca alargada del control de velocidad
para operar la herramienta. La veIocidad de la
herramienta se puede variar con el gatillo.
• Para detener la herramienta, suelte Ia patanca deI
control de velocidad.
(7)
(Vea la Fig. 3 per la ubicacion/entrada
neumatica).
LLAVE NEUMATICA DE IMPACTO COMPUESTO
Modelo CRAFTSMAN
No. 875.198641 de Sears
Vista detallada
DE 1/2 PULGADA
y lista de piezas de repuesto
19
15
18
14
13
12 11
24
17
25 26 27 29
30
39
33 32
27
22
21
20
10
28
9
34
Ref,
1
2
3
4
5
6
7
8
9
I0
11
12
13
t4
15
16
17
18
19
20
21
31
No, de piez:a
8700974
8700862
V&ste_3o£_ la 'v&M._la
Resorte (_ I co n_rol de ve I,oc?Jad 870_}382
:87Cq_884
8,700975
Anillo en '_O"
8700866
Ga illo (_1 con iol de velocid ad 8700892
Anillo en 'O"
8729936
8731200
Anillo en 'C)" (2}
8700883
:8729478
Coi nete 5e bol_ (2}
Sello de ac÷#:e
8729477
Anilben "O"
8700868
PJaca del frent:e
8700884
C]lindro
8700885
Rotor
8708886
8700887
870.0888
8730832
8700889
Junta _:b la tapa d÷l ext_'emo
8708973
36
Ref,
22
23
24
25
26
27
28
29
30
31
32
33
34
35
36
:37
38
39
40
41
(8)
38
No, de pieza
Palanca d÷l r_#ul_or
TornIIo "Tot;<" (4)
Caia <_1m_Jt_tIo
PIo_o ,_ bob _ lev8
Bola de leva
Pasa_or del martillo (211
Levs del marti_k_
Resort÷ sokador de [e_s
Anillo r÷t_n <_1 oubo
Anillo en '_O"
JunCa_I fl'ente
T@6n ,_ a_te
Tol nillo "$orx" (2)
Selb c_ a_iI÷
Varilla de sc>porte
Buie del v&stago de la valvula
Arande_a
(4r_
87rx:_972
8700871
87
8572035
8572034
8700315
87 O0098
8708,098
87O8896
87088%
81013129
81O
8708894
8729739
8700989
8700744
0.730022
8708897
8_80%80
8700923
LOCALIZACION
DE FALLAS
Acci6n
La _rram:_enta funci_s
mw bntamente o no
_un,,cioBa
corr÷ctiw
I Umpie A t_rrambrXa con un _isotvent÷ o
aceite para h_rram_ntas r*._um_ticas
2 No k_y at÷it÷ en la
herrambnta
2. Lubr'_u÷ la herrsmiem:a d÷ a_:uerdo con tss
instruc_iones _ Jubr_sc:_6n eneste manual
g Baj_ pres6n d÷
a'_re
38
Ajuste el reguJador en la _rmmienta
a su
3b Ajuste el regulador en el Gompresor s ulna
presi6n m£_ma de 90 ps
4 La mangu÷ra @
airs tbr_a un _saps
4 Apriete y s÷lb bs GgneGor÷s de ta martguer&
Si er_;L_ntra un ÷s,ca_, u_ una cinta de tefl6n.
5 Hay una caida
5.a Aseg@'e_ _ qua la manguers es det
tamaSo corr_to
Las manguerss largss y As
h_rramiantss qua usan 9rsn_s cantids_s
d÷
air÷ podran requerir una mang_ra con un
diamet_o i_erno _ 1/2' o msyor, _r_r:_:lendo
d_ la Iong_tud total _ Is msnguera
5b No u_ un nOra÷re mOlti_b _ msng, ueras
r_ns
iunta$ oon ooneclores @,
de_c_ne:×iSn r&pid& Esto csuss una caida
presJ6n adiconsl
Consote As mar_gueras
dire cts_nta
6, Abta @1 rotor con
_
,6 Cam@b Is ab_a d÷l rotor
en el motor
7 Coj ne_e d8 bolas
con #_sgaste en el
motor,
Sab hume_sd con el a)re
7 _ti_ e nsl_oc_n÷ el coji_te psra ver s
t_n÷ corros_f6n, su¢i÷dad o _a engomado
Csmb_ o Imp_ el cojinete y en@r&_lo con
11H_y agus en el
t D_r_ el tanque (Veael manual del
oom_resor}
Ponga _r,e'_e en Is herram_nta y
hagals _uncionsr hssta que no hays ev_encis
@ _tua V[_lva a a_i_ar Is h÷rramie_a y
op_r÷h #ur_#_e 162 segundos m_s
qua ÷soaps de la
l'_rr ami÷ nta
(9)
Service Notes:
For the repair or replacement
parts you need delivered directly to your home
Call 7 am - 7 pm, 7 days a week
1-800-366-PART
(1-800-366-7278)
Para ordenar piezas con entrega
a domicilio - 1-800-659-7084
For the location
of a
Sears Parts and Repair Center
in your area
Call 24 hours a day, 7 days a week
1-800-488-1222
For more information
on
purchasing a Sears
Maintenance Agreement or to inquire
about an existing Agreement
Call 9 am - 5 pm, Monday-Saturday
1-800-827-6655
The model number of your air tool is located
on the serial plate attached to the tool.
When requesting service or ordering parts,
always give the following information:
• Product Type
• Model Number
Distributed
• Pneumatic
SE/ARS
Tool
• Part Description
by Sears, Roebuck
and Co., Hoffman
Estates, IL 60179 USA