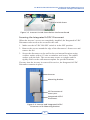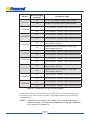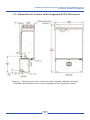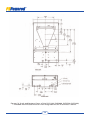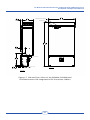
1
PV Grid-tied Residential Inverter and Integrated AC/DC Disconnect INSTALLATION & OPERATION MANUAL 97-600100-02-A01 Preface PV Powered Contact Information PV Powered, Inc. PO Box 7348 Bend, OR 97708 Tel: 541-312-3832 Technical Support: 1-877-312-3832 Fax: 541-383-2348 www.pvpowered.com email: [email protected] Document Copyright PV Grid-tied Residential Inverter and Integrated AC/DC Disconnect Installation and Operation Manual ©2009 PV Powered. All rights reserved. This manual may not be reproduced or distributed without written permission from PV Powered. i PREFACE PV Powered designs, manufactures and markets the solar power industry’s most reliable photovoltaic solar inverter solutions. We’ve assembled a highly experienced solar power electronics design team. Our vision is to spur the widespread adoption and success of solar power, by assisting our distributors, dealers and installers in this dynamic market while ensuring that our products are the best supported, easiest to install and most reliable solar inverters in the industry. Our innovative approach to performance monitoring provides secure and easy access to system performance and inverter status over the Internet. ii PV Grid-tied Residential Inverter and Integrated AC/DC Disconnect Installation and Operation Manual Safety Information and Conventions SAVE THESE INSTRUCTIONS: This manual contains important instructions for the PV Grid-tied Residential Inverter and Integrated AC/DC Disconnect that shall be followed during installation and maintenance of the inverter. Designation of Danger, Warning and Caution ! ! ! ! ! ! DANGER The Danger statement is used to inform the installer/operator of a situation requiring the utmost attention. Failure to heed this warning will result in serious injury or death to personnel and destruction of equipment. WARNING The Warning statement is used to inform the installer/operator of a situation requiring serious attention. Failure to heed this warning may result in serious injury or death to personnel and destruction of equipment. CAUTION The Caution statement is used to inform the installer/operator of a situation requiring attention. Failure to heed this Caution may result in injury to personnel and damage to equipment. DANGER L’alerte de sécurité Danger est employée pour informer l’installateur ou l’opérateur d’une situation exigeant la plus grande attention. Le non-respect de cet avertissement entraînera des blessures graves ou la mort et la destruction de l’équipement. AVERTISSEMENT L’alerte de sécurité Avertissement est employée pour informer l’installateur ou l’opérateur d’une situation exigeant une attention sérieuse. Le non-respect de cet avertissement peut entraîner des blessures graves ou la mort et la destruction de l’équipement. ATTENTION L’alerte de sécurité Attention est employée pour informer l’installateur ou l’opérateur d’une situation exigeant l’attention. Le non-respect de cet avertissement peut entraîner des blessures et endommager l’équipement. iii For applicability of technical information with your specific product, contact PV Powered Customer Service and Technical Support at [email protected]. Certifications UL 1741 IEEE 1547 FCC Class A & B CEC Efficiency Testing CSA 22.2 107.1 UL 98 iv PV Grid-tied Residential Inverter and Integrated AC/DC Disconnect Installation and Operation Manual Acronyms and Abbreviations AC Alternating Current ANSI American National Standards Institute AWG American Wire Gage CEC California Energy Commission (US)/Canadian Electrical Code CSA Canadian Standards Association CPU Controlled Processing Unit DC Direct Current EGC Equipment Grounding Conductor FCC Federal Communications Commission (US) GEC Grounding Electrode Conductor GFI Ground Fault Interrupt IEEE Institute of Electrical and Electronics Engineers LED Light-Emitting Diode LOTO Lockout Tagout LP Low Power MPPT Maximum Power Point Tracking NEC National Electric Code NEMA National Electrical Manufacturers Association NFPA National Fire Protection Association Nm A unit of torque PLL Phase Lock Loop PPE Personal Protective Equipment PV Photovoltaic STC Standard Test Condition UL Underwriters Laboratory VAC Voltage Alternating Current VDC Voltage Direct Current VFD Vacuum Fluorescent Display VOC Voltage Open Circuit VOC_TC Voltage Open Circuit, Temperature Coefficient v vi Table of Contents Preface.................................................................................................................. i Safety Information and Conventions.................................................................. iii Acronyms and Abbreviations...............................................................................v 1. Introduction and Safety....................................................................................1 1.1 Introduction...............................................................................................1 1.2 General Safety...........................................................................................1 1.3 FCC Compliance.......................................................................................2 3. Installation........................................................................................................7 3.1 Mounting and Anchoring the Inverter and Integrated AC/DC Disconnect.................................................................................7 4. Wiring Requirements......................................................................................11 4.1 Electrical Connections.............................................................................11 4.2 Supported Voltages and Grid Types........................................................12 4.3 Wiring Information..................................................................................13 4.4 AC Circuit Breaker Requirements...........................................................14 4.5 Inverter Voltage and Frequency Limits...................................................14 4.6 Circuit Separation....................................................................................16 4.7 Single-point Grounding...........................................................................17 4.8 Wiring a Single Inverter with an Integrated AC/DC Disconnect............21 4.9 Wiring Multiple Inverters with Integrated AC/DC Disconnects.............26 5. Operation........................................................................................................29 5.1 Start Up Procedures.................................................................................29 5.2 Inverter Front Panel Status Indicators.....................................................30 6. Troubleshooting..............................................................................................33 6.1 LED Status...............................................................................................33 6.2 Displayed Fault Codes.............................................................................34 6.3 Fault Code Lists.......................................................................................36 7. Service and Replacement...............................................................................39 7.1 Accessing the Wiring Terminals..............................................................39 7.2 Removing the Inverter.............................................................................40 7.3 Replacing the Inverter.............................................................................41 7.4 Finishing the Replacement......................................................................42 vii TABLE OF CONTENTS 2. Planning............................................................................................................5 2.1 Selecting a Location for the Inverter and Integrated AC/DC Disconnect................................................................5 2.2 Guidelines for Mounting the Inverter and Integrated AC/DC Disconnect . .............................................................5 Appendix A - Specifications................................................................................43 A.1 Inverter Specifications.............................................................................43 A.2 Integrated AC/DC Disconnect Specifications.........................................45 A.3 Circuit Breaker Requirements.................................................................46 A.4 Abnormal Specifications.........................................................................46 Appendix B - Ground Configuration..................................................................47 B.1 Field Configuration of an Inverter for Use with Positively Grounded PV Arrays............................................................47 Appendix C - Cabinet Dimensions.....................................................................51 C.1 Schematics for Inverter-only...................................................................51 C.2 Schematics for Inverter with Integrated AC/DC Disconnect..................55 Limited Warranty................................................................................................59 Return Procedure................................................................................................63 Index...................................................................................................................65 viii PV Grid-tied Residential Inverter and Integrated AC/DC Disconnect Installation and Operation Manual List of Figures and Tables Figure 2-1 Interior Components of the Inverter/Disconnect Unit................6 Figure 3-1 Small Mounting Bracket............................................................7 Figure 3-2 Large Mounting Bracket............................................................8 Figure 3-3 Inverter’s Inside Screw Below the Power Board.......................9 Figure 3-4 Inverter and Integrated AC/DC Disconnect with Mounting Bracket............................................9 Table 4-1 Inverter Compatibility with Voltage and Grid..........................13 Figure 4-1 Supported Utility Voltage Configurations................................13 Table 4-2 Recommended Branch Circuit Protection................................14 Table 4-3 Inverter Voltage and Frequency Limits....................................15 Figure 4-2 Knockouts on AC/DC Disconnect - Bottom View...................17 Table 4-4 Grounding Electrode Conductor Sizing...................................18 Figure 4-3 System Block Diagram of Single-point System Ground ........19 Figure 4-4 Grounding of the Inverter and Integrated AC/DC Disconnect.20 Figure 4-5 Ground Fault Message.............................................................21 Figure 4-6 AC and PV Grounding in Integrated AC/DC Disconnect Cabinet.....................................................21 Table 4-5 Conductor Use By Inverter Model...........................................22 Figure 4-7 Disconnect’s AC Conductor Connections: EGC, Line 1 and Line 2...........................................................24 Figure 4-8 Wiring Multiple Arrays with Inverter/Disconnect Units..........28 Figure 5-1 Normal Startup Screens............................................................31 Figure 5-2 Running Screens.......................................................................32 Figure 6-1 Faulted......................................................................................34 Figure 6-2 Starting Up From a Faulted State.............................................35 Figure 6-3 AC Voltage High/DC Voltage Low Fault.................................35 Figure 6-4 Power Low Fault......................................................................36 Table 6-1 Fault Codes...............................................................................37 Table 6-2 Normal Fault Codes.................................................................38 Table 6-3 Fault Codes Requiring Service.................................................38 Figure 7-1 Connections between the Inverter and Integrated AC/DC Disconnect................................................................................40 Figure 7-2 Reconnecting the Inverter’s Conductors..................................42 ix Table A-1 Table A-2 Table A-3 Table A-4 Inverter PVP1100 through PVP2800 Specifications................43 Integrated AC/DC Disconnect Technical Specifications..........45 Circuit Breaker Requirements..................................................46 Abnormal Specifications..........................................................46 Figure B-1Inverter’s Power Board Terminals...........................................47 Figure B-2Conductors Reversed on Power Board Terminals....................48 Figure B-3New Label for DC Terminal Circuit Board..............................48 Figure B-4New Label for Exterior of AC/DC Disconnect........................48 Figure B-5GFI Negative Jumper in J10 Port.............................................49 Figure B-6Negative and Positive GFI Jumpers.........................................49 Figure B-7PV Terminals in the Inverter....................................................50 Figure B-8Negative and Positive GFI Jumpers.........................................50 Figure C-1Side and Front Views of the PVP1100, PVP2000, PVP2500, PVP2800, PVP3000 and PVP3500 Inverter-only Cabinet.......51 Figure C-2Back and Bottom Views of PVP1100, PVP2000, PVP2500, PVP2800, PVP3000 and PVP3500 Inverter-only Cabinet.......52 Figure C-3Side and Front Views of the PVP4600, PVP4800 and PVP5200 Inverter-only Cabinet...............................................53 Figure C-4Back and Bottom Views of PVP4600, PVP4800 and PVP5200 Inverter-only Cabinet Inverter-only Cabinet............54 Figure C-5Side and Front Views of the PVP1100, PVP2000, PVP2500, PVP2800, PVP3000 and PVP3500 Inverter with Integrated AC/DC Disconnect Cabinet............................55 Figure C-6Back and Bottom Views of the PVP1100, PVP2000, PVP2500, PVP2800, PVP3000 and PVP3500 Inverter with Integrated AC/DC Disconnect Cabinet............................56 Figure C-7Side and Front Views of the PVP4600, PVP4800 and PVP5200 Inverter with Integrated AC/DC Disconnect Cabinet.....................................................57 Figure C-8Back and Bottom Views of PVP4600, PVP4800 and PVP5200 Inverter with Integrated AC/DC Disconnect Cabinet.....................................................58 x 1. Introduction and Safety 1.1 Introduction The PV Grid-tied Residential Inverter and Integrated AC/DC Disconnect is a utility interactive inverter for photovoltaic (PV) systems. The inverter and disconnect are integrated, requiring installation as a single unit. The integrated inverter and disconnect are tied to an electrical source provided by the local utility company as well as the PV system. The inverter contains everything needed to convert the DC energy generated by the PV array(s) into AC energy required to power a house. The Integrated AC/DC Disconnect provides the disconnect switch for DC and AC connections for the PV array and the utility grid using a single switch. This manual provides information necessary for the successful installation and operation of the PV Grid-tied Residential Inverter and Integrated AC/DC Disconnect. IMPORTANT SAFETY INSTRUCTIONS: This product has been engineered and manufactured to ensure your personal safety. Improper installation and operation may result in potential electrical shock or burns. Read and follow all instructions for installation, use and servicing of this product. Read all safety warnings before installing or operating the inverter and disconnect. The disconnect has a locking on/off switch. When the switch is in the off position, a lock can be inserted through the switch so it cannot be opened. Locking the unit is the responsibility of the end user. The lid should be secured to prevent unauthorized access or damage to the unit. SAVE THESE INSTRUCTIONS: This manual contains important instructions for the PV Grid-tied Residential Inverter and Integrated AC/DC Disconnect that must be followed during installation, operation and maintenance. INSTRUCTIONS IMPORTANTES CONCERNANT LA SECURITÉ CONSERVER CES INSTRUCTIONS. CETTE NOTICE CONTIENT DES INSTRUCTIONS IMPORTANTES CONCERNANT LA SÉCURITÉ. 1 INTRODUCTION & SAFETY 1.2 General Safety ! ! CAUTION • All electrical installations should be done in accordance with local electrical codes and the National Electrical Code (NEC), ANSI/NFPA 70. • Before connecting the inverter to the electrical utility grid, your utility company must grant approval. Only qualified electricians should make the connection. • When exposed to light, PV arrays form electrical energy that creates a potentially hazardous condition. To avoid this, completely cover the surface of all PV arrays with opaque material before wiring them. • The inverter contains no user-serviceable parts. Refer maintenance to qualified service personnel. ATTENTION • Toutes les installations électriques devraient être faites selon les codes de l’électricité locaux et le Code national de l’électricité (NEC), ANSI/NFPA 70. • Avant de connecter l’onduleur au réseau électrique du service public, votre entreprise de service public doit en accorder l’autorisation. Seuls les électriciens qualifiés devraient faire la connexion. • Lorsqu’exposés à la lumière, les générateurs PV produisent de l’énergie électrique qui crée une situation susceptible d’être dangereuse. Pour éviter ceci, couvrir entièrement la surface de tous les générateur PV d’un matériel opaque avant de les connecter. • L’onduleur ne contient aucune pièce réparable par l’utilisateur. Confier la maintenance au personnel d’entretien qualifié. 1.3 FCC Compliance The PV Grid-tied Residential Inverter and Integrated AC/DC Disconnect have been tested and found to pass FCC Class B radio interference standards with proper installation of the unit. This is not a guarantee that there will be no interference at every installation. If you notice interference at your installation, try the following potential solutions: • Move or re-orient the affected device. • Increase the distance between the devices. • Connect the device to a different AC circuit. 2 PV Grid-tied Residential Inverter and Integrated AC/DC Disconnect Installation and Operation Manual ! ! CAUTION Read all safety warnings and instructions before installing or operating the inverter/disconnect unit. ATTENTION Lire toutes les alertes de sécurité et les instructions avant d’installer ou d’utiliser l’onduleur ou le dispositif de déconnexion. 3 4 2. Planning 2.1 Selecting a Location for the Inverter and Integrated AC/DC Disconnect When choosing a location for the inverter/disconnect unit, consider the following criteria: • The unit is suitable for both indoor and outdoor installation; the inverter and disconnect enclosures have a NEMA 3R rating. • The optimum location of the unit is outside, shielded from direct exposure to sunlight (i.e. not on the south facing side of the building). • The heat sink temperature can exceed 158°F (70°C). The unit should be installed so people cannot touch the top of the inverter. • The inverter is designed and tested to produce maximum continuous output power within the ambient temperature range of -15°F to 105°F (-25°C to 40°C). Location and Clearances The following clearances are recommended for proper placement of the unit: Visibility of the operating LEDs and display located at the top front of the inverter box should also be considered. Refer to Figure 2-1 for the location of the LED and display. If the unit is installed in an enclosed space, adequate ventilation must be provided. 2.2 Guidelines for Mounting the Inverter and Integrated AC/DC Disconnect The inverter/disconnect unit should be mounted vertically to a flat, solid surface such as strut, concrete, or wood siding. It should be located near the PV arrays to minimize the DC conductor length. The provided bracket and paper mounting template make mounting the unit quick and simple. The small bracket: • Has a vertical row of screw holes down the center and is designed for a single-stud mount. Refer to Figure 3-1. 5 PLANNING • A minimum of 36” (91.5 cm) between the bottom of the Integrated AC/DC Disconnect box and the ground. • A minimum of 12” (30.5 cm) above the heat sink. • Approximately .5” (1.25 cm) of width clearance on the right and left sides of the unit’s cabinet. The large bracket: • Has two top screw holes at either end of the large bracket, 16” (40.6 cm) apart which are designed to match standard stud spacing. Refer to Figure 3-2. The inverter also has an internal mounting screw. Refer to Figure 2-1 for the location of this screw. ! ! WARNING Before drilling holes to mount the inverter, verify that there are no electrical wires or plumbing in the area. AVERTISSEMENT Avant de percer des trous pour installer l’onduleur, vérifier qu’il n’y a aucun fil électrique ou plomberie dans le secteur. Display Inverter Control Board with LED Lights Transformer Inductor Mounting Screw Power Board GFI Fuse Terminals GFI Fuse Port Disconnect AC Wiring Connections DC Wiring Connections Figure 2-1 Interior Components of the Inverter/Disconnect Unit 6 3. Installation 3.1 Mounting and Anchoring the Inverter and Integrated AC/DC Disconnect After you have determined a suitable location for the inverter/disconnect unit, the next step is anchoring the bracket to the wall stud(s). Models PVP1100, PVP2000, PVP2500, PVP2800, PVP3000 and PVP3500 1. Locate a wall stud in the desired location and align the mounting bracket or paper mounting template with the vertical row of screw holes over it for a single-stud mount. Mark the mounting holes ensuring holes A through D are directly over the single stud. 2. VERIFY THE BRACKET IS LEVEL. Align points A through D with the wall stud. Drill 1/8” (.32 cm) pilot holes for the screws. • Use heavy-duty 1/4” x 2” (.635 cm x 5 cm) (coarse thread lag screws to secure points A, B and D. • Use an 1/8” (.32 cm) screw (and anchor if necessary) to secure point C. Refer to the following figure. A B C D 3. Carefully hang the inverter/disconnect unit on the upper part of the bracket. The hooks located at the rear of the inverter should hang over the bracket. 4. Verify the inverter/disconnect unit is level. 5. Remove the front lid of the inverter by unscrewing the two cover screws located at the bottom perimeter of the inverter. 7 INSTALLATION Figure 3-1 Small Mounting Bracket 6. Locate the inverter mounting hole below the power board (see Figure 3-3). Insert the mounting screw through the inverter and tighten securely. Models PVP4600, PVP4800 and PVP5200 1. Locate the wall studs in the desired location and align the mounting bracket or paper mounting template over the studs. Mark the mounting holes. Ensure that locations A and B in the following figure are aligned over two wall studs. 2. VERIFY THE BRACKET IS LEVEL. Ensure points A and B are aligned with the wall studs. Drill 1/8” pilot holes for the screws. • Use heavy-duty 1/4” x 2” (.635 cm 5 cm) coarse thread lag screws to secure points A and B to the wall. • Use an 1/8” (.32 cm) screw (and anchor if necessary) to secure point C. A B C Figure 3-2 Large Mounting Bracket 3. Carefully hang the inverter/disconnect unit on the upper part of the bracket. The hooks located at the rear of the inverter should hang over the bracket. 4. Verify the inverter/disconnect unit is level. 5. Remove the front lid of the inverter by unscrewing the four screws located around the front perimeter of the inverter. 6. Locate the inverter mounting hole below the power board (see Figure 3-3). Insert the mounting screw through the inverter and tighten securely. 8 PV Grid-tied Residential Inverter and Integrated AC/DC Disconnect Installation and Operation Manual Inside Screw Figure 3-3 Inverter’s Inside Screw Below the Power Board Securing the Integrated AC/DC Disconnect When the inverter’s screws are completely installed, the Integrated AC/DC Disconnect also needs to be secured to the wall. 1. Make sure the AC/DC ON/OFF switch is in the OFF position. 2. Remove the screws around the edge of the disconnect’s front cover and remove the lid. 3. Secure the disconnect to the wall at the two internal locations using a rubber washer with a #13 zinc or stainless steel screw. The rubber washer seals the hole. The screws must secure to a single stud for rigidity. Refer to the wall mount template for specific locations. If at any time the inverter is removed for service, the Integrated AC/DC Disconnect remains in place. Inverter Mounting Bracket GFI fuse external access port Integrated AC/DC Disconnect Figure 3-4 Inverter and Integrated AC/DC Disconnect with Mounting Bracket 9 NOTE: Do not proceed with making the electrical connections until the inverter/disconnect unit is properly mounted. ! ! WARNING: Shock hazard Do not remove the Integrated AC/DC Disconnect after it is installed. The AC/DC disconnect switch in the Integrated AC/DC Disconnect is compliant with UL 98. This is a non-serviceable component and needs to remain in place even during removal of the inverter. Removal of the Integrated AC/DC Disconnect can expose energized conductors. Use caution when working around DC source circuits. Although the AC/DC disconnect switch disconnects the inverter from both AC and DC source circuits, hazardous voltages may still be present on the source side of the switch and inside the Integrated AC/DC Disconnect housing. AVERTISSEMENT: Risque de choc électrique Ne pas retirer le dispositif de déconnexion CA/CC intégré après qu’il soit installé. L’interrupteur général CA/CC dans le dispositif de déconnexion CA/CC intégré est conforme à la norme UL 98. Ceci est un composant non réparable et doit demeurer en place même lors de l’enlèvement de l’onduleur. L’enlèvement du dispositif de déconnexion CA/CC intégré peut exposer des conducteurs sous tension. Soyez prudent en travaillant autour de circuits alimentés en CC. Bien que l’interrupteur général CA/CC déconnecte l’onduleur des circuits alimentés en CA et en CC, de dangereuses tensions peuvent encore être présentes du côté de la source de l’interrupteur et à l’intérieur du boîtier du dispositif de déconnexion intégré CA/CC. Leave the inverter and disconnect lids off to allow access to the wiring terminals for completing the electrical connections described in the next chapter, Wiring Requirements. 10 4. Wiring Requirements 4.1 Electrical Connections The design intent of the PV Grid-tied Inverter and Integrated AC/DC Disconnect unit is to provide a safe method of connecting the inverter to the PV system array and the utility service source circuits. The AC/DC Disconnect provides a single location for terminating AC, DC and ground conductors. In addition, the AC/DC Disconnect provides the following: • An AC/DC ON/OFF disconnect switch to the PV array and the utility service, and functions as a wire raceway. • Is shipped with the inverter as an integrated assembly, housed individually: an inverter and a disconnect. • Allows an inverter to be removed for service while leaving the disconnect in place. ! CAUTION 11 WIRING REQUIREMENTS All electrical installations should be completed in accordance with local electrical codes. The National Electrical Code (NEC) requires that the inverter be connected to a dedicated circuit with no other outlets or devices connected to the same circuit. See NEC Section 690-64(b)(1). The NEC also places limitations on the size of the inverter and the manner in which it is connected to the utility grid. See NEC Section 690-64(b)(2). Please refer to CSA 22.1 or your applicable electrical code if this product is installed outside the United States. To reduce the risk of fire, connect the inverter to the appropriate size breaker (see Table 4-2 for required branch circuit protection). Maximum branch-circuit over-current protection is calculated in accordance with the National Electrical Code (NEC), ANSI/NFPA 70, CSA 22.1 or applicable local electrical codes. When exposed to light, photovoltaic (PV) arrays create electrical energy that cause a hazardous condition. To avoid this, completely cover the surface of all PV arrays with opaque material before wiring them. Only qualified electricians should make the connection between the AC/DC Disconnect and the utility grid. The AC/DC Disconnect contains no user-serviceable parts. Refer maintenance to qualified service personnel. ! ATTENTION Toutes les installations électriques devraient être faites selon les codes de l’électricité locaux. Le Code national de l’électricité (NEC) exige que l’onduleur soit connecté à un circuit spécialisé sans aucun autre dispositif ou sortie connecté au même circuit. Voir le NEC à la section 690-64(b)(1). Le NEC impose également des restrictions sur la taille de l’onduleur et la manière dont il est connecté au réseau du service public. Voir le NEC à la section 690-64(b)(2). Veuillez vous référer à la norme CSA 22.1 ou au code de l’électricité applicable si ce produit est installé à l’extérieur des États-Unis. Afin de réduire le risque d’incendie, connecter l’onduleur au calibre de disjoncteur approprié (voir tableau 4-2 pour la protection requise d’un circuit de dérivation). La protection de surintensité maximale d’un circuit de dérivation est calculée selon le Code national de l’électricité (NEC), la norme ANSI/ NFPA 70, la norme CSA 22.1 ou les codes de l’électricité locaux applicables. Lorsqu’exposés à la lumière, les générateurs photovoltaïques (PV) produisent de l’énergie électrique qui crée une situation susceptible d’être dangereuse. Pour éviter ceci, couvrir entièrement la surface de tous les générateurs PV d’un matériel opaque avant de les connecter. Seuls les électriciens qualifiés devraient faire la connexion entre le dispositif de déconnexion CA/CC et le réseau du service public. Le dispositif de déconnexion CA/CC ne contient aucune pièce réparable par l’utilisateur. Confier la maintenance au personnel d’entretien qualifié. 4.2 Supported Voltages and Grid Types Prior to installation, refer to the following table to determine whether the inverter is compatible with the intended grid nominal voltage or grid type. Inverter Model PVP1100 Nominal Voltage 120VAC PVP2000 240VAC PVP2500 240VAC PVP2800 208VAC PVP3000 240VAC PVP3500 240VAC 12 Grid Type 120VAC Split Phase 240VAC: 120VAC Split Phase, 240VAC: 120VAC High Leg 240VAC: 120VAC Split Phase, 240VAC: 120VAC High Leg 208VAC: 120V Wye Three Phase 240VAC: 120VAC Split Phase, 240VAC: 120VAC High Leg 240VAC: 120VAC Split Phase, 240VAC: 120VAC High Leg PV Grid-tied Residential Inverter and Integrated AC/DC Disconnect Installation and Operation Manual Inverter Model PVP4600 Nominal Voltage 208VAC PVP4800 240VAC PVP5200 240VAC Grid Type 208VAC: 120V Wye Three Phase 240VAC: 120VAC Split Phase, 240VAC: 120VAC High Leg 240VAC: 120VAC Split Phase, 240VAC: 120VAC High Leg Table 4-1 Inverter Compatibility with Voltage and Grid 208VAC: 120V Wye Three Phase 240VAC: 120VAC Split Phase 240VAC: 120VAC High Leg Figure 4-1 Supported Utility Voltage Configurations No PV Powered inverter models can be used in the grid type indicated by a red “X”. 4.3 Wiring Information Wire Raceway The wire raceway is the cavity in the bottom of the AC/DC Disconnect cabinet. The wire raceway is designed to accommodate the wiring of multiple inverters with disconnects. Additional knockouts on each disconnect cabinet provides access for running the AC and DC source circuits and system grounding conductors through the raceway. There is room for expanding the knockouts if it is required. Conductor Size and Stripping Length Use a conductor size as specified by the NEC or applicable electrical codes. All conductors need to be stripped to 3/8” (9 mm) and torqued to the recommended value specified on the Field Connections label inside the AC/DC Disconnect cabinet. Use copper conductors only, rated at 194°F (90° C). 13 4.4 AC Circuit Breaker Requirements The main utility service panel must dedicate a single- or multi-pole breaker to operate each installed 120/240/208 VAC PV Powered Inverter. This circuit breaker must be sized to handle the rated maximum output voltage and current of the inverter. To reduce the risk of fire, connect the inverter/disconnect unit to the appropriate size circuit breaker provided in Table 4-2. Maximum branch-circuit over-current protection is calculated in accordance with the National Electrical Code (NEC), ANSI/NFPA 70 or applicable local electrical codes. An exception exists if a dedicated PV system AC sub-panel is used to combine multiple inverters. The dedicated PV system AC sub-panel requires a single breaker at the main utility service panel for a multiple inverter installation. Inverter Model PVP1100 Required Circuit Breaker 1 pole 15A PVP2000 2 pole 15A PVP2500 2 pole 20A PVP2800 2 pole 20A PVP3000 2 pole 20A PVP3500 2 pole 20A PVP4600 2 pole 30A PVP4800 2 pole 30A PVP5200 2 pole 30A Table 4-2 Recommended Branch Circuit Protection 4.5 Inverter Voltage and Frequency Limits The inverter is factory calibrated to the voltage and frequency limits specified in the following table. Condition Voltage phase high (line to ground) Factory Setting 132.0 Maximum Trip Time(s) <1 second Voltage phase low (line to ground) 105.6 <2 seconds Voltage phase fast high (line to ground) 144.0 < 160ms Voltage phase fast low (line to ground) 60.0 < 160ms Voltage high line to line (240V inverters) 264.0 Voltage low line to line (240V inverters) 211.0 Voltage high line to line (208V inverters) 228.8 Voltage low line to line (208V inverters) 183.0 14 PV Grid-tied Residential Inverter and Integrated AC/DC Disconnect Installation and Operation Manual Condition Line frequency low Factory Setting 59.3 Hz Maximum Trip Time(s) < 160ms 60.5 Hz < 160ms Line frequency high Table 4-3 Inverter Voltage and Frequency Limits ! ! WARNING Electrical connections must be completed in accordance with local electrical codes and the National Electrical Code (NEC), ANSI/NFPA 70. Use 12 AWG minimum, 90°C copper wire for all inverter electrical connections. Voltage drop as well as other considerations may dictate using larger wire sizes. AVERTISSEMENT Les connexions électriques doivent être effectuées selon les codes de l’électricité locaux et le Code national de l’électricité (NEC), ANSI/NFPA 70. Utiliser un fil de cuivre de calibre 12 AWG minimum, résistant à 90°C pour toutes les connexions électriques de l’onduleur. La chute de tension aini que d’autres facteurs peuvent indiquer l’utilisation de plus gros calibres de fil. NOTE: To avoid an increase in AC voltage level, which may lead to nuisance faults, PV Powered recommends sizing the conductor for a drop of less than 2%. ! ! ! WARNING Ensure the breaker in the main utility service panel is switched OFF before wiring the inverter/disconnect. This breaker should be switched ON only after all wiring has been completed as described in this manual. AVERTISSEMENT S’assurer que le disjoncteur du panneau de service public principal est déconnecté avant de connecter l’onduleur ou le dispositif de déconnexion. Ce disjoncteur devrait être connecté uniquement après que tous les câbles électriques aient été connectés tel que décrit dans ce manuel. WARNING Follow the order listed below to wire the inverter/disconnect. Failure to do so may result in hazardous voltages or disconnection of contacts. 15 ! AVERTISSEMENT Suivre l’ordre présenté ci-dessous pour connecter l’onduleur et le dispositif de déconnexion. L’inobservation de cet ordre peut causer des tensions dangereuses ou la déconnexion des contacts. IMPORTANT: When mounting the inverter/disconnect outside, use raintight or wet-location conduit hubs that comply with the requirements in the Standard for Fittings for Conduit and Outlet Boxes, UL 514B. IMPORTANT: Pour installer l’onduleur et le dispositif de déconnexion à l’extérieur, utiliser des raccords pour conduits étanches et pour endroits mouillés conformes aux exigences de la norme UL 514B sur les raccords pour conduits et les boîtes de sortie. ! ! CAUTION The DC/AC input and output circuits are isolated from the enclosure. The PV equipment grounding conductor (EGC), where required by Sections 690-41, 690-42, and 690-43 of the National Electric Code (NEC), ANSI/NFPA 70, is the responsibility of the installer. Failure to properly install the ground conductor for the PV equipment can result in exposed metallic surfaces becoming energized to the full potential of the PV array. ATTENTION Les circuits d’entrée et de sortie CA/CC sont isolés du du boîtier. La cosse de mise à la terre de l’équipement PV, lorsqu’elle est exigée aux sections 690-41, 690-42 et 690-43 du Code national de l’électricité (NEC), ANSI/NFPA 70, est la responsabilité de l’installateur. Une installation inadéquate de la cosse de mise à la terre pour l’équipement PV peut entraîner l’exposition de surfaces métalliques qui deviennent sous tension à la pleine puissance du générateur PV. 4.6 Circuit Separation The disconnect is organized into three sections, for data comm, AC and DC connections with corresponding knockout(s) for the conductors. UL 1741 requires a straight run of a conductor, with no loops or crossover to the other circuits (sections) and low voltage versus high voltage in each section. 16 PV Grid-tied Residential Inverter and Integrated AC/DC Disconnect Installation and Operation Manual The three sections are: • Left knockouts — dedicated to the low voltage DC communications for the PVM1010 Data Monitoring Module • Center knockouts — dedicated to AC connections • Right knockouts — dedicated to DC connections Refer to the following figure for specific locations of the knockouts. GFI Fuse External Access Port Data Comm Knockout DC Knockouts AC Knockouts Figure 4-2 Knockouts on AC/DC Disconnect - Bottom View 4.7 Single-point Grounding Inverter Grounding A single-point ground conductor connection is located in the lower right-hand side of the inverter cabinet. This is where the DC Grounding Electrode Conductor (GEC) is terminated. The AC Equipment Grounding Conductor (EGC) is terminated next to the Line 1 and Line 2 connections on the circuit board. The grounding lug is attached to the cabinet with a 10-32 bolt. The equipment ground connector or grounding lug is provided, utilizing the PV equipment and AC ground conductor. This is the only place the PV ground should be connected to the inverter. • Do not tie the GEC to the PV array positive or negative. This would defeat the PV ground fault interrupt protection circuit. Refer to Figure 4-6 for illustrated information. • Refer to Table 4-4 for appropriate sizing of the grounding electrode conductor. Use the maximum current AC or DC - whichever is larger and multiply by 1.25 to get the maximum current rating per NEC 690. 17 Maximum Current Rating 15 Minimum Size of Grounding Electrode Conductor AWG Copper Aluminum Copper Clad 8 6 20 8 6 30 8 6 40 8 6 60 8 6 Table 4-4 Grounding Electrode Conductor Sizing Disconnect Grounding The AC/DC Disconnect uses a single-point grounding connection, the grounding lug, providing continuity for both the EGC and GEC. The grounding lug is permanently bonded to the metal of the disconnect. The grounding lug is provided to facilitate the system ground bonding to the cabinet. This is the only place the GEC should be connected to the disconnect. The inverter/disconnect unit are connected by copper conductors and do not rely on conduit connections for bonding. All ground connections between the inverter cabinet and the disconnect cabinet are completed at the factory. During installation you will complete the ground connections by: • Connecting the GEC coming from the PV system array, and • Connecting the EGC coming from the main utility service panel. Figure 4-4 shows the pre-existing ground connections between the inverter and disconnect cabinets and the location of the ground connections that need to be completed. For information on connecting or disconnecting the single-point ground when replacing the inverter, see Connecting the Ground Conductors of Multiple Units on page 27. 18 PV Grid-tied Residential Inverter and Integrated AC/DC Disconnect Installation and Operation Manual Grounding Schematic Figure 4-3 is a schematic representation of the PV Powered single-point grounding in the inverter. The front lid is grounded through the metal pem insert which accepts each screw securing the lid. Residential Inverter Functional Architecture Control PCB DSP - Power PCB + + + + + + Line Filter DC Power Supply GFI Detect PVM 1010 + PV NEG L1 L2 GND PV POS PV System Ground Gnd L1 L2 AC/DC Disconnect AC Disconnect Board + + + GND - - - DC Disconnect Board Figure 4-3 System Block Diagram of Single-point System Ground 19 Inverter Cabinet Inverter Grounding Lug EGC Conductor PV GFI AC Ground Terminal GEC Conductor Disconnect Grounding Lug Disconnect Cabinet Figure 4-4 Grounding of the Inverter and Integrated AC/DC Disconnect Ground Fault Interruption Circuit (GFI) The purpose of the GFI circuit is to detect a ground fault current, interrupt the flow of a fault current and provide an indication of the fault. A ground fault is defined as “unintended current flow to ground” which presents a hazardous condition. • For the GFI circuit to function as designed, the GEC must be connected only at the ground terminals detailed in Figure 4-6. • Bonding the GEC to the grounded leg of the array anywhere but through the inverter bypasses the GFI circuit. • The GFI circuit operates by bonding the PV array negative or positive to earth ground through a 600 VDC 1-amp fuse. The GFI circuit activates if any DC ground fault currents are greater than 1 amp. The GFI circuit opens the 1-amp fuse, interrupting the fault’s current path, disabling the inverter’s power production and displaying a unique error message shown in Figure 4-5. • The GFI is a latching circuit which prevents the inverter from operating until the fault is repaired and the inverter is reset. The inverter will not operate, even if the fault is repaired, unless manually reset by turning the AC source circuit off and then on. 20 PV Grid-tied Residential Inverter and Integrated AC/DC Disconnect Installation and Operation Manual Figure 4-5 Ground Fault Message If the inverter displays “Ground Fault”, turn the AC/DC Disconnect OFF and refer to the fault information in Chapter 7. Integrated AC/ DC Disconnect AC Wiring Connections DC Wiring Connections AC Ground Terminal Grounding Lug Figure 4-6 AC and PV Grounding in Integrated AC/DC Disconnect Cabinet 4.8 Wiring a Single Inverter with an Integrated AC/DC Disconnect Connecting AC Conductors from the Electrical Grid The inverter/disconnect unit is connected to the main utility service panel using three conductors. Refer to the following table to determine the appropriate conductors to use on each AC Line Input Terminal for each inverter model. 21 Model PVP1100 PVP2000 PVP2500 AC Line Input Terminal L1 L1 or L2 of 120VAC Split Phase Service L2 Neutral of 120VAC Split Phase Service L1 L1 of 240VAC: 120VAC Split Phase Service L2 L2 of 240VAC: 120VAC Split Phase Service L1 L1 of 240VAC: 120VAC Split Phase Service L2 L2 of 240VAC: 120VAC Split Phase Service L1 Phase A, B or C of 208VAC: 120V Wye Three Phase Service L2 Phase A, B or C of 208VAC: 120V Wye Three Phase Service L1 L1 of 240VAC: 120VAC Split Phase Service L2 L2 of 240VAC: 120VAC Split Phase Service L1 L1 of 240VAC: 120VAC Split Phase Service L2 L2 of 240VAC: 120VAC Split Phase Service L1 Phase A, B or C of 208VAC: 120V Wye Three Phase Service L2 Phase A, B or C of 208VAC: 120V Wye Three Phase Service L1 L1 of 240VAC: 120VAC Split Phase Service L2 L2 of 240VAC: 120VAC Split Phase Service L1 L1 of 240VAC: 120VAC Split Phase Service L2 L2 of 240VAC: 120VAC Split Phase Service PVP2800 PVP3000 PVP3500 PVP4600 PVP4800 PVP5200 Conductor Type Table 4-5 Conductor Use By Inverter Model A neutral conductor is used only by the PVP1100. A neutral conductor is not used by any other inverter model. A ground conductor is used in all configurations. NOTE: To avoid an increase in AC voltage level, which may lead to nuisance faults, PV Powered recommends sizing the conductor for a drop of less than 2%. 22 PV Grid-tied Residential Inverter and Integrated AC/DC Disconnect Installation and Operation Manual ! ! WARNING Ensure the main circuit breaker at the utility service panel is switched off before connecting to the AC terminal block. AVERTISSEMENT S’assurer que le disjoncteur principal du panneau de service public est déconnecté avant de le connecter au bloc de jonction en CA. To wire the inverter/disconnect unit to the main utility grid, follow these steps. 1. Ensure the disconnect switch is in the OFF position. 2. Route conduit from the main breaker panel to the AC side of the disconnect. 3. Insert a fitting into one of the AC knockouts on the bottom of the disconnect and fasten securely with a locking nut. Refer to Figure 4-2 for knockout locations. 4. Route the AC conductor from the main utility service panel to the AC/ DC Disconnect using an NEC compliant method. 5. Route the conductors through the fitting and into the wire raceway in the disconnect. Refer to Table 4-5 to determine the appropriate conductors. 6. Connect the ground conductor to the terminal marked with the ground symbol located on the left side of the AC circuit board inside the disconnect. Note: When inserting conductors, ensure that there aren’t any loose strands on the conductor when secured to the terminal block. Any loose strands can effectively reduce the current carrying capacity of a given conductor. Additionally, there is risk creating a short across conductors through loose strands. 7. Connect the L2 conductor to the terminal marked “L2” on the AC circuit board inside the disconnect . 8. Connect the L1 conductor to the terminal marked “L1” on the AC circuit board inside the disconnect. 9. Ensure all connections are wired correctly, properly torqued and there are no loose strands of wire. 23 NOTE: In the PVP1100 units the Line 1 conductor is the only phase voltage wire and Line 2 is neutral. Line 1 EGC Line 2 Figure 4-7 Disconnect’s AC Conductor Connections: EGC, Line 1 and Line 2 Connecting DC Conductors from the PV System Array The DC input terminals provided in the disconnect accept up to 6 AWG multi-stranded conductors from the PV system array. Check the polarity and the open-circuit voltage on the conductors coming from the PV arrays before connecting the DC conductors to the disconnect’s terminals. Applying an open-circuit DC-input voltage that exceeds the maximum DC-input-voltage range will cause irreversible damage to the inverter and void the warranty. Use the online string calculator at www.pvpowered.com to determine the correct string configuration. ! ! ! WARNING Before proceeding with the DC wiring, completely cover the surface of all PV panels with opaque material to avoid the production of electrical energy. AVERTISSEMENT Avant de procéder à la connexion du CC, couvrir entièrement la surface de tous les panneaux PV d’un matériel opaque afin d’éviter la production d’énergie électrique. WARNING Make sure the grounding scheme and the PV panel voltage between the positive and the negative cable connectors of the PV panels are correct before connecting the panels to the DC terminal block on the power distribution board. 24 PV Grid-tied Residential Inverter and Integrated AC/DC Disconnect Installation and Operation Manual AVERTISSEMENT ! Note: S’assurer que le système de mise à la terre et la tension du panneau PV entre la borne positive et négative des connecteurs de câble des panneaux PV sont corrects avant de connecter les panneaux au bloc de jonction en CC sur le tableau de distribution de l’alimentation. For all temperature conditions the VOC, for each series connection, must total less than 500 VDC for all residential inverter models. To wire the inverter/disconnect unit to the PV Array, follow these steps. 1. Ensure the AC/DC Disconnect switch is in the OFF position. 2. Determine the PV array grounding scheme by following the PV manufacturer’s recommendation. • If the PV array is negatively grounded, proceed on to the next step. • If the PV array is positively grounded, follow the instructions in the appendix to properly configure the inverter for positive grounding schemes. 3. Clearly label the ground and equipment ground conductor (EGC) conductors from the PV array. The AC/DC Disconnect accepts multistranded wire gauges up to 6 AWG from the PV array. 4. Insert a fitting into one of the DC knockouts on the bottom of the disconnect and fasten securely with a locking nut. Refer to Figure 4-2 for knockout locations. 5. Route the PV system array’s conductors through the fitting and into the wire raceway in the disconnect. 6. Connect the equipment ground conductor (EGC) to the grounding lug located on the lower front of the wire raceway of the disconnect. Note: Verify the polarity and the open-circuit voltage from the PV array before you connect the DC wires to the DC input terminals on the inverter/disconnect unit. Applying an open-circuit DC-input voltage that exceeds the maximum DC-input-voltage range will cause irreversible damage to the inverter and void the warranty. Use the online string calculator at www.pvpowered.com to determine the correct string configuration. 7. Connect the grounded conductor to the terminal marked “-”on the DC circuit board on the right side of disconnect. 8. Connect the ungrounded conductor to the terminal marked “+”on the DC circuit board on the right side of disconnect. 25 9. Ensure all connections are wired correctly, properly torqued and that there are no loose strands of wire. 10.Remove the 1A fuse from the external port on the inverter by unscrewing the cap housing the fuse. Refer to Figure 4-2 for the location of the fuse. 11.Confirm the AC/DC Disconnect is in the OFF position and remove the material covering the PV array. The PV array should now be exposed to sunlight, energizing the PV side of the system. 12.With a digital voltmeter, verify the open circuit voltage and polarity of the PV array conductors. Set your digital volt meter to read DC voltage, using the red lead on an ungrounded conductor and the black lead on the grounded conductor. Verify the reading matches that of the designed voltage and is below 500VDC. If a negative reading results, the polarity of your PV array conductors are reversed. Correct the polarity before commissioning the inverter/disconnect unit. 13.Secure the disconnect’s lid by reversing the steps in the inverter installation section of the manual. This completes the wiring for the inverter and disconnect to the PV system array and the electric utility. To start the inverter/disconnect unit, see Chapter 5, Operation. 4.9 Wiring Multiple Inverters with Integrated AC/DC Disconnects If there is more than one PV system array, make sure the positive, negative and ground conductors are labeled for each array. For example: • PV array 1 = PV1 pos, PV1 neg, PV1 ground • PV array 2 = PV2 pos, PV2 neg, PV2 ground • PV array 3 = PV3 pos, etc. The AC and DC wiring connections are the same for multiple and single inverter/disconnect unit installation. The system grounding requirements vary slightly from a single inverter to a multiple inverter installation with AC/DC Disconnects. The DC GEC must maintain continuity through all pieces of equipment, and careful attention must be paid to avoid ground loops. 26 PV Grid-tied Residential Inverter and Integrated AC/DC Disconnect Installation and Operation Manual Note: An exception exists if a dedicated PV system AC sub-panel is used to combine multiple inverters. The dedicated PV system AC sub-panel requires a single breaker at the main utility service panel for a multiple inverter installation. Preparing for Wiring Multiple AC/DC Disconnects The wiring raceway in the AC/DC disconnect allows a continuous run of the AC, DC and system ground conductors between multiple inverter/ disconnect units. 1. Make sure each disconnect ON/OFF switch is in the OFF position. 2. Remove the screws from the lid of each disconnect. 3. Remove the side knockouts on each disconnect to access the wiring raceway. 4. Insert a fitting in each knockout opening so a continuous, water-tight connection is created between each disconnect. 5. Route the AC, DC and the system ground conductors through each disconnect, terminating applicable connections. For instructions on connecting the PV array and the AC conductors inside the disconnect, refer to the section Wiring a Single Inverter with an Integrated AC/DC Disconnect on page 21. Connecting the Ground Conductors of Multiple Units System grounding requirements for a multiple unit system also uses a single-point ground. 1. Connect the EGC coming from the first PV array to the grounding lug inside the disconnect cabinet of the first unit. 2. Connect the remaining units with a continuous EGC, branching from grounding lug to grounding lug. 3. On each unit, connect the EGC from the utility grid to the grounding terminal of the AC connection. 27 Inverter #1 GND L1 L2/N Inverter #2 Pos Gnd Neg GND L1 L2/N Inverter #3 Pos Gnd Neg From Utility L1, L2 and EGC GND L1 L2/N Pos Gnd Neg From PV System Pos, Neg and GEC Figure 4-8 Wiring Multiple Arrays with Inverter/Disconnect Units To start the inverter/disconnect unit, see the next chapter Operation. 28 5. Operation ! ! ! Before turning on the inverter, ensure that the inverter and disconnect front covers are closed properly. AVERTISSEMENT Avant de mettre l’onduleur sous tension, s’assurer que les panneaux avant de l’onduleur et du dispositif de déconnexion sont adéquatement fermés. WARNING The heat sink can reach temperatures in excess of 158ºF (70ºC). Do not touch the heat sink when in use, and do not place anything on top of the heat sink. AVERTISSEMENT Le dissipateur thermique peut atteindre des températures supérieures à 70ºC (158ºF). Ne pas toucher le dissipateur thermique lorsqu’il fonctionne et ne placer aucun objet sur le dessus. 5.1 Start Up Procedures To start up the inverter, complete the following steps in the order indicated. NOTE: All steps are assumed completed in previous sections; including but not limited to: • PV array open circuit voltage calculation • Checking the system for ground faults • Verifying the PV conductors are the correct polarity 1. Switch the main AC circuit breaker in the main utility panel to ON. 2. Use your voltmeter to verify the AC voltage is within the AC Operating range indicated in Appendix A. 3. Turn the AC/DC Disconnect ON/OFF switch to the ON position. ! WARNING Before turning on the inverter and AC/DC Disconnect, ensure that the front panel is closed properly and the lid’s screws are tightened. 29 OPERATIONS ! WARNING ! AVERTISSEMENT Avant de mettre l’onduleur et le dispositif de déconnexion CA/CC sous tension, s’assurer que le panneau avant est adéquatement fermé et que les vis du couvercle sont vissées. The green LED should illuminate. Locate the LEDs in the upper left hand corner of the inverter’s display. Verify that the red and green LED lights are illuminated. • If the red LED is not illuminated or is blinking, refer to Chapter 6, Troubleshooting on page 33. • If no green LED illuminates, verify DC voltage is present in the PV System Disconnect. The DC voltage present should be at least 15 volts greater than the minimum operating voltage stated in Appendix A Specifications on page 43. After five minutes the inverter starts to produce power if all necessary operating conditions are met. NOTE: PV Powered recommends that a lock be attached to prevent unauthorized access or damage to the inverter/disconnect unit. 5.2 Inverter Front Panel Status Indicators The inverter continuously monitors: 1. The AC grid connection to ensure the AC voltage and frequency levels are within safe operating limits per UL1741 and CSA 22.2 107.1. 2. The DC voltage and current from the PV array to ensure safe operating conditions per the inverter’s specifications. 3. The inverter’s internal operational parameters to ensure safe operating conditions exist within the operating environment. The inverter has two LED indicator lights visible through the upper left corner of the lid. These lights indicate the inverter’s status. Green LED is illuminated when: • All three monitored operating conditions are within the specifications. • Inverter’s operating environment is safe to export power to the AC grid. Red LED flashes when: • Any one of the monitored operating conditions are not within the specifications. • When a fault condition exists. • The operating environment moves outside the safe operating limits governed by UL 1741, IEEE 1547, and IEEE 519. 30 PV Grid-tied Residential Inverter and Integrated AC/DC Disconnect Installation and Operation Manual Red LED is illuminated when: • The PV array voltage is not within required operating limits, such as: • At sunset, when the inverter turns off for the night. • When clouds reduce the amount of available sunlight or when portions of the PV array are covered with debris. • Any time the DC output from the PV array drops below the inverter’s minimum DC operating voltage, the inverter turns off. • The DC polarity input has reversed conductors. No message is displayed in this situation. When the array is once again exposed to enough sunlight, the green LED illuminates, the inverter’s auto-start feature begins, and after five minutes the inverter begins to export power. If the red LED continues to illuminate when there is sufficient sunlight for operation, verify that no wiring connections are loose. If the wiring is secure, see Chapter 6, Troubleshooting on page 33 for additional information. The vacuum fluorescent display (VFD) indicates the inverter’s status and real-time power output into the AC grid. This display provides the following information: • • • • • • • Inverter model type. AC power produced in real time (watts). Lifetime energy produced (kWh). AC voltage in real time (VAC). PV voltage input in real time (VDC). During start-up, a count-down timer. Fault code message if a fault exists or recently occurred. Normal Display Cycle The display changes every two seconds to show a different set of information as shown in Figure 5-1 and Figure 5-2. Screen 1 Screen 2 Figure 5-1 Normal Startup Screens 31 Screen 3 Screen 1 Screen 2 Screen 3 Figure 5-2 Running Screens If a fault occurs, the display also provides a corresponding fault code. Refer to Chapter 6, Troubleshooting on page 33 for additional information. 32 6. Troubleshooting The inverter provides two indicator lights in the form of Light Emitting Diodes, or LEDs. The LEDs are the primary indicators of the system status: O.K., Sleep or Faulted. The LEDs are located above the inverter display in the upper left hand corner on the front lid. 6.1 LED Status • The light on the left is a red LED and is the primary indicator of system stand-by or fault condition. • A solid red LED and a blank screen indicates the system is in normal sleep or stand-by mode. This mode occurs if there is not enough sunlight present to generate DC voltage at night and the AC properties are within the provided specifications. This may also occur when the DC conductors are connected with reversed polarity. • The red LED blinks if the inverter has had a fault condition, and the vacuum fluorescent display (VFD) displays a fault code. If the red LED is blinking, carefully record the numerical error code and text describing the error. Possible faults are listed in Table 6-1 on page 37. Green LED • The light on the right is a green LED and is the primary indicator the system is generating power. • The green LED illuminates any time the DC voltage is above the inverter’s DC start voltage and all operational parameters are met. When the green light illuminates, the inverter tries to convert power from the PV array. Red and Green LED Lights On If both LED lights are solid at the same time, contact PV Powered Technical Support for assistance. Ground Fault Error 1. The inverter’s GFDI circuit reports a ground fault error if the 1-amp fuse is open and the voltage potential between ground and the grounded terminal of the PV array is greater than +25 VDC, or less than -25 VDC. This voltage potential can only occur if the ground fault fuse in the inverter has opened. 2. A ground fault occurs when unintended current has a path to ground. The most common source of a PV system ground faults are crossed wires, a nicked PV module conductor touching a grounded surface, or cables inside a conduit have metal exposed through the insulation. 33 TROUBLESHOOTING Red LED 3. A less likely cause is limited to multiple inverter installations, when the positive and negative array strings are crossed. Crossed wires occur when a positive or negative conductor from array 1 is connected with wires in array 2. An example is if inverter A has the positive conductor from array 1 and the negative conductor from array 2 connected. 4. If the fuse is open, then a ground fault condition exists. • Check the DC voltage between the grounded terminal of the array and earth ground. • The voltage should be less than 25 VDC with the GFI fuse removed. If the voltage is greater than this, check the array wiring as there may be a ground fault. For the best results, perform this test with the disconnect on and off. If you are not comfortable conducting this test, DO NOT ATTEMPT IT. (See Chapter 7, Service and Replacement on page 39). • If a ground fault condition is not present because it is now repaired or intermittent, replace the fuse with a similar fuse rated at 600VDC and 1A. Note: Replace the GFI fuse with the same type and rating of fuse. The inverter uses Littlefuse KLKD1 1A/600VDC. 5. Make sure the grounded leg of the PV array is not broken in the disconnect. NOTE: The GFI is a latching circuit which prevents the inverter from operating until the fault is repaired and the inverter is reset. The inverter will not operate, even if the fault is repaired, unless it is manually reset by turning the disconnect off and then on. 6.2 Displayed Fault Codes The vacuum fluorescent display (VFD) provides the codes shown in Figure 6-1 and Figure 6-2 when a fault has occurred. Screen 1 Screen 2 Figure 6-1 Faulted 34 Screen 3 PV Grid-tied Residential Inverter and Integrated AC/DC Disconnect Installation and Operation Manual Screen 1 Screen 2 Screen 1 Screen 2 Figure 6-2 Starting Up From a Faulted State NOTE: In this case the fault refers to the last fault detected. If the inverter is in a faulted state, the red LED blinks and the VFD scrolls through the screens shown in the faulted example above. The text of the fault describes the specific fault condition that the inverter experienced. If the inverter is no longer experiencing the condition that caused the fault (e.g. the AC voltage climbs above 264V then drops below 264V), the red LED stops blinking and the inverter starts the five minute count-down timer. During these five minutes, the display also shows the last fault. Multiple Faults If the inverter detects multiple faults at one time, the inverter display cycles through all detected faults. For multiple faults, the numerical values of the fault codes are added as shown in Figure 6-3. Figure 6-3 AC Voltage High/DC Voltage Low Fault Figure 6-3 displays the AC Voltage High fault (1000 0400), plus a DC Voltage Low fault (1000 0020). This might occur at night, when the panel voltage is low, due to darkness, and the utility voltage was above the limits defined in Table 4-3. 35 Figure 6-4 Power Low Fault Figure 6-4 shows a Power Low fault. After the fault occurrence, the inverter had a DC Voltage High fault. In this case, the display added the fault codes 0200 0000 plus 1000 0040 to become 1200 0040. If the faults have the same first digit (such as 1000 XXXX) the 1 remains the same and only the second block of four numbers add to the original fault code. ! ! WARNING These servicing instructions are for qualified personnel only. To reduce the risk of electric shock, do not perform any servicing other than that specified in the operating instructions unless you are qualified. AVERTISSEMENT Les instructions d’entretien s’adressent au personnel qualifié seulement. Afin de réduire le risque de choc électrique, ne pas effectuer d’entretien autre que ce qui est spécifié dans les instructions d’utilisation à moins que vous ne soyez qualifié. 6.3 Fault Code Lists Fault Code VFD Text 8000 0000 Power Module 4000 0000 Power Module 1000 0800 PLL Fault 1000 0400 AC Voltage High 1000 0200 AC Voltage Low Fault Description Generated by the power electronics to protect the switching module. Generated by the power electronics to protect the switching module. The inverter was unable to match the grid frequency. This is usually caused by an unstable power grid. The grid voltage exceeded the limits in Table 4-3. The grid voltage dipped below the AC limits in Table 4-3. 36 PV Grid-tied Residential Inverter and Integrated AC/DC Disconnect Installation and Operation Manual Fault Code VFD Text Fault Description The grid frequency went below the limits in Table 4-3. The grid frequency went above the limits in Table 4-3. 1000 0100 AC Freq Low 1000 0080 AC Freq High 1000 0020 DC Voltage Low 1000 0010 DC Voltage High 1000 0002 Power Supply +15 1000 0001 Power Supply +5 0400 0000 Ground Fault 0200 0000 Power Low 0100 0000 CPU Fault 0040 0000 Over Current 0020 0000 Pre-charge 0004 0000 Heatsink Temp 0002 0000 Watchdog Fault The CPU experienced a watch-dog fault. 0001 0000 Ambient Temp The temperature detected inside the inverter is outside the normal operating limits of -13°F to 203°F (-25°C to 95°C). The DC voltage is below the startup voltage. DC voltage is above upper operating limit 450V. Housekeeping DC power supply 15VDC is out of tolerance. Housekeeping DC power supply 5VDC is out of tolerance. The inverter detected a blown GFI fuse. The inverter shut down because it was producing less than 60W for 5 minutes. The inverter encountered a problem in the CPU. Safety protection. The inverter encountered an over-current fault. The inverter experienced trouble energizing the transformer. The heat sink is above or below the operating limits of -13°F to 203°F (-25°C to 95°C). Table 6-1 Fault Codes The following fault codes indicate the inverter will restart once conditions are within normal operating conditions as listed in Appendix A, Table A-1. Fault Code 1000 0400 1000 0200 1000 0100 1000 0080 1000 0020 1000 0010 37 Fault Code 1000 0002 1000 0001 0200 0000 0004 0000 0001 0000 Table 6-2 Normal Fault Codes If the following fault codes occur, please contact PV Powered Technical Support for service. Fault Code 8000 0000 4000 0000 1000 0800 0400 0000 0040 0000 0020 0000 0002 0000 Table 6-3 Fault Codes Requiring Service 38 7. Service and Replacement PV Powered provides service guidelines for disconnecting and replacing an inverter. Always request and receive a replacement prior to separating the inverter from the Integrated AC/DC Disconnect assembly. PV Powered maintains an advanced replacement policy which provides qualified personnel with a similar inverter for immediate replacement of the unit being removed. In the unlikely event the inverter requires replacement, the disconnect remains in place. Only the inverter is removed and immediately replaced. Note: If the inverter cannot be replaced immediately, it is the qualified service personnel’s responsibility to provide ¾” (1.9 cm) water-tight plugs as specified by UL 514B. These plugs need to be installed in the disconnect’s knockouts to protect the inside of the disconnect unit from exposure to the elements. 1. On the disconnect, move the AC/DC handle to the OFF position. Note: The AC/DC disconnect switch must be in the off position before the lid can be removed. Note: The load side terminals of the AC and DC source circuits may still be energized. ! ! DANGER Risk of Electrical Shock. Allow five (5) minutes for internal power to dissipate prior to entering the enclosure cabinet. Ensure all terminals are voltage free with the use of a multimeter. DANGER Risque de choc électrique. Laisser cinq (5) minutes à la tension interne pour se dissiper avant d’entrer dans la chambre du boîtier. S’assurer que toutes les bornes ne sont pas sous tension à l’aide d’un multimètre. 2. Remove the screws located around the front perimeter of the inverter and remove the lid. 3. Remove the screws around the front edge of the disconnect and remove the lid. Now the wiring terminals in the inverter/disconnect unit are accessible. The terminal connections are located inside the inverter on the Power Distribution Board board at the bottom of the cabinet. 39 SERVICE AND REPLACEMENT 7.1 Accessing the Wiring Terminals These connections include: • AC connection terminal • DC connection terminal • External Ground Fault Interrupt fuse Review the following figure for the terminal locations. The inverter is connected to the electrical grid using three wires: Line 1, Line 2 and GEC. AC Conductor Connections DC Conductor Connections Dividers Knockout for DC Knockout for Data Comm Inverter Grounding Lug Knockout for AC AC Conductor Connections DC Conductor Connections AC/DC Disconnect Grounding Lug Figure 7-1 Connections between the Inverter and Integrated AC/DC Disconnect 7.2 Removing the Inverter 1. Disconnect the AC and DC conductors, including the GEC at the grounding lug, inside the inverter. 2. Pull all conductors down through the appropriate fitting to the wiring raceway inside the disconnect. 3. Remove the locking nuts on the conduit fittings between the inverter and the disconnect units. 4. Remove the three mounting screws in the lower section of the inverter assembly to detach the inverter from the mounting bracket. 5. Lift the inverter from the mounting bracket. 6. Replace the lid on the inverter. 40 PV Grid-tied Residential Inverter and Integrated AC/DC Disconnect Installation and Operation Manual 7.3 Replacing the Inverter 1. Remove the screws and the lid on the replacement inverter. 2. Place the replacement inverter on the mounting bracket. 3. Replace the three mounting screws in the lower section of the inverter assembly to secure the inverter to the mounting bracket. 4. Reinstall each of the fittings with their locking nuts in the knockouts for the conductors. Wiring the Replaced Inverter to the Disconnect The disconnect connections are arranged in the following configuration (refer to Figure 4-2): • The left side is dedicated to AC • The right side is dedicated to DC DC Connections To wire the DC conductors from the disconnect to the replaced inverter: 1. Route the DC conductors through the correct fitting and into the inverter. 2. Connect the DC conductors to the DC wiring terminals inside the inverter. • Connect positive to positive • Connect negative to negative • GEC is terminated at the grounding lug Note: The DC conductors are reversed when running from the disconnect to the inverter. For example, the PV+ EGC is the left DC terminal in the disconnect but is the right terminal in the inverter. AC Connections To wire the AC connections from the disconnect to the replaced inverter: 1. Route the AC conductors through the correct fitting and into the inverter. 2. Complete the following connections by: • Connecting the EGC conductor to the GND terminal. • Connect the conductor coming from L2 in the disconnect to the terminal marked Line 2 inside the inverter. (For the PVP1100 this is the neutral conductor.) • Connect the conductor coming from L1 to the terminal marked Line 1 inside the inverter. 41 Note: The AC conductors are reversed when running from the disconnect to the inverter. For example, the EGC is the left terminal in the disconnect but is the right terminal in the inverter. 3. Ensure all connections are wired correctly and properly torqued as indicated on the Field Connections label inside the AC/DC Disconnect cabinet. DC Conductor Connections } AC Conductor Connections AC Conductors, from Disconnect, Threaded through Fitting + GEC DC Conductors, from Disconnect, Threaded through Fitting Line 1 Line 2/N GND Grounding Lug Figure 7-2 Reconnecting the Inverter’s Conductors 7.4 Finishing the Replacement • Replace the lids and the screws securing the lids for the inverter and the disconnect. ! ! WARNING Before turning on the inverter and disconnect, ensure that the front panel is closed properly and the lid’s screws are tightened. AVERTISSEMENT Avant de mettre l’onduleur et le dispositif de déconnexion sous tension, s’assurer que le panneau avant est adéquatement fermé et que les vis du couvercle sont vissées. To start the inverter/disconnect unit the disconnect, see Chapter 5 Operations on page 29. 42 Appendix A - Specifications The specifications detailed below are expected operational parameters, and should be used in designing your PV system in accordance with the NEC. A.1 Inverter Specifications Specifications PVP1100 PVP2000 115VDC450VDC 115VDC380VDC 115VDC450VDC 115VDC380VDC 140VDC450VDC 140VDC380VDC 180VDC450VDC 180VDC380VDC 10A 18A 20A 18A 105.6V132.5V 211V264V 211V264V 183V229V 120V 240V Maximum DC Input Voltage (VOC) DC Voltage Operating Range (V) DC MPPT Range (V) DC Imp Maximum Current (A) PVP2500 500VDC DC Isc Maximum Current (A) AC Operating Range (V) 26A AC Frequency Range (Hz) AC Nominal Voltage (V) PVP2800 59.3Hz-60.5Hz Normal Output Frequency 240V 208V 8.4A < 2.0A 60Hz Synchronization in Rush Current < 2.0A Power Factor 0.99 - 1.0 at > 50% Power 10A 9A 11A 13A Continuous Output Power (Watts) 1100 2000 2500 2800 Maximum Continuous Output Power (Watts) 1100 2000 2500 2800 Enclosure Steel- NEMA 3R to UL 50 Standards 22 1/2” x 15 5/8” x 8 1/4” (57.15cm x 39.69cm x 21cm) 30 3/8” x 15 5/8” x 8 1/4” (77cm x 39.69cm x 21cm) Dimensions (H x W x D) With AC/DC Disconnect (H x W x D) Weight (lbs) 84.5 (38 kg) 92.5 (42 kg) Cooling 106.5 (48 kg) Natural Convection - Heat Sink Relative Humidity 0% to 95% Condensing Ambient Temperature Range -15°F to 105°F (-25°C to 40°C) Environmental Rating Listings 106.5 (48 kg) NEMA 3R UL 1741, IEEE 1547, IEEE 519, IEEE 929, IEEE 620, CSA 22.2 107.1 GFI Fuse Littlefuse KLKD1 1A/600VDC Table A-1 Inverter PVP1100 through PVP2800 Specifications 43 SPECIFICATIONS AC Maximum Continuous Current (A) Specifications PVP3000 PVP3500 170VDC450VDC 170VDC380VDC 18A 200VDC450VDC 200VDC380VDC 18A Maximum DC Input Voltage (VOC) DC Voltage Operating Range (V) DC MPPT Range (V) DC Imp Maximum Current (A) DC Isc Maximum Current (A) AC Operating Range (V) 500VDC 205VDC450VDC 205VDC380VDC 25A Power Factor AC Maximum Continuous Current(A) 240VDC450VDC 240VDC380VDC 25A 26A 211V183V264V 229V 59.3Hz-60.5Hz 48A 211V264V 211V264V 240V 240V 240V 240V 208V Normal Output Frequency Synchronization in Rush Current 200VDC450VDC 200VDC380VDC 26A 26A 211V264V AC Frequency Range (Hz) AC Nominal Voltage (V) PVP4600 PVP4800 PVP5200 60Hz < 2.0A 8.4A 0.98 - 1.0 at > 50% Power 13A 15A 23A 23A 23A Continuous Output Power (Watts) 3000 3500 4600 4800 5200 Maximum Continuous Output Power (Watts) 3000 3500 4600 4800 5200 Enclosure Dimensions (H x W x D) With AC/DC Disconnect (H x W x D) Weight (lbs) Steel - NEMA 3R to UL 50 Standards 22 1/2” x 15 5/8” x 8 1/4” (57.15cm x 39.69cm x 21cm) 30 3/8” x 15 5/8” x 8 1/4” (77cm x 39.69cm x 21cm) 106.5 (48 kg) 120.5 (55 kg) Cooling Steel - NEMA 3R to UL 50 Standards 27 1/8” x 18 1/8” x 8 5/8” (69cm x 46cm x 22cm) 35” x 18 1/8” x 8 5/8” (88.9cm x 46cm x 22cm) 162 (73 kg) Natural Convection - Heat Sink Relative Humidity 0% to 95% Condensing Ambient Temperature Range -15°F to 105°F (-25°C to 40°C) Environmental Rating Listings NEMA 3R UL 1741, IEEE 1547, IEEE 519, IEEE 929, IEEE 620 GFI Fuse Littlefuse KLKD1 1A/600VDC Table A-1 (continued) Inverter PVP3000 through PVP5200 Specifications 44 PV Grid-tied Residential Inverter and Integrated AC/DC Disconnect Installation and Operation Manual A.2 Integrated AC/DC Disconnect Specifications Specification Value Switch orientation AC/DC ON AC/DC OFF 12 AWG, minimum 6 AWG maximum 194oF (90oC) copper wire Input/output wire sizes Max. DC voltage Max. DC current 500 VDC 48 ADC Max. continuous current > 26 ADC Max. AC voltage Max. AC current 600 VAC 40 AAC Number of terminals 3 positive/3 negative Enclosure type NEMA 3R Weight (lbs) 5 (2.25 kg) Dimensions (H x W x D) Small Large 15 3/8” x 6 5/8” x 8 1/2” (39cm x 39.69cm x 21cm) 17 7/8” x 6 5/8“ x 8 1/2” (45.4cm x 39.69cm x 21cm) NEC 690, UL98 Compliance Operating temperature range -22oF to 122oF (-30oC to 50oC) Table A-2 Integrated AC/DC Disconnect Technical Specifications 45 A.3 Circuit Breaker Requirements Inverter Model Circuit Breaker Required PVP1100 1 pole 15A PVP2000 2 pole 15A PVP2500 2 pole 20A PVP2800 2 pole 20A PVP3000 2 pole 20A PVP3500 2 pole 20A PVP4600 2 pole 30A PVP4800 2 pole 30A PVP5200 2 pole 30A Table A-3 Circuit Breaker Requirements A.4 Abnormal Specifications The specifications listed below are classified as abnormal and are not representative of normal operation. Abnormal Specifications PVP1100 PVP2000 PVP2500 PVP2800 Momentary current transient obtained during abnormal operation Maximum input source backfeed current to input source 100 A-pk / 0.58 ms 142 A-pk / 0.66 ms 88 A-pk 166 A-pk / 0.61 ms Abnormal Specifications Momentary current transient obtained during abnormal operation Maximum input source backfeed current to input source 0A PVP3000 PVP3500 PVP4600 PVP4800 PVP5200 166 A-pk / 0.61 ms 88 A-pk 88 A-pk 0A Table A-4 Abnormal Specifications 46 88 A-pk 88 A-pk Appendix B - Ground Configuration B.1 Field Configuration of an Inverter for Use with Positively Grounded PV Arrays If the inverter is: • Equipped with an Integrated AC/DC Disconnect, use the instructions in “Inverter with an Integrated AC/DC Disconnect”. Otherwise, if the inverter is: • Not equipped with an Integrated AC/DC Disconnect, skip to the section titled “Inverter without an Integrated AC/DC Disconnect”. Inverter with an Integrated AC/DC Disconnect 1. Inside the inverter remove both the grounded and ungrounded conductors from the terminals on the Power Board. Inverter’s Power Board DC Terminals 2. Install the black conductor into the center “+” terminal on the right side. 3. Install the white conductor into the center “–” terminal on the left side. 47 APPENDIX B Figure B-1 Inverter’s Power Board Terminals Port J10 Note the reversal of the black and white conductors in the terminals from Figure B-1. Figure B-2 Conductors Reversed on Power Board Terminals 4. The text on the DC terminal circuit boards must now be covered with the following label so the text on the DC terminal circuit board is reversed. Figure B-3 New Label for DC Terminal Circuit Board 5. Affix the following label on the exterior of the AC/DC Disconnect. Figure B-4 New Label for Exterior of AC/DC Disconnect 48 PV Grid-tied Residential Inverter and Integrated AC/DC Disconnect Installation and Operation Manual GFI Negative Jumper Figure B-5 GFI Negative Jumper in J10 Port 6. Locate the pre-installed negative GFI jumper into port J10. Remove the negative jumper and replace with a positive ground jumper. Negative GFI Positive GFI Figure B-6 Negative and Positive GFI Jumpers ! WARNING Do not connect or disconnect the GFI jumper shown in Figure C-1 while the inverter is supplied with DC or AC power. ! AVERTISSEMENT Ne pas connecter ou déconnecter la bretelle du différentiel présenté à la Figure C-1 lorsque l’onduleur est alimenté en CC ou CA. Resume the installation procedures. 49 Inverter without an Integrated AC/DC Disconnect 1. Determine the polarity of DC conductors coming from the PV array. J10 Port with GFI Negative Jumper PVreceives DC+ from array PV+ receives DC- from array Figure B-7 PV Terminals in the Inverter 2. Install the DC positive conductor from the PV array into the PV positive (+) terminal on the inverter Power Board. 3. Install the DC negative conductor from the PV array into the PV negative (-) terminal on the inverter Power Board. 4. Locate the pre-installed negative GFI jumper into port J10. Remove the negative jumper and replace with a positive ground jumper. Negative GFI Positive GFI Figure B-8 Negative and Positive GFI Jumpers ! WARNING Do not connect or disconnect the GFI jumper shown in Figure C-1 while the inverter is supplied with DC or AC power. ! AVERTISSEMENT Ne pas connecter ou déconnecter la bretelle du différentiel présenté à la Figure C-1 lorsque l’onduleur est alimenté en CC ou CA. Resume the installation procedures. 50 Appendix C - Cabinet Dimensions C.1 Schematics for Inverter-only Figure C-1 Side and Front Views of the PVP1100, PVP2000, PVP2500, PVP2800, PVP3000 and PVP3500 Inverter-only Cabinet APPENDIX C 51 Figure C-2 Back and Bottom Views of PVP1100, PVP2000, PVP2500, PVP2800, PVP3000 and PVP3500 Inverter-only Cabinet 52 PV Grid-tied Residential Inverter and Integrated AC/DC Disconnect Installation and Operation Manual Figure C-3 Side and Front Views of the PVP4600, PVP4800 and PVP5200 Inverter-only Cabinet 53 Figure C-4 Back and Bottom Views of PVP4600, PVP4800 and PVP5200 Inverter-only Cabinet Inverter-only Cabinet 54 PV Grid-tied Residential Inverter and Integrated AC/DC Disconnect Installation and Operation Manual C.2 Schematics for Inverter with Integrated AC/DC Disconnect Figure C-5 Side and Front Views of the PVP1100, PVP2000, PVP2500, PVP2800, PVP3000 and PVP3500 Inverter with Integrated AC/DC Disconnect Cabinet 55 Figure C-6 Back and Bottom Views of the PVP1100, PVP2000, PVP2500, PVP2800, PVP3000 and PVP3500 Inverter with Integrated AC/DC Disconnect Cabinet 56 PV Grid-tied Residential Inverter and Integrated AC/DC Disconnect Installation and Operation Manual Figure C-7 Side and Front Views of the PVP4600, PVP4800 and PVP5200 Inverter with Integrated AC/DC Disconnect Cabinet 57 Figure C-8 Back and Bottom Views of PVP4600, PVP4800 and PVP5200 Inverter with Integrated AC/DC Disconnect Cabinet 58 Limited Warranty Terms of Coverage The warranty period for the inverter is ten years, and the warranty on the data monitoring module is one year, each beginning on the date of purchase by the original end user. Coverage PV Powered will, at its option, repair or replace the defective component(s) free of charge, provided that you notify PV Powered of the defect during the warranty period, have a dated proof of purchase, and PV Powered determines that the defect is covered by the limited warranty set forth above. PV Powered reserves the right to inspect the defective component(s) and determine if the defect is due to material or manufacturing flaws. PV Powered also reserves the right to charge a fee for service time expended if the defect is not due to material or manufacturing flaw or is not for some other reason subject to this limited warranty. PV Powered will, at its option, use new and/or reconditioned parts in performing warranty repair and in building replacement products. PV Powered reserves the right to use parts or products of original or improved design in the repair or replacement. If PV Powered repairs or replaces a product, its warranty continues for the remaining portion of the original warranty period or 90 days from the date of the return shipment to the customer, whichever period expires later. All replaced products and all parts removed from repaired products become the property of PV Powered. For defects covered by this limited warranty, PV Powered will provide, at no additional cost to the customer, both parts and labor necessary to repair the product, and return shipment to the customer via a PV Powered selected, non-expedited, surface freight carrier within the United States and Canada. What is Not Covered PV Powered does not warrant its products from any and all defects or damage caused by: • Normal wear and tear. 59 WARRANTY PV Powered, Inc. provides a limited warranty for your residential or commercial inverter and optional data monitoring module for defects caused by material or manufacturing flaws. The inverter and the data monitoring module must be installed and maintained by a qualified installer in order for the warranty to be valid. • • • • • • • • Shipping or transportation damages. Improper installation. Improper maintenance. Excessive voltage or current conditions from the electrical grid or PV panels. Exposure to unsuitable environmental conditions (including but not limited to damage due to lightning strikes, storm, fire, flood, etc.). Unauthorized or abnormal use, repair, modification, or operation. Negligence or accidents. Material or workmanship not provided by PV Powered or its authorized service centers. This warranty also does not cover costs related to the removal, installation, or troubleshooting of your electrical systems. Disclaimer and Limitation of Liability EXCEPT FOR THIS EXPRESS LIMITED WARRANTY, PV POWERED EXPRESSLY EXCLUDES ALL WARRANTIES WITH RESPECT TO THE INVERTER AND DATA MONITORING MODULE, EXPRESS AND IMPLIED, INCLUDING BUT NOT LIMITED TO THE WARRANTY OF MERCHANTABILITY, THE WARRANTY OF FITNESS FOR A PARTICULAR PURPOSE, AND ANY WARRANTIES THAT MAY HAVE ARISEN FROM COURSE OF DEALING OR USAGE OF TRADE. TO THE MAXIMUM EXTENT PERMITTED BY LAW, PV POWERED’S AGGREGATE MONETARY LIABILITY TO THE CUSTOMER FOR ANY REASON AND FOR ANY AND ALL CAUSES OF ACTION, WHETHER IN CONTRACT, TORT OR OTHERWISE, WILL NOT EXCEED THE AMOUNT PAID TO PV POWERED FOR THE INVERTER OR DATA MONITORING DEVICE. PV POWERED WILL NOT BE LIABLE TO YOU UNDER ANY CAUSE OF ACTION, WHETHER IN CONTRACT, TORT OR OTHERWISE, FOR ANY INDIRECT, SPECIAL, INCIDENTAL, CONSEQUENTIAL, OR PUNITIVE DAMAGES, EVEN IF PV POWERED HAS BEEN ADVISED OF THE POSSIBILITY OF SUCH DAMAGES. THE ORIGINAL PRICE FOR THE INVERTER AND DATA MONITORING MODULE AND PV POWERED’S OBLIGATIONS UNDER THIS EXPRESS LIMITED WARRANTY ARE CONSIDERATION FOR LIMITING PV POWERED’S LIABILITY. IF THIS PRODUCT IS A CONSUMER PRODUCT, FEDERAL LAW DOES NOT ALLOW AN EXCLUSION OF IMPLIED WARRANTIES. TO THE EXTENT YOU ARE ENTITLED TO IMPLIED WARRANTIES UNDER FEDERAL LAW, TO THE EXTENT PERMITTED BY 60 PV Grid-tied Residential Inverter and Integrated AC/DC Disconnect Installation and Operation Manual APPLICABLE LAW THEY ARE LIMITED TO THE DURATION OF THIS LIMITED WARRANTY. SOME STATES AND PROVINCES DO NOT ALLOW LIMITATIONS OR EXCLUSIONS ON IMPLIED WARRANTIES OR ON THE DURATION OF AN IMPLIED WARRANTY OR ON THE LIMITATION OR EXCLUSION OF INCIDENTAL OR CONSEQUENTIAL DAMAGES, SO THE ABOVE LIMITATION(S) OR EXCLUSION(S) MAY NOT APPLY TO YOU. THIS LIMITED WARRANTY GIVES YOU SPECIFIC LEGAL RIGHTS. YOU MAY HAVE OTHER RIGHTS WHICH MAY VARY FROM STATE TO STATE OR PROVINCE TO PROVINCE. Arbitration IN THE EVENT OF A DISPUTE BETWEEN PV POWERED AND ANY PURCHASER COVERED UNDER THIS WARRANTY, TO THE MAXIMUM EXTENT ALLOWED BY LAW, THE PURCHASER AGREES TO RESOLVE ANY AND ALL SUCH DISPUTES USING BINDING ARBITRATION IN ACCORDANCE WITH THE RULES AND PROCEDURES OF THE ARBITRATION SERVICE OF PORTLAND, INC., AND JUDGMENT UPON AWARD RENDERED PURSUANT TO SUCH ARBITRATION SHALL BE BINDING ON THE PARTIES. THE LOCATION FOR ANY ARBITRATION HEARINGS SHALL BE BEND, OREGON. THE PRICE FOR THE INVERTER OR PVM1010 DEVICE AND PV POWERED’S OBLIGATIONS UNDER THIS EXPRESS LIMITED WARRANTY ARE CONSIDERATION FOR THIS BINDING ARBITRATION PROVISION. 61 62 Return Procedure Before returning the product directly to PV Powered, you must first obtain a Return Materials Authorization Number (RMA) from PV Powered. When you contact a PV Powered representative, please have the following information ready: 1. The serial number of the product 2. The reason for the return 3. A copy of your dated proof of purchase On the packaging, please include the following: 1. Clearly mark the Return Materials Authorization Number (supplied by PV Powered) on the outside of the box. 2. A return address where the product can be shipped. 3. A telephone number where you can be reached during business hours. 4. A brief description of the problem. Ship the product prepaid to the address provided by your PV Powered representative. Information about Your System Note the following information for your records, and retain your dated proof of purchase: Serial Number ______________________________________________ Purchased From _____________________________________________ Date of Purchase ____________________________________________ 63 RETURN PROCEDURE When you return the product to PV Powered, PV Powered advises that you use the original packaging or its equivalent, and that you fully insure the shipped product. PV Powered is not responsible for damage to the product due to improper packaging. 64 Index A abbreviations v AC breakers 14 circuit board 23 connections 40 grounding 17 reversed conductors 42 sub-panel 14, 27 wiring 21 wiring multiple inverters 27 acronyms v anchoring 7 B block diagram of system grounding 19 bracket 5, 7, 8, 9, 40, 41 C caution information about iii checking polarity 26 checking voltage 26 circuit breaker AC requirements 14 requirements 14, 46 circuits 16 clearances 5 conductor neutral (PVP1100) 41 reversing 41, 42 size 13, 15 stripping 13 conduit hubs 16 connecting inverter/disconnect unit to array 24 inverter/disconnect unit to grid 21 connections terminating 11 contact information i copper conductors 13 covering PV array 24 current rating 17 E EGC 18 energizing system 26 F fault display 21 ground 20, 29, 33 nuisance 15 timer 35 fault codes 31, 32, 34, 36 multiple 35 normal 38 requiring service 38 FCC compliance 2 fuse 40 type and rating 34 65 INDEX D danger information about iii Data Monitoring Module 17 DC connections 40 grounding 17 reversed conductors 41 voltage 30 wiring 24 wiring multiple inverters 27 dimensions 51 disconnect 25 connection termination 11 exposure concern 39 grounding 23 grounding lug 25 grounding multiple 27 knockout 27 locking switch 1 locking tab 1 maintenance of 11 removing cover 9 display 5, 30 inverter/disconnect unit anchoring 7 brackets 5 circuit breaker requirements 14 components 6 connecting to array 24 connecting to utility service 23 enclosure 5 energizing 26 locating 5 locking 30 mounting 5, 7 multiple installation of 14, 26, 27 service 11 starting 29 troubleshooting 33 ventilation 5 voltage frequency limits 14 wiring multiple 26 G GEC 17, 18 connecting 40 generating power 33 GFI 20 activating circuit 20 fuse type 34 ground fault 20, 29, 33 display 21 grounding field configuring 47 for multiple units 27 inverter 17 positive 47 schematic 19 single-point 17, 19 steps to complete 18 system 18 grounding lug 18, 25, 40 GEC connection 27 system ground 18 K knockout 27 expansion 13 locations 17 H heat sink 5, 29 L latching circuit 20 LEDs 33 locating unit 5 locking switch 9 locking unit 30 I installing inverter/disconnect unit 9 interference 2 inverter connecting 40 dimensions 51 display 34 fault codes 31, 34, 36 grounding 17 mounting bracket 40 power distribution board 40 removing 40 removing cover 8 replacing 41 servicing 9 specifications 43, 44 status information 30 M maintenance of inverter/disconnect unit 11 monitoring LEDs 30, 33 mounting 7, 8 bracket 40 screws 5 unit 5 N NEMA rating 5 66 PV Grid-tied Residential Inverter and Integrated AC/DC Disconnect Installation and Operation Manual system disconnect 21 system ground 18 diagram of single-point 19 system voltage 26 O online string calculator 24 P polarity 29, 50 checking 24 reversed 26, 33 troubleshooting 31 power distribution board 40 power generation 33 PV array positive grounding 47 PV Powered how to contact i T temperature 25 terminals for conductors 39 terminating connections 11 timer on fault conditions 35 troubleshooting interference 2 polarity 31, 33 R raceway definition of 13 rain-tight see water-tight removing inverter 40 replacement policy 39 reverse polarity 26 reversing conductors 41 U utility service breaker 14 connecting to 18, 23 V vacuum fluorexcent display 31 ventilation for unit 5 voltage checking 24 frequency limits 14 voltage drop 15, 22 S safety 1 conventions iii shock hazard 10 screens 31, 34 service fault codes 38 removing inverter 40 replacing inverter 11, 41 single-point grounding 19 specifications 44 abnormal 46 starting inverter 29 status indicators 33 stripping conductors 13 stud, in wall 7 sub-panel for AC 14, 27 switch to disconnect 1 W warning information about iii warranty 59 water-tight 16 fitting 27 plugs 39 wire raceway definition of 13 use of 27 wiring single unit main utility grid 23 67 68 PV Grid-tied Residential Inverter and Integrated AC/DC Disconnect Installation and Operation Manual 69 70 PO Box 7348 • Bend, OR 97708 • P: 541-312-3832 • www.pvpowered.com