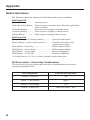
1
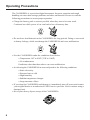
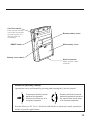
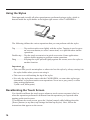
E-100/E-105
Getting Started with
the CASSIOPEIA
(Hardware Manual)
User documentation consists of two manuals:
Palm-size PC User’s Guide and this booklet. Be
sure to read this manual first.
Be sure to read the Safety Precautions contained in
this manual to ensure proper operation of this
product.
Keep this manual in a safe place for future
reference.
E
• Microsoft, Windows, and Windows NT are either registered trademarks or trademarks of
Microsoft Corporation in the United States and/or other countries.
• Pentium is a registered trademark of Intel Corporation.
• CompactFlash is a registered trademark of SanDisk Corporation.
• All other product and company names mentioned herein may be the trademarks of their
respective owners.
• Data can be uploaded from this unit to a personal computer for storage on a hard disk,
floppy diskette, or other storage medium. Be sure to make multiple copies of all
important data to protect against its accidental loss.
• CASIO COMPUTER CO., LTD. assumes no responsibility for any damage or loss
resulting from the use of this manual.
• CASIO COMPUTER CO., LTD. assumes no responsibility for any loss or claims by
third parties which may arise through the use of this product.
• CASIO COMPUTER CO., LTD. assumes no responsibility for any damage or loss
caused by deletion of data as a result of malfunction, repairs, or battery replacement. Be
sure to back up all important data on other media to protect against its loss.
• The contents of this manual are subject to change without notice.
• No part of this manual may be reproduced in any form without the express written
consent of the manufacturer.
Safety Precautions
Congratulations upon your selection of the CASSIOPEIA. Be sure to read the following
Safety Precautions before trying to use it for the first time.
Note
All mentions of “the unit” in the following precautions refer to the CASSIOPEIA.
Markings and Symbols
The following are the meanings of the markings and symbols used in these Safety
Precautions.
Danger
This symbol indicates information that, if ignored or applied
incorrectly, creates the danger of death or serious personal injury.
Warning
This symbol indicates information that, if ignored or applied
incorrectly, creates the possibility of death or serious personal
injury.
Caution
This symbol indicates information that, if ignored or applied
incorrectly, creates the possibility of personal injury or property
damage.
• A diagonal line indicates something you should not do. The symbol shown
here indicates you should not try to take the unit apart.
• A black circle indicates something you should do. The symbol shown here
indicates you should unplug the unit from the wall outlet.
Health Precautions
Warning
• Long continuous use of the unit when you are tired is not good for your
health, and should be avoided.
Caution
• Be sure to allow for adequate rest when using the unit for
long periods. As a general rule, you should allow for 10 to 15 minutes of rest
per hour.
1
Precautions During Use
Warning
Abnormal Conditions
• Continued use of the unit while it is emitting smoke or strange odor creates
the danger of fire and electrical shock. Immediately turn off power, unplug the
AC adapter from the wall outlet, remove batteries, and contact your original
dealer or an authorized CASIO service provider to request servicing.
Water and Foreign Matter
• Should any foreign matter (metal, water or other liquid) ever get into the
unit, immediately turn off power, unplug the AC adapter from the wall
outlet, remove batteries, and contact your original dealer or an authorized
CASIO service provider to request servicing.
Dropping and Damage
• Should the unit ever fall or otherwise become damaged, unplug the AC
adapter from the power outlet, remove batteries, and contact your original
dealer or an authorized CASIO service provider. Continued use creates the
danger of fire and electrical shock.
Disassembly
• Never try to take the unit apart or modify it in any way. Doing so creates the
danger of fire and electrical shock.
Magnetic Force
• If you are fitted with a pacemaker, keep the unit away from your chest area.
In particular, do not carry the unit in your breast pocket. Magnetic force
generated by the speaker built into the unit could possibly affect operation of
a pacemaker. Should you ever suspect a problem, immediately move away
from the unit and contact your physician.
Caution
Memory Protection
• Be sure to keep separate copies of all important data by saving it on a
computer hard disk or other medium. Note that all data stored in unit
memory is deleted whenever batteries go dead. Memory contents can also
become lost or corrupted due to malfunction and repair of the unit.
Location
• Do not locate the unit in an area subjected to large amounts of humidity or
dust. Doing so can create the danger of fire and electrical shock.
• Keep the unit away from food preparation area, stoves, and anywhere else it
might be exposed to oil smoke or steam. Such conditions can create the
danger of fire and electrical shock.
2
Caution
Avoid unstable surfaces.
• Never place the unit on an unstable surface, on a high shelf, or in any other
unstable location. Doing so can create the danger of the unit falling and
causing personal injury.
Magnetic Force
• Keep the unit away from ATM cards, credit cards, and any other magnetic
card during transport and storage. Magnetic force generated by its speaker
can render magnetic cards unusable.
• Keep the unit away from televisions and other radio wave receivers.
Magnetic force generated by its speaker can cause interference with radio
wave reception.
Rechargeable Battery Pack
Danger
• Never try to take apart the battery pack or modify it in any way. The battery
pack has built-in safety and protection mechanisms that ensure safe
operation. Damaging these mechanisms creates the danger of fire, smoke
emission, and explosion.
• Never allow the positive (+) and negative (–) terminals of the battery pack to
become connected by metal. Never transport or store the battery pack together
with a necklace, hairpins or other metal objects. Doing so can short the battery
pack, which creates the danger of fire, overheating, and explosion.
• Never use or leave the battery pack next to open flame, near a stove, or any
other area exposed to temperatures of 80°C/170°F or greater. Doing so
creates the danger of fire and explosion.
• Never charge the battery pack near a stove, under direct sunlight, in an
automobile parked in the sun, or any other area subject to high temperatures.
High temperature can cause the battery pack’s safety mechanism to operate
making it impossible to achieve a full charge. Heat can also cause an
abnormal chemical reaction, which creates the danger of fire and explosion.
• Never pierce the battery pack with nails, hit it with a hammer, step on it, or
throw it. Doing so can cause internal shorting, which creates the danger of
fire and explosion.
• Never use a battery pack whose exterior is extremely damaged or deformed.
Use of such a battery pack creates the danger of fire, overheating, and explosion.
• Never use the battery pack with any device other than this product. Doing so can
cause abnormal current that damages the battery pack and creates the danger of fire.
• Keep a battery pack that is emitting a strange odor or leaking fluid away
from open flame. Fluid leaking from the battery pack is highly flammable.
It creates the danger of fire and explosion.
3
Warning
• Never expose the battery pack to direct flame, do not throw it into fire, fresh
water, or seawater. Doing so can damage the built in safety and protection
mechanisms, and cause battery fluid to ignite, creating the danger of fire and
explosion.
• Should fluid from the battery pack ever accidentally get into your eyes, do
not rub them. Rinse your eyes with tap water and then consult your
physician immediately.
• If the battery pack does not achieve full charge after the normal charge time,
stop charging. Continued charging creates the danger of fire, overheating,
and explosion.
Batteries
Warning
• Never try to charge backup battery, take it apart, or allow it to become
shorted. Do not apply solder to battery or expose it to heat, and never throw
battery into fire or water.
• While the lithium battery is removed from the unit, take care to keep it in a
place where there is no danger of it being accidentally swallowed. Be
especially careful around young children.
• Keep batteries out of the reach of young children. If a battery is accidentally
swallowed, consult a physician immediately.
• Should fluid from the battery accidentally get into your eyes, do not rub
them. Rinse your eyes with water and then consult your physician
immediately.
Caution
Misuse of batteries can cause them to leak, which damages and corrodes the
area around the battery and creates the danger of fire and personal injury. Be
sure to observe the following precautions.
• When loading batteries, make sure their positive (+) and negative (–) poles
are facing correctly.
• Remove battery from the unit if you do not plan to use it for a long time.
• Use only battery types that are specified for this unit.
4
AC Adapter
Warning
• Never use a voltage that is different from that for which the AC adapter is
rated. Also, do not plug the unit into a power outlet that is shared by other
devices. Doing so creates the danger of fire and electrical shock.
• Never modify the power cord or excessively bend, twist, or pull it. Doing so
creates the danger of fire and electrical shock.
• Do not allow the power cord to become damaged. Do not place heavy
objects on the power cord or expose it to heat. A damaged power cord
creates the danger of fire and electrical shock.
• Never touch the AC adapter while your hands are wet. Doing so creates the
danger of electrical shock.
• Should the power cord ever become seriously damaged (internal wiring
exposed or shorted), contact your original dealer or an authorized CASIO
service provider to request servicing. Continued use of a seriously damaged
power cord creates the danger of fire and electrical shock.
• Use only the AC adapter specified for this unit. Use of another type of AC
adapter can damage the battery pack and create the danger of fire and
personal injury.
Caution
• Unplug the AC adapter from the wall outlet whenever leaving the unit
unattended for long periods.
• Be sure to unplug the AC adapter from the wall outlet before attempting to
move the unit to another location.
• Be sure to grasp the AC adapter when unplugging it from a wall outlet.
Pulling on the power cord can damage it, and create the danger of fire and
electrical shock.
• Keep the power cord away from stoves and other sources of heat. Heat can
melt the insulation of the power cord and create the danger of fire and
electrical shock.
5
Operating Precautions
The CASSIOPEIA is a precision digital instrument. Incorrect operation and rough
handling can cause data storage problems and other malfunction. Be sure to read the
following precautions to ensure proper operation.
• Charge the battery pack as soon as possible when they start to become weak.
Continued use while power is low can lead to loss of memory data.
• Do not leave dead batteries in the CASSIOPEIA for long periods. Doing so can result
in battery leakage, which can damage the CASSIOPEIA and cause malfunction.
• Use the CASSIOPEIA under the conditions listed below.
• Temperature: 0°C to 40°C (32°F to 104°F)
• No condensation
Conditions other than those above can cause malfunction.
• Avoid using the CASSIOPEIA in areas subjected to the following conditions.
• Static electricity
• Extreme heat or cold
• High humidity
• Sudden temperature changes
• Large amounts of dust
• If you drop the CASSIOPEIA and damage it, immediately turn off power and contact
your original dealer or an authorized CASIO service provider. Never continue using a
damaged unit.
• Never place heavy objects on top of the CASSIOPEIA.
6
• Never try to take the CASSIOPEIA apart. Doing so can cause malfunction.
• Never insert foreign objects into connectors, slots, or other openings.
• Take care to avoid spilling water or drinks on the CASSIOPEIA.
• Use only the stylus that comes with the CASSIOPEIA to press the RESET button.
• Never use a pen, pencil, or other sharp writing implement. Doing so can scratch the
touch screen and cause malfunction.
• Never use thinner, benzene, cosmetics, or other volatile agents to clean the exterior of
the CASSIOPEIA. Use only a dry soft cloth or a soft cloth moistened with a weak
solution of water and mild neutral detergent.
• Setting the display brightness too high or use of an optionally available
CompactFlash card results in battery life shorter than that indicated in the
specifications of this manual.
• Be sure to use the soft case to protect the display panel of your CASSIOPEIA while
carrying it.
Important!
• The TFT color LCD is a product of the latest color LCD manufacturing technology.
However, virtually all TFT color LCDs have a very small number of pixels (about
0.01% of the total number of pixels) that do not turn on or always remain turned on.
This is normal and does not indicate malfunction.
• Playing back movies, digital camera images, and audio files consumes large amounts
of power and may cause the CASSIOPEIA to become warm to the touch.
This is normal and does not indicate malfunction.
7
Contents
Safety Precautions ............................................................................................ 1
Markings and Symbols ........................................................................................... 1
Health Precautions .................................................................................................. 1
Precautions During Use .......................................................................................... 2
Rechargeable Battery Pack ..................................................................................... 3
Batteries .................................................................................................................. 4
AC Adapter ............................................................................................................. 5
Operating Precautions ...................................................................................... 6
Terms and Symbols used in this manual .......................................................... 9
Getting Ready .................................................................................................. 10
Initial Setup .......................................................................................................... 10
Where to go for information... .............................................................................. 11
Operations ....................................................................................................... 12
General Guide ....................................................................................................... 12
Using the Stylus .................................................................................................... 14
Recalibrating the Touch Screen ............................................................................ 14
Adjusting Display Contrast .................................................................................. 15
Adjusting Display Brightness ............................................................................... 15
Adjusting Auto Dimming Settings ....................................................................... 15
Using the Cradle ................................................................................................... 16
To remove the CASSIOPEIA from the cradle ............................................... 17
Connecting the Cradle to a Computer ............................................................ 18
Required System Configuration ........................................................................... 19
Using the AC Adapter ........................................................................................... 20
Infrared Communications ..................................................................................... 21
Using a CompactFlash Card ................................................................................. 22
Removing the Card Slot Cover ...................................................................... 23
Replacing the Card Slot Cover ....................................................................... 23
About Modem Cards (U.S. and Canada Only) ..................................................... 23
Software Applications ........................................................................................... 24
User Maintenance ........................................................................................... 25
Batteries ................................................................................................................ 25
Replacing the Main Battery ............................................................................ 26
Replacing the Backup Battery ........................................................................ 27
Charging the Battery Pack .............................................................................. 29
8
Resetting the Unit ................................................................................................. 30
Performing a Reset ......................................................................................... 30
Memory Error Message .................................................................................. 31
Full Reset (Memory Initialize) ............................................................................. 32
Performing a Full Reset .................................................................................. 32
Errors Following a Full Reset ........................................................................ 33
Troubleshooting .............................................................................................. 34
Appendix .......................................................................................................... 38
Button Operations ................................................................................................. 38
[Action] control + Cursor Key Combinations ................................................ 38
Specifications ........................................................................................................ 39
Regulatory Information ........................................................................................ 40
Terms and Symbols used in this manual
• The term “unit” in this manual refers to the CASSIOPEIA.
• The symbol “Important ” indicates important information about a procedure
that can result in problems if not performed correctly. Be sure to read such
information carefully.
9
Getting Ready
Initial Setup
After you first unpack your CASSIOPEIA, perform the following initial setup
procedure before using it for the first time.
1. Load the main battery (rechargeable battery pack) (page 25).
Important
Be sure to use the AC Adapter to charge the battery pack before doing anything else.
Your CASSIOPEIA will not operate correctly if you load the backup battery before
charging the battery pack.
2. Use the AC Adapter to charge the battery pack.
3. Load the backup battery.
4. Let the CASSIOPEIA rest for about five seconds, and then press the [Power] button.
5. The initial startup screen should appear first, followed shortly by a touch screen
calibration screen.
6. Follow the instructions that appear on the screen to set up your CASSIOPEIA.
• You can later change the settings you make with this procedure if you want. See the
separate Palm-size PC User’s Guide for more information.
• The desktop appears after settings are complete.
• See “Where to go for information...” on page 11 of this manual for information about
where you should go to find out about the versatile features and functions of your
CASSIOPEIA.
• Be sure to press the [Power] button to turn off power after you are finished using your
CASSIOPEIA.
Important
• If the touch panel does not respond when you tap it or if nothing appears on the
display, try performing a full reset (page 32). If this does not restore proper operation,
remove the main battery and the backup battery and wait for about five minutes.
Reload the main battery first and then the backup battery, and perform the above
procedure again from step 4.
• Make sure the positive and negative poles of batteries are facing correctly when you
load them into the unit.
• If the message “A problem with memory contents has been found...” appears on the
display, perform a full reset (page 32).
10
Where to go for information...
Your CASSIOPEIA comes with two manuals: this Hardware Manual and a separate
Palm-size PC User’s Guide. Be sure to read the contents of this Hardware Manual first.
What should I do after reading this Hardware Manual?
Read the Palm-size PC User’s Guide next to find out about the powerful software
features and functions available on the CASSIOPEIA.
What should I do if I run into problems?
Check the troubleshooting guides on page 34 of this Hardware Manual and in the
Palm-size PC User’s Guide.
Where can I find out about the bundled software?
Your CASSIOPEIA comes with a collection of standard Palm-size PC programs from
Microsoft, plus a collection of original programs from CASIO.
■ Microsoft Programs
See the Palm-size PC User’s Guide for details on Calendar, Contacts, Tasks, Inbox, and
Note Taker from Microsoft.
■ CASIO Programs
See the Palm-size User’s Guide for details on Menu launcher program and Card Backup
Tool.
How can I connect my CASSIOPEIA to a desktop computer?
See page 16 of this Hardware Manual for details about how to connect and the type of
computer you can connect to. See the separate Palm-size PC User’s Guide for
information about actually exchanging data between your CASSIOPEIA and a
computer.
How can I install the software on the CASSIOPEIA Applications CD-ROM that
comes with the E-105?
See the documentation contained on the CD-ROM. Note that you need a Windows
computer to view the contents of the CD-ROM.
Important
The optionally available modem card mentioned in this and the other manuals is
intended for use in the U.S. and Canada only.
11
Operations
General Guide
Charge indicator (Green)
Indicates battery pack is charging.
Stylus
Stereo headphone jack
For connection of a
commercially available
earphone/headphone (ø3.5mm)
Card slot
Indicator lamp (Red)
Alerts you to alarms and
warning.
Power button
Turns power on
and off.
Touch screen
Perform operations and input
data by tapping and writing
directly on the screen.
Exit button
Same as a computer’s
ESC key
• Menu
(Launcher)
• Contacts
• Calendar
Action control
See “About the
[Action] Control”
on the next page.
Voice recorder button
(Program button)
Hold down to activate
Voice Recorder for instant
recording of a voice memo.
Program buttons
Press to launch the
assigned program.
The programs
shown here are the
initial default
settings.
Speaker
Cursor button
Moves the cursor around
the screen.
Microphone
Infrared port
AC adapter terminal
12
Card lock switch
If the inserted card has
a lock, this switch locks
the card in place so it
does not come out
accidentally.
Backup battery cover
RESET button
Main battery cover
Battery cover switch
Serial connector
Mates with the cradle
connector.
About the [Action] Control
Operations can be performed by pressing and rotating the [Action] control.
Pressing the [Action] control
performs an operation
similar to the Enter key of a
computer keyboard.
Rotating the [Action] control
performs operations similar to
the up and down arrow keys
of a computer keyboard.
See the Palm-size PC User’s Guide for full details on [Action] control operations
inside of specific applications.
13
Using the Stylus
Data input and virtually all other operations are performed using a stylus, which is
housed inside the stylus holder in the higher right corner of the CASSIOPEIA.
The following defines the various operations that you can perform with the stylus.
Tap ................ Tap on the touch screen lightly with the stylus. Tapping is used to press
an on-screen button, to select a menu item, or to perform other similar
operations.
Double-tap .... Tap the touch screen twice in quick succession. Some applications
require double-tapping to perform certain operations.
Drag .............. Keeping the stylus pressed lightly against the screen, move the stylus to
another location.
Important
• Take care that you do not misplace or otherwise lose the stylus by always storing it in
the stylus holder when you are not using it.
• Take care to avoid breaking the tip of the stylus.
• Use only the stylus that comes with the CASSIOPEIA, or some other stylus type
instrument* to perform touch screen operations. Never use a pen, pencil, or other
sharp writing implement.
*(with a soft, blunt point)
Recalibrating the Touch Screen
You should recalibrate the touch screen whenever touch screen response is bad, or
when the operation performed is different from the operation you expected when
tapping on the touch screen.
To recalibrate the touch screen, press the [Action] control while holding down the
[Power] button (or tap Start, tap Settings and then tap Stylus). Next, follow the
instructions that appear on the screen.
14
Adjusting Display Contrast
Perform the following operations to adjust display contrast and make figures on the
display darker or lighter.
• Tap Start, Programs, Utility, and then Brightness. Follow the instructions on your
screen for adjusting the contrast.
• You can also adjust contrast by holding down [Exit] and pressing the top of the cursor
button to make contrast darker, and the bottom of the cursor button to make it lighter.
Adjusting Display Brightness
Use the following operations to adjust display brightness to make it easier to read.
• Tap Start, Programs, Utility, and then Brightness. On the dialog that appears, tap
the Brightness tab.
• While holding down the [Exit] button, press the right side of the cursor button to
make the screen brighter, or the left side of the cursor button to make it dimmer.
Adjusting Auto Dimming Settings
1. Tap Start, Programs, Utility, and then Brightness.
2. On the dialog that appears, tap the Auto Dim tab.
3. Follow the instructions that appear on the screen to make auto dimming settings.
• You can make separate auto dimming settings for battery power and AC adapter
power by checking the appropriate check box.
15
Using the Cradle
The cradle provides quick and easy connection between your CASSIOPEIA and a
personal computer. CASSIOPEIA can also be powered from an AC power source when
it is placed on the cradle.
• The battery pack charges while the CASSIOPEIA is on the cradle. See page 29 for
more information.
Important
Make sure that CASSIOPEIA power is turned off before you place it onto or remove it
from the cradle.
Use the following procedure to place the unit onto the cradle.
1. Place the cradle on a desk or other flat, level surface.
2. Turn off the CASSIOPEIA.
3. Slide the CASSIOPEIA’s serial connector cover to open it.
4. Orient the CASSIOPEIA in relation to the cradle as shown in the illustration below.
16
5. Taking care to align the serial connector on the bottom of the CASSIOPEIA with the
connector on the cradle, lower the CASSIOPEIA into the cradle as shown in the
illustration below.
Important
Make sure the CASSIOPEIA lowers securely into the cradle as far as it can go.
To remove the CASSIOPEIA from the cradle
1. Press the cradle’s eject button.
2. Slide the CASSIOPEIA straight up from the cradle.
17
Connecting the Cradle to a Computer
The cradle has a serial cable for connection to a personal computer. Connect the end of
the cable to a serial port of the computer to which you want to connect.
Important
• See “Required System Configuration” on page 19 of this Hardware Manual for
details on the type of computer system required for use with the cradle.
• Be sure to turn off the CASSIOPEIA and your computer before connecting the
cradle.
• The above illustration is one example of possible connection configurations. The
location and layout of serial connectors vary from computer to computer. See the
documentation that comes with your computer for full details on connecting to its
serial ports.
• The cradle can be connected directly to a 9-pin type serial port, which is the type
used by most personal computers. You can also connect to a 25-pin serial port using
an adapter.
• Note that after connecting the cradle to your computer, you also need to make certain
Windows CE Services settings on your computer to enable data transfers. See the
Palm-size PC User’s Guide for details about setting up and using Windows CE
Services.
18
Required System Configuration
The minimum system configuration required to connect the cradle and perform data
communications is described below. This system configuration also makes it possible to
install and use Windows CE Services, which is included on the Microsoft CD-ROM
provided with the unit.
Minimum Desktop Computer Requirements
• Microsoft Windows NT Workstation 4.0 or Windows 95/98 (U.S.version)
• Desktop computer with a Pentium processor for Windows NT.
• Desktop computer with a 486/66 DX or higher processor (Pentium P90
recommended) for Windows 95/98
• 16 MB of memory for Windows 95/98 (More memory improves performance.) or
Windows NT Workstation 4.0 (32 MB recommended for Windows NT)
• Hard disk drive with 10 to 50 MB of available hard disk space (Actual requirements
vary based on selection of features and user’s current system configuration.)
• Available 9 or 25 pin communications port (adapter required for 25 pin
communication port)
• One CD-ROM drive
• VGA or higher-resolution graphics card (Super VGA 256-color recommended)
• Keyboard
• Microsoft Mouse or compatible pointing device
Options for either Windows NT Workstation 4.0 or Windows 95/98
• Audio card/speakers for sound
• Microsoft Office 97 or Microsoft Office 95
• Serial or built-in infrared adapter for synchronization (Windows 95/98 only)
• Modem for remote synchronization
• Ethernet LAN connection for remote synchronization
Requirements for Mobile Channels Support
• Microsoft Internet Explorer 4.0 (included on CD), which requires 40 MB to 70 MB
of hard disk space and a minimum 486/66 processor. Service Pack 3 (or higher) is
required for Windows NT systems (included on CD).
Note
Different minimum system requirements are required when using the applications
included on the CASSIOPEIA Applications CD-ROM that comes with the E-105. See
the documentation contained on the CD-ROM for full details.
19
Important
• When installing Windows CE Services οn a computer, check to make sure that the
specified COM port number correctly indicates the serial port to which the cradle is
connected.
• Some laptop and sub-compact computers with built-in infrared ports and modems are
initially configured so the COM port is not always used as a serial port. In such a
case, you must change the setting so the COM port is always used as a serial port.
See the documentation that comes with your computer for full details on COM port
numbers and settings.
Using the AC Adapter
You can use the AC adapter to directly power the CASSIOPEIA or to supply power
through the cradle. The battery pack charges while the CASSIOPEIA is directly
connected to a power source by the AC adapter or while it is on the cradle. See page 29
for more information.
■ Direct Connection
■ Cradle Connection
Warning
Use only the AC adapter that is specified for this unit. Use of another type of AC
adapter creates the danger of malfunction and bursting of battery.
20
Important
• Power also will not turn on if the main battery loaded in the CASSIOPEIA is dead.
• Long term use of the AC adapter can cause it to become warm to the touch. This is
normal and does not indicate malfunction.
• Be sure to unplug the AC adapter from the power outlet whenever you are not using it.
• The AC adapter is designed for indoor use only. It should not be used outdoors.
Infrared Communications
The infrared port of this unit can be used to exchange data with another CASSIOPEIA,
or with another device equipped with infrared communication capabilities. Remember
that the two infrared ports must be pointed directly at each other when performing
communications. The distance between the two infrared ports must be less than 30 cm.
See the Palm-size PC User’s Guide for full details on performing infrared
communications.
For infrared data communications with another device, the other device must conform
with IrDA 1.0 standards, and it must specifically support infrared data communication
with a CASSIOPEIA.
Your CASSIOPEIA currently does not support IrCOMM communication with another
device. The IrCOMM is equipped for communication that will be available in the
future.
Important
• Take care so either of the units does not move while infrared data communications
are in progress.
• Infrared data communications may be impossible under strong sunlight or inverter
type fluorescent lighting.
• Infrared data communication problems can be caused by the distance between the
two ports, the angle between the two ports, outdoor sunlight, and low batteries.
• Dirt and dust on the infrared port surface can cause communications errors and other
problems. Use a soft, dry cloth to wipe the port clean of dirt and dust.
• Disconnect the AC adapter from the CASSIOPEIA before starting infrared
communication.
21
Using a CompactFlash Card
Your CASSIOPEIA supports Type I and Type II CompactFlash cards (3.3V).
Important
• The card slot cover will not close when certain types of cards are in the slot. Remove
the card slot cover and keep it in a safe place so you can replace it when you remove
the card.
• Gently but firmly slide the card into place as far as it will go, but do not force it.
Forcing a card can damage connectors. If you have problems inserting a card, pull it
out and check to make sure it is oriented correctly.
• We strongly recommend that you store all unsaved data you are inputting or editing
before performing this procedure.
• Sometimes, your CASSIOPEIA may not be able to detect a CompactFlash card. This
is indicated when a program on the card does not start up normally. When this
happens, remove the card, reinsert it, and then press the CASSIOPEIA RESET
button.
• Your CASSIOPEIA supports 3.3V CompactFlash cards only. 5.0V cards are not
supported.
• Use of an IO card that requires large amounts of power can cause the CASSIOPEIA
to restart when CASSIOPEIA battery power is low.
1. Make sure your CASSIOPEIA is turned off.
• Press the [Power] button to turn off power.
2. Pressing upward at the point indicated in the illustration, slide the cover up to open it.
Press upward here.
Important
Pull the cover out as far as it will
go and then swing it open.
3. If there is already a card in the slot, remove it.
22
4. Slide the card you want to use into the card slot.
• Make sure the top of the card is facing towards the top of the CASSIOPEIA unit. A
card that is not oriented correctly will not slide all the way into the slot.
Top
Bottom
Carefully slide the card into the slot as far as it will go.
5. Close the card slot cover.
Removing the Card Slot Cover
Remove the card slot cover when using a card that protrudes from the slot when fully
inserted. To remove the cover, pull it up part way open, and then slide it from the unit as
shown in the illustration below.
Important
Handle the cover carefully
and do not force it! Using
too much force can cause
the cover hooks to break
off!
Replacing the Card Slot Cover
Reverse the above removal operation to replace the card slot cover.
About Modem Cards (U.S. and Canada Only)
Use of a CompactFlash type modem card (JK-711MC56) lets you use your
CASSIOPEIA to access the Internet over an analog dial-up connection. See the
documentation that comes with the modem card for information about how to use it.
Important
Check to make sure that the battery pack is charged before using the modem card. Low
battery power can cause sudden interruption of communications, unstable
communications, and loss of data.
23
Software Applications
Software applications are available for purchase from Microsoft and third parties who
support Windows CE. For details on commercially available software applications,
contact your local retailer or visit the Microsoft Web site at http://www.microsoft.com.
E-105 also comes with a CASSIOPEIA Applications CD-ROM that contains a number
of useful applications. Note that you must install the applications you need from the
CD-ROM before you can use them. See the documentation contained on the CD-ROM
for details on using the software applications.
Important
Whenever purchasing software applications, always double-check to make sure that it is
compatible with the CASSIOPEIA.
24
User Maintenance
Batteries
Your CASSIOPEIA is powered by a dual power supply that consists of a main battery
(rechargeable battery pack) and a backup battery (CR2032 lithium battery).
• We recommend that you use the Power properties dialog to keep informed about the
current levels of your main and backup batteries. See the separate Palm-size PC
User’s Guide for more information about this dialog.
• Icons appear in the Taskbar to let you know when battery power is low. See the
separate Palm-size PC User’s Guide for more information about these icons.
Important
The following messages appear whenever battery power drops below a certain level.
Main Battery
Recharge the battery pack as soon as possible after the following message appears.
“Prevent possible data loss by promptly replacing or recharging your main
batteries according to your hardware manufacturer’s instructions.”
Backup Battery
Replace the backup battery as soon as possible after the following message appears.
“Prevent possible data loss by promptly replacing or recharging your back up
battery according to your hardware manufacturer’s instructions.”
• Data stored in memory can be lost if you continue operation after the low battery message
appears or if you incorrectly load batteries. Be sure to always back up important data on
your desktop computer hard disk or on a CompactFlash memory card. See the separate
Palm-size PC User’s Guide for information about backing up data.
• See the separate Palm-size PC User’s Guide for information about using the Card
Backup Tool program to back up data to a CompactFlash memory card.
• Never remove the main battery and backup battery from the CASSIOPEIA at the
same time. Doing so causes all data stored in memory to be deleted.
• Should the main battery and the backup battery both require replacement, be sure to
always replace the main battery first.
• Use the rechargeable battery pack for the main battery and a CR2032 lithium battery
for the backup battery. Never use any other type of batteries.
25
If unit power turns off due to insufficient power, the following warning message
appears on the display the next time you turn on unit power.
“Warning
Due to high current demand by the hardware, the system powered down in order
to protect memory contents...”
If unit power turns off due to sudden power drain by a CompactFlash card, the
following warning message appears on the display the next time you turn on unit
power.
“Warning
Due to high current demand by the card, the system powered down in order to
protect memory contents...”
Important
Be sure to observe the following important battery handling precautions. Failure to do
so can cause batteries to leak, resulting in damage to surrounding items and create the
danger of fire and electrical shock.
• Always make sure that the positive (+) and negative (–) poles of the batteries are
oriented correctly.
• Use only the types of batteries specified for use with this unit.
• Charge the battery pack in an area where the temperature is between 10°C (50°F)
and 35°C (95°F). Charging in areas that are very cold or exposed to direct sunlight
can cause deterioration and leaking of the battery pack.
• To avoid deterioration and leaking, the battery pack is designed to discharge even
when you do not use the CASSIOPEIA. Be sure to recharge the battery pack at least
once every three months, regardless of how much you use the CASSIOPEIA during
that time.
• A battery pack that loses power too quickly after it is charged is probably near the
end of its service life. In such a case, you have to purchase a new battery pack.
Replacing the Main Battery
1. Make sure your CASSIOPEIA is turned off.
• Press the [Power] button to turn off power.
2. Turn the CASSIOPEIA over.
26
3. Slide the battery cover switch to MAIN, and then remove the main battery cover.
4. Remove the main battery and then load a new battery pack.
• Make sure that the battery pack is oriented correctly.
5. Replace the main battery cover.
6. Slide the battery cover switch to LOCK.
Replacing the Backup Battery
Important
• Never remove the main battery and backup battery from the CASSIOPEIA at the
same time. Doing so causes all data stored in memory to be deleted.
• Should the main battery and the backup battery both require replacement, be sure to
always replace the main battery first.
• Be sure to replace the backup battery as soon as possible whenever the following
message appears on the display: “Prevent possible data loss by promptly replacing
or recharging your back up battery according to your hardware manufacturer’s
instructions.”
27
1. Make sure your CASSIOPEIA is turned off.
• Press the [Power] button to turn off power.
2. Turn the CASSIOPEIA over.
3. Slide the battery cover switch to BACK UP, and then remove the backup battery
cover.
Battery cover switch
4. Remove the old battery.
5. Wipe off a new lithium battery (CR2032) with a dry cloth, and load it into the
CASSIOPEIA.
Make sure the positive side is facing up, so you can see it.
6. Replace the backup battery cover.
7. Slide the battery cover switch back to LOCK.
28
Charging the Battery Pack
1. Install the battery pack into the CASSIOPEIA.
2. Attach the AC adapter to the cradle and place the CASSIOPEIA onto the cradle.
• Charging starts automatically as soon as you place the CASSIOPEIA onto the cradle.
• The charge indicator is green while charging is in progress. It goes out when charging
is complete.
• It takes about five or six hours to reach full charge.
• You can use your CASSIOPEIA while the battery pack is charging.
Important
• Do not use the CASSIOPEIA while it is charging for the first time after you
purchased it or for the first time after you installed a newly purchased battery pack.
• If the battery pack does not achieve full charge after the normal charge time, remove
the CASSIOPEIA or unplug the AC adapter from the cradle to stop charging.
Remove the CASSIOPEIA from the cradle after charging is complete.
The following illustration shows how to connect the AC adapter directly to the
CASSIOPEIA for charging.
• Charging starts automatically as soon as you attach the AC adapter to the CASSIOPEIA.
• Direct connection charging conditions are the same as those described for cradle
charging above.
29
Resetting the Unit
“Reset” is similar to a computer reboot. Performing a reset deletes any data that is in
the process of being input or edited, without yet being saved. Data stored in memory
and all settings, however, are retained.
Perform the reset operation whenever the unit fails to operate correctly due to
operational error or some other abnormality. Any of the following symptoms indicate
that reset is required.
• Failure of the unit to respond when the screen is tapped or a button is pressed
• The hourglass icon remaining on the screen
Performing a Reset
1. Use the stylus to press the RESET button.
• The unit performs a reset followed by a memory check operation.
If no data error is found, the following two screens appear on the display in
succession.
• Startup screen
• Desktop
2. Normal unit operation is possible after the desktop appears.
• Since memory data and settings are retained, you can continue operation from where
you last left off.
Important
If the above operation does not solve the problem, perform a full reset (memory
initialize, page 32).
30
Memory Error Message
If the memory check operation that the unit performs when the RESET button is
pressed detects a data error, the following message appears on the screen instead of the
startup screen.
“A problem with memory contents has been found. Press [Action] to continue with
the reset procedure, which restores normal system operation.
Note that if the system determines that user memory cannot be repaired, it will
delete all user data currently in memory.
See the User’s Guide for details about initializing memory.”
This message indicates that the memory error is fatal and so recovery is impossible.
Press the [Action] control to execute a full reset (memory initialize), which deletes all
data stored in memory.
• Pressing the [Action] control should display the Startup screen followed by the touch
screen calibration screen. Perform steps 5 through 6 under “Initial Setup” on page 10
to set up the unit.
• If pressing the [Action] control returns to the desktop without displaying the startup
screen first, see the following explanation for the procedure you need to follow.
What to do if the startup screen does not appear when you press the
[Action] control
Even though the desktop appears when you press the [Action] control, there is still a
data error in memory and you have to perform a full reset (memory initialize). Before
you do, however, there is the chance that some of the data in memory can be recalled
and even transferred to a computer. Try recalling the data you need before performing
the procedure described on the next page to perform a full reset.
Important
Do not use the Windows CE backup function to back up data to a computer when you
suspect a data error. Doing so may also include the corrupted data that is causing your
problem, which means the problem will reappear when you restore the data.
31
Full Reset (Memory Initialize)
Full reset (memory initialize) deletes all data, and resets all unit parameters to their
initial defaults.
The following are conditions when you should perform a full reset.
• When you want to delete all memory data and return unit settings to their factory
defaults
• When you forget your password and need to clear it
• When a data error causes operational problems
• Appearance of the message: “A problem with memory contents has been found...”
Performing a Full Reset
Important
• The following procedure deletes all data in memory. Be sure that data is backed up or
that you no longer need it before performing the following procedure.
• If there is a CompactFlash card in the CASSIOPEIA’s slot, remove the card before
performing the full reset.
1. Make sure that unit power is turned on.
2. While holding down the [Power] button, use the stylus to hold down the RESET
button for about two seconds.
• This causes the following message to appear on the display screen.
“Proceeding with this operation initializes memory. Press [Action] to proceed or
[Exit] to cancel.”
3. Press the [Action] control.
• This causes the following message to appear on the display screen.
“Proceeding with this operation deletes all data stored in memory. Press [Action]
to proceed or [Exit] to cancel.”
4. Press the [Action] control again.
• This starts the full reset operation, which deletes all data in memory.
• Pressing the [Action] control displays the Startup screen. Perform steps 5 through 6
under “Initial Setup” on page 10 to set up the unit.
You can abort the full reset operation while the messages in steps 2 and 3 are on the
display by pressing the [Exit] button.
32
Errors Following a Full Reset
Either of the following two conditions can cause errors to continue, even after you
perform a full reset.
• Hardware defect
• System problem caused by failure by you to correctly perform the reset procedure
before using the unit for the first time
If you suspect that the problem is being caused because you did not properly reset the
unit before using it for the first time, perform the procedure on page 37 of this manual.
This should correct the problem.
33
Troubleshooting
Before assuming malfunction and contacting your service provider when experiencing
operational problems, be sure to check the following information as well as the
troubleshooting section of the Palm-size PC User’s Guide first.
Nothing happens when the [Power] button is pressed.
Possible Cause
Recommended Action
Page
Main battery is weak.
Charge the battery pack.
29
Internal malfunction
Reset the unit.
If resetting the unit does not correct the
problem, perform a full reset (memory
initialize).*
30
32
Operation is disabled when the AC adapter is connected.
Possible Cause
Recommended Action
Page
Main battery is weak.
Charge the battery pack.
29
The unit is not mounted on the cradle
correctly.
Mount the unit on the cradle correctly.
16
Replacing the main battery caused malfunction.
Recommended Action
Page
Main battery is not loaded correctly.
Remove and then reload the main
battery.
• Make sure the positive (+) and negative
(–) poles are oriented correctly.
26
The battery replacement procedure was
not followed correctly.
Perform a full reset (memory initialize).*
• If the above action does not solve the
problem, remove the main battery
and contact your original dealer or an
authorized CASIO service provider.
32
Possible Cause
34
Rechargeable battery pack life is very short after each charge.
Possible Cause
Battery pack is damaged or has reached
the end of its service life.
Recommended Action
Purchase a new battery pack.
Page
–
The low backup battery message continues to appear even after replacement of the
backup battery.
Possible Cause
Recommended Action
Page
The backup battery is upside down.
Remove the backup battery, turn it
over, and reload it.
27
The backup battery was loaded before
the main battery.
Remove the backup battery, and reload
it.
27
Power was left on while the battery
pack was replaced.
Turn power off and then back on again.
–
Nothing happens when the touch screen is touched.
Possible Cause
Recommended Action
Page
The touch screen is out of calibration.
Recalibrating the touch screen.
14
Static electricity or some other problem
has caused the touch screen to
malfunction.
Reset the unit.
30
The touch screen is damaged.
Contact your original dealer or an
authorized CASIO service provider.
–
35
The screen is locked up.
Possible Cause
Internal malfunction
Recommended Action
Page
Reset the unit.
If resetting the unit does not correct the
problem, perform a full reset (memory
initialize).*
30
32
A message about a data error is on the screen.
Possible Cause
Internal malfunction
Recommended Action
Follow the instructions that appear on
the screen.
Page
–
* Perform the procedure on page 37 when the full reset (memory initialize) does not
correct the problem.
36
• Perform the following procedure if your CASSIOPEIA remains locked up even after
you perform a full reset.
Important
• The following operation deletes all data in CASSIOPEIA memory.
• If you previously backed up your CASSIOPEIA data to your desktop computer hard
disk or a CompactFlash memory card, you will be able to restore the data after
performing the following operation.
• If backed up data includes data that is the cause of the original problem, your
CASSIOPEIA may start malfunctioning again after data is restored. In this case, you
will not be able to use the backed up data.
• To protect against backing up corrupted data that can cause problems when restored,
first synchronize Pocket Outlook program data between your CASSIOPEIA and
desktop computer. Next, use drag and drop to copy other files to you computer. See
the separate Palm-size PC User’s Guide for information about data synchronization
and copying files.
1. Remove both the main battery and the backup battery from the CASSIOPEIA.
2. Wait for about five minutes.
3. Reload the main battery.
• Be sure to load the main battery first. The CASSIOPEIA will not operate properly if
you load the backup battery first. If you inadvertently load the backup battery first,
start over from step 1 above.
4. Attach the AC adapter and charge the battery pack.
5. Reload the backup battery.
6. Make sure the battery cover switch is in the LOCK position.
7. Wait for about five seconds and then press the [Power] button to turn on your
CASSIOPEIA.
• Turning on power displays the startup screen, following by the touch panel
calibration screen.
8. Follow the instructions that appear on the screen to make initial settings.
9. After setting up your CASSIOPEIA, turn it off.
• After completing the above procedure, you can restore data you have backed up on
your desktop computer hard disk or CompactFlash memory card. See the separate
Palm-size PC User’s Guide for information about restoring backed up data.
• See the separate Palm-size PC User’s Guide for information about using the Card
Backup Tool program to restore data from a CompactFlash memory card.
• If your CASSIOPEIA does not operate correctly, contact your original dealer or your
nearest authorized CASIO service provider.
37
Appendix
Button Operations
The following shows the function of each button under various conditions.
Unit Power Off
[Power] Button ................. Turns on power.
[Voice Recorder] Button ... Turns on power, launches Voice Recorder application,
starts recording.
[Calendar] Button ............. Turns on power, displays Calendar screen.
[Contacts] Button .............. Turns on power, displays Contacts screen.
[Menu] Button .................. Turns on power, displays Menu screen.
Unit Power On
[Exit] Button + press [Action] control ................. Opens the Start menu*.
[Power] Button + press [Action] control ............. Launches the touch screen
calibration procedure.
[Exit] Button + Cursor up .................................... Makes contrast darker.
[Exit] Button + Cursor down ............................... Makes contrast lighter.
[Exit] Button + Cursor right ................................ Increases brightness.
[Exit] Button + Cursor left .................................. Decreases brightness.
∗ See the Palm-size PC User’s Guide for details on the Start menu.
[Action] control + Cursor Key Combinations
You can use the [Action] control and cursor key in combination to perform the
operations described below.
38
This combination:
Performs this operation:
Action + Cursor Up
Alt
Action + Cursor Down
Space
Action + Cursor Right
Tab
Action + Cursor Left
Back Tab (Shift + Tab)
Specifications
Model:
Display:
E-100/E-105
240 × 320 dots
TFT Color LCD (65,536 colors)
CPU:
VR4121
Memory:
16MB / 32MB (16MB storage memory max.)
Interfaces:
Serial: RS-232C, 115.2 kbps max.
Infrared: IrDA Ver. 1.0, 115.2 kbps (max.)
Range: 30 cm max.
Card Slot: CompactFlash card, 3.3V Type I / Type II
Headphone jack: ø 3.5 mm stereo output
Accepts monaural earphone, stereo earphones, stereo headphones.
Power Supply
Main: Rechargeable battery pack JK-210LT (Lithium-Ion battery)
AC adapter (AD-C50200)
Backup: One CR2032 lithium battery
Power Consumption: 3.6W
Approximate Battery Life (Normal Temperature)
Main: (Actual time may be shorter due to conditions when charging.)
6 hours: Continuous input and data display at a ratio of 1:10, with
screen brightness at lowest possible level.
3 hours: Continuous communication using the optional modem card
(JK-711MC56, US and Canada only), with screen brightness
at lowest possible level.
Backup: 5 years: Main battery is charged or replaced immediately after
appearance of message to replace main battery.
2 weeks (E-100): No battery replacement after appearance of message
to replace main battery.
1 week (E-105): No battery replacement after appearance of message
to replace main battery.
Approximate Charge Time (Normal Temperature)
5 to 6 hours: Charge time is longer for the first charges after
purchasing the unit or installing a new battery pack.
Operating Temperature: 0°C to 40°C (32°F to 104°F)
Dimensions: 20H × 83.6W × 131.2D mm (3/4"H × 31/4"W × 51/8"D)
Weight: 255 g (9.0 oz)
39
Regulatory Information
GUIDELINES LAID DOWN BY FCC RULES FOR USE OF THIS UNIT IN THE U.S.A. (not
applicable to other areas).
NOTICE
This equipment has been tested and found to comply with the limits for a Class B digital device, pursuant
to Part 15 of the FCC Rules. These limits are designed to provide reasonable protection against harmful
interference in a residential installation. This equipment generates, uses and can radiate radio frequency
energy and, if not installed and used in accordance with the instructions, may cause harmful interference
to radio communications. However, there is no guarantee that interference will not occur in a particular
installation. If this equipment does cause harmful interference to radio or television reception, which can
be determined by turning the equipment off and on, the user is encouraged to try to correct the interference
by one or more of the following measures:
• Reorient or relocate the receiving antenna.
• Increase the separation between the equipment and receiver.
• Connect the equipment into an outlet on a circuit different from that to which the receiver is connected.
• Consult the dealer or an experienced radio/TV technician for help.
FCC WARNING
Changes or modifications not expressly approved by the party responsible for compliance could void the
user's authority to operate the equipment.
Proper connectors must be used for connection to host computer and/or peripherals in order to meet FCC
emission limits.
Connector ...................... E-100/E-105 unit to Cradle
Connector cable that comes with E-100/E-105
...................... E-100/E-105 unit to desktop computer
Declaration of Conformity
Model Number:
E-100/E-105
Trade Name:
CASIO COMPUTER CO., LTD.
Responsible party: CASIO, INC.
Address:
570 MT. PLEASANT AVENUE, DOVER, NEW JERSEY 07801
Telephone number: 973-361-5400
This device complies with Part 15 of the FCC Rules, Operation is subject to the following two conditions:
(1) This device may not cause harmful interference, and (2) this device must accept any interference
received, including interference that may cause undesired operation.
Tested To Comply With FCC Standards
FOR HOME OR OFFICE USE
40
CASIO ELECTRONICS CO., LTD.
Unit 6, 1000 North Circular Road
London NW2 7JD, U.K.
CASIO COMPUTER CO., LTD.
6-2, Hon-machi 1-chome
Shibuya-ku, Tokyo 151-8543, Japan
MO9907-000003B PN411184-001