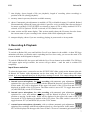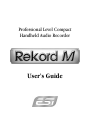
1
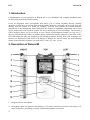
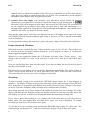
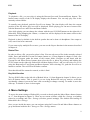
Professional Level Compact
Handheld Audio Recorder
User’s Guide
ESI - Copyright © 2010
Revision 1, May 2010
www.esi-audio.com
ESI
Rekord M
INDEX
1. Introduction.................................................................................................................................. 4
2. Description of Rekord M............................................................................................................. 4
Accessories ................................................................................................................................................................ 5
LCD display............................................................................................................................................................... 6
3. Recording & Playback................................................................................................................. 7
Power On/Off............................................................................................................................................................. 7
Input Source selection................................................................................................................................................ 7
Folder selection & Filenames .................................................................................................................................... 8
Recording................................................................................................................................................................... 8
Playback..................................................................................................................................................................... 9
Delete Files ................................................................................................................................................................ 9
Key Hold function...................................................................................................................................................... 9
4. Menu Settings ............................................................................................................................... 9
Bitrate (Rec. Setting) ............................................................................................................................................... 10
Rec. LED (Rec. Setting) .......................................................................................................................................... 10
Line Level (Rec. Setting) ......................................................................................................................................... 10
Repeat (Func. Setting) ............................................................................................................................................. 10
Play Speed (Func. Setting)....................................................................................................................................... 11
Backlight (Func. Setting) ......................................................................................................................................... 11
Power Sav. (Func. Setting) ...................................................................................................................................... 11
Monitor (Func. Setting) ........................................................................................................................................... 11
Date/Time (Func. Setting)........................................................................................................................................ 11
FactorySet (Func. Setting) ....................................................................................................................................... 11
Info. (Func. Setting)................................................................................................................................................. 11
5. USB Connection to PC or Mac ................................................................................................. 12
Windows .................................................................................................................................................................. 12
Mac OS X ................................................................................................................................................................ 12
6. Specifications .............................................................................................................................. 14
7. General Information .................................................................................................................. 14
3
ESI
Rekord M
1. Introduction
Congratulations on your purchase of Rekord M, a very affordable and compact handheld audio
recorder with professional studio quality.
It has an integrated stereo microphone that allows you to record anything directly virtually
anywhere. It also has a stereo line input with adjustable input gain, allowing you to record your mix
directly from the output of a mixer for example. You can even connect an external dynamic
microphone to the microphone input. Rekord M also features a headphone output that can be used
as line output and even a built-in speaker for direct monitoring of your recordings. The internal 4
GB of memory allows you to record up to over 6 hours of uncompressed audio (or even over 17
days of compressed mp3 audio) in pristine quality. Rekord M directly connects to your Mac or PC
via USB connection and gets charged via the integrated battery directly from your computer. All
features are displayed via the color LCD display of Rekord M. And of course, the most amazing
feature is the extremely compact size with only 3.4 cm x 8.7 cm x 1.4 cm.
2. Description of Rekord M
1. integrated stereo microphone
2. microphone input for dynamic microphones (1/8" mono connector) and stereo line input (1/8"
stereo connector), preferably for usage with included adapter accessories
4
ESI
Rekord M
3. red recording LED, shows recording status
4. RECORD button to start recording mode and save recorded data
5. headphone and line output (1/8" stereo connector)
6. VOLUME +/- buttons to increase and decrease playback volume
7. USB connector under plastic cover, used for PC/Mac connection and charging using the
supplied USB accessory cable
8. FOLDER/UP button to access the different folders with WAV/MP3 files and navigate in menu
9. color LCD display
10. FUNC button, used to change recording modes (INT or WIDE and AUTO on/off) and delete
recorded files
11. HOLD slider, can be used to lock all function buttons
12 REWIND/LEFT button to move back to the beginning of a file and navigate in menu
13. PLAY/PAUSE & POWER button, used to play & pause recording and playback and to turn on/off
Rekord M by pressing and holding for a few seconds
14. input source selection for recording: INT (internal stereo microphone), EXT (external mono
dynamic microphone) and LINE (external stereo line input)
15. FORWARD/RIGHT button to move forward in a file and navigate in menu
16. integrated speaker for direct playback without usage of headphones or line output
17. MENU/DOWN button to access configuration menu and navigate in menu
Accessories
5
ESI
Rekord M
A. USB connection cable, this cable is used to connect Rekord M to your PC or Macintosh and to
charge the battery. Simply connect it to the computer and the internal battery of Rekord M gets
charged automatically.
B. microphone input adapter, this adapter from 1/8" to 1/4" is used to connect an external dynamic
microphone (mono) to Rekord M. Note that recording from condenser microphones is not
possible.
C. hand strap, allows you to conveniently hold Rekord M on your arm wrist or anywhere else. The
strap connects to the small holder on the top backside of Rekord M.
D. line input adapter, allows you to record from line input signals in stereo. It connects two
unbalanced 1/4" line signals (for left & right channel) to the 1/4" line input of Rekord M.
LCD display
1. shows the current input source for recording: INT (internal stereo microphone), WIDE (internal
stereo microphone with higher sensitivity for wider rooms / areas), EXT (external mono
dynamic microphone) or LINE (external stereo line input).
2. shows the current selected folder for recording & playback (A, B, C, D or E – 5 in total).
3. shows the current repeat mode for playback (Normal, One Repeat, Dir Repeat, All Repeat,
Shuffle All).
4. shows if the key lock is enabled (lock icon) or disabled (empty, default).
5. shows the battery charge level.
6. shows the selected MP3 bitrate and/or PCM status: PCM (no compression, direct WAV file
recording), SHQ (128kbps mp3), HQ (64kbps mp3), SP (32kbps mp3) or LP (16kbps mp3).
6
ESI
Rekord M
7. time display, shows length of file (no playback), length of recording (when recording) or
position of the file (during playback).
8. memory status in percent, shows the available memory
9. shows if automatic gain adjustment is enabled (AUTO) or disabled (empty). If enabled, Rekord
M automatically adjusts the input gain which is good for voice recording but often not desired
for music recordings. If INT & WIDE are selected as input, AUTO is always enabled. If EXT is
selected, AUTO is optional. If LINE is selected, AUTO cannot be used.
10. status section and file name display. This section usually shows the file name, but also shows
the current status of your recording or the volume slider while adjusting the volume.
11. transport display, shows if you are recording, playing, in pause mode or in stop mode.
3. Recording & Playback
Power On/Off
To switch on Rekord M, press and hold the PLAY/PAUSE button in the middle. A short ESI logo
animation will show you that the unit is switching itself on. Once ready, you can see the main LCD
screen as shown in the diagram in chapter 2.
To switch off Rekord M, also press and hold the PLAY/PAUSE button in the middle. The ESI logo
will appear again and get smaller, the screen will get darker – until the unit is switched off
completely.
Input Source selection
To select the input source, you need to use the INT/EXT/LINE slider switch on the bottom right side
of Rekord M. Further input adjustments can be done using the FUNC button above the slider
switch. It is very important that you do this before starting to record. You cannot change the input
source after a recording has been initiated. The following input sources are available:
A. internal stereo microphone, for local recording with automatic gain adjustment,
optimized for voice and vocal recordings with the Rekord M placed at a fixed position.
In this mode, INT will be displayed in the upper left corner of the LCD screen and AUTO is
displayed in middle of the LCD screen. The slider switch is set to INT. To toggle between INT
(A) and WIDE (B), use the FUNC button.
B. internal stereo microphone, for wide recording with automatic gain adjustment,
optimized for voice and ambient recordings with the Rekord M placed at a fixed
position or moving. In this mode, WIDE will be displayed in the upper left corner of the LCD
screen and AUTO is displayed in middle of the LCD screen. The slider switch is set to INT. To
toggle between INT (A) and WIDE (B), use the FUNC button.
C. external mono microphone (dynamic), with or without automatic gain adjustment,
optimized for recordings with the microphone placed at a fixed position. In this mode,
EXT will be displayed in the upper left corner of the LCD screen. Automatic gain control can be
7
ESI
Rekord M
enabled (AUTO is displayed in middle of the LCD screen) or disabled (no AUTO will be shown)
using the FUNC button to switch between the two options. We recommend to use the supplied
microphone input adapter when using this input source.
D. external stereo line input, with automatic gain adjustment always turned off,
optimised to record from line level sources such as the output of your mixing desk. In
this mode, LINE will be displayed in the upper left corner of the LCD screen. We recommend to
use the supplied line in adapter when using this input source. Note that monitoring (i.e. a
through output signal of the input signal is sent out through the headphone / line output) can be
enabled in the menu, see chapter 4 for more details.
Note that the input source will always be displayed on the LCD display in the upper left corner
(INT/WIDE/EXT/LINE) and the automatic gain setting is shown as AUTO if enabled in the middle
of the LCD display.
It is also possible to change the input level / gain in the menu. Chapter 4 describes this with detail.
Folder selection & Filenames
Rekord M saves the recorded files into 5 folders with the names A, B, C, D & E. These folders can
be accessed with the FOLDER/UP button (button no. 8 from diagram in chapter 2). Pushing the
button toggles through the folders.
Whenever you are pushing the button, the LCD display will show Notice! Folder change … and
change to the next folder (i.e. from A to B, from B to C, from C to D, from D to E and from E back
to A).
Now you can play back files from only this folder. If you start recording, the new file will be placed
into this selected folder as well.
File names of new recordings will be created by Rekord M automatically. The first recording in
folder A will be called A001.WAV (or .MP3), then A002.WAV(.MP3), A003.WAV(.MP3) and so on.
This means that you can store up to 999 recordings in each folder.
Recording
To start recording, simply press and hold the RECORD button (button no. 4 from diagram in
chapter 2). The display will turn from blue into red/orange and the status message will say READY.
Note, doing this is even possible when Rekord M is turned off but obviously it is better if you turn it
on before, select the destination folder and input source and then start recording.
Now simply press the PLAY/PAUSE button in the middle to actually start the recording. The status
display will show the new filename and the time display will start to count up in seconds. Above the
time display you can see a smaller time display that shows the remaining recording time.
If you want to pause the recording (i.e. to continue later in the same file), press the PLAY/PAUSE
button again. The time display then will blink and a pause icon will be displayed. To resume
recording, press the PLAY/PAUSE button once again.
To end and save your recording, press and hold the RECORD button again for a short time. The
status message will display Save … and once finished, the display will be in blue color again.
8
ESI
Rekord M
Playback
To playback a file, you can select it using the REWIND/LEFT and FORWARD/RIGHT buttons. The
bottom status section of the LCD display displays the filename. You can only play files in the
currently selected folder.
To actually start playback, push the PLAY/PAUSE button. The time display will show the current
position in the file and a play icon will be displayed. While playing you can move between files
with the REWIND/LEFT and FORWARD/RIGHT buttons
Also while playing you can change the volume with the two VOLUME buttons on the right side of
Rekord M. When changing the volume, a volume bar will be displayed in the status section at the
bottom of the LCD display.
Playback is done by default via the built-in speaker but can be done via headphone / line output as
well, once it has been connected.
If you want to play multiple files at once, you can use the Repeat function in the menu as described
in chapter 4.
Delete Files
In order to delete a file, you need to select it first. You can only access files in the currently selected
folder. Press and hold the FOLDER/UP button (button no. 8 from diagram in chapter 2) and a list
with files will appear under the name of the current folder. Navigate up and down with the
FOLDER/UP and MENU/DOWN buttons then select the file to delete by pressing and holding the
FUNC button on the right side. Rekord M will then display Delete? and you can select Yes or No
using the REWIND/LEFT and FORWARD/RIGHT buttons. After selecting Yes, push the PLAY/PAUSE
button to confirm. The red LED will flash to confirm.
Note that deleted files cannot be restored, so this is final.
Key Hold function
The key HOLD slider on the left side of Rekord M (no. 11 from diagram in chapter 2) allows you to
lock all button entries. This is good if you are using Rekord M and you want to avoid that
accidentally a button is pressed to start / end a recording or change a setting. To enable it, move the
slider up. To disable it, move it down again.
4. Menu Settings
To access the menu settings of Rekord M, you need to shortly push the MENU/DOWN button (button
no. 17 from diagram in chapter 2). There are two menu sections, called Rec. Settings (everything
related to recording) and Func. Settings (all other general settings). The default after turning on
Rekord M is Rec. Settings.
Once you are inside the menu, you can navigate using the FOLDER/UP and MENU/DOWN buttons to
go up and down inside the Rec. Settings or Func. Settings menus.
9
ESI
Rekord M
To select an entry, you can use the FORWARD/RIGHT button or alternatively the PLAY/PAUSE button.
Changing a setting requires you to select it (again using FOLDER/UP and MENU/DOWN buttons) and
confirm it with the PLAY/PAUSE button in the middle. If you do not want to change a setting but stay
in the menu, use the REWIND/LEFT button.
To toggle between the Rec. Settings and Func. Settings menus, you need to use the REWIND/LEFT
button. Pictures showing a screw nut (for Func. Settings) and microphone (Rec. Settings) indicate
your selection. To confirm the selected menu, press the PLAY/PAUSE button.
To exit the menu, press and hold the MENU/DOWN button for a longer time until you can see the
main LCD screen again.
Bitrate (Rec. Setting)
The Bitrate menu entry allows you to select PCM / WAV or MP3 (with selected bitrate) recording.
The available options are PCM (no compression, direct WAV file recording), SHQ (128kbps mp3),
HQ (64kbps mp3), SP (32kbps mp3) or LP (16kbps mp3). PCM is the recommended default with
the best pristine audio quality. However, to record for a longer time, any of the mp3 settings are a
nice option – the lesser the bitrate in kbps, the lesser the audio quality will be, but you can store
much more data.
Rec. LED (Rec. Setting)
The Rec. LED section allows you to turn On or Off the red recording LED during recording. If you
want to record something without anyone seeing that the unit is recording, you would turn it off.
Line Level (Rec. Setting)
The Line Level function allows you to adjust the input gain when recording from the line input as
input source (i.e. LINE is displayed on LCD screen). The range is between –12dB to +12dB.
Rekord M is optimized for standard –10dBv line level signals by default, but as line signals tend to
vary in their exact level, an input level adjustment is very helpful and sometimes actually needed to
avoid distortion or signals with too low volume.
When you use the line input and want to record, it is recommended to use the Monitor (Func.
Setting) function (check below with more information) or better to make a short test recording to
check if the input level has been setup correctly or might need to be adjusted.
Repeat (Func. Setting)
The Repeat section allows you to change the repeat mode for playback when playing data via
Rekord M. Normal means, that the playback does not repeat. One Repeat means that the file gets
played one more time, Dir Repeat means that all files from the currently selected folder will be
repeated, All Repeat means that all files, from all folders, will be repeated and Shuffle All means tht
the files fill be played and repeated in a random order. The repeat selection will be displayed on the
LCD screen in the top middle section as a small icon.
10
ESI
Rekord M
Play Speed (Func. Setting)
The Play Speed section allows you to change the playback speed of the files you are playing in the
range from 70% to 120%. This is interesting for practicing (i.e. percussion, etc.). Obviously the
default is 100%.
Backlight (Func. Setting)
The Backlight menu entry allows you to set the LCD backlight of Rekord M to automatically switch
itself off to save battery power. All functions will still work, but the display will be dark. You can
change this to Always (Rekord M will not switch off the backlight), 5 sec, 10 sec, 30 sec and 60 sec.
By default, Rekord M keeps the backlight on always.
Power Sav. (Func. Setting)
The Power Sav. menu entry allows you to set Rekord M to automatically switch itself off to save
battery power. You can change this to OFF (Rekord M will not switch off automatically), 30 sec,
45 sec, 60 sec and 90 sec. By default, Rekord M switches itself off after 60 seconds.
Monitor (Func. Setting)
The Monitor section allows you to enable direct monitoring of the recorded input signal. You would
usually set it to the default Earphone, which means that everything that you record, i.e. from the
line input) gets sent out via the headphone / line output simultaneously. This means for example
you can connect Rekord M to the output of your mixing desk and connect the output of Rekord M
to your monitoring speakers, headphones or amplifier and as such place the recorder “in between”
your existing setup.
As alternative you can also monitor via the built-in speaker using the Speaker setting (note that this
setting has no effect if you select INT or WIDE as input source as otherwise you would only record
feedback noise).
Date/Time (Func. Setting)
With Date/Time you can select the date & time that will be saved with your new recordings. It is
recommended to set it at least once initially so that each WAV/MP3 file gets the correct time stamp
that you can later see on your PC or Mac when you copy / edit the file. With the FOLDER/UP and
MENU/DOWN buttons you can adjust each value, with the PLAY/PAUSE key you can move forward
to the next value.
FactorySet (Func. Setting)
If you select Yes under FactorySet, all settings / menu options are reset to their factory defaults.
This does not delete or remove any of your audio files, only the settings are changed.
Info. (Func. Setting)
The Info menu entry will display the amount of memory installed in Rekord M and the firmware
version that is currently installed.
11
ESI
Rekord M
5. USB Connection to PC or Mac
Rekord M is detected as a USB memory device when connected to your PC or Macintosh system
with Windows XP, Windows Vista, Windows 7 or Mac OS X – similar like a USB memory stick or
an external USB hard disk. This means you simply need to connect it to your computer using the
supplied USB cable and you can directly access the files and copy them from Rekord M to your
computer.
When connected to your computer, the red LED will blink and the LCD display
will show an icon with a USB connection cable like shown on the right. While
the LED is blinking, the battery of Rekord M gets charged.
Windows
The following pictures show a folder of Rekord M with some files under Windows Vista. Even
though the look is a bit different under Windows XP or Windows 7, the principle is exactly the
same. You can click on files and simply drag them to your local hard disk or any other drive on
your system for further editing. You can also copy them back to Rekord M for playback.
Mac OS X
The following pictures show the folders of Rekord M with some files under the Finder of Mac OS
X. You can click on files and copy them to your local desktop, hard disk, etc. by dragging them
with the mouse. You can also copy mp3 or WAV files back to Rekord M for playback.
12
ESI
Rekord M
13
ESI
Rekord M
6. Specifications
< General Features >
-
audio recorder for PCM/WAV and mp3 data
USB 2.0 connection to computer
color LCD display, 96x64 pixel
4 GB of internal memory
integrated speaker & stereo microphone
folder & file manager (5 folders with up to 999 files each)
< Audio Recording >
-
built-in stereo microphone (2x cardioid)
line input (1/8" stereo)
external microphone input (1/8" mono) for dynamic microphone
WAV/PCM recording (uncompressed data)
mp3 recording (16, 32, 64, 128 kbps)
bitrate: 16 bit
samplerate: 44.1kHz
< Audio Playback >
-
built-in speaker
1/8" headphone connector, works as line output
WAV / PCM file playback
mp3 file playback (8 - 320kbps)
samplerates: 8, 11.5, 12, 16, 22.05, 24, 32, 44.1, 48kHz
< Technical Specifications >
-
4 GB of internal memory
recording time: up to 6.15h (WAV/PCM), up to 426h (mp3/LP)
Li-Polymer Battery, rechargeable via USB
battery lifetime: about 12h when recording, about 5h when playing via
speaker
< Compatibility >
- compatible to Windows XP, Vista, 7 & Mac OS X
- software firmware upgrade possible
< Accessories & Appearance >
-
Y-cable for line input (2x 1/4" TRS) included
microphone input adapter (1/4" TS) included
hand strap included
USB cable included
34mm x 87mm x 14mm dimensions
ca. 38g weight
7. General Information
Trademarks
ESI and Rekord M are trademarks of ESI Audiotechnik GmbH. Windows is a trademark of
Microsoft Corporation. Other product and brand names are trademarks or registered trademarks of
their respective companies.
14
ESI
Rekord M
The FCC and CE Regulation Warning
This device complies with Part 15 of the FCC Rules. Operation is subject to the following two
conditions : (1) this device may not cause harmful interference, and (2) this device must accept any
interference received, including interference that may cause undesired operation. Caution : Any
changes or modifications in construction of this device with are not expressly approved by the party
responsible for compliance, could void the user's authority to operate equipment.
Note: This equipment has been tested and found to comply with the limits for a Class A digital
device, pursuant to Part 15 of the FCC Rules. These limits are designed to provide reasonable
protection against harmful interference when the equipment is operated in a commercial
environment. This equipment generates, uses, and can radiate radio frequency energy and, if not
installed and used in accordance with the instruction manual, may cause harmful interference to
radio communications. Operation of this equipment in a residential area is likely to cause harmful
interference in which case the user will be required to correct the interference at his own expense. If
necessary, consult an experienced radio/television technician for additional suggestions.
Correspondence
For technical support inquiries, contact your nearest dealer, local distributor or ESI support online at
www.esi-audio.com.
Disclaimer
All features and specifications subject to change without notice.
Parts of this manual are continually being updated. Please check our web site www.esi-audio.com
occasionally for the most recent update information.
15