1
LP-II
Electronic Price Computing
Label/Receipt Printing Scale
REV: 3.00 Sep. 2006
Attention:
Copyright© 2006, by CAS Corporation. All rights reserved. No part of this publication may be
reproduced, transmitted, transcribed, stored in a retrieval system, or translated into any
language or computer language, in any form or by any means, electronic, mechanical,
magnetic, optical, chemical, manual or otherwise, without the prior expressed written
permission of this company.
Disclaimer:
This company makes no representations or warranties, either expressed or implied, with respect
to the contents hereof and specifically disclaims any warranties of merchantability or fitness for
any particular purpose. Any software describes in this manual is sold or licensed “as is”. Should
the programs prove defective following their purchase, the buyer (and not this company, its
distributors, or its dealers) assumes the entire cost of all necessary servicing, repair, and any
incidental or consequential damages resulting from any defect in the software. Further, this
company reserves the right to revise this publication and to make changes from time to time in
the contents hereof without obligation to notify any person of such revision or changes.
Brand and product names are trademarks and/or registered trademarks of their respective companies.
TABLE OF CONTENTS
PAGE
1 General
1.1 Model and Specifications............................................................................................................ 7
1.2 Dealers and Service...................................................................................................................... 8
2 Unpacking and Assembly
2.1 Box Contents.................................................................................................................................. 8
2.2 Assembly of Display Column ....................................................................................................... 9
3 Proper Operation
3.1 Environmental Considerations and Safety ............................................................................. 10
3.2 Leveling and Location................................................................................................................ 12
3.3 Dont’s ............................................................................................................................................ 13
3.4 Cleaning and Maintenance ..................................................................................................... 14
3.5 Power Outlet Requirements ...................................................................................................... 14
4 Nomenclature
4.1 Scale Overview ........................................................................................................................... 15
4.2 Display and Indicators................................................................................................................ 16
4.3 Printer............................................................................................................................................. 17
4.4 The Sales Mode Numeric Key Pad Configuration ................................................................. 18
4.5 The Program Mode Numeric Key Pad Configuration ........................................................... 22
5 Quick Set-Up
5.1 Installation of the Label Roll ....................................................................................................... 25
5.2 Basic Quick Start.......................................................................................................................... 28
6 Programming
6.1 Main Menu .................................................................................................................................... 30
6.1.1 RPK: Repack Mode ................................................................................................................... 31
6.1.2 Store Settings.............................................................................................................................. 31
6.1.3 Store Name, Address, & Number............................................................................................ 31
6.1.4 Security Control ......................................................................................................................... 32
6.1.5 Department Names.................................................................................................................. 34
6.1.6 Scale Assignments..................................................................................................................... 35
6.1.7 Date and Time ........................................................................................................................... 35
6.2 Settings ........................................................................................................................................... 36
6.2.1 Print Inhibiting............................................................................................................................. 36
6.2.2 Sales Messages .......................................................................................................................... 37
6.2.3 Scrolling Message...................................................................................................................... 37
6.2.4 Scrolling Sequence ................................................................................................................... 38
6.2.5 Tax Rates ..................................................................................................................................... 39
6.2.6 Label Types................................................................................................................................. 39
6.2.7 Adjust Feed Length ................................................................................................................... 40
6.2.8 Origin ........................................................................................................................................... 41
6.3 PLU Programming ......................................................................................................................... 41
6.3.1 PLU Price Change ..................................................................................................................... 42
6.3.2 Creating PLUs ............................................................................................................................. 43
6.3.3 Renumbering PLUs..................................................................................................................... 51
6.3.4 Listing PLUs .................................................................................................................................. 51
iv
TABLE OF CONTENTS
PAGE
6.3.5 Copying PLUs ............................................................................................................................ 52
6.3.6 Edit PLUs ..................................................................................................................................... 52
6.3.7 Promotion/Frequent Shopper Program ............................................................................... 53
6.3.8 Deleting PLUs............................................................................................................................. 54
6.3.9 Audit Trail PLUs .......................................................................................................................... 54
6.3.10 Speed Key Programming ..................................................................................................... 55
6.4 Self-Time Print Mode ................................................................................................................... 55
6.5 Global Settings ............................................................................................................................ 57
6.5.1 Global Label Format ............................................................................................................... 56
6.5.2 Frequent Shopper Discount Program................................................................................... 56
6.6 Network Settings (optional) ....................................................................................................... 59
7 Sale Modes
7.1 REG, MGR, and RPK Modes....................................................................................................... 57
7.2 REG Mode .................................................................................................................................... 60
7.2.1 ZERO Key.................................................................................................................................... 58
7.2.2 TARE Key .................................................................................................................................... 58
7.2.3 lb/kg Key ................................................................................................................................... 59
7.2.4 ON/OFF Key .............................................................................................................................. 59
7.2.5 PLU/SHIFT Key and Speed Keys.............................................................................................. 60
7.2.6 MISC PLU Keys........................................................................................................................... 60
7.2.7 FOR Key ..................................................................................................................................... 62
7.2.8 1/2, 1/4, and 100g Keys........................................................................................................... 63
7.2.9 CLEAR Key ................................................................................................................................. 64
7.2.10 ADD, VOID, and ST/TTL Keys ................................................................................................. 64
7.2.11 SAVE Key.................................................................................................................................. 65
7.2.12 AUTO/MANUAL Key ............................................................................................................... 65
7.2.13 PRE-PACK Key......................................................................................................................... 66
7.2.14 X Key ........................................................................................................................................ 66
7.2.15 RETURN Key ............................................................................................................................. 67
7.2.16 OVERRIDE Key......................................................................................................................... 68
7.2.17 DEPT Key .................................................................................................................................. 69
7.2.18 Temporary Date Change ..................................................................................................... 70
7.2.19 Temporary Date Print Inhibit ................................................................................................ 70
7.2.20 Temporary PLU Data Change ............................................................................................. 71
7.3 MGR Mode................................................................................................................................... 74
7.4 RPK Mode ..................................................................................................................................... 75
8 X and Z Modes
8.1 Reading Sales Sumaries: X Mode ............................................................................................. 73
8.1.1 PLU Sales .................................................................................................................................... 73
8.1.2 MISC PLU Sales.......................................................................................................................... 75
8.1.3 Group Sales............................................................................................................................... 75
8.1.4 Department Sales .................................................................................................................... 76
8.1.5 Scale Sales ................................................................................................................................ 76
8.1.6 Hourly Sales ............................................................................................................................... 77
8.1.7 Clerk Sales................................................................................................................................. 77
8.1.8 Summary Report ...................................................................................................................... 77
8.2 Resetting Sales Summaries: Z Mode ........................................................................................ 78
v
TABLE OF CONTENTS
PAGE
Appendix A; Country Codes........................................................................................................... 81
Appendix B; Label Formats ............................................................................................................. 83
Appendix c: Quick Reference........................................................................................................ 86
Warranty ............................................................................................................................................. 88
vi
1 General
1 General
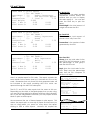
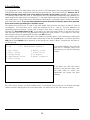
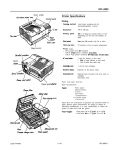
1.1 Model and Specifications
MODEL
CHARACTERS PER PLU
DISPLAYS
GENERAL
PROGRAMMABLE DATA
INTERFACES
LABEL SIZES
MAX TARE
MEASUREMENT TYPE
MEMORY CAPACITY
MEMORY OPTION
NETWORK
SPECIFICATIONS
OPERATING TEMP.
PLU PROGRAMMABLE
DATA
PLATTER SIZE
POWER SOURCE
PRINT SPEED
PRINTER TYPE
SALES PERIODS
SALES REPORT MODES
SALES REPORT TYPES
SHIPPING WEIGHT
WEIGHING CAPITY
WEIGHING RANGE
WEIGHING UNITS
LP-2, (version 2.25)
Ingredients: 2000 char. MAX, PLU Name: 114 char. MAX
WEIGHT: 5 digits
(5 max)
UNIT PRICE: 6 digits
(8 max)
TOTAL PRICE: 7 digits
(9 max)
Users/Clerks
: 99 @ 20 Char
Scrolling Messages : 32 @ 80 Char
Label Formats
: 999 @ 30 Char
Sales Messages
: 32 @ 40 Char
Label Formats
: Over 50 Built-In
Store Name
: 150 Char
Origin
: 400 @ 25 Char
Departments
: 32 @ 20 Char
RS-232, Wired Ethernet(RJ45), Wireless Ethernet(IEEE 802.11b)
Width: 10mm~80 mm (0.40 in.~3.15 in.)
Length: 20mm~170 mm (0.94 in.~6.69 in.)
Length: 850 mm (33.46 in.) max length using linked formats.
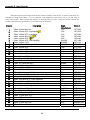
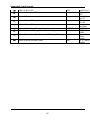
FULL CAPACITY
LOAD CELL
4 MEGABYTES STANDARD
N/A
10/100MB ETHERNET
W/ WIRELESS CABILITY OPTIONAL
-10° C~ 40° C (14° F~ 104° F)
Tare Weight
: 0~Capacity
Department #
: 1~32
Price
: 0.00~9999.99
PLU #
: 1~999999
Sale Weight
: 0~Capacity
Commodity Name
: 114 Char
Sale Price
: 0.00~9999.99
Label Format #
: 1~999
Net Weight
: 0~99999
Sales Message #
: 1~32
Count
: 1~99
Unit
: lb, kg
Sale Count
: 0~99
Group Code
: 0~99
UPC
: 0~999999
Tax Rates
: 0~3
Ingredients
: 2000 Char
Country Code
: 0~999
Origin
: 25 Char
Sell By Date
: 0~999 days
Barcode Type/Format
Cook By Date
: 0~999 days
Nutritional Information
Frequent Shopper/Discount Feature
Length: 403 mm (15.87 in.), Width: 260 mm (10.24 in.)
85~240VAC 50/60Hz ±5%
100 mm/sec (4 in./sec)
DIRECT THERMAL PRINT
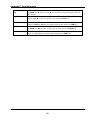
Dual totals for daily/monthly or user selectable reporting periods.
Read: X1/X2 Modes, Read & Reset: Z1/Z2 Modes
Clerk Report
Monthly PLU & Misc. PLU Report
Daily PLU & Misc. PLU Report
Monthly Department Report
Daily Department Report
Monthly Scale Report
Daily Scale Report
Monthly Group Report
Daily Group Report
Monthly Hourly Report
Daily Hourly Report
Monthly Detailed Report
Daily Detailed Report
13 kg (29 lb)
0~15 x 0.005 lb / 0~30 x 0.01 lb
0~30 x 0.01 lb / 30~60 x 0.02 lb
(0~6 x 0.002 kg / 0~15 x 0.005 kg, 0~15 x 0.005 kg / 15~30 x 0.01 kg
DUAL RANGE
Pound & Kilo push-button selectable.( Only USA version )
7
1 General
Note: Specifications are subject to change without notice.
1.2 Dealers and Service
1)
Our Dealers: CAS Corporation is committed to offer the best products and the best service. To
offer the best products, CAS manufactures all of its products using only the best components
available and thoroughly tests all of its products to assure a maximum level of quality and
dependability. CAS feels that each of its valued customers should get the best service available.
Whether it’s the initial installation of our product, maintenance/repair work, or simply answering
questions about our products, CAS Corporation and all of its Authorized Dealers are highly trained
to assist you with any need regarding CAS products.
2)
Our Service: CAS (USA) offers service and support to all of its US products through its vast network
of Authorized Dealers. If you cannot find or are unaware of any CAS Authorized Dealers in your
area, please visit us on the web at www.cas-usa.com. We will help you locate the CAS Authorized
Dealer nearest you.
3)
Dealers and Service: The CAS family of Authorized Dealers is always ready to assist you. Should
you need warranty service, supplies, or even have some questions about our products, don’t
hesitate to call on us! Remember that your first contact should always be the local CAS Authorized
Dealer whom you purchased the product from. He is best able to quickly help you with any
problem or question you should have regarding our product. CAS Authorized Dealers have a vast
library of documentation, stock of replacement parts and supplies, and all of the training needed
to assist you. Whether it’s help programming or maintaining your CAS products, CAS Authorized
Dealers are always ready to assist!
Thank you again for making CAS your choice!
8
2 Unpacking and Assembly
2 Unpacking and Assembly
2.1 Box Contents
Pictured above are the contents that come with the LP-2. The scale comes with one roll of LST-8010
labels already installed and ready to use. It also comes with the software which can be used to
program the scale using the RS-232C cable, which is also included. It is important to note that the RS232 cable is a Y cable, with 3 connections. The 25 pin connector is no longer used, but is included for
possible future use. The scale also comes with a tear bar (not pictured) which is used for continuous
strip labels. A CAT-5 or Ethernet crossover cable, which can also be used to connect to a PC can be
purchased from your authorized CAS dealer.
9
2 Unpacking and Assembly
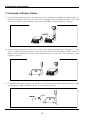
2 .2 Assembly of Display Column
1) You must follow the instructions in this section in order to assemble the Display Assembly properly. To
begin the installation, make sure that the scale is unplugged from any electrical source. Your scale
body has a display column bracket in the rear that the display column slides into. (See fig.)
2) Hold the display assembly in front of you such that the display assembly forms the figure “7”. Next,
with the scale’s keyboard facing you, insert the display column into the display bracket. When the
display column reaches the bottom of the display bracket, you will “feel” the connectors “snap”
together. (See fig.)
3) Underneath the display bracket you will find 2 screw holes for the display assembly screws. Insert
and fasten the 2 display assembly screws. You are done! (See fig.)
10
3 Proper Operation
3 Proper Operation
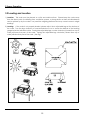
3.1 Environmental Considerations & Safety
1) Please avoid the following hostile conditions:
Temperatures below or exceeding:
-10º C ~ 40º C (14º F ~ 104º F)
Excessive vibration
Wind or fans functioning in direct
contact with weighing platform.
Direct sunlight
High humidity
Ungrounded electrical outlet
Unstable or flimsy surface
Shared electrical outlet
Dust or dirt
Poor ventilation
2) Environmental Protection: The scale should be installed in a dry and liquid free environment. When
the scale is installed in a high humidity or wet-type environment, be sure to avoid spilling or spraying
directly on any surface of the scale.
3) Personal Safety: It is extremely important to be aware of personal safety whenever maintaining or
operating this equipment. Wherever possible, we have tried to place warning labels and other
indicators at the actual location on the equipment where the danger is most likely to occur.
However, it is not always possible to foresee all dangerous situations. Warnings and cautions that are
necessary for the safe operation of the scale are contained in this manual. Please, make sure to
carefully read ALL warnings and cautions before operating the scale.
4) Observe the following safety precautions:
Shut the scale OFF and unplug the scale whenever you are changing the label
roll or whenever working in the printer bay.
The outlet that the scale is plugged into, should be properly grounded.
Whenever connecting or disconnecting ANY cables from the scale, be sure to
hold the cables by the end connector. Failure to do so may cause a short
circuit.
Maintain a static free work area.
Never use any other equipment on the same line: it should be a dedicated line.
The outlet used must have the proper voltage ratings.
11
3 Proper Operation
3.2 Leveling and Location
1) Location: This scale must be placed on a flat and stable surface. Please keep the scale away
from the direct path of oscillating fans, ventilation systems, or strong drafts as these air disturbances
can be picked-up by the scale’s very sensitive weighing platform and may cause incorrect weight
readings.
2) Leveling: If the scale is not properly leveled, please adjust the 4 adjustable legs at the bottom of
the scale. Turn the legs clockwise or counterclockwise so as to center the bubble of the leveling
gauge inside the indicated circle. Turning the adjustable legs counter-clockwise (viewed from top of
scale) will lower that part of the scale. Turning the adjustable legs clockwise (viewed from top of
scale) will raise that part of the scale. (See Fig.)
12
3 Proper Operation
3.3 Don’ts
DO NOT subject the platter to sudden shocks.
DO NOT drop anything on the platter.
DO NOT store any thermal labels where they may be subject to:
direct sunlight
high humidity
high temperature
dust.
DO NOT press the keys excessively hard. The keys will operate
correctly if they are pressed lightly. If any keys fail to work, contact
your Authorized CAS Dealer.
DO NOT hold or attempt to carry the scale by the Pole Display.
DO NOT pour water or ANY liquid directly on the scale.
DO NOT use any label media that is not recommended by CAS Corp.
DO NOT attempt to effect repairs to this equipment. Doing so is
against the law in most states. If any fault occurs that cannot be
rectified using this manual, unplug the scale and contact you
Authorized CAS Dealer.
13
3 Proper Operation
3.4 Cleaning and Maintenance
1)
The LP-2’s exterior should be cleaned with a damp cloth and a mild soap solution. Do not spray
any chemicals directly onto the LP-2. Always spray any cleaning liquids onto the cloth rag you are
using to wipe the scale clean. Remember NEVER to hose-down the scale. Before doing any type
of cleaning, always make sure that the scale is turned OFF using the side COM Port Access Panel
ON/OFF switch. Using the keyboard’s ON/OFF switch is NOT enough.
The keyboards should be cleaned with a damp cloth rag soaked in a mild soap solution.
Never spray water or any liquid directly on to the keyboard as these may cause damage to the
keyboard’s seal and then further damage individual keys. DO NOT use solvents, harsh, or abrasive
chemicals or cleaning devices as these may discolor and even completely remove the trim paint
on the keyboards. If you require more thorough cleaning, contact your local Authorized CAS
Dealer for service.
The displays should be cleaned with a damp cloth rag soaked in a mild soap solution.
Never spray water or any liquid directly on to the displays as these may cause damage to the
display’s seal and possibly short out the scale’s electronic components. Also, these displays use
very high voltages so special care should be taken never to wet them. DO NOT use solvents, harsh,
or abrasive chemicals as these may discolor and even completely remove the wording on the
displays. If you require more thorough cleaning, contact your local Authorized CAS Dealer for
service.
2)
To clean the LP-2’s platter, please make sure that the scale is turned OFF using the side COM Port
Access Panel ON/OFF switch. Using the keyboard’s ON/OFF switch is NOT enough. First, remove
the platter from the platform and place it in a large tub or sink. You can wash it down with soap
and high-pressure water and/or hot water. Before replacing the platter on the platform, make sure
that it is completely dry.
3)
The printer compartment also needs cleaning; however, this process requires more careful
cleaning. There are many sensitive parts as well as moving parts in the printer bay. Whenever
doing anything in the printer bay, please make sure that the scale is turned OFF using the side
COM Port Access Panel ON/OFF switch. Using the keyboard’s ON/OFF switch is NOT enough.
To begin, turn the scale OFF via the ON/OFF switch located on the left side of the scale in
the COM Port Access Panel. Next, open and remove the Printer Side Access Panel. With a small
brush or toothbrush, remove all of the debris that has accumulated on the base of the printer bay.
DO NOT attempt to remove any dirt or debris from anywhere else in the printer bay area. If you
require more thorough cleaning, contact your local Authorized CAS Dealer for service. If you
attempt to effect cleaning of other printer parts yourself, you risk damage to components or even
electrical shock regardless of the scale’s ON/OFF status.
4)
The thermal print head also requires cleaning. It is recommended to clean the thermal print head
every time you replace the label roll. You can clean the thermal print head with a cotton swab
dipped in either a mild soap solution or isopropyl alcohol.
14
3 Proper Operation
3.5 Power Outlet Requirements
The LP-2 is designed to be used almost anywhere in the world! Like the many appliances of today,
the LP-2 is designed with an automatically switching power supply. This allows operation when
connected to an AC source from 85V to 240V at 50/60Hz with 5% tolerance.
Remember: a switching power supply does not imply that bad, noisy, or improperly wired power
lines will be problem free. With that in mind, please make sure that the power lines used for the LP2 are dedicated lines with no high-noise devices (such as compressors, motors, etc) running on it.
Also, make sure that the wiring to the electrical socket is correct. If you are uncertain as to the
state of your business’ electrical lines, please contact a certified electrician.
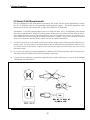
1)
Once you are sure as to the safety of the electrical line, make sure to ONLY plug the scale into a 3prong outlet. The third prong is a safety ground and an electrician should properly wire this if it is
not correct or if you are unsure. Failure to this CAN result in electrical shock from use of this or any
electronic scale.
2)
Do not use any 3-prong to 2-prong adapters or break-off the third prong from the LP-2 power cord.
The third prong is necessary and must be properly connected.
3)
If you have any problems or questions regarding this matter, make sure to consult an Authorized
CAS Dealer or an electrician.
15
3 Proper Operation
Note: Be sure to check the LP-2’s serial number plate on the back of the scale for power specifications.
16
4 Nomenclature
4 Nomenclature
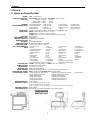
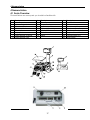
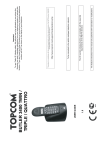
4.1 Scale Overview
Pictured Below are some parts you should be familiar with
#
1
2
3
4
5
6
7
8
Description
Advertisement Insert, rear
Wireless Bridge Connector
RS-232C 25 Pin Connector
RS-232C 9 Pin Connector
Ethernet Connector
Display Column
Display Window, customer
Display Window, user
#
9
10
11
12
13
14
15
Description
Fuse Cap
Gauge, Leveling
Keyboard, Numeric
Keyboard, Speed Keys
Leveling Feet
Platform
Platter
17
#
16
17
18
19
20
21
22
23
Description
Power Switch
Printer
Serial Number Plate
Side Access Door, Com port
Side Access Door, printer
Template Sheet, Numeric
Template Sheet, PLU
Power Switch
4 Nomenclature
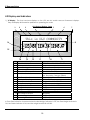
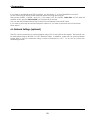
4.2 Display and Indicators
1) VF Display: The front and rear displays on the LP-2 are dot matrix vacuum fluorescent displays.
They will display all information pertinent to operating the scale.
LP-2 Display Window: Sales
1
III
2
4
5
6
7
<REG> Auto PrePack Shift Ride 12:12:00 PM
This is PLU COMMODITY
WEIGHT
16
15
3
lb
UNIT $/
TOTAL PRICE $
lb
8
ZERO ◀
STABLE ○
NET ◀
CAPACITY:
14
13
0~30 lb x 0.01 lb / 30~60 lb x 0.02 lb, e=d=0.01 lb, 0.02 lb
0~15 kg x 0.005 kg / 15~30 kg x 0.01 kg, e=d=5g, 10g
12
11
#
1
2
3
4
5
6
Description
Mode indicator
Print Mode indicator
Auto Clearing status indicator
Speed key Shift status indicator
Override & Discount Status
Multi-function indicator
7
8
9
.10
11
12
13
14
15
16
17
PLU Description line
Total price heading
Total price indicator
Unit price heading
Unit price indicator
Weight indicator
Weight heading
Negative weight indicator
Net-Weight indicator
Stable weight indicator
Zero weight indicator
10
9
Values
REG, RPK, MGR, ADD, NET1, STR2,
Auto
PrePack, Save, (Blank)
Shift, (Blank)
Ride, DISC, Disc,FSP)
Time, date, scale #, department #,
Alt, Temporary Changes, (Blank)
First non-blank line of PLU commodity
TOTAL PRICE and money symbol
7 digits USA: 0.00~9999.99
UNIT, money and weigh symbols
6 digits USA: 0.00~999.99
5 digits
WEIGHT and weigh symbol
-, (Blank)
◀, (Blank)
○, (Blank)
◀, (Blank)
A Gross Zero indication is reached when the Net-Weight indicator is OFF, the Zero-Weight indicator is
ON, the Stable indicator is ON, and the weight reads 0.00 or 0.000.
18
4 Nomenclature
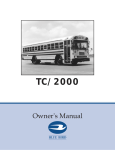
4.3 Printer
1) Pictured below are important printer components and parts that you should be familiar with.
#
1
2
3
4
5
6
Description
Label/Paper Roll
Label Roll Spool
Lock-Down Tab
Paper Cutter
Peel-Off Bar
Pick-Up Spool Assembly
#
7
8
9
10
11
12
Description
Pin, label roll
Platen
Pressure plate & width adjuster
Release Lever, TPH
Roller, return
Roller, width-adjusting
#
13
14
15
16
17
Description
Sensor Assembly, Gap
Sensor Assembly, Peel-Off
Shaft, Pick-Up Motor
Side Access Door, printer
Thermal Print Head
To clean the Thermal Print Head, turn the scale OFF. Open the printer’s side-access door and release
the print head using the release lever. Use a clean cloth, moistened with a non-abrasive cleaning
solution to gently clean the underside of the printhead, NEVER insert a metal object such as a
screwdriver or knife under the printhead.
19
4 Nomenclature
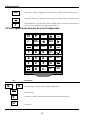
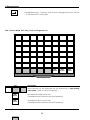
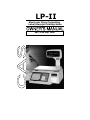
4.4 The Sales Mode Numeric Key Pad Configuration ( USA )
ZER
TARE
OVERRID
DATE
TIME
ON
OFF
RETURN
AUTO
MANUAL
PRE-PACK
SAV
DEPT
1/4
1/2
lb
kg
FOR
VOI
7
8
9
PLU
SHIFT
ADD
4
5
6
MENU
ST
TTL
1
2
3
X
FEED
00
.
0
C
ALT
PRINT
Key
0
~
Description
9
Numeric keys. Used to enter pricing, qty, count, tare, etc.
00
.
Double zero key.
C
Clear key. Used to clear erroneous entries and error conditions. This key can
use to stop printing of label.
ZER
Re-Zero key. Use to remove small variations in the scale’s zero.
20
4 Nomenclature
TARE
Tare key. Use to manually enter and remove tare weights.
OVERRID
Override key. For temporary price change entry.
In REG, requires a level 2 password. In MGR, RPK no password needed.
DATE
TIME
Date & Time key. Toggles the display between time, date, scale number,
department number, and clerk name. Also does temporary date changes.
In REG, requires a level 2 password. In MGR, RPK no password needed.
Description
Key
ON
OFF
ON / OFF key. This key turns the display on or off; however, the rest of the
scale remains powered. Also does temporary DATE Print Inhibit change
Return key. Used to credit sales for erroneous transactions or returns.
In REG, requires a level 2 password. In MGR, RPK no password needed.
AUTO
MANUAL
PRE-PACK
SAVE
AUTO/MANUAL key. Toggles between Auto-print mode and Manual mode.
Pre-Pack key. Used to enter Pre-Packaging mode in which the scale Autoprints for every transaction and prevents the auto clearing of data.
Save key. Save mode prevents the auto clearing of any called-up data like
tare weight, PLU pricing, etc.
DEPT
Department key. For temporarily selecting PLUs from other departments.
In REG, requires a level 2 password. In MGR, RPK no password needed.
1/4
1/4 pound key. In lb mode this key is used to multiply unit prices by 4.
1/2
1/2 pound key. In lb mode this key is used to multiply unit prices by 2.
Lb
kg
lb/kg key. Use this key to switch from pound to metric weighing.
FOR
For key. Use this key for by-count pricing: 3 @ 3 FOR $1.00.
between the QTY, PIECE, and PRICE fields of by-count picing.
VOID
Void key. To remove erroneous sales from ADD-Up or Receipt sales only.
PLU
SHIFT
ADD
It toggles
PLU and SHIFT key. When you type a PLU number and press this key, it callsup that PLU. Simply pressing the key will change the PLU shift status.
ADD-Up key. This key when used in conjunction with ST/TL key allows you
print a customer-total label as well as individual transaction labels.
21
4 Nomenclature
MENU
MENU key. This key toggles from Main menu to <REG><MGR><RPK> mode.
ST
TTL
Subtotal / Total key. Used with the ADD key in order to print customer-totals.
X
Multi-Label key. Use this key to print multiple sales of the same transaction &
is also used for selecting the displayed currency.
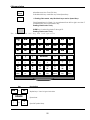
4.5 The Program Mode Numeric Key Pad Configuration
O
P
COPY
▲
PAGE
UP
L
BACK
SPACE
◀
SAVE
▶
INSERT
OVER
DELETE
PASTE
▼
PAGE
DOWN
7
8
9
SHIFT
4
5
6
ESC
HELP
1
2
3
TEST
LABEL
FEED
00
0
C
ALT
ENTER
.
Key
0
~
00
.
C
COPY
Description
9
Numeric keys. Used to enter programming data.
Decimal key.
Clear key. Used to clear erroneous entries and error conditions
Copy key.
22
4 Nomenclature
▲
▼
Up & Down arrow keys. Use to navigate through PGM mode.
◀
▶
Left & Right arrow keys. Use to navigate through PGM mode.
BACK
SPACE
Backspace key. Used to backspace and delete text data.
Key
PAGE
UP
Description
PAGE
DOWN
A ~
Z
Page Up & Page Down keys. Use these to navigate 1 screen at a time.
Alpha keys. Used to type text data.
INSERT
OVER
Insert/overwrite key. Used to toggle between Insert and overwrite modes for
text typing.
SAVE
Save key. At any point in programming, this key saves your current data.
ENTER
DELETE
PASTE
ALT
Enter key. Used as an ENTER key.
Delete key. Used to delete text data.
Paste key.
ALT key. This key is used for special key combination presses.
SHIFT
SHIFT key. This is the Caps Lock key. It controls whether you are typing in
uppercase .
ESC
Escape key. This key toggles between Main menu and <REG> mode. It also
is used to exit programs.
HELP
Help key. When the screen displays the word of “help”, you can see help
message by pressing ‘HELP’key.
TEST
Test key. Used to print test pattern, preview a scrolling message, and print a
PLU verification label.
LABEL
FEED
Label Feed key. Use this key to feed labels or paper through printer.
23
4 Nomenclature
Carriage Return key. This key is used to insert Carriage Returns into the Text
1, 2, & 3 fields of PLU Create/Edit.
The Sales Mode PLU Key Pad Configuration
MISC.
Weighed
Key
MISC.
By-count
MISC.
Non-food
Description
All of the keys on this keyboard can be Speed keys in Non-Floating
Clerk mode. Used to call-up PLUs quickly.
MISC.
Miscellaneous Weighed PLU key.
If disabled this key works like any other Speed key.
MISC.
Miscellaneous By-Count PLU key.
If disabled this key works like any other Speed key.
Weighed
By-Count
24
4 Nomenclature
MISC.
Miscellaneous Non-Food PLU key.
If disabled this key works like any other Speed key.
Non-Food
In Floating Clerk mode, only this blank keys can be Speed Keys.
Clerk-Speed keys for Clerks 1 to 4 numbered from left to right. And last 5
numbered key is the Clerk Select key
Floating Clerk mode 1 Only
CLERK key for selecting clerks 5 through 99.
Floating Clerk mode 1 Only
The Program Mode PLU Key Pad Configuration
Q
W
E
R
T
Y
U
I
A
S
D
F
G
H
J
K
Z
X
C
V
B
N
M
,
,
|
\
{
[
}
]
_
-
+
=
.
.
@
(
#
)
^
&
%
!
$
*
:
;
“
‘
?
/
À
à
È
è
Ì
ì
Ñ
ñ
Ò
ò
Ù
ù
Ü
ü
<
>
CHANGE
PRICE
NEW
PLU
EDIT
PLU
DELETE
PLU
LIST
PLUs
PROGRAM
SPEED KEYS
PRINT
TEST
ASSIGN
SCROLL
Key
A
~
Description
Z
SPACE
,
,
~
SPACE
Alpha keys. Used to type text data.
Space bar.
<
>
Special Symbol keys.
25
4 Nomenclature
CHANGE
PRICE
NEW
PLU
EDIT
PLU
DELETE
PLU
Key
LIST
PLUs
PROGRAM
SPEED KEYS
PRINT
TEST
ASSIGN
SCROLL
PLU Price Change key.
PLU Create key.
PLU Edit key.
PLU Delete key.
Description
PLU Listing key.
Speed Key programming key.
Print test key.
Scrolling message assignment key.
26
5 Quick Set-Up
5 Quick Set-Up
5.1 Installation of the Label Roll
To install the label roll at ANY time you must follow the directions in this section:
1) Press the ON/OFF key and make sure that the display is completely off. Open the printer’s sideaccess panel. As you can see, there is a detailed diagram affixed onto the inside of the sideaccess panel. Use this diagram (or this manual) for future reference on how to properly install the
label roll. (See fig.)
2) Find and remove the Pick-Up Spool assembly and the label-roll Pin. Also, find the Print Head Release
Lever and push it in the direction indicated. The print head will be in the “UP” position. If there were
any labels previously installed please remove all the collected backing paper from the Pick-Up Spool
assembly. The Pick-Up Spool assembly automatically collapses when it is removed from the Pick-Up
shaft. This makes the removal of the backing paper very simple. Also remove the cardboard paper
roll core if there was a label roll previously installed. (See fig.)
27
5 Quick Set-Up
3) Take the new roll of labels and find the ending. Peel-off and discard about one foot (12 inches) of
labels from the backing before installing the roll into the scale. Place the label in the scale as shown
and thread the backing through the appropriate places. (See fig.)
4) Please view the checkpoints on the diagram below as you read these directions to thread the labels.
c Feed the backing paper over the width-adjusting Pressure Shaft lifting the Pressure Plate in order to
place the backing between the two making sure that the width adjustment is as exact as possible
without bending the backing paper.
d Feed the backing paper inside the slot between the Gap sensor assembly making sure that the
labels travel under the Secondary width-adjuster.
Make sure that labels are not pushed all the way to the left on the Peel-Off bar. Leave about ¼ inch
space left of the backing paper
f Feed the backing over the Rubber Roller and under the Print Head being careful not to touch the
underside of the Print Head.
g Continue to feed the backing paper over the Peel-off Bar.
h Continue to feed it under the Return Roller.
i Feed the backing under and around the Pick-Up Shaft.
j Now attach the Pick Up Spool assembly onto the Pick-Up Shaft and turn it slowly counterclockwise in
order to tighten the backing paper.
5) Push the Print Head down in order to lock it back in place. You will feel and hear it lock in place.
Close the printer access panel and press the ON/OFF key. You have completed the label roll
installation. (See fig.)
28
5 Quick Set-Up
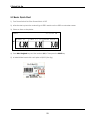
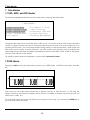
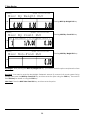
5.2 Basic Quick Start
1) Turn Power Switch ON if the Power Switch is OFF.
2) After the start-up tests the scale will go to ZERO and show the <REG> mode sales screen.
3) Place an item on the platter.
<REG>
WEIGHT lb
12:12:00 PM
UNIT $ / lb
TOTAL PRICE $
◀
○
4) Press Misc Weighed key and the numbers 2,3,3. Then press the PRINT key.
5) A label will be issued with a unit price of $2.33 (See fig.)
29
5 Quick Set-Up
STEP2
STEP1
MAIN MENU
STEP3
1. REG: Sale Mode
2.MGR: Manager Mode
3.RPK: Repack Mode
4.PLU: Program PLUs
1.Change PLU Prices
2.Create PLUs
3.Renumber PLUs
4.Edit PLUs
5.Discount/FSP
6.PLU Management
7.Edit Nutrifacts
8.PLU Speed Keys
5.X: Report
6.Z: Report
7. SET: Settings
1.PLU Sales
1.PLU Sales
2.Misc Sales
2.Misc Sales
3.Group Sales
3.Group Sales
4.Department Sales
4.Department Sales
5.Scale Sales
5.Scale Sales
6.Hourly Sales
6.Hourly Sales
7.Clerk Sales
7.Clerk Sales
8.X1 Report
8.X2 Report
1.PLU Sales
1.PLU Sales
2.Misc Sales
2.Misc Sales
3.Group Sales
3.Group Sales
4.Department Sales
4.Department Sales
5.Scale Sales
5.Scale Sales
6.Hourly Sales
6.Hourly Sales
7.Clerk Sales
7.Clerk Sales
8.Z1 Report
8.Z2 Report
1.Print Inhibiting
2.Sales Messages
3.Scrolling Messages
4.Scrolling Sequence
5.Tax Rates
6.Label Type
7.Adjust Feed Length
8.Origin
9.Receipt
30
STEP1
STEP1
STEP2
STEP3
5 Quick Set-Up
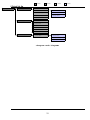
MAIN MENU
8.Store Settings
1.Store Name
2.Security Control
1.Add or Edit Users
3.Department Name
2.List All Users
4.Scale Assignments
3.Security Options
5.Date & Time
9.Global Settings
1.Label Format
2.Discount/FSP
3.Barcode
4.Add-Up TTL Format
5.Misc. PLU Format
6.Printer Fonts
0.Network Management
1.Network Mode
1.Network Setting
2.Clerk Mode Setting
3.Application
<Program mode Diagram>
31
STEP1
6 Programming
6 Programming
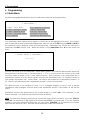
6.1 Main Menu
The following highlighted selections from the Main Menu make up the Program Menu.
< MAIN MENU >
1.REG: Sale Mode
2.MGR: Manager Mode
3.RPK: Repack Mode
4.PLU: Program PLUs
5.X: Report
6.Z: Report & Clear
7.SET: Settings
8.Store Settings
9.Global Settings
0.Network Management
You will require a level 2 password (or higher) to access any of the highlighted functions. If the scale is
new or there are no level 3 passwords programmed, then you can enter 001 and press ENTER or PRINT at
the password screen; otherwise, enter your password here. Remember that if there are ANY level 3
passwords, then 001 will NOT work. When the screen is at the Main Menu Press 8 and the screen will
read:
INS/CAPS
< ENTER LEVEL 2 PASSWORD >
[*******]
The LP-2 can have up to 99 clerks/users. Each clerk is given a 5 character alphanumeric password.
Each password can have any of 4 access levels: 0, 1, 2, or 3. Level 3 access has access to ALL scale
functions; where as levels 0 and 1 have minimal access. Each password is also associated with a
department number (0 to 32), where 0 grants access to all departments and 1 to 32 grants access to
that specific department only. Levels 0 and 1 can only be associated with a department number 1 to
32. Level 3 is only associated with a department access 0. Level 2 can be either.
This allows for user to be assigned to level 1 or 0; managers assigned to level 2 with a specific
department; store managers could be level 2 and department access 0; and owner’s or MIS can be
level 3.
Remember that the only password that you cannot assign to a clerk is 001. This is because it is the
Master Password. You will never see it listed in the List All Users list.
NOTE: The format for entering a password at a password entry screen is as follows: you enter XXYYYYY
where XX is a compulsory 2 digit Operator ID number and YYYYY is your password. If you are Operator
number 5 and have password ALEX22 then you must enter “05ALEX22” at a password entry screen.
Passwords are always in CAPS. The scale will automatically correct for lowercase.
32
6 Programming
6.1.1 RPK: Repack Mode
In Repack mode, the transactions will not be added to the totals when reports are generated. This is
useful when printing duplicate labels or when an item is marked down. They will be different from other
labels in that they will have a letter ‘R’ after the price in the total price field.
6.1.2 Store Settings
Store Settings is used to program many of the scale’s features. The Store Settings menu screen appears
as follows:
< STR: STORE SETTINGS >
1.Store name
2.Security Control
3.Department Names
4.Scale Assignments
5.Date & Time
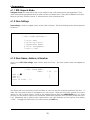
6.1.3 Store Name, Address, & Number
Once at the STR: Store settings menu screen, press the 1 key. The Store name screen will appear as
follows:
INS/CAPS
< STR: STORE NAME >
CHAR:
1 OF
LINE 1:[■
]
LINE 2:[
]
LINE 3:[
]
Store Id Code:[ 0]
50
The display will show each line of text and flash a cursor on the first character position of first line. If
there was any previous data it will appear as it was stored. Using the arrow keys, position the cursor
where you wish to begin typing. Once at the desired position, press the INSERT/OVER key if you want
the text you are about to type to be overwritten (rather than inserted) at the location where the cursor
is at. Remember that in order to get capital letters, the CAPS indicator on the top line must display
“CAPS”. To toggle the CAPS status you need to press the SHIFT key
33
6 Programming
Begin typing using any text or numeric keys. You can press the ▼ arrow key to go to the next line or the
▲ arrow key to go to the previous line. At any time, you may use the INSERT/OVER, SHIFT, text/numeric
keys, or the Arrow keys to modify your text.
Once you are done, press the SAVE key and the scale will store the current data and return to the
previous menu. You can also press ENTER while the cursor is on the last field and the scale will also save
your data and return to the previous menu. At any time you can press the ESC key to quit.
Keep in mind that the Store Data and any other printable data will only print if the label format being
printed supports the data you are trying to print. Most of the embedded formats have the ability to
print the Store Data. Also, keep in mind that the Print Inhibit feature also controls whether or not data
prints on a label. Whenever there seems to be some data that you feel should be printing but isn’t,
check the following 3 things:
1
Make sure that the field in question contains data. For example, if a PLU
name is not printing make sure that you programmed the PLU name for
the PLU in question.
2
Make sure that the Print Inhibit for that data item is not on. For example,
if the Print Inhibit for PLU Name is set, then no PLUs will print the PLU name.
3
Make sure that the label format you are using has a field that you are
trying to print. For example, label format 87 has a PLU Name field and it is
big enough to print any PLU name. If the field is not big enough to hold
the desired information, it will print as a solid black box on the label.
6.1.4 Security Control
This is where you can add or edit clerk data, passwords, etc. You can also list all clerks in case you have
lost track of a clerk. Once at the STR: Store Settings menu screen, press the 2 key. The Security Control
screen will appear as follows:
< STR: SECURITY CONTROL >
1.Add or Edit Users
2.List All Users
3.Security Option
Once at the STR: Security Control screen, press the 1 key to add new users or edit existing ones, press
the
2 key to list current users or the 3 key to allow or disallow passwords.
INS/CAPS
< STR: ADD OR EDIT USER >
CHAR:
1 OF
Clerk (1~99): #[ 1]
Name: [JOHN DOE■
]
Password: [12345]
Level (0~3): [3](0=Inactive)
Dept. (0~32): [0](0=All)
34
9
6 Programming
Remember that you cannot see passwords that are higher or equal level as your password, except for
level 3, which can see ALL passwords. So, you should always use a level 3 password when you wish to
edit all or any existing clerk. All level 3 passwords are implicitly set to Dept. = 0, therefore all level 3
passwords can only be set to Dept. = 0. Level 2 can be assigned to either a specific department, or to
Dept. = 0. Levels 1 and 0 CANNOT be assigned a Dept. = 0. Any clerk assigned to Dept. = 0 will have
access to any and all departments; however, any clerk with a non-zero department assignment, will
only be able to access that department which they are assigned to. This prevents cross-departmental
access when it is desired, and allows the assignment of department managers and store manager
passwords.
To make a Store Manager password, simply assign that clerk to level 2 and Dept = 0. To make a
Department Manager, simply assign that clerk to level 2 and department number = to the department
you wish for that clerk to manage. Employees that are only to use the scale in REG mode must be
assigned level 1 and a department assignment equal to the department that they shall work in. Level 0
is reserved for future use. Refer to next page for the various password level requirements of the different
screens and functions.
Pressing the SAVE key at any point or the ENTER key while the cursor is on the last field will save the
current clerk and move on to the next available clerk number. Press the ESC key to exit Security
Control.
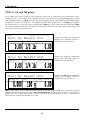
Once at the STR: Security Control screen, press the 2 key to list all clerks.
< USER LIST >
ID #
Name
Password Level Dept
1
JOHN DOE
12345
3
0
NO MORE USERS
You can use the Page Up and Page Down keys or the Arrow keys to navigate up and down the list. Be
careful when you use this feature. If you do this while others may be looking, they can see the
passwords for any user. Press ESC to exit this feature.
Screen name or Function
REG mode
PLU programming mode
PLU Delete
MGR mode
RPK mode
SET mode
X mode
Z mode
Required Password level
No password protection.
2
3
2
2
2
2
2
35
6 Programming
STR Settings
Global Settings
Network Management
Quick Program Keys
2
2
3
Same as respective menu’s requirements.
Key name
RETURN key in REG mode
RETURN key in MGR mode
OVERRIDE key in REG mode
OVERRIDE key in MGR mode
VOID key in REG mode
VOID key in MGR mode
DEPT key in REG mode
DEPT key in MGR mode
ALT + DATE/TIME key for temporarily date change in REG mode
ALT + DATE/TIME key for temporarily date change in MGR mode
ALT + ON/OFF key for temporary Print Inhibit of dates (REG)
ALT + ON/OFF key for temporary Print Inhibit of dates (MGR)
ALT + PLU/SHIFT key for temporary change of PLU data (REG)
ALT + PLU/SHIFT key for temporary change of PLU data (MGR)
Required Password level
2
No password protection.
2
No password protection.
No password protection.
No password protection.
2
No password protection.
2
No password protection.
2
No password protection.
2
No password protection.
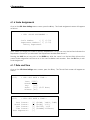
6.1.5 Department Names
Once at the STR: Store Settings menu screen, press the 3 key. The Department Name screen will appear
as follows:
INS/CAPS
< STR: DEPARTMENT NAME >
Dept. Number:[ 1] (1~32)
Dept. Name :[Bakery Department■
]
This is where you can name your 32 departments. It is best to type the name of the department and
then the word “Department” so as to make things clear when and if you print department data.
Pressing the SAVE key at any point or the ENTER key while the cursor is on the last field will save the
current department and move on to the next available department number. Press ESC to finish.
36
6 Programming
6.1.6 Scale Assignments
Once at the STR: Store Settings menu screen, press the 4 key. The Scale Assignment screen will appear
as follows:
< STR: SCALE ASSIGNMENT >
Scale Number
:[ 1] (1~32)
Department Number:[ 1] (1~32)
Bakery Department
This is where you assign your scales to specific departments. As you can see, the last line indicates the
Department name that you selected in the Department Number field above it
Pressing the SAVE key at any point or the ENTER key while the cursor is on the last field will save the
current Scale Assignment and move on to the next available scale number. Press the ESC key to exit
Scale Assignment.
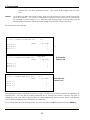
6.1.7 Date and Time
Once at the STR: Store Settings menu screen, press the 5 key. The Time & Date screen will appear as
follows:
(1/2)
NUMERIC
< STR: SET DATE & TIME >
Year: [2005]
Month: [ 3]
Day:
[20]
Hour:
[12] (0-23 Hour)
Minute: [40]
(2/2)
NUMERIC
< STR: SET DATE & TIME >
Date Format:
Month Format:
Year Format:
Time Format:
Data Separator:
[1]
[1]
[1]
[1]
[-]
(0=DMY, 1=MDY, 2=MD)
(0=DEC, 1=12)
(0=1999, 1=99
(0=AMPM,1=24hour)
37
6 Programming
Pressing the SAVE key at any point or the ENTER key while the cursor is on the last field will save the
current screen contents and exit. Press the ESC key to exit Time and Date.
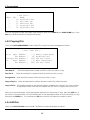
6.2 Settings
When the screen is at the Main Menu Press 7, enter a level 2 or higher password when prompted, and
then the screen will read:
< SET: SETTINGS >
1.Print Inhibiting
2.Sales Messages
3.Scrolling Messages
4.Scrolling Sequence
5.Tax Rates
6.Label Type
7.Adjust Feed Length
8.Origin
9.Receipt
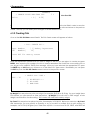
6.2.1 Print Inhibiting
Once at the SET: Settings menu screen, press the 1 key. The Print Inhibiting screen will appear as follows:
OVR/CAPS
( 1/ 8)< SET: PRINT INHIBITING >
ALTERNATE CURRENCY
AMOUNT SAVED
BARCODES
CENTURY
COMMODITY NAME
(Y/N):
(Y/N):
(Y/N):
(Y/N):
(Y/N):
/ENG
[N]
[N]
[N]
[N]
[N]
The 2 numbers at top right (1/8) indicate the number of pages or screens. The number to the left of the
slash is the current page or screen number and the number to the right of the slash indicates the total
number of pages or screens. You can use the Page Up and Page Down keys to navigate from page to
page, or you can use the Arrow or Enter keys to go through each page 1 line at a time.
If you set any of the items to Y, then they will NOT print on any labels regardless of the label format.
These items are listed in alphabetical order.
Remember that you can press SAVE at any time or the ENTER key while the cursor is on the last field, in
order to save the current screen contents and exit. The ESC key exits and returns to the previous menu.
38
6 Programming
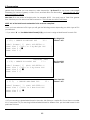
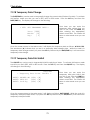
6.2.2 Sales Messages
Once at the SET: Settings menu screen, press the 2 key. The Sales Message screen will appear as
follows:
INS/CAPS
/ENG
< SET: SALES MESSAGE >
CHAR:
1 OF
40
Number :[ 1] (1~32)
Message :[■
]
You can link these sales messages to PLUs. They can be printed on PLU labels so long as the format that
you use contains a Sales Message field. This is a great tool for advertising and cross-marketing products.
Each sales message can be up to 40 characters long.
Remember that you can press SAVE at any time or the ENTER key while the cursor is on the last field, in
order to save the current screen contents and move on to the next available message number. The
ESC key exits and returns to the previous menu.
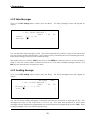
6.2.3 Scrolling Message
Once at the SET: Settings menu screen, press the 3 key. The Scroll Message screen will appear as
follows:
INS/CAPS
/ENG
< SET: SCROLL MESSAGE >
CHAR:
1 OF
80
Message No.:[ 1] (1~32)
Text:[ ■
]
You can use these scrolling messages to advertise or inform your customers of anything you wish. The
messages will come on the scale when it is not in use. The order and sequence in which these
messages can be displayed is programmed in the Scroll Sequence programming (section 6.2.4). Each
scrolling message can be up to 80 characters long.
39
6 Programming
Remember that you can press SAVE at any time or the ENTER key while the cursor is on the last field, in
order to save the current screen contents and move on to the next available message number. The
ESC key exits and returns to the previous menu
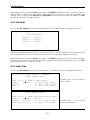
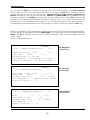
6.2.4 Scrolling Sequence
Once at the SET: Settings menu screen, press the 4 key. The Scroll Sequence screen will appear as
follows:
(1/4)
NUMERIC
< SET: SCROLL SEQUENCE >
Scale Number: (1-32)
Scroll Delay Time:
First Message Number
First Message Effect
(Use the TEST key
: [ 1]
[
0] seconds
(0~32) : [ 1]
(0~3) :
[0]
to test.)
For every scale, you can choose any 4 of these 32 scroll messages to be displayed on that scale. Each
of the 4 can be displayed with different special effects. The messages will come on the scale when it is
not in use.
The Scroll Delay Time is the number of seconds that the scale needs to be inactive for the scrolling
sequence to begin. Note, if the scroll time is set to 0, no messages will scroll.
The Scroll Effect is the special effects code that determines which special effect to use for that
message. Effect 0 simply scrolls a message across the screen from right to left. Effect 1 is the same as
effect 0 except that the message also flashes as it scrolls. Effects 2 and 3 will only properly work with 12
character messages. Effect 2 is a curtain effect that scrolls the message from right to left and left to
right simultaneously and when the messages intersect at the center, they remain displayed statically for
a few seconds. Effect 3 is the same as 2 except that the message will flash for s few seconds when it
gets to the center.
To see a message as it will appear when it scrolls, simply press the TEST key while the cursor is on
message field 1 through 4. The last screen appears as follows:
(4/4)
< SET: SCROLL SEQUENCE >
Fourth Message Number (0~32): [ 0]
Fourth Message Effect (0~3) :
[0]
(Use the TEST key to test.)
40
6 Programming
Remember that you can press SAVE at any time or the ENTER key while the cursor is on the last field on
the last page, in order to save the current screen contents and move on to the next available scale
number. You can also use the Page Up and Page Down keys to navigate through the pages. The ESC
key exits and returns to the previous menu.
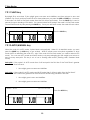
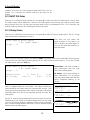
6.2.5 Tax Rates
Once at the SET: Settings menu screen, press the 5 key. The Tax Rates screen will appear as follows:
< SET: TAX RATES >
Rate 1: [ 0.000] %
Rate 2: [ 0.000] %
Rate 3: [ 0.000] %
There are 3 different tax rates that you can use on any PLU. You can program the tax rate here and
when you program a PLU, you can select which tax rate you want to be charged on that PLU.
Remember that you can press SAVE at any time or the ENTER key while the cursor is on the last field on
the last page, in order to save the current screen contents and return to the previous menu. The ESC
key exits and returns to the previous menu.
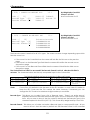
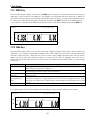
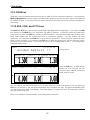
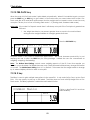
6.2.6 Label Type
Once at the SET: Settings menu screen, press the 6 key. The Label Type screen will appear as follows:
Press ALT for Auto Setup
NUMERIC
< SET: LABEL TYPE >
Type (0-2):[0] 60mm X 41mm Labels
Width
(25-80): [60] mm= 2.244 inches
Length
41 mm= 1.614 inches
Gap
3 mm= 0.118 inches
For Label Type = 0, you will always
see this screen.
< SET: LABEL TYPE >
Type (0-2):[1] 60mm Continuous Strip Label
Width
(25-80): [60] mm
Length
(0-170): [ 41] mm= 1.614 inches
Rcpt Feed (0-170): [ 15] mm= 0.118 inches
41
For Label Type = 1 or 2, you will
always see this screen.
6 Programming
Label Type 0 is the standard fixed sized, gap label media with liner backing paper. The Length value is
the length of the label itself. To capture the Length value, press the ALT key twice. The scale will feed
out several labels and automatically detect the length and the gap size. Please make sure that you
have standard “gapped” labels in the printer whenever you execute this procedure.
Label Type 1 is continuous strip label media with liner backing paper. The Feed value determines the
amount of labels/paper to feed when you press the FEED key. The Feed value can be 0 mm to 170 mm.
Label Type 2 is continuous strip label media or receipt thermal paper both without liner backing paper.
Type to works the same as Type 1 except that the pick-up motor will not operate as there should be no
liner to pick-up.
The Width value is the width of the label or paper and NOT the width of the liner backing paper. It must
be specified in millimeters. If this value is incorrect then some label formats may print properly but no
receipts will print properly. Please make sure to set this value properly. The Width can be from 20 mm to
80 mm.
The Rcpt Feed value is the amount of blank space to feed after each receipt or label is printed. This is
done so that the paper cut can tear the receipt or label properly. The Rcpt Feed can be from 0 mm to
170 mm. The Rcpt Feed is only for type 1 or 2.( recommendation Rcpt Feed is 15mm )
Remember that you can press SAVE at any time or the ENTER key while the cursor is on the last field in
order to save the current screen contents and return to the previous menu. The ESC key exits and
returns to the previous menu.
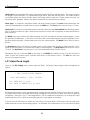
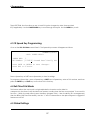
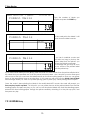
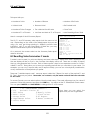
6.2.7 Adjust Feed Length
Once at the SET: Settings menu screen, press the 7 key. The Adjust Feed Length screen will appear as
follows:
NUMERIC
< SET: ADJUST FEED LENGTH >
Feed Adjustment :[100] (0-200)
Use FEED key to test.
Use SAVE or ENTER key to save
The Feed Adjustment is a fine adjustment that controls the print position from top-to-bottom on a label.
The higher the number, the higher the printing will appear. The lower the number, the lower the printing
will appear. The norm is 100. 1 Feed Adjustment is 1/8 of a millimeter, therefore if you change the Feed
Adjustment from 100 to 108, then everything will print 1 mm higher on the label.
You can also use this feature to make sure that when you print a label, it will come out far enough to be
easily removed from the liner backing paper. For example, if the label feeds out too far then the labels
42
6 Programming
may fall-off after they print. If the label does not feed out far enough, then the labels may need to be
pulled-on after they print.
Another reason to change this value is when you use labels with pre-printed lines and boxes. In this
case, you may need to change the Feed Adjust so that fields are printed in the right places.
You may also find that changing label stock, type, or formats may require you to fine adjust the Feed
Adjust setting. However, you will find that when you use the same label stock, you will get very similar
results. Make sure to always use CAS Certified media. Using poor quality media whether it be thermal
paper or labels, may damage your LP-2’s thermal print head and void the warrantee. Consult you CAS
Authorized dealers about where you can purchase the media you require. Also, they can help you with
custom labels and customs formats.
Remember that you can press SAVE or ENTER at any time in order to save the current screen contents
and return to the previous menu. The ESC key exits and returns to the previous menu.
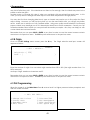
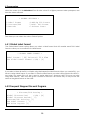
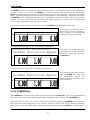
6.2.8 Origin
Once at the SET: Settings menu screen, press the 8 key. The Origin selection and input screen will
appear as follows:
NUMERIC
< SET : ORIGIN >
Origin No.:[ 256]
Text : [
]
Enter the number of origin. You can select origin number from 256 to 400. (the origin number from 1 to
255 is reserved.)
And input Origin. Maximum characters are 25.
Remember that you can press SAVE or ENTER at any time in order to save the current screen contents
and return to the previous menu. The ESC key exits and returns to the previous menu.
6.3 PLU Programming
When the screen is at the Main Menu Press 4, enter a level 2 or higher password when prompted, and
then the screen will read:
< PLU: PLU DATA >
1.Change PLU Prices
2.Create PLUs
3.Renumber PLUs
4.Edit PLUs
5.Discount/FSP
6.PLU Management
7.Edit Nutrifacts
8.PLU Speed Keys
43
6 Programming
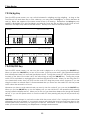
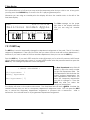
6.3.1 PLU Price Change
Once at the PLU: PLU Data screen Press 1. The PLU Price Change screen will appear as follows:
NUMERIC
< PLU: CHANGE PRICE PLU >
Dept. Number:
PLU
Number:[
[ 1] Bakery Department
1] Yellow Sheet Cake
Press ALT for memory status
Enter the Department number of the PLU you wish to change the price of and press ENTER. Next, enter
the PLU number you wish to change the price of; remember that it MUST be an existing PLU or you will
get a PLU not found error message. After you have selected the appropriate PLU, press the ENTER key
and you will move on to one of the various Price Change screens. Remember, you can press the ESC
key from the PLU: PLU Price Change screen to return to the previous screen.
The Price change screens differ for the different PLU types. Here are the 3 possible screens:
NUMERIC
< CHANGE PRICE BY-WEIGHT PLU
1 >
Price
Sale Weight
Sale Price
:
:
:
[
[
1.00]/kg
[ 0.000] kg
0.00]/kg
NUMERIC
< CHANGE PRICE BY-COUNT PLU
1 >
By-Count PLU
Net Weight
Count
Price
Sale Count
Sale Price
ByWeight PLU
: [ 2]
: [ 3] pcs
:
3 FOR $[
: [ 20] pcs
:
3 FOR $[
(g)
1.00]
0.90]
44
By Count PLU
6 Programming
NUMERIC
< CHANGE PRICE NON-FOOD PLU
3 >
Non-Food PLU
Price
: $[
4.56]
You can press SAVE at any time or the ENTER key while the cursor is on the last field in order to save the
current screen contents and return to the previous menu. The ESC key exits and returns to the previous
screen. This way you can effect price changes to several different PLUs.
6.3.2 Creating PLUs
Once at the PLU: PLU Data screen Press 2. The PLU Create screen will appear as follows:
< PLU: CREATE PLU >
Dept. Number:
PLU
Number:[
[ 1] Bakery Department
10]
Press ALT for memory status
Enter the Department number that you wish to assign to the PLU you are about to create and press
ENTER. Next, enter the PLU number you wish to create; remember that it MUST be a non-existing PLU or
you will get a PLU ALREADY EXISTS error message. After you have selected the appropriate PLU, press
the ENTER key or SAVE and you will move on to the Select PLU Type screen. Remember, you can press
the ESC key from the PLU: PLU Create screen to return to the previous screen.
< SELECT PLU TYPE >
PLU : 10
1. BY-WEIGHT <-2. BY-COUNT
3. NON-FOOD
By-Weight PLUs are priced as price-per-weight; for example, $3.99/lb or $1.99/kg. You must weigh these
PLUs before you can execute a sales transaction. By-Weight PLUs can have a TARE weight, a Sale
Weight, and Sale Price for discounting. This includes ALL food that is sold by weight.
By-Count PLUs are priced as pieces-for-price; for example, 3 FOR $3.99. Before you execute a By-Count
sale transaction you may specify a Quantity so as to be able to multiply and do split pricing; for
example, 6 AT 3 FOR $1.00 gives you a Total Price of $2.00. You must have a QTY, PIECE, and PRICE all
45
6 Programming
greater than 0 before you can execute a sales transaction. By-Count PLUs can have a Net-Weight
Statement (in ounces or grams), a Sale Count, and Sale Price for discounting. This includes ALL food
that is NOT sold by weight.
Non-Food PLUs are priced a Straight-price; for example, $3.99. You must have a Total Price greater
than 0 before you can execute a sales transaction. This includes ALL NON-FOOD items.
NOTE: ALL of the label formats embedded in the scale are compliant.
Once you have selected a PLU type you will get the following screen depending on which type of PLU
you selected:
* If you select ‘N’ on Use Global Label Format (Y/N), you have to assign a label format for each PLU.
By-Weight PLU
Screen 1 of 8
INS/CAPS /ENG
( 1/8) < CREATE BY-WEIGHT PLU
10 >
Label Format:[ 1] (CAS) LST-8000****
Name Line 1 :[This is a By-Weight PLU
Name Line 2 :[■
Name Line 3 :[
]
]
]
INS/CAPS /ENG
( 1/8) < CREATE BY-COUNT PLU
11 >
By-Count PLU
Screen 1 of 8
Label Format:[ 1] (CAS) LST-8000****
* Name Line 1 :[This is a By-Count PLU
]
]
]
Name Line 2 :[ ■
Name Line 3 :[
( 1/ 5)
INS/CAPS
< CREATE NON-FOOD PLU
Label Format:[ 1] (CAS) LST-8000****
Name Line 1 :[This is a Non-Food PLU
Name Line 2 :[ ■
Name Line 3 :[
Non-Food PLU
Screen 1 of 5.
12 >
]
]
]
****IF you are using a global label format in the scale, this field won’t matter. But it must have a number
in it. It cannot be 0. If you are using individual label formats for different PLUs, put the label format for this
particular PLU here.
46
6 Programming
You can press the SAVE key at anytime to save the current PLU data and return to the PLU: Create PLU
screen. After you enter the Label Format number, you can press the TEST key at any time to get a
preview print-out of what the PLU will look like. See Appendix B for Label Format suggestions and
samples. Remember, you can use the Arrow keys, PAGE UP, and PAGE DOWN keys to navigate through
the pages and fields. The ENTER key will also move you from field to field. Pressing ESC at anytime will
prompt you with the message ABANDON CHANGES TO LAST PLU (Y/N)? If you press Y then the scale will
disregard ALL of the current PLU’s data which you have entered and return to the previous menu. If
you press N then the scale will return to whichever page you were on when you pressed the ESC key.
The first 15 characters of the Label Format’s name appear to the right of the Label Format number field.
You can get to the next page by pressing PAGE DOWN. You can also get to the next page by pressing
ENTER or the
key while the cursor is on the last field of the page. This is true for any page of the PLU
Create screens.
The next section looks like this:
NUMERIC
( 2/8) < CREATE BY-WEIGHT PLU
10 >
By-Weight PLU
Screen 2 of 8
Weight Unit (0-kg 1-lb)
:[ 1]
Group Code
(0-99)
: [ 0]
Tax Rate Code: [0] No Tax
Sales Message : [ 0] Message not found
Country of Origin : [ 0] Not assigned
( 2/8) < CREATE BY-COUNT PLU
NUMERIC
11 >
By-Count PLU
Screen 2 of 8.
Weight Unit (0-kg 1-lb)
:[ 1]
Group Code
(0-99)
: [ 0]
Tax Rate Code (0-3)
: [1] 7.2500%
Sales Message : [ 1] SALE on frozen shrimp
Country of Origin : [ 0]
NUMERIC
( 2/ 5) < CREATE NON-FOOD PLU
12 >
Price
: $
Group Code (0-99)
Tax Rate Code (0-3)
Sales Message : [ 0]
Country of Origin : [
[
1.56]
: [ 0]
: [3] 9.0000%
0]
47
Non-Food PLU
Screen 2 of 5
6 Programming
Group Code: This is a number you can assign to each PLU. It can be from 0 to 99. You can
use this to group PLUs together or as a sub-department grouping.
Tax Rate Code:
For ALL PLUs, this is the Tax Rate (1, 2, or 3) which will be charged by this PLU. If it is 0
then no tax will be charged.
Sales Message:
For ALL PLUs, this is where you can link one of 32 sales messages to a PLU. When you
select a sales message, the first 17 characters of that message are shown on the
screen to the right of the Sales Message number field.
Country of Origin Code:
Price:
For ALL PLUs, this is a 3 digit code that can be used to print a Country of Origin
Name on a Label (assuming the label has been formatted properly). To see
the values for Country Codes, go to Appendix A.
For Non-Food PLUs, this is the Total Price of that PLU.
The next section looks like this:
Press TEST to weigh TARE.
( 3/8) < CREATE BY-WEIGHT PLU
Tare Weight
Price
Sale Weight
Sale Price
:
:
:
:
$[
:
:
$[
:
$[
By-Weight PLU
Screen 3 of 8.
-[ 0.00] kg
1.00] /kg
[10.000] kg
0.90] /kg
$[
( 3/8) < CREATE BY-COUNT PLU
Net Weight(oz)
Count
Price
3 FOR
Sale Count
Sale Price 3 FOR
10 >
[
[
[
11 >
39]
3] pcs
1.00]
10] pcs
0.90]
( 3/ 5) < CREATE NON-FOOD PLU
By-Count PLU
Screen 3 of 8.
12 >
UPC Code :[
12]
Barcode Type :[0]
Barcode Format:[1]
Non-Food PLU
Screen 3 of 5.
See page 52.
48
6 Programming
Tare Weight:
(For By-Weight PLUs only) This is the weight of the container that this PLU will be
packaged in. You can enter the tare weight manually or by placing a container on the
platter. While the cursor is on the Tare Weight field, place the tare item on the platter
making sure that the weight in the Weight field is zero, and then press the ALT key. If the
weight in the Weight field is not zero, press the Clear key while the cursor is on the Tare
Weight field.
Net Weight:
(For By-Count PLUs only) This is the Net Weight Statement in pound-ounce or grams that is
required for food PLUs that are not sold by weight.
Price:
(For By-Weight PLUs only) This is the price per pound or price per kilogram for the PLU. The
Weighing Unit field determines whether this is priced as a lb or kg PLU.
Count: (For By-Count PLUs only) this determines the number of pieces sold for a given price. See ByCount Price.
Price:
(For By-Count PLUs only) this determines the pricing structure. If Count = 3 and Price = 1.00 then
the pricing structure is 3 FOR $1.00.
Sale Weight & Sale Price:
(For By-Weight PLUs only) This is the price per pound or price per kilogram for
the PLU. If Weigh Unit = 1 (kg), Price = 2.00, Sale Weight = 10.000 kg, and the
Sale Price = $1.00, then whenever the Net Weight is greater than or equal to
10.000 kg this PLU is sold at $1.00-per-pound.
Sale Count & Sale Price:
For By-Count PLUs, this determines the sale pricing structure. If Sale Count = 9,
Sale Price = 1.00, Count = 3, and Price = 2.00, then whenever you sell 9 or
more pieces the price structure is 3 FOR $1.00 as opposed to 3 FOR $2.00.
The next section looks like this:
(4/8) < CREATE BY-WEIGHT PLU
Discount/FSP Select:
Discount/FSP Period:
Discount/FSP Data:
NUMERIC
10 >
[0]
[ 0]
[ 0]
Disc/FSP Select: Enter 0 for no discount, enter 1 for promotional discount, enter 2 for Frequent Shopper
Program.
Discount/FSP Period: Enter the NUMBER of the discount or FSP period which applies to this PLU.
Disc/FSP Data: Enter the NUMBER of the discount data entry applying to this PLU.
The next section looks like this:
( 5/8) < CREATE BY-WEIGHT PLU
Sell By Date : [ 20] days
Cook By Date : [ 20] days
NUMERIC
10 >
49
6 Programming
By-Weight PLU
Screen 5 of 8
( 5/8) < CREATE BY-COUNT PLU
11 >
By-Count PLUs
Screen 5 of 8
Sell By Date : [ 20] days
Cook By Date : [ 20] days
Sell/Cook By Dates:
These are expiration dates that are numbered in days and added to the Packed
on date in order to be calculated. The packed on date is day 1.
Remember, at any time during PLU Creation, if you press the SAVE key you will save the current PLU’s
contents and return to the Department/PLU number entry screen.
Don’t forget that there are more screens left to fully complete PLU programming. The next screens add
UPC barcode numbers, Ingredients text, optional text, NutriFacts, and Frequent Shopper Discount data.
So if you are not interested in programming any of these features into your PLU’s, then you can stop
here by pressing the SAVE key and moving on to programming the next PLU.
If you do wish program UPC barcode numbers, Ingredients text, optional text, NutriFacts and /or Frquent
Shopper data, then you must proceed to the next screens of PLU programming located on the next
page. If not, press SAVE to use only the data you have already entered.
The next section looks like this:
( 6/8) < CREATE BY-WEIGHT PLU
10 >
Code: [
10]
Barcode Type :[0]
Barcode Format:[1]
50
By-Weight & By-Count PLU
Screen 6 of 8 and
Non-Food Screen 3 of 5
6 Programming
( 6/8) < CREATE BY-WEIGHT PLU
Code :[
11]
Barcode Type :[0]
Barcode Format:[1]
0=UPC-12
1=UPC-13
2=EAN-13
( 6/8) < CREATE BY-WEIGHT PLU
Code :[
12]
Barcode Type :[0]
Barcode Format:[0]
10 >
3=EAN-8
4=Code 39
10 >
0=Custom Barcode
1=DNNNNNVPPPP
2=DNNNNVPPPPP
3=DNNNNNNPPPP
4=DNNNNNWWWWW
By-Weight & By-Count PLU
Screen 6 of 8 and
Non-Food Screen 3 of 5
By-Weight & By-Count PLU
Screen 6 of 8 and
Non-Food Screen 3 of 5
The barcode screen is identical for all 3 PLU types. The screen contents change depending upon which
field the cursor is on.
If the cursor is in the Code field then the screen will look like the first one on the previous
page.
If the cursor is on the Barcode Type field then the screen will look like the second one on
the previous page.
If the cursor is on the Barcode Format field then the screen will look like the third one on
the previous page.
The Custom field can ONLY be accessed if the Barcode Format is set to 0, otherwise this field is
not seen. The characters below are the only acceptable input for the Custom field.
The following defines the format characters for Barcode Formats:
• G = Group Code
• D = Dept. #
• V = Price Checksum
• 0~9 = Numbers
• P = Total Price
• W = Weight
• K = Country Code
• N = Code
• T = Text3 Data
• Z = Special Checksum
• A = Customer Number • B= Transaction
Counter
Code:
For ALL PLUs, this defaults to be the same as the PLU number. In most cases it is easiest to
keep the UPC Code and the PLU number the same; however, if necessary you can
change the UPC Code to be whatever 6 digit number you would like.
Barcode Type:
This allows you to select from a list of Barcode types. There is an entire area-ofexpertise devoted to Barcodes and barcode types, much too extensive to be covered
here. All you need to know is that the scale by default sets the Barcode Type to the
standard required for food PLUs (UPC-12). This covers all By-Weight and By-Count PLUs.
Barcode Format: This allows you to further customize a Barcode type to a more specific style. All you
need to know is that the scale by default sets the Barcode Format to the standard
51
6 Programming
required for food PLUs (DNNNNNVPPPP). This covers all By-Weight and By-Count
PLUs.
Custom:
If you select the Barcode Format to be 0, then you can create your own custom format with
up to 40 characters. You can use Compressed Formatting to get more than 40 characters.
For example, a format string of “42T” tells the scale that you want a format string with 42
alphanumeric characters which the scale will get from the TEXT 3 field of your PLU.
The next section looks like this:
INS/CAPS
( 7/8) < CREATE BY-WEIGHT PLU
10 >
CHAR:
Block 1:[_
Block 2:[
Block 3:[
( 7/8) < CREATE BY-COUNT PLU
CHAR:
1 OF 2000
]
]
]
INS/CAPS
11 >
1 OF 2000
Block 1:[_
Block 2:[
Block 3:[
( 5/5) < CREATE NON-FOOD PLU
CHAR:
/ENG
ㅠ
By Count PLU
Screen 7 of 8
]
]
]
INS/CAPS
12 >
1 OF 2000
Block 1:[
Block 2:[
Block 3:[
Non-Food PLU
Screen 5 of 5.
]
]
]
The Ingredients screen is identical for all 3 PLU types. You have up to 2000 characters of Ingredients or
Optional Text. You can split the 2000 characters into 3 sections and these 3 sections can print in
different font size, style, effects, and location on a label depending upon its format. Block 3 can also be
used to embed alphanumeric characters for a barcode.
If you wish to enter a <CR> carriage return, you must use press the ALT key followed by the ENTER key.
52
6 Programming
The last field in the Create PLU menu is Nutrifacts.
(8/8) CREATE BY WEIGHT PLU
(9999 Nutrition Facts: [
0]
Enter the NUMBER of the nutrifacts data applicable to this PLU.
6.3.3 Renumbering PLUs
MAIN MENU – PROGRAM PLUs
Once at the PLU: PLU Data screen Press 3. The Change PLU Number screen will appear as follows
NUMERIC
< PLU: CHANGE PLU NUMBER >
From Dept.
PLU
To
Dept.
PLU
Number:
Number:[
Number:
Number:[
[ 1]
110]
[ 1]
111]
Bakery Department
By-Weight PLU
Bakery Department
By-Weight PLU
When you have entered ALL of the appropriate data and you are ready to copy, press the SAVE key. If
the cursor is on the last field, you have entered ALL of the appropriate data, and you are ready to copy
then press the ENTER key. You can press the ESC key to return to the previous screen or menu.
6.3.4 Listing PLUs
Once at the PLU: MANAGEMENT screen Press 1. The List PLUs screen will appear as follows:
NUMERIC
< LIST PLUs >
Dept. Number (1-32): [ 1]
When you have entered selected a specific department , you can press the SAVE key or press the
ENTER key. You can press the ESC key to return to the previous screen or menu.
53
6 Programming
DEPT
1
1
1
1
1
PLU
< PLU LIST >
NAME
10 By-Weight PLU
11 By-Count PLU
12 Non-Food PLU
13 By-Weight PLU
14 By-Weight PLU
You can navigate through the pages using the Arrow keys or the PAGE UP and PAGE DOWN keys. Press
ESC key to finish and return to the previous screen.
6.3.5 Copying PLUs
Once at the PLU: MANAGEMENT screen Press 2. The Copy PLU screen will appear as follows:
NUMERIC
< PLU: COPY PLU >
From
Dept.
PLU
Through PLU
To
Dept.
PLU
From Dept. #:
From PLU #:
[ 1]
10]
110]
[ 2]
100]
Bakery Department
By-Weight PLU
PLU Not found
Meat Department
PLU Not found
Enter the Department number of the PLU which you wish to copy.
Enter the starting PLU number of the PLUs which you wish to copy.
Through PLU #:
Copy to Dept. #:
Copy to PLU #:
Number:
Number:[
Number:[
Number:
Number:[
Enter the final number of PLUs which you wish to copy
Enter the Department number where the new PLU(s) will be located.
This number defaults to be the next highest-available PLU number in the Copy to Dept.
# department field. Enter the PLU number that you wish to copy the Source PLU into.
When you have entered ALL of the appropriate data and you are ready to copy, press the SAVE key. If
the cursor is on the last field, you have entered ALL of the appropriate data, and you are ready to copy
then press the ENTER key. You can press the ESC key to return to the previous screen or menu.
6.3.6 Edit PLUs
Once at the PLU: PLU Data screen Press 4. The Edit PLU screen will appear as follows:
54
6 Programming
NUMERIC
< PLU: EDIT PLU >
Dept. Number:
PLU
Number:[
[ 1] Bakery Department
10]
Press ALT for memory status
The Edit PLU program works exactly like the Create PLU program except that you can only enter PLU
numbers for existing PLUs, all other PLU numbers will give you PLU
DOES NOT EXIST error. You can follow the instructions from section 6.3.2 Creating PLUs.
6.3.7 Promotion/Frequent Shopper Program
Once at the PLU: PLU Data screen Press 5. The DISCOUNT/FSP screen will appear as follows:
< PLU: DISCOUNT >
1.Period
2.DISCOUNT
This combination of features allows the user to establish specific time periods (by date, day of week and
hours/minutes) and apply predetermined discounts to specific products either on a promotional basis or
as part of a FSP special.
To create the discount time periods and data: (from the Main Menu) press the 4 key (program PLUs) –
then the 5 key (discount/FSP).
Select 1 to create the discount/FSP period. Each period will be identified by a unique number and
delineated by a from and to date and a from and to time. Use the PRINT key to advance through the
screens as you enter data. Each discount /FSP period allows the user to enable or disable that period
by specific day of the week. Enter a 0 to enable or a 1 to disable at the WEEK: (1111111) entry. The days
run from Sunday to Saturday.
(1111101) would be enabled every day except Friday. Use the SAVE key to save the data from one
period and advance to the template for the next. Once all of the discount/FSP time periods have been
entered, use the MENU key to escape back to the PLU:
DISCOUNT / FSP screen. Press the 2 key (discount/FSP data). The user can now create specific discount
parameters (pricing and quantity specifications) As before, each different discount gets a unique
number.
At REMARK: enter a description of the discount
At TARGET TYPE: enter 0 if the discount applies to By Weight PLUs. Enter 1 if By Count PLUs.
55
6 Programming
At PRICE TYPE: enter 0 if the discount is applied to the UNIT PRICE. Enter 1 if the discount applied to
the TOTAL PRICE. Enter 2 if the discount is applied as a PERCENTAGE of the price.(for BY COUNT PLUs)
IF THE DISCOUNT IS FOR A “BY WEIGHT” PLU:
At SALE WEIGHT 1: Enter the weight at which the first price reduction takes effect (you can enter up to
two “trigger points” and two price reductions per discount.
At SALE WEIGHT 2: Enter the second trigger point.
At DISC/FSP Price 1 (either the UNIT price or the TOTAL price depending on the basis of the discount):
Enter the discounted price that applies at weight 1.
At DISC/FSP Price 2: Enter the price that applies at weight 2.
IF THE DISCOUNT IS FOR A “BY COUNT” PLU, Follow the above instructions using a minimum count
number instead of weight amount.
Note: It is important to remember to design a label format that will work with the frequent shopper
discount. Unlike the global discount, the Frequent Shopper price will not appear on the display. The
only way the customer will see the savings is on the label.
6.3.8 Deleting PLUs
Once at the PLU: MANAGEMENT screen Press 3. The Delete PLU screen will appear as follows:
NUMERIC
< PLU: DELETE PLU >
Dept. Number:
[ 1] Bakery Department
From PLU Number:[
To
PLU Number:[
Department Number:
Delete from PLU #:
100] By-Weight PLU
110] By-Weight PLU
This is the department number of the PLU(s) you wish to erase.
This number defaults to be the lowest-available existing PLU number. Enter the PLU
number that you wish to delete.
To PLU #: This number defaults to be the same as whatever you enter in to Delete From PLU #. If you
wish to delete an entire range of PLUs, enter the high end range PLU # here. In our example,
we will delete PLUs #100 through #110 of department #1.
When you have entered ALL of the appropriate data and you are ready to copy, press the SAVE key. If
the cursor is on the last field, you have entered ALL of the appropriate data, and you are ready to copy
then press the ENTER key. You can press the ESC key to return to the previous screen or menu.
6.3.9 Audit Trail PLUs
Once at the PLU: MANAGEMENT screen Press 4. The Audit Trail PLU screen will appear as follows:
< AUDIT TRAIL LIST >
No DATE
TIME
0
0
0
0
11:52
00:00
00:00
00:00
JAN-06
000-00
000-00
000-00
PLU
01-000001
00-000000
00-000000
00-000000
OLD_PR NEW_PR C#
1.00
0.00
0.00
0.00
1.25
56
0.00
0.00
0.00
00
00
00
00
6 Programming
The AUDIT TRAIL function allows a user to track PLU price changes by date, time and clerk
ID (if applicable). Use the PAGE DOWN key to scroll through the report. Use the MENU key to exit.
6.3.10 Speed Key Programming
Once at the PLU: PLU Data screen Press 8. The Speed Keys screen will appear as follows:
NUMERIC/SHIFT
<PLU: SPEED KEYS>
SPEED KEY: 1
PLU Number: [123456] Ground Beef Family Pac
Press SAVE or ENTER to save changes.
Press ESC to finish.
Press a Speed key or SHIFT and a Speed key to view its settings.
To program a Speed key: press a Speed key or SHIFT and a Speed key, enter a PLU number, and then
press the ENTER key or SAVE key to save that PLU to that key.
6.4 Sell-Time Print Mode
This feature allows the user to print a single alphabetic character on the label to
correspond to the time of day the label was created, usually when the item was packed. To access this
function – (within the Main Menu) press the 4 key (program PLUs) – then the 6 key (PLU management)
then the 5 key (Sell-Time Print Mode). Use the ‘Y’ and ‘N’characters on the alpha keypad to toggle this
feature on and off.
6.5 Global Settings
57
6 Programming
When the screen is at the Main Menu Press 9, enter a level 2 or higher password when prompted, and
then the screen will read:
< GLOBAL SETTINGS >
1.Label Format
2.Discount/FSP
3.Barcode
4.Add-Up TTL Format
5.MISC. PLU Format
6.Printer Fonts
From here you can select the various Global Options.
6.5.1 Global Label Format
The Global label Format option allows you select a label format that will override each PLU’s label
format or allow you to use each PLU’s label format.
< GLOBAL LABEL FORMAT >
Label Format: [ 99] Universal 50 X 45mm
Use Global Label Format? (Y/N): [Y]
If you select N then all the PLU’s will print using their respective label formats. When you create PLU, you
have to assign Label format. If you select Y then the label format you select will be printed for all PLU’s.
And when you create PLU, you don’t need to assign label type. However, MISC PLUs may not print
using these formats. MISC PLUs are given a format of their own. This format may or may not be the
same as the global format on the scale.
6.5.2 Frequent Shopper Discount Program
< Discount/FSP Setting >
Global Discount Use?
(Y/N): [N]
Global Discount Period:[ 0]
Discount/FSP Priority: [1]
FSP Label Format: [ 1]
FSP Print Layout: [1]
58
6 Programming
If you want to use the discount/FSP for all PLUs, you should set ‘Y’ on the ‘Global Discount Use?’.
On the ‘Discount/FSP Priority, there are three options for using Discount/FSP.
They are the ‘INDEX’, ‘GLOBAL’, and ‘PLU’. If you select 6 for ‘PLU, INDEX’, ‘Sales Price’ on PLU data will
operate at first, and the ‘Discount/FSP’ on PLU data will at second.
You can use the FSP label format only for the PLUs that already have the FSP data.
If you want to print only discounted total price, select 0. If you want to print both the unit and total
Price, select 1.
6.6 Network Settings (optional)
The LP-II can be connected to a network either using a PC or one scale as the master. The network can
be hard-wired using an RS-232C or CAT-5 Ethernet cable. In addition, scales with an optional wireless
bridge built in can be connected using a router connected to a PC. To set this up consult the
networking manual
59
7 Sale Modes
7 Sale Modes
7.1 REG, MGR, and RPK Modes
The following highlighted selections from the Main Menu make up the Sale Modes.
< MAIN MENU >
1.REG: Sales Mode
2.MGR: Manager Mode
3.RPK: Repack Mode
4.PLU: Program PLUs
5.X: Report
6.Z: Report & Clear
7.SET: Settings
8.STR:Store Settings
9.Global Settings
0.Network Management
All regular sales transactions should be done in REG mode. For security reasons, REG mode has limited
access to certain features that can be accessed either through the entry of a level 2 password, or by
accessing MGR mode. You can change modes during, before, or after an operation. MGR mode and
RPK mode access require a level 2 password. All three modes work the same way and display the
same things except that they will display their respective Mode names (REG, MGR, or RPK) in the upperleft side of the top-line on the display.
For details on password level requirements, see section 6.1.4 Security Control.
7.2 REG Mode
Pressing the ESC key from the Main Menu will take you to REG mode. The REG mode screen looks like
this:
<REG>
WEIGHT lb
12:12:00
UNIT $ / lb
TOTAL PRICE $
◀
○
From here you can make sales transactions or operate any key or sales function. In this state the
Weight, Unit Price, and Total Price displays will function but no labels or receipts can be issued until you
select a PLU or Misc. PLU.
This is the final screen that comes up whenever you power on the scale. You can press the MENU key to
go to the Main Menu from here.
60
7 Sale Modes
7.2.1 ZERO Key
From the REG mode screen, we can use the ZERO key to correct for a deviation from zero as long as
there are no PLUs or MISC PLUs called-up. The weight can sometimes drift from zero due to debris on
the platter, leaving objects on the platter for excessive periods of time, or other environmental factors.
To correct this, remove everything from the platter and press the ZERO key when the stable indicator “○
” is on. Below is a possible zero drifted state that should be corrected by simply pressing the ZERO key.
<REG>
WEIGHT lb
12:12:00 PM
UNIT $ / lb
TOTAL PRICE $
○
7.2.2 TARE Key
From the REG mode screen, you can also enter tare weights as long as there are no PLUs or MISC PLUs
called-up. If you need to temporarily override a PLU’s tare weight, you must enter the tare weight first
and then call-up that PLU. There are two ways to enter a tare weight and both ways will only work if
there is no PLU or MISC PLU called-up. When you call up the PLU with an assigned tare, you have to
delete the tare in Sale ( REG mode ) mode. If you do not delete the tare in REG mode, you can’t assign
a new one.
Tare Type
Comments
Manual tare entry
The weight must be stable and at Gross Zero. Entering a tare weight manually by pressing
the numeric keys and then the TARE key.
The weight must be at Gross Zero. Place the empty container on the platter making sure
that the weight is stable, and then press the TARE key.
Make sure that there is nothing on the scale and the weight is stable. Press the TARE key to
remove the tare.
If you wish to temporarily use a PLU without its pre-programmed tare, simply call-up that PLU
and press the TARE key to toggle between no tare and the pre-programmed tare. When
doing this, the weight must be stable and the Gross Weight must be greater than or equal
to zero.
See the Index and Glossary section for details.
Weighed tare entry
Clearing both
Tare types
Temporary Clearing
Pre-Programmed
Tares
Successive Tare
If you enter a tare of 0.01 lb the display should look like this when there is nothing on the platter:
<REG>
WEIGHT lb
12:12:00 PM
UNIT $ / lb
TOTAL PRICE $
◀
○
◀
61
7 Sale Modes
7.2.3 lb/kg Key
From the REG mode screen, you can switch between lb weighing and kg weighing. As long as the
Total Price is 0.00 and there are no PLUs called-up, you may press the lb/kg key to switch between lb
and kg. Below are samples of the same screen shown in lb and kg. Remember, the lb/kg key only
applies to By-Weight PLUs, Misc By-Weight, and Misc By-Count but has no effect on By-Count or NonFood PLUs. This key is only used on the USA version. This key is not used on the others versions.
<REG>
WEIGHT lb
12:12:00 PM
UNIT $ / lb
TOTAL PRICE $
◀
○
◀
<REG>
WEIGHT kg
12:12:00 PM
UNIT $ / kg
TOTAL PRICE $
◀
○
◀
7.2.4 ON/OFF Key
From the REG mode screen, you can turn the scale’s displays on or off by pressing the ON/OFF key.
When you press the ON/OFF key to turn off the scale, it still has power and is fully operational except
that the keyboard does not work and the displays are off. Turning the power OFF with the power switch
located on the side of the scale is NOT the same thing as using the ON/OFF key. Turning the power
switch OFF is equivalent to unplugging the scale from the electrical outlet. When you are using the LP-2
as a stand-alone scale, then you may turn the scale OFF using the power switch; however, if you are
using the scale in a network then it is recommended that you never turn the scales OFF with the power
switch unless the network is not in use.
Whenever you have a scale network and you need to turn the scale off, you can use the ON/OFF key.
When you use the ON/OFF key to turn the displays off, you can tell that it is still operational by pressing
any key while the displays are off. When you do this you can hear them beep even though the displays
are off. If you use the power switch to turn the scale OFF then pressing any key will not produce any
beeping.
WARNING! Never attempt to service the scale while the power switch is ON. Unplug the scale before
attempting any kinds of repairs. If you need to remove any labels that may have become glued to the
thermal print head, make sure you unplug the scale first. Remember, in order to effect repairs on any
scale, you must be licensed by your Department of Weights and Measures.
62
7 Sale Modes
7.2.5 PLU/SHIFT Key and Speed keys
From the REG mode screen, you can call-up PLUs by typing the PLU number and then pressing the
PLU/SHIFT key. You can also call-up PLUs by pressing that PLU’s Speed key, or pressing the PLU/SHIFT key
and then that PLU’s Speed key.
PLU number + PLU/SHIFT: To call-up PLU number 410023 you need to press the following keys : 4, 1, 0, 0,
2, 3, and PLU/SHIFT key.
Speed key: To call-up PLU number 79, and you programmed Speed key #5 to be PLU number 79, then
you need to press the following key: Speed key #5.
Speed key, shifted: To call-up PLU number 412290, and you programmed Speed key #100 to be PLU
number 412290, then you need to press the following keys: PLU/SHIFT and Speed key #44.
The Speed keys are numbered left-to-right and top-to-bottom. There are 8 columns and 7 rows for a
total of 56 physical keys but if you press the PLU/SHIFT key and then one of the 56 Speed keys, then you
can access Speed keys 57 through 112. If you use the 3 MISC PLU keys, then you loose Speed keys 54,
55, and 56 as well as their shifted Speed keys (110, 111, and 112). That is why when you use the 3 MISC
PLU keys, then your Speed keys are numbered 1 to 53 and 57 to 109.
<REG>
12:12:00 PM
Beef, 85% lean
WEIGHT lb
UNIT $ / lb
Pressing Speed key 1.
TOTAL PRICE $
◀
○
◀
Calling-up By-Weight PLUs that are programmed as kg while the scale is in lb mode will work
automatically display the PLU that you called-up. At that time, weighting mode is changed to kg mode,
vice versa.
7.2.6 MISC PLU keys
From the REG mode screen, you can call-up any of the 3 MISC PLUs by pressing the corresponding MISC
PLU key. Even if you have never programmed ANY PLUs into your scale, you can always use any of the
MISC PLU keys. The 3 MISC PLU keys correspond to the 3 PLU types: By-Weight, By-Count, and NonFood. The By-Weight and By-Count PLUs should be used for food items as these PLUs can contain all
required information for food packaging. Non-Food PLUs do not have all of the required data
necessary to label food products. Remember, even though By-Weight and By-Count PLUs can contain
all required information for food packaging, the Label Format assigned to these PLUs needs to contain
those required fields in order to print them. If you use the formats recommended for each PLU type, you
can never go wrong.
63
7 Sale Modes
<REG>
RIDE 12:12:00 PM
Misc By Weight PLU
WEIGHT
lb
UNIT $ / lb
TOTAL PRICE $
◀
○
Pressing MISC By-Weight PLU key.
<REG>
RIDE1 12:12:00 PM
Pressing MISC By-Count PLU key.
Misc By Count PLU
QTY
PCS/$PRICE ( 33 oz) TOTAL PRICE $
◀
○
<REG>
RIDE 12:12:00 PM
Pressing MISC By-Weight PLU key.
Misc Non-Food PLU
PRICE
$
◀
○
By-Weight: After pressing the MISC By-Weight PLU key, you need to enter the price and place the item
on the scale.
By-Count: You need to enter the Net-Weight Statement amount (in ounces for lb mode, grams for kg
mode), then press the MISC By-Count PLU key, and then enter the price using the FOR key. See section
7.2.7 FOR key for details on using the FOR key.
Non-Food: Press the MISC Non-Food PLU key, and then enter the price.
64
7 Sale Modes
7.2.7 FOR key
The FOR key is strictly used only for By-Count PLU pricing. Pressing the FOR key toggles between the QTY
field, PIECES field, PRICE field, and back to the QTY field. Remember that the toggle wraps around so
that the sequence is repeated indefinitely. Therefore, you can always return to the QTY field, PIECES
field, or PRICE field.
<REG>
RIDE1 12:12:00 PM
Misc By Count PLU
QTY
PCS/$PRICE ( 33 oz)
Pressing any numeric key at this
point will change the QTY field (the
shaded region).
TOTAL PRICE $
◀
○
<REG>
RIDE2 12:12:00 PM
Misc By Count PLU
QTY
PCS/$PRICE (33 oz)
TOTAL PRICE $
◀
○
<REG>
RIDE3 12:12:00 PM
Misc By Count PLU
QTY
Pressing the FOR key and then
pressing any numeric key at this
point will change the PIECES field
(the shaded region).
PCS/$PRICE (
33 oz)
TOTAL PRICE $
◀
○
Pressing the FOR key and then
pressing any numeric key at this
point will change the PRICE field
(the shaded region).
A By-Count price of QTY=2, PIECES=4, and PRICE=1.00 is read as 2 at 4 FOR $1.00. It yields a Total Price
of $0.50. You can calculate all By-Count prices as (QTY÷PIECES) × PRICE = TOTAL PRICE.
NOTE: Shading is not done by the scale display. This is done in the manual for clarity.
65
7 Sale Modes
7.2.8 1/2, 1/4, and 100 g Keys
If you assign the country code for USA, these keys are used for fractional pricing conversion for byweight PLUs only. If you assign country default, you can’t use these keys. The 1/2 and 1/4 keys only work
in lb weighing mode. The 100 g key works only in kg weighing mode. When pressed, the 1/2 key simply
multiplies the current Unit Price by 2. The 1/4 key multiplies the Unit Price by 4. The 100 g key multiplies
the Unit Price by 10. Once you press the 1/2, 1/4, or 100 g key, you cannot press the 1/2, 1/4, or 100 g
keys again until the current PLU is cleared from the screen. This key is only used with the USA version. This
key is not in use to the Others Version.
<REG>
RIDE
12:12:00 PM
Misc By Weight PLU
WEIGHT lb
UNIT $ / lb
TOTAL PRICE $
Pressing the 1/2 key temporarily
displays the following before it
multiplies the Unit Price by 2.
◀
○
<REG>
RIDE
12:12:00 PM
Misc By Weight PLU
WEIGHT lb
UNIT $ / lb
TOTAL PRICE $
Pressing the 1/4 key temporarily
displays the following before it
multiplies the Unit Price by 4.
◀
○
<REG>
RIDE 12:12:00 PM
Misc By Weight PLU
WEIGHT lb
UNIT $ / lb
TOTAL PRICE $
Pressing the 100 g key temporarily
displays the following before it
multiplies the Unit Price by 10.
◀
○
Note: Some States do not allow fractional pricing or the use of 1/2 or 1/4 keys. These keys may be
disabled and pressing them will yield a Key not enabled error message on the screen. If you wish to
enable the use of these keys, please contact your Authorized CAS Dealer as only a state-licensed
individual may change this feature on a scale.
66
7 Sale Modes
7.2.9 CLEAR key
The C key is used to clear erroneous entries and to clear PLUs that have been called-up. If you press the
MISC By-Weight PLU key, enter a price, and then press the C key only the Unit Price that you entered will
be cleared to 0.00. If you press the C key when the Unit Price is 0.00, then the PLU will be cleared from
the screen.
7.2.10 ADD, VOID, and ST/TTL keys
The ADD and ST/TL keys are used for conducting Cash Register-like transactions. If you press the ADD
key instead of the PRINT key, you will initiate the ADD-UP process. In ADD-UP mode the scale prints
every time you press the ADD key to make a sale transaction. The scale also keeps tract of how many
items were added and the running total that it continuously displays. You can ADD-UP 20 items
maximum. You can press the VOID key to undo the last transaction. Once you have added all of the
items for that customer, you can press the ST/TTL key to print the grand-total. ADD-UP does not wok in
Pre-Pack or Auto-Print modes. This function is out of use to Floating clerk mode 1, 2 ( Floating clerk,
Standard clerk mode).
<REG>
12:12:00 PM
Golden Apple11 !!
WEIGHT lb
UNIT $ / lb
Call up a PLU.
TOTAL PRICE $
○
<ADD>1 ITEMS $ 15.0 (12)
WEIGHT lb
UNIT $ / lb
12:12:00 PM
TOTAL PRICE $
Press the ADD key. A label will be
printed for that PLU and the PLU
will auto-clear normally unless the
SAVE mode is active.
◀
○
You can repeat the ADD-UP process up to 19 more times for a total of 20 items or you can press the
ST/TL key at anytime to get the grand-total label and complete the sale. The grand-total label gives
you the Packed-On date, Total Weight, Total Tare Weight, Average Unit Price, Total Number of Items,
and the Grand-Total price.
This is not a receipt-mode transaction or a floating clerk transaction.
67
7 Sale Modes
7.2.11 SAVE key
By-Weight PLUs auto-clear if the weight goes over zero and stabilizes, and then returns to zero and
stabilizes. By-Count and Non-Food PLUs auto-clear whenever you press the ADD or PRINT key. However,
if the scale is in SAVE or Pre-Pack mode, then the PLU will not auto-clear. Thus the SAVE key is used to
prevent the auto clearing of PLU data. You cannot select SAVE mode if the scale is in Pre-Pack mode.
You exit SAVE mode by also pressing the SAVE key. Once you exit SAVE mode, the scale will auto-clear.
<REG>
SAVE
WEIGHT lb
UNIT $ / lb
12:12:00 PM
TOTAL PRICE $
Press the SAVE key.
◀
○
7.2.12 AUTO/MANUAL key
When the scale is in AUTO mode, it prints labels automatically. When it is in MANUAL mode, you must
press the PRINT key (or ADD key) to get a label. ADD-UP mode never auto-prints regardless of what
mode (AUTO or MANUAL) the scale is in. Also, if the scale is in Pre-Pack mode, you cannot select AUTO
mode. You can use AUTO mode and SAVE mode to do pre-packaging but the weight must return to
zero for every auto-print. This key is out of use to floating clerk mode.( Floating clerk, Standard clerk
mode)
Auto-print: If the scale is in AUTO mode then it will auto-print the first time if the Total Price is greater
than 0.00 and:
1. the weight goes over zero and stabilizes
Auto-print: If the scale is in AUTO mode and SAVE mode then it will auto-print after the first time if
the Total Price is greater than 0.00 and both the following conditions are met:
1. the weight goes to zero and stabilizes.
2. the weight goes over zero and stabilizes
<REG> AUTO
12:12:00 PM
Press the AUTO key.
WEIGHT lb
UNIT $ / lb
TOTAL PRICE $
◀
○
68
7 Sale Modes
7.2.13 PRE-PACK key
When the scale is in Pre-Pack mode, it prints labels automatically. When it is in MANUAL mode, you must
press the PRINT key (or ADD key) to get a label. In Pre-Pack mode, you cannot select AUTO mode. PrePack works like AUTO and SAVE mode except that the weight does not need to return to zero for every
auto-print. This key is out of use to Floating clerk mode 1, 2.( floating clerk, Standard clerk mode)
Auto-print: If the scale is in Prepack mode then it will always auto-print if the Total price is greater than
0.00 and:
1. the weight deviates by an amount greater than or equal to the Motion Band
setting and the weight stabilizes at a weight greater than zero.
<REG>
PrePack
12:12:00 PM
Press the PRE-PACK key.
WEIGHT lb
UNIT $ / lb
TOTAL PRICE $
◀
○
Pre-pack mode is very useful in back-room applications. This mode increases productivity by not
requiring the user to press the PRINT key for every package. Instead the user can concentrate on
weighing, wrapping, and labeling.
Note: The Motion Band Setting controls some weighing aspects of the LP-2 and thus requires you
contact your Authorized CAS Dealer because only a state-licensed individual may change this feature
on a scale. The Motion Band Setting is set to 1 by default. This means that the weight needs to change
by ±1 external display division in order to auto-print.
7.2.14 X key
The X key is used to print multiple transactions for the same PLU. It only works for By-Count or Non-Food
PLUs. You can specify to print up to 999 labels. The X key does not work with By-Weight PLUs or PrePack mode. The X key operation is called the Multi-Label function.
ENTER NUMBER OF LABELS
12:12:00 PM
Call-up a Non-Food PLU and then
press the X key.
Common Nails
PRICE
◀
○
69
$
7 Sale Modes
PRESS PRINT FOR
3 LABELS
12:12:00 PM
Common Nails
Type the number of labels you
require and press the PRINT key.
PRICE
$
◀
○
LABELS LEFT=2
12:12:00 PM
As the scale prints the labels it will
count down the label counter.
Common Nails
PRICE
$
◀
○
PRINTER PEEL-OFF HOLD
12:12:00 PM
Common Nails
PRICE
◀
○
$
If you are in MANUAL mode and
you take too long to pick-up the
printed label from the printer, you
will see the following message.
This message will go away as soon
as you remove the printed label
from the printer bay.
If you use the Multi-Label function (X key) while the scale is in AUTO mode, then the printer will print all of
the labels that you specified and it will not pause between labels. Also, the pick-up motor and spool
will not run so that you can have the labels remain on the liner backing-paper so that you can place
them on the appropriate items at another time. In this case you will never see the Printer Peel-Off Hold
error message. When you want to stop label printing, press C(clear ) key. Label printing will be stoped.
Once the scale is done printing the labels in the Multi-Label/AUTO mode, the scale will prompt you
Press any key to pick-up slack. At this point, you can either remove all the printed labels from the liner
backing-paper and press any key, or you can cut-off the printed labels with their liner backing-paper,
rethread the liner backing-paper through the printer assembly attaching it to the pick-up spool, and
then press any key.
7.2.15 RETURN key
70
7 Sale Modes
The RETURN key is used to delete erroneous sale transactions. This key requires that you be MGR mode
in order to use it. You can use the RETURN key to undo erroneous sales transactions like pressing the
PRINT key inadvertently, selecting and printing the wrong PLU, an inadvertent Auto-Print in Pre-Pack
mode, or perhaps adjusting the sales totals for a damaged or ruined package. Whatever the reason,
the RETURN function will decrement returned PLU’s transaction counter and sales totals by the specified
amount. A return transaction also increments the Return-transaction counter and the Return-Sales
Total. A return transaction does not print any labels.
First, make sure that you are in MGR mode. Press the RETURN key and the display will show:
RETURN PLU:
WEIGHT
lb
0
12:12:00 PM
UNIT $ / lb
TOTAL PRICE $
◀
○
At this point, you need to call-up
the PLU that you wish to return by
either pressing its corresponding
speed key or typing its number.
Once you select the returned PLU, the display will change to:
ENTER TOTAL PRICE, THEN PRESS RETURN
Golden Delicious Apple
WEIGHT lb
UNIT $ / lb
TOTAL PRICE $
At this point, you need to enter the
total price that was printed on the
return PLU’s label and then press
the RETURN key.
◀
○
Once you enter the total price, the display will change to:
PRICE TO BE RETURNED= $
1.10
Golden Delicious Apple
WEIGHT lb
UNIT $ / lb
TOTAL PRICE $
◀
○
After you enter the return amount,
press the RETURN key. The scale
will
temporarily
display
the
returned amount and then autoclear the display.
7.2.16 OVERRIDE key
The OVERRIDE key is used to temporarily change the pricing of priced PLUs. That is, PLUs programmed
with a zero price, can have their prices temporarily changed without the use of the OVERRIDE key.
Call-up the PLU you wish to use. Once it comes up on the screen, press the OVERRIDE key. If you are in
REG mode the scale will prompt you for a level 2 password; MGR mode will not display a password
entry screen. If you are in REG mode, enter the password and then press the PRINT key. At this point the
71
7 Sale Modes
PLU’s price will be set to 0.00 and you may enter the temporary price that you wish to use. At any point,
you may press the OVERRIDE key to revert to the PLU’s pre-programmed price.
Whenever you are using an override price the display will show the override status to the left of the
time/date display.
<REG>
Ride 12:14:19 PM
Delicious Golden Apple
WEIGHT lb
UNIT $ /lb
The Ride message on the upper
right side of the display indicates
that you are using an override
price.
TOTAL PRICE $
◀
○
7.2.17 DEPT key
The DEPT key is used to temporarily change the department assignment of the scale. That is, if a scale is
assigned to department 1 then all of the PLUs that you select on that scale will be from department 1;
however, if you want to select a PLU from another department, then you can use the DEPT key.
Press the DEPT key. If you are in REG mode the scale will prompt you for a level 2 password; MGR mode
will not display a password entry screen. If you are in REG mode, enter the password and then press the
PRINT key. The Change Department screen will appear.
The New Department entry field will
default to have the same number
as the Old Department field. The
Old Department: 1
Old Department field indicates the
Bakery Department
scale’s assigned department; the
New Department field allows you
New Department:[ 2]
enter the temporary department
you wish to change to. Press the
PRINT key after you select the
temporary department.
The display will return to the sales mode screen. The time/date field will show ◀DEPT#: 2 where the
asterisks indicate that you are in a temporary department assignment state. You can press the DEPT
key to cancel the temporary department assignment or proceed with a transaction. After a
transaction, the scale will revert to its programmed department assignment.
< CHANGE DEPARTMENT >
72
7 Sale Modes
7.2.18 Temporary Date Change
The DATE/TIME key can be used to temporarily change the current date (Packed On date). To activate
this feature, make sure that you are in REG, MGR or RPK mode. Press the ALT key and then the
DATE/TIME key. The display will change to the following:
< SET: SET TEMPORARY DATE >
Year: [1999]
Month: [10]
Day:
[ 2]
From here you can enter the
temporary date settings that you
wish to use. Press the PRINT key
after entering the appropriate
data in each field. The screen will
return to sales mode once you are
done.
Once the screen returns to the sales mode, it will display the temporary date as follows: ◀10-02-1999.
The arrowhead (◀) indicate that you are in a temporary date change state. While the scale is in
temporary date change mode if you press the ALT key followed by the DATE/TIME key it will cancel the
temporary date change.
7.2.19 Temporary Date Print Inhibit
The ON/OFF key can be used to temporarily inhibit the printing of dates. To activate this feature, make
sure that you are in REG, MGR or RPK mode. Press the ALT key and then the ON/OFF key. The display
will change to the following:
INS/CAPS
< Temporary Date Print Inhibit >
DATE1: PACKED ON (Y/N) :[N]
DATE2: SELL BY
(Y/N) :[N]
DATE3: Cook By
(Y/N) :[N]
From here you can enter the
temporary date print inhibit that
you wish to use. Press the PRINT key
after entering the appropriate
data in each field. The screen will
return to sales mode once you are
done.
Once the screen returns to the sales mode, it will display as follows: DATE INHIBIT. While the scale is in
temporary date print inhibit mode, if you press the ALT key followed by the ON/OFF key it will cancel the
temporary date print inhibit.
73
7 Sale Modes
7.2.20 Temporary PLU Data Change
The PLU/SHIFT key can be used to temporarily change certain PLU data. To activate this feature, make
sure that you are in REG, MGR or RPK mode. Press the ALT key and then the PLU/SHIFT key. The display
will change to the following:
INS/CAPS
< Temporary PLU Data Change >
Sell By Date
:
Cook By Date
:
Country of Origin :
Sales Message : [ 0]
[ 10]Days
[ 2]Days
[ 0]Not assigned
Message not Found
From here you can enter the
temporary PLU data that you wish
to use. Press the PRINT key after
entering the appropriate data in
each field. The screen will return to
sales mode once you are done.
Once the screen returns to the sales mode, there is no way of knowing that the temporary PLU data is
being used. Simply pressing Clear, loading another PLU, or terminating & auto-clearing after a
transaction will clear the temporary PLU data.
7.3 MGR Mode
MGR mode (Manager mode) works very similarly to REG mode except that you need a level 2
password to access MGR mode. Any sales mode features requiring a password (i.e. return, temporary
date change, etc) will not require a password while in MGR mode.
To access MGR mode, you can select option 2 from the Main Menu. The scale will prompt you for a
level 2 password. Enter the password and press the PRINT key. You will be in the MGR mode screen.
<MGR>
WEIGHT
12:12:00 PM
lb
UNIT $ / lb
TOTAL PRICE $
◀
○
74
7 Sale Modes
7.4 RPK Mode
RPK mode (Re-Packaging mode) works very similarly to REG mode except that you need a level 2
password to access RPK mode and cannot use ADD key. RPK mode however, does not record any
sales transactions. You can use this mode for training a clerk to use the LP-2, or to repackage/markdown selected merchandise. You will not be able to distinguish labels printed in RPK mode from those
printed in any other sales mode.
To access RPK mode, you can select option 3 from the Main Menu. The scale will prompt you for a
level 2 password. Enter the password and press the PRINT key. You will be in the RPK mode screen.
<RPK>
WEIGHT
12:12:00 PM
lb
UNIT $ / lb
TOTAL PRICE $
◀
○
75
8 X and Z Modes
8 X and Z Modes
8.1 Reading Sales Summaries: X mode
X mode is used to read (i.e. print and display) sales data. When sales data is displayed, only the user
display will be on, that is, the customer side display will be off. There are a variety of reports that you
can generate from X mode. Each of these reports is kept in two separate counters or “books” called X1
and X2. The X1 and X2 reports allow you to print reports at any time for either of the reporting periods.
You can use X1 reports to see current daily totals and X2 reports to see current weekly totals. The time
period combination you chose is completely dependent upon how you use Z1 and Z2.
There are 7 detailed reports and 1 summary report called the X Report for each of the periods X1 and
X2. That’s 8 reports per period. Remember, on a network, only the master scale will have the sale data
for ALL scale. Also, remember that you can generate as many X reports as you would like because X
mode does NOT clear any sales data.
To access X mode, you can select option 4 from the Main Menu. The scale will prompt you for a level 2
password. Enter the password and press the PRINT key. You will be at the X1: Read Totals screen. You
can press PAGE UP and PAGE DOWN to change from X1 to X2 screens.
< X1: READ TOTALS >
(1/2)
Periodic Totals #1
1.PLU Sales
5.Scale Sales
2.Misc. Sales
6.Hourly Sales
3.Group Sales
7.Clerk Sales
4.Department Sales
8.X1 Report
From here you can select the
report that you wish to generate.
8.1.1 PLU Sales
From the X1 or X2 Read Totals screen you can press 1 to select the PLU Sales report. The X1: PLU Sales
screen will be displayed.
Press SAVE to
<
Department: [
PLU:
[
print report
X1: PLU SALES >
1]:
Bakery Department
0]:
PLU not found
From here you can select the
department number and PLU
number of the PLU you wish to
display the sales report of. You
can also press the SAVE key to
print the report.
Once you have selected a PLU and pressed PRINT, the display will show the sales data for that PLU. At
that point you can select another department and/or PLU to see the sales data of. If you wish to print
the sales report, make sure that there are sufficient labels/paper in the printer; however, if you run out of
labels/paper during an X report, do not worry because you can re-generate that same X mode report
as many times as you would like.
76
8 X and Z Modes
Press SAVE to print report
< X1: PLU SALES >
Department: [ 1]:
Bakery Department
PLU:
[
1]:
Red Delicious Apples
Transactions:
3 Total $:
2.59
Total Weight:
0.000
Dept 1 Net $:
0.00
0.00%
Total Gross $:
0.00
0.00%
Press SAVE to print report
< X1: PLU SALES >
Department: [ 1]:
Bakery Department
PLU:
[
2]:
Bread
Transactions:
3 Total $:
2.59
Total Pcs:
20
Dept 1 Net $:
0.00
0.00%
Total Gross $:
0.00
0.00%
Press SAVE to
<
Department: [
PLU:
[
Transactions:
print report
X1: PLU SALES >
4]:
Misc Department
3]:
Nails
3 Total $:
2.59
Dept 1 Net $:
Total Gross $:
0.00
0.00
0.00%
0.00%
Here is a sample report for PLU sales. The report contains the
same details as the screen does but it includes ALL PLUs at the
scale. Remember that only those PLUs that generated sales will
be included in this report excluding Misc PLUs which are
reported through the Misc PLU Sales report.
The X2, Z1, and Z2 PLU sales reports look the same as this one.
Depending on the width of the labels/paper that you are using,
you may get things printing in different positions than indicated.
Also, if you are using labels of fixed size, you may require several
labels to print an entire report.
We recommend the use of thermal paper to print reports. This
makes the reports print on one strip of paper and because you
are not using labels, you need not worry about the report
sticking to itself or other objects. However, this requires the
77
By-Weight PLU
From here you can select another
department number and/or PLU
number that you wish to display
the sales report of. You can also
press the SAVE key to print the
report.
Total Weight is the total amount of
weight sold under that PLU.
By-Count PLU
Total Pcs is the total amount of
pieces sold of a By-Count PLU.
Transactions is the number of sales
generated by that PLU.
Non-Food PLU
Group gives the total sales for the
group that this PLU belongs to and
the percentage of that group’s
sale that this PLU sold.
Dept gives the total sales for the
PLU’s dept and the percentage
sales that this PLU composes of
relative to its dept.
X1 PLU SALES- SCALE 1
APR 2 1999 12:10:46 PM
Dept 1 PLU: 1
Transactions: 3
Total $: 16.78
Total Weight:
1.416 kg
% Dept Net :
10.0%
% Tot Gross:
20.0%
Dept 1 PLU: 2
Transaction: 7
Total $: 26.78
Total Pcs:
26
% Dept Net :
10.0%
% Tot Gross:
20.0%
Dept 32 PLU: 99999
Transaction: 10
Total $: 36.78
% Dept Net :
% Tot Gross:
10.0%
20.0%
8 X and Z Modes
insertion and removal of the paper media each time you do
reports. On a network the master scale has the data for all
scales.
8.1.2 MISC PLU Sales
From the X1 or X2 Read Totals screen you can press 2 to select the Misc PLU Sales report. The X1: Misc
PLU Sales screen will be displayed. The Misc PLU Sales report works exactly the same as the PLU Sale
report except that you can only get the sales data for the 3 miscellaneous PLUs. On a network, the
master scale has the Misc PLU sales report data for all scales.
8.1.3 Group Sales
From the X1 or X2 Read Totals screen you can press 3 to select the Group Sales report. The X1: Group
Sales screen will be displayed.( Group 0
From here you can select the
group number of the group you
wish to display the sales report of.
You can also press the SAVE key to
print the report.
Press SAVE to print report
< X1: GROUP SALES >
Group: [ 1]
Once you have selected a group and pressed PRINT, the display will show the sales data for that group.
At that point you can select another group that you wish to see the sales data of. If you wish to print
the sales report, press the SAVE key.
Transactions is the total number of
sales transactions and the total
sales for the entire group.
Press SAVE to print report
< X1: GROUP SALES >
Group: [ 1]
Transactions:
All Groups
0 Total $:
Total $:
0.00
0.00
0.0%
Here is a sample report for Group sales. The report contains the
same details as the screen does but it includes ALL Groups. Only
those groups that generated sales will be included in this report
excluding Misc PLUs which are reported through the Misc PLU
Sales report.
The X2, Z1, and Z2 Group sales reports look the same as this one.
Depending on the width of the labels/paper that you are using,
you may get things printing in different positions than indicated.
Also, if you are using labels of fixed size, you may require several
labels to print an entire report.
78
All Groups is the total number of
sales transactions for all groups
and the percentage sales that this
group composes relative to all
groups.
X1 GROUP SALES- SCALE 1
APR 2 1999 12:10:46 PM
Group 0
Transactions: 3
Total $: 16.78
% All Groups:
20.0%
Group 2
Transaction: 3
Total $: 16.78
% All Groups:
20.0%
Group 99
Transaction: 3
Total $: 16.78
% All Groups:
20.0%
8 X and Z Modes
On a network, the master scale has the Group sales report data
for all scales.
8.1.4 Department Sales
From the X1 or X2 Read Totals screen you can press 4 to select the Department Sales report. The X1:
Dept Sales screen will be displayed.
Press SAVE to print report
< X1: DEPT SALES >
Department: [ 1]:
From here you can select the
department
number
of
the
department you wish to display
the sales report of. You can also
press the SAVE key to print the
report.
Once you have selected a department and pressed PRINT, the display will show the sales data for that
department. At that point you can select another group that you wish to see the sales data of. If you
wish to print the sales report, press the SAVE key.
Press SAVE to print report
< X1: DEPT SALES >
Department: [ 1]: Bakery Department
Transactions:
83 Total $:
All Depts
Total $:
20.00
Transactions is the total number of
sales transactions and the total
sales for the entire department.
99.00
15.3%
All Depts is the total number of
sales transactions for all departments and the percentage sales
that this department composes
relative to all departments.
The Department Sales report is very similar to the Group Sales report and the printed report is practically
identical. On a network, the master scale has the Department sales report data for all scales. The X2,
Z1, and Z2 Department sales reports look the same as the X1 report.
8.1.5 Scale Sales
From the X1 or X2 Read Totals screen you can press 5 to select the Scale Sales report. The X1: Scale
Sales screen will be displayed. You can proceed through this sales report as with Department sales and
Group sales, which are both practically identical in displayed and printed sales formats. On a network,
the master scale does not have the Scale sales report data for all scales; you must acquire the Scale
sales report at each individual scale. For all other sales reports, the master does have the sales data
from all scales on a network. The X2, Z1, and Z2 Scale sales reports look the same as the X1 report.
79
8 X and Z Modes
8.1.6 Hourly Sales
From the X1 or X2 Read Totals screen you can press 6 to select the Hourly Sales report. The X1: Hourly
Sales screen will be displayed. This screen lists all 24 hours of the day along with pertinent sales data for
those hours. Once at the Hourly Sales screen, you can press the ▼,▲, PAGE UP, and PAGE DOWN keys
to navigate through the 5 pages of hourly sales data.
Hour
12AM
1AM
2AM
3AM
4AM
< X1: HOURLY SALES >
Transactions
Total $
0
0.00
0
0.00
0
0.00
0
0.00
1
1.00
% Daily
0.0%
0.0%
0.0%
0.0%
0.5061%
If you wish to print the sales report, you can press the SAVE key
while on any of the 5 pages.
Here is a sample report for Hourly sales. The report contains the
same details as the screen does.
The X2, Z1, and Z2 Hourly sales reports look the same as this one.
Depending on the width of the labels/paper that you are using,
you may get things printing in different positions than indicated.
Also, if you are using labels of fixed size, you will require several
labels to print an entire report.
On a network, the master scale has the Hourly sales report data
for all scales.
X1 HOURLY SALES- SCALE 1
APR 2 1999 12:10:46 PM
Hour: 12AM
Transaction: 0
Total $: 0.00
% Total:
0.0%
Hour: 1AM
Transaction: 0
Total $: 0.00
% Total:
0.0%
Hour: 11PM
Transaction: 2
Total $: 1.00
% Total:
8.3%
8.1.7 Clerk Sales
From the X1 or X2 Read Totals screen you can press 7 to select the Clerk Sales report. The X1: Clerk Sales
screen will be displayed. You can proceed through this sales report as with Department sales and
Group sales, which are both practically identical in displayed and printed sales formats. On a network,
the master scale has the Clerk sales report data for all scales. The X2, Z1, and Z2 Scale sales reports look
the same as the X1 report. This report is only for scales used in Floating Clerk mode. Clerk 0 is the nofloating sale value.
8.1.8 Summary Report
From the X1 or X2 Read Totals screen you can press 8 to select the X1 or X2 Summary Sales report.
Once you press the 8 key the report will begin to print. This report contains summarized and detailed
information on specific sales functions. On a network, the master scale has the Summary Sale report
data for all scales. The X2, Z1, and Z2 Summary Sales reports look the same as the X1 report.
80
8 X and Z Modes
This report tells you:
Number of Voids
Number of Returns
Number of Re-Packs
Voided totals
Returned total
Re-Packed total
Number of Price Changes
Tax collected for all 3 rates
Gross Total
Number of Z1 or Z2 resets
Last time and date of Z1 or Z2 report
Non Resetting Grand Total
Here is a sample of the X1Summary Report.
The X2, Z1, and Z2 Summary sales reports look the same as this
one. Depending on the width of the labels/paper that you are
using, you may get things printing in different positions than
indicated. Also, if you are using labels of fixed size, you may
require several labels to print an entire report.
On a network, the master scale has the Summary Sales report
data for all scales.
8.2 Resetting Sales Summaries: Z mode
X1 X-REPORT- SCALE 1
APR 2 1999 12:10:46 PM
Voids: 2
Void $: 2.00
Returns: 1
Return $: 1.00
Repacks: 2
Repack $: 1.99
Price Changes: 10
Tax1 $: 0.00
Tax2 $: 0.00
Tax3 $: 0.00
Gross $: 114.00
NRCN1: 1
Last Reset: 3-12-99 12:21:00 PM
NRGT $: 114.73
Z mode is used to read (i.e. print and display) and reset sales data. When sales data is displayed, only
the user display will be on, that is, the customer side display will be off. There are a variety of reports
that you can generate from Z mode. Each of these reports is kept in two separate counters or “books”
called Z1 and Z2. These allow you to have two reporting periods that you can tailor to your needs. For
example, you can use Z1 reports daily and Z2 reports weekly; you can use a hourly/daily combination;
or any combination of time periods you prefer.
There are 7 detailed reports and 1 summary report called the Z Report for each of the periods Z1 and
Z2. That’s 8 reports per period. Remember, on a network, only the master scale will have the sale data
for ALL scales.
To access Z mode, you can select option 6 from the Main Menu. The scale will prompt you for a level 3
password. Enter the password and press the PRINT key. You will be at the Z1: Read/Reset Totals screen.
You can press PAGE UP and PAGE DOWN to change from Z1 to Z2 screens.
< Z1: READ/RESET TOTALS >
(1/2)
Periodic Totals #1
1.PLU Sales
6.Hourly Sales
2.Misc. Sales
7.Clerk Sales
3.Group Sales
8.Z1 Report
4.Department Sales
9.Reset Counters
5.Scale Sales
81
From here you can select the
report that you wish to generate.
8 X and Z Modes
If you generate a Z1 PLU Sales report, then any X1or Z1 PLU Sales reports that you generate immediately
after (barring any sales) will give zero sales data for those reports. This is also true for Z2. However, the Z1
and Z2 Summary reports also clear out the data for ALL other reports (options 1 to 7)! If you generate a
Z1 Summary report, then any X1or Z1 sales reports that you generate immediately after (barring any
sales) will give zero sales data for those reports. Z Summary reports clear the following: PLU Sales report,
Misc. Sales report, Group Sales report, Department Sales report, Scale Sales report, Hourly Sales report,
and Clerk Sales report. If you also wish to generate reports other than Z Summary reports, then generate
those reports before generating the Z Summary report.
All screens and functions for Z1 and Z2 are very similar and both are the same as their X1 and X2
counterparts. The instructions for X1 mode are sufficient for X2, Z1, and Z2. The only difference in
generating reports between Z mode and X mode is that after a report prints in Z mode the scale
prompts you Clear Report Data? (Y/N). If you select yes, then the screen returns to the previous menu
and the sales totals for which you generated the report are then cleared. If you select no, then the
sales totals for which you generated the report are NOT cleared.
And z Report has function of daily report and weekly or monthly report, if you clear report data every
day by using Z1 report and you clear report data every month by using Z2 report, you will be received
daily report and monthly report. Because, even though you clear z1 report, Z2 report has the items of
an account still.
(1/2)
< Z1: READ/RESET TOTALS >
1.PLU Sales
2.Misc. Sales
3.Group Sales
4.Department Sales
5.Scale Sales
6.Hourly Sales
7.Clerk Sales
8.Z1 Report
9.Reset Counters
Did the Report Print OK? (Y/N)
If you press the 8 key, the scale will
print the Z1 Summary report and
then prompt you with the following
screen.
If you select yes, then the screen
returns to the previous menu and
the sales totals for which you
generated the report are then
cleared.
This “Print check” feature can be incredibly useful. For example, if the scale runs out of labels or paper
while the report is printing and you loose some data, you select NO for the “Print check” screen.
82
Appendix A: Country Codes
#
1
2
3
4
5
6
7
8
9
10
11
12
13
14
15
16
17
18
19
20
21
22
23
24
25
26
27
28
29
30
31
32
33
34
35
36
37
38
39
40
41
42
43
44
45
46
47
48
49
50
51
52
53
54
55
56
57
58
59
60
Country
Afghanistan
Algeria
Andorra
Angola
Antarctica
Antigua & Barbuda
Argentina
Armenia
Australia
Austria
Azerbaijan
Bahamas
Bahrain
Bangladesh
Barbados
Belarus
Belgium
Belize
Benin
Bhutan
Bolivia
Bosnia & Herzegovina
Botswana
Brazil
Brunei
Bulgaria
Burkina Faso
Burma/Myanmar
Cambodia
Cameroon
Canada
Cape Verde
Central African Republic
Chad
Chile
China
Colombia
Comoros
Congo
Congo, Democratic Rep. of
Costa Rica
Cote d’Ivoire
Croatia
Cuba
Cyprus
#
61
62
63
64
65
66
67
68
69
70
71
72
73
74
75
76
77
78
79
80
81
82
83
84
85
86
87
88
89
90
91
92
93
94
95
96
97
98
99
100
101
102
103
104
105
106
107
108
109
110
111
112
113
114
115
116
117
118
119
120
Country
Denmark
Djibouti
Dominica
Dominican Republic
Ecuador
Egypt
El Salvador
Equatorial Guinea
Eritrea
Estonia
Ethiopia
Ecuador
Fiji
Finland
France
Gabon
Gambia
Georgia
Germany
Ghana
Greece
Grenada
Guatemala
Guinea
Guinea-Bissau
Guyana
Haiti
Honduras
Hungary
Iceland
India
Indonesia
Iran
Iraq
Ireland
Israel
Italy
Jamaica
Japan
Jordan
Kazakstan
Kenya
Kiribati
Korea, North
Korea, South
Kuwait
83
#
121
122
123
124
125
126
127
128
129
130
131
132
133
134
135
136
137
138
139
140
141
142
143
144
145
146
147
148
149
150
151
152
153
154
155
156
157
158
159
160
161
162
163
164
165
166
167
168
169
170
171
172
173
174
175
176
177
178
179
180
Country
Laos
Latvia
Lebanon
Lesotho
Liberia
Libya
Liechtenstein
Lithuania
Luxembourg
Macedonia
Madagascar
Malawi
Malaysia
Maldives
Mali
Malta
Marshall Islands
Mauritania
Mauritius
Mexico
Micronesia
Moldova
Monaco
Mongolia
Morocco
Mozambique
Namibia
Nauru
Nepal
Netherlands
New Zealand
Nicaragua
Niger
Nigeria
Norway
Oman
Pakistan
Palau
Panama
Papua New
Paraguay
Peru
Philippines
Poland
Portugal
Appendix A: Country Codes
#
181
182
183
184
185
186
187
188
189
190
191
192
193
194
195
196
197
198
199
200
201
202
203
204
205
0
Country
Qatar
Romania
Russian Federation
Rwanda
Saint Kitts
Saint Lucia
Saint Vincent
San Marino
Sao Tome
Saudi Arabia
Senegal
Seychelles
Sierra Leone
Singapore
Slovakia
Slovenia
Solomon Islands
Somalia
South Africa
Spain
#
206
207
208
209
210
211
212
213
214
215
216
217
218
219
220
221
222
223
224
225
226
227
228
229
230
Country
Sri Lanka
Sudan
Suriname
Swaziland
Sweden
Switzerland
Syria
Taiwan
Tajikistan
Tanzania
Thailand
Togo
Tonga
Trinidad and Tobago
Tunisia
Turkey
Turkmenistan
Tuvalu
Uganda
Ukraine
United Arab Emirates
COUNTRY CODE NOT USED.
84
#
231
232
233
234
235
236
237
238
239
240
241
242
243
244
245
246
247
248
249
250
251
252
253
254
255
Country
United Kingdom
United States
Uruguay
Uzbekistan
Vanuatu
Vatican City
Venezuela
Vietnam
Western Samoa
Yemen
Yugoslavia
Zambia
Zimbabwe
Appendix B: Label Formats
Format numbers 1 to 99 are built into LP-2; however, only 56 of the 99 available label formats are used.
These formats are a permanent part of the LP-2’s memory and CANNOT be lost or erased. Using the SP2 software package, you can program format numbers 100 to 999. Provided you have enough
memory, you can download those formats from your PC to your LP-2.
In all of the listings below, the label format number that is in bold is the number that you input to your
PLUs when you wish to use that label. The numbers prefixed with “LST” are Rittenhouse Inc. stock
numbers. Dimensions are specified as Width X Length.
GRAND TOTAL
TOTAL NET WT lb
1.00
PRICE / lb
TOTAL PIECES
1.23
AVG PRICE / lb
Misc By Weight PLU
5
PACKED ON
7-27-99
1.23
NET WT. lb
TIME
1.00
2:00 PM
GRAND TOTAL PRICE
TOTAL PRICE
PACKED ON
SELL BY
1.23
1.23
Store Name & Address
123 ABC Ave. Anywhere, USA
Store Name & Address
123 ABC Ave. Anywhere, USA
98: 50mm X 45mm
Add Up Total Format
7-27-99
7-27-99
99: 50mm X 45mm
Universal 50x45 Format
Misc By Count PLU
Misc Non-Food PLU
PRICE / lb
COUNT
3
QTY / $
NET WT. lb
3/1.00
TOTAL PRICE
1.00
PACKED ON
7-27-99
SELL BY
TOTAL PRICE
1.23
7-27-99
PACKED ON
7-27-99
Store Name & Address
123 ABC Ave. Anywhere, USA
Store Name & Address
123 ABC Ave. Anywhere, USA
99: 50mm X 45mm
Universal 50x45 Format
99: 50mm X 45mm
Universal 50x45 Format
85
Appendix B: Label Formats
There are many more formats that are the same or similar to the above, in which case the LP-2 is
capable of using those labels. For a complete cross-reference and listing, visit us on the web at
www.cas-usa.com. These formats are subject to change without notice. Type the format number into
a Label Format field to determine if your scale has such a format.
Number
1
2
3
4
5
6
7
8
10
11
12
13
14
21
22
23
24
25
29
35
41
43
44
51
52
53
54
55
56
61
62
63
64
65
Description
58mm X 30mm Non Upc
58mm X 60mm UPC, Ingredients
58mm X 60mm UPC, Ingredients
58mm X 50mm Non-UPC
58mm X 60mm UPC
60mm X 80mm UPC, Safe Handling
60mm X 43mm, UPC
60mm X 55mm, UPC, Ingredients
60mm X 40mm UPC
60mm X 40mm UPC
60mm X 60mm UPC, Ingredients
60mm X 40mm UPC
60mm X 60mm UPC, Ingredients
64mm X 49mm, UPC, Ingredients
64mm X 47mm, UPC
67mm X 37.5mm Non-UPC
67mm X 47.5mm Non-UPC
67mm X 47.5mm UPC
54mm X 52.5mm UPC
57mm X Continuous, UPC, Safe Handling, Ingredients
48mm X 40mm, UPC
48mm X 69.3mm UPC, 6 Line Ingredient
48mm X 54.8mm UPC, 6 Line Ingredient
57mm X 63.5mm, UPC, 6 Line Ingredients
64mm X 49mm, UPC, Ingredients
40mm X 92mm, UPC, Ingredients
40mm X 62mm, UPC
57mm X 49.2mm, UPC
40mm X 47mm Non-UPC
54mm X 35mm Non- UPC
54mm X 35mm Non- UPC
58mm X 30mm Non Upc
58mm X 30mm Non Upc
58mm X 40mm UPC
86
Scale
Manufacturer
CAS
CAS
CAS
CAS
CAS
Digi.NBI
Digi/NBI
Digi/NBI
CAS
CAS
CAS
CAS
CAS
Ishida
Ishida
Kubota
Kubota
Kubota
Kubota
TEC
TEC
TEC
TEC
TEC
Ishida
Digi/NBI
Digi/NBI
TEC
Digi
Acom
Acom
CAS
CAS
CAS
Stock #
LST-8000
LST-8010
LST-8020
LST-8030
LST-8040
LST-1264
LST-6110
LST-6250
CPT-6040
CPT-6040
CPT-6060
LST-6040
LST 6060
LST-4160
LST-4150
LST-3330
LST-3370
LST-3360
LST-3610
LST-5030
LST-2530
LST-2540
LST-2730
LST-4910
LST-4160
LGT-6410
LGT-1211
LST-4900
LST-60-N-R
acom 60/2c1i
acom 60/1c3i
cas8000/2c1i
cas8000/1c2i
cas8010/2c1i
Appendix B: Label Formats
66
67
58mm X 40mm UPC
65mm X 38mm Non-UPC, Ingredients
CAS
Hankook
68
62mm X 58mm
Hankook
69
40mm X 62mm UPC, Ingredients
Hankook
70
60mm X 60mm UPC, Ingredients
Hankook
89
97
46mm X 74mm Non-UPC, Ingredients, Horizontal
57mm X 100mm UPC, Ingredients, Safe Handling
MERIDITH
CAS
98
50mm X 45mm Grand Total Format for ST/TL key (ADD mode.)
CAS
99
50mm X 45mm Universal Format
CAS
87
cas8010/1c2i
HK-aco Non
UPC
HanAh Reum
ingr.???
hanahreum
40 X 60
hanahreum
58 X 60sh
MERIDITH
DEFAULT
LABEL
Total 50 X
45mm
Format
50 X 45mm
Mac#99
Appendix C: Quick Reference
How to Call up a
PLU
By-Weight PLU
OVERRIDE key
(By-Weight PLU)
By-Count PLU
OVERRIDE key
(By-Count PLU)
Non-Food PLU
OVERRIDE key
(Non-Food PLU)
SAVE key
PRE-PACK key
X key
RETURN key
TARE key
AUTO/MANUAL
key
C key
ZERO key
How to Program
PLU
To call up a PLU number 3:
1. Press the 3 key Î Press the PLU key.
2. Press the speed key #3.
* Speed Key, shifted (#57~ #112) : Press the PLU/SHIFT key Î Speed key
To call up a speed key #100: Press the PLU/SHIFT and Speed key #44.
Call up a By-Weight PLU ÎPlace an item on the platter Î Press the PRINT
key
Call up a By-Weight PLU Î Press the OVERRIDE key. Î Enter the password
and then press the PRINT key Î enter the temporary price ÎPlace an item
on the platter ÎPress the PRINT key.
Call up a By-Count PLU ÎEnter the quantity Î Press the PRINT key
Call up a By-Count PLU Î Press the OVERRIDE key Î Enter the password
and then press the PRINT key Î Enter the quantity ÎPress the FOR
keyÎchange pieces by pressing numeric keysÎ Press the FOR key Î
Change price by pressing numeric keys Î Press the PRINT key
Call up a Non-Food PLU Î Press the PRINT key
Call up a Non-Food PLU Î Press the OVERRIDE key Î Enter the password
and then press the PRINT key Î Enter the temporary price Î Press the
PRINT key
Call up a PLU Î Press the SAVE key Î(Place an item on the platter) Î Press
the PRINT key
* SAVE key is used to prevent the auto clearing of PLU data.
Press the PREPACK keyÎ Call up a PLU Î Place an item on the platter Î
Label is printed automatically
• To release prepack function, press the PREPACK key
To print 5 labels :
Call up a PLU Î Place an item on the platter ÎPress the X keyÎType a
number of labels Î Press the PRINT key
* When you want to stop label printing, press C(clear ) key
To undo erroneous sales transactions :
Press the RETURN key Î Enter the password and then press the PRINT key Î
call-up the PLU that you wish to returnÎ Enter the total price that was
printed on the return PLU’s label ÎPress the PRINT or RETURN key.
Put a container on the platterÎ Press the TARE keyÎ Put an item in the
container ÎCall up a PLU ÎPress the PRINT key
* To cancel the TARE function, remove the container and press the TARE
key.
Auto Print : Press the AUTO key (Auto lamp “ ▼” is ON) Î Call up a PLU
ÎPut an item on the platter Î Label is printed automatically
Manual Print : In the Auto mode, press the AUTO key. (Auto lamp “ ▼” is
OFF)
C key is used to clear erroneous entries and to clear PLUs that have been
called-up.
ZERO key is used to correct for a deviation from zero as long as there are no
PLUs or MISC PLUs called-up.
Press the MENU key Î Press the 4 key Î Enter the password and then press
the PRINT key Î Press the 2 keyÎ Program PLU.
88
Appendix C: Quick Reference
How to Set Speed Press the MENU key Î Press the 4 key Î Enter the password and then press
key
the PRINT key Î Press the 9 key Î Set Speed key by pressing the PAGE UP,
DOWN keys
ADD-UP Mode
Call up a PLU ÎPut an item on the platter ÎPress the ADD key Î Repeat
above steps ÎTo print the grand-total, press the ST/TTL key
VOID key
DATE/TIME
DEPT key
To void last transaction in ADD-UP mode :
Press the VOID key Î Enter the password and then press the PRINT key
Press the ALT and the DATE/TIME key Î Enter the password and then press
the PRINT key ÎEnter Year, Month, Day and then press the PRINT key
Press the DEPT key Î Enter the password and then press the PRINT key Î
Enter new Department number and then press the PRINT key
89
Warranty
CAS (USA) CORPORATION
LIMITED WARRANTY
CAS (USA) Corporation (“CAS”) warrants to the first end user customer of the CAS product enclosed with this limited warranty statement,
that the product if purchased and used in the United States or Canada, conforms to the manufacturer’s specifications and will be free from
defects in workmanship and materials for a period indicated on the space provided on the bottom of this form from the date of original
purchase or three months after product is shipped from CAS to the CAS Authorized Dealer, which ever comes first. CAS warrants that the
CAS product is manufactured from new components and parts or like-new components and parts which perform like new and meet the CAS
standard of quality. And only on CAS printing products, CAS also warrants that the consumable labels enclosed will perform to the
manufacturer’s specific usage, which usage may expire before the expiration of the limited warranty for the CAS product.
Should your CAS product prove defective during the warranty period, please contact the CAS Dealer from which you purchased the product..
CAS or a CAS Authorized Service Center will, at their option, repair or replace on an exchange basis the defective unit, without charge for
parts or labor. When warranty service involves the exchange of the product or of a part, the item replaced becomes CAS property. The
exchanged product or part may be new or previously repaired to the CAS standard of quality. Exchange or replacement products or parts
assume the remaining warranty period of the product covered by this limited warranty.
This warranty covers only normal consumer use in the United States and Canada. This warranty does not cover labels or third party parts,
components or peripheral devices added to the CAS product after its shipment from CAS, e.g., the dealer-added boards or chips, or the
accuracy of the product after it is shipped from CAS. CAS is not responsible for warranty service should the CAS label or logo or the rating
label or serial number be removed or tampered with or should the product fail to be properly maintained or fail to function properly as a result
of misuse, abuse, improper installation, neglect, improper shipping, damage caused by disasters such as fire, flood, and lightning, improper
electrical current, software problems, interaction with non-CAS products, or service other than by CAS or a CAS Authorized Service Center.
Packaging and shipping cost to and from the CAS repair facility will be CAS’s responsibility. If a claimed defect cannot be identified or
reproduced in service, you will be held responsible for costs incurred.
THE WARRANTY AND REMEDY PROVIDED ABOVE ARE EXCLUSIVE AND IN LIEU OF ALL OTHER
EXPRESS OR IMPLIED WARRANTIES INCLUDING, BUT NOT LIMITED TO, THE IMPLIED WARRANTIES OF
MERCHANTABILITY OR FITNESS FOR A PARTICULAR PURPOSE. SOME LAWS DO NOT ALLOW THE
EXCLUSION OF IMPLIED WARRANTIES. IF THESE LAWS APPLY, THEN ALL EXPRESS AND IMPLIED
WARRANTIES ARE LIMITED TO THE WARRANTY PERIOD IDENTIFIED BELOW. UNLESS STATED HEREIN,
ANY STATEMENTS OR REPRESENTATIONS MADE BY ANY OTHER PERSON OR FIRM ARE VOID. EXCEPT
AS PROVIDED IN THIS WRITTEN WARRANTY, NEITHER CAS (USA) CORPORATION NOR ITS AFFILIATES
SHALL BE LIABLE FOR ANY LOSS, INCONVENIENCE, LOSS OF ANY DATA OR PROGRAMMING, OR
DAMAGE, INCLUDING DIRECT, SPECIAL, INCIDENTAL, OR CONSEQUENTIAL DAMAGES, RESULTING
FROM THE USE OR INABILITY TO USE THE CAS PRODUCT, WHETHER RESULTING FROM BREACH OF
WARRANTY OR ANY OTHER LEGAL THEORY.
In Canada, warranties include both warranties and conditions.
Some jurisdictions do not allow limitations on how long an implied warranty lasts and some jurisdictions do not allow the
exclusion or limitation of incidental or consequential damages, so the above limitations and exclusions may not apply to you.
This warranty gives you specific legal rights, and you may have other rights that may vary from jurisdiction to jurisdiction.
This warranty applies ONLY to the LP-Series label printing scales
WARRANTY PERIOD: 1 (ONE) YEAR
To locate the CAS Authorized Dealer or CAS Authorized Service Center nearest you call:
(201) 933-9002
or write to:
CAS (USA) Corporation • 99 Murray Hill Parkway • East Rutherford, NJ 07073
90
Warranty
CAS Corporation, 2006
VER 0.90