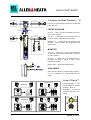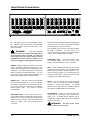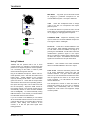
1
Dual Function Live Sound Console
USER GUIDE
Publication AP4314
Introduction
This user guide presents a quick reference to the ML4000. We recommend that you read this fully
before starting. Included is information on installing, connecting and operating the console, panel
drawings, system block diagram and technical specification. For further information on the basic
principles of audio system engineering, please refer to one of the specialist publications available
from bookshops and audio equipment dealers.
Whilst we believe the information in this guide to be reliable we do not assume responsibility for
inaccuracies. We also reserve the right to make changes in the interest of further product
development.
We are able to offer further product support through our world-wide network of approved dealers
and service agents. You can also access our Web site on the Internet for information on our
product range, assistance with your technical queries or simply to chat about matters audio. To
help us provide the most efficient service please keep a record of your console serial number, and
date and place of purchase to be quoted in any communication regarding this product. The serial
number is located on the rear panel.
Check out our home site for information on the company and its pedigree, our full product range
and our design philosophy. We also have a site dedicated to the exciting ML Series consoles.
www.allen-heath.com
www.mlseries.com
ML4000 User Guide AP4314 Issue 4
Copyright © 2003 Allen & Heath Limited. All rights reserved
Manufactured in the United Kingdom by Allen & Heath Limited
Kernick Industrial Estate, Penryn, Cornwall, TR10 9LU, UK
http://www.allen-heath.com
2
ML4000 User Guide
Contents
Introduction.......................................................... 2
Configuring Groups and Auxes......................... 34
Warranty............................................................... 4
Main Mix Masters............................................... 35
Important Safety Instructions .............................. 5
Using the Engineers Wedge Monitor ................ 35
Mains Plug Wiring Instructions............................ 6
Matrix ................................................................. 36
General Precautions ............................................ 6
2-Track Output................................................... 37
ML4000 Key Features ......................................... 7
VCA Groups....................................................... 38
Quick Start Sheet................................................. 8
VCA Groups Explained...................................... 38
System Block Diagram ...................................... 10
Assigning VCA Groups...................................... 40
Technical Specifications.................................... 12
Mute Groups...................................................... 41
The Range ......................................................... 13
Assigning Mute Groups..................................... 41
Installation Details.............................................. 13
Snapshot Memories .......................................... 42
Connecting the Power Supply .......................... 14
Channel Automation Safes................................ 42
Turning the Console On or Off .......................... 14
Headphones / Local Monitor / PAFL ................. 43
Earthing.............................................................. 15
Oscillator / Noise Generator .............................. 45
Rear Panel Connections.................................... 16
Intercom............................................................. 46
Audio Connector Types and Wiring .................. 18
Talkback ............................................................ 47
Gain Structure.................................................... 19
Meterpod ........................................................... 48
Control Layout and Description ........................ 20
Meter Types ....................................................... 49
Mono Input and EQ ........................................... 22
MIDI Overview.................................................... 50
Using the Equaliser ........................................... 23
Changing the MIDI channel number ................. 50
Channel Group / Auxiliary Sends ...................... 24
MIDI Channel Mutes .......................................... 51
Channel Internal Link Options........................... 25
MIDI Snapshot Messages ................................. 51
Using the GRP/AUX Sends ............................... 25
MIDI AFL Messages........................................... 51
Channel Main Mix and Fader ............................ 26
Archiving the Console Settings ......................... 52
Removing the Fader .......................................... 27
Operating System Technical Support............... 53
Checking the Channel Signal Level .................. 27
Operating Software Version Number ................ 53
Using LCRplus™................................................ 28
Loading New Operating Software ..................... 53
Stereo Input and EQ.......................................... 30
Console Reset ................................................... 53
Using the Dual Inputs ........................................ 31
Blank for User Notes ......................................... 54
Group / Aux Fader and Rotary Masters ............ 32
Cue Sheet .......................................................... 55
ML4000 User Guide
3
Limited One Year Warranty
This product has been manufactured in the UK by ALLEN & HEATH and is
warranted to be free from defects in materials or workmanship for period of one
year from the date of purchase by the original owner.
To ensure a high level of performance and reliability for which this equipment has
been designed and manufactured, read this User Guide before operating.
In the event of a failure, notify and return the defective unit to ALLEN & HEATH or
its authorised agent as soon as possible for repair under warranty subject to the
following conditions :
Conditions Of Warranty
1. The equipment has been installed and operated in accordance with the
instructions in this User Guide
2. The equipment has not been subject to misuse either intended or accidental,
neglect, or alteration other than as described in the User Guide or Service
Manual, or approved by ALLEN & HEATH.
3. Any necessary adjustment, alteration or repair has been carried out by ALLEN
& HEATH or its authorised agent.
4. The defective unit is to be returned carriage prepaid to ALLEN & HEATH or its
authorised agent with proof of purchase.
5. Units returned should be packed to avoid transit damage.
In certain territories the terms may vary. Check with your ALLEN & HEATH agent
for any additional warranty which may apply.
This product complies with the European Electromagnetic
Compatibility directives 89/336/EEC & 92/31/EEC and the
European Low Voltage Directives 73/23/EEC & 93/68/EEC.
This product has been tested to EN55103 Parts 1 & 2 1996 for use in
Environments E1, E2, E3, and E4 to demonstrate compliance with the
protection requirements in the European EMC directive 89/336/EEC. During
some tests the specified performance figures of the product were affected.
This is considered permissible and the product has been passed as
acceptable for its intended use.
Allen & Heath has a strict policy of ensuring all products are tested to the
latest safety and EMC standards. Customers requiring more information
about EMC and safety issues can contact Allen & Heath.
NOTE: Any changes or modifications to the console not approved by Allen &
Heath could void the compliance of the console and therefore the users
authority to operate it.
4
ML4000 User Guide
Important Safety Instructions
WARNINGS
- Read the following before proceeding :
CAUTION
ATTENTION: RISQUE DE CHOC ELECTRIQUE – NE PAS OUVRIR
Read instructions:
Retain these safety and operating instructions for future reference. Adhere to
all warnings printed here and on the console power unit. Follow the operating
instructions printed in this user guide and the power unit user guide.
Do not remove covers:
Operate the power unit with its covers correctly fitted. Refer any service work
to competent technical personnel only.
Power sources:
Connect the power unit to a mains power only of the type described in this
User Guide and marked on the rear panel. Use the power cord with sealed
mains plug appropriate for your local mains supply as provided with the
console. If the provided plug does not fit into your outlet consult your service
agent for assistance.
Power cord routing:
Route the power cord so that it is not likely to be walked on, stretched or
pinched by items placed upon or against it.
Grounding:
Do not defeat the grounding and polarisation means of the power cord plug.
Do not remove or tamper with the ground connection in the power cord.
WARNING: This equipment must be earthed.
Water and moisture:
To reduce the risk of fire or electric shock do not expose the power unit or
console to rain or moisture or use it in damp or wet conditions. Do not place
containers of liquids on it which might spill into any openings.
Ventilation:
Do not obstruct the ventilation slots or position the console or power unit
where the air flow required for ventilation is impeded. If the console is to be
operated in a flightcase ensure that it is constructed to allow adequate
ventilation.
Heat and vibration:
Do not locate the power unit in a place subject to excessive heat or direct
sunlight as this could be a fire hazard. Locate the console and its power unit
away from any equipment which produces heat or causes excessive
vibration.
Servicing:
Switch off the equipment and unplug the power cord immediately if it is
exposed to moisture, spilled liquid, objects fallen into the openings, the power
cord or plug become damaged, during lightening storms, or if smoke, odour
or noise is noticed. Refer servicing to qualified technical personnel only.
Installation:
Install the console in accordance with the instructions printed in this User
Guide. Do not connect the output of power amplifiers directly to the console.
Use audio connectors and plugs only for their intended purpose.
ML4000 User Guide
5
Important Mains Plug Wiring Instructions.
The power unit is supplied with a moulded mains plug fitted to the AC mains
power lead. Follow the instructions below if the mains plug has to be
replaced.
The mains lead wires are coloured in accordance with the following code:
WIRE COLOUR
TERMINAL
European
USA/Canada
L
LIVE
BROWN
BLACK
N
NEUTRAL
BLUE
WHITE
E
EARTH GND
GREEN & YELLOW
GREEN
The wire which is coloured Green and Yellow must be connected to the
terminal in the plug which is marked with the letter E or with the Earth symbol.
This appliance must be earthed.
The wire which is coloured Blue must be connected to the terminal in the plug
which is marked with the letter N.
The wire which is coloured Brown must be connected to the terminal in the
plug which is marked with the letter L.
Ensure that these colour codes are followed carefully in the event of the plug
being changed.
General Precautions
6
Damage :
To prevent damage to the controls and cosmetics avoid placing heavy
objects on the control surface, scratching the surface with sharp objects, or
subjecting the console to rough handling and vibration.
Environment :
Protect from excessive dirt, dust, heat and vibration when operating and
storing. Avoid tobacco ash, smoke, drinks spillage, and exposure to rain and
moisture. If the console becomes wet, switch off and remove mains power
immediately. Allow to dry out thoroughly before using again.
Radiation :
To avoid induced noise and interference pickup do not operate the console
close to strong sources of electromagnetic radiation such as power supplies,
video monitors, lighting cables and dimmers.
Cleaning :
Avoid the use of chemicals, abrasives or solvents. The control panel is best
cleaned with a soft brush and dry lint-free cloth. Stubborn marks can be
removed using a cloth dampened with isopropyl alcohol. Do not leave
marking tape stuck to the console for long periods of time as the adhesive
can degrade and leave a sticky residue. The faders, switches and
potentiometers are lubricated for life. The use of electrical lubricants on these
parts is not recommended. Refer to the power unit user guide for instructions
on cleaning its ventilation filters.
Transporting :
The console should be transported in the original packing or purpose built
foam lined flightcase. Protect the control surface from damage during transit.
The console is a large and heavy item. To avoid injury ensure adequate man
power and precaution when lifting or moving the console.
ML4000 User Guide
ML4000 Key Features
The Allen & Heath ML4000 is a large format VCA equipped dual function live sound console
providing many of the features of its larger brother the ML5000. It can be quickly configured for
front-of-house (FOH) or stage monitor mixing. As one console suitable for both applications it is
equally well suited to installation, rental and touring. It offers an IO capability and feature set that
satisfies the latest trends in live sound engineering, in particular the growing number of inputs and
outputs for multi-speaker house and monitor systems, demands of stereo in-ear monitoring, 3
speaker LCR imaging, advanced grouping and automation. The design ensures on-the-road
durability, a clear layout for easy walk up and go operation, and no-compromise audio
performance.
Inputs and Outputs
•
4 Standard frame sizes: 24+2, 32+2, 40+2, 48+2 (mono + dual stereo channels)
•
Optional ‘B’ versions: 20+6, 28+6, 36+6, 44+6 (mono + dual stereo channels)
•
24, 32, 40, 48 mono mic/line inputs with inserts and direct outputs
•
2 dual stereo line inputs standard (6 optional)
•
24 input sidecar to expand to a maximum 96 inputs
•
Main Left, Right and Centre outputs with inserts, Centre configurable as the engineers monitor
•
8 Groups, 12 Auxes: Group/Aux 1-8 and Aux 9-12 with faders and inserts, Aux 1-8 with rotaries
•
11x4 Matrix
•
2-Track monitor input and recording send
•
Stereo headphones and local monitors
•
Talkback mic input
•
ClearCom compatible intercom interface
Groups and Automation
•
8 VCA groups with mutes and PAFL monitoring
•
8 audio groups with LCRplus™ sub grouping
•
8 mute groups
•
MIDI accessible snapshot memories
•
MIDI mute on/off, snapshot recall and dump in/out control
•
Channels can be made safe from the automation
Processing and Control
•
4-Band full sweep mono EQ with switched Q mids, 4-band fixed frequency stereo EQ
•
Sweepable high pass filter
•
LCRplus™ 3 speaker imaging system
•
Protected mode switching to configure the console for FOH or monitor application
•
Intelligent PAFL system with all-clear, PFL/in-place AFL, priority, auto-cancel/add mode…
•
Assignable talkback and intercom
•
1kHz tone and pink noise generator for system line-up and testing
•
Full console monitoring and extensive metering of inputs, mix busses and outputs
ML4000 User Guide
7
QUICK START SHEET
Copy this sheet to keep with the console for guest user reference.
AUX MIX
Configure the Mode Switches :
AUX OUT
AUX
1
Use a pen or pointed object to select the underpanel
mode switches.
+6
OO
AFL
AUX
AUX 1-8 = AUX 1-4 and 5-8 switchable pre or postfade. Rotary masters.
INSERT
GROUP MIX
FRONT-OF-HOUSE
FOH
MONITOR
mode
#
TB
GROUP OUT
AUX 9-12 = Switchable pre or post-fade and mono
or stereo in pairs. Fader masters with inserts.
MUTE
EDIT/SAFE
AFL
GROUP 1-8 = Audio groups with paired routing
switches. Fader masters with subgrouping and
matrix sends.
PK
+6
MAIN
MIX
6
0
-6
LCR +
BLEND
SIG
OO
+6
OO
+6
OO
+6
=
7
5
LR
0
=
C
PAN
MONITOR
8
5
L
10
20
R
SUBGROUP
AUX 1-8 = Monitor mix 1-4 and 5-8 switchable pre
or post-fade. Fader masters with inserts. Group mix
on rotary masters.
MATRIX
30
OO
GROUP
AUX 9-12 = Monitor mix 9-12 switchable pre or
post-fade and mono or stereo in pairs. Fader
masters with inserts.
down
MAIN C OUT = Engineers wedge monitor.
WEDGE
mode
C
MONITOR
DUAL MODE
Set the mode switches to configure fader masters 18 in any combination of audio groups and aux
sends.
Using LCRplus™
STEREO+FILL
PAN and BLEND = Two
controls adjust the balance
between L, R and C.
MONO PA
L
R
C
BLEND
L
R
C
MAIN MIX = Routes the
channel to the main L,R,C
outputs.
BLEND
LR
C
L
R
PAN
LR
C
L
R
PAN
LCR +
BLEND
STEREO PA
BLEND
C
L
R
PAN
8
R
C
L
BLEND
LR
MAIN
MIX
LCR
LR
L
=
LR
C
L
R
R
C
=
C
PAN
PAN
L
R
ML4000 User Guide
How to Assign a VCA or MUTE GROUP :
CHANNEL
PRE-FADE SENDS
POST-FADE SENDS
SUBGROUP
PAN
L
R MAIN MIX
C
PAN
1.
Press EDIT GROUP. The key flashes.
2.
Press MUTE on the master you want to edit. It flashes.
3.
Press the channel MUTE keys to assign or remove them
from the group.
4.
Check which channels are assigned on the channel
SAFE/EDIT LEDs.
5.
Press the next master to edit. Press EDIT GROUP when
finished to return to exit edit mode.
MATRIX SEND
INSERT
ASSIGN
CHANNEL
FADER
MASTER
FADER
AUDIO GROUP
AUDIO BUSS
CHANNEL
PRE-FADE SENDS
POST-FADE SENDS
L
R MAIN MIX
C
PAN
M
U
T
E
MUTE
EDIT
GROUP
SELECT GROUP TO EDIT
ASSIGN USING CH MUTES
SAFE
SAFE/EDIT
PAFL
PAFL
PK
MUTE
+6
0
VCA
+
ASSIGN
DC
-6
VCA GROUP
10
10
5
5
SIG
MASTER
FADER
CHANNEL
FADER
DC VOLTAGE
Using P/AFL :
PFL / AFL
AUTO
CANCEL
ADD MODE
Input PAFL = Select mono PFL or
stereo in-place AFL.
PFL
AFL
Output AFL = Press one for
mono, two together for stereo.
IN-PLACE
INPUT PAFL
Problems ?
www.allen-heath.com
Input PAFL overrides output AFL.
Output AFL cancels input PAFL.
CLEAR
ALL
The channel is routed but there is no
audio. If it is assigned to a VCA group
check that the group fader is up.
The audio groups do not work. Check
the setting of the fader master 1-8
GRP/AUX mode switches.
The PAN control does not work. For
main mix check the setting of the BLEND
control. For groups check the GRP PAN
ON switch.
-
20
10
7
5
3
1
0
3
5
+
-
20
10
7
5
3
1
0
3
5
+
-
20
10
7
5
3
1
0
PAFL
3
5
+
AFL
CALL
16
12
9
6
3
0
3
6
9
12
15
18
21
24
27
30
off
-
20
10
7
5
3
1
0
3
5
+
-
20
10
7
5
3
1
0
3
5
+
-
20
10
7
5
3
1
0
PAFL
3
5
+
AFL
CALL
The console takes a long time to
power up. Check the rear panel slide
switch setting. RS232 takes longer to
boot in than MIDI.
16
12
9
6
3
0
3
6
9
12
15
18
21
24
27
30
16
12
9
6
3
0
3
6
9
12
15
18
21
24
27
30
off
16
12
9
6
3
0
3
6
9
12
15
18
21
24
27
30
16
12
9
6
3
0
3
6
9
12
15
18
21
24
27
30
PFL
16
12
9
6
3
0
3
6
9
12
15
18
21
24
27
30
AFL-L AFL-R AFL-M
-
20
10
7
5
3
1
0
3
5
+
-
20
10
7
5
3
1
0
3
5
+
-
20
10
7
5
3
1
0
PAFL
3
5
+
The channel does not respond to MIDI.
Check that it has not been made safe
(green SAFE/EDIT LED on in normal
console mode).
AFL
CALL
16
12
9
6
3
0
3
6
9
12
15
18
21
24
27
30
off
-
20
10
7
5
3
1
0
3
5
+
-
20
10
7
5
3
1
0
3
5
+
-
20
10
7
5
3
1
0
PAFL
3
5
+
AFL
CALL
16
12
9
6
3
0
3
6
9
12
15
18
21
24
27
30
16
12
9
6
3
0
3
6
9
12
15
18
21
24
27
30
off
16
12
9
6
3
0
3
6
9
12
15
18
21
24
27
30
16
12
9
6
3
0
3
6
9
12
15
18
21
24
27
30
AFL
16
12
9
6
3
0
3
6
9
12
15
18
21
24
27
30
AFL-L AFL-R AFL-M
ML4000 User Guide
9
SYSTEM BLOCK DIAGRAM
VCA GROUPS
METER
PFL
MUTE
PEAK
L
MUTE GROUPS
SNAPSHOTS
GAIN
+48V
C
R
PAD
INSERT
SEND RETURN
HPF IN
+
-
PAFL
PAFL LOGIC
FADER
MONO CHANNEL
L AFL
+
R AFL
VCA
EQ IN
+
-
+
PAN
LCR+
MIX
BLEND
L MIX
R MIX
C MIX
INPUT
FILTER
FREQ
L
4 BAND EQUALISER
LF
LM
HM
R
LR
C
HF
PRE-FADE AUX
OPTION LINKS
POST-MUTE
J7
J3
J8
POST-EQ
PRE-EQ
J2
PRE-INSERT
J1
GROUP
ASSIGN
1-2
GRP 1
GRP 2
3-4
GRP 3
GRP 4
5-6
PRE
PRE
7-8
PRE
AUX5 AUX6 AUX7 AUX8
AUX9
AUX10
AUX11
(AUX1 ONLY)
AUX12
STEREO
PAN
AUX11
LEV 11-12
AUX9
PAN
AUX 8
AUX 7
AUX 6
AUX 5
AUX 4
AUX 3
AUX 2
AUX 1
LEV 9-10
STEREO
AUX10
PRE-FADE
POST-TRIM
PAFL
PAFL LOGIC
FADER
STEREO CHANNEL
VCA GROUPS
METER
PFL
MUTE
PEAK
+
-
L
MUTE GROUPS
SNAPSHOTS
ON
INPUT A
AUX12
AUX1 AUX2 AUX3 AUX4
J4
J6
J9
J10
C
R
GAIN
+
SOURCE
+
-
R
GRP 7
GRP 8
J5 POST-FADE
DIRECT OUT
L
GRP 5
GRP 6
PRE
DIRECT OUT
OPTION LINKS
+
VCA
EQ IN
MONO L
BAL
LCR+
BLEND
+
L AFL
+
R AFL
MAIN
MIX
L MIX
R MIX
C MIX
MONO R
L
4 BAND EQUALISER
+
-
L
LF
LM
HM
HF
PRE-FADE AUX
OPTION LINKS
ON
INPUT B
GAIN
POST-EQ
+
-
R
PRE-EQ
PRE-FADE
LR
C
+
POST-MUTE
J3
GROUP
ASSIGN
R=J2
1-2
L=J1
POST-FADE
R
+
3-4
L
R
M
L
R
M
5-6
7-8
PRE
PRE
AUX9
AUX5 AUX6 AUX7 AUX8
AUX10
AUX5 AUX6 AUX7 AUX8
+48V
AUX12
STEREO
11-12 LEV
AUX9
AUX10
PAN
AUX 8
AUX 7
AUX 6
AUX 5
AUX 8
AUX 7
AUX 6
AUX 5
OSC/NOISE/TALKBACK
TRIM
AUX11
STEREO
9-10 LEV
PINK NOISE
PRE
INTERCOM
OSC/NOISE TO TB
TRIM
PAN
AUX11
AUX12
PRE
TALK TO INTERCOM
DIM
+
TRIM
SIDETONE
+
TB
LISTEN
TO PHONES
TALK TO TB
1kHz OSC
Disable
10
TB MIC
LAMP
+
-
INTERCOM IN/OUT
MONITOR DIM
CALL
MONITOR DIM
ML4000 User Guide
GRP 1
GRP 2
GRP 3
GRP 4
GRP 5
GRP 6
GRP 7
GRP 8
GRP 1-8
AUX 9-12
TB ENABLE
TB
MUTE GROUPS
SNAPSHOTS
MUTE
AFL
METER
PEAK
L AFL
FADER
MODE
(1-8 ONLY)
GRP
MATRIX
R AFL
INSERT
SEND RETURN
MIX
AFL LOGIC
TO VU METER
+
-
MAIN
MIX
BLEND
PAN
L
R
LR
GRP 1
L MIX
R MIX
C MIX
LCR+
GRP 2
(1-8 ONLY)
C
GRP 3
Press MODE to reverse GRP and AUX master control sections
GRP 4
AFL
GRP TO MTX
AFL LOGIC
AUX 1-8
BAL
GRP OUT
GRP 5
GRP 6
L AFL
GRP 7
MIX
R AFL
MASTER
BAL
AUX OUT
GRP 8
AUX
L
R
LEFT
TB
FADER
PEAK
C
L
INSERT
SEND
RETURN
L MIX
LEFT
OUT
BAL
TB ENABLE
TB
+
-
L MIX
LEVEL
POST-FADE
PRE-INSERT
MUTE
TB
MUTE GROUPS
SNAPSHOTS
RIGHT
PRE-INSERT
AFL
AFL LOGIC
R
INSERT
SEND
RETURN
R MIX
2TRK
OUT
R
POST-FADE
FADER
PEAK
L
RIGHT
OUT
BAL
+
-
R MIX
L AFL
R AFL
WEDGE mode
C
TB
CENTRE
PEAK
INSERT
SEND
RETURN
C MIX
C MIX
BAL
MUTE
FADER
OUT
MUTE
C METER
MUTE GROUPS
SNAPSHOTS
CENTRE
OUT
BAL
MATRIX
+
-
WEDGE MON
L METERS
MONITOR
METERS 1-8
GRP
PFL MIX
PFL
L AFL MIX
R METERS
L
L AFL
R AFL MIX
C METERS
+
METERS 9-12
AUX
MATRIX
R
R AFL
C
METER SELECT
MONITOR SOURCE
LR
C
FROM INTERCOM
L
+
PHONES
WEDGE MON
R
+
C
PFL
TRIM
L
R
HEADPHONES
+
TB DIM
2TRK
+
MONO
L
2TRK
IN
R
+
-
LOCAL
+
-
R
PAFL LOGIC
ML4000 User Guide
L
+
AFL
PFL
LOCAL
MONITOR
INPUT PAFL
OUTPUT AFL
11
Technical Specifications
0dBu = 0.775 Vrms, +4dBu = 1.23 Vrms
Operating Levels
Channels ......................................... 0dBu Headroom +21dB
Mix .................................................. -2dBu Headroom +23dB
Max XLR output .............................. +23dBu
Frequency Response Referred to 1kHz at +4dBu
Mic to main output (+40dB)............. 20Hz to 30kHz +0/-0.5dB
Line to main output (0dB)................ 20Hz to 30kHz +0/-0.5dB
Distortion @1kHz +14dBu
THD+noise ...................................... < 0.02%
CMRR Common mode rejection @1kHz
Mic (+40dB)..................................... > 80dB
Mic + Pad (0dB) .............................. > 50dB
Crosstalk Referred to driven channel @1kHz
Channel to channel ......................... < -95dB
Mute shutoff .................................... < -90dB
Fader shutoff................................... < -90dB
Noise Performance Measured rms 22Hz to 22kHz unweighted
Mic EIN with 150 ohm source ......... -128dB
Residual output noise ..................... < -98dBu
Mix noise, nothing routed................ < -94dBu
Mix noise, 24 channels routed ........ < -84dBu
Metering
Reading 0................. 0dBu at XLR outputs
LED meters .............. Peak reading, 3 colours
VU meters ................ Ave reading, Illuminated moving coil
Peak indicators ........ 5dB before clip, multi-point sensing
Input meters ............. 5 bar LED (signal, -6, 0, +6, peak)
Group mix meters .... 5 bar LED (signal, -6, 0, +6, peak)
Group/Mtx meters .... VU
L,R,C meters ............ VU and 16 bar LED
Lamp Connectors x3
Connector ....................................... XLR-F 4pin
Rating.............................................. 12V 400mA max
Channel Filters
Slope ............................................... 12dB/oct high pass
Frequency ....................................... 20Hz to 400Hz
Mono Equaliser
HF................. +/-15dB, 2kHz to 20kHz shelf
HM................ +/-15dB, 500Hz to 15kHz bell, Q = 1 or 2
LM ................ +/-15dB, 35Hz to 1kHz bell, Q = 1 or 2
LF ................. +/-15dB, 20Hz to 200Hz shelf
Stereo Equaliser
HF................. +/-15dB, 12kHz shelf
HM................ +/-15dB, 2.5kHz bell
LM ................ +/-15dB, 250Hz bell
LF ................. +/-15dB, 60Hz shelf
Power Supply Model MPS14
Type ........................... External 2U rack or floor mount
Mains input ................. 100-230V 50/60Hz universal input
Power consumption.... 500W
Full protection and fan cooling
Built-in combiner for redundant supply
Dimensions
Width.............. Depth ...... .....Height
24 Channel
1196 (47”) ...... 781 (30.7”) ....282 (11.1”)
32 Channel
1451 (57”) ...... 781.......... .....282
40 Channel
1706 (67”) ...... 781.......... .....282
48 Channel
1961 (77”) ...... 781.......... .....282
Sidecar
831 (33”) ........ 781.......... .....282
MPS14 psu
483 (19”) ........ 260 (10.2”) ....
Weights
24 Channel..... 53 kg (116 lbs)
32 Channel..... 65 kg (143 lbs)
40 Channel..... 75 kg (165 lbs)
48 Channel..... 87 kg (191 lbs)
24 Sidecar...... 40 kg (88 lbs)
MPS14 psu .... 2.5 kg (5 lbs)
INPUTS:
Mic (Pad out)................ XLR.................balanced, pin2+........ 2k ohm ..............variable -60 to -10dBu ........ Max +11dBu
Mic (Pad in).................. ........................ ................................. >20k ohm..........variable -40 to +10dBu ....... Max +31dBu
Stereo A ...................... TRS jack .........balanced, tip+........... >20k ohm..........variable -18 to +6dBu ......... Max +27dBu
Stereo B ...................... XLR.................balanced, pin2+........ >20k ohm..........variable –18 to +6dBu ........ Max +27dBu
2-Track ......................... TRS jack .........balanced, tip+ .......... >20k ohm..........+4dBu ................................. Max +25dBu
INSERTS:
Input send .................... TRS jack .........ground comp, tip+ .... <50 ohm............0dBu ................................... Max +21dBu
Input return................... TRS jack .........balanced, tip+........... >20k ohm..........0dBu ................................... Max +21dBu
Output send ................. TRS jack .........ground comp, tip+ .... <50 ohm............-2dBu.................................. Max +21dBu
Output return................ TRS jack .........balanced, tip+........... >20k ohm..........-2dBu.................................. Max +21dBu
OUTPUTS:
L,R,C ............................ XLR.................balanced, pin2+........ <75 ohm............0Bu ..................................... Max +23dBu
Grp/Aux 1-12................ XLR.................balanced, pin2+........ <75 ohm............0dBu ................................... Max +23dBu
Matrix 1-4 ..................... XLR.................balanced, pin2+........ <75 ohm............0dBu ................................... Max +23dBu
Direct out...................... TRS jack .........ground comp, tip+ .... <50 ohm............0dBu ................................... Max +21dBu
2-Track ......................... TRS jack .........ground comp, tip+ .... <50 ohm............0dBu ................................... Max +21dBu
Local Monitor ............... TRS jack .........ground comp, tip+ .... <50 ohm............0dBu ................................... Max +21dBu
Headphones................. TRS jack .........tip left, ring right........ for stereo headphones >30 ohms
12
ML4000 User Guide
The Range
•
ML4000-24 24 mono, 2 dual stereo inputs
•
MPS14
2U power supply unit
•
ML4000-32 32 mono, 2 dual stereo inputs
•
002-583
2.8 metre DC power lead
•
ML4000-40 40 mono, 2 dual stereo inputs
•
002-584
0.5 metre DC combiner lead
•
ML4000-48 48 mono, 2 dual stereo inputs
•
AP4314
ML4000 Console User Guide
•
ML4000-24B 20 mono, 6 dual stereo inputs
•
AP4373
ML4000 Sidecar User Guide
•
ML4000-32B 28 mono, 6 dual stereo inputs
•
AP3898
MPS14 User Guide
•
ML4000-40B 36 mono, 6 dual stereo inputs
•
AP4316
ML4000 Service Manual
•
ML4000-48B 44 mono, 6 dual stereo inputs
•
AL4061
Gooseneck lamp 18”
•
ML4000-24SC 24 mono input sidecar
Installation Details
Weights
24 Channel
32 Channel
40 Channel
48 Channel
24 Channel sidecar
MPS14 psu
53 kg (116 lbs)
65 kg (143 lbs)
75 kg (165 lbs)
87 kg (191 lbs)
40 kg (88 lbs)
2.5 kg (5 lbs)
HEADPHONES SOCKET
UNDER ARMREST
LAMP SOCKETS
282
130
781
ML4000-24
ML4000-32
ML4000-40
ML4000-48
ML4000-24SC = 831
440
482.6
FC 76.2
90
263
REMOVABLE RACK EARS
2U HEIGHT
ML4000 User Guide
=
=
=
=
1196
1451
1706
1961
Refer to the power supply user guide
for safety and installation instructions.
Heed all warnings printed in the user
guide and on the power unit.
Refer to the sidecar user guide for
instructions on connecting the sidecar
expander to the console.
13
Connecting the Power Supply
DO NOT OBSTRUCT VENTILATION OPENINGS.
DO NOT OPEN. NO USER SERVICEABLE PARTS INSIDE.
THIS APPARATUS MUST BE EARTHED BY THE POWER CORD.
CAUTION
WARNING: TO REDUCE THE RISK OF ELECTRIC SHOCK
DO NOT EXPOSE THIS APPARATUS TO RAIN OR MOISTURE.
AVIS: RISQUE DE CHOC ELECTRIQUE - NE PAS OUVRIR.
CAUTION: FOR CONTINUED PROTECTION AGAINST RISK OF FIRE REPLACE FUSE
WITH SAME TYPE AND RATING. DISCONNECT SUPPLY BEFORE CHANGING FUSE.
ATTENTION: REMPLACER LE FUSIBLE AVEC UN DES MEMES CARACTERISTIQUES.
COUPER L'ALIMENTATION AVANT DE CHANGER LE FUSIBLE.
MAINS INPUT
FUSE
T
T5A 250V
100V - 230V.AC
S/No
MADE IN ENGLAND
ML5000
47-63 Hz ~ 500W MAX
The ML4000 console range is supplied with the
MPS14 power supply unit. A second MPS14 may
be connected through the first as a redundant
(backup) supply.
Before connecting please read the IMPORTANT
SAFETY INSTRUCTIONS printed at the front of this
user guide and the warnings printed on the rear of
the power supply.
Also read the user guide
provided with the power supply.
Heed all
instructions regarding the installation and ventilation
requirements of the unit.
Connecting Mains Power
DIRECT
OUT
DIRECT
OUT
DIRECT
OUT
INSERT
SEND
INSERT
SEND
INSERT
SEND
RET
RET
RET
IN
IN
IN
DC POWER IN
Check that the correct mains lead with moulded
plug suitable for your territory has been supplied
with your console. The MPS14 accepts mains
voltages within the range 100-240V AC without the
need to change any fuses or settings.
Make sure that the IEC mains plug is pressed fully
into the MAINS INPUT socket.
RS232
CHASSIS
GROUND
Connecting the DC Cable
Plug the cable into the power supply DC POWER
OUT 1 socket. First align the locating lugs, press
the plug into the socket, and screw on the locking
ring to hold it firmly in place. Plug and secure the
other end into the console DC POWER IN socket.
MPS14
If you are using a second ‘redundant’ supply as a
backup then connect the short cable to both power
supplies. Connect from the DC POWER OUT 1
socket on the backup supply to DC POWER OUT 2
on the main supply.
Turning the Console On or Off
First check that the mains and DC leads are
correctly plugged in and secured. Turn on the
power supply using its front panel mains switch.
The console must be connected to the power
supply before turning it on. Failure to do so will
result in the unit powering up in protect mode. Turn
off, connect the console, and turn on again.
MPS14
To avoid loud pops in the speakers make sure that
the connected power amplifiers are turned off
before switching the console on or off.
WARNING:
To avoid damage to the
speakers always switch the power amplifiers on
last and off first.
14
ML4000 User Guide
Earthing
The connection to earth (ground) in an audio system is important for two reasons:
1.
SAFETY - To protect the operator from high voltage shock, and
2. AUDIO PERFORMANCE - To minimise the effect of earth (ground) loops
which result in audible hum and buzz, and to shield the audio signals from interference.
For safety it is important that all equipment earths are connected to mains earth so that
exposed metal parts are prevented from carrying high voltage which can injure or even
kill the operator. It is recommended that the engineer check the continuity of the safety
earth from all points in the system including microphone bodies, guitar strings,
connector cases, equipment panels and so on.
The same earth is also used to shield audio cables from external interference such as
the hum fields associated with power transformers, lighting dimmer buzz, and computer
radiation. Problems arise when the signal sees more than one path to mains earth. An
earth loop results causing current to flow between the different earth paths. This
condition is usually detected as a mains frequency audible hum or buzz.
To ensure safe and trouble-free operation we recommend the following:
Use a clean mains outlet for the audio system.
Keep the audio
equipment mains feed separate from that powering ‘dirty’ equipment such as air
conditioning and lighting systems, motors and vending machines.
Use star point earthing. It is best to install a ‘star point’ system where the
individual earths to the equipment racks and equipment areas are separately run from a
solid central reference earth point.
Have your mains system checked by a qualified electrician. If the
supply earthing is solid to start with you are less likely to experience problems.
Do not remove the earth connection from the console mains plug.
The console chassis is connected to mains earth through the power cable to ensure
your safety. Audio 0V is connected to the console chassis internally. If problems are
encountered with earth loops operate the audio ‘ground lift’ switch on the power supply
or connected equipment, or disconnect the cable screens at one end, usually at the
destination.
Avoid induced interference. To prevent interference pickup keep audio cables
away from mains power units, cables and distribution boards, motors, lighting and
computer cables and equipment, and any other heavy duty electrical equipment. Where
this cannot be avoided cross the audio and ‘dirty’ equipment cables at right angles to
minimise interference.
Use low impedance sources such as microphones and line level equipment
rated at 200 ohms or less to reduce susceptibility to interference. The console outputs
are designed to operate at very low impedance to minimise interference problems.
Use balanced connections where possible as these provide further
immunity by cancelling out interference that may be picked up on long cable runs. To
connect an unbalanced source to a balanced console input, link the cold input (XLR pin
3 or jack ring) to 0V earth (XLR pin 1 or jack sleeve) at the console. To connect a
balanced console output to an unbalanced destination, link the cold output to 0V earth at
the console.
Use good quality cables and connectors and check for correct wiring and
reliable solder joints. Allow sufficient cable loop to prevent damage through stretching.
If you are not sure ... Contact your service or local Allen & Heath agent for advice.
ML4000 User Guide
15
Rear Panel Connections
DIRECT
OUT
DIRECT
OUT
DIRECT
OUT
DIRECT
OUT
DIRECT
OUT
DIRECT
OUT
DIRECT
OUT
DIRECT
OUT
DIRECT
OUT
DIRECT
OUT
DIRECT
OUT
DIRECT
OUT
DIRECT
OUT
DIRECT
OUT
DIRECT
OUT
DIRECT
OUT
INSERT
SEND
INSERT
SEND
INSERT
SEND
INSERT
SEND
INSERT
SEND
INSERT
SEND
INSERT
SEND
INSERT
SEND
INSERT
SEND
INSERT
SEND
INSERT
SEND
INSERT
SEND
INSERT
SEND
INSERT
SEND
INSERT
SEND
INSERT
SEND
RET
RET
RET
RET
RET
RET
RET
RET
RET
RET
RET
RET
RET
RET
RET
RET
IN
IN
IN
IN
IN
IN
IN
IN
IN
IN
IN
IN
IN
IN
IN
IN
DC POWER IN
EXPANDER AUDIO
INPUT
A
INPUT
B
OUT
EXPANDER LOGIC
SIDECAR
2
SIDECAR
THRU
IN
MIDI
1
RS232
Select MIDI for normal operation !
CHASSIS
GROUND
SELECT
Serial No.
IN. XLR input for mic or line level signals. Pin 2
hot. Phantom power is fed to pins 2 and 3 through
6k8 series resistors when the front panel +48V
switch is pressed.
WARNING:
Do not connect
unbalanced sources or cables to the XLR inputs
when phantom power is selected. To avoid loud
clicks always turn the channel off by pressing
the MUTE switch when switching +48V on or off
and when plugging or unplugging microphones.
INSERT. Separate TRS jack sockets for send and
return. The insert is post-HPF and pre-EQ. It can
operate with both balanced or unbalanced line level
equipment. The channel signal path is interrupted
when you plug into the RETURN socket. You can
tap off the pre-EQ signal without interrupting the
signal path by plugging into the SEND socket.
DIRECT OUT. TRS jack providing the post-fade
channel signal as standard. You can reconfigure
the output as pre-fader or as post-fader with the
AUX 1 send control as a level trim by repositioning
internal jumper links.
The output is ground
compensated.
EXPANDER AUDIO. Two 37-pin D-connectors to
connect the outputs of the expander sidecar into the
main console. These provide inputs to all the mix
busses and P/AFL system. They are balanced and
operate at –2dBu. Up to two sidecars may be
connected.
16
Note that the audio outputs of the first sidecar plugs
into the second. The output of the second presents
the combined mix to the main console.
The expander inputs conform to the Allen & Heath
SYS-LINK II standard. You can connect to a
console fitted with SYS-LINK I using special adapter
cables. Contact Allen & Heath for details.
EXPANDER LOGIC.
9-pin D-connectors to link
the expander sidecar and main console logic
system. Up to two sidecars may be connected.
MIDI. Three standard opto-isolated 5-pin sockets
for MIDI IN, OUT and THRU. The small slide switch
selects either the MIDI or RS232 connection. For
normal console operation it is recommended that
the switch is set to MIDI. The power up boot routine
is quicker in this position than RS232.
RS232. 9-pin D-connector to connect to the serial
port of a PC for loading new console operating
software or archiving the settings. To enable
RS232 set the slide switch to the RS232 position.
Set it back to the MIDI position when finished.
DC POWER IN. A heavy duty 7-pin connector with
locking ring for connecting to the console power
supply unit. A chassis ground terminal post is
provided for situations that require earth strapping
between equipment.
WARNING:
Use only the DC power
cable provided with the console.
ML4000 User Guide
R
INSERT
SEND
RETURN
INSERT
S
INSERT
S
R
R
INSERT
S
R
INSERT
S
R
L
INSERT
S
R
R
INSERT
S
R
INSERT
S
R
L
INSERT
S
R
R
INSERT
S
R
INSERT
S
R
L
INSERT
S
R
INSERT
S
R
INSERT
S
R
DIRECT
OUT
DIRECT
OUT
DIRECT
OUT
DIRECT
OUT
DIRECT
OUT
DIRECT
OUT
DIRECT
OUT
DIRECT
OUT
INSERT
SEND
INSERT
SEND
INSERT
SEND
INSERT
SEND
INSERT
SEND
INSERT
SEND
INSERT
SEND
INSERT
SEND
RET
RET
RET
RET
RET
RET
RET
RET
IN
IN
IN
IN
IN
IN
IN
INTERCOM
Made in England by
ALLEN & HEATH
A Division of Harman International Industries Limited
STEREO IN. Each provides two balanced stereo
inputs which can be selected independently or
mixed into the channel, INPUT A on TRS jacks,
INPUT B on XLR. These accept line level signals.
LOCAL MONITOR OUT.
Ground compensated
stereo monitor output on TRS jacks. These can
connect to a stereo amplifier/speaker system for
local monitoring.
2-TRACK IN / OUT.
Line level TRS jacks to
connect to a 2-track recorder such as MiniDisc, tape
or DAT. Connect OUT to the recorder input, and IN
to the recorder output.
The connections are
balanced. Link ring (cold) to sleeve (ground) when
connecting to unbalanced equipment.
MAIN OUTPUTS. Line level balanced XLR outputs
for the L, R and C main mix. Pin 2 hot. These
outputs can provide up to +23dBu maximum and
are suited to driving line level equipment operating
at nominal 0dBu or +4dBu. The C output is
available as the engineers wedge monitor feed
when the front panel mode switch is selected.
INSERTS. Each of the 8 mix and 3 main outputs
has a pre master fader insert point. These provide
separate TRS jack sockets for send and return.
The mix signal path is interrupted when you plug
into the RETURN socket. You can tap off the prefade signal without interrupting the signal path by
plugging into the SEND socket.
INTERCOM. Female XLR socket for connecting
the console to a ClearCom compatible intercom
system. An intercom headset is not required as the
console headphones and talkback microphone are
used. A standard 2-core shielded mic cable is
suitable.
LAMP.
4-pin XLR for plugging in a gooseneck
lamp to illuminate the control surface. Three lamp
sockets are provided along the back of the
meterpod.
The right angled Littlite type is
recommended.
The 4-pin XLR prevents any
confusion with the 3-pin audio connections.
GRP / AUX / MATRIX OUTPUTS.
Line level
balanced XLR outputs for Grp 1-8, Aux 1-12 and
Matrix 1-4. Pin 2 hot. These outputs can provide
up to +23dBu maximum and are suited to driving
line level equipment operating at nominal 0dBu or
+4dBu.
Note:
The GRP and AUX output XLRs always
remain on their respective connectors regardless of
the setting of the front panel REVERSE switches.
ML4000 User Guide
17
IN
Audio Connector Types and Wiring
18
ML4000 User Guide
Gain Structure
How the levels between the different signal stages
are set up is referred to as the gain structure. For
best performance it is important that the connected
source signals are matched to the ‘normal operating
level’ of the console. Similarly the levels of the
connected amplifiers and destination equipment
should be correctly matched to the console outputs.
If set too high then the signal peaks will be clipped
resulting in distortion, and if set too low then the
signal-to-noise performance will be degraded
resulting in excessive background hiss and noise.
Using the Meters. The ML4000 provides metering
at all important stages through the signal chain. For
best results operate the console with the LED bar
meters averaging around ‘0’ allowing the loudest
moments to reach ‘+6’. Reduce the gain if the red
peak LEDs start to flash. Note that the peak leds
light 5dB before actual clipping to warn that you are
nearing distortion and should reduce gain. The
LED bar meters have a peak response with fast
attack and slow release so that fast musical
transients are accurately displayed. The VU meters
have a slower attack so that the average levels are
better displayed. Both types of metering are useful
in live sound mixing.
Matching a Source to the Console.
Start by
turning down the channel fader and send levels to
prevent unexpected loud volumes reaching the
main speakers and monitors. Adjust the GAIN
control for an average ‘0’ reading on the channel
meter. Press PAFL (in PFL mode) to listen to the
signal using headphones, local or wedge monitor,
and to view its level on the main LED and VU
meters. Once the gain is correctly set you can raise
the levels to bring the channel into the mix. Note
that you may need to adjust the gain if you make
significant changes to the EQ. Make sure that any
equipment inserted into the channel is set to
operate around 0dBu line level. It is best to first set
the gain with inserted signal processors such as
compressors switched to bypass.
ML4000 User Guide
Matching the Console to Destination Equipment.
The console produces a standard XLR output level
of 0dBu for a meter reading of ‘0’. It can produce a
maximum of +23dBu and is therefore well suited to
driving equipment operating at nominal 0dBu or
+4dBu while providing plenty of headroom. If you
are connecting directly to a sensitive power
amplifier it is advisable to turn down its input trim
control if the normal console level is too high.
Simply turning down the console output faders
degrades the output stage noise performance and
reduces the resolution of the fader movement. The
output faders are best operated around ‘-10’ to ‘0’
for loudest average volume required. This allows
plenty of additional headroom if you need it.
Terminology. The normal operating level is the
optimum signal level for best console performance,
indicated by ‘0’ meter readings and resulting in the
0dBu output level. The channels operate at 0dBu
and the mix stages at –2dBu for extended
headroom. Headroom is the extra level available
above normal to allow for loud peaks before the
signal becomes clipped resulting in audible
distortion. The signal-to-noise ratio (SNR) is the
difference measured in dB between normal level
and residual noise floor (hiss) produced by the
console electronics. The dynamic range is the
sum of headroom and SNR representing the
maximum signal range possible from quietest to
loudest.
Using the VCA Groups. Assigning a channel to
one or more VCA groups lets those group faders
control the level of its VCA element. Each fader
provides up to +10dB boost. Note that the channel
VCA allows a maximum combined fader boost of
+10dB. Any more is simply ignored. It is best to
operate the VCA group faders around their nominal
‘0’ position. You can also use a VCA group to
reduce the overall level of a hot mix without having
to adjust all the channel faders.
Final word…
A little care with setting gain
structure throughout the signal chain will give you
the very best performance and most manageable
control of the mix.
19
Control Layout
+48V
PAD
40
20
20dB
GAIN
- 10 10
50
1
60 40
100
L
1
L
1
L
1
-3
L
+48
300
20Hz
+6
OO
+6
OO
2
400
IN
+6
OO
R
+6
OO
2
+6
OO
R
+6
OO
2
+6
OO
R
+6
OO
2
10k
+6
OO
20kHz
+6
OO
3
2kHz
+6
OO
3
+6
OO
C
+6
OO
3
A
+6
OO
C
OO
+6
OO
+6
OO
+6
+6
OO
OO
+6
OO
+6
OO
+6
+6
OO
4
OO
+6
METERS
+6
OO
3
OO
+6
OO
+6
4
OO
+6
OO
+6
OO
+6
4
-3
5
Q
5
15k
6
-15
80
180
PINK NOISE
1kHz OSC
B
6
TB
6
LEV
TB
3
10
-6
18
B
ON
6
LEV
ON
LEV
Q
OO
+6
OO
+6
OO
+6
+6
OO
7
1k
OO
+6
OO
+6
OO
+6
+6
OO
7
MUTE
8
90 +15
OO
+6
OO
+6
OO
+6
+6
OO
7
MUTE
8
OO
+6
HF
OO
+6
OO
+6
MUTE
PFL
8
200Hz
AFL
STEREO
MIC IN
AFL
max
min
AUX
1
GRP/AUX 3
reverse
GRP/AUX 4
reverse
GRP/AUX 6
reverse
GRP/AUX 5
reverse
GRP/AUX 7
reverse
GRP/AUX 8
reverse
AUX
2
AUX
3
AUX
AUX
4
5
AUX
6
LOCAL
AUX
7
+6
+6
OO
AFL
+6
OO
+6
OO
AFL
+6
OO
AFL
+6
OO
AFL
+6
OO
AFL
+6
OO
AFL
0
+6
OO
AFL
3
MAIN
MIX
MAIN
MIX
MAIN
MIX
=
LCR +
BLEND
=
LCR +
BLEND
MAIN
MIX
MAIN
MIX
=
LCR +
BLEND
=
LCR +
BLEND
MAIN
MIX
=
LCR +
BLEND
MAIN
MIX
=
LCR +
BLEND
MAIN
MIX
=
LCR +
BLEND
PFL
AFL
5
LR
C
=
LR
C
=
PAN
PAN
LR
C
=
PAN
LR
C
=
PAN
LR
C
=
LR
C
=
PAN
PAN
LR
C
=
PAN
LR
C
=
L
R
L
R
L
R
L
R
L
R
L
TALK TO
INTERCOM
+6
OO
TB
TB
TALK
TO TB
TB
MUTE
TB
MUTE
TB
+6
OO
TB
MUTE
MUTE
TB
TB
TB
TB
MUTE
MUTE
+6
AUX
+6
PRE
8
EDIT/SAFE
EDIT/SAFE
EDIT/SAFE
EDIT/SAFE
EDIT/SAFE
EDIT/SAFE
EDIT/SAFE
EDIT/SAFE
EDIT/SAFE
9-10
OO
+6
OO
+6
PRE
AUX
10
AUX
AFL
AFL
AFL
STEREO
AFL
AFL
STEREO
AFL
AFL
STEREO
AFL
AFL
STEREO
PK
PK
PK
PK
PK
PK
PK
PK
PK
+6
+6
+6
+6
+6
+6
+6
+6
+6
AFL
PK
PK
PK
+6
+6
+6
0
0
0
0
0
0
0
0
0
0
0
0
-6
-6
-6
-6
-6
-6
-6
-6
-6
-6
-6
SIG
SIG
SIG
SIG
SIG
SIG
SIG
SIG
SIG
SIG
PRE
9-10
OO
+6
OO
+6
PRE
AUX
B
A
L
SIG
11-12
5
5
5
5
5
5
5
5
5
5
0
0
0
0
0
0
0
0
0
0
0
0
AUX
5
5
5
5
5
5
5
5
5
5
5
5
B
A
L
12
LCR +
BLEND
LR
=
=
MAIN
MIX
C
PAN
L
10
10
10
10
10
10
10
10
10
10
10
10
20
20
20
20
20
20
20
20
20
20
20
20
30
30
30
30
30
30
30
30
30
30
30
30
OO
OO
OO
OO
OO
OO
OO
OO
OO
OO
OO
OO
OO
+6
OO
+6
PRE
LCR +
BLEND
LR
=
2
VCA 1
VCA 2
M
U
T
E
MUTE
PAFL
10
11
L
MUTE GROUPS
M
U
T
E
SAFE
PAFL
9
VCA 8
M
U
T
E
SAFE
PAFL
8
VCA 7
M
U
T
E
SAFE
PAFL
7
VCA 6
M
U
T
E
SAFE
PAFL
6
VCA 5
M
U
T
E
SAFE
PAFL
5
VCA 4
M
U
T
E
SAFE
PAFL
4
VCA 3
M
U
T
E
SAFE
SAFE/EDIT
3
MAIN
MIX
EDIT MUTE & VCA GRPS
SAFE
PAFL
PAFL
M
U
T
E
11-12
OO
+6
OO
+6
PRE
AUX
LCR +
BLEND
=
=
=
MAIN
MIX
C
BAL
R
L
R
ST2
C
M
U
T
E
SAFE/EDIT
STEREO
LR
ST1
R
MAIN
PRE
11
B
A
L
BAL
12
+6
AUX
C
L
1
OO
STEREO
12
R
24
+6
AUX
L
E
V
12
+6
OO
OO
9-10
B
A
L
STEREO
11
5
+6
9
10
AUX
L
E
V
5
OO
AUX
L
E
V
10
+6
AUX
STEREO
9
L
E
V
11-12
OO
+6
AUX
STEREO
-6
SIG
STEREO
11
AFL
STEREO
PRE
8
OO
AFL
STEREO
9
+6
AUX
EDIT/SAFE
+6
OO
AUX
OO
7
AUX
EDIT/SAFE
+6
AUX
OO
PRE
8
EDIT/SAFE
OO
6
MUTE
MUTE
+6
OO
AUX
+6
AUX
R
TB
MUTE
MUTE
OO
5
7
MUTE
+6
AUX
5
OO
TB
OO
4
AUX
7
MUTE
+6
AUX
PAFL
+6
OO
AUX
OO
GROUPS
+6
6
R
+6
3
AUX
L
OO
AUX
4
6
R
+6
GROUPS
AUX
CLEAR
ALL
PAN
OO
2
+6
AUX
AUX
L
PRE
AUX
AUX
OO
IN-PLACE
+6
+15
1
3
AUTO
CANCEL
ADD
AUX
OO
PRE
OO
=
LF
EQ IN
+6
CALL
+6
LCR +
BLEND
LM
max
10
AUX
+6
+15
-15
2
min
0
under armrest
GROUPS
OO
+15
AUX
10
PHONES
AFL
AUX
OO
-15
TRIM
LISTEN
4
LF
1
INTERCOM
MONITOR
8
AUX
OO
+15
HM
TB TO C
MONO
OO
2
-15
EQ IN
GRP/AUX 2
reverse
AUX
AUX
+6
OO
-15
TB TO LR
mode
GRP/AUX 1
reverse
PRE
1
+15
+15
max
C
FOH
MONITOR
-15
LM
SOURCE
LR
+15
+15
-15
TRIM
LCR
EQ IN
-15
HM
TALKBACK
2TRK
LF
+15
+48V
AFL
STEREO
-15
0dB
min
AUX
HF
+6
OO
7
MUTE
8
AFL
130
-15
MONO R
Disable
MIDI CH
TRIM
LM
20Hz
MONO L
L+R
MONO R
Use CH MUTES
Hold and press CH1>16 MUTE
450
-15
MONO L
L+R
EDIT SAFES
300
50
OSC/NOISE
TO TB
5
TB
LEV
DUMP
+15
45
35Hz
5
TB
HM
P
A
N
-3
GAIN
10
18
RS232
7k
500Hz
L
E
V
ON
5k
700
P
A
N
A
3
-6
max
MIDI
+15
3k
1k
10
18
ON
GAIN
min
+6
OO
3
-6
OSC/NOISE
TRIM
AUX 9-12
MTX 1-4
C
+6
OO
18
R
HF
4
-15
+6
OO
C
-3
GAIN
10
-6
-17
7k
3k
L
E
V
3
GAIN
+17
30
M
U
T
E
SAFE/EDIT
MUTE
SAFE/EDIT
SELECT USING GROUP MUTE
ASSIGN USING CH MUTES
SAFE/EDIT
WEDGE
mode
MUTE
SAFE/EDIT
C
PAFL
PAFL
MONITOR
PK
PK
MUTE
PK
PK
10
10
10
10
10
10
10
10
10
10
10
10
SIG
5
5
5
5
5
5
5
5
5
5
5
5
0
0
0
0
0
0
0
0
0
0
0
0
5
5
5
5
5
5
5
5
5
5
5
5
20
5
5
1
4
5
10
0
1
0
2
3
5
4
5
5
10
10
10
10
10
10
10
10
10
10
10
10
20
20
20
20
20
20
20
20
20
20
20
20
30
30
30
30
30
30
30
30
30
30
30
30
40
40
40
40
40
40
40
40
40
40
40
40
40
40
OO
OO
OO
OO
OO
OO
OO
OO
OO
OO
OO
OO
OO
OO
10
6
8
VCA
GROUP
-6
SIG
3
6
7
0
10
2
3
5
-6
SIG
2
4
+6
0
0
1
PK
+6
+6
-6
PK
7
6
20
8
VCA
GROUP
10
7
20
8
30
VCA
GROUP
30
ML4000 User Guide
System Description
MONO INPUT and EQ.
The input preamp
matches microphone or line level signals to the
console. The sweepable high pass filter removes
unwanted low frequency sounds below the selected
frequency. The channel insert is post filter, pre EQ.
A swept frequency 4 band equaliser provides
shelving high and low bands with adjustable shelf
frequency, and peak/dip high and low mid bands
with adjustable centre frequency and switched Q.
The filter and EQ can be independently switched in
or out.
GRP/AUX SENDS. This section provides controls
for the group routing and auxiliary sends. The
groups are routed in pairs and affected by the pan
control. The auxes are switched pre or post-fader
as groups 1-4, 5-8, 9-10, 11-12. Auxes 9-12 can be
configured as true stereo with level and pan
controls. The pre-fade settings can be changed
using internal jumper links.
MAIN MIX SENDS.
A single switch routes the
channel signal to the main L, R and C outputs. The
balance between the three outputs is determined by
the LCRplus™ pan and blend controls.
This
provides full 3 output imaging from each channel
and group.
INPUT FADERS.
Includes the channel fader,
mute, signal meter and PAFL monitoring. The 8
VCA group assignments are displayed. VCA and
mute group editing and channel safe selection is
performed using the mute switch with green
safe/edit indicator below. The channels can be
monitored in mono PFL or stereo in-place AFL.
STEREO INPUT and EQ.
The input preamp
accepts two stereo sources with independent
control of each. This allows selection of either or
mixing together both sources. A fixed frequency 4
band equaliser provides shelving high and low
bands and two peak/dip mid bands. The EQ can be
switched in or out.
GRP/AUX 1-8 FADER MASTERS. These are the
fader masters with inserts for channel sends 1-8,
configurable using mode switches as audio group or
pre/post aux masters. The groups can be routed to
the main mix through LCRplus controls to create
sub groups. LED meters display the pre-fade mix
levels.
AUX 9-12 MASTERS.
These are the fader
masters with inserts for channel sends 9-12. They
can be AFL’d in mono or stereo.
AUX/GRP 1-8 FADER MASTERS. These are the
rotary masters for aux sends 1-8. They can be
reversed with the group fader masters together with
the inserts for full featured monitor mixing.
ML4000 User Guide
MAIN MIX FADERS.
Provides separate master
faders, mutes and inserts for the main L, R and C
outputs. A mode switch configures the C output as
the engineers wedge monitor feed for the stage
monitor application.
MATRIX. This section provides all the controls for
the 4 matrix outputs, including the source and
master rotaries.
VCA GROUPS. These are the VCA group master
faders, mutes and PAFL monitor switches. Mute
and PAFL remotely activate the assigned channel
switches. Channels are assigned to the groups
using the edit key. The normal fader operating level
is marked ‘0’.
MUTE GROUPS. These are the master keys that
mute all channels assigned to the group. Channels
are assigned using the edit key.
MIDI CONTROLS Keys and indicators to action a
console data dump to external archiver via MIDI or
RS232, make selected channels automation safe,
and select the console MIDI channel number.
HEADPHONES / MONITOR.
Provides source
selection and independent control of the
headphones and local monitor outputs.
PAFL CONTROL. This section controls how the
intelligent PAFL system functions and provides the
clear all key. Add or auto-cancel mode, and input
PFL/AFL are selected here.
OSC/NOISE GENERATOR. Enables and selects
a 1kHz tone or pink noise which can be routed to
any output for line up or system testing.
INTERCOM.
The console talkback mic and
headphones can be interfaced to a ClearCom
compatible intercom system so eliminating the need
for a separate intercom headset.
TALKBACK. Pressing the talk switch routes the
talkback mic to any output with its TB enable switch
selected.
GRP/AUX 1-8 METERS. These moving coil VU
meters display the grp/aux 1-8 outputs.
LRC/PAFL METERS. The main L,R and C outputs
are simultaneously displayed on both VU and LED
bar meters. These switch to display any PFL or
AFL when selected. The display is mono or
mono+stereo depending on source. The large call
lamp lights to warn when the intercom is signalled.
AUX 9-12 / MTX 1-4 METERS.
These meters
display either the aux 9-12 outputs or matrix 1-4
levels according to the setting of the meter select
switch.
21
MONO INPUT and EQ
+48V. Switches +48VDC to the channel input XLR
for powering microphones or DI boxes that need
phantom power. The power is current limited
through 6800 ohm resistors to pins 2 and 3.
+48V
PAD
40
20
20dB
GAIN
- 10 10
50
WARNING Do not connect unbalanced
sources or cables to inputs with phantom power
selected. To avoid loud clicks always mute the
channel before switching +48V on or off and
when plugging or unplugging microphones.
60 40
100
300
30
20Hz
400
IN
7k
3k
GAIN. Adjusts the input sensitivity to match the
connected source to the internal 0dBu operating
level of the channel. Provides a variable 50dB
range from +10 to +60dB gain. The gain should be
set so that the channel meter averages ‘0’ with
loudest moments lighting ‘+6’. Reduce gain if the
red peak meter lights.
10k
2kHz
20kHz
-15
3k
1k
HF
+15
5k
700
7k
Q
500Hz
PAD.
Attenuates the input signal by 20dB for
connection to high level microphone or line sources.
When pad is selected the gain control adjusts from
–10dB attenuation to +40dB gain.
15k
HM
-15
180 +15
300
80
45
POLARITY.
Reverses the polarity of the input
signal. This is used to correct reverse wired cables
or sources, and can be effective in reducing
phasing problems between microphones or acoustic
feedback
between
the
microphone
and
loudspeakers.
450
Q
35Hz
1k
LM
-15
90 +15
50
130
20Hz
-15
200Hz
HPF FREQUENCY. Adjusts the cut off frequency
of the high pass filter between 20Hz and 400Hz to
reduce low frequency source noise. The filter
attenuates frequencies below cut off by 12dB per
octave.
LF
+15
EQ IN
HPF IN. Switches the high pass filter in or out.
When switched out the response extends to lower
than 10Hz.
HIGH PASS FILTER
+10
+5
20Hz
400Hz
Using the Filter
0dB
-5
-10
-15
-20
-25
-30
-35
-40
22
10
100
1kHz
10k
30k
Switch in the filter and adjust the cut off frequency
to clean up sources that do not have much bass
content, for example drum kit overheads (set to
400Hz), reduce proximity popping on vocals (set
around 150Hz), reduce handling noise and stage
rumble, or protect the speakers from very low
frequency energy (set around 30 to 50Hz). Switch
out to preserve full sub energy for low frequency
sounds such as kick drum, bass and special effects.
ML4000 User Guide
HF EQ
+20
2kHz
20kHz
+15
+10
EQUALISER.
The channel equaliser provides
adjustment of 4 independent frequency bands.
Each has cut/boost and frequency sweep controls.
HF and LF are shelving. HM and LM are peak/dip
with switched Q control.
HF
The high frequency band has a shelving
response that cuts or boosts the higher (treble)
frequencies by up to 15dB. The shelf turning point
frequency can be adjusted from 2kHz to 20kHz.
+5
0dB
-5
-10
-15
-20
10
100
1kHz
10k
30k
HM EQ
+20
500Hz
15kHz
+15
+10
HM
The higher mid band has a bell shaped
peak/dip response that cuts or boosts the higher
mid frequencies by up to 15dB.
The centre
frequency can be adjusted from 500Hz to 15kHz.
The width of the bell is set using the Q switch to
either wide = 1 (switch up) or narrow = 2 (switch
pressed). The higher setting has a more selective
response better suited to enhancing a narrow range
of frequencies or notching out a problem frequency.
LM The lower mid band is similar to the high mid
but provides adjustment from 35Hz to 1kHz.
+5
0dB
LF
The low frequency band has a shelving
response that cuts or boosts the lower (bass)
frequencies by up to 15dB. The shelf turning point
frequency can be adjusted from 20Hz to 200Hz.
-5
-10
-15
-20
10
100
1kHz
10k
30k
A8
EQ IN. Switches the equaliser in or out.
LM EQ
+20
35Hz
1kHz
Using the Equaliser
+15
The channel equaliser can be used to creatively
enhance or correctively improve the tonal quality of
the sound. For example, to brighten up a guitar so
that it stands out in the mix, to cut back the
boominess of the kick drum while enhancing the
snap of the beater, or to notch out a ringing
frequency associated with the position of a mic on
stage to help increase its gain before feedback.
+10
+5
0dB
-5
-10
-15
-20
10
100
1kHz
10k
30k
LF EQ
+20
20Hz
400Hz
+15
+10
+5
0dB
-5
-10
-15
-20
10
100
ML4000 User Guide
1kHz
10k
30k
Before using the equaliser make sure you choose
the best microphones for the job and place them to
capture each sound accurately. Start with the EQ
set flat and apply only as much boost or cut as is
needed. Use low Q settings to affect a wide range
of frequencies, and higher settings for more
selective control, for example when notching out
resonances or feedback. The HM and LM bands
have an extended frequency range to overlap the
HF and LF shelves. This allows tighter and more
precise two point control of bass and treble where
needed.
Use the in/out switch to compare the original and
equalised sound. The equaliser has a flat response
and therefore no effect when all the cut/boost
controls are set to their centre detented position.
23
GROUP / AUXILIARY SENDS
These controls send the channel signal to the audio
groups 1-8 and aux sends 1-12. They are the same
for both the mono and stereo channels.
PRE
AUX
ROUTING SWITCHES. These route the channel
signal to the audio groups in pairs. The signal is
post-fader and follows the pan control. Mono or
stereo groups can be created using the pan control.
The LCRplus blend control does not affect the
signal routed to the groups.
1
OO
+6
OO
+6
AUX
2
AUX
3
GROUPS
OO
+6
AUX
4
AUX SEND 1-8. These rotary controls adjust how
much channel signal is sent to the mono auxiliary
outputs 1-8. The 0dB position is marked at 3
o’clock. An extra +6dB boost is available.
For the stereo channels the left and right signals are
combined to provide a mono feed.
OO
+6
AUX SEND 9-16. These rotary controls adjust how
much channel signal is sent to the mono/stereo
auxiliary outputs 9-12. They function according to
the position of the STEREO switches described
below. An extra +6dB boost is available.
AUX
5
OO
+6
OO
+6
OO
+6
AUX
6
STEREO. These configure aux 9-12 in pairs for
mono or stereo operation. In the up position they
become independent mono sends. In the down
position they become stereo pairs with separate
level and pan controls.
AUX
7
PRE
AUX
8
OO
+6
AUX
STEREO
9
L
E
V
9-10
OO
+6
PRE
AUX
10
P
A
N
OO
+6
AUX
PRE. Switches the channel pre-fade signal to the
auxiliary outputs. Aux 1-4 and 5-8 are switched in
groups of four, aux 9-10 and 11-12 are switched in
pairs. In the up position the source is post-fade.
When pressed the source is pre-fade. The pre-fade
source follows the setting of the internal jumper
links.
STEREO
11
L
E
V
For the stereo channels the left and right signals are
combined to provide a mono feed when the switch
is in the up position. When pressed the signal is
routed in stereo to the pair of auxes.
11-12
OO
+6
PRE
AUX
12
P
A
N
24
OO
+6
ML4000 User Guide
Internal Link Options
Using the GRP/AUX Sends
Several link options are available to satisfy user
preferences. These require removal of the console
base panels and replugging of 2way jumpers on the
circuit boards. It is not necessary to remove
assemblies from the console. To avoid damage to
the internal assemblies this work should be carried
out by competent technical personnel.
Configure the underpanel mode switches above the
master faders according to the number of fader
controlled audio groups you need. This is typically
fewer on a VCA equipped console where it is
determined by the number of group processors you
want to insert or the number of groups needed to
feed the matrix, rather than the group level control
required. The remaining output faders can be
configured as masters for the related aux sends.
The associated groups swap with these auxes and
are available on their rotary masters.
Pre-fade Source. The source for the pre-fade aux
sends may be changed by repositioning jumper
links on each mono and stereo channel. The
default factory setting is pre-insert, pre-EQ, postmute.
This is usually preferred when mixing
monitors from front-of-house. Select the source as
pre-insert, pre-EQ, or post-EQ by setting one
jumper. Select pre or post mute by setting another.
Set pairs of links on the stereo channels to affect
left and right signals.
Direct Output Source. The default factory setting
is post-fade. This can be changed to pre-fade.
Pre-fade follows the source as described above.
An additional option sources the output from the
AUX1 send control. This provides a post-fade
direct output with level trim. If preferred, the
channel feed to the AUX1 rotary master can be
disabled so that adjusting the direct output level
does not feed the mix. Note that this does not
affect the AUX1 send to the fader master when aux
mode is selected. Select the source as pre-fade,
post-fade, or post-fade with AUX1 trim by setting its
jumper. Set another jumper to turn the AUX1 feed
to the rotary master on or off as required.
FADER
MONO CHANNEL
AUX1>ON
AUX1>OFF
AUX1>DIR
POST-FADE
PRE-FADE
POST-EQ
PRE-EQ
PRE-INSERT
POST-MUTE
PRE-MUTE
AUX1 TO
ROTARY MASTER
DIR OUT SOURCE
PRE-FADE SOURCE
PRE-FADE MUTE
CONNECTORS
FADER
STEREO CHANNEL
POST-EQ
PRE-EQ R
POST-EQ
PRE-EQ L
POST-MUTE
PRE-MUTE
CONNECTORS
ML4000 User Guide
PRE-FADE SOURCE
RIGHT
PRE-FADE SOURCE
LEFT
PRE-FADE MUTE
Audio Groups. These let you route channels to
independent outputs, mix into the matrix, or insert a
common signal processor to affect more than one
signal, for example a compressor on a vocal group.
8 Groups are available. Route the channel signal
by pressing one or more group switches. For mono
groups set the PAN control to odd or even
according to the group you wish to feed. For stereo
position the PAN control according to the stereo
image required.
Effects Sends. Use post-fade aux sends to feed
effects processors such as reverb. This ensures
that the balance between the dry and effect signals
is always maintained regardless of channel fader
position. The output of the processor should be
returned to the mix through another channel,
typically a stereo input.
Monitor Sends.
Use aux sends to provide
independent monitor mixes to the performers, MD,
backstage crew and so on. These may feed stage
wedges, side fills, hotspot speakers, headphones
and in-ear monitors, and may be mono or stereo.
Aux 9-12 have full featured fader masters. For
similar aux 1-8 control with faders, meters, inserts
and automation configure the master section
underpanel mode switches as required.
Select pre-fade when mixing monitors from front-ofhouse so that the main mix does not affect the
monitors. However, you may prefer to set some
channels post-fade, for example to avoid backstage
pickup when working with radio microphones.
Select post-fade when using the console for
dedicated monitor mixing so that the channel fader
becomes the master for that signal to all mixes.
Up to 2 stereo monitors may be configured by
selecting the channel STEREO switches. This
provides separate level and pan controls and is
ideal for in-ear monitoring.
Special Sends. The aux sends can be used for
any application where an independent mix is
required. Select pre or post-fade and mono or
stereo as required.
25
MAIN MIX and INPUT FADERS
LCR +
BLEND
LR
=
=
MAIN
MIX
BLEND. This control adjusts the balance between
the LR and C outputs. Fully anti-clockwise all the
signal routes to the LR outputs and none to C. At
the detented centre position the signal routes
equally to the LR and C outputs. Fully clockwise all
signal routes to the C output and none to LR.
BLEND does not affect the group routing. The
control has a 3dB attenuation at centre position.
The stereo channels route stereo to LR and sum
the signal in mono to C.
C
PAN
L
MAIN MIX.
A single switch routes the channel
signal to the 3 output main mix. Its balance and
image within the L, R and C outputs is determined
by the BLEND and PAN controls.
R
24
MUTE
SAFE/EDIT
PAFL
PK
+6
PAN. Adjusts the balance between the L and R
outputs. It does not affect the C output. At the
detented centre position the signal routes equally to
L and R. PAN and BLEND combine to adjust the
balance between the 3 outputs. PAN also adjusts
the balance between odd and even groups if the
GRP PAN ON switch is selected. The control has a
3dB attenuation at centre position.
0
-6
10
SIG
5
1
0
2
3
4
5
5
10
6
7
20
8
VCA
GROUP
IDENT STRIP. Identifies the channel numbers and
provides a write-on area. The use of low adhesion
artist or masking tape is recommended.
30
MUTE. This momentary action switch turns the
channel signal on or off. Both pre and post-fade
signals are affected unless the pre-fade pre-mute
setting has been internally configured. The channel
can also be muted by the mute groups, VCA group
mutes, snapshot memories (externally controlled)
and MIDI note on/off messages.
The switch
illuminates when the channel is muted.
The switch also functions as an edit key when in
EDIT GROUPS, EDIT SAFES or MIDI CHANNEL
SELECT mode. The channel mute status is always
displayed on the switch regardless of mode.
40
OO
26
ML4000 User Guide
SAFE / EDIT.
This green LED has a different
function according to console operating mode:
Normal
The LED lights when the channel has
been made safe from the snapshot and MIDI
automation.
Edit Safes Continues to indicate which channels
are automation safe while they are edited.
Edit Groups The LED lights to indicate that the
channel is assigned to the VCA or MUTE group.
Edit MIDI Channel Number The LED flashes to
indicate which MIDI channel has been selected for
the console. This affects only CH1 to 16.
PAFL. Press this switch to listen to the channel
signal in the headphones or engineers monitor
without affecting the main outputs.
Either PFL or stereo in-place AFL. Either PFL
(pre-fade listen) or AFL (after-fade listen) is
selected according to the master section INPUT
PAFL switch. PFL is mono. AFL is stereo ‘in-place’
as it provides a stereo mix of L and R with C mixed
into both. This lets you listen to the image of the
signal in the 3 output main mix using the console
stereo headphones and monitor.
Latching or momentary action.
The switch
provides latching or momentary action depending
on how long it is held down. Press and hold for
longer than 1 second for momentary action.
PAFL override monitor. Pressing any input PAFL
automatically overrides any currently selected
output AFL or monitor source. Releasing PAFL
restores that selection.
Auto cancel or Add mode. The master section
ADD MODE switch determines if pressing a
channel PAFL cancels or adds to any previous
selection.
Clear all. Pressing the master section CLEAR ALL
switch turns off any PAFL / AFL switches selected
and restores the monitor source.
INPUT SIGNAL METER. The 5 LED bar meter
displays the pre-fade signal level. SIG lights to
display signal presence at –26dB, -6, 0 and +6
display normal signal level, and PK (peak) lights
when the signal is within 5dB of clipping. PK
senses the signal at 4 critical stages in the signal
path, pre-insert, pre-EQ, pre-fader and post-fader,
to warn of potential overload. PK can flash, for
example, if the preamp is clipping while signal reads
low due to attenuation through an inserted
processor.
ML4000 User Guide
VCA GROUP Indicators.
These LEDs light to
show which VCA groups the channel is assigned to.
The channel can be assigned to more than one
group. The channel is assigned or removed from a
group using the EDIT GROUPS function in the VCA
master section. The LEDs always show VCA group
assignment.
FADER. A 100mm smooth travel ALPS K-fader is
fitted providing +10dB gain above the nominal 0dB
operating position. Audio is not passed through the
fader. Instead, its position is read by the console
computer which produces a DC voltage to control
the level of the channel VCA (voltage controlled
amplifier).
Removing the Fader
The vertical, offset shaft design of the fader reduces
the risk of damage through dust and liquid spillage.
The fader should provide long life subject to the
usual wear and tear and not normally require
servicing or replacement. If necessary, access to
the faders is by removal of the fader module from
the top of the console. First unclip and lift away the
plastic ident strip. Undo the fader panel crosshead
screws and lift the module up being careful not to
damage the circuit assemblies and cables. The
fader can be unscrewed, its harness unplugged,
and then removed by sliding it out of the assembly.
Checking the Channel Signal Level
When plugging in a new source start with the
channel muted or fader and sends turned down.
This prevents any unexpected signal in the
loudspeakers. Adjust the channel GAIN control for
an average channel meter reading of ‘0’ with loud
moments lighting ‘+6’. Select PAD if the signal is
still too high with gain turned down. Reduce the
gain if the signal meter red PK LED lights. It may
be necessary to re-adjust the gain if changes are
made to the equaliser or inserted signal processing.
If the PK LED lights with channel meter reading low
then check the channel for correct gain structure, in
particular the equaliser and inserted equipment
settings.
Set the master INPUT PAFL switch for PFL and
select channel PAFL to check the signal quality in
the headphones while the fader is off. The signal is
also displayed on the main VU and LED bar meters
providing finer resolution and dynamic display.
27
Using LCRplus
The ML4000 LCRplus system extends signal
imaging beyond conventional LR and LCR panning
by allowing full 3 speaker balance and positioning
from each channel and group. This satisfies the
standard requirements of mono, stereo and
conventional LCR speaker systems as well as
providing a unique extended capability.
The MAIN MIX. This comprises 3 outputs: L (left),
R (right) and C (centre). How you use these
depends on the type of sound system you are
running. For example, you may use all for a 3
cluster LCR system, just L and R for a conventional
stereo system, or C only for a mono system.
PAN and BLEND.
These are the two imaging
controls that let you position the sound anywhere in
the three output mix. For example, it could be
balanced in all three outputs, somewhere between
any two, or routed to just one. The controls have a
smooth response with 3dB centre attenuation to
ensure that the power is distributed evenly between
the speakers as you move the signal around.
MONO PA. To control a mono sound system using
a single master fader, set BLEND fully clockwise to
route all the channel signal to the C output. The LR
outputs are not used and PAN has no effect.
MONO PA
L
R
C
BLEND
LR
C
L
R
PAN
STEREO PA. To control a stereo sound system,
set BLEND fully anticlockwise to route the signal to
LR only. Use PAN to position the sound between
the speakers. The C output is not used.
STEREO PA
BLEND
R
STEREO+FILL
L
R
C
BLEND
LR
C
L
R
PAN
LCR PA. LCR systems are increasingly popular in
large installed or touring systems. They comprise
three main speaker stacks, left, centre and right to
provide better coverage of a large audience. In
some situations C is used only for sounds such as
vocals to lift them out of the mix making them more
intelligible, leaving backing instruments in the LR
speakers. In other situations individual sounds are
panned between the speakers according to source
position.
Adjust both BLEND and PAN to position each
sound exactly where you want it whether in one
speaker, between two, or blended across all three.
Use BLEND to balance between the LR and C
speakers. Use PAN to adjust the balance between
the L and R speakers. PAN does not affect the
level of the C output.
LCR
C
L
R
C
BLEND
LR
C
PAN
LR
C
L
R
PAN
L
28
L
STEREO + CENTRE FILL. A centre fill speaker is
used to reinforce the sound to the first few rows of
the audience when the L and R speakers are
positioned far apart.
Start with BLEND fully
anticlockwise to set up the main LR mix. Then
gradually rotate BLEND clockwise to raise the
signal in the fill speaker as required. It should not
be necessary to adjust beyond the centre position
at which point equal signal is fed to all 3 outputs.
Beyond centre the LR signal would drop
significantly. Having LCRplus available on every
channel and group means that you can choose
which signals are reinforced, for example the back
stage mics rather than the front floats which would
feed back if routed to the fill.
R
ML4000 User Guide
L
C
R
L
C
R
L
C
R
PAN L
BLEND
LR
C
L
R
PAN
PAN L to C
BLEND
LR
C
L
R
PAN
Positioning the Sound. Use the PAN and BLEND
controls to position the sound within the LCR image.
It is possible to dynamically move the sound using
the two controls together but this is not a common
requirement in real world systems. For example,
dynamically panning an actor as he moves across a
theatre stage may be uncomfortable for the front
row listeners who hears the voice move from say
the left speaker upwards to the hung centre
speaker, and then back down to the right rather
than evenly across the stage. Static positioning is
more common in the theatre situation where the ear
adjusts to and accepts the source of the sound.
PAN C to R
BLEND
LR
C
L
R
PAN L. To position the sound at the left speaker
only set PAN fully left and BLEND to LR.
PAN
L
C
R
PAN R
BLEND
LR
C
L
R
PAN L to C. To position the sound between the
left and centre speaker set PAN fully left and adjust
BLEND clockwise from LR to C.
PAN C to R. To position the sound between the
centre and right speaker set PAN fully right and
adjust BLEND anticlockwise from C back to LR.
PAN
PAN R. To position the sound at the right speaker
only set PAN fully right and BLEND to LR.
L
C
R
L
C
R
LR
BLEND
LR
C
L
R
PAN
FOCUS LR to C
BLEND
LR
C
L
R
PAN
L
C
R
L
C
R
BLEND C to LR
BLEND
LR
C
L
R
PAN
BLEND LR to C
BLEND
LR
C
L
R
Focussing the Sound. Typically, a large music
venue or festival may use an LCR system with
vocals and key sounds such as kick and bass fed to
the main centre cluster and backing instruments fed
to the LR stacks. This helps the clarity and
intelligibility of these sounds.
Use BLEND to position each sound in the LR or C
speakers. You can dynamically bring a sound
forward by panning it from LR to C. For example,
use this to improve the focus of a backing
instrument such as guitar for the duration of a lead
solo. Pan it back from C to LR again after the solo.
Blending the Sound between Speakers. In nonideal situations where the three speakers do not
cover all the audience evenly, a small portion of
centre cluster lead sounds such as vocals can be
blended into the LR stacks so improving coverage.
Similarly, LR sounds can be blended into the centre
cluster.
Using the two controls you can adjust the balance
smoothly listening to the results and being able to
make small changes without the big jumps in
volume associated with switched routing.
PAN
ML4000 User Guide
While you could use the matrix to balance groups of
sounds between the speakers, LCRplus lets you
balance the image independently for each sound.
29
STEREO INPUT and EQ
-3
Two dual input stereo channels are provided to the
right of the master section on standard models. A
further four are provided to the right of this on the
optional ‘B’ version consoles. These extra four
stereos replace the standard model mono channels.
3
GAIN
10
-6
18
A
-3
GAIN. Adjusts the input sensitivity to match the
connected line level source to the internal 0dBu
operating level of the channel. Provides a variable
24dB range from –6dB attenuation to +18dB gain.
Inputs A and B have independent gain controls so
that you can switch between sources without having
to re-adjust the gain, or mix them together in the
required balance. The gain should be set so that
the channel meter averages ‘0’ with loudest
moments lighting ‘+6’. Reduce gain if the red peak
meter lights.
ON
3
GAIN
10
-6
18
B
ON
MONO L
L+R
MONO R
A (B) ON.
Turns the input source on or off.
Source A and B are mixed together when A ON and
B ON are both pressed. No source is selected if
both switches are off.
HF
-15
+15
-15
+15
-15
+15
-15
HM
MONO L (R). With both switches up the selected
source is routed through the channel in stereo.
Press MONO L to select the left input as a mono
source. Press MONO R to select the right input as
a mono source. Press both switches to sum the left
and right inputs together as a mono source.
LM
LF
EQUALISER.
The stereo channel equaliser
provides adjustment of 4 independent frequency
bands. Each has a cut /boost control.
+15
EQ IN
HF
The high frequency band has a shelving
response that cuts or boosts the higher (treble)
frequencies by up to 15dB. The shelf turning point
is 12kHz.
HM
The higher mid band has a bell shaped
peak/dip response that cuts or boosts by up to
15dB. The centre frequency is 2.5kHz. The bell
has a Q (width) of 1.8.
LF EQ
+20
250Hz
+15
2.5kHz
+10
LM The lower mid band is similar to the high mid
but has a lower centre frequency at 250Hz.
+5
LF
The low frequency band has a shelving
response that cuts or boosts the lower (bass)
frequencies by up to 15dB. The shelf turning point
is 60Hz.
0dB
-5
-10
-15
-20
10
30
100
1kHz
10k
30k
E5 EQ IN. Switches the equaliser in or out.
ML4000 User Guide
Using the Dual Inputs.
Using the Equaliser
The 2 (6 optional) stereo channels let you connect
up to 4 (12 optional) stereo sources. Two sources
may be plugged into each channel strip. Either may
be selected or both can be mixed together as a
common source.
The channel equaliser can be used to creatively
enhance or correctively improve the tonal quality of
the sound. For example, to brighten up a dull
sound so that it stands out in the mix, to cut back
rumble or hiss on a noisy reverb, or to shape the
response of low level walk-in music.
The possibilities are endless. The advantage is that
you can connect many stereo sources without
wasting channels. Here are a few examples:
Effects Returns. Typical application of the stereo
channels is to return the processed output from
effects devices such as reverb and multi-effects
units. With full routing available you can send the
effects to the main mix, groups and auxes as
required. The LCRplus panning lets you position
the stereo return in the 3 speaker mix, for example
reverb mostly to LR with a little blended to C. Too
much returned to C may affect intelligibility. The
signal routes in stereo to LR but sums into mono
when blended to C.
To save channels you could return two effects to
the same stereo strip, adjusting the gain separately
for each. This is convenient when you are working
with several effects returned to the same mix, for
example different reverbs.
Before using the equaliser make sure that the
source is correctly adjusted, especially if it includes
its own filters or EQ. Start with the EQ set flat and
apply only as much boost or cut as is needed.
Use HF to add sparkle to the sound, or to remove
hiss. HM centred around 2.5kHz can be used to
add presence and improve intelligibility by
brightening up the sound and helping it cut through
the mix. LM centred around 250Hz can be used to
add warmth or reduce low frequency boominess.
Use LF to add punch to the low end, or to remove
source rumble and low frequency noise.
Use the in/out switch to compare the original and
equalised sound. The equaliser has a flat response
and therefore no effect when all the cut/boost
controls are set to their centre detented position.
Stereo Playback. You may have a CD player for
walk-in music and a DAT or similar player for prerecorded announcements. You could connect both
to the same stereo channel and simply start the
player, or switch the A or B input on, as required.
Sound Effects.
Here, you could connect two
effects players such as MiniDisc to the same stereo
channel. This lets you handle quick fire cues using
two machines rather than trying to cue up a single
player. Alternatively this could be used for a
backup machine.
Using Mono Sources
The stereo channels can also be used with mono
line level sources. Plug into either the left or right
channel connector and select MONO L or MONO R
as appropriate.
Alternatively, use these switches to select one track
of a backing or dual track tape where different
material is recorded on each track, for example a
song recorded with vocals on one and instruments
on the other.
You can also mono a stereo source by pressing
both MONO L and MONO R together. Use this
when the stereo image is too wide or not
appropriate for the application.
ML4000 User Guide
31
GROUP / AUX 1-8
FOH
MONITOR
and AUX 9-12 MASTERS
mode
GRP/AUX 1
reverse
AUX
GRP/AUX
reverse
AUX
1
2
+6
OO
+6
OO
AFL
AFL
MAIN
MIX
LCR +
BLEND
LR
=
=
MAIN
MIX
LCR +
BLEND
C
LR
=
=
C
AUX/GRP MODE. This switch reverses the group
fader and aux rotary master sections.
It is
underpanel to protect it from accidental operation.
Use a pen or pointed implement to select the
required setting. The default up position is flush
with the panel.
In the up position FOH MODE is selected. This is
the default setting for the front-of-house application.
In FOH mode the fader master section and insert
are associated with the audio group while the rotary
master is associated with the aux send.
In the pressed position MONITOR MODE is
selected. This reverses the fader and rotary master
so that the fader master section and insert are
associated with the aux send while the rotary
master is associated with the group. The group
always feeds the matrix and sub grouping to main
mix regardless of mode.
PAN
PAN
L
R
L
TB
MUTE
R
TB
MUTE
EDIT/SAFE
EDIT/SAFE
AFL
AFL
AUX ROTARY MASTER. Adjusts the aux master
output level from fully off to a maximum boost of
+6dB. The normal ‘0’ position is marked. This
becomes the group master when MONITOR mode
is configured.
AFL. Press this switch to listen to the master signal
in the headphones or engineers monitor without
affecting the main outputs. The signal is monitored
post-level so that the signal feeding the connected
equipment can be checked. The same capabilities
apply as described for the fader master AFL.
STEREO
32
PK
PK
+6
+6
0
0
-6
-6
SIG
SIG
5
5
0
0
5
5
10
10
20
20
30
30
OO
OO
MAIN MIX. A single switch routes each group 1-8
signal to the 3 output main mix. Select this to create
up to 8 subgroups to the main mix. Its balance and
image within the L, R and C outputs is determined
by the BLEND and PAN controls. The group
always feeds this sub grouping to main mix
regardless of mode.
BLEND. This control adjusts the balance between
the LR and C outputs. Fully anti-clockwise all the
signal routes to the LR outputs and none to C. At
the detented centre position the signal routes
equally to the LR and C outputs. Fully clockwise all
signal routes to the C output and none to LR. The
control has a 3dB attenuation at centre position.
PAN. Adjusts the balance between the L and R
outputs. It does not affect the C output. At the
detented centre position the signal routes equally to
L and R. PAN and BLEND combine to adjust the
balance between the 3 outputs. The control has a
3dB attenuation at centre position.
ML4000 User Guide
FADER MASTER. A 60mm smooth travel fader is
fitted providing +10dB gain above the nominal 0dB
operating position. These faders control the output
level of group/aux 1-12. They are not part of the
console VCA group system.
TB ENABLE. Press these to enable talkback to
any combination of grp/aux master outputs. When
selected, pressing the TALK TO TB switch routes
the talkback mic signal, or pressing the OSC/NOISE
TO TB switch routes the oscillator/noise generator
signal to the output. When not selected, pressing
these switches does not affect the output. The
talkback and osc/noise signals are routed preinsert.
MUTE. This momentary action switch turns the
grp/aux master signal on or off. The master can
also be muted by the mute groups, VCA group
mutes, snapshot memories (externally controlled),
and MIDI note on/off messages.
The switch
illuminates when the signal is muted.
The switch also functions as an edit key when in
EDIT GROUPS or EDIT SAFES mode. The mute
status is always displayed on the switch regardless
of mode.
SAFE / EDIT.
This green LED has a different
function according to console mode:
Normal The LED lights when the master has been
made safe from the snapshot and MIDI automation.
PFL/AFL Monitoring
The ML4000 intelligent P/AFL system provides the
following operating capabilities:
Mono or stereo AFL. Press a single AFL switch
to listen to that master as a mono signal fed to both
left and right channels of the headphones and local
monitor. Press two related AFL switches together
to listen to a related pair in stereo, ideal when
checking in-ear monitor mixes. The odd number
master is fed to the left channel, even to right.
Latching or momentary action.
The switch
provides latching or momentary action depending
on how long it is held down. Press and hold for
longer than 1 second for momentary action.
AFL override monitor. Pressing any master AFL
automatically overrides the currently selected
monitor source.
Releasing AFL restores that
selection.
PAFL override AFL. Pressing any channel PAFL
overrides the current AFL selection. Releasing
PAFL restores AFL.
AFL cancel PAFL. Pressing an AFL while one or
more PAFL is selected cancels that PAFL selection
and selects the AFL.
Auto cancel or Add mode. The master section
ADD MODE switch determines if pressing a
channel PAFL cancels or adds to any previous
selection.
Clear all. Pressing the master section CLEAR ALL
switch turns off any PAFL / AFL switches selected
and restores the monitor source.
Edit Safes Continues to indicate which masters
are automation safe while they are edited.
Edit Groups The LED lights to indicate that the
master is assigned to the MUTE group.
MIX SIGNAL METER.
The 5 LED bar meter
displays the post-mute, pre-fade mix signal level.
SIG lights to display signal presence at –26dB, -6, 0
and +6 display normal signal level, and PK (peak)
lights when the signal is within 5dB of clipping. PK
senses the signal pre and post-fader to warn of
potential overload.
If the red PK LED lights check the channels feeding
the mix for correct operating level and reduce the
input level if necessary. You can use VCA groups
to simultaneously control the level of more than one
channel.
Also check inserted processing for
correct operating level.
ML4000 User Guide
AFL.
Press this switch to listen to the master
signal in the headphones or engineers monitor
without affecting the main outputs. The signal is
monitored post-insert, post-fader, pre-mute so that
any adjustments made to the faders or inserted
processing such as EQ can be checked.
IDENT STRIP. Identifies the master numbers and
provides a write-on area. The use of low adhesion
artist or masking tape is recommended.
33
Configuring Groups and Auxes
Decide the application of the console whether front-of-house or monitor or doing both
jobs. Decide the number of audio groups required. The rest can be configured as fader
controlled auxes.
Front-of-House. This is the application with all mode switches in their default up
position. This provides 8 audio groups with paired routing switches and LCRplus™ sub
grouping, 8 mono auxes switchable pre or post-fader on rotary masters for effects and
monitor sends, and a further 4 mono/stereo auxes on faders for more effects, monitors
and special feeds. The groups can be mixed to the 4 matrix outputs. If you do not need
fader control on all 8 groups then you can press the mode switches to configure fader
controlled aux sends with inserts.
Stage Monitor. Press mode switches to configure the C fader as the engineers wedge
monitor, and to configure the number of fader controlled monitor mixes you need up to a
maximum of 12. The rest can be used for effects sends. Up to 2 stereo mixes can be
configured, for example when in-ear monitor mixing. Each mix provides an insert for
patching in an equaliser or other signal processing, full metering, mono or stereo AFL,
and talkback enable. The groups are available on the rotary masters if required.
The diagram below shows how the fader master section together with its insert point
reverses with the rotary master section when the mode switch is pressed. The Aux and
Group output XLR connectors do not reverse. The matrix and sub grouping is always
fed from the group signal regardless of mode.
AUX MIX
AUX OUT
AUX
1
+6
OO
AFL
AUX
FOH
MONITOR
mode
GROUP MIX
INSERT
TB
GROUP OUT
MUTE
EDIT/SAFE
AFL
PK
+6
0
MAIN
MIX
6
-6
SIG
5
=
LCR +
BLEND
OO
+6
OO
+6
OO
+6
7
LR
0
=
C
PAN
8
5
10
20
L
R
SUBGROUP
MATRIX
30
OO
GROUP
34
ML4000 User Guide
MAIN MIX MASTERS
L
R
MAIN
M
U
T
E
C
M
U
T
E
M
U
T
E
SAFE/EDIT
SAFE/EDIT
SAFE/EDIT
WEDGE
mode
C
MONITOR
PK
PK
PK
MUTE. This momentary action switch turns the
master signal on or off. It can also be muted by the
mute groups, snapshot memories (externally
controlled) and MIDI note on/off messages. The
switch illuminates when the signal is muted.
The switch also functions as an edit key when in
EDIT GROUPS or EDIT SAFES mode. The mute
status is always displayed on the switch regardless
of operating mode.
10
10
10
5
5
5
0
0
0
SAFE / EDIT.
This green LED has a different
function according to console mode:
5
5
5
Normal The LED lights when the master has been
made safe from the snapshot and MIDI automation.
10
10
10
20
20
20
30
30
30
40
40
40
OO
OO
OO
Edit Safes Continues to indicate which masters
are automation safe while they are edited.
Edit Groups The LED lights to indicate that the
master is assigned to the MUTE group.
It is best to use the same type of monitor speaker
as provided on stage. This lets the engineer hear
the sound as the performer hears it.
WEDGE MODE.
This underpanel mode switch
configures the C output to become the engineers
monitor when the console is used for the stage
monitor application. When pressed the monitor
source is routed in mono through the C insert and
fader to the main output. The C mix bypasses this
section and is available from the matrix outputs if
needed. The yellow LED lights when wedge mode
is selected. The switch is protected to prevent
accidental operation.
Use a pen or pointed
implement to select the required mode.
Select the underpanel WEDGE MODE switch to
configure the C output as the engineers wedge
monitor. Use the insert to patch in any processing
required, for example a graphic EQ to preview
changes in the monitor before applying them to the
mix being checked.
PEAK. The red PK LED senses the signal both
pre and post master fader and lights to warn when
the main mix is within 5dB of clipping. Reduce the
inputs to the mix if the LED flashes.
Using the Engineers Wedge Monitor
Select LR, C, 2-TRK or none as the default monitor
source. Pressing AFL overrides the source to listen
to a selected output. Pressing PAFL overrides any
AFL selection to check one or more inputs.
Releasing PAFL restores the previously selected
AFL. This is well suited to monitor mixing where
you need to listen to the mixes in turn but quickly
check individual inputs along the way.
FADER MASTER. The main mix L,R and C each
have a 100mm smooth travel ALPS K-fader
providing +10dB gain above the nominal 0dB
operating position. These faders are not part of the
console VCA group system.
Pressing the TALK TO TB switch automatically
dims the output by 20dB to prevent feedback
between the local speaker and talkback mic.
ML4000 User Guide
35
MATRIX and 2-TRACK
4 Matrix outputs are available. Each has 11
sources derived from group 1-8 and the LRC main
mixes. Conveniently positioned away from the
other controls, these can be used to create
independent mixes for distributed speaker systems,
recording, broadcast, video and other special feeds.
They include mute switches, talkback assign,
balanced XLR outputs and mono/stereo AFL.
1
L
OO
+6
2
1
OO
+6
R
OO
+6
3
OO
+6
OO
+6
2
+6
C
OO
L
OO
+6
3
OO
+6
4
OO
+6
OO
+6
OO
+6
R
C
OO
+6
GROUP 1-8. Each of the 8 groups can be mixed
into the matrix. The source is derived post-fader.
Adjust the level clockwise from fully off to +6dB
boost. The ‘0dB’ position is marked.
L,R,C. Each channel of the main output can be
mixed into the matrix. The source is derived postfader. Adjust the level clockwise from fully off to a
maximum +6dB boost.
TB ENABLE. Press this to enable talkback to the
matrix output. When selected, pressing the TALK
TO TB switch routes the talkback mic signal, or
pressing the OSC/NOISE TO TB switch routes the
oscillator/noise generator signal to the output.
When not selected, pressing these switches does
not affect the output. The talkback and osc/noise
signals are routed pre master level.
4
OO
+6
OO
5
MASTER LEVEL. Adjusts the matrix output level
from fully off to a maximum boost of +6dB. The
normal ‘0’ position is marked.
+6
5
TB
OO
TB
+6
6
OO
OO
+6
7
OO
+6
LEV
OO
+6
7
MUTE
OO
+6
6
LEV
+6
8
OO
+6
MUTE
OO
+6
OO
+6
8
AFL
OO
+6
STEREO
AFL
MUTE.
This latching switch turns the matrix
master signal on or off. It is not part of the console
mute group and automation system. The switch
illuminates when the signal is muted.
AFL. Press this switch to listen to the matrix signal
in the headphones or engineers monitor without
affecting the main outputs. The signal is monitored
post-level, pre-mute so that it can be checked while
the output is muted.
This switch has the same capability as the fader
master section AFL.
Includes momentary or
latching action, add or auto-cancel mode, all clear
and PAFL override AFL logic.
Mono or stereo AFL. Press a single AFL switch
to listen to that matrix as a mono signal fed to both
left and right channels of the headphones and local
monitor. Press two related AFL switches together
to listen to a related pair in stereo, ideal when
checking stereo sends. The odd number master is
fed to the left channel, even to right.
36
ML4000 User Guide
Using the Matrix
2-TRACK Output
The matrix provides 4 additional console outputs. It
is a ‘mixer within a mixer’ taking its source from the
groups and main mix. It can be used to provide
duplicate main outputs or to create new mixes from
the main outputs. The possibilities are endless. A
few applications are discussed below:
The 2-track output is sourced from the main LR mix.
The factory default setting is post master LR faders.
If you want to source pre-insert, pre-fader then
replug the internal jumper links on the LR MIX
circuit board as shown below. For stereo recording
from a three channel LCR mix, or by creating a new
balance from the groups, use the MATRIX outputs
instead.
Distributed Speaker Systems.
The traditional
application for the matrix is to feed a multi-speaker
system such as that found in theatre sound
reinforcement. Use the console L,R and C outputs
to feed the main front speakers typically hung
around the proscenium arch. Use the matrix to
provide independent mixes to the under-balcony,
centre, side and rear fill speakers.
The fill speakers should be delayed to acoustically
align the signal with the stage so keeping the
listener focussed on the source of the sound. They
would also be equalised to aid intelligibility without
distracting the listener from the source. You may
wish to send only certain groups of sound to the fill
speakers. Use the group 1-8 controls to create the
required balance, for example just the vocal groups
to improve speech intelligibility. You could add in a
small amount of the main mix with the LRC controls
using equal amounts of L and R to create a mono
mix.
FADER
2-TRACK SOURCE
PRE-INSERT
POST-FADE
PRE-INSERT
POST-FADE
PRE-INSERT
POST-FADE
PRE-INSERT
POST-FADE
LEFT OUT
RIGHT OUT
CONNECTORS
Recording and Broadcast Feeds. Use the matrix
to create feeds in mono, stereo or both. It may not
be good enough to simply tap off the main console
mix, especially in smaller venues where the
acoustic output from the band back line or orchestra
contributes to the front-of-house sound. Here, the
acoustically strong sounds such as drums, bass
and guitar may be low in the front-of-house mix.
You can compensate for this in the recording using
the matrix. Start with the main LRC mix then add
the groups to boost selected sounds.
Stereo from LCR. The matrix also lets you create
stereo feeds from a 3 output LCR mix by adding C
into both channels. Use one matrix with L+C
routed, the other with R+C to feed the left and right
recording channels.
Managing the Matrix. Check the matrix mix using
AFL. Press the related pair together to listen in
stereo if you are using two matrix outputs as a
stereo feed. Use TB to route talkback or the
oscillator/noise generator to the matrix to test
speakers and feeds.
ML4000 User Guide
37
VCA GROUPS
M
U
T
E
M
U
T
E
M
U
T
E
SAFE
SAFE
PAFL
M
U
T
E
SAFE
PAFL
M
U
T
E
SAFE
PAFL
M
U
T
E
SAFE
PAFL
M
U
T
E
SAFE
PAFL
M
U
T
E
SAFE
PAFL
EDIT
GROUP
SELECT GROUP TO EDIT
ASSIGN USING CH MUTES
SAFE
PAFL
PAFL
MUTE
10
10
10
10
10
10
10
10
5
5
5
5
5
5
5
5
0
0
0
0
0
0
0
0
5
5
5
5
5
5
5
5
10
10
10
10
10
10
10
10
20
20
20
20
20
20
20
20
30
30
30
30
30
30
30
30
40
40
40
40
40
40
40
40
OO
OO
OO
OO
OO
OO
OO
OO
NOM
VCA Groups Explained
The benefits of VCA grouping
VCA groups provide an important alternative to
audio subgroups for simultaneously controlling the
level of more than one channel using a single fader.
Effects balance is maintained. Because the
channel post-fade sends are affected, the reverb
level returned elsewhere in the console also follows
the group fader movements.
Unlike an audio subgroup the signal is not routed
through the group fader itself. Instead, you route
the signal directly to the main output. The VCA
group fader sends a DC voltage to remotely control
the assigned channel levels, so providing the group
control. This is possible because each channel has
a pre-pan VCA (voltage controlled amplifier) which
can be controlled by both the channel fader and
group faders. This means that all post-fade outputs
from assigned channels will be affected by the VCA
master faders. Note that the channel pre-fade
(monitor) sends are not affected by VCA groups.
Note that the channel fader always controls the
signal level. If the channel is assigned to one or
more VCA groups then both the channel and the
group faders control the level as if they were in
series. Refer to the diagrams over the page.
The ML4000 has 8 VCA groups. Mono and stereo
input channels can be assigned to one or more
groups. The VCA group assignments are stored as
part of the console snapshot memory system
(externally controlled).
38
Stereo groups on one fader. Because the level is
controlled before the channel pan circuit, a single
VCA group fader is all that is required to control a
stereo or LCR group. This would take 2 or 3 faders
using audio groups if the channel pan image is to
be maintained.
Multiple output control. The relative balance
between all outputs is maintained when moving
VCA group faders.
Multi-level grouping. A channel can be assigned
to more than one VCA group. This lets you assign
multi-level groups, or even a ‘grand master’,
impossible with audio groups.
Conventional audio groups are still useful when you
need to insert a signal processor such as a
compressor to affect a group of signals, or you need
to feed different groups of signals into the matrix.
However, fewer such groups are usually required
on a VCA equipped console. For this reason the
ML4000 provides the mode switching to reconfigure
unused audio groups as full featured aux sends.
ML4000 User Guide
Using VCA Groups
Use audio groups where you want to insert group
signal processing or send groups of signals to the
matrix. Use VCA groups if you want grouped level
control only.
Route the channels to the mix by pressing the MAIN
MIX switch. Adjust the PAN and BLEND controls
for the image required. Assign the channel to the
required VCA group using the edit groups routine
described on the next page. Check the channel
VCA assign LEDs next to the fader for correct
assignment.
Once assigned, the group fader
affects the channel level. Start with the group fader
set to its nominal ‘0’ position.
You can assign the channel to more than one
group.
Take for example a theatre musical
production.
Here, you may have stage
microphones assigned to Group 1, radio mics to
Group 2, and all microphones to Group 3. You may
also have all channels assigned to Group 8 as a
‘grand master’ to control the overall volume. In this
case, a radio microphone would be assigned to
Groups 2, 3 and 8. Note that the VCA groups affect
all channel post-fade sends such as effects and
direct outputs but not the pre-fade monitors.
PRE-FADE SENDS
POST-FADE SENDS
SUBGROUP
L
R MAIN MIX
C
PAN
MATRIX SEND
INSERT
ASSIGN
CHANNEL
FADER
MASTER
FADER
AUDIO GROUP
AUDIO BUSS
CHANNEL
PRE-FADE SENDS
POST-FADE SENDS
L
R MAIN MIX
C
PAN
The switch also functions as a group select key
when in EDIT GROUPS mode, or as a safe select
when in EDIT SAFES mode.
The VCA group mute cannot be assigned to a mute
group or snapshot memory. However, channels
which have been muted by the group can be stored
in the memories.
PAFL.
Press this switch to listen to the group
signal in the headphones or engineers monitor
without affecting the main outputs. It acts as a
remote control for the PAFL switches on assigned
channels. It actions either all channel PFL or stereo
AFL in-place depending on the setting of the master
section INPUT PAFL switch.
Using PAFL
Set the master section INPUT PAFL switch for
either PFL or stereo AFL in-place when you select a
VCA group PAFL.
CHANNEL
PAN
MUTE.
This momentary action switch turns all
assigned input channels on or off. It acts as a
remote control for the mute switches on those
channels. The channel pre-fade, post-mute sends
are also affected. The mute switches on assigned
channels light when the group is muted.
Use PFL to check for signal presence while the
group fader is down. This is useful when you need
to check that all is well before raising the fader and
bringing the assigned channels into the mix. The
channel PFL switches are turned on and the signals
mixed together at the same level. Turn down the
master PFL TRIM control N1 if the signal is too
loud in the monitor.
Use AFL to check the balance and contribution of
the group of channels to the mix. The signal follows
the fader levels and image controls with C mixed
into the L and R so that you can listen to the LCR
mix in stereo.
VCA
+
ASSIGN
DC
VCA GROUP
MASTER
FADER
CHANNEL
FADER
DC VOLTAGE
ML4000 User Guide
39
VCA GROUP FADER. The fader adjusts the level
of all channels assigned to the group. The ‘0’
position is referred to as the ‘nominal’ operating
setting. At this position the channel levels are as
marked on the channel faders. Any adjustment
made to the group fader offsets the channel level by
that amount. It is best to start with the group faders
set to their ‘0’ position.
EDIT GROUPS.
Press this switch to put the
console into edit groups mode. The red LED
flashes to warn that the console is in edit mode.
Press at any time while the LED is flashing to
restore normal operating mode. All the VCA group
MUTE LEDs and channel SAFE/EDIT LEDs turn off
when edit mode is first entered. This means that no
group is selected for editing.
At minimum position the fader shuts off all assigned
channels. At maximum position it provides a further
+10dB boost. Note that the maximum boost that
may be applied to the channel VCA is +10dB
regardless of how many group faders are assigned
and set above ‘0’.
The same edit groups mode is used to edit both the
mute and VCA groups. Pressing the associated
master switch while in edit mode selects the mute
group or VCA group you want to edit.
The following diagrams illustrate the combined
channel gain when assigning more than one VCA
group. In this case the final gain is affected by the
channel fader and three VCA groups.
Example 1. A 0dBu signal is passed through the
channel. The fader attenuates this by 5dB. Group1
attenuates it by a further 10dB to –15dBu. Group2
boosts by 5dB bringing it up to –10dBu. Group3 is
set to ‘0’ resulting in the final level of –10dBu.
Example 2.
Once again the channel fader
attenuates the signal to –5dBu. However, Group1
is set to minimum turning the signal off. There is no
output regardless of the setting of Groups 2 and 3.
Example 3. Here the channel fader and Groups 1
and 2 faders are set for +10dB boost. The result is
the channel VCA reaching its maximum of +10dB
regardless of the combined 30dB boost. It is best to
work with the faders around ‘0’ and avoid excessive
boost.
Only one group may be edited at a time. The
current assignments for all groups are always
displayed on the channel VCA assign LEDs.
To Assign a VCA Group
Press EDIT GROUPS. Next, press the MUTE
switch for the group you want to edit. Both switches
flash. The channel SAFE/EDIT LEDs display which
channels are currently assigned to the group. Now
press the channel MUTE switches to toggle
channels in or out of the group. Press EDIT
GROUPS again to exit edit mode, or press another
group mute switch to edit a different group.
M
U
T
E
MUTE
EDIT
GROUP
SELECT GROUP TO EDIT
ASSIGN USING CH MUTES
SAFE
SAFE/EDIT
PAFL
PAFL
PK
MUTE
+6
0
Example 1
+20
+15
+10
+5
0
IN
-5
0dB
-10
-15
-20
-30
-40
off
Example 2
+20
+15
+10
+5
0
IN
-5
0dB
-10
-15
-20
-30
-40
off
Example 3
+20
+15
+10
+5
0
IN
-5
0dB
-10
-15
-20
-30
-40
off
40
CHANNEL
GROUP 1
GROUP 2
+5
-5
-6
GROUP 3
0
1
-10
OUT
-10dB
GROUP 1
GROUP 2
+5
10
5
5
0
0
5
5
NOM
2
3
4
CHANNEL
10
SIG
GROUP 3
0
-5
off
OUT
off
CHANNEL
+10
GROUP 1
+10
GROUP 2
GROUP 3
+10
0
OUT
+10dB
(max)
ML4000 User Guide
MUTE GROUPS
EDIT GROUPS.
Press this switch to put the
console into edit groups mode. The red LED
flashes to warn that the console is in edit mode.
Press at any time while the LED is flashing to
restore normal operating mode. All the group
MUTE LEDs and channel SAFE/EDIT LEDs turn off
when edit mode is first entered. This means that no
group is selected for editing.
EDIT
GROUP
SELECT GROUP TO EDIT
ASSIGN USING CH MUTES
Only one group may be edited at a time. The
current assignments for the selected mute group
are displayed on the channel SAFE/EDIT LEDs.
MUTE
MUTE GROUP.
Press one or more of these
momentary action switches to mute the channels
assigned to them. More than one group can be
selected at the same time. The switch illuminates
when the group is selected. Press again to turn the
group off. Note that you can release and reselect
the assigned channel mutes while the group is on.
To Assign a Mute Group
Press EDIT GROUPS. Next, press the MUTE
switch for the group you want to edit. Both switches
flash. The channel SAFE/EDIT LEDs display which
channels are currently assigned to the group. Now
press the channel MUTE switches to toggle
channels in or out of the group. Press EDIT
GROUPS again to exit edit mode, or press another
group switch to edit a different group.
Mute Groups Explained
A mute group lets you turn a selected combination
of channels on or off with a single key press. The
mute group key acts as a remote control for the
assigned channel mutes.
Mute groups are edited by selecting edit groups
mode and using the channel MUTE switches to
assign channels to the group. The assignment is
edited or viewed one group at a time.
Using Mute Groups
Applications include muting groups of instruments,
unused channels when mixing different bands, all
channels except walk in music before the show
starts, all effects, a bank of radio mics during an
instrumental number, stage mics during a scene
change, and so on.
The ML4000 has 8 mute groups. You can select
more than one group at the same time. VCA group
mutes cannot be assigned to the mute groups.
Mute group settings are not stored as part of the
console snapshot memory system.
However,
channels which have been muted by a group and
have not been made safe from the automation will
be stored.
ML4000 User Guide
41
SNAPSHOT MEMORIES
Snapshots Explained
Channel Safes Explained
Note: This function is not available from the
console control surface. It is an ‘extra’ feature
accessed via the MIDI or RS232 port using a PC
running the Allen & Heath ML4 Archiver program.
This can be downloaded from the Allen & Heath
Internet site. Full details and instructions are
provided with the program.
A channel is referred to as being made ‘safe’ when
it is protected from being overwritten or affected by
an automated process.
The mute and VCA assignment settings can be
stored in the 128 console ‘snapshot’ memories.
This is similar to taking a ‘picture’ of the settings.
These can be recalled for scene or song changes
during live performance. Patch changes can be
linked to external sequencers and effects devices
using MIDI for sophisticated show control and
archiving of the memories.
Channels made safe are not affected by the
snapshots. Memory data is retained on power
down.
The following capability is provided:
•
128 Snapshot memories
•
Channel automation safes
•
Store console settings to the snapshots
•
Recall to overwrite the console settings
•
Auto increment on recall
•
Disable store to protect the memories
•
MIDI program message send and receive
•
MIDI dump in/out for archiving
•
MIDI channel number select
•
MIDI / RS232 activity indicators
A Note on Snapshot Mutes
The input and output channel mutes can be stored
and recalled from the snapshot memories. The
VCA group and Mute group mutes cannot.
However, those channels muted by the groups, and
not made automation safe, at the time the snapshot
is stored will be stored and recalled.
Recalling a snapshot does not turn off any mutes
which have been turned on by the Mute and VCA
groups. The groups always take priority.
42
Selected channels can be made safe from the
automation so that they are not overwritten by the
snapshots and MIDI messages. This is useful when
channel allocations are changed ‘on the fly’ during a
pre-programmed show. Input and outputs can be
made safe.
EDIT SAFES. Press this switch to enter edit safes
mode. The red LED flashes to warn that you are in
edit mode.
Making a Channel Automation Safe
From normal console mode press EDIT SAFES.
The red LED flashes. Now press the mute switches
on the channels you want to make safe or restore to
automation. The channel SAFE/EDIT LED lights if
the channel is safe. Press EDIT SAFES again to
return to normal console mode.
Using Snapshot Memories
The snapshot memories provide a powerful
automation tool. Decide first if and how you wish to
use the system:
Automated Mutes and VCA assignments. This
adds a powerful new level of automation. Attaching
the VCA group assignments to the snapshot system
means that which channels are assigned to the
VCA groups can change scene by scene or song by
song. For example, a VCA fader may be assigned
as ‘lead vocal’, another as ‘chorus’. A performer
may sing lead in one song and chorus in the next
while a different singer (channel) takes the lead.
The same group faders adjust the lead and chorus
levels. This may also apply when mixing different
bands on the same faders, or applying different
effects to different songs.
For more automated control you can connect a
MIDI sequencer or show controller to sequence and
trigger the memories according to programmed
cues.
Refer also to the section on MIDI /RS232 for details
on archiving the console settings and memory
contents.
ML4000 User Guide
HEADPHONES / LOCAL MONITOR and P/AFL SYSTEM
The Console Monitor System
PFL
The engineer is able to listen to any channel, mix or
matrix signal using stereo headphones and an
amplifier/speaker system connected to the local
monitor output. In addition the C output provides an
engineers wedge monitor feed when the console is
configured for monitor operation.
All have
independent level control. The headphones are
connected by plugging in under the front armrest.
0dB
TRIM
min
max
2TRK
SOURCE
LR
LCR
C
MONO
LOCAL
MONITOR
0
10
10
AUTO
CANCEL
ADD
PFL
AFL
IN-PLACE
CLEAR
ALL
ML4000 User Guide
The ML4000 features an intelligent P/AFL system
that provides extended monitoring capability. The
inputs can be selected as mono PFL or stereo inplace AFL, the outputs as mono or stereo AFL.
Selection is auto cancel or add mode. How the
switches are pressed determines if they have a
latching or momentary function.
Together with the wedge monitor capability this
gives the engineer total and conveniently quick
monitoring of all sounds passing through the
console.
PHONES
0
under armrest
The source is selected as either the 2-track input,
main LR mix, main C mix, or LR combined with C
for listening to a 3 output LCR system using the
stereo monitor. Pressing any console PAFL or AFL
switch overrides this selection with a priority well
suited to live sound applications. The selected
source can be listened to in mono or stereo. All
monitor outputs automatically dim by 20dB when
the TALK switch is pressed.
The Monitor Logic
•
No switches pressed = quiet
•
Main selection: 2-TRK overrides LR, C
•
LR and C together = LCR in stereo
•
Pressing AFL overrides the main selection
•
Pressing PAFL overrides AFL and main
•
Releasing PAFL restores AFL
•
Pressing AFL cancels PAFL
•
CLEAR ALL cancels all PAFL and AFL
•
Input PAFL = mono PFL or stereo in-place AFL
•
Output AFL = mono or stereo AFL
•
Press related two together = stereo AFL
•
Hold P/AFL longer than 1 second = momentary
•
P/AFL selection is cleared on power down
•
The L,R,C meters = main mix or P/AFL
•
Pressing TALK dims all by 20dB
43
PFL TRIM. Adjust this control to set the listening
level of the PFL selection. Provides a range from 12dB attenuation to +6dB gain with normal ‘0dB’
centre detented position. It does not affect the PFL
metering which always reflects the true reading.
This lets you match the PFL listening level to your
normal AFL and main mix monitoring levels,
typically much quieter. It can prevent the sudden
rise in volume when you press a PFL switch.
2TRK SOURCE. Press this switch to listen to the
2-track input in the headphones, local, and
engineers wedge monitors. The signal is fed in
mono to the engineers wedge. This lets you check
the output of a stereo recorder. This selection
overrides any selected LR and C monitor source
until released. It is itself overridden by any P/AFL
selection. The 2TRK source is not sent to the
meters.
PHONES LEVEL.
This adjusts the level of the
monitor signal in the stereo headphones.
WARNING: To prevent damage to
your hearing start with the headphones level set
to minimum. Avoid continued high listening
levels in the headphones or any other earpiece.
ADD MODE.
This switch determines how the
P/AFL system works. It selects whether pressing
one or more input PAFL switches cancels or adds
to the previous selection, the same for the output
AFL switches. It does not affect the how the PAFL
and AFL switches interact.
Auto-cancel. In its up position auto-cancel mode
is selected. Pressing a PAFL automatically turns off
any previous PAFL selection, and pressing an AFL
turns off any previously AFL selection. This lets you
quickly check the channels one at a time without
having to turn each selection off first.
LR SOURCE. Press this switch to listen to the
main post-fade LR output in stereo. It is overridden
by the 2TRK and P/AFL selections.
Add mode. Press this switch to select add mode.
Pressing a PAFL adds to any currently active PAFL
selection, and pressing an AFL adds to any
currently active AFL selection. This lets you check
combinations of signals in the monitor.
C SOURCE. Press this switch to listen to the main
C (centre) output in mono. As with LR it is
overridden by the 2TRK and P/AFL selections.
PAFL / AFL interaction. Pressing any PAFL while
AFL is active automatically overrides the AFL
selection by turning it off. Releasing PAFL restores
the AFL selection. However, pressing any AFL
while PAFL is active cancels the PAFL selection.
Releasing AFL does not restore the PAFL selection.
This logic suits live sound mixing where you would
monitor an output mix using AFL and interrupt it to
quickly check the input sources using PAFL.
Press LR and C together to monitor a 3 output LCR
system in stereo. This mixes the C signal equally
into L and R.
MONO. Press this switch to listen to the selected
monitor source in mono. This only affects the
monitor outputs.
It is useful to check for mono signal compatibility. If
the signal drops in level or loses quality when
monoed then there may be a problem with phasing
between the left and right signals.
LOCAL MONITOR LEVEL.
This adjusts the
stereo local monitor output level.
INPUT PAFL. In its up position pressing an input
channel PAFL switch selects PFL. In its down
position stereo in-place AFL is selected. It does not
affect the output AFL switching.
Input PFL (pre-fade listen). The input channel
pre-fade signal is monitored in mono.
Input AFL (after-fade listen). The input channel
post-fade, post-pan/blend signal is monitored in
stereo. It follows the setting of the pan and blend
controls with C mixed into L and R. This lets you
check the level and image of the signal in the mix.
Output AFL. The output channel post-fade signal
is monitored in mono or in stereo pairs.
CLEAR ALL.
Press this switch to turn off all
currently selected PAFL and AFL switches. Its LED
lights to show that one or more switches are active
and can be cleared.
44
ML4000 User Guide
OSC/NOISE GENERATOR
OSC/NOISE TRIM.
Adjusts the level of the
oscillator or noise signal from –30 to +10dB.
OSC/NOISE
TRIM
OSC/NOISE SELECT. In its up position pink noise
is selected as the generator source. Press to select
the 1kHz test tone.
Pink noise. This is a constant level random noise
signal with equal energy per octave covering the full
audio bandwidth.
min
max
PINK NOISE
1kHz OSC
OSC/NOISE
TO TB
Disable
1kHz Oscillator. This produces a pure 1kHz tone
(sine wave) for single frequency testing and line up.
OSC/NOISE TO TB. Press this switch to route the
pink noise or 1kHz tone test signal to any
combination of LR, C, Matrix and Grp/Aux outputs
that have their TB switches selected. The switch
has a latching action so that it can remain selected
while testing and calibrating the speakers.
DISABLE. Press the underpanel switch to disable
the osc/noise generator. This protects against
accidental operation during live performance.
Using the Osc/Noise Generator
WARNING: The generator is capable
of producing a high level continuous signal. To
avoid damage to the speakers check that the
generator and output levels are turned down
before you route the test signal to the outputs.
Start with the TRIM control turned down. Select
either pink noise or the 1kHz tone as the test signal.
Check all the TB enable switches are correctly set
to route the signal to the required outputs. Make
sure the DISABLE switch is up (flush with the
panel). Press OSC/NOISE TO TB to route the
signal to the selected outputs. Raise the TRIM
control and output faders to achieve the level
required. The test signal should register on the
console meters in the normal way.
Use pink noise to test the speakers for correct
operation. This is made up of the full audio
bandwidth and can test all the drivers at the same
time. Used with a reference microphone and RTA
(real time analyser) you can check the venue
acoustics for frequency response.
Use the 1kHz tone to check matching and line up
between equipment by adjusting input and output
levels using the meters as the reference.
When you have finished using the generator be
sure to disable it if you want to avoid the possibility
of accidental operation during performance.
ML4000 User Guide
45
INTERCOM
INTERCOM TRIM.
Adjusts the level of the
intercom signal in the console headphones. This is
not affected by the PHONES level. The console
monitor and intercom listen signals are
independently controlled.
INTERCOM
TRIM
min
max
LISTEN
CALL
LISTEN. Press this switch to route the intercom
signal to the console headphones. You can choose
when you want to listen in to the intercom. This
prevents background noise when you are trying to
monitor the console signals.
TALK TO
INTERCOM
CALL.
Press this momentary action switch to
signal the intercom. This lights the call lamps on all
connected intercom stations as well as the CALL
lamp in the meterpod.
TALK TO INTERCOM.
Press this momentary
switch to talk to all connected intercom stations. It
does not affect any of the console outputs.
CONNECTOR.
Rear panel 3-pin XLR female
socket. Connect to the intercom ring using a 2 core
shielded audio cable such as a microphone cable.
The Intercom Explained
A Clearcom compatible interface is built into the
console. This industry standard intercom system
provides two way talk and signal communication so
that technicians and stage crew can communicate
during set up and performance. It uses a three wire
connection such as a microphone cable. The
intercom interfaces with the talkback mic and
console headphones system.
This avoids the
difficulty faced by operators in checking problem
sources such as radio mics in the console
headphones while communicating with stage crew
via a separate intercom headset.
It is useful to be able to turn off the intercom audio
while checking console signals and to reduce
unwanted background audio while running the
show. A large yellow lamp in the meterpod lights to
attract the attention of the operator when the
intercom is being signalled, especially useful if
LISTEN is turned off.
The controls are logically grouped near the talkback
section for easy single handed operation of the
listen, signal and talk functions.
46
ML4000 User Guide
TALKBACK
MIC INPUT. Top panel 3-pin XLR female socket
for plugging in gooseneck microphone for the
console talkback system. The input is balanced.
MIC IN
+48V
TALKBACK
To avoid loud clicks do not press the TALK TO TB
switch while you are switching phantom power on or
off, or plugging or unplugging the microphone.
TRIM
min
+48V.
Press this underpanel switch to assign
+48V to the XLR for microphones that require
phantom power.
max
TB TO LR
TALKBACK TRIM. Adjusts the sensitivity of the
input to match the connected talkback microphone.
The range is +5dB to +50dB gain.
TB TO C
TALK
TO TB
TB TO LR. Press this to enable talkback to the
main LR output. When selected, pressing the TALK
TO TB switch routes the talkback mic signal, or
pressing the OSC/NOISE TO TB switch routes the
oscillator/noise generator signal to the output.
When not selected, pressing these switches does
not affect the output. The talkback and osc/noise
signals are routed into the mix pre master level.
Using Talkback
Talkback lets the operator talk to one or more
console outputs, for example to communicate with
performers on stage through their monitor speakers,
cue a recording via the matrix, or make a public
announcement through the main mix.
Plug in the talkback microphone. Select +48V if it
needs phantom power. Start with the TRIM control
turned down. Enable talkback to the required
output by selecting its TB switch. The TALK switch
green LED turns on. Check that the output faders
and levels are set to their normal operating position.
Now press the large TALK TO TB switch and talk
into the microphone. Adjust the TRIM control for
the required volume. The console monitor level is
automatically dimmed to avoid acoustic feedback
and aid intelligibility. To avoid accidentally routing
talkback where it is not wanted you should release
the TB enable switches when finished.
TB TO C. This is similar to the switch described
above but enables talkback to the main C output.
TALK TO TB. Press this momentary switch to talk
to all output destinations which have their TB
switches selected. The green switch LED lights
when one or more TB switches are selected to warn
that the signal will be routed to an output when
TALK is pressed. If no TB switches are selected
the LED remains off.
The microphone is turned on when the switch is
pressed and turned off as soon as it is released.
Pressing TALK automatically dims the console
headphones, local monitor and engineers wedge
monitor by 20dB.
If you do not need to use talkback you can release
all the TB enable switches and use TALK TO TB as
a monitor dim function, for example when using the
intercom, when talking with someone at the
console, or to dim the pink noise signal when
testing speakers.
ML4000 User Guide
47
The Meterpod
-
20
10
5
7
3
1
0
3
5
20
-
+
10
7
5
3
1
0
3
5
-
+
20
10
7
5
3
1
0
3
5
-
+
20
10
5
7
3
1
0
3
5
-
+
20
10
7
5
3
1
0
3
5
+
-
20
10
5
7
3
1
0
3
5
-
+
20
10
7
5
3
1
0
3
5
-
+
20
10
7
5
3
1
0
3
5
-
+
20
10
7
5
3
1
0
3
5
+
-
20
10
7
5
3
1
0
3
5
+
-
20
10
7
5
3
1
0
16
12
9
6
3
0
3
6
9
12
15
18
21
24
27
30
P AFL
3
5
+
AFL
CALL
L
-
20
10
5
7
3
1 0
3
5
-
+
20
5
7
10
3
1
0
3
5
-
+
20
10
7
5
3
1
0
16
12
9
6
3
0
3
6
9
12
15
18
21
24
27
30
PAFL
3
5
+
AFL
CALL
L
16
12
9
6
3
0
3
6
9
12
15
18
21
24
27
30
R
16
12
9
6
3
0
3
6
9
12
15
18
21
24
27
30
16
12
9
6
3
0
3
6
9
12
15
18
21
24
27
30
R
16
12
9
6
3
0
3
6
9
12
15
18
21
24
27
30
C
-
MAT RIX
20
10
7
5
3
1
0
3
5
MATRIX
+
-
20
10
7
3
5
1
1
0
3
5
MAT RIX
-
+
20
10
7
5
2
3
1
0
3
5
MATRIX
-
20
10
7
-
+
20
10
7
5
3
3
1
0
3
5
MATRIX
5
3
MATRIX
1
0
+
4
3
5
MATRIX
C
+
1
METERS
AUX 9-12
MTX 1-4
The Console Meterpod
-
20
10
7
5
3
1
0
3
5
+
-
20
10
7
5
3
1
0
3
5
+
-
20
10
7
5
3
1
0
PAFL
3
5
+
AFL
CALL
16
12
9
6
3
0
3
6
9
12
15
18
21
24
27
30
off
-
20
10
7
5
3
1
0
3
5
+
-
20
10
7
5
3
1
0
3
5
+
-
20
10
7
5
3
1
0
PAFL
3
5
+
AFL
CALL
16
12
9
6
3
0
3
6
9
12
15
18
21
24
27
30
16
12
9
6
3
0
3
6
9
12
15
18
21
24
27
30
off
16
12
9
6
3
0
3
6
9
12
15
18
21
24
27
30
16
12
9
6
3
0
3
6
9
12
15
18
21
24
27
30
PFL
16
12
9
6
3
0
3
6
9
12
15
18
21
24
27
30
AFL-L AFL-R AFL-M
-
20
10
7
5
3
1
0
3
5
+
-
20
10
7
5
3
1
0
3
5
+
-
20
10
7
5
3
1
0
PAFL
3
5
+
AFL
CALL
16
12
9
6
3
0
3
6
9
12
15
18
21
24
27
30
off
-
20
10
7
5
3
1
0
3
5
+
-
20
10
7
5
3
1
0
3
5
+
-
20
10
7
5
3
1
0
PAFL
3
5
+
AFL
CALL
16
12
9
6
3
0
3
6
9
12
15
18
21
24
27
30
16
12
9
6
3
0
3
6
9
12
15
18
21
24
27
30
off
16
12
9
6
3
0
3
6
9
12
15
18
21
24
27
30
16
12
9
6
3
0
3
6
9
12
15
18
21
24
27
30
AFL
16
12
9
6
3
0
3
6
9
12
15
18
21
24
27
30
AFL-L AFL-R AFL-M
The ML4000 continues the Allen & Heath tradition
to provide full signal metering at all key stages in
the signal chain. The channel LED meters give you
important signal information and multipoint peak
sensing. The output LED meters display the prefade mix levels. The meterpod displays all the postfade main output levels including groups, auxes,
matrix and main, as well the PFL/AFL metering of
any signal in the console.
The meterpod is a low profile, full length integral
design that cannot be removed.
It has 15
illuminated moving coil VU meters. The right hand
VU meters can be switched to display either Aux 912 or Matrix 1-4 outputs. For example you could
configure the console to display Groups 1-8, LCR,
and Matrix 1-4 on the meters in front-of-house
mode, or Aux 1-12 in stage monitor mode.
The 3 main output meters are duplicated on both
VU and LED bar meters so that the main or
PFL/AFL signals can be checked for average and
peak levels simultaneously. Bright red LEDs light
when an input PAFL or output AFL has been
selected. The meters switch to display the PFL or
AFL signals in mono or stereo+mono. Stereo AFL
displays the left and right signals as well as the
summed mono signal so that mono compatibility
can be checked.
A large CALL lamp is positioned centrally to grab
the attention of the operator when the intercom is
being signalled.
The console lamp connectors are positioned on the
rear of the meterpod. Standard 4-pin right-angled
XLR gooseneck Littlites are recommended.
48
ML4000 User Guide
GRP/AUX VU Meters 1-8. Illuminated moving coil
VU (volume unit) meters display the output levels of
mix 1 to 8. Depending on the setting of the master
section mode switches these display group or aux
signals. The signal is metered post-fade, postmute.
MAIN LRC VU Meters. Illuminated VU meters
display the output levels of the main mix. The
signal is metered post-fade, post-mute. The meters
automatically switch to display PFL or AFL levels
when a PAFL or AFL switch is selected.
MAIN LRC Led Meters. These 16 LED bar meters
duplicate the readings of the main VU meters. They
also switch to display PFL or AFL when selected.
Sensitivity ranges from –30dB to +16dB. A 0dB
meter reading represents 0dBu at the main XLR
outputs.
Three LED colours display signal condition:
Green. Normal signal readings up to 0dB.
Yellow. Hot signal readings above 0dB and up to
12dB. Loud moments reading up to 6dB are fine.
Higher readings warn of reduced headroom.
Red. Lights at +16dB to warn that you are within
5dB of clipping and audible distortion. If this flashes
then reduce the gain or mix levels.
PAFL and AFL Indicators. These light when an
input PAFL or output AFL switch is selected. They
show that the main meters and console monitor are
switched to the P/AFL rather than main mix signals.
CALL Lamp. Lights when the intercom is being
signalled.
Its large size and position in the
meterpod ensure it grabs the attention of the
operator when signalled.
MATRIX Meter Select. Press the METERS switch
in the master section to switch the right hand VU
meters to display the Matrix 1-4 rather than Aux 912 output levels. The green LED in the meterpod
lights when matrix is selected.
Meter Types
Both VU and LED bar types of meter are provided
on the ML4000. This gives you the best of both
average and peak metering.
-
20
10
7
5
3
1 0
3
5
+
VU Meter.
The VU (volume unit) meter is an
established standard for measuring audio signals.
Unlike LED meters, it is easy to read under all
lighting conditions. This makes it well suited to
outdoor festival work. It has reasonably slow
dynamics (attack and release) and is therefore good
at displaying the average music programme. It is
not able to display fast peaks and transients. The
scale is restricted between –20 and +5 to provide
good resolution around average reading. A reading
of ‘0’ represents 0dBu at the main outputs.
16
12
9
6
3
0
3
6
9
12
15
18
21
24
27
30
LED Bar Meter. This meter comprises a ladder of
LEDs each set to light when the signal reaches its
preset level. It has the advantage of much faster
dynamics and can show the musical peaks and
transients. The scale is extended to read from a
low –30 to a very high +16 which represents a peak
warning 5dB before clipping.
AUX/MATRIX VU Meters. Illuminated moving coil
VU (volume unit) meters display the output levels of
Aux 9-12 or Matrix 1-4 if selected.
The signal is
metered post-fade/level, post-mute.
ML4000 User Guide
49
MIDI
MIDI Overview
MIDI
RS232
DUMP
EDIT SAFES
Use CH MUTES
MIDI CH
Hold and press CH1>16 MUTE
The ML4000 includes a Musical Instrument Digital
Interface (MIDI) port. Standard 5-pin IN, THRU and
OUT sockets allow connection to external MIDI
equipment such as computer show control systems,
sequencers, instruments and data archiving
devices. Applications include sophisticated ‘handsoff’ scene control, effects and instrument patch
control, switching of signal processing remote
controllers, and archiving of the console settings
and memories for later re-use.
What the console MIDI can do :
OUT
THRU
IN
MIDI
9
Turn channel mutes on and off
9
Recall snapshot memories
9
Snapshot program change messages
9
AFL SysEx
controllers
9
Archive console settings and memories
RS232
messages
for
BSS
&
dbx
SELECT
What the console MIDI cannot do :
The MIDI Cables
Use standard 5-pin 180 degree DIN type male-tomale MIDI cables. These should be available from
your local audio dealer or music shop. The cables
should not exceed 15 meters (50 feet) in length.
To control external equipment plug console MIDI
OUT to external equipment MIDI IN. To control the
console plug external equipment MIDI OUT or
THRU to console MIDI in. To pass MIDI through
the console to other equipment plug console MIDI
THRU to equipment MIDI IN.
Make sure the same MIDI channel number is
selected on the console and external equipment
you want the console to communicate with.
8
Turn Mute Groups on and off
8
Turn VCA group mutes on and off
8
Assign channels to VCA groups
8
Control VCA fader levels
The capabilities of the console automation system
are subject to continual development and new
features may be added in time.
The latest
operating software is available on the Allen & Heath
Internet site together with loading instructions.
Selecting MIDI Operation
For MIDI operation make sure the rear panel switch
is set to the MIDI position. The RS232 setting is
only used when updating the console operating
software to a new version, or with the Allen & Heath
ML4 Archiver utility for the PC.
Changing the MIDI Channel Number
Hold down the master section MIDI CH key. The
current MIDI channel number is displayed on one of
the CH1 to 16 SAFE/EDIT LEDs. The LED flashes
to attract your attention. Simply press one of the
CH1 to 16 MUTE keys while holding down MIDI CH
to change the MIDI channel number. The channel
mute is not affected during this operation.
50
ML4000 User Guide
HEX (cc)
00
01
02
03
04
05
06
07
08
09
0A
0B
0C
0D
0E
0F
10
11
12
13
14
15
16
17
20
21
22
23
24
25
26
27
28
29
2A
2B
2C
2D
2E
2F
30
31
32
33
34
35
36
37
38
39
3A
3B
3C
3D
3E
3F
40
41
42
43
44
45
46
47
48
49
4A
4B
4C
4D
4E
4F
50
51
52
53
54
55
56
Standard
MUTE
GRP/AUX 1
GRP/AUX 2
GRP/AUX 3
GRP/AUX 4
GRP/AUX 5
GRP/AUX 6
GRP/AUX 7
GRP/AUX 8
AUX 9
AUX 10
AUX 11
AUX 12
32ch
'B' versions
40 & 48ch
GRP/AUX 1
GRP/AUX 2
GRP/AUX 3
GRP/AUX 4
GRP/AUX 5
GRP/AUX 6
GRP/AUX 7
GRP/AUX 8
AUX 9
AUX 10
AUX 11
AUX 12
GRP/AUX 1
GRP/AUX 2
GRP/AUX 3
GRP/AUX 4
GRP/AUX 5
GRP/AUX 6
GRP/AUX 7
GRP/AUX 8
AUX 9
AUX 10
AUX 11
AUX 12
Channel Mutes
Pressing any input or output channel MUTE switch
transmits a MIDI Note On message. Similarly,
receiving a MIDI Note On message will turn the
associated channel mute on or off, unless the
channel has been made automation safe.
Console mutes are mapped to MIDI Note numbers
as shown in the table. Running status is supported
on receive and transmit.
Transmit.
Pressing a channel MUTE switch
transmits the following Note On messages:
MATRIX 1
MATRIX 2
MATRIX 3
MATRIX 4
MATRIX 1
MATRIX 2
MATRIX 3
MATRIX 4
MATRIX 1
MATRIX 2
MATRIX 3
MATRIX 4
CH 1
CH 2
CH 3
CH 4
CH 5
CH 6
CH 7
CH 8
CH 9
CH 10
CH 11
CH 12
CH 13
CH 14
CH 15
CH 16
CH 17
CH 18
CH 19
CH 20
CH 21
CH 22
CH 23
CH 24
CH 25
CH 26
CH 27
CH 28
CH 29
CH 30
CH 31
CH 32
CH 33
CH 34
CH 35
CH 36
CH 37
CH 38
CH 39
CH 40
CH 41
CH 42
CH 43
CH 44
CH 45
CH 46
CH 47
CH 48
STEREO 1
STEREO 2
CH 1
CH 2
CH 3
CH 4
CH 5
CH 6
CH 7
CH 8
CH 9
CH 10
CH 11
CH 12
CH 13
CH 14
CH 15
CH 16
STEREO
STEREO
STEREO
STEREO
CH 17
CH 18
CH 19
CH 20
CH 21
CH 22
CH 23
CH 24
CH 25
CH 26
CH 27
CH 28
CH 29
CH 30
CH 31
CH 32
CH 33
CH 34
CH 35
CH 36
CH 37
CH 38
CH 39
CH 40
CH 41
CH 42
CH 43
CH 44
STEREO
STEREO
CH 1
CH 2
CH 3
CH 4
CH 5
CH 6
CH 7
CH 8
CH 9
CH 10
CH 11
CH 12
CH 13
CH 14
CH 15
CH 16
CH 17
CH 18
CH 19
CH 20
CH 21
CH 22
CH 23
CH 24
STEREO
STEREO
STEREO
STEREO
CH 25
CH 26
CH 27
CH 28
CH 29
CH 30
CH 31
CH 32
CH 33
CH 34
CH 35
CH 36
CH 37
CH 38
CH 39
CH 40
CH 41
CH 42
CH 43
CH 44
STEREO
STEREO
MAIN L
MAIN R
MAIN C
MAIN L
MAIN R
MAIN C
3
4
5
6
1
2
9n cc vv 9n cc 00
Where
n = console MIDI channel number
cc = input or output channel number
vv = 3FH for mute off, 7FH for mute on
Receive. The console responds to the following
MIDI Note On message:
9n cc vv (00 is ignored)
Where
vv < 40 = mute off,
40 <= vv <= 7F = mute on
Snapshot Memories
Recalling a snapshot will transmit a MIDI Program
Change message. Receiving a Program Change
message will recall a snapshot.
Snapshot numbers 1 to 128 are mapped to MIDI
Program Change numbers 0 to 127. Running
status is supported on receive and transmit.
Transmit and Receive. The message format is:
3
4
5
6
Cn pp
Where
n = console MIDI channel number
pp = console snapshot number 00 to 7F
MIDI AFL Messages
SysEx message strings are transmitted each time
an output channel AFL switch is selected or
released. These are for use with BSS and dbx
speaker management systems to automatically
select the remote control surface associated with
the output being AFL monitored.
BSS Omnidrive
F0 00 20 18 7F 20 cc F7
1
2
dbx Drive Rack
F0 00 01 1E 7F 7F 20 cc F7
ML4000 User Guide
MAIN L
MAIN R
MAIN C
These messages are subject to further development
and addition. Please check the Allen & Heath Web
site for the latest information.
51
Archiving the Console Settings
MIDI Dump Message Format
The console settings can be saved to an external
device such as a MIDI sequencer or data archiver
using the dump out facility. Saved settings can be
loaded back into the console using dump in. This is
ideal when you want to archive the settings to use
at a later date, for example a re-run of a previous
performance. You can also use the dump facility to
program additional ML4000 consoles, for example
when setting up duplicate shows or swapping
consoles around. Simply link MIDI OUT from one to
MIDI IN of the other and action the dump out facility.
The format for dump out and in is identical. The
dump data string is made up of multiple System
Exclusive messages (known as packets) which
contain the console information.
Settings which are archived :
Transmit and Receive.
packet is as follows:
The format for a single
F0 <SysEx header> <packet
number> <data> <checksum> F7
type>
<packet
<SysEx header> = 00 00 1A 50 07 VV vv nn
Where
VV = software version number – unit
vv = software version number – decimal
nn = console MIDI channel number
9
Current mute settings
9
Current Mute group assignments
<packet no.> = packet number from 0 to 127
9
Current VCA group assignments
<data> = block of console data (7-bit format)
9
Automation safes
<checksum> = checksum to allow error detection
9
All snapshot memories
Settings which are not archived :
8
Current console operating mode
8
Current PAFL selection and settings
MIDI Dump Out
Connect the console to a suitable MIDI archiving
device. Set the same MIDI channel number on
both. Check the rear switch is set to MIDI. Press
the DUMP key. The console dumps the current
settings and memory contents using a SysEx
message string. During this time the DUMP and
MIDI LEDs light to show that data is being sent via
the MIDI port. Note that this operation can take up
to 10 seconds during which time the console mutes,
assignment and P/AFL operations are interrupted.
MIDI Dump In
Connect the console to the MIDI archiving device.
Set the same MIDI channel number on both. Check
the rear switch is set to MIDI. Start the process
using the MIDI archiver. The console current
settings and memory contents are overwritten.
During this time the DUMP and MIDI LEDs light to
show that data is being received by the console.
Note that this operation can take a while during
which time the console mute, assignment and PAFL
operations are interrupted.
MIDI Dump Errors
If the console or connected equipment fails to
respond to a MIDI dump then check:
•
The MIDI cable is good and correctly plugged
•
The same MIDI channel number is selected
•
The rear panel switch is set to MIDI
•
Try again
Allen & Heath ML4 Archiver
The ML4Archiver Windows™ utility for the PC can
be downloaded from the Allen & Heath Internet site.
This can be used to archive data to and from the
PC via MIDI or RS232.
The program also includes the useful Snapshot
Manager which lets you store and recall the console
mute settings and VCA group assignments from the
128 internal snapshot memories. The snapshots
cannot be accessed from the console control panel
itself. The archiver provides this extra feature.
Check the Allen & Heath Web site for further details
and loading instructions.
If you are using a MIDI sequencer to record the
dump out data string then make sure you play it
back at the same speed you recorded it. If you
dump it back into the console faster than it was
recorded some data may not load correctly.
52
ML4000 User Guide
Operating System Technical Support
Operating Software Version Number
Power Up and Power Down
You can check the current version number of the
ML4000 software running on the console using a
PC connected via RS232. Instructions for this are
provided on the Allen & Heath Internet site.
The console settings are saved when power is
removed. On power up these settings are restored.
To Reset the Console Settings
Loading New Operating Software
Check the Allen & Heath Web site for the latest
version of console software. New software is
loaded from a PC via the RS232 port.
IMPORTANT ! The current console settings and
snapshots may be lost when you load new
operating software. If you wish to keep your
settings and snapshot contents, first archive them
using the dump out facility. Restore these after
loading the new software by using dump in.
Download the software from the Allen & Heath Web
site to your PC computer. Connect the PC RS232
port to the console RS232 port using a standard
pin-to-pin (not null modem) 9-pin serial cable. Set
the console rear panel switch to the RS232 position.
Power up the console. The console awaits data
from the PC. Follow the instructions provided on
the Web site for loading the new software into the
console. When completed make sure you set the
console rear panel switch back to its normal
operating position, typically MIDI.
Hold down the MIDI CH and EDIT SAFES keys
together while turning on the console to reset all
current settings. This does not affect the contents
of the snapshot memories. The default settings are
restored:
•
Selects normal console operating mode
•
Clears all current Mute Group assignments
•
Clears all current VCA Group assignments
•
Clears all channel automation safes
To Reset the Snapshot Memories
Hold down the MIDI CH and DUMP keys together
while turning the console on to clear all the
snapshot memories. This does not affect the
current console settings. For all snapshots reset:
•
Clears all stored mutes
•
Clears all stored VCA Group assignments
To reset all Settings and Memories
Hold down the MIDI CH, the EDIT SAFES and
DUMP keys together while turning the console on to
clear all current settings and the memories.
Contacting Allen & Heath
If you have any queries about the automation
system please quote the console model, serial
number and operating system version number in
any communication with Allen & Heath or your
appointed service agent. Technical support is
available through your dealer or by visiting the Allen
& Heath Internet Web site.
www.allen-heath.com
ML4000 User Guide
53
USER NOTES :
54
ML4000 User Guide
+48V
20
PAD
40
20dB
GAIN
- 10 10
50
1
60 40
100
L
1
L
1
L
1
-3
L
+48
300
30
20Hz
OO
+6
OO
+6
2
400
IN
OO
+6
OO
+6
R
OO
+6
OO
+6
2
OO
+6
OO
+6
R
OO
+6
OO
+6
2
OO
+6
OO
+6
R
OO
+6
OO
+6
2
OO
+6
10k
OO
+6
3
2kHz
20kHz
C
3
+6
+6
OO
+6
OO
4
3k
3
C
+6
OO
3
+6
OO
4
+6
OO
4
min
4
+6
OO
-3
18
PINK NOISE
1kHz OSC
3
GAIN
10
-6
max
MIDI
6
6
LEV
TB
+6
OO
DUMP
10
-6
18
B ON
TB
+6
OO
6
LEV
B ON
6
LEV
LEV
Q
OO
+6
OO
+6
+6
OO
7
1k
OO
+6
OO
+6
+6
OO
7
MUTE
-15
8
90 +15
OO
+6
OO
+6
+6
OO
7
MUTE
8
OO
+6
HF
OO
+6
MUTE
PFL
8
200Hz
AFL
MIC IN
STEREO
+6
OO
max
+6
OO
STEREO
LR
FOH
MONITOR
min
1
+6
OO
+6
AUX
1
GRP/AUX 4
reverse
GRP/AUX 5
reverse
GRP/AUX 7
reverse
GRP/AUX 6
reverse
GRP/AUX 8
reverse
AUX
2
+6
OO
AUX
3
+6
OO
AFL
AUX
4
AUX
AUX
5
6
LOCAL
AUX
7
+6
OO
AFL
+6
OO
AFL
+6
OO
AFL
+6
OO
AFL
+6
OO
AFL
0
0
under armrest
GROUPS
PRE
MAIN
MIX
=
MAIN
MIX
=
LCR +
BLEND
MAIN
MIX
=
LCR +
BLEND
MAIN
MIX
=
LCR +
BLEND
MAIN
MIX
MAIN
MIX
=
LCR +
BLEND
=
LCR +
BLEND
MAIN
MIX
=
LCR +
BLEND
+6
OO
+6
PFL
AFL
5
LR
C
=
LR
C
=
PAN
LR
C
=
PAN
LR
C
=
PAN
LR
C
=
LR
C
=
PAN
PAN
LR
C
=
PAN
LR
C
=
4
TALK TO
INTERCOM
R
L
AUX
R
L
R
L
R
L
R
TB
L
R
TB
L
R
L
TB
TB
TB
TB
TB
+6
MUTE
MUTE
MUTE
MUTE
MUTE
MUTE
MUTE
MUTE
MUTE
MUTE
MUTE
+6
OO
PRE
PRE
AUX
8
8
EDIT/SAFE
EDIT/SAFE
EDIT/SAFE
EDIT/SAFE
EDIT/SAFE
EDIT/SAFE
EDIT/SAFE
EDIT/SAFE
EDIT/SAFE
EDIT/SAFE
EDIT/SAFE
AFL
9-10
+6
OO
PRE
AUX
10
+6
OO
AUX
STEREO
11
AFL
AFL
STEREO
AFL
AFL
STEREO
AFL
AFL
STEREO
AFL
AFL
STEREO
AFL
AFL
STEREO
AFL
PK
PK
PK
PK
PK
PK
PK
PK
PK
PK
PK
+6
+6
+6
+6
+6
+6
+6
+6
+6
+6
+6
+6
0
0
0
0
0
0
0
0
0
0
0
0
-6
-6
-6
-6
-6
-6
-6
-6
-6
-6
-6
-6
SIG
SIG
SIG
SIG
SIG
SIG
SIG
SIG
SIG
SIG
SIG
SIG
L
E
V
PRE
5
5
5
5
5
5
LR
=
MAIN
MIX
C
PAN
L
PRE
5
5
5
5
0
0
0
0
0
0
0
0
0
0
0
0
5
5
5
5
5
5
5
5
5
5
5
5
10
10
10
10
10
10
10
10
10
10
10
10
20
20
20
20
20
20
20
20
20
20
20
20
30
30
30
30
30
30
30
30
30
30
30
30
OO
OO
OO
OO
OO
OO
OO
OO
OO
OO
OO
OO
B
A
L
+6
OO
STEREO
11-12
PRE
AUX
B
A
L
+6
LR
=
=
1
2
3
4
5
6
7
8
VCA 2
VCA 3
VCA 4
VCA 5
VCA 6
VCA 7
VCA 8
M
U
T
E
M
U
T
E
MUTE
SAFE/EDIT
SAFE
PAFL
M
U
T
E
SAFE
PAFL
M
U
T
E
SAFE
PAFL
PAFL
M
U
T
E
SAFE
SAFE
SAFE
PAFL
M
U
T
E
M
U
T
E
PAFL
10
11
L
EDIT MUTE & VCA GRPS
SAFE
PAFL
PAFL
12
OO
+6
STEREO
11-12
PRE
+6
OO
LR
=
=
MAIN
MIX
C
R
L
R
ST2
C
M
U
T
E
SAFE/EDIT
+6
BAL
ST1
R
MAIN
M
U
T
E
M
U
T
E
SAFE
PAFL
9
MUTE GROUPS
OO
LCR +
BLEND
C
BAL
L
VCA 1
MAIN
MIX
PRE
AUX
12
B
A
L
OO
9-10
11
12
LCR +
BLEND
STEREO
AUX
L
E
V
+6
OO
R
24
+6
AUX
10
B
A
L
AUX
+6
=
OO
PRE
9
10
11
5
+6
AUX
L
E
V
+6
OO
L
E
V
12
OO
9-10
AUX
+6
AUX
STEREO
9
PK
5
LCR +
BLEND
+6
AUX
STEREO
11-12
OO
OO
8
OO
STEREO
9
+6
AUX
EDIT/SAFE
+6
AUX
OO
7
MUTE
+6
OO
+6
AUX
7
OO
OO
6
AUX
7
AUX
+6
AUX
R
TB
TB
OO
5
+6
OO
OO
TB
+6
AUX
5
TALK
TO TB
+6
TB
OO
4
+6
OO
6
TB
+6
AUX
AUX
L
OO
GROUPS
+6
PAFL
6
OO
+6
GROUPS
AUX
AUX
OO
3
AUX
CLEAR
ALL
PAN
+6
AUX
CALL
MAIN
MIX
OO
2
AUX
IN-PLACE
PAN
PRE
AUX
AUX
3
AUTO
CANCEL
ADD
AUX
+6
+15
EQ IN
max
10
=
LCR +
BLEND
LF
1
OO
OO
LCR +
BLEND
+15
-15
2
min
+6
OO
+15
AUX
10
PHONES
AFL
AUX
+6
-15
LM
TRIM
+6
OO
AFL
3
OO
LF
1
INTERCOM
MONITOR
8
LISTEN
4
+15
HM
TB TO C
AUX
OO
-15
TB TO LR
MONO
AUX
2
-15
EQ IN
GRP/AUX 3
reverse
GRP/AUX 2
reverse
AUX
AUX
OO
+15
+15
max
mode
GRP/AUX 1
reverse
PRE
AUX
-15
LM
SOURCE
C
+15
+15
-15
TRIM
LCR
EQ IN
-15
HM
TALKBACK
2TRK
LF
+15
+48V
AFL
AFL
+6
OO
-15
0dB
min
+6
OO
-15
HF
+6
OO
7
MUTE
8
AFL
130
20Hz
MONO R
Disable
MIDI CH
TRIM
LM
50
MONO L
L+R
MONO R
Use CH MUTES
Hold and press CH1>16 MUTE
450
35Hz
MONO L
L+R
EDIT SAFES
+6
OO
180 +15
300
45
OSC/NOISE
TO TB
5
TB
+6
+6
OO
5
TB
OO
+6
OO
5
15k
HM
80
+6
OO
5
Q
-15
P
A
N
A ON
3
GAIN
+6
OO
-3
RS232
7k
500Hz
L
E
V
18
5k
700
P
A
N
10
-6
OSC/NOISE
TRIM
AUX 9-12
MTX 1-4
+15
1k
3
A ON
METERS
C
+6
OO
18
R
HF
OO
-15
C
-3
GAIN
10
-6
-17
7k
3k
L
E
V
3
GAIN
+17
M
U
T
E
SAFE/EDIT
SELECT USING GROUP MUTE
ASSIGN USING CH MUTES
MUTE
MUTE
SAFE/EDIT
SAFE/EDIT
WEDGE
mode
SAFE/EDIT
C
PAFL
PAFL
MONITOR
PK
PK
MUTE
PK
PK
+6
0
0
10
10
10
10
10
10
10
10
10
10
10
10
SIG
-6
0
10
0
5
0
5
0
5
0
5
0
5
0
5
0
5
0
5
0
5
0
5
0
5
0
5
1
0
5
1
2
2
2
3
3
3
4
5
5
5
5
5
5
5
5
5
5
5
5
5
10
10
10
10
10
10
10
10
10
10
10
10
20
20
20
20
20
20
20
20
20
20
20
20
6
7
VCA
GROUP
4
5
5
10
6
8
10
-6
SIG
SIG
5
1
PK
+6
+6
-6
PK
7
0
5
4
5
10
6
20
8
20
7
8
30
30
30
30
30
30
30
30
30
30
30
30
40
40
40
40
40
40
40
40
40
40
40
40
40
40
OO
OO
OO
OO
OO
OO
OO
OO
OO
OO
OO
OO
OO
OO
ML4000 User Guide
VCA
GROUP
30
30
VCA
GROUP
55
Visit Allen & Heath :
http://www.allen-heath.com
http://www.mlseries.com
ML4000 User Guide
56
ML4000 User Guide