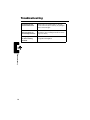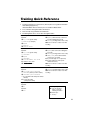
1
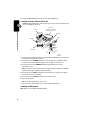
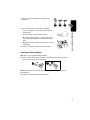
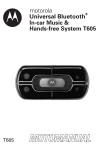
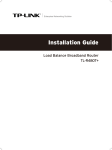
™
Bluetooth Wireless
Hands Free
Car Kit
User's Guide >
art#020829-O.eps
Welcome
Welcome to Motorola’s “connected” world of Bluetooth™ personal area wireless
networking. The Motorola Bluetooth Wireless Hands Free Car Kit makes wireless
connection simple and quick.
The advanced, sophisticated Motorola Bluetooth Wireless Hands Free Car Kit offers these
features:
• seamless, wireless hands-free audio through Bluetooth link
• digital audio interface with high quality, full-duplex, hands free speech
• Voice Recognition
• voice user interface
• entertainment mute—automatically mutes radio during calls
• noise reduction and acoustic echo cancellation
• automatic volume control
• Ignition sense—continue an active call after car is turned off
• compliance with Bluetooth Headset v1.1 and Bluetooth Hands Free 0.96 profile
Note: There may be differences between the performances of the Bluetooth headset
profile and the Bluetooth Hands Free profile. See the “Using Your Car Kit” chapter for
details.
1
Personal Communications Sector
600 North U.S. Highway 45
Libertyville, Illinois 60048
1-800-331-6456 (United States)
1-888-390-6456 (TTY/TDD United States)
1-800-461-4575 (Canada)
www.motorola.com (United States)
www.motorola.ca (Canada)
MOTOROLA, the Stylized M Logo and all other trademarks indicated as such herein are trademarks of
Motorola, Inc. ® Reg. U.S. Pat. & Tm. Off. The Bluetooth trademarks are owned by their proprietor and used by
Motorola, Inc. under license. All other product or service names are the property of their respective owners.
© 2002 Motorola, Inc. All rights reserved. Printed in the U.S.A.
Manual number: 6889176G01-O
2
Contents
Welcome . . . . . . . . . . . . . . . . . . . . . . . . . . . . . . . . . . . . . . . . . . . . . . . . . . . . . . . . . . . . . . 1
Safety and General Information . . . . . . . . . . . . . . . . . . . . . . . . . . . . . . . . . . . . . . . . . . . 4
Installing the Hands Free Kit . . . . . . . . . . . . . . . . . . . . . . . . . . . . . . . . . . . . . . . . . . . . . 5
Guidelines for Installation and Connection . . . . . . . . . . . . . . . . . . . . . . . . . . . . . . . . . . . 5
Installation Procedure . . . . . . . . . . . . . . . . . . . . . . . . . . . . . . . . . . . . . . . . . . . . . . . . . . 5
Using Your Car Kit . . . . . . . . . . . . . . . . . . . . . . . . . . . . . . . . . . . . . . . . . . . . . . . . . . . . . . 8
The Control Module . . . . . . . . . . . . . . . . . . . . . . . . . . . . . . . . . . . . . . . . . . . . . . . . . . . . 8
Linking Your Car Kit and Phone . . . . . . . . . . . . . . . . . . . . . . . . . . . . . . . . . . . . . . . . . . . 8
Disconnecting the Car Kit from Your Phone . . . . . . . . . . . . . . . . . . . . . . . . . . . . . . . . . 10
Training Your Car Kit’s Internal Voice Recognition . . . . . . . . . . . . . . . . . . . . . . . . . . . . 10
Placing a Call with the Car Kit . . . . . . . . . . . . . . . . . . . . . . . . . . . . . . . . . . . . . . . . . . . 13
Using Features While on a Call . . . . . . . . . . . . . . . . . . . . . . . . . . . . . . . . . . . . . . . . . . 14
Troubleshooting . . . . . . . . . . . . . . . . . . . . . . . . . . . . . . . . . . . . . . . . . . . . . . . . . . . . . . . 16
Training Quick Reference . . . . . . . . . . . . . . . . . . . . . . . . . . . . . . . . . . . . . . . . . . . . . . . 17
Calling Features Quick Reference . . . . . . . . . . . . . . . . . . . . . . . . . . . . . . . . . . . . . . . . 19
Motorola Limited Warranty for Accessories . . . . . . . . . . . . . . . . . . . . . . . . . . . . . . . . 20
Total Customer Satisfaction . . . . . . . . . . . . . . . . . . . . . . . . . . . . . . . . . . . . . . . . . . . . . 22
Motorola’s Warranty . . . . . . . . . . . . . . . . . . . . . . . . . . . . . . . . . . . . . . . . . . . . . . . . . . . . 23
3
Safety and General Information
IMPORTANT INFORMATION ON SAFE AND EFFICIENT OPERATION. READ THIS
INFORMATION BEFORE USING YOUR PHONE.
Users are not permitted to make changes or modify the device in any way. Changes or
modifications not expressly approved by the party responsible for compliance could void
the user’s authority to operate the equipment. See 47 CFR Sec. 15.21.
This device complies with part 15 of the FCC rules and with RSS-210 / RSS-139 of the
Industry Canada. Operation is subject to the following two conditions: (1) This device may
not cause harmful interference, and (2) this device must accept any interference received,
including interference that may cause undesired operation. See 47 CFR Sec. 15.19(3).
Canada Compliance (Industry Canada)
To prevent radio interference to the licensed service, this device is intended to be operated indoors
and away from windows to provide maximum shielding. Equipment that is installed outdoors is
subject to licensing.
European Union (EU) and EFTA
This equipment complies with the R&TTE directive 1999/5/EC and has
been provided with the CE mark accordingly.
Electromagnetic Interference/Compatibility
Nearly every electronic device is susceptible to electromagnetic interference (EMI) if inadequately
shielded, designed, or otherwise configured for electromagnetic compatibility.
4
Installing the Hands Free Kit
Guidelines for Installation and Connection
• Only qualified personnel should install this car kit. If necessary, contact with vehicle
manufacturer for air bag information specific to the vehicle.
• Mount components securely on strong surfaces to prevent shifting that could cause
injury or interfere with safe vehicle operation. Always use the supplied mounting
hardware
• Mounted components and attached wires or cables must not interfere with seating or
leg space.
• Route cables so they are protected from pinching, sharp edges, and crushing. Keep
all in-line connectors easily accessible.
Installing the Hands Free Kit
Caution: An air bag inflates with great force. DO NOT place objects, including
communication equipment, in the area over the air bag or in the air bag deployment area. If
the communication equipment is improperly installed and the air bag inflates, serious injury
could occur.
• This car kit is intended for use in 12 volt negative ground systems only. The car kit
draws less than 3 amps. Confirm that the vehicle’s electrical system can supply this
current.
Installation Procedure
Caution: This car kit must be connected to a maximum 10A fuse in the car fuse panel to
prevent fire or other damages if a short circuit should occur somewhere in the Junction
Box.
Before installation, unpack, assemble, and test all components on a service bench.
Installing the Bluetooth Junction Box
Mount the box using the screws provided.
The best location for the Bluetooth junction box is under the dash. The box must be
protected from dirt and moisture and have adequate space for cooling and to allow for
cable connection.
For optimal Bluetooth performance, mount the junction box so that the side with the
barcode faces away from the mounting surface.
5
The location MUST NOT interfere with the vehicle’s air bag deployment.
Installing the Power Cable and Fuse Kit
Caution: Failure to follow these steps may cause the accessory not to work properly and
may cause damage to the car kit.
Junction Box
(SYN8883A, SYN0415A,
SYN0416A, SYN0417A
Installing the Hands Free Kit
Speaker
(SSN4020)
Power Cable
(SKN4834A)
Vehicle
Radio
Microphone
(SMN4103)
Orange
Blue
C
B
Control Module
(SYN9698A)
Wire crimps:
green to green,
red to red,
black to black
Yellow
Green: to a point in
the fuse box
Black
Vehicle
Chassis
Red: to a point in fuse box
that is always active
4 - 10 AMP fuse
Fuse Kit
(SKN4937A)
1 Remove all fuses and tape them to their respective holders. DO NOT re-insert fuses until
you complete and inspect all connections.
2 Connect the fuse kit’s GREEN Ignition Sense wire (3 amp fuse) to an ignition-switched
location on the fuse block. When the ignition is off, the ignition sense line is low.
3 Connect the power cable’s ORANGE Entertainment Mute Wire to the vehicle’s
entertainment system.
Note: This feature is only operational if the car radio and/or phone support this capability.
Installation may require an optional relay (not included).
4 Connect the fuse kit’s RED positive primary lead (4 amp fuse) to a point in the vehicle’s
fuse box that is fused at 4 to 10 amp.
5 Connect the fuse kit’s BLACK ground wire to the vehicle chassis.
6 Inspect all connections.
Note: The Yellow and Blue wires are not used.
7 Re-insert all fuses. Do not replace any fuse with a higher amperage fuse.
Installing the Microphone
Note: Always use the supplied mounting hardware.
6
1 Attach one of the three supplied mounting clips to the
microphone.
2 Select a suitable location, and mount the microphone.
• Aim the microphone directly toward the driver.
• Do not allow anything (such as a rear-view mirror or sun
visor) to block the path between the microphone and the
driver.
• Mount the microphone firmly so that vibrations do not affect
audio quality.
3 Connect the microphone to the Bluetooth Junction Box.
Installing the Hands Free Kit
• Locate the microphone no more than 16 inches (40 cm)
from the driver.
Installing the External Speaker
Note: Always use the supplied mounting hardware.
1 Mount the speaker to the transmission hump or beneath the dash. Position the speaker
so that it does not directly face the microphone.
Caution: The location of the external speaker MUST NOT interfere with the vehicle’s air
bag deployment.
2 Connect the speaker to the Bluetooth Junction Box.
7
Using Your Car Kit
The Control Module
The control module enables you to set up and use the Bluetooth Hands Free Car Kit.
Bluetooth Button
Voice Recognition Button
Volume-Up Button
C
Using Your Car Kit
B
Volume-Down Button
Microphone Mute Button
Linking Your Car Kit and Phone
Before you can use this car kit, you must link it with your phone.
You establish a Bluetooth link between your car kit and phone with a paired link.
When you set up a paired link, the car kit remembers the phone’s ID. Once the car kit and
phone are paired, your car kit automatically connects to your phone every time you start your
vehicle or power up the car kit.
Initial Pairing
With the car kit and phone in close proximity:
Step
1 Set the car kit to pairing mode:
Start your vehicle.
or
Power up the car kit by pressing the
Bluetooth Button E.
8
Result
Step
2 If your phone has a Bluetooth Hands
Free Profile, press and hold the Bluetooth
Button E.*
Result
The Bluetooth Button E and the Voice
Recognition Button begin to flash
(often 3 seconds).
or
If your phone has only a Bluetooth
Headset Profile, press and hold both the
Bluetooth Button E and the Voice
Recognition Button.*
The Bluetooth Button E and the Mute
Button begin to flash.
You now have two minutes to create a
wireless connection between the car kit
and your phone.
* If you don’t know which profile to use, see “Validating Pairing” on page 10.
3 Set phone to scan and connect to this Your phone scans all Bluetooth Hands
car kit.
Free devices around it. When your
phone “finds” the car kit, it displays
For Motorola phones:
Motorola BT Car-kit.
a Press MENU.
Using Your Car Kit
To leave pairing mode before timeout,
press the Bluetooth Button E until the
buttons stop flashing (often 3 seconds).
b Select SETTINGS.
c Select CONNECTION.
d Select BLUETOOTH LINK.
e Select HANDSFREE.
f Select SCAN ALL.
Note: If your phone is not a Motorola
phone, refer to its manual for instructions
on how to scan/discover the car kit.
4 Select LINK.
5 Enter Pass Key
or
Press 0000
or
Your phone displays Pass Key.
The Bluetooth Button E remains lit
(indicating that the link between your
phone and the car kit has been
established), while all other buttons
stop flashing.
Press OK/Send/Yes key (depends on
your phone)
Validating Pairing
To verify whether your phone has the Bluetooth headset or Bluetooth Hands Free profile,
attempt to pair your phone with the car kit as if the phone has Bluetooth Hands Free profile.
9
If the Bluetooth link cannot be established, or if you are not able to make a call, then pair
your phone and the car kit according to the procedure for Bluetooth headset profile.
This car kit can be paired with up to three phones at a time.
Automatic Connection
After initial pairing, every time you start your vehicle, your phone and car kit will automatically
be connected (if your phone’s relevant settings are not changed and it is in power-on mode).
When the wireless connection is established, the Bluetooth Button E remains lit.
If your phone is powered off when you start your vehicle, the Bluetooth connection may
not be automatically established when you turn on your phone.
Using Your Car Kit
To manually establish the connection:
Step
Press the Bluetooth Button E after you
turn on the phone.
If the connection cannot be established
10 seconds after you press the Bluetooth
Button E, press the button again to
restart the paging.
Result
The Bluetooth Button E begins to flash,
and the car kit attempts to connect to your
phone. If the wireless connection is
established, the Bluetooth Button E will
stop flashing and remain lit.
Disconnecting the Car Kit from Your Phone
To disconnect the car kit from your phone, press and hold the Bluetooth Button E for more
than 3 seconds.
The car kit and phone are automatically disconnected when you turn off the vehicle, unless
you are in an active call.
Training Your Car Kit’s Internal Voice
Recognition
The Bluetooth Hands Free Car Kit supports two types of Voice Recognition:
• your phone’s voice dial feature
• the car kit’s internal Voice Recognition
What Is Training?
Voice Recognition is a feature that allows you to use speech to control your Bluetooth Hand
Free Car Kit. First you must train the car kit to recognize and then perform various
commands that you speak.
Training the car kit’s Voice Recognition “teaches” it to:
• recognize your voice—familiarize the car kit with your voice qualities and pronunciation
• attach your voice commands to key words or phone numbers
10
Training the Car Kit
To train the car kit’s Voice Recognition, follow these steps:
1 Make sure your phone’s keypad tones are set to normal tones. (Refer to the user’s guide
for your phone for information about using your phone’s Settings menu to define keypad
tones.)
If the Bluetooth Button E is not lit, press it to establish a Bluetooth link.
2 Press and hold the Voice Recognition Button until it begins to flash.
3 Train the car kit by using the commands described in “Training Commands” below.
4 To exit Training Mode, press and release the Voice Recognition Button.
Training Commands
The following sections describe the commands used in Training Mode to train your car kit’s
Voice Recognition.
Each section shows you how to enter each command as follows:
H#2#
The H symbol means that you should press the keys indicated. In this example, you would
press your phones # key, followed by the 2 key, then the # key again.
Using Your Car Kit
Note: To use the functions described below, a Bluetooth link must be established between
the car kit and your phone.
H # 5 # Language Selection
Allows you to choose a language used by Voice Recognition when it prompts you with
instructions. After you enter this command, you can step through a list of languages.
• Press * to advance through the list, # to go back.
• Press any other number key to select a language.
H # 6 # Key Word On/Off
Used to activate and deactivate the key word. The key word can be set to On or Off.
When the key word is set to On, you can answer an incoming phone call by pronouncing the
keyword (not compatible with music tone ringer).
H # 2 # Record Key Word
Used to record the key word described above.
The key word is attached to a single user and cannot be used by anyone else. Other users
must activate Voice Recognition by pressing the Voice Recognition Button and then saying
names that they have recorded.
During normal recording, you are required to say the name twice.
To exit this mode, press any key.
To distinguish the key word from other words spoken during a normal conversation, and to
prevent the key word from being activated accidentally, follow these guidelines:
• Select a key word made of 2- 3 words.
11
• When recording, say the key word in a louder tone of voice.
H # 8 # Record Name
Used to record and store names and their associated phone numbers in the Voice
Recognition Phone Book.
During normal recording, you are required to say the name twice. If the Voice Recognition
has difficulty matching the first to the second pronunciation, it may require you to say the
name yet again.
When entering a phone number, press C to delete the last digit or press and hold C to
cancel the recording. Note that the + and # characters can be stored as part of a phone
number, but the * character cannot.
When recording names, follow these guidelines:
Using Your Car Kit
• For your safety, do not record while driving. Park the vehicle in a quiet environment
(windows rolled up, radio off).
• Do not try to record a number while a passenger is talking to you.
• Direct your voice directly toward the microphone.
• Speak in your normal tone and inflection. The Voice Recognition will match the word
exactly as you have spoken it in record mode.
• Use words with multiple syllables to help the Voice Recognition differentiate names.
• Avoid names that sound alike.
H # 3 # Delete / Browse
Used to delete one or more recorded names or the Voice Recognition key word.
When you select this mode, you enter the Voice Recognition phone book. If you speak a
name when you enter the phone book, the list of entries is sorted from that name onward.
You can browse through the phone book to verify or delete entries.
• To scroll through the phone book, press # or *.
• To delete a selected name, press 9.
• To exit this mode, press C.
H # 9 # Delete List
Used to delete all phone book entries as well as the key word.
• To delete the full list of phone book entries, press 9.
• To exit this mode, press any key except 9, #, and *.
H # 4 # AGC Mode
AGC (Automatic Gain Control) Mode enables the car kit to automatically adjust for changes
in surrounding background noise. The default setting for this mode is Off.
Press # 4 # to toggle this mode On and Off.
Placing a Call with the Car Kit
You can place a call with the car kit in these ways:
12
• dial a number from the phone
• use voice activation
See “Making a Call with the Car Kit’s Internal Voice Recognition” on page 13.
In both cases, you must first link your car kit and phone as described in “Linking Your Car
Kit and Phone” on page 8.
When connected, the call is hands free.
Making a Call with the Car Kit’s Internal Voice Recognition
Before you can use your car kit’s Voice Recognition, you must:
• Record voice names for phone book entries on your car kit—See “H # 8 # Record
Name” on page 12.
• Activate Voice Recognition Mode—See “Turning on Voice Recognition Mode” below.
By default, the car kit’s Voice Recognition is disabled. It is turned on the first time you enter
Training Mode and record a name. You can then selectively disable it and enable it again,
depending on whether you want to use Voice Recognition on the car kit or on your phone.
When Car Kit Voice Recognition
Is .. . .
disabled
enabled
Pressing Voice Recognition Button
Activates . . .
PHONE’s voice dial feature
CAR KIT’s Voice Recognition
Using Your Car Kit
Turning on Voice Recognition Mode
• To turn on the car kit’s Voice Recognition Mode, enter # 0 # (using your phone’s
keypad).
• To exit the car kit’s Voice Recognition Mode, enter # 0 # again.
Placing a Call
1 Activate Voice Recognition Mode on the car kit. (See “Turning on Voice Recognition
Mode” on page 13 above.)
2 Press and release (within three seconds) the Voice Recognition Button.
From the car kit’s speaker, you will hear “say a name.”
3 Say the name of the entry you want to call.
When the car kit recognizes the name, it automatically dials the number. You will hear
“calling,” followed by the name you said.
To use the functions described below, a Bluetooth link must be established between the car
kit and your phone. Most phones automatically activate a Bluetooth connection when you
place a call.
During an active call with no Bluetooth link established, you can still transfer the call to the
car kit:
• Press and release (in less than three seconds) the Bluetooth Button E. A Bluetooth
link is established, and the call is hands free. (Your phone must support this feature.)
13
Note: Some phones require you to press the Bluetooth Button E twice. See the user’s guide
for your phone for more information.
Receiving a Call
To answer an incoming call, do one of the following:
• Press and release (in less than three seconds) the Bluetooth Button E.
or
Press your phone’s press the OK/Send/Yes key (depending on your phone), just as you
would to answer a call in privacy mode.
or
• Use voice activation. See “Making a Call with the Car Kit’s Internal Voice
Recognition” on page 13.
Using Your Car Kit
Ending a Call
To end a call:
• Press and release (in less than three seconds) the Bluetooth Button E. You can also
end a call by pressing the END key on the phone.
Using Features While on a Call
Note: To use the functions described below, a Bluetooth link must be established between
the car kit and your phone. Most phones automatically activate a Bluetooth connection when
you place a call.
Rejecting an Incoming Call
While the phone is ringing, reject the call by pressing and holding the Bluetooth Button E for
more than 3 seconds.
Note: Performance may vary on different phones. For example, for some phones (such as
Ericsson’s T68), rejecting an incoming call can break the Bluetooth link.
Transferring a Call
From the car kit to your phone:
• During a call, press and hold the Bluetooth Button E for more than 3 seconds. (Most
phones prompt you to accept the transfer before completing the transfer.)
From your phone to the car kit:
• During a call, press and release the Bluetooth Button E. (Some phones require you to
press the Bluetooth Button E twice. See the user’s guide for your phone for more
information.)
Muting and Unmuting a Call
To mute the microphone during a call, press the car kit’s mute button. The Mute Button will
flash, and the other party will not be able to hear you.
To un-mute the call, press the mute button again.
14
Volume Buttons
Press the volume buttons (C and B) on the car kit to increase and decrease the volume.
If you press and hold a volume button, the volume is automatically increased or decreased
to the highest or lowest step.
You can also adjust the volume remotely by pressing the phone’s volume buttons, if your
phone supports this feature.
Using Your Car Kit
15
Troubleshooting
Troubleshooting
16
You cannot pair your
phone with the car kit.
Turn the phone off and then back on. (You may
need to remove the phone’s battery.) Try pairing the
phone and car kit again.
You make a call and the
other party hears too
much background noise.
Check the location and placement of your car kit’s
microphone. (See “Installing the Hands Free Kit” on
page 5 for details.)
Nothing happens when
you enter a training
command.
You must have a Bluetooth link and be in Voice
Recognition Training Mode.
Training Quick Reference
1
2
3
4
Set phone keypad tones to normal tones. (Refer to phone user’s guide for information
about defining keypad tones.)
If Bluetooth Button E does not flash, press it to establish a Bluetooth link.
Press, hold Voice Recognition Button until it flashes.
Train car kit by using commands described below.
Exit Training Mode: Press, release Voice Recognition Button.
Record Key Word
H #2#
F Say a name (speak clearly)
G Motorola (for example)
F Repeat
G Motorola
F Motorola stored
Record Name
H #8#
F Say a name (speak clearly)
G John Smith
F Repeat
G John Smith
F Press the number, star to end
H number to store, then *
F John Smith Stored
Delete/Browse
H #3#
F Say a name, press 9 to delete
G John Smith (name you want to delete)
F John Smith, press 9 to delete
G 9 (John Smith name and phone number
Related Information
F Repeat (confirm first entry or when car
kit cannot distinguish key word)
F Aborting (if nothing said for 10 seconds)
Note: Turn off vehicle to reduce noise while
recording.
Related Information
F Repeat (when car kit cannot distinguish
key word)
F Aborting (if nothing said for 10 seconds)
F Memory full (if more than 30 names
stored or 30 s. recorded)
H C (clear last digit—not on all phones)
H C (press and hold to erase phone
number and cancel)
Note: Turn off vehicle to reduce noise while
recording.
Related Information
F Aborting (if nothing said for 10 seconds)
Note: Turn off vehicle to reduce noise while
recording.
deleted)
H # (hear next name)
* (hear previous name)
Key Word On/Off
H #6#
F On
H #6#
F Off
Related Information
Key to Symbols
H Press the following
key(s) or enter the
following information
F Car kit says ...
G You say ...
17
AGC Mode On/Off
H #4#
F On
H #4#
F Off
Delete List
H #9#
F Press 9 to delete all
H 9 (all names and key word deleted)
Car Kit Voice Recognition Mode On/Off
H #0#
F On
H #0#
F Off
18
Related Information
Related Information
F Aborting (if nothing said for 10 seconds)
Related Information
Calling Features Quick
Reference
Make a Call
H Voice Recognition Button
F Say a name
G John Smith (name of person to call)
F Calling John Smith
Answer a Call
G key word
F Answering
or
H OK/Send/Yes key (on phone keypad)
or
H Bluetooth Button E (press and release)
Language Selection
H #5#
F English (default language)
H # or * (to scroll to other languages)
H any key except # or * (to choose
Related Information
F Aborting (if no name found or if nothing
said within 10 seconds)
Related Information
To use key word, you must first:
• Record a key word:
H #2#
• Activate the key word:
H #6#
F On
Related Information
F Stored (if no confirmation for 10
seconds)
language)
F Stored (when language is selected)
Key to Symbols
H Press the following
key(s) or enter the
following information
F Car kit says ...
G You say ...
19
Motorola Limited Warranty for Accessories
I. What This Warranty Covers and for How Long
The Motorola company listed below (“Motorola”) warrants this accessory (the “Products”) against defects in
materials and workmanship under normal use for a period of one year from the date of purchase. This warranty
extends to the first end-user purchaser only and is not transferable. This warranty does not extend to other
products, including batteries.
Motorola, at its option, will at no charge either repair, replace or refund the purchase price of any Products that
do not conform with this warranty. Repair may include the replacement of parts with functionally equivalent
reconditioned or new parts. Replacement may include providing a functionally equivalent “Motorola Certified
Reconditioned Pre-Owned” or a new Product. Products that have been repaired or replaced are warranted for
the balance of the original warranty period or for 90 days from the date that the repaired or replaced Product is
received by you, whichever is longer. All Products for which replacements have been provided will become
Motorola’s property.
II. Other Warranty Conditions
This warranty is valid only in the United States and Canada, and is Motorola’s complete warranty for the
Products. Motorola assumes no obligation or liability for changes to this warranty unless made in writing and
signed by an officer of Motorola.
Motorola does not warrant any installation, maintenance, or service that it did not perform. SERVICE WORK
PERFORMED BY SERVICE CENTERS NOT AUTHORIZED BY MOTOROLA TO PERFORM SUCH WORK
WILL VOID THIS WARRANTY.
III. What this Warranty Does Not Cover
a. Defect or damage resulting from: use of the Products in any manner not normal or customary, misuse,
accident or neglect such as dropping the Product onto hard surfaces, contact with water, rain or extreme
humidity, contact with sand, dirt or the like, contact with extreme heat, spills of food or liquid; improper testing,
operation, maintenance, installation, adjustment; or any alteration or modification of any kind.
b. Scratches or other damage to plastic surfaces, cracked displays, or other externally exposed parts caused by
use of the Products.
c. Products disassembled or repaired in such a manner as to adversely affect performance or prevent adequate
inspection and testing to verify any warranty claim.
d. Products on which serial numbers or date tags have been removed, altered or obliterated.
IV. How to Get Warranty Service
To get warranty service, please call:
1-800-331-6456 USA1-800-461-4575 Canada
You will receive directions on how to mail the Products to Motorola.
All Products shipped to Motorola Service Centers must be shipped with freight and insurance prepaid. Along
with the Products you must include a receipt, bill of sale, or some other comparable proof of purchase, a written
description of the problem and, most importantly, your name, your address, and telephone number. Products
that are repaired or replaced under this warranty will be shipped to you at Motorola’s expense for the freight and
insurance. If additional information is needed, please contact Motorola at the address at the bottom of this
document.
V. General Provisions
THIS IS THE COMPLETE WARRANTY FOR THIS PRODUCT BY MOTOROLA AND SETS FORTH YOUR
EXCLUSIVE REMEDIES. THIS WARRANTY IS GIVEN IN LIEU OF ALL OTHER EXPRESS WARRANTIES.
IMPLIED WARRANTIES, INCLUDING WITHOUT LIMITATION THE IMPLIED WARRANTIES OF
MERCHANTABILITY AND FITNESS FOR A PARTICULAR PURPOSE, ARE GIVEN ONLY IF SPECIFICALLY
REQUIRED BY APPLICABLE LAW. OTHERWISE THEY ARE SPECIFICALLY EXCLUDED. IN NO EVENT
SHALL MOTOROLA BE LIABLE FOR DAMAGES IN EXCESS OF THE PURCHASE PRICE OF THE
20
ACCESSORY, OR FOR ANY INDIRECT, INCIDENTAL, SPECIAL OR CONSEQUENTIAL DAMAGES
ARISING OUT OF THE USE OR INABILITY TO USE THE PRODUCT, TO THE FULL EXTENT THESE
DAMAGES MAY BE DISCLAIMED BY LAW.
VI. Patent and Software Provisions
Motorola will defend at its own expense, any suit brought against you to the extent that it is based on a claim
that the Products infringe a United States patent. Motorola will pay those costs and damages finally awarded
against you in any such suit which is attributable to any such claim. The defense and payments by Motorola
are conditioned on the following: (a) that you will notify Motorola promptly in writing any notice of the claim;
and (b) that Motorola will have sole control of the defense of the suit and all negotiations for its settlement or
compromise; and (c) should the Products become, or in Motorola’s opinion be likely to become, the subject of
a claim of infringement of a United States patent, that you will permit Motorola, at its option and expense, to
procure for you the right to continue using the Product or parts; to replace or modify them so that they
become non-infringing; or to grant you a credit for such Products or parts as depreciated and accept the
return. The depreciation will be an equal amount per year over the lifetime of the products, accessories,
battery or parts as established by Motorola.
Motorola will have no liability to you with respect to any claim of patent infringement which is based upon the
combination of the Products or parts furnished under this limited warranty with software, apparatus or devices
not furnished by Motorola. Motorola will have no liability for the use of ancillary or peripheral equipment or
software not furnished by Motorola which is attached to or used in connection with the Products. The
foregoing states the entire liability of Motorola with respect to infringement of patents by the Products,
accessories, batteries or any parts of them.
Laws in the United States and other countries preserve for Motorola certain exclusive rights for copyrighted
Motorola software such as the exclusive rights to reproduce in copies and distribute copies of the Motorola
software. Motorola software may be copied into, used in and redistributed with only the Products associated
with such Motorola software. No other use, including without limitation disassembly, of such Motorola
software or exercise of exclusive rights in such Motorola software is permitted.
VII.State and Jurisdiction Law Rights
Some states and jurisdictions do not allow the limitation or exclusion of incidental or consequential damages,
so the above limitations or exclusions may not apply to you. This warranty gives you specific legal rights, and
you may also have other rights which vary from state to state or from one jurisdiction to another.
Motorola:
In the U.S.A.:
Motorola, Inc.
600 North U.S. Highway 45
Libertyville, IL 60048
In Canada:
Motorola Canada Limited
5875 Whittle Road
Mississauga, ON L4Z 2H4
21
Total Customer Satisfaction
At Motorola, Total Customer Satisfaction is a top priority. If you have a question, a suggestion, or a concern
about your Motorola Cellular Phone, Motorola wants to hear from you.
Please contact the Motorola Cellular Response Centre by fax on: +44 (0) 131 458 6732, or use one of the local
phone numbers in the following countries:
Austria
Belgium
Czech Republic
Denmark
Egypt
Eire
Finland
France
Germany
Greece
Italy
Jordan
Kuwait
Lebanon
Luxembourg
Netherlands
Norway
Oman
Poland
Portugal
Qatar
Saudi Arabia
South Africa
Spain
Sweden
Switzerland
Turkey
UK
United Arab Emirates
22
0800 297 246
0800 72 370
00420 2 21 85 21 01
43 48 8005
02 3411800
01 402 6887
0800 117 036
0 803 303 302
0180 35050
00800 441 28150
02 696 333 16
06 863750
484 2000 Ext. 1177
01 744156
0800 21 99
0800 022 27 43
22 55 10 04
790925
0801 620 620
21 318 0051
418999
01 2303294
0800 11 48 49
902 100 077
08 445 1210
0800 553 109
0212 425 9090
0500 55 55 55
04 32 11 66
Motorola’s Warranty
Your Cellular Phone is warranted by Motorola to be of satisfactory quality, fit for its purpose and comply with
applicable Motorola specifications for a period of twelve (12) months from the date you bought it (verified by
reference to your proof of purchase).
This warranty does not apply if the phone has:
1. been mishandled, misused, willfully damaged, neglected, improperly tested, repaired, altered or defaced in
any way.
2. a defect arising as a result of any failure to follow instructions either in the manual or product specification.
3. a defect which has arisen from the use of non-Motorola approved accessories an ancillary items attached
to or in connection with the telephone.
This warranty does not affect your statutory rights as a consumer.
Warranty conditions may vary depending on the country in which you bought the accessory
23