1
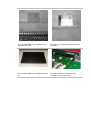
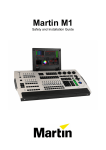
Jands Vista USB Console
Setup Guide
Copyright & disclaimer
This product is approved for use in Europe and Australia/New Zealand and conforms to
EN55103-1, EN55103-2, and EN60950. Conformance has been achieved for intended usage in
environment E1: Residential.
To ensure continued compliance with EMC Directive 89/336 and the Australian
Radiocommunications Act 1992, use only high quality data cables with continuous shield, and
connectors with conductive back shells. Examples of such DMX cable is Belden 8102 (100%
Aluminium foil screen, 65% Copper braid)
This equipment has been tested and found to comply with the limits for a Class B digital device,
pursuant to Part 15 of the FCC Rules. These limits are designed to provide reasonable protection
against harmful interference in a residential installation. This equipment generates, uses and can
radiate radio frequency energy and, if not properly installed and used in accordance with the
instructions, may cause harmful interference to radio communications. However, there is no
guarantee that interference will not occur in a particular installation.
If this equipment does cause harmful interference to radio or television reception, which can be
determined by turning the equipment off and on, the user is encouraged to try to correct the
interference by one or more of the following measures:
• reorient or relocate the receiving antenna;
• increase the separation between the equipment and receiver;
• connect the equipment into an outlet on a different circuit from that to which the receiver is
connected;
• consult the dealer or an experienced radio/television technician for help.
Disclaimer
Information contained in this manual is subject to change without notice and does not represent
a commitment on the part of the vendor. Jands Pty Limited shall not be liable for any loss or
damage whatsoever arising from the use of information or any error contained in this manual.
It is recommended that all service and repairs on this product be carried out by Jands Pty
Limited or its authorised service agents. Jands Pty Limited cannot accept any liability
whatsoever for any loss or damage caused by service, maintenance or repair by unauthorised
personnel, or by use other than that intended by the manufacturer.
Jands lighting products must only be used for the purpose they were intended by the
manufacturer and in conjunction with the user manual. Disconnect mains power when not in
use.
JANDS Pty Limited
ACN 001 187 837
Locked Bag 15
MASCOT NSW 1460
Sydney AUSTRALIA
40 Kent Rd
MASCOT NSW 2020
Sydney AUSTRALIA
Phone:
Fax:
http://www.jands.com.au
http://www.jandsvista.com
+61-2-9582-0909
+61-2-9582-0999
Copyright JANDS PTY LIMITED 2007
Jands USB Console Setup Guide Version 1.0
All rights reserved
Welcome to the Vista
Welcome to the Setup Guide for the Jands Vista USB Consoles. This guide
is intended to give you the information you need to get your Vista up and
running as quickly as possible.
This Setup Guide should be read in conjunction with the Vista User Guide.
You can find the latest version of the User Guide at www.jandsvista.com.
What is a Vista USB Console?
The Vista USB Console is an operating control surface designed for use
with the Vista software running on a user supplied host computer. In the
case of a S3, S1, or M1 product the host computer is a Windows PC or Intel
Macintosh; in the case of the E2, the host is a Vista T4 or T2 console.
The USB Console and the Vista software for the PC or Macintosh are
purchased and supplied separately, and you’ll need both packages to get
your lighting control system up and running.
The Vista E2 is specifically designed to extend the front panel control
surface of a Vista T2 (or T4) and does not require a computer. The E2 can
only be used in conjunction with a T2 or T4 and connects to it via a USB
cable.
What’s supplied
The Vista control surface is supplied with:
•
a USB Type-A to Type-B cable
•
an IEC power cable (except M1).
The Vista Software package (purchased and supplied separately) includes:
•
a software installation CD
•
the Vista User Guide
•
a USB dongle – 128, 256, 512, 1024, 2048 and unlimited channel
versions available.
Connections
DMX
Two or four DMX outputs are available from the USB
Console, depending upon the model. The actual number
of DMX channels available to you will depend on the
type of dongle you have purchased (e.g. 128, 512, 2048,
etc)
USB to host
One Type B
USB outputs
Type A, quantity depends on the USB Console
LTC
You can use SMPTE Timecode as a trigger input.
Information on using timecode is included in the Vista
software manual
(S1 and S3
only)
MIDI
(S1 and S3
only)
Desklamp
Standard MIDI IN, OUT and THRU connectors are
available, but MIDI is not currently implemented in the
Vista software
Connect a standard gooseneck desklamp (not supplied)
About the Vista dongle
The dongle is a USB device that the Vista software requires to enable
output through either the computer’s Ethernet connection or the console’s
DMX outputs. Vista T4 and T2 products are factory fitted with a dongle,
while an E2 does not require one.
Normally your supplier will fit the dongle to the USB Console when you
buy it, but if it hasn’t been fitted you can either:
•
plug the dongle into any available USB port on the computer or the
rear panel of the console, or
•
have your dealer fit the dongle to the internal USB port on the USB
Console (S3 and S1 only). If you choose this option we recommend that
you get it done by a qualified service person. If you are qualified to do
this yourself, contact Jands for a technical note.
Jands USB Console Setup Guide Version 1.0
The concealed USB port is located on the
underside of the S3
Remove the cover plate to expose the USB
connector
The concealed USB port is located inside the
S1
Remove the base to expose the USB
connector on the Output Card
Setting up and turning on the console – E2
To get your Vista T4/T2 console going with a Vista E2 USB Console:
1.
Connect the E2 to any mains supply between 100 and 240VAC.
2.
Connect the USB cable supplied with the console from the input port
on the console (Type B) to an output port (Type A) on your desktop
computer.
3.
Turn on the E2 USB Console.
4.
Turn on the host Vista T2 or T4 (for E2 only).
5.
Plug in any other USB and DMX cables.
Setting up and turning on the console – S3, S1, M1
To get your Vista S3, S1, or M1 USB Console going:
1.
Connect the Vista S3 or S1 console to any mains supply between 100
and 240VAC.
2.
Connect the USB cable supplied with the console from the input port
on the console (Type B) to an output port (Type A) on your Windows
PC or Macintosh computer.
3.
Connect the dongle to a USB port on either the console or the
computer. Skip this step if your dongle has been fitted to one of the
internal ports.
4.
Turn on the computer.
5.
Install Vista software (see the documentation supplied with the
software).
6.
Turn on the S3 or S1 console. The computer will respond with a “Found
new hardware” dialogue box asking "Can Windows connect to Windows
Update to search for software?" Select “No, not this time” and click
“Next”. When the computer displays the "What do you want the
software to do?" Select "Install the software automatically
(Recommended)" and click “Next”.
7.
Launch the Vista software.
USB LED operation – S1
The back panel LED on continuously indicates that the USB link between
the S1 and host computer is complete and ready for transmission. Once
data communication occurs, the LED flashes.
USB LED operation – M1
The back panel LED on continuously indicates that the USB power link
between the M1 and host computer is complete and ready for data
transmission.
Jands USB Console Setup Guide Version 1.0
Technical information
Installing the Console
The Vista console must be installed in a location that allows adequate
ventilation. There should be at least 150mm of free space around the rear
and sides of the console when in use. Failure to allow adequate ventilation
may result in the console shutting down.
An external uninterruptible power supply can be connected if mains
blackouts are anticipated.
Service & Maintenance
With care the Vista console will require little or no maintenance.
If the front panel requires cleaning, wipe with a mild detergent on a damp
soft cloth.
DO NOT spray liquids onto the front panel.
DO NOT use solvents for cleaning the front panel.
Warning: Do not allow the entry of liquids of any sort into the console
chassis.
Specifications
Parameter
M1
S1
S3
E2
Power Source
USB powered
Mains
Mains
Mains
Supply
Voltage
5VDC
100-240VAC
+/- 10%
100-240VAC
+/- 10%
100-240VAC
+/- 10%
Supply
Frequency
N/A
50-60Hz
50-60Hz
50-60Hz
Power
Consumption
2.5W
maximum
15W
maximum
25W
maximum
25W
maximum
Power
Connector
USB Type B
IEC 3-pin
IEC 3-pin
IEC 3-pin
Ingress
Protection
IP20
IP20
IP20
IP20
Ambient
Operating
Temperature
0C Minimum
0C Minimum
0C Minimum
0C Minimum
40C Maximum
40C Maximum
40C Maximum
40C Maximum
Cooling
Convection
Convection
Convection
Convection
Size
249(W) x 62
(H) x 284 (D
540(W) x 72
(H) x 337 (D)
642(W) x 140
(H) x 530 (D)
441(W) x 218
(H) x 638 (D)
Weight
Net/shipping
2kg / 3kg
5kg / 7kg
15kg / 20kg
15kg / 20kg
Inputs & Outputs
Parameter
M1
S1
S3
E2
DMX Outputs
2
2
4
4
LTC Input
2
6.5mm Jack
3 pin AXR
2
External USB
Outputs
2
2
4
4
Internal Dongle
2
1 position
2 positions
Not
required
Desk Light
Socket
2
2
1
1
MIDI
2
3
3
2
Description
DMX 512
Type
5 pin Female AXR
Pin Outs
1
Shield
2
Data –
3
Data +
4, 5
MIDI
In/thru/Out
LTC
5 pin Female DIN
3 pin Female AXR
(6.5mm Audio Jack)
USB
Type A, B
Desk Lamp
Jands USB Console Setup Guide Version 1.0
Function
Not connected
1
NC
2
Shield
3
NC
4
Data +
5
Data
1 (Sleeve)
Shield
2 (Ring)
LTC –
3 (Tip)
LTC +
1
Vcc
2
Data –
3
Data +
4
Ground
1
Chassis
2
Lamp -
3
Lamp +