1
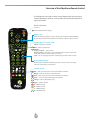
TM VidyoRoom™: Users Guide HD-200 & HD-100 Version 1.4 Table of Contents 1 2 4 6 7 8 10 13 15 18 19 20 22 31 33 35 Document Overview Definitions Overview of the VidyoRoom Remote Control Overview of VidyoRoom On-Screen Icons Overview of Input Modes Initial VidyoRoom Setup for HD-200 Initial VidyoRoom Setup for HD-100 Initial VidyoRoom Setup Overview of the VidyoRoom Homepage Using the VidyoRoom During a Meeting Overview of the Browse Meetings & Users Page Managing Speed Dials Settings Product Specifications System Specifications Installation Safety Appendix ©2009 Vidyo, Inc. All rights reserved. Document Overview Welcome to Vidyo Video conferencing solutions that just work. Simply. Intuitively. Reliably. Inexpensively. From anywhere. All traditional video conferencing vendors offer high-definition room systems, but do you know of any that are capable of delivering up to 60 fps encoding? The VidyoRoom HD-200 and HD-100 do just that. The VidyoRoom HD-200 delivers 60 fps encoding as well as decoding and displaying multiple HD participants, while the VidyoRoom HD-100 encodes 30 fps and supports dual monitors to display conference participants on one monitor and shared applications on the other — all at a level of video quality unequaled by systems that require dedicated bandwidth to perform at their best. Even more significant is that the VidyoRoom was specifically designed for use with general-purpose IP networks. The VidyoRoom system also is simple to use, easy to configure, and voiceactivated with continuous presence. Flexible conference control options make it a snap to manage, using either the VidyoPortal™ or a remote control device. And because video conferencing ought to be a natural extension of the way people normally work, the VidyoRoom interoperates seamlessly with VidyoDesktop™ clients, making it possible for people to join a conference from their home office or wherever else they might happen to be. This guide details how to use the features of the VidyoRoom. As a VidyoRoom user, you may: Start your own meeting Join a meeting Place a direct call to any user in the system Easily search for any user by typing the name or extension in the form field Browse meetings and users Separate guides are available for the administrator portal and end user VidyoPortal. TM 1 Definitions As a new Vidyo user, it is helpful to have a basic understanding of the following terms that are used throughout this document: Destinations Places where you may interact with the VidyoConferencing System: VidyoPortal — The Web interface of the VidyoConferencing System VidyoDesktop — The Vidyo software client running on your local computer, enabling a user to participate in a conference VidyoRoom — The dedicated Vidyo endpoint appliance for use in a physical conference room Users Anyone who uses the system. There are five types of users: Admin — Has administrative privileges. Can add, delete, manage users, set up public rooms, and set up groups (define maximum participants and bandwidth for users). A PIN Code is a 3- to 10-digit number that meeting participants must enter before being admitted to the meeting room. It can be set and changed by the admin and user. Operator — Can manage meeting rooms and normal users. The operator has the same rights as the administrator except an operator cannot change any system settings. Normal — Can join meetings, control own meeting, and place direct calls. Can change own password, set own PIN number. VidyoRoom — The dedicated Vidyo endpoint appliance. Has the same rights as a normal user. This guide is targeted toward such end users. VidyoGateway — End user for portal. Has no personal room. There is also a provision for guest users. Guest users are users you may invite to a meeting who are not registered with the system. To invite users, simply send them a link to your meeting. The guest user will follow that link and enter their name to be able to join. Guest users only have the ability to join a conference. They do not have the ability to login to the system or receive incoming calls. Meeting Rooms Meeting rooms are virtual rooms where users of the Vidyo system can gather for Vidyo conferences. There are two types of meeting rooms: Personal — Each user is automatically assigned his or her own personal room. This is the equivalent of a “personal office” in the physical world. TM Public — Common public spaces may also be created by the operator and administrator only. These are the equivalent of conference rooms in the 2 Definitions physical world. Meeting rooms (of either type) offer attributes Set by the administrator — such as “maximum bandwidth” and “maximum number of participants.” Rooms may be locked/unlocked and/or PIN-protected. A PIN-protected room requires the meeting invitees to enter the specified PIN in order to be admitted to the room. Groups Groups are created by the admin in order to manage a common set of privileges and attributes for rooms and users. These attributes include the maximum number of participants and maximum bandwidth. If you need your max participants or max bandwidth adjusted, please contact your admin. Direct Call You may directly call a specific user in a point-to-point call. As its name suggests, a point-to-point call involves just two users; no additional users can join. A direct call is different than a meeting, in which more than two users can join. Note that if you are already in a call, you cannot attend a meeting or place a call until you end your current call. Meeting A meeting is an audio and video connection of a meeting room with two or more users interacting and sharing their video streams/presentations. Meeting Status A meeting room may be empty, full, locked, or PIN-protected. The following icons are used to indicate meeting room status: Empty Full Locked PIN-Protected User Status The user status may show: online, offline, or in a meeting. Online/offline refers to whether they can be reached for a direct call. In a meeting refers to whether they are connected to a meeting room or on a call. TM 3 Overview of the VidyoRoom Remote Control The VidyoRoom comes with a remote control allowing quick key shortcuts to frequent VidyoRoom activities. It also provides the input mode/keyboard for typing information. Not In Conference CONNECT Starts meeting from the homepage. ARROWS / OK Use the arrow keys to navigate on-screen. The option you navigate to will be highlighted in green when activated. Press the OK key on the remote to select the option on-screen. VOLUME / MUTE / SELFVIEW / ZOOM Volume — adjusts the sound level MUTE Mute — mutes your microphone SELFVIEW , @- 1 2 3 Selfview — Single Screen Mode — shows preview Dual Screen Mode — shows help screen on the first monitor and turns control to the camera while preview is shown on the second monitor Zoom — acts as a page up/page down for scrolling through search results on-screen 7 ALPHA-NUMERIC KEYPAD [ . :/ _ Use these keys in conjunction with the input modes on-screen to key in user names, passwords, speed dials, and search terms. MANAGE CONTROL KEYPAD Back — takes you to the previous screen in the VidyoRoom interface Manage — brings up the remote control Help screen Home — takes users to the home screen in the VidyoRoom interface Delete — acts as a backspace when typing in a form field Settings — brings up the Settings screen Toggle — refreshes the GUI A — multifunction key B — multifunction key C — multifunction key D — multifunction key TM 4 Overview of the VidyoRoom Remote Control In Conference DISCONNECT Ends meeting ARROWS / OK Left/Right – pans camera Up/Down – tilts camera VOLUME / MUTE / SELFVIEW / ZOOM Volume — adjusts the sound level MUTE Mute — mutes your microphone or recording source SELFVIEW , @- 1 2 3 Selfview — cycles through Selfview modes Single Screen Mode — picture-in-picture, docked, full screen and off Dual Screen Mode — picture-in-picture, docked and off Zoom — zooms your camera In/Out ALPHA-NUMERIC KEYPAD [ 7 . :/ _ 1-8 — sets the number of participants viewed 0 — sets the number of participants back to auto MANAGE CONTROL KEYPAD Manage — brings up the remote control Help screen Home — resets Camera Pan, Tilt, and Zoom to default position (if VISCA connected) Privacy — toggles Privacy mode, so that no one in the conference can see your video Share — toggles sharing on and off when using VGA2USB device Toggle — cycles through shared sources, including none A — swaps displays when using Dual Screen mode (HD-200 only) D — toggles between Preferred/Non-Preferred mode TM 5 Overview of VidyoRoom On-Screen Icons Speaker Mute — Displayed when local speakers are muted (volume turned all the way down via remote control). Microphone Mute — Displayed when local microphone is muted remote control. via Privacy — Displayed when local camera is muted (Privacy mode via remote control). enabled Participants in Non-Preferred Mode — Displayed when number of participants selected via remote control (number will change based on the number of participants selected on the remote control, 1-8; 0 selects all participants and icon disappears). Participants in Preferred Mode — Displayed when number of participants selected via remote control (number will change based on the number of participants selected on the remote, 1-8; 0 selects all participants and icon disappears). Remote Share — Displayed when a remote participant Share is available, Select on the remote control to view the available share. It is also displayed after a local Share is enabled using the VGA2USB Adapter. Share Error — Displayed when the VGA2USB Adapter is connected but an error has occurred and the Share in not available. Share Ready — Displayed when the VGA2USB Adapter is connected and the Share has successfully synchronized. Press on the remote control to then share the desktop connected to the adapter (once the Share is activated this icon will scroll away and you will see the Remote Share icon indicating that the Share is available to view). Share with VGA2USB — Not currently used. For future use with VGA2USB Adapter. TM 6 Overview of Input Modes ABC Mode ABC input mode features the numbers 0 through 9, the pound sign, and the asterisk, along with corresponding symbols and letters, in a layout similar to a touch-tone phone. Selecting the button once enters the first superscript character or alpha letter into the form field. Selecting it a second time brings in the second superscript character or alpha letter into the form field. Selecting it a third time moves on to the third superscript character or alpha letter, and so on until you get to the numeral, then cycles again. This input mode corresponds to the buttons on your remote control, so when in this mode, you can either press the buttons on the remote control or key around on-screen. To change input modes at any time, press on the remote control. ! Number Mode Number input mode features the numbers 0 through 9, the pound sign, and the asterisk, in a layout similar to a touch-tone phone. This input mode is the default mode for entering extensions, PIN numbers, and speed dials. Arrow through the numbers to select the ones you want. If you make a mistake, you can press the Delete button on the remote control, which acts as a backspace. To change input modes at any time, press on the remote control. ! Keyboard Mode The default presentation of the keyboard input mode is lowercase letters in four rows from a to z. To change to uppercase, press on the remote control. To enter symbols (including: comma, at symbol, hyphen, period, colon, slash, underscore, and bracket), arrow over to the Symbols button. Arrow to the Alpha button to return to the letters. Arrow to the Delete button to delete a single character at a time or to the Clear button to clear the entire form field entry. To change input modes at any time, press TM ! 7 on the remote control. Initial VidyoRoom Setup for HD-200 Connecting Your VidyoRoom for Your HD-200 System Front 1. Power Back ! 7. VGA2USB (optional) 4. Camera 5. VISCA 6. Yamaha PJP-25UR 2. Ethernet 3. Primary Display 3. Secondary Display 1. Connect Power cable. 2. Connect Ethernet cable to ETH-1 and to your network. 3. Connect to TV using DVI to HDMI cable on TV-1. A second screen can be connected to TV-2. 4. Connect HD Camera using BNC Coax HD-SDI cable to CAMERA. (See illustration on page 9.) 5. Connect VISCA cable to camera VISCA port and to SERIAL (if applicable). 6. Connect Yamaha PJP-25UR to any USB port. 7. Connect VGA2USB (optional) to any USB port. TM 8 Initial VidyoRoom Setup for HD-200 HD Camera Kit Setup Power Supply System Select BNC Coax HD-SDI VISCA Serial Cable In order for the Sony EVI-HD1 Camera to Sync with your VidyoRoom HD-200, you need to set the System Select POT screw on the rear of the camera to #2. Connect Power Supply to power input. Connect VISCA cable to VISCA IN. Connect HD-SDI BNC Coax cable to HD OUT. Audio Connection Using Yamaha PJP-25UR DC IN 5V TM 9 AUDIO OUT IN Initial VidyoRoom Setup for HD-100 Connecting Your VidyoRoom for Your HD-100 System VGA HDMI to TV HDMI TM 3. Secondary Display D89-Connection USB to Serial 3. Primary Display SERIAL / USB CABLE VISCA ETH0 2. Ethernet OR LINE IN LINE OUT 5. Chat 50 4. Camera 5. Yamaha PJP-25UR SDI Use only one audio device between the above two HDMI CAMERA VGA2USB (optional) 1. Power Front Back 1. Connect Power cable. 2. Connect Ethernet cable to ETH-0 and to your network. 3. Connect to TV using HDMI to HDMI cable on HDMI-to-TV. NOTE: A second screen can be connected to the VGA port (2nd display is for Data Share viewing only). 4. Connect HD Camera using HD Camera Kit Set. (See illustration on page 11.) NOTE: Do not power on HD-100 unit until camera is fully connected. TM 5. Connect USB SpeakerPhone cable to open USB port. 10 Initial VidyoRoom Setup for HD-100 SDI HD Camera Kit Setup SD D OUT Power Supply DC IN 12V SYSTEM SELECT IN VISCA OUT VIDEO O S VIDEO HD O OUT COMPONENT COMPO O ONENT HD-SDI 1 2 3 IR SELECT VISCA Serial Cable BNC Coax HD-SDI VGA HDMI to TV SERIAL / USB CABLE SERIAL / USB CABLE ETH0 LINE IN LINE OUT USB to Serial Cable and VISCA Cable connection CAMERA HDMI CAMERA SDI IN 1. In order for the Sony EVI-HD1 Camera to Sync with your VidyoRoom HD-100, you need to first set the System Select POT screw on the rear of the Sony Camera to #2. 2. Connect HD-SDI BNC Coax cable to HD OUT on Sony Camera. 3. Connect other end of HD-SDI Coax cable to SDI IN port of BlackMagic SDI-to-HDMI Converter. 4. Connect HDMI/HDMI cable to HDMI port of BlackMagic SDI-to-HDMI Converter. 5. Connect other end of HMDI/HDMI cable to Camera port on HD-100. 6. Connect VISCA Cable to VISCA IN on Sony Camera. 7. Connect DB9 end of VISCA cable to DB9 end of USB to Serial Adapter cable. 8. Connect USB to Serial cable into USB port labeled ‘Serial/USB Cable’ on back of HD-100. IMPORTANT: The VISCA cabling will only work on the specific USB port labeled. 9. Connect Camera Power Supply to power input of camera. 10.Connect SDI-to-HDMI converter Power Supply to power input of converter. TM 11 Initial VidyoRoom Setup for HD-100 Audio Connection Using Yamaha PJP-25UR DC IN 5V TM 12 AUDIO OUT IN Initial VidyoRoom Setup Creating a VidyoRoom Account on the VidyoPortal Please refer to the VidyoPortal Admin Guide. Configuring the VidyoRoom System Upon bootup you will receive the following screen and message: ! Press on your VidyoRoom remote control. ! Enter system name — arrow right to scroll to input modes area; when complete, arrow left to return to fields. Enter password — arrow down to password field and then arrow right to input modes. Enter VidyoPortal server IP address or URL. Press 13 on remote, or scroll down to Continue button and then press TM . Initial VidyoRoom Setup Select Obtain network settings automatically for DHCP Or Select Use the following network settings for Static IP and enter your appropriate information. Press on remote, or scroll down to Save button and press . Receiving this screen means you have successfully registered your VidyoRoom with your VidyoPortal. NOTE: If you receive any errors, please double check your User Name, Password, and Server address settings. TM REBOOT THE SYSTEM NOW BY PRESSING THE POWER BUTTON ON THE FRONT OF THE SYSTEM AND THEN POWER BACK ON. 14 Overview of the VidyoRoom Homepage From the VidyoRoom homepage you can easily start a meeting, place a direct call, and manage your speed dial contacts (if you have added users to your speed dials list). Actions You Can Take from the Homepage: Start Meeting: If you want to host a meeting, you can ask participants to meet in your VidyoRoom. To begin the meeting, press the Connect button on the remote. You can also arrow over to the large Start Meeting button on-screen and press on the remote control. This will place a call using the VidyoRoom. For more details about using the VidyoRoom during a meeting, see page 18. Place a Call To… Search Box: To join a meeting room or call a user direct, use the keyboard input to enter in the person, room, or extension you intend to call. To find someone to call or a meeting room to join, you can search by: User’s first or last name User’s initials Room name Extension TM 15 Overview of the VidyoRoom Homepage User’s Status: After typing/selecting the name of a user or personal room, press on the remote control. An overlay box detailing the user’s online/ offline status will appear and the rest of the screen will darken. Depending on the user’s status, different options will be available to you in the overlay screen, the most common of which are the choices of Call Meeting Room or Call Direct. (Remember that a direct call involves just two users; no additional users can join. When you call a meeting room and there are just two of you in the room, it is similar to being in a direct call. The difference with calling a meeting room is that others can potentially join you in the meeting. This is not so in a direct call.) Other statuses/attribute choices: Place a point-to-point call through the VidyoDesktop: If the user is online, you may arrow to the Call Direct button on-screen and press or simply press on the remote control. You will then be placed in a point-to-point call through the VidyoDesktop. Place a call using the VidyoRoom: If the user is online or offline, you may arrow to the Call Meeting Room button on-screen and press or simply press the on the remote control. This will place a call using the VidyoRoom. If the room is locked, the Call Meeting Room button will be grayed out/inactive. You cannot join a locked room. PIN required: If a PIN code is required for the meeting room, you must enter it before being admitted to the meeting. The Call Meeting Room button will be grayed out/inactive until you enter the appropriate PIN. Future feature: If the person is not online or has turned on Do Not Disturb, the Call Direct button will be grayed out/inactive. TM 16 Overview of the VidyoRoom Homepage Selecting a Public Room will bypass the overlay process because there is no option to call direct. Unless the room is full or locked, you will be directly connected with the meeting. Speed Dials: You can create a custom Speed Dials list of commonly called numbers. Your saved Speed Dials appear here on the homepage when logged in and are also accessible from the Browse Meetings & Users page. Note that you must add users to Speed Dials before they will appear in your Speed Dials list. (To add users to your Speed Dials, see page 20.) You may arrow down to the user’s name and press on the remote to place a direct call; an overlay screen will appear as previously outlined. Browse Meetings and Users: Arrow down to the Browse Meetings & Users button to see a list of meetings and users available in the system and to set up your Speed Dials list. For more information on Browse Meetings & Users, see page 19. Settings: Arrow down and over to the Settings button and press on the remote control to change your VidyoRoom settings. For more information on Settings, see page 22. TM 17 Using the VidyoRoom During a Meeting Upon starting or joining a meeting, the VidyoRoom will display a progress bar. Once you’ve entered a meeting, you may utilize the following functions to optimize your meeting: Toggle — Many participants may share their application screens, but you may only view one screen at a time. When shared applications are available from multiple participants, you may toggle between the multiple applications using the Toggle button on the remote control. As well you may select not to view any of the application shares. Selfview — For HD-200 To see your own video feed, press the Selfview button on the remote control. Your picture will be included in the screen layout. Press the Selfview button again to see yourself in Dual Screen Mode, and a third time to remove yourself from the layout and only view the other meeting participant(s). For HD-100 Toggles between picture and picture, docked and full screen and off (4 modes). Mute — Press the Mute button on the remote control to mute/unmute the sound you’re broadcasting. Settings — This button brings up remote control Help screen. Privacy — This button pauses/blinds your camera feed so that no one in the conference can see your video. Disconnect — Press the red Disconnect button on the remote control to end your session. A — Swaps the views between displays when in Dual Screen Mode. (HD-200 only) D — Toggles between Preferred Mode and Non-Preferred Mode. In Preferred Mode: the loudest speaker appears in a larger window among the number of viewed participants, when in Single Screen Mode; with Dual Screens, Preferred Mode is selected by default and toggle is not available. (HD-200 only) TM 18 Overview of the Browse Meetings & Users Page At the top of the Browse Meetings & Users page is a search box that is identical to the Place a Call to... search box on the VidyoRoom homepage. Below the search box is the Browse Meetings & Users table. Using this table allows you to arrow through a list of meeting rooms/users in the system, arrow over to get more details about the room’s/user’s status, and select buttons to call the room or join the meeting. Once you have scrolled to a user or room you wish to call or whose meeting you would like to join, arrow to the right to get more details about the user’s status. User status may be: online, offline, in a meeting. Meeting status may be: empty, full, PIN-protected. Max participants: the maximum number of users who may be in the room at a given time. Participants: the number of users currently in the room. Call Meeting Room: to call the user’s meeting room, press the button on the remote control. Or, arrow to the Call Meeting Room button on-screen and press on the remote control. Call User Direct: to call the user direct, press the button on the remote control. Or, arrow to the Call User Direct button on-screen and press on the remote control. Note that if the user is offline or in another meeting, this button will be grayed out/inactive. TM 19 Managing Speed Dials Adding a User or Room to Speed Dials From the Browse Meetings & Users table, scroll down to highlight the name you wish to add to your speed dials. When you’ve highlighted a name you wish to add, press on the remote control. That user will be added to your Speed Dials list. The user will also be accessible from Speed Dials on the homepage. Deleting an Entry from Your Speed Dials From the Browse Meetings & Users table, scroll down to highlight the name you wish to remove from your Speed Dials list. When you’ve highlighted a name you wish to remove, press on the remote control. That user will be deleted from your Speed Dials list. The user will no longer be accessible from Speed Dials on the homepage. Speed Dials entries may also be removed from within the Speed Dials list on the homepage. TM 20 Managing Speed Dials Using Speed Dials From the VidyoRoom homepage, arrow over to the Speed Dials button and press on the remote control. You may arrow down to the user’s or room’s name and press on the remote to place a call; an overlay screen will appear as previously outlined asking you to select Call Meeting Room or Direct Call. Deleting an Entry from Your Speed Dials When you’ve highlighted a name on the Speed Dials list that you wish to remove, press on the remote control to delete that entry. There will be no confirmation prompt or undo, so take care that you are deleting an entry you really want to delete from your list. To add users or rooms to the Speed Dials list, please refer to page 20. TM 21 Settings The Settings section allows you to maintain and change your VidyoRoom settings. Arrow to the red Restart button and press restart VidyoRoom. on the remote control to You will get the following screen: Either Press the button on the remote, or scroll down to highlight the Proceed button and press on the remote, to reboot the system. TM 22 Settings General In the first field on the General Settings page, you can name (or rename) your VidyoRoom system. This is the name that will be associated with your VidyoRoom box; the rest of the VidyoConferencing System will recognize this name. It will show up in searches. In the second field, you can set the VidyoRoom password. You may also set a configuration code in the third field for additional security. Press on the remote control in the checkbox, and then use the remote control keys to enter your configuration code. When enabling and adding a Configuration Code, users will be prompted to enter the code in order to change the system’s configuration. Remember that the VidyoRoom account must be created in the VidyoPortal in order for the unit to register. Be sure to press the button on the remote control to save your changes. Or, arrow to the Save button on-screen and press on the remote control. TM 23 Settings Preferences PIN To set your room to be PIN-protected, arrow to the box that says Use a PIN Code and press on the remote control. (Conversely, to unset the PIN requirement, press O on the remote control so that the checkmark disappears.) Then use the remote control buttons to enter/change your PIN. Press the button on the remote control to save your changes. Or, arrow to the Save button on-screen and press on the remote control. Participants will be prompted to type this PIN before being admitted to your VidyoRoom, so be sure to share your PIN with invited participants prior to the meeting. Language The VidyoConferencing System is available in nine languages: Chinese Japanese English Korean French Portuguese German Spanish Italian Select your preferred language options shown and press on the remote control. TM 24 Settings Local IP To change your VidyoRoom’s network settings – Select Use the following network settings: to manually set your addresses, and enter your network’s settings appropriately. Your VidyoRoom is set to Obtain network settings automatically (DHCP) by default. TM 25 Settings Network To change your VidyoRoom’s network settings – Select Use the following network settings: to manually set your addresses, and enter your network’s settings appropriately. TM 26 Settings Audio HD-200 HD-100 Select your microphone and speakers by arrowing to the system you’re using and pressing on the remote control. Adjust the volume for each by scrolling to that control and pressing left or right on the arrows on the remote control. TM Press the button on the remote control or scroll over to the Save button and press on the remote control to Save the settings. 27 Settings Video HD-200 HD-100 To select the number of displays you have connected to the VidyoRoom system, select Single or Dual and press on the remote control. To reset the camera, select Reset Camera and press on the remote control. To turn the camera’s backlight compensation On, select Backlight On and press on the remote control. To turn the camera’s backlight compensation Off, select Backlight Off and press on the remote control. Press the button on the remote control or scroll over to the Save button and press on the remote control to Save the settings. TM NOTE: Dual Screen Mode in HD-100 is only for data sharing. 28 Settings About HD-200 HD-100 The About page lists your VidyoRoom model number, serial number, and version. TM 29 Settings System The System page allows you to select between Internal IR Receiver and External IR Receiver. TM 30 Product Specifications 1 2 Available in future version. Support in Point-to-Point calls in future version. HD-200 HD-100 Primary Video Codec H.264 Annex G (SVC) Arithmetic coding H.264 Annex G (SVC) Legacy Video Codec H.264 AVC, H.263+ H.264 AVC, H.263+ via the VidyoGateway Up to HD 720P @ 60FPS Up to HD 720P @ 30FPS Main Video 2 x HD 720P @ 60FPS 1 x HD 720P @ 30FPS Document Video Up to WUXGA (fitted to screen resolution) Up to WUXGA (fitted to screen resolution) Screen Layout and Aspect Ratio Full-Screen, 16:9 Full-Screen, 16:9 Local Preview Supported Supported Multi Participants Views Two Screens - Voice Activated - Continuous Presence - Voice Activated - Continuous Presence Multi Participants Layout Control - Automatic - Manually set the number of viewable sources - Automatic - Manually set the number of viewable sources Dual Screen Support Yes Yes Primary Audio Codec SPEEX Wideband (16KHz), AAC LD1 SPEEX Wideband Legacy Audio Codecs G.711 (A-, μ -Law) G.711 (A-, μ -Law), G.722, via VidyoGateway Video Transmit Max Resolution & Frame Rate Main Video Receive Max Resolution & Frame Rate Audio Remote Unit Management and Control Interface Web-based control via the VidyoPortal Web-based control via the VidyoPortal Software Update Automatic, Downloadable from VidyoPortal Automatic, Downloadable from VidyoPortal TM Continued on next page 31 Product Specifications HD-200 HD-100 Customizable, Multi-language Support and Enterprise Branding1 Customizable, Multi-language Support and Enterprise Branding1 Integrated in Endpoint1 and Through VidyoPortal Integrated in Endpoint1 and Through VidyoPortal User Interface Conference Control Network and IP Protocol SIP RFC 32612 Maximum Data Rate 6 Mbps NAT & Firewall Traversal Supported Encryption AES1 128bit, HTTPS AES1 128bit1 Remote Control Web Interface, IR Remote Control Web Interface, IR Remote Control Supported 1 TM 32 4 Mbps System Specifications HD-200 HD-100 Stand-alone Chassis, (Freestanding or 19” Rack-mountable) Stand-alone Freestanding Chassis Height 3.6” (91mm) 13” (330mm) Width 17.4 (442mm) 3.5” (89mm) Depth 17.1 (434mm) 12.75” (324mm) Gross Weight 32 Lbs (14.5kg) 4.6 Lbs (2.1kg) Form Factor 2U Rackmount Form Factor Dimensions Physical Interfaces Camera In 1 x HD-SDI – BNC 1 x HDMI Camera Control 1 x RS-232 1 x RS-232 (through supplied USB adapter) Video Out 2 x DVI-I 1 x HDMI 2 x VGA (for content) Audio In 2 x RCA (Stereo) 1 x 3.5mm Stereo Jack Audio Out 2 x RCA (Stereo) 1 x 3.5mm Stereo Jack USB-2 4 (2 front, 2 rear) 5 (1 front, 4 rear) Network 2 x Gigabit Ethernet Supports 10BASE-T, 100BASE-TX, and 1000BASE-T, RJ45 outputs 1 x Gigabit Ethernet Supports 10BASE-T, 100BASE-TX, and 1000BASE-T, RJ45 outputs Configuration Display Outputs DVI-I, Up to 2 HD Displays DVI/ HDMI (Plasma/LCD/Projector) Camera (Optional) HD PTZ Camera, HD-SDI Interface Microphones (Optional) USB Echo Cancellation Speaker-phone w/ Noise Suppression Power Supply 520W AC to DC power supply w/ PFC 100 - 240V, 50 - 60Hz, 7 - 3Amp TM 33 Auto-switching 300W AC to DC power supply w/ PFC 100 - 240V, 50 - 60Hz, 4 - 2Amp System Specifications HD-200 HD-100 Operating Temperature Range 10 to 35 °C (50 to 95 °F) 10 to 35 °C (50 to 95 °F) Non-Operating Temperature -40 to 70 °C (-40 to 158 °F) -40 to 70 °C (-40 to 158 °F) Humidity Range 8% to 90% (non-condensing) 8% to 90% (non-condensing) Non-Operating Humidity Range 5% to 95% (non-condensing) 5% to 95% (non-condensing) USA - UL listed, FCC , Canada - CUL listed, Europe/CE Mark EN 60950/IEC 60950-Compliant EMI/EMC: EN55022, EN55024, FCC, VCCI, Australian/ New Zealand, MIC (Korea), Taiwan Operating Environment Regulatory Safety: USA - TUV certified, FCC, Canada - TUV certified, Europe/CE Mark EN 60950/IEC 60950-Compliant China: CCC Certification Environmental: RoHS compliant TM 34 Installation Safety Appendix HD-200 Installation Instructions A. Elevated Operating Ambient – If installed in a closed or multi-unit rack assembly, the operating ambient temperature of the rack environment may be greater than room ambient. Therefore, consideration should be given to installing the equipment in an environment compatible with the maximum ambient temperature (Tma) of 40° C. B. Reduced Air Flow – Installation of the equipment in a rack or cabinet should be such that the amount of airflow required for safe operation of the equipment is not compromised. C. Mechanical Loading – Mounting of the equipment in the rack or cabinet should be such that a hazardous condition is not achieved due to uneven mechanical loading. D. Circuit Overloading – Consideration should be given to the connection of the equipment to the supply circuit and the effect that overloading of the circuits might have on over current protection and supply wiring. Appropriate consideration of equipment nameplate ratings should be used when addressing this concern. E. Reliable Earthing – Reliable earthing of rack-mounted equipment should be maintained. Particular attention should be given to supply connections other than direct connections to the branch circuit. (e.g., use of power strips). F. Redundant Power Supplies – Where redundant power supplies are provided with the equipment, each power supply shall be connected to a separate circuit to optimize the equipment redundancy. G. Servicing – Prior to servicing the equipment, disconnect all power supplies. Additional Warnings Caution: There is danger of explosion if battery is replaced with incorrect type. Replace the battery with the same type recommended by the manufacturer. Dispose of used batteries according to the manufacturer’s instructions. TM 35 Installation Safety Appendix HD-100 Installation Instructions A. Power Supply Cord – The power supply cord is used as the main disconnect device. Ensure that the socket outlet is located/installed near the equipment and is easily accessible. B. Circuit Overloading – This product relies on the building’s installation for short-circuit (overcurrent) protection. Ensure that a fuse or circuit breaker no larger than 120 VAC, 15A U.S. (240 VAC, 10A international) is used on the phase conductors (all current-carrying conductors). Additional Warnings Caution: There is danger of explosion if battery is replaced with incorrect type. Replace the battery with the same type recommended by the manufacturer. Dispose of used batteries according to the manufacturer’s instructions. TM 36