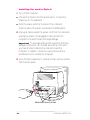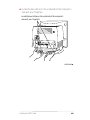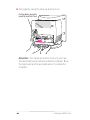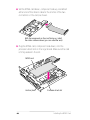
1
Apple MPEG Media System Installation Guide K Apple Computer, Inc. © 1995 Apple Computer, Inc. All rights reserved. Under the copyright laws, this manual may not be copied, in whole or in part, without the written consent of Apple. Your rights to the software are governed by the accompanying software license agreement. The Apple logo is a trademark of Apple Computer, Inc., registered in the U.S. and other countries. Use of the “keyboard” Apple logo (Option-Shift-K) for commercial purposes without the prior written consent of Apple may constitute trademark infringement and unfair competition in violation of federal and state laws. Every effort has been made to ensure that the information in this manual is accurate. Apple is not responsible for printing or clerical errors. Apple Computer, Inc. 1 Infinite Loop Cupertino, CA 95014-2084 (408) 996-1010 Apple, the Apple logo, Macintosh, and Performa are trademarks of Apple Computer, Inc., registered in the U.S. and other countries. Power Macintosh is a trademark of Apple Computer, Inc. Simultaneously published in the United States and Canada. Mention of third-party products is for informational purposes only and constitutes neither an endorsement nor a recommendation. Apple assumes no responsibility with regard to the performance or use of these products. ii C O N T E N T S Communications regulation information iv Introduction 1 1 What you should have 2 2 Installing the MPEG card 3 Installing the card in a modular computer 4 Installing the card in a compact computer 12 3 Installing the software 34 4 Playing digital video with Apple Video Player 36 5 Technical information 39 iii Communications regulation information FCC statement This equipment has been tested and found to comply with the limits for a Class B digital device in accordance with the specifications in Part 15 of FCC rules. See instructions if interference to radio or television reception is suspected. Radio and television interference The equipment described in this manual generates, uses, and can radiate radiofrequency energy. If it is not installed and used properly—that is, in strict accordance with Apple’s instructions—it may cause interference with radio and television reception. This equipment has been tested and found to comply with the limits for a Class B digital device in accordance with the specifications in Part 15 of FCC rules. These specifications are designed to provide reasonable protection against such interference in a residential installation. However, there is no guarantee that interference will not occur in a particular installation. You can determine whether your computer system is causing interference by turning it off. If the interference stops, it was probably caused by the computer or one of the peripheral devices. If your computer system does cause interference to radio or television reception, try to correct the interference by using one or more of the following measures: m Turn the television or radio antenna until the interference stops. m Move the computer to one side or the other of the television or radio. m Move the computer farther away from the television or radio. m Plug the computer into an outlet that is on a different circuit from the television or radio. (That is, make certain the computer and the television or radio are on circuits controlled by different circuit breakers or fuses.) If necessary, consult the service and support information that came with your computer for instructions on how to contact an Apple-authorized service provider or Apple for assistance. Or, contact an experienced radio/television technician for additional suggestions. You may find helpful the following booklet, prepared by the Federal Communications Commission: Interference Handbook (stock number 004-000-00345-4). This booklet is available from the U.S. Government Printing Office, Washington, DC 20402. Important Changes or modifications to this product not authorized by Apple Computer, Inc., could void the FCC Certification and negate your authority to operate the product. iv This product was tested for FCC compliance under conditions that included the use of shielded cables and connectors between system components. It is important that you use shielded cables and connectors to reduce the possibility of causing interference to radios, television sets, and other electronic devices. For Apple peripheral devices, you can obtain the proper shielded cables wherever Apple products are sold. For nonApple peripheral devices, contact the manufacturer or dealer for assistance. DOC statement DOC Class B Compliance This digital apparatus does not exceed the Class B limits for radio noise emissions from digital apparatus set out in the radio interference regulations of the Canadian Department of Communications. Observation des normes—Classe B Le présent appareil numérique n’émet pas de bruits radioélectriques dépassant les limites applicables aux appareils numériques de la Classe B prescrites dans les règlements sur le brouillage radioélectrique édictés par le Ministère des Communications du Canada. VCCI statement v I N T R O D U C T I O N With the Apple MPEG Media System and the Apple Video Player System or TV/Video Player System installed, you can watch MPEG-compressed digital video on your Macintosh computer’s monitor. This manual covers installing the Apple MPEG Media System hardware and software, and takes you through the first steps in opening the software and watching a movie. To use the Apple MPEG Media System, you must have an Apple Macintosh or Power Macintosh computer with an LC processor-direct slot (PDS) and a video input slot. In addition, you must have either the Apple Video System or Apple TV/Video System installed in your computer. The Apple MPEG Media System does not support the Apple LC 630 DOS-compatible computer or the Macintosh Performa 640 DOS-compatible computer. Note: If you purchased your computer with the Apple MPEG Media System already installed, turn to Section 4 of this book, “Playing Digital Video with Apple Video Player.” You can also get onscreen instructions on how to do this by using Apple Video Player Guide. This Guide is your resource for all information about using the Apple Video Player software. To use the Apple Guide, open Apple Video Player and choose Apple Video Player Guide in the Guide (h) menu. See the manual that came with your computer for more information on using Apple Guide. 1 S E C T I O N 1 What You Should Have Check your package to make sure you have both the MPEG card and a ribbon cable. MPEG card 2 Ribbon cable S E C T I O N 2 Installing the MPEG Card Before you can install the MPEG card, the video input card (which comes with the Apple Video System and Apple TV/Video System) must already be installed. If it isn’t, you may want to install the MPEG and video input cards at the same time, since you have to remove the logic board in both cases. (See the Video or TV/Video System User’s Guide for details.) Before you put the logic board back, one step advises you to press the reset button on the board. This sets certain system parameters to their default states: m time and date m mouse tracking m master sound volume m double-click rate m insertion point blink rate m disk cache size m menu blink rate m auto-key threshold and rate m default boot device 3 m alert sound m default highlight color m default AppleTalk or network connection The next time you start your computer, you’ll probably want to reset the system date and time and adjust the other parameters to your liking. To install the MPEG card, you’ll insert it into a slot on the computer’s logic board and then connect it to the video input card. The steps for installing the MPEG card vary slightly depending on whether the computer has a built-in monitor. Installing the card in a modular computer If your system has a separate monitor, like the computer shown below, continue with the steps that follow. If the monitor is built into your computer, go to the next section, “Installing the Card in a Compact Computer.” 4 Installing the MPEG Card To install the MPEG card in a computer with a separate monitor, follow these steps: 1 Turn off the computer. You can do this by choosing Shut Down from the Special menu. 2 Unplug all the cables except the power cord from your computer. Leaving the power cord plugged in until you’re ready to remove the logic board from the computer helps protect the computer from electrostatic discharge damage. To avoid generating static electricity that may damage components, do not walk around the room until you have finished installing the card and closed the computer. In addition, move the logic board as little as possible while it is outside the computer. Important 3 Place your thumbs on the two tabs at the top of the plastic panel, and press down. continues . Installing the MPEG Card 5 4 Pulling gently, swing the panel down and slip it out. Remove the back panel. 5 If there are security screws on the vertical plate on the back of the computer, remove them with a Phillips screwdriver. If there are security screws, remove both screws from the back panel. 6 Unplug the power cord from your computer. Remember: Don’t walk around the room until you have finished installing the card and closed the computer. Move the logic board as little as possible while it’s outside the computer. 6 Installing the MPEG Card 7 Swing the handle out from its storage position, then grasp the handle and gently but firmly pull it toward you. The vertical plate and the logic board to which it’s attached slide all the way out of the computer. Wire handle Pull out the logic board. 8 Remove the MPEG card from its static-proof bag. Hold the card by its edges to avoid touching any connectors. 9 Set the MPEG card down, component side up, and attach either end of the ribbon cable to the shorter of the two connectors on the card, as shown. With the components on the card facing up, install the ribbon cable as shown (you can use either end). continues . Installing the MPEG Card 7 10 Plug the MPEG card, component side down, into the processor-direct slot on the logic board. Make sure the card is firmly seated in the slot. MPEG card Vertical plate 8 Processor-direct slot Installing the MPEG Card 11 Attach the other end of the ribbon cable to the Digital Audio and Video (DAV) connector on the video input card. Video input card DAV connector Ribbon cable connector continues . Installing the MPEG Card 9 12 Slip the base of the logic board into the guide rails inside the computer case and swing the handle back into its storage position. Make sure the logic board slides into the guides on both sides of the computer’s interior. Swing the handle up into its storage position. 13 Press the reset button on the logic board, and then slide the logic board back into the computer case. 1 Press the reset button. 2 Gently but firmly push on the back plate until the logic board is solidly back in place. 10 Installing the MPEG Card 14 If you removed security screws, reinsert and tighten them now. Insert security screws here. 15 Fit the hooks at the base of the plastic back panel into the case. Slip the three hooks on the back panel into the grooves in the computer case. continues . Installing the MPEG Card 11 16 Swing the plastic back panel up and snap it into place. Snap the plastic back panel into place. 17 Reconnect the power cord and any cables you disconnected at the start of this process. To reset the system date and time, as well as other system parameters, see the user’s guide that came with your computer. Installing the card in a compact computer Your compact computer may look like either of the computers pictured on the next page; the steps for installing the card vary slightly depending on which model you have. If your computer looks like Style A, follow the first set of steps to install the MPEG card. If your system looks like Style B, skip to the next section, “Installing the Card in Style B.” 12 Installing the MPEG Card Style A Style B Installing the MPEG Card 13 Installing the card in Style A 1 Turn off the computer. m Choose Shut Down from the Special menu, or press the Power key on the keyboard. m Press the power switch at the back of the computer. Press the side of the switch marked with the j symbol. 2 Unplug all cables except the power cord from the computer. Leaving the power cord plugged in helps protect the computer from electrostatic discharge damage. To avoid generating static electricity that may damage components, do not walk around the room until you have finished installing the card and closed the computer. In addition, move the logic board as little as possible while it is outside the computer. Important 3 Use a Phillips screwdriver to remove the two security screws from the back panel. Remove both security screws. 14 Installing the MPEG Card 4 Locate the two latches on the underside of the computer’s case with your fingertips. Locate the two latches on the underside of the computer’s case with your fingertips. continues . Installing the MPEG Card 15 5 Pulling gently, swing the panel up and slip it out. Pulling gently, swing the panel up, and slip it out. Remember: Don’t walk around the room until you have finished installing the card and closed the computer. Move the logic board as little as possible while it’s outside the computer. 16 Installing the MPEG Card 6 There is a wire handle on the back of the logic board. Swing it down and use it to pull the logic board toward you. Wire handle The logic board is plugged into a slot inside the computer. You may have to brace the computer with your other hand and pull firmly at first. Slide the entire logic board all the way out of the computer. 7 Remove the MPEG card from its static-proof bag. Handle the card by its edges to avoid touching the connectors. continues . Installing the MPEG Card 17 8 Set the MPEG card down, component side up, and attach either end of the ribbon cable to the shorter of the two connectors on the card, as shown. With the components on the card facing up, install the ribbon cable as shown (you can use either end). 9 Plug the MPEG card, component side down, into the processor-direct slot on the logic board. Make sure the card is firmly seated in the slot. MPEG card Vertical plate 18 Processor-direct slot Installing the MPEG Card 10 Attach the other end of the ribbon cable to the Digital Audio and Video (DAV) connector on the video input card. Video input card DAV connector Ribbon cable connector continues . Installing the MPEG Card 19 11 Swing the wire handle on the logic board back up into its storage position, securing it under its catch. Then fit the logic board into the guide rails on both sides of the computer’s interior. Make sure the logic board slides into the guides that are on both sides of the computer’s interior. Swing the handle up, into its storage position. 20 Installing the MPEG Card 12 Press the reset button on the right side of the logic board, then gently but firmly push the board back into place within the computer. You’ll need to push a little harder at the end to make sure the connectors at the back of the board are seated in their slot. 1 Press the reset button (on the main logic board located underneath this edge of the installed card). 2 Gently but firmly push on the back plate until the logic board is solidly back in place. continues . Installing the MPEG Card 21 13 Fit the tabs at the top of the back panel into the case. Slip the three tabs on the back panel into the grooves in the computer case. 14 Snap the bottom of the panel into place, making sure it is flush with the back of the computer. Snap the plastic back panel into place. 22 Installing the MPEG Card 15 Reinsert the security screws on either side of the back panel. Reinsert both security screws. 16 Reconnect any cables you disconnected at the start of this process. To reset the system date and time, as well as other system parameters, see the user’s guide that came with your computer. Skip the steps that follow (“Installing the Card in Style B”) and go on to the section titled “Installing the Software.” Installing the card in Style B 1 Turn off the computer. m Choose Shut Down from the Special menu, or press the Power key on the keyboard. m Press the power switch at the back of the computer. Press the side of the switch marked with the j symbol. continues . Installing the MPEG Card 23 2 Unplug all the cables except the power cord from your computer. Leaving the power cord plugged in helps protect the computer from electrostatic discharge damage. To avoid generating static electricity that may damage components, do not walk around the room until you have finished installing the card and closed the computer. In addition, move the logic board as little as possible while it is outside the computer. Important 3 If there are screws securing the back panel, remove them with a Phillips screwdriver. Then press down with your thumbs to loosen the clips on either side of the back panel. 24 Installing the MPEG Card 4 Pulling gently, swing the panel down and slip it out. continues . Installing the MPEG Card 25 5 Remove both retainer screws from the vertical plate behind the back panel. Remove both retainer screws from the vertical plate. Remember: Don’t walk around the room until you have finished installing the card and closed the computer. Move the logic board as little as possible while it’s outside the computer. 26 Installing the MPEG Card 6 There is a wire handle on the back of the logic board. Swing it down and use it to pull the logic board toward you. Swing down the wire handle, and slide the logic board out of the computer. The logic board is plugged into a slot inside the computer. You may have to brace the computer with your other hand and pull firmly at first. Slide the entire logic board all the way out of the computer. 7 Remove the MPEG card from its static-proof bag. Handle the card by its edges to avoid touching the connectors. continues . Installing the MPEG Card 27 8 Set the MPEG card down, component side up, and attach one end (either end) of the ribbon cable to the shorter of the two connectors on the card, as shown. With the components on the card facing up, install the ribbon cable as shown (you can use either end). 9 Plug the MPEG card, component side down, into the processor-direct slot on the logic board. Make sure the card is firmly seated in the slot. MPEG card Vertical plate 28 Processor-direct slot Installing the MPEG Card 10 Attach the other end of the ribbon cable to the Digital Audio and Video (DAV) connector on the video input card. Video input card DAV connector Ribbon cable connector continues . Installing the MPEG Card 29 11 Swing the wire handle on the logic board back up into its storage position, securing it under its catch. Then fit the logic board into the guide rails on both sides of the computer’s interior. Make sure the logic board slides into the guides that are on both sides of the computer’s interior. Swing the handle up, into its storage position. 30 Installing the MPEG Card 12 Press the reset button on the logic board, then gently but firmly push the board back into place within the computer. You will need to push a little harder at the end to make sure the connectors at the back of the board are seated in their slot. 1 Press the reset button. 2 Gently but firmly push on the vertical plate until the logic board is solidly back in place. continues . Installing the MPEG Card 31 13 Reinsert the retainer screws into the vertical plate on the logic board. Reinsert both retainer screws into the vertical plate. 32 Installing the MPEG Card 14 Slip the tabs at the bottom of the back panel into the matching grooves in the computer case. Then press down on the clips and snap the top of the panel into place, making sure it is flush with the back of the computer. 15 If you removed security screws from the back panel in step 3, reinsert them. 16 Reconnect any cables you disconnected at the start of this process. To reset the system date and time, as well as other system parameters, see the user’s guide that came with your computer. Installing the MPEG Card 33 S E C T I O N 3 Installing the Software The Apple Video Player application program lets you watch video on your computer. Your computer probably already has a version of this program installed, but it may be less recent than the version supplied with the MPEG card. You can determine this for yourself, if you like, as follows: 1 Click the icon for the Apple Video Player program on your computer. 2 Choose Get Info from the File menu. A window appears listing information about the program. Note the version number and repeat these steps for the icon for this program on the Apple MPEG Media System Software CD. If the version on the CD is more recent than the one on your computer, install it to replace the earlier version. 34 Follow these steps to install the software. 1 Start up your computer. 2 Press the Open/Close button on your CD-ROM drive to open the tray. 3 Place the Apple MPEG Media System Software CD into the CD-ROM drive with the disc label facing up. 4 Push the tray in, or press the Open/Close button, to close the tray. 5 Double-click the disc icon to open it. 6 Double-click the Installer icon. 7 Click Install. The program is installed automatically. 8 When the installation is complete, click Restart. Installing the Software 35 S E C T I O N 4 Playing Digital Video With Apple Video Player Below is a short introduction to starting Apple Video Player and playing digital movies. For these steps, you need to have one of the MPEG CDs that came with your Apple MPEG Media System on hand. You can also have Apple Video Player Guide take you through these steps. To do this, double-click the Apple Video Player icon and choose Apple Video Player Guide from the Guide (h) menu. Then follow the instructions in the Guide window that appears. Note: To use Apple Video Player to play a digital movie: 1 Open Apple Video Player by double-clicking its icon. If the Controls window does not appear, choose Show Controls Window from the Windows menu. 2 Insert the MPEG CD into the CD-ROM drive. 36 3 Click the movie projector icon in the Controls window. The Controls window appears and, in a moment, displays playback controls and a pull-down menu of movie selections: Movie Selection pull-down menu 4 Make a selection from the Movie Selection pull-down menu. Sometimes relatively minor sequences, such as copyright information, are listed in this menu as separate files. You may need to make more than one selection to play a sequence you want to watch. The playback controls in this window are similar to those on a typical VCR: Stop Play Pause Eject Step Forward Step Back continues . Playing Digital Video 37 5 Click the Play button. After a moment, the movie should start playing in the Movie window. You can experiment with the playback controls and with the movie position bar (under Position in the Controls window), which you can slide to play a different part of the movie. When you are done, click the Eject button, or press the Open/Close button on your CD-ROM drive, to stop the movie and eject the CD. Some digital movies are divided into “chapters.” Each chapter is a different part of the movie. There is usually a descriptive title for each chapter in the booklet that comes with the movie. When you play such a movie with Apple Video Player, the Position button changes to a pull-down menu of chapter numbers: Note: Click here to select a chapter. To go directly to the beginning of any chapter, select it from this menu. For more information about using Apple Video Player, select Apple Video Player Guide from the Guide (h) menu. (Note: The Apple Video Player program must be open to make Apple Video Player Guide available in the Guide [h] menu.) 38 Playing Digital Video S E C T I O N 5 Technical Information m 24-bit color display m NTSC video playback: 30 frames per second m PAL video playback: 25 frames per second m Film playback: 24 frames per second (at 320 x 240 resolution) m Pixel doubling for full-screen display (up to 640 x 480 resolution) m Sound: 44.1 kHz, 16-bit “CD quality” m Dual frame buffer 39 App Me Installa Apple Computer, Inc. 1 Infinite Loop Cupertino, California 95014-2084 408.996.1010 030-7406-A Printed in U.S.A.