1
Operator's Manual
I r s.. i
I
LAWN TRACTOR
24 HP,* 42" Mower
Electric Start
6-Speed Transaxle
Model No.
917.25432
[_
This product has a low emission engine which operates
ifferently from previously built engines. Before you start the
engine, read and understand this manual.
I
IMPORTANT:
Read and follow all Safety
Rules and Instructions
before
operating this equipment.
Sears Brands Management Corporation, Hoffman Estates,
Visit our Craftsman webslte: www.craftsman.com
The
power
average
r:_ng as declared
gross
power
output
[L 60179 U.S.A,
Dy the engine
at the
spec_hed
manufacturer
RRM
fs the
of a typical
produ&lfon
erlqH3e for the et_glr_ model
measured
us_hg SAE
S[aRd_,rds
for engine
gross
power
F_Jease yefer tO t_B eP, gT4he
m_nu|acturellor detad£
586506726
Rev. 2
Warranty .................................................
Safety Rules ............................................
Product Specifications .............................
AssemblyiPre-Operatlon
.........................
OperatEon .................................................
Maintenance ..........................................
CRAFTSMAN
TWO YEARS
2
3
6
7
9
16
Maintenance
Schedule ..........................
16
Service and Adjustments ....................... 2I
Storage ................................................
27
Troubleshooting
.....................................
28
Sears Service ........................
Back Cover
FULL WARRANTY
ON RIDING
EQUIPMENT
When operated and maintained according
cover defects in matenat and workmanship
the date of purchase
to eli supplied instructlons, Warranty wtll also
of the Frame and Front Axle for five years from
This warranty covers ONLY defects in material and workmanship. Sears will NOT
pay for:
•
•
Expendable
items that become worn dunng normal use, including
blades, spark plugs, air cleaners, belts, and o_1filters.
but not hm_ted to
Standard maintenance servicing, o_1changes, or tune-ups.
Tire replacement
or repair caused by punctures from outside objects, such as na_ls.
thorns, stumps, or glass.
Tire or wheel replacement or repair resulting from normal wear, accident, or fmproper
operation or matntenance.
Repairs necessary because of operator abuse, including but not limited to damage
caused by towing obiects beyond the capabJhty of the riding equipment, impacting
objects that bend the frame or crankshaft, or over-speeding
the engine.
Repairs necessary because of operator negligence, including but not ttmited to, electrical
and mechantcal damage caused by improper storage, failure to use the proper grade
and amount of engine oil, fadure to keep the deck clear of flammable debris, or failure to
malntarn the riding equipment according to the instructions contatned tn the operator's
manual.
•
Engine (fuel system) cleantng or repairs caused by fuel determined to be contaminated
or oxidized (stale]. In general, fuel should be used within 30 days of its purchase date.
Normal deterioration and wear of the exterior ftnishes, or product label replacement.
All rEd,rig equipment and battery warranty
commercial or rental purposes.
This warranty
Brands
_svoid _fth_s product
is ever used for
apphes only wh_le thts product _swlthtn the United States.
This warranty gives you specific
vary from state to state.
Sears
coverage
Management
legal rights, and you may also have other nghts which
Corporation,
Hoffman
Estates,
IL 60179
_DANGER:
This
cutting machine is capable of amputating
hands
throwing objects. Failure to observe the following safety instructions
in serious injury or death.
_WARNING:
In order to prevent accidental starting when setting up. transporting,
adjusting or making repairs, always disconnect spark ptug wire and place wire where
It cannot contact spark plug.
_WARNING:
Do not coast down a hill in
neutral, you may lose control of the tractor.
_WARNING;
Tow only the attachments
that are recommended
by and comply with
spec_hcatlons of the manufacturer
of your
tractor. Use common sense when towing.
Operate only at the lowest possible speed
when on aslope. Too heavy of a load, wh_le
on a slope, _s dangerous.
Tires can lose
traction with the ground and cause you to
lose control of your tractor.
_WARNING:
Engine exhausL some of
its constituents, and certain vehicle components contain or emit chemicals known to
the S_ate of California to cause cancer and
b_rth defects or other reproduchve harm.
_,WARNING:
Battery posts, terminals and
related accessories
contain tead and lead
compounds, chemicals known to the State of
Cahforma to cause cancer and b_rth defects
or other reproductive
harm. Wash hands
after handling.
I. GENERAL
OPERATION
Read, understand, and follow all instructions on the machine and in the manual
before starting.
De not put hands or feet near rotating
parts or under the machine. Keep clear
of the discharge opening at all times.
Only allow responsible adults, who are
familiar with the instructions, to operate
the machine.
Clear the area of objects such as rocks,
toys, wire. etc., which could be Dcked
up and thrown by the blades.
Be sure the area is clear of bystanders
before operating. Stop machine if anyone
enters the area.
Never carry passengers.
Do not mow in reverse unless absolutely
necessary. Always look down and behind
before and while backing.
and feet and
could result
Never direct d_scharged material toward
anyone.
Avoid discharging
material
against a wall or obstruction.
Material
may ricochet back toward the operator.
Stop the blades when crossing gravel
surfaces.
Do not operate machine without the entire grass catcher, discharge chute, or
other safety devices In place and working,
Slow down before turning.
Never leave a running machine unattended.
Always turn off blades, set
parking brake, stop engine, and remove
keys before dismounting.
Disengage
blades when not mowing
Shut off engine and walt for all parts to
come to a complete stop before cleamng
the machine, removing the grass catcher,
or unclogging the discharge chute.
Operate machine onty _ndaylig ht or good
artificial light.
Do not operate the machine wMe under
the _nfluence of alcohol or drugs.
Watch for traffic when operahng near or
crossing roadways,
Use extra care when loading or unloading
the machine into a trailer or truck.
Always wear eye protection when operating machine,
Use ear protectors to avoid damage to
hearing,
Data indicates that operators, age 60
years and above, are involved in a large
percentage of nding mower-related iniunes. These operators should evaiuate
their ability to operate the nd_ng mower
safely enough to protect themselves and
others from serious injury.
Followthe manufacturer's recommendation for wheel weights or counterweights,
Keep machine free of grass, leaves or
other debris build-up which can to uch hot
exhaust / engine parts and burn. Do not
allow the mower to plow leaves or other
debris which can cause build-up to occur, Clean any oil or fuel sDllage before
operating or stenng the machine. Allow
machine to cool before storage.
11,
SLOPE
OPERATION
Slopes are a major factor related to toss of
control and t_p-over accidents, which can
result in severe _njury or death. Operation
on a!l slopes requtres extra caution. If you
cannot back up the slope or _fyou feel uneasy
on _t,do not mow it.
Mow up and down slopes, not across.
• Watch for holes, ruts, bumps, rocks, or
other hidden objects.
Uneven terrain
could overturn the machine,
Tall grass
can hide obstacles.
Choose a low ground speed so that you
will not have to stop or sh_ft white on the
slope,
* Do not mow on wet grass. Tires may !ose
traction.
Always keep the machine in gear when
going down slopes, Do not sh_ftto neutral
and coast downhill.
Avoid starting, stopping, or turning on a
slope, lfthetireslosetractlon,
dtsengage
the blades and proceed slowly straight
down the slope.
•
Keep all movement on the slopes slow
and gradual.
Do not make sudden
changes
in speed or direction, which
could cause the machine to roll over.
Use extra care while operating machine
with grass catchers orother attachments,
they can affect the stability of the machine. Do no use on steep s{opes.
Do not try to stabilize the machine by
putting your foot on the ground.
Do not mow near drop-offs, ditches,
or embankments.
The machine could
suddeniy roll over if a wheel _s over the
edge or if the edge caves in.
i11. CHILDREN
_WARNING:
CHILDREN CAN BE INJURED
BY THIS EQUIPMENT The Amencan Academy of Pediatrics recommends that children
be a m_ntmum of 12 year of age before operating a pedestrian con[roiled Fawn mower
and a minimum of 16 years of age before
operatIng a ndmg fawn mower,
Tragic acctden[s can occur if [he
is not alert to the presence of
Ch_fdren are often attracted to the
and the mowing activtty,
Never
that children will remain where
saw them.
operator
children.
machine
assume
you last
Keep chddren out of the mow_ng area
and m the watchful care era responsEble
adult other than the operator.
Be alert and turn machine off if a chdd
enters the area.
Before and while backing, look behind
and down for small children.
Never carry children, even with th e blades
shut off. They may fall off and be seriously
injured or interfere with safe machine
operation. Children who have been given
rides In the past may suddenly appear in
the mowing area for another ride and be
run over or backed over by the machine,
Never allow children to operate the machine.
Use extra care when approaching blind
corners, shrubs, trees, or other objects
that may block your view of a chdd.
IV. TOWING
•
•
Tow only with a machine that has a hitch
designed for towing. Do not attach towed
equipment except at the hitch point.
Followthemanufacturer'srecommendauonfor weight hm_ts for towed equipment
and towing on slopes.
Never allow children or others in or on
towed equipment.
Onslopes, the weight ofthe towed equipment may cause loss of tractron and loss
of control.
Travel slowly and allow extra distance to
stop.
V, SERVICE
SAFE HANDLING
OF GASOLINE
To avoid personal injury or property damage, use extreme care in handling gasohne.
Gasohne _s extremely flammable and the
vapors are explosive.
Extinguish alt cigarettes, cigars, p_pes,
and other sources of ignit_on.
• Use only approved gasoline container.
Never remove gas cap or add fuel w_th
the engine running. Allow engine to cool
before refueling.
Never fue! the machine _ndoors.
Never store the machine or fuel container
where there _san open flame, sped<, or
pl{ot light such as on a water heater or
other appliances.
•
Never flit containers inside a vehicle or
on a truck or trailer bed with piashc liner.
Always place containers on the ground
away from your vehicle when fiJltng.
Remove
gas-powered
equipment
from
thetruckortrailerandrefuei
it onthe
ground,
ifthisisnotpossible,
thenrefuel
such
equlpmentw_th
aportable
container,
ratherthanfroma gasoline
dispenser
nozzle.
Keep
thenozzle
_ncontact
w_th
therim
ofthefueltankorcontainer
opening
at
alltimesuntil
fueling
iscomplete,
Donot
usea nozzle
lock-open
device.
Iffuelisspilled
onclothing,
change
clothing_mmediately.
Never
overfill
fueltank.Replace
gascap
andughten
securely.
GENERALSERVICE
*
Neveroperate
machine in a closed area.
Keep al! nuts and bolts t_ght to be sure the
equipment is _nsafe working condthon.
Maintain or replace safety and instruchon
labels, as necessary.
Be sure the area is clear of bystanders
before operating. Stop machine #anyone
enters the area.
Never carry passengers.
Do not mow in reverse unless absolutely
necessary Always look down and behind
betore and while backing.
Never carry children,
even with the
blades shut off. They may fall off and
be senously injured or interfere with safe
machine operation, Chddren who have
been g_ven r_des in the past may suddenly
appear _n the mowing area for another
ride and be run over or backed over by
the machine.
Keep children out of the mowing area
and _nthe watchful care of a responsible
adutt other than the operator.
Never tamper with safety devices. Check
their proper operation regularly.
Keep machine free of grass, leaves, or
other debris build-up, Clean oil or fuel
spillage and remove any fuel-soaked debris. Allow machine to cool before stonng,
If you stnke a foreign oblect, stop and
inspect the machine. Repair, if necessary,
before restarting.
Never make any adiustments or repairs
with the engine running.
Check grass catcher components and the
discharge chute frequently and replace
with manufacturer's recommended parts r
when necessary.
Mower blades are sharp. Wrap the blade
or wear gloves, and use extra caution
when servicing them.
Check brake operation frequently. Adjust
and service as required,
Be alert and turn machine off _f a child
enters the area.
Before and while backing, took behind
and down for small cMdren.
Mow up and down slopes (15" Max), not
across,
Choose a low ground speed so that you
w_ll not have to stop or shift while on the
slope.
Avoid starting, stopping, or turning on a
slope, lfthetlres Iosetraction, d_sengage
the blades and proceed slowly straight
down the slope.
If machine
stops while going uphill,
disengage blades, shift into reverse and
back down slowly.
Do not turn on slopes unless necessary,
and then, turn slowly and gradually
downhill, if possible.
When loading or unloading this machine,
do not exceed the maximum
recommended operation angle of 15 °.
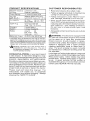
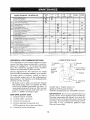
PRODUCT
SPECIFICATIONS
CUSTOMER
Gasohne Capacrty 3 GaIi_ns/t 1,35 L
and type
Regular UnleadedlPower
Rating"
SAE 30 _abeve32_Ft0_C)
S_E 5W30 Ibelow 32"F/0"C)
W.,Rlter
64 Oz '1.96 L
W/out FEIter 60 Qz/t,77
L
Spark Plug
Champion 696798
tGap
030" / 0 76 ram)
ChargEng
System
3 Amps Battery
5 Amps HeadlEghts
Battery
Amp/Hr
Mtn CCA
Case s_ze
28
230
U1R
• Always let someone
mow_ng.
The power ratEng as declared
by the engine manufacturer is the averagegross poweroutputatthe spectfJed
RPMofatyptcal production eng¢_eforthe enginemode{
measuredusingSAEStandardsfor enginegrosspower.
Pleaserefer to the engLnemanufacturerfor deta(_s
contalmng
up to 10% ethanol tel0) _s
for use in this machine
Tr_e use of
any gasohne exceedtng
10% ethanol
vo_d the product warranty.
(EI01
_nmamta_nlng,
tractor.
"Maintenance"
th_s manual.
• Wear proper Personal Protectwe Equipment (PPE) while operahng [hEs machine,
Including (at a minEmum) sturdy footwear
eye protection, and heartng protechen.
Do not mow in shorts and/or open toed
footwear.
Blade Bolt Torque 45-55 Ft. Lbs _62-75Nm
acceptable
the safety rules.
• Follow a regular schedule
caring for and using your
• Follow anstructtons under
and "S_orage" sections of
t 7 5 K-"W@ 3400 RF'M
eLI Type
(API SG-SLI
Q_tCapactty
"l'_lkGasehne
RESPONSIBILITIES
• Read and observe
w_ll
_<nowyou are outside
_,WARNING:
Th_s tractor _sequipped with
at_ internal combustion engine and should
not be usect on or near any unimproved
forest-covered,
brush-covered
or grasscovered land unless the engine's exhaust
system is equipped with a spark arrestor
meeting apphcable local or state laws (If
any). [f a spark arrester is used, It should
be maintained tn effective working order by
the operator.
In the state of Cahfornia the above is req ulred
by law (Section 4442 of the Caltfornla Pubhc
Resources Code). Other states may have
stmilar taws. Federal laws apply on federal
lands. A spark arrester for the muffler ts
ava ilablethrough your nearest Sears service
center (See REPAIR PARTS manual).
CONGRATULATIONS
on your purchase of
a new tractor. It has been deslgnedr enginee red and manufactured to give you the best
possible dependabih:y
and performance.
Should you experience any problem you cannot easily remedy, please contact a Sears or
other qualified servicecenter,
We have competent, well-trained representati,!es
and the
proper tools to service or repair th_s tractor.
PIease read and retain this manual.
The
instructions
w_ll enable you to assemble
and maintain your tractor properly. Always
observe the "SAFETY RULES",
6
Keys
Slope
Sheet
(2) Keys
Your new tractor has been assembled
unassembled for shipping purposes.
TOOLS REQUIRED
at the factory with the exception
of those parts left
FOR ASSEMBLY
A socket wrench set will make assembly
eas_er. Standard wrench sizes are l_sted.
(1) 1/2" wrench
Tire pressure
(2) 7116" wrenches
Pliers
Utility knife
Label
gauge
When righ_ or left hand is mentioned in this
manual, itmeans whenyou arelntheoperating
position {seated behind the steering wheel),
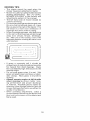
TO REMOVE
CARTON
UNPACK
TRACTOR
FROM
CARTON
Remove all accessible loose parts and
parts cartons from carton.
Cut along dotted lines on all four panels of carton. Remove end panels and
lay side panels fiat.
Check for any additional loose parts or
cartons and remove.
BEFORE REMOVING
FROM SKID
TO CHECK
1,
l
[-
<-.
TRACTOR
BATTERY
Lift hood to raised position.
NOTE: If th_s battery _sput into service after
month and year _nd_cated on taoel (labe{ is
located between _erminals) charge battery
for m_nimum of one hour at 6-10 arabs. (See
"BATTERY" in Maintenance
section of this
manual for charging instructions),
*
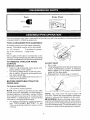
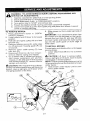
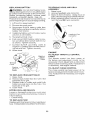
ADJUST SEAT
l. Satin seat.
2. Lift up adjustment lever (A) and slide seat
until a comfortable position is reached
which allows you to press clutch/brake
pedal all the way down.
3. Release lever to lock seat in posit_on.
For battery, and battery cable installahon
see "REPLACING
BATTERY"
_n the
"Service and Adjustments" section in this
manual.
NOTE: You may now roll your tractor off
the skid. Follow the appropnate
instruchor_
below to remove the tractor from the skid.
_kWARNING:
Before start{ng, read, understand and follow al! instructions in the Operatlon sec[ion of this manual. Ensure trac_or _sIn
a well-ventilated area, Ens ure the area in front
of tractor is clear of other people and objects,
NOTE:
Youmaynowrollyourtractor
offthe
,!CHECKLIST
skid.Continue
ustngtheinstructions
that Before you operate your new tractor, we
follow
toremove
thetractor
fromtheskid. wish to ensure that you receive the best
WARNING:
Before
starting,
read,un- performance and satisfaction from th_s
derstand
andfollowallinstructions
inthe Quality Product.
Operation
section
ofth_smanual.
Besure Please rewew the following checkiist:
tractor
IS_nawefl-ventdated
area.Besure ,/Alt assembly instructions have been comtheareain frontoftractor
_sc{ear
ofother pleted,
people
andobjects.
v" No remaining loose parts _n carton.
TOROLLTRACTOR
OFFSKID(See ,/Battery is properly prepared and charged.
Operationsectionfor locationand ,/Seat _sadjusted comfortably and tfg hte ned
securely,
functionofcontrols)
tires are properly inflated.
(For shEp1, Raise
attachment
liftlever
toitshighest¢" All
ping purposes, the tires were overinflated
position.
2. Release
parking
brakebydepressing at the factory).
¢" Ensure mower deck is properly leveled
clutch!brake
pedal.
for best cueing
3. Place
gearshift
lever
Inneutral
position. side-to-sideifront-te-rear
results. (Tires must be properly inftated
4. Rolltractor
forward
offskid.
5, Remove
banding
holding
thedeflector for levehng).
,/Check
mower and dnve belts. Ensure
shield
upagainst
tractor.
Continue
withtheinstructions
thatfollow. they are routed properly around pulleys
and inside all belt keepers.
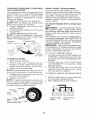
CHECK
TIREPRESSURE
v" Check w_rEng. See that all connections
Theflresonyourtractor
wereeve
nnflated
at are stitl secure and w_res are properly
thefactory
for.shipping
purposes.
Correct clamped.
tirepressure
is _mportant for best cutting
Whtle learning how to use your tractor, pay
performance,
• Reduce tire pressure
[ires.
to PSI shown
on
CHECK
DECK
For best
should be
MOWER"
section of
cutting results, mower housing
properly leveled. See 'TO LEVEL
tn the Servtce and Adjustments
th_s manual
CHECK
FOR
ALL BELTS
LEVELNESS
PROPER
POSITION
OF
See the figures that are shown for replacing motion and mower blade dnve belts _n
the Service and Adjustments section of this
manual.
Verify that the belts are routed
correctly.
CHECK
BRAKE
SYSTEM
After you learn how to operate your tractor,
check to see that the brake is operating
properly, See "TO CHECK BRAKE" in the
Service and Adjustments
section of this
manual,
extra atXent_on to the following important
_tems'
•/ Engine otl is at proper level.
,/Fuel tank _sfilled w_th fresh, clean, reguIar
unleaded gasoline.
,/Become
familEar wtth all comrois, [herr Iocahon and function. Operate them before
you start the engine.
v' Ensure brake system is tn safe operatHlg
condition.
v" Ensure Operator Presence System and
Reverse Operal:lon System (ROSI are
working properly (See the Operation and
Maintenance secttons in [h_s manual).
These
symbols
mayappear
onyourtractor
orinliterature
supplied
withtheproduct.
Learn
andunderstand
theirmeaning.
R
N
REVERSE
NEUTRAL
H
L
Ikl
HIGH
LOW
CHOKE
FAST
@
ENGINE
OFF
ENGINE
START
ENGINE
ON
IklH
REVERSE
FORWARD
IGNITION
SWITCH
@} @
PARKING
BRAKE
CLUTCH/
BRAKE
PEDAL
DIFFERENT[AL
LOCK
®,u
REVERSE
OPERATION
SYSTEM (ROS)
SLOW
MOWER
HEIGHT
MOWER
LIFT
o
CRUISE CONTROL
FUEL
LIGHTS ON
BATTERY
EAR
PROTECTION
REOU1RED
®@@@@
ATTACHMENT
CLUTCH
DISENGAGED
A'N'ACHMENT
CLUTCH
ENGAGED
&
&
&
FREEWHEEL
)Automatic
Models
only)
KEEP AREA CLEAR
SLOPE HAZARDS
{SEE SAFETY RULES SECTION)
DANGER, KEEP
HANDS AND
FEET AWAY
DANGER
will
indicates
a hazard
result in death
WARNING
_ndlcates
could result
CAUTION
might
a hazard
In death
_ndlcates
result
wnlcr=, if not avoided
or serious
injury.
wr_leh, if not avmoed,
or serious
injury.
a hazard which
in minor
or moderate
tf Dot avoided
injury.
CAUTION when used without
me alert symbol,
JndLcates a situation that could result in damage
Faliure to follow instructions
could result tn senous
to the tractor
injury or
HOT SURFACES
death. The safety alert symbol
is used to _dentffy safety information about hazards which can
result _n death,
and:or property
serious
damage.
injury
and/or
,lll_tlll,lllu,I
engine.
tnd=cates
=1ROt avoided,
could
inluqi
property
and/or
FIRE indicates
could
property
result
result
a hazard
in death,
damage.
a hazard
In death,
wh{cn,
serious
damage.
which,
serious
_f rxot avoided,
injury
and/or
KNOW
YOUR
TRACTOR
READ THIS MANUAL
AND SAFETY
RULES
BEFORE
OPERATING
YOUR TRACTOR
Compare the illustrations with your tractor to familiarize yourself with the locations
vanous controls and adjustments
Save this manual for future reference.
i
Our tractors
,i
conform to the applicable safety standards
American National Standards Institute.
(A) ATTACHMENT
LIFT LEVER - Used to
raise and lower the mower or other attachments mounted to your tractor.
of
of the
(F) IGNITION SWITCH - Used for starting
and stopping the engine.
(G} REVERSE
OPERATION
SYSTEM
(ROS) "ON" POSITION - Allows operation
of mower or other powered attachment white
(B) CLUTCH/BRAKE
PEDAL -Used for
declutch_ng and braking the tractor and
starting the engine.
IR reverse.
(C) PARKING BRAKE _ Locks clutch/brake
pedal into the brake posItion.
(H) LIGHT SWITCH
on and off.
(D) THROTTLE/CHOKE
CONTROLUsed
for starting and controlling engine speed,
(J) GEARSHIFT LEVER- Selects the speed
and direction of tractor.
(E) ATTACHMENT
CLUTCH LEVER - Used
to eng age the mower blades, or other attachmerits mounted to your tractor.
(P) SERVICE MINDERiHOUR
METER Indicates when service _s required for the
engine and mower.
10
- Turns the headhghts
The operation of any tractor can result in foreign objects thrown into the
eyes, which can result in severe eye damage. Always wear safety glasses
or eye shields while operating your tractor or performing any adjustments
or repa;rs. We recommend standard safety glasses or a wide vision safety
mask worn over spectacles.
HOW
TO USE YOUR
TO SET PARKING
ENGINE
TRACTOR
Your tractor ts equipped with an operator
presence sensing
sw_tch. When engme
is running, any attempt by the operator to
leave the seat wlthoutflrst seltingthe parking
brake w_ll shut off the engine,
1, Depress clutchfbrake
pedal (B) a!l the
way down and hold.
2. Pull parkmg brake lever (C) up and hold,
release pressure from clutchlbrake pedal
(B), then release parking brake tever. Pedal should remain in brake position. Ensure
parking brake wilt hold tractor secure.
to slow position and atlowlng engine to
idle before stopping may cause engine to
"backfi re".
* Turn ignition key (F) to "STOP" poslbon
and remove key. Always remove keywhen
leavt ng tractor to p revent unauthonzed use.
• Never use choke to stop engine.
, Z-:
.
. t.t__ "
..,.(c)-s
[/?
':',;4_',<,J "L
-
'-"
BLADES
CONTROL
(D)
Always operate engine at full speed (fast).
• Operating engine at less than ful! speed
(fast) red uces engine's operating efficiency.
• Full speed (fast) offers the best mower
performance.
-
• To stop mower blades, move attachment
clutch control to disengaged position (r_).
l .. iI :iii
J
',i>...
"--T._),
(1"_1) Attachment
Clutch Contro]
"Engaged ....
IMPORTANT: Leavmg the _gnition switch in
any positaon other than "STOP" will cause the
battery to discharge and go dead,
NOTE: Under certain conditions when tracto r
ts standing tdle with the engme runmng, hot
engine exhaust gases may cause "brownmg'' of grass. To eliminate this poss_bihty,
always stop engine when stopping tractor
on grass areas.
_i_ CAUTION:
Always stop tractor completely, as described above, before leaving
the operator's position.
TO USE THROTTLE
STOPPING
MOWER
-
• Move throttle control (D) to slow position.
NOTE;
Failure to move throttle control
BRAKE
(t_)
Attachment
Clutch Control
Disengaged"
GROUND DRIVE • To stop ground dnve, depress brake pedal
all the way down.
• Move gearshift lever to neutral posmon.
1!
TO MOVE
FORWARD
AND BACKWARD
The d{rectlon and speed of movement
controlled by the gearshift lever (J},
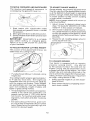
TO ADJUST
is
"-_L
GAUGE WHEELS
Gauge wheels are properly adjusted when
_hey are shghtly off the ground when mower
ts at the desired CUttEng height _noperating
posit_on. Gauge wheels then keep the deck
_n proper posttton to help prevent scalping
in most terrain conditions,
NOTE: Adjust gauge wheels with tractor on
a flat lave] surface,
_--J2"- "-
1. Adjust mower to desired cu_ng height
(See "TO ADJUST MOWER CUTTING
HEIGHT" in this sectton of manuall.
<
Start tractor with clutch/brake
pedal
depressed and gearshift lever =nneutral
(N) posiuon.
2. Move gearshift leverto desired pos_tion,
3, Slowly release clutch/brake pedalto start
movement.
IMPORTANT:
Bnng tractor to a complete
stop before shifting
or changing
gears.
Fadure to do so will shorten the useful life
of your transaxle.
2. W_th mower tn desired height of cut posit_on, gauge wheels should be assembled
so they are stightly oflthe ground, install
gauge wheel in appropriate hoie, Tighten
secureiy.
3.
Repeat for all, installing gauge wheel in
same adjustment hole_
r
TO ADJUST
MOWER
CUFFING
The position of tile attachment
determines the cutting height.
I ._.
HEIGHT
hft _ever (A)
"°
]
TO OPERATE
• Put attachment
height slot.
hft _ever _ndesired
MOWER
Your tractor is equipped with an operator
presence
sensing
switch,
Any attempt
by the operator to leave the seat with [he
engine running and the attachment clutch
engaged wtli shut off the engine. You must
remain fully and centrally positioned tn the
seat to preven[the engtne from hes_tahng or
cutting off when operating your equipment
on rough, rolling terrain or hills.
cutting
The cutting height range is approxtmately
1
to 4" (25,4 to 101,6 mm), The heights are
measured from the ground to the blade tip
with the engine not running, These heiglqts
are approximate
and may vary dependtng
upon soil conditions,
height of grass and
types of grass being mowed.
1
Select destred height of cut with attachment hfl lever.
2. Start mower blades by engagtng attachmerit clutch control,
, The average lawn should be cut to approximately 2-1/2" (63,5 mm) during the cool
season and to over 3" (76,2 ram) during
hot months. For heakh[er and better looking tawns, mow often and after moderate
growth.
• For best cutttng performance,
grass over
6" (152,4 ram) in height should be mowed
[w_ce. Make the first cut rela[wely hEgh, the
second to desired Iqelght,
!2
TO STOP MOWER
D_sengage
BLADES
attachment
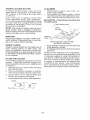
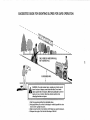
TO OPERATE ON HILLS
_,WARNING:
Do not dnve up or down
hills with slopes greater than 15 ° and do
not drive across any slope, Use the slope
guide provided at the back of this manual.
• Choosetheslowestspeed
beforestarting
up or down hills,
• Avoid stopping or changing speed on hills.
• If stopping is absolutely necessary, push
clutch/brake pedal quickly to brake position and engage parking brake.
• Move gearshift lever to 1st gear. Ensure
you have allowed room for tractor to roll
shghtty as you restart movement.
* To restart movement, slowly release parking brake and clutch/brake pedal.
• Make all turns slowly.
clutch control.
_kCAUTION:
Do not operate the mower
without e_ther the entire grass catcher, on
mowers so equipped, orthe deflector shield
in place.
i
, ,,-
"/'
"q
TO TRANSPORT
REVERSE OPERATION SYSTEM (ROS)
Your tractor is equipped with a Reverse
Operation System (ROS). Any attempt by
the operator to travel in the reverse direction
with the attachment clutch engaged wdl shut
off the engine unless tgnit{on key is placed
in _he ROS "ON" position.
1. Raise attachment lift lever to its highest.
2. When pushing or towing your tractor, be
sure gearshift lever is in neutra{ posttion.
• Do not push or tow tractor at more than
five (5) mph (8 kmih}.
NOTE. To protect hood from damage when
transporting your tractor on atruck or atrailer,
be sure hood is closed and secured totractor.
Use an appropriate means of tying hood to
tractor (rope, cord, etc.).
_WARNING:
Backing up with the attachment clutch engaged while mowing is
strongly discouraged. Turning the RQS "ON",
to allow reverse operation with the attachment clutch engaged, shoutd only be done
when the operator dec_des it _snecessary to
reposlt_on the machtne w_th the attachment
engaged
Do not mow in reverse unless
absolutely
necessary.
USING
THE
SYSTEM -
REVERSE
TOWING CARTS AND OTHER ATTACHMENTS
Tow only the attachments
that are recommended by and comply with specifications
of the manufacturer
of your tractor. Use
common sense when towing. Too heavy of
a load, while on a slope, Is dangerous. Tires
can lose traction with the ground and cause
you to lose control of your tractor.
OPERATION
Only use ff you are certain no children or
other bystanders will enter the mowing area.
l. Depress clutch/brake pedal aif the way
down and hold.
2. W_th engtne running, turn _gnit_on key
counterclockwise
to ROS "ON _'pos_t_on.
3. Look down and behind before and while
backing.
4. Move gear shift lever to reverse (R}
posit{on and siowly release clutch/brake
pedal to start movemen:.
5. When use of the RQS is no longer
needed, wrn the ignition key clockwise
to engine "ON" position.
ROS "ON" Poskt_on
SERVICE
MINDERiHOUR
METER
Service Minder shows the total number of
hours the engine has run and indicates when
the engine or mower needs servicing, After
every 50 hours of operation the olf can icon
will stay on for 2 hours or until a manual reset
occurs, To reset the display manually turn
the ignition switch to the on posit_on, then
the off position five times (l second on, I
second off). To service engine and mower,
see the Maintenance section of this manual.
NOTE: Service M[nder
key is in any posttion
cu rate reading, ensure
"STOP" position when
Engine "ON" Position
(Normal Operating}
13
runs when the ignition
but "STOP". For acthe key remains tn the
engine is not running,
BEFORE
CHECK
STARTING
ENGINE
THE
ENGINE
TO START
OIL LEVEL
The engine in your tractor has been shipped
from the factory already filled w_th summer
weight oil,
1. Check engrne otl wtth tractor on level
ground.
2. Remove etl fiTI cap!dipstick
and wipe
clean, re_nsert the dtpstEck and screw cap
tight, wa_t for a few seconds, remove and
read oi! level. If necessary, add oil unttl
"FULL' mark on d_pstick is reached. Do
not overfill.
• For cold weather operation you should
change oil for easier starting (See the o_1
viscosity chart in the Maintenance sechon
of this manual).
• To change engine oil, see the Maintenance
section in this manual.
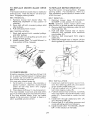
ADD
ENGINE
When starting the engine for the first hme or
if the engine has run out of fuel, _tw_ll take
extra cranking time to move fuel from the
tank to the engine.
GASOLINE
• Fill fuel tank to bottom of filler neck. Do
not overfill.
Use fresh, clean, regular
gasoltne wtth a mtnimum of 87 octane.
Do not mix oil wrth gasohne.
Purchase
fuel in quamitles that can be used wtth_n
0 days to ensure fuel freshness.
CAUTION: Wipe off any spilled oil or fuel.
Do not store, sp_ll or use gasohne near an
open flame.
1. Sit on seat In operating pos_hon, depress
clutch/brake pedal and set parking brake.
2.
Place gearshift
3.
Move attachment
positron.
lever _nneutral posttion.
4.
Move throttle control to dqoke pos_uon
clutch to disengaged
NOTE: Before starting, read the warm and
cold starting procedures below.
5,
insert key _nto fgnition and turn key
clockwise to start posklon and release
key as soon as engine starts. Do not run
starter continuously for more than f_fteen
seconds per minute. If the engine does
not start after several attempts, move
throttle control to fast position, watt a
few minutes and try again, If engine sttll
does not start, move the throttle control
back to the choke positron and retry.
WARM WEATHER
STARTING
(50°F (10°C) and above)
IMPORTANT:
When operating Lntemperatures below 32°F (0°C), use fresh, clean
winter grade gasoline to help ensure good
cofd weather starting,
6. When engine starts, move the throttle
control to the fast position.
• The attachments
and ground drive
can now be used. If the engine does
not accept the load, restart the engine
and aliow it to warm up for one m_nute
using the choke as described above.
_IbCAUTION:
COLD WEATHER
Alcohol blendedfuels
(called
gasohel or us{rig ethanol or methanol) can
attract moisture which leads to separatton
and formation of acids dunng storage. Acidic
gas can damage the fuel system of an engine
while in storage. To avoid engine problems.
the fuel system should be emptied before
storage of 30 days or longer, Dram the gas
tank, start the engine and let _t run unttt the
fuel Itnes and carburetor are empty.
Use
fresh fuel nextseason.
See Storage Instructtons for additional _nformatlon. Never use
engine or carburetor cleaner products in the
fuef tank or permanent damage may occur,
Fuel stabihzer is an acceptab{e alternative _n
m tnlmizt ng the fo rm art on of fuel g um deposits
dunng storage. Add stabd_zer to gasoline in
fuel tank or storage container. Always follow
the mix ratio found on stabihzer container.
Run engine a_ least 10 minutes after adding
stabilizer to allow the stabilizer to reach the
carburetor.
Do not empty the gas tank and
carburetor if using fuel s_ab_lizer.
14
(50°F (I0°C)
STARTING
and below)
6. When engine starts, leave throttle control
_nchoke poslt_on until engine warms up
and begins to run roughly. Once rough
running begins, immediately
move the
throttle controito the fast posttlon. Engine
warm-up may take from several seconds
to severat m_nutes (the colder the temperature, the longer the warm-up).
• The attachments
can also be used
during the engtne warm-up period
MOWING
TIPS
• Tire chains cannot
•
•
•
•
be used when
the
mower housing is attached to tractor.
Mower should be properly leveled for best
mowing performance.
See "TO LEVEL
MOWER HOUSING" in the Service and
Adjustments section of this manual.
The left hand side of mower should be
used for trimming,
Drivesothatctipptngs
are dischargedonto
the area that has already been cut. Have
the cut area to the right of the tractor. Th_s
will result m a more even d_stribution of
chppings and more uniform cutting.
When mowing large areas, start by turning
to the right so that chppings will discharge
away from shrubs, fences, driveways,
etc. After one or two rounds, mow m the
opposite direction making left hand turns
untJt ftntshed.
f
p
J
J
• If grass is extremely tall, it should be
mowed twice to reduce load and possible
fire hazard from dned chppings.
Make
first cut relatively hgh; the second to the
desired height.
• Do not mew grass when it is wet. Wet
grass will plug mower and leave undesirable clumps.
Allow grass to dry before
mowing.
• Always operate engine at full throttle
when mowing
to ensure better mowing performance
and proper discharge
of material.
Regulate ground speed by
selecting a tow enough speed to gtve the
mower cutttng performance as well as the
quahty of cut desired.
• When operating attachments,
select a
ground speed that will suit the terrain and
gwe best performance of the attachment
betng used.
15
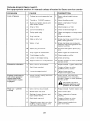
GENERAL
LUBRICATION CHART
RECOMMENDATIONS
The warranty on th_s tractor does not cover
items that have been subiected to oper&tor
abuse or negligence.
To recewe full value
from the warranty, operator must maintain
tractor as _nstructed _nthis manual.
"_; Spindle_--__-'lr---_
Zerk
,'::_ ......
Front _-_J'_=_="_" "_,_<2"_
Front Wheat
Wheel
,-_
_
_
Bearing Zerk
Beanna
_'_f ........... _ _.-'."_
zerk _
" i _ :_ ,I i "-_"X Engine
Some adlus[ments
wilt need to be made
periodicallyto
properly maintain your tractor.
At least once a season, check to see if
you should make any of the adjustments
described
_n the Service and Adlustments
section of this manual.
P
.........
, At least once a year you should replace
the spark plug, clean or replace a_r filter,
and check blades and belts for wear. A
new spark plug and clean a_r filter assure
proper air-fuel m_xture and help your engine run better and fast longer.
BEFORE
EACH
Check engine oil level.
2,
Check brake operation.
3.
Check tire pressure.
4.
Check operator
5.
ROS systems for proper operabon.
Check for loose fasteners,
presence
?""i
Pivots
@,SAE 30 or 10w30 motor o_I
,_)General Purpose Grease
L_3}Refer_o Maintenance "ENGINE"
Section.
IMPORTANT:
Do not oil or grease tt_e pivot
points which have special nylon beanngs.
Viscous lubricants wd/attract dust and dirt
that wilt shorten the life of the self-lubncatmg
bearings. If you feelthey must be lubricated,
use only a dry, powdered graphite type
lubncant spanngly.
USE
l,
Spindle
_['_ Zerk
and
16
TRACTOR
Always observe safety rules when performing any maintenance.
BRAKE OPERATION
If tractor requires more than 5 feet (1,5 m)
to stop at highest speed in highest gear on
a level, dry concrete or paved surface, then
brake must be serviced. (See "TO CHECK
BRAKE" _n the Service and Adjustments
section of this manual).
TIRES
BLADE
• Maintain proper a_r pressure in all tires
(See the side of tires for proper PSi.)
• Keep tires free of gasoline, oil, or insect
control chemicals which can harm rubber.
_CAUTION:
Use onIy a replacement blade
approved bythe manufacturer of your tractor.
Using a btade not approved by the manufacturer of your tractor is hazardous, could
damage your tractor and void your warranty.
Ros "On"
Pos_t_on
BLADE
I
REMOVAL
Raise mowerto highest position to allow
access to biades.
NOTE: Protect your hands with gloves and,"
or wrap blade w_th heavy cloth,
2. Remove blade bolt by turntng counterclockwise.
OPERATOR
PRESENCE
SYSTEM AND
REVERSE OPERATION
SYSTEM (ROS)
3.
Install new blade with stamped "GRASS
SIDE" facing the ground,
IMPORTANT:
To ensure proper assembly,
center hole _n blade must ahgn with star on
mandrel assembly.
4. Install and tighten bfade bolt securely
(45-55 Ft. Lbs,i62-75 Nm).
IMPORTANT
Special b{ade bolt is heat
treated
Be sure operator presence
and reverse
operatton systems are working properly, If
your tractor does not function as descnbed,
repair the problem _mmedlately.
• The eng=ne should not start un{ess the
brake pedal is fully depressed,
and the
attachment dutch control is in the dtsengaged position,
CHECK OPERATOR PRESENCE SYSTEM
Star
• When the engine _srunning, any attempt
by the operator to leave the seat without
first setting the parking brake should shut
off the engine.
CHECK
REVERSE
SYSTEM
CARE
For best res ul;s mower b{ades mus_ be sharp.
Replace worn, bent or damaged blades.
• Avoid stumps, stones, deep ruts, sharp
objects and other hazards that may cause
tire damage.
NOTE: To seal hre punctures and preven[
flat tires due to slow leaks, tire sealant may
be purchased from your local parts dealer.
T_re sealant aJso prevents t_re dry rot and
corrosion
• When the engine is running
tachment clutch is engaged,
by the operator to leave the
shut off the engtne.
• The attachment clutch should
ate unless the operator is in
Engtne "On" Posttton
(Normal Operating}
Center
Hole
\
"_
B ade
never operthe seat.
I-_
71
I oo..o,
_'_'_'"J--
['..
BATTERY
Your tractor has a battery charging system
which is sufficient for normal use. However,
periodic charging of the battery with an automotwe charger will extend its life,
(ROS)
• When the engine is running with the lgnttion
switch in the engine "Q N" position and the
attachment clutch engaged, any attempt
by the operator to dnve in reverse shouid
shut off the engine.
• Whentheeng_ne_s running wtththe
switch in the RQS "ON" position
attachment clutch engaged, any
by the operator to drive _nreverse
NOT shut off the engine.
, ._
'_'
o.o0o°o.
......
and the atany attempt
seat should
OPERATION
i-,
• Keep battery and terminals
clean.
• Keep battery bolts tight.
• Keep small vent holes open.
• Recharge at 6-I0 amperes for 1 hour
ignition
and the
attempt
shoutd
NOTE; The orlgtnal equipment battery on
your tractor is maintenance
free. Do not
attempt to open or remove caps or covers.
Adding or checking level of elec[roiyte
is
not necessary.
17
TO CLEAN
BATTERY
AND TERMINALS
TO CHANGE
Co rrosion and dtrton the battery and terminals
can cause the battery to "leak" power.
1. Remove temlinal guard.
2. Disconnect
BLACK battery cable first
then RED
battery cable and remove
battery from tractor.
3.
Rinse
dry.
the battery
4.
Clean terminals and battery cable ends
wIth wire brush until bright.
5.
Coat terminals with grease or petroleum
ielly.
6.
Remstalf
battery
(See "REPLACING
BATTERY" in the Service and Adjustments section of this manuall.
TRANSAXLE
ENGINE
OIL
Determine
temperature
range expected
before oil change. All oil must meet API
service classification SG-SL,
• Be sure tractor
is on level surface.
• QEI will drain more freely when warm,
• Catch eel in a sultab{e container.
w_th plain water and
1
Remove oil fill capidipsttck,
Be careful
not to allow dirt to enter the engine when
changing oil.
2.
Shdeoil dram extension from the dock_ng
pos_t_on on the engtne blower housing
and extend outward from engtne,
Docking
Posit{on
Oii Dratn
Extension
MAINTENANCE
Keep transaxle free from bu_ld-up of dirl and
chaff wh=ch can restrict cootng.
Do not attempt to clean transaxle while
engine is running or while the transaxle {s
hot. To prevent possible damage to seals,
do not use high pressure water or steam to
clean transaxle.
3,
V-BELTS
Check V-baits for deterioration and wear after
t00 hours of operation and replace if necessary. The belts are net adjustable, Replace
belts _f they begin to slip from wear.
After oil ts drained completely, replace
cap and twist clockwise until it stops.
5, Re-attach oil drain extension to engine
blower housing.
6. Refilt engtne with oil through o_Ifill dtpst_ck
tube. Pour slowly. Do not overNi. For approximate capacity see "PRODUCT SPECIFICATIONS"
section of this manual.
LUBRICATION
Only use high quality detergent eelrated with
API servtce classification SG-SL. Seiectthe
oil's SAE viscosity grade according to your
expected operat=ng temperature,
I
SAE
VfSCOSITI
To open, twist cap counter-clockwise
4.
ENGINE
I__
Cap
7.
GRADES
J
NOTE: Although mulh-wscoslty ells (5W30.
10W30 etc.) treprove starttng Er_coId weather
they will result in increased oil consumption
when used above 32_F/0°C.
Check your
engine oit level more frequentiyto avoid possible engine damage from runntng low on oil.
Use gauge on oil fill cap/dipstick
for
checktng level. For accurate reading,
tighten d_pshck cap securely onto the
tube before removing dipstick. Keep o_1
at "FULE' line on d_pstick. T_ghten cap
onto the tube securely when finished,
ENGINE
OIL FILTER
Replace the engine od filter every season or
every ether od change _f[he tractor _sused
more than 100 hours in one year
AIR FILTER
Your engine w=ll not run properly using a
d_rty a_r Nter, Service atr cteaner more often
under dusty cendftions. See engine manual.
CLEAN AIR SCREEN
The a_r screen _sover the a_r _ntake blower
located on top of engine
The azr screen
must be kept free of d_r[ _nd chaff to prevent
engine damage from overheating. C{ean w_th
a w_re brush or compressed
air to remove
d_rt and stubborn dned gum fibers.
Changethe eit after every 50 hours of operatton or at least once a year If the tractor is
not used for 50 hours _none year.
Check the crankcase otl level before starting
the engine and after each eight (8) hours
of operation.
Tighten oil flit cap/dipshck
securely each time you check the oil level.
18
ENGINE
COOLING
SYSTEM
CLEANING
To ensure proper coohng, make sure the
grass screen, cooling fins, and other external surfaces of tile engine are kept clean
at all t_mes.
*
Every 100 hours ef operahon (more often
under extremely
dusty, dirty conditions),
remove the blower housing and other cooling
shrouds. Clean the cooling fins and externa{
surfaces as necessary. Ensure _he cooling
shrouds are reinstalled.
Cfean engine, battery, seat, finish, etc.
of all foreign matter.
Clean debnsfromsteermg
plate. Debris
can restrict clutch/b rake pedal shaft: movement, causing belt slip and toss of dnve.
_1,CAUTION:
Avoid
movable parts
-../-
Clutch/brake pedal
Clean
top side
NOTE. Operating the engine w_th a blocked
grass screen, dirty or plugged cooling fins,
and/or cooling shrouds removed will cause
engine damage due to overheating.
all pinch
,
points
/
and
_ , ,'
'
' _: . .
_ -.:- _..../
/-
"1
MUFFLER
Plate _,
Inspect and replace corroded muffler and
spark arrester (if equipped) as it could create a fire hazard and/or damage.
Steering System, Dash, Fender
and Mower Not Shown
SPARK PLUG(S)
Replace spark plug(s) at the beginning of
each mowing season or after every !00
lTours of operation, whichever occurs f_rst.
Spark plug type and gap setting are shown
in "PRODUCT
SPECIFICATIONS"
section
el this manual.
IN-LINE
•
FUEL FILTER
Immed_atetywipe
CIam p_
up any spilled gasotme.
,"_'_,._'--_
Fuel F itter_j[-"__-_
Keep finished surfaces and wheels free
of all gasoline, oil, etc.
Protect painted s uriaces with auto motive
type wax.
Except ?or the washout port (if equipped),
we do not recommend using a garden hose
or pressure washer to clean the outside of
your tractor unless the engine and transmission are covered to keep water out. Water
m engine or transmission
will shorten the
useful hfe of your tractor. Use compressed
air or a leaf blower to remove grass, leaves
and trash from outside tractor and mower.
The fuei filter should be replaced once each
season, if fuel filter becomes clogged, obstruchng fuel flowto carburetor, replacement
is required,
1. With engine cool, remove filter and plug
fuel line sections.
2. Place newfuel filter in position in fuet hne
with arrow pointing towards c_rburetor,
3, Ensure there are no fuel line leaks and
clamps are property positioned.
4,
_'__
Clam
J
19
DECK
WASHOUT
PORT
10.
Your tractor's deck is equipped with a washout port on _tssurface as part of its deck wash
system, it should be uN_zed after each use.
water and to help dry before
tractor away.
1.
Drive the tractor to a level, clear spot
on your lawn, near enough to a water
spigot for your garden hose to reach,
IMPORTANT:
Make certain the tractor's
discharge chute is dErected AWAY from your
house, garage, parked cars, etc. Remove
bagger chute or mulch cover if attached.
2.
Make sure the attachment clutch control
is in the "DISENGAGED"
position, set
the parking brake, and stop the engine.
3.
4.
CoRoector
_"i:
...._,_ _t',,
(t 2rr_m Female)
_.&tashout
J
POF'.
,:_
€,
IMPORTANT:
tion Js secure.
Tug hose ensuring
connec-
5.
Turn the water on.
6.
While setting in the operator's position
on the tractor, re-start the engine and
place the throttle lever in the Fast ",_"
positEon.
IMPORTANT:
Recheck the
certain the area is clear.
area
making
7,
Move the
control to
Remain in
the cutting
is cleaned.
8.
Move the tractor's attachment
clutch
control to the "DISENGAGED"
position. Turn the ignition key to the STOP
position to turn the tractor's engine off.
Turn the water off.
9.
Pull back the lock collar of the hose
connector to disconnect the connector
from the nozzle washout port.
the
Replace broken or missing
washout fitting
immediately,
prior to using mower again.
Plug any holes in mower
with bolts and
Iocknuts.
connector and push the connector onto
the deck washout port at the left end of
the mowerdeck
Refeasethe tockcoltar
to lock the connector on the nozzle.
Hose
putting
Aid, WAR NING: A broken or missing washout
fitting could expose you or others to thrown
objects from contact
with the blade.
Ensure your garden hose is fitted w_th a
standard t 2ram female hose connector
(at the opposite end from the tap connect_on).
Pull back the lock collar of the hose
Hose
Move the tractor to a dry area, preferably a concrete
or paved
area. Place
the attachment
clutch
control
in the
"ENGAGED"
position
to remove excess
tractor's attachment clutch
the "ENGAGED"
poslhon
the operator's posit_on w_th
deck engaged until the deck
2O
WARNING:ORTO
SERVICE
ADJUSTMENTS:
AVOID SERIOUS INJURY, BEFORE PERFORMING ANY
1.
2,
3,
4,
5.
6.
Depress clutch/brake pedal fully and set parktng brake.
Place gearshift lever In neutral poslt_on.
Place attachment clutch in "DISENGAGED"
position.
Turn ignition key to "STOP" and remove key.
Ensure the blades and all moving parts have completely stopped.
O_sconnect spark plug wire from spark plug and place wire where it cannot
come in contact with plug,
TO REMOVE
1.
2.
3,
4.
5.
6.
7.
MOWER
8, Slide mower out from under nght side of
tractor.
IMPORTANT:
If an attachment other than
the mower is to be mounted on the tractor,
remove the front link (E) and rear lift hnks
(C) from tractor and hook the clutch spring
(Q) into the cable guide on front edge of
lower dash.
Place attachment
clutch in 'DISENGAGED" posrtfon.
Lower attachment hft lever to its lowest
position.
Roll belt off engine pulley (M) and belt
keepers (G).
Remove retafner spring (K), slide collar
(L) off and push housing guide (P} out
of bracket.
Remove clutch cable spring (Q) from
idler arm (R).
Disconnect fronl link (E) from mower remove retainer spring and washer.
Go to either s_de of mower and disconnect mower suspension
arm (A) from
chassis pin (B) and rear lift link (C) from
rear mower bracket (D) - remove retainer
springs and washers.
CAUTION: After rear lift hnks are discon-
TO INSTALL
MOWER
Ensure tractor fs on leve! surface and engage
parking brake.
1. Lower attachment lift [ever to 1Is Iowest
pos_t_on.
_IL CAUTION:
Lift lever is spnng loaded.
Have a tight grip on lift lever, lower it slowly
and engage in lowest position.
NOTE: Ensure mower side suspensron arms
(A) are pointing forward before sliding mower
under tractor.
2 Slide mower under tractor unhl it is centered under tractor.
nected, the attachment lift lever will be spring
loaded. Have a tight grip on lift lever when
changing position of the lever,
03042te_
21
3.
4.
5.
ATTACH MOWER SIDE SUSPENSION
ARMS (A) TO CHASSIS - Position hole
in arm over pin (B) on outside of tractor
chassis and secure w_th retainer spr_ng.
Repeat on opposite stcie of tractor.
7.
Insert end of link /E) into hole in front
mower bracket
(H) and secure w_th
washer and retainer spring /J).
8,
into
Hook end of clutch cablespr;ng
(Q)
hole In tdler arm (R).
9 Push clutch cable housing guide IP)
bracket, slide collar (L) onto gu{de
secure wtth retainer spring (K).
10. Install belt onto eng}ne pulley (M) and
keepers (G).
ATTACH REAR LIFT LINKS (C) o Lift
rear corner of mower and position slot
in hnk assembly over pin (D) on rear
mower bracket and secure wEth washer
and retainer spnng,
IMPORTANT: Check beit for proper
in all mower pulley grooves.
11,Raise attachment
ttft lever to
pos=fion.
12, If necessary, adiust gauge wheels
operattng mower as shown inthe
tion section of thEs manual.
6. ATTACH FRONT LINK (E) - Work from
left stde of tractor. Insert rod end of link
assembly through front hole in tractor
front suspension
bracket (F).
_nto
and
belt
rout=ng
h=ghest
before
Opera-
/
D)
22
03042te_
TO LEVEL MOWER
Ensure tires are properiy inflated to the PSi
shown on tires, if ttres are over or under
inflated, it may affect the appearance of your
lawn and Iead you to th_nk the mower is not
adjusted properly.
VISUAL
SIDE-TO-SIDE
FRONT-TO-BACK
IMPORTANT:
to-side.
ADJUSTMENT
Deck
must be level side-
To obtain the best cutting results, the mower
blades should be adjusted so the front tip
is 1i8 to 1/2" (3,1 to t2,7 ram) (iower than
the rear tip when the mower Is in its h_ghest
posibon.
ADJUSTMENT
1. W_th all tires properly _nflated and ffyour
lawn appears unevenly cut, determine
which side of mower is cutting lower.
A(_CAUTION:
Blades are sharp. Protect
your hands with gloves and/or wrap blade
w_th heavy cloth.
2. W_th a 3/4" or adjustable wrench, turn
lift link adjustment
nut (A) to the left to
lower LH side of mower, or, to the right
to raise LH side of mower.
• Raise mower to h_ghest position.
• Position any blade so the tip is pointing
straight forward. Measure distance "B'Lto
the ground at front and rear hp of blade
• If front tip of blade is not 1/8 to I/2" (3,1
to ! 2,7 ram) lower than the rear tip, go to
the front of tractor.
Turn nut
rsght to
raise
mower
• With an 11/16" or adjustable
wrench,
loosen jam nut "A" several turns to clear
adjustment nut "B".
Turn nut
left to
_
lower
mower
NOTE: Each full turn of adjustment nut w_ll
change mower height about 3/1 6" (4,7 ram).
3. Test your adjustment by mowing some
uncut grass and visually ci_eckmg the
appearance. Readjust, if necessary, untif
you are sat{stied with the resuits.
PRECISION
SIDE-TO-SIDE
• With a 3/4" or adjustable wrench, turn
fro nt link adjustment nut "B" clockwise (,_)
(t_ghten) to raise the front of mower_ or.
counterclockwise
(¢',) (loosen) to lower
the front mower.
ADJUSTMENT
®
1. Wtth all ttres properly inflated, park tractor
on level ground or driveway.
A01LCAUTION: Blades are sharp. Protect
your hands w_th gloves and/or wrap blade
w_th heavy cloth
2.
Raise mower to its highest posit_on.
3.
At both sides of mower, posltLon blade
at side and measure d_stance "A" from
bottom edge of blade to ground. The distance should be the same en both sides.
T_grtten adjust
nut "B" to
raise mower
-- ---
Loosen
Loosen adjust
nut "B" to
lower mower
jam nut "A" first
NOTE: Each full turn of adiustment nut will
change mower height about 1,._8
'' [3,1 mm).
4. If adjustment _snecessary, see steps in
V_sual Adiustment instructions above.
• Recheck measurements,
adjust if necessary until front tip of blade is 1/8 to ti2"
(3,1 to I2,7 ram) lower than the rear tip.
5. Recheckmeasurements,
adjustifnecessary until both sides are equal.
• Hotd adjustment
nut in positBon w_th
wrench and tighten jam nut securely
against adjustment nut.
23
TO REPLACE
BELT
MOWER
BLADE
DRIVE
TO REPLACE
MOTION
DRIVE BELT
The mower blade drwe belt may be replaced
w_thout teoJs. Park the tractor on level surface. Engage parking brake.
Park the tractor on level surface. Engage
parF,mg brake.
For assistance, there is a
belt mstallabon guide decal on bottom s_de
of {eft footrest.
BELT REMOVAL
BELT REMOVAL-
-
1. Remove mower from tractor (See "TO
REMOVE
MOWER" in this section of
manual).
2. Work belt off both mandrel pulleys and
idler pulleys,
3. Pull belt away from mower,
BELT INSTALLATION
1. Remove mower (See '%O REMOVE
MOWER 'r In this section of manual).
NOTE: Observe
enbre motion dove belt
and position of all belt guides and keepers.
2. Remove beltfromstationary
idler (A) and
clutching idler CB).
3. Pull belt slack toward rear of tractor.
Remove belt upwards from transaxle
toput pulley (D),
4. Remove belt downward
from engine
pulley (E).
5. Shde belt toward rear of trac_or, off the
steering plate (F) and remove from tractor.
-
l.
Work belt around both mandrel pulleys
and idler pulleys
2, Ensure belt _s in all pulley grooves and
inside all belt guides.
3, Instal! mower (See "To Install Mower" in
this section of this manual),
TO CHECK
BRAKE
tf tractor requires more than five (5) feet (1,5
m) to stop at highest speed m h_ghest gear
on a level, dry concrete or paved surface,
then brake must be serviced.
BELT INSTALLATION
You may also check brake by
1. Park tractor on a level, dry concrete or
paved surface,
depress clutch/brake
pedal all the way down and engage
parking brake
2. Place gear shift lever _nneutral posEbon.
The rear wheels must lock and skid when
you try to manually push the tractor forward.
If the rear wheels rotate, then t_qe brake
needs to be serviced. Contact a Sears or
other quahfJed service center,
1.
2.
3.
4.
5.
6.
24
-
Install new belt from tractor rear to front,
over the steering plate (F) and above
clutch brake pedal shaft (G).
Pull belt toward front of tractor and roll
belt onto engine pulley (E).
Pull belt toward rear of tractor. Carefully
work belt down around transaxle input
pulley (D), Ensure belt is reside the belt
keeper.
install belt through stabonary idier (A_
and ctutchmg idler (B).
Ensure belt is _n all pulley grooves and
inside all belt guides and keepers.
Install mower (See "TO INSTALL MOWER" In this secbon of manual),
TRANSAXLE
GEAR
TRAL ADJUSTMENT
SHIFT
LEVER
NEU-
FRONT WHEEL TOE-IN/CAMBER
Your new tractor front wheel toe-in and
camber is set at the factory and _snormal.
The front wheet toe-in and camber are Rot
adjus[able.
If damage has occurred to
affect the factory set front wheel toe-in or
camber, contact a Sears or other qualified
service center.
The transaxte should be in neutral when the
gear shift lover ts in neutral (N) (lock gate)
position. The adjustment
_s preset at the
factory, however, if adjustment
is needed,
proceed as follows:
1. Make sure transaxle is tn neutral (N).
NOTE: When the tractor rear wheels move
freely, the transaxie ts in neutral.
2, Loosen adjustment
bolt in front of the
right rear wheel.
3, Position the gear shift lever _nthe neutral
(N) position.
4. Tighten adjustment bolt securely.
NOTE: If additional clearance _sneeded to
get to adjustment
bolt, move mower deck
hetght to the lowest position,
Gearshift
..- _
__
WHEEL
1. Block up axle securely.
3.
A WEAK
Remove axte cover, retaining ring and
washers to atlow wheel removal Irear
wheels have a square key - Do not tose)
Repair tire and reassemble,
cable (D) to good chassts ground,
from fuel tank and battery.
NOTE: On rear wheels only. ahgn grooves in
rear wheel hub and axle, Insert square key.
4. Replacewashers
andsnap retaining ring
securely _n axle groove.
5. Replace axle cover.
TO REMOVE CABLES,
1
NOTE: To seal fire punctures and prevent
flat tires due to slow leaks, purchase and
use ttre sealant from Sears. T_re sealant atso
prevents tire dry rot and corrosion.
2.
REVERSE
BLACK cable f{rst from chass{s and then
from the fully charged battery,
RED cable last from both batteries,
A
Ring.
Cover\
\
+A
'\
'\\
Weak or Dead
Battery
Square
(Rear Wheel
Only)
25
away
ORDER
Washers
Retaining
Axle
BAT-
TO ATTACH JUMPER CABLES I. Connect one end of the RED cabIe to the
POSITIVE (+) terminal of each battery(AB), taking care not to short against tractor
chassis.
2, Connect one end of the BLACK cable
to the NEGATIVE (-) terminal (C) of fully
charged battery.
3. Connect the other end of the BLACK
Lock Gate
2.
WITH
If your battery _stoo weak to star_ the engine,
it should be recharged. (See "BATTERY" in
the MAINTENANCE
section of this manual).
If "jumper cables" are used for emergency
starting, follow th_s procedure
IMPORTANT'
Your tractor is equipped with
a 12 volt system. The other vehicle must also
be a 12 vott system, bo not use your tractor
battery to start other vehicles.
5:-
TO REMOVE
ENGINE
_WARNING:
Lead-acid batteries generate explosive gases.
Keep sparks, flame
and smoking materials away from batteries.
Always wear eye protection when around
batteries.
Adjustment Bolt
Lever
2_:.,
TO START
TERY
Fully Charged
Battery
REPLACING
BATI'ERY
TO REMOVE HOOD AND GRILL
ASSEMBLY
I. Raise hood.
2. Unsnap headlight wtre connector.
3. Stand in front of tractor, Grasp hood at
stdes, t_lttoward engine and hffoff oftractor.
4. When replacing hood, ensure to reconnect the headlight w_re connecter.
n_asWARNING:
Do not short battery termiby a{Iowf ng a wrench or any other object
to contact both term_nNs at the same time.
Before connecting
battery, remove metal
bracelets, wristwatch bands, rings, etc.
Positive terminal must be connected first to
prevent sparkff_g from accidental
grounding.
1. Lift hood to ratsed posit_on.
2. Removeterm_nal
cover.
3.
Disconnect
BLACK battery cable then
RED battery cable and carefully remove
battery from tractor.
4.
Install new battery w_th termEnals _nsame
pos_hon as old battery.
RemstNt terminal cover.
5.
6.
First connect RED battery cable to posetire (+} battery terra,nat with bolt and nut
as shown. Tighten securely.
7.
Connect
BLACK
grounding
cable to
negative (-) battery termt hal wath re maining bolt and nut. T_ghten securely
Close hood.
8.
ENGINE
TO ADJUST
CABLE
Negatwe
TO ADJUST
CHOKE
CONTROL
The choke control has been preset at the
factory and adjustment shoutd not be necessary. If adjustment is necessary, see engine
manual.
TO REPLACE HEADLIGHT BULB
1. Raise hood.
2. Remove bulb holder from the hole _nthe
backside of the grill.
3. Reptace bulb in holder and _nstall bulb
holder securely back _nto the hole _nthe
backside of the gnll.
4. Close hood.
AND RELAYS
Loose or damaged wiring may cause your
tractor to run poorly, stop running, or prevent
it from starting.
• Check winng.
TO REPLACE
CONTROL
The throttle control has been preset at
_he factory and adIustment should not be
necessary Check adjustment as descnbed
below before Ioosentng cable. If adjustment
_snecessary, see engine manual.
Cable
INTERLOCKS
THROTTLE
FUSE
Replace w_th 30 amp automotwe-type plug-_n
fuse. Thefuseholderistocatedbehindthedash.
26
ENGINE
Immediately prepare your tractor for storage
at the end of the season or if the tractor will
not be used for 30 days or more.
WARNING:
FUEL SYSTEM
Never store the tractor with
gasohne in the tank inside a butldlng where
fumes may reach an open flame or spark
Atlow the engine to cool before storing _n
any enclosure.
TRACTOR
Remove mower from tractor for w_nter storage. When mower is to be stored for a period
of brae, clean It thoroughly, remove atl dwt,
grease, teaves, etc. Storein aclean, dryarea,
1. Clean entlretractor
(See"CLEANfNG"
in
the Maintenance section of this manual).
2, Inspect and replace belts, if necessary
(See belt replacement instructions in the
Service and Adjustments section of this
manual).
3. Lubncate as shown in the Maintenance
secbon of _h_s manual.
4. Ensure that alf nuts, bolts and screws
are securely fastened.
Inspect movtng
parts for damage, breakage and wear.
Replace if necessary.
5. Touch up all rusted or chipped paint
surfaces; sand lightly before painting.
BATTERY
IMPORTANT.
It is important to prevent
gum deposits from forming in essential tuel
system parts such as carburetor, fuel hose,
or tank dunng storage. Also, alcohol blended
fuels (called gasohol or using ethanol or
methanoi) can attract moisture which feNdS
to separation and formabon of acids dunng
storage. Acidic gas can damage the fuel
system of an engine while in storage.
• Empty the fuel tank by starting the engine
and le_lng it run until the fuel lines and
carburetor are empty.
• Never use engine or carburetor cleaner
products =n the fuel tank or permanent
damage may occur.
• Use fresh fuel next season,
NOTE: Fuel stabihzer is an acceptable alternattve in minimtz_ng the formation of fuel
gum deposits during storage. Add stabilizer
to gasoline _nfuel tank or storage container.
Always followthe mix raUo found on stabdizer
container,
Run engine at least 10 minutes
after add_ng stab ilize r to al low the stabilizer to
reach _he carburetor. Do not empty the gas
tank and carburetor tf using fuel stabilizer.
ENGINE OIL
Drain oil (with engine warm) and replace
with clean engine oi!. (See "ENGINE" in the
Maintenance section of this manual).
• Fully charge the battery for storage.
• After a penod of time tn storage, battery
may require recharging.
• To help prevent
corrosion
and power
leakage during long periods of storage,
battery cables should be disconnected
and battery cleaned thoroughly (see "TO
CLEAN BATTERY AND TERMINALS"
in
the Maintenance section of th_s manual).
• After cleaning, leave cables disconnected
and place cables where they can not come
m contact w_th battery terminals.
• If battery
_s removed
from tractor for
storage, do not store battery dwectly on
concrete or damp surfaces.
• If unit is equipped with battery tndlcatori
charging plug, an opbonal charging unit
may be purchased and connected to the
unit to charge the battery dunng long term
storage.
Inspect and clean the battery
terminals
as needed prior to long term
storage w_th charger connected.
CYLINDER(S)
1, Remove spark plug(s),
2. Pour one ounce (29.5 mL) of oil through
spark plug hole(s) into cylinder(s).
3. Turn ignition key to "START" position for
a few seconds to dtstribute off.
4, Replace with new spark plug(s).
OTHER
• Do not store gasoline from one season to
another.
• Replaceyourgasoline
can tfyourcan starts
to rust, Rust and/or dirt in your gasohne
will cause problems.
• if possible, store your tractor tndoors and
cove r_tto give protection from dust and dirt.
• Cover your tractor wtth a suitable protective cover that does not retaIn moisture,
Do not use plastic, Piastic cannot breathe
which allows condensation to form and wtll
cause your tractor to rust.
IMPORTANT'
Never cover
engine
27
and exhaust
tractor
while
areas are stdl warm.
TROUBLESHOOTING
CHART:
See appropriate section in manual
PROBLEM
CAUSE
Will not start
Hard to start
Engine witl not
turn over
Engine clicks
will not start
unless directed
but
to Sears service
center
CORRECTION
I
Out of fuel
2
Engine not CHOKED'
1
FJil fuel lank
2
See "TO START ENGINE'
Operation £ectlon
Engine flooded
3
Watt several mLnutes before
attempting to start
4
Bad spark plug
4
Replace spark pIug
5
Dirty air filter
5
Clean, replace a_rfilter
6
Dirty fuel filter
6
Replace fuel filter
7
Water Jn fuel.
7
Empty fuel tank and carburetor.
refdl tank wrth fresh gasoline and
replace fuel filter
8
Loose or damaged w_nng.
8
Check all w_nng
9
Engine valves out of adjustment
9
Contact a Sears or other quaIff_ed
service center
1
DErty air filter
I
Clean/_eplace
2
Bad spark plug
2
Replace sparV, plug
13roperly
in
air filter
3
Weak or dead battery'.
4
Dirty fuel filter
4
5
Stale or dErty fuel.
5
6
Luose or damaged wEir_g.
6
Check all wlnng.
7
Engine valves out of adjustment.
7
Contact a Sears or ether qualified
service center
1
Clutchfbrake
2
Attachment
3
Weak
or dead
4
Blown
fuse
5
Corroded
6
Loose
or damaged
6
Ctleck all wErlng
7
Faulty
_gn_hon sw_tch,
7
Checklreplace
,gn_t_on swEtch
8
Faulty
solenoid
or starter
8
Cheek/replace
solenc=d or starter
9
FauRy
switch
operator
(as)
presence
9
Contact a Sears or ether quahffed
service center
1
Weak
or dead
2
Corroded
3
Loose
or damaged
4
Faulty
solenoid
pedal
clutch
not
:3
depressed
is engaged
battery.
battery
terminals
WENng
Replace fuel filter
Empty fuel tank and reNI tank w_tki fresh, clean gasoline.
1
Depress clutch/brake
2
D_sengage attachment
pedal
3
Recharge or replace battery.
4
Replace fuse.
5
CLean battery lerm,nats
c{utch
t
Recharge or replace battery
terminals
2
Clean battery terminals
w_nng
3
Check all wErEng
battery
battery
Recharge or replace battery"
or starter.
28
4- Checklreplace
soler_o_d or starter.
TROUBLESHOOTING
CHART:
Seeappropriate
sectionin manualunlessdirectedtoSearsservicecenter
PROBLEM
Loss
CAUSE
of power
CORRECTION
1
Cutting too much grass/too
2
3
fast
I
Raise cutting hetghttreduce
speed
Throttle _n CHOKE" pestt_on
2
Adjust throttle control
BuEId-up of grass, leaves and
trash under mawer,
3
Clean underside
housing.
4
Dirty a_rNter
4
Clean/replace
5
Low o_1level/d_rty o_t
5
Check o_1leve!/change
6
Faulty spark plug
6
Clean and regap or change
plug.
7
D_rty fuel fi{ter
7
Replace fuel filtec
8
Stale or dirty fuel
8
Empty rue{ tank and refill tank wlt_"
fresh, clean gasoline.
9
Water rn fuel
9
Empty fuel tank and carburetor,
refill tank with fresh gasoline and
replace fuel filter.
t0
Spark pIug wire lease.
I0
of mower
a_rfilter
o_l
spark
Connect and tighten spark p]ug
wire.
Excessive
vibration
Engine continues
to
run when operator
leaves seat with
attachment
clutch
engaged
tl
D_rty engine air screen/fins,
1I
Clean engine a_r screen, fins,
t2
D_rty/cfegged muffler
12
Clean/replace
13
Loose er damaged wiring.
13
Check all wlnng.
14
Engine valves out of adjustment
14
Contact a Sears er other qualified
service center
1
V'vorn, bent or loose blade
1
Replace blade
2
Bent blade mandret
2
Contact a Sears or ether
qualified service center
3
Loose/damaged
3
Tighten loose partlst
Replace damaged parts
1
Faulty opera[or-safety
control system
1
Check wEnng, switches and
connechons. If not corrected,
contact a Sears or other quahfled
service center
part(s)
presence
._
U
Poor cut - uneven
cutting
T_gbten blade bolt
CAUTION: DO NOT
operate machine until
problem is corrected.
1
Worn, bent or loose blade.
2
Mower deck not revel
3
Buildup of grass, leaves, and
trash under mower.
3
Clean underside
housing
4
Bent blade mandrel
4
Contact a Sears or other
qualified service center
Clogged mower deck vent from
build-up of grass, leaves, and
trash around mandrels.
29
1
muffler
!2
:5
Replace
biade
Tighten
blade
Level mower deck
of mower
Ciean around mandrels
open vent holes
to
bolt
TROUBLESHOOTING
CHART:
See appropriate
section in manual
PROBLEM
Mower blades
not rotate
unless directed to Sears service center
CAUSE
will
Poor grass
discharge
! Headlight(s)
not
working
(if so equipped)
Battery will not
charge
i Loss of drive
Engine "backfires"
when turning
engine "OFF"
Engine dies when
tractor is shifted
into reverse
CORRECTION
1
Oustructlon
tn cIutch mechanism
2
Womldamaged
3
Frozen _dler pulley
4
Frozen blade mandrel
4
Contact a Sears or other
quahfied service centeL
1
Engine speed too slow
1
P_ace throttle control tn '}-AST '_
position.
2
Travel speed too fast
2
Sh_ft to slower speed
3
Wet grass
3
Allow grass to dry betore mowing
4
Mower deck not tevel
4
Level mowe; deck
5
Low/uneven
,5
Check t_res for proper PSi
6
Worn, bent or loose blade
6
Replace/sharpen
blade bolt
blade
7
7
Clean underside
housing
of mower
8
Buildup ot grass, leaqes and
trash under mower.
Mower dnve bell worn
8
Replace mowe; dnve belt
9
Blades _mproperl,y _nstalied
9
Remstalt blades sharp edge down
10
Improper blades use_
101 Replace w_th blades listed [n
tins rnanua[
11
Clogged mo_'_er deck vent holes
11 Clean around mandrels
open vent holes
from buildup ef grass leaves, and
trash around mandrets
mower
dr_ve belt
hre a_r pressure_
1
Remove obstructLon,
2
Replace mower dnve Beit
3
Replace _dler pulley.
T_ghten
to
1
Light switch [s OFF'
1
Turn Itght switch "ON"
2
Bulb(s} or lamp(s)
2
RepJace bulb(s} or lamp(s)
3
Faulty i_ght switch
3
Checklrepiace
4
Loose or damaged w_nng
4
Check wLnng and connections
5
Blown fuse_
5
Replace fuse.
1
Bad battery ceil(s).
1
Replace battery.
2
Poor cable connections.
2
Cheektclean
3
Faulty regulator
3
Replace regulator
4
Faulty alternator
4
Replace alternator
1
Debns on steering
equtpped)
1
See "CLEANING" Lnthe
maintenance section,
2
Morton drive be_t worn, damaged,
or broken
2
Replace motion drive be}t.
3
Axte key missing
3
install axle key at rear wheel See
"TO REMOVE WHEEL" _nthe
Service and Ad}ustments section.
1
Move throttle control between
half and full speed [fast) posit!on
before stopping engtne
1
Turn ignltFon key to ROS "ON"
posit(on See Operation section.
1
Engine
between
pos_t_on
burned out.
(Efso equipped)
plate /_f
throttle
control
not
SOl
half and full speed
(fast}
before
stopping
engine
Reverse
operatton
system
(RQS}
_s not 'ON'
wh_le mower
or other
attachment
_s engaged
30
hght switch
all connectbons
SUGGESTED
GUIDE
FOR SIGHTING
SLOPES
ONLY RIDE UP AND DOWN
NOT ACROSS
HILL
15 DEGREES
FOR SAFE OPERATION
HILL,
MAX,
t
WARNING: To avoid serious injury, operate your tractor up and
down the face of slopes, never across the face. Do not mow
slopes greater than t5 degrees. Make turns gradually to prevent
tipping or toss of control. Exercise extreme caution when
changing direction on slopes.
t. Fold this page along dotted line indicated above.
2. Hold page before you so that its ]eft edge is vertically parallel to a tree
trunk or other upright structure.
3. Sight across the fold in the direction of hill slope you want to measure.
4. Compare the angle of the fold with the slope of the hill.
CRRFTSMFlti !
Product
questions
or problems?
1-888-331-4569
Customer Care Hot Line
Get answers to questions, troubleshoot problems,
order parts, or schedule repair service.
Para respuestas a preguntas o problemas, y ordenar
piezas o pedlr servlcJo para la reparact6n de su equtpo.
To
help
us help
Para poderte
you,
ayudar
register
your
product
at www.craftsman.comlregistration
me._or reg=stra tu producto
Join
the Craftsman
en www
craftsman
comlreg_strat_on
Club today!
CRRFT.TMAN
www,
Receive
exclusive
project
Como
m_embro
nuevos,
02,24.14
AP
sharing,
excluswo,
consejos
craftsman.com/sig
member
expert
benefits
advice,
recLbe dlv_rsos
de experlos
y nuestro
including
and
beneflc,os
programa
SHOP
como
n up
special
YOUR
ofertas
de puntos
pricmg
WAY
and
offers,
REWARDS!
prec_es espec_ales,
SHOP
YOuR
WAY
proyectos
REWARDSI
Printed
in the U.S.A.